-
Contents
-
Table of Contents
-
Bookmarks
Quick Links
DT300/DT700 Series Terminals
SV8300 USER’S GUIDE
NEC Unified Solutions, Inc.
February, 2008
Related Manuals for NEC DT300 Series
Summary of Contents for NEC DT300 Series
-
Page 1
DT300/DT700 Series Terminals SV8300 USER’S GUIDE NEC Unified Solutions, Inc. February, 2008… -
Page 2: Liability Disclaimer
NEC Unified Solutions, Inc. has prepared this document for use by its employees and customers. The information contained herein is the property of NEC Unified Solutions, Inc. and shall not be reproduced without prior written approval from NEC unified Solutions, Inc. All brand names and product names on this document are trademarks or registered trademarks of their respective companies.
-
Page 3
1.INTRODUCTION • General This guide explains how to operate DT300/DT700 Series terminals. CHAPTER 1 INTRODUCTION Explains the configuration of this guide and contains the following information. • Face layout of DT Series • Keys and Parts of DT Series • Icon Display •… -
Page 4: Face Layout
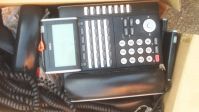
• Face Layout DT310/710 (6-Button with LCD) DT310/710 (2-Button without LCD)
-
Page 5
DT330/DT730 (12-Button with LCD) DT330/DT730 (24-Button with LCD) Security button is equipped on DT730 only. Security button is equipped on DT730 only. Note: Note:… -
Page 6
DT330/DT730 (32-Button with LCD) DT330/DT730 (DESI Less 8-Button) Security button is equipped on DT730 only. Note: Security button is equipped on DT730 only. Note:… -
Page 7: Keys And Parts
• Keys And Parts Server Administrator. When Telephony Server Administrator sets “One-Touch Speed Dial key” on the programmable keys, users can assign any DT310/DT710 numbers (ex. Telephone number, etc.) to the key (up to 24 (2-Button without LCD) digits). * For the assignment of the keys, confirm to the Telephony Server Administrator.
-
Page 8
(9) Message Press key to access the voice mail system. (10)Up/Down DOWN Used to adjust LCD contrast, speaker/receiver volume, and ringer volume. • LCD Contrast: Press ( ) or ( ) key while idle. • Speaker/Receiver Volume: Press ( ) or ( ) key during conversation. •… -
Page 9: Dt330/Dt730 Overview
DT330/DT730 (1) Security Button (DT730 only) The user can prevent information leakage from (24-Button with LCD) terminal by simple operation. (2) Call Indicator Lamp Lamp at top corner of DT Series Display flashes when a call terminates to the terminal. Lamp lights steadily when a message has been left.
-
Page 10
(5) Soft Keys (10) Answer Any feature shown at the bottom of the LCD is When LED on this key is lit, press key to answer a available. The appropriate feature key is displayed waiting call. on the screen according to the call handling process. (11) Mic (6) Help Press key to respond hands free. -
Page 11
Feature Description (Menu) 1. Missed Call Access to history of Missed Call. Access to history of incoming Voice 1. Call History 2. Voice Mail Mail. 3. Directory 3. IM Not supported. Down Cancel Save 4. Presence Not supported. 5. Bluetooth Not supported. -
Page 12
DT330/DT730 (1) Security Button (DT730 only) The user can prevent information leakage from terminal by (DESI Less 8-Button with LCD) simple operation. (2) Call Indicator Lamp Lamp at top corner of DT Series Display flashes when a call terminates to the terminal. Lamp lights steadily when a message has been left. -
Page 13
(5) Soft Keys * Maximum 8 characters can be displayed. Any feature shown at the bottom of the LCD is available. The appropriate feature key is displayed on the screen according to ** The users can change the name displayed on the LCD. For the call handling process. -
Page 14
The icon flashes during events such as call Note 3: termination to a line key or call back. Example: (b) Feature Key Information Feature Key Information displays the followings. Maximum Description digits to be displayed Line Key — Name and Number Up to 8 digits. -
Page 15
number, etc.) to the key (up to 24 digits). When Station line/Trunk line are assigned. * For the assignment of the keys, confirm to the Telephony Server Administrator. Following picture shows LCD indication of Programmable keys. No icons are displayed. * Users can register name on each Speed Dial key. -
Page 16
(12) Answer When LED on this key is lit, press key to answer a waiting call. (13) Mic Press key to respond hands free. LED on this key lights during speakerphone operation. (14) Menu From this key, the user can access to the functions not normally used easily. -
Page 17
Feature Description 3. IM Not supported. 4. Presence Not supported. 5. .Bluetooth Not supported. (17) Speaker Controls the built-in speaker which can be used for Hands Free dialing/monitoring. LED on key lights when key is active. (18)Transfer Allows the station user to transfer established calls to another station, without attendant assistance. -
Page 18: Icon Display
• ICON DISPLAY The LCD of DT730 Series displays Desktop Icons which provide notification when events (such as missed call and voice mail) occur. Note: DT310/DT330/DT710 Series does not support the icon display. Note 1: Currently unavailable.
-
Page 19
• Menu List • Simple Operation By Menu Key and Cursor Key From the Menu List, the user can use various By using Menu Key and Cursor Key, DT Series user can application features such as Directory and Call History. access to Call History, Directory and terminal settings with simple operation. -
Page 20: Terminal Setup
TERMINAL SETUP This chapter describes operating procedures for terminal settings by the UP/Down Key and Feature Keys. Various terminal settings such as display, sounds, password, and language are also available from Menu Key. For detailed information on terminal settings from Menu Key, see SV7000 IP Peripheral Guide.
-
Page 21: Terminal Setup With The Feature Key
Terminal Setup with the Feature Key To Select Ringer Tone DT Series has 10 kinds of ringer tones that you can Microphone On/Off select. LED on Mic key shows the status of the built-in microphone. Press Feature and 3. The LCD displays the selected tone number (n=1 ~ 14).
-
Page 22
To Adjust Transmission/Receiving Volume Handset volume can be changed. Press Feature and 4. The LCD displays the current volume. 4:26 PM TUE 13 APR 2008 Press Feature and 4 again to alternate between Small and Large volume. 4:26 PM TUE 13 APR 2008… -
Page 23: Basic Operation
BASIC OPERATION Login (DT700 Series Only) Logout (DT700 Series Only) When login mode is activated, following procedure is Press the pre-assigned Logout Feature Key on the required. terminal. Enter login code and press Set Soft key. Note: This location is an example. (The station number is used as the Login code.) Note: Logout button is assigned by data setting at the ECP (Enterprise Communication Platform).
-
Page 24: To Originate An Outside Call
To Originate an Outside Call Multiline Appearance Lift handset or press Speaker key, receive dial To Originate a Call tone. Press the MULTILINE APPEARANCE feature key. Dial the Central Office access code, e.g. 9. Lift handset or press Speaker. Dial the Central Dial desired telephone number.
-
Page 25
To Originate an Outside Call Press Hold. Held line wink flashes. Held station number HOLD 2001 4:26 PM TUE 13 APR 2008 Note: If held line appears on other DT Series stations, the associated LED flashes red slowly. To Retrieve Lift handset or press Speaker key. -
Page 26: To Place A Call On Exclusive Hold
To Place a Call on Exclusive Hold Note: Exclusive Hold excludes any other phone from picking up your held call. Exclusive Hold shows as a flashing green LED on your phone. The same line Press Hold twice. Line appearance indicates on other phones appears as a solid red LED.
-
Page 27: To Transfer A Call
To Transfer a Call After conversing, ask party to hold. Press Transfer. Receive interrupted dial tone. 2001 4:26 PM TUE 13 APR 2008 Dial destination station’s extension, hang up or wait for answer. 2001 4:26 PM TUE 13 APR 2008 If transferring party hangs up, that station’s number appears in the center of recipient’s display.
-
Page 28: Feature Operation
FEATURE OPERATION To Originate a Call Using Speed Calling (One-touch Speed Calling keys) Press the desired Speed Calling key, or press Speaker and Speed Calling key. To program (Available only on DT Series with One-Touch Speed Calling key.) Press Feature button. Press desired Speed Calling key.
-
Page 29
LCD Indication of 8LD Display • Alphabetic character (Uppercase) Press the desired One-Touch Speed Calling key Digit and originate a call. Registered name will be Code displayed as follows. For the key to which no name information is registered, the character “SPD” will be &… -
Page 30
• European Character (Uppercase) • European Character (Lowercase) Digit Digit Code Code à è ì ñ ù À È Ì Ñ Ù á é í ò ú Á É Í Ò Ú â ê î ó û Â Ê Î Ó… -
Page 31: To Originate A Call Using Speed Calling (-Station/Group)
To Originate a Call Using Speed Calling (-Station/Group) XXXX 4:26 PM TUE 12 FEB 2008 Press the Redial button. Press the desired speed calling number. If the DT Series does not have the “Speed Calling – System” key, dial the “Speed Calling – System” LNR[*]/SPD[_ _ ] access code, then the abbreviated call code.
-
Page 32: Authorization Code
Account Code Authorization Code To Enter To Enter Without Account Code: Lift handset or press Speaker key, receive dial tone. Lift handset or press Speaker key, receive dial tone. Enter feature access code, receive service set tone. Enter feature access code, receive service set tone. Enter Account Code (up to 16 digits).
-
Page 33: Originating A Voice Call
Originating a Voice Call To answer: AICM key flashes green indicating an incoming intercom call. Lift handset. Dial desired station number. Calling party Press Voice key or press 1. 2001 4:26 PM TUE 12 FEB 2008 2000 4:26 PM TUE 12 FEB 2008 Voice Call alert tone is heard.
-
Page 34: Manual Intercom
Manual Intercom Dial Intercom To Initiate: To Initiate: Lift handset or press Speaker key, press MICM key, Lift handset or press Speaker key. ring back tone is heard. Press DICM key. Dial desired intercom station number (0-9). Tone Called party burst is sent.
-
Page 35: Dial By Name Using Station Speed Dialing
Dial By Name Using Station Speed Dialing To Transfer A Call After conversing, ask party to hold. To Initiate: Press Transfer key. Receive interrupted dial tone. Press the Directory key. Enter up to the first four characters of a name using Transferred station the keypad.
-
Page 36: To Place A Call On Remote Hold
If Unanswered: If Unanswered: After preprogrammed time, Automatic Recall is After preprogrammed time, Automatic Recall is initiated. initiated. Visual and audible signal (rapid flash and ring burst) Visual and audible signal (rapid flash and ring burst) is sent to station which placed call on Exclusive Hold. is sent to station that placed call on hold.
-
Page 37: To Establish A Broker Call
To Retrieve At Destination: Option 2 Lift handset or press Speaker key. Press line on hold. Use handset to converse. With call in progress and third party on hold on another Line/Trunk key. NOTE: Any station with the destination line Press Conf key, Conf LED flashes.
-
Page 38: Call Back (Station)
Call Back (Station) To Set Camp-On (Transfer Method) Lift handset or press Speaker. With call in progress, ask party to hold. Depress Dial desired station number and receive busy tone or Transfer button, feature dial tone is heard. ring back tone. Dial desired station number and receive busy tone.
-
Page 39: Call Pickup (Group)
To Answer Call Waiting To Park A Call From Terminal Without LCD (Station 2000) While call in progress, press Transfer key and dial Hear burst of tone. LCD display indicates CW and the Call Park access code, or press Call Park key. Answer button flashes.
-
Page 40: Call Pickup (Direct)
Call Pickup (Direct) Timed Queuing (Outside Line Only) Lift handset. Press Call Pickup Direct key or dial Call Pickup Direct Press Speaker key, receive dial tone. access code (may be stored on one-touch key). Dial Outside Line access code and desired number. Receive busy tone or ring no answer from distant Called Calling…
-
Page 41: Last Number Redial
Last Number Redial To Search, Call Back, or Erase A Calling Number Without Using Soft-keys: To Recall The Last Number Dialed Lift the handset or press Speaker key. Press Redial key. Receive special dial tone. Press Message key. Dial 1 to search for desired number. REDIAL[#]/SPEED[ ] Dial 2 to call back desired number.
-
Page 42: Cid Call Display
CID Call Display To verify(with multi-line phone) Press Speaker key. Receive extension dial tone. Press FD-A key or dial Call Forward-All access code. To Display Calling Party Information: Display indicates the station number calls are Press CID key, CID lamp lights. forwarded to.
-
Page 43: Call Forwarding-No Answer
Call Forwarding-Busy To Cancel Press Speaker key. Receive dial tone. Press FD-B key plus * or dial Call Forward Busy To Set cancel code. Receive service set tone. LED goes out Press Speaker key. Receive dial tone. at your station. Press FD-B key or dial Call Forward Busy access code.
-
Page 44: Call Forwarding Destination
To Verify To Cancel Press Speaker key. Receive extension dial tone. Press Speaker key. Receive dial tone. Press FD-N key or dial Call Forward-No Answer Press FD-DC key or dial Call Forward Destination access code. cancel code. Display indicates destination number of call forward. CNCL Forwarding station…
-
Page 45: Internal Zone Paging With Meet-Me Page
Internal Zone Paging with Meet-Me Page Boss/Secretary Calling This allows a system user to page over built-in speaker Secretary of multi-line phone within the assigned zone or all zones. Lift handset, press boss’ ringing line. Ask calling party to hold. Example: Station A can page Station B.
-
Page 46: Boss/Secretary Override
Boss/Secretary Override Option 1 Boss presses Answer and converses with secretary. Outside line is placed on hold. Example: Station 2000 is boss, Station 2001 is secretary. Secretary hangs up. Boss is connected to Outside Boss is connected to 2003. Incoming call on Outside line line.
-
Page 47: Do Not Disturb
Do Not Disturb Press Speaker key, Receive dial tone. Press DND key or dial DND access code. 4:26 PM TUE 12 FEB 2008 To Cancel Press Speaker key, Receive dial tone. Press DND key or dial DND cancel code. CNCL 4:26 PM TUE 12 FEB 2008 NOTE: When key is used the LED will light when DND is active.
-
Page 48: Privacy Release
Privacy Release If 0 or 1: dial desired military time. Example: D term Station B is engaged in a conversation, IN:BACK 0900 and allows Dterm Station A to enter the call in progress. 4:26 PM TUE 12 FEB 2008 Station 2000, while engaged in conversation, presses Conf key.
-
Page 49: Name Display
Name Display When the desired letter is displayed, depression of the Transfer key will change the letter to a lower case letter (default is upper case). Depress the Hold key to NOTE: Requires Display Phone enter that letter and advance to the next entry. Repeat the previous two steps until the desired name A name with up to 16 characters can be entered to is displayed and entered.
-
Page 50: Whisper Page
Whisper Page System Clock Setup By Station Dialing To Initiate Press Speaker key or lift handset, Receive dial tone. Press System Clock Setup Key or feature access Option 1 code. Lift handset or press Speaker key. Dial new time in 24 hr format using 6 digits Dial desired station number.
-
Page 51: To Change Security Password
To Change Security Password User Setting [1] Incoming Call Press Menu Key [2] Talk Display reads: [3] Display [4] Change Password [Menu] Security [1] History Peripherals [2] Directory [0] Setting Reset [3] Tool [4] Call Function [5] Setting Back Presence [#] Favorite [0] Config Using Up/Down arrows scroll down to [4]…
-
Page 52: Directory Operation
Enter default password 0000 Directory Operation Press set, then enter New Password Press set, then enter the new password again This allows the user to access and program Press set station speed dials. [ [Change password 1 ] Press Menu key Display reads: Old Pass [ 0000…
-
Page 53: History Operation
History Operation Press HIST (History) Soft Key [4081] 8:19 AM FRI 15 FEB 2008 (ABC) ENTRY PREV NEXT Display reads: [Call History} [4081] 8:19 AM FRI 15 FEB 2008 (OG) Press OG (To view Outgoing calls) or Press IC (To view Incoming Calls) Programming required in the PBX…
-
Page 54: Quick Reference Guide
Quick Reference Guide Internal Zone Paging Group 0 Page Outside Line Group 1 Group 2 Queuing-Outside Line Group 3 Call Back Cancel Group 4 Call Forwarding-All Calls Entry Internal Zone Paging Group 0 Answer Cancel Group 1 Group 2 Call Forwarding-No Answer/Busy Entry Group 3 Line…
- Главная
-
NEC
-
Телефоны
-
DT300 Series
На этой странице вы найдёте полный список документов на Телефоны NEC DT300 Series.
Выберите необходимый PDF файл.
-

Телефоны
NEC DT300 Series Инструкция по эксплуатацииТип файла
PDFРазмер
1.79 MbКол-во страниц
41Просмотров
65535Download / Read online
- 1
Другие NEC Телефоны
-
NEC DT300 Series Инструкция по эксплуатации
PDF файлов
1Просмотров
157740 -
NEC DTL-12D-1 — DT330 — 12 Button Display… Инструкция по эксплуатации
PDF файлов
1Просмотров
9207 -
NEC DTL-6DE-1 — DT310 — 6 Button Display… Инструкция по эксплуатации
PDF файлов
1Просмотров
6752 -
NEC DTerm Series E Telephones Инструкция по эксплуатации
PDF файлов
1Просмотров
5722 -
NEC AT-35 Инструкция по эксплуатации
PDF файлов
1Просмотров
5172 -
NEC NEAX 2400 IPX Руководство пользователя
PDF файлов
2Просмотров
4556
Другие устройства NEC
-
Сетевые карты
NEC PD78056 Инструкция по эксплуатацииPDF файлов
1Просмотров
66001 -
Серверы
NEC Express5800/320Fd Руководство пользователяPDF файлов
11Просмотров
29714 -
Серверы
NEC Express5800/R120e-1M Руководство пользователяPDF файлов
25Просмотров
25770 -
Серверы
NEC Express5800/R120a-1 Руководство пользователяPDF файлов
8Просмотров
25371 -
Серверы
NEC Express5800/R120d-2M Руководство пользователяPDF файлов
25Просмотров
25210 -
Серверы
NEC Express5800/R120d-1M Руководство пользователяPDF файлов
25Просмотров
23304
Вопросы
-
слабая батарея
Ноутбуки
Acer
1310
Alex 12.02.2016 17:26
Ранее вы смотрели
Производители
Arrow Storage Products
Bock Water heaters
IDEAL INDUSTRIES
Interphase Tech
Invacare
Mobile Crossing
Molteni
Powercom
Quantum Audio
Sabre by John Deere
Типы устройств
Уплотнитель мусора
Миксеры
Слуховые аппараты
Настольные игры
Игрушечные музыкальные инструменты
Ручные миксеры
Сонификаторы
Лазерные принтеры
Система обработки изображений
Блендеры и соковыжималки
Устройства
Graco 3180
Hampton Direct U32
Harbor Freight Tools 4041
Maytag AES5730BAB
NuTone LA126WH
Philips Analogue monitor SCD464
Raypak 30A
SMC Networks SMC6724L2GSSC
freeuserguide.ru
About Us
Contacts
Disclamers
Privacy Policy
Эта страница полезна для вас? Поделитесь ссылкой:
2014-12-11
: Nec Nec-Dt300-Series-Users-Manual-120731 nec-dt300-series-users-manual-120731 nec pdf
Open the PDF directly: View PDF ![]() .
.
Page Count: 41
NDA-30917 ISSUE 1.0 UNIVERGE Terminal DT300 Series USER’S GUIDE NEC Infrontia Corporation 2008 July 1. KEYS AND PARTS (1) Call Indicator Lamp • KEYS AND PARTS ON DTL-8LD-1 Here, explanations are given by taking DTL-8LD-1 as an example. (2) (3) (4) Help (2) LCD LCD (Liquid Crystal Display) provides DT Series activity information plus data, time and Soft Key Operation. (1) Exit Lamp at top corner of DT Series Display flashes when a call terminates to the terminal. Also, when using Voice Mail service, the Lamp lights steadily when a message has been left. (5) (6) (3) Exit To exit from the Menu or Help mode and go back to the time display. (4) Soft Keys Any feature shown at the bottom of the LCD is available. The appropriate feature key is displayed on the screen according to the call handling process. (5) Help Scroll (7) 1 2 ABC (8) 3 DEF 4 GHI 5 JKL 6 MNO 7 8 TUV 9 WXYZ 0 # Recall Feautre Answer Mic (9) (10) PQRS Menu (11) Redial HOLD (13) Transfer (14) Speaker (15) (12) Explanations of the Soft Keys can be called up on the LCD by pressing this key. (6) Programmable Keys These keys can be programmed as Flexible Line key/Programmable Feature Key by Telephony Server Administrator. When Telephony Server Administrator sets “OneTouch Speed Dial key” on the programmable keys, users can assign any numbers (ex. Telephone number, etc.) to the key (up to 24 digits). 1. Details on Cursor key * For the assignment of the keys, confirm to the Telephony Server Administrator. (a) Volume (UP) key (d) Enter Key (4-way Scroll UP key) (b) Redial key (4-way Scroll LEFT key) (7) Recall (c) Directory key N/A (4-way Scroll RIGHT key) (a) Volume (DOWN) key Press key to finish the call and hear the dial tone. (4-way Scroll DOWN key) (8) Feature Used to activate any features as terminal setup functions, etc. and to program One-Touch Speed Dial Keys. (9) Answer When LED on this key is lit, press key to answer a waiting call. N/A (10) Mic Press key to respond hands free. LED on this key lights during speakerphone operation. (11) Menu To access the local menu of DT310/DT330, such as Call History, Directory or Terminal Setting. (12) Cursor By using this key, DT Series user can access to various features with simple operation. (a) Up/Down ( DOWN UP) Used to adjust LCD contrast, speaker/receiver volume, and ringer volume. • LCD Contrast: Press ( ) or ( ) key while idle. • Speaker/Receiver Volume: Press ( ) or ( ) key during conversation. • Ringer Volume: Press ( ) or ( ) key during ringing. (b) Redial (Last Number Call, Speed Calling-Station/ Group) Press key to activate redial feature. Press redial and scroll back through numbers that have been dialed. When the desired number is displayed, press the or # key to activate dialing. Note: A-law Countries [Australia, Russia, Latin America, UK, Middle near East, other Asian nations]: # µ-law Countries [North America, Japan, Hong Kong, Taiwan]: 1. (d) Enter (15)Speaker DT330 Series has shortcut menu for frequentlyused features. Use this key to display the shortcut menu (see SHORTCUT MENU) and determine the selected item in the menu. Controls the built-in speaker which can be used for Hands Free dialing/monitoring. LED on key lights when key is active. * All TDM enabled versions are half duplex handsfree mode. Also, this key is used as cursor-movement key on the Menu screen. • THE OTHER KEYS AND PARTS UP DOWN Move the highlighted area one line up the screen. Move the highlighted area one line down the screen. LEFT Go back to the previous screen. RIGHT Enter Go to the screen that corresponds to the highlighted menu item. Go to the screen that corresponds to the highlighted menu item. (13)Hold Press this key to place an internal or external call on hold. (14)Transfer Allows the station user to transfer established calls to another station, without attendant assistance. Redial (only for DTL-2E-1 and DTL-6DE-1) (Last Number Call, Speed Calling-Station/Group) Press key to activate redial feature. Press redial and scroll back through numbers that have been dialed. When the desired number is displayed, press the or # key to activate dialing. Note: A-law Countries [Australia, Russia, Latin America, UK, Middle near East, other Asian nations]: # µ-law Countries [North America, Japan, Hong Kong, Taiwan]: Conf (only for DTL-2E-1 and DTL-6DE-1) Press key to establish a conversation. LED on key lights when key is active. Directory (only for DTL-2E-1 and DTL-6DE-1) Press key to activate speed calling - system feature. Message (only for DTL-2E-1 and DTL-6DE-1) Press key to access the voice mail system. 1. Up/Down (only for DTL-2E-1 and DTL-6DE-1) ( DOWN UP) Used to adjust LCD contrast, speaker/receiver volume, and ringer volume. • LCD Contrast: Press ( ) or ( ) key while idle. • Speaker/Receiver Volume: Press ( ) or ( ) key during conversation. • Ringer Volume: Press ( ) or ( ) key during ringing. GHI (a) (b) (C) (b) (a) Directory (only for DTL-2E-1 and DTL-6DE-1) Press key to activate speed calling - system feature. Rachel 1 Julia Ben 2 FDA 8LD Display (only for DTL-8LD-1) Hannah 3 FDN 32 (8 keys x 4 pages) additional programmable keys (Flexible Line/Programmable Feature key) are provided. Also, information set to each programmable key is displayed on 8LD display. For setting of the programmable key, contact Telephony Server Administrator. James 4 Paul When Telephony Server Administrator sets “OneTouch Speed Dial key” on the programmable keys, users can assign any numbers (ex. Telephone number, etc.) to the key (see TO ORIGINATE A CALL USING SPEED CALLING (ONE-TOUCH SPEED CALLING KEYS) and TO REGISTER NAME ON ONE-TOUCH SPEED CALLING KEY). * For the assignment of the keys, confirm to the Telephony Server Administrator. Scroll (a) Icon Status information on the Line key such as Call termination, Call Hold or Busy can be indicated as following Icons. User’s Status • Idle Icon No Icon Flashing Pattern 1. User’s Status Icon • Call Hold (Individual Hold/Individual Hold on Call Park Group) • Call Hold (Other Party Hold/Other Party Hold on Call Park Group) • Recall (Individual Hold/Exclusive Call Hold/Call Transfer/Individual Hold on Call Park Group) • Recall (Other Party Hold/Other Party Hold on Call Park Group) • Incoming Call • During Conversation (Individual Use) • Call Transfer • Conference • During Conversation (Other Party Use) Flashing Pattern Blink (The icon will blink per one second cycle.) Description - Name and Number information - Speed Dial Name InformaOne-Touch tion Speed Dial Key - Number Information Line Key 1 3 4 Steady Lit Note: (b) Programmable Key Information Programmable Key Information displays the following. Maximum digits to be displayed 8 digits 8 digits - Feature Name 6 digits (c) Page Icon 8LD display has four pages (8 programmable keys per page). Page Icon key indicates currently displayed page. The user can switch the programmable key display from page 1 to 4 by using Scroll key. 2 • Active Feature (Under a setting of feature key like a “Call Forwarding”) Key Feature Key Programmable Key Black background indicates 1-8 currently displayed page. Programmable Key 9-16 Programmable Key Flashing indicates page with 17-24 event happening. Programmable Key 17-24 The icon flashes during events such as call termination to a line key or call back. 1. Example: Page Turning by Scroll Key Appropriate icons are displayed according to the feature. These displays cannot be changed by user. Page 1 Key No. 2 Rachel Ben Key No. 3 Hannah 3 Key No. 4 012345 4 Key No. 1 1 2 nglia Flashi FDA FDN Paul Scroll Switch Page Key No. 5 Key No. 6 Key No. 6 Key No. 8 Press twice. The following shows each LCD indication when One-Touch Speed Dial key is set to Programmable key. When Station line/Trunk line are assigned. Page 3 Call on Hold Key No. 17 Peter 1 Key No. 18 Michael 2 Key No. 19 Powell 3 Key No. 23 Key No. 20 James 4 Key No. 24 Key No. 21 Julia Key No. 22 OR Scroll Press Feature Key 2 on Page 3 to answer incoming call. Note: For example, when an incoming call is terminated to a line key on Page 3 while Page 1 is being displayed on the screen, the screen is not automatically switched from Page 1 to Page 3. The user must display Page 3 manually and then answer the incoming call. No icons are displayed. * Users can register name on each One-Touch Speed Dial key. For the procedures, see TO REGISTER NAME ON ONE-TOUCH SPEED CALLING KEY. When any features using feature access code are assigned. The following shows LCD indication of Programmable keys. OR Icons turn black. * Users can register name on each One-Touch Speed Dial key. For the procedures, see TO REGISTER NAME ON ONE-TOUCH SPEED CALLING KEY. 1. (3) Scroll Key This key is used to turn over the page of 8LD display. Note: Unavailable Menu items are grayed out. SIMPLE OPERATION BY MENU KEY AND CURSOR KEY MENU KEY From the Menu Key, the user can use various application features such as Directory and Call History. To Display Menu List Press Menu key while indicating the current time on LCD. The Menu List is displayed in LCD. Use Cursor Key to select desired Menu Item. By using Menu key and key, DT Series user can access to Call History, Directory and terminal settings with simple operation. As an example, the following shows the operations how to access to Directory menu. Press Menu key Main Menu for DT330 Series [Menu] [Menu] 1 Hisotry GHI 1 Call History 2 Directory 3 Settings OK Description To view Call History. For details, see 1 Call History 6.1FOR DT330 SERIES in chapter 6 Call 3 Setting Note: 2 Directory 3 Tool Menu WXYZ History Operation. To use Phonebook function. For details, see PHONEBOOK in chapter 5. To set up the terminal such as ringing volume control, LCD display setting and download of Music on Hold. For details, see SETUP WITH MENU KEY FOR DT300 SERIES. DTL-6DE-1/DTL-2E-1 does not have Menu key. Up Down Back OK # Redial Speaker 2 Directory Mic 9 Back Menu Item Answer [Directory] 1 Personal 2 System Up N/A Down Back OK Press Directory key 1. ICON DISPLAY SHORTCUT MENU The LCD of DT330 Series displays Desktop Icons which provide notification when events (such as missed call and voice mail) occur. As shown in the figure below, DT330 Series has Shortcut Menu for frequently-used features. The user can access to Shortcut Menu by pressing (Enter) key. Icon Display GHI Answer Mic 9 WXYZ Menu [Shortcut Menu] 1 Missed Calls 2 Voice Mail # Redial 4:26 PM TUE 13 APR 2007 MIC Feature Missed Call Voice Mail Cursor Icon DND Speaker 3 Receive IM Back >>> Description This icon appears when there is a missed call. Once the user has checked the missed call, this icon will disappear. This icon provides notification of incoming Voice Mail. Once the user has checked the mail, this icon will disappear. This icon indicates the currently available direction of the Cursor key. Press Enter Key Note: OK DT310 Series does not support the Shortcut Menu. Shortcut Menu includes the following features. Note: Unavailable Menu items are grayed out. Shortcut Menu for DT330 Series Feature Description 1 Missed Calls Access to history of Missed Call. 2 Voice Mail Access to history of incoming Voice Mail. 3 Bluetooth Currently Not Used (grayed out). 1. PROGRAMMABLE FEATURE KEYS These are examples of DT Series features available by pressing the programmable keys. Some features using feature access code may be programmed by the user. Others must be programmed by the telephone system administrator. AICM: Press key to activate “Automatic Intercom”. N/A MW-SET: Press key to leave message waiting indication on boss’ station from secretary’s station. MW-OFF: Press key to cancel message waiting indication on boss’ station from secretary’s station. N/A P-RLS: Press key to release “Privacy” feature. DICM: Press key to activate “Dial Intercom”. S&R (Save and Repeat): Press key to store a number or redial a stored number. DND (Do Not Disturb): Press key to activate or cancel “Privacy” feature. SIG: Press key to cause chime at predetermined station. FDA: Press key to activate or cancel “Call Forwarding - All Calls” feature. FDN: Press key to activate, verify or cancel “Call Forwarding Ŕ Busy Line” feature. SPD: One Touch Speed Calling. NAME: Press key to register name for the key to One-Touch Speed Calling key. 1. SOFT KEYS The Soft Keys on the DT Series provide a set of functions on the LCD that adapts to the changing state of the telephone. While default Soft Key settings are provided, desired functions can be assigned to individual stations as required. The Soft Keys, at the bottom of the LCD, can display the names of available functions, names of user-assigned functions and names of functions assigned by a specific Soft Key pattern. Displayed Soft Keys can vary, depending on the state of the phone and/or when the Next/Previous button is pressed. 4051 7:35 AM MON 18 JUL 2002 MIC DND >>> Exit Note: Default Displays for Each Status Default Soft Key settings are provided corresponding to particular functions. Different Soft Key settings are displayed at the bottom of the LCD depending on the status, as shown below. Different patterns of Soft Key settings can be registered for individual call status and assigned to individual terminals as required. IDLE 4:26 PM TUE 13 APR 2004 NAME HSET MIC >>> Help Soft Key function is available for the terminals with LCD. Exit Key Press to exit from the Menu or Help mode and go back to the time display. Help Key Press the Help Key, then desired Soft Key for helpful information about that key. MIC (Microphone) Press the Soft Key below "MIC" to activate or deactivate the Microphone. LED on Mic key will illuminate when Mic is on. DIAL TONE/DIALING (1) 4:26 PM TUE 13 APR 2004 RLS HSET PICK >>> Push >>> (2) 4:26 PM VOICE TUE 13 APR 2004 HSET RLS >>> RINGING 4:26 PM TUE 13 APR 2004 CONF HSET RLS >>> 1. The following shows the default display patterns of main features. BUSY (1) (2) BUSY 2000 4:26 PM TUE 13 APR 2004 MUTE HSET RLS >>> Push >>> BUSY 4:26 PM S&R 2000 TUE 13 APR 2004 >>> CONNECTION 2000 4:26 PM TUE 13 APR 2004 MIC DND >>> CONSULTATION HOLD TRANSFER 2000 4:26 PM TUE 13 APR 2004 MIC CONF >>> Soft Key Features When the Soft Key corresponding to a desired feature name is operated, the selected feature name starts to blink on the LCD. The blinking display of available features takes precedence over the display of features specified by the Soft Key pattern. Note: The Soft Keys can be programmed in System Data to blink, remain steady, have no indication, or display a character when either in use or idle. PICK (Call Pickup – Group) Permits a station user to answer any calls directed to other lines in the user’s preset Call Pickup Group. CONF (Three-way Calling) Enables a station user to establish a three-way conference by connecting an additional party to an already existing conversation. VOICE (Voice Call) Enables the user to make a call to the called party’s built-in speaker. If the called party’s MIC is on, the called party can converse on hands-free. MIC (Microphone On/Off) Allows the user to turn the microphone on and off for use with the speakerphone. HSET (Headset) Allows the user to go off-and on-hook when using the headset. RLS (Release Key) Allows the user to release the current call when using the headset, without waiting for the party to hang up. S&R (Save and Repeat) Allows a station to save a specific dialed number and then redial that number later. 1. MWSET (Message Waiting - Set) Allows a station to set a Message Waiting indication or lamp. HOLD (Call Hold) Permits a station user to hold a call in progress and to return to the previously held call. MWOFF (Message Waiting - Cancel) Allows a station to cancel a Message Waiting indication or lamp. FDB (Call Forwarding – Busy Line) Permits a call to a busy station to be immediately forwarded to a predesigned station. Busy Out. FLASH (Flash) Provides the station with a switchhook flash. FDN (Call Forward - No Answer) Permits a call to an unanswered station to be forwarded to a predesignated station if the called station does not answer within a predetermined period of time. C-RPT (ISDN Malicious Call Trace) Allows the user to initiate a Call Trace on ISDN calls only. G-SPD (Speed Calling - Group) Allows a station user to share a set of common Speed Calling numbers with other station users in the group. N/A FDA (Call Forwarding – All Calls) Permits all calls designated for a particular station to be routed to another station regardless of the busy or idle status of the called station. P-RLS (Privacy Release) Allows another station to depress a busy line button and enter the conversation of a station already engaged in communication. FDL (Logged Out IP Station – Call Destination) Enables a system to transfer the call to appropriate station when Dterm whose LOGGED OUT IP STATION Ŕ CALL DESTINATION has already been registered is in logout status. DND (Do Not Disturb) Allows a station user to deny access to the station line for incoming calls. S-SPD (Speed Calling - System) Allows a station user to call certain frequently dialed numbers using fewer digits (abbreviated call codes) than would normally be required. CAS (CAS-Switch Hook Flash) Allows the user to send a switchhook flash while on an outside trunk. UCDBO (UCD Busy Out) Allows a station user to block UCD calls and to cancel E-OVR (Executive Override) Enables selected stations users, upon encountering a busy condition at an internal station, to bridge into the busy connection. PAGE (Button Page) Allows the user to toggle between pages when two numbers are registered on One-Touch Speed Calling key. CW (Call Waiting) Enables a busy station to receive a second incoming call. 1. A camp-on indication tone is sent to the busy station, and the user can use a switchhook flash to answer the second call. CB (Call Back) Provides the ability for a calling station to set a CALL BACK. The calling station will be rung as soon as the busy station becomes available. SIG (Manual Signaling) Permits station users to send a one-second ring to a predetermined station. If the signaled station is ringing from another call, the manual intercom signal will interrupt that ringing. CKEEP (Eight-Party Conference Retrain) Allows all outside parties to stay on a conference when all internal parties hang up. another line, to the existing two-party connection. VISIT (Survivable Remote MGC) Allows a station to indicate a status: when a user is in remote office, VISIT will be blinking. After recovering the main office, VISIT will return to light. RMUTE (Ringer Mute) Allows a station user to mute or recover station ringing. >>> (Display Function Next Page) Allows the user to scroll to the next screen. <<< (Display Function Previous Page) Allows the user to scroll to the previous screen. N/A SCALL (Serial Call) Allows the user to set Serial Call for the caller before extending the call, allowing the caller to receive an announcement at the end of the call guiding the caller to dial the next number and subsequent numbers. IZP (Internal Zone Paging) Allows a user to make a voice call through the speakers of the designated group. IDCHG (Call ID Change Display) Allows the user to toggle between standard display and an alternate display. GPICK (Call Pickup - Group Enhancement) Allows the user to answer any ringing station within the user's expanded call pickup group. CHCNF (Call Hold - Conference) Allows a station user to establish a conference connection by adding a third party, who is held on SETUP WITH UP/DOWN KEY • TO ADJUST RINGER TONE DT300 Series • TO ADJUST HANDSET RECEIVER VOLUME DT300 Series Press Up/Down ( or status or during the call. / Press Up/Down ( / ) key during ringing. ) key in the off-hook LCD indication for North America, Latin America, Asia, Middle East and Russia HANDSET RING • TO ADJUST LCD CONTRAST DT300 Series Press Up/Down ( status. LCD indication for Australia HANDSET • TO ADJUST SPEAKER VOLUME DT300 Series or / ) key during Press Up/Down ( speakerphone operation or during the call. SPEAKER or LCD or / ) key in the on-hook SETUP WITH FEATURE KEY • MICROPHONE ON/OFF LED on Mic microphone. DT300 Series Press Feature and 3 key. The LCD displays the selected tone number (n=1 ~ 17). key shows the status of the built-in Press soft key associated with the MIC Display or press Feature and 1 key. • TO CHANGE HANDSET RECEIVER VOLUME DT300 Series Handset receiver volume can be changed. Press Feature and 2 key. The LCD displays the current volume status. RCV VOL. 4:26 PM SMALL TUE 13 APR 2004 RINGER TONE n 4:26 PM TUE 13 APR 2004 No. RCV VOL. LARGE 4:26 PM TUE 13 APR 2004 • TO SELECT RINGER TONE DT300 Series DT Series has 10 kinds of ringer tones that you can select. Modulation (Hz) 1 520/660 16 2 520/660 8 3 1100/1400 16 4 5 660/760 Melody 1 6 Melody 2 7 8 Melody 3 Melody 4 9 10 Melody 5 Melody 6 Note: Press Feature and 2 key to alternate between Large and Small volume. Frequency (Hz) 16 Tone number 5, 6, 8~10 (Melody 1, 2, 4~6) will sound continuously. • TO ADJUST TRANSMISSION/RECEIVING VOLUME DT300 Series HANDS FREE OFF 4:26 PM TUE 13 APR 2004 Handset volume can be changed. Press Feature and current volume. 4 key. The LCD displays the • CALL INDICATOR LAMP ON/OFF DT300 Series T/R VOL. 4:26 PM SMALL TUE 13 APR 2004 The user can choose to turn the call indicator lamp either on or off during ringing. Press Feature and Press Feature and 4 key again to alternate between Small and Large volume. T/R VOL. 4:26 PM INDICATOR ON 4:26 PM TUE 13 APR 2004 LARGE TUE 13 APR 2004 • TO ACTIVATE HANDS-FREE DT300 Series To set hands-free on: Press Feature and 5 key. The LCD displays: HANDS FREE ON 4:26 PM TUE 13 APR 2004 7 key. The LCD displays: INDICATOR OFF 4:26 PM TUE 13 APR 2004 Note: The call indicator lamp lights when used as a Message Waiting Lamp, even when it is turned off by the above operation. • DYNAMIC DIAL PAD ON/OFF DT300 Series The user can originate a call at first hand without lifting handset or pressing Speaker key. To Set Hands-Free Off: Press Feature and 6 key. The LCD displays: Press Feature and 8 key. The LCD displays: Direct Dial Pad ON 4:26 PM TUE 13 APR 2004 Direct Dial Pad OFF 4:26 PM TUE 13 APR 2004 Note: When this feature is ON, the user may initiate a call by immediately dialing the number and the station will go hands-free off-hook automatically. Please note when the features on the following pages are used in conjunction with Dynamic Dial Pad, that the user does not have to press the Speaker key or lift the handset to receive dial tone. SETUP WITH MENU KEY FOR DT300 SERIES • TO CHANGE RINGER TONE VOLUME DT300 The procedure below shows how to change the volume of ringer tone. While indicating the current time on LCD, press Menu key to open the Menu screen. Select 3 Setting and then press (Enter), (Right-cursor) or OK soft key. (or press 3 key.) [Settings] 1 2 3 4 5 Ring Volume Offhook Ring Back Light Headset Ring Peripherals Back OK Ring Volume can be set in 13 levels (0 - 12). Adjust the ringer tone volume by using key and then press (Enter) or OK soft key. Turn the volume up. [Menu] Turn the volume down. 1 Call History 2 Directory 3 Settings Back OK Select 1 Ring Volume and then press (Enter), (Right-cursor) or OK soft key. (or press 1 key.) [Ring Volume] [ ] Back OK • TO ENABLE/DISABLE OFF-HOOK RINGING DT300 To disable/enable the off-hook ringing, select 1 Disable or 2 Enable. Then, press (Enter) or OK soft key. The procedure below shows how to [Offhook Ring] While indicating the current time on LCD, press Menu key to open the Menu screen. 1 Disable 2 Enable Back Select 3 Setting and then press (Enter), (Right-cursor) or OK soft key. (or press 3 key.) [Menu] 1 Call History 2 Directory 3 Settings Back OK Select 2 Offhook Ring and then press (Enter), (Right-cursor) or OK soft key. (or press 2 key.) [Settings] 1 2 3 4 5 Ring Volume Offhook Ring Back Light Headset Ring Peripherals Back OK OK Note: Default setting is 2 Enable. Note: The currently enabled item is highlighted. • TO ENABLE/DISABLE BACKLIGHT [Settings] DT300 1 2 3 4 5 The following explains how to enable/disable the backlights of LCD and digit keys. The backlights illuminate (for approximately 10 seconds) when the user presses any key or lift the handset. While indicating the current time on LCD, press Menu key to open the Menu screen. Select 3 Setting and then press (Enter), (Right-cursor) or OK soft key. (or press 3 key.) Back Menu Item 1 Disable [Menu] Note: Note: Back OK Select 3 Back Light and then press (Enter), (Right-cursor) or OK soft key. (or press 3 key.) OK Make a selection from the following list. 2 Enable 1 Call History 2 Directory 3 Settings Ring Volume Offhook Ring Back Light Headset Ring Peripherals Meaning Backlights of LCD and digit keys are disabled. Backlights of LCD and digit keys are enabled. Default setting is 2 Enable. The currently enabled item is highlighted. [Back Light] 1 Disable 2 Enable Back After making a selection, press soft key. OK (Enter) or OK • TO SET RINGING OF HEADSET DT300 The procedure below shows how to enable/disable the ringing of headset. To disable/enable the ringing of headset, select 1 Disable or 2 Enable. Then, press (Enter) or OK soft key. [Headset Ring] While indicating the current time on LCD, press Menu key to open the Menu screen. 1 Disable 2 Enable Back Select 3 Setting and then press (Enter), (Right-cursor) or OK soft key. (or press 3 key.) [Menu] 1 Call History 2 Directory 3 Settings Back OK Select 4 Headset Ring and then press (Enter), (Right-cursor) or OK soft key. (or press 4 key.) [Settings] 1 2 3 4 5 Ring Volume Offhook Ring Back Light Headset Ring Peripherals Back OK OK Note: Default setting is 1 Disable. Note: The currently enabled item is highlighted. TO ORIGINATE AN OUTSIDE CALL MULTILINE APPEARANCE DT300 Series DT300 Series To Originate a Call Lift handset or press Speaker key, receive dial tone. Dial the Central Office access code, e.g. 9. Dial desired telephone number. Use handset or MIC to start a conversation. Display indicates: Press the MULTILINE APPEARANCE feature key. Lift handset or press Speaker key. Dial the Central Office access code (i.e.9). Dial the desired number. To Answer a Call Elapsed time 15:39 4:26 PM Trunk type Trunk number DDD 3 TUE 13 APR 2004 TO ORIGINATE AN INTERNAL CALL DT300 Series Lift handset or press Speaker key. Receive dial tone. Dial desired station number. Display indicates digits dialed. Use handset or MIC to converse. Press the MULTILINE APPEARANCE feature key (ringing and flashing LED alert user to incoming call). Lift handset or press Speaker key. Speak with incoming party. TO HOLD A CALL DT300 Series Press HOLD Note: key. Held line wink flashes. Held station number HOLD 4:26 PM Note: 2001 TUE 13 APR 2004 If held line appears on other DT Series stations, the associated LED flashes red slowly. Hold shows as a flashing green LED on your phone. The same line on other phones shows as a flashing red LED. Recall shows as a flashing green LED on your phone and flashing red LED on other phones with the same line. TO PLACE A CALL ON EXCLUSIVE HOLD DT300 Series Press HOLD key twice. Line appearance indicates interrupted wink. Held station number To Retrieve E_HOLD 4:26 PM Lift handset or press Speaker key. Press held line. Use handset to converse. Note: Any station with this line appearance can retrieve the call. Note: 2001 TUE 13 APR 2004 If held line appears on other DT Series stations, LED remains steadily lit red. If unanswered To Retrieve After preprogrammed time, Automatic Recall is initiated. Visual and audible signal (rapid flash and ring burst) is sent to station that placed call on hold. Lift handset or press Speaker key. Press held line. Use handset to converse. Note: Only the DT Series that set Exclusive Hold option can retrieve the call. If unanswered After preprogrammed time, Automatic Recall is initiated. Visual and audible signal (rapid flash and ring burst) is sent to station which placed call on Exclusive Hold. Recall shows as a flashing green LED on your phone, and solid red on other phones with same line. Note: Exclusive Hold excludes any other phone from picking up your held call. Exclusive Hold shows as a flashing green LED on your phone. The same line on other phones appears as a solid red LED. TO TRANSFER A CALL DT300 Series After conversing, ask party to hold. Press Transfer key. Receive interrupted dial tone. TRANSFER 4:26 PM TUE 13 APR 2004 Dial destination station’s extension, hang up or wait for answer. Transferred station or trunk number TRANSFER 2001 4:26 PM TUE 13 APR 2004 If transferring party hangs up, that station’s number appears in the center of recipient’s display. Transferring station TRANSFER 2000 DDD 3 4:26 PM TUE 13 APR 2004 5. FEATURE OPERATION TO ORIGINATE A CALL USING SPEED CALLING (ONE-TOUCH SPEED CALLING KEYS) DT300 Series Press the desired One-Touch Speed Calling key, or press Speaker key and One-Touch Speed Calling key. To Program (Available only on DT Series with One-Touch Speed Calling key.) (SPD) Press Feature key. Press desired One-Touch Speed Calling key. Enter desired telephone number or feature access code on the keypad. Display indicates the digits dialed. Press Feature key again to save the number. SPEED SET 4:26 PM TUE 13 APR 2004 To Verify Press Feature key. Press desired One-Touch Speed Calling key. Display indicates digits programmed. Note: To program a hook switch for transfer or feature activation, press Recall key as first digit. (! dis- plays on LCD.) Note: To program a pause, press the Recall key as any digit other than the first digit. (- displays on LCD.) Note: To program a Voice Call, press Transfer key after dialing station number. (V displays on LCD.) Note: One-Touch Speed Calling key for feature access: One-Touch Speed Calling key may be used as a feature key by storing the UNIVERGE SV7000 feature access code. The features may be programmed on a system basis by the Telephony Server Admin. Access codes may be stored in conjunction with telephone numbers. For example, one button can be programmed by the user to transfer to a certain extension. LCD Indication of 8LD Display EUROPEAN CHARACTER (UPPERCASE) Press the desired One-Touch Speed Calling key and originate a call. Registered name will be displayed as follows. For the key to which no name information is registered, the character “SPD” will be displayed. When registering Name Information of One-touch Speed Calling, the user can use uppercase alphabetic, uppercase European or lowercase European characters. The following tables show available characters for One-Touch Speed Calling keys. ALPHABETIC CHARACTER (UPPERCASE) DIGIT KEY 1 1 2 A 3 D 4 G 5 J B E H K N Q U X C F I L O R V Y a d g j m S t Z , ) b e h k n p u w ’ [ c f i l o q v x : ] 2 3 4 5 6 r 8 y ; ! s z - ? 7 9 / 6 M 7 P 8 T 9 W 0 0 ∗ ∗ # # @ & DIGIT KEY 2 3 4 5 6 7 8 9 0 ∗ # A D G J M P T W 0 ∗ # , : B C E F H K N Q U X ! 1 I L O R V Y À È Ì 5 Ñ S Ù Z ? Á É Í Ò β Ú 9 - Â Ê Î Ó 7 Û + Ã Ë Ï Ô Ü % Ä 4 Õ 8 & Å / Æ Œ ( Ç Ø ) 2 6 N/A 3 Ö = ¿ ¡ ( 1 Note: The shaded area indicates the characters which cannot be entered. EUROPEAN CHARACTER (LOWERCASE) DIGIT KEY 1 2 3 4 5 6 7 8 9 0 ∗ # d e g j m p t ∗ # h k n q u w x 0 , a b : c f i l o r v y ! à è ì 5 ñ s ù z ? á é í ò β ú 9 - ê ë î ï ó ô 7 + â ã û ü % ä 3 4 õ & å / æ œ ( ç ø ) 2 6 N/A 8 ö TO REGISTER NAME ON ONETOUCH SPEED CALLING KEY DT300 (Available for 8LD Display terminal.) Press NAME button. Push Speed Calling Key 4:26 PM TUE 13 APR 2004 NAME(*) >>> Press desired One-Touch Speed Calling key. Enter desired name on the keypad. Display indicates the name entered. NEC BNET ^ SET CANCEL CLEAR = ¿ >>> Press SET to save the name. ¡ 1 Note: 4:26 PM NAME The shaded area indicates the characters which cannot be entered. TUE 13 APR 2004 >>> Note: To delete the entry, press DEL or BK key and delete each one character. Note: To delete the whole setting, press CLEAR key and back to idle status. Note: If a 4-, 8-, 16- or 32-button display terminal is used, the display indicates all of the digits dialed. Note: and pressing the Transfer key. (V displays if programming on an DT Series with LCD. Save by pressing One-Touch Speed Calling key.) VOICE CALL DT300 Series Lift handset. Dial desired station number. Press Voice. VOICE 4:26 PM A Voice Call may be programmed on a OneTouch Speed Calling key by pressing OneTouch Speed Calling key, dialing the extension, Note: 2000 TUE 13 APR 2004 If called party is on their line when a Voice Call is attempted, calling station's display indicates: VOICE BUSY 4:26 PM TUE 13 APR 2004 Speak to called party. Note: Lift handset. Dial desired station number; VOICE Soft Key appears while station is ringing. 2000 4:26 PM TUE 13 APR 2004 MIC VOICE >>> Press VOICE Soft Key. Speak to called party. A voice call is restricted if called party's station is not a DT Series. Display indicates: VOICE REST 4:26 PM TUE 13 APR 2004 TO ANSWER A VOICE CALL HANDS FREE DT300 Series Receive incoming Voice Call. Press the MIC Soft Key or Mic Respond hands-free. key. LED lights. Calling station VOICE 4:26 PM Note: Overriding party 2001 TUE 13 APR 2004 If privacy is required, lift handset. AUTOMATIC INTERCOM DT330/310 To Initiate Lift handset or press Speaker key. Press the AICM key. Hear ringback tone. N/A ICM 4:26 PM 1 TUE 13 APR 2004 Press AICM, lift handset or press Speaker key. LED lights solid green. If called station is engaged in a non-intercom call, the station may press AICM after placing original caller on hold (with HOLD key). To Bridge Into An Automatic Intercom Call Note: Bridging is an optional feature. Called party ICM 4:26 PM 2 TUE 13 APR 2004 To Answer AICM key flashes red indicating an incoming intercom call. Press the AICM key, lift handset or press Speaker key. Overriding party OVERRIDE 1 4:26 PM TUE 13 APR 2004 A three-party conference is established. CONFERENCE DT300 Series With call in progress, ask party to hold. Press Transfer key, receive interrupted dial tone. Dial desired number. After call is answered, press Conf key. The LED lights. Three-way conference is established. CONF 4:26 PM cally placed on hold. Dial desired party to consult. Press Transfer key to return to original caller. Third party is automatically placed on hold. By repeating these steps, it is possible to alternate between calls. Note: The display indicates connected station or trunk at any given time. TUE 13 APR 2004 TO ANSWER A CAMPED-ON CALL DT330/310 Using Soft Key With a call in progress, press Transfer key and dial desired number. After call is answered, press CONF Soft Key. Three-way conference is established. CONF 4:26 PM MIC TUE 13 APR 2004 >>> If one party hang up, other two remain connected. Conf LED goes out. TO ESTABLISH A BROKER CALL DT330/310 While engaged in a call and wishing to consult a third party, press Transfer key. Caller is automati- N/A While engaged in a call, receive the camp-on indication (one short tone burst). LED of Answer key flashes. Press Answer key. Call in progress is placed on hold. Connection to camped-on call is established. Press Answer key to return to original call. Camped-on call is placed on hold. By repeating these steps, it is possible to alternate between calls. Display indicates connected station or trunk at any given time. Trunk type Trunk number CAMP ON DDD 3 4:26 PM TUE 13 APR 2004 Station that parked the call 2000 4:26 PM Called station DDD 2 TUE 13 APR 2004 PICK UP 4:26 PM MIC Calling party 2000 2001 TUE 13 APR 2004 >>> CALL PICK-UP (GROUP) DT300 Series CALL PICK-UP (DIRECT) When Station Within Pick-up Group Rings To Program Pick-up Direct Key (OneTouch Speed Calling Key) Lift handset. Press CALL PICK-UP or dial “Call Pick-up” access code (may be stored on One-Touch Speed Calling key). Connection to calling party is established. If currently on a call, press Transfer key and dial “Call Pick-up” access code. The original party is placed on hold. Called station PICK UP 4:26 PM Calling party 2000 DDD 3 TUE 13 APR 2004 Using Soft Key Lift handset and press PICK Soft Key. Connection to calling party is established. DT330/310 Press Feature key. Press One-Touch Speed Calling key. Dial “Direct Call Pick-up” access code. Press Feature key again. When A Station Within System Rings Lift handset, receive dial tone. Press PICK-DIRECT and dial the station number to be picked up. - Or Dial “Direct Call Pick-up” access code and the station number to be picked up. Connection to calling party is established. If busy, original call must be placed on hold before new call can be picked up. CALL FORWARDING - ALL CALLS OVERRIDE 2001 4:26 PM TUE 13 APR 2004 MIC >>> Note: N/A Override may be programmed by the Telephony Server Admin. for one of the Programmable feature keys, or may be programmed by the user on a One-Touch Speed Calling key by storing the Recall and Override access code. LAST NUMBER REDIAL DT300 Series To Recall Last Number Dialed Press Redial key. Last number dialed is displayed. LNR[# or ]/SPD[_ _] DT300 Series To Set Press Speaker key. Receive dial tone. If setting for another station, press MULTILINE APPEARANCE. Press FDA or dial “Call Forwarding - All Calls” access code. Receive special dial tone. Dial destination station or external telephone number. Receive service set tone. FDA LED lights (at your station or at the DT Series of the multiline station you are setting). Press Speaker key. Call Forwarding - All Calls is set. Forwarding station ‚Ä XXXXXX FORWARD SET 2000 4:26 PM TUE 13 APR 2004 Press Redial key until desired number is displayed. Up to 5 previously dialed numbers. Press # or . The number on the display is automatically redialed. When party has answered, lift handset or speak hands-free. Note: A-law Countries [Australia, Russia, Latin America, UK, Middle near East, other Asian nations]: # µ-law Countries [North America, Japan, Hong Kong, Taiwan]: Using Soft Key Press FDA Soft Key. Receive special tone. Dial destination; wait for service set tone. “FORWARD SET” is displayed, call forwarding for all calls is set. N/A FORWARD SET 4:26 PM TUE 13 APR 2004 MIC >>> To Verify (Only For Terminal With LCD) Press FDA. Display indicates the station number calls are forwarded to. Using Soft Key Press FDA Soft Key. Receive service set tone and “FORWARD CANCEL” is displayed. Forwarding station FORWARD CANCEL 4:26 PM TUE 13 APR 2004 MIC >>> FORWARD 2000 4:26 PM TUE 13 APR 2004 Note: With Soft Key operation, FDB flashes on the display. CALL FORWARDING - BUSY LINE DT330/310 To Set To Cancel Press Speaker key. Receive dial tone. If canceling for another station, press MULTILINE APPEARANCE. Press FDA or dial “Call Forwarding - All Calls” cancel code. Receive service set tone. LED goes out at your station (or the DT Series of the multiline station). Press Speaker key. Call Forwarding - All Calls is cancelled. FORWARD CANCEL 4:26 PM TUE 13 APR 2004 Press Speaker key. Receive dial tone. If setting for another station, press MULTILINE APPEARANCE. Press FWD-BY or dial “Call Forwarding - Busy Line” access code. Receive special dial tone. Dial destination station or external telephone number. Receive service set tone. FWD-BY LED lights (at your station or at the DT Series of the multiline station you are setting). Press Speaker key. Call Forwarding - Busy Line is set. FORWARD SET 4:26 PM TUE 13 APR 2004 Using Soft Key Press FDB Soft Key. Receive special dial tone. Dial destination; wait for service set tone. “FORWARD SET” is displayed; Call Forwarding Busy Line is set. FORWARD SET 4:26 PM TUE 13 APR 2004 MIC >>> To Verify (Only For Terminal With LCD) N/A Press FWD-BY. Display indicates the station number calls are forwarded to. goes out at your station (or the DT Series of the multiline station). Press Speaker key. Call Forwarding - Busy Line is cancelled. FORWARD CANCEL 4:26 PM TUE 13 APR 2004 Using Soft Key N/A Press FDB Soft Key. Receive service set tone and “FORWARD CANCEL” is displayed. FORWARD CANCEL 4:26 PM TUE 13 APR 2004 MIC >>> Forwarding station FORWARD 2000 4:26 PM TUE 13 APR 2004 Note: With Soft Key operation, FDB flashes on the display. To Cancel Press Speaker key. Receive dial tone. If canceling for another station, press MULTILINE APPEARANCE. Press FWD-BY or dial “Call Forwarding - Busy Line” cancel code. Receive service set tone. LED CALL FORWARDING - DON’T ANSWER DT300 Series To Set Press Speaker key. Receive dial tone. If setting for another station, press MULTILINE APPEARANCE. Press FDN or dial “Call Forwarding - Don’t Answer” access code. Receive special dial tone. Dial destination station or external telephone number. Receive service set tone. FDN LED lights (at your station or at the DT Series of the multiline station you are setting). Press Speaker key. Call Forwarding - Don’t Answer is set. Forwarding station FORWARD 2000 4:26 PM TUE 13 APR 2004 Forwarding station FORWARD SET 2000 4:26 PM TUE 13 APR 2004 Using Soft Key Press FDN Soft Key. Receive special dial tone. Dial destination; wait for service set tone. “FORWARD SET” is displayed; Call Forwarding Don’t Answer is set. FORWARD SET 4:26 PM TUE 13 APR 2004 MIC >>> To Verify (Only For Terminal With LCD) If verifying for another station, press MULTILINE APPEARANCE while idle. Press FDN. Display indicates the station number calls are forwarded to. Note: Call Forwarding for Busy Line and Don't Answer may be combined depending upon system programming. Note: With Soft Key operation, FDB flashes on the display. To Cancel Press Speaker key. Receive dial tone. If canceling for another station, press MULTILINE APPEARANCE. Press FDN or dial "Call Forwarding - Don't Answer" cancel code. Receive service set tone. LED goes out at your station (or the DT Series of the multiline station). Press Speaker key. Call Forwarding - Don’t Answer is cancelled. FORWARD CANCEL 4:26 PM TUE 13 APR 2004 6.1 FOR DT330 SERIES TO VIEW CALL HISTORY DT300 • To VIEW DATA OF INCOMING CALL/ OUTGOING CALL STEP 1: While indicating the current time on LCD, press Menu key to open the Menu screen. Note: STEP 3: Select a kind of calls and then press (Enter), (Right-cursor) or OK soft key (or press an appropriate digit key). In this example, 1 Incoming Calls is selected. Item Description Incoming Calls Outgoing Calls To view the history of incoming calls. To view the history of outgoing calls. [Call History] This feature is DT330 Series. The following are examples of LCD displays of DT330 Series. 1 Incoming Calls: 3 2 Outgoing Calls: 7 DT330 Series Del Back OK Indicate the number of calls STEP 4: The history data of the last received call is displayed. If name information of the caller exists, the name is displayed as follows: [Menu] 1 Call History 2 Directory Back OK [Incoming Calls] 01. 4 OCT Ken Kobus STEP 2: Select 1 Call History and then press (Enter), (Right-cursor) or OK soft key. (or press 1 key.) Del Note: [Menu] 1 Call History 2 Directory 3 Settings 13:17 Back OK There are two types of incoming call: Answered Call and Missed Call. When history data of missed calls is displayed on the screen, appears on the top line of the screen. Back OK STEP 5: To view the telephone number of the caller, press (Right-cursor). [Incoming Calls] 01. 4 OCT 19:20 PM FRI 15 FEB 2008 13:17 09012345678 Del Back Note: If two or more records exist, use OK Note: key to display missed call. the next/former records (or pressing an appropriate digit key). For example, press “0” key to display the tenth record. Note: If no history data is saved, "No data" will be displayed on LCD. Note: To go back to name display, press key. For the telephone without the cursor key, switching between “name” and “telephone number” cannot be performed. indicate that the telephone has received a voice mail. STEP 2: Select 1 Missed Calls and then press (Enter), (Right-cursor) or OK soft key. (or press 1 key.) [Shortcut Menu] Note: To go back to former menu (STEP 3), press Back 1 Missed Calls : 2 2 Voice Mail : 12 3 Back OK soft key. Note: If the telephone number of the caller is not received (due to Caller ID blocking, public phone or out of area, etc.), “Private” is displayed on LCD. • TO VIEW DATA OF MISSED CALL ONLY indicate that the telephone has received a Note: When voice mail service is not used, “ 2 ” is displayed instead of “ 2 Voice Mail”. STEP 1: While indicating the current time on LCD, (Enter) key to open Icon Menu press (Shortcut Menu) screen. STEP 3: The history data of the last received call is displayed. If name information of the caller exists, the name is displayed as follows: STEP 2: Press (Enter) key while the history data for the target telephone number is displayed on LCD. [Incoming Calls] 01. 4 OCT Ken Kobus 13:17 Del Note: Back OK If two or more records exist, use key to dis- play the next/former records (or pressing an appropriate digit key).For example, press “0” key to display the tenth record. Note: To go back to former menu (STEP 3), press Back soft key. Note: If the telephone number of the caller is not received (due to Caller ID blocking, public phone or out of area, etc.), “Private” is displayed on LCD. TO MAKE A CALL FROM CALL HISTORY DT300 STEP 1: Display the call history data of the target telephone number (see TO VIEW CALL HISTORY). The following is an example when the history data of an incoming call is displayed. [Incoming Calls] 01. 4 OCT Ken Kobus Del 13:17 Back OK Note: While the history data is displayed, the user cannot make a call by dialing a telephone number. Note: If a dialing error occurs, the following error message appears. Dialing Error Back TO DELETE ALL DATA DT300 STEP 3: Press Del soft key. The display changes as follows: STEP 1: On the Menu screen, select 1 Call History and then press (Enter), (Right-cursor) or OK soft key. (or press 1 key.) [Incoming Calls] Delete All Back [Menu] 1 Call History 2 Directory 3 Settings Note: To cancel the data deletion, press soft key. Back OK Outgoing Calls To delete all the history data of incoming calls. To delete all the history data of outgoing calls. following is an example when the history data of an incoming call is displayed. [Incoming Calls] [Call History] 01. 4 OCT Ken Kobus 1 Incoming Calls: 3 2 Outgoing Calls: 7 Del TO DELETE A SPECIFIC DATA DT300 STEP 1: Display the call history data which you want to delete (see TO VIEW CALL HISTORY). The Description Incoming Calls or Back STEP 4: Press (Enter) or OK soft key to delete all the history data of selected call type. STEP 2: Select a kind of calls and then press (Enter), (Right-cursor) or OK soft key (or press an appropriate digit key). In this example, 1 Incoming Calls is selected. Item OK Back OK Indicate the number of calls Del 13:17 Back OK STEP 2: Press Del soft key. The display changes as follows: [Incoming Calls] Delete One Back Note: OK To cancel the data deletion, press or Back soft key. STEP 3: Press (Enter) or OK soft key to delete the selected history data.
Source Exif Data:
File Type                       : PDF
File Type Extension             : pdf
MIME Type                       : application/pdf
PDF Version                     : 1.7
Linearized                      : No
Author                          : Provided By MANUALSLIB.COM - http://www.manualslib.com/
Create Date                     : 2014:01:29 18:53:57Z
Keywords                        : manuals, instruction manuals, user manuals, service manuals, user guides, pdf manuals, owners manuals, installation guides
Modify Date                     : 2014:12:07 14:37:59+08:00
Subject                         : Search through 700.000 manuals online & and download pdf manuals.
Has XFA                         : No
XMP Toolkit                     : Adobe XMP Core 5.4-c005 78.147326, 2012/08/23-13:03:03
Format                          : application/pdf
Creator                         : Provided By MANUALSLIB.COM - http://www.manualslib.com/
Description                     : Search through 700.000 manuals online & and download pdf manuals.
Title                           : ManualsLib - Makes it easy to find manuals online!
Creator Tool                    : pdftk 1.44 - www.pdftk.com
Metadata Date                   : 2014:12:07 14:37:59+08:00
Producer                        : itext-paulo-155 (itextpdf.sf.net-lowagie.com)
Document ID                     : uuid:6ba0d444-46fd-7d47-8051-f4beab50423f
Instance ID                     : uuid:4d2aa3b9-2b1b-7b49-9694-f44ee5aad44f
Page Count                      : 41
EXIF Metadata provided by EXIF.tools
![]()
100 ₽/$
в наличии на складе в Москве
DTL-6DE-1P (7), DTL-24D-1P (1)
Телефоны NEC UNIVERGE DT300/DT700NEC DT300 Series
ЦИФРОВОЙ СИСТЕМНЫЙ ТЕЛЕФОН NEC DTL-24D-1P (2шт)
Телефон DTL-24D-1P(BK)TEL 24 доп. кнопоки, 4-х строчный дисплей 224*96 точек, регулировка дисплея по высоте, подсветка тастатуры, чёрный 16 451руб
.JPG)
DT300 серии DTL-6DE-1P 7шт
Цифровой системный телефон NEC DTL-6DE-1P (7шт) Телефон DTL-6DE-1P(BK) 6 доп. кнопок, дисплей 168*58 точек, черный 10 068 руб

NEC 8lc-aa 2 + блок питания атс NEC NEAX 2000 IPS
PN-8COTR —
— PN-CP27-A —
— PN-8LCAA —
— PN-DTA — ,
— PN-CP15(FP) —
— PN-30PRTA —
— PN-CFTC –
— PZ-M606-A –
— PN-IPTB-A–
— PN-4VCTI-A –
— Блок питания PZ-PW121 –
— Блок питания PN-PW00 –
— Системный блок (PIM) АТС NEC NEAX2000IPS –
— 4 трубки (замена нортел)
![]()
![]()
![]()
Задать вопрос о товаре 
— отвечаем в течении нескольких часов.