Nice ON3EBD, ON3EBD/A Manual
HOW TO USE


PRODUCT DESCRIPTION AND INTENDED USE
The ON3EBD (ON3EBD/A) transmitter is designed to control automations (gates, garage doors, road barriers and similar).
All uses other than that described herein and use in environmental conditions other than those indicated in this manual are considered improper and forbidden!
ON3EBD (ON3EBD/A) is compatible with receivers that adopt both the one-way «O-Code» («O-Code/A») and the two-way «BD» radio encoding systems; the latter, besides the advanced and exclusive functions of the «NiceOpera» system, has a series of additional functions (Paragraph 2).
The ON3EBD (ON3EBD/A) transmitter, configured in two-way mode, can be memorised on maximum 10 two-way receivers (OXIBD (OXIBD/A)). Configured in one-way mode (6 — ENCODING SWITCH PROCEDURE), it can be memorised on any desired number of one-way receivers.
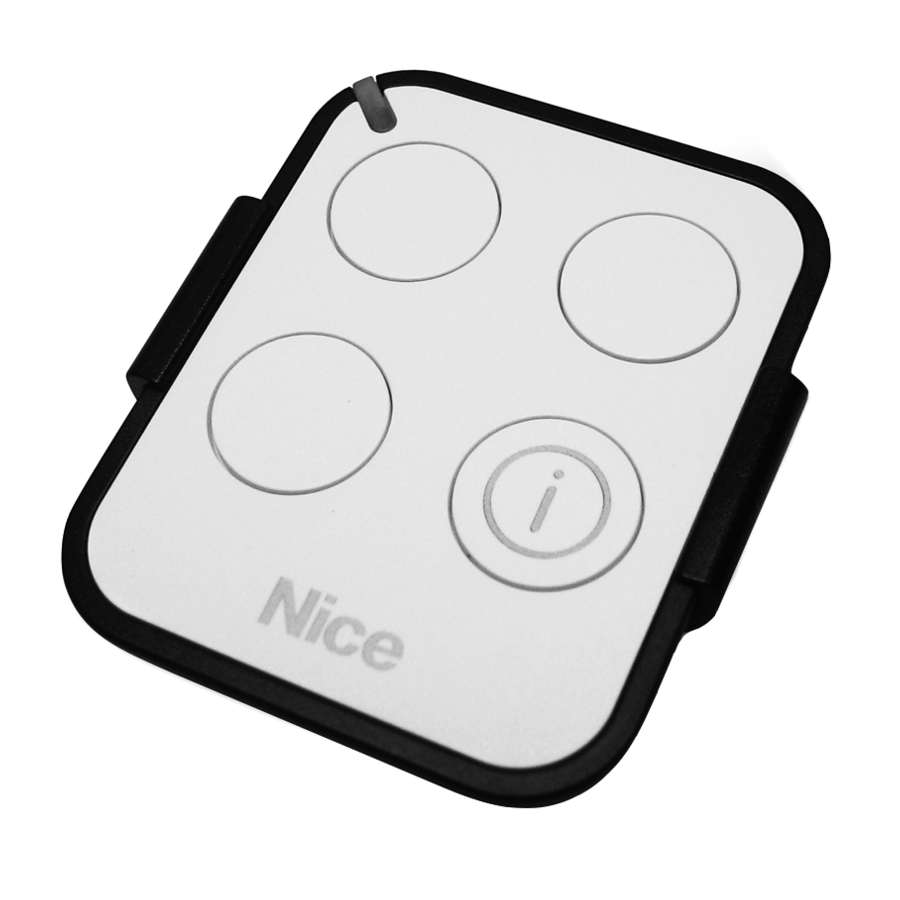
The ON3EBD (ON3EBD/A) is equipped with 4 keys (Fig. 1): 3 keys are used to send commands and 1 function key to request the automation’s status or to switch the encoding system. Moreover, a series of optional accessories are available: string for keyring (Fig. 2); support for mounting (Fig. 3 ON3EBD, Fig. 4 ON3EBD/A).
TRANSMITTER FUNCTIONS
Each single encoding allows for exploiting only the functions linked to that specific encoding system.
The two-way communication between the ON3EBD (ON3EBD/A) transmitter and the OXIBD (OXIBD/A) receiver has the following functions:
- Sending of the receiver’s confirmation of the command received: sending to the transmitter of the confirmation that the command transmitted was received by the receiver.
- Command received: the transmitter vibrates and the LED emits a series of orange flashes followed by a steady green light for 2 seconds.
- Command not received: the transmitter LED emits a series of orange flashes followed by a steady red light for 2 seconds (there is no vibration).
- Sending of the automation’s status (for example, whether the gate is open or closed): see Paragraph 5.
- Indication of the automation’s anomaly status: flashing of the red LED and intermittent vibration.
TRANSMITTER VERIFICATION
Before memorising the transmitter in the automation’s receiver, ensure that it is working correctly by pressing any key while observing whether the LED (Fig. 1) lights up; should this not occur.
TRANSMITTER MEMORISATION
To memorise the transmitter in a receiver, the following procedures can be adopted:
- Memorisation in «Mode 1»
- Memorisation in «Mode 2»
- Memorisation in «Extended Mode 2»
- Memorisation through the «Enabling Code» received from a previously memorised transmitter
These procedures are described in the instruction manual of the receiver or control unit with which the transmitter must be operated. The above-mentioned manuals are also available on the website: niceforyou.com
— For the procedures listed below only keys 1, 2, 3 of the transmitter are enabled (Fig. 1). The fourth key is exclusively reserved for the status request.
- Memorisation in «Mode 1»
Allows for memorising in the receiver, once only, the 3 transmitter command keys, associating them automatically with each command managed from the control unit (default commands). - Memorisation in «Mode 2»
Allows for memorising in the receiver a single transmitter key, associating it with the commands managed from the control unit (maximum 4 and chosen by the user). Note – the same procedure must be repeated for each key to be memorised. - Memorisation in «Extended Mode 2»
The same as memorisation «B» — «Mode 2«, with the added possibility of choosing the desired command (to be paired with the key being memorised) in an extended list of commands managed from the control unit (up to 15 different commands).
The feasibility of the procedure depends on the control unit’s ability to manage the 15 commands. - Memorisation through the «ENABLING Code» (between an OLD transmitter already memorised and a NEW transmitter)
The ON3EBD (ON3EBD/A) transmitter has a secret code, the so-called «ENABLING CODE». By transferring this code from a memorised transmitter to a new transmitter, the latter is recognised (and memorised) automatically by the receiver.
Memorisation procedure:
- Bring the two transmitters (NEW and OLD one already memorised) close to one another as shown in Fig. 5.
- On the NEW transmitter press and release a command key. The LED of the OLD transmitter will switch on and start flashing.
- On the OLD transmitter press and release a command key. Once the code has been transferred, for an instant both the transmitters (NEW and OLD) will vibrate and the green LED will light up (end of the procedure).
When the NEW transmitter will be used, for the first 20 times it will transmit this «enabling code» to the receiver together with the command. The receiver will automatically memorise the identification code of the transmitter that transmitted it.
STATUS REQUEST PROCEDURE
- Press and release the «i» «Status request» key (Fig. 1).
- Press and release the command key associated with the automation for which the status is requested.
- Observe the final colour of the LED after the series of orange flashes:
- GREEN: gate/door OPEN
- RED: gate/door CLOSED
- ORANGE: partial opening/closing
Note – If the transmitter is memorised in multiple automations and a status request is made, the ON3EBD (ON3EBD/A) will only signal the status of the automation that responded first to the status request or that falls within the transmitter range.
In this specific case, Nice cannot offer any guarantee regarding the status of all the automations.
ENCODING SWITCH PROCEDURE
This procedure allows for modifying the type of encoding system («O-Code» («O-Code/A») or «BD») associated with a single command key.
ON3EBD (ON3EBD/A) is configured by default with the two-way «BD» radio encoding. If the system’s automation uses the one-way «O-Code» («O-Code/A») encoding system, for each command key to be associated with the automation the «encoding switch» procedure must be carried out:
- Identify the relevant command key.
- Press and release 3 times the «i» function key (Fig. 1).
- Hold down for 3 seconds the command key chosen at Point 01.
- The RED LED signals that the one-way «O-Code» («O-Code/A») encoding has been set.
To restore the «BD» encoding, repeat Points 01, 02 and 03: the GREEN LED signals that the «BD» encoding has been set.
Note – A command key can only be memorised in multiple automations if the same radio technology is used (either one-way or two-way).
DELETION PROCEDURE
To restore the default conditions of the transmitter, perform the following deletion procedure:
- Remove the battery (Fig. 6).
- Press and hold key 1 (Fig. 1) and insert the battery.
After the initial red flashes, the LED switches off and turns red; at this point, release the key. - Within 3 seconds press and release key 1 (Fig. 1): the LED signals the deletion with red flashes.
After deleting the memory, all the transmitter’s default settings are restored.
BATTERY REPLACEMENT
When the battery is flat and a key is pressed, the corresponding LED fades and the transmitter does not transmit. With the battery almost flat, the LED emits red flashes during the transmission process.
To restore normal transmitter operation, replace the flat battery with a version of the same type, observing the pole markings shown in Fig. 6.
PRODUCT DISPOSAL
This product is an integral part of the automation system it controls and must be disposed of alongside it.
As in installation, also at the end of product lifetime, the disassembly and scrapping operations must be performed by qualified personnel. This product is made of various types of materials, some of which can be recycled while others must be scrapped. Seek information on the recycling and disposal systems required by local regulations in your area for this product category.
certain parts of the product may contain polluting or hazardous substances that, if released into the environment, may seriously damage the environment and human health. As indicated by the adjacent symbol it is forbidden to dispose of this product together with domestic waste. Separate the waste into categories for disposal, according to the methods set forth in the regulations in force in your area, or return the product to the retailer when purchasing a new equivalent product.
local regulations may include the application of heavy fines in the event of improper disposal of this product.
Battery disposal
The flat battery contains toxic substances and must not be disposed of with common waste. Dispose of according to «separate» waste collection methods as envisaged by current local standards.
PRODUCT TECHNICAL SPECIFICATIONS
- Power supply: 3 VDC type-CR2032 lithium battery
- Battery life: estimated 2 years, with 10 transmissions per day
- Frequency: 433.92 MHz
- Power emitted (ERP): < 10 mW (ON3EBD)
- Radio encoding: ON3EBD: «BD» and «O-Code» — ON3EBD/A: «BD» and «O-Code/A»
- Operating temperature: -5°C… +55°C
- Protection rating: IP 40 (suitable for use indoors or in protected environments)
- Dimensions: 45 x 56 x 11mm
- Weight: 18 g.
Notes:
- The range of transmitters and the reception capacity of the receivers are heavily affected by other devices (alarms, headphones, etc.) operating on the same frequency in your area. Nice cannot provide any guarantee with regard to the actual range of its devices under such conditions.
- All technical specifications stated herein refer to an ambient temperature of 20°C (± 5°C).
- Nice S.p. A. reserves the right to modify the product at any time when deemed necessary, without altering the its intended use and functions.
COMPLIANCE WITH THE FCC RULES
(PART 15) AND WITH RSS-210 RULES
This device contains licence-exempt transmitter(s)/receiver(s) that comply with Innovation, Science and Economic Development Canada’s licence-exempt RSS(s); and with Part 15 of the FCC rules of the United States of America. Operation is subject to the following two conditions:
- This device may not cause interference.
- This device must accept any interference, including interference that may cause undesired operation of the device.
Any changes or modifications made to this device, without the express permission of the manufacturer, may void the user’s authority to operate this device.
SIMPLIFIED EU DECLARATION OF CONFORMITY
Hereby Nice S.p. A. declares that the radio equipment type ON3EBD is in compliance with Directive 2014/53/EU.
The full text of the EU declaration of conformity is available at the following internet address: niceforyou.com/en/support 

Documents / Resources
Download manual
Here you can download full pdf version of manual, it may contain additional safety instructions, warranty information, FCC rules, etc.
Download Nice ON3EBD, ON3EBD/A Manual
С помощью пульта Nice ON3EBD для шлагбаума и ворот и приемника OXI BD вы можете получать обратную связь о получении приемником сигнала и узнавать статус ворот (открыто-закрыто-работа).
При сохранении двусторонних передатчиков в памяти приемника OXIBD идентификационный код этого приемника также автоматически сохраняется в памяти передатчика. Внимание! — если выполняется удаление двустороннего передатчика из памяти приемника OXIBD, для завершения операции необходимо также очистить память передатчика.
На пульте 4 кнопки: 3 управляющих кнопки и 1 кнопка запроса статуса автоматики. Динамический код, работает на частоте 433,92 Мгц, работает с идентификационными кодами и самообучается.
В памяти передатчиков с кодировками O-Code и BD имеется «код активации» (секретный), с помощью которого можно дать разрешение на сохранение в памяти приемника нового передатчика. Возможность получения дополнительной информации с помощью технологии NFC Технология NFC дает возможность получить дополнительную информацию, просто поднеся пульт ERA One BD к вашему смартфону.
Если приемник принял сигнал и начал выполнять команду, то пульт управления вибрирует и светодиод на пульте светится зеленым, а если блок управления не видит пульт, то пульт не вибрирует и светодиод на пульте светится красным. Также на пульте есть четвертая кнопка — кнопка программирования, которая позволяет посмотреть в каком состоянии находится проем — «Открыт — в процессе — закрыт». При этом изменяется цвет светодиода на пульте «Зеленый — оранжевый — красный» соответственно положению проема при подаче команды проверки состояния.
Этой же кнопкой программирования можно изменить работу пульта на работу в одностороннем режиме, как пульта серии ONE или INTI. Передатчик не отправляет сигнал непрерывно, а прекращает передачу сигнала после получения ответа от приемника.
Элегантный и практичный пульт Era One LR можно носить как брелок или закрепить на стене и в автомобиле, благодаря специальному креплению в комплекте.
Подробную инструкцию по настройке пульта Nice ON3EBD для шлагбаума и ворот можно посмотреть здесь — инструкция к пульту Nice ON3EBD для шлагбаума и ворот
Сохранение пульта в памяти автоматики Nice
- На приемнике удерживать кнопку 1 секунду. Светодиод начнет мигать.
- На пульте не позднее чем через 10 секунд удерживать предпочитаемую для программирования кнопку 5 секунд.
- Пульт сохранится в памяти приемника через 20 секунд.
Копирование пульта Nice
- На программируемом (новом) пульте удерживать предпочитаемую кнопку в течение 5 секунд.
- На запрограммированном (старом) пульте выполнить 3 нажатия по интересующей кнопке.
- На программируемом (новом) пульте повторить первое действие (5 секунд удерживать предпочитаемую кнопку).
Перевод пульта Nice ON3EBD в обычный режим
Заводская настройка ON3EBD предусматривает работу в двустороннем режиме с кодировкой радиосигнала «BD». Если
система автоматики использует технологию односторонней связи с кодировкой «O-Code», каждой кнопке управления, которую вы хотите придать системе, необходимо выполнить процедуру «изменения кодировки».
- 3 раза нажать функциональную клавишу i.
- Предпочитаемую кнопку удерживать 3 секунды. Красный сигнал светодиода оповещает об установленной кодировке O-Code.
03.02.2023
Читайте также

Возврат к списку
Nice ON3EBD — пульт управления с обратной связью ERA ONE. Пульт и приемник с обратной связью – это хорошая замена для тех конечных потребителей автоматики, которые хотят повышенной защиты от копирования-клонирования пультов, так как не только пульт прописывается в приемник, но и приемник записывается в пульт.
Основные отличия пульта ON3EBD:
В памяти передатчиков с кодировками O-Code и BD имеется «код активации» (секретный), с помощью которого можно дать разрешение на сохранение в памяти приемника нового передатчика.
Если блок управления принял сигнал и начал выполнять команду, то пульт вибрирует и светодиод на пульте светится зеленым, а если блок управления не видит пульт, то пульт не вибрирует и светодиод на пульте светится красным. Также на пульте есть четвертая кнопка – кнопка программирования, которая позволяет посмотреть, в каком состоянии находится проем «открыт -в процессе –закрыт». При этом изменяется цвет светодиода на пульте «зеленый – оранжевый – красный» соответственно положению проема при подаче команды проверки состояния. Этой же кнопкой программирования можно изменить работу пульта на работу в одностороннем режиме, как пульта серии ONE или INTI.
В двунаправленный передатчик встроена технология NFC. Если просто поднести смартфон к передатчику, открывается веб-страница с дополнительной информацией о самих передатчиках. Простым жестом вы можете проверить уровень заряда батареи, купить новую батарею, если необходимо, и ознакомиться с функциональными возможностями двунаправленной системы.
Технические характеристики NICE ON3EBD:
- Питание: литиевая батарея напряжением 3 В пост. тока типа CR2032
- Срок службы батареи: 2 года из расчета 10 передач в день
- Частота: 433,92 МГц
- Излучаемая мощность: 0 дБм (эффективная излучаемая мощность)
- Кодировка радиосигнала: “BD” и “O-code”
- Рабочая температура: -5°C … +55 °C
- Класс защиты: IP 40 (при использовании в доме или в защищенных помещениях)
- Размеры: 45 x 56 x 11 мм
- Вес: 18 г.
Написать отзыв
Ваше имя:
Ваш отзыв:
Примечание: HTML разметка не поддерживается! Используйте обычный текст.
Оценка: Плохо
Хорошо
Введите код, указанный на картинке: