Данная лицензия не предназначена для продажи этого Руководства и Вы не становитесь владельцем этого Руководства после приобретения любого продукта, загрузки и/или использования. Nikon сохраняет за собой право владения данным Руководством и, следовательно, всеми копиями и все соответствующие права, относящиеся к интеллектуальной собственности, и сохраняет за собой все права, которые явно не предоставлены Вам в рамках данного Соглашения. Данное Соглашение представляет собой полное и эксклюзивное соглашение, устное и письменное, между Вами и Nikon.
1. РУКОВОДСТВО
Руководство предназначено для клиентов, которые приобрели наши продукты. Мы можем не иметь возможности ответить на запрос физических лиц, которые не приобрели наши продукты. Пожалуйста, имейте в виду, что данное руководство и контактная информация, указанные здесь, могут быть изменены без уведомления.
Данное Руководство защищено Законом об авторском праве Японии и международными законами об авторском праве и международными договорами. Вам необходимо воспроизвести на каждой копии уведомление об авторском праве Nikon и любую другую информацию о праве собственности, которые присутствовали на оригинале.
2. ОГРАНИЧЕНИЯ
Кроме случаев, когда в данном Соглашении указано иное, нельзя делать или передавать копии данного Руководства другим или передавать в электронной форме Руководство с одного компьютера на другой по сети. НЕЛЬЗЯ ИЗМЕНЯТЬ ИЛИ УДАЛЯТЬ ЛЮБЫЕ УВЕДОМЛЕНИЯ ОБ АВТОРСКОМ ПРАВЕ, ТОРГОВОЙ МАРКЕ ИЛИ ДРУГИЕ ЗАЩИТНЫЕ УВЕДОМЛЕНИЯ, СОДЕРЖАЩИЕСЯ В ДАННОМ РУКОВОДСТВЕ. НЕЛЬЗЯ ПРИСВАИВАТЬ ИЛИ ИНЫМ ОБРАЗОМ ИЗБАВЛЯТЬСЯ, МОДИФИЦИРОВАТЬ, НАСТРАИВАТЬ, ПЕРЕВОДИТЬ, АРЕНДОВАТЬ, БРАТЬ В НАЕМ, ЗАНИМАТЬ, ПЕРЕПРОДАВАТЬ, РАСПРОСТРАНЯТЬ, ПЕРЕДАВАТЬ ПО СЕТИ ИЛИ СОЗДАВАТЬ ИЛИ ИМЕТЬ СОЗДАННЫЕ ПРОИЗВОДСТВЕННЫЕ РАБОТЫ, ОСНОВАННЫЕ НА ДАННОМ РУКОВОДСТВЕ ИЛИ ЛЮБОЙ ЧАСТИ ТАКОВОГО.
3. ОГРАНИЧЕННАЯ ГАРАНТИЯ И ОТКАЗ
В НАИБОЛЬШЕЙ СТЕПЕНИ, РАЗРЕШЕННОЙ В СИЛУ ДЕЙСТВУЮЩЕГО ЗАКОНОДАТЕЛЬСТВА, ДАННОЕ РУКОВОДСТВО ПРЕДОСТАВЛЕНО НА ОСНОВЕ ПРИНЦИПА «КАК ЕСТЬ», БЕЗ ГАРАНТИИ В ЛЮБОЙ ФОРМЕ, И КОМПАНИЯ NIKON, ЕЕ СОТРУДНИКИ, РАСПРОСТРАНИТЕЛИ, ДИЛЕРЫ И АГЕНТЫ ПРЯМО НЕ ПРИЗНАЮТ ЛЮБУЮ ГАРАНТИЮ В ЛЮБОЙ ФОРМЕ, ВЫРАЖЕННУЮ ИЛИ ПОДРАЗУМЕВАЕМУЮ, ВКЛЮЧАЯ, НО НЕ ОГРАНИЧИВАЯСЬ, ЛЮБОЙ ПОДРАЗУМЕВАЕМОЙ ГАРАНТИЕЙ ПРИГОДНОСТИ ДЛЯ ТОРГОВЛИ, ПРИГОДНОСТИ ДЛЯ ОПРЕДЕЛЕННОГО НАЗНАЧЕНИЯ ИЛИ ОТСУТСТВИЯ НАРУШЕНИЙ. В НАИБОЛЬШЕЙ СТЕПЕНИ, РАЗРЕШЕННОЙ В СИЛУ ДЕЙСТВУЮЩЕГО ЗАКОНОДАТЕЛЬСТВА, КОМПАНИЯ NIKON, ЕЕ СОТРУДНИКИ, РАСПРОСТРАНИТЕЛИ, ДИЛЕРЫ И АГЕНТЫ НЕ ГАРАНТИРУЮТ ИСПОЛНЕНИЕ ИЛИ РЕЗУЛЬТАТЫ, КОТОРЫЕ ВЫ МОЖЕТЕ ПОЛУЧИТЬ ИЗ ДАННОГО РУКОВОДСТВА, ИЛИ ЧТО ДАННОЕ РУКОВОДСТВО БУДЕТ СООТВЕТСТВОВАТЬ ВАШИМ ТРЕБОВАНИЯМ ИЛИ ЧТО РАБОТА РУКОВОДСТВА БУДЕТ БЕСПЕРЕБОЙНОЙ, БЕЗОШИБОЧНОЙ ИЛИ НЕ БУДЕТ СОДЕРЖАТЬ ВИРУСОВ. В НАИБОЛЬШЕЙ СТЕПЕНИ, РАЗРЕШЕННОЙ В СИЛУ ДЕЙСТВУЮЩЕГО ЗАКОНОДАТЕЛЬСТВА, НИ КОМПАНИЯ NIKON, НИ ЕЕ СОТРУДНИКИ, РАСПРОСТРАНИТЕЛИ, ДИЛЕРЫ И АГЕНТЫ НЕ ДОЛЖНЫ НЕСТИ ПЕРЕД ВАМИ ОТВЕТСТВЕННОСТЬ ЗА ЛЮБЫЕ КОСВЕННЫЕ, ПОСЛЕДУЮЩИЕ ИЛИ НЕПРЕДНАМЕРЕННЫЕ УБЫТКИ, ПОТЕРИ ИЛИ ИЗДЕРЖКИ ЛЮБОГО ТИПА, БУДЬ ТО ПОТЕРЯ ПРИБЫЛИ, ПЕРЕРЫВ В ДЕЯТЕЛЬНОСТИ ИЛИ ИНЫМ СПОСОБОМ ВОЗНИКАЮЩИЙ ИЛИ ЯВЛЯЮЩИЙСЯ СЛЕДСТВИЕМ ДАННОГО РУКОВОДСТВА, ВЫЗВАННЫЙ КАКИМ-ЛИБО СПОСОБОМ, ДАЖЕ ЕСЛИ КОМПАНИЯ NIKON, ЕЕ СОТРУДНИКИ, РАСПРОСТРАНИТЕЛИ, ДИЛЕРЫ ИЛИ АГЕНТЫ УВЕДОМЛЕНЫ О ВОЗМОЖНОСТИ ВОЗНИКНОВЕНИЯ ТАКИХ УБЫТКОВ, ПОТЕРЬ ИЛИ ИЗДЕРЖЕК. ЭТОТ ОТКАЗ СОСТАВЛЯЕТ СУЩЕСТВЕННУЮ ЧАСТЬ ДАННОГО СОГЛАШЕНИЯ, И НЕИСПОЛЬЗОВАНИЕ ДАННОГО РУКОВОДСТВА УПОЛНОМОЧЕНО, КРОМЕ СЛУЧАЕВ В РАМКАХ ДАННОГО ОТКАЗА.
4. ОБЩИЕ СВЕДЕНИЯ
Данное соглашение регулируется и должно истолковываться в соответствии с законами Японии независимо от его принципов коллизионного права. В случае возникновения спора в рамках или в связи с данным соглашением Вы, таким образом, даете согласие на персональную юрисдикцию Японии и отказываетесь от любого возражения, что такая дискуссия вызывает затруднение. Далее Вы соглашаетесь на получение судебных извещений в любом действии, возникающем из данного Соглашения по обычной почте или другими коммерчески оправданными способами доставки расписки в получении. Если любое положение данного Соглашения должно быть определено недействительным по какой-либо причине, то оставшиеся положения не должны быть признаны недействительными и должны остаться в силе без изменений. Данное Соглашение устанавливает в дальнейшем целое соглашение и понимание между Вами и компанией Nikon, и замещает собой и заменяет любые другие соглашения, относящиеся к сути дела данного Соглашения. Неуспех любой стороны в настаивании на строгом исполнении любого правила или положения данного соглашения, или выполнение любой опции, права или защиты прав, содержащихся в данном документе, не должны толковаться в качестве отказа от любого применения такого правила, положения, опции, права или защиты прав в будущем, и такое правило, положение, опция, право или защита прав должны продолжиться и сохранить полную юридическую силу и действие. Заголовки разделов данного Соглашения вставлены только для удобства и не должны составлять часть данного документа или влиять каким-либо образом на значение или толкование данного Соглашения. Кроме случаев, когда иначе явно указано в данном документе, положения раздела 3 и раздела 4 вместе с любыми положениями, которые с помощью своих прямо выраженных условий относятся к периодам после прекращения срока действия данного Соглашения, должны оставаться в силе после прекращения действия данного Соглашения по какой-либо причине.
Руководства для продуктов Nikon/ 2018/02/15/ Вер. 2.0.0
- Manuals
- Brands
- Nikon Manuals
- Digital Camera
- Coolpix L830
- Reference manual
-
Contents
-
Table of Contents
-
Troubleshooting
-
Bookmarks
Quick Links
DIGITAL CAMERA
Reference Manual
Related Manuals for Nikon Coolpix L830
Summary of Contents for Nikon Coolpix L830
-
Page 1
DIGITAL CAMERA Reference Manual… -
Page 3
Introduction Parts of the Camera The Basics of Shooting and Playback Shooting Features Playback Features Recording and Playing Back Movies General Camera Setup Connecting the Camera to a TV, Computer, or Printer Reference Section Technical Notes and Index… -
Page 4: Introduction
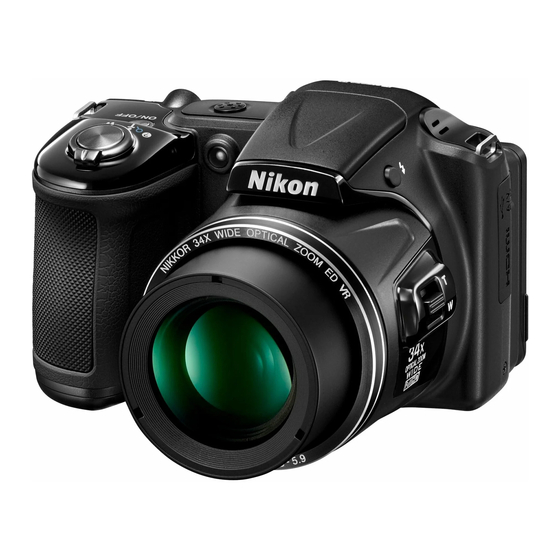
Introduction Read This First Thank you for purchasing the Nikon COOLPIX L830 digital camera. Before using the camera, please read the information in “For Your Safety” (A viii-xi) and familiarize yourself with the information provided in this manual. After reading, please keep this manual handy and refer…
-
Page 5: About This Manual
About This Manual If you want to start using the camera right away, see “The Basics of Shooting and Playback” (A 12). To learn about the parts of the camera and information that is displayed in the monitor, see “Parts of the Camera” (A 1).
-
Page 6
Other Information Symbols and Conventions To make it easier to find the information you need, the following symbols and conventions are used in this manual: Icon Description This icon indicates cautions and information that should be read before using the camera. This icon indicates notes and information that should be read before using the camera. -
Page 7: Information And Precautions
Before taking pictures on important occasions (such as at weddings or before taking the camera on a trip), take a test shot to ensure that the camera is functioning normally. Nikon will not be held liable for damages or lost profits that may result from product malfunction.
-
Page 8
Nikon will not be held liable for any damages resulting from the use of this product. While every effort was made to ensure that the information in these manuals is accurate and complete, we would appreciate it were you to bring any errors or omissions to the attention of the Nikon representative in your area (address provided separately). -
Page 9
Disposing of Data Storage Devices Please note that deleting images or formatting data storage devices such as memory cards or built-in camera memory does not completely erase the original image data. Deleted files can sometimes be recovered from discarded storage devices using commercially available software, potentially resulting in the malicious use of personal image data. -
Page 10: For Your Safety
For Your Safety To prevent damage to your Nikon product or injury to yourself or to others, read the following safety precautions in their entirety before using this equipment. Keep these safety instructions where all those who use the product will read them.
-
Page 11
(total result in low-temperature burns. of four batteries). The EN-MH2 rechargeable batteries Do not leave the product are for use with Nikon digital where it will be exposed to cameras only, and are compatible extremely high temperatures, with COOLPIX L830. -
Page 12
Continued use could result in fire. and output jacks, use only the cables provided or sold by Nikon for the Do not handle the power cable or go near the battery charger during purpose, to maintain compliance with lightning storms. -
Page 13
Handle moving parts with care Turn the power off when using inside an airplane or the Be careful that your fingers or other hospital objects are not pinched by the lens Turn the power off while inside the cover or other moving parts. airplane during take off or landing. -
Page 14: Notices
Nikon determined by turning the equipment Corporation may void the user’s off and on, the user is encouraged to try authority to operate the equipment.
-
Page 15
Interface Cables Notice for Customers in Europe Use the interface cables sold or This symbol indicates that provided by Nikon for your equipment. electrical and electronic Using other interface cables may equipment is to be collected exceed the limits of Class B Part 15 of separately. -
Page 16
This symbol on the batteries indicates that the batteries are to be collected separately. The following apply only to users in European countries: All batteries, whether marked with this symbol or not, are designated for separate collection at an appropriate collection point. Do not dispose of as household waste. -
Page 17: Table Of Contents
Table of Contents Introduction ……….. ii The Basics of Shooting and Playback… 12 Read This First …………ii Preparation 1 Insert the Batteries ….12 About This Manual ……….iii Applicable Batteries ……….13 Information and Precautions……v Preparation 2 Insert a Memory Card..14 For Your Safety ……….
-
Page 18
Shooting Features……..31 Playback Features ……..62 G (Easy Auto) Mode ……..31 Playback Zoom ……….62 Scene Mode (Shooting Suited to Scenes) … 32 Thumbnail Playback, Calendar Display..63 Tips and Notes …………33 Functions That Can Be Set with the d Button (Playback Menu) ……. -
Page 19
Editing Movies ……….E25 Reference Section ……… E1 Extracting Only the Desired Portions of a Using Easy Panorama Movie …………..E25 (Shooting and Playback) ……E2 Saving a Frame from a Movie as a Still Shooting with Easy Panorama….E2 Image………….. -
Page 20
The Movie Menu ……..E52 Technical Notes and Index ….F1 Movie Options……….E52 Caring for the Product……..F2 AF Area Mode……….E55 The Camera…………F2 Autofocus Mode……….E55 Batteries…………..F3 Movie VR…………. E56 Memory Cards …………F5 Wind Noise Reduction ……. E56 Cleaning and Storage…….. -
Page 21: Parts Of The Camera
Parts of the Camera The Camera Body 12 11 Zoom control…………25 Speaker…………..70 f : wide-angle……….25 Microphone (stereo) ………65 g : telephoto……….25 Flash ……………5, 44 h : thumbnail playback……63 i : playback zoom……..62 USB/audio/video output connector..74 j : help …………..
-
Page 23: Changing The Angle Of The Monitor
14 DC input connector (for AC adapter available Tripod socket ……….F17 separately from Nikon) ……E78 DC input connector cover Changing the Angle of the Monitor The angle of the monitor can be lowered down to approx. 85° or raised upward to approx.
-
Page 24: Attaching The Camera Strap And Lens Cap
Attaching the Camera Strap and Lens Cap Attach the lens cap to the camera strap, and then attach the strap to the camera. Attach them at two places. Lens Cap When the camera is not in use, protect the lens by attaching the lens cap.
-
Page 25: Raising And Lowering The Flash
Raising and Lowering the Flash Press the m (flash pop-up) button to raise the flash. See “Using the Flash” (A 44) for more information about flash settings. Push the flash down gently to lower the flash until it clicks into place when not in use.
-
Page 26: Using Menus (The D Button)
Using Menus (the d Button) Use the multi selector and k button to navigate the menus. Press the d button. Press the multi selector J. The menu is displayed. The current menu icon is displayed in yellow. Shooting menu Image mode White balance Continuous ISO sensitivity…
-
Page 27
Press the k button. Select a menu option. The settings for the option you selected are displayed. Photo VR Welcome screen Time zone and date Monitor settings On (hybrid) Print date Photo VR Motion detection AF assist Press the k button. Select a setting. -
Page 28: The Monitor
The Monitor The information that is displayed in the monitor during shooting and playback changes depending on the camera’s settings and state of use. By default, information is displayed when the camera is first turned on and when you operate the camera, and turns off after a few seconds (when Photo info is set to Auto info in Monitor settings (A 72)).
-
Page 29
Focus area (subject tracking)..54, E39 Shooting mode……….22, 23 Flash mode…………. 44 Aperture value …………27 Macro mode …………49 Shutter speed…………27 Zoom indicator ……….25, 49 Travel destination icon ……..72 Focus indicator…………. 26 ISO sensitivity…………54 Movie options (normal speed movies)… 69 Battery level indicator ……..20 Movie options (HS movies) …… -
Page 30: Playback Mode
Playback Mode 999/999 999/999 9 9 9 / 9 9 9 9 9 9 / 9 9 9 9999/9999 9999/9999 29m 0s 29m 0s 29m 0s 29m 0s 9 9 9 9 . J P G 9 9 9 9 . J P G 9 9 9 9 .
-
Page 31
Protect icon……….64, E46 Image mode………. 54, E27 Movie options ……..69, E52 Sequence display (when Individual pictures is selected) ……64, E51 Easy panorama ……..36, E2 Print order icon ……..64, E42 Crop icon……….62, E15 Skin softening icon……64, E11 Small picture icon……64, E14 Filter effects icon………64, E12 Easy panorama playback guide … -
Page 32: The Basics Of Shooting And Playback
The Basics of Shooting and Playback Preparation 1 Insert the Batteries Open the battery-chamber/memory card slot cover. Hold the camera upside down to prevent the batteries from falling out. Insert the batteries. Confirm that the positive (+) and negative (–) terminals are oriented correctly and insert the batteries.
-
Page 33: Applicable Batteries
Applicable Batteries Four LR6/L40 (AA-size) alkaline batteries (included batteries) Four FR6/L91 (AA-size) lithium batteries Four EN-MH2 rechargeable Ni-MH (nickel metal hydride) batteries * EN-MH1 rechargeable Ni-MH batteries cannot be used. Removing the Batteries Turn the camera off and make sure that the power-on lamp and the monitor have turned off, and then open the battery-chamber/memory card slot cover.
-
Page 34: Preparation 2 Insert A Memory Card
Preparation 2 Insert a Memory Card Turn off the camera and open the battery- chamber/memory card slot cover. Hold the camera upside down to prevent the batteries from falling out. Insert the memory card. Slide the memory card in until it clicks into place. Memory card slot Be Careful to Insert the Memory Card in Correct Direction…
-
Page 35: Internal Memory And Memory Cards
Formatting Memory Cards The first time you insert a memory card that has been used in another device into this camera, make sure to format it with this camera. Insert the card into the camera, press the d button, and select Format card in the setup menu.
-
Page 36: Preparation 3 Setting The Display Language, Date, And Time
Preparation 3 Setting the Display Language, Date, and Time When the camera is turned on for the first time, the language-selection screen and the date and time setting screen for the camera clock are displayed. If you exit without setting the date and time, O will flash when the shooting screen is displayed.
-
Page 37
Select your home time zone and London, Casablanca press the k button. To enable daylight saving time, press H. When the daylight saving time function is enabled, W is displayed above the map. To turn off the daylight saving time function, press I. -
Page 38
Make sure that the lens cap has been removed and press the A button. Press this button in The shooting-mode selection screen is displayed. shooting mode for shooting-mode selection menu. When Easy auto mode is displayed, press the Easy auto mode k button. -
Page 39
Changing the Language Setting and the Date and Time Setting You can change these settings using the Language and Time zone and date settings in the z setup menu (A 72). You can enable or disable daylight saving time in the z setup menu by selecting Time zone and date followed by Time zone. -
Page 40: Step 1 Turn The Camera On
Step 1 Turn the Camera On Remove the lens cap and press the power switch. The monitor turns on. To turn the camera off, press the power switch again. Check the battery level indicator and the number of exposures remaining. Battery level indicator Display Description…
-
Page 41
Notes About the Flash When you need to use the flash, such as when shooting in dark locations or when the subject is backlit, press the m (flash pop-up) button to raise the flash (A 5, 44). The Auto Off Function Flashes No operations No operations… -
Page 42: Step 2 Select A Shooting Mode
Step 2 Select a Shooting Mode Press the A button. Use the multi selector HI to select a Easy auto mode shooting mode and press the k button. G (easy auto) mode is used in this example. The shooting mode setting is saved even after the camera is turned off.
-
Page 43: Available Shooting Modes
Available Shooting Modes A 31 Easy auto mode The camera automatically selects the optimum scene mode when you frame an image, making it even easier to take images using settings that suit the scene. A 32 Scene mode Camera settings are optimized according to the scene that you select. A 38 Special effects Effects can be applied to images during shooting.
-
Page 44: Step 3 Frame A Picture
Step 3 Frame a Picture Hold the camera steady. Keep fingers and other objects away from the lens, flash, AF-assist illuminator, microphone, and speaker. Frame the picture. Shooting mode icon When the camera automatically determines the scene mode, the shooting mode icon changes (A 31). 2 5 m 0 s 2 5 m 0 s 1 9 0 0…
-
Page 45: Using The Zoom
When Using a Tripod We recommend using a tripod to stabilize the camera in the following situations. — When shooting in dim lighting — When the flash is lowered or when using a shooting mode in which the flash does not fire — When using the telephoto setting When using a tripod to stabilize the camera during shooting, set Photo VR to Off in the setup menu (A 72) to prevent potential errors caused by this function.
-
Page 46: Step 4 Focus And Shoot
Step 4 Focus and Shoot Press the shutter-release button halfway. When the subject is in focus, the focus area glows green (multiple focus areas can glow green). When you are using digital zoom, the camera focuses on the subject in the center of the frame and the focus area is not displayed.
-
Page 47: The Shutter-Release Button
The Shutter-release Button To set focus and exposure (shutter speed and aperture value), press the shutter-release button lightly until you feel a slight Press halfway resistance. Focus and exposure remain locked while the shutter- release button is pressed halfway. Press the shutter-release button all the way to release the shutter and take an image.
-
Page 48: Step 5 Play Back Images
Step 5 Play Back Images Press the c (playback) button. If you press and hold down the c (playback) button while the camera is turned off, the camera turns on in playback mode. c (playback) button Use the multi selector to select an image to Display the previous image display.
-
Page 49: Step 6 Delete Images
Step 6 Delete Images Press the l button to delete the image currently displayed in the monitor. Use the multi selector HI to select the desired deletion method and press the Delete k button. Current image To exit without deleting, press the d button. Erase selected images All images Select Yes and press the k button.
-
Page 50
Operating the Erase Selected Images Screen Use the multi selector JK to select an image Erase selected images to be deleted, and then use H to display c. To undo the selection, press I to remove c. Move the zoom control (A 1) toward g (i) to switch to full-frame playback or f (h) to switch to thumbnail playback. -
Page 51: Shooting Features
Shooting Features G (Easy Auto) Mode The camera automatically selects the optimum scene mode when you frame an image, making it even easier to take images using settings that suit the scene. Enter shooting mode M A (shooting mode) button M G (easy auto) mode M k button When the camera selects a scene mode, the shooting mode icon displayed in the shooting screen changes to that for the scene mode currently enabled.
-
Page 52: Scene Mode (Shooting Suited To Scenes)
Scene Mode (Shooting Suited to Scenes) When a scene is selected, camera settings are automatically optimized for the selected scene. Enter shooting mode M A (shooting mode) button M b (second icon from the top*) M K M HI M select a scene M k button * The icon of the last scene selected is displayed.
-
Page 53: Tips And Notes
Tips and Notes d Sports While the shutter-release button is held all the way down, the camera shoots up to about 5 images continuously at a rate of about 6.7 fps (when Image mode is set to P 4608×3456). The frame rate for continuous shooting may vary depending upon the current image mode setting, the memory card used, or shooting condition.
-
Page 54: Night Landscape
j Night landscape From the screen displayed after j Night landscape is selected, select Y Hand-held or Z Tripod. Y Hand-held (default setting): — When the j icon at the top left of the monitor glows green, press the shutter-release button all the way to capture a series of images which are combined into a single image and saved.
-
Page 55: L Museum
l Museum The camera captures a series of up to ten images while the shutter-release button is held all the way down, and the sharpest image in the series is automatically selected and saved (BSS (Best Shot Selector)). The flash does not fire. m Fireworks show The shutter speed is fixed at about four seconds.
-
Page 56: Easy Panorama
p Easy panorama From the screen displayed after p Easy panorama is selected, select the shooting range from W Normal (180°) or X Wide (360°). The zoom position is fixed at wide-angle. Press the shutter-release button all the way down, remove your finger from the button, and then slowly pan the camera horizontally.
-
Page 57: O Pet Portrait
O Pet portrait When you point the camera at a dog or cat, the camera detects the pet’s face and focuses on it. By default, the shutter is automatically released when the camera detects a dog or cat face (pet portrait auto release).
-
Page 58: Special Effects Mode (Applying Effects When Shooting)
Special Effects Mode (Applying Effects When Shooting) Effects can be applied to images during shooting. Enter shooting mode M A (shooting mode) button M D (third icon from the top*) M K M HI M select an effect M k button * The icon of the last effect selected is displayed.
-
Page 59
The camera focuses on the area in the center of the frame. When Selective color or Cross process is selected, use the multi selector HI to select the desired color from the slider. To change settings for any of the following functions, press the k button to cancel color selection. -
Page 60: Smart Portrait Mode (Capturing Images Of Smiling Faces)
Smart Portrait Mode (Capturing Images of Smiling Faces) When the camera detects a smiling face, you can take an image automatically without pressing the shutter-release button (smile timer (A 53)). You can use the skin softening option to smooth the skin tones of human faces. Enter shooting mode M A (shooting mode) button M F Smart portrait mode M k button Frame the picture.
-
Page 61
Functions Available in Smart Portrait Mode Flash mode (A 44) Self-timer (A 47) Exposure compensation (A 50) Smart portrait menu (A 53) -
Page 62: A (Auto) Mode
A (Auto) Mode Used for general shooting. Settings can be adjusted to suit the shooting conditions and the type of shot you want to capture. Enter shooting mode M A (shooting mode) button M A (auto) mode M k button You can change how the camera selects the area of the frame to focus on by changing the AF area mode setting (A 54).
-
Page 63: Functions That Can Be Set Using The Multi Selector
Functions That Can Be Set Using the Multi Selector The functions that are available vary with the shooting mode, as shown below. G (easy Special Smart A (auto) Scene auto) effects portrait 1 X Flash mode (A 44) – 2 n Self-timer (A 47) 3 p Macro (A 49) –…
-
Page 64: Using The Flash
Using the Flash In dark locations or when the subject is backlit, you can take images with the flash by raising the flash. When using A (auto) mode and other shooting modes, you can select the flash mode to match the shooting conditions. Press the m (flash pop-up) button.
-
Page 65: Available Flash Modes
Available Flash Modes Auto The flash fires when necessary, such as in dim lighting. The flash mode icon on the shooting screen is displayed only immediately after the setting is made. Auto with red-eye reduction Reduce red-eye in portraits caused by the flash (A 46). Fill flash The flash fires whenever an image is taken.
-
Page 66
Lowering the Flash Push the flash down gently to lower the flash until it clicks into place when not in use (A 5). The Flash Lamp The status of the flash can be confirmed by pressing the shutter- release button halfway. On: The flash fires when you press the shutter-release button all the way down. -
Page 67: Using The Self-Timer
Using the Self-timer The camera is equipped with a self-timer that releases the shutter about ten seconds or two seconds after you press the shutter-release button. Set Photo VR to Off in the setup menu (A 72) when using a tripod to stabilize the camera during shooting.
-
Page 68
Press the shutter-release button the rest of the way down. Countdown starts. The self-timer lamp flashes and then glows steadily about one second before the shutter is released. When the shutter is released, the self-timer is set to OFF. 1 / 2 5 0 1 / 2 5 0 F 3.0 F 3.0… -
Page 69: Using Macro Mode
Using Macro Mode Use macro mode when taking close-up images. Press the multi selector I (p). Select ON and press the k button. Macro mode If a setting is not applied by pressing the k button within a few seconds, the selection will be canceled. Move the zoom control to set the zoom ratio to a position where F and the zoom indicator glow green.
-
Page 70: Adjusting Brightness (Exposure Compensation)
Adjusting Brightness (Exposure Compensation) You can adjust overall image brightness. Press the multi selector K (o). Select a compensation value and press the Exposure compensation k button. + 2 . 0 To brighten the image, set a positive (+) value. + 0 .
-
Page 71: Default Settings
Default Settings Default settings for each shooting mode are described below. Exposure Flash Self-timer Macro compensation (A 44) (A 47) (A 49) (A 50) G (easy auto) Scene b (portrait) c (landscape) d (sports) e (night portrait) f (party/indoor) Z (beach) z (snow) h (sunset) i (dusk/dawn)
-
Page 72
The setting that is used when the flash is raised. The setting cannot be changed. The camera automatically selects the flash mode appropriate for the scene it has selected. The setting cannot be changed. Automatically changes to macro mode when the camera selects Close-up. -
Page 73: Functions That Can Be Set With The D Button (Shooting Menu)
Functions That Can Be Set with the d Button (Shooting Menu) The settings listed below can be changed by pressing the d button during shooting. Image mode White balance Continuous ISO sensitivity Color options 2 5 m 0 s 2 5 m 0 s AF area mode 1 9 0 0 1 9 0 0…
-
Page 74: Options Available In The Shooting Menu
Options Available in the Shooting Menu Option Description Allows you to set the combination of image size and image quality Image mode used when saving images. Default setting: P 4608×3456 Allows you to adjust white balance to suit the weather conditions or light source in order to make the colors in images match what you White balance see with your eyes.
-
Page 75: Functions That Cannot Be Used Simultaneously
Functions That Cannot Be Used Simultaneously Some functions cannot be used with other menu options. Restricted Option Description function When a setting other than Single is selected, the flash Continuous (A 54) cannot be used. Flash mode Blink proof (A 54) When Blink proof is set to On, the flash cannot be used.
-
Page 76
Restricted Option Description function When a setting other than Auto is selected for White White balance AF area mode balance in Target finding AF mode, the camera (A 54) does not detect the main subject. When Continuous H, Continuous L, Continuous H: Continuous (A 54) 120 fps, Continuous H: 60 fps, or BSS is selected, date and time cannot be imprinted on images. -
Page 77: Focusing
Focusing The focus area varies depending on the shooting mode. Using Face Detection When the following shooting modes or settings are selected, the camera uses face detection to automatically focus on human faces. G (easy auto) mode (A 31) Portrait or Night portrait in scene mode (A 32) Smart portrait mode (A 40) 2 5 m 0 s 2 5 m 0 s…
-
Page 78: Using Skin Softening
Notes About Face Detection When Autofocus mode in the movie menu is set to Single AF, the focus area is not displayed even if a face is detected. The camera’s ability to detect faces depends on a variety of factors, including the direction in which the faces are looking.
-
Page 79: Using Target Finding Af
Using Target Finding AF When AF area mode (A 54) in A (auto) mode is set to Target finding AF, the camera focuses in the manner described below when you press the shutter-release button halfway: The camera detects the main subject and focuses on it. When the subject is in focus, the focus area glows green.
-
Page 80: Subjects Not Suitable For Autofocus
Subjects Not Suitable for Autofocus The camera may not focus as expected in the following situations. In some rare cases, the subject may not be in focus despite the fact that the focus area or the focus indicator glows green: Subject is very dark Objects of sharply differing brightness are included in the scene (e.g.
-
Page 81: Focus Lock
Focus Lock Focus lock shooting is recommended when the camera does not activate the focus area that contains the desired subject. Set AF area mode to Center in A (auto) mode (A 53). Position the subject in the center of the frame and press the shutter- release button halfway.
-
Page 82: Playback Features
Playback Features Playback Zoom Moving the zoom control toward g (i) in full-frame playback mode (A 28) zooms in on the image. 4 / 4 4 / 4 Displayed area guide 0 0 0 4 . J P G 0 0 0 4 . J P G 3 .
-
Page 83: Thumbnail Playback, Calendar Display
Thumbnail Playback, Calendar Display Moving the zoom control toward f (h) in full-frame playback mode (A 28) displays images as thumbnails. 1 / 2 0 1 / 2 0 1 / 2 0 2 0 1 4 Sun Mon Tue Wed Thu 10 10 11 11 12 12…
-
Page 84: Functions That Can Be Set With The D Button (Playback Menu)
Functions That Can Be Set with the d Button (Playback Menu) When viewing images in full-frame playback mode or thumbnail playback mode, you can configure the menu operations listed below by pressing the d button. Option Description Allows you to create retouched copies in which contrast and Quick retouch* saturation have been enhanced.
-
Page 85: Recording And Playing Back Movies
Recording and Playing Back Movies Recording Movies Display the shooting screen. Check the remaining amount of movie recording time. If Photo info in the Monitor settings (A 72) in the setup menu is set to Movie frame+auto info, the area that will be visible in the movie can be confirmed before movie recording starts.
-
Page 86: (B) Movie Length
Maximum Movie Length Individual movie files cannot exceed 4 GB in size or 29 minutes in length, even when there is sufficient free space on the memory card for longer recording. The maximum movie length for a single movie is displayed on the shooting screen. Recording may end before either limit is reached if camera temperature becomes elevated.
-
Page 87
Notes About Vibration Reduction When Recording Movies When Movie VR in the movie menu (A 69) is set to On (hybrid), the angle of view (i.e., the area visible in the frame) becomes narrower when recording movies. When using a tripod to stabilize the camera during shooting, set Movie VR to Off to prevent potential errors caused by this function. -
Page 88: Saving Still Images While Recording Movies
Saving Still Images While Recording Movies If the shutter-release button is pressed all the way while recording a movie, one frame is saved as a still image (JPEG). Movie recording continues while the still image is being saved. y is displayed in the monitor. When z is displayed, a still image cannot be saved.
-
Page 89: Functions That Can Be Set With The D Button (Movie Menu)
Functions That Can Be Set with the d Button (Movie Menu) Enter shooting mode M d button M D menu icon M k button The settings of the menu options listed below can be Movie options configured. AF area mode Autofocus mode Movie VR Wind noise reduction…
-
Page 90: Playing Back Movies
Playing Back Movies Press the c button to enter playback mode. 1 0 s 1 0 s Movies are indicated by the movie options icon (A 69). Press the k button to play back movies. 0 0 1 0 . M O V 0 0 1 0 .
-
Page 91
Functions Available During Playback Playback controls are displayed in the monitor. The operations listed below can be performed by using the multi selector JK to select a control and then pressing the k button. Paused Function Icon Description Hold down the k button to rewind the movie. Rewind Hold down the k button to advance the movie. -
Page 92: General Camera Setup
General Camera Setup Functions That Can Be Set with the d Button (Setup Menu) Press the d button M z (setup) menu icon M k button The settings of the menu options listed below can be Welcome screen configured. Time zone and date Monitor settings Print date Photo VR…
-
Page 93
Option Description Format memory/ Allows you to format the internal memory or the memory card. Format card Language Allows you to change the camera’s display language. TV settings Allows you to adjust TV-connection settings. Allows you to set whether or not closed eyes are detected when Blink warning taking images of people using face detection. -
Page 94: Connecting The Camera To A Tv, Computer, Or Printer
Connecting the Camera to a TV, Computer, or Printer Connection Methods You can enhance your enjoyment of images and movies by connecting the camera to a TV, computer, or printer. USB/audio/video output connector HDMI micro connector (Type D) Open the connector cover. Insert the plug straight.
-
Page 95
Viewing images on a TV Images and movies captured with the camera can be viewed on a TV. Connection method: Connect the video and audio plugs of the optional audio video cable to the TV’s input jacks. Alternatively, connect a commercially available HDMI cable to the TV’s HDMI input jack. -
Page 96: Using Viewnx 2
ViewNX 2™ Your Imaging Toolbox Installing ViewNX 2 An Internet connection is required. For system requirements and other information, see the Nikon website for your region. Download the ViewNX 2 installer. Start the computer and download the installer from: http://nikonimglib.com/nvnx/ Double-click the downloaded file.
-
Page 97: Transferring Images To The Computer
Transferring Images to the Computer Choose how images will be copied to the computer. Choose one of the following methods: Direct USB connection: Turn the camera off and ensure that the memory card is inserted in the camera. Connect the camera to the computer using the USB cable. Turn the camera on. To transfer images that are saved in the camera’s internal memory, remove the memory card from the camera before connecting it to the computer.
-
Page 98: Transfer Images To The Computer
Nikon Transfer 2 and click OK. 2 Double-click Import File. If the memory card contains a large number of images, it may take a while for Nikon Transfer 2 to start. Wait until Nikon Transfer 2 starts. Connecting the USB Cable The connection may not be recognized if the camera is connected to the computer via a USB hub.
-
Page 99: Viewing Images
Terminate the connection. If the camera is connected to the computer, turn the camera off and disconnect the USB cable. If you are using a card reader or card slot, choose the appropriate option in the computer operating system to eject the removable disk corresponding to the memory card, and then remove the card from the card reader or card slot.
-
Page 101: Reference Section
Reference Section The Reference Section provides detailed information and hints about using the camera. Shooting Using Easy Panorama (Shooting and Playback)……… E2 Playback Viewing and Deleting Images Captured Continuously (Sequence) … E6 Editing Still Images ………………E8 Connecting the Camera to a TV (Viewing Images on a TV)..E16 Connecting the Camera to a Printer (Direct Print) ……
-
Page 102: Using Easy Panorama (Shooting And Playback)
Using Easy Panorama (Shooting and Playback) Shooting with Easy Panorama Enter shooting mode M A (shooting mode) button M b (second icon from the top*) M K M HI M p (easy panorama) M k button * The icon of the last scene selected is displayed. Select W Normal (180°) or X Wide (360°) as Normal (180°) the shooting range and press the k button.
-
Page 103
Press the shutter-release button all the way, and then remove your finger from the shutter-release button. KLJI are displayed to indicate the direction of camera movement. Move the camera in one of the four directions Guide until the guide indicator reaches the end. When the camera detects which direction it is moving in, shooting begins. -
Page 104
Notes About Easy Panorama Shooting The range of the image seen in the saved image is narrower than that seen in the monitor at the time of shooting. If the camera is moved too quickly or shaken too much, or if the subject is too uniform (e.g. walls or darkness), an error may occur. -
Page 105: Viewing Images Captured With Easy Panorama
Viewing Images Captured with Easy Panorama Switch to playback mode (A 28), display an image captured 4 / 4 4 / 4 using easy panorama in full-frame playback mode, and then press the k button to scroll the image in the direction that was used when shooting.
-
Page 106: Viewing And Deleting Images Captured Continuously (Sequence)
Viewing and Deleting Images Captured Continuously (Sequence) Viewing Images in a Sequence Images captured continuously are saved as a sequence. The first image of a sequence is used as the key picture to 1 / 5 1 / 5 represent the sequence when displayed in full-frame playback mode or thumbnail playback mode (default setting).
-
Page 107: Deleting Images In A Sequence
Deleting Images in a Sequence When the l button is pressed for images in a sequence, the images that are deleted vary depending on how the sequences are displayed. When the key picture is displayed: — Current image: All images in the displayed sequence are deleted. — Erase selected images: When a key picture is selected on the erase selected images screen (A 30), all images in that sequence are deleted.
-
Page 108: Editing Still Images
Editing Still Images Before Editing Images You can easily edit images on this camera. Edited copies are saved as separate files. Edited copies are saved with the same shooting date and time as the original. Restrictions on Image Editing An image can be edited up to ten times.
-
Page 109: Quick Retouch
Quick Retouch: Enhancing Contrast and Saturation Press the c button (playback mode) M select an image M d button M Quick retouch M k button Use the multi selector HI to select the amount Quick retouch of effect applied and press the k button. The edited version is displayed on the right.
-
Page 110: Red-Eye Correction: Correcting Red Eyes Caused By Using The Flash
Red-eye Correction: Correcting Red Eyes Caused by Using the Flash Press the c button (playback mode) M select an image M d button M Red-eye correction M k button Preview the result and press the k button. Red-eye correction To exit without saving the copy, press the multi selector J. Back Back Save…
-
Page 111: Skin Softening: Softening Skin Tones
Skin Softening: Softening Skin Tones Press the c button (playback mode) M select an image M d button M Skin softening M k button Use the multi selector HI to select the Skin softening amount of effect applied and press the k button.
-
Page 112: Filter Effects: Applying Digital Filter Effects
Filter Effects: Applying Digital Filter Effects Press the c button (playback mode) M select an image M d button M Filter effects M k button Option Description Pop and Super vivid Mainly enhances the color saturation. Painting, High key, Toy camera effect 1, Mainly adjusts hue and creates a different look for Toy camera effect 2, Low key, and the image.
-
Page 113
Adjust the effect and press the k button. When using Cross process or Selective color: Use HI Cross process to select the color. When using Soft: Use HI to select the range of the effect. Press J to return to the Filter effects selection screen without making any changes. -
Page 114: Small Picture: Reducing The Size Of An Image
Small Picture: Reducing the Size of an Image Press the c button (playback mode) M select an image M d button M Small picture M k button Use the multi selector HI to select the Small picture desired copy size and press the k button. For images taken at an image mode setting of 640×480 l 4608×2592, only 640×360 is displayed.
-
Page 115: Crop: Creating A Cropped Copy
Crop: Creating a Cropped Copy Move the zoom control to enlarge the image (A 62). Refine copy composition and press the d button. Move the zoom control toward g (i) or f (h) to adjust the zoom ratio. Set a zoom ratio at which u is displayed.
-
Page 116: Connecting The Camera To A Tv (Viewing Images On A Tv)
Connecting the Camera to a TV (Viewing Images on a TV) Turn off the camera and connect it to the TV. Make sure that the plugs are properly oriented. Do not insert or remove the plugs at an angle when connecting or disconnecting them. When using the audio/video cable Yellow White…
-
Page 117
Set the TV’s input to external video input. See the documentation provided with your TV for details. Hold down the c button to turn on the camera. Images are displayed on the TV. The camera monitor does not turn on. If Images Are Not Displayed on the TV Make sure that TV settings (E68) in the setup menu conforms to the standard used by your TV. -
Page 118: Connecting The Camera To A Printer (Direct Print)
Connecting the Camera to a Printer (Direct Print) Users of PictBridge-compatible printers can connect the camera directly to the printer and print images without using a computer. Take images Select images for printing and number of copies using Print order option (E42) Connect to the printer (E19) Print images one at a time Print multiple images (E22)
-
Page 119: Connecting The Camera To A Printer
Connecting the Camera to a Printer Turn off the camera. Turn on the printer. Check printer settings. Connect the camera to the printer using the USB cable. Make sure that the plugs are properly oriented. Do not insert or remove the plugs at an angle when connecting or disconnecting them.
-
Page 120: Printing Individual Images
Printing Individual Images Use the multi selector to select the desired Print selection image and press the k button. 15/05/2014 No. 32 Move the zoom control toward f (h) to switch to thumbnail playback or g (i) to switch to full-frame playback.
-
Page 121
Select the desired paper size and press the Paper size Default k button. 3.5×5 in. To apply the paper size setting configured on the printer, 5×7 in. select Default as the paper size option. 100×150 mm The paper size options available on the camera vary 4×6 in. -
Page 122: Printing Multiple Images
Printing Multiple Images When the Print selection screen is displayed, Print selection press the d button. 15/05/2014 No. 32 Use the multi selector HI to select Paper Print menu size and press the k button. Print selection Print all images To exit the print menu, press the d button.
-
Page 123
Print selection Select images (up to 99) and the number of copies Print selection (up to nine) of each. Use the multi selector JK to select images, and use HI to specify the number of copies to be printed. Images selected for printing are indicated by a and the numeral indicating the number of copies to be printed. -
Page 124: More Information
DPOF printing Print images for which a print order was created DPOF printing using the Print order option (E42). When the screen shown on the right is displayed, prints select Start print and press the k button to start printing. Start print To view the current print order, select View View images…
-
Page 125: Editing Movies
Editing Movies Extracting Only the Desired Portions of a Movie The desired portions of a recorded movie can be saved as a separate file. Play back the desired movie and pause at the start point of the portion that is to be extracted (A 71). Use the multi selector JK to select the 1 m 3 0 s 1 m 3 0 s…
-
Page 126: Saving A Frame From A Movie As A Still Image
Use HI to select m (Save) and press the Save k button. Follow the instructions on the screen to save the movie. 3 0 s 3 0 s Notes About Movie Editing A movie that was created by editing cannot be trimmed again. The actual trimmed portion of a movie may differ slightly from the portion selected using the start and end points.
-
Page 127: The Shooting Menu (For A (Auto) Mode)
The Shooting Menu (for A (Auto) Mode) Image Mode Settings (Image Size and Quality) Enter shooting mode M d button M Shooting menu M Image mode M k button Select the combination of image size and compression ratio that is used when saving images. The higher the image mode setting, the larger the size at which images can be printed, and the lower the compression ratio, the higher the quality of the images, but the number of images that can be saved is reduced.
-
Page 128
Notes About Image Mode The image mode setting can also be changed in shooting modes other than A (auto) mode. The changed setting is also applied to other shooting modes. The setting may not be changed when using certain settings of other functions. Number of Images That Can Be Saved The approximate number of images that can be saved can be checked in the monitor when shooting (A 20). -
Page 129: White Balance (Adjusting Hue)
White Balance (Adjusting Hue) Select A (auto) mode M d button M White balance M k button Adjust white balance to suit the light source or weather conditions in order to make the colors in images match what you see with your eyes. Use Auto under most conditions.
-
Page 130
Using Preset Manual Use the procedure below to measure the white balance value under the lighting used during shooting. Place a white or gray reference object under the lighting that will be used during shooting. Use the multi selector HI to select Preset White balance Auto Auto… -
Page 131
Press the k button to measure the value. The shutter is released and measurement is complete. No image is saved. Notes About Preset Manual A value for flash lighting cannot be measured with Preset manual. When shooting using the flash, set White balance to Auto or Flash. -
Page 132: Continuous Shooting
Continuous Shooting Select A (auto) mode M d button M Continuous M k button Option Description U Single One image is taken each time the shutter-release button is pressed. (default setting) While the shutter-release button is held all the way down, images are captured continuously.
-
Page 133
Notes About Continuous Shooting When a setting other than Single is selected, the flash cannot be used. Focus, exposure, and white balance are fixed at the values determined with the first image in each series. It may take some time to save the images after shooting. When ISO sensitivity increases, noise may appear in captured images. -
Page 134: Iso Sensitivity
ISO Sensitivity Select A (auto) mode M d button M ISO sensitivity M k button Higher ISO sensitivity allows darker subjects to be captured. Additionally, even with subjects of similar brightness, images can be taken at faster shutter speeds, and blurring caused by camera shake and subject movement can be reduced.
-
Page 135: Color Options
Color Options Select A (auto) mode M d button M Color options M k button Make colors more vivid or save images in monochrome. Option Description n Standard color Use for images exhibiting natural color. (default setting) o Vivid color Use to achieve a vivid, “photoprint”…
-
Page 136: Af Area Mode
AF Area Mode Select A (auto) mode M d button M AF area mode M k button Use this option to determine how the camera selects the focus area for autofocus when shooting still images. Option Description When the camera detects a human face, it focuses on that face.
-
Page 137
Option Description Use the multi selector HIJK to Scope of movable move the focus area to where you focus area want to focus. To use the multi selector to configure the flash mode or other settings, press the k button. To x Manual return to moving the focus area, press the k button again. -
Page 138
Option Description When the camera detects the main subject, it focuses on that subject. See “Using Target Finding AF” (A 59). M Target finding AF (default setting) 1 / 2 5 0 1 / 2 5 0 F 3.0 F 3.0 Focus areas Notes About AF Area Mode When digital zoom is in effect, the camera focuses on the area in the center of the frame… -
Page 139: Using Subject Tracking
Using Subject Tracking Select A (auto) mode M d button M AF area mode M k button M s Subject tracking M k button M d button Register a subject. Align the subject that you want to track with the border in the center of the monitor and press the k button.
-
Page 140: The Smart Portrait Menu
The Smart Portrait Menu See “Image Mode Settings (Image Size and Quality)” (E27) for information about Image mode. Skin Softening Enter smart portrait mode M d button M Skin softening M k button Option Description When the shutter is released, the camera detects one or more human e On (default faces (up to three), and processes the image to soften facial skin tones setting)
-
Page 141: Blink Proof
Blink Proof Enter smart portrait mode M d button M Blink proof M k button Option Description The camera automatically releases the shutter twice with every shot and saves one image in which the subject’s eyes are open. A blink was detected in the If the camera saved an image in picture just taken.
-
Page 142: The Playback Menu
The Playback Menu See “Editing Still Images” (E8) for information about image editing functions. Print Order (Creating a DPOF Print Order) Press the c button (playback mode) M d button M Print order M k button If you configure print order settings in advance, you can use them with the printing methods listed below.
-
Page 143: Select Whether Or Not To Print Shooting Date
Select images (up to 99) and the number of Print selection copies (up to nine) of each. Use the multi selector JK to select images, and use HI to specify the number of copies to be printed. Images selected for printing are indicated by a and the numeral indicating the number of copies to be printed.
-
Page 144
Notes About Printing Shooting Date and Shooting Information Some printers may not be able to print the shooting date and shooting information. Shooting information is not printed when the camera is connected to a printer. The Date and Info settings are reset each time the Print order option is displayed. The date printed is that saved when the image was captured. -
Page 145: Slide Show
Slide Show Press the c button (playback mode) M d button M Slide show M k button Play back images one by one in an automated “slide show.” When movie files are played back in the slide show, only the first frame of each movie is displayed. Use the multi selector HI to select Start Slide show and press the k button.
-
Page 146: Protect
Protect Press the c button (playback mode) M d button M Protect M k button The camera protects selected images from accidental deletion. Select images to protect or cancel protection for previously protected images from the image selection screen (E47). Note that formatting the camera’s internal memory or the memory card permanently deletes protected files (E67).
-
Page 147: Rotate Image
The Image Selection Screen When an image selection screen such as the one shown on Protect the right is displayed while operating the camera, follow the procedures described below to select the images. Back Use the multi selector JK to select an image. Protect Move the zoom control (A 1) toward g (i) to switch to full-frame playback or f (h) to switch to thumbnail…
-
Page 148: Rotate Image
Rotate Image Press the c button (playback mode) M d button M Rotate image M k button Specify the orientation in which saved images are displayed during playback. Still images can be rotated 90 degrees clockwise or 90 degrees counterclockwise. Select an image from the image selection screen (E47).
-
Page 149: Copy (Copy Between Internal Memory And Memory Card)
Copy (Copy Between Internal Memory and Memory Card) Press the c button (playback mode) M d button M Copy M k button Copy images between the internal memory and a memory card. Use the multi selector HI to select a Copy destination option to which images are copied and press the k button.
-
Page 150
Notes About Copying Images Only files in formats that this camera can record can be copied. Operation is not guaranteed with images captured with another make of camera or that have been modified on a computer. The Print order (E42) settings configured for images are not copied. Notes About Copying Images in a Sequence If you select a key picture of a sequence in Selected images, all images in the sequence are copied. -
Page 151: Sequence Display Options
Sequence Display Options Press the c button (playback mode) M d button M Sequence display options M k button Select the method used to display images in the sequence (E6). Option Description Displays each image in a sequence individually. Q Individual pictures F is displayed on the playback screen.
-
Page 152: The Movie Menu
The Movie Menu Movie Options Enter shooting mode M d button M D menu icon M Movie options M k button Select the desired movie option to record. Select normal speed movie options to record at normal speed, or HS movie options (E53) to record in slow or fast motion.
-
Page 153: Hs Movie Options
HS Movie Options Recorded movies are played back in fast or slow motion. See “Playing Back in Slow Motion and Fast Motion” (E54). Image size Option Aspect ratio Description (horizontal to vertical) 1/8-speed slow motion movies 320 × 240 HS 240/8× Max.
-
Page 154
Playing Back in Slow Motion and Fast Motion When recording at normal speed: Recording 10 s time Playback 10 s time When recording at h/a HS 480/4×: Movies are recorded at 4× normal speed. They are played back in slow motion at 4× slower speed. Recording 10 s time… -
Page 155: Af Area Mode
AF Area Mode Enter shooting mode M d button M D menu icon M AF area mode M k button Set the focus area in movie mode. Option Description When the camera detects a human face, it focuses on that face a Face priority (A 57).
-
Page 156: Movie Vr
Movie VR Enter shooting mode M d button M D menu icon M Movie VR M k button Select the vibration reduction setting used when recording movies. Set to Off when using a tripod to stabilize the camera during shooting. Option Description Movies are corrected optically using the lens shift method, and at the…
-
Page 157: The Setup Menu
The Setup Menu Welcome Screen d button M z menu icon M Welcome screen M k button Configure the welcome screen that is displayed when you turn on the camera. Option Description None (default setting) Does not display the welcome screen. COOLPIX Displays a welcome screen with the COOLPIX logo.
-
Page 158: Time Zone And Date
Time Zone and Date d button M z menu icon M Time zone and date M k button Set the camera clock. Option Description Select an item: Press the multi selector Date and time JK (changes between D, M, Y, h, and Edit the date and time: Press HI.
-
Page 159
Select w Home time zone or x Travel Time zone destination and press the k button. Home time zone Travel destination The date and time displayed in the monitor changes depending on whether the home time zone or travel London, Casablanca destination is selected. -
Page 160: Monitor Settings
Monitor Settings d button M z menu icon M Monitor settings M k button Option Description Photo info Set whether or not to display information in the monitor. This setting determines whether or not the captured image is displayed Image review immediately after shooting.
-
Page 161
Shooting mode Playback mode Hide info The current settings or operation guide is displayed as in Auto info. Framing 2 5 m 0 s 2 5 m 0 s 1 9 0 0 1 9 0 0 grid+auto info In addition to information shown with Auto info, a framing grid is displayed to help frame images. -
Page 162: Print Date
Print Date (Imprinting Date and Time) d button M z menu icon M Print date M k button The shooting date and time can be imprinted on the images when shooting, allowing the information to be printed even from printers that do not support date printing (E44). 15.05.2014 15.05.2014 Option…
-
Page 163: Photo Vr
Photo VR d button M z menu icon M Photo VR M k button Set to reduce the effects of camera shake while shooting still images. Set to Off when using a tripod to stabilize the camera during shooting. Option Description The effects of camera shake are optically reduced using the lens shift method.
-
Page 164: Motion Detection
Motion Detection d button M z menu icon M Motion detection M k button Enable motion detection to reduce the effects of subject movement and camera shake when shooting still images. Option Description Motion detection is enabled with some shooting modes or settings, when r is displayed on the shooting screen.
-
Page 165: Af Assist
AF Assist d button M z menu icon M AF assist M k button Enable or disable the AF-assist illuminator which assists autofocus operation. Option Description The AF-assist illuminator automatically lights up when the subject is dimly lit. The illuminator has a range of about 5.0 m (16 ft) at the maximum wide-angle a Auto position and about 5.0 m (16 ft) at the maximum telephoto position.
-
Page 166: Auto Off
Auto Off d button M z menu icon M Auto off M k button Set the amount of time that elapses before the camera enters standby mode (A 21). Option Description Auto off Select 30 s (default setting), 1 min, 5 min, or 30 min. If On (default setting) is selected, the camera enters standby mode when there is no change in the brightness of the subject, even before the time selected for Sleep mode…
-
Page 167: Format Memory/Format Card
Format Memory/Format Card d button M z menu icon M Format memory/Format card M k button Use this option to format the internal memory or a memory card. Formatting the internal memory or memory cards permanently deletes all data. Data that has been deleted cannot be recovered.
-
Page 168: Language
Language d button M z menu icon M Language M k button Select a language for display of camera menus and messages. TV Settings d button M z menu icon M TV settings M k button Adjust settings for connection to a TV. Option Description Select from NTSC and PAL.
-
Page 169: Blink Warning
Blink Warning d button M z menu icon M Blink warning M k button Select whether or not the camera detects human subjects that have blinked using face detection (A 57) when shooting in the following modes: G (easy auto) mode Portrait or Night portrait scene mode (A 32) A (auto) mode (when Face priority (E36) is selected for AF area mode option) Option…
-
Page 170: Eye-Fi Upload
Eye-Fi Upload d button M z menu icon M Eye-Fi upload M k button Select whether or not the camera’s Eye-Fi card (available from third-party manufacturers) sends images to your computer. Option Description b Enable Upload images created by the camera to a preselected destination. (default setting) c Disable Images are not uploaded.
-
Page 171: Reset All
Reset All d button M z menu icon M Reset all M k button When Reset is selected, the camera’s settings are restored to their default values. Some settings, such as Time zone and date or Language, are not reset. Resetting File Numbering To reset file numbering to “0001”, delete all images saved in the internal memory or on the memory card (A 29) before selecting Reset all.
-
Page 172: Battery Type
To ensure that the camera shows the correct battery level (A 20), select the type that matches the batteries currently in use. Option Description k Alkaline (default setting) LR6/L40 (AA-size) alkaline batteries Nikon EN-MH2 rechargeable Ni-MH (nickel metal hydride) l COOLPIX (Ni-MH) batteries m Lithium FR6/L91 (AA-size) lithium batteries Firmware Version d button M z menu icon M Firmware version M k button View the current camera firmware version.
-
Page 173: Error Messages
Error Messages Refer to the table below if an error message is displayed. Display Cause/Solution Either the inside of the camera or the batteries have become The camera will turn off hot. – to prevent overheating. The camera turns off automatically. Wait until the camera or the batteries have cooled before resuming use.
-
Page 174
Display Cause/Solution An error occurred while saving the image. Insert a new memory card or format the internal memory or memory card. The camera has run out of file numbers. Insert a new memory card or format the internal memory or Image cannot be saved. -
Page 175
Lens error 4, 20 camera off and then on again. If the error persists, contact your retailer or Nikon-authorized service representative. An error occurred while communicating with the printer. Communications error Turn the camera off and reconnect the USB cable. -
Page 176
Display Cause/Solution Replace the ink cartridge, select Resume, and press the Printer error: out of ink. – k button to resume printing.* There is a problem with the image file to be printed. Printer error: file corrupt. – Select Cancel and press the k button to cancel printing. * See the documentation provided with your printer for further guidance and information. -
Page 177: File Names
File Names Images or movies are assigned file names as follows. D S C N 00 0 1 . J P G Identifier Extension (not shown on camera monitor) (indicates file format) Original still images, Still images .JPG movies, and still DSCN Movies .MOV…
-
Page 178: Optional Accessories
Optional Accessories Battery Charger MH-73 (includes four EN-MH2 rechargeable Ni-MH Battery charger, batteries) rechargeable batteries* Replacement rechargeable batteries: Rechargeable Ni-MH batteries EN-MH2-B4 (set of four EN-MH2 batteries) AC adapter AC Adapter EH-67 Audio/video cable Audio Video Cable EG-CP16 Hand strap Hand Strap AH-CP1 * When using EN-MH2 rechargeable Ni-MH batteries with the camera, charge the batteries four at a time using Battery Charger MH-73.
-
Page 179: Technical Notes And Index
Technical Notes and Index Caring for the Product……….F2 The Camera………………….F2 Batteries ……………………F3 Memory Cards …………………..F5 Cleaning and Storage……….F6 Cleaning……………………F6 Storage ……………………F6 Troubleshooting…………F7 Specifications…………F14 Approved Memory Cards …………….F18 Index ……………..F21…
-
Page 180: Caring For The Product
Caring for the Product The Camera To ensure continued enjoyment of this Nikon product, observe the precautions described below in addition to the warnings in “For Your Safety” (A viii-xiv) when using or storing the device. Do Not Drop The product may malfunction if subjected to strong shock or vibration.
-
Page 181: Batteries
Images in the monitor may be difficult to see under bright lighting. The monitor is lit by an LED backlight. Should the monitor begin to dim or flicker, contact your Nikon-authorized service representative. Batteries Be sure to read and follow the warnings in “For Your Safety” (A viii-xiv) before use.
-
Page 182
Charging Rechargeable Batteries Do not mix batteries with different amounts of charge remaining, or batteries of a different make or model. When using EN-MH2 batteries with this camera, charge four batteries at a time using Battery Charger MH-73. Use only Battery Charger MH-73 to charge EN-MH2 batteries. When using Battery Charger MH-73, only charge EN-MH2 batteries. -
Page 183: Memory Cards
Memory Cards Use only Secure Digital memory cards. See “Approved Memory Cards” (F18) for recommended memory cards. Observe the precautions noted in the documentation included with your memory card. Do not affix labels or stickers to the memory card. Do not format the memory card using a computer. The first time you insert a memory card that has been used in another device into this camera, be sure to format it with this camera.
-
Page 184: Cleaning And Storage
Cleaning and Storage Cleaning Do not use alcohol, thinner, or other volatile chemicals. Avoid touching glass parts with your fingers. Remove dust or lint with a blower (typically a small device with a rubber bulb attached to one end that is pumped to produce a stream of air out the other end).
-
Page 185: Troubleshooting
Troubleshooting If the camera fails to function as expected, check the list of common problems below before consulting your retailer or Nikon-authorized service representative. Power, Display, Settings Issues Problem Cause/Solution Wait for recording to end. If the problem persists, turn the camera off.
-
Page 186
Problem Cause/Solution 72, E60 Adjust the monitor brightness. Monitor is hard to read. The monitor is dirty. Clean the monitor. If the camera clock has not been set, O flashes during shooting and movie recording. Images and movies saved before the clock is set are dated “00/ 00/0000 00:00”… -
Page 187
Shooting Issues Problem Cause/Solution 74, 77, Cannot switch to shooting E16, Disconnect the HDMI cable or USB cable. mode. When the camera is in playback mode, press the 1, 28 A button or the shutter-release button. No image captured when When menus are displayed, press the d button. -
Page 188
Problem Cause/Solution The flash is lowered. 5, 44 A scene mode that restricts the flash is selected. 54, E41 Flash does not fire. On is selected for Blink proof in the smart portrait menu. A function that restricts the flash is enabled. Digital zoom cannot be used in the following situations. -
Page 189
Problem Cause/Solution The flash is lowered or a shooting mode that 5, 44, 51 restricts the flash is selected. The flash window is blocked. The subject is beyond the range of the flash. Images are too dark Adjust exposure compensation. (underexposed). -
Page 190
Playback Issues Problem Cause/Solution This camera may not be able to play back images saved with another make or model of digital camera. This camera cannot play back movies recorded File cannot be played back. – with another make or model of digital camera. This camera may not be able to play back data edited on a computer. -
Page 191
The camera is not recognized by the computer. – start when camera is The computer is not set to start Nikon Transfer 2 connected to a computer. automatically. For more information about Nikon Transfer 2, refer to help information contained in ViewNX 2. -
Page 192: Specifications
Specifications Nikon COOLPIX L830 Digital Camera Type Compact digital camera Number of effective pixels 16.0 million Image sensor -in. type CMOS; approx. 16.79 million total pixels Lens NIKKOR lens with 34× optical zoom 4.0–136 mm (angle of view equivalent to that of 22.5–765 mm lens…
-
Page 193
7.5 cm (3-in.), approx. 921k-dot (RGBW), wide viewing angle TFT Monitor LCD with 6-level brightness adjustment, tiltable approx. 85° downward, approx. 90° upward Frame coverage Approx. 99% horizontal and 99% vertical (compared to actual (shooting mode) picture) Frame coverage Approx. 100% horizontal and 100% vertical (compared to actual (playback mode) picture) Storage… -
Page 194
Aperture Electronically-controlled ND filter (–2 AV) selection Range 2 steps (f/3 and f/6 [W]) Self-timer Can be selected from 10 s and 2 s Flash Range (approx.) [W]: 0.5–9.0 m (1 ft 8 in.–29 ft) (ISO sensitivity: Auto) [T]: 1.5–4.5 m (5–14 ft) Flash control TTL auto flash with monitor preflashes Interface… -
Page 195
Individual movie files cannot exceed 4 GB in size or 29 minutes in length. Recording may end before this limit is reached if camera temperature becomes elevated. Specifications Nikon will not be held liable for any errors this manual may contain. The appearance of this product and its specifications are subject to change without notice. -
Page 196: Approved Memory Cards
Approved Memory Cards The following Secure Digital (SD) memory cards have been tested and approved for use in this camera. Memory cards with an SD Speed Class rating of 6 or faster are recommended for recording movies. When using a memory card with a lower Speed Class rating, movie recording may stop unexpectedly.
-
Page 197
AVC Patent Portfolio License This product is licensed under the AVC Patent Portfolio License for the personal and noncommercial use of a consumer to (i) encode video in compliance with the AVC standard (“AVC video”) and/or (ii) decode AVC video that was encoded by a consumer engaged in a personal and non-commercial activity and/or was obtained from a video provider licensed to provide AVC video. -
Page 198
HDMI, HDMI logo and High-Definition Multimedia Interface are trademarks or registered trademarks of HDMI Licensing LLC. All other trade names mentioned in this manual or the other documentation provided with your Nikon product are trademarks or registered trademarks of their respective holders. FreeType License (FreeType2) Portions of this software are copyright ©… -
Page 199: Index
Index AF area mode ..54, 69, E36, E55 Symbols AF assist……….72, E65 g Telephoto…………25 AF-assist illuminator ……….1 f Wide-angle………… 25 Alkaline batteries……….13 i Playback zoom ……….62 Aperture value ………… 27 h Thumbnail playback……. 63 Audio/video cable..
-
Page 200: Eyelet For Camera Strap 4
Brightness …………. E60 BSS…………35, E32 Easy auto mode……….. 31 Button sound……….E65 Easy panorama p….32, 36, E2 Easy panorama playback….36, E5 Calendar display ……….63 Editing movies ……….. E25 Choose key picture ..64, E6, E51 EN-MH2 ……….E78, F4 Close-up k ……….
-
Page 201
Museum l ……….32, 35 Internal memory……….15 ISO sensitivity……..54, E34 Night landscape j …….. 32, 34 Night portrait e……..32, 33 JPG…………..E77 Nikon Transfer 2 ……….77 Nostalgic sepia E ……….. 38 Landscape c…………32 Language ……….73, E68… -
Page 202
Printer…………75, E18 Number of exposures remaining …………..20, E28 Protect……….. 64, E46 Optical zoom …………25 Quick retouch……..64, E9 Optional accessories ……E78 Rechargeable battery ……E78 Paper size ……..E20, E22 Rechargeable nickel-metal hydride Party/indoor f……… 32, 33 batteries ………….. -
Page 203: Speaker
Shutter sound……….E65 Thumbnail playback……..63 Shutter speed…………27 Time difference ……… E58 Shutter-release button ……1, 26 Time zone ……….17, E58 Side zoom control ……..1, 25 Time zone and date….16, 72, E58 Single AF……….69, E55 Toy camera effect 1 m………
-
Page 204
No reproduction in any form of this manual, in whole or in part (except for brief quotation in critical articles or reviews), may be made without written authorization from NIKON CORPORATION. CT3K01(11) 6MN34111-01…
Требуется руководство для вашей Nikon Coolpix L830 Цифровая камера? Ниже вы можете просмотреть и загрузить бесплатно руководство в формате PDF. Кроме того, приведены часто задаваемые вопросы, рейтинг изделия и отзывы пользователей, что позволит оптимально использовать ваше изделие. Если это не то руководство, которое вы искали, – свяжитесь с нами.
Ваше устройство неисправно, и в руководстве отсутствует решение? Перейдите в Repair Café для получения бесплатных ремонтных услуг.
Руководство

Рейтинг
Сообщите нам, что вы думаете о Nikon Coolpix L830 Цифровая камера, оставив оценку продукта. Хотите поделиться вашими впечатлениями от данного изделия или задать вопрос? Вы можете оставить комментарий в нижней части страницы.
Довольны ли вы данным изделием Nikon?
Да Нет
Будьте первым, кто оценит это изделие
0 голоса
Часто задаваемые вопросы
Наша служба поддержки выполняет поиск полезной информации по изделиям и отвечает на часто задаваемые вопросы. Если вы заметили неточность в наших часто задаваемых вопросах, сообщите нам об этом с помощью нашей контактной формы.
Как предотвратить появление «красных глаз» на фотографиях? Проверенный
Эффект «красных глаз» вызван попаданием слишком большого количества света за слишком короткий промежуток времени в глаза людей на фото. Этот эффект еще сильнее заметен в темноте. Чтобы его предотвратить, можно сделать следующее: не позволяйте людям смотреть прямо в камеру, создайте больше света, подойдите ближе к позирующим, не используйте функцию приближения/удаления.
Это было полезно (200)
Что такое мегапиксель? Проверенный
Мегапиксель (Мп) равен одному миллиону пикселей. Мегапиксели, кроме прочего, используются для обозначения разрешения цифровых фотоаппаратов и видеокамер. Например, фотоаппарат, который выдает снимки размером 1280×960 пикселей, имеет разрешение около 1,3 Мп. На качество снимков влияют различные факторы, но все же можно сказать, что большее количество мегапикселей дает более качественное изображение.
Это было полезно (189)
Нужно ли полностью разряжать литий-ионный аккумулятор перед зарядкой? Проверенный
Нет, не нужно. Это необходимо было делать с аккумуляторами старого образца. Литий-ионные аккумуляторы можно заряжать после использования и останавливать процесс зарядки в любой момент.
Это было полезно (161)
Что означает SD? Проверенный
SD означает Secure Digital. SD-карты являются стандартным носителем информации для многих цифровых фотоаппаратов.
Это было полезно (130)
Аккумулятор в моем устройстве окислился, могу ли я его безопасно использовать? Проверенный
Ja, устройство все еще можно безопасно использовать. Во-первых снимаем оксидизд АКБ. Никогда не используйте для этого голые руки. Затем протрите батарейный отсек ватным тампоном, смоченным уксусом или лимонным соком. Дайте ему высохнуть и вставьте новые батарейки.
Это было полезно (120)
В каких условиях лучше всего длительно хранить литий-ионный аккумулятор? Проверенный
Рекомендуется хранить литий-ионный аккумулятор при температуре от 5 до 45 °C. Прежде чем отправить аккумулятор на хранение, следует также убедиться в том, что он заряжен примерно на 67%.
Это было полезно (113)
В каких условиях литий-ионный аккумулятор функционирует оптимально? Проверенный
Литий-ионный аккумулятор работает оптимально при температуре от 5 до 45 °C. В очень холодную и очень теплую погоду вы можете заметить, что аккумулятор быстрее разряжается. Не рекомендуется заряжать аккумулятор при температурах ниже 5 °C и выше 45 °C.
Это было полезно (105)
Устройство:
Nikon COOLPIX L830
Размер: 10 MB
Добавлено: 2023-05-15
Количество страниц: 204
Как пользоваться?
Наша цель — обеспечить Вам самый быстрый доступ к руководству по эксплуатации устройства Nikon COOLPIX L830. Пользуясь просмотром онлайн Вы можете быстро просмотреть содержание и перейти на страницу, на которой найдете решение своей проблемы с Nikon COOLPIX L830.
Для Вашего удобства
Если просмотр руководства Nikon COOLPIX L830 непосредственно на этой странице для Вас неудобен, Вы можете воспользоваться двумя возможными решениями:
- Полноэкранный просмотр -, Чтобы удобно просматривать инструкцию (без скачивания на компьютер) Вы можете использовать режим полноэкранного просмотра. Чтобы запустить просмотр инструкции Nikon COOLPIX L830 на полном экране, используйте кнопку Полный экран.
- Скачивание на компьютер — Вы можете также скачать инструкцию Nikon COOLPIX L830 на свой компьютер и сохранить ее в своем архиве. Если ты все же не хотите занимать место на своем устройстве, Вы всегда можете скачать ее из ManualsBase.
Nikon COOLPIX L830 Справочное руководство — Online PDF
Ознакомьтесь с подробным руководством пользователя для замечательного творения Nikon, модель COOLPIX L830. Получите ценную информацию и инструкции, чтобы максимально использовать возможности вашего устройства и оптимизировать взаимодействие с пользователем. Раскройте весь потенциал своего устройства Nikon COOLPIX L830 с помощью этого подробного руководства пользователя, в котором содержатся пошаговые инструкции и советы экспертов, которые сделают работу с ним легкой и приятной.
Печатная версия
Многие предпочитают читать документы не на экране, а в печатной версии. Опция распечатки инструкции также предусмотрена и Вы можете воспользоваться ею нажав на ссылку, находящуюся выше — Печатать инструкцию. Вам не обязательно печатать всю инструкцию Nikon COOLPIX L830 а только некоторые страницы. Берегите бумагу.
Резюме
Ниже Вы найдете заявки которые находятся на очередных страницах инструкции для Nikon COOLPIX L830. Если Вы хотите быстро просмотреть содержимое страниц, которые находятся на очередных страницах инструкции, Вы воспользоваться ими.
-
Страница 1
No repr oduction in an y form of this ma nual, in whole or in part (excep t for brief quotation in critical articl es or reviews), may be made without written authorization from NIK ON CORPORA TION. CT3K01(11) 6MN34111-01 DIGIT AL CAMERA Ref erence Manual[…]
-
Страница 2
[…]
-
Страница 3
i Introduction Parts of the Camera The Basics of Shooting and Playback Shooting Features Playback Features Recording and Playing Back Movies General Camera Setup Connecting the Camera to a TV, Computer, or Pri nter Reference Section Technical Notes and Index[…]
-
Страница 4
ii Introduction Introduction Thank you for purchasing the Nikon COOLPIX L830 digital camera. Before using the camera, please read the informa tion in “For Your Safety” ( A viii-xi) and familiarize your self with the information provided in this manual. After read ing, please keep this manual handy and refer to it to enhance your enjoyment of yo[…]
-
Страница 5
iii Introduction About This Manual If you want to start using the camera right aw ay, see “The Basi cs of Shooting and Playback” ( A 12). To learn about the parts of the camera and information that is displ ayed in the monitor, see “Parts of the Camera” ( A 1).[…]
-
Страница 6
iv Introduction Other Information • Symbols and Conventions To make it easier to find th e information you need, the foll owing symbols and conventions are used in this manual: • SD, SDHC, an d SDXC memory cards are re ferre d to as “memory cards” in this manual. • The setting at the time of purchase is referred to as the “def ault sett[…]
-
Страница 7
v Introduction Information and Precautions Life-Long Learning As part of Nikon’s “Life-Long Learni ng” commit ment to ongoing product support and education, continually updated information is avai lable online at the followi ng sites: • For users in the U.S.A.: http://www.nikonusa.com/ • For users in Europe and Af rica: http://www.europe-[…]
-
Страница 8
vi Introduction About the Manuals • No part of the manuals included with this prod uct may be reproduced, transmitted, transcribed, stored in a retrieval sys tem, or tran slated i nto any language in any form , by any means, without Nikon’s prior written perm ission. • Nikon reserves the r ight to change the spe cificat ions of th e hardware […]
-
Страница 9
vii Introduction Disposing of Data Storage Devices Please note that deleting images or form atting data storage devices su ch as memory car ds or built-in camera memor y does not completely er ase the original image data. Deleted files can sometimes be recover ed from discarded storage devices using commercially available software, potentially resu[…]
-
Страница 10
viii Introduction To prevent damage to your Nikon product or injury to yourself or to others, read the following safety precautions in their entirety befor e usin g this equipment. Keep thes e safety in structions where a ll those who use the pro duct will read th em. WARNINGS Turn off in the event of malfunction Should you notice smoke or an unusu[…]
-
Страница 11
ix Introduction Keep out of reach of children Particular care should be taken to prevent infants from putting the batteries or other small par ts into their mouths. Do not remain in contact with the camera, battery charger, or AC adapter for extended periods while the devices are on or in use Parts of the devices become hot. Leaving the devices in […]
-
Страница 12
x Introduction • Batteries are pron e to leakage when fully discharged. To avoid damage to the product, be sure to remove the batteries when no charge remains. • Discontinue use immediately should you notice any change in the batteries, such as discoloration or deformation. • If liquid from damaged batteries comes in contact with clothing or […]
-
Страница 13
xi Introduction Handle moving parts with care Be careful that your fingers or other objects are not pinched by the lens cover or other moving parts. Observe caution when using the flash Using the flash close to your subject’s eyes could cause temporary visual impairment. The flash should be no less than 1 m (3 ft 4 in.) from the subject. Particul[…]
-
Страница 14
xii Introduction Notice for Customers in the U.S.A. Federal Communications Commissio n (FCC) Radio Frequency Interference Statement This equipment has been tested and found to comply with the limits for a Class B digital device, pursuant to Part 15 of the FCC rules. These limits are designed to provide reasonable protection against harmful interfer[…]
-
Страница 15
xiii Introduction Interface Cables Use the interface cables sold or provided by Nikon f or your equipment. Using other interface cables may exceed the limits of Class B Part 15 of the FCC rules. Notice for customers in the State of California WARNING Handling the cord on this product will expose you to lead, a chemical known to the St ate of Califo[…]
-
Страница 16
xiv Introduction This symbol on the batteries indicates that the batteries are to be collected separately. The following apply only to users in Europe an countri es: • All batteries, whether marked with this symbol or not, are designated for separate collec tion at an appropriate collection point. Do not dispose of as household waste. • For mor[…]
-
Страница 17
xv Introduction Introduction ……… …………… ………….. …………. ii Read This First ………………………………………………. ii About This Manu al ….. ……………… ………………. …….. iii Information and P recautions . …………… …………. v For Your Safety ………………………… .[…]
-
Страница 18
xvi Introduction Shooting Features …….. ………….. …………… . 31 G (Easy Auto) Mode ……………………………….. 31 Scene Mode (Shooting Suited to Scenes) … 32 Tips and Notes ………. …………… ……………… ………….. 33 Special Effects Mode (Applying Effects When Shootin g) ……….. .. 38 Smart Portr[…]
-
Страница 19
xvii Introduction Reference Section . ………….. …………… … E 1 Using Easy Panorama (Shooting and Playback) ……………………… E 2 Shooting with Easy P anorama …………. …. E 2 Viewing Images Cap tured with Easy Panorama …………. ………………. …………… …………… E 5 Viewing and Deletin g Images Ca[…]
-
Страница 20
xviii Introduction The Movie Menu ……………………………… …. E 52 Movie Options ……………… …………… ……………. E 52 AF Area Mode . …………… ……………… …………… . E 55 Autofocus Mode …………. …………… ……………. E 55 Movie VR …….. …………… ……………… …..[…]
-
Страница 21
1 Parts of the Camera Parts of the Camera The Camera Body 13 14 7 6 58 43 3 2 1 12 11 9 10 1 Zoom control …………………. …………… ……………… . 25 f : wide-angle ……… …………… …………… …….. 25 g : telephoto ….. ……………… …………… ………… 25 h : thumbnail playback …….. ………[…]
-
Страница 22
2 Parts of the Camera 10 11 5 8 9 4 3 2 7 1 6 13 12[…]
-
Страница 23
3 Parts of the Camera Changing the Angle of the Monitor The angle of the monito r can be lowered down to approx. 85 ° or raised upward to approx. 90°. This is convenient when taking images with the camera held at high or low positions. B Notes About Monitor • Do not apply excessive force when ch anging the angle of the monitor. • The monitor […]
-
Страница 24
4 Parts of the Camera Attaching the Camera Strap and Lens Cap Attach the lens cap to the cam era strap, and then attac h the strap to the camera. B Lens Cap When the cam era is not in use, protec t the lens by attaching the lens cap. Attach them at tw o places.[…]
-
Страница 25
5 Parts of the Camera Raising and Lowering the Flash Press the m (flash pop-up) button to raise the flash. • See “Using the Flash” ( A 44) for more informatio n about flash settings. • Push the flash down gentl y to lower the flash until it clicks into pl ace when not in use.[…]
-
Страница 26
6 Parts of the Camera Use the multi se lector and k button to navigate the menu s. Using Menus (the d Button) 1 Press the d button. • The menu is displayed. 2 Press the multi selector J . • The current menu icon is displayed in yellow. 3 Select the desired menu icon. • The menu is changed. 4 Press the k button. • The menu options be come se[…]
-
Страница 27
7 Parts of the Camera C Notes About Setting Menu Options • Certain menu options cannot be set dependi ng on the current shootin g mode or the state of the camera. Unavailable options are displaye d in gray and cann ot be selected. • When a menu is displayed, you can switch to shooting mode by pressing th e shutter-release button, A (shooting mo[…]
-
Страница 28
8 Parts of the Camera The information that is displayed in the mo nitor during shooting and playback chan ges depending on the camera’s se ttin gs and state of use. By default, information is displayed when the ca mera is first turned on and when you operate the camera, and turns of f after a few seconds (when Photo info is set to Auto info in Mo[…]
-
Страница 29
9 Parts of the Camera 1 Shooting mode ………….. ………………. ……….. 22, 23 2 Flash mo de . …………… …………… …………… …………… 44 3 Macro mode ……… ………………. …………… …………… 49 4 Zoom indicator … ………………. ……………… …. 25, 49 5 Focus indicator……..[…]
-
Страница 30
10 Parts of the Camera Playback Mode b a 9 9 9 / 9 9 9 999 / 999 9 9 9 9 / 9 9 9 9 9999 / 9999 2 9 m 0s 29 m 0s 2 9 m 0s 29 m 0s 9 9 9 9 . J P G 9999.JPG 9 9 9 9 . J P G 9999.JPG 15 / 0 5 / 2 0 1 4 1 2 : 0 0 15/05/2014 12:00 9 9 9 / 9 9 9 999/999 17 5 6 22 11 12 9 3 10 16 15 4 12 13 14 19 20 21 18 78[…]
-
Страница 31
11 Parts of the Camera 1 Protect icon …………………. ………………. … 64, E 46 2 Sequence display (when Individual pictures is selected) .. ………………. … 64, E 51 3 Print order icon ……. ……………… ……….. 64, E 42 4 Skin softening icon .. ………………. ……. 64, E 11 5 Filter effects ic on…. ……[…]
-
Страница 32
12 The Basics of Shooting and Playback The Basics of Shooting and Playback 1 Open the battery-c hamber/memory card slot cover. • Hold the camera upside down to prevent the batteries from falling out. 2 Insert the batteries. • Confirm that the positive (+) and negative (–) terminals are oriented correc tly and insert the b atteries. 3 Close th[…]
-
Страница 33
13 The Basics of Shooting and Playback Applicable Batteries • Four LR6/L40 (AA-size) alkaline batteries (includ ed batteries) • Four FR6/L91 (AA-size) lithium batteries • Four EN-MH2 rechargeable Ni-MH (nickel metal hydr ide) batteries * EN-MH1 rechargeable Ni-MH batteries cannot be used . B Removing the Batteries • Turn the camera off and […]
-
Страница 34
14 The Basics of Shooting and Playback 1 Turn off the camera and open the battery- chamber/memory card slot cover. • Hold the camera upside down to prevent the batteries from falling out. 2 Insert the memory card. • Slide the memory card in until it clicks into place. B Be Careful to Insert the Memory Card in Correct Direction Inserting the mem[…]
-
Страница 35
15 The Basics of Shooting and Playback B Form atting Memory Card s The fir st t im e yo u i nse rt a mem or y ca rd t ha t ha s b een use d in an oth er d ev ice int o th is c am era , m ake sure to form at it with this came ra. In sert the card into th e camera, press the d button, and select Format card in the setup menu. Removing Memory Cards Tu[…]
-
Страница 36
16 The Basics of Shooting and Playback When the camera is turne d on for the first time, the langua ge-selection screen an d the date and time setting screen for the camera clock are displaye d. • If you exit without setting th e date and time, O will flash when t he shooting sc reen is displayed. 1 Press the power switch to turn on the camera. 2[…]
-
Страница 37
17 The Basics of Shooting and Playback 4 Select your home time zone and press the k button. • To enable daylig ht saving time, p ress H . When the daylight saving time function is enabled, W is displayed above the map. To turn off the d aylight saving time function, pr ess I . 5 Select the date format and press the k button. 6 Set the date and ti[…]
-
Страница 38
18 The Basics of Shooting and Playback 8 Make sure that the lens cap has been removed and press the A button. • The shooting-mode selection screen is displayed. 9 When Easy auto mode is displayed, press the k button. • The camera enters th e shooting mode and you can take images in E asy auto mode ( A 22). • To switch to another shooting mode[…]
-
Страница 39
19 The Basics of Shooting and Playback C Changing the Language Setting and the Date and Time Setting • You can change thes e settings using the Language and Time zon e and date settings in the z setup menu ( A 72). • You can enable or disable daylig ht saving time in the z setup menu by selecting Time zone and date followed by Time zone . Press[…]
-
Страница 40
20 The Basics of Shooting and Playback 1 Remove the lens cap and press the power switch. • The monitor turns on. • To turn the camera off, press the power switch again. 2 Check the battery level indicator and the number of exposures remaining. Battery level indicator Number of Exposures Remaining The number of images that can be tak en is dis p[…]
-
Страница 41
21 The Basics of Shooting and Playback C Notes About the Flash When you need to use the f lash, such as when shooting in dar k locations or when the subject is backlit, press the m (flash pop-up) button to raise the flash ( A 5, 44). C The Auto Off Fu nction • The time that elapses before the camera enters standby mode is about 30 seconds. The ti[…]
-
Страница 42
22 The Basics of Shooting and Playback 1 Press the A button. 2 Use the multi selec tor HI t o s e l e c t a shooting mode and press the k button. • G (easy auto) mode is used in this exampl e. • The shooting m ode setting is saved ev en after the camera is turned off. Step 2 Select a Shooting Mode Easy auto mode[…]
-
Страница 43
23 The Basics of Shooting and Playback Available Shooting Modes G Easy auto m ode A 31 The camera automa tically selects the opt imum scene mode when you frame an image, making it even easier to take imag es using sett ings that sui t the scene. b Scene mod e A 32 Camera settings are optimized according to the scene that you se lect. D Special effe[…]
-
Страница 44
24 The Basics of Shooting and Playback 1 Hold the camera steady. • Keep fingers and othe r objects away from the lens, flash, AF-assist illu minator, microphone , and speaker. 2 Frame the picture. • When the camera automatically determines the scene mode, the sh ooting mode icon changes ( A 31). B Notes About Easy A uto Mode • Depending upon […]
-
Страница 45
25 The Basics of Shooting and Playback C When Using a Tripod • We recommend using a tripod to stabilize th e camera in the following situations. — When shooting in dim lighting — When the flash is lowered or when using a shootin g mode in which the flash does not fire — When using the telephoto settin g • When using a tripod to stabil ize the c[…]
-
Страница 46
26 The Basics of Shooting and Playback 1 Press the shutter-release button halfway. • When the sub ject is in focus , the focus are a glows green (multiple focus areas can gl ow green). • When you are using digital zoom, the camera focuses on the subject in the center of th e fr ame and the focus a rea is not displayed. W hen the camera has focu[…]
-
Страница 47
27 The Basics of Shooting and Playback The Shutter-release Button B Notes About Saving Images and Recording Movies The indicat or showing the number of exposures remain ing or the in dicator showing t he maximum movie length flashes whi le images are being saved or wh ile a movie i s being recorded . Do not open the battery-chamber/memory card slot[…]
-
Страница 48
28 The Basics of Shooting and Playback 1 Press the c (playback) button. • If you pre ss and hold d own the c (playback) button while the camera is turned off, the camera turns on in playback mode. 2 Use the multi selector to select an image to display. • Press and hol d down HIJK to scroll through th e images quick ly. • To return to shooting[…]
-
Страница 49
29 The Basics of Shooting and Playback 1 Press the l button to delete the image currently displayed in the monitor. 2 Use the multi selector HI to select the desired deletion method and press the k button. • To exit without deleting, press the d button. 3 Select Yes and press the k button. • Deleted images cannot be recovered . • To cancel, s[…]
-
Страница 50
30 The Basics of Shooting and Playback Operating the Erase Selected Images Screen 1 Use the multi selector JK to select an image to be deleted, and then use H to display c . • To undo th e selection, press I to remove c . • Move the zoom control ( A 1) toward g ( i ) to switch to full-frame playback or f ( h ) to switch to thumbn ail playbac k.[…]
-
Страница 51
31 Shooting Features Shooting Features The camera automatically sele cts the optimum scene mode when you frame an image, making it even easier to take images using settin gs that suit the scene. When the camera sele cts a scene mode, the shoo ting mode icon displayed in the shooting screen changes to that for the s cene mode currently enabled. * On[…]
-
Страница 52
32 Shooting Features When a scen e is selecte d, camera se ttings are automatically optimiz ed for the selected sce ne. * The icon of the la st scene selected is d isplayed. 1 The camera focuses on the area in the center of the frame. 2 The camera focuses at infinity. 3 Use of a tripod i s recommended, because the shutter speed is slow. Set Photo V[…]
-
Страница 53
33 Shooting Features Tips and Notes d Sports • While the shutter-release button is held all the way down, the camera sh oots up to about 5 images continuously at a ra te of about 6.7 fp s (when Image mode is set to P 4608×3456 ). • The frame rate for continuous shooting may vary depending upon the current image mode setting, the me mory card u[…]
-
Страница 54
34 Shooting Features j Night landscape • From the scre en displayed after j Night lands cape is selected, select Y Hand- held or Z Tripod . • Y Hand-held (default setting): — When the j icon at the top left of the monitor gl ows green, press th e shutter-release button all the way to capture a series of images whic h are combined into a single […]
-
Страница 55
35 Shooting Features l Museum • The camera captur es a series of up to ten imag es while the shutter-release button is held all the way down, and the sharpest image in the series is automa tically selected an d saved (BS S (Best Shot Selector)). • The flash does not fire. m Fireworks show • The shutter speed is fixe d at about four seconds. ?[…]
-
Страница 56
36 Shooting Features B Notes About Printing Panorama Images The entire image may not be able to be printed depending on th e printer’s settings. Additionally, printing may not be possib le depending on the printe r. p Easy panorama • From the screen d isplayed after p Easy pano rama is selected , select the sh ooting range from W Normal (180 °[…]
-
Страница 57
37 Shooting Features B Pet Po rtrait Auto Release • Press the multi sel ector J ( n ) to change the Pet portrait auto release settings. — Y : The shutter is automatically released when the cam era detects a dog or cat face. — k : The camera does not release the shutter automatically, even if a dog or cat face is detected. Press the shutter-releas[…]
-
Страница 58
38 Shooting Features Effects can be applied to images during shooting. * The icon of th e last e ffect sele cted is displayed . Special Effects Mode (Applying Effects When Shooting) Enter shoo ting mode M A (shooting mode) button M D (third icon from th e top*) M K M HI M select an effect M k button Category Description D Soft (defaul t setting ) S[…]
-
Страница 59
39 Shooting Features • The camera focuses on the area in the center of the frame. • When Selective color or Cross process is selected, use the multi selec tor HI to select the desired color from the slider. To change settings for any of the foll owing functions, press the k button to cancel color selection. — Flash mode ( A 44) — Self-ti mer ( […]
-
Страница 60
40 Shooting Features When the camera detec ts a smiling face, you can ta ke an image automatically wit hout pressing the shutter-relea se button (smile timer ( A 53)). You can use the skin softening option to smo oth the sk in tones of human faces. 1 Frame the picture. • Point the camer a at a human face. 2 Without pressing the shutter-release bu[…]
-
Страница 61
41 Shooting Features Functions Available in Smart Portrait Mode • Flash mode ( A 44) • Self-timer ( A 47) • Exposure compensation ( A 50) • Smart portrait menu ( A 53)[…]
-
Страница 62
42 Shooting Features Used for general shooting. Sett ings can be adjusted to suit the shooting conditions and the type of shot you want to capture. • You can change how t he camera selects the area of the frame to focus on by changing the AF area mode setting ( A 54). The default se tting is Target finding AF ( A 59). Functions Available in A (Au[…]
-
Страница 63
43 Shooting Features The functions that are available vary with the shooting mode , as shown below. 1 Can be set when the flash is raised . The flas h does not f ire while it is lowered . 2 Availability depends on the setting. Functions That Can Be Se t Using the Multi Selector G (easy auto) Scene Special effects Smart portrait A (auto) 1 X Flash m[…]
-
Страница 64
44 Shooting Features Using the Flash In dark locatio ns or when the su bject is backlit, you can take images with the flash by ra ising the flash. When using A (auto) mode and other shooting modes, you can select the flash mode to match the shooting condit ions. 1 Press the m (flash pop-up) button. • The flash pops up. • The flash does not fire[…]
-
Страница 65
45 Shooting Features Available Flash Modes U Auto The flash fires when necessary, such as in dim lighting. • The flash mode icon on the shooting screen is displayed only imme diately after the setting is made . V Auto with red-eye reduct ion Reduce red-ey e in portraits caus ed by the flash ( A 46). X Fill flash The flash fires wh enever an ima g[…]
-
Страница 66
46 Shooting Features B Lowering the Flash Push the flash down gently to lower the flash until it clicks into place whe n not in use ( A 5). C The Flash Lamp The status of the flash can be confirmed by pressing the shutter- release button halfway. • On: The flash fires wh en you press the shutter-re lease button all the way down. • Flashing: The[…]
-
Страница 67
47 Shooting Features Using the Self-timer The camera is equipped with a self-tim er that releases the shut ter about ten seconds or two seconds after you pres s the shutter-release button. Set Photo VR to Off in the setup menu ( A 72) when using a tripod to stabil ize the camera during shooting. 1 Press the multi selector J ( n ). 2 Select n 10s or[…]
-
Страница 68
48 Shooting Features 4 Press the shutter-release button the rest of the way down. • Countdown starts. The s elf-timer lamp flashes and then glows steadily about one second before the shutter is released. • When the shutter is released, the self-timer is set to OFF . • To stop the countdown, press the shutter- release button again. F 3.0 F 3.0[…]
-
Страница 69
49 Shooting Features Using Macro Mode Use macro mode when taking clos e-up images. 1 Press the multi selector I ( p ). 2 Select ON and press th e k button. • If a setting is not applied by pressing the k button within a few seconds, the selection will be canceled. 3 Move the zoom control to set the zoom ratio to a position where F and the zoom in[…]
-
Страница 70
50 Shooting Features Adjusting Brightness (E xposure Compensation ) You can adjust overall imag e brightness. 1 Press the multi selector K ( o ). 2 Select a compensation value and press the k button. • To brighten the imag e, set a positive (+) value. • To darken the imag e, set a negative (–) value. • The compensa tion value i s applied, e[…]
-
Страница 71
51 Shooting Features Default Settings Default settings fo r each shoo ting mode are described below. Flash 1 ( A 44) Self-ti mer ( A 47) Macro ( A 49) Exposure compens ation ( A 50) G (easy auto) U 2 Off Off 3 0.0 Scene b (portrait) V Off Off 4 0.0 c (landscape) W 4 Off Off 4 0.0 d (sports) W 4 Off 4 Off 4 0.0 e (night portrait) V 4 Off Off 4 0.0 f[…]
-
Страница 72
52 Shooting Features 1 The setting that is used when the flash i s raised. 2 The setting cannot be changed. The camera automa tically selects the flash mode appropriate for the scene it ha s selected. 3 The setting cannot be changed. Automatically change s to macro mode when the camera selects Close-up . 4 The setting cannot be changed. 5 Slow sync[…]
-
Страница 73
53 Shooting Features The settings listed bel ow can be changed by pressing the d button during shooting. The settings that can be chan ged vary depending on the shooting mode, as shown below. * The setting is also applied to other shooting modes. Functions Th at Can Be Set with the d Button (Shooting Menu) Easy auto mode Scene Special effects Smart[…]
-
Страница 74
54 Shooting Features Options Available in the Shooting Menu Option Description A Image mode Allows you to set the combinati on of image size an d image quality used when savin g images. • Default setting: P 4608×3456 E 27 White bala nce Allows you to adjust white balance to suit the we ather conditions or light source in order to make the colors[…]
-
Страница 75
55 Shooting Features Some functions cannot be used with other menu options. Functions That Cannot Be Used Simultaneously Restricted function Option Description Flash mode Continuous ( A 54) When a setting other than Sing le is selected, th e flash cannot be used. Blink proof ( A 54) Wh en Blink proof is set to On , the flash cannot be used . Self-t[…]
-
Страница 76
56 Shooting Features AF area m ode White balanc e ( A 54) When a setting other than Auto is selected for White balance in Target finding AF mode, t he camera does not detect the main subject. Print date Continuous ( A 54) When Continuous H , Continuous L , Continuous H: 120 fps , Continuous H: 60 fps , or BSS is selected, date and time cannot be im[…]
-
Страница 77
57 Shooting Features The focus area varie s depe nding on the shooting mode. Using Face Detection When the following shooting mode s or settings are selec ted, the camera uses face det ection to automatically focus on human faces. • G (easy auto) mode ( A 31) • Portrait or Night portrait in scene m ode ( A 32) • Smart portrait mode ( A 40) ?[…]
-
Страница 78
58 Shooting Features B Notes About Face Detection • When Autofocus mode in the movie menu is set to Single AF , the focus area is not displayed even if a face is detected. • The camera’s ability to detect faces depends on a variety of factors, in cluding the direction in which the fac es are looking. • The camera may be unable to detect fac[…]
-
Страница 79
59 Shooting Features Using Target Finding AF When AF area mode ( A 54) in A (auto) mode is set to Target finding AF , the camera focuses in the manner desc ribe d below when you press the shutter-relea se button halfway: • The camera dete cts the mai n subject and f ocuses on it . When the subj ect is in focus, th e focus area glows green. If a h[…]
-
Страница 80
60 Shooting Features Subjects Not Suitable for Autofocus The camera may not focus as expected in the fo llowing situations. In some rar e cases, the subject may not be in focus des pite the fact that the focus area o r the focus indicator glows green: • Subject is very dark • Objects of sharply differing brightness are in cluded in the scene (e[…]
-
Страница 81
61 Shooting Features Focus Lock Focus lock shoot ing is recommended when the camera does not ac tivate the focus are a that contains the desired subject. 1 Set AF area mode to Center in A (auto) mode ( A 53). 2 Position the subject in the center of the frame and press the shutter- release button halfway. • Confirm that the focus area glows green.[…]
-
Страница 82
62 Playba ck Features Playback Features Moving the zo om control toward g ( i ) in full-frame playback mode ( A 28) zooms in on the image. • You can change the zoom ratio by m oving the z oom control toward f ( h ) or g ( i ). • To view a different area of the image, press the multi sele ctor HIJK . • If you are viewing an image that was ca p[…]
-
Страница 83
63 Playba ck Features Moving the z oom control to ward f ( h ) in full-frame playback mode ( A 28) displays images as thumbnails. • You can change the number of thumbnails di splayed by moving the zoom control toward f ( h ) or g ( i ). • While using thumbnail playback mode, pres s the multi s elector HIJK to select an image and then press the […]
-
Страница 84
64 Playba ck Features When viewing images in full-f rame playback mode or thum bnail playback mode, you can configure the menu operations listed below by pressing the d button. * Edited images ar e saved as separate files . Some imag es may n ot be edited . Functions That C an Be Set with the d Button (Playba ck Menu) Option Description A Quick ret[…]
-
Страница 85
65 Recording and Playing Back M ovies Recording and Playing Back Movies 1 Display the shooting screen. • Check the re maining amount of movie recordi ng time. • If Photo info in the Moni tor settin gs ( A 72) in the setup menu is set to Movie frame+auto info , the area that will be visible in the movie can be conf irmed before movie recording s[…]
-
Страница 86
66 Recording and Playing Back M ovies B Maximum Mo vie Length Individual mo vie files cann ot exceed 4 GB in size or 29 minu tes in length, even when there is sufficient fr ee space on the memory card fo r longer reco rding. • The maximum movi e length for a single mov ie is displayed on the shooting screen. • Recording may end before ei ther l[…]
-
Страница 87
67 Recording and Playing Back M ovies B Notes About Vibration Reduction When Recording Movies • When Movie VR in the movie me nu ( A 69) is set to On (hybrid) , th e angle of view (i.e., the area visible in t he frame) becomes n arrower when record ing movies. • When using a tripod to stabil ize the camera during shooting, se t Movie VR to Off […]
-
Страница 88
68 Recording and Playing Back M ovies Saving Still Images While Recording Movies If the shutter-release button is pressed all the wa y while recording a movie, one frame is saved as a still imag e (JPEG). Movie recording continues while the still ima ge is being saved. • y is displayed in the monitor. When z is displayed, a still image cannot be […]
-
Страница 89
69 Recording and Playing Back M ovies Functions That Can Be Set with the d Button (Movie M enu) The settings of the me nu options listed below can be configured. Enter shooti ng mode M d button M D menu ico n M k button Option De scription A Movie options Select the movie type. Select normal speed to record movie s at normal speed, or HS (high spee[…]
-
Страница 90
70 Recording and Playing Back M ovies Press the c button to en te r playback mode. Movies ar e indicated by the movie optio ns icon ( A 69). Press the k button to play back movies. • To adjust the volume, move t he zoom control ( A 1). Playing Back Movies 1 5 / 0 5 / 2 0 1 4 1 5 : 3 0 15/05/2014 15:30 0 0 1 0 . M O V 0010. MOV 1 0 s 10s Movie opt[…]
-
Страница 91
71 Recording and Playing Back M ovies Functions Available During Playback Playback controls are di splayed in the monitor. The operations listed below can be performed by using the multi selector JK to select a control and then pressing the k button. Deleting movies To delete a movie, select the desired movi e in full-frame playback mode ( A 28) or[…]
-
Страница 92
72 General Camera Setup General Camera Setup The settings of the me nu options listed below can be configured. Functions That Can Be Set with the d Button (Setup Menu) Press the d button M z (setup) men u icon M k butt on Option De scription A Welcome screen Allows you to select whether or not the welcome screen is displayed when the camera is turn[…]
-
Страница 93
73 General Camera Setup Format memory/ Format card Allows you to format the internal memory or the memory card. E 67 Language Allows you to change the camera’s display language. E 68 TV settings Allows you to adjust TV-connection sett ings. E 68 Blink warnin g Allows you to set whe ther or not closed eyes are detected when taking images of people[…]
-
Страница 94
74 Connecting the Camera to a TV, Computer, or Printer Connecting the Camera to a TV, Computer, or Printer You can enhance yo ur enjoyment of images and movies by connecting the camera to a TV, computer, or printer. • Before connectin g the camera to an external device, make sure the remaining battery level is sufficient and turn the came ra off.[…]
-
Страница 95
75 Connecting the Camera to a TV, Computer, or Printer Viewing images on a TV E 16 Images and movies capture d with the camera can be viewed on a TV. Connection method: Connect the vide o and audio plugs of the optional audio video cable to the TV’s inpu t jacks. Alternatively, connect a commercially available HDMI cabl e to the TV’s HDMI input[…]
-
Страница 96
76 Connecting the Camera to a TV, Computer, or Printer Install ViewNX 2 to upload, view, edit, and shar e photos and movies. Installing ViewNX 2 An Internet connect ion is required. For system r equirements and othe r informatio n, see the Nikon webs ite for your region. 1 Download the ViewNX 2 installer. Start the computer and down load the instal[…]
-
Страница 97
77 Connecting the Camera to a TV, Computer, or Printer Transferring Images to the Computer 1 Choose how images will be copied to the computer. Choose one of the following methods: • Direct USB connection : Turn the camera off and en sure that the memory card is insert ed in the camera. Connect the camera to the computer using the US B cable. Turn[…]
-
Страница 98
78 Connecting the Camera to a TV, Computer, or Printer If a message is displayed pr ompting you to c hoose a program , select Niko n Transfer 2. • When using Wi ndows 7 If the dialog shown at ri ght is displayed, follow the steps be low to sele ct Nikon Tran sfer 2. 1U n d e r Import pictures and videos , click Change program . A program selecti […]
-
Страница 99
79 Connecting the Camera to a TV, Computer, or Printer 3 Terminate the connectio n. • If the camera is connected to the computer, turn the camera off and disconnect the USB cable. If you are using a card reader or card sl ot, choose the appropri ate option in the computer operating system to eject the remova ble disk corresponding to the memory c[…]
-
Страница 100
80[…]
-
Страница 101
E 1 The Reference Section provides detailed info rmation and hints about using the camera. Shooting Using Easy Pan orama (Shooti ng and Playback ) ……….. …………… ……. E 2 Playback Viewing and Deleting Images Captured Continuousl y (Sequence) … E 6 Editing Still Images ……………… …………. ………… …………… .[…]
-
Страница 102
E 2 Reference Section Shooting with Easy Panorama * The icon of the la st scene selected is d isplayed. 1 Select W Normal (180°) or X Wide (360°) as the shooting range and press the k button. • When the camera is readied in the hori zontal position, the image size (width × height) is as follows. — W Normal (180°) : 4800 × 920 when moved hori[…]
-
Страница 103
E 3 Reference Section 3 Press the shutter-release button all the way, and then remove your finger from the shutter-re lease button. • KLJI are displayed to indicate the direction of cam era movement. 4 Move the camera in one of the four directions until the guide indicator reaches the end. • When the cam era detects which direction it is moving[…]
-
Страница 104
E 4 Reference Section B Notes About Easy Panorama Shooting • The range of the image se en in the saved image is narrower than th at seen in the mo nitor at the time of shooting. • If the camera is moved too quickly or shaken too much, or if the subj ect is too uniform (e.g. walls or darkness), an error may occur. • If shooting is s topped bef[…]
-
Страница 105
E 5 Reference Section Viewing Imag es Captured with Easy Panorama Switch to playback mode ( A 28), display an image captured using easy panorama in full-f rame playback mode, and then press the k button to scro ll the image in the direction that was used when shooting. Playback controls are disp layed in the monitor during playback. Use the multi s[…]
-
Страница 106
E 6 Reference Section Viewing Imag es in a Sequence Images captured continuously are saved as a sequence. The first image of a sequenc e is used as the key picture to represent the sequenc e when disp layed in full-frame playback mode or thumbnail playback mode (default sett ing). To display each image in the sequence in dividually, press the k but[…]
-
Страница 107
E 7 Reference Section Deleting Images in a Se quence When the l button is pressed for images in a seq uence, the images that are delet ed vary depending on how the se qu ences are displ ayed. • When the key pic ture is displa yed: — Current image : All images in the displayed sequence are deleted. — Erase selected images : When a key pictu re is […]
-
Страница 108
E 8 Reference Section Before Editing Images You can easily edit images on this came ra. Edited copies are saved as separate files. Edited copies are save d with the same shooting date and time as the o riginal. C Restrictions on Image Editing An image can be edited up to ten times. Editing Still Images[…]
-
Страница 109
E 9 Reference Section Quick Retouch: Enhancing Contrast and Saturation Use the multi selector HI to select the amount of effect applied and press the k button. • The edited version i s displayed on the rig ht. • To exit without saving the copy, press J . D-Lighting: Enhancin g Brightness and Contrast Use the multi selector HI to select OK and p[…]
-
Страница 110
E 10 Reference Section Red-eye Correction: Corr ecting Red Eyes Caused by Using the Flash Preview the result and press the k button. • To exit without saving the copy, press the multi selector J . B Notes About Red-eye Correction • Images in which the camera cannot de tect red eyes cann ot be corrected. • For pets (dogs or cats), red-eye corr[…]
-
Страница 111
E 11 Reference Section Skin Softening: Softening Skin Tones 1 Use the multi selector HI to select the amount of effect applied and press the k button. • The confirmation di alog is displayed with the face to which the effect was appl ied enlarged in the mon itor. • To exit without saving the copy, pr ess J . 2 Preview the result and press the k[…]
-
Страница 112
E 12 Reference Section Filter Effects: App lying Digital Filter Effects * Whe n the image size is 640 ×480 or smaller, Soft portrait cannot be applied. 1 Use the multi selector HI to select the desired effect and press the k button. • When any setting other than Cross proc ess , Soft , or Selective color is selec ted, proceed to step 3. Press th[…]
-
Страница 113
E 13 Reference Section 2 Adjust the effect and press the k button. • When using Cross process or Selective color : Use HI to select the color. • When using Soft : Use HI to select the range of the effect. • Press J to return to the Filter effects selection screen without making any changes. 3 Preview the result and press the k button. • An […]
-
Страница 114
E 14 Reference Section Small Picture: Reducing the Size of an Im age 1 Use the multi selector HI to select the desired copy size and press the k button. • For images taken at an image mode settin g of l 4608 ×2592 , onl y 640×360 is displayed. 2 Select Yes and press the k button. • An edited copy is created (com pression ratio of approximatel[…]
-
Страница 115
E 15 Reference Section Crop: Creat ing a Cropped Copy 1 Move the zoom control to enlarge the image ( A 62). 2 Refine copy composition and pres s the d button. • Move the zoom control toward g ( i ) or f ( h ) to adjust the zoom ratio. Set a zoom ratio at which u is displaye d. • Use the multi selector HIJK to scroll the image so that only the p[…]
-
Страница 116
E 16 Reference Section 1 Turn off the camera and connect it to the TV. • Make sure th at the plugs are properly orien ted . Do not insert or remove the plugs at an angle when connectin g or disconnecting them. When using the au dio/video cable When using a commerc ially available HDM I cable Connecting the Camera to a TV (Viewing Images on a TV) […]
-
Страница 117
E 17 Reference Section 2 Set the TV’s input to external video input. • See the documentation provided with your TV for details. 3 Hold down the c button to tu rn on the camera. • Images are displayed on the TV. • The camera moni tor does not turn on. B If Images Are Not Displayed on the TV Make sure that TV settings ( E 68) in the setup men[…]
-
Страница 118
E 18 Reference Section Users of PictBridge-compatible printers can connect the camera directly to the printer and print images without using a co mputer. Connecting the Camera to a Printer (Direct Print) Take images Select images for printi ng and number of copies using Print order optio n ( E 42) Connect to the printe r ( E 19) Print images one at[…]
-
Страница 119
E 19 Reference Section Connecting the Camer a to a Printer 1 Turn off the camera. 2 Turn on the printer. • Check printer setti ngs. 3 Connect the camera to the printer using the USB cable. • Make sure th at the plugs are properly orien ted . Do not insert or remove the plugs at an angle when connectin g or disconnecting them. 4 Turn on the came[…]
-
Страница 120
E 20 Reference Section Printing Individual Images 1 Use the multi selector to s elect the desired image and press the k button. • Move the zoom control toward f ( h ) to switch to thumbnail playback or g ( i ) to switch to full-frame playbac k. 2 Use HI to select Copies and press the k button. 3 Select the desired number of copies (up to nine) an[…]
-
Страница 121
E 21 Reference Section 5 Select the desire d paper size and press the k button. • To apply the paper size setting configured on the prin ter, select Default as the pa per size op tion. • The paper size options available on the camera vary depending on the printe r that you use. 6 Select Start print and press the k button. • Printing starts. ?[…]
-
Страница 122
E 22 Reference Section Printing Multiple Images 1 When the Print selection screen is displayed , press the d button. 2 Use the multi selector HI to select Paper size and press the k button. • To exit the print menu, press the d button. 3 Select the desire d paper size and press the k button. • To apply the paper size setting configured on the p[…]
-
Страница 123
E 23 Reference Section Print selection Select images (up to 99) and th e number of copies (up to nine) of each. • Use th e mult i selec tor JK to select images, and use HI to specify the numb er of copies to be printed. • Images sel ected for prin ti ng are indicated by a and the numeral indicating the num ber of copies to be pr inted. If n o c[…]
-
Страница 124
E 24 Reference Section C More Information See “Prin ting Images of Size 1:1” ( E 28) for more information. DPOF printing Print images for which a print orde r was created using the Print order option ( E 42). • When the screen shown on the right is disp layed, select Start print and press the k button to start printing. To view the current pr[…]
-
Страница 125
E 25 Reference Section Extracting Only the Desired Portions of a Movie The desired portions of a recorded mo vie can be saved as a separate file. 1 Play back the desired movie and pause at the start point of the portion that is to be extracted ( A 71). 2 Use the multi selector JK to select the I control, and then press the k button. 3 Use HI to sel[…]
-
Страница 126
E 26 Reference Section 5 Use HI to select m (Save) and press the k button. • Follow the instructions on the screen to save the movie. B Notes About Movie Editing • A movie that was created by editing cannot be trimmed again. • The actual trimmed portion of a movie may differ slightly fr om the portion selected using the start and end points. […]
-
Страница 127
E 27 Reference Section Image Mode Settings (Image Size and Quality) Select the combination of image size and compre ssion ratio th at is used when s aving images. The higher the image mo de setting, the larger the size at which images can be printed, and the lower the compres sion ratio, the higher the quality of the images, but the number of image[…]
-
Страница 128
E 28 Reference Section C Notes About Image Mode • The image mode setti ng can also be chang ed in shooting modes other than A (auto) mo de. The changed setting is also applied to other shooting mo des. • The setting may not be changed whe n using certain setting s of other functions. C Number of Images That Can Be Saved • The approximate num […]
-
Страница 129
E 29 Reference Section White Balance (Adjusting Hue) Adjust white balance to suit the light source or weat her conditions in order to make the colors in images match what you see with your eyes. • Use Auto under most conditio ns. Change the setting when yo u want to adjust t he hue of the image you are taking. B Notes About White Balance • Lowe[…]
-
Страница 130
E 30 Reference Section Using Preset Manual Use the procedure be low to measure the white balanc e value under the lighting used du ring shooting. 1 Place a white or gray reference object und er the lighting that wil l be used during shooting. 2 Use the multi selector HI to select Preset manual in the White balance menu, and press the k button. • […]
-
Страница 131
E 31 Reference Section 5 Press the k button to measure the value. • The shutter is released and measurement is complete. No image is saved. B Notes About Preset Manual A value for flash lighti ng cannot be meas ured with Pres et manual . When sh ooting using the flash , set White balance to Auto or Flash .[…]
-
Страница 132
E 32 Reference Section Continuous Shooting Select A (auto) mode M d button M Co ntinuous M k button Option Description U Single (defaul t setting ) One image is taken each tim e the shutter-rele ase bu tton is pressed. k Continuous H While the shutter-re lease button is held all the way down, images are captured continuously. • The frame rate for[…]
-
Страница 133
E 33 Reference Section B Notes About Continuous Shooting • When a setting other than Si ngle is selected, the flas h cannot be used. Focus, exposu re, and white balance are fixed at the values determined wit h the first image in each seri es. • It may take some time to sa ve the imag es after sh ooting. • When ISO sensitivity increas es, nois[…]
-
Страница 134
E 34 Reference Section ISO Sensitivity Higher ISO sensitivity allows darke r subjects to be capture d. Additionally, even with subject s of similar brightness, images can be taken at faster shutter speeds, and blurring caused by camera shake and subject mo vement can be reduced. • When higher ISO sensitivity is set, im ages may contain noise. B N[…]
-
Страница 135
E 35 Reference Section Color Options Make colors more v ivid or save images in monochrome. B Notes About Color Options The setting may not be changed when usin g certain setting s of other functions. Select A (auto) mode M d button M Co lor options M k butt on Option Description n Standard color (defaul t setting ) Use for images exhibiting natural[…]
-
Страница 136
E 36 Reference Section AF Area Mode Use this option to dete rmine how the camera selects the focu s area for autofocus when shooting still images. Select A (auto) mode M d button M AF area mode M k butt on Option Description a Face priority When the cam era detects a huma n face, it focuses on that face. See “Using Face Detection” ( A 57) for m[…]
-
Страница 137
E 37 Reference Section x Manual Use the multi selector HIJK to move the focus area to where y ou want to focus. • To use the multi sel ector to configure the flash mode or other settings, press the k button. To return to moving the focus area, press the k button again. y Center The camera focuses on the su bject in the center of the fram e. s Sub[…]
-
Страница 138
E 38 Reference Section B Notes About AF Area Mode • When digital zoom is in effect, the camera focuse s on the area in the center of t he frame regardless of the AF a rea mode setting. • The setting may not be changed whe n using certain setting s of other functions. M Target finding AF (defaul t setting ) When the camera detects the main subje[…]
-
Страница 139
E 39 Reference Section Using Subject Tracking 1 Register a subject. • Align the subject that you want to track with the border in the center of th e monitor and pre ss the k bu tton. • When the subject is registered , a yellow border (focus area) is displayed around that su bject and the camera begins tracking that subject. • If the subject c[…]
-
Страница 140
E 40 Reference Section • See “Image Mode Se ttings (Image Size an d Quality)” ( E 27) for information about Image mode . Skin Softening The result o f skin softening effect on your subject cannot be confirmed when framing images for shooting. Check the resu lts in playback mode, after taking ima ges. Smile Timer The camera detect s human face[…]
-
Страница 141
E 41 Reference Section Blink Proof Enter smart portrait mode M d button M Blink proof M k button Option Description y On The camera automatically releases the shutter twice with every shot and saves one image in which the subject’s eyes are open. • If the camera saved an image in which the s ubject’s ey es may have been closed, the dialog sho[…]
-
Страница 142
E 42 Reference Section • See “Editing Still Images” ( E
 for information about image editing functio ns. Print Order (Creating a DPOF Print Order) If you configur e print order settings in advance, you can us e them with the pr inting methods listed below. • Taking the memory card to a digital photo la b that supports DPOF (Digital Print […]
 -
Страница 143
E 43 Reference Section 2 Select images (up to 99) and the number of copies (up to nine) of each. • Use the multi selector JK to select images, and use HI to specify the n umber of copies to be p rinted. • Images selected for printing are indi cated by a and the numeral indicating the number of copies to be printed. If no copies have b een speci[…]
-
Страница 144
E 44 Reference Section B Notes About Printing Shooting Date and Shooti ng Information • Some printers may not be able to print the shooting date and shooting information. • Shooting information i s not printed wh en the camera is con nected to a printe r. • The Date and Info settings are reset each time the Print order option is disp layed. ?[…]
-
Страница 145
E 45 Reference Section Slide Show Play back images one by one in an automated “sl ide show.” When movie f iles are played back in the slide show, onl y the first frame of each mo vie is displayed. 1 Use the multi selector HI to select Start and press the k button. • The slide show begins . • To repeat the slide show automatically, select Lo[…]
-
Страница 146
E 46 Reference Section Protect The camera prot ects selected imag es from accidenta l deletion. Select images to prot ect or ca ncel protection for previously protected images fr om the image selection scre en ( E 47). Note that formatt ing the camera’s internal memory or the memory card per manently deletes protected files ( E 67). Press the c b[…]
-
Страница 147
E 47 Reference Section The Image Selection Screen When an image selectio n screen such as the one shown on the right is displayed while op er ating the camera, follow the procedures desc ribed below to select the images. 1 Use the multi selector JK to select an image. • Move the zoom control ( A 1) toward g ( i ) to switch to full-frame playback […]
-
Страница 148
E 48 Reference Section Rotate Image Specify the orientation in which saved images are displayed during playback. Still images can be rotated 90 degrees c lockwise or 90 degrees counterclockwise. Select an image from the image selection screen ( E 47). When the Rotate image scree n is displayed, press t he multi select or JK to rotate the image 90 d[…]
-
Страница 149
E 49 Reference Section Copy (Copy Betw een Internal Mem ory and Memory Card) Copy images between the internal memory and a memory card. 1 Use the multi selector HI to select a destination option to which images are copied and press the k button. 2 Select a copy option and press the k button. • If you choose the Selected images option, u se the im[…]
-
Страница 150
E 50 Reference Section B Notes About Copying Images • Only files in formats that thi s camera can record can be copied. • Operation is not guaranteed with images captured with another make of ca mera or that have been modified on a comput er. • The Print ord er ( E 42) settings con figured for images are not copied. C Notes About Copying Imag[…]
-
Страница 151
E 51 Reference Section Sequence Display Options Select the method used to display images in the sequence ( E 6). Settings are applied to all sequences, and the setting is saved in the c amera’s memory even if the camera is turned off . Choose Key Picture Specify a different image in the sequ ence as the key picture. • When the key picture selec[…]
-
Страница 152
E 52 Reference Section Movie Options Select the desired movie option to record. Select normal s peed movie option s to record at no rmal speed, or HS movie optio ns ( E 53) to record in slow or fas t motion. Memory cards (Class 6 or higher) ar e recommended for re cording movies ( F 18). Normal Speed Movie Options 1 The available options and fram e[…]
-
Страница 153
E 53 Reference Section HS Movie Options Recorded movies are played back in fast or slow motion. See “Playing Back in Slow Motion and Fast Motion” ( E 54). B Notes About HS Movie • Sound is not recorded. • Zoom position, focus, exposure, and white bala nce are locked wh en movie recording starts . Option Image size Aspect ratio (horizontal t[…]
-
Страница 154
E 54 Reference Section C Playing Back in Slow Motion and Fast Motion When recordin g at normal spee d: When recordin g at h / a HS 480/4×: Movies are recorded at 4 × normal speed. They are played back in slow motion at 4× slower spee d. When recordin g at j / Y HS 1080/0.5×: Movies are r ecorded at 1/2 n ormal speed. They are play ed back in fa[…]
-
Страница 155
E 55 Reference Section AF Area Mode Set the focus area in movie m ode. • When Movie options is set to Z 1080/60i or U 1080/50i , and Movi e VR is set to On (hybrid) , the setting is fixed at Center . • When an HS movie option is se lected in Movie options , the setting is fixe d at Center . Autofocus Mode Set how the camera focuses in movie mod[…]
-
Страница 156
E 56 Reference Section Movie VR Select the vibration re duction setting used wh en recording movies. Set to Off when using a tripod to st ab ilize the camera during shooting. • When an H S movie opti on is selected in Movie options , the setting is fixed at Off . B Notes About Movie VR • Vibration reduc tion may be u nable to completely el imin[…]
-
Страница 157
E 57 Reference Section Welcome Screen Configure the we lcome scree n that is disp layed when you tu rn on the camer a. The Setup Menu d button M z menu icon M Wel come screen M k button Option Description None (default settin g) Does not display the welcome screen. COOLPIX Display s a welcom e screen with t he COOLPIX logo. Select an image Displays[…]
-
Страница 158
E 58 Reference Section Time Zone and Date Set the camera clock. Setting the Time Zone 1 Use the multi selector HI to select Time zone and press the k button. d button M z menu icon M Time zone and date M k button Option Description Date and time • Select an item: Press the multi selector JK (changes bet ween D , M , Y , h , and m ). • Edit the […]
-
Страница 159
E 59 Reference Section 2 Select w Home time zone or x Travel destination and press the k button. • The date and time displayed in the monitor chang es depending on whether the hom e time zone or travel destination is sel ected. 3 Press K . 4 Use JK to select the time zone. • Press H to enable daylight saving time function, and W is displaye d. […]
-
Страница 160
E 60 Reference Section Monitor Settings Photo Info d button M z menu icon M Mon itor settings M k button Option Description Photo info Set whether or not to d isplay information in the monitor. Image review This setting determin es whether or not the captured image is displayed immediately after shootin g. • Default setting: On Brightness Set the[…]
-
Страница 161
E 61 Reference Section Hide info Framing grid+auto info In addition to information shown with Auto info , a framing grid is displayed t o help frame images. The framing grid is not displayed when recordin g movies. The current settings or operatio n guide is displayed as in Auto info . Movie frame+auto info In addition to information shown with Aut[…]
-
Страница 162
E 62 Reference Section Print Date (Imprinting Date and Time) The shooting date and time can be imprinted on the images when shooting, allowing the info rmation to be printed even from printers tha t do not support date printing ( E 44). B Notes About Print Date • Imprinted dates form a permanent part of image data and cannot be deleted. The date […]
-
Страница 163
E 63 Reference Section Photo VR Set to reduc e the effects of camera s hake while sho oting still imag es. Set to Off when using a tripod to st ab ilize the camera during shooting. B Notes About Photo VR • After turning on the cam era or after switching fr om playback mode to shooting mode, wait for the shooting mode s creen to be displayed compl[…]
-
Страница 164
E 64 Reference Section Motion Detection Enable motion det ection to reduce the effect s of subject movement and camera shake when shooting still images. B Notes About Motion Detection • Motion detection may be unable to eliminate th e effects of s ubject moveme nt and camera shake in some situ ations. • Motion detection m ay be disabled if the […]
-
Страница 165
E 65 Reference Section AF Assist Enable or disable the AF-assist illuminator which assis ts autofocus op eration. Sound Settings d button M z menu icon M AF as sist M k button Option Description a Auto (defaul t setting ) The AF-assist illuminator automaticall y ligh ts up when the subject is di mly lit. The illu minator ha s a range of abou t 5.0 […]
-
Страница 166
E 66 Reference Section Auto Off Set the amount of time that elapses before the camera enters standby mode ( A 21). C Notes About Auto Off • The time that passes before the camera enters st andby mode is fix ed in the fo llowing sit uations: — When shooting using Pet portrait auto release : 5 minutes (when auto off is set to 30 s or 1 min ) — When[…]
-
Страница 167
E 67 Reference Section Format Memory/F ormat Card Use this optio n to format th e internal memory or a memory card. Formatting the internal memor y or memory cards permanently deletes all data. Data that has been deleted cannot be recovered. Make sure to tra nsfer impor tant images to a computer before formatting. • Do not turn the camera off o r[…]
-
Страница 168
E 68 Reference Section Language Select a language for display of camer a menus and messages. TV Settings Adjust settings fo r connection to a TV. C HDMI and HDMI-CEC HDMI (High-D efinition Multimedi a Interface) is a multimedia in terface. HDMI-CE C (HDMI-Consumer Electronics Control ) allows compatible dev ices to inter-operate. d button M z menu […]
-
Страница 169
E 69 Reference Section Blink Warning Select whether or not the came ra detects h uman subjects that have blinked using face detection ( A 57) when shooting in the following modes: • G (easy auto) mode • Portrait or Night portrait scene mode ( A 32) • A (auto) mode (when Face priority ( E 36) is selected for AF area mode opt ion) The Blink War[…]
-
Страница 170
E 70 Reference Section Eye-Fi Upload Select whether or not the camera’ s Eye-Fi card (available from third-party manufacture rs) sends images to you r computer. B Notes About Eye-Fi Cards • Note that images will not be uploaded if signal stre ngth is insuffici ent even if Ena ble is selected. • Remove your Eye- Fi card from the camera wher e […]
-
Страница 171
E 71 Reference Section Reset All When Reset is selected, th e camera’s settings are resto red to their default values. • Some settings, such as Time zone and date or Language , are not reset. C Resetting File Numbering To reset file numbering to “0001”, delete all images save d in the internal memor y or on the memory card ( A 29) before se[…]
-
Страница 172
E 72 Reference Section Battery Type To ensure that the ca mera shows the corr ect battery level ( A 20), select the type that matches the batterie s currently in use. Firmware Version View the current c amera firmware version. d button M z menu icon M Battery type M k button Option Description k Alkaline (defau lt setting) L R6/L40 (AA-size) alkali[…]
-
Страница 173
E 73 Reference Section Refer to the table belo w if an error message is displayed. Error Messages Display Cause/Solution A The camera will turn off to prevent overheati ng. Either the inside of the came ra or the batteries have become hot. The camera turns off automatically. Wait until the camera or the batteries have cooled befor e resuming use. ?[…]
-
Страница 174
E 74 Reference Section Image cannot be saved. An error occurred while saving the image. Insert a new memory card or format the in ternal memory or memory card. E 67 The camera has ru n out of file numbers. Insert a new memory card or format the in ternal memory or memory card. E 67 The image cannot be used for the welcome scre en. E 57 There is ins[…]
-
Страница 175
E 75 Reference Section Raise the fla sh. The flash is lowered. Raise the fl ash when shootin g in Night p ortrait or Backlighting (when HDR is set to k ) scene mode. 33, 35, 44 Lens er ror The lens cap may be attached, or a lens error occurred. Make sure that the lens cap ha s be en removed, and turn the camera off and then on again. If the error p[…]
-
Страница 176
E 76 Reference Section * See the documentation pr ovided with your printer for furthe r guidance and information. Printer error: out of ink. Replace the ink cartridge, se lect Resume , and press the k button to resume printing.* – Printer err or: file cor rupt. There is a problem with the image file to be printed. Select Cancel and press the k bu[…]
-
Страница 177
E 77 Reference Section Images or m ovies are as signed file name s as follows . • Serial file numbers are auto matically assigned to still images th at are saved during movi e recording ( A 68), st arting from the “file number of the movie curr ently being rec orded + 1.” File Names DSCN0001.JPG Identifier (not shown on camera monitor) Origin[…]
-
Страница 178
E 78 Reference Section * When using EN-MH2 rechargeable Ni-M H batteries with the camera , charge the batteries four at a time using Battery Charger MH-73. Also, do not ch arge b atteries at the sam e time if the y have different amounts of charge remainin g ( F 4). EN-MH1 rechargeable Ni -MH batterie s cannot be used. Availability may vary with co[…]
-
Страница 179
F 1 Caring for the Product ………………… ……………. ………. F 2 The Camera …. ………… …………… …………. ………… ……………. ………… ………… …………. F 2 Batteries … …………. …………… …………. ………… …………… …………. ………… ……………. … F[…]
-
Страница 180
F 2 Technical Notes and In dex The Camera To ensure continued enj oyment of this Nikon product, obse rve the precautions descr ibed below in addition to the wa rn ings in “For Your Safety” ( A viii-xiv) when using or storing the device. B Do Not Drop The product may m alfunction if subjec ted to strong shock or vibration. B Handle the Lens and […]
-
Страница 181
F 3 Technical Notes and In dex B Do Not Point the Lens at Strong Light Sources for Extended Periods Avoid pointing the lens at the sun or other strong light sources for extended periods when using or storing the camera. Intense light may cause deteri oration of the image sensor, producing a white blur effect in photographs. B Turn the Product off B[…]
-
Страница 182
F 4 Technical Notes and In dex B Charging Rechargeable Batteries • Do not mix batteries with different amounts of char ge remaining, o r batteries of a di fferent make or model. • When using EN-MH2 batteries with this camera, charge four batteries at a time using Battery Charger MH-73. Use onl y Battery Charger MH-73 to charge EN-MH2 batteries.[…]
-
Страница 183
F 5 Technical Notes and In dex Memory Cards • Use only Secure Digital memory cards. See “Ap proved Memory Cards” ( F 18) for recommended memory cards. • Observe the precautions n oted in the documentation included with your memory card. • Do not affix labels or stickers to the memory card. • Do not format the memory card using a compute[…]
-
Страница 184
F 6 Technical Notes and In dex Cleaning Do not use alcohol, thinne r, or other volatile chemical s. Storage Turn the camera off when not in use. Be sure th at the power-on lamp is off before putting the camera away. Remove the batteries if the camera will not be used for an extended period. Do not store the camera with naphtha or camphor mo th ball[…]
-
Страница 185
F 7 Technical Notes and In dex If the camera fails to function as expected, check th e list of common problems belo w before consulting your re tailer or Nikon-aut horized service re presentative. Power, Display, Settings Issues Troubleshooting Proble m Cause/Soluti on A The camera is on but does not respond. Wait for recordi ng to end. If the prob[…]
-
Страница 186
F 8 Technical Notes and In dex Monitor is hard to read. • Adjust the monitor brightness. • The monitor is dirty. Clean the monitor. 72, E 60 F 6 Date and time of recording are not correct. • If the camera clock has not been set, O flashes during shooting and movie record ing. Images and movies saved b efore the clock is set are date d “00/ […]
-
Страница 187
F 9 Technical Notes and In dex Shooting Issues Proble m Cause/Soluti on A Cannot switch to shooting mode. Disconnect the HDMI cable or USB cable. 74, 77, E 16, E 19 No image captured when the shutter-release button is pressed. • When the camera is in pla yback mode, press the A button or th e shutter-release button . • When men us are displ aye[…]
-
Страница 188
F 10 Technical Notes and In dex Flash does not fire. • The flash is lowe red. • A scene mode that restricts the flash is selected. • On is selected for Blink proof in the smart portr ait menu. • A function that restricts the flash is enabled. 5, 44 51 54, E 41 55 Digital zoom cannot be used. • Digital z oom cannot be used in the fol lowin[…]
-
Страница 189
F 11 Technical Notes and In dex Images are too dark (underexposed ). • The flash is lowered or a shooting mode that restricts the flash is selecte d. • The flash wind ow is blocked. • The subject is be yond the range of the flash. • Adjust exposure compensation. • Increase ISO sensitivit y. • The subject is backlit. Select Backlighting […]
-
Страница 190
F 12 Technical Notes and In dex Playback Issues Proble m Cause/Soluti on A File cannot be played bac k. • This camera m ay not be able to play back images saved with another make or model of digi tal camera. • This camera cannot play back movies recorded with another make or mo del of digital camera. • This camera may n ot be able to play bac[…]
-
Страница 191
F 13 Technical Notes and In dex Nikon Transf er 2 does not start when camera is connected to a computer. • The camera is off. • The batteries are exh austed. • The USB cable is not correctl y connected. • The camera is not re cognized by the compu ter. • The computer is not set to start Nikon Transfer 2 automatically. For more information[…]
-
Страница 192
F 14 Technical Notes and In dex Nikon COOLPIX L830 Digital Camera Specific ations Type Compact digital camera Number of effective pixels 16.0 million Image sensor 1 / 2.3 -in. type CMOS; approx. 16.76 million total pixels Lens NIKKOR lens with 34× optical zoom Focal length 4.0–136 mm (angle of view equivale nt to that of 22.5–765 mm lens in 35[…]
-
Страница 193
F 15 Technical Notes and In dex Monitor 7.5 cm (3-in.), approx. 921k-dot (RGBW), wide viewing angle TFT LCD with 6-l evel brigh tness adjustm ent, tilta ble approx . 85° downward, approx. 90° upward Frame coverage (shooting mode) Approx. 99% horizontal and 99% vertical (compared to actu al picture) Frame coverage (playback mode) Approx. 100% hori[…]
-
Страница 194
F 16 Technical Notes and In dex Aperture Electronically-controlled ND filter (–2 AV) selection Range 2 steps (f/3 and f/6 [W]) Self-ti mer Can be sele cted from 10 s and 2 s Flash Range (approx.) (ISO sensitivit y: Auto) [W]: 0.5–9.0 m (1 ft 8 in.–29 ft) [T]: 1.5–4.5 m (5–14 ft) Flash control TTL auto flash with monitor preflashes Interfa[…]
-
Страница 195
F 17 Technical Notes and In dex • Unless otherwise stated, all fi gures assume fresh LR6/L40 (AA-size ) alkaline batteries and an ambient temperature of 23 ±3°C (73.4 ±5.4°F ) as specified by the Camera and Imaging Products Association (CIPA). 1 Battery life ma y vary depend ing on conditi ons of use, such as the interval betwe en shots or th[…]
-
Страница 196
F 18 Technical Notes and In dex Approved Memory Ca rds The following Secure Digital (SD) memory cards have been tested and approv ed for use in this camera. • Memory cards with an SD Speed Class rating of 6 or faster are recommended for reco rding movies. When us ing a memory card with a lo wer Speed Class rating, movie recording may stop unexpec[…]
-
Страница 197
F 19 Technical Notes and In dex AVC Patent Portfol io License This product is licensed under the AVC Pat ent Portfolio Licens e for the per sonal and noncommercial use of a consumer to (i) encode video in co mpliance with the AVC standard (“AVC video”) and/or (ii) decode AVC video that was encoded by a consumer engaged in a personal and non-com[…]
-
Страница 198
F 20 Technical Notes and In dex Trademark Information • Microsoft, Windows and Windows Vist a are either regist ered trademarks o r trademarks of Microsoft Corporation in the United States and/or other countries . • Mac, OS X, the iFrame logo and the iFrame s ymbol are trademar ks or registered tradem arks of Apple Inc. in the U.S. and other co[…]
-
Страница 199
F 21 Technical Notes and In dex Symbols g Telephoto ……….. ………………… ……………………. 25 f Wide-angle ……….. ……………………… ………….. 25 i Playback zoom ……………. ………………… ……… 62 h Thumbnail playback …… ………………… …. 63 G Easy auto mode …… …………..[…]
-
Страница 200
F 22 Technical Notes and In dex Brightness ……….. …………………….. ……………. E60 BSS ……………………… ………………… ………… 35, E32 Button sound ……… ……………………… ………. E65 C Calendar display ……………… …………………….. …. 63 Choose key picture ………. 64,[…]
-
Страница 201
F 23 Technical Notes and In dex Food u . …………………….. …………………. ………. 32, 34 Format internal memory ………… 73, E67 Format memory cards ……… 15, 73, E67 Formatting ………………………… …. 15, 73, E67 FSCN . …………………. …………………….. ……………. E77 Full-frame playbac[…]
-
Страница 202
F 24 Technical Notes and In dex Number of exposures remaining ………………… ………………… ………………….. 20, E28 O Optical zoom ……… ……………………… ………………. 25 Optional accessories ……………………. ….. E78 P Paper size …… …………………. …….. E20, E22 Party/indoor f …[…]
-
Страница 203
F 25 Technical Notes and In dex Shutter sound ………………. ………………… ….. E65 Shutter speed … …………………….. ……………………. 27 Shutter-rel ease button …. …………………… 1, 26 Side zoom control ……………………. ………….. 1, 25 Single AF ………….. …………………….. .[…]
-
Страница 204
No repr oduction in an y form of this ma nual, in whole or in part (excep t for brief quotation in critical articl es or reviews), may be made without written authorization from NIK ON CORPORA TION. C T4C02 (11) 6MN34111-02 DIGIT AL CAMERA Ref erence Manual[…]