Руководство по эксплуатации Nokia 305
Выпуск 1.1
|
2 |
Содержание |
|||||
|
Содержание |
Сохранение имени и телефонного |
22 |
||||
|
номера |
||||||
|
Использование быстрого набора |
||||||
|
Техника безопасности |
4 |
номера |
23 |
|||
|
Отправка своей контактной |
||||||
|
Начало работы |
6 |
информации |
23 |
|||
|
Ваш телефон с двумя SIM-картами |
6 |
|||||
|
Клавиши и компоненты |
7 |
Обмен сообщениями |
23 |
|||
|
Установка основной SIM-карты и |
Отправка сообщения |
23 |
||||
|
аккумулятора |
8 |
Чтение полученного сообщения |
24 |
|||
|
Вставка второй SIM-карты |
10 |
|||||
|
Установка или извлечение карты |
Ввод текста |
25 |
||||
|
памяти |
11 |
Набор текста с помощью экранной |
||||
|
Зарядка аккумулятора |
12 |
клавиатуры |
25 |
|||
|
Использование экранной |
||||||
|
Зарядка аккумулятора от USB |
13 |
|||||
|
Включение и выключение |
клавиатуры |
27 |
||||
|
телефона |
13 |
Использование режима |
||||
|
GSM-антенна |
14 |
интеллектуального ввода |
27 |
|||
|
Подключение мини-гарнитуры |
14 |
|||||
|
Связь |
28 |
|||||
|
Прикрепление ремешка |
14 |
|||||
|
Bluetooth |
28 |
|||||
|
Кабель USB для передачи данных |
30 |
|||||
|
Основное использование |
15 |
|||||
|
Сенсорный экран телефона |
15 |
|||||
|
Часы и календарь |
30 |
|||||
|
Поддержка |
18 |
|||||
|
Изменение времени и даты |
30 |
|||||
|
Коды доступа |
18 |
|||||
|
Установка будильника |
31 |
|||||
|
Выбор используемой SIM-карты |
19 |
|||||
|
Просмотр различных |
||||||
|
Блокировка клавиатуры и экрана |
19 |
|||||
|
Копирование контактов и других |
представлений календаря |
31 |
||||
|
Добавление календарной записи |
31 |
|||||
|
данных со старого телефона |
20 |
|||||
|
Использование телефона без SIM- |
||||||
|
Фотографии и видео |
31 |
|||||
|
карты |
20 |
|||||
|
Фотосъемка |
31 |
|||||
|
Отключение уведомлений |
||||||
|
Запись видеоклипа |
32 |
|||||
|
социальных сетей |
21 |
|||||
|
Отправка фотографии или видео |
32 |
|||||
|
Упорядочение файлов |
33 |
|||||
|
Вызовы |
21 |
|||||
|
Посылка вызова |
21 |
|||||
|
Музыка и аудио |
33 |
|||||
|
Переадресация вызовов на |
||||||
|
Воспроизведение композиции |
33 |
|||||
|
голосовую почту или другой |
||||||
|
FM-радио |
33 |
|||||
|
телефонный номер |
21 |
|||||
|
Организация конференции |
21 |
|||||
|
Управление телефоном |
35 |
|||||
|
Контакты |
22 |

Содержание 3
|
Обновление программного |
|
|
обеспечения телефона с помощью |
|
|
телефона |
35 |
|
Обновление программного |
|
|
обеспечения телефона с помощью |
|
|
компьютера |
36 |
|
Восстановление первоначальных |
|
|
настроек |
37 |
|
Резервное копирование |
|
|
фотографий и другого |
|
|
содержимого на карту памяти |
37 |
|
Интернет |
37 |
|
Об интернет-браузере |
37 |
|
Просмотр интернет-страниц |
38 |
|
Очистка журнала поиска |
38 |
|
Карты |
38 |
|
О приложении »Карты» |
38 |
|
Поиск места |
39 |
|
Информация о продукте и |
|
|
сведения о безопасности |
39 |

4Техника безопасности
Техника безопасности
Ознакомьтесь с перечисленными ниже правилами техники безопасности. Нарушение этих правил может быть опасным или незаконным. Дополнительная информация приведена в полном руководстве по эксплуатации.
ВЫКЛЮЧАЙТЕ В МЕСТАХ, ГДЕ ИСПОЛЬЗОВАНИЕ ЗАПРЕЩЕНО
Выключайте устройство в местах, где его использование запрещено, опасно либо может вызвать помехи, например в самолете, в больницах или рядом с медицинским оборудованием, в местах хранения топлива, химических веществ или взрывоопасных материалов. Следуйте всем инструкциям в местах с ограничениями на использование..
БЕЗОПАСНОСТЬ ДОРОЖНОГО ДВИЖЕНИЯ — ПРЕЖДЕ ВСЕГО
Строго соблюдайте местное законодательство. Не держите в руке мобильное устройство за рулем движущегося автомобиля. Помните о том, что безопасность дорожного движения имеет первостепенное значение!
РАДИОПОМЕХИ
Любые мобильные устройства подвержены воздействию радиопомех, которые могут ухудшить качество связи.
ОБРАЩАЙТЕСЬ ТОЛЬКО К КВАЛИФИЦИРОВАННЫМ СПЕЦИАЛИСТАМ
Работы по настройке и ремонту изделия должны проводить только квалифицированные специалисты.
АККУМУЛЯТОРЫ, ЗАРЯДНЫЕ УСТРОЙСТВА И ДРУГИЕ АКСЕССУАРЫ
Используйте только совместимые зарядные устройства и аксессуары, рекомендованные корпорацией Nokia для данного устройства. Не подключайте несовместимые устройства.
ЗАЩИТА УСТРОЙСТВА ОТ ВЛАГИ
Данное устройство не является водонепроницаемым. Оберегайте его от попадания влаги.

ЗАЩИТА СЛУХА
Длительное прослушивание при максимальной громкости может привести к повреждению слуха. Старайтесь не подносить устройство близко к уху при включенном громкоговорителе.

6Начало работы
Начало работы
Ваш телефон с двумя SIM-картами
Телефон поддерживает работу с двумя SIM-картами.
Некоторые преимущества телефона с двумя SIM-картами
•Можно использовать оба телефонных номера и носить с собой только один телефон — используйте личную и рабочую SIM-карту одновременно.
•Не имеет значения, на какой номер звонят абоненты — обе SIM-карты всегда активны.
•Экономьте средства — используйте наиболее подходящего поставщика сетевых услуг в той или иной ситуации.
•Оставайтесь на связи — не беспокойтесь об отсутствии покрытия поставщиком сетевых услуг в той или иной местности.
В режиме ожидания обе SIM-карты, установленные в устройство, доступны одновременно, однако пока одна из карт активна (например, во время звонка), вторая карта недоступна.
Если у вас только одна SIM-карта, установите ее в держатель SIM1. Некоторые функции и службы могут быть доступны только в том случае, если SIM-карта установлена в держатель SIM1. Если SIM-карта установлена только в держатель SIM2, с помощью этого телефона можно совершать звонки только на номера служб экстренной помощи.
Доступность SIM-карт
•При использовании одной SIM-карты только для исходящих вызовов, отправки текстовых или мультимедийных сообщений или выгрузки и загрузки данных, другая SIM-карта также используется для получения вызовов или текстовых и мультимедийных сообщений.
•Если одна из SIM-карт используется в настоящий момент для вызова, отправки или получения текстовых или мультимедийных сообщений или для выгрузки или загрузки данных, другая SIM-карта недоступна.
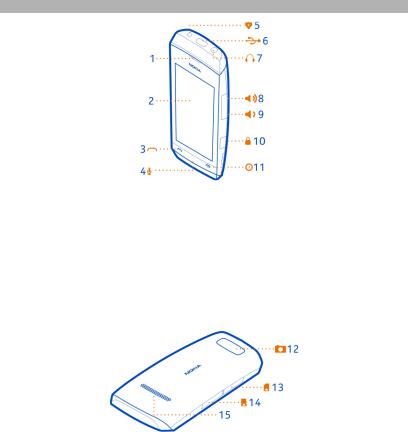
Клавиши и компоненты
1Динамик
2Экран
3 Клавиша вызова
4Микрофон
5 Разъем для подключения зарядного устройства
6Разъем Micro-USB
7 Разъем наушников (разъем Nokia AV 3,5 мм) 8 Клавиша увеличения громкости/масштаба 9 Клавиша уменьшения громкости/масштаба
10Клавиша блокировки
11Клавиша разъединения/включения
12Объектив камеры. Перед использованием камеры снимите защитную пленку с объектива.
13Гнездо SIM-карты (SIM2)
14Гнездо карты памяти
15Громкоговоритель
8Начало работы
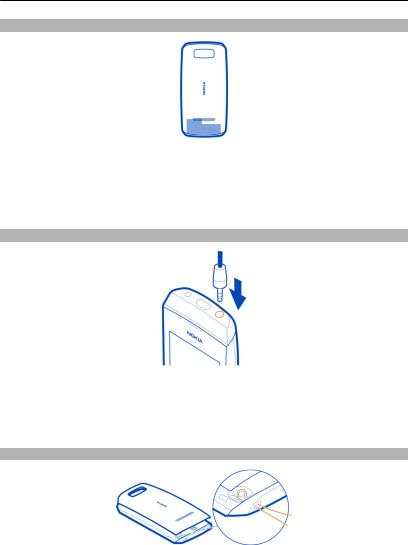
Установка основной SIM-карты и аккумулятора
 Примечание: Перед снятием панелей необходимо выключить питание устройства и отсоединить зарядное и другие устройства. При замене панелей не дотрагивайтесь до электронных компонентов. Не храните и не используйте устройство со снятыми панелями.
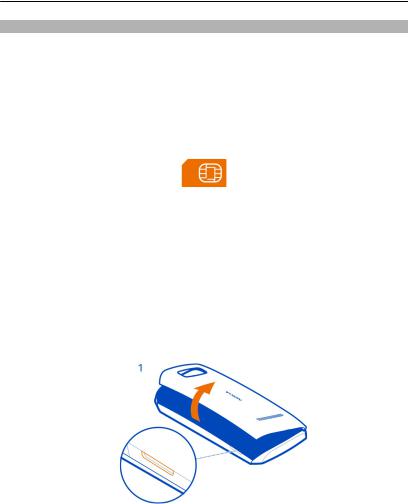
 Важное замечание: Это устройство поддерживает только стандартные SIMкарты (см. рисунок). Использование несовместимых SIM-карт может привести к повреждению самой карты и устройства, а также порче информации, записанной на карте. По вопросам использования SIM-карт с вырезом mini-UICC обращайтесь к своему оператору мобильной связи.
 Важное замечание: Во избежание повреждения SIM-карты всегда извлекайте аккумулятор перед установкой или извлечением карты.
Телефон необходимо использовать с аккумулятором BL-4U. Рекомендуется использовать только фирменные аккумуляторы Nokia.
Если используется только одна SIM-карта, поместите ее во внутренний держатель.
SIM-карту и ее контакты достаточно просто повредить, поцарапать или согнуть, поэтому будьте осторожны, устанавливая и извлекая карту.
1Вставьте палец в выемку на правой грани телефона, затем осторожно приподнимите и снимите заднюю крышку (1).
2Если аккумулятор находится в телефоне, извлеките его (2).
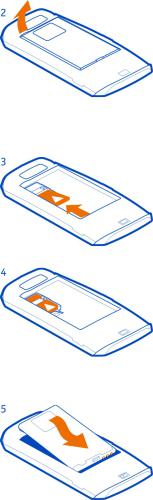
3Вставьте SIM-карту под металлический держатель (3). Убедитесь, что контактная область карты обращена вниз и SIM-карта удерживается в нужном месте (4).
4Выровняйте контакты аккумулятора, вставьте аккумулятор (5), затем верните на место заднюю панель (6).

10 Начало работы
Вставка второй SIM-карты
Есть вторая SIM-карта, но Вы хотите продолжить пользоваться своей основной SIM-картой? Вы можете вставить или извлечь вторую SIM-карту без отключения телефона.
1 Откройте крышку внешнего гнезда SIM-карты, помеченного значком  . 2 Вставьте SIM-карту в разъем до щелчка контактной стороной вверх.
3Закройте заглушку.
Извлечение второй SIM-карты
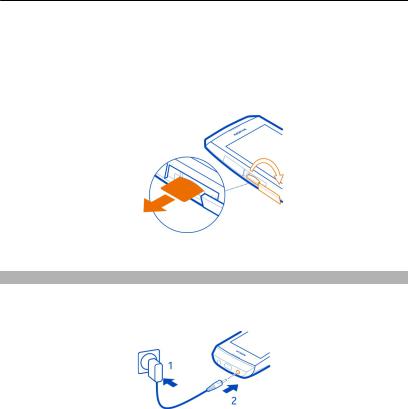
1Откройте крышку гнезда SIM-карты.
2Надавите на SIM-карту, пока она не будет разблокирована, затем извлеките ее.
![]()
Начало работы 11
Установка или извлечение карты памяти
Пользуйтесь только совместимыми картами карты microSD, рекомендованными корпорацией Nokia для данного устройства. Использование несовместимых карт памяти может привести к повреждению самой карты и устройства, а также порче информации, записанной на карте памяти.
Данный телефон поддерживает карты памяти емкостью до 32 Гб. Можно вставить или извлечь карту памяти, не выключая телефон.
Установка карты памяти
1Подцепите ногтем и откройте крышку разъема карты памяти.
2 Вставьте карту памяти в разъем до щелчка контактной стороной вверх.
3Закройте крышку разъема.
12 Начало работы
Извлечение карты памяти
 Важное замечание: Не извлекайте карту памяти в то время, когда она используется приложением. Это может привести к повреждению карты памяти и устройства, а также уничтожению информации на карте.
1Откройте крышку разъема для карты памяти.
2Надавите на карту, пока она не будет разблокирована, затем извлеките ее.
3Закройте заглушку.
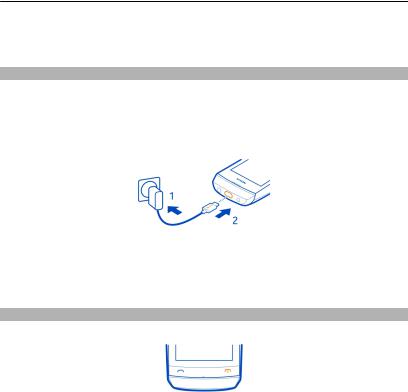
Зарядка аккумулятора
Аккумулятор поставляется частично заряженным, однако перед первым включением телефона может потребоваться перезарядка аккумулятора. При отображении индикатора низкого заряда выполните следующие действия:
1 Включите зарядное устройство в розетку сети питания.
2Подключите зарядное устройство к телефону.
3После отображения индикатора полного заряда отсоедините зарядное устройство от телефона, а затем отключите его от розетки.
Необязательно заряжать аккумулятор в течение определенного времени. Телефоном можно пользоваться во время зарядки.
Начало работы 13
Если аккумулятор полностью разряжен, то до появления на дисплее индикатора уровня заряда или до того, как телефон можно будет использовать для звонков, может пройти несколько минут.
Зарядка аккумулятора от USB
Низкий уровень заряда аккумулятора, но с собой нет зарядного устройства? Для подключения к совместимому устройству, например к компьютеру, можно воспользоваться совместимым кабелем USB.
Будьте осторожны во время подключения или отключения кабеля, чтобы не сломать разъем зарядного устройства.
Если отсутствуют электрические розетки, для зарядки устройства можно использовать USB-кабель. Во время зарядки устройства можно передавать данные. Эффективность зарядки через USB-кабель значительно ниже. Кроме того, процесс зарядки, достаточной для запуска и начала работы устройства, может занять продолжительное время.
Включение и выключение телефона
Нажмите и удерживайте нажатой клавишу включения  до вибрации телефона.
Может выводиться запрос на получение параметров конфигурации от поставщика услуг. Дополнительную информацию об этой услуге сети можно получить у поставщика услуг сети.
14 Начало работы
GSM-антенна
На рисунке область GSM-антенны обозначена серым цветом.
Не следует без необходимости прикасаться к антенне во время ее использования. Прикосновение к антеннам ухудшает качество связи и может привести к сокращению времени работы от аккумулятора из-за повышения мощности излучаемого сигнала.
Подключение мини-гарнитуры
Не подключайте аппаратуру, которая формирует выходной сигнал, поскольку в результате устройство может оказаться повреждено. Не подключайте источники напряжения к разъему AV Nokia. При подключении к разъему AV Nokia внешнего устройства или минигарнитуры, отличных от рекомендованных для данного устройства, уделите особое внимание уровню громкости.
Прикрепление ремешка
 Loading…
- Manuals
- Brands
- Nokia Manuals
- Cell Phone
- 305
- User manual
-
Contents
-
Table of Contents
-
Bookmarks
Quick Links
Nokia 305 User Guide
Issue 1.0
Related Manuals for Nokia 305
Summary of Contents for Nokia 305
-
Page 1
Nokia 305 User Guide Issue 1.0… -
Page 2: Table Of Contents
Contents Contents Read a received message Write text Safety Write text using the on-screen keypad Get started Use the on-screen keyboard Your dual SIM phone Use predictive text Keys and parts Connectivity Insert a primary SIM card and battery Bluetooth Insert a second SIM card USB data cable Insert or remove a memory card…
-
Page 3
Contents Maps About Maps Search for a place Nokia original accessories Practical rules about accessories Battery Product and safety information… -
Page 4: Safety
QUALIFIED SERVICE Only qualified personnel may install or repair this product. BATTERIES, CHARGERS, AND OTHER ACCESSORIES Use only batteries, chargers, and other accessories approved by Nokia for use with this device. Do not connect incompatible products. KEEP YOUR DEVICE DRY Your device is not water-resistant.
-
Page 5: Get Started
Get started Get started Your dual SIM phone You can have two SIM cards in your phone. Some benefits of a dual SIM phone • Have two phone numbers, but carry one phone – use a work and personal SIM at the same time.
-
Page 6: Insert A Primary Sim Card And Battery
SIM card that has a mini-UICC cutout. Important: To prevent damage to the SIM card, always remove the battery before you insert or remove the card. This phone is intended for use with a BL-4U battery. Always use original Nokia batteries.
-
Page 7
Get started If you only have one SIM, put the card in the internal SIM holder. The SIM and its contacts can be easily damaged by scratches or bending, so be careful when handling, inserting, or removing the card. Put your fingernail in the gap on the right edge of the phone, then carefully lift and remove the back cover (1). -
Page 8: Insert A Second Sim Card
Get started Line up the battery contacts, push the battery in (5), then replace the back cover (6). Insert a second SIM card Have a second SIM card, but want to keep using your main SIM card? You can insert or remove a second SIM card without switching the phone off.
-
Page 9: Insert Or Remove A Memory Card
Push the SIM in until it’s free, then pull it out. Insert or remove a memory card Use only compatible microSD cards approved by Nokia for use with this device. Incompatible cards may damage the card and the device and corrupt data stored on the card.
-
Page 10: Charge The Battery
Get started Insert a memory card Use your fingernail to open the cover of the memory card slot. Push the memory card in with the contact area face up until it locks into place. Close the cover of the memory card slot. Remove the memory card Important: Do not remove the memory card when an app is using it.
-
Page 11: Charge The Battery Over Usb
Get started Connect the charger to a wall outlet. Connect the charger to the phone. When the phone indicates a full charge, disconnect the charger from the phone, then from the wall outlet. You do not need to charge the battery for a specific length of time, and you can use the phone while it is charging.
-
Page 12: Gsm Antenna
Do not connect products that create an output signal, as this may damage the device. Do not connect any voltage source to the Nokia AV connector. If you connect an external device or headset, other than those approved by Nokia for use with this…
-
Page 13: Attach A Strap
Basic use Attach a strap Straps may be available separately. Basic use Your touch screen phone Change settings quickly Rather than going into the phone menus, in most views, you can quickly change some settings by swiping down from the top of the screen. You can: •…
-
Page 14
Basic use Open an app or item Tap the app or item. Tap and hold to see more options Place your finger on an item until the menu opens. Example: To edit or delete a calendar appointment, tap and hold the appointment, then select the option you want. -
Page 15
Basic use Zoom in or out Place two fingers on an item, such as a map, photo, or web page, and slide your fingers apart or together. Switch between screens Your phone has three home screens: one for apps, one for your favourite shortcuts, and one for your most used app, such as the dialler. -
Page 16: Support
• Restore the original factory settings If your issue remains unsolved, contact Nokia for repair options. Go to www.nokia- asia.com/repair. Before sending your phone for repair, always back up your data, as all personal data in your phone may be deleted.
-
Page 17: Set Which Sim Card To Use
Basic use The module PIN is required to access the information in the security module of your SIM card. The signing PIN may be required for the digital signature. The barring password is required when using the call barring service. To set how your phone uses the access codes and security settings, select settings >…
-
Page 18: Copy Contacts And Other Stuff From Your Old Phone
Calls Copy contacts and other stuff from your old phone Want to copy your contacts, calendar, and other stuff from your old compatible Nokia phone, so you can start using your new phone without missing a beat? You can do that, free of charge.
-
Page 19: Divert Calls To Your Voice Mailbox Or Another Phone Number
Calls When someone calls you, the phone shows you which SIM is used. Divert calls to your voice mailbox or another phone number When you cannot answer, you can divert your calls. Call divert is a network service. Select settings calls call forwarding.
-
Page 20: Contacts
Contacts While in the call, select options call. > Type in the phone number, then select CALL, or select SEARCH and a contact. The first call is put on hold until you connect the conference call. When you’re able to talk to the second caller, select options >…
-
Page 21: Send Your Contact Info
Messaging Send your contact info Want to send your phone number or mail address to a person you just met? Add your own contact info to your contacts list, and send a business card to the person. Select contacts. Select the contact card containing your own info. Select send contact card, and how you want to send the card.
-
Page 22: Read A Received Message
Write text Read a received message When someone sends you a message, a notification is shown on the lock screen. Swipe left or right over the notification to see the message. Messages are combined into conversations, containing all the messages to and from a contact in a single view.
-
Page 23
Write text Close key Character keys Smiley key — This may not be available in all languages. Space key Shift key — Change the character case. This may not be available in all languages. Input options key — Switch predictive text input on or off, change the writing language, or switch to the on-screen keyboard. -
Page 24: Use The On-Screen Keyboard
Write text Type in a space Select Move the cursor to the next line When predictive text is off, select three times. Type in a number Select , then select the number. Type in a special character Select the sym key, then select the special character. Use the on-screen keyboard When holding the phone in landscape mode, select a text box.
-
Page 25: Use Predictive Text
Connectivity Use predictive text Predictive text is not available in all languages. Select prediction > > Start writing a word. Your phone suggests possible words as you write. When the correct word is shown, select the word. If the word is not in the dictionary, select the pop-up and , and add the new word to the dictionary.
-
Page 26
Connectivity When your phone is locked, it is only possible to connect to a paired device that has been set to auto-connect. Tip: To quickly switch Bluetooth on or off, swipe down from the top of the screen, then select or . -
Page 27: Usb Data Cable
Nokia Suite — Use this mode if Nokia Suite is installed on your computer. media transfer — Use this mode if Nokia Suite is not installed on your computer. You can also use this mode if you want to connect to a home entertainment system.
-
Page 28: Set An Alarm
Photos and videos For example, GMT +8 is the time zone for Singapore, Malaysia, and Philippines, 8 hours east of Greenwich, London (UK). For example, GMT +10 is the time zone for Sydney (Australia), 10 hours east of Greenwich, London (UK). For example, GMT +12 is the time zone for Auckland (New Zealand), 12 hours east of Greenwich, London (UK).
-
Page 29: Record A Video
Photos and videos Close the camera Select Record a video Besides taking photos with your phone, you can also capture your special moments as videos. To open the camera, select video. To start recording, select To zoom in or out, use the volume keys. To stop recording, select Videos are saved in gallery.
-
Page 30: Music And Audio
Music and audio Create a new folder In the folder where you want to create a subfolder, select folder. > Copy or move a file to a folder Select and hold the file, then select an option. Select where you want to copy or move the file. Music and audio Play a song Listen to your favourite music on your phone.
-
Page 31
Music and audio Listen to the radio Connect a compatible headset to your phone. The headset acts as an antenna. Select radio. Change the volume Use the volume keys. Stop the radio Press the end key. Set the radio to play in the background Select Find and save radio stations Search for your favourite radio stations, and save them, so you can easily listen to… -
Page 32: Phone Management
Phone management Go to the next or previous saved station Select Automatically switch to a frequency with better reception Select > on. > Select auto-frequency > on. Phone management Update phone software using your phone Want to improve the performance of your phone and get application updates and great new features? Update the software regularly to get the most out of your phone.
-
Page 33: Update Phone Software Using Your Pc
Update phone software using your PC You can use the Nokia Suite PC app to update your phone software. You need a compatible PC, a high-speed internet connection, and a compatible USB cable to connect your phone to the PC.
-
Page 34: Web
Restore a backup Select restore backup. Select what you want to restore, then select About the web browser Select internet. Catch up on the news, and visit your favourite websites. You can use the web browser to view web pages on the internet. The web browser compresses and optimises web content for your phone, so you can browse the web more quickly and save on data costs.
-
Page 35: Clear Your Browsing History
Search for a place Select maps. Select to see the toolbar, then select Write the name of the place or the address. Nokia original accessories For availability of approved accessories, check with your dealer.
-
Page 36: Practical Rules About Accessories
Product and safety information An extensive range of accessories is available for your device. For more details, see www.nokia-asia.com/accessories. Practical rules about accessories • Keep all accessories out of the reach of small children. • When you disconnect the power cord of any accessory, grasp and pull the plug, not the cord.
-
Page 37
Always use original Nokia batteries. This device is intended for use when supplied with power from the following chargers: AC-11. The exact Nokia charger model number may vary depending on the plug type, identified by E, X, AR, U, A, C, K, B, or N. -
Page 38
Give the necessary info as accurately as possible. Do not end the call until given permission to do so. When you switch your phone on for the first time, you are asked to create your Nokia account. To make an emergency call during the account setup, press the call key. -
Page 39
If you have any questions about using your wireless device with an implanted medical device, consult your health care provider. Accessibility solutions Nokia is committed to making mobile phones easy to use for all individuals, including those with disabilities. For more information, visit the Nokia website at www.nokiaaccessibility.com. Hearing Warning: When you use the headset, your ability to hear outside sounds may be affected. -
Page 40
Terms of Use 1. Acceptance These Nokia Service Terms together with the Privacy Policy and all other additional terms and information that may be provided within the Service (collectively “Terms”) govern your use of the service, site, content and software (collectively the… -
Page 41
Nokia may verify your email address before account can be used. Upon first use of your device and each time you update the Nokia device software, a text message will be sent to Nokia. The creation of a Nokia Account will require data transmission. -
Page 42
Material to incorporate the Material into other works, and to grant similar sublicenses to the extent necessary for Nokia to provide the Service. You may be able to adjust this grant in the privacy and other settings of the Service. -
Page 43
The third party Content providers are third-party beneficiaries under these Terms and may enforce the provisions that directly concern the Content in which they have rights. Nokia may be acting as an agent for third party Content provider in providing the Content to you. Nokia is not a party to the transaction between you and the third party Content provider for such Content. -
Page 44
You may pay by credit or debit card, network service provider billing, or other payment methods if available. Your credit or debit card must have a billing address in the country where the Content is offered by the Service. Nokia will charge your credit card or debit your bank account within a reasonable time after you have made your Order. -
Page 45
To access the Service, you may need to download a specific piece of software developed by Nokia or by another party. Nokia may, in its sole discretion, change, correct or discontinue the Service in whole or in part. The Service may not be available during maintenance breaks and other times. -
Page 46
Except for liability for death or personal injury caused by its gross negligence or intentional misconduct, Nokia is not liable for any direct damages caused by your use or inability to use the Service. In no case will Nokia be liable for any indirect, incidental, punitive or consequential damages resulting from your use or inability to use the Service. -
Page 47
By using this website and/or by submitting personal data to Nokia, you agree to the processing of your personal data as explained in this Policy. If you do not agree with this Policy, please do not use this website or provide Nokia with your personal data. -
Page 48
First use of your Nokia device Depending on your device a Nokia Account may be created for you or you may need to sign in with your existing Nokia Account when you first use your device. In the activation process your user name, email address, mobile number, unique mobile device identifier and subscriber identity information will be sent to Nokia and we may associate this information with your Nokia Account. -
Page 49
As certain Nokia products and services may allow you to manage your profile, we encourage you to ac-cess your personal data from time to time to ensure that it is correct. Please remember that in case of any changes it is your responsibility to update the personal data you have provided us with. -
Page 50
Please note that Nokia may need to iden-tify you and to ask for additional information in order to be able to fulfill your request. -
Page 51: Copyright And Other Notices
Changes to This Privacy Policy Nokia may from time to time change this Policy or change, modify or withdraw access to this site at any time with or without notice. However, if this Policy is changed in a material, adverse way, Nokia will post a notice advising of such change at the beginning of this Policy and on this site’s home page for 30 days.
-
Page 52
Includes RSA BSAFE cryptographic or security protocol software from RSA Security. The Bluetooth word mark and logos are owned by the Bluetooth SIG, Inc. and any use of such marks by Nokia is under license. Java is a trademark of Sun Microsystems, Inc.
This manual is also suitable for:
306
Как использовать наш сайт инструкций OnlineManuals.ru
Наша цель состоит в том, чтобы предоставить вам быстрый доступ к содержанию инструкции для Инструкция, руководство по эксплуатации сотового gsm, смартфона Nokia Asha 305.
С помощью онлайн просмотра, Вы можете быстро просмотреть содержимое инструкции и найти решение проблемы с Инструкция, руководство по эксплуатации сотового gsm, смартфона Nokia Asha 305.
Для Вашего удобства
Если листать руководство пользователя Инструкция, руководство по эксплуатации сотового gsm, смартфона Nokia Asha 305 прямо на сайте, не очень удобно для Вас, есть два возможных решения:
• Просмотр в полноэкранном режиме — легко просмотреть руководство пользователя (без загрузки его на свой компьютер), Вы можете использовать режим полноэкранного просмотра.
Для просмотра инструкции пользователя Инструкция, руководство по эксплуатации сотового gsm, смартфона Nokia Asha 305 на полном экране, используйте кнопку «Открыть в Pdf-viewer».
• Загрузка на компьютер — Вы можете также скачать Инструкция, руководство по эксплуатации сотового gsm, смартфона Nokia Asha 305 на свой компьютер и сохранить его в файлах.
Многие люди предпочитают читать документы не на экране, а в печатной версии.
Возможность печати руководства пользователя также была предусмотрена на нашем сайте,
и вы можете использовать ее, нажав на иконку «печать» в Pdf-viewer.
Нет необходимости печатать все руководство Инструкция, руководство по эксплуатации сотового gsm, смартфона Nokia Asha 305, можно выбрать только нужные страницы инструкции.