Программа Symantec Ghost — безотказная программа для клонирования дисков, разделов, создания их образов и восстановления дисков и разделов из файлов образов. Инструкция создана на примере версии Symantec Ghost 11.5.
Загрузитесь с загрузочного диска или флешки, содержащих программу Symantec Ghost. После запуска программы нажмите ОК:

Создание образа раздела (диска)
1 Нажимаем Local.
2 Выбираем Partition, т.е. Партицию (раздел).
3 Выбираем пункт To Image. Это означает, что мы хотим сохранить партицию в образ:

4 Выберите физический диск.
5 Нажмите ОК:

6 Выберите партицию (раздел).
7 Нажмите ОК:

8 В верхнем выпадающем меню выберите другой диск, куда вы хотите поместить образ первого диска.
9 В поле File name задайте имя файла.
10 Нажмите Save для сохранения файла, в который будет записываться образ:

11 Выберите степень сжатия. Рекомендуем выбирать Fast:

12 Теперь программа спрашивает «Продолжить создание образа?» Отвечаем Yes

Запускается процесс создания. Нужно дождаться, когда прогресс дойдёт до 100%:

По завершению вы увидите такое сообщение. Нажмите Continue:

Теперь можно нажать на Quit и перезагрузить компьютер кнопкой RESET.
Внимание! Имейте в виду, для создания полноценной резервной копии Windows 7 или Windows 8.1 создавайте образ не только раздела с самой операционной системой (на примере которого написана инструкция), но загрузочного раздела, если такой имеется на диске. Резервная копия последнего вам также может пригодиться.
Загрузочный раздел Windows7 занимает 100MB. Загрузочный раздел Windows8.1 занимает 350MB.
Восстановления раздела (диска) из образа
1 В главном меню программы нажмите Local.
2 Выберите пункт Partition.
3 Выберите From Image, что означает «из образа»:

4 Вверху в поле Look In выберите локальный диск, содержащий ранее созданный в программе Ghost образ раздела.
5 Найдите нужный файл образа. Он должен иметь расширение *.GHO. Нажмите на нужный файл мышью для его выбора (кнопку Open нажимать скорее всего не придётся):

6 Выберите исходную партицию в образе. Нужно нажать на неё мышью, даже если она в списке одна.
7 Нажмите ОК:

8 Выберите физический диск, на который будем восстанавливать партицию.
9 Нажмите ОК:

10 На выбранном физическом диске выберите партицию, на которую будем развёртывать образ (Другими словами — нужно выбрать партицию,, которую вы хотите «восстановить» или «перезаписать»).
11 Нажмите ОК:

12 Программа спросит «Продолжить с восстановлением партиции? Целевая партиция будет безвозвратно перезаписана.»
Отвечаем Yes (Да):

После этого программа Ghost приступит к восстановлению партиции в указанный раздел из образа:

13 Нажмите кнопку Reset Computer для перезагрузки компьютера и проверки результата:

-
Contents
-
Table of Contents
-
Troubleshooting
-
Bookmarks
Quick Links
™
Norton Ghost
Personal Edition
User’s Guide
Related Manuals for Symantec NORTON GHOST PERSONAL EDITION
Summary of Contents for Symantec NORTON GHOST PERSONAL EDITION
-
Page 1
™ Norton Ghost Personal Edition User’s Guide… -
Page 2
Corporation. NO WARRANTY. The technical documentation is being delivered to you AS-IS and Symantec Corporation makes no warranty as to its accuracy or use. Any use of the technical documentation or the information contained therein is at the risk of the user. Documentation may include technical or other inaccuracies or typographical errors. -
Page 3
The software which accompanies this license (the «Software») is the property of Symantec or its licensors and is protected by copyright law. While Symantec continues to own the Software, you will have certain rights to use the Software after your acceptance of this license. Except as may be modified by a license… -
Page 4
(60) days from the date of delivery of the Software to you. Your sole remedy in the event of a breach of this warranty will be that Symantec will, at its option, replace any defective media returned to Symantec within the warranty period or refund the money you paid for the Software. -
Page 5: Table Of Contents
Setting up Norton Ghost Minimum system requirements …………13 Hardware requirements for Norton Ghost transfer modes ..14 Installing Norton Ghost Personal Edition ……..14 Installing Norton Ghost in Windows ……..14 Installing Norton Ghost in DOS ……….15 Uninstalling Norton Ghost …………. 16 Uninstalling Norton Ghost in Windows ……..
-
Page 6
Appendix D Diagnostics Hard drive detection and diagnostic information ……69 Norton Ghost abort error file (ghost.err) ……… 69 Hard disk geometry diagnostics ……….70 Full diagnostic statistics dump summary ……..70 Symantec Service and Support Solutions Disk Replacement Form Index… -
Page 7: Chapter 1 About Norton Ghost Personal Edition
PC to a new PC. Caution: Norton Ghost Personal Edition is a powerful utility program that performs complex operations on your computer. It is recommended for experienced and highly skilled PC users only.
-
Page 8: How Norton Ghost Works
Chapter 1: About Norton Ghost Personal Edition partitions, Norton Ghost positions each partition or logical drive on the target disk using the same rules as FDISK, copying the partitions on a file- by-file basis. An image file can be stored on a CD, Superdisk, JAZ or ZIP drive, or other removable media.
-
Page 9: Save And Load Image Files To And From Removable Media
How Norton Ghost works Norton Ghost usage, both the source and destination must be free from file corruption and physical hard disk drive problems prior to cloning. Note: When cloning an entire hard disk drive, the existing partition configuration is overwritten and need not be set in advance. Internal transfer operations are one of the fastest methods of cloning, and offer a simple quick hard disk drive backup or migration tool.
-
Page 10: Clone Hard Disk Drives And Partitions Peer-To-Peer
Chapter 1: About Norton Ghost Personal Edition For restoration purposes, once the device is working and has a drive letter, Norton Ghost can use that drive to perform the required task. Clone hard disk drives and partitions peer-to-peer Peer-to-peer connections are typically used when there are two computers that you wish to connect.
-
Page 11
How Norton Ghost works These components can be loaded from a boot disk to allow Norton Ghost to use NetBIOS to communicate and clone between master and slave. Master Crossover Ethernet Cable Slave Using the parallel (LPT) port With two computers and a parallel data transfer cable (not provided with Norton Ghost) you can clone two computers, master to slave. -
Page 12
Chapter 1: About Norton Ghost Personal Edition… -
Page 13: Chapter 2 Setting Up Norton Ghost
Setting up Norton Ghost Minimum system requirements The system requirements to run Norton Ghost are: 386SX processor (486 or above recommended) 4 MB RAM (8 MB RAM for NTFS), 16 MB recommended DOS 5.0 or above VGA monitor…
-
Page 14: Hardware Requirements For Norton Ghost Transfer Modes
Windows or DOS. Installing Norton Ghost in Windows To install Norton Ghost in Windows: Insert the Norton Ghost Personal Edition CD in your CD-ROM drive. After a moment, the Norton Ghost setup program starts automatically.
-
Page 15: Installing Norton Ghost In Dos
Replacement form in this guide for information about getting floppy disks. Follow the instructions that appear on the screen. The setup program places a Norton Ghost Personal Edition program group in your Start menu and installs the files necessary to run Norton Ghost Personal Edition.
-
Page 16: Uninstalling Norton Ghost
Chapter 2: Setting up Norton Ghost Uninstalling Norton Ghost Uninstalling Norton Ghost in Windows To uninstall Norton Ghost in Windows: Click the Start button, then select Settings > Control Panel. Double-click Add/Remove programs. In the list of installed programs, select Norton Ghost Personal Edition.
-
Page 17: Setting Up Transfer Methods
Setting up transfer methods Use the following DOS command to copy the system files to the formatted disk: C:\> sys c: a: Use the following DOS command to format and copy the system files to the unformatted disk: C:\> format a: /s Copy GHOSTPE.EXE onto the boot disk.
-
Page 18: Peer-To-Peer Connections
All operator input will be on the master computer. Use the previous table to choose which machine will be the master and which will be slave. Peer-to-peer NetBIOS network connections NetBIOS is only available for peer-to-peer connections. Sample third-party files are available on the Symantec FTP site at: ftp://ftp.symantec.com/public/english_us_canada/products/ ghost/…
-
Page 19
Setting up transfer methods Sourcing NetBIOS The following steps explain the NetBIOS setup procedure. Install network interface cards. Once the network interface cards are installed, the two peer machines need to be connected using cabling. The type and setup of the connection will depend on your individual network requirements. -
Page 20
Chapter 2: Setting up Norton Ghost… -
Page 21: Chapter 3 Using Norton Ghost
Using Norton Ghost This chapter describes how to perform operations. The procedures assume that all hardware is configured properly and communication methods are established. See “Setting up transfer methods” on page 17 for more information. Information on the following tasks is provided: Starting Norton Ghost Navigating in Norton Ghost without a mouse Cloning disks…
-
Page 22
Chapter 3: Using Norton Ghost No other devices. Other peripheral devices not needing additional setup (for example, Jaz or Zip drive). SCSI tape drive requiring DOS ASPI driver setup. Third-party device requiring DOS driver setup. Peer-to-peer connection using LPT printer port. Peer-to-peer connection using NetBIOS and network interface cards connection. -
Page 23: Starting Norton Ghost
Starting Norton Ghost Select source hard disk drive, partitions, or image file. Select destination hard disk drive, partition, or image file. Warning: Choose carefully. Make sure you select the correct destination to overwrite. In most cases, you will not be able to recover from an incorrectly selected destination drive.
-
Page 24: Navigating Without A Mouse
Chapter 3: Using Norton Ghost Ghost to access and use some hardware. See “Setting up transfer methods” on page 17 for more information. Navigating without a mouse Depending upon how Norton Ghost is started, mouse support may not be available. To use Norton Ghost without a mouse: Use arrow keys to navigate the menu.
-
Page 25: Cloning From Disk To Disk
Cloning disks LPT > Master NetBIOS > Master Cloning from disk to disk To clone disk to disk: From the main menu, select Disk > To Disk. The Source Drive dialog box displays. Select the source drive. The Source Drive dialog box displays the details of every disk Norton Ghost can find on the local machine.
-
Page 26
Chapter 3: Using Norton Ghost Confirm or change the destination drive partition layout. The Destination Drive Details dialog box displays a suggested partition layout for the destination drive. By default Norton Ghost allocates any extra space that the new disk has to the first FAT or NTFS partition that it discovers. -
Page 27: Cloning A Disk To Image File
Cloning disks Select Yes to proceed with the disk cloning. The system performs a quick integrity check of the file structure on the source disk and then copies the source disk to the destination. If you need to abort the process use Ctrl-C, but be aware that this leaves the destination disk in an unknown state.
-
Page 28
Chapter 3: Using Norton Ghost Specify the drive or device, and specify the full pathname. The image file may reside on a local drive (but not the one that is being copied from). When using peer-to-peer connections, the image file will be created on the slave machine. On pressing Enter, the compress image question displays. -
Page 29: Cloning A Disk From An Image File
Cloning disks Norton Ghost displays the final “Proceed with disk dump?” question. This is the last chance to back out. Check the details displayed and ensure the correct options have been selected. Do one of the following: Select Yes to proceed with the image file creation. The system performs a quick integrity check of the file structure on the source disk and then copies the source disk to the destination image file.
-
Page 30
Chapter 3: Using Norton Ghost Specify the drive or device and select the full pathname. Note that the image file may reside on a local drive (but not the one that is being copied to). When using peer-to-peer connections, the file will be located on the slave machine. -
Page 31
Cloning disks held in the source partition. On selecting OK, Norton Ghost displays the final “Proceed with disk load?” question. This is the last chance to back out. Check the details displayed and ensure the correct options have been selected. Do one of the following: Select Yes to proceed with the disk cloning. -
Page 32: Cloning Partitions
Chapter 3: Using Norton Ghost Cloning partitions Partition cloning procedures are accessed from the main menu. To specify a transfer method, select one of the following: Local LPT > Master NetBIOS > Master The source and destination partitions must be correctly configured before cloning partitions.
-
Page 33
Cloning partitions Select the source partition. The Source Partition dialog box displays the details of all the partitions on the selected source drive. On selection of the source partition, the Destination Drive dialog box displays. Select the destination drive. The Destination Drive dialog box displays the details of every disk Norton Ghost can find on the destination machine. -
Page 34: Cloning From Partition To Image File
Chapter 3: Using Norton Ghost Warning: Choose carefully as this is the partition that is going to be overwritten. Check the details displayed and ensure the correct options have been selected. Do one of the following: Select Yes to proceed with the partition copy. If you need to abort the process use Ctrl-C, but be aware that this leaves the destination drive in an unknown state.
-
Page 35
Cloning partitions The Source Drive dialog box displays the details of every disk Norton Ghost can find on the local machine. On selection of the source drive, the Source Partition dialog box displays. Select the source partitions to be included in the destination image file. -
Page 36: Cloning A Partition From An Image File
Chapter 3: Using Norton Ghost Norton Ghost displays the final “Proceed with partition dump?” question. This is the last chance to back out. Check the details displayed and ensure the correct options have been selected. Do one of the following: Select Yes to proceed with the image file creation.
-
Page 37
Cloning partitions Select the source partition from the image file. The Source Partition dialog box displays the details of all the partitions in the image file. On selection of the source partition, the Destination Drive dialog box displays. Select the destination drive. The Destination Drive dialog box displays the details of every disk Norton Ghost can find on the local machine. -
Page 38
Chapter 3: Using Norton Ghost Warning: Choose carefully as this is the partition that is going to be overwritten. Check the details displayed and ensure the correct options have been selected. Do one of the following: Select Yes to proceed with the partition cloning. Norton Ghost overwrites the destination partition using the partition details contained in the image file. -
Page 39: Managing Image Files
Managing image files Managing image files Norton Ghost can create an image file that contains all the information required to recreate a complete disk or partition. Image files are a useful way to store and reliably compress images of model system configurations, or to create backup copies of complete drives or partitions.
-
Page 40: Image Files And Crc32
Chapter 3: Using Norton Ghost Image files and CRC32 Cyclic Redundancy Checking (CRC) is a data error checking technique. CRC ensures that the original data that was written to the image file is the same as the data that is being used from the image file. The 32 value in CRC32 indicates the CRC technique uses a 32-bit value to store error checking information.
-
Page 41
Managing image files Spanned image files Spanned image files are similar to size-limited multi-segment image files. The difference is that each segment file (or span) of the image file is limited by the actual volume size of the media the image is being saved to. This allows you to specify a drive and filename and let Norton Ghost sort out when to request another volume or location for the remaining data. -
Page 42
Chapter 3: Using Norton Ghost If you select compression and there is still a possibility of insufficient space, the following message displays: If spanning is not enabled, an error message displays: Before starting to save the disk contents to the image file, Norton Ghost displays the source and destination details and gives you a chance to back out. -
Page 43: Image Files And Tape Drives
Managing image files The screen below shows how Norton Ghost will prompt you for span set disk one and for subsequent volumes. How to load from a spanned image When loading a disk or partition from an image file, the process is the same as loading from an unspanned image file.
-
Page 44: Viewing Image File Content And Selective File Restoration
Chapter 3: Using Norton Ghost When using tape drives with Norton Ghost, the tape drive can be selected as the source or destination device in the File Locator window. Each SCSI tape device is shown as MTx, where x is a number starting at 0 and increases incrementally for each drive present.
-
Page 45
Managing image files boxes to prompt for the disk and partition to save. A sample screen is shown below: Norton Ghost creates an index in the image file as it works that allows Ghost Explorer to create a display of files very quickly. For more information on Ghost Explorer, see the Ghost Explorer online help. -
Page 46
Chapter 3: Using Norton Ghost… -
Page 47: Appendix A Norton Ghost Command-Line Switches
Norton Ghost command-line switches Norton Ghost can be run: Interactively with no command-line switches Interactively with selected switches The Norton Ghost command-line switches are used to alter Norton Ghost’s behavior and automate procedures. To list Norton Ghost’s command-line switches, type: ghostpe.exe -h.
-
Page 48
Appendix A: Norton Ghost command-line switches -clone,mode=pdump,src=1:2,dst=g:\part2.gho -fcr -afile=filename Overrides the default abort error log file (ghost.err) to the directory and file given in filename. -autoname Automatically names spanned image files during creation. Avoids the user prompt asking for confirmation of the next destination location for the remainder of the image file. -
Page 49
Command-line switches MODE={copy | load | dump | pcopy | pload | pdump} MODE defines the type of clone command: copy — disk-to-disk copy load — file-to-disk load dump — disk-to-file dump pcopy — partition-to-partition copy pload — file-to-partition load pdump — partition-to-file dump SRC={drive | file | drive:partition | @MTx}… -
Page 50
Appendix A: Norton Ghost command-line switches dump Disk image filename, for example g:\images\system2.img. If using a tape drive set to @MTx(x=0…). pcopy/pload Destination partition, For example, 2:2 indicates the LOAD second partition on drive two. pdump Partition image filename e.g, g:\images\part1.img:2. SZE{E | F | L | n={nnnnM | nnP| F | V}} SZE is used to set the size of the destination partitions for either a disk load or disk copy operation. -
Page 51
Command-line switches Rule 2: If the destination disk is smaller than the original source disk (but still large enough to accommodate the data from the source disk), the free space left over after the data space has been satisfied will be distributed between the destination partitions in proportion to the data usage in the source partitions. -
Page 52
Appendix A: Norton Ghost command-line switches dst=1,szeL -CRC32 The -CRC32 switch allows making a list of the files on a disk or partition, or in an image file with CRC values for each, and to verify that list against the original or a clone. -
Page 53
Command-line switches dcreate Create an ASCII CRC32 file from an image file. dverify Verify an image file from an ASCII CRC32 file. Examples of -CRC32 usage To create a CRC32 file (called ghost.crc) while making an image file: ghostpe.exe -fcr To create a list of files and CRC32 values for a disk: ghostpe.exe -CRC32,action=create,src=1,crcfile=ghost.crc To verify the list against an image file:… -
Page 54
Appendix A: Norton Ghost command-line switches Same as previous but specify the disk, CRC file, and list file. This example uses disk 1 as the source drive, myfile.txt as the ASCII CRC32 file, and myfile.out as the verification list file. To verify the contents of the primary drive against a CRC32 file: ghostpe.exe -CRC32,action=verify,src=1, crcfile=myfile.txt,vlist=myfile.out,vexcept=myfile.exc… -
Page 55
Command-line switches Files specified before the first [Partition:x] heading will be used to match files in any partition. A directory of * matches any subdirectory, regardless of nesting. The above exclusion file will match any file with an extension of .1 in any subdirectory on the second partition. -
Page 56
Appendix A: Norton Ghost command-line switches Norton Ghost. This switch may also assist when tape drives are incorrectly reported as drives. Valid values for number are 128 to 255. -f32 Allows Norton Ghost to convert all FAT16 volumes to FAT32 volumes when the destination partition is larger than 2047 MB in size. -
Page 57
Command-line switches Displays the fingerprint details written on a hard disk drive created by Norton Ghost. The fingerprint displays the process used to create the drive or partition and the time, date, and disk the operation was performed on. -fnf Disables the creation of a fingerprint when cloning hard disk drives or partitions. -
Page 58
Appendix A: Norton Ghost command-line switches image file or to another disk, Norton Ghost examines the source partition and decides whether to copy just the files and directory structure, or to do a sector-by-sector copy. If it understands the internal format of the partition, it defaults to copying the files and directory structure. -
Page 59
Command-line switches main menu. See “Peer-to-peer connections” on page 18, for more information. -lps LPT slave mode. This switch causes Norton Ghost to automatically go into LPT slave mode, and is the equivalent of selecting LPT Slave in the main menu. -
Page 60
Appendix A: Norton Ghost command-line switches Ignores the NTFS volume CHKDSK bit. Norton Ghost checks the CHKDSK bit on a NTFS volume before performing operations. When Norton Ghost indicates the CHDSK bit is set, we recommend running CHKDSK on the volume to ensure the drive is in a sound state before cloning. -
Page 61
Command-line switches Override. Allows the override of internal space and integrity checks. Use of this switch should be avoided. -pwd and -pwd=x Specifies password protection to be used when creating an image file. x indicates the password for the image file. If no password is given in the switch Norton Ghost will prompt for one. -
Page 62
Appendix A: Norton Ghost command-line switches Skips files as outlined in the skipfile.txt file. For example, the skipfile.txt contains: *\*.tmt [partition:1] \windows\ *\*.exe [Partition:2] *\*me.txt This would skip all *.tmt files on any partition, the windows directory and any *.exe files on the first partition, and any file that ended with the me.txt on the second partition. -
Page 63
Command-line switches Sets the ASPI driver to report a read/write as successful only when the data has been transferred to the physical medium. Useful when using older or unreliable tape devices or sequential media. -tapespeed=x Allows control of tape speed. Where x equals 0 to F. 0 is default, 1-F increases tape speed. -
Page 64
Appendix A: Norton Ghost command-line switches -z or -z1 low compression (fast) -z2 high compression (medium) -z3 thru -z9 higher compression (slower) -
Page 65: Appendix B Frequently Asked Questions
Frequently asked questions When I compare the contents of the original source disk to the disk Norton Ghost created there is a difference in the number of files. Why? In addition to files skipped using the -skip switch, some temporary files are not included when cloning a FAT volume.
-
Page 66
Appendix B: Frequently asked questions Can Norton Ghost compress an image file? Yes. Norton Ghost includes several levels of compression that offer a range of performance and storage gains. After cloning and restarting Windows 95, Windows 95 keeps finding a new NIC card. -
Page 67: Appendix C Troubleshooting
“Diagnostics” on page 69 for information on the ghost.err file generated when an abort error occurs. Further information is available on Symantec’s Norton Ghost technical support website. See “Symantec Service and Support Solutions.” 8005, 8012 Norton Ghost is being run in a non-DOS environment. Either boot the system to DOS or create a DOS boot disk with required device drivers to start the system and run Norton Ghost.
-
Page 68
Norton Ghost to continue. You can locate the offender by looking at the drive:\path\filename at the bottom of the Norton Ghost window when this error occurs. Visit the Symantec website at www.symantec.com for details on how to purchase Norton Ghost. 15150 Probable corrupt image file. -
Page 69: Appendix D Diagnostics
Diagnostics This appendix contains information that may be helpful for diagnostic purposes. Hard drive detection and diagnostic information Norton Ghost has the ability to generate several different diagnostic reports outlining the hard drive devices detected, other system-related information, and error conditions when they are detected. Norton Ghost abort error file (ghost.err) An error message consists of an error number, a description, and possibly a suggestion of what can be done to remedy the problem.
-
Page 70: Hard Disk Geometry Diagnostics
Appendix D: Diagnostics Hard disk geometry diagnostics A list of all detected hard drives on the system and their associated geometry values can be reported to screen using the command line switch -di. To generate a file containing the details, the DOS redirect output can be used as shown in the following example: c:\ >…
-
Page 71: Symantec Service And Support Solutions
Symantec Service and Support Solutions Symantec is committed to excellent service worldwide. Our goal is to provide you with professional assistance in the use of our software and services, wherever you are located. Technical Support and Customer Service solutions vary by country. If you have questions about the services described below, please refer to the section “Worldwide Service and Support”…
-
Page 72
Symantec online support technicians. File downloads Point your web browser to http://service.symantec.com to search for and download technical notes and software updates. You can also click the LiveUpdate button in programs enabled with this feature to automatically download and install software updates and virus definitions. -
Page 73
Technical information may still be available through online support. When Symantec announces that a product will no longer be marketed or sold, telephone support will be discontinued 60 days later. Support will only be available for discontinued products through online services. -
Page 74
+61 (2) 9817 4550 Most International Partners provide Customer Service and Technical Support for Symantec products in your local language. For more information on other Symantec and International Partner locations, please call our Technical Support automated fax retrieval service, in the United States at +1 (541) 984-2490, choose Option 2, and request document 1400. -
Page 75: Disk Replacement Form
Street Address (No P.O. Boxes, Please) _______________________________________________________________________________________ City ________________________________________________________________________State _______ Zip/Postal Code _________________ Country* __________________________________________________________Daytime Phone _______________________________________ Software Purchase Date___________________________________________________________________________________________________ *This offer limited to U.S., Canada, and Mexico. Outside North America, contact your local Symantec office or distributer. Briefly describe the problem:_______________________________________________________________________________________________ _____________________________________________________________________________________________________________________ Disk Replacement Price $ 10.00…
-
Page 76
Disk Replacement Form… -
Page 77
conversion from FAT16, 56 NTFS abort log, 48, 69 switches, 59–60 ASPI driver, 17, 22 files automation skipping, 61 clone switch and examples, 48 fingerprint. See Ghost close on completion, 57 format NetBIOS, 59 logical, 7 reboot on completion, 61 switches, 47–63 version checking, 63 Ghost… -
Page 78: Index
Index See also image files multi-segment See also slave See also image files spanned partition features, 39 cloning, 7 loading, 43 peer to peer connection multi-segment, 40–43, 48, 62 LPT. See parallel port transfer password, 61 procedures, 21–23 SCSI tape, 43 disk, 24–31 size limited.
-
Page 79
Index tape drive See image files See SCSI tape uninstalling, 16 Windows — running Ghost inside, 23 Zip drive. See image files spanned… -
Page 80
Index…

Здравствуйте Друзья! Тема статьи — клонирование жесткого диска. Инструмент, с помощью которого мы будем это делать — Portable Symantec Norton Ghost. Что такое клонирование. Это создание точной копии всегожесткого диска или раздела на другой жесткий диск или раздел. Это необходимо для переезда на новый, более емкий диск (или SSD) дабы избежать установки операционной системы, драйверов, программ, не настраивать интернет и все остальное и, следовательно, не тратить гору времени. Другое дело когда Windows на старом диске работает не стабильно, тогда да. Переустановка — отличный выход. Если же система на старом диске работает отлично, можно потратить пол часа на клонирование жесткого диска и все. Как это сделать читайте далее или смотрите видео в конце статьи.
Структура статьи
- Готовим загрузочную флешку для клонирования
- Клонируем жесткий диск (создаем образ)
1. Готовим загрузочную флешку для клонирования
Почему будем загружаться с USB девайса? Потому что на многих компьютерах (например в моем домашнемстационарном компьютере) и ноутбуках (в домашнем ноуте не работает привод) нет приводов для чтения оптических дисков. В нетбуках их никогда не было. Зато разъемы USB есть, были и будут. Поэтому клонирование жесткий дисков универсальнее будет производить загрузившись с флешки.
Для начала нам необходимо скачать USB Flash boot to DOS.7z
- USB Flash boot to DOS.7z [~2 МБ]
Это утилита с помощью которой мы сделаем загрузочный накопитель. Скачиваем и распаковываем. Если возникают трудности с распаковкой можно прочитать статью Как открыть файл с расширением rar.
Установим программу с помощью которой мы сделаем флешку загрузочной
Заходим в распакованную папку и запускаем файл Setup.exe

Принимаем лицензионное соглашение Next >

Принимаем лицензионное соглашение Next >
Нажимаем Next >

Принимаем еще одно лицензионное соглашение Yes

Принимаем еще одно лицензионное соглашение Yes
Если необходимо изменяем место установки программы и/или жмем Next >

Завершаем установку программы. Давим Finish

Завершаем установку программы. Давим Finish
Программа установлена.
Сделаем флешку загрузочной, что бы клонировать HDD.
Запускаем установленную программу с ярлычка на рабочем столе. В разделе Device из выпадающего списка выбираем наш накопитель.
В разделе File system выбираем файловую систему FAT32

Устанавливаем флажок Quick Format и Create a DOS startup disk.
Устанавливаем точку в позицию using DOS system files located at: C помощью кнопки […] указываем путь к папке bot
Нажимаем Start

Устанавливаем флажок Quick Format и Create a DOS startup disk.
Устанавливаем точку в позицию using DOS system files located at: C помощью кнопки […] указываем путь к папке bot
Нажимаем Start
Программа выдаст предупреждение, что все данные на USB накопителе будут удалены. Сохраняете все важные данные и кликаете Да

После завершения форматирования программа выдаст отчет. Жмете ОК

После завершения форматирования программа выдаст отчет. Жмете ОК
Загрузочная флешка с DOS создана.
После, из папки USB все копируем на наш загрузочный USB девайс. Содержимое накопителя будет выглядеть следующим образом.

Накопитель почти готов.
Теперь необходимо скачать другой архив
- Portable Symantec Norton Ghost 11.0.0.1502.7z [~ 3.5 МБ]
Эта сам Norton Ghost с помощью которого мы будет клонировать наш диск.
Копируете содержимое на загрузочный USB диск.

Накопитель почти готов.
Теперь необходимо скачать другой архив
- Portable Symantec Norton Ghost 11.0.0.1502.7z [~ 3.5 МБ]
Эта сам Norton Ghost с помощью которого мы будет клонировать наш диск.
Копируете содержимое на загрузочный USB диск.
Загрузочная флешка с Norton Ghost под DOS готова.
2. Клонируем жесткий диск (создаем образ)
Вставляем подготовленный накопитель в компьютер и перезагружаемся.
Для клонирования или создания образа (имиджа от слова Image — образ) нам необходимо загрузиться с него.
Это можно сделать двумя способами. Или выставить загрузку с USB в BIOS или запустить меню загрузки Windows и единоразово загрузиться с USB девайса.
Меню загрузки, на подопытном компьютере, вызывается нажатием клавиши F9 при перезагрузки компьютера. На домашнем компьютере вход в меню загрузки осуществляется клавишей F8. Методика входа такая же как и при входе вбезопасный режим (F8). При загрузке несколько раз нажимаете F9(F8) и попадаете в меню загрузки.
Выбираем USB Device и жмем Enter

Загружается Volkov Commander. В левой панели выбираем файл ghost.exe и Enter

Загружается Volkov Commander. В левой панели выбираем файл ghost.exe и Enter
Загружается Symanteс Ghost. Кликаем ОК мышкой или Enter

Попадаем в главное окно программы клонирования HDD — Ghost. Можно управлять мышкой, но удобнее стрелочками на клавиатуре. Выбираем Local или нажимаем на клавиатуре стрелочку вправо.

Попадаем в главное окно программы клонирования HDD — Ghost. Можно управлять мышкой, но удобнее стрелочками на клавиатуре. Выбираем Local или нажимаем на клавиатуре стрелочку вправо.
Открывается меню из трех пунктов: Disk, Partition и Check. Если необходимо клонировать целый диск или создать образ всего HDD выбираем Disk. Если будем работать с конкретным разделом выбираем Partition. В нашем случае мы создадим имидж системного раздела. Выбираем Partition

Если вы будете клонировать раздел со старого жесткого диска на новый, то, раздел куда вы будете клонировать должен быть больше по объему чем клонируемый. Это важно!
Далее у нас открывается еще одно меню с вариантами: клонировать раздел в раздел, создать Image из раздела и восстановить раздел из имиджа. Если вы подключили два жестких диска, то можно сразу клонировать раздел в раздел — To Partition. В нашем случае создадим образ из раздела — To Image
Выбираем диск с которого будем клонировать или создавать Image. На рисунке представлены два диска. По столбцу Size(MB) можно без труда определить кто из них кто. Выбираем жесткий диск и жмем ОК

Выбираем раздел который вы хотите клонировать. В нашем случае создавать имидж. Выбираем первый системный раздел и жмем ОК

Выбираем раздел который вы хотите клонировать. В нашем случае создавать имидж. Выбираем первый системный раздел и жмем ОК
Если вы клонируете раздел в раздел, то вы будете выбирать диск и раздел куда вы хотите его клонировать. В нашем случае, мы выбираем на какой раздел сохранять Image. Norton Ghost дает возможность выбрать любой раздел кроме того с которого мы будем снимать образ.
Сразу может быть не понятно какому разделу какая буква относится. Метод тыка выручает.

Когда мы определились с разделом на котором у нас будет записан имидж мы задаем имя. Рекомендую поставить дату и обозначить буквой Image какого раздела содержится в этом файле. Расширение можно не указывать. Сохраняем — Save

Когда мы определились с разделом на котором у нас будет записан имидж мы задаем имя. Рекомендую поставить дату и обозначить буквой Image какого раздела содержится в этом файле. Расширение можно не указывать. Сохраняем — Save
В случае создания имиджа, можно выбрать сжатие. Рекомендуется выбирать Fast

Для запуска клонирования или создания имиджа нажимаем Yes

Для запуска клонирования или создания имиджа нажимаем Yes
Процесс клонирования или создания образа. Ждем завершения.

Имидж создан. Continue

Имидж создан. Continue
Попадаем в главное меню Symantec Ghost. Жмем Quit
Нажимаем Yes для выхода из Norton Ghost

Нажимаем Yes для выхода из Norton Ghost
Попадаем в Volkov Commander. F10 — выходим из него.
Затем перезагружаем компьютер и вынимаем USB накопитель.
Image системного диска у нас создан. Теперь его можно развернуть на новом HDD или использовать как бэкап на черный день.
Заключение
В статье про клонирование жесткого диска рассказал вам самый на мой взгляд простой способ это сделать. Плюс! С помощью Symantec Ghost можно сделать Image раздела или всего диска целиком, тем самым решив вопрос с резервными копиями. Этот образ можно развернуть на любом жестком диске.
Если у вас уже есть новый HDD и вам необходимо переехать, то клонируем сразу без посредников. Это будет быстрее чем читать и записывать на один и тот же диск. Основной момент. Раздел нового диска на который вы будете клонировать должен быть по объему больше раздела источника.
Видео «Как клонировать жесткий диск» в котором покажу как создать образ раздела и развернуть его на другом диске.
Возникнут вопросы, пишите в комментариях.
Благодарю, что поделились статьей в социальных сетях. Всего Вам Доброго!
http://youpk.ru/klonirovanie-zhestkogo-diska/
-
Symantec Norton Ghost 15.0 — page 1
Norton Ghost 15.0 User’s Guide …
-
Symantec Norton Ghost 15.0 — page 2
Norton Ghost 15.0 User’s Guide The software described in this book is furnished under a license agreement and may be used only in accordance with the terms of the agreement. Documentation version: 9.0 Legal Notice Copyright © 2009 Symantec Corporation. All rights reserved. Symantec, the Symantec Logo, Norton, Norton AntiVirus, LiveUpdate, pcA …
-
Symantec Norton Ghost 15.0 — page 3
Symantec Corporation 350 Ellis Street Mountain View, CA 94043 http://www.symantec.com …
-
Symantec Norton Ghost 15.0 — page 4
Technical Support Symantec Technical Support maintains support centers globally. Technical Support ’ s primary role is to respond to specific queries about product features and functionality. The Technical Support group also creates content for our online Knowledge Base. The Technical Support group works collaboratively with the other functional …
-
Symantec Norton Ghost 15.0 — page 5
■ Version and patch level ■ Network topology ■ Router, gateway, and IP address information ■ Problem description: ■ Error messages and log files ■ Troubleshooting that was performed before contacting Symantec ■ Recent software configuration changes and network changes Licensing and registration If your Symantec product requires regist …
-
Symantec Norton Ghost 15.0 — page 6
Maintenance agreement resources If you want to contact Symantec regarding an existing maintenance agreement, please contact the maintenance agreement administration team for your region as follows: customercare_apac@symantec.com Asia-Pacific and Japan semea@symantec.com Europe, Middle-East, and Africa supportsolutions@symantec.com North America and …
-
Symantec Norton Ghost 15.0 — page 7
Technical Support . . . . . . . . . . . . . . . . . . . . . . . . . . . . . . . . . . . . . . . . . . . . . . . . . . . . . . . . . . . . . . . . . . . . . . . . . . . . . . . . . . . . . . . . . . . . . . . 4 Chapter 1 Introducing Norton Ghost ™ . . . . . . . . . . . . . . . . . . . . . . . . . . . . . . . . . . . . . . . . . . . . . . . 13 Abou …
-
Symantec Norton Ghost 15.0 — page 8
Adjusting default tray icon settings . . . . . . . . . . . . . . . . . . . . . . . . . . . . . . . . . . . . . . . . . . . 40 Managing file types . . . . . . . . . . . . . . . . . . . . . . . . . . . . . . . . . . . . . . . . . . . . . . . . . . . . . . . . . . . . . . . . 41 Using nicknames for external drives . . . . . . . . . . . . . . . . . . . …
-
Symantec Norton Ghost 15.0 — page 9
About using a network server as your Offsite Copy destination . . . . . . . . . . . . . . . . . . . . . . . . . . . . . . . . . . . . . . . . . . . . . . . . . . . . . . . . . . . . . . . . . . . . . 84 About using an FTP server as your Offsite Copy destination . . . . . . . . . . . 85 Chapter 7 Backing up files and folders . . . . . . . . . . . . …
-
Symantec Norton Ghost 15.0 — page 10
Chapter 10 Monitoring the status of your backups . . . . . . . . . . . . . . . . . . . . . . . . . 115 About monitoring backups . . . . . . . . . . . . . . . . . . . . . . . . . . . . . . . . . . . . . . . . . . . . . . . . . . . . . . . . . . . 115 Rescanning a computer ’ s hard disk . . . . . . . . . . . . . . . . . . . . . . . . . . . . . . . …
-
Symantec Norton Ghost 15.0 — page 11
Limiting the number of file versions to keep . . . . . . . . . . . . . . . . . . . . . . . . . . . . . . 155 Manually deleting files from your file and folder backup . . . . . . . . . . . . . . 155 Finding versions of a file or folder . . . . . . . . . . . . . . . . . . . . . . . . . . . . . . . . . . . . . . . . . . . 156 Automating management of …
-
Symantec Norton Ghost 15.0 — page 12
Chapter 15 Copying a drive . . . . . . . . . . . . . . . . . . . . . . . . . . . . . . . . . . . . . . . . . . . . . . . . . . . . . . . . . . . . . . . . . . 197 About copying a drive . . . . . . . . . . . . . . . . . . . . . . . . . . . . . . . . . . . . . . . . . . . . . . . . . . . . . . . . . . . . . . . . . . 197 Preparing to copy drives . . …
-
Symantec Norton Ghost 15.0 — page 13
Introducing Norton Ghost ™ This chapter includes the following topics: ■ About Norton Ghost ■ What is new in Norton Ghost ■ Hiding or showing the Advanced page ■ Getting more information about Norton Ghost About Norton Ghost Norton Ghost provides advanced backup and recovery for your computer. Protect any kind of data you keep on your com …
-
Symantec Norton Ghost 15.0 — page 14
■ Virus attacks: Damage might be done before a virus is quarantined. ■ Faulty software installations: Some software can negatively affect your computer’s performance, and slow it down to the point that programs or documents require too much time to open. But when installed, removing a program might not recover unintentional damage by the i …
-
Symantec Norton Ghost 15.0 — page 15
Table 1-1 What is new Norton Ghost (continued) Description Feature You can now create independent recovery points using the new Back Up My Computer feature in Symantec Recovery Disk. Sometimes known as a cold backup or offline backup, you can create recovery points of a partition without the need to install Norton Ghost or its Agent. See “ About …
-
Symantec Norton Ghost 15.0 — page 16
Note: When you refer to the documentation while using the Advanced page, the first one or two steps do not apply. The first one or two steps merely indicate where to access each feature from the other pages of the product interface. From that point on, follow the remaining steps of each procedure. The Advanced page can be hidden from view if you do …
-
Symantec Norton Ghost 15.0 — page 17
Installing Norton Ghost This chapter includes the following topics: ■ Before you install ■ Installing Norton Ghost ■ Updating Norton Ghost ■ About uninstalling Norton Ghost Before you install Installation procedures might vary, depending on your work environment and which installation options you choose. This chapter focuses on installing t …
-
Symantec Norton Ghost 15.0 — page 18
Table 2-1 Minimum system requirements Minimum requirements Component The following Windows 32- or 64-bit operating systems are supported: ■ Windows 7 ■ Windows Vista Ultimate ■ Windows Vista Business ■ Windows XP Professional/Home (SP2 or later) ■ Windows XP Media Center (SP2 or later) Operating system The following are the memory require …
-
Symantec Norton Ghost 15.0 — page 19
Table 2-1 Minimum system requirements (continued) Minimum requirements Component The drive can be any speed, but it must be capable of being used as the startup drive from the BIOS. Norton Ghost uses Gear Software technology. To verify that your CD writer or DVD writer is compatible, visit the Gear Software Web site. http://www.gearsoftware.com/sup …
-
Symantec Norton Ghost 15.0 — page 20
Norton Ghost supports the following file systems: ■ FAT16, FAT16X ■ FAT32, FAT32X ■ NTFS ■ GUID Partition Table (GPT) ■ Dynamic disks ■ Linux Ext2, Linux Ext3 ■ Linux swap partitions Note: You must decrypt encrypted NTFS drives before you attempt to restore them. You cannot view the files that are in a recovery point for an encrypted …
-
Symantec Norton Ghost 15.0 — page 21
See “ About running a one-time backup from Symantec Recovery Disk ” on page 76. The 60-day grace period of Norton Ghost begins when you do any one of the following in the software: ■ Define a drive-based or file and folder backup ■ Recover a computer ■ Copy a drive ■ Consolidate incremental recovery points ■ Run a drive-based or file …
-
Symantec Norton Ghost 15.0 — page 22
Warning: The Symantec Recovery Disk CD provides the tools that you need to recover your computer. How you received Symantec Recovery Disk depends on the version of the product that you purchased. For example, Symantec Recovery Disk is included with your product either on a separate CD, or on your product CD. Be sure you store the CD in a safe place …
-
Symantec Norton Ghost 15.0 — page 23
Required for backing up directly to CD/DVD, and for creating a custom Symantec Recovery Disk CD. A CD/DVD burner is required to use this feature. CD/DVD Support Keeps your Symantec software up-to-date with the latest product updates. LiveUpdate 7 Click Finish to complete the installation. 8 Remove the product CD from the media drive, and then click …
-
Symantec Norton Ghost 15.0 — page 24
4 Do any of the following: ■ Click Run LiveUpdate to check for any product updates since the product shipped. ■ Click Launch Easy Setup to open the Easy Setup window when you complete the install process. (This option is not available in the Desktop version of Norton Ghost.) ■ Click Enable Google Desktop File and Folder Recovery if you want G …
-
Symantec Norton Ghost 15.0 — page 25
Updating Norton Ghost You can receive software updates for your version of the product over an Internet connection. LiveUpdate connects to the Symantec LiveUpdate server and automatically downloads and installs updates for each Symantec product that you own. You run LiveUpdate as soon as you install the product. You should continue to run LiveUpdat …
-
Symantec Norton Ghost 15.0 — page 26
Installing Norton Ghost About uninstalling Norton Ghost 26 …
-
Symantec Norton Ghost 15.0 — page 27
Ensuring the recovery of your computer This chapter includes the following topics: ■ About ensuring the recovery of your computer ■ Testing Symantec Recovery Disk ■ If driver validation fails ■ Creating a custom Symantec Recovery Disk CD About ensuring the recovery of your computer If Windows fails to start or it does not run normally, you …
-
Symantec Norton Ghost 15.0 — page 28
Testing Symantec Recovery Disk You should test the Symantec Recovery Disk CD to ensure that the recovery environment runs properly on your computer. Note: Depending on which version of the product you have purchased, Symantec Recovery Disk is either included on your product CD, or as a separate CD. You should place the CD containing Symantec Recove …
-
Symantec Norton Ghost 15.0 — page 29
Without access to the correct drivers, a device cannot be used while you run Symantec Recovery Disk. Therefore, if the recovery points that are required for recovering your computer are stored on a network or a local hard drive, you might not have access to them. You can find the drivers and copy them to a CD or a floppy disk, or you can create a c …
-
Symantec Norton Ghost 15.0 — page 30
6 Specify the following: Type the name that you want to use for the Symantec Recovery Disk label. Disk label If you want to save your customized Symantec Recovery Disk to media, select this option and then in the list box, select the media burning device that you want to use. Burn Symantec Recovery Disk to CD/DVD If you want to save your customized …
-
Symantec Norton Ghost 15.0 — page 31
Select this option if you want the Symantec pcAnywhere thin host to start automatically when you start Symantec Recovery Disk. Click Configure to specify pcAnywhere log on credentials and the following optional parameters: ■ Host name In the Host name box, type the name that you want to use for the host. You can leave this box blank to configure …
-
Symantec Norton Ghost 15.0 — page 32
13 On the License Setup pane, specify how you want to enable licensed features in the customized Symantec Recovery Disk (such as the cold imaging feature called Back Up My Computer). 14 Click Finish . Warning: Be certain to test your new, custom Symantec Recovery Disk CD. It ensures that you can use the CD to start your computer and that you can ac …
-
Symantec Norton Ghost 15.0 — page 33
Getting Started This chapter includes the following topics: ■ About key product components ■ How you use Norton Ghost ■ Starting Norton Ghost ■ Configuring Norton Ghost default options About key product components Norton Ghost includes two key components: the program itself, and the Symantec Recovery Disk CD. Table 4-1 Key product component …
-
Symantec Norton Ghost 15.0 — page 34
Table 4-1 Key product components (continued) Description Key Component The Symantec Recovery Disk CD is used to start your computer in the recovery environment. If your computer’s operating system fails, use Symantec Recovery Disk to recover your system drive (the drive where your operating system is installed). Note: Depending on which versio …
-
Symantec Norton Ghost 15.0 — page 35
Figure 4-1 Using Norton Ghost Starting Norton Ghost Norton Ghost is installed in the Windows Program Files folder by default. During installation, a program icon is installed in the Windows system tray from which you can open Norton Ghost. You can also open Norton Ghost from the Windows Start menu. To start Norton Ghost ◆ Depending on the Windows …
-
Symantec Norton Ghost 15.0 — page 36
■ On the classic Windows taskbar, click Start > Programs > Norton Ghost > Norton Ghost 15.0 . ■ On the Windows taskbar, click Start > All Programs > Norton Ghost > Norton Ghost 15.0 . ■ In the Windows system tray, double-click the SymantecNorton Ghost 15.0 tray icon. ■ In the Windows system tray, right-click the Norton Gho …
-
Symantec Norton Ghost 15.0 — page 37
Description Options Lets you manage file types and file type categories, which are used as a method for selecting the types of files you want included in a file and folder backup. See “ Managing file types ” on page 41. File Types If Google Desktop is installed on your computer when you install Norton Ghost, you have the option of enabling Goog …
-
Symantec Norton Ghost 15.0 — page 38
Description Options If you have a Network Management System (NMS) application, you can enable SNMP Traps support to send notifications to you NMS application. See “ About SNMP traps ” on page 122. SNMP Trap To configure Norton Ghost default options 1 Start Norton Ghost. 2 Click Tasks > Options . 3 Select an option you want to edit, make any …
-
Symantec Norton Ghost 15.0 — page 39
5 Enter a path to a folder where you want to store recovery points and file and folder backup data, or click Browse to look for a location. You cannot use an encrypted folder as your backup destination. If you want to encrypt your backup data to prevent another user from accessing it, refer to the Advanced options when you define or edit a backup. …
-
Symantec Norton Ghost 15.0 — page 40
■ Network cards: Is your network wired or wireless? What are the speeds of your network cards? ■ Network backbone: What is the size of your network pipeline? Does it support 10 MB transfer rates, or 1 GB transfer rates? ■ Network server: How robust is your server hardware? How fast is its processor? How much RAM does it have? Is it fast or sl …
-
Symantec Norton Ghost 15.0 — page 41
To adjust default tray icon settings 1 In Norton Ghost, on the menu bar, click Tasks > Options . 2 Click Tray Icon and select one of the following: Displays the Norton Ghost icon in the system tray. You must select this option to enable or disable any of the remaining options. Show system tray icon Notifies you when a backup was scheduled but di …
-
Symantec Norton Ghost 15.0 — page 42
To create a new file type and extensions 1 In Norton Ghost, on the menu bar, click Tasks > Options . 2 Click File Types . 3 At the bottom of the File types list, click the Add a file type ( + ) button to add a file type category. 4 Type a descriptive name of the new file type category, and then press Enter. 5 At the bottom of the Extensions for …
-
Symantec Norton Ghost 15.0 — page 43
Using nicknames for external drives When you choose an external drive for use with Norton Ghost as either a backup destination or an Offsite Copy destination, it can become confusing if you are using more than one drive, especially when the assigned drive letter changes each time you plug in the drive. To help you manage these destinations, Norton …
-
Symantec Norton Ghost 15.0 — page 44
Configuring default FTP settings for use with Offsite Copy File Transfer Protocol, or FTP, is the simplest and most secure way to copy files over the Internet. Norton Ghost serves as an FTP client to copy your recovery points to a remote FTP server as a secondary backup of your critical data. The Options dialog box lets you configure basic FTP sett …
-
Symantec Norton Ghost 15.0 — page 45
Two logging methods are available: Norton Ghost logging, and the Windows application log. From the Options page, you can configure both methods. To log Norton Ghost messages 1 In Norton Ghost, on the menu bar, click Tasks > Options . 2 Under Notifications, click Log File . 3 Click the Select the priority and type of messages list and select the …
-
Symantec Norton Ghost 15.0 — page 46
3 Click the Select the priority and type of messages list and select the priority level at which a message should be logged. Send all messages, regardless of priority levels. All messages Send only medium and high priority messages. Medium and high priority messages Send only high priority messages. High priority messages only Do not send any messa …
-
Symantec Norton Ghost 15.0 — page 47
3 Click the Select the priority and type of messages list and select the priority level at which an email should be sent. Send all messages, regardless of priority levels. All messages Send only medium and high priority messages. Medium and high priority messages Send only high priority messages. High priority messages only Do not send any messages …
-
Symantec Norton Ghost 15.0 — page 48
Getting Started Configuring Norton Ghost default options 48 …
-
Symantec Norton Ghost 15.0 — page 49
Best practices for backing up your data This chapter includes the following topics: ■ About backing up your data ■ About choosing a backup type ■ Best practices for backing up ■ Additional tips about backups ■ After defining your backup job ■ About selecting a backup destination ■ About backing up dual-boot computers About backing up …
-
Symantec Norton Ghost 15.0 — page 50
■ What compression levels to specify for recovery points, and whether to enable security settings (encryption and password protection). ■ Which of the many other options you want to use. You can customize each backup according to your backup needs. About choosing a backup type There are two types of backups available: ■ Drive-based backup: Ba …
-
Symantec Norton Ghost 15.0 — page 51
About backups When you back up your computer, you choose from two types of backups: ■ drive-based backup : backs up an entire hard drive ■ file and folder backup : backs up only the files and folders you select Which backup type you choose depends on what you are trying to protect and how much storage space you have to store backup data (recove …
-
Symantec Norton Ghost 15.0 — page 52
Using an external drive makes your backup data more portable. Should you need to remove your critical data from a particular location, you can quickly grab an external drive on your way out the door. See “ About Offsite Copy ” on page 81. Consider using external drives as your backup destination. You can assign a nickname to each external drive …
-
Symantec Norton Ghost 15.0 — page 53
You should keep your operating system and software programs separate from your own data. It speeds the creation of recovery points and reduces the amount of information that needs to be restored. For example, use the C drive to run Windows and to install and run software programs. Use the D drive to create, edit, and store personal files and folder …
-
Symantec Norton Ghost 15.0 — page 54
Periodically review the Status page. You can also review the events log on the Advanced page. The event log records events when they occur, backups and any errors that might have occurred during or after a backup. If you do not see the Advanced page tab, click View > Show Advanced Page . Note: Backup status and other messages are also conveyed i …
-
Symantec Norton Ghost 15.0 — page 55
■ Do not run a disk defragmentation program during a backup. Doing so will significantly increase the time that it takes to create the recovery point and might cause unexpected system resource issues. ■ If you have two or more drives that are dependent on each other, you should include both drives in the same backup. This provides the safest pr …
-
Symantec Norton Ghost 15.0 — page 56
About selecting a backup destination You should review the following information before deciding where to store recovery points and file and folder backup data. Note: If you choose to use CDs or DVDs as your backup destination (not recommended), you cannot back up to a sub-folder on the disk. Backup data must be created at the root of CDs and DVDs. …
-
Symantec Norton Ghost 15.0 — page 57
Table 5-1 Selecting a backup destination (continued) Information to consider Backup destination If your computer is connected to a network, you can save your recovery points and file and folder backup data to a network folder. Backing up to a network folder typically requires that you authenticate to the computer that is hosting the folder. If the …
-
Symantec Norton Ghost 15.0 — page 58
Table 5-2 Advantages and disadvantages of backup destinations (continued) Disadvantages Advantages Backup destination ■ Must have supported network interface card drivers to restore from Symantec Recovery Disk ■ Must understand and assign the appropriate rights for users who will run backups and restore data ■ Fast backup and recovery ■ Can …
-
Symantec Norton Ghost 15.0 — page 59
Backing up entire drives This chapter includes the following topics: ■ About defining a drive-based backup ■ Defining a drive-based backup ■ Compression levels for drive-based backups ■ Running a one-time backup from Norton Ghost ■ About running a one-time backup from Symantec Recovery Disk ■ About Offsite Copy ■ How Offsite Copy work …
-
Symantec Norton Ghost 15.0 — page 60
Defining a drive-based backup Define a drive-based backup to take a shapshot of your entire hard drive. To define a drive-based backup 1 On the Home or Tasks page, click Run or Manage Backups . 2 In the Run or Manage Backups window, click Define New . If you have not yet defined a backup, the Easy Setup dialog appears instead. 3 Click Back up my co …
-
Symantec Norton Ghost 15.0 — page 61
See “ About Offsite Copy ” on page 81. 10 Click Next . 11 On the Options panel, set the recovery point options you want. See “ Recovery point options ” on page 64. 12 (Optional) Click Advanced , set the advanced options you want, and then click OK to return to the Options panel. See “ Advanced options for drive-based backups ” on page 7 …
-
Symantec Norton Ghost 15.0 — page 62
Runs the backup one time on the date and at the time you specify. When you select this option, the Create a single recovery point box appears. Only run once 16 If you want the backup to run automatically according to a schedule, select Schedule, enter a start time, and select the days of the week when the backup should run. If you only want to run …
-
Symantec Norton Ghost 15.0 — page 63
See “ About backing up Microsoft virtual hard disks ” on page 205. If you use Microsoft’s BitLocker Drive Encryption to encrypt the data on a data drive (any drive that does not have the operating system installed on it), be aware that Norton Ghost does not work with locked data drives. Instead, you must unlock the bitlocked drive before y …
-
Symantec Norton Ghost 15.0 — page 64
Backup destination options The following table describes the options on the Backup Destination Page. Table 6-2 Backup destination options Description Option Indicates the location where you want to store the recovery points. If Norton Ghost detects that this location does not have enough available space, it alerts you. You should choose another loc …
-
Symantec Norton Ghost 15.0 — page 65
Table 6-3 Recovery point options Description Options Type a name for your backup. Note: This option does not appear if you create a recovery point using the Back Up My Computer feature in Symantec Recovery Disk. Name Select one of the following compression levels for the recovery point.: ■ None ■ Standard ■ Medium ■ High See “ Compression …
-
Symantec Norton Ghost 15.0 — page 66
Table 6-3 Recovery point options (continued) Description Options Select this option to let a search engine, such as Google Desktop, index all of the file names that are contained in each recovery point. By indexing the file names, you can then use your search engine to locate files you want to restore. This option is for NTFS file systems only. See …
-
Symantec Norton Ghost 15.0 — page 67
Table 6-4 Advanced scheduling options Description Option Do one or more of the following: ■ Click Schedule , and then select the days and a start time for when the backup should run. ■ Select Run more than once per day if you frequently edit data that you want to protect. Also, specify the maximum time that should occur between backups and the …
-
Symantec Norton Ghost 15.0 — page 68
About network credentials If you are connecting to a computer on a network, you are required to enter the user name and password for network access, even if you have previously authenticated to the network. This is because the Norton Ghost 15.0 service runs as the local System account. When entering network credentials, the following rules apply: ? …
-
Symantec Norton Ghost 15.0 — page 69
You can specify the location of command files if you want them to be located in a place other than the default location. You can also specify a location on a per-job basis, as well as specify a location that can be shared among several computers. If you specify a network location, you will be asked for network credentials. The most common use for r …
-
Symantec Norton Ghost 15.0 — page 70
Table 6-5 Recovery point creation stages Description Stage This stage occurs after a backup has started and before a recovery point is created. You can run a command during this stage to prepare for the recovery point creation process. For example, you can close any open applications that are using the drive. Note: If you use this option, be sure t …
-
Symantec Norton Ghost 15.0 — page 71
Table 6-6 Advanced options for drive-based backups Description Option Splits the recovery point into smaller files and specifies the maximum size (in MB) for each file. For example, if you plan to copy a recovery point to ZIP disks from your backup destination, specify a maximum file size of 100 MB, according to the size of each ZIP disk. Divide in …
-
Symantec Norton Ghost 15.0 — page 72
Editing advanced backup options After you define a backup, you can go back at any time and edit the advanced options you chose when you first defined the backup. To edit advanced backup options 1 On the Home or Tasks page, click Run or Manage Backups . 2 Select the backup you want to edit, and then click Edit Settings . 3 Click Next twice. 4 Click …
-
Symantec Norton Ghost 15.0 — page 73
Warning: Store the password in a secure place. Passwords are case sensitive. When you access or restore a recovery point that is password encrypted, Norton Ghost prompts you for the case-sensitive password. If you do not type the correct password or you forget the password, you cannot open the recovery point. Symantec Technical Support cannot open …
-
Symantec Norton Ghost 15.0 — page 74
3 In the tree panel of the Recovery Point Browser, select the recovery point. For example: C_Drive001.v2i. 4 On the File menu, click Verify Recovery Point . If the Verify Recovery Point option is unavailable, you must first dismount the recovery point. Right-click the recovery point and click Dismount Recovery Point . 5 When the validation is compl …
-
Symantec Norton Ghost 15.0 — page 75
Table 6-8 Compression levels (continued) Description Compression level This option uses high compression for a 50 percent average data compression ratio on recovery points. This setting is usually the slowest method. When a high compression recovery point is created, CPU usage might be higher than normal. Other processes on the computer might also …
-
Symantec Norton Ghost 15.0 — page 76
7 On the Options panel, select the appropriate options. See “ Recovery point options ” on page 64. 8 Click Next . 9 If appropriate, in the lists, select the command files that you want to run during a particular stage in the recovery point creation process. Then, specify the amount of time (in seconds) that you want the command to run before it …
-
Symantec Norton Ghost 15.0 — page 77
When you want to create a backup from the Symantec Recovery Disk CD, you are prompted for a valid license key only for the following scenarios: ■ You use the original, shipping version of the Symantec Recovery Disk CD to create a backup of a computer that does not have Norton Ghost installed. ■ The computer that you intend to back up using the …
-
Symantec Norton Ghost 15.0 — page 78
6 In the Backup Destination panel, set the options you want, then click Next . Lets you browse to and specify the location where you want to store the independent recovery point. Folder field Lets you map a network drive by using the UNC path of the computer on which you want to store the recovery point. For example, computer_nameshare_name or …
-
Symantec Norton Ghost 15.0 — page 79
7 In the Options panel, set the desired compression level for the recovery point. Use this option if storage space is not an issue. However, if the backup is being saved to a busy network drive, high compression may be faster than no compression because there is less data to write across the network. None This option uses low compression for a 40 p …
-
Symantec Norton Ghost 15.0 — page 80
You can split the recovery point into smaller files and specify the maximum size (in MB) for each file. For example, if you plan to copy a recovery point to ZIP disks from your backup destination, specify a minimum file size of 100 MB, according to the size of each ZIP disk. Divide into smaller files to simplify archive SmartSector technology speed …
-
Symantec Norton Ghost 15.0 — page 81
12 Click Next . 13 Click Finish to run the backup. 14 When the backup is finished, click Close to return to the main Symantec Recovery Disk window. About Offsite Copy Backing up your data to a secondary hard disk is a critical first step to protecting your information assets. But to make certain your data is safe, use Offsite Copy. This feature cop …
-
Symantec Norton Ghost 15.0 — page 82
the backup job completes at 6:20 p.m., Norton Ghost detects that the Offsite Copy destination drive is not available and the copy process is aborted. The following morning, you plug the drive back in to the computer. Norton Ghost detects the presence of the Offsite Copy destination drive and automatically begins copying your recovery points. Offsit …
-
Symantec Norton Ghost 15.0 — page 83
On Tuesday morning, you find that Monday’s base recovery point has been successfully copied to drive A. At the end of the day, you unplug drive A and take it home for safe keeping. On Wednesday morning, you bring drive B to the office. You plug in drive B and Norton Ghost detects that drive B is an Offsite Copy destination. Norton Ghost then a …
-
Symantec Norton Ghost 15.0 — page 84
Each time you plug in either drive A or B, the latest recovery points are added to the drive. This method gives you multiple points in time for recovering your computer in the event that the original backup destination drives fail or become unrecoverable. Using external drives as your Offsite Copy destination ensures that you have a copy of your ba …
-
Symantec Norton Ghost 15.0 — page 85
About using an FTP server as your Offsite Copy destination Using an FTP server as your Offsite Copy destination is similar to using a network path. You must provide a valid FTP path to the FTP server. You must also provide the correct FTP connection information to Norton Ghost in order for this method to work correctly. When Offsite Copy is configu …
-
Symantec Norton Ghost 15.0 — page 86
Backing up entire drives How Offsite Copy works 86 …
-
Symantec Norton Ghost 15.0 — page 87
Backing up files and folders This chapter includes the following topics: ■ Defining a file and folder backup ■ About folders that are excluded by default from file and folder backups Defining a file and folder backup When you define and run a file and folder backup, copies are made of each of the files and folders that you have chosen to back u …
-
Symantec Norton Ghost 15.0 — page 88
4 Select the files and folders you want to include in your backup, and then click Next . Selecting file types lets Norton Ghost find and include files that match the files you want backed up. If a file type is not included in the predefined list, click Add File Type . You can also manually select folders or individual files. Note: On all versions o …
-
Symantec Norton Ghost 15.0 — page 89
See “ About folders that are excluded by default from file and folder backups ” on page 89. 9 Click OK , and then click Next . 10 Click Schedule if you want the backup to run automatically, according to a schedule. If you want to run the backup only when you start it manually, uncheck Schedule . 11 Enter a start time and select the days of the …
-
Symantec Norton Ghost 15.0 — page 90
See “ Defining a file and folder backup ” on page 87. You can include these folders when you define a file and folder backup. Backing up files and folders About folders that are excluded by default from file and folder backups 90 …
-
Symantec Norton Ghost 15.0 — page 91
Running and managing backup jobs This chapter includes the following topics: ■ Running an existing backup job immediately ■ Running a backup with options ■ Adjusting the speed of a backup ■ Stopping a task ■ Verifying that a backup is successful ■ Editing backup settings ■ Enabling event-triggered backups ■ Editing a backup schedule …
-
Symantec Norton Ghost 15.0 — page 92
You can run an existing backup at any time. Note: If necessary, you can run a quick backup of a particular drive without using a defined backup. See “ Running a one-time backup from Norton Ghost ” on page 75. Norton Ghost can be configured to run a backup automatically when an event occurs on your computer, such as installing a new software pro …
-
Symantec Norton Ghost 15.0 — page 93
Note: Using this option does not change the settings of the defined backup. To do that, you must open the backup and edit its settings manually. See “ Editing a backup schedule ” on page 97. See “ Editing backup settings ” on page 95. To run a backup with options 1 On the Home page, click Run or Manage Backups . 2 In the Run or Manage Backu …
-
Symantec Norton Ghost 15.0 — page 94
Table 8-1 Backup options (continued) Description Options Select this option to create an independent recovery point, which is a complete snap shot of your entire drive. To specify an alternate backup location, click Browse . Independent recovery point Adjusting the speed of a backup Depending on the speed of your computer, how much RAM you have ins …
-
Symantec Norton Ghost 15.0 — page 95
■ On the Windows system tray, right-click the Norton Ghost tray icon, and then click Cancel the Current Operation . Verifying that a backup is successful After a backup completes, you can validate the success of the backup from the Status page to ensure you have a way to recover lost or damaged data. The Status page contains a scrolling calendar …
-
Symantec Norton Ghost 15.0 — page 96
Enabling event-triggered backups Norton Ghost can detect certain events and run a backup when they occur. For example, to protect your computer when you install new software, Norton Ghost can run a backup when it detects that new software is about to be installed. If a problem occurs that harms your computer, you can use this recovery point to rest …
-
Symantec Norton Ghost 15.0 — page 97
Note: If your computer is not online, then it is not susceptible to online threats. But if you connect your computer to the Internet at any time, it becomes vulnerable. You do not have to enable or disable Symantec ThreatCon when you go on or offline. It works if you are online, but does nothing if you are off line. For more information about Syman …
-
Symantec Norton Ghost 15.0 — page 98
Deleting a backup job does not delete the recovery points or file and folder backup data from the storage location. Only the backup job is deleted. See “ Managing recovery point storage ” on page 137. To delete backup jobs 1 On the Home page, click Run or Manage Backups . 2 Select one or more backups, and then click Remove . 3 Click Yes . Addin …
-
Symantec Norton Ghost 15.0 — page 99
To configure access rights for users or groups 1 On the Windows taskbar, click Start > Programs > Symantec Norton Ghost > Security Configuration Tool On Windows Vista and Windows 7, click Start > All Programs > Symantec > Security Configuration Tool . 2 Select a user or group from the Group or user names box. 3 Choose from the fol …
-
Symantec Norton Ghost 15.0 — page 100
Running and managing backup jobs Adding users who can back up your computer 100 …
-
Symantec Norton Ghost 15.0 — page 101
Backing up remote computers from your computer This chapter includes the following topics: ■ About backing up other computers from your computer ■ Adding computers to the Computer List ■ Deploying the Norton Ghost Agent ■ Using the Norton Ghost Agent ■ About managing the Norton Ghost Agent through Windows Services ■ About best practices …
-
Symantec Norton Ghost 15.0 — page 102
Note: You must purchase a separate license for each computer you want to manage. You can deploy the agent without a license for a 60-day evaluation. After that time, you must purchase and install the license to continue managing the remote computer. You can purchase additional licenses at the Symantec Global Store. Visit the following Web site: htt …
-
Symantec Norton Ghost 15.0 — page 103
To remove a computer from the Computer List 1 On the Norton Ghost menu bar, click Computers > Edit List . 2 Select the remote computer that you want to remove, click the minus sign (-), and then click OK . Note: Removing a computer from the Computer List does not uninstall the agent from the computer. You must run your operating system’s un …
-
Symantec Norton Ghost 15.0 — page 104
3 On the View tab, scroll to the end of the list and verify that the Use simple file sharing check box is not selected, and then click OK . 4 On the Windows Control Panel, click Windows Firewall . 5 On the Exceptions tab, select File and Printer Sharing , and then click OK . Note: You should close any open applications before you continue with the …
-
Symantec Norton Ghost 15.0 — page 105
where <drive> is the drive letter of your media drive. For Windows Vista, if the Run option is not visible, do the following: ■ Right-click the Start button, and click Properties . ■ On the Start Menu tab, click Customize . ■ Scroll down and select Run command . ■ Click OK . 3 In the CD browser panel, click Install Norton Ghost . 4 In …
-
Symantec Norton Ghost 15.0 — page 106
to use the Norton Ghost Deploy Agent feature to remotely install the agent on a computer in the domain whose data you want to protect. To use the Norton Ghost Agent ◆ On the Windows system tray, do one of the following: ■ Right-click the Norton Ghost tray icon, and then click Reconnect to restart the service automatically. You cannot run a back …
-
Symantec Norton Ghost 15.0 — page 107
■ Set up recovery actions to take place if the Norton Ghost Agent fails to start. For example, you can restart the Norton Ghost Agent automatically or restart the computer. See “ Setting up recovery actions when the Norton Ghost Agent does not start ” on page 109. About best practices for using services The following table describes some best …
-
Symantec Norton Ghost 15.0 — page 108
Opening Windows Services There are several methods you can use to open Windows Services to manage the Norton Ghost Agent. To open Services 1 Do one of the following: ■ On the Windows Control Panel , click Administrative Tools > Services . ■ On the Windows taskbar, click Start > Run . In the Open text field, type services.msc , and then cl …
-
Symantec Norton Ghost 15.0 — page 109
If you stop the Norton Ghost Agent service while Norton Ghost is running, you receive an error message, and Norton Ghost is disconnected from the agent. In most cases, you can click Reconnect from the Task pane or from the Tray icon to restart the Norton Ghost Agent. To start or stop the Norton Ghost Agent service 1 On the Windows taskbar, click St …
-
Symantec Norton Ghost 15.0 — page 110
5 On the Recovery tab, in the First failure, Second failure, and Subsequent failures lists, select the action that you want: Specify the number of minutes before an attempt to restart the service is made. Restart the Service Specify a program to run. You should not specify any programs or scripts that require user input. Run a Program Click Restart …
-
Symantec Norton Ghost 15.0 — page 111
Table 9-2 Required services Startup type Service Automatic Event Log Automatic Plug and Play Automatic Remote Procedure Call (RPC) To view Norton Ghost Agent dependencies 1 In the Services window, under Name , click Norton Ghost . See “ Opening Windows Services ” on page 108. 2 On the Action menu, click Properties . 3 Click the Dependencies tab …
-
Symantec Norton Ghost 15.0 — page 112
Table 9-3 Permission options (continued) Description Option Users or groups can get status information, and can run a backup job. But they cannot define, change, or delete any backup jobs, or use any other function of the product. Status Only Users cannot perform any function, or see any information. They are blocked from any access to Norton Ghost …
-
Symantec Norton Ghost 15.0 — page 113
To remove a user or group 1 On the Windows Start menu, click Programs > Symantec Norton Ghost > Security Configuration Tool . 2 Select the user or group that you want to remove, and then click Remove . 3 Click OK when you are finished. Running Norton Ghost using different user rights If the permissions for a user are insufficient for running …
-
Symantec Norton Ghost 15.0 — page 114
Backing up remote computers from your computer Controlling access to Norton Ghost 114 …
-
Symantec Norton Ghost 15.0 — page 115
Monitoring the status of your backups This chapter includes the following topics: ■ About monitoring backups ■ Monitoring backup protection from the Home page ■ Monitoring backup protection from the Status page ■ About SNMP traps ■ Customizing the status reporting of a drive (or file and folder backups) ■ Viewing drive details ■ Impro …
-
Symantec Norton Ghost 15.0 — page 116
Rescanning a computer ’ s hard disk Use Refresh to update the drive information that is displayed in various views of the product. This feature is useful when hard disk configurations have changed but the changes do not immediately appear in Norton Ghost. For example, adding hard disk space or creating a partition. When you use Refresh, Norton Gh …
-
Symantec Norton Ghost 15.0 — page 117
Table 10-1 Backup protection levels (continued) Description Title Icon A backup is defined, but it is not scheduled or has not run for a long time. This status can indicate that the existing recovery points are outdated. It can also indicate that one or more drives are not assigned to a defined backup. A partially protected drive can be recovered, …
-
Symantec Norton Ghost 15.0 — page 118
Monitoring backup protection from the Status page The Status page lets you monitor the status of your backups. The Status page lists each drive on your computer and includes a calendar that contains your backup histories. The calendar lets you quickly identify when a backup ran, and what type of backup it was. It identifies your upcoming, scheduled …
-
Symantec Norton Ghost 15.0 — page 119
Table 10-2 Backups calendar icons (continued) States Description Icon This icon can appear in the following states: Indicates that the backup ran and that an incremental recovery point was created. Indicates that the backup is unavailable. Indicates that the backup did not run as scheduled. This problem could occur if an error prevents the backup f …
-
Symantec Norton Ghost 15.0 — page 120
Table 10-2 Backups calendar icons (continued) States Description Icon This icon can appear in the following states: Indicates that the backup ran and that file and folder backup data was created successfully. Indicates that the backup is not available. Indicates that the backup did not run as scheduled. This problem could occur if an error prevents …
-
Symantec Norton Ghost 15.0 — page 121
Table 10-2 Backups calendar icons (continued) States Description Icon This icon can appear in the following states: Indicates that two or more backups have run and the last backup was created successfully. Indicates that two or more backups are scheduled and that at least one is unavailable. Indicates that two or more backups have run and the last …
-
Symantec Norton Ghost 15.0 — page 122
■ Use the scroll bar at the bottom of the calendar to scroll backward or forward in time. About SNMP traps You must install and configure the Windows SNMP service on your computer in order for SNMP traps to work from Norton Ghost. By default, Norton Ghost is not enabled to send traps to NMS managers. You can configure Norton Ghost 15.0 to send SN …
-
Symantec Norton Ghost 15.0 — page 123
that your computer is at risk. You can configure Norton Ghost to ignore drive D so that it does not calculate the status of drive D in the Backup Status panel on the Home page. Or, you can specify that only errors, such as missed or failed backups, are to be figured in to the status report. Note: The backup status of each drive is reported througho …
-
Symantec Norton Ghost 15.0 — page 124
Viewing drive details The Advanced page lets you view details about your hard drives. You can view the following drive details: Displays the name that you assigned to the backup when you defined it. Name Identifies the type of recovery point the backup creates when it runs. Type Identifies the storage location of the recovery point, or the location …
-
Symantec Norton Ghost 15.0 — page 125
To improve the protection level of a drive 1 On the Status page, select a drive that requires attention from the Drives column. 125 Monitoring the status of your backups Improving the protection level of a drive …
-
Symantec Norton Ghost 15.0 — page 126
2 In the Status section at the bottom of the page, right-click the backup you want to edit, and then select one of the following menu items: Runs the selected backup job immediately. Run Backup Now Opens the Run Backup With Options dialog, which lets you select the desired recovery point type. Recovery point option types include Incremental recover …
-
Symantec Norton Ghost 15.0 — page 127
See “ Editing backup settings ” on page 95. About using event log information to troubleshoot problems When Norton Ghost performs an action, it records the event (for example, when a backup job runs). It also records program error messages. You can use the event log to track down the source of problems or to verify the successful completion of …
-
Symantec Norton Ghost 15.0 — page 128
Monitoring the status of your backups About using event log information to troubleshoot problems 128 …
-
Symantec Norton Ghost 15.0 — page 129
Exploring the contents of a recovery point This chapter includes the following topics: ■ About exploring recovery points ■ Exploring a recovery point through Windows Explorer ■ Opening and restoring files within a recovery point ■ About using a search engine ■ Dismounting a recovery point drive ■ Viewing the drive properties of a recove …
-
Symantec Norton Ghost 15.0 — page 130
You can only run programs from within a mapped recovery point that do not rely on registry values, COM interfaces, dynamic link libraries (DLLs), or other similar dependencies. You can set up a mounted drive as a shared drive. Users on a network can connect to the shared drive and restore files and folders from the recovery point. You can mount one …
-
Symantec Norton Ghost 15.0 — page 131
Mounting a recovery point from Windows Explorer You can also manually mount a recovery point as a drive by opening your backup destination folder in Windows Explorer. You can use Windows Explorer to search the contents of the recovery point. For example, if you cannot remember where a particular file was originally stored, you can use the Explorer …
-
Symantec Norton Ghost 15.0 — page 132
4 In the right content panel, double-click the folder that contains the file that you want to view. 5 Right-click the file that you want to view, and then click View File . The View option is unavailable if you select a program file that has a .exe, .dll, or .com file extension. To restore files within a recovery point 1 On the Tools page, click Ru …
-
Symantec Norton Ghost 15.0 — page 133
Dismounting a recovery point drive All of your mounted recovery point drives are unmounted when you restart the computer. You can also unmount the drives without restarting the computer. To dismount a recovery point drive in Windows Explorer 1 In Windows Explorer, navigate to the mounted recovery point. 2 Right-click the drive, and then click Dismo …
-
Symantec Norton Ghost 15.0 — page 134
To view the drive properties of a recovery point 1 In the Recovery Point Browser, in the tree panel, click the recovery point that contains the drive that you want to view. 2 Select a drive. 3 Do one of the following: ■ On the File menu, click Properties . ■ Right-click the recovery point, and then click Properties . Exploring the contents of a …
-
Symantec Norton Ghost 15.0 — page 135
Managing backup destinations This chapter includes the following topics: ■ About backup destinations ■ About how backup data works ■ Managing recovery point storage ■ Running a one-time virtual conversion ■ Defining a virtual conversion job ■ About managing file and folder backup data ■ Automating management of backup data ■ Moving …
-
Symantec Norton Ghost 15.0 — page 136
Use this option to back up an entire drive (for example, your system drive which is typically C). You can then restore any file, folder, or your entire drive. Drive-based backup Use this option to back up only the files and folders that you select. You can then restore any file or all of them at any time. This option typically requires less disk sp …
-
Symantec Norton Ghost 15.0 — page 137
stored at several locations on your computer, Norton Ghost locates all Word documents (files that end with .doc) and includes them in your backup. You can even edit the list of file types to include types unique to the software you use. Norton Ghost also keeps multiple versions of the same files for you, so that you can restore the version of a fil …
-
Symantec Norton Ghost 15.0 — page 138
Cleaning up old recovery points Over time, you might end up with recovery points that you no longer need. For example, you might have several recovery points created months ago that you no longer need because you have more current ones containing your latest work. See “ Automating management of backup data ” on page 156. The Clean Up feature de …
-
Symantec Norton Ghost 15.0 — page 139
3 Click Yes to confirm the deletion. 4 Click OK . Deleting recovery points within a set A recovery point set can contain multiple recovery points created over time that you can delete to reclaim storage space. The Delete Points option lets you delete all of the recovery points created between the first recovery point and last recovery point in the …
-
Symantec Norton Ghost 15.0 — page 140
removable media such as DVDs or CDs. You can then store these copies in a protected location. You can also create archive copies of your recovery points to free up disk space. For example, you can copy recovery points to a CD or DVD, and then manually delete the original recovery points. You should verify the copies of the recovery points to ensure …
-
Symantec Norton Ghost 15.0 — page 141
This option sets a password on the recovery point. Passwords can include standard characters, not extended characters, or symbols. (Use characters with an ASCII value of 128 or lower.) A user must type this password before they can restore a backup or view the contents of the recovery point. Use password You can encrypt your recovery point data to …
-
Symantec Norton Ghost 15.0 — page 142
To run a one-time recovery point conversion to virtual disk 1 On the Tasks page, click One Time Virtual Conversion . 2 Click the virtual disk type (and version, if applicable) that you want to create, and then click Next . 3 Do one of the following: ■ Click View all recovery points near the bottom of the pane, and then select a recovery point in …
-
Symantec Norton Ghost 15.0 — page 143
Uses the current system index file that is located in the recovery point storage location. The system index file displays a list of all of the drives on your computer and any associated recovery points from which you can select. Or, you can select an alternate system index file (.sv2i) that resides elsewhere, such as a network location. The use of …
-
Symantec Norton Ghost 15.0 — page 144
■ Folder for virtual disks Type the path to the folder where you want to place the virtual disk files. ■ Browse Click Browse to locate the folder in which you want to place the virtual disk files. ■ Network Credentials If you selected a virtual disk folder location on a network, type your network credentials. ■ Create one virtual disk per v …
-
Symantec Norton Ghost 15.0 — page 145
■ ESX server name or IP address Type the name of the server or the server’s IP address. ■ ESX Server Credentials In the ESX Server Credentials group box, type a valid administrator user name that has sufficient rights. Type a valid password. ■ Destination for the virtual disks Type the path to the folder where you want to place the virtu …
-
Symantec Norton Ghost 15.0 — page 146
Select this option (default) to run Windows Mini-Setup when you restart the computer after recovery. During recovery a text-based answer file is generated that scripts the answers for a series of dialog boxes. When the Mini-Setup wizard starts, it looks for this answer to automate the wizard. For example, the answer file, by way of the wizard, can …
-
Symantec Norton Ghost 15.0 — page 147
Select this option if you want to split the virtual disk into multiple 2 GB .vmdk files. For example, use this option if your virtual disk is stored on a FAT32 drive (any file system that does not support files larger than 2 GB). Or, if you want to copy the virtual disk files to a DVD but the size is larger than the DVD allows. Note: This option is …
-
Symantec Norton Ghost 15.0 — page 148
You can also create a one-time virtual conversion. See “ Running a one-time virtual conversion ” on page 141. See “ Viewing the properties of a virtual conversion job ” on page 153. See “ Viewing the progress of a virtual conversion job ” on page 153. See “ Editing a virtual conversion job ” on page 153. See “ Running an existing …
-
Symantec Norton Ghost 15.0 — page 149
■ Folder for virtual disks Type the path to the folder where you want to place the virtual disk files. ■ Browse Click Browse to locate the folder in which you want to place the virtual disk files. ■ Network Credentials If you selected a virtual disk folder location on a network, type your network credentials. ■ Rename To edit the name of th …
-
Symantec Norton Ghost 15.0 — page 150
■ ESX server name or IP address Type the name of the server or the server’s IP address. ■ ESX Server Credentials In the ESX Server Credentials group box, type a valid administrator user name that has sufficient rights. Type a valid password. ■ Destination for the virtual disks Type the path to the folder where you want to place the virtu …
-
Symantec Norton Ghost 15.0 — page 151
Select this option (default) to run Windows Mini-Setup when you restart the computer after recovery. During recovery a text-based answer file is generated that scripts the answers for a series of dialog boxes. When the Mini-Setup wizard starts, it looks for this answer to automate the wizard. For example, the answer file, by way of the wizard, can …
-
Symantec Norton Ghost 15.0 — page 152
Select this option if you want to split the virtual disk into multiple 2 GB .vmdk files. For example, use this option if your virtual disk is stored on a FAT32 drive (any file system that does not support files larger than 2 GB). Or, if you want to copy the virtual disk files to a DVD but the size is larger than the DVD allows. Note: This option is …
-
Symantec Norton Ghost 15.0 — page 153
Running an existing virtual conversion job immediately After you create a conversion job, you can use Run Now to create an on-demand recovery point conversion to virtual disk format. A manual conversion starts immediately. To run an existing virtual conversion job immediately 1 On the Tasks page, click Run or Manage Virtual Conversions . 2 Select t …
-
Symantec Norton Ghost 15.0 — page 154
To edit a virtual conversion job 1 On the Tasks page, click Run or Manage Virtual Conversions . 2 Select the name of a conversion job that you want to edit. 3 Do one of the following: On the toolbar, click Change Schedule . Make changes to the conversion schedule, and then click OK . To change the schedule On the toolbar, click Edit Settings . Make …
-
Symantec Norton Ghost 15.0 — page 155
Viewing how much file and folder backup data is stored Start by viewing the total amount of file and folder backup data you currently store. To view how much file and folder backup data is stored 1 On the Tools page, click Manage Backup Destination . 2 To select an alternate backup destination, in the Drives list, select another drive to use as a b …
-
Symantec Norton Ghost 15.0 — page 156
■ If you don’t know the name of the file, click Search to return a list of all of the files that have been backed up, and then browse for the file. 3 Click View All Versions to display all versions of each file that exist in the file and folder backup data. 4 Select one or more files that you want to delete. 5 Right-click, and then click Del …
-
Symantec Norton Ghost 15.0 — page 157
■ Select Warn me when backup storage exceeds threshold if you only want to be notified when the storage size is exceeded, but you do not want any action to be taken. ■ Select Automatically optimize storage if you want Norton Ghost to manage the backup data automatically, without prompting you. If you select this option, Norton Ghost automatical …
-
Symantec Norton Ghost 15.0 — page 158
5 Select the defined backups that should use the new backup destination. Deselect the defined backups that you do not want to move. 6 Select Save as default backup destination if you want to use this destination as the default backup destination for any new backups that you define in the future. 7 Click OK . 8 To move existing recovery points to th …
-
Symantec Norton Ghost 15.0 — page 159
Recovering files, folders, or entire drives This chapter includes the following topics: ■ About recovering lost data ■ Recovering files and folders by using file and folder backup data ■ Recovering files and folders using a recovery point ■ Recovering a secondary drive ■ Restoring using LightsOut Restore About recovering lost data Norton …
-
Symantec Norton Ghost 15.0 — page 160
Norton Ghost includes a search tool to help you locate the files that you want to recover. To recover files and folders by using file and folder backup data 1 On the Home or Tasks page, click Recover My Files . 2 In the left pane of the Recover My Files window, select File and Folder as the search method. 3 Do one of the following: ■ In the Find …
-
Symantec Norton Ghost 15.0 — page 161
■ Click Recovered Files folder on the desktop to restore your files to a Recovered Files folder on your Windows desktop. Norton Ghost creates this folder during the restore. ■ Click Alternate folder and type the path to the location in which you want to restore your files. 7 Click Recover . 8 If you are prompted to replace the existing file, cl …
-
Symantec Norton Ghost 15.0 — page 162
Lets you browse to another location, for example, an external (USB) drive or removable media to select a recovery point (.v2i) file. Select this option, and then do the following: ■ Click Browse , locate and select a recovery point (.v2i file), and then click Open . ■ If you select a network location, type your network credentials. See “ Abou …
-
Symantec Norton Ghost 15.0 — page 163
6 Click Recover Files . 7 In the Recover My Files dialog box, do one of the following: ■ Click Original folders to have your files restored in the original folder where they existed when they were backed up. If you want to replace the original files, select Overwrite existing files . If you do not select this option, a number is added to the file …
-
Symantec Norton Ghost 15.0 — page 164
Recovering a secondary drive If you lose data on a secondary drive, you can use an existing recovery point for that drive to restore the data. A secondary drive is a drive other than the drive on which your operating system is installed. Note: You can recover your system drive (typically, drive C). For example, if your computer has a D drive and th …
-
Symantec Norton Ghost 15.0 — page 165
5 Do one of the following: ■ To use the recovery point that is selected, click Next . ■ Click Browse to select a different recovery point, and then click Next . If you need to access recovery points on a network that requires user authentication, enter your user name and password, and then click Next . 6 Select the drive that you want to restor …
-
Symantec Norton Ghost 15.0 — page 166
Description Option Checks the restored drive for errors after the recovery point is restored. Check for file system errors Automatically expands the drive to occupy the target drive’s remaining unallocated space. Resize restored drive Makes the restored drive the active partition (for example, the drive from which the computer starts). You sho …
-
Symantec Norton Ghost 15.0 — page 167
The Norton Ghost LightsOut Restore feature enables administrators to restore a computer from a remote location, regardless of the state the computer is currently in, so long as its file system is intact. This option provides a way to boot the Symantec recovery environment from a folder on the operating system partition. This option has been develop …
-
Symantec Norton Ghost 15.0 — page 168
4. Run the LightsOut Restore wizard by going to the Windows Start menu and selecting Programs > Symantec > Norton Ghost 15.0. This installs the Symantec recovery environment to the local file system, and creates an entry in the Windows boot menu that can be used to boot to this environment. 5. When either file or system recovery is needed, us …
-
Symantec Norton Ghost 15.0 — page 169
5 At the Options dialog, you can specify the amount of time that the boot menu is displayed. The default is 10 seconds. If you leave the Enable Symantec pcAnywhere check box selected, networking will automatically start, and pcAnywhere will be loaded. If you clear this check box, pcAnywhere will not be automatically started. 6 Select the type of IP …
-
Symantec Norton Ghost 15.0 — page 170
Description Option Select this option to connect to a network without the need for additional network configuration. You can click this option if you know there will be a DHCP server available on the network at the time you restore. Dynamic IP Click this option to connect to a network with a particular network adapter and specific address settings. …
-
Symantec Norton Ghost 15.0 — page 171
Reconfiguring Using the LightsOut Restore Option Wizard 1 From Windows, click Start > All Programs > Symantec > Norton Ghost 15.0 > LightsOut Restore Setup . 2 Make your desired changes in the wizard screens, and then click Finish . 3 Click Yes if you want to recopy all of the files, or click No to only make the changes necessary for up …
-
Symantec Norton Ghost 15.0 — page 172
Recovering files, folders, or entire drives Restoring using LightsOut Restore 172 …
-
Symantec Norton Ghost 15.0 — page 173
Recovering a computer This chapter includes the following topics: ■ About recovering a computer ■ Starting a computer by using Symantec Recovery Disk ■ How to prepare to recover a computer ■ Recovering a computer ■ Recovering a computer from a virtual disk file ■ Recovering files and folders using Symantec Recovery Disk ■ About using …
-
Symantec Norton Ghost 15.0 — page 174
the Recover My Computer Wizard to restart the computer into its previous, usable state. Note: If you purchased Norton Ghost from your computer manufacturer, some features in the recovery environment might not be available. For example, if the manufacturer installed the recovery environment on your computer’s hard disk. Your manufacturer might …
-
Symantec Norton Ghost 15.0 — page 175
To start a computer by using Symantec Recovery Disk 1 If you store your recovery points on a USB device, attach the device now (for example, an external hard drive). Note: You should attach the device before you restart the computer. Otherwise, Symantec Recovery Disk might not detect it. 2 Insert the Symantec Recovery Disk CD into the media drive o …
-
Symantec Norton Ghost 15.0 — page 176
3 In the BIOS setup window, select Boot Sequence, and then press Enter . 4 Follow the on-screen instructions to make the CD or DVD device be the first bootable device in the list. 5 Put your Symantec Recovery Disk CD into the CD drive, and then restart your computer. Note: Depending on which version of the product you have purchased, Symantec Recov …
-
Symantec Norton Ghost 15.0 — page 177
To scan for viruses 1 On the Analyze panel, click Scan for Viruses . 2 Select one of the following: Select this option to use the definitions that are included on the Symantec Recovery Disk CD. Use the virus definitions currently available Select this option if you downloaded the latest virus definitions to a disk. Use Update Locator virus definiti …
-
Symantec Norton Ghost 15.0 — page 178
■ Scroll down and select Run command . ■ Click OK . 3 Click Run Update Locator . 4 Click Find and retrieve virus definitions . If more recent virus definitions are not found, you can still scan for viruses on your damaged computer by using the virus definitions that are on the Symantec Recovery Disk CD. However, the computer might not be protec …
-
Symantec Norton Ghost 15.0 — page 179
recover your computer or other hard drive back to the state it was in when the recovery point was created. See “ Recovering a computer from a virtual disk file ” on page 183. To recover a computer 1 Start the computer by using the Symantec Recovery Disk CD. See “ Starting a computer by using Symantec Recovery Disk ” on page 174. 2 On the Ho …
-
Symantec Norton Ghost 15.0 — page 180
This type of recovery operation uses a system index file (.sv2i) to restore a computer that has multiple drives. A system index file reduces the amount of time that is needed to restore the drives. When a recovery point is created, a system index file is saved with it. The system index file contains a list of the most recent recovery points, which …
-
Symantec Norton Ghost 15.0 — page 181
10 Select Reboot when finished if you want the computer to restart automatically after the recovery process finishes. 11 Click Finish . 12 Click Yes to begin the recovery process. Edit target drive and options The following table describes the options that are available on the Edit Target Drive and Options page after booting to the Symantec Recover …
-
Symantec Norton Ghost 15.0 — page 182
Description Options Makes the restored drive the active partition (for example, the drive from which the computer starts). You should select this option if you are restoring the drive on which your operating system is installed. Set drive active (for booting OS) Restores the original, physical disk signature of the hard drive. Disk signatures are p …
-
Symantec Norton Ghost 15.0 — page 183
Description Options Restores the master boot record. The master boot record is contained in the first sector of a physical hard disk. The master boot record consists of a master boot program and a partition table that describes the disk partitions. The master boot program analyzes the partition table of the first physical hard disk to see which pri …
-
Symantec Norton Ghost 15.0 — page 184
To recover a computer from a virtual disk file 1 Start the computer by using the Symantec Recovery Disk CD. See “ Starting a computer by using Symantec Recovery Disk ” on page 174. 2 On the Home panel, click Recover My Computer . 3 On the Welcome page of the wizard, click Next . 4 In the View recovery points by list, select Filename and then do …
-
Symantec Norton Ghost 15.0 — page 185
Virtual disk recovery options The following table describes the recovery options that are available when you recover a virtual disk. Description Option Verifies whether a recovery point is valid or corrupt before it is restored. If the recovery point is invalid, the recovery is discontinued. This option can significantly increase the time that is r …
-
Symantec Norton Ghost 15.0 — page 186
Description Option Restores the original, physical disk signature of the hard drive. Disk signatures are part of all Windows operating systems that Norton Ghost supports. Disk signatures are required to use the hard drive. Select this option if either of the following situations are true: ■ Your computer’s drive letters are atypical (for exa …
-
Symantec Norton Ghost 15.0 — page 187
Recovering files and folders using Symantec Recovery Disk You can use the Symantec Recovery Disk CD to start your computer and to restore files and folders from within a recovery point. To recover files and folders using Symantec Recovery Disk 1 Start the computer by using the Symantec Recovery Disk CD. See “ Starting a computer by using Symantec …
-
Symantec Norton Ghost 15.0 — page 188
6 Click Recover Files . Where possible, the Recover Items dialog box automatically completes the Restore to this folder box with the original path from which the files originated. If the original location does not include a drive letter you must type the drive letter at the beginning of the path. Note: While in the recovery environment, drive lette …
-
Symantec Norton Ghost 15.0 — page 189
See “ Using the pcAnywhere thin host for a remote recovery ” on page 189. See “ Mapping a network drive from within Symantec Recovery Disk ” on page 191. See “ Configuring network connection settings ” on page 192. Starting networking services If you need to start networking services, you can do so manually. To start networking services …
-
Symantec Norton Ghost 15.0 — page 190
Remotely connecting to the pcAnywhere thin host Symantec pcAnywhere lets you remotely connect to a computer that is running in the recovery environment. The computer must be running the pcAnywhere thin host that is included in the Symantec Recovery Disk CD, and it must be waiting for a connection. When connected, the client computer can remotely ma …
-
Symantec Norton Ghost 15.0 — page 191
To prevent unauthorized users from tampering with your settings or trying to launch a session without your permission, set a password for your remote connection item. This option is available in the Remote Properties window on the Protect Item tab. The thin host does not support encryption. 5 In pcAnywhere, start the remote control session. If the …
-
Symantec Norton Ghost 15.0 — page 192
■ On the left side of the recovery environment window, click Network , and then in the right pane click Map a Network Drive . 2 Map a network drive by using the UNC path of the computer on which the recovery point is located. For example: computer_nameshare_name or IP_addressshare_name You can also map a network drive from within the Recove …
-
Symantec Norton Ghost 15.0 — page 193
6 Type the address of the computer that you want to ping on the network segment. 7 Click OK . If you specified a computer name or a computer name and domain as the address method, make note of the IP address that is returned from the computer that you pinged. If communication to the storage computer is operating as expected, you can use the Map Net …
-
Symantec Norton Ghost 15.0 — page 194
A user-assigned comment associated with the recovery point Description The total size (in megabytes) of the recovery point Size The date and time that the recovery point file was created Created The compression level that is used in the recovery point Compression Whether the entire recovery point file is spanned over several files Split across mult …
-
Symantec Norton Ghost 15.0 — page 195
The selected drive’s drive status as either the primary partition or the logical partition. Primary/Logical The total size (in megabytes) of the drive. This total includes used and unused space. Size The amount of used space (in megabytes) within the drive. Used space The amount of unused space (in megabytes) within the drive. Unused space Ind …
-
Symantec Norton Ghost 15.0 — page 196
Recovering a computer About the Support Utilities 196 …
-
Symantec Norton Ghost 15.0 — page 197
Copying a drive This chapter includes the following topics: ■ About copying a drive ■ Preparing to copy drives ■ Copying one hard drive to another hard drive About copying a drive You can use the Copy Drive feature to copy your operating system, applications, and data from one hard drive to another hard drive. You can even copy a larger hard …
-
Symantec Norton Ghost 15.0 — page 198
■ Prepare the computer. ■ Get the manufacturer’s directions for installing the drive. ■ Shut down the computer, and then disconnect the power cord. ■ Discharge electricity by touching a grounded metal object. ■ Remove the computer cover. 2 Change the jumper settings on the hard drive to make the new hard drive the slave drive, or con …
-
Symantec Norton Ghost 15.0 — page 199
To copy one hard drive to another hard drive 1 On the Tools page, click Copy My Hard Drive . 2 Complete the steps in the wizard to copy the drive. The wizard steps you through the process of selecting the right drive to copy, selecting the destination drive, and selecting the options for copying the data from one drive to another. About drive-to-dr …
-
Symantec Norton Ghost 15.0 — page 200
Table 15-1 Drive-to-drive copying options (continued) Description Option This option copies the drive even if there are errors on the disk. Ignore bad sectors during copy This option copies the master boot record from the source drive to the destination drive. Select this option if you are copying the C: drive to a new, empty hard drive. You shoul …
-
Symantec Norton Ghost 15.0 — page 201
Using a search engine to search recovery points This appendix includes the following topics: ■ About using a search engine to search recovery points ■ Enabling search engine support ■ Recovering files using Google Desktop’s Search Desktop feature About using a search engine to search recovery points Norton Ghost supports the use of Googl …
-
Symantec Norton Ghost 15.0 — page 202
A Google plug-in for Norton Ghost is required before you can use Google Search to locate and recover files. The plug-in is installed for you automatically when you enable this feature. See “ To enable Google Desktop support ” on page 202. Enable Google Desktop support When you define a backup job, or edit an existing backup job, enable search e …
-
Symantec Norton Ghost 15.0 — page 203
4 Click OK . This option is not available if you do not have Google Desktop installed. Install Google Desktop, and then repeat this procedure. 5 Click OK to install the Google Plugin. To enable search engine support for a backup job 1 Start Norton Ghost. 2 Do one of the following: ■ Edit an existing backup job and select Enable search engine supp …
-
Symantec Norton Ghost 15.0 — page 204
■ Right-click the Google Desktop icon in the system tray and click Indexing > Re-Index . Re-indexing can take a significant amount of time. Be sure to wait until it completes before attempting to search again. ■ Right-click the Google Desktop icon in the system tray and click Preferences . Under Search Types, verify that Web history is check …
-
Symantec Norton Ghost 15.0 — page 205
About backing up Microsoft virtual environments This appendix includes the following topics: ■ About backing up Microsoft virtual hard disks ■ About backing up and restoring Microsoft Hyper-V virtual machines About backing up Microsoft virtual hard disks Microsoft Windows 7 now supports the use of Virtual Hard Disks (VHDs). Microsoft does not s …
-
Symantec Norton Ghost 15.0 — page 206
http://technet.microsoft.com/en-us/library/dd440865(WS.10).aspx About backing up and restoring Microsoft Hyper-V virtual machines To create a backup of a Microsoft Hyper-V virtual machine, you must back up the volumes of the computer where the virtual machine is hosted. To do this, create either a live backup or a system state backup of the host ma …
-
Symantec Norton Ghost 15.0 — page 207
Symbols .sv2i, using to restore multiple drives 178 A access allow or deny users or groups 111 activate the product 24 administrator, running Norton Ghost as 113 Advanced page about 15 showing or hiding 15 Advanced scheduling options 66 agent dependencies, viewing 108, 110 Microsoft Services 106 set security for 111 setting up recovery actions for …
-
Symantec Norton Ghost 15.0 — page 208
backups (continued) things to do after 53 things to do before 51 things to do during 53 tips 54 tips for a better backup 50 types of 50 verifying success 95, 118 viewing progress 74 benefits of using Norton Ghost 13 best practices, services 107 boot configuration database 62 C cancelling the current operation 94 categories managing file types 41 ch …
-
Symantec Norton Ghost 15.0 — page 209
email notification setting up to send warnings and errors 46 emergency recovering a computer 178 recovering a computer, about 173 encryption recovery point 72 error messages configuring to show or hide 40 errors setting notification for warnings:setting up email to send 46 evaluation version installing or upgrading 20 Event Log about 127 use to tro …
-
Symantec Norton Ghost 15.0 — page 210
L license product 23 LightsOut Restore 166 reconfiguring 170 starting 168 LightsOutRestore restoring with 166 LiveUpdate, using 25 log file event 127 log files checking 107 M mapping drive from Symantec Recovery Disk 191 master boot, restoring 183, 186 Microsoft Virtual Disk 141 Microsoft Virtual Disk (.vhd) 147 Microsoft virtual hard disks, suppor …
-
Symantec Norton Ghost 15.0 — page 211
recovery (continued) options for drives 165 original disk signature 182, 186 restoring files and folders 159 recovery actions setting up when agent does not start 109 recovery point archiving 139 checking integrity of 65 cleaning up old 138 copying to CD or DVD 139 create a specific type 92 default storage location 38 deleting sets 138 encrypting 7 …
-
Symantec Norton Ghost 15.0 — page 212
SmartSector Copying about 71 starting computer Agent services 105 starting agent 108 status messages configuring to show or hide 40 status reporting customize per drive 122 stopping agent 108 stopping computer agent services 105 stopping tasks 94 Support Utilities 195 Symantec Backup Exec Web Retrieve configuring with backups 132 use to search for …
-
Symantec Norton Ghost 15.0 — page 213
W Windows 7 support for 14, 17 Windows Explorer mount recovery points from 131 viewing file and folder version information in 156 213 Index …
Вы приобрели новый жесткий диск. Что делать дальше? Можно переставить систему и все программы с нуля, затем перенести данные на новый диск. Но часто на это просто нет времени или возможности. Как вариант – сделать полную копию диска.
Мы рассмотрим два возможных случая
- Исходный диск в порядке.
- Исходный диск работает плохо. На нем появились бед-блоки, он медленно работает, плохие показатели S.M.A.R.T
1. Копируем исправный жесткий диск.
Существует много разных программ, предназначенных для копирования информации диск-в-диск. Например, Acronis True Image, Paragon Drive Backup, Aomei Partition Assistant и многие другие.
Мы рассмотрим одну из самых старых программ для клонирования – Symantec Ghost (ранее Nortn Ghost). Чтобы создать копию диска с помощью Symantec Ghost достаточно загрузить компьютер с флешки или CD-диска, на которую записана программа, и запустить мастер клонирования.
После запуска программы нам необходимо выбрать, что мы собираемся делать. Можно создать образ всего диска, образ раздела диска, произвести запись из образа или скопировать диск в диск. Нам в данном случае нужно последнее. Выбираем:
Local -> Disk -> To Disk
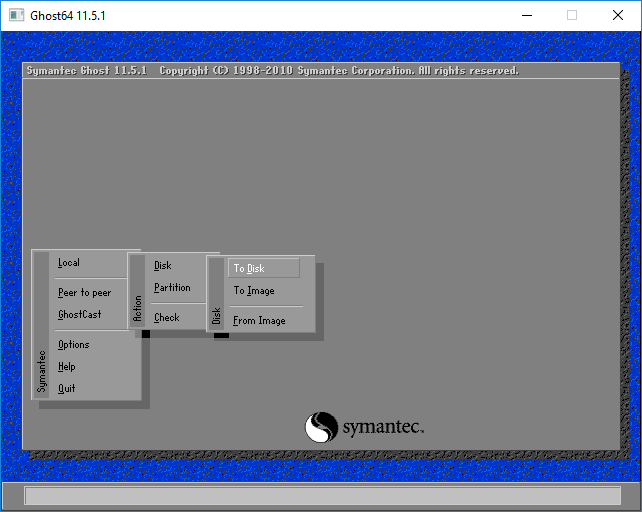
Выбираем диск, который мы будем копировать.(Select local source drive by clicking on the drive number). В нашем случае это Kingston 120Gb.
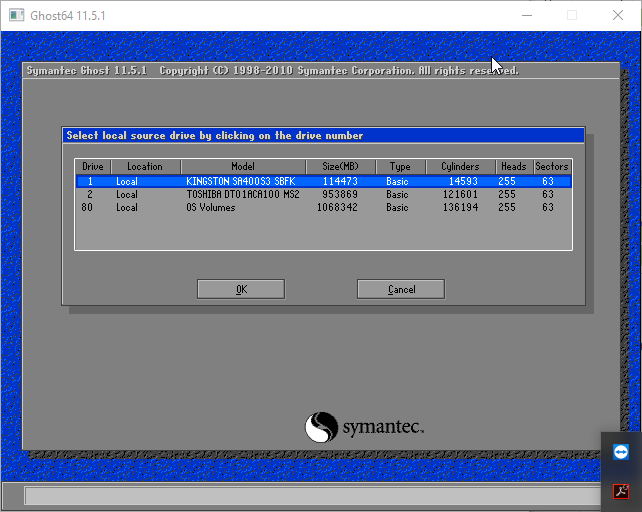
Далее помечаем диск на который копируем (Select local destination drive by clicking on the drive number). У нас это Toshiba 1Tb.
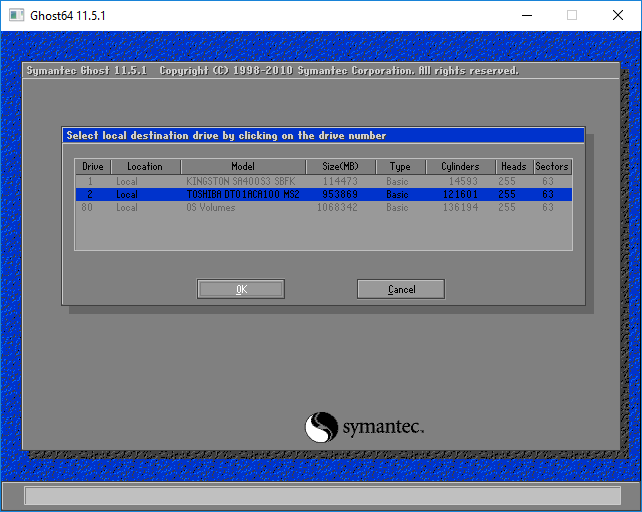
Будьте внимательны! Если у Вас несколько дисков одинакового размера во избежании ошибки лучше отключите лишние. Вся информация на этом диске будет потеряна!
Нажимаем OK. Если новый диск больше старого, программа сама пропорционально увеличит размеры разделов на новом. По своему желанию их можно изменить.

Опять нажимаем OK и проверяем что у нас правильно выбраны диски. Source – откуда копируем, Destination – куда копируем.
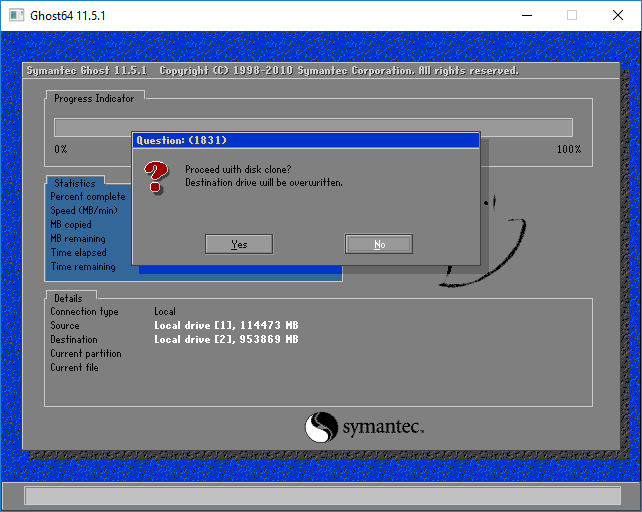
После этого нажимаем OK и процесс клонирования запуститься. Программа выводит сколько прошло времени от старта программы и показывает сколько примерно осталось до конца. Время копирования зависит от скорости диска и от объема информации.
По окончании необходимо выключить компьютер и отключить диск-источник. Иначе при первом запуске может возникнуть ситуация когда Windows потеряет пути с каталогам временных файлов или swap-файлу и не сможет загрузится.
Стартуем с нового диска, убеждаемся, что все работает.
2. Копируем жесткий диск с проблемами чтения.
Часто покупка нового жесткого диска обусловлена очевидными проблемами со старым. С такими дисками программы типа Symantec Ghost справляются не всегда. Выручит нас копирование из под ОС Linux.
Для начала скачаем образ диска, например, Ubuntu 16.04.
http://releases.ubuntu.com/16.04.2/ubuntu-16.04.2-desktop-amd64.iso
Запишем образ на DVD или USB-диск и загрузимся с него.
Переключимся для удобства на русский язык и нажмем на кнопку “Запустить Ubuntu”
Через 2-3 минуты система загрузится
Нажмите на клавиатуре клавишу со значком Windows или щелкните мышкой по значку Ubuntu в левом верхнем углу экрана.
Запустим терминал.

Копировать диск мы будем с помощью программы ddrescue. Сначала установим ее.
Чтобы скачать ddrescue в терминале введем следующую команду:
sudo wget http://www.hamishmb.altervista.org/files/Downloads/ddrescue-gui/1.7.1/Trusty/ddrescue-gui_1.7.1~trusty-0ubuntu1~ppa1_all.deb
Запустим установку:
sudo dpkg -i ddrescue-gui_1.7.1~trusty-0ubuntu1~ppa1_all.deb
Далее необходимо узнать имена дисков, которые нам назначила операционная система:
sudo fdisk -l
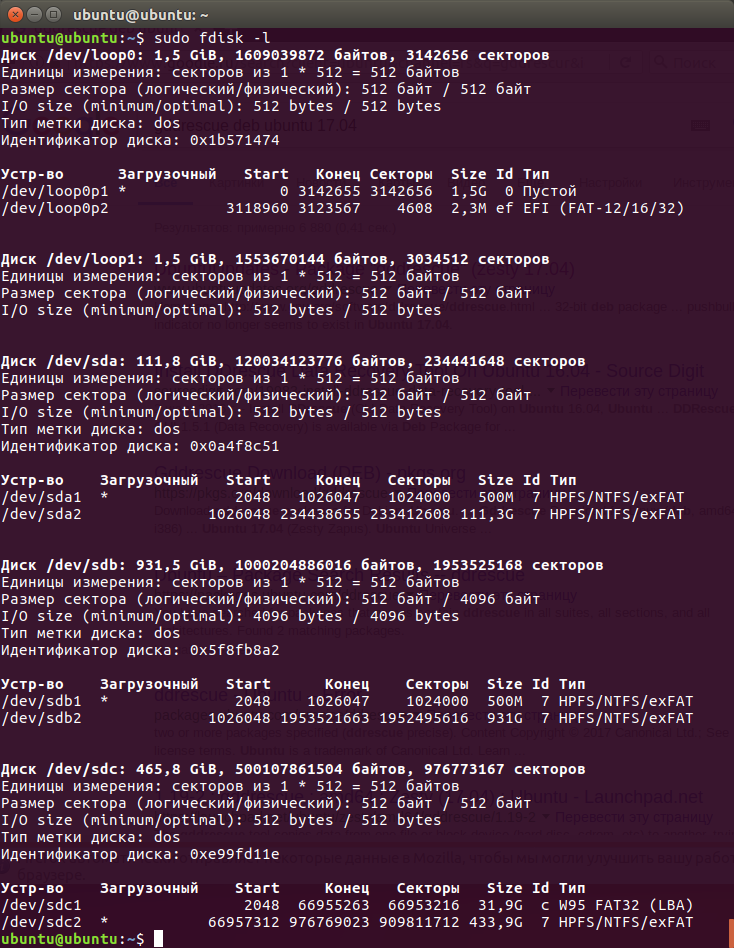
sda – сбойный диск, который будем копировать, sdb – диск на который будем копировать, sdc – USB-диск с которого мы загрузились.
ddrescue [параметры] infile outfile [mapfile] [параметры]
infile и outfile могут быть устройствами, разделами или файлами. mapfile – это обычный файл, который должен находиться в существующей директории. Если файла нет, программа создаст его.
Всегда используйте mapfile – это может сэкономить много времени так как без него ddrescue не сможет продолжить остановленное, зависшее, не до конца завершённое копирование, а сможет только заново его начать .
ddrescue -f -r 3 /dev/sda /dev/sdb ddrescue.log
-f или –force – принуждает ddrescue перезаписать диск outfile. Необходим, когда в качестве outfile используется устройство.
-r n или –retry-passes=n – задает количество повторных попыток чтения поврежденных областей, по умолчанию – 0.
Более подробно параметры запуска можно посмотреть командой ddrescue -h