
The Navi2Coach cycling computer may very well be one of the first GPS-enabled bike computers that aims to compete against every aspect of the Garmin Edge 500, from customization of data fields to advanced training metrics. But can this first-time entrant into the market really compete against a player as big as Garmin? And how does it hold up to months of testing? Well, I set out to find out. Back in January a unit arrived on my doorstep and I’ve been banging away on it since (hence why it may look a touch bit ‘loved’ in the photos).
Because I want to be transparent about my reviews – O-Synce sent me the Navi2Coach GPS bicycling computer to try out. Once I’m complete here, I’ll send this back to Germany and then go out and buy my own (to be able to support y’all in the comments section down the road). Simple as that. Sorta like hiking in wilderness trails – leave only footprints. If you find my review useful, you can use any of the Amazon or Clever Training links from this page to help support future reviews.
Lastly, at the end of the day keep in mind I’m just like any other regular triathlete out there. I write these reviews because I’m inherently a curious person with a technology background (my day job), and thus I try and be as complete as I can. But, if I’ve missed something or if you spot something that doesn’t quite jive – just let me know and I’ll be happy to get it all sorted out. Also, because the technology world constantly changes, I try and go back and update these reviews as new features and functionality are added – or if bugs are fixed.
So – with that intro, let’s get into things.
Unboxing:
The unit is displayed inside a see-through box, meaning that you can validate you’ve got the right thing before you tear it open. By the way, this is a good time to note that O-Synce is pronounced “O-Science”. I figure that the pronunciation for Navi2Coach is fairly self-explanatory.


Inside you’ll find the upper level has the unit, and the lower level hides all the mount brackets, cables and other accessories.


Here’s everything all sorted out once you’ve got the box moved out of the way:

And then here’s the parts post plastic baggie kidnapping:

I’ll quickly walk through everything. First is the manual, of particular note is the mount setup. While the whole thing may be obvious after reading this post, I assure you that upon opening it up the first time you’ll be confused. If nothing else, read the manual to figure out the mount.

Then we’ve got the micro-USB cable. Basically the same as most phone chargers these days:

Next up is the battery (yup, it’s both rechargeable and end-user swappable), as well as half of the mount stuff. The other half of the mount stuff came on the unit itself.

A closer look at the battery:

Here’s the unit itself. You’ll notice it came on one of the two provided mounts, sorta pre-assembled.


Flipping it over you can see how the mount would attach to one’s handlebars and provide a fairly stable platform. Additionally, you can see the charging/download port towards the top.

To access/install the battery you’ll simply remove the lower gray section and stick the battery inside from the bottom.

With that, everything is ready to start toying with. I’ll come back to the mount situation in a short bit, after we size things up a bit.
Size Comparisons:
Bike units are a bit more difficult to put on a rolling pin than typical watches are. Mostly because they don’t have watch bands. So, I just nudge them up against it all in a row – roughly from largest to smallest. Sometimes it’s tricky, for example with the O-Synce where it’s taller than the Joule GPS, but skinnier. Otherwise, it’s fairly self-explanatory. In general, it’s smaller than the Garmin Edge 510, but larger than the Edge 500.

Above from left to right: Garmin Edge 810/800, Edge 510, CycleOps Joule GPS, O-Synce Navi2Coach [this review], CycleOps Joule, Garmin Edge 200/500, Timex Cycle Trainer 2.0, Bryton Rider 21, and Magellan Switch Up.
Below, simply the above, but reversed (view as seen from above).

Because everyone in the industry likes to compare their bike computer to being “sorta like the Garmin Edge 500”, or “sorta like the Garmin Edge 800”, I’ll do the same. In this case, the unit functionally is “sorta like the Garmin Edge 500”, therefore, here’s the size comparison to it. Yes, it’s bigger in height, but equal in all other dimensions.

Here’s the two units sitting side by side:

And, nudged up against each other. Sorta spooning I guess.

Mounting Options:

The Navi2Coach comes with two different mounts for you to use. As in, two different styles of mounts – not two of the same.. The first style is fairly straight forward, and is primarily aimed at mounting on road bike handlebars. And, it’s the style that comes attached and configured on the unit to begin with:

The mount attaches to your bike via zip ties. In fact, this is true of both mounts.
The second mount option is what I selected to use, since it’s a bit more versatile. It allows attachment to not only road bikes, but also triathlon bikes. First up, here’s a standard handlebar configuration on a road bike (or, my commuter bike as it may be).

The mount uses zip ties to attach to your handlebars. The underside of the mount has an adhesive to keep things in place.


To change the orientation, you’ll simply find the smallest screwdriver in your house and then unscrew the four screws on the back to rotate the whole platform.
Once that’s done, you can plop it on your aerobars and you’ll be good to go. If you’re trying to understand on a triathlon bike why I put it on my aerobars, read this post, which explains pretty well why it doesn’t block my arms.

Alternatively, you can also mount it off to the side with one of the generic Profile Design mounts:


As you can see, you have some flexibility here. That said, out of the entire Navi2Coach ‘experience’ the mount is the thing that I dislike the most. Actually, it’s really one of the only things I dislike. Perhaps I’m just a bit spoiled coming from the world of quick install mounts using industrial strength rubber bands – like those found on the Garmin Edge series and other bike units. That said, if you’re not like me and constantly swapping bike mounts on bikes, then it’s probably not a big deal. I admit, the problem may be limited to my frequency of changing bike computers on bikes for testing.
From a mount strength standpoint, I’ve seen no issues in using it since January, including riding across many of the cobbles spread around Europe.
Core Cycling Functionality:
With everything all mounted up, let’s start using it. Upon turning it on you’ll be brought to the home screen:

The home screen is where you decide how you’re going to use the unit. In general, you’re likely going to just chose ‘Quickstart’, which simply translates to “Leave me alone and let me ride”. The Training option takes you into the areas to start pre-defined workouts, training by zones, or other programs. While the Navigation button helps in navigating on known courses (more on that later). If you scroll down a bunch you’ll see other settings as well. We’ll go ahead and just choose ‘Quickstart’.

When you started the unit it’s already looking for GPS signal, which it shows in the upper left corner. Additionally, you’ll see the sensor state for various ANT+ sensors and the battery indicator too. At this point though, the unit is pretty much ready to go. You’ll just tap the ‘Start’ button to start recording your ride. To stop, you’ll press stop. And to create a lap, you’ll press ‘Lap’. All pretty self-explanatory there.
Along the right hand side you’ll see three buttons:

These three buttons allow you to change the display pages. The upper and bottom buttons scroll through the data pages you’ve setup. You can create up to six data pages, each with up to eight pieces of information on them. I discuss all that in detail later on.

As you ride your speed, distance, elevation, ascent and any other data fields you’ve configured will be displayed. Additionally, any ANT+ sensors that you’ve got connected will display also. For example, above you can see I’ve got my heart rate strap connected (151BPM), and power meter connected (237w average over the last 30s), and the cadence data as well (91RPM). Also, you’ll see that the barometric altimeter is being used to provide not only elevation (3,465 ft), but also grade (2%).
Below, you can see another data page more focused on elevation:

Going back to that side middle button, it takes you to the non-data field pages – such as course pages, primarily used for navigation. You can see that display here:

If you hold down that middle button (the button, not your middle finger), you’ll get the below screen:

Think of this as a bit of a mid-ride menu. It allows you to change just about anything you need to – from navigation to profiles to settings. More than likely you’d be using this to change navigational pieces for mid-ride use.
While it would be rare to change a bike mid-ride, this is a good time to point out the bike profiles. The unit allows multiple bike profiles to be created, and named. You’ll use the same button to change bike profiles – for example, prior to a ride. Each bike profile has different ANT+ sensors associated with it, as well as different display pages.

While you can configure all of these things on the device itself, it’s way easier to do it on the software app instead. For example, here’s the page for creating a new bike profile:

You’ll notice up there a setting called ‘Smart Break’. This is more commonly known on other units as ‘Auto Pause’, which basically means that when you slow below a certain threshold (such as for a stoplight), it’ll automatically pause recording. You can configure the threshold.
Auto Lap is also configurable and can be set for either distance or time. I tend to leave mine disabled, but this allows you to have the unit automatically create laps on a predefined schedule. For example, create a lap every 1 or 5 miles (or kilometers).

The next worthy area of note is the timer alerts, commonly used for nutrition alerts. These can be configured to say anything you’d like, and at any timer interval (distance or time).

When they trigger, they’ll beep audibly as well as display a message for a short period on your screen. You can see below the ‘Eat Now!’ and ‘Drink now!’ messages I had configured:


Of course, everything you see on the screen is being recorded for download later on. Thus, when you’re done, be sure to hit the ‘Stop’ button and save the workout (you can just hold the power button to turn off the unit, which will save the file).
Now that we’ve covered the basics, let’s get into some of the differentiators and more advanced areas.
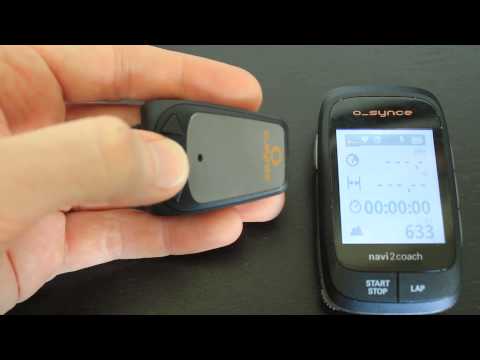
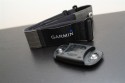
O-Synce ANT+ Remote Control:

The Navi2Coach is the first bike computer on the market to support the idea of a remote button control. This is primarily targeted at mountain bikers (and some triathletes) in that it enables you to control functions on the bike computer without having you’re hands leave the handlebars (or wherever they may be).

The remote control uses a simple CR2023 replaceable coin-cell battery and attaches with a single industrial stretch rubber band. Pretty quick and easy to attach. Here you can see I’ve attached it to the end of my aerobars:

And here’s a photo I took a long while ago on a non-tri bike, showing a more common configuration:

As you can see, I can easily tap the buttons from there without moving my hands out of aero position:

Now, this function is probably easier to show via video than via text. So, I put together a quick video showing navigation around the menus using the remote control:
As you can see, pretty straight forward. The remote control uses the ANT+ specification over a standard device profile, so in theory any other company or application could adopt to use it by itself without the Navi2Coach (and some are already working on it to control other things). For example, TrainerRoad could allow folks to pause or skip workout with it. Which, is exactly what Golden Cheetah is working on doing with it… (Note how I cleverly apply pressure for other companies to work together?)
Now, the only complaint I have here is that at $70US, I think the unit is a bit on the pricey side. I’d prefer to see it quite a bit cheaper.
Creating Workouts:
The Navi2Coach supports the ability to create pre-defined workouts that can then be downloaded to the device, giving you step by step instructions through a given workout. This can also be used for race plans (where I tend to use this type of functionality the most).
To start with, you’ll load up their free TrainingLab software suite. From there you’ll open ‘Workout Editor’ to start the workout creation process:

Once that’s opened you can name a given workout and start adding steps. In this case, each step has a type (for example, Warm-Up), and then a given duration and target.

Targets can include: No Target, Heart Rate, Cadence, Power, or Speed.
Duration can include: Time, Distance, Calories, Lap Button, HR Less Than, HR Greater Than, Power Less Than, and Power Greater Than.
One that’s all set, you’ll go ahead and click OK and then continue adding steps as you see fit. You can see below how I’ve created an entire workout:

You’ll notice that I was able to add repeating steps in there – in this case, an interval with a target of 250w for 16 minutes, and then a recovery time of 2 mins and 30 secs. At which point, I repeat it again. After the repeat numbers are done, it’ll go ahead and segue into the cool down.
To execute the workout, on the device navigate to Training, then Workouts:

Then from there you’ll select the specific workout that you’ve downloaded to your device:

And with that, you’ll go ahead and select ‘Quickstart’. If a given segment requires a sensor (such as a power meter), it’ll notify you of that prior to starting the workout.

You’ll then press the center button on the right side to access the workout page, which is shared with the map page. Along the bottom it’ll provide you with your current time (or other metric) left in that segment, as well as whether you’re on/below/above target.
Course and Navigation Support:

The Navi2Coach supports breadcrumb style navigation over a downloaded course. In other words, you can create a course online and then copy it to the Navi2Coach. The unit will then give you oncourse/offcourse type instructions, but won’t give you ‘Turn left on Maple Street’ instructions. Effectively, you’re following a series of breadcrumbs.
You can create the course online through a variety of sites, but ones like MapMyRide or BikeRouteToaster.com are probably the easiest. Ultimately, the unit will accept any .GPX or .FIT file as a route/course. Most sites on the internet make it easy to create those. All you need to do is plop them into the ‘Import’ folder and you’re good to go. It’ll then import them and put them into the Courses folder when you turn on the unit.

You can access the navigation aspects at any time via the middle-right button, which means you can do it mid-ride if you want to. Or at the start. Either way.
In my case, I selected Navigation and then I’m given the choice of GPS information or ‘Routes’. Routes are what I want for courses, so we’ll select that.

Now you can see all of my courses listed that I created above:

Once I choose one to navigate and start my ride, you’ll see it displayed as a trail to follow. You can zoom in on the trail as you see fit to stay on course.

Note that because it’s a breadcrumb trail, it won’t necessarily help you in every situation. For example, taking a look at the below, the course was a bit of a lollipop design, so I had to know which way to go once I got to that point (left in this case)

The unit does have a magnetic compass, which means that it will show you the correct direction based purely on the orientation of the unit. You’ll need to calibrate the compass first, but it only takes a few seconds.
To demonstrate the magnetic compass, see how when I flip the unit over/around, it changes orientation of the route (over the next two images):


In the same navigational menu is the ability to display the current Lat/Long, as well as the accuracy and GPS altitude (different from barometric altimeter):

Also, you can create points of interest (POI’s), which you can navigate back to later on.

Note that when navigating back to a POI, it’s “as the bird flies”, and not taking into account any sort of terrain barriers.

You can create the points of interest ahead of time within the TrainingLab software, or on the unit as you go along.
Indoor Trainer Use:

The Navi2Coach can utilize ANT+ sensors such as speed/cadence/power/HR to gather metrics while indoors on a trainer. I used it many times this way over the winter. While indoors you can select to turn off the GPS receiver so that it doesn’t continually attempt to search for it:

To do so, simply head to QuickStart, then when you press ‘Start’ it’ll ask you whether you’d like to start logging without GPS. At which point, you’re good to go!
In addition to gathering standard ANT+ sensors, I’ve asked the O-Synce engineering team what their plans are for supporting the Wahoo KICKR trainer directly from the head unit. The Wahoo KICKR is the first trainer that supports the ANT+ Resistance Control profile (currently in a final draft state), which other trainer companies will be adopting (CycleOps being one that’s also confirmed, with a few more rumored). In doing so it means that one could utilize their cycling head unit to control the resistance on trainers that support it.
The O-Synce folks noted that they do plan to support the KICKR quickly, as soon as the device profile is finalized (such that they can support all vendors at once). Hopefully that happens soon, and with the PerfPro folks being the first application (not a head unit) to support KICKR control over ANT+ (just this week), I suspect we’ll see this happen quickly. And actually, make that two apps, Peripedal added support for ANT+ control on Thursday as well.
Data Fields and Pages:
The Navi2Coach supports creation of upwards of eight data fields per data page, and six total data pages per bike profile. Each bike profile also gets navigational and altitude pages as well. There can be a total of five bike profiles.

I’ve put together a complete listing of all data fields that the Navi2Coach supports, as of May 7th, 2013. Note that during the course of my review period the number of data fields they supported expanded numerous times. As such, I expect it’ll continue to expand again.

Here’s a few different views to show off the sizing:


You’ll configure the data pages via the app, which makes the process quick and straight-forward. You an split any given full-width box into two boxes and then divide up the data fields as you see fit:


To change a data field, simply click on it and then select a new display field:

At Eurobike they noted simply that “If there are data fields that people want, we’re happy to add them”. Thus, if you see something missing, I’m sure if you note it in the comments below the O-Synce folks will see it and probably add it. Sorta like Burger King, “your way”. At this point, I honestly can’t think of any data pages that anyone else has that they don’t. But, I’m sure someone will have some good suggestions.
Waterproofing:
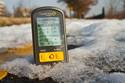
The O-Synce Navi2Coach is waterproofed to IPX7 standards, which means that it can withstand submersion in water 1-meter (3ft) deep for 30 minutes. I’ve done tests of this sort in the past actually (in the bathtub). Though as I often point out about IPX7 ratings for cycling computers, if you have to utilize the rating to its fullest extent, it means that something has gone horribly wrong. One’s handlebars should not be 3ft underwater for 30 minutes.
However, it does mean that there are no issues with constant rain. I’ve done a number of rides in the rain with the Navi2Coach and had no issues at all:

I’ve also washed it off in the sink without any problems either. Typically the USB ports are internally weatherproofed, so as long as you don’t try and charge the unit while underwater, you’re usually in good shape.
Power Meter Integration:

For those cyclists with a power meter, perhaps the most important aspect of a head unit is how well it handles the power meter and the different metrics it can display. After all, the cheapest power meters out there today start at $700, with most costing between $1,000 and $2,000US. The Navi2Coach supports ANT+ power meters, which is basically everyone on the market except for the Polar power meters (chain and pedal based).
As it stands today within the marketplace, the Navi2Coach is actually the most advanced power meter head unit out there. It’s simply a factual statement based on the number of power meter metrics and format types it supports. No other unit today for example supports the new ANT+ specifications around Pedal Smoothness and Torque Effectiveness – primarily used by the ROTOR3D power meter, but also by those coming into the market this summer/fall. Yet, the Navi2Coach does. And, it supports all the ‘normal’ stuff that everyone else does.
TSS/NP/IF: The Navi2Coach has licensed these metrics from Training Peaks for use within Navi2Coach. TSS (Training Stress Score), NP (Normalized Power), and IF (Intensity Factor) are all ways to measure effort on a given ride. You can add these data fields to your different data pages:

3s/10s/30s Power: These metrics allow you to see your power averages for the past 3s (3-seconds), 10s (10-seconds), and 30s (30-seconds). This is useful because most power meters produce very jumpy data when viewed as instantaneous power. Meaning it would be something like 277,242,288,242,250,275, etc… Versus a 10s average would have it more like 277,275,277,273,278, etc… with the numbers barely shifting – allowing you to pace easier. For me, I tend to use a combination of the three when pacing by power. Note that this is just for display. The unit still records at the correct 1-second sampling rate. (Data field below called ‘Avg 30s’).

Peak Power: This is pretty cool and allows you to see your best efforts over a given time period. Often called Mean-Max efforts, you usually see them in chart-format within various training log apps. It’s pretty cool to see this on the head unit itself. I should point out, no Garmin units have this – though CycleOps does on their head units. (Data field below called ‘MAX 5min’)

1-second recording: The Navi2Coach will record at 1-second intervals. This is standard, and the way it should be.

Zero Averaging: The Navi2Coach can zero-average both cadence and power values separately. As a general rule, you should check these to ‘yes’ to get the most accurate representation of your ride as far as comparing rides week over week. Like many things in cycling though, there’s a bit of a religious aspect here too, so some folks prefer to see non-zero averaging (which inflates your numbers). (See above for screenshot)
Power Meter Calibration: The Navi2Coach supports both types of calibration methods – manual and auto-zero. Manual calibration is typically done in a static (standstill) position, but varies by power meter manufacturer. For example, on a PowerTap it should be done holding the bike still (but not on it or moving). On a Quarq, the crank arm should be in the 12/6 position and without being clipped in.

In addition, it also supports Auto Zero support, which means that for certain power meters that support the ability to effectively self-calibrate themselves in known situations (for example, the PowerTap during coasting), it’ll honor these requests.
The unit also allows you to enable or disable Auto Zero support for any power meter type it supports (which is basically all of them these days).
Stroke Metric Support: The Navi2Coach supports Left/Right power balance information for those newer power meters on the market that support it (2012+ Power2Max units, 2012+ Quarq units). Additionally, it supports Pedal Smoothness and Torque Effectiveness for the even newer power meters that support the latest ANT+ power meter metrics (right now, just the ROTOR power meter, but later this year others). These were added in the latest update on May 3rd, 2013.
Zero Offset Values: A core tenant of calibration is knowing your zero offset value. It’s actually not terribly important what it is, but rather, how much it changes. Meaning, it doesn’t matter if your Quarq is showing 100 or 200. What matters is does it consistently show 100, or does it drift from 100 to 200 over the course of a ride. In almost all power meter head units I’m aware of today, it shows you your zero offset value at the time of calibration – but doesn’t show it to you again. Thus you’d have to memorize what that value is (or rather, was). The Navi2Coach will actually show you your current zero offset, and then show you the next offset when you calibrate – allowing you to see what the amount of drift is:

It’s actually interesting, they’re also investigating what it will take to record these values into the data stream for later analysis. I’ve already seen e-mail sent out to all of the developers of major power meters on the market today understanding what it would take to complete this. Rather cool.
Power Meter Company Information: Finally, the unit supports enumerating the power meter information page from a given power meter. While this page isn’t terribly useful for most consumers, it can be useful for bike shops looking to troubleshoot power meter firmware levels.

Backlight, Display and Sound Settings:
Yes, I said sound settings. This is the first bike computer that I’ve reviewed that you can actually change the volume level. Now, there isn’t a significant number of sound options – but, there’s still at least an option:

Meanwhile, on the more common display settings side you’ve got two areas of options. First is to modify the contrast:

And second is to modify the backlight. Here, you’ve got a slew of options. First you can select whether it’s enabled or not. Then you’ve got the intensity (1-10 level), and then the duration that it’ll remain on after pressing a button. Additionally, you can specify whether it’s only to be turned on at night:

Speaking of which, at night that light is plenty bright for any required operation:

As the entire screen illuminates, there’s no issues with viewing any detail on the screen.
And, since we’re talking about screen and display, I should point out that you can view any and all settings in metric (kilometers) or statute (miles), as well as metric or non for other settings like altitude and temperature:

Lastly, you can configure the following languages: English, French, Italian, German, Spanish, Dutch.

Included Software Application (O-Synce TrainingLab):
The O-Synce Navi2Coach includes access to the company’s free software suite – TrainingLab – which allows viewing and editing of training log data. Additionally, as seen elsewhere in the review, it also allows creation of workouts that you can transfer to the unit. In this section though, I’ll just focus on the downloading and viewing of the training data.
When you plug the unit in, the software will automatically recognize the Navi2Coach and ask you if you’d like to import the workouts in:

Once complete, you’ll see a list of new workouts imported, as well as those not added:

This is probably a good time to point out that the Navi2Coach appears as a standard USB mass storage device, and the file structure mirrors that of Garmin Edge series devices. This is great in that it ensures compatibility with just about every 3rd party app on the market today:

Anyway, back to the TrainingLab software. Now that I’ve got a given activity imported in, I can start off with the activity highlights. This page covers the summary information.

As you can see, it’s a bit busy. And while the software suite is very detail-oriented, presenting the data in a super-clean and stylish fashion isn’t necessarily the pinnacle of their technical achievements.
You’ll see that I’ve got my totals as well as averages and max’s displayed. Though, power doesn’t seem to show up on the main page, as that requires heading elsewhere for. There are some quirky little bugs here as well, for example you’ll notice the temperature doesn’t seem to be carrying through correctly in the upper ‘Weather Conditions’ section (but does lower in the screen). And the weight from my scale didn’t seem to update either on this particular day.
If you click on that little red/blue icon in the lower left corner you’ll get transferred over to the graph view. This is where I suspect most athletes will spend their time.

For those of you with a history in WKO+, you’ll probably find this quite familiar. Along the bottom you’ll see those little red blobs. Those are lap markers. I can click on one and get information about the laps that I created:

If I click on the ‘Summary’ button I’ll then get a listing of all the laps I created. I wasn’t using any sort of Auto-Lap functionality, but rather just marking various sections of my workout. For example, the second ‘lap’ (the one highlighted below) is simply the main set of this particular workout, a bunch of loops going around a park.

If you click the ‘Comparison Charts’ tab, I can compare laps quickly and easily. Now in this case these laps aren’t really the same, so they aren’t super-valid for comparison. If I had made a lap marker for each loop of the park, that would have produced a more consistent chart.
Along the bottom you’ll see different ways I can organize the comparisons – from speed to distance to ascent. Though, strangely average power is missing from there.

Going back to the charts, I can also view the data all on a single chart – like you’ve seen other software suites do. You can toggle any of the sensor data bits on or off with the buttons along the top right. I can also highlight any given section by dragging over it to select it, and then zooming into the data just in that section.

And finally, I can view the GPS map as well. They have a few different mapping providers to select from, which is nice. Though, satellite maps is not one of them (likely due to not wanting to pay the Google Maps licensing fees).

On the above, you can see the red dots again on the map, indicating lap markers where I pressed them.
Now I noted that there were no satellite maps in there today. But the application does support 3rd party plug-ins, thus potentially allowing these to be added down the line. This is also interesting in that you can see the internally developed plug-ins for importing in other company’s workout file types:

Overall the TrainingLab software is a good offline option for quickly analyzing data from your rides. Though, it does seem to be in need of a user interface refresh to bring it inline to being a bit more modern. The good news though is that because the Navi2Coach uses the industry standard .FIT file format, you can use the files in any training platform you choose (free or paid).
Exporting Data to 3rd Parties:
I believe one of the most important things with training data is having the ability to analyze it with whatever tools or applications you want, and to be able to ‘own’ that data and take it where you want. As such, I tend to come down pretty hard on companies that ‘island’ your data, locking you into their services or devices.
In the case of the Navi2Coach, it fully supports the .FIT file format, which is the same file format now used by Garmin, Timex, Magellan and many others out there. Of course, sometimes the devil is in the details – but here’s a quick pass of a few different 3rd party apps that I regularly use.
Strava: Upload of activity to Strava worked without issues for me using the latest firmware.

Sport Tracks: Using the latest version of Sport Tracks (3.1.4781) I was able to successfully import in the files from the Navi2Coach:

Training Peaks: I was able to successfully upload the workout to Training Peaks and analyze it without any issues.

Garmin Connect: For those looking to make the switch from other Garmin devices, the Navi2Coach looks to Garmin Connect just like that of a Garmin Edge unit. However, at present if you try and use the ‘Upload all new stuff’ option, it seems to hang midway through the search. So instead, you’ll just use the ‘Manual Upload’ button and select your latest file(s).

At which point the activity is fully viewable within Garmin Connect. Everything looks correct to me, only one summary data field seemed off (Max Avg 20m power), but NP/TSS/IF were all right. You can look at the below activity in more detail at this link here on Garmin Connect.

Golden Cheetah: Lastly, the free and community driven Golden Cheetah is also fully compatible with the Navi2Coach unit. The file imports in just like any other activity file.

Golden Cheetah has a slew of pretty in-depth analysis tools, primarily aimed at the cyclist (more than a triathlete or runner).

There are of course likely many other applications out there that work with the Navi2Coach files, primarily because they mirror that of Garmin devices (with the industry standard .FIT file format). In order to test your applications, I’ve put together a small zip file of test files from my rides you can download and try. If you’re a developer of training log software, feel free to state/note compatibility in the comments section below.
Updating the Firmware:
The Navi2Coach unit supports firmware upgrades, which the O-Synce folks appear to make quite often (in a good way, as in, adding features). The whole process only takes a moment and in none of the updates have I lost any of my settings or user configuration pieces.
After transferring the small file to the Navi2Coach device (like a USB thumb drive), I simply disconnect the device and it updates the firmware.

The whole process generally takes about 15-20 seconds on the device to complete before it’s fully turned on like normal.
ANT+ Weight Scale Support:
The Navi2Coach is the first non-Garmin unit that (to my knowledge) includes the ability to connect to ANT+ weight scales and download your weight and body fat information. The ANT+ enabled scales transmit the information wirelessly to the head unit, which then records it and typically makes it available to applications for health tracking purposes (like a weight log).
To utilize the weight scale support on the Navi2Coach, you’ll go ahead and dig into the user profile properties, where you’ll find the scale menu:

From there, it’ll trigger the ANT+ sequence for finding a weight scale. Now, different scales handle this process differently. Some scales require the unit to ‘wake up’ the scale before stepping on them (Tanita BC-1000), while other scales have you step on them first and then this just ‘picks up’ the data.
In this case, I’m using the Lifesource ANT+ enabled scale, which has me weigh myself first and then grab the data post-weigh-in. Once I press ‘Weigh’ on the Navi2Coach it goes and searches for the scale:

A few seconds later it’ll come back with the information:

In this case, this scale doesn’t do body fat or hydration, though the BC-1000 does and it would have transferred that as well.
Accessory Compatibility:
The Navi2Coach is currently compatible with virtually all ANT+ cycling accessories, made by any vendor our there. As a quick refresher, these are:
ANT+ Heart Rate Straps: The Navi2Coach supports all ANT+ enabled heart rate straps. Simply look for the ANT+ logo on the back of the transmitter pod if you already have a strap.

ANT+ Power Meters: As noted in far more detail within the power meter section, the Navi2Coach supports all types of ANT+ power meters that are on the market as of today.

ANT+ Speed/Cadence Sensors: This includes both ANT+ Speed/Cadence combo sensors, as well as speed-only and cadence-only sensors.

ANT+ Weight Scales: As noted in the previous section, these scales have ANT+ in them and can transmit your weight to compatible devices.

ANT+ Wireless Remote Controls: Currently the only company making one is O-Synce themselves. But what’s cool here is there’s a couple other hardware and software folks in the industry looking at leveraging it. Right now the remote allows you to navigate the menus of the Navi2Coach, though, expect to see other companies integrating it here shortly as well:

Non-supported accessories:
1) It should be noted that the O-Synce Navi2Coach does not support ANT+ foot pods for running indoors on a treadmill. This one is probably self-explanatory, but I figured I’d note it.
2) In addition, it does not support non-ANT+ heart rate straps, such as the Suunto heart rate straps (they use Suunto ANT, not ANT+), and the Polar HR straps (including the Nike ones). Essentially, if you don’t see a little ANT+ logo on the back, you’ll need to get a new strap.
3) It does not support the ANT+ Tempe external temperature sensor (currently only made by Garmin). Given the Navi2Coach has an internal temperature sensor, and that sensor is generally free of body heat being on your handlebars, I don’t think there’s much of a reason to support Tempe at this time.
Comparison Chart:
You can utilize the below comparison table that’s dynamically updated over time (so as features change via firmware) to compare the different cycling units I reviewed within this segment. Note the key part being ‘I’ve reviewed’. There are no doubt many other great units on the market, it’s just that if I haven’t reviewed it, I don’t feel right including it based on some marketing fluff. However, with that said – I’d also suggest that within the GPS cycling market, I’ve reviewed virtually every major product that you’d want to be looking at.
The Navi2Coach sits in the middle-tier bike computers (roughly $200-250), so if you’re looking for a more wallet-friendly option, see my GPS recommendations post from a few months ago.
| Function/Feature | O-Synce Navi2Coach | Garmin Forerunner 265 | Wahoo ELEMNT ROAM V2/2022 | Apple Watch SE (2022) | COROS APEX 2 (Base) |
|---|---|---|---|---|---|
| Copyright DC Rainmaker — Updated July 11th, 2023 @ 8:08 am New Window | |||||
| Price | $249 | $349/$399 | $399 | $249/$299 (cellular) | $399 |
| Product Announcement Date | AUG 31, 2012 | June 1st, 2022 | Oct 4th, 2022 | Sept 7th, 2022 | Nov 3rd, 2022 |
| Actual Availability/Shipping Date | OCT 2012 | June 1st, 2022 | Oct 4th, 2022 | Sept 16th, 2022 | Nov 3rd, 2022 |
| GPS Recording Functionality | Yes | Yes | Yes | Yes | Yes |
| Data Transfer | USB | USB, Bluetooth Smart, WiFi (Only Music has WiFi) | Bluetooth Smart, WiFi, USB | Bluetooth Smart | Bluetooth Smart (smartphone) |
| Waterproofing | IPX7 | 50 Meters | IPX7 | 50m | 50m |
| Dive/Snorkel Feature | No | ||||
| Battery Life (GPS) | 16 hours | Up to 30 hours in GPS mode | 17 hours | 12 hours GPS | Up to 45 hours |
| Solar Charging | No | No | No | No | |
| Recording Interval | 1s, 5s, 10s, 20s, 30s, 60s | 1-second, Smart, UltraTrac | 1-second | Varies | 1-second |
| Dual-Frequency GNSS | Yes | Yes | No | No | |
| Alerts | Audio/Visual | VIBRATE/SOUND/VISUAL | AUDIO/VISUAL + LED’s | Vibration/Audio/Visual | Audio/Visual/Vibration |
| Display Type | Transflective MIPS | AMOLED | MIPS | ||
| Backlight Greatness | Great | Good | Great | Great | Great |
| Ability to download custom apps to unit/device | No | Yes | No | Yes | No |
| Acts as daily activity monitor (steps, etc…) | No | Yes | N/A | Yes | Yes |
| Voice Integration | O-Synce Navi2Coach | Garmin Forerunner 265 | Wahoo ELEMNT ROAM V2/2022 | Apple Watch SE (2022) | COROS APEX 2 (Base) |
| Has Mic/Speaker | No | Yes | No | ||
| Can make/receive calls | No | Non-cellular editions with phone/Cellular Editions without phone | No | ||
| Voice Assistant | No | Apple Siri | No | ||
| Music | O-Synce Navi2Coach | Garmin Forerunner 265 | Wahoo ELEMNT ROAM V2/2022 | Apple Watch SE (2022) | COROS APEX 2 (Base) |
| Can control phone music | Yes | No | Yes | No | |
| Has music storage and playback | Yes (Music version) | No | Yes | Yes | |
| Streaming Services | Spotify, Amazon Music, Deezer | No | Apple Music | No (MP3 files only) | |
| Payments | O-Synce Navi2Coach | Garmin Forerunner 265 | Wahoo ELEMNT ROAM V2/2022 | Apple Watch SE (2022) | COROS APEX 2 (Base) |
| Contactless-NFC Payments | Yes | No | Yes | No | |
| Connectivity | O-Synce Navi2Coach | Garmin Forerunner 265 | Wahoo ELEMNT ROAM V2/2022 | Apple Watch SE (2022) | COROS APEX 2 (Base) |
| Bluetooth Smart to Phone Uploading | No | Yes | Yes | Yes | Yes |
| Phone Notifications to unit (i.e. texts/calls/etc…) | No | Yes (with connected phone) | Yes | Yes | Yes |
| Live Tracking (streaming location to website) | No | Yes (with connected phone) | Yes | With 3rd party apps | No |
| Group tracking | Yes (with connected phone) | Yes | No | No | |
| Emergency/SOS Message Notification (from watch to contacts) | No | Yes (with connected phone) | No | Yes | No |
| Built-in cellular chip (no phone required) | no | No | No | Yes (with cellular version) | No |
| Cycling | O-Synce Navi2Coach | Garmin Forerunner 265 | Wahoo ELEMNT ROAM V2/2022 | Apple Watch SE (2022) | COROS APEX 2 (Base) |
| Designed for cycling | Yes | Yes | Yes | Yes | Yes |
| Power Meter Capable | Yes | Yes | Yes | With 3rd party apps | Yes |
| Power Meter Configuration/Calibration Options | Yes | Yes | Yes | N/A | No |
| Power Meter TSS/NP/IF | Yes | Yes | Yes | N/A | NP only |
| Speed/Cadence Sensor Capable | Yes | Yes | Yes | No | Yes |
| Strava segments live on device | No | Yes | No | No | |
| Crash detection | Yes | No | Yes | No | |
| Running | O-Synce Navi2Coach | Garmin Forerunner 265 | Wahoo ELEMNT ROAM V2/2022 | Apple Watch SE (2022) | COROS APEX 2 (Base) |
| Designed for running | No | Yes | N/A | Yes | Yes |
| Footpod Capable (For treadmills) | N/A | YES (Also has INTERNAL ACCELEROMETER) | N/A | With 3rd party apps | Yes |
| Running Dynamics (vertical oscillation, ground contact time, etc…) | N/A | Yes WITH RD POD, HRM-TRI, HRM-PRO, HRM-RUN (NOT VIA OPTICAL HR) | N/A | Yes | Yes |
| Running Power | Yes WITH RD POD, HRM-TRI, HRM-PRO, HRM-RUN (NOT VIA OPTICAL HR) | N/A | Yes | Yes (Built-in) | |
| VO2Max Estimation | N/A | Yes | N/A | Yes | Yes |
| Race Predictor | N/A | Yes | N/A | No | Yes |
| Recovery Advisor | N/A | Yes | N/A | No | Yes |
| Run/Walk Mode | N/A | Yes | N/A | With 3rd party apps | No |
| Track Recognition Mode | Yes | N/A | Coming Dec 2022 | Yes | |
| Swimming | O-Synce Navi2Coach | Garmin Forerunner 265 | Wahoo ELEMNT ROAM V2/2022 | Apple Watch SE (2022) | COROS APEX 2 (Base) |
| Designed for swimming | No | Yes | N/A | Yes | Yes |
| Openwater swimming mode | N/A | Yes | N/A | YEs | Yes |
| Lap/Indoor Distance Tracking | N/A | Yes | N/A | Yes | Yes |
| Record HR underwater | N/A | Yes | N/A | Yes | Yes |
| Openwater Metrics (Stroke/etc.) | N/A | Yes | N/A | Basic stroke type only | Yes |
| Indoor Metrics (Stroke/etc.) | N/A | Yes | N/A | Basic stroke type only | Yes |
| Indoor Drill Mode | N/A | Yes | N/A | No | No |
| Indoor auto-pause feature | N/A | No | N/A | Yes | — |
| Change pool size | N/A | Yes | N/A | Yes | Yes |
| Indoor Min/Max Pool Lengths | N/A | 14M/15Y TO 150Y/M | N/A | 1y/m to 1,500y/m+ | 15y/m-300y/m |
| Ability to customize data fields | N/A | Yes | N/A | Yes | Yes |
| Captures per length data — indoors | N/A | Yes | N/A | Yes | |
| Indoor Alerts | N/A | Yes | N/A | Yes (goals) | Yes |
| Triathlon | O-Synce Navi2Coach | Garmin Forerunner 265 | Wahoo ELEMNT ROAM V2/2022 | Apple Watch SE (2022) | COROS APEX 2 (Base) |
| Designed for triathlon | No | Yes | N/A | Not really | Yes |
| Multisport mode | N/A | Yes | N/A | Yes | Yes |
| Workouts | O-Synce Navi2Coach | Garmin Forerunner 265 | Wahoo ELEMNT ROAM V2/2022 | Apple Watch SE (2022) | COROS APEX 2 (Base) |
| Create/Follow custom workouts | Yes | Yes | Yes | Yes | Yes |
| On-unit interval Feature | No | Yes | No | Yes | Yes |
| Training Calendar Functionality | No | Yes | No | With 3rd party apps | Yes |
| Functions | O-Synce Navi2Coach | Garmin Forerunner 265 | Wahoo ELEMNT ROAM V2/2022 | Apple Watch SE (2022) | COROS APEX 2 (Base) |
| Auto Start/Stop | Yes | Yes | Yes | Yes | Yes |
| Virtual Partner Feature | No | Yes | No | Yes | No |
| Virtual Racer Feature | No | Yes | No | Coming Dec 2022 | No |
| Records PR’s — Personal Records (diff than history) | No | Yes | No | No | No |
| Tidal Tables (Tide Information) | No | No | N/A | No | No |
| Weather Display (live data) | No | YEs | No | Yes | No |
| Navigate | O-Synce Navi2Coach | Garmin Forerunner 265 | Wahoo ELEMNT ROAM V2/2022 | Apple Watch SE (2022) | COROS APEX 2 (Base) |
| Follow GPS Track (Courses/Waypoints) | Yes | Yes | Yes | With 3rd party apps | Yes |
| Markers/Waypoint Direction | Yes | Yes (Up Ahead support) | Yes | Yes (Backtrack) | Yes |
| Routable/Visual Maps (like car GPS) | No | No | Yes | With 3rd party apps | Maps but not routable |
| Back to start | Yes | Yes | Yes | Yes (Backtrack) | Reverse course |
| Impromptu Round Trip Route Creation | No | No | No (But can create one-way routes from phone app) | With 3rd party apps | No |
| Download courses/routes from phone to unit | No | Yes | Yes | With 3rd party apps | Yes |
| Sensors | O-Synce Navi2Coach | Garmin Forerunner 265 | Wahoo ELEMNT ROAM V2/2022 | Apple Watch SE (2022) | COROS APEX 2 (Base) |
| Altimeter Type | Barometric | Barometric | Barometric | Barometric with real-time watch face | Barometric |
| Compass Type | Magnetic | Magnetic | Magnetic | Magnetic | Magnetic |
| Optical Heart Rate Sensor internally | YEs | N/A | Yes | Yes | |
| SpO2 (aka Pulse Oximetry) | Yes | Yes | Yes | ||
| ECG Functionality | No | No | No | ||
| HRV Recording | Yes (nightly and on-demand) | Yes | Yes (Manual) | ||
| Heart Rate Strap Compatible | Yes | Yes | Yes | Yes | Yes |
| ANT+ Heart Rate Strap Capable | Yes | Yes | Yes | No | No |
| ANT+ Speed/Cadence Capable | Yes | Yes | Yes | no | No |
| ANT+ Footpod Capable | No | Yes | No | No | No |
| ANT+ Power Meter Capable | Yes | Yes | Yes | No | No |
| ANT+ Lighting Control | Yes | No | No | No | |
| ANT+ Bike Radar Integration | Yes | Yes | No | No | |
| ANT+ Trainer Control (FE-C) | Yes | Yes | No | FTMS (Bluetooth) only | |
| ANT+ Remote Control | Yes | No | No | No | No |
| ANT+ eBike Compatibility | No | Yes | Yes | No | No |
| ANT+ Gear Shifting (i.e. SRAM ETAP) | No | Yes | No | No | |
| Shimano Di2 Shifting | No | Yes | No | No | |
| Bluetooth Smart HR Strap Capable | No | Yes | Yes | Yes | Yes |
| Bluetooth Smart Speed/Cadence Capable | No | Yes | Yes | No | Yes |
| Bluetooth Smart Footpod Capable | No | Yes | YEs | No | Yes |
| Bluetooth Smart Power Meter Capable | No | Yes | Yes | No | Yes |
| Temp Recording (internal sensor) | Yes | Yes | Yes | No | Yes |
| Temp Recording (external sensor) | No | YES (TEMPE) | No | No | No |
| Software | O-Synce Navi2Coach | Garmin Forerunner 265 | Wahoo ELEMNT ROAM V2/2022 | Apple Watch SE (2022) | COROS APEX 2 (Base) |
| PC Application | TrainingLab | Garmin Express | N/A | None | No |
| Web Application | Trainingsplan.com | Garmin Connect | N/A | None | No |
| Phone App | No | iOS/Android | iOS/Android | iOS only | iOS/Android |
| Ability to Export Settings | Yes | No | No | No | No |
| Purchase | O-Synce Navi2Coach | Garmin Forerunner 265 | Wahoo ELEMNT ROAM V2/2022 | Apple Watch SE (2022) | COROS APEX 2 (Base) |
| Amazon | Link | Link | Link | Link | Link |
| Backcountry.com | Link | Link | |||
| Competitive Cyclist | Link | ||||
| REI | Link | Link | Link | ||
| TPC | Link | Link | |||
| Wiggle | Link | Link | Link | ||
| DCRainmaker | O-Synce Navi2Coach | Garmin Forerunner 265 | Wahoo ELEMNT ROAM V2/2022 | Apple Watch SE (2022) | COROS APEX 2 (Base) |
| Review Link | Link | Link | Link | Link | Link |
Remember to click the ‘Expand Results’ button as it’ll show a gazillion more rows than the quick preview above. Or, you can mix and match your own comparison table here with products that are of interest to you.
Pros and Cons:
As always, I’d suggest that the below pros and cons is highly concentrated, and doesn’t really cover all the details of the 6,000+ words above. But, with that warning, here we go:
Pros:
– Simple to use, ‘just works’ factor
– Company frequently adding new features, numerous times during review
– Fully compatible with industry standards, works with 3rd party apps like Strava/Training Peaks
– Heavily customizable via both software app and unit itself
– Swappable battery
Cons:
– Mount system isn’t quite as flexible for multi-bike users
– TrainingLab desktop software needs a bit of a graphical overhaul
– Slightly larger than the Edge 500 from a size standpoint
Again, the above list attempts to condense down a significant number of thoughts into just a few bullet points…and generally that doesn’t work well in a technical decision making setting.
Summary:

A lot of people (and companies) like to say that they can go out and make a device as good as a Garmin Edge cycling computer. But when it comes time for wheels to hit the pavement, it’s the never ending list of little items that always ends up separating those devices from something like the Edge 500. Death by a thousand tiny cuts. However, this is probably the first cycling computer that is from a unit standpoint on par with the Edge 500 in virtually every meaningful way I can think of.
Of course, if you look at the comparison tables, there are differences. Probably about 4-5 different areas where one unit has something the other doesn’t. For example, the Edge 500 has a Virtual Pacer where the Navi2Coach doesn’t. On the flip side, the Navi2Coach supports all the latest power meters and ANT+ Scales, and the Edge 500 doesn’t. And the O-Synce has a magnetic compass and remote control and the Edge 500 doesn’t. So, it depends a bit on what components are important to you.
In my mind, about the only meaningful difference between the two units themselves is the mount system, which I discussed in the mounts section. From a software side, the Garmin Connect platform is cleaner and easier to utilize day to day than the TrainingLab software, though the TrainingLab software does offer more depth and analysis capability than Garmin Connect.
I’d have zero problems recommending this unit, for two specific reasons. First is that the thing actually works like it’s supposed to. No crashes, no obvious/apparent issues with any of my data files, nor any features missing that I’d use day to day. And secondly, is that if any of those were to occur, I’m seeing firsthand that the company is frequently releasing updates to add features and fix any known issues (and doing it with some urgency). I can’t say the same for other big-name companies that I often review.
Found this review useful? Here’s the super easy no-pain way you can help support future reviews! Read on…
Hopefully you found this review useful. At the end of the day, I’m an athlete just like you looking for the most detail possible on a new purchase – so my review is written from the standpoint of how I used the device. The reviews generally take a lot of hours to put together, so it’s a fair bit of work (and labor of love).
– O-Synce Navi2Coach GPS Bike Computer ($250)
– O-Synce ANT+ Remote Control ($65)
As you probably noticed by looking below, I also take time to answer all the questions posted in the comments – and there’s quite a bit of detail in there as well. Thus, if you use Clever Training (at left) to pickup the device, you’ll save 10% on your entire order, and get free shipping for US folks. Oh – and you’ll really help support the site! Just add coupon code DCR10BTF to the checkout page. Thanks for reading!
As you’ve seen throughout the review there are numerous compatible accessories for the unit. I’ve consolidated them all into the below chart, with additional information (full posts) available on some of the accessories to the far right. Also, everything here is verified by me – so if it’s on the list, you’ll know it’ll work. And as you can see, I mix and match accessories based on compatibility – so if a compatible accessory is available at a lower price below, you can grab that instead.
| Product | Street Price | Amazon | |
|---|---|---|---|
| 2013 Recommendations: Cycling GPS Units | |||
| 2014 Winter Recommendations: Cycling Units | |||
| Left/Right Capable Bike Computers | |||
 |
PowerTap G3 ANT+ Power Meter (Hub) $790 (hub only) |
$790 (hub only) | Amazon |
|
PowerTap Pro ANT+ Power Meter (Hub) $899 |
$899 | Amazon |
| Garmin ANT+ Heart Rate Strap (Classic Plastic Strap) — HRM1 $37.00 |
$37.00 | Amazon | |
| Garmin ANT+ Heart Rate Strap (Premium Soft-Strap) — HRM2 $69.00 |
$69.00 | Amazon | |
 |
Garmin ANT+ Heart Rate Strap (Premium Soft-Strap) — HRM3 $50 |
$50 | Amazon |
| Garmin ANT+ Speed/Cadence Cycling Sensor (GSC-10) $35.00 |
$35.00 | Amazon | |
| Lifesource UC-324 ANT+ Enabled Weight Scale (My recommendation) $109.00 |
$109.00 | Amazon | |
| Motorola ANT+ Speed/Cadence Cycling Sensor (Quick Install) — BEST! $55.00 |
$55.00 | Amazon | |
 |
Power2Max ANT+ Power Meter $970 (no cranks) |
$970 (no cranks) | N/A |
| PowerCal ANT+ Estimated Power Meter $99 |
$99 | Amazon | |
| SRAM Quarq Cinqo (Original) ANT+ Power Meter Discontinued |
Discontinued | Amazon | |
| SRAM Quarq Elsa & RED ANT+ Power Meter $1,600 (with cranks, no chainrings) |
$1,600 (with cranks, no chainrings) | Amazon | |
| SRAM Quarq Riken ANT+ Power Meter $1,200 (with cranks, no chainrings) |
$1,200 (with cranks, no chainrings) | Amazon | |
| Stages ANT+/Bluetooth Smart Power Meter $699 |
$699 | N/A | |
| Tanita BC-1000 ANT+ Enabled Weight Scale $215.00 |
$215.00 | Amazon |
And as always, feel free to post comments or questions in the comments section below, I’ll be happy to try and answer them as quickly as possible. Further, you can always e-mail me at the address on the sidebar. And lastly, if you felt this review was useful – I always appreciate feedback in the comments below. Thanks! Finally, I’ve written up a ton of helpful guides around using most of the major fitness devices, which you may find useful. These guides are all listed on this page here.
FITTING
1
Option A
Option B
INSERT THE BATTERY
2
BASIC ADJUSTMENTS
4
Switch on the navi2coach by pressing and holding the
POWER-button, for 2 seconds. When switched on for the first
time the navi2coach takes you through the most important
basic settings and allows you to pair optional ANT+ sensors
with the device.
Fit and switch on your sensors at the same time as switching
on the navi2coach so that you can pair them straight away.
You can access basic adjustments at any time in the main
menu
Settings.
In this menu you can also access add-on functions at a later
time.
TRAINING SOFTWARE
6
Download our free
trainingLab-Software
from the o-synce website.
This program allows you to transfer and analyse training data.
Using the integrated Workout editor you can quickly and easily
create training sessions on your PC.
TRAINING PLANS
The online portal
Trainingsplan.com
can automatically generate a
customised training plan for you without you requiring specialist
knowledge. You can load the data direct to your navi2coach
device.
USING THE TRAINING FUNCTIONS
8
The navi2coach utilises the FIT-File Format in order to access instructions during a workout.
You can create workout-FIT-Files using our training software or download one from the many online
training portals which use this file format. Transfer the workout file onto the device using trainingLab
or by copying the file into the device
Import
folder when the navi2coach is shown as an external hard
drive (see step 7).
In the menu
Training > Training plan
you can access and begin a workout
OVERVIEW MAIN MENU
Use the upper and lower buttons to scroll through the menus, confirm the selection with the middle button.
Quickstart
Training
Access the Sport mode and start a recording straight away.
Contains all training information and
functions.
Training today
Starts the planned training for the
current day.
Manual Training
Creates a workout step-by-step which
can then be carried out.
Training plan
Lists all planned workouts.
Quickstart
Training data
Shows a summary of all workouts
Training
completed.
Navigation
Total
Geocache
Shows a summary of all recordings
(distance, time,calories, etc.)
Scales
Setting
Scales
(weight management)
If ANT+ scales are connected you
can use this function to save your
measurements.
GEOCACHING
The navi2coach allows you to join up with the popular «Geocaching» treasure hunts. Simply enter the cache co-ordinates
and allow the device to pilot the route. You can also plot a ride and play it back on the device.
Status bar
Satellite signal strength
11:16 Time
Battery charge remaining
Compass rose
The arrow head always shows
towards north.
Map scale
Shows the current map sca-
le. You can change the zoom
level using the +/- buttons.
Fit the device to & release it from the mounting bracket
CHARGING THE BATTERY
3
RECORD TRAINING
5
In the main menu press the
2 Sec.
button, or select Quickstart. The Sport mode is
selected and the device automatically searches
for paired sensors.
The START/STOP button activates recordings,
whilst recording use the START/STOP button
to end or pause training.
START NAVIGATION
7
If you don’t already have planned routes use one of
the popular planning portals e.g.
a route in either GPX or FIT format. Alternatively you
can use commercially available mapping software e.g.
MagicMaps.
Connect the
until it is recognised as an external drive with the name
navi2coach. Open the drive and copy the file created into
the
Import folder.
TRAININGLAB.COM
You can access your data and start a ride from the menu
Navigation >
DETAILED MANUAL ONLINE
9
Find more detailed information about your navi2coach at
www.navi2coach.com
You can also download the full instruction manual as a PDF file
from our homepage.
DATA VIEW
You can view any data relevant to your training here. Using the menu
data fields. You can create multiple data pages and access them with the +/- buttons.
Navigation
Contains all navigation functions.
Routes
Select and follow planned routes which
have been loaded onto the device.
Track summary
Shows routes already ridden.
GPS
Retrieve the current GPS-coordinates.
Geocache
This function allows you to manually
enter Geocaches or to retrieve a
loaded Geocache.
Settings
*With an ANT+ power meter
This area contains all adjustment
options.
PAIRING — ANT+ Sensors combine
To enable the use of your ANT+ accessories with the navi2coach these accessories must be connected to the device. If the
pairing with the default settings in Step 4 did not work or have been skipped, you can catch up on this as follows.
1
Select all the ANT+ sensors. This occurs for example when you connect the heart rate monitor to the speed and
cadence sensors or move your power meter in motion. Make sure that all sensors are within a radius of 2m from
navi2coach.
2
Geocache
Go to
Settings > Sports Profiles> Profile 1-4 > Sensors > Pair
sensors and stores them in profile 1.
Shows the position of a
Geocache.
The navi2coach allows you to save up to
above procedure in which you select one of the sections 2-4. Make sure that you are at least 8m from the sensors that you
do not want to connect with the selected profile. You can repeat the process for all 4 sports profiles.
My position
If you want to add or change a sensor in a profile, proceed as follows:
Shows your current position in
relation to the route or a POI.
1
Go to Settings under the profile to edit from:
Track
2
Select the menu
Sensors
Now the device searches the appropriate sensor and, when found, will save it.
Shows the route travelled.
Do you want to for example add/exchange the speed sensor in the sports section 1, proceed as follows:
Settings> Sports Profiles> Profile 1> Sensors> Speed> Pair.
so make sure that it is turned on.
Note: All 4 sports profiles are automatically using the same heart rate sensor.
START/STOP-
Quickstart
Training
Navigation
Geocache
Waage
Einstellungen
Gpsies.com
to create
navi2coach
to your computer and wait
navi2coach
Routes.
Settings > Display Pages
you can freely configure the
Speed
Temperature
Riding time
Sunrise
Distance
Sunset
Stop watch
Time
Altitude
Altitude in meters (+/-)
Cadence
Pedal power balance
Heart rate
Gradient
Calories
Zones
Burned fat (g)
Above high zone setting
Below high zone setting
*Power (Watt)
*IF
Intensity Factor
AVG
Average value
*NP
Normalised power
MAX
Maximum value
*TSS
Training stress score
all. Now, the device searches for all available
4 sport
profiles. If you want to have a second bike with other sensors, repeat the
Settings> Sports Profiles> Profile 1-4
and in the following menu select the existing sensor to be exchanged or edited.
The navi2coach will now look for a speed sensor,
IN THE BOX
KEY FUNCTIONS
POWER-button
Long key stroke
Turn device on-or-off
Menus – short key stroke
Leave current menu
Sport mode – short key stroke
Pause the recording
START & STOP-button
Main menus – short key stroke
Open the Sport mode and
start the Sensor search
Sport mode – short key stroke
Start or pause a recording
Sport mode – long key stroke
End and save the current recording
LAP-button
Sport mode – short key stroke
Save an interim time
Sport mode – long key stroke
Set a POI
Accessories (optional)
Speed &
Heart rate
Cadence
heart2feel x
You can complement the
macro2sx com
navi2coach perfectly with our
macro2sx speed
ANT+ scales
range of o-synce ANT+ acces-
macro2sx cad
ANT+remote
sories and enjoy the complete
functionality of your training
ANT+power measuring
computer.
NAVIGATION VIEW
In use the route is displayed as a track view with an additional arrow based navigation. The zoom function allows
you to see the route in detail. Additional functions such as backtrack navigation, route inversion and the saving
and access of POIs are possible too.
Status bar
Satellite signal strength
11:16 Time
Battery charge remaining
Waypoint
A designated waypoint on
the route.
Turning instruction
Turning instructions are shown with
corresponding distance information.
SUPPORT
GUARANTEE
You can help us improve our customer service by sending
We are only liable for damages in accordance to the
your comments or questions to our email address at
statutory regulations in respect to our contractual partners.
www.o-synce.com. Please keep your purchase receipt or a
Batteries are excluded from warranties. In case of a
copy of it in a safe place.
warranty please contact the retailer where you purchased
your device. Batteries can be returned after use.
Phone:
+49-6201 980 50-0
Fax:
+49-6201 980 50-11
UPDATES
Email:
support@o-synce.com
o-synce Europe GmbH
Thaddenstr. 14a
Current soft- and firmware updates can be found on
69469 Weinheim
www.o-synce.com
Germany
This product is compliant with the Directive 1999/5/EC. The relevant Declaration of Conformity is available at
http://www.o-synce.com/en/customer-support
DE
EN
Upper button
Menus
Scroll up through the menus
Sport mode
Display training data: open further pages
(forwards)
Navigation view: zoom function (+)
Middle button
Menus
Confirm selection
Sport mode
Change between the display categories
(Data & Navigation)
Lower button
Menus
Scroll down through the menus
Sport mode
Display training data: open further pages
(backwards)
Navigation view: zoom function (-)
!ATTENTION PAIRING!
If you want to use ANT+ accessories
with the navi2coach you must pair/
connect them first. The pairing function
is described in Settings >> Pairing.
Compass rose
The arrow head always shows
towards north.
Route guide
Shows the current route and
the remaining route.
My position
Shows your current position
in relation to the route or
a POI.
Map scale
Shows the current map
scale. You can change the
zoom level using the +/-
buttons.
-
22.10.2016, 12:57
#31

Веломаньяк


o-synce navi2coach после двух лет активной эксплуатации перестал альтиметрию писать. В чем причина установить сложно, у меня он где только ни был, как только ни падал… Записал около 1000 треков, порядка 20 тысяч километров около 350 км набора высоты. Был я очень доволен этой моделью, причем к нему подходил аккум от нокии. можно было с собой всегда возить запасной на случай разряда. Каефный был комп, были недочеты(например очень бы была кстати функция круга по местоположению), но за эту цену супер. Вот думаю над заменой тоже.
-
22.10.2016, 13:08
#32
Веломаньяк

 Сообщение от Maytan

o-synce navi2coach после двух лет активной эксплуатации перестал альтиметрию писать. В чем причина установить сложно, у меня он где только ни был, как только ни падал… Записал около 1000 треков, порядка 20 тысяч километров около 350 км набора высоты. Был я очень доволен этой моделью, причем к нему подходил аккум от нокии. можно было с собой всегда возить запасной на случай разряда. Каефный был комп, были недочеты(например очень бы была кстати функция круга по местоположению), но за эту цену супер. Вот думаю над заменой тоже.
Спасибо за отзыв! А как у navi2coach с ведение по треку реализовано? Интересует — какие форматы понимает, есть ли масштабирование на экране. Издает какой-нибудь звук в случае ухода с трека, рисует ли направление для возврата на трек?
-
22.10.2016, 13:21
#33
Веломаньяк
Сообщение от aush
договориться и ELEMNT с оказией заказал.
ну и как?) напиши че к чему, кайфовый или не очень, стоит ли своих денег?)———- Добавлено в 13:21 ———- Предыдущее сообщение было в 13:14 ———-
Сообщение от vasay
А как у navi2coach с ведение по треку реализовано?
да я ни разу трек туда не закидывал и не ездил. Маштабирование такое: рабочая ширина экрана 28мм(высота 38) из них самый крупный масштаб 8мм=5метрам, самый мелкий 8мм=200 км. градация такая 200км, 100км,50,20,10,5,2,1,500м,200,100,50,20,10 и 5. нуто есть если ехать обратно по своему же маршруту, то можно приближатьудалять вот в таком диапазоне.
-
22.10.2016, 16:00
#34
Веломаньяк

Сообщение от Maytan
ну и как?)
Да нормально. совсем не то устройство, которое покупал) Пока разрабы его активно допиливают. В летних прошивках появились strava сегменты, навигация по маршруту. Пересчета маршута нет (и походу не будет). А так датчики не теряет, трек пишет. Карту показывает. На холоднуу еще не катался — как ведет себя при низкой температуре не знаю.
Из заметных минусов — нет одометра.
-
23.10.2016, 13:28
#35
Веломаньяк
Перепрошил свой велокомп вчера, все пишет. Замена отменяется=)
-
14.11.2016, 12:04
#36
Веломаньяк
Похоже, что под потребность топикстартера полностью подходит Lezyne — и велокомп с плюшками, а не наоборот, и ЧБ, и долгий runtime…
Есть побольше http://www.lezyne.com/product-gps-su…p#.WCmLKdWLSUk, и поменьше http://www.lezyne.com/product-gps-mi…p#.WCmL-9WLSUk
-
14.11.2016, 19:04
#37
Веломаньяк
Сообщение от Winner
Похоже, что под потребность топикстартера полностью подходит Lezyne — и велокомп с плюшками, а не наоборот, и ЧБ, и долгий runtime…
Возможно (в первом после я обозначил его, как один из вариантов)
У Вас есть опыт его использования? По рекламным роликам — штука интересная, но как всегда, дьявол кроется в деталях

-
15.11.2016, 13:26
#38
Веломаньяк
Сообщение от vasay
У Вас есть опыт его использования? По рекламным роликам — штука интересная, но как всегда, дьявол кроется в деталях
К сожалению нет. Я и сам ищу себе комп. Запросы аналогичны вашим.
-
15.11.2016, 13:30
#39
Omnia mea mecum porto

Сообщение от Winner
К сожалению нет. Я и сам ищу себе комп. Запросы аналогичны вашим.
Edge 500———- Добавлено в 14:30 ———- Предыдущее сообщение было в 14:28 ———-
Сообщение от vasay
тут уже приходится вглядываться, что на синглтреке между деревьями может быть весьма опасно.
Нафига меж деревьев пульс?
")
-
15.11.2016, 14:03
#40
Веломаньяк
Сообщение от pavlinux
Нафига меж деревьев пульс?
Во первых, Вы вырвали цитату из контекста. В том контексте было сравнения читаемости ЧБ экрана и цветного Transflective на тех устройствах, которые у меня есть (а это пульсометр и спортивные часы).
Во вторых, нужен! Что бы сказать себе «спокойней! Еще впереди **км пути!» А то, порой, со старта, в азарте, да на адреналине, ломишь в группе более сильных людей, а потом «докатываешь» 3/4 дистанции.
По г. Москве в пределах МКАД
Стоимость доставки составляет 340 р. за одну единицу товара. Доставка производится в пределах МКАД, а также в район Куркино и г. Химки. Доставка осуществляется до вашего подъезда. Максимальный срок доставки 3 рабочих дня со дня оформления заказа (зависит от загрузки службы доставки). Доставка осуществляется в будние дни с 10.00 до 22.00. Накануне доставки курьер свяжется с вами и сообщит о доставке.
В целях безопасности мы осуществляем доставку заказа только на конкретный адрес и не передаём товар на автостоянках, станциях метро и в других общественных местах.
Перед доставкой каждый велосипед собирается и тщательно настраивается профессиональными механиками.
Вместе с заказанным товаром покупатель получает полный комплект документов: чек, гарантийный талон, паспорт и инструкцию, в случае приобретения велосипеда.
Прием товара покупателем производится в присутствии курьера в месте достаточном для осмотра и при хорошем освещении.
К сожалению, курьер не сможет проконсультировать вас по вопросам технических параметров и функциональных особенностей товара.
Обязательно убедитесь в правильной комплектности и отсутствии дефектов товара. После получения заказа претензии к внешним дефектам товара, его количеству, комплектности и товарному виду не принимаются. В случае обнаружения брака, курьером описывается характер повреждений в соответствующем пункте акта приема-передачи, на основании которого будет произведен возврат товара.
Время ожидания покупателя курьером в месте доставки составляет не более 10 минут. В случае отсутствия покупателя в месте доставки, курьер возвращает товар в магазин.