Раздел: Бытовая, кухонная техника, электроника и оборудование
Тип: Микроволновая печь с грилем и конвекцией
Характеристики, спецификации
Габаритные размеры (В*Ш*Г):
32*52*45 см
СВЧ с грилем и конвекцией:
Да
Инверторная технология:
Да
Полезный объем камеры:
28 л
Внутренние размеры (В*Ш*Г):
21*36*37 см
Диаметр поворотного стола:
35 см
Материал поворотного стола:
стекло
Внутреннее покрытие:
нерж. сталь
Мощность микроволн:
1000 Вт
Режим микроволны+гриль:
Да
Режим микроволны+конвекция:
Да
Тип управления:
электронный
Размер дисплея (В*Ш):
25*50 мм
Светящиеся символы дисплея:
Да
Цвет светящихся символов:
зеленый
Индикация режима работы:
Да
Таймер продолжит. работы:
до 99 минут
Сенсорное приготовление:
4 режима
Автоматич. приготовление:
8 режимов
Занесение в память:
2 рецепта
Отсрочка запуска:
до 99 минут
Звуковой таймер:
до 99 минут
Отключение звук. сигнала:
Да
Режим »защита от детей»:
Да
Внутреннее освещение:
1 х 15 Вт
Тип открывания дверцы:
ручка
Направление открыв. дверцы:
вниз
Макс. потребляемая мощность:
1700 Вт
Низкая решетка для гриля:
Да
Материал фронт. панели:
пластик
Инструкция к Микроволновой печи с грилем и конвекцией Panasonic NN-C785 JFZPE
Установка и подключение
Проверка микроволновой печи
Предупреждение
Распакуйте микроволновую печь и удалите
1. Уплотнители дверцы и места их прилегания
упаковочный материал. Проверьте печь на наличие
необходимо протирать влажной салфеткой.
таких повреждений и дефектов, как вмятины,
Прибор необходимо проверять на наличие
неисправность запоров дверцы, трещины в дверце.
повреждений уплотнителей дверцы и мест их
При обнаружении каких-либо неисправностей сразу же
прилегания. При обнаружении подобных
обратитесь к Вашему дилеру. Не производите
повреждений не допускается эксплуатация прибора
установку печи, имеющей неисправности или
до выполнения ремонта специалистом сервисной
повреждения.
службы, прошедшим обучение у изготовителя.
2. Не допускается эксплуатация прибора при
Указания по заземлению
повреждении сетевого шнура или штепсельной
ВНИМАНИЕ: В ЦЕЛЯХ ОБЕСПЕЧЕНИЯ БЕЗОПАСНОСТИ
вилки, а также если произошло падение или
МИКРОВОЛНОВАЯ ПЕЧЬ ДОЛЖНА БЫТЬ ЗАЗЕМЛЕНА.
повреждение самого устройства или в его работе
Если сетевая розетка не имеет заземления, покупатель
имеются неполадки. В случае повреждения сетевого
должен заменить ее на розетку с системой заземления.
шнура он должен быть заменен таким же шнуром,
поставляемым производителем. Замена должна
Рабочее напряжение
производиться квалифицированным специалистом.
Напряжение в сети должно соответствовать значению,
3. Не пытайтесь самостоятельно разбирать или
указанному на фирменной наклейке. При подключении
производить регулировку или ремонт дверцы,
PУCCKИЙ
к сети с напряжением выше указанного возможно
cтойки панели управления, предохранительных
возгорание или другие повреждения.
блокировочных выключателей или любой другой
части печи. Не снимайте наружную панель печи,
Установка микроволновой печи
которая не пропускает микроволны за пределы
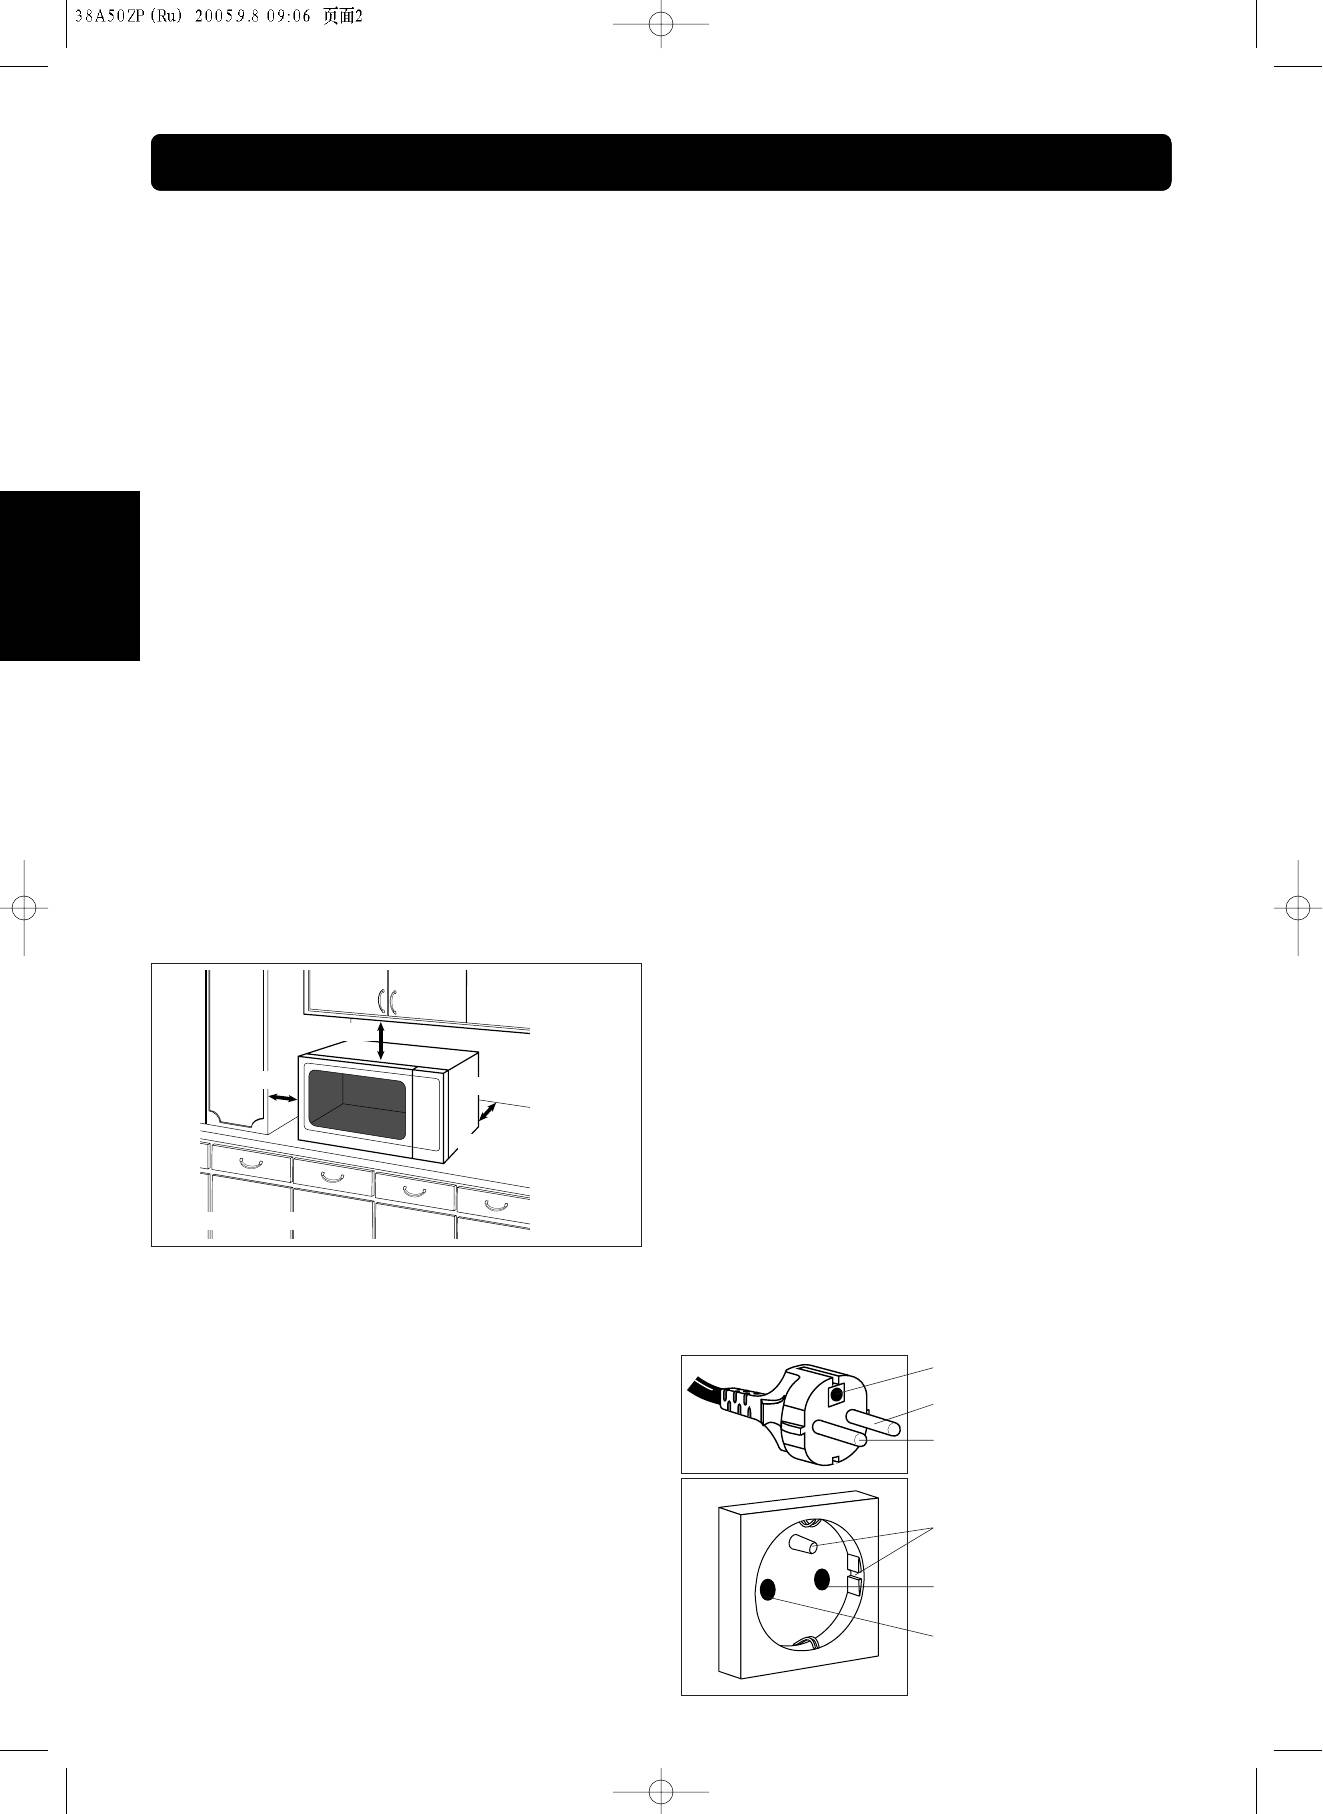
1. Установите печь на ровную устойчивую поверхность
устройства.
на высоте не ниже 85 см от пола.
Проведение ремонта неквалифицированными
2. Проследите, чтобы установленную печь было легко
лицами опасно, поэтому он должен
отключить от электросети путем отсоединения вилки
производиться только специалистом сервисной
шнура питания от розетки или активации
службы, прошедшим обучение у производителя.
прерывателя цепи.
4. Замена осветительной лампы печи должна
3. Для правильной работы печи необходимо
производится только специалистом сервисной
обеспечить достаточную циркуляцию воздуха.
службы, прошедшим обучение у производителя.
Использование поверхности для печи:
Когда возникнет необходимость замены лампы,
Оставьте 30 см свободных над печью, 10 см сзади, 5
обратитесь к Вашему дилеру.
см с одной стороны и более 40 см с другой.
5. Жидкости и другие продукты не должны
разогреваться в плотно запечатанных или закрытых
ёмкостях, так как они могут взорваться.
6. Дети могут пользоваться микроволновой печью
30 cm
только после того, как им будут даны понятные
инструкции по эксплуатации печи и они смогут
5 cm
10 cm
безопасно пользоваться ею, осознавая возможные
опасности при ее неправильном использовании.
Открыть
Внимание!
Данное устройство предназначено для подключения к
сетевой розетке, имеющей заземление. Не
пренебрегайте данной мерой безопасности, поскольку
Верхняя поверхность
при отсутствии заземляющего провода в цепи
устройство не будет отвечать требованиям защиты от
4. Не размещайте микроволновую печь вблизи
поражения электрическим током. Вы должны
электрической или газовой плиты.
обратиться к квалифицированному специалисту для
5. Не допускается снятие ножек.
установки розетки с заземлением, показанной на
6. Данная печь предназначена только для бытового
рисунке ниже.
применения. Не используйте ее вне помещения.
7. Не рекомендуется пользоваться микроволновой
Земля
печью при повышенной влажности воздуха.
Нейтраль
8. Шнур питания не должен касаться внешней
поверхности корпуса. Не допускайте его
Фаза
соприкосновения с горячей поверхностью. Шнур
питания не должен свисать с края стола. Не
опускайте саму печь, шнур питания или его вилку в
воду.
Земля
9. Не загораживайте вентиляционные отверстия
микроволновой печи. Если во время работы они
окажутся закрытыми, это может привести к
Фаза
перегреву или повреждению устройства. Если Вы
хотите положить какую-либо ткань на верхнюю
Нейтраль
поверхность корпуса, следите, чтобы она не
загораживала вентиляционные отверстия печи.
— Ru-1 —

Меры безопасности
Назначение микроволновой печи
5. Если пища или посуда на стеклянном поворотном
1. Не используйте печь ни для каких иных целей, кроме
cтоле касается стенок печи и препятствует
приготовления пищи. Эта печь разработана
вращению, cтол будет автоматически вращаться в
специально для разогрева и приготовления пищи. Не
противоположном направлении. Это нормально.
используйте печь для разогрева каких-либо
6. Не кладите пищу непосредственно на поворотный
химических веществ или непищевых продуктов.
стол.
2. Удостоверьтесь, что посуда/емкость подходит для
использования в микроволновой печи.
Роликовое кольцо
3. Не используйте микроволновую печь для сушки
1. Для обеспечения бесшумной работы и
бумаги, газет, белья и других материалов. Это может
предотвращения образования нагара необходимо
вызвать возгорание.
регулярно очищать роликовое кольцо и дно печи.
4. Когда Вы не пользуетесь печью, не кладите внутрь
2. Во время приготовления пищи роликовое кольцо
посторонние предметы на тот случай, если она будет
всегда используется вместе с поворотным cтолом.
случайно включена.
5. Не допускается включение микроволнового режима,
Решетка
PУCCKИЙ
если внутри печи нет продуктов. Это может вызвать
1. В комплект входит решетка, благодаря которой на
повреждение устройства.
поверхности небольших по объему порционных
6. В случае задымления нажмите кнопку Стоп/Сброс или
блюд быстрее образуется румяная корочка.
поверните ручку Таймера в нулевое положение и,
2. Решетку необходимо регулярно чистить.
оставив дверцу закрытой, отсоедините сетевой
3. При использовании подставки в ГРИЛЕВОМ,
кабель или отключите электричество во всей
КОНВЕКЦИОННОМ или КОМБИНИРОВАННОМ
квартире.
режимах необходимо использовать термостойкую
посуду; применение пластиковых или бумажных
Использование нагревательного
емкостей может привести к их возгоранию под
элемента
действием тепла, излучаемого от нагревателя.
1. Перед первым использованием функций Гриль или
4. При эксплуатации печи в режиме Комбинации не
Комбинация дайте печи поработать в режиме гриля в
ставьте алюминиевые или металлические
течение 10 минут, не загружая в нее продукты и не
контейнеры непосредственно на решетку — между
устанавливая аксессуары. Это позволит избавиться от
ними всегда должно находиться стеклянное блюдо.
масла, нанесенного для защиты от коррозии.
Это предотвратит искрение, способное повредить
2. Внешние поверхности печи, включая вентиляционные
печь.
отверстия на корпусе и дверце, нагреваются в
5. При приготовлении пищи в режиме Микроволны
режимах Гриль, Конвекция и Комбинация. Соблюдайте
решеткой пользоваться не рекомендуется.
осторожность, открывая и закрывая дверцу печи при
размещении в ней продуктов или установке
Обслуживание микроволновой печи
аксессуаров.
1. Ремонт и техобслуживание
3. В верхней части печи находится нагревательный
ЕСЛИ ВАША ПЕЧЬ ТРЕБУЕТ
элемент. Поэтому после работы в режимах Гриль,
РЕМОНТА, обратитесь в
Конвекция и Комбинация верхняя панель корпуса
ближайшую службу технической
будет очень горячей.
поддержки Panasonic. Любые
Примечание:
операции по ремонту и
При работе в режимах Гриль, Конвекция и Комбинация
техобслуживанию микроволновой печи, требующие
аксессуары, установленные внутри печи, также сильно
снятия крышки корпуса, должны выполняться только
нагреваются.
квалифицированным персоналом сервисного
4. При работе в ГРИЛЕВОМ/КОНВЕКЦИОННОМ и
центра, так как при этом возникает опасность
КОМБИНИРОВАННОМ режиме принадлежности печи и
микроволнового облучения.
поверхность печи сильно нагреваются, поэтому будьте
2. Уплотнители дверцы
осторожны—не подпускайте детей к печи.
Не пытайтесь самостоятельно модернизировать,
регулировать или ремонтировать дверцу, панель
Рaботa вентилятора
управления, предохранительную систему замка
Пoсле использования печи вентилятор может некоторое
дверцы или любую другую деталь микроволновой
время продолжать работать, чтобы охладить
печи. Не снимайте переднюю панель корпуса.
электрические компоненты.
Необходимо поддерживать чистоту уплотнителей
дверцы и мест их прилегания. Периодически
В соответствии с п.2 ст. 5 Федерального закона РФ «О
протирайте их влажной тканью.
защите прав потребителей» производителем
Запомните: Следует время от времени проверять
установлен минимальный срок службы для данного
целость уплотнителей дверцы и прилегающих
изделия, который составляет 7 лет с даты производства
участков корпуса. Если они повреждены,
при условии, что эксплуатация изделия производится в
устройством нельзя пользоваться до тех пор, пока
строгом соответствии с настоящей инструкцией и
все повреждения не будут устранены техническим
предъявляемыми техническими требованиями.
специалистом, обученным производителем.
3. Внутреннее освещение камеры
Принадлежности
Лампа внутреннего освещения
К микроволновой печи прилагаются различные
должна заменяться только
принадлежности. Всегда следуйте указаниям по их
техническим специалистом,
использованию.
обученным производителем. НЕ
ПЫТАЙТЕСЬ самостоятельно
Поворотный cтол
разбирать корпус устройства.
1. Не допускается включение печи без роликового
кольца и поворотного cтола.
2. Используйте только специально предназначенный для
данной печи поворотный cтол.
3. Если поворотный cтол еще горячий, дайте ему
остынуть, прежде чем мыть или чистить его.
4. Поворотный стол может вращаться в разных
направлениях.
— Ru-2 —
Важная информация
в) Перемешайте жидкость дважды: один раз перед тем,
1) Время приготовления
как поместить емкость с жидкостью в печь, и второй
• Время приготовления блюд в сборнике рецептов
раз — по истечении половины срока, отведенного для
указано приблизительно.
приготовления.
• Время приготовления зависит от состояния
г) После разогрева оставьте жидкость в печи на
продуктов, их температуры, а также от типа
некоторое время, а затем помешайте и аккуратно
используемой посуды.
выньте емкость из печи.
Во избежание переваривания пищи следует сначала
е) При разогреве жидкостей в микроволновой печи
устанавливать минимальное время приготовления.
может происходить их бурное кипение уже после
Если блюдо не совсем готово, можно установить
воздействия волн, поэтому соблюдайте
дополнительное время приготовления.
осторожность, когда вынимаете ёмкость с
жидкостью из печи.
Внимание! При превышении рекомендуемого
времени приготовления блюд пища портится,
7) Бумага/Пластик
кроме того, возможно возгорание и повреждение
• При разогревании продуктов в
внутренней поверхности печи.
пластиковых или бумажных
упаковках нужно следить за
2) Небольшие порции продуктов
процессом, так как при перегреве
При длительном приготовлении
пластик или бумага могут
небольшие порции или блюда с
PУCCKИЙ
загореться.
низким содержанием влаги могут
• Не помещайте в печь продукты,
пересохнуть или даже сгореть. Если
упакованные в бумагу из вторсырья (например,
произошло возгорание продукта,
оберточную бумагу или бумажные полотенца), за
необходимо отключить печь, не
исключением тех случаев, когда на бумаге есть
открывая дверцу, и отсоединить
специальная наклейка <Безопасно при
сетевой шнур от розетки.
использовании в микроволновых печах>, так как
упаковка может содержать примеси, вызывающие
3) Яйца
искрение и/или возгорание при работе печи.
Не допускается варить яйца в
• Перед загрузкой продуктов в печь удалите все
скорлупе или подогревать
металлические проволочные скрепки, которые могут
сваренные вкрутую яйца в
содержаться в упаковке.
МИКРОВОЛНОВОМ режиме, так как
они лопнут из-за повышения
 Посуда/Фольга
внутреннего давления.
• Не допускается разогрев продуктов в закрытых
консервных банках или закупоренных бутылках, т.к.
4) Прокалывание
они могут взорваться.
При приготовлении в
• Нельзя пользоваться металлической посудой или
МИКРОВОЛНОВОМ режиме
посудой с металлическим ободком при
продуктов с непористой кожурой,
использовании микроволнового режима, т.к. это
таких как картофель, яичный желток
вызывает искрение.
или сосиски рекомендуется
• Если Вы используете алюминиевую фольгу, шампуры
предварительно проколоть их,
или металлическую посуду, обеспечьте расстояние не
чтобы они не лопнули.
менее 2 см до стенок и дверцы печи во избежание
искрения.
5) Термометр для мяса
Для определения степени готовности мяса или птицы
9) Бутылочки для кормления/
Вы можете использовать специальный термометр для
Консервы для детского питания
мяса. Для этого необходимо предварительно вынуть
• Бутылочки для кормления и банки с детским
блюдо из печи. Не пользуйтесь обычными
питанием следует помещать в печь без крышек и
термометрами для мяса при использовании
сосок.
МИКРОВОЛНОВОГО режима, так как они вызывают
• Содержимое нужно помешивать или периодически
искрение.
встряхивать.
• Перед кормлением необходимо проверить
6) Жидкости
температуру содержимого, чтобы не допустить
При разогревании жидкостей в
ожогов.
микроволновой печи, например
супа, соусов или напитков, их
закипание может произойти без
видимых пузырьков. В результате
кипящая жидкость может
выплеснуться из посуды. Во избежание этого
соблюдайте следующие правила:
а) Не пользуйтесь прямыми емкостями и узким
горлышком.
б) Не допускайте перегрева жидкостей.
— Ru-3 —
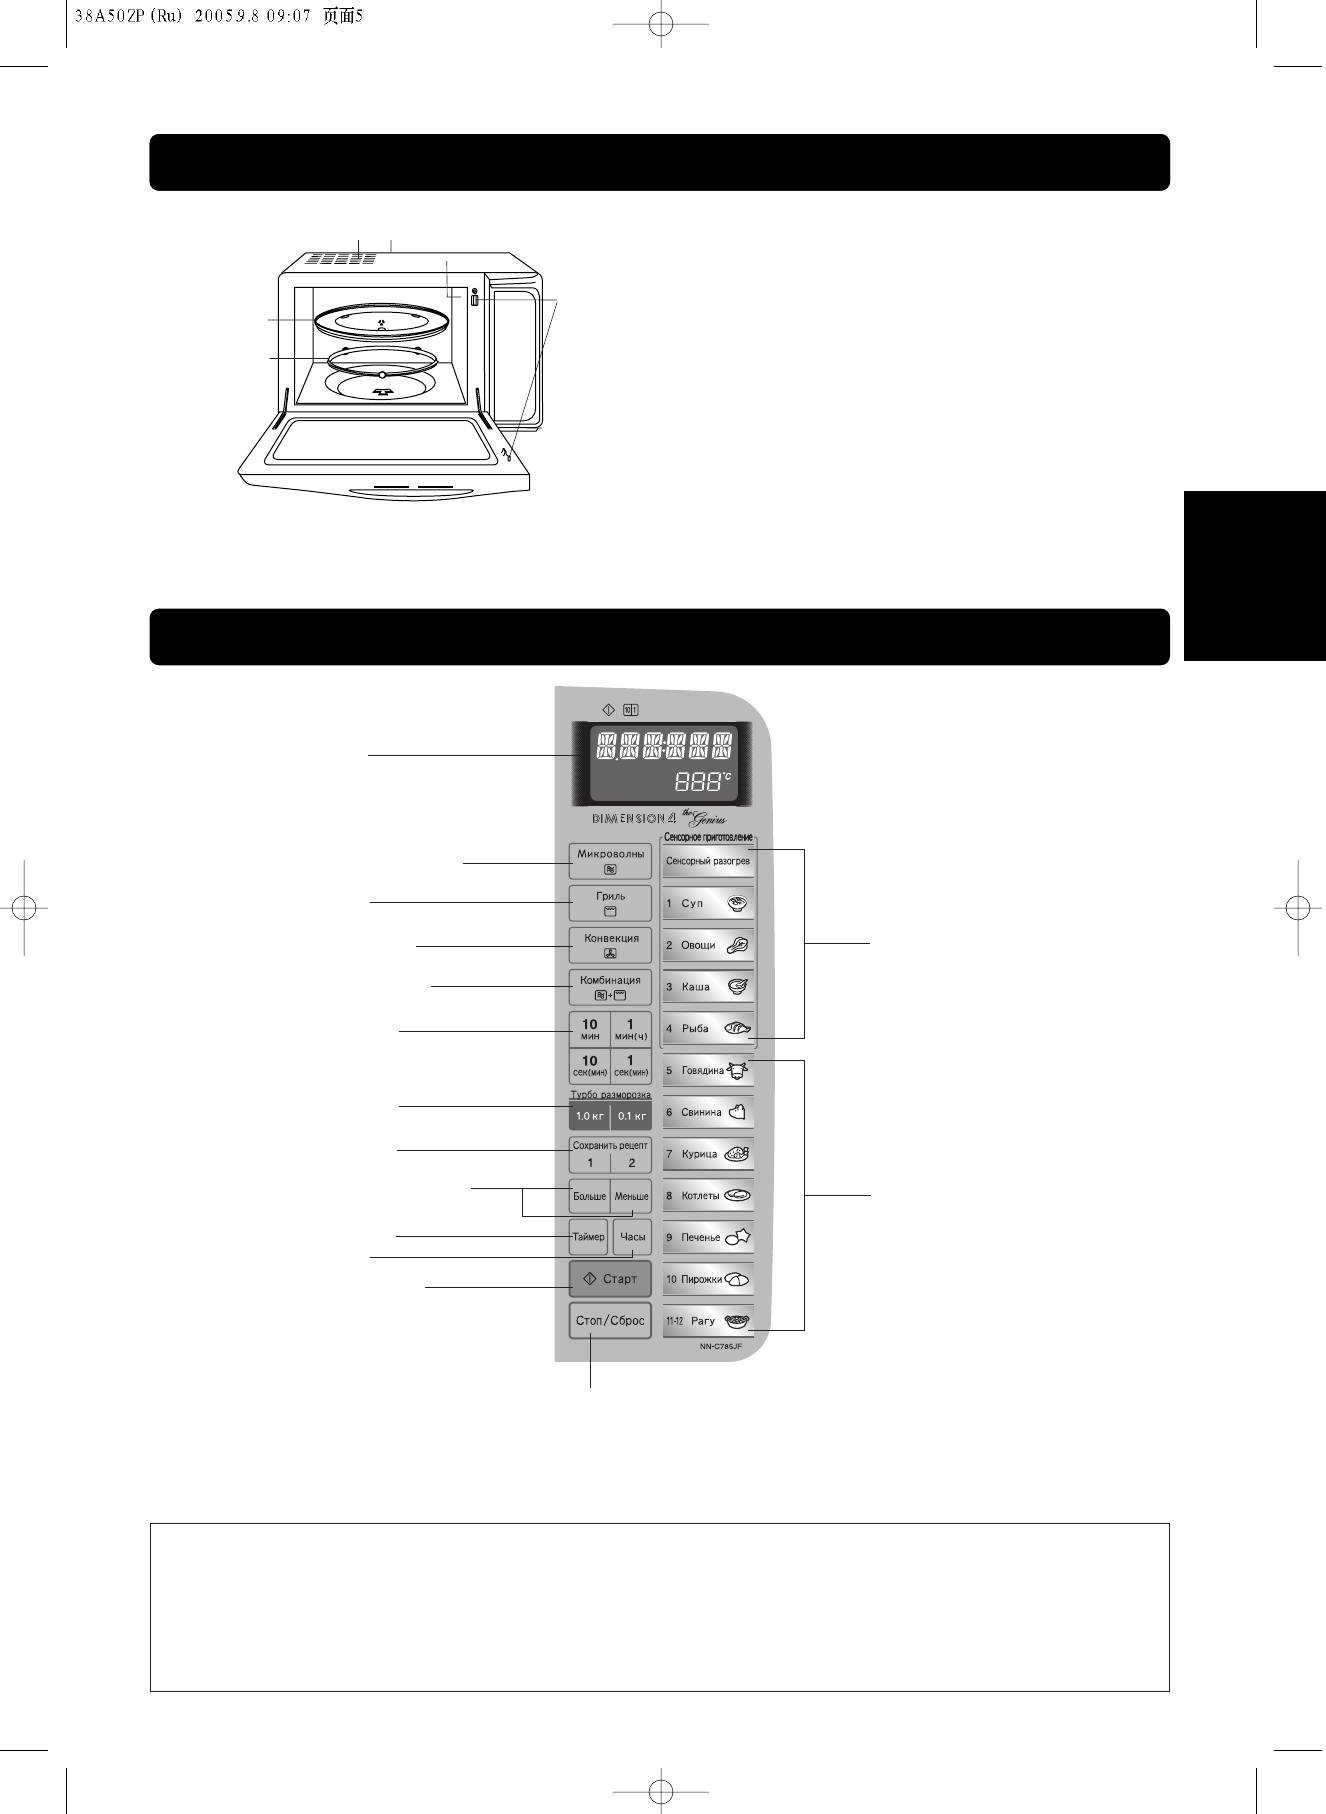
Принципиальная схема устройства
➀ Ручка открывания двери
➇➈
Потяните на себя
➃
чтобы открыть дверцу. Если Вы открываете дверцу
печи во время приготовления пищи, процесс готовки
временно прекращается, но ранее сделанные
➂
установки не отменяются. Процесс приготовления
➅
возобновится, как только Вы закроете дверцу и
➄
нажмете на кнопку включения. При открытии дверцы
➆
в печи горит лампа.
➁ Смотровое окно печи
➂ Предохранительная запирающая система
➁
дверцы
➃ Вентиляционное отверстие печи
➀
➄ Панель управления
➅ Поворотный стол
PУCCKИЙ
➆ Роликовое кольцо
➇ Идентификационная табличка
➈ Наружные вентиляционные отверстия печи
Панель управления
Звуковой сигнал:
При нажатии кнопок раздается звуковой сигнал.
Если сигнал отсутствует, значит, установка произведена неправильно.
При переходе от одного этапа программы к другому раздается двойной сигнал.
После завершения предварительного разогрева в режиме гриля или конвекционной
выпечки, раздаются три сигнала.
По окончании процесса приготовления прозвучит 5 звуковых сигналов.
— Ru-4 —
MIN
SEC
MICROCOMBCONV
GRILL
Зкран дисплея
Клавиша
микроволнового режима
Клавиша гриля
Клавиша конвекции
Программы сенсорного
приготовления
Клавиша комбинации
Клавиша времени
Турбо разморозка
Сохранить рецепт
Клавиша больше/меньше
Программы автоматического
приготовления по весу
Клавиша таймера
Клавиша часов
Клавиша включения:
Нажмите клавишу для начала
работы печи. Если во время
приготовления будет открыта
дверца или нажата клавиша
Стоп/Сброс, необходимо
Клавиша Стоп/Сброс:
нажать клавишу Старт для
Перед приготовлением: Одно нажатие сбрасывает
возобновления процесса
предыдущие команды.
приготовления.
Во время приготовления: Одно нажатие
останавливает процесс приготовления. Второе нажатие
сбрасывает программу, на дисплее появляется время.
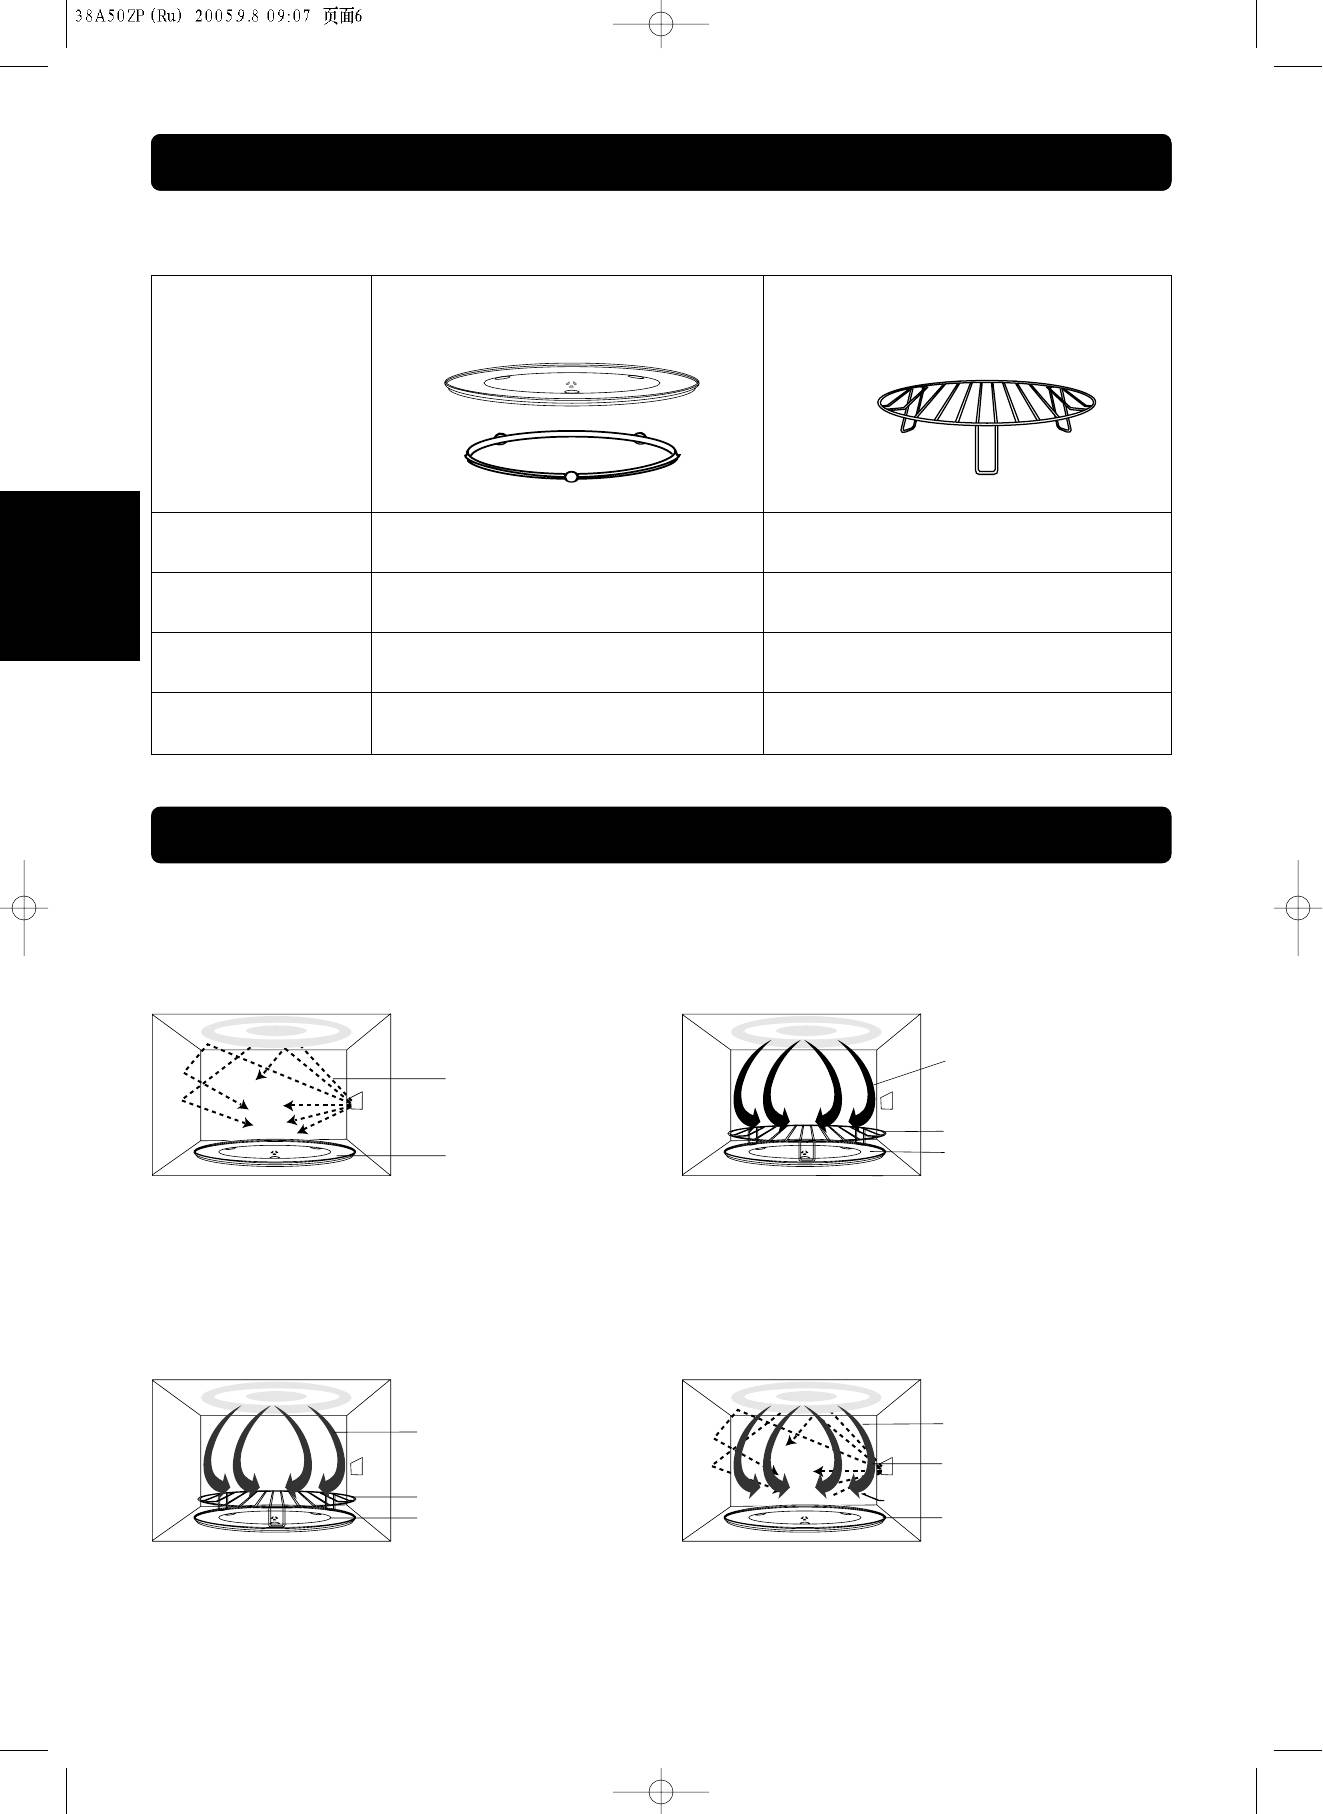
Дополнительные принадлежности
Следующая таблица поможет Вам правильно использовать дополнительные принадлежности для печи.
Поворотный стол с
роликовым кольцом
Решетка
Микроволновый режим
ДА
НЕТ
Гриль
ДА
ДА
PУCCKИЙ
Конвекционная
ДА
ДА
выпечка
Комбинация
ДА
ДА
Peжимы работы печи
На рисунках. показанных ниже, изображены примеры использования дополнительных принадлежностей. Варианты могут
изменяться в зависимости от рецепта и посуды для приготовления. Более подробную информацию Вы найдете в кулинарной
книге.
МИКРОВОЛНЫ ГРИЛЬ
ТЕПЛО
МИКРОВОЛНЫ
РЕШЕТКА
ПОВОРОТНЫЙ СТОЛ
ПОВОРОТНЫЙ СТОЛ
Поставьте посуду непосредственно на поворотный
Поставьте решетку на поворотный стол. Положите
стол.
продукты на решетку.
КОНВЕКЦИЯ КОМБИНРОВАННЫЙ РЕЖИМ
МИКРОВОЛНЫ
ТЕПЛО
ТЕПЛО
РЕШЕТКА
ПОВОРОТНЫЙ СТОЛ
ПОВОРОТНЫЙ СТОЛ
Поставьте решетку на поворотный стол. Положите
Положите продукты в термостойкую посуду для
продукты на решетку.
микроволновой печи. Поставьте посуду на поворотный
стол. Для приготовления блюд в комбинированном
режиме можно использовать решетку.
— Ru-5 —

Клавиши управления и порядок работы
УСТАНОВКА ЧАСОВ
При подключении печи к сети на цифровом дисплее загорается индикация «88:88».
Например: Для установки времени 11:25
1 paз
1 paз
5 paз2 paзa
● Нажмите клавишу часов.
● Установите время путем нажатия
● Нажмите клавишу часов.
☛ Двоеточие начинает мигать.
клавиш времени.
☛ Двоеточие перестает мигать, и
☛ На цифровом дисплее
время дня установлено.
PУCCKИЙ
появляется индикация
времени, и мигает двоеточие.
Замечания:
1. Для повторной установки времени дня снова выполните вышеуказанные пункты.
2. Время дня будет отображаться на дисплее до тех пор, пока печь подсоединена к сети и нет перебоев
в питании.
3. Данные часы имеют 24-часовую индикацию времени.
ПОШАГОВЫЙ ДИСПЛЕЙ
Для упрощения программирования микроволновой печи на экране дисплея отображается условное обозначение
клавиш следующей операции.
● Установите время
● Нажмите клавишу Старт.
приготовления пищи.
СИСТЕМА ЗАЩИТЫ ОТ ИСПОЛЬЗОВАНИЯ ДЕТЬМИ
Эта функция позволяет Вам защитить устройство от использования детьми: при этом дверца печи будет свободно
открываться.
Замечание: Система защиты может быть установлена, когда на дисплее горит двоеточие или время.
Установить:
Отменить:
● Нажмите клавишу Старт три раза.
● Нажмите кнопку Стоп/Сброс три раза.
☛ на дисплее появится значок “ ❋ ”,
☛ Исчезнет значок “ ❋ ”, отменится система
и установится защита от детей.
защиты от детей и снова на дисплее
появится двоеточие или время.
— Ru-6 —
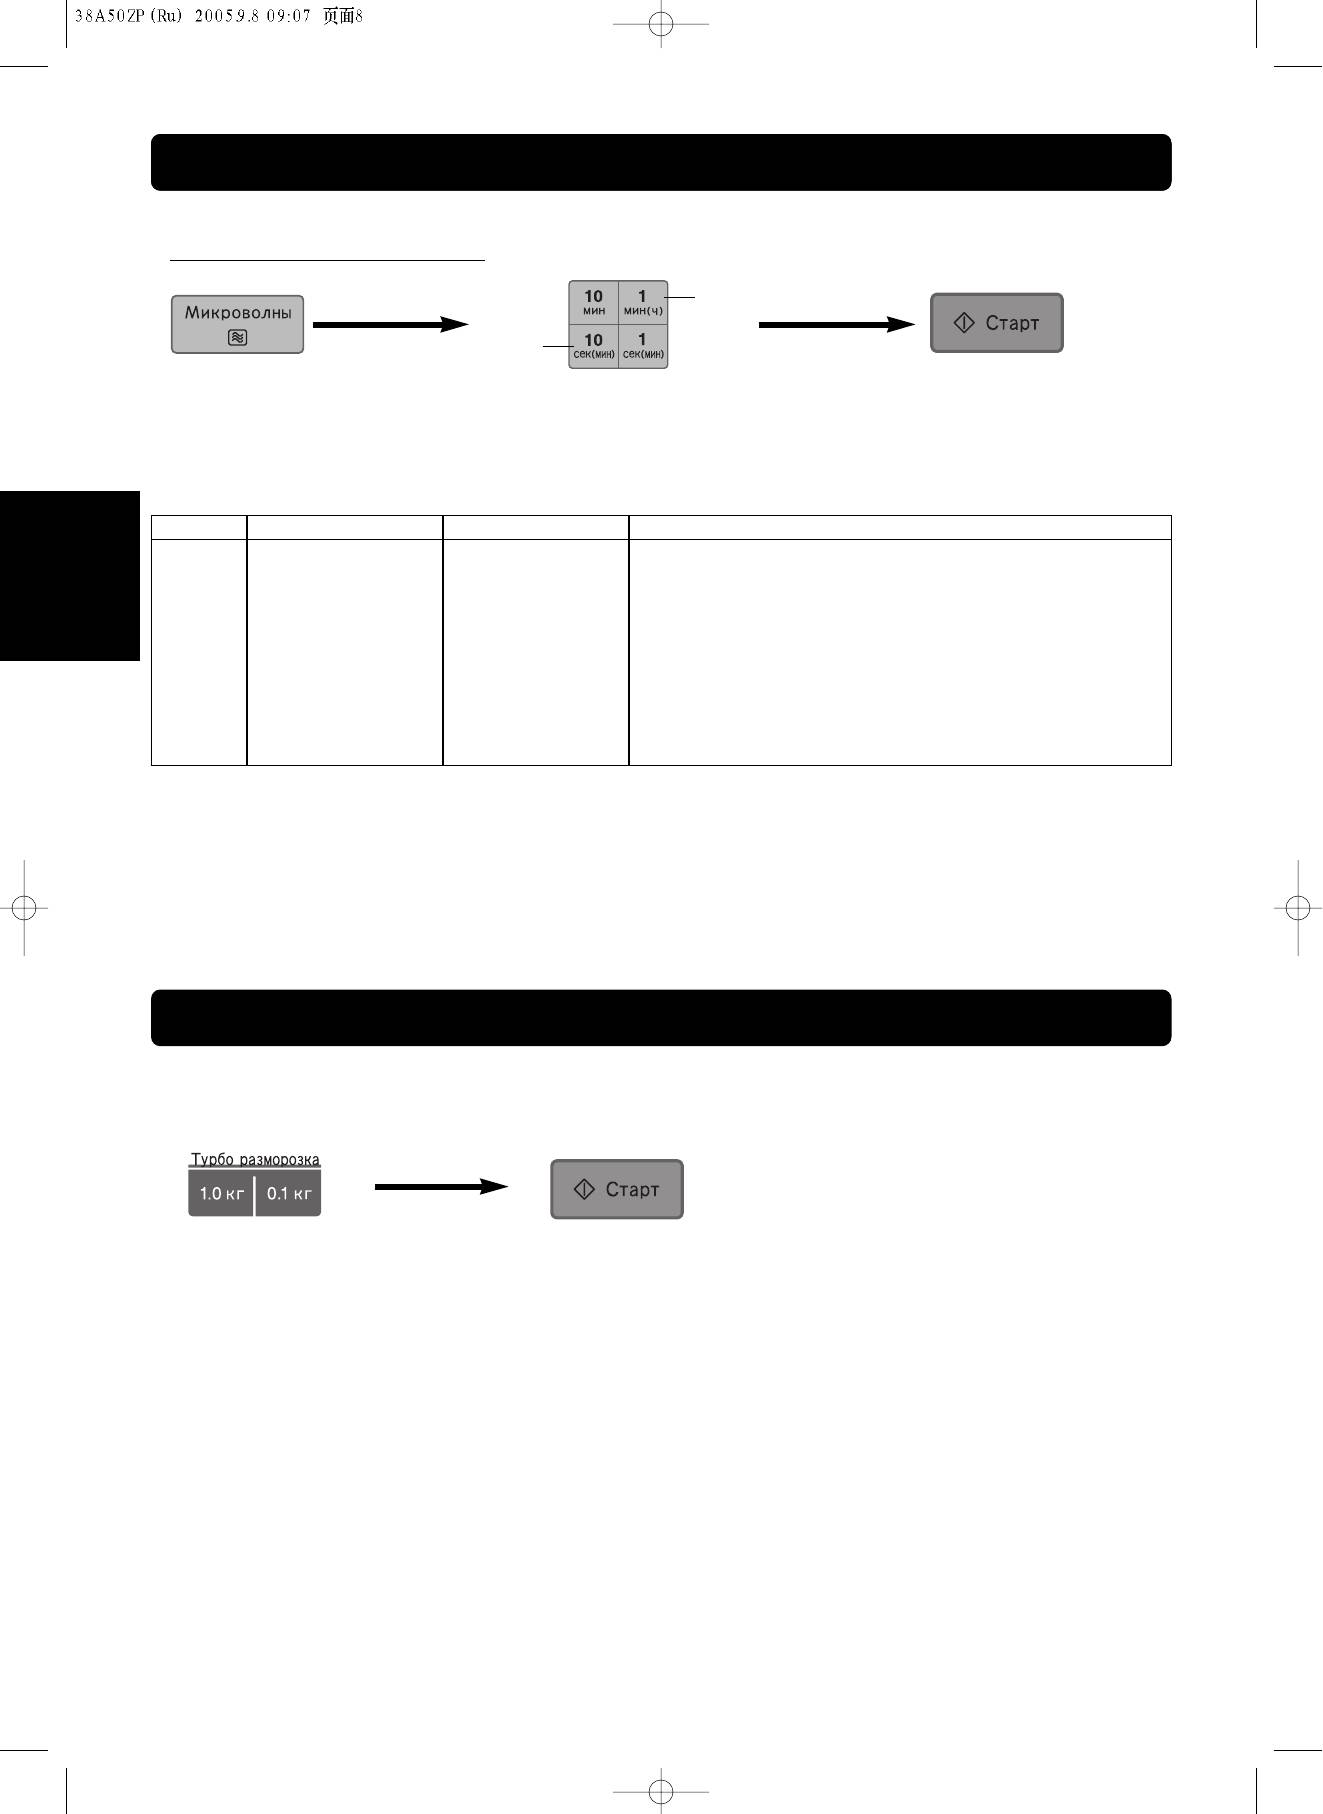
Выбор мощности микроволновой печи и установка времени
Печь может быть запрограммирована на 6 различных уровней мощности (смотри таблицу ниже).
Например: ВЫСОКИЙ 1 мин. 30 сек.
1 paз
2 paзa
● Нажмите клавишу режима
● Установите время приготовления,
● Нажмите клавишу Старт.
микроволн для установки
используя клавиши времени.
уровня мощности
(Высокий уровень мощности: не более
30 минут. Другие уровни мощности: не
более 99 минут 59 секунд)
Нажмите
Уровень мощности
Прибл. мощность
Виды готовки
1 paз
ВЫСОКИЙ
1000 Bт
Разогрев пищи и соусов, приготовление рыбы, овощей,
соусов, супов.
2 paзa
РАЗМОРАЖИВАНИЕ
270 Bт
Размораживание мороженых продуктов.
3 paзa
СРЕДНЕ-ВЫСОКИЙ
600 Bт
Приготовление омлетов, блюд из птицы, мяса, подогрев
PУCCKИЙ
молока, выпечка бисквитов
4 paзa
СРЕДНИЙ
440 Bт
Тушение птицы, приготовление мясного фарша, каш,
запеканок.
5 paз
СРЕДНЕ-НИЗКИЙ
250 Bт
Приготовление тушеных блюд, бульонов, варенья,
фруктовых кексов, яичных кремов
6 paз
НИЗКИЙ
100 Bт
Размягчение мороженого, масла, сливочных сыров
Замечания:
1. Печь может быть запрограммирована на 3 этапа.
Например: Размораживание 5 мин и Пауза 5 мин и Высокий уровень 2 мин
При выборе ВЫСОКОЙ мощности на первом этапе можно начинать со второго шага (установки времени).
2. Время приготовления может быть установлено до 99 минут 59 секунд на каждом этапе (кроме Высокой
мощности).
3. Время паузы может быть установлено до/после ручной установки режимов
разогрева/приготовления/РАЗМОРАЖИВАНИЯ пищи.
Турбо разморозка
Благодаря этой функции Вы можете размораживать мясо, птицу и морские продукты с учетом их веса. Вес
программируется в килограммах и десяых долях килограмма.
● Установите вес замороженного
● Нажмите клавишу
продукта (до 3 кг).
Старт.
Замечания:
1. В процессе размораживания раздаются звуковые сигналы с тем. чтобы Вы не забывали проверить состояние
продуктов, перевернуть их, удалить полностью размороженные куски, накрыть более тонкие части отдельных
кусков.
2. Данная программа не предназначена для размораживания пористых продуктов, таких как хлеб и кексы.
3. Время паузы или уровень мощности могут быть запрограммированы после автоматической разморозки.
4. Если продолжительность размораживания превышает 60 мин., то время на дисплее будет указываться в часах и
минутах.
5. Форма и размер продукта являются определяющими для максимального веса, который можно разместить в
печи. Для ЛЧШЕГО результата не размораживайте менее 100 г или более 3 кт продукта.
— Ru-7 —
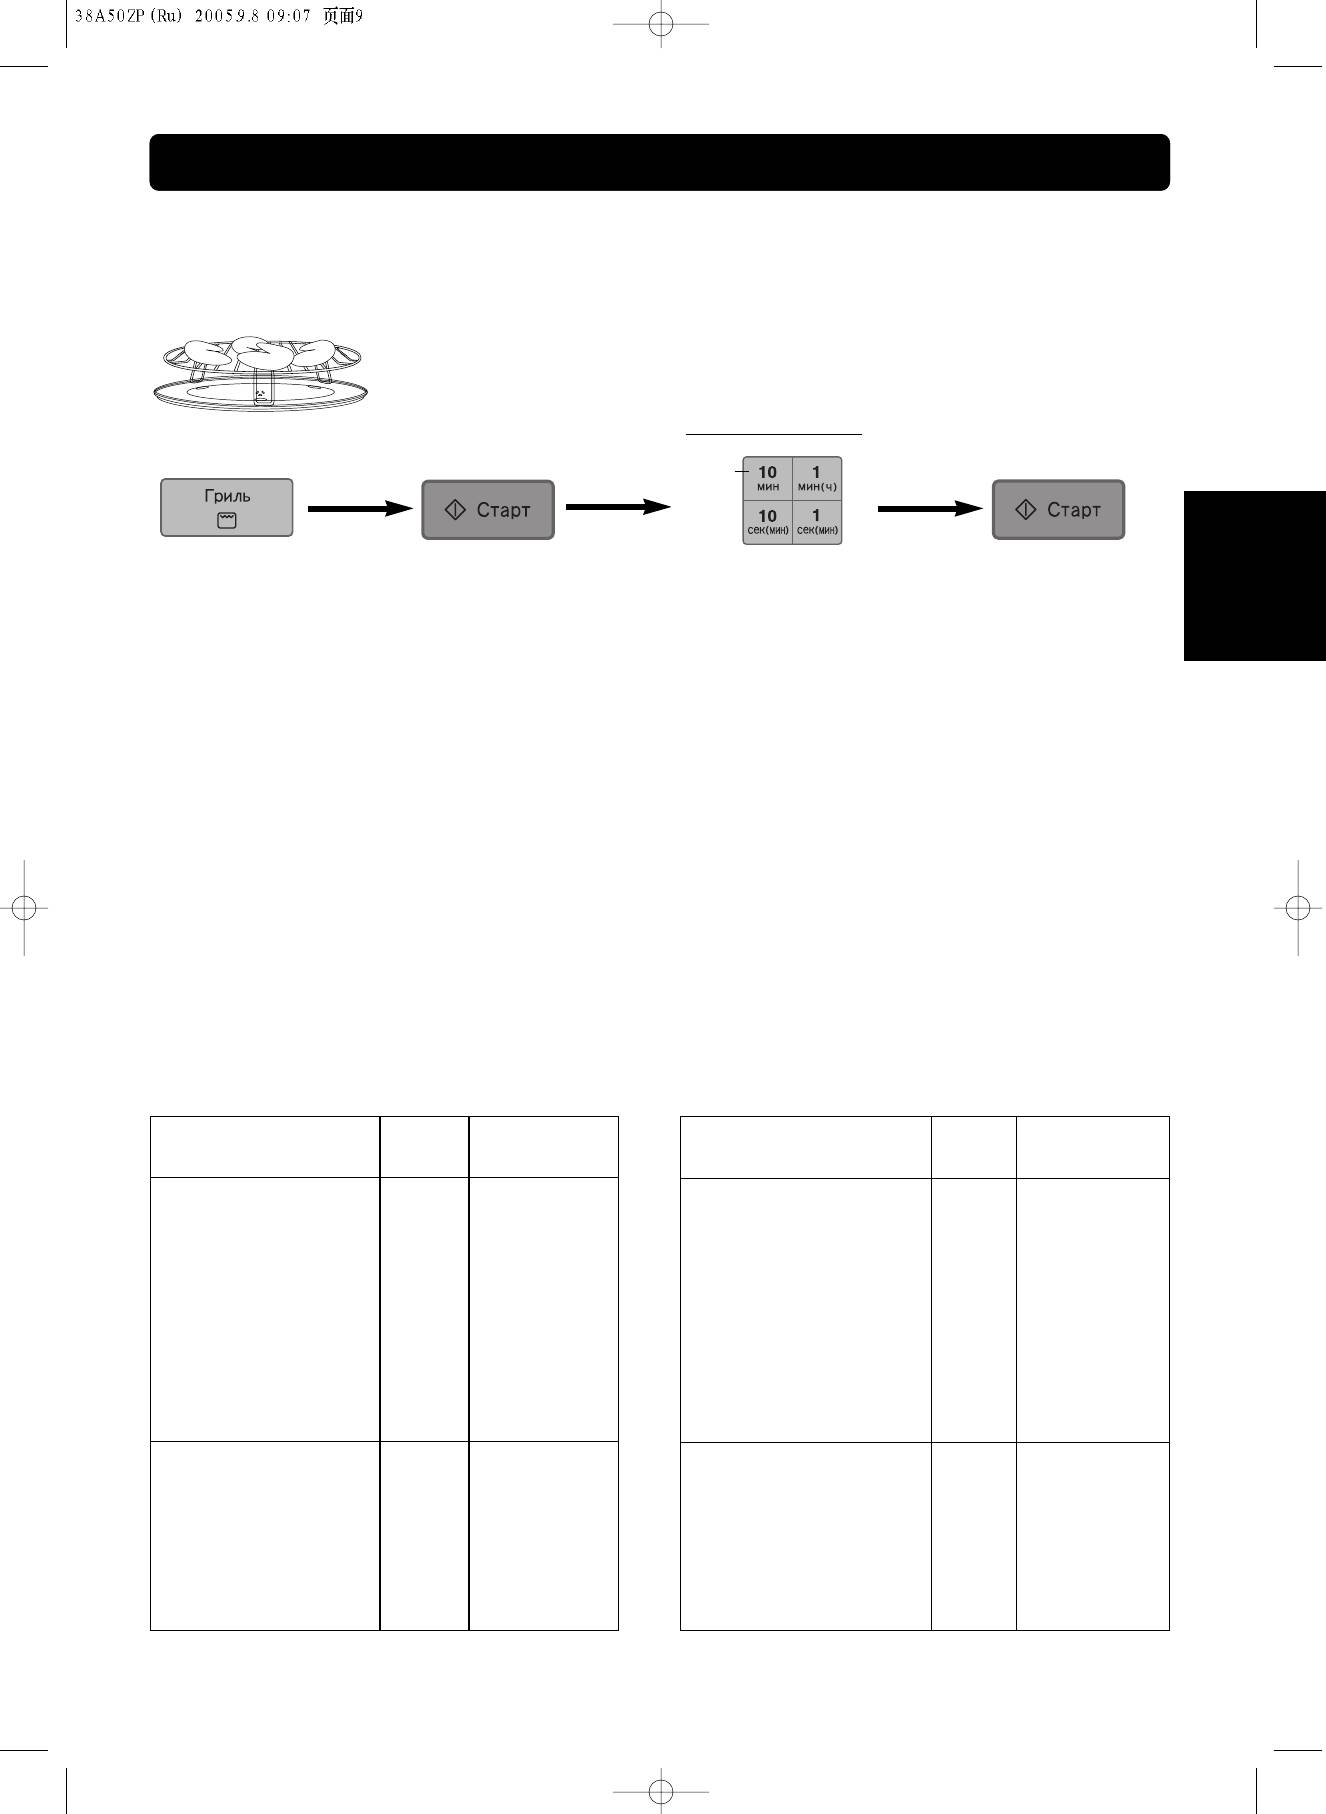
Работа в режиме гриля и установка времени
При помощи клавиши гриль можно сделать 2 установки;
Нажмите клавишу гриля один раз для установки режима Гриль 1 — установка режима высокой мощности для
жарки мяса, птицы и филе рыбы.
Нажмите клавишу гриля два раза для установки режима Гриль 2 — установка режима средней мощности для
жарки целой рыбы, приготовления чипсов,
запекания сыра и яичных блюд.
*Установите поворотный стол в печь перед предварительным разогревом печи.
* Положите продукты на решетку и поставьте в разогретую печь на поворотный стол.
Например. 30 минут
3 paзa
PУCCKИЙ
● Нажмите клавишу
● Нажмите клавишу Старт.
● После предварительного
● Нажмите
Гриль один или два
Если по рецепту не требуется
разогрева печи, поставьте
клавишу Старт.
раза для установки
предварительного разогрева
в нее продукты. Затем
нужного режима.
печи, то пропустите эту
установите время готовки
операцию.
(до 99 мин 59 секунд).
Замечания по предварительному разогреву:
1. После нажатия клавиши Гриль и клавиши включения, на дисплее появится постоянная индикация «Р». Когда Вы
услышите 3 звуковых сигнала, и начнет мигать «Р», гриль будет разогрет и готов к работе.
2. Если по завершении предварительного разогрева печи не открывать дверцу, то сделанная установка будет
сохраняться в течение 30 мин. после чего печь автоматически отключится.
3. Если по рецепту предварительный разогрев печи не требуется, то пропустите вторую операцию (нажмите
клавишу Старт). Поставьте продукты в печь и задайте время готовки сразу же после установки грилевого
режима.
Примечания по приготовлению пищи:
1. ГРИЛЬ будет работать только при закрытой дверце.
2. Время работы печи в грилевом режиме может устанавливаться в пределах 99 минут 59 секунд.
Руководство по работе в грилевом режиме:
Гриль особенно удобен для жарки тонких кусков мяса, стейков, отбивных, шашлыков, сосисок или порционной
курицы. Им также можно пользоваться для приготовления горячих сэндвичей и блюд в сухарях. В процессе жарки
продукты обычно следует переворачивать по истечении половины установленного времени. Когда открывается
дверца, выполнение программы прерывается. Переверните продукты, поместите их обратно в камеру, закройте
дверцу и снова включите печь. Во время работы в грилевом режиме можно в любое время открыть дверцу и
проверить состояние продукта.
Ориентирово-
Ориентирово-
Установ-
Установ-
Вид продукта
чное время
Вид продукта
чное время
ка гриля
ка гриля
готовки (мин.)
готовки (мин.)
РЫБА
ГОВЯДИНА
Филе толщина 1 см
1
6-8
Гамбургер
толщина 1,5 см
1
18-10
(толщ. ок 3 cм)
Стейки толщина 2 см
1
14—16
прожаренный
1
12—14
ЦЕЛАЯ РЫБА
Вырезка «Миньон»
250-375 г
2
10—12
(толщ. ок 3 cм)
500 г
2
14—16
С кровью
1
18-10
МОРЕПРО ДУКТЫ
Средней готовности
1
12—14
Хвосты лобстеров
Стейк (толщ. ок. 3 cм)
250-300 г
2
12—14
С кровью
1
10—12
Морские гребешки 500 г
1
4-6
Средней готовности
1
14—16
Креветки 500 г
2
6-8
Прожаренный
1
16—18
КУРИЦА
БАРАНИНА
2 грудки, раз. пополам
1
15—18
Отбивные толщ, 2 см
Куски (целая тушка)
1
25—30
Средней готовности
1
12—14
8 ножек
1
20—22
Прожаренные
1
14—16
4 okopoчka
1
20—22
4 почки
1
6-8
16 крылышек
1
18—22
(разрезанные пополам)
4 порции «Мэриленд»
1
18—20
4 кебаба
1
15—18
— Ru-8 —
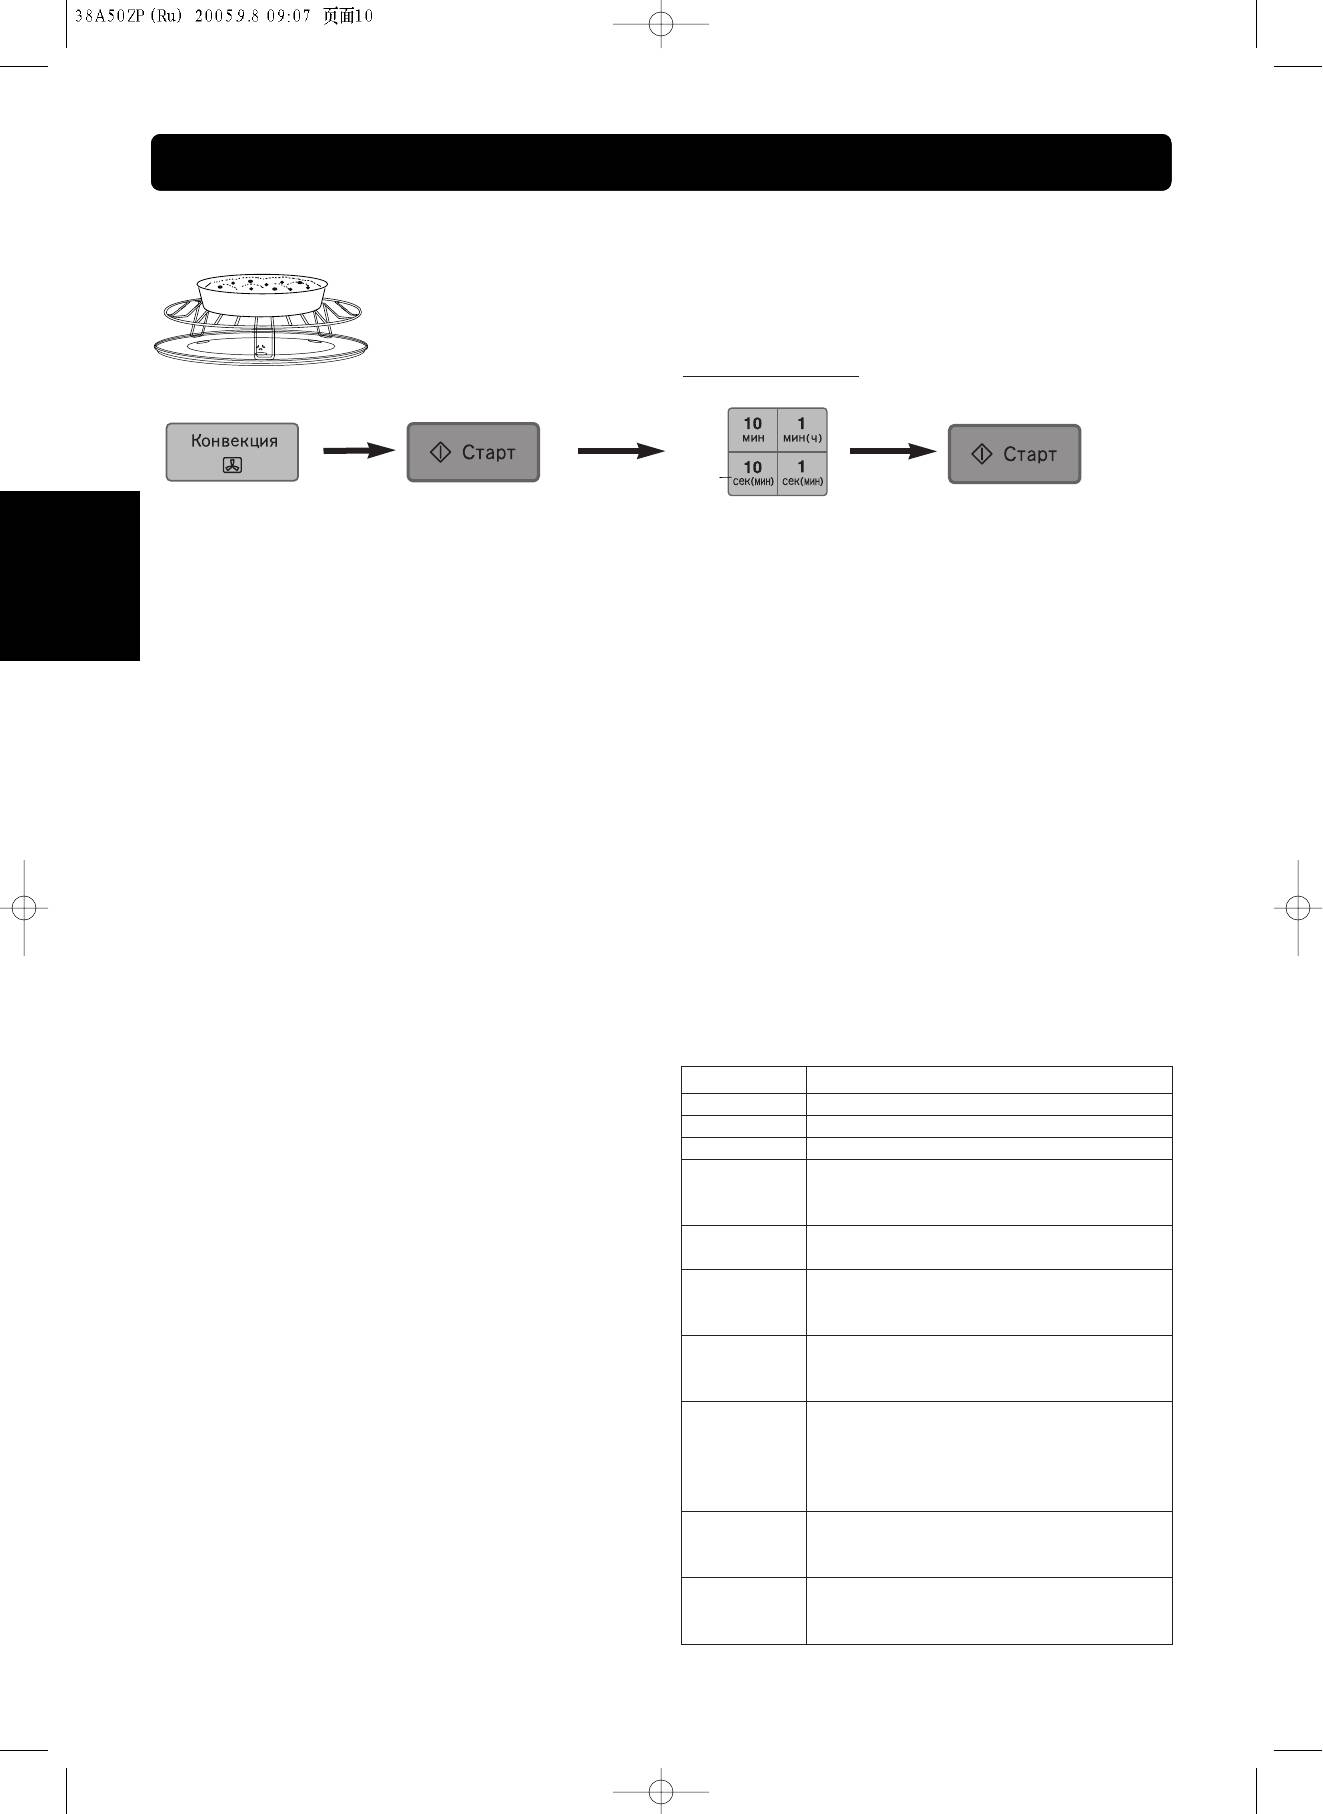
Работа в режиме конвекция и установка времени
Данной клавишей можно установить температуру конвекции от 100 С до 250 С с шагом по 10 С.
∗
Установите поворотный стол в печь перед предварительным разогревом печи.
∗
Положите продукты на решетку и поставьте в разогретую печь на поворотный стол.
Например. 30 минут
3 paзa
● Установите
● Нажмите клавишу Старт.
● После предварительного
● Нажмите
необходимую
Если по рецепту не требуется
разогрева, поставьте
клавишу Старт.
температуру.
предварительный разогрев
продукты в печь. Затем
печи, пропустите эту
установите время (в
операцию.
пределах 9 часов 59 мин.).
PУCCKИЙ
Замечания по предварительному разогреву:
1. После выбора температуры и нажатия клавиши Старт, на дисплее появится буква «Р». Как только прозвучат 3
звуковых сигнала и замигает буква «Р», это означает что печь предварительно разогрета и готова к
использованию.
2. Если после предварительного разогрева дверца не будет открыта, печь будет продолжать поддерживать
установленную температуру в течение 30 минут. По истечении 30 минут печь автоматически отключится, и на
дисплее появится индикация времени суток.
3. Если для приготовления блюда не требуется предварительный разогрев печи, тогда необходимо пропустить
вторую операцию. Положите продукты в печь и установите время приготовления после установки необходимой
температуры.
Примечания по приготовлению пищи:
1. Если установленное время готовки не превышает одного часа, то его обратный отсчет будет производиться
посекундно.
2. Если установленное время готовки превышает 1 час, то его обратный отсчет будет производиться поминутно до
тех пор, пока не останется «1Н 00» (1 час). После этого на дисплее будут указываться минуты и секунды, а
обратный отсчет времени будет вестись посекундно.
Указания по приготовлению пищи в
Темп, печи
Использование
режиме конвекционной выпечки
100 C
Миндально- ореховые коржи для торта
110 C
Пирожные безе
Данная печь так же, как и обычная духовка, имеет
120 C
Сушка ягод, сухофруктов, зелени
нагревательный элемент, который вырабатывает сухое
130 C
Пироги из сдобного теста с фруктовой
тепло, необходимое для получения хрустящей
начинкой, с мясом, рыбой, капустой,
золотистой корочки.
пудинги, курник.
140 C
Начало выпечки сдобных пирогов
При работе в режиме конвекции воздух в печи
150 C
(потом убавить), запеканки, гренки.
циркулирует, что несколько сокращает время,
160 C
Песочные коржи для торта, медовые
необходимое для получения традиционного
170 C
коржи, коврижки, пряники, пироги с
результата.
картофелем, грибами.
Бисквит для торта, кексы, печенье,
В данном режиме можно готовить по обычным
180 C
пирожки и слойки с разными
рецептам.
начинками, шарлотки.
Коржи из слоеного теста для торта
Следуйте указаниям относительно минимального
Наполеон, волованы, песочные
времени готовки и при необходимости устанавливайте
190 C
корзиночки, жаркое в горшочках,
дополнительное время.
буженина, мясные и куриные
фаршированные рулеты.
200 C
Пшеничный и ржаной хлеб, калачи,
210 C
лепешки, жареный картофель, мясо в
220 C
тесте.
230 C
Пицца
240 C
250 C
— Ru-9 —
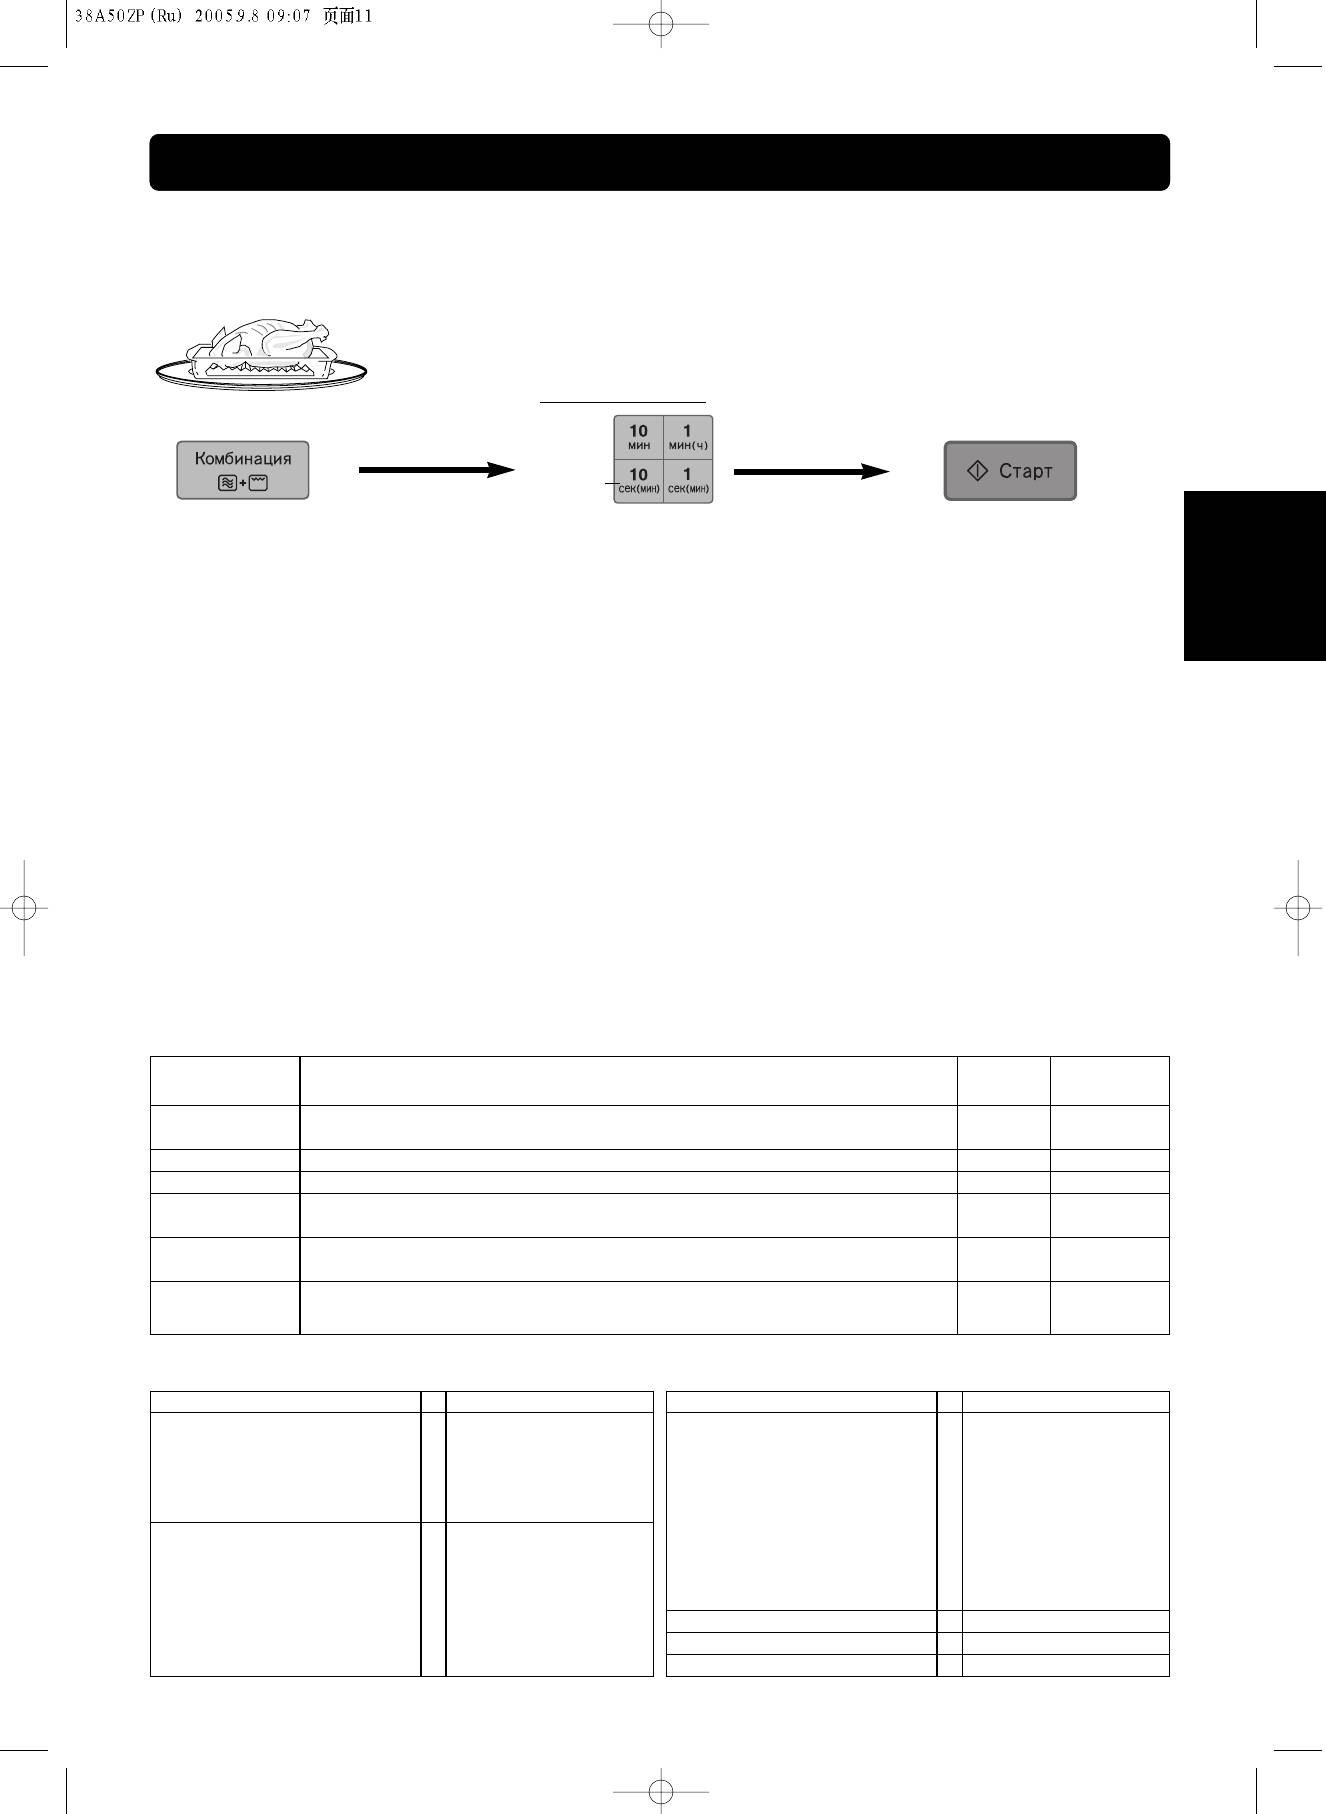
Работа в комбинированном режиме с установкой времени
Этот режим позволяет Вам готовить блюда, используя мощность микроволн и нагревателя. Микроволны обеспечивают
быстрое приготовление пищи, в то время как печь или гриль придают продуктам характерный золотистый цвет и делают
корочку хрустящей.
Существует 6 установок комбинированного режима. Нет необходимости устанавливать температуру или мощность печи.
∗
Положите продукты в термостойкую посуду пригодную для использования в
микроволновой лечи и поставьте все в печь на поворотный стол.
∗
Вы можете использовать решетку для приготовления блюд в комбинированном режиме.
Например. 30 минут
3 paзa
PУCCKИЙ
● Нажмите клавишу комбинированного
● Установите продолжительность
● Нажмите клавишу
режима и выберите нужную Вам
приготовления путем нажатия клавиш
Старт.
установку (от 1 до 6).
времени (в пределах 9 часов 59 минут).
Замечания:
1. При установке продолжительности приготовления пищи менее одного часа обратный отсчет времени идет
посекундно.
2. При установке продолжительности приготовления пищи более одного часа обратный отсчет времени идет
поминутно, пока не останется «1Н 00″(1 час), после чего индикация времени будет производиться в минутах и
секундах, а обратный отсчет вестись посекундно.
Руководство по работе в комбинированном режиме:
Комбинированный режим наиболее удобен для
Чтобы рассчитать время, начинайте приготовление
зажаривания мяса, птицы, выпечки кексов, изделий из
пищи, установив приблизительно 2/3 от обычного
теста, готовки продуктов, разделанных на куски.
времени готовки, а затем при необходимости сделайте
дополнительную установку.
Преимуществом комбинированного режима является
то, что при работе в нем, благодаря конвекции,
Для готовки в комбинированном режиме используется
продукты приобретают подрумяненный вид, а обычное
посуда для микроволновой печи, включая стекло и
время готовки зачастую сокращается. Время готовки
керамику. Кексы, разрезанное на куски мясо, десерты
сокращается также и потому, что в данном режиме нет
и.т.п. можно готовить в металлической посуде при
необходимости предварительно разогревать печь.
условии, что количества продуктов будет достаточно
для микроволнового разогрева.
Примерный перечень продуктов для приготовления в комбинированном режиме
Установка комбини-
Продукты
Те мпера-
Уровень
рованного режима
тура печи
мощности
COMB 1
Тушеные блюда, жаркое, куски мяса, солонина
150 C
СРЕДНЕ-
НИЗКИЙ
COMB 2
Открытые пироги, десерты, рисовый пудинг
160 C
НИЗКИЙ
COMB 3
Кексы, пудинги, многослойные мясные блюда, яблочный пирог
180 C
СРЕДНИЙ
COMB 4
Однослойные блюда, легкие кексы, жаркое из баранины
200 C
СРЕДНЕ-
ВЫСОКИЙ
COMB 5
Жареная говядина, картошка в «мундире», индейка, утка, гренки с чесноком,
200 C
СРЕДНЕ-
тушеная курица, разогрев лазаньи, сладкие и др. пироги, разогрев булочек.
НИЗКИЙ
COMB 6
Кондитерские изделия, хлеб, обжаривание сосисок, гренки с мясным
230 C
НИЗКИЙ
фаршем, целая курица, порционная курица, пицца, разогрев рогаликов.
Таблица времени приготовления в комбинированном режиме:
Продукты
Время готовки
Продукты
Время готовки
ПТИЦА
Огузок (Высш. кач.)
Куры (до 2,8кг)
6
15 мин / 500 г
С кровью
5
12-15 мин. / 500 г
Порц. курица (1-1,5 кг)
6
ок. 2/3 обычн. времени
Средней готовности
5
13-18 мин. / 500 г
Индейка (2-6 кг)
5
14 мин / 500 г
Прожаренный
5
18-20 мин. / 500 г
Утка (1,5 кг- 2,5 кг)
5
15-18 мин / 500 г
Говяжья вырезка
Жареная говядина
С кровью
5
16-18 мин. / 500 г
Ребра, мясо без костей
Средней готовности
5
22-24 мин. / 500 г
С кровью
5
11-14 мин / 500 г
Жаркое (1,5 — 2 кг)
1
1,5 — 2 чaca
Средней готовности
5
14-16 мин / 500 г
Лопатка (перев. через 1 ч)
1
1,5 — 2 чaca
Прожаренное
5
18-20 мин / 500 г
ЖАРЕНАЯ БАРАНИНА
4
18-20 мин. / 500 г
БОЛЬШИЕ КУСКИ МЯСА
1
25-30 мин. / 500 г
ТУШЕНЫЕ БЛЮДА
1
ок. 2/3 обычного времени
— Ru-10 —
Автоматические сенсорные программы
В этих программах различные блюда могут готовиться без установки мощности и времени приготовления. В печь
встроен сенсор пара который автоматически выбирает необходимый уровень мощности и определяет время
приготовления/разогрева блюд.
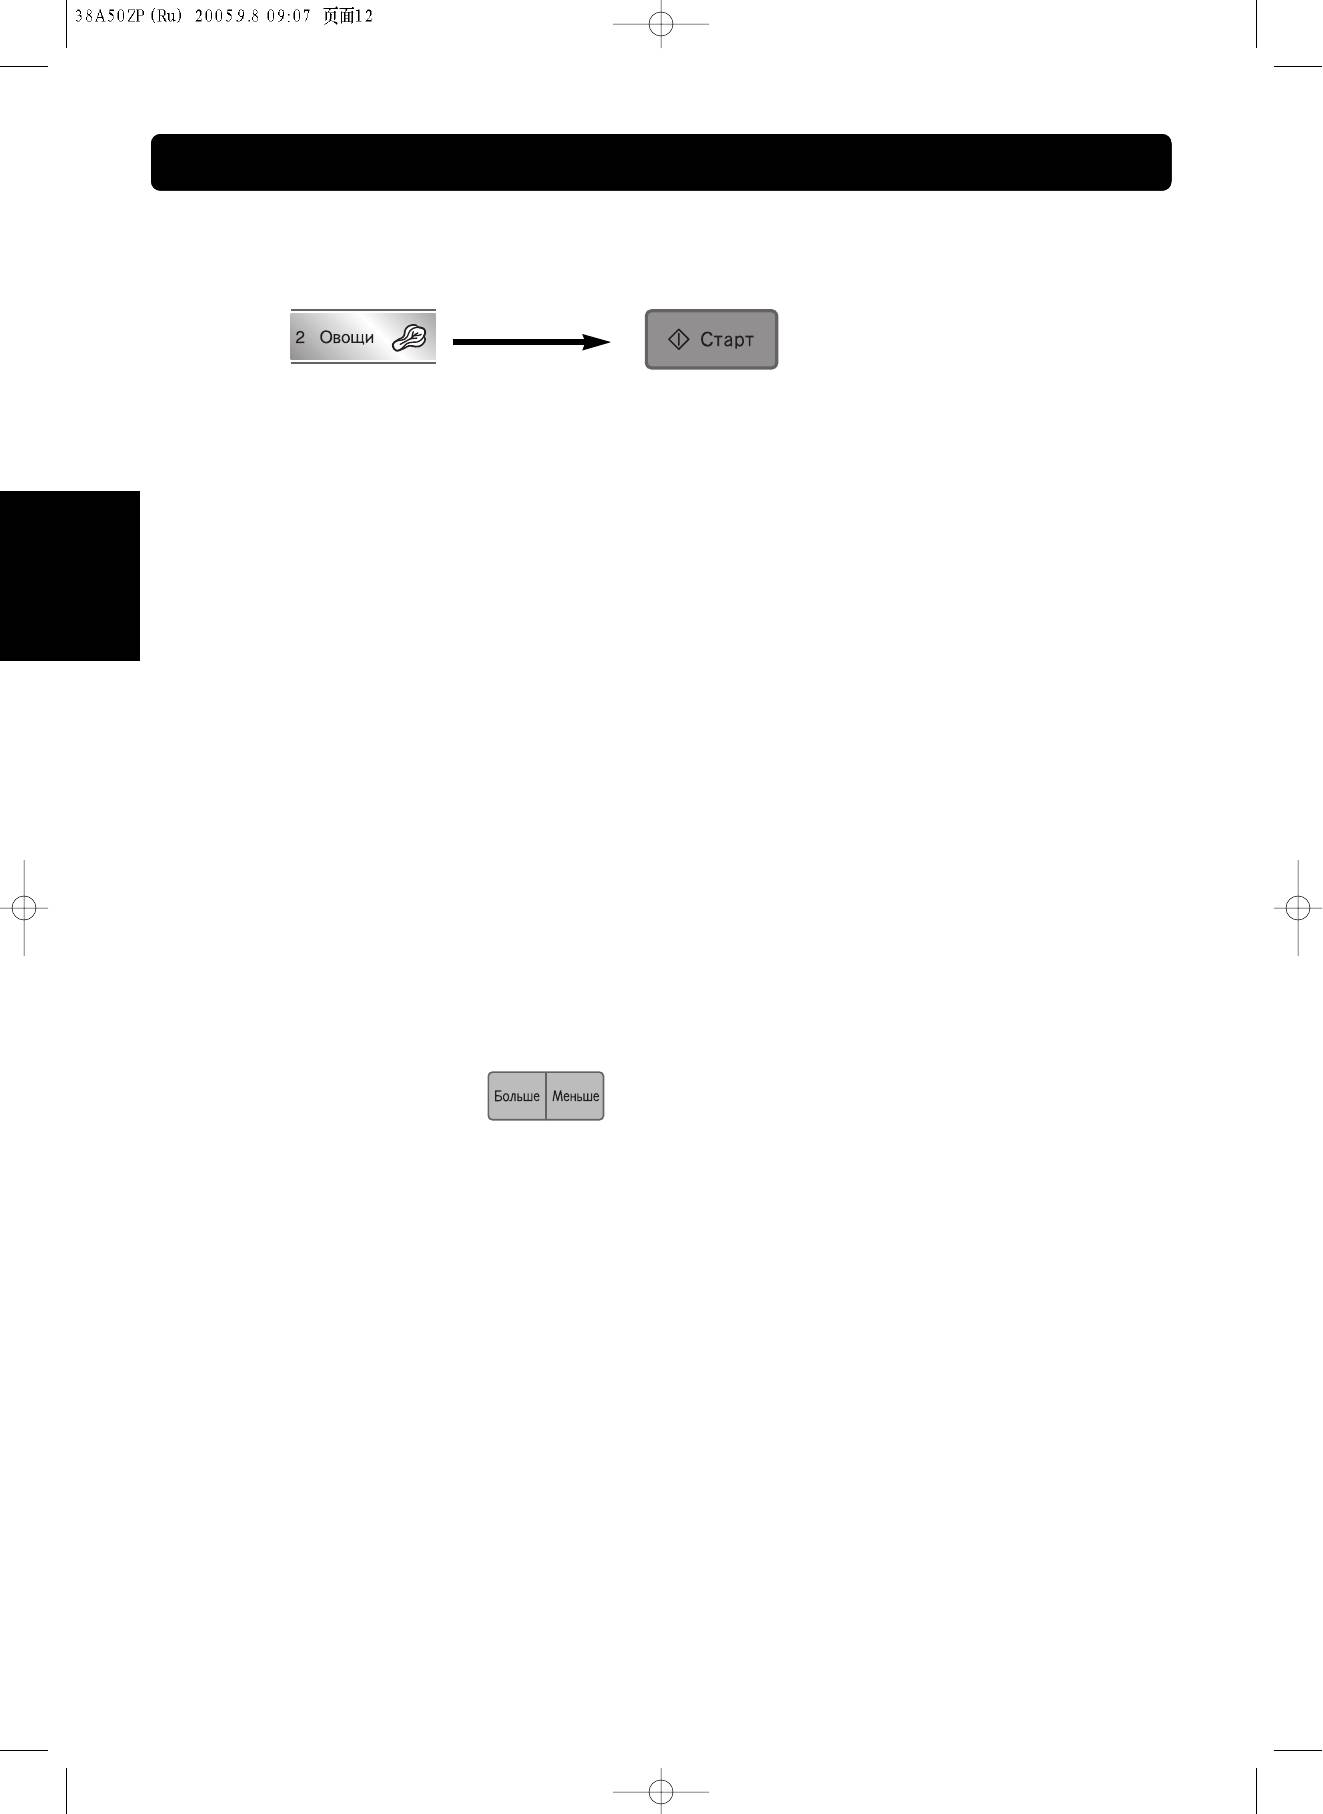
Например:
● Выберите программу
● Нажмите
автоматического
клавишу Старт.
сенсорного приготовления.
ЗАМЕЧАНИЯ:
1. Во время приготовления из продукта выделяется пар. После того как сенсор определит выделение пара,
оставшееся время до конца приготовления высветится на экране дисплея, и начинается его отсчёт.
Примечание: Для некоторых типов меню оставшееся время приготовления не отображается на дисплее. Это
нормально.
2. Пока на дисплее высвечивается выбранная категория продукта, не рекомендуется открывать дверцу печи.
Открытие печи в этот период может негативно повлиять на результаты приготовления. Дверца печи может быть
PУCCKИЙ
открыта для того чтобы посолить, перемешать или перевернуть пищу только после того, как на дисплее
высветится оставшееся время приготовления.
3. Во избежание ошибок при приготовлении в автоматическом сенсорном режиме, убедитесь, что поворотный стол
и посуда сухие.
4. Посуда с продуктами должна быть накрыта крышками или пленкой пригодной для использования в
микроволновой печи.
5. Комнатная температура не должна быть выше 35 С и ниже О С.
6. Не используйте Автоматические Сенсорные программы для приготовления блюд, вес которых выходит за
пределы рекомендуемых границ.
7. Если время приготовления больше чем 1 час, то на дисплее будет высвечиваться время в часах и минутах.
8. Если до этого печь работала в Конвекционном, Комбинированной или Грилевом режимах, и она слишком
горячая, чтобы включать автоматические сенсорные программы, на дисплее появится надпись «НОТ». Как только
надпись «НОТ» погаснет, можно использовать программы автоматического сенсорного приготовления. Если Вы
торопитесь, выберите соответствующий уровень мощности Микроволнового режима и установите время
вручную.
9. Более подробную информацию по приготовлению в Автоматических Сенсорных программах смотрите на этой
странице ниже и на следующей странице.
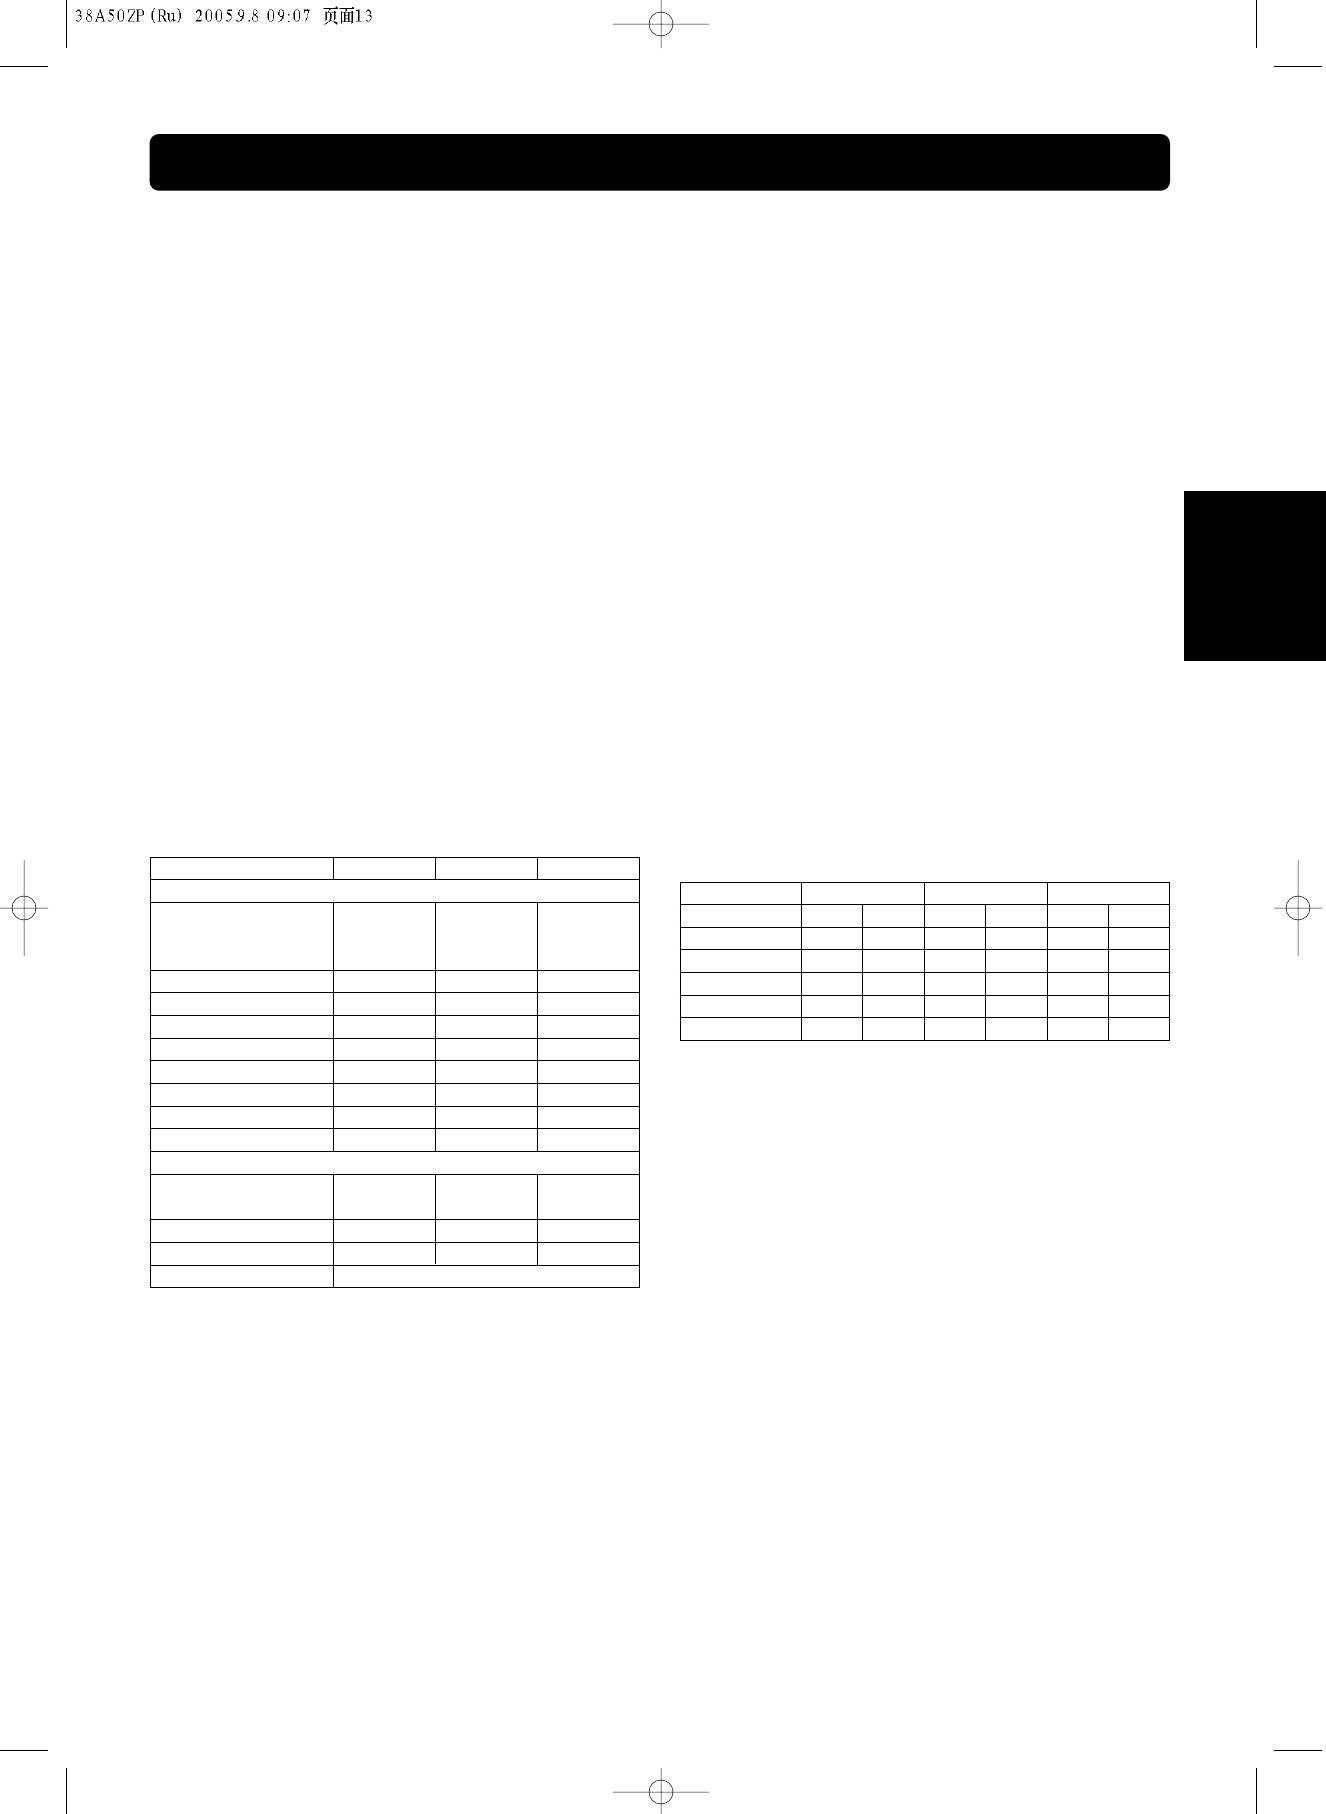
Клавиши управления:
Применяется для блюд, приготовление которых Вы хотите изменить по-своему После использования программ
автоматического сенсорного приготовления несколько раз, Вы можете прийти к выводу, что Вы хотите готовить
эти блюда по-своему. Используя клавиши БОЛЬШЕ/МЕНЬШЕ, Вы можете сокращать или увеличивать время
приготовления пищи.
Нажмите клавишу БОЛЬШЕ или МЕНЬШЕ перед тем, как нажать клавишу Старт.
Если Вас устраивают программы автоматического сенсорного приготовления, не используйте эти клавиши.
— Ru-11 —
Автоматические сенсорные программы
Сенсорный подогрев
2 Овощи
Рекомендуемый вес (100-1500 г)
Рекомендуемый вес (200-1200 г)
• Все блюда должны быть уже приготовлены.
Программа предназначена для приготовления
• Блюда должны иметь комнатную температуру
свежих нарезанных овощей, таких как:
или температуру из холодильника.
картофель, морковь, лук, свекла, капуста,
• После того, как блюдо будет вынуто из печи,
цветная капуста, тыква, кабачки, грибы и их
перемешайте его.
смесей.
• Все блюда следует выдерживать в печи в
• Овощи должны быть почищены, подготовлены и
закрытой посуде в течение 3-5 минут после
порезаны на равные кусочки.
разогрева.
• Если овощи слегка подвяли или Вы хотите
• Не разогревайте блюда в фольге или
получить более мягкую консистенцию, добавьте
пластмассовых емкостях.
немного воды-от 1 столовой ложки дo
1
/4 чaшки.
PУCCKИЙ
• Посуду следует накрывать пленкой или
• Положите овощи на тарелку подходящего
подходящей по размеру крышкой.
размера или в кастрюлю и накройте их пленкой
• Рекомендуется разогревать блюда, которые
или плотно прилегающей крышкой.
можно перемешивать.
• По желанию можно добавить сливочное масло,
зелень и т.п., однако до конца готовки блюдо не
следует солить.
1 Суп
Рекомендуемый вес (0,5 -2,5 литра)
3 Каша
Программа предназначена для приготовления
Рекомендуемый вес (200 — 1000 г)
традиционных заправочных супов, таких как
солянка, щи, рассольник.
• Программа подходит для приготовления каш из
• Супы можно готовить на бульоне или воде.
таких круп как: гречка, рис, пшено, и др.
Важно, что бы бульон или вода имели комнатную
Используйте посуду подходящего размера.
температуру.
Кашу можно готовить с добавлением воды или
• Воспользуйтесь приведенным ниже рецептом:
молока.
Продукты
Солянка Щи
Рассольник
• Воспользуйтесь приведенным ниже рецептом:
На 4 порции (1, 5 литра)
Продукты Гречка Пшено ** Рис
Копчености
порции 2 4 2 4 2 4
ветчина, сосиски,
200 г — —
Крупа (г)
200 400 130 260 130 260
сервелат
Вода (мл)
400 800 — — — —
Огурцы маринов. 3 шт. — 3 шт.
Молоко (мл)
—450 900 400 800
Лук 2 шт. 1 шт. 1 шт.
Соль (ч.л.)
1
/2 112
1
/2 1
Перец сладкий 1 шт. — —
Сахар (ст.л.)
—2412
Томатный соус 4 ст.л 4 ст.л 4 ст.л
Накройте кастрюлю пленкой, поставьте в печь и
Картофель — 2-3 шт. 2-3 шт.
нажмите «КАША». После звукового сигнала
Капуста свежая — 200 г —
перемешайте и снимите крышку.
Морковь — 1 шт. 1 шт.
*Перед варкой пшено промойте, обдайте
Масло растит — 2 ст.л. 2 ст.л.
кипятком, и замочите на 30 минут.
Добавить после звукового сигнала:
Бульон с мясом или
1000 мл 1000 мл 1000 мл
вода
4 Рыба
Оливки 8-10 шт. — —
Лимон
1
/2 шт. —
1
/2 шт.
Рекомендуемый вес (200-1000 г)
Зелень, соль, перец По вкусу
• Для приготовления рыбы на пару.
•
Используйте овощи среднего размера. Овощи
• Отберите рыбу, пригодную для готовки в
для супа должны быть очищены. Все продукты
микроволновой печи, положите ее на плоское
должны быть нарезаны на одинаковые по
блюдо кожицей вниз.
размеру и форме кусочки.
• Заверните тонкие края филе, чтобы они не
•
Готовьте в посуде достаточно большого
переготовились.
размера, например для 1,5 л. супа нужно взять
• Места вокрут глаз и хвостовую часть накройте
2,5 л. кастрюлю.
кусочками алюминиевой фольги, чтобы они не
переготовились.
1.Положите все продукты из верхней части
• Накройте рыбу пленкой или плотно
рецепта в кастрюлю, хорошо перемешайте их,
прилегающей крышкой.
закройте крышкой или пленкой и готовьте в
• Большое количество рыбы выдержите в печи в
автоматической сенсорной программе СУП до
течение 3-5 минут после окончания готовки.
звукового сигнала.
2.После этого, добавьте продукты из нижней
части рецепта, хорошо перемешайте, и
продолжайте готовить под крышкой до
окончания программы.
3. Перед подачей оставьте на 10 минут в
выключенной печи. Подавайте со сметаной.
— Ru-12 —
Автоматические программы приготовления
Данная функция позволяет подогревать и готовить Ваши любимые блюда без предварительной установки уровня
мощности и времени.
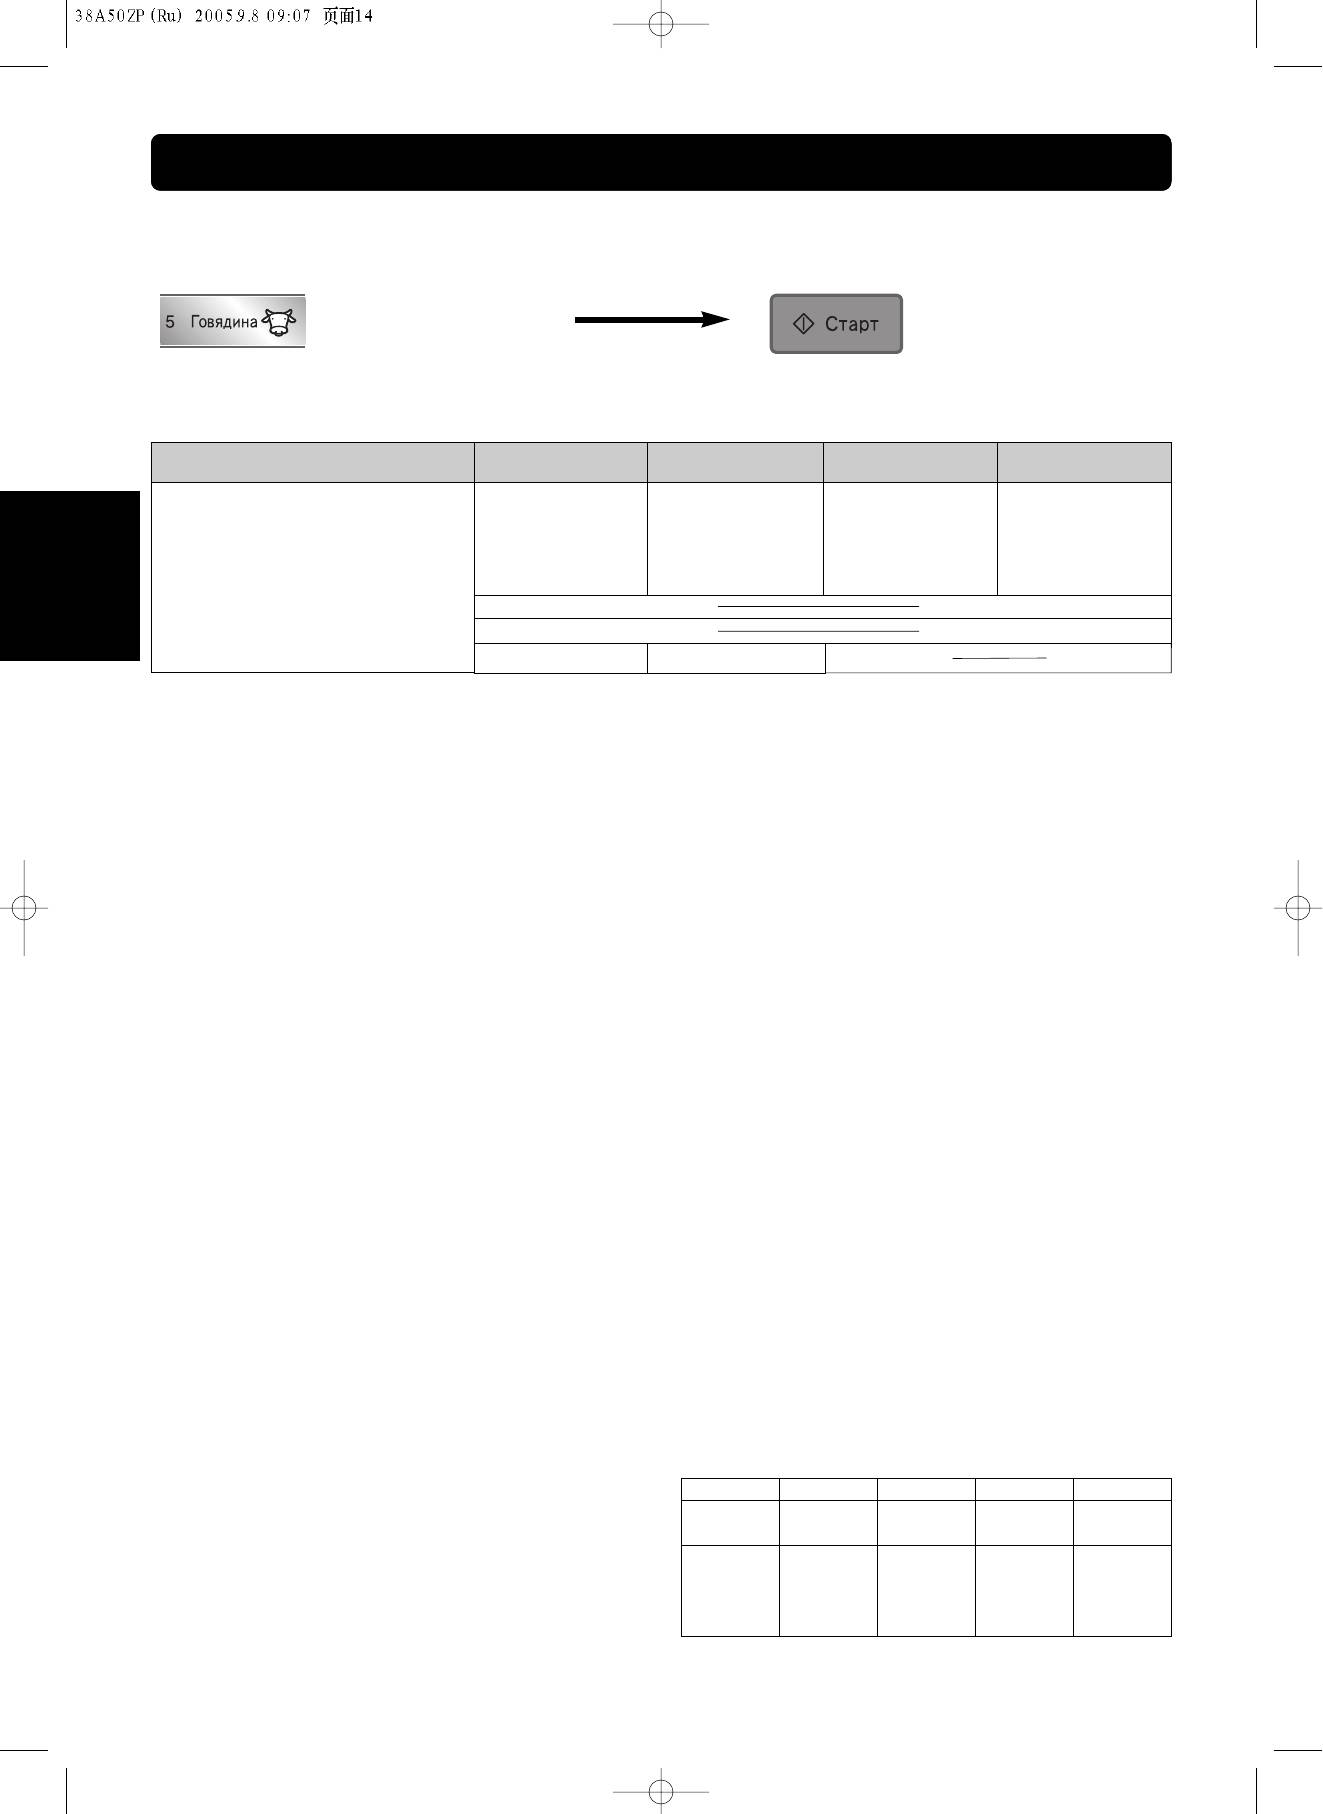
Например:
● Выберите необходимую категорию продукта.
● Нажмите
Нажимайте на клавишу до тех пор, пока на
клавишу Старт.
дисплее не появится нужный вес/программа.
Категория
1 нажатиc 2 нажатия 3 нажатия 4 нажатия
5. Говядина
500 г
1000 г
1300 г
1500 г
6. Свинина
300 г
600 г
1000 г
1300 г
7. Курица
1000 г
1300 г
1500 г
1800 г
8. Котлеты
250 г
375 г
500 г
750 г
9. Печенье
10. Пирожки
PУCCKИЙ
11, 12. Paгy
11. Тушеное мясо
12. Рагу
Замечания:
1. Как только Вы нажмете клавишу включения, на дисплее появится индикация времени приготовления,
и начнется его обратный отсчет.
2. Если время приготовления превышает один час, то оно будет указываться в часах и минутах.
5 Говядина
7 КУРИЦА
• Отбирайте для жарки ровные куски, если куски
• Программа подходит для приготовления курицы
неровные, перевяжите их шпагатом, чтобы
целиком, а также фаршированной курицы. Для
обеспечить равномерное обжаривание.
компактности можете связать ножки шпагатом.
• Положите ГОВЯДИНУ на термостойкое блюдо
Если Вы собираетесь готовить большую курицу,
для микроволновой печи и поставьте все на
рекомендуем ее разрезать со стороны грудки и
поворотный стол.
разложить на решетке.
• Приблизительно в середине готовки
• Положите курицу на решетку и поставьте в печь
переверните ГОВЯДИНУ.
на поворотный стол. Под решетку поставьте
• По окончании готовки заверните говядину в
жаропрочное блюдо с водой для стекающего
алюминиевую фольгу и дайте ей постоять 10-15
жира.
минут перед тем, как разрезать.
• По желанию смажьте курицу маринадом или
растопленным сливочным маслом и посыпьте
специями.
6 Свинина
• Переверните курицу по истечении половины
времени приготовления. При желании полейте
• Программа подходит для приготовления
курицу жиром в середине процесса
эскалопов и отбивных, а так же запекания
приготовления.
крупных кусков мяса, например, жаркого или
• По окончанию приготовления заверните курицу
буженины.
в алюминиевую фольгу и дайте ей постоять 10-
• Для равномерного приготовления отбивные, по
15 мин. перед тем, как разрезать на части.
возможности, должны быть одинаковой
толщины, а куски для запекания — ровной формы
или обвязаны шпагатом для придания им
8 Котлеты
компактности.
• Для большей мягкости и сочности свинины,
Программа подходит для приготовления
предварительно замаринуйте ее с соевым
домашних котлет или размороженных
соусом или горчицей. Положите свинину на
полуфабрикатов.
термостойкое блюдо для микроволновой печи и
Положите котлеты в форму с бортиками на
поставьте на решетке в печь на поворотный
небольшом расстоянии друг от друга, поставьте
стол.
форму на решетку в печь и нажмите «КОТЛЕТЫ».
• В середине приготовления прозвучит звуковой
• Для выбора веса, придерживайтесь следующей
сигнал, напоминающий о необходимости
таблицы:
перевернуть кусочки. Перед подачей на стол или
Вес 250 г 375 г 500 г 750 г
нарезкой на кусочки накройте блюдо из свинины
Домашни
2 шт. по
3 шт. по
4 шт. по
6 шт. по
фольгой и оставьте на 5-10 минут для устойки.
е котлеты
125 г
125 г
125 г
125 г
Разморож
3 шт. по
4 шт. по
6 шт. по
8 шт. по
енные
85 г
85 г
85 г
85 г
полуфабр
икаты
После звукового сигнала переверните котлеты
для поджаривания их с двух сторон.
— Ru-13 —

Автоматические программы приготовления
9 ПЕЧЕНЬЕ
10 Пирожки
• Эта программа предназначена для выпечки
• Программа предназначена для выпечки
печенья в РЕЖИМЕ конвекционная выпечка.
пирожков с различными начинками из сдобного
• Можно использовать металлический поднос для
дрожжевого и слоеного теста.
выпечки. Поставьте поднос на решетку и
• Установите решетку на поворотный стол и
поместите все на поворотный стол.
нажмите клавишу ПИРОЖКИ и Старт. После того
• Предварительный разогрев печи не требуется.
как печь разогреется до нужной температуры,
• Воспользуйтесь нижеприведенным рецептом.
прозвучит звуковой сигнал. После сигнала
поставьте противень подходящего размера с
ШОКОЛАДНОЕ ПЕЧЕНЬЕ
подготовленными к выпечке пирожками на
решетку в разогретую печь. Нажмите СТАРТ и
Ингредиенты:
готовьте до окончания программы.
PУCCKИЙ
A: 125 гр. сливочного масла
• Для выпечки следующей партии повторите
1
/
3
чашки коричневого сахара
сначала.
1
/
3
чашки сахара
1
/
2
чашки шоколадной стружки
B: 1
1
/
4
чашки муки
11-12 Рагу
1
/
2
ложки ванильного экстракта
1
/
2
ложки пищевой соды
• Положите все ингредиенты в кастрюлю
1
/
4
ложки соли
подходящего размера (чтобы она была
1 яйцо
заполнена прибл. на
3
/4 объема) и накройте
крышкой.
Способ приготовления:
• Все ингредиенты порежьте на равные куски.
1. Взбейте миксером масло с двумя видами
Число
Категория
Рекомендуемый вес
сахара, пока не получится однородная
нажатий
продукта
кремообразная масса.
Овощи
Мясо
Жидкость
2. Добавьте яйцо и хорошо перемешайте. Затем
1
11 Тушеное мясо
––
1-1.5 кг
500 мл
добавьте ванильный экстракт и взбейте до
2
12 Рагу
300 г
400 г
150 мл
однородной, гладкой массы.
3. Добавьте муку, соль и соду. Необходимо все
вымесить до однородной консистенции.
4. Добавьте шоколадную стружку и хорошо
перемешайте.
5. Сделайте из теста шарики размером с
большой гроцкий орех и уложите на смазанный
маслом поднос для выпечки. Поставьте его на
решетку, а затем на поворотный стол. Оставьте
место между шариками теста. Нажмите
клавишу ПЕЧЕНЬЕ, а затем клавишу СТАРТ.
6. Когда печенье будет готово необходимо его
остудить на решетке.
— Ru-14 —
Задержка включения
Данная функция позволяет запрограммировать задержку включения.
Например 20 минут
2 paзa
● Нажмите
● Задайте время, на
● Задайте требуемую
● Нажмите
клавишу
которое Вы хотите
программу приготовления
клавишу
Таймера.
задержать начало
пищи согласно указаниям,
Старт.
приготовления пищи,
которые уже были приведены
путем нажатия клавиш
в данной инструкции.
времени (в пределах
до 99 мин 59 секунд).
Замечания:
1. Функция задержки включения не может быть запрограмирована перед любой программой автоматического
приготовления. Это связано с тем, что бы продукт не нагревался перед началом размораживания или
PУCCKИЙ
приготовления. Изменения начальной температуры может привести к нерпедвиденным результатам
приготовления.
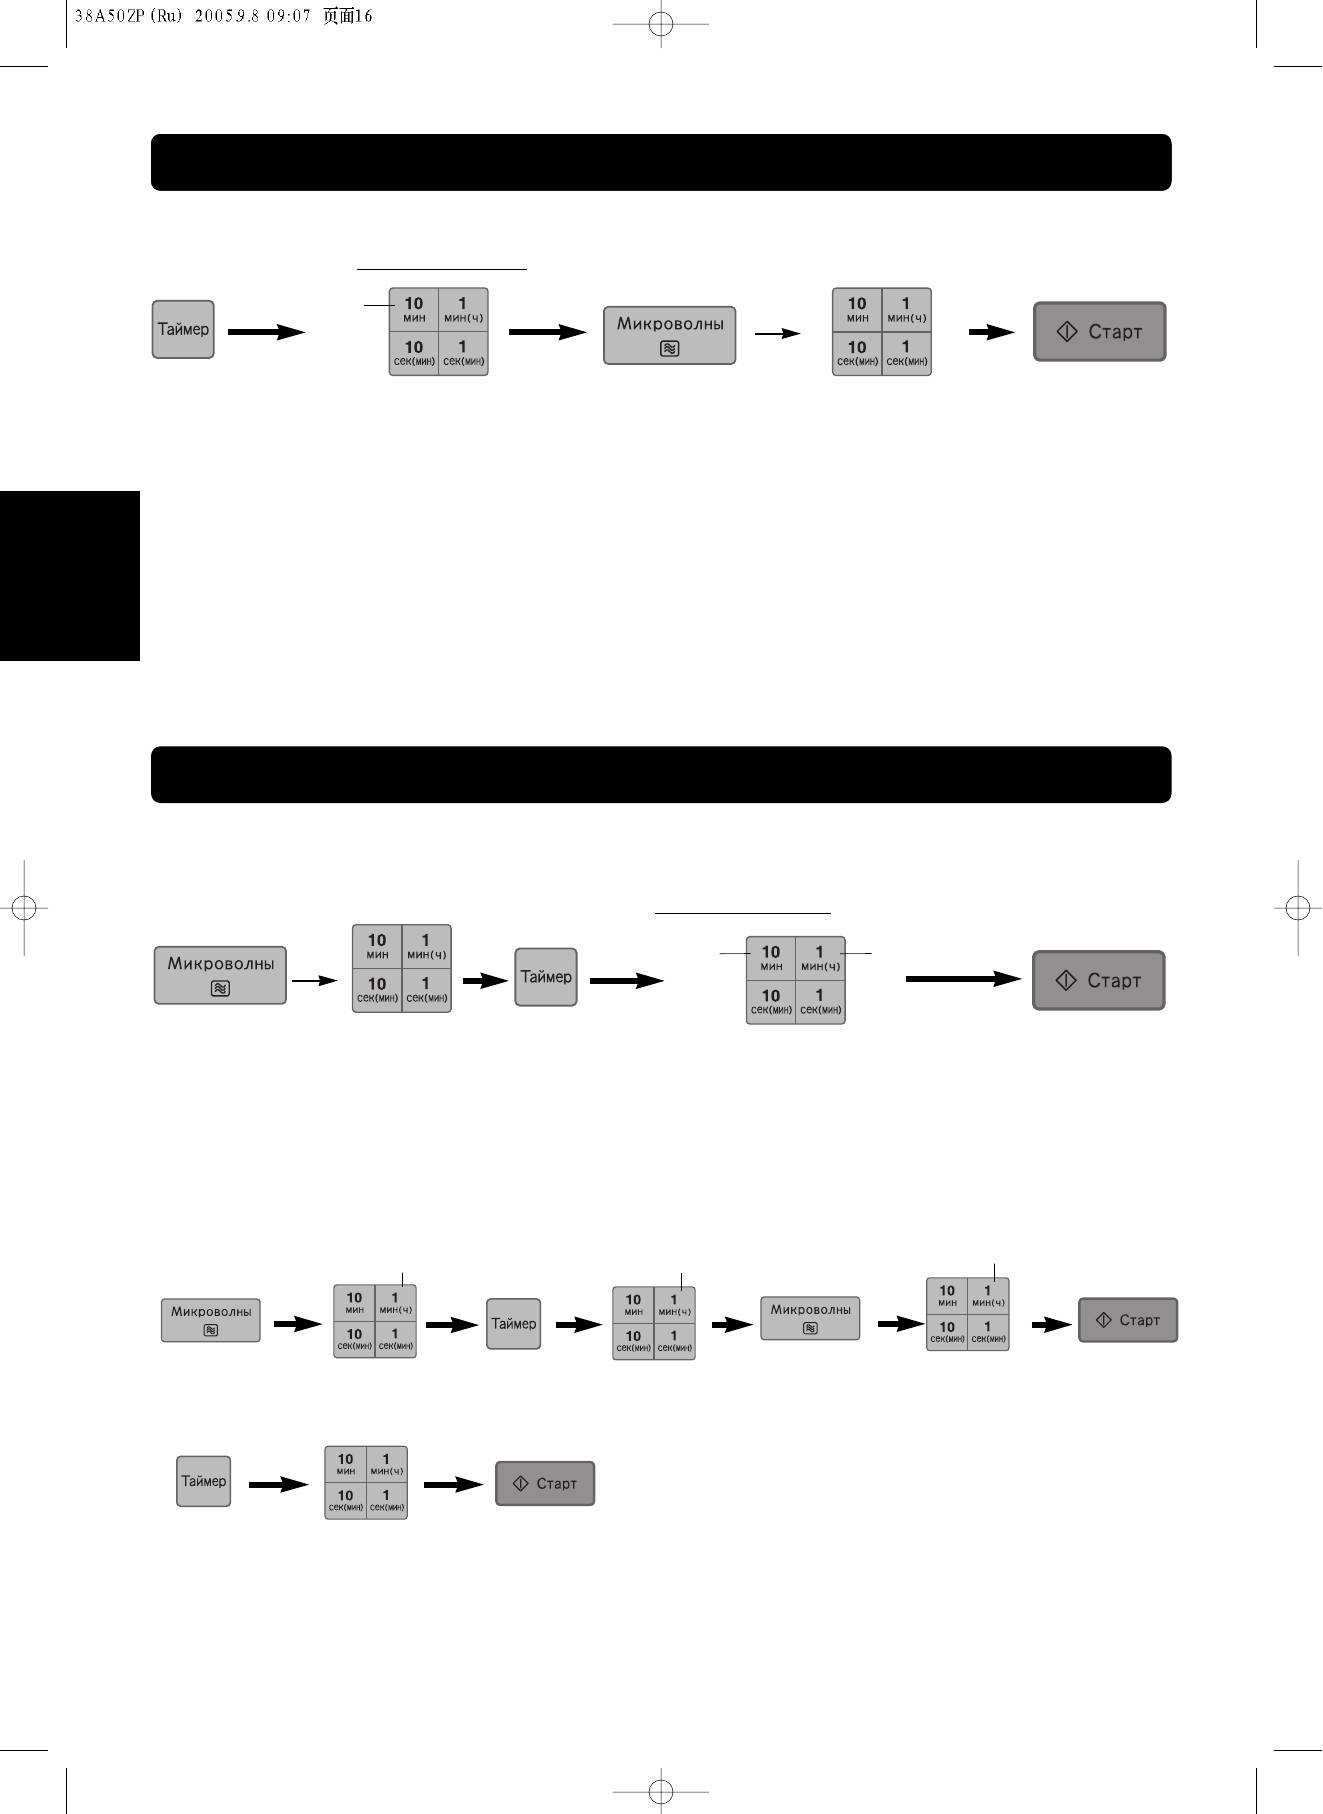
Время паузы
Данная функция позволяет Вам запрограммировать время паузы после окончания приготовления пищи и
запрограммировать печь в режиме минутного таймера.
Например: 15 минут
Например:
1 раз
5 раз
● Задайте требуемую программу
● Нажмите клавишу
● Задайте требуемый интервал
● Нажмите
согласно указаниям, которые
таймера.
времени путем нажатия
клавишу Старт.
были переведены в данной
клавиш времени (в пределах
инструкции.
до 99 мин 59 секунд).
Замечания:
1. Для приготовления некоторых блюд требуется несколько стадий приготовления. Вы можете запрограммировать
три стадии приготовления, включая время паузы.
Высокий уровень
Время паузы 5 мин. Высокий уровень
2 раза
мощности 4 мин.
4 раза
5 paз
мощности 2 мин.
2. Эта функция может ТАКЖЕ использоваться как кухонные часы. В этом случае пропустите первый шаг (установка
программы приготовления.
3. Время на дисплее будет продолжать отсчитываться, даже если Вы открыли дверь во время паузы.
4. Функция время паузы не может быть запрограммирована перед любой функцией автоматического
приготовления. Это связано с тем, что бы продукт не нагревался перед началом размораживания или
приготовления. Изменение начальной температуры может привести к непредвиденным результатам
приготовления.
— Ru-15 —
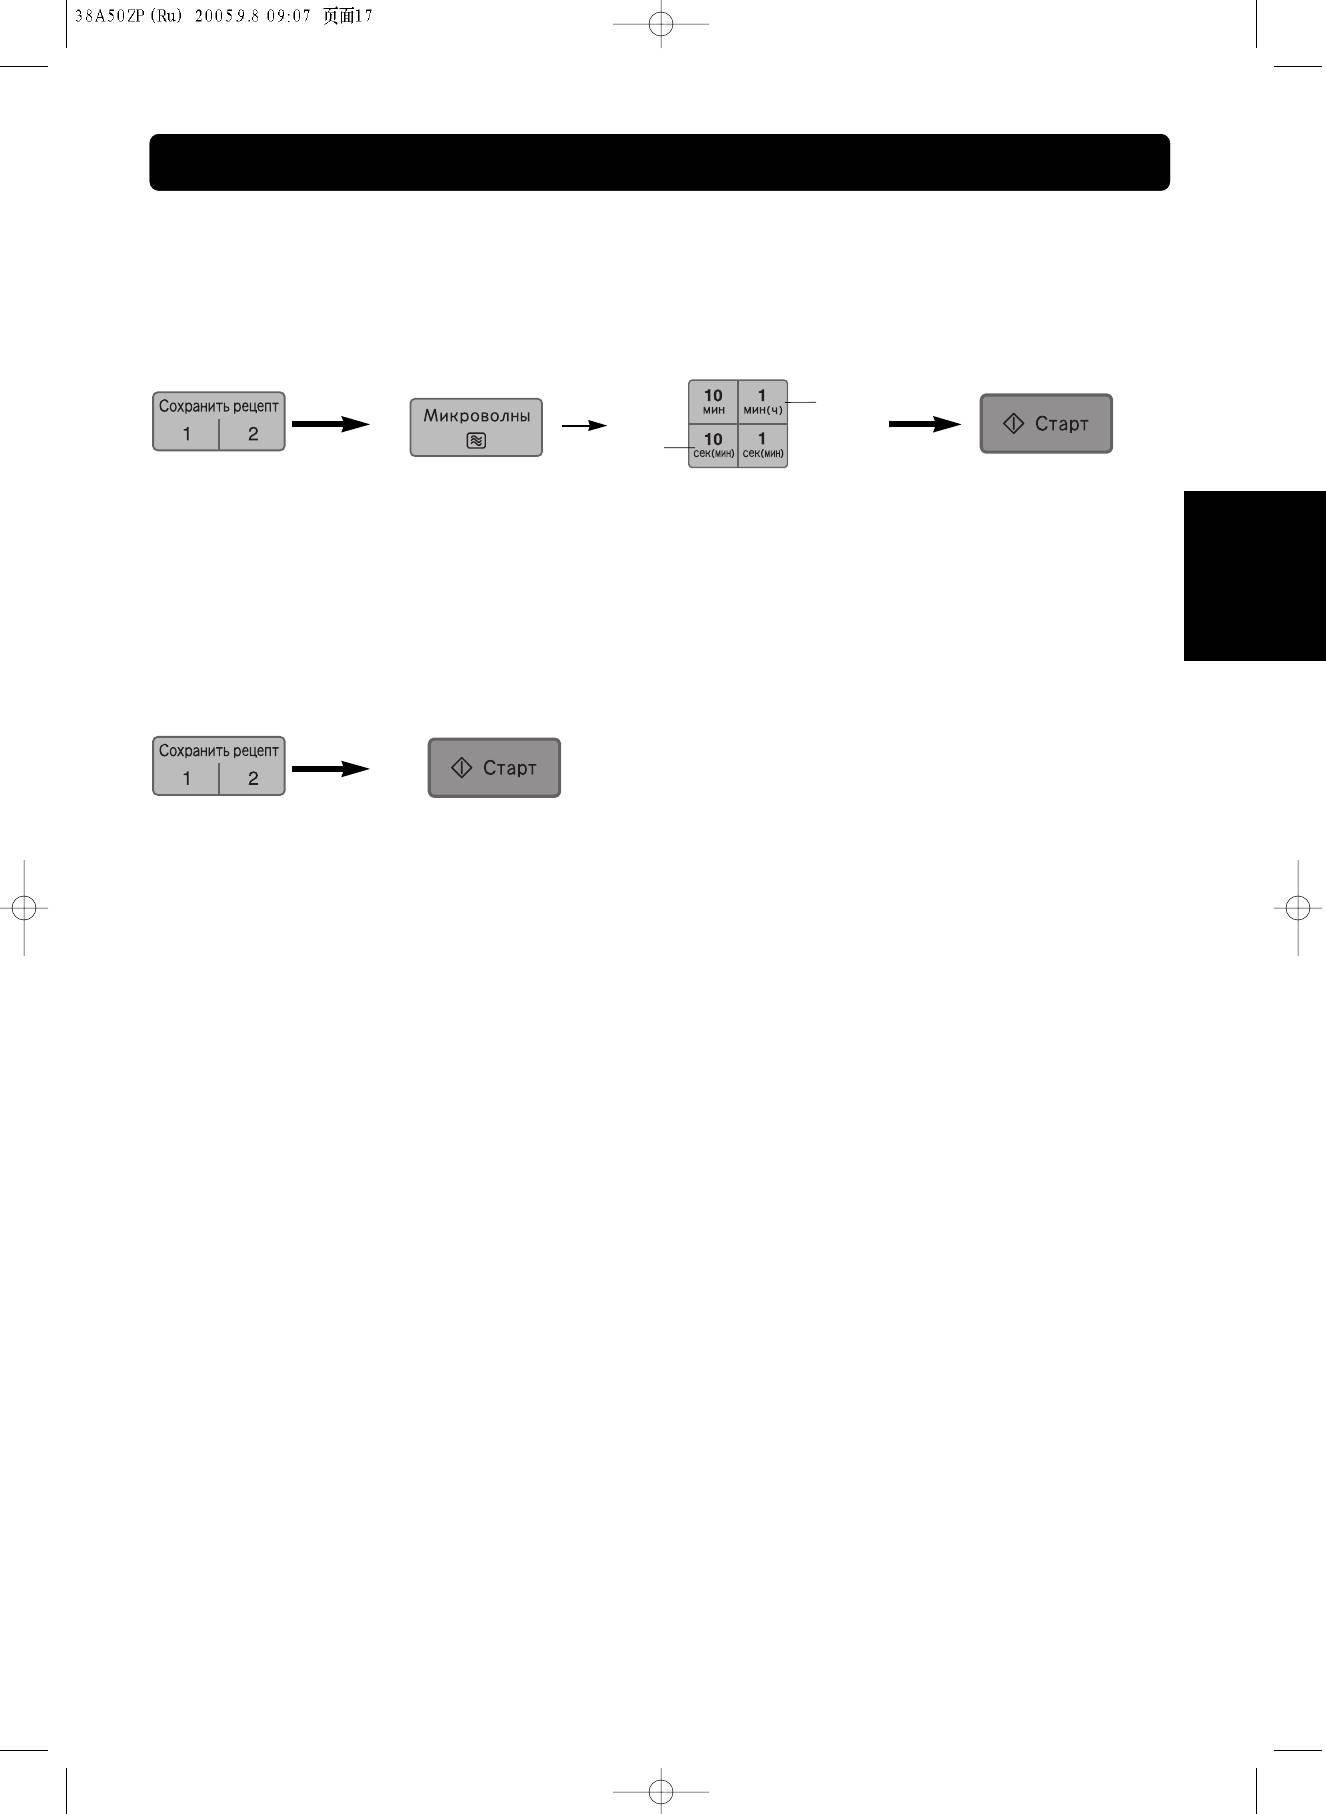
Сохранить рецепт
Если Вы регулярно готовите или разогреваете пищу в печи, то для облегчения работы с печью Вы можете заранее
запрограммировать уровень мощности и время, которое наиболее, на Ваш взгляд, подходит Вам.
Установка программы запоминания рецепта:
Например:
1 paз
3 paзa
PУCCKИЙ
● Нажмите клавишу
● Задайте выбранную программу
● Нажмите клавишу
памяти. (1 или 2)
приготовления.
Старт.
(не более двух этапов приготовления)
Использование программы памяти:
● Нажмите клавишу
● Нажмите клавишу Старт.
памяти. (1 или 2)
ЗАМЕЧАНИЯ:
1. Автоматические программы приготовления не могут быть занесены в память.
2. При программировании новых рецептов приготовления, ранее запрограммированные рецепты будут
автоматически стерты.
3. При прерывании питания или отключения печи от сети рецепт, занесенный в память, не сохранится.
— Ru-16 —

Вопросы и ответы
B: Почему моя микроволновая печь не
O: Если микроволновая печь не включается, проверьте следующее:
включается?
1. Проверьте, плотно ли вставлена вилка в сетевую розетку. Выньте
вилку из розетки, подождите 10 секунд и снова вставьте ее.
2. Проверьте автоматический выключатель или предохранитель.
Включите автоматический выключатель или замените
предохранитель, если он неисправен или перегодел.
3. Если автоматический выключатель или предохранитель исправны,
подключите в ту же розетку друтой электроприбор. Если он работает,
то, вероятно, неисправна микроволновая печь. Если он не работает,
то, вероятно, неисправна розетка.
Обращайтесь в специализированный сервисный центр.
B: Моя микроволновая печь вызывает
O:Работа микроволновой пени может вызвать некоторые помехи при
помехи в телевизоре. Это
приме радио- и телевизионных программ. Аналогичные помехи могут
нормально?
возникать при работе таких электрических приборов как миксер,
пылесос. Это не означает, что ваша печь неисправна.
B: Программа не вводится в печь.
O:Конструкция микроволновой печи не допускает ввода неправильной
Почему?
программы. Так, печь не запрограммирует четвертую стадию и не
PУCCKИЙ
воспримет программу автоматического ПРИГОТОВЛЕНИЯ после
установки задержки включения.
B: Иногда из вентиляционных
O:Тепло, исходящее от пищи, нагревает воздух в камере печи, нагретый
отверстий печи выходит теплый
воздух выходит из печи через систему вентиляционных отверстий. В
воздух. Почему?
этом воздухе не содержится никакого микроволнового излучения. Не
загораживайте ничем вентиляционные отверстия печи.
B:» D » (Демонстрационный режим)
O:В печи есть запрограммированная демонстрационная программа,
появляется на дисплее, и печь не
разработанная специально для демонстрации в магазинах. Отключите
работает.
программу путем нажатия клавиши часов три раза.
B: Во время работы в
O:Шумы возникают, когда печь автоматически переключается с
комбинированном режиме моя печь
микроволн на конвекцию или гриль, выполняя установку
гудит и пощелкивает. В чем причина
комбинированного режима. Это нормально.
этих шумов?
B: Могу ли я использовать в печи
O:Только при использовании режимов гриля и конвекции. Металл,
обычный термометр?
содержащийся в некоторых типах термометров, может вызвать дуговой
разряд в печи, поэтому их не следует использовать при работе в
микроволновом и комбинированном режимах.
B: Могу ли я готовить по моим
O:Да. Вы можете готовить по своим любимым рецептам также, как
любимым рецептам в режимах
вобыкновенной духовке. Проверьте указания относительно
КОНВЕКЦИИ или ГРИЛЯ?
температуры и времени приготовления в кулинарной книге фирмы
Panasonic.
B: Как проверить блюда на
O: Вот некоторые показатели:
готовность?
● Кекс должен отстать от стенок формы.
● Проткните кекс зубочисткой или лучинкой. Тесто не должно липнуть к
ним.
● Птица перестает выделять сок, а ножка легко отделяется.
● Все блюда должны быть «с пылу, с жару».
B: Моя печь издает неприятный запах
O: Необходимо регулярно протирать печь, особенно после работы в
и дымит при работе в режимах
КОМБИНИРОВАННОМ или ГРИЛЕВОМ режимах. Если печь не чистить,
КОНВЕКЦИИ, КОМБИНАЦИИ и
то жир, скопившийся на потолке и стенках камеры начнет дымить.
ГРИЛЯ. Почему?
B: Когда я включаю мою печь слышен
O: Эти шумы могут появляться, если дно печи, роликовое кольцо и
сильный шум от вращающегося
поворотный стол грязные. Необходимо все вымыть и шумы должны
поворотного стола.
исчезнуть.
— Ru-17 —
Уход и техническое обслуживание микроволновой печи
1. Перед чисткой печи выключите ее и отсоедините
6. Поворотный cтол нужно периодически чистить.
кабель питания от сетевой розетки.
Мойте его в теплой мыльной воде или в
2. Внутренние поверхности микроволновой печи
посудомоечной машине.
должны быть чистыми.
7. Роликовое кольцо и днище печи нужно
Если частицы пищи или брызги от жидкостей
периодически очищать для обеспечения бесшумной
пристали к стенкам печи, протрите их мягкой
работы печи. Просто протирайте нижнюю
салфеткой. При сильном загрязнении можно
поверхность, используя мягкое моющее средство,
использовать мягкие чистящие средства. Не
например жидкое мыло для посуды. Испарения
рекомендуется использовать сильные моющие
скапливаются внутри печи при ее долгой работе, но
средства или абразивные препараты.
это ни в коем случае не влияет на состояние днища
3. Внутренние поверхности печи следует протирать
и колесики роликового кольца. Следите за
мягкой тканью.
правильной установкой роликового кольца на днище
Во избежание повреждения внутренних деталей
микроволновой печи после того, как Вы снимали его
PУCCKИЙ
устройства не допускается попадание жидкости
для чистки.
внутрь вентиляционных отверстий.
8. Во время приготовления блюд в режимах Гриля и
4. Не допускайте попадания жидкостей на панель
Комбинации на стенках печной камеры неизбежно
управления. При чистке панели управления
остается жир. Если печь не чистить, может
используйте мягкую салфетку, не применяйте
появиться неприятный запах и дым во время ее
сильные моющие средства, абразивные материалы
работы. Кроме того, брызги жира будет труднее
или чистящие аэрозоли. Во время чистки панели
отчистить по прошествии некоторого времени.
управления дверца должна оставаться открытой во
9. Техническое обслуживание этой печи должно
избежание случайного включения печи. После
проводиться только специалистом сервисной
чистки нажмите Стоп/Сброс, что бы вернуть печь в
службы, прошедшим обучение у производителя.
исходное положение.
10.При необходимости замены лампочки обратитесь к
5. Если на внутренней поверхности или вокруг
Вашему дилеру.
наружных краев дверцы конденсируется влага,
11.Необходимо содержaть микроволновую печь в
вытрите ее мягкой салфеткой. Это может
чистоте, потому что загрязнения могут привести к
происходить при эксплуатации микроволновой печи
повреждению внутренних поверхностей,
в условиях повышенной влажности и не является
значительно сокрaтить cрок cлужбы прибора, и
признаком неисправности.
стать причиной опаcной cитуaции.
Технические характеристики
Источник электроэнергии:
220 B, 50 Гц
Потребление электроэнергии:
Микроволновый режим
5.9 aмпep, 1,260 Bт
Максимум
6.9 aмпep, 1,550 Bт
Выходная мощность:
Микроволновый режим
1,000 Bт
Нагреватель
1,515 Bт
Га баритные размеры:
312 (Г) x 520 (Ш) x 400 (B) мм
Внутренние размеры печи:
206 (Г) x 373 (Ш) x 373 (B) мм
Диаметр поворотного стола:
350 мм
Рабочая частота:
2,450 МГц
Масса без упаковки:
15.5 кг
* Тест IEC
Технические характеристики могут быть изменены без предварительного уведомления.
Информация относительно требований к напряжению, месяца изготовления, страны и серийного номера находится
на специальной наклейке на задней стороне микроволновой печи.
— Ru-18 —
Аннотации для Микроволновой печи с грилем и конвекцией Panasonic NN-C785 JFZPE в формате PDF
Топ 10 инструкций
Другие инструкции

ИСТРУКЦИЯ
по
ЭКСПЛУАТАЦИИ
Operating Instructions
Микроволновая печь/Гриль/Конвекция
Microwave/Grill/Convection Oven
NN-C897W / NN-C897C
Panasonic
Перед началом эксплуатации печи внимательно прочтите данную инструкцию.
Before operating this oven, please read these instructions completely.

Summary of Content for Panasonic NN-CD987W Oven Operating Instructions PDF
NN-CD997S
NN-CD987W
Operating Instructions
Microwave / Convection Oven
Model No. NN-CD997S NN-CD987W
Please read these instructions completely before operating this oven and keep for future reference.
A00037F40QP F0907-0
Printed in Japan
Cook Book
Microwave / Convection Oven
Model No. NN-CD997S NN-CD987W
Please read these instructions completely before operating this oven and keep for future reference.
A00037F40QP F0907-0
Printed in Japan
We are glad you have chosen to purchase a PANASONIC microwave/Convection Oven. Before operating this oven, please read these instructions completely.
If you have only used a microwave oven for reheating and defrosting, with Panasonics Inverter Technology, you can be reassured of excellent results when cooking a variety of foods, as the soft penetration of microwave energy to the centre of food helps prevent overcooking on edges and surfaces. Foods can now be gently simmered without the concern of boil over. You also have the added advantage of cooking with either convection or grill to achieve perfect browning and crisping of foods. Combination allows you to cook with speed as well as browning at the same time.
After reading the introductory chapter, I am sure you will be able to master the basic technique and thereby develop a firm understanding of your new oven. This book includes recipes from starters to desserts.
Start experimenting now, and enjoy the first class results you will achieve by using your new microwave/convection oven.
Consultant Home Economist Fiona Campbell
Panasonic Australia Pty. Ltd. P.O. Box 505 Frenchs Forest NSW 2086
Panasonic New Zealand 31 Carbine Road, mt Wellington, Auckland Tel No: (09) 272-0100 Fax No:(09) 272-0137
The serial number of this product may be found on the mODEL NUmBER ______________________ rear panel of product. You should note the model number and serial number of this oven in the SERIAL NUmBER ______________________ space provided and retain this book as a permanent record of your purchase for future reference. DATE OF PURCHASE ___________________
Cooking Guide
microwave Recipe Preparation and Techniques ………………………………….. 2 — 4 Everyday Basics ……………………………………………………….. 5 — 7 Soups, Snacks and Starters ………………………………………………. 8 — 14 Fish and Shellfish …………………………………………………….. 15 — 19 Poultry …………………………………………………………….20 — 29 main Fare meats ……………………………………………………… 30 — 40 Vegetable Varieties ……………………………………………………. 41 — 47 Rice, Pasta and Cereal …………………………………………………. 48 — 52 Cakes, Slices and Biscuits ………………………………………………. 53 — 57 Desserts and Pastries ………………………………………………….. 58 — 63 micro-made Extras ……………………………………………………. 64 — 67
Turn over for Operating Guide.
1
Table of Contents
Matsushita Electric Industrial Co., Ltd. microwave Oven Business Unit 800 Tsutsui-cho, Yamatokoriyama City, Nara 639-1188, Japan Web Site: http://panasonic.net
B efo
re O p
eratio n
—
O p
eratio n
& H
in ts
M ain
ten an
ce
Table of Contents
Before Operation
Safety Instructions . . . . . . . . . . . . . . . . . . . . . . . . . . . . . . . . . . . . . . . . . . . . . . . . . . . . . . . . . . . . . . . . 2, 3 Installation and Earthing Instructions . . . . . . . . . . . . . . . . . . . . . . . . . . . . . . . . . . . . . . . . . . . . . . . . . . 3, 4 General Instructions . . . . . . . . . . . . . . . . . . . . . . . . . . . . . . . . . . . . . . . . . . . . . . . . . . . . . . . . . . . . . . . 4, 5 Microwaves and How They Work . . . . . . . . . . . . . . . . . . . . . . . . . . . . . . . . . . . . . . . . . . . . . . . . . . . . . . . 5 Cookware and Utensil Guide . . . . . . . . . . . . . . . . . . . . . . . . . . . . . . . . . . . . . . . . . . . . . . . . . . . . . . . . 6, 7 Feature Diagram . . . . . . . . . . . . . . . . . . . . . . . . . . . . . . . . . . . . . . . . . . . . . . . . . . . . . . . . . . . . . . . . . . . 8 Feature Diagram — Control Panel . . . . . . . . . . . . . . . . . . . . . . . . . . . . . . . . . . . . . . . . . . . . . . . . . . . . . . . 9 Oven Accessories . . . . . . . . . . . . . . . . . . . . . . . . . . . . . . . . . . . . . . . . . . . . . . . . . . . . . . . . . . . . . . . . . 0 Cooking Modes : Heating Source . . . . . . . . . . . . . . . . . . . . . . . . . . . . . . . . . . . . . . . . . . . . . . . . . . . . . 0 Cook Navigator/Prompting . . . . . . . . . . . . . . . . . . . . . . . . . . . . . . . . . . . . . . . . . . . . . . . . . . . . . . . . . . . 0
Operation & Hints
Lets Start to Use Your Oven! . . . . . . . . . . . . . . . . . . . . . . . . . . . . . . . . . . . . . . . . . . . . . . . . . . . . . . . . . Quick Guide to Operation . . . . . . . . . . . . . . . . . . . . . . . . . . . . . . . . . . . . . . . . . . . . . . . . . . . . . . . . . . . 2 To Set Clock . . . . . . . . . . . . . . . . . . . . . . . . . . . . . . . . . . . . . . . . . . . . . . . . . . . . . . . . . . . . . . . . . . . . . . 3 Operation Guide on the Screen . . . . . . . . . . . . . . . . . . . . . . . . . . . . . . . . . . . . . . . . . . . . . . . . . . . . . . . 3 To Use Child Safety Lock . . . . . . . . . . . . . . . . . . . . . . . . . . . . . . . . . . . . . . . . . . . . . . . . . . . . . . . . . . . . 3 To Reheat/Defrost/Cook by Micro Power and Time . . . . . . . . . . . . . . . . . . . . . . . . . . . . . . . . . . . . . 4 — 6 To Cook using the Time/Weight Dial . . . . . . . . . . . . . . . . . . . . . . . . . . . . . . . . . . . . . . . . . . . . . . . . . . . 5 To Defrost by Turbo Defrost . . . . . . . . . . . . . . . . . . . . . . . . . . . . . . . . . . . . . . . . . . . . . . . . . . . . . . . . . . 7 To Cook on Convection/2 Level Convection . . . . . . . . . . . . . . . . . . . . . . . . . . . . . . . . . . . . . . . . . . 8, 9 To Set Standing Time . . . . . . . . . . . . . . . . . . . . . . . . . . . . . . . . . . . . . . . . . . . . . . . . . . . . . . . . . . . . . . . 9 To Cook on Grill . . . . . . . . . . . . . . . . . . . . . . . . . . . . . . . . . . . . . . . . . . . . . . . . . . . . . . . . . . . . . . . . . . . 20 To Cook on Combination . . . . . . . . . . . . . . . . . . . . . . . . . . . . . . . . . . . . . . . . . . . . . . . . . . . . . . . . . 2, 22 To Reheat by Sensor Reheat . . . . . . . . . . . . . . . . . . . . . . . . . . . . . . . . . . . . . . . . . . . . . . . . . . . . . . . . 23 To Cook by Auto Menu . . . . . . . . . . . . . . . . . . . . . . . . . . . . . . . . . . . . . . . . . . . . . . . . . . . . . . . . . . 24 — 28 To Use Recipe Prompting . . . . . . . . . . . . . . . . . . . . . . . . . . . . . . . . . . . . . . . . . . . . . . . . . . . . . . . . 29, 30 To Change the Cooking Time . . . . . . . . . . . . . . . . . . . . . . . . . . . . . . . . . . . . . . . . . . . . . . . . . . . . . . . . 30
Maintenance
Before Requesting Service . . . . . . . . . . . . . . . . . . . . . . . . . . . . . . . . . . . . . . . . . . . . . . . . . . . . . . . . . . 3 Care of Your Microwave Oven . . . . . . . . . . . . . . . . . . . . . . . . . . . . . . . . . . . . . . . . . . . . . . . . . . . . . . . . 32 Technical Specifications . . . . . . . . . . . . . . . . . . . . . . . . . . . . . . . . . . . . . . . . . . . . . . . . . . . . . . . . . . . . . 32 Panasonic Warranty . . . . . . . . . . . . . . . . . . . . . . . . . . . . . . . . . . . . . . . . . . . . . . . . . . . . . . . . . . . . . . . . 33
Turn over for Cook Book .
070823_A00037F40QP_OG.indd 1 2007/08/23 14:11:32
B ef
o re
O p
er at
io n
-2-
Safety Instructions
Precautions to be taken when using Microwave Ovens for Heating foodstuffs INSPECTION FOR DAMAGE A microwave oven should only be used if an inspection confirms all of the following conditions: . The door grille is not damaged or broken . 2 . The door fits squarely and securely and opens
and closes smoothly . 3 . The door hinges are in good condition . 4 . The metal plates of a metal seal on the door are
neither buckled nor deformed . 5 . The door seals are neither covered with food nor
have large burn marks .
PRECAUTIONS Microwave radiation from microwave ovens can cause harmful effects if the following precautions are not taken: . Never tamper with or deactivate the interlocking
devices on the door . 2 . Never poke an object, particularly a metal object,
through a grille or between the door and the oven while the oven is operating .
3 . Never place saucepans, unopened cans or other heavy metal objects in the oven .
4 . Do not let other metallic articles, e .g . fast food foil containers, touch the side of the oven .
5 . Clean the oven cavity, the door and the seals with water and a mild detergent at regular intervals . Never use any form of abrasive cleaner that may scratch or scour surfaces around the door .
6 . Always use the oven with the trays or cookware recommended by the manufacturer .
7 . Never operate the oven without a load (i .e . an absorbing material such as food or water) in the oven cavity unless specifically allowed in the manufacturers literature .
8 . For horizontally hinged doors, never rest heavy objects such as food containers on the door while it is open .
9 . Do not place sealed containers in microwave ovens . Baby bottles fitted with a screw cap or a teat are considered to be sealed containers .
PRACTICAL HINTS Exterior oven surfaces, including air vents on the cabinet and the oven door will get hot during CONVECTION, COMBINATION and GRILL . Use care when opening or closing door and when inserting or removing food and accessories .
WE CERTIFY THAT THIS MICROWAVE OVEN HAS BEEN INSPECTED AND COMPLIES WITH THE REQUIREMENTS OF REGULATION 3, SUBCLAUSE(2),OF THE MICROWAVE OVENS REGULATIONS 982 . MATSUSHITA ELECTRIC INDUSTRIAL CO ., LTD .
(This statement applicable only to New Zealand .)
This appliance is not intended for use by young children or infirm persons unless they have been adequately supervised by a responsible person to ensure that they can use the appliance safely . Young children should be supervised to ensure that they do not play with the appliance .
WARNING a) If the door or door seals are damaged, the
appliance must not be opened until it has been repaired by a competent person .
b) It is hazardous for anyone other than a competent person to carry out any service or repair operation that involves the removal of a cover which gives protection against exposure to microwave energy .
c) Liquids and other foods must not be heated in sealed containers since they are liable to explode .
d) Only allow children and persons with reduced physical, sensory or mental capabilities, or lack of experience and knowledge, to use the oven without supervision when adequate instructions have been given so that the child and such person is able to use oven in a safe way and understands the hazards of improper use . Children should be supervised to ensure that they do not play with the appliance .
e) Accessible parts may become hot during use . Young children should be kept away .
f) If the supply cord of this appliance is damaged, it must be replaced by the special cord available only from the manufacture .
(continued on the following page .)
SAVE THESE INSTRUCTIONS
B efo
re O p
eratio n
-3-
Safety Instructions
Important Instructions WARNING — To reduce the risk of burns, electric shock, fire, injury to persons or excessive microwave energy: . Read all instructions before using microwave oven . 2 . Some products such as whole eggs and sealed
containers — (for example, closed glass jars and sealed baby bottles with a teat) — may explode and should not be heated in a microwave oven .
3 . Use this microwave oven only for its intended use as described in this manual .
4 . As with any appliance, close supervision is necessary when used by children .
5 . Do not operate this microwave oven, if it is not working properly, or if it has been damaged or dropped .
6 . Do not store or use this appliance outdoors . 7 . Do not immerse cord or plug in water . 8 . Keep cord away from heated surfaces . 9 . Do not let cord hang over edge of table or counter . 0 .To reduce the risk of fire in the oven cavity:
a) Do not overcook food . Carefully attend microwave oven if paper, plastic, or other combustible materials are placed inside the oven to facilitate cooking .
b) Remove wire twist-ties from bags before placing bag in oven .
c) If materials inside the oven should ignite, keep oven door closed, turn oven off at the wall switch, or shut off power at the fuse or circuit breaker panel .
.Do not remove outer panel from oven .
Placement of Oven . The oven must be placed on a flat, stable surface
more than 85 cm above the floor . For correct operation, the oven must have sufficient air flow . Allow 15 cm of space on the top of the oven, 10 cm at back and 5 cm on both sides. If one side of the oven is placed flush to a wall, the other side or top must not be blocked. a) Do not block air vents . If they are blocked
during operation, the oven may overheat . If the oven overheats, a thermal safety device will turn the oven off . The oven will remain inoperable until it has cooled .
b) Do not place oven near a hot or damp surface such as a gas stove, electric range or sink etc .
c) Do not operate oven when room humidity is too high .
2 . The surfaces of top, back and left side of the oven become hot during operation . Do not allow the mains cable to come in contact with the surface of the oven .
3 . This oven was manufactured for household use only .
WARNING (continuance)
g) Only use utensils that are suitable for use in microwave ovens .
h) When heating food in plastic or paper containers, keep an eye on the appliance due to the possibility of ignition .
i) If smoke is observed, switch off or unplug the appliance and keep the door closed in order to stifle any flames .
j) When microwave heating liquids, overheating the liquid beyond boiling point can occur without evidence of bubbling . This could result in a sudden boil over of hot liquid .
k) The contents of feeding bottles and baby food jars must be stirred or shaken and the temperature checked before consumption, in order to avoid burns .
l) Eggs in their shell and hard-boiled eggs should not be heated in microwave ovens since they may explode, even after microwave heating has ended .
m) The door seals and door seal areas should be cleaned with a damp cloth .
n) The oven should be cleaned regularly and any food deposits removed .
o) Failure to maintain the oven in a clean condition could lead to deterioration of the surface that could adversely affect the life of the appliance and possibly result in a hazardous situation .
p) During use the appliance becomes hot . Care should be taken to avoid touching heating elements inside the appliance .
q) A steam cleaner is not to be used .
Installation and Earthing Instructions
070823_A00037F40QP_OG.indd 3 2007/08/23 14:11:33
B ef
o re
O p
er at
io n
-4-
Installation and Earthing Instructions (continuance)
General Use . In order to maintain high quality, do not operate
the oven when empty . The microwave energy will reflect continuously throughout the oven if no food or water is present to absorb energy .
2 . Do not dry clothes, newspapers or other materials in the oven . They may catch on fire .
3 . Do not use recycled paper products, unless the paper product is labelled as safe for microwave oven use . Recycled paper products may contain impurities which may cause sparks and/or fires when used .
4 . Do not use newspapers or paper bags for cooking .
5 . Do not hit or strike control panel . Damage to controls may occur .
6 . POT HOLDERS may be needed as heat from food is transferred to the cooking container and from the container to Ceramic Tray . The tray can be very hot after removing the cooking container from the oven .
7 . Do not store flammable materials next to, on top of, or in the oven . It could be a fire hazard .
8 . Do not cook food directly on Ceramic Tray unless indicated in recipes . (Food should be placed in a suitable cooking utensil .)
9 . Do NOT use this oven to heat chemicals or other non-food products . Do NOT clean this oven with any product that is labeled as containing corrosive chemicals . The heating of corrosive chemicals in this oven may cause microwave radiation leaks.
0 . When using the COMBINATION mode, never place any aluminum or metal container directly on the wire rack . Always insert a heatproof, glass plate or dish between the wire rack and the aluminum container . This will prevent sparking that may damage the oven .
. It is recommended not to use the wire rack when cooking in the MICROWAVE mode only .
General Instructions
Earthing Instructions This microwave oven must be earthed . In the event of an electrical short circuit, earthing reduces the risk of electric shock by providing an escape wire for the electric current . This microwave oven is equipped with a cord having an earthing wire with an earthing plug . The plug must be plugged into an outlet that is properly installed and earthed . WARNING — Improper use of the earthing plug can result in a risk of electric shock .
Circuit Your microwave oven should be operated on a separate 0 A circuit from other appliances . Failure to do this may cause the power board fuse to blow, and/or food to cook slower . Do not insert higher value fuse in the power board .
Fan Motor Operation After using the oven, the fan rotates to cool the electric components . Do not switch the electricity off for 5 minutes after using the oven . This continuance of fan operation is perfectly normal, and you can take out the food from the oven while the fan operates .
2 . If ceramic tray is hot, allow to cool before cleaning or placing in water .
Food . Do not use your oven for home canning or the
heating of any closed jar . Pressure will build up and the jar may explode . In addition, the microwave oven cannot maintain the food at the correct canning temperature . Improperly canned food may spoil and be dangerous to consume .
2 . Do not attempt to deep fat fry in your microwave oven . 3 . Potatoes, apples, egg yolks, whole squash,
chicken wing and sausages are examples of foods with non porous skins . This type of food must be pierced before cooking, to prevent bursting .
4 . When heating liquids, e .g . soup, sauces and beverages in your microwave oven, overheating the liquid beyond boiling point can occur without evidence of bubbling . This could result in a sudden boil over of the hot liquid . To prevent this possibility the following steps should be taken: a) Avoid using straight-sided containers with
narrow necks . b) Do not overheat . c) Stir the liquid before placing the container in the
oven and again halfway through cooking time . d) After heating, allow to stand in the oven for
a short time, stirring again before carefully removing the container .
5 . DO NOT USE A CONVENTIONAL MEAT THERMOMETER IN THE MICROWAVE OVEN. To check the degree of cooking of roasts and poultry use a MICROWAVE THERMOMETER. Alternatively, a conventional meat thermometer may be used after the food is removed from the oven . If undercooked, return meat or poultry to the oven and cook for a few more minutes at the recommended power level . It is important to ensure that meat and poultry are thoroughly cooked .
B efo
re O p
eratio n
-5-
General Instructions
Microwaves are a form of high frequency radio waves similar to those used by a radio, including AM, FM and CB .
Electricity is converted into microwave energy by the magnetron tube (which is the heart of the microwave oven) .
From the magnetron tube, microwave energy is transmitted to the oven cavity . The microwaves are converted to heat in the food . The microwaves enter from the outside of the food and travel through the food . Continued cooking to the centre occurs by conduction .
Although pacemakers used to be affected by microwaves (as well as by other radio waves), they are now shielded and are not bothered by these interferences . This allows people with pacemakers to sit calmly by their radio or television and cook with microwave ovens . When the microwaves come in contact with a substance, any one or a combination of three things may occur . They can be: . REFLECTED 2 . TRANSMITTED 3 . ABSORBED
Reflection Metal substances REFLECT microwave energy because there is no absorption and there is no heating . This is why the oven interior is either stainless steel or paint-coated steel . This ensures that the microwaves are kept inside the cavity and evenly distributed throughout the food with the help of the turntable .
Transmission Such substances as paper, glass and plastic TRANSMIT microwave energy and do not become hot except from food . Because these substances do not reflect or absorb microwave energy, they are ideal materials for microwave cooking containers .
Absorption Food contains moisture and will ABSORB microwave energy, which causes the moisture molecules within the food to vibrate at an incredible rate (2,450,000,000 times per second) . Friction, created by vibration, produces heat energy which is conducted throughout the food .
6 . COOKING TIMES given in the cookbook section are APPROXIMATE. Factors that may affect cooking time are preferred degree of cooking, moisture content, starting temperature, altitude, volume, size, shape of food and utensils used . As you become familiar with the oven, you will be able to adjust for these factors .
7 . It is better to UNDERCOOK RATHER THAN OVERCOOK foods. If food is undercooked, it can always be returned to the oven for further cooking . If food is overcooked, nothing can be done . Always start with minimum cooking times recommended .
8 . Extreme care should be taken when cooking popcorn . Cook for minimum time as recommended by manufacturer . Use the directions suitable for the wattage of your oven . NEVER leave oven unattended when popping popcorn .
9 . Take care when heating food in foil trays . Trays should be no deeper than 2 cm and should not touch the sides of the oven walls . If you are unsure of the heating time, do not leave the oven unattended .
Microwaves and How They Work
B ef
o re
O p
er at
io n
-6-
Cookware and Utensil Guide
Plastics Plastic dishes, cups and some freezer containers should be used with care in a microwave oven . Choose plastic containers carefully, as some plastic containers may become soft, melt and scorch . The majority of plastic dishes, even those designed for use in the microwave oven, are not suitable for cooking foods with high fat or sugar content, or for lengthy cooking time . Most microwave plastic dishes should not be used for longer than 3 to 5 minutes on HIGH power . These dishes, although not suitable for extended cooking, may be successfully used for defrosting or for use on lower power levels . Cooking Bags designed to withstand boiling, freezing, or conventional heating are microwave safe . Prepare bags according to manufacturers’ directions . When cooking by microwave, DO NOT use wire twist-ties to close bag . They can act as an antenna and cause arcing (sparks) . DO NOT COOK IN PLASTIC FOOD STORAGE BAGS . Plastic Wrap such as GLAD WRAP can be used to cover dishes in most recipes . Over an extended heating time, some disfiguration of the wrap may occur . When removing plastic wrap «covers» as well as any glass lid be careful to remove it away from you to avoid steam burns . Loosen plastic but let dish stand covered .
Browning Dishes NOTE: Browning dishes are no longer available . This information is supplied to assist people who already own a browning dish .
Browning dishes are used to sear chops, meat patties, steaks etc . A special coating on the bottom of the dish absorbs the microwave energy and becomes very hot . When foods are added to the dish, the result is a seared effect . Preheat the dish according to the manufacturers’ directions . Add food to be seared and heat according to recipe or personal preference . Use pot holders to remove the dish from the Microwave Oven . Do not use the browning dish on or in a conventional stove . Remember: Food can be covered with a loose sheet of absorbent towel to prevent splattering . Do not attempt to deep fry in the browning dish or microwave oven as you cannot control the temperature of the oil .
It is important to use correct containers when cooking in a microwave oven . The following will help you to make the right selection .
How to Test a Container for Safe Microwave Oven Use Fill a -cup glass measure with water and place it in the microwave oven along with the container to be tested; heat one minute on HIGH . If the container is microwave oven safe, it should remain comfortably cool and the water should be hot . If the container becomes very hot, it has absorbed some microwave energy and should not be used . This test cannot be used for plastic containers .
Paper Products and Freezer Wrap Waxed paper, paper plates, cups and napkins should not be used for heating or cooking food by Convection, Combination and Grill . Freezer wrap should not be used as it is not heat resistant and may melt . Paper towels, greaseproof paper and bake paper may be safely used for short periods of time for covering or lining .
Glass, Ceramic and China Heat-Resistant glass cookware is invaluable in microwave cooking . Many of these items are readily available in most homes: glass jugs, mixing bowls, loaf dishes, covered casseroles, oblong baking dishes, pie plates and round or square cake dishes . Examples of this type of cookware are Pyrex and Corningware .
Dinnerware can be used for microwave heating . Many brands of dinnerware are microwave safe . Check the care information for reference to microwave use for dinnerware and serving pieces . If dinnerware is marked ovenproof, it frequently is safe to use in the microwave oven . However, to be sure, check by conducting a microwave dish test .
Several types of glassware and dinnerware are not recommended for use in the Microwave Oven . Do not use dishes with metallic trim or containers with metal parts . Do not use cups or mugs with glued on handles, as they may fall off with continued heating . Do not use delicate glassware . Although the glassware may be transparent to microwave energy the heat from the food may cause the glassware to crack .
B efo
re O p
eratio n
-7-
Cookware and Utensil Guide
* Check manufacturers recommendation, must withstand heat . ** Follow recipe instructions . NOTE: See page 0 for accessories included .
Microwave Grill Convection Combination Aluminium foil for shielding yes yes for shielding Browning dish yes no no no Brown paper bags no no no no
Dinnerware oven/microwave safe non-oven, microwave safe
yes yes
yes no
yes no
yes no
Disposable polyester paperboard dishes
yes*
no
yes*(up to 220C)
yes*(up to 220C)
Glassware oven glassware & ceramic non heat resistant
yes no
yes no
yes no
yes no
Metal cookware no yes yes yes** Metal twist-ties no yes yes no Oven cooking bag yes no yes* yes Paper towels and napkins yes no no no Plastic defrosting rack yes no no no
Plastic dishes microwave safe non microwave safe
yes no
no no
*
no
*
no
Plastic wrap yes no no no Silicon Bakeware yes * * * Straw, wicker, wood yes no no no
Thermometers microwave safe conventional
yes no
no yes
no yes
no no
Waxed paper yes no no no
Cookware and Utensil Guide
Metal Metal cookware or utensils, and those with metallic trim, should NOT be used on microwave . Since microwave energy is reflected by metal, foods in metal containers will not cook evenly . There is also the possibility of «arcing» . Although metal utensils must be avoided in microwave cooking, some metal can be helpful when used correctly . Aluminium foil can be used safely, if certain guidelines are followed, to prevent overcooking . Small pieces of foil are used to cover areas such as chicken wings, tips of roasts, or other thin parts that cook before the rest of the recipe is finished . Make sure foil is attached securely and doesn’t touch sides of oven; otherwise arcing may occur . Foil lined containers, either cardboard or plastic, should NOT be used in the microwave oven as arcing could occur .
Metal twist-ties, either paper or plastic coated, should NOT be used on Microwave or Combination . Frozen dinner trays can be used on Microwave if the container is no deeper than 2 cm and is filled with food . They may be used on Convection . Metal skewers can not be used on Microwave as arcing may occur . Wooden skewers are readily available and give the same result .
Shells: Scalloped baking shells are best used during reheating and for short periods of cooking time only . Thermometers are available for use in microwave ovens . DO NOT USE CONVENTIONAL MERCURY TYPE CANDY OR MEAT THERMOMETERS in food while cooking in the microwave oven or on Combination .
Jars and Bottles Jars and Bottles can be used to warm food to serving temperature, if the lid is removed first . Cooking should not be done in these containers since most are not heat resistant and during extended heating times, heat from food would cause cracking or breaking .
Straw, Wicker, and Wood Straw and wicker baskets may be used in the microwave oven for a short period of time to warm rolls or bread . Large wooden utensils, such as bowls or cutting boards should NOT be used for prolonged heating as the microwave energy may cause the wood to become dry and brittle .
B ef
o re
O p
er at
io n
-8-
Feature Diagram
Ceramic Tray . Do not operate the oven without Roller Ring and Ceramic Tray in place . 2 . Only use Ceramic Tray specifically designed for this oven . Do not substitute any other Ceramic tray . 3 . If Ceramic Tray is hot, allow to cool before cleaning or placing in water . 4 . Do not cook directly on Ceramic Tray unless otherwise indicated . Always place food in a microwave-safe
dish, or on a rack set in a microwave-safe dish . 5 . If food or utensils on Ceramic Tray touches the oven walls, causing the tray to stop moving, the tray will
automatically rotate in the opposite direction . This is normal . 6 . Ceramic Tray can rotate in either direction .
Door
Door Safety Lock System
Door Safety Lock System
Roller Ring . Roller Ring and oven floor
should be cleaned frequently to prevent excessive noise .
2 . Roller Ring must always be used together with Ceramic Tray for cooking .
Identification Plate The oven model number and serial number are recorded here . (back side)
Door Release Button Press to open the door . Opening the door during cooking will stop the cooking process without cancelling the programme . Cooking resumes as soon as the door is closed and Start Pad is pressed . The oven light will stay on or turn on whenever the door is opened . It is quite safe to open the door at any time during a cooking program and there is no risk of microwave exposure .
Control Panel
B efo
re O p
eratio n
-9-
Feature Diagram — Control Panel
Prompters: When a pad is pressed, a beep sound is heard and the corresponding letter or word(s) appear and roll across the screen . If a pad is pressed and no beep is heard, the unit does not or cannot accept the instruction . As each pad is pressed the corresponding word(s) roll across the screen . Words will automatically appear to prompt user to perform the next step . It is not necessary to wait for the words to appear before pressing pads for the next step . A two beep sound is heard between stages . At the end of any complete program, the oven will beep five times .
The control panel of NN-CD987W has the same key layout as NN-CD997S .
Display Window
Time / Weight Dial
Micro (Microwave) Power Pad (page 4 — 6)
Grill Pad (page 20)
Convection Pad (page 8, 9)
Combination Pad (page 2, 22)
Turbo Defrost Pad (page 7)
Menu / Temp. (Temperature)
Select Dial
Stop/Reset Pad Before cooking: One tap clears your instructions . During cooking: One tap temporarily stops the cooking process . Another tap cancels all your instructions and time of day appears in display window .
Start Pad One tap allows oven to begin functioning . If door is opened or STOP/RESET pad is tapped once during oven operation, START pad must again be pressed to restart oven .
More / Less Pad (page 23, 24)
2 Level Conv. (convection) Pad (page 8, 9)
Timer/Clock Pad (page 3)
Sensor Reheat Pad (page 23)
Auto Menu Pad (page 24 — 28)
Recipe Prompting Pad (page 29, 30)
B ef
o re
O p
er at
io n
-0-
Ceramic Tray with Roller Ring
Use always
High Rack Low Rack
Microwave yes no no Grill yes yes yes Convection yes yes yes 2 Level Convection yes yes yes Combination yes no yes
Oven Accessories
Microwave
Heat
Cook Navigator/Prompting This feature allows you to be guided through the cooking process . Once a pad has been selected, the oven will prompt you to the NEXT step until cooking starts .
e.g. 1 Press Convection Pad .
Display window will prompt you to SET TEMPERATURE .
Turn to temperature required .
Display window will prompt you to PRESS START .
Press Start Pad .
Cooking Modes: Heating Source Microwave Grill
Low Rack can be used for Combination cooking .
Combination
Convection 2 Level Convection
NOTE: This feature operations for all cooking modes . Operation guide can be turned off (refer page 3) .
e.g. 2 Press Auto Menu Pad .
Display window will prompt you to . FROZEN REHEAT (category) .
Turn to select menu required .
Display window will prompt you to PRESS START .
Press Start Pad .
e.g. 3 Press Micro Power Pad .
Display window will prompt you to SET TIME .
Turn to select cooking time .
Display window will prompt you to PRESS START .
Press Start Pad .
—
O p
eratio n
& H
in ts
Lets Start to Use Your Oven!
1. Plug In Plug into a properly grounded electrical outlet . PANASONIC MICROWAVE/ CONVECTION OVEN WELCOME TO COOKING appears in the display window . (This will immediately cease when any pad is pressed .)
2. Press Open the door and place the food on Ceramic Tray in the oven . Then close the door .
4. Set Time Turn dial clockwise to increase or anti-clockwise to decrease cooking time .
5. Press Starts the cooking process .
3. Select Power Level
e .g . HIGH power Press once (Continue pressing for other
power levels page 4)
-2-
O p
er at
io n
& H
in ts
Feature How to Operate
To Set Clock (page 3)
2 x press Enter time of day . (Max 2:59)
To Use Child Safety Lock (page 3)
To Set:
3 x press
Display To Cancel:
3 x press
Display
Display returns to clock .
To Use Micro Power and Time Setting (page 4 — 6)
Select Power
To Cook on Grill (page 20)
Select Grill or 2
To Cook on Convection /2 Level Convection (page 8, 9) e .g . Level Convection
Place food in the oven .
For preheating:
For Cooking:
Select Temp . Select Time
To Cook by Combination (page 2, 22)
Select -6
To Reheat using Sensor Reheat pad (page 23) Optional
To Cook using Auto Menu pad (1-20): (page 24 — 28) Optional
Select Desired Food Category . (Auto Menu:
— 9, 9, 20)
Optional
Select Desired Food Category . (Auto Menu:
0 — Set weight .
To Set Stand Time (page 9)
To Select Standing Time
Set Desired Cooking Programme .
To Use Recipe Prompting (page 29, 30)
Select the Desired Recipe .
Turn clockwise for the next instruction . Turn counterclockwise for the previous instruction .
Quick Guide to Operation
-3-
O p
eratio n
& H
in ts
To Set Clock
To Use Child Safety Lock
NOTES: . To reset time of day, repeat the steps as above . 2 . The clock will keep time of day as long as the oven is plugged in and electricity is supplied . 3 . Max time available is 2:59 . Clock is 2 hour only . 4 . You can use the oven without setting the clock .
This feature allows you to prevent operation of the oven by a young child; however, the door will open . You can set Child Lock when colon or time of day is displayed .
Operation Guide on the Screen To assist you in programming your oven, the following operation will appear on the screen . When you become familiar with your oven, the operation guide can be turned off .
Enter time of day using the Time / Weight Dial.
Display
e .g . :25 Press twice. Press.
To turn off: Display
Press 3 times
Colon or time of day appears on the screen .
Press 3 times
Display Colon or time of day appears on the screen .
To turn on:
Colon or time of day is displayed .
Press 3 times.
To Set: Display
Colon or time of day will reappear .
Press 3 times.
To Cancel:
Display
-4-
O p
er at
io n
& H
in ts
To Reheat / Defrost / Cook by Micro Power and Time
1. Select Micro Power
3. Press Cooking will start . The time in the display window will count down .
2 or 3 stage cooking: Repeat steps and 2 above then press Start Pad, the oven will beep twice between stages . e .g . Casseroles — HIGH 0 minutes
to bring to the boil, then MED LOW 30 mins to finish by simmering .
Micro Power: You can select different power levels for cooking foods at different speeds, refer to the chart below .
2. Set Cooking Time
HIGH: up to 30 minutes Others: up to /2 hours Time can be entered in 0 second intervals up to 5 mins then min intervals .
* Refer to page 6 .
Power Level Power No. of Taps Example of Use HIGH 000 W Boil water, cook fresh fruit, vegetables, rice and pasta .
Reheat soups, stews and casseroles . DEFROST* 350 W 2 Thaw foods . MED HIGH 700 W 3 Cook poultry, meat, cakes and desserts . Heat milk . MEDIUM 550 W 4 Cook pot roasts, casseroles and meatloaves, melt chocolate . Cook eggs
and cheese . Cook fish . MED LOW 350 W 5 Simmer soups, stews and casseroles (less tender cuts .) Soften butter
and cream cheese . LOW 00 W 6 Keep cooked foods warm, simmer slowly .
Use of Accessory:
Ceramic Tray
-5-
O p
eratio n
& H
in ts
Frozen Convenience Foods
Item Frozen (pre-cooked) Power Approx. Time
(in minutes) Instruction
BREAD & BAKED PRODUCTS Bread slice loaf (700 g) 6 rolls
MED HIGH MED HIGH MEDIUM
5 — 20 sec 2 — 3 2 — 3
Do not let bread get hot, or it will become rubbery and dry out . Remove whole loaf from original wrapper . Place on paper towel to absorb moisture .
Cheesecake (450 g) DEFROST 2 — 3 Remove from container . Defrost on plate .
Muffins 4 (350 g) MED HIGH 2 — 3 Place onto paper towel lined plate .
Scones 6 (400 g) MEDIUM 2 — 3 Defrost on paper lined plate . Stand 2 minutes .
Croissants 4 (200 g) MEDIUM — 2 Place onto paper towel lined plate .
PIES Fruit Pie (500 g)
DEFROST then
MED HIGH
5 — 7
5 — 7
Remove from foil container and place uncovered into a pie dish .
Meat Pie (75 g) DEFROST then MEDIUM
4 — 6 3 — 4
Place onto paper towel lined plate .
Pizza (350 g) HIGH 5 — 7 Remove from package and place onto paper towel or follow manufacturers instructions .
FROZEN MEAL Fish in Sauce (200 g) MEDIUM 6 — 7 Pierce corner of bag . Heat on a plate . Instant Casserole in Pouch (serves 2)
MEDIUM 6 — 7 Pierce pouch .
Lasagne (400 g) MEDIUM 4 — 6 Remove from foil container, place into serving dish .
Plate Food / TV style dinner (320 g)
MEDIUM 8 — 0
Remove foil cover and replace with plastic wrap .
Vegetables & Sauce (in the bag) (500 g)
MEDIUM 8 — 0
Pierce corner of bag . Heat on a plate .
MISCELLANEOUS Chicken Pieces (500 g)
DEFROST then
MED HIGH
5 — 7
6 — 8
Place onto paper towel lined plate .
Fish Fingers 8 (200 g)
DEFROST then HIGH
3 — 5 2 — 3
Place onto paper towel lined plate .
Sausage Rolls (250 g) MEDIUM 3 — 5 Place onto paper towel lined plate .
To Cook using the Time/Weight Dial This feature allows you to set cooking times at micro power HIGH easily .
e .g . To cook at HIGH Power for 5 minutes .
Set cooking time . (Up to 30 minutes)
Press . Cooking starts .
NOTE: This feature is not available for 2 or 3 stage cooking .
To Reheat / Defrost / Cook by Micro Power and Time
-6-
O p
er at
io n
& H
in ts
Defrost by Setting Time
Preparation for Freezing: . Heavy-duty plastic wraps and bags, and freezer wraps are suitable . 2 . Freeze meat, poultry and fish in packages with only or 2 layers of food . To aid in separating layers, place
two pieces of wax paper between them . 3 . Remove all air and seal securely . 4 . Label package with type and cut of meat, date and weight . 5 . Defrosting times given in the charts are for thoroughly frozen foods (i .e . at least 24 hours in freezer
maintained at -8C or lower) .
Defrosting Technique: . Remove from wrapper and set on a Plastic or Ceramic rack in a dish on Ceramic Tray . 2 . After defrosting: Large roasts may still be icy in the centre . Allow to stand 5 to 30 minutes in refrigerator to
completely defrost .
Defrosting Chart (using Micro Power defrost and time):
To Reheat / Defrost / Cook by Micro Power and Time
Food Approx. Time Instruction
MEAT Beef minced beef roast: topside beef tenderloin chuck or rump sirloin, rolled steak miscellaneous Pork/Lamb roast chops ribs
per 500 g
8 — 2 — 5 2 — 5 0 — 3 — 4 8 — 0 8 — 2
9 — 2 8 — 8 — 2
Turn meat over two or three times during defrosting .
Halfway through the defrost cycle break apart minced beef, separate chops and remove meat that is defrosted .
Shield edges and unevenly shaped ends of roasts halfway through the defrost cycle .
Large roasts may still be icy in the centre . Allow to stand .
POULTRY Chicken whole pieces fillets Duck Turkey
9 — 2 8 — 8 — 0 0 — 2 0 — 3
Turn poultry over two to four times during defrosting . Halfway through the defrost cycle shield end of drumstick, wings, breast bones, and ends of poultry with foil .
Break apart chicken pieces and remove small pieces such as wings, that may defrost before larger pieces .
Rinse poultry under cold water to remove ice crystals . Allow to stand for 5 to 0 minutes before cooking .
FISH & SHELLFISH Fish fillets Whole fish Crabmeat Lobster tails Sea scallops Green prawns
9 — 9 — 2 8 — 0 8 — 0 8 — 0 0 — 2
Halfway through the defrost cycle, turn whole fish or blocks of fillets over . Also, break apart prawns or scallops . Remove any pieces that are defrosted .
Allow to stand 5 to 0 minutes before cooking .
Press twice . Set time . Press .
-7-
O p
eratio n
& H
in ts
To Defrost by Turbo Defrost
2. Set Weight Max . weight 3 kg Weight can be entered in 0 . kg intervals .
The shape and size of the food will determine the maximum weight the oven can accommodate .
3. Press Defrosting time appears in the display window and begins to count down .
Turbo Defrost This feature allows you to defrost meat, poultry and seafood by entering the weight .
1. Press
NOTES: . Stand time or power level may be programmed after Turbo Defrost . (See pages 9) 2 . During Turbo Defrost, the oven will beep .
At the beep: Turn over all meat, poultry, fish and shellfish . Break apart stewing meat, chicken pieces and minced meat . Separate chops and hamburger patties . Remove defrosted minced meat, stewing meat, poultry pieces or prawns etc . Shield thin ends, fat bones of roasts or poultry legs and wings with foil .
3 . For further information on Defrost, refer to page 6 .
Use of Accessory:
Ceramic Tray
-18-
O p
er at
io n
& H
in ts
To Cook on Convection/2 Level Convection Use of Accessory:
Ceramic Tray
Low Rack
Ceramic Tray
Low RackHigh Rack 1 Level Convection: 2 Level Convection:
2. Select the desired oven temperature
100C to 250C. 40C is temperature for fermentation of yeast doughs.
6. Press Cooking will start.
1. Press (1 Level Convection)
1. Press (2 Level Convection)
5. Set Cooking Time
(Up to 9 hours) Time can be entered 1 min intervals.
3. Press The oven begins to preheat. Do not open the door during preheating.
4. After preheating, place the food into the oven
After preheating 3 beeps will be heard and P will blink in the display.
-9-
O p
eratio n
& H
in ts
Convection Cooking: Just like a conventional oven, the convection oven has a heating element to give the dry heating needed to produce crisp, browned exteriors . Convection cooking has the addition of a fan to produce conventional results with a slightly reduced cooking time . Convection cooking temperatures range from 00C to 250C . Most conventional recipes will be suitable for use . Follow the minimum suggested cooking times and add additional time if required . Convection recipes are also available throughout the recipe section of this book .
2 Level Convection: 2 Level Convection is available for when you wish to cook a larger quantity of food . The entire oven cavity may then be utilised . For example, cooking two trays of biscuits .
NOTES: . Place Ceramic Tray correctly in the oven before preheating . 2 . If the oven door is not opened after the completion of preheating, the oven will maintain the selected
temperature for 30 minutes . After 30 minutes, the oven will shut off automatically and revert to the time of day .
3 . If preheating is not required for the food you are cooking, eliminate step 3 . 4 . When selected cooking time is less than one hour, the time counts down by minutes and seconds . 5 . When selected cooking time is more than one hour, the time counts down by hours and minutes until only
H 00 ( hour) remains . Then the display then counts down by minutes and seconds . 6 . 2 Level Convection is not available for 2 or 3 stage cooking .
To set Standing Time Using the Timer Pad, you can program ) a Stand Time after cooking is completed or 2) a minute timer .
NOTES: . Three stage cooking can be programmed including a Stand Time . 2 . If the oven door is opened during the Stand Time, the time in the display window will continue to count
down . 3 This feature may also be used as a timer . In this case, eliminate first step .
To Cook on Convection/2 Level Convection (continuance)
e .g . STEP 1: STEP 2:
Select the desired cooking program .
Press Timer pad .
Set the desired amount of time . (up to /2 hours)
Press Start pad .
-20-
O p
er at
io n
& H
in ts
To Cook on Grill
Use of Accessory:
1. Select Grill Power
Grill 1 (High) or Grill 2 (Low) can be selected.
Ceramic Tray
High Rack There are two Grill settings available. Grill 1(High) is ideal for grilling meat, chicken and fish fillets. Grill 2 (Low) is ideal for grilling whole fish and oven baked chips and browning cheese and egg dishes.
Place a heatproof glass or ceramic dish under the rack to catch any excess fat or meat juices.
2. Set Time (up to 1 hour 30 minutes) Time can be entered 10 second intervals up to 5 mins then 1 min intervals.
3. Press Cooking will start.
-2-
O p
eratio n
& H
in ts
To Cook on Combination
1. Select Setting
COMB -6 and the program temperature appears in the display .
3. Press Cooking will start .
NOTES: . When selected cooking time is less than one hour, the time counts down by minutes and seconds . 2 . When selected cooking time is more than one hour, the time counts down by hours and minutes until only
H 00 ( hour) remains . Then the display counts down by minutes and seconds .
There are 6 combination settings for Convection/Microwave . To select the correct program for particular foods, refer to next page .
2. Select Cooking Time
(up to 9 hours)
Low Rack can be used for Combination cooking .
Use of Accessory:
Ceramic Tray
(continued on the following page .)
-22-
O p
er at
io n
& H
in ts
Use of Accessory:
Cakes, slices, desserts, etc . may be cooked in metal cookware . Do not place a small amount of food in a large metallic dish as arcing may occur .
Combination cooking is ideal for roasting meats, poultry and cooking cakes, pastries and slices . Combination cooking automatically alternates between Convection and Microwave heating .
The advantage of Combination cooking is that it gives you the browning of Convection and often shortens the conventional cooking time . Time is also reduced as preheating is not required .
To calculate cooking time start by cooking for approximately 2/3 of the conventional cooking time and add additional time If required . For examples of recipes and cooking times, consult recipes in the recipe section .
Ovenproof cookware, including ceramic is suitable for use when cooking on Combination . Cakes, slices, desserts etc . may be cooked in metal cookware providing there is suitable quantity of food to be absorbed by the microwave heat . For example, do not place a small amount of food in a large metallic dish as arcing may occur .
When cooking by Combination, place dishes to be cooked on the Ceramic Tray . When roasting meat, the roasts may be placed directly on Low Rack . Sausages and rissoles may also be cooked in this way .
Place a heatproof glass or ceramic dish (less than 2 cm high) under the rack to catch any drips from the roast . Alternately, elevate the roast on a roasting rack in a baking dish and place directly on Ceramic Tray .
Examples of Foods to Cook by Combination Mode
Combination setting Foods suitable Oven
Temperature Micro Power
Level
COMB Casseroles, pot roasts, meat loaves, corned meat 50C LOW
COMB 2 Quiche, baked custards, rice pudding 60C LOW
COMB 3 Cakes, self saucing pudding, layered slices, apple pie 70C LOW
COMB 4 Single layer slice, light cakes, roast lamb 80C LOW
COMB 5 Roast pork, roast beef, jacket potato, turkey, duck, garlic bread, chicken pieces casseroles, lasagne, reheating sweet/savoury pies, reheating muffins
200C MED LOW
COMB 6 Pastries, bread, grilling sausages and rissoles, whole chicken, chicken pieces, pizzas, reheating croissants
230C LOW
To Cook on Combination
-23-
O p
eratio n
& H
in ts
To Reheat by Sensor Reheat
This feature allows you to reheat most of your favourite foods without having to select cooking times and power levels . The oven does it all automatically .
2. Press After the burst of steam is detected by the SENSOR, the remaining cooking time appears in the display and begins to count down . Do not open the door until the remaining cooking time appears in the display window .
More/Less pad Preferences for food doneness vary with each individual . After having used Sensor Reheat a few times, you may decide you would prefer your food cooked to a different doneness . By using the More/Less pads, the programs can be adjusted to cook food for a longer or shorter time . Press More/Less pads after selecting category and before pressing Start pad . tap = More 2 taps = Less 3 taps = Original setting
For best results, follow these recommendations: . The Sensor Reheat work by detecting the amount of steam generated by the food being cooked .
From the generated steam, the oven then calculates the remaining cooking time . 2 . The door should not be opened before the time appears in the display window . 3 . If the oven has been previously used on CONVECTION, COMBINATION or GRILL, and it is too hot to be
used on a Sensor Program, a HOT will appear in the display window . The cooling fan will operate to cool the oven rapidly . After the HOT disappears, the program may be used . If you are in a hurry, cook food manually i .e . select Micro Power Level and cooking time yourself .
1. Press
Sensor Reheat (200 g — 1.2 kg)
All foods must be pre-cooked . Foods should be at room or
refrigerated temperatures . Stirrable foods are
recommended . Place in a suitably sized dish
(approximately 3/4 full) . Dish should be covered with
plastic wrap or a fitting lid that does not snap seal .
Stir food after removal from oven . Allow 2 to 3 minutes standing
time . Do not reheat in foil or plastic
containers .
Use of Accessory:
Ceramic Tray
-24-
O p
er at
io n
& H
in ts
To Cook by Auto Menu
This feature allows you to cook most of your favourite foods without having to select cooking times and power levels . The oven does it all automatically .
3. Press After the burst of steam is detected by the SENSOR, the remaining cooking time appears in the display and begins to count down . Do not open the door until the remaining cooking time appears in the display window . During cooking, the oven will beep and scroll STIR or REARRANGE ( — 5, 7, 9) or TURN OVER or REARRANGE (8) to signal that the food needs to be stired or rearranged or turned .
More/Less pad Preferences for food doneness vary with each individual . After having used Sensor Cook a few times, you may decide you would prefer your food cooked to a different doneness . By using the More/Less pads, the programs can be adjusted to cook food for a longer or shorter time . Press More/Less pads after selecting category and before pressing Start pad . tap = More 2 taps = Less 3 taps = Original setting
1. Press
2. Select Menu Category and PRESS START appears in the display window .
For best results, follow these recommendations: .The Sensor Cook works by detecting the amount of steam generated by the food being cooked . From the generated steam, the oven then calculates the remaining cooking time . 2 .When an Auto Program has been selected, the category will appear in the display window . 3 .The door should not be opened before the time appears in the display window . 4 .When cooking time is longer than 60 minutes, the time will appear in hours and minutes . 5 .Do not use plastic dishes as a secure seal cannot be achieved and inaccurate results may occur . 6 .If the oven has been previously used on CONVECTION, COMBINATION or GRILL, and it is too hot to be used on a Sensor Program, a HOT will appear in the display window . The cooling fan will operate to cool the oven rapidly . After the HOT disappears, the program may be used . If you are in a hurry, cook food manually i .e . select Micro Power Level and cooking time yourself .
Use of Accessory:
Ceramic Tray
Sensor Cook (Auto Menu 1 — 9)
-25-
O p
eratio n
& H
in ts
1. FROZEN REHEAT (200 g — 1.2 kg) Suitable for reheating pre-cooked soups, stews,
casseroles, roast dinners, pasta dishes (except lasagne) and rice dishes from a frozen temperature .
This setting is not suitable for reheating frozen bread or pastry products, raw or uncooked foods or beverages .
Remove convenience foods from foil or plastic packaging and place in an appropriate sized dish .
Cover dish with plastic wrap or a lid that does not snap seal .
When a beep is heard during cooking, the oven will prompt you to STIR or REARRANGE the foods . At the end of the cooking time, stir and let stand for 3-5 minutes .
2. VEGETABLES (125 g — 1.0 kg) Place in a suitably sized dish and cover with
plastic wrap or a fitting lid that does not snap seal . Larger vegetables should be placed in a single
layer in a shallow dish . Add tablespoon to /4 cup of water if vegetables
appear slightly dehydrated or a softer texture is desired .
Do not add salt before cooking . When a beep is heard during cooking, the oven
will prompt you to STIR or REARRANGE the foods .
At the completion of cooking, stir larger quantities and allow to stand for 2 to 3 minutes .
3. ROOT VEGETABLES (125 g — 1.0 kg) Vegetables should be trimmed, prepared and cut
into even sized pieces . Add tablespoon to /4 cup of water if vegetables
appear slightly dehydrated or a softer texture is desired .
Place in a suitably sized dish and cover dish with plastic wrap or a fitting lid that does not snap seal .
If desired, butter, herbs, etc . may be added but do not add salt until the completion of cooking .
When a beep is heard during cooking, the oven will prompt you to STIR or REARRANGE the foods .
4. FROZEN VEGETABLES (125 g — 1.0 kg) See above 2 and 3 .
5. FRUIT (125 g — 2.0 kg) The addition of water and sugar is optional as
most fruit will yield juice as it cooks . If liquid is required to produce a softer result, add
approximately /4 cup per 250 g . A sugar syrup may be made by combining /4 cup
of caster sugar with /2 cup of water and cooking on HIGH for 2 to 3 minutes, stirring once to dissolve .
Place prepared fruit to be cooked in an appropriately sized dish with water or syrup if desired and cover with plastic wrap or a fitting lid that does not snap seal .
When a beep is heard during cooking, the oven will prompt you to STIR the foods .
6. RICE (1/2 cup — 3 cups) Use a larger sized dish to prevent rice from
boiling over . Use cold water at a ratio of:
/2 cup rice / cup water cup rice / /2 cups water 2 cup rice / 3 cups water
Cover with plastic wrap or a fitting lid that does not snap seal .
When a beep, the cooking time appears in the display window . Stir and remove plastic wrap or lid .
At the completion of cooking, allow 5-0 minutes standing time .
7. PASTA (125 g — 500 g) Suitable for cooking dried pasta . Place pasta and water in a large size dish to
prevent from boiling over . Use boiling water at the ratio of,
25 g pasta / 3 cups water 250 g pasta / 4 cups water 375 g pasta / 6 cups water 400 g pasta / 7 cups water 500 g pasta / 8 cups water
add teaspoon of oil, if desired, before cooking to prevent the pasta from sticking together .
Cover with plastic wrap or a fitting lid that does not snap seal .
When a beep is heard and the cooking time appears in the display . Stir and remove the cover .
Stand for 5-0 minutes at the completion of cooking time .
8. FISH (250 g — 1.0 kg) Suitable for cooking whole fish, fish fillets and
cutlets . Select fish suitable for microwave cooking and
place skin side down in a shallow dish . Overlap thin ends of fillets to prevent overcooking . Cover dish with plastic wrap or a fitting lid . When a beep is heard during cooking, the
oven will prompt you to TURN OVER or REARRANGE the foods .
Allow larger quantities of fish to stand for 3 to 5 minutes at the completion of cooking .
For dense pieces of fish, slightly extra cooking time should be allowed by pressing More/Less pad .
9. CASSEROLE (500 g — 2.5 kg) Select less tender cuts of meat as these will
produce the best results . Cut meat and vegetables into even sized pieces . Place into a suitably sized dish (approx . 3/4 full) . Add approximately /2 to cup of stock or soup
per 500 g meat . Ensure that a casserole dish with a lid is used .
DO NOT USE PLASTIC WRAP, as the heater could melt the wrap .
When a beep is heard during cooking, the oven will prompt you to STIR the foods .
Stand for 0 minutes at the completion of cooking time .
To Cook by Auto Menu Sensor Cook (Auto Menu 1 — 9) continuance
-26-
O p
er at
io n
& H
in ts
To Cook by Auto Menu
2. Select Menu Select category 10 — 18. (see page 27 — 28.)
3. Set Weight Weight can be entered in 0.1 kg intervals.
4. Press Cooking time appears in the display window and begins to count down.
During cooking, the oven will beep and scroll TURN OVER (10, 11, 13, 17) or TURN OVER / ADD VEGETABLES (12, 14, 18) or ADD VEGETABLES (16) to signal that the food needs to be turned or vegetables added.
This feature allows you to cook most of your favourite foods on combination by setting the weight.
NOTE: 1. These settings are cooked by Combination (Convection and Microwave). 2. When the weight has been entered, the cooking times will be determined. 3. When using settings 12, 14, 16 and 18, enter the weight of the meat only.
If potatoes are not sufficiently crispened at the completion of cooking, remove roast from oven and leave potatoes on Low Rack. Program Grill 1 for 10 minutes.
4. Roasts weighing above or below the recommended weights should be cooked by manual combination (see page 21).
Use of Accessory:
1. Press
Weight Cook (Auto Menu 10 — 18):
Ceramic Tray
Low Rack
-27-
O p
eratio n
& H
in ts
15. PORK (0.7 — 3.0 kg)
Select roasts that are uniform in shape, if not, tie roasts with string, to aid with even cooking .
Place the pork crackling side up on Low Rack with a shallow dish (less than 2 cm high) underneath to collect drips .
For crispy crackling, score rind, brush with oil and sprinkle with salt .
There is no need to turn the pork during the cooking time .
At the completion of cooking time, wrap the pork in aluminium foil and allow to stand for 0-5 minutes before carving .
16. PORK AND BAKED VEGETABLES (0.7 — 3.0 kg (meat only))
Select roasts that are uniform in shape, as this will produce the most evenly cooked result .
Place crackling side up on Low Rack with a large shallow dish (less than 2 cm high) underneath to collect the drips .
For crispy crackling, score rind, brush with oil and sprinkle with salt .
Prepare vegetables and cut into even sized pieces .
For roasts weighing more over .2 kg, place potatoes around the outside of the rack . Brush with melted butter or oil . Add softer vegetables such as pumpkin and sweet potato after /3 of the cooking .
There in no need to turn the meat or vegetables during the cook time . Potatoes may require additional basting halfway through cooking time .
17. CHICKEN (0.7 — 3.0 kg)
To keep chicken in shape during cooking, truss or tie the legs of the bird together .
Place the chicken breast side down on Low Rack, with a shallow dish (less than 2 cm high) underneath to collect the drips .
If desired, brush the chicken with oil or melted butter and sprinkle with herbs .
At the completion of cooking, wrap the chicken in aluminium foil and allow to stand for 0-5 minutes before carving .
The oven will beep and scroll TURN when /2 of the cooking time is complete .
10. BEEF RARE / 11. BEEF MEDIUM (0.7 — 3.0 kg)
Select roasts that are even in shape, if not, tie roasts with string to aid with even cooking .
Place the beef fat side down on Low Rack, with a shallow dish (less than 2 cm high) underneath to collect drips .
Turn the beef approximately halfway through cooking time .
At the completion of cooking, wrap in aluminium foil and allow to stand for 0-5 minutes before carving .
12. BEEF MEDIUM AND BAKED VEGETABLES (0.7 — 3.0 kg (meat only)) Select roasts that are even in shape, if not, tie
roasts with string, to aid in even cooking . Place beef fat side up on Low Rack with a
shallow dish (less than 2 cm high) underneath to collect the drips .
Cut vegetables into even sized pieces . For roasts weighing more than . kg, position
potatoes around the outside of the rack . Brush with melted butter or oil .
The oven will beep and scroll TURN OVER/ ADD VEGETABLES when /3 of the cooking time is complete .
ADD softer vegetables such as pumpkin and sweet potato, and turn the meat .
At the completion of the cooking time, wrap the beef in aluminium foil and allow to stand for 0-5 minutes before carving .
13. LAMB (0.7 — 3.0 kg) Place the lamb fat side down on Low Rack .
with a shallow dish underneath to collect drips . Turn the lamb over approximately halfway through
cooking time . At the completion of the cooking time, wrap the
meat in aluminium foil and allow to stand for 0-5 minutes before carving .
Boneless roasts may require an additional 5-0 minutes cooking time on Micro Power MEDIUM .
14. LAMB AND BAKED VEGETABLES (0.7 — 3.0 kg (meat only))
Place lamb fat side down on Low Rack with a shallow dish underneath to collect the drips .
Cut vegetables into even sized pieces . For roasts weighing more than .4 kg place
potatoes around the outside of the rack . Brush with melted butter or oil .
The oven will beep and scroll TURN OVER/ ADD VEGETABLES when /3 of the cooking time is complete .
ADD softer vegetables such as pumpkin and sweet potato, and turn the meat .
At the completion of the cooking time, wrap the lamb in aluminium foil and allow to stand for 0 minutes before carving . (continued on the following page .)
To Cook by Auto Menu Weight Cook (Auto Menu 10 — 18): continuance
-28-
O p
er at
io n
& H
in ts
To Cook by Auto Menu
19. CAKE / SLICE This setting is designed for cooking single layer slices and light cakes which are cooked at a moderate temperature . Metal cookware may be used . Position dish to be cooked on the Low Rack, placed on Ceramic Tray . Preheating is not required . Recipes can be found in Cookbook section .
20. CAKE / DESSERT This setting is designed for cooking layered slices and heavier cakes such as Banana which are cooked at a moderate temperature . It is also suitable for cooking desserts such as apple pie and self saucing puddings . Metal cookware may be used . Position the dish to be cooked on Low Rack, placed on Ceramic Tray . Preheating is not required . Recipes can be found in Cookbook section .
18. CHICKEN AND BAKED VEGETABLES (0.7 — 3.0 kg (meat only))
To keep poultry in shape during cooking , truss or tie the legs of the bird together . Brush with melted butter and sprinkle with herbs if desired .
Place the chicken breast side down on the Low Rack with a shallow dish (less than 2 cm high) underneath to collect the drips .
Prepare the vegetables into even sized pieces . For chicken weighing . kg or less, place all vegetables around the outside of the rack . Brush with melted
butter or oil . For chickens weighing more than .kg, place potatoes around the outside of the rack .
Brush with melted butter or oil . At the completion of the cooking time, wrap the chicken in aluminium foil and allow to stand for 0-5
minutes before carving . The oven will beep and scroll TURN OVER/ADD VEGETABLES when /3 of the cooking time is complete . ADD softer vegetables such as pumpkin and sweet potato, and turn the chicken .
Auto Cook (Auto menu 19, 20):
Weight Cook (Auto menu 10 — 18): continuance
Use of Accessory:
Ceramic Tray
Low Rack
Select Menu 9 or 20 .
press . Time appears in the display and begins to count down .
press .
-29-
O p
eratio n
& H
in ts
To Use Recipe Prompting
2. Select Menu until the desired recipe appears in the display window.
Recipes are arranged alphabetically.
Recipe Prompting helps you to cook by following the recipe methods in the display window. 40 recipes are pre-programmed. (Refer to the next page.)
1. Press
3. Press The first instruction will be scrolled across the display window.
Turn clockwise for the next instruction. Turn counterclockwise for the previous instruction.
Instructions include operation of microwave / convection oven. For detailed information on operation, please refer to page 14-22.
ENJOY YOUR MEAL will be scrolled across the display window at the end of each recipe.
(continued on the following page.)
-30-
O p
er at
io n
& H
in ts
To Use Recipe Prompting NOTE: Throughout Recipe Prompting, the oven will instruct you to set the cooking time and power level at each stage of the recipe. Set the instructed power level and cooking time using the Micro Power pad and Time / Weight Dial. These settings are a guide only. If you wish to change the timing the oven will accept a different power level and cooking time. For further information about cooking any of these recipes, refer to the cooking guide section.
The following recipes are pre-programmed in Recipe Prompting:
To Change the Cooking Time While operating, you can change the cooking time.
1. Press the Function Pad you set. 2. Change the cooking time to desired amount by using the Time / Weight Dial.
While the light of the Dial is turned on, changing the cooking time is possible. (The light turns off after 1 minute.) When the light disappears, press the Function Pad you set again.
You can change the oven temperature for Convection cooking.
NOTE: This feature is not available for Sensor Reheat or Auto Menu or Turbo Defrost.
Recipe Page Recipe Page
1. APRICoT HoNEY SLICE 57 21. MALAY CoCoNUT FISH 17
2. APRICoT NECTAR CHICkEN 25 22. MINI BAkED PoTAToES 45
3. BLUEBERRY MUFFINS 55 23. PARMESAN CRUSTED CHICkEN 23
4. CARAMEL SAUCE 64 24. PEACH CRUMBLE 63
5. CHEESE AND HAM FILLED PoTAToES 45 25. PEPPER PoT BEEF 39
6. CHEESE SAUCE 68 26. PoTATo CASSERoLE 46
7. CHICkEN AND MUSHRooM PASTA SAUCE 52 27. PoTATo WEDgES 45
8. CHICkEN CURRY 25 28. PUMPkIN SoUP 9
9. CHICkEN RISoTTo 50 29. RED CoCoNUT DHAL 46
10. CHILLI BEEF 36 30. RHUBARB APPLE gINgER CoMPoTE 63
11. CHINESE BEEF AND VEgETABLES 37 31. RICH CHoCoLATE SAUCE 68
12. CHoCoLATE BRoWNIES 57 32. RoAST HERB CHICkEN 26
13. CHoCoLATE FUDgE 54 33. SEASoNED RICE 50
14. CREAMY BACoN SAUCE 51 34. SEASoNED RoAST LAMB 34
15. FRAgRANT CoCoNUT RICE 49 35. SPAgHETTI MEAT SAUCE 51
16. FRENCH oNIoN BEEF CASSERoLE 40 36. SPEEDY CHoCoLATE BIT SLICE 57
17. gARLIC PRAWNS 19 37. SWEET BERRY SAUCE 64
18. gINgERED WHoLE FISH 19 38. ToMATo BACoN SoUP 8
19. HERBED VEgETABLES 43 39. ToMATo VEgETABLE CASSERoLE 44
20. HoNEY SESAME DRUMSTICkS 28 40. VEgETABLE CURRY 44
-31-
M ain
ten an
ce
Before Requesting Service
ALL THESE THINGS ARE NORMAL: The oven causes interference with my TV.
The fan continues to operate after using the oven & the display shows COOL.
Steam accumulates on the oven door and warm air comes from the oven vents.
I accidentally ran my microwave oven without any food in it.
There are humming and clicking noises from my oven when I cook by Combination.
The oven has an odour and generates smoke when using the Convection, Combination and Grill function.
Some radio and TV interference might occur when you cook with the microwave oven. This interference is similar to the interference caused by small appliances such as mixers, vacuums, hair dryer, etc. It does not indicate a problem with your oven.
This is normal — the fan can continue to operate after cooking, this is to cool the oven and the electronic components. It is safe to open the door and remove the food.
During cooking, steam and warm air are given off from the food. Most of the steam and warm air are removed from the oven by the air which circulates in the oven cavity. However, some steam will condense on cooler surfaces such as the oven door. This is normal.
Running the oven empty for a short time will not damage the oven. However, we do not recommend this to be done.
These noises occur as the oven automatically switches from microwave power to Convection/Grill, to create the Combination setting. This is normal.
It is essential that your oven is wiped out regularly particularly after cooking. Any fat and grease that builds up on the roof and walls of the oven will begin to smoke if not cleaned.
PROBLEM
The oven is not plugged in securely.
Remove plug from outlet, wait 10 seconds and re-insert.
Circuit breaker or fuse in your home is tripped or blown.
Reset circuit breaker or replace fuse in your home.
There is a problem with the outlet.
Plug another appliance into the outlet to check if the outlet is working.
The door is not closed completely.
Close the oven door securely.
Start pad was not pressed after programming.
Press Start pad.
Another program has already been entered into the oven.
Press Stop/Reset pad to cancel the previous program and program again.
The program has not been entered correctly.
Program again according to the Operating Instructions.
Stop/Reset pad has been pressed accidentally.
Program oven again.
Clock pad has been pressed three times.
Deactivate mode by pressing Clock pad three times.
Roller Ring and oven bottom are dirty.
Clean these parts according to Care of Your Oven (see page 32).
POSSIBLE CAUSE REMEDY
The words DEMO MODE* appear on the screen.
When the oven is turning on, there is noise coming from Ceramic Tray.
Oven will not start cooking.
Oven will not turn on.
* DEMO MODE is designed for retail store display. Cooking and other functions will not operate during demo mode.
If it seems there is a problem with the oven, contact an authorised Service Centre.
070823_A00037F40QP_OG.indd 31 2007/08/23 16:57:19
-32-
M ai
n te
n an
ce
Oven Door: Wipe with a soft cloth when steam accumulates inside or around the outside of the oven door . This may occur when the oven is operated under high humidity conditions and in no way indicates a malfunction of the unit or microwave leakage .
Control Panel: If the control panel becomes wet, clean with a soft, dry cloth . Do not use harsh detergents or abrasives on the control panel .
Outside oven surfaces and back vents: Clean with a damp cloth . To prevent from damage to the operating parts inside the oven, water should not be allowed to seep into ventilation openings .
Inside of the oven: Wipe with a damp cloth . Mild detergent may be used if the oven gets very dirty . The use of harsh detergent or abrasives is not recommended . Do not use oven cleaners on the top of the oven .
The roller ring and oven cavity floor: Wipe the bottom surface of the oven with mild detergent water or window cleaner and dry . The roller ring may be washed in mild soapy water or in the dishwasher . These areas should be kept clean to avoid excessive noise .
Ceramic Tray: Remove and wash in warm soapy water or in a dishwasher . If grease accumulates, clean with a non-abrasive nylon mesh scouring pad and nonabrasive cleaners .
After GRILL or COMBINATION cooking, the oven should be cleaned with a soft cloth squeezed in soapy water . If the oven is not cleaned occasionally to eliminate this grease, it can accumulate and cause the oven to SMOKE during use . To avoid smoking, run the oven without food on GRILL for 20 minutes .
AFTER CLEANING: Be sure to replace Roller Ring and Ceramic Tray in the proper position and press Stop/Reset Pad to clear the display window .
For the voltage requirement, the production month, country and serial number, please refer to the identification plate on the microwave oven .
*IEC Test procedure Specifications subject to change without notice .
BEFORE CLEANING: Unplug at socket of the oven . If impossible, leave oven door open to prevent oven from accidentally turning on .
Care of Your Microwave Oven
Do not use a steam cleaner.
Technical Specifications Power Source 240 V, 50 Hz 230 V, 50 Hz
Power Consumption Microwave Heater Power Requiment (Maximum) Output Microwave* Heater
5 .8 Amps, ,250 W 7 .5 Amps, ,800 W
7 .9 Amps, ,890 W
,000 W Apprtox . ,800 W
6 .0 Amps, ,230 W 7 .8 Amps, ,800 W
8 .2 Amps, ,890 W
,000 W Approx . ,800 W
Outside Dimension Oven Cavity Dimensions Uncrated Weight
376 (H) x 626 (W) x 50 (D) mm 242 (H) x 42 (W) x 426 (D) mm Approx . 22 kg
070823_A00037F40QP_OG.indd 32 2007/08/23 14:11:33
-33-
Panasonic Warranty . The product is warranted for 2 months from the date of purchase . Subject to the conditions of this warranty Panasonic
or it’s Authorised Service Centre will perform necessary service on the product without charge for parts or labour if, in the opinion of Panasonic, the product is found to be faulty within the warranty period .
2 . This warranty only applies to Panasonic products purchased in Australia and sold by Panasonic Australia or its Authorised Distributors or Dealers and only where the products are used and serviced within Australia or it’s territories . Warranty cover only applies to service carried out by a Panasonic Authorised Service Centre and only if valid proof of purchase is presented when warranty service is requested .
3 . This warranty only applies if the product has been installed and used in accordance with the manufacturers recommendations (as noted in the operating instructions) under normal use and reasonable care (in the opinion of Panasonic) . The warranty covers normal domestic use only and does not cover damage, malfunction or failure resulting from use of incorrect voltages, incorrect installation, accident, misuse, neglect, build-up of dirt or dust, abuse, maladjustment of customer controls, mains supply problems, thunderstorm activity, infestation by insects or vermin, tampering or repair by unauthorised persons (including unauthorised alterations), exposure to abnormally corrosive conditions or any foreign object or matter having entered the product .
4 . This warranty does not cover the following items unless the fault or defect existed at the time of purchase:
(a) Video or Audio Tapes (b) Video or Audio Heads and Stylii resulting
from wear and tear in normal use (c) Shaver Heads or Cutters
(d) Cabinet Parts (e) User replaceable Batteries (f) Thermal Paper, Toner/Ink Cartridges,
Drums, Developer, Film (Ink/Ribbon), Film Cartridge, Printer Heads
(g) Microwave Oven cook plates . (h) Kneader mounting shaft unit
(bread bakery)
5 . If warranty service is required you should:
Telephone Panasonics Customer Care Centre on 32600 or visit our website and use the Service Centre Locator for the name/address of the nearest Authorised Service Centre .
Send or bring the product to a Panasonic Authorised Service Centre together with your proof of purchase receipt as a proof of purchase date . Please note that freight and insurance to and / or from your nearest Authorised Service Centre must be arranged by you .
Note that home or pick-up/delivery service is available for the following products in the major metropolitan areas of Australia or the normal operating areas of the nearest Authorised Service Centres:
(a) Picture tube (CRT) based Television Receivers (screen sizes greater than 66cm); Rear Projection TVs; Plasma/LCD televisions / displays (screen size greater than 03 cm)
(b) Convection/Combination Microwave Ovens (c) Whiteboard (except portable type)
6 . The warranties hereby conferred do not extend to, and exclude, any costs associated with the installation, de-installation or re-installation of a product, including costs related to the mounting, de-mounting or remounting of any screen, (and any other ancillary activities), delivery, handling, freighting, transportation or insurance of the product or any part thereof or replacement of and do not extend to, and exclude, any damage or loss occurring by reason of, during, associated with, or related to such installation, de-installation, re-installation or transit .
Panasonic Authorised Service Centres are located in major metropolitan areas and most regional centres of Australia, however, coverage will vary dependant on product . For advice on exact Authorised Service Centre locations for your product, please telephone our Customer Care Centre on 32600 or visit our website and use the Service Centre Locator .
Unless otherwise specified to the consumer the benefits conferred by this express warranty are additional to all other conditions, warranties, guarantees, rights and remedies expressed or implied by the Trade Practices Act 1974 and similar consumer protection provisions contained in legislation of the States and Territories and all other obligations and liabilities on the part of the manufacturer or supplier and nothing contained herein shall restrict or modify such rights, remedies, obligations or liabilities . November 2005
THIS WARRANTY CARD AND THE PURCHASE DOCKET (OR SIMILAR PROOF OF PURCHASE) SHOULD BE RETAINED BY THE CUSTOMER AT ALL TIMES
If you require assistance regarding warranty conditions or any other enquiries, please visit the Panasonic Australia website
www.panasonic.com.au or by phone on 132 600 If phoning in, please ensure you have your operating instructions available.
Panasonic Australia Pty. Limited ACN 00 592 87 ABN 83 00 592 87
Locked Bag 505, Frenchs Forest, NSW 20
Manualsnet FAQs
If you want to find out how the NN-CD987W Panasonic works, you can view and download the Panasonic NN-CD987W Oven Operating Instructions on the Manualsnet website.
Yes, we have the Operating Instructions for Panasonic NN-CD987W as well as other Panasonic manuals. All you need to do is to use our search bar and find the user manual that you are looking for.
The Operating Instructions should include all the details that are needed to use a Panasonic NN-CD987W. Full manuals and user guide PDFs can be downloaded from Manualsnet.com.
The best way to navigate the Panasonic NN-CD987W Oven Operating Instructions is by checking the Table of Contents at the top of the page where available. This allows you to navigate a manual by jumping to the section you are looking for.
This Panasonic NN-CD987W Oven Operating Instructions consists of sections like Table of Contents, to name a few. For easier navigation, use the Table of Contents in the upper left corner.
You can download Panasonic NN-CD987W Oven Operating Instructions free of charge simply by clicking the “download” button in the upper right corner of any manuals page. This feature allows you to download any manual in a couple of seconds and is generally in PDF format. You can also save a manual for later by adding it to your saved documents in the user profile.
To be able to print Panasonic NN-CD987W Oven Operating Instructions, simply download the document to your computer. Once downloaded, open the PDF file and print the Panasonic NN-CD987W Oven Operating Instructions as you would any other document. This can usually be achieved by clicking on “File” and then “Print” from the menu bar.
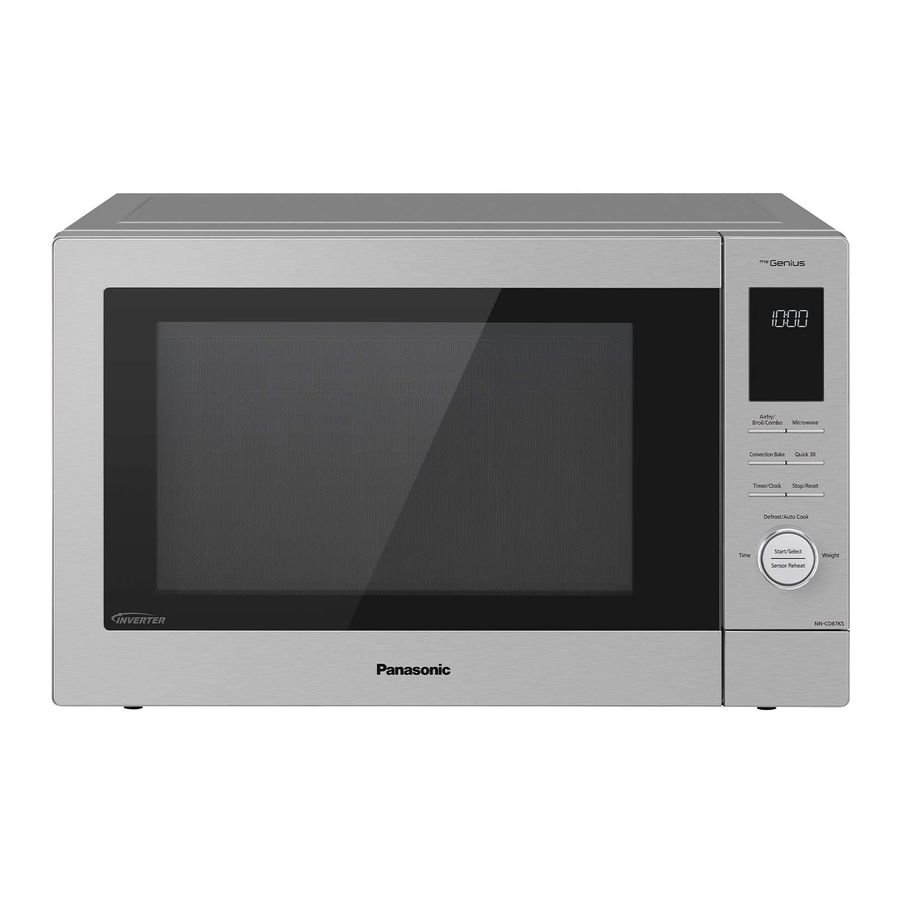
-
Contents
-
Table of Contents
-
Bookmarks
Quick Links
Bedienungsanleitung
Convection/Grill/Microwave Oven
Model No. NN-CD87KS
NN-CD87KS
FOR HOUSEHOLD USE ONLY
Related Manuals for Panasonic NN-CD87KS
Summary of Contents for Panasonic NN-CD87KS
-
Page 1
Bedienungsanleitung Convection/Grill/Microwave Oven Model No. NN-CD87KS NN-CD87KS FOR HOUSEHOLD USE ONLY… -
Page 2
WICHTIGE SICHERHEITSANWEISUNGEN. Bitte sorgfältig durchlesen und zur weiteren Bezugnahme aufbewahren. -
Page 3: Table Of Contents
Thank you for purchasing this Panasonic appliance. Contents Operating Instructions ….2-51 Grilling ……….23 Safety Instructions ……2-6 Convection……..24-25 Disposal of Old Equipment ….7 Combination Cooking ….26-27 Installation and Connection ….8 Multistage Cooking ……28 Placement of Your Oven ….8 Using the Timer ……29-30…
-
Page 4: Operating Instructions
Safety Instructions Important safety instructions. Before operating this oven, � please read these instructions carefully and keep for future reference. This appliance can be used by children aged from � 8 years and above and persons with reduced physical, sensory and mental capabilities or lack of experience and knowledge if they have been given supervision or instruction by a person responsible for their safety concerning the use of the appliance in a safe way…
-
Page 5
It is not intended for use inside a cupboard. This oven may be built into a wall cabinet by using the proper trim kit, (NN-TK81KCSCP) which may be purchased from a local Panasonic dealer. For Countertop use: Oven must be placed on a flat, stable surface 85 cm �… -
Page 6
Safety Instructions If smoke is emitted or a fire occurs in the oven, press � Stop/Cancel button and leave the door closed in order to stifle any flames. Disconnect the power cord, or shut off power at fuse or circuit breaker panel. This appliance is intended to be used in household �… -
Page 7
Safety Instructions Failure to maintain the oven in a clean condition could � lead to deterioration of surfaces that could affect the life of the appliance and possibly result in a hazardous situation. Warning! The appliance and its accessible parts become �… -
Page 8
Safety Instructions In case of electronic failure, the oven can only be turned � off at the wall socket. This combination oven is intended for heating food and � beverages only. Take care when heating foods low in moisture, e.g. bread items, chocolate, biscuits and pastries. -
Page 9: Disposal Of Old Equipment
Disposal of Old Equipment By disposing of them correctly, you will Only for European Union help to save valuable resources and and countries with prevent any potential negative effects recycling systems on human health and the environment. For more information about collection This symbol on the products, and recycling, please contact your local packaging, and/or accompanying…
-
Page 10: Installation And Connection
Installation and Connection Examine your Oven Important! Unpack the oven, remove all packing This unit has to be properly material, and examine the oven for any earthed for personal safety. damage such as dents, broken door latches or cracks in the door. If you find any damage, notify your dealer Operation Voltage immediately.
-
Page 11: Important User Instructions
Important User Instructions 1. Do not use the oven for any reason sponges, damp cloth, wheat bags, other than the preparation of food. hot water bottles and similar may This oven is specifically designed lead to risk of injury, ignition or fire. to heat or cook food.
-
Page 12
Important User Instructions 4. The accessible parts may become Small Quantities of Foods hot in convection, combination Small quantities of food or foods with and grill use. Young children less low moisture content can burn, dry out than 8 years of age should be kept or catch on fire if cooked too long. -
Page 13
Important User Instructions Liquids Utensils/Foil When heating liquids, e.g. soup, Do not heat any closed cans or bottles sauces and beverages in your oven, because they might explode. overheating the liquid beyond boiling point can occur without evidence of Metal containers or dishes with bubbling. -
Page 14: Parts Of Your Oven
Parts of Your Oven Door release 9 Plug 10 Identification label Press to open the door. When 11 Glass tray you open the oven door during 12 Roller ring cooking, the cooking is stopped temporarily without clearing earlier 13 Heating elements 14 Caution label (hot surfaces) made settings.
-
Page 15: Oven Accessories
Oven Accessories Accessories Roller Ring The oven comes equipped with a 1. The roller ring and the oven floor variety of accessories. Always follow should be cleaned frequently to the instructions given for use of the prevent noise and build-up of accessories.
-
Page 16: Control Panel
Control Panel Display window NN-CD87KS Convection button (pages 24-25) Micro Power button (page 19) Grill button (page 23) Combination button (pages 26-27) Timer/Clock button (pages 17-18, 29-30) Stop/Cancel button Before cooking: One press clears your instructions. During cooking: One press temporarily stops the cooking program.
-
Page 17: Display Window
Display Window Temperature Display Preheating Child Lock Setting Auto Beverage Number/Character program Defrost mode Time Display (Minute/Second) Prompt to enter Weight Weight Display (g) Multistage Display Junior Menu Program Convection mode Auto Weight Program Grill mode More/Less Display Enamel Tray Wire Rack Microwave mode Auto Sensor Program…
-
Page 18
Cooking Modes Accessories Cooking modes Uses Containers to use GRILL Use heatproof • Grilling of meat or fish. dishes, plates or • Toast grilling. ® Wire rack bowls eg. Pyrex • Colouring of gratin dishes on enamel directly on the or meringue pies. -
Page 19: Word Prompting
Word Prompting Word prompting «DEUTSCH» In German «NEDERLANDS» In Dutch Press Start These models have a unique function “Word Prompting” which guides you through the operation of your microwave. After plugging in the oven press Start until you locate your language. As you press the buttons and turn the dial, the display will scroll the next instruction eliminating the opportunities for mistakes.
-
Page 20: Setting The Clock
Setting the Clock When the oven is first plugged in “HERZLICH WILLKOMMEN VOR GEBRAUCH DIESES GERAETES BITTE BEDIENUNGSANLEITUNG LESEN” appears in display window. Press Timer/Clock twice Turn dial Press Timer/Clock “ZEIT EINGEBEN” will Enter the time by turning The colon stops appear in the display the dial.
-
Page 21: Microwave Cooking And Defrosting
Microwave Cooking and Defrosting The glass tray must always be in position when using the oven. There are 7 different microwave power levels available (see the chart below). Use of accessory: Glass tray Set time Press Start Select Microwave power level Select cooking time by The cooking Press this button until the power…
-
Page 22: Defrosting Guidelines
Defrosting Guidelines quickly. Place them near the centre Tips for Defrosting of the glass tray or protect them with Check the defrosting several times, small pieces of foil. even if you use the auto programs. Observe the standing times. Bread Loaves will require a standing time Standing Times of 5-30 minutes to allow the centre to…
-
Page 23: Defrosting Charts
Defrosting Charts Choose defrost power 270 W then calcuate the cooking time as per the chart below. For large quantities, adjust the cooking time. The times indicated are for guidance only. Always check the food during defrosting by opening the door then restarting the defrosting.
-
Page 24
Defrosting Charts Choose defrost power 270 W then calcuate the cooking time as per the chart below. For large quantities, adjust the cooking time. The times indicated are for guidance only. Always check the food during defrosting by opening the door then restarting the defrosting. -
Page 25: Grilling
Grilling The grill system on the oven gives fast efficient cooking for a wide variety of foods e.g. chops, sausages, steaks, toast, etc. There are 3 different grill settings available. The glass tray must always be in position when using the oven.
-
Page 26: Convection
Convection This feature offers a choice of convection temperatures 40 °C, 100 — 220 °C in 10 °C increments. For quick selection of the most commonly used cooking temperatures, the temperatures start at 150 °C and count up to 220 °C then 40 °C, 100 °C, 110 °C etc.
-
Page 27: Convection
Convection Note 1. When the selected cooking time is less than one hour, the time counts down second by second. 2. When the selected cooking time is over one hour, the time counts down minute by minute until only “1H 00” (1 hour) remains. The display then indicates minutes and seconds and counts down second by second.
-
Page 28: Combination Cooking
Combination Cooking Combination cooking is ideal for many foods. The microwave power cooks them quickly, whilst the oven or grill gives traditional browning and crispness. All this happens simultaneously resulting in most foods being cooked in 1/2 — 2/3 of the conventional cooking time. There are 5 fixed combination settings (see table below).
-
Page 29: Combination Cooking
Combination Cooking Notes on Preheating 1. When using Grill + Microwave mode, preheat is not available. 2. When using Convection + Microwave, the oven can be preheated. Press Start after selecting Combi level 2, 3, 4 or 5. No microwaves are emitted during combination preheating.
-
Page 30: Multistage Cooking
Multistage Cooking 2 or 3 Stage Cooking Example To cook on 600 W for 2 minutes, cook on 180 °C for 15 minutes and cook on Grill 1 for 10 minutes. Press Convection Press Micro Set the Set the button 4 times to cooking time Power 4 times to cooking time…
-
Page 31: Using The Timer
Using the Timer The timer can be used either before or after a cooking program. This feature can be used to set a standing time after cooking or to delay the start of your cooking. 1. To Set a Standing Time: Set the desired cooking program, by selecting power…
-
Page 32: Using The Timer
Using the Timer 3. To Set a Delay Start: Set the desired cooking program, by selecting power level and time required (up to 2 stages). Press Set desired Delay Press Start Timer/Clock time using the dial Delayed time (max 9 hours). An will count “H”…
-
Page 33: Using The Add Time Function
Using the Add Time Function This feature allows you to add cooking time at the end of previous cooking. After cooking, turn dial to select Press Start Add Time function. Maximum cooking Time will be added. time: Micro Power: 1000 W (High) up to The time in the display 30 minutes;…
-
Page 34: One Push Reheating
One Push Reheating This unique feature ‘the Genius’ built in sensor allows you to reheat a chilled meal with one push of the dial. It is not necessary to select the power level or cooking time. The built-in sensor measures the humidity of the food and calculates the microwave power level together with a cooking time.
-
Page 35
One Push Reheating Note This feature is not suitable for foods that cannot be stirred eg. lasagne / macaroni cheese. The oven automatically calculates the reheating time or the remaining reheating time. The door should not be opened before the time appears in the display window. -
Page 36: Turbo Defrost
Turbo Defrost This feature allows you to defrost minced meat, chops, chicken portions, meat joints and bread. Foods should be placed in a suitable dish, whole chickens and joints of meat should be on an upturned saucer or on a microwave safe plate. Chops, chicken portions and slices of bread should be placed in a single layer.
-
Page 37
Turbo Defrost With this feature you can defrost frozen food according to the weight. Press the dial to confirm the program selection. Auto program number appears in the display. The microwave, auto and defrost symbols light. Select the weight of Press Start To allow auto program the food by turning… -
Page 38: Auto Weight Programs
Auto Weight Programs This feature allows you to cook or reheat foods by setting the weight only. The oven determines the Microwave power level and/or Convection or grill and/or Combination setting, then the cooking time automatically. Select the category of food and then just enter the weight.
-
Page 39: Auto Weight Programs
Auto Weight Programs It is not necessary to preheat the oven for the remaining auto programs. Operate as below: Auto Programs without Preheating Press the dial to confirm the program. Auto program number appears in the display. The microwave and /or grill or convection and auto weight symbols appear in the display…
-
Page 40: Auto Beverage Programs
Auto Beverage Programs Program Weight Accessories Instructions For reheating one beverage with a fixed 4. Tea/ weight of 200 g or two beverages of Coffee 200 g each from room temperature eg. tea, coffee or hot chocolate. Turn dial 200 g or to select program 4, Tea/coffee.
-
Page 41: Re-Bake Bread Programs
Re-Bake Bread Programs Program Weight Accessories Instructions To re-bake baguettes and crusty 7. Baguette/ rolls. This program is suitable for Crusty reheating, browning and crisping pre- Rolls purchased baguettes and rolls from room temperature. Ensure height of baguette/rolls is no more than 5 cm. Turn the dial to select program 7, Baguette/Crusty Rolls.
-
Page 42: Auto Sensor Programs
Auto Sensor Programs This feature allows you to cook or reheat foods without entering the weight. The built-in sensor measures the humidity of the food and calculates the recommended microwave power level together with a suggested cooking time. How it works for the oven to calculate how much Once the food has been selected and longer the food needs to cook.
-
Page 43
Auto Sensor Programs Note 1. The oven automatically calculates the cooking time or the remaining cooking time. 2. The door should not be opened before the time appears in the display window. 3. The temperature for frozen food is assumed to be -18 °C to -20 °C, for other types of food +5 °C to +8 °C (refrigerator temperature). -
Page 44: Auto Sensor Programs
Auto Sensor Programs Program Weight Instructions 9. Fresh To cook fresh vegetables. Place prepared vegetables Vegetables into a suitable sized container. Sprinkle with 1 tbsp water per 100 g vegetables. Cover with cling film. 200 g — Pierce cling film with a sharp knife once in the centre 1000 g and four times around the edge.
-
Page 45: Junior Menu Programs
Junior Menu Programs The Junior Menu offers a range of programs catering for babies, toddlers and older children — great for time saving and convenience. The fruit and vegetable purées are ideal first foods for weaning babies. Homemade purées taste like real food and cost less than jars or packets.
-
Page 46
Junior Menu Programs Program Weight Accessories Instructions 17. Junior For cooking fresh pasta bake using fresh Pasta Bake pasta (penne, spaghetti, fusilli), cheese or tomato based sauce and grated mild cheddar cheese. Use a suitable square, shallow Pyrex container. Use the ®… -
Page 47: Junior Menu Programs
Junior Menu Programs ingredients Banana Mug cake 1. Mix together flour, baking powder and sugar. For 1 serving 3 tbsp flour 2. Add melted butter, milk, beaten egg and honey. ½ tsp baking powder 3 tbsp light brown sugar 3. Add mashed banana. Mix thoroughly. 1 tbsp melted butter 1 tbsp milk 4.
-
Page 48: Auto Combi Programs
Auto Combi Programs For operation refer to pages 36-37. Program Weight Accessories Instructions For reheating and browning of pre- 22. Frozen purchased frozen pizza. Turn the dial to Pizza select program 22, Frozen Pizza. Press the dial to confirm the program. Remove 200-450 g all packaging and place the pizza directly on the wire rack on the enamel tray.
-
Page 49
Auto Combi Programs Program Weight Accessories Instructions For reheating and browning frozen 25. Frozen purchased savoury dishes eg. Lasagne Lasagne or Gratin. Remove any lid or covering. If in a foil container transfer to a similar sized heatproof dish and place on glass tray. If using heatproof plastic based dish 400-800 g that food is purchased in, take… -
Page 50: Questions And Answers
Questions and Answers Q: Why won’t my oven turn on? microwaves in the air. The oven vents should never be blocked A: When the oven does not turn on, during cooking. check the following: 1. Is the oven plugged in securely? Q: Can I easily cook my favourite Remove the plug from the outlet, recipes using convection/grill?
-
Page 51: Care Of Your Oven
Questions and Answers Q: The oven stops cooking by Q: The fan continues to rotate after microwave and ‘H97’ or ‘H98’ cooking. Why? appears in the display. Why? A: After using the oven, the fan motor A: This display indicates a problem may rotate to cool the electrical with the microwave generation components.
-
Page 52: Building-In Your Oven
10. A steam cleaner is not to be used for cleaning. Building-in Your Oven In case of fitting into an oven A microwave which is built in must housing, please use Panasonic’s be more than 850 mm above floor Trim Kit NN-TK81KCSCP- level. Read Trim- Kit instructions Stainless.
-
Page 53: Technical Specifications
Class B means that this product may be used in normal household areas. Manufactured by: Panasonic Appliances Microwave Oven (Shanghai) Co., Ltd. 888, 898 Longdong Road. Pudong, Shanghai, 201203, China. Imported by: Panasonic Marketing Europe GmbH REP.
-
Page 54
Panasonic Corporation http://www.panasonic.com F0003CD10GT PA0319-0 Printed in P.R.C. © Panasonic Corporation 2019…