Требуется руководство для вашей Rational CombiMaster Plus духовой шкаф? Ниже вы можете просмотреть и загрузить бесплатно руководство в формате PDF. Кроме того, приведены часто задаваемые вопросы, рейтинг изделия и отзывы пользователей, что позволит оптимально использовать ваше изделие. Если это не то руководство, которое вы искали, – свяжитесь с нами.
Ваше устройство неисправно, и в руководстве отсутствует решение? Перейдите в Repair Café для получения бесплатных ремонтных услуг.
Руководство

Рейтинг
Сообщите нам, что вы думаете о Rational CombiMaster Plus духовой шкаф, оставив оценку продукта. Хотите поделиться вашими впечатлениями от данного изделия или задать вопрос? Вы можете оставить комментарий в нижней части страницы.
Довольны ли вы данным изделием Rational?
Да Нет
Будьте первым, кто оценит это изделие
0 голоса
Часто задаваемые вопросы
Наша служба поддержки выполняет поиск полезной информации по изделиям и отвечает на часто задаваемые вопросы. Если вы заметили неточность в наших часто задаваемых вопросах, сообщите нам об этом с помощью нашей контактной формы.
Духовка недостаточно нагревается. Что мне делать? Проверенный
За нагревание духовки до заданной температуры отвечает термостат. Скорее всего, термостат неисправен. Его следует заменить. В случае сомнений обратитесь к производителю.
Это было полезно (2487)
Что такое пиролиз? Проверенный
Некоторые духовки оснащены функцией пиролиза. Это система очистки, которая сжигает грязь и жир в духовке за счет очень высоких температур. После пиролиза вся грязь превратится в золу, и ее легко удалить. Если духовка имеет функцию пиролиза, рекомендуется использовать ее 3-4 раза в год, чтобы духовка оставалась чистой.
Это было полезно (2325)
Когда я использую духовку, продукты часто падают на дно, вызывая дым. Как я могу предотвратить это? Проверенный
Многие духовки поставляются с решеткой и противнем. Когда пища готовится на решетке, противень можно ставить на дно, чтобы остатки пищи не пригорали и не задымились.
Это было полезно (561)
Могу ли я приготовить несколько блюд одновременно, используя несколько противней для гриля? Проверенный
Технически это возможно. Однако это зависит от типа продуктов, нужно ли вам регулировать время приготовления или менять противни на полпути во время приготовления.
Это было полезно (561)
Почему в духовке при разогреве накапливается дым? Проверенный
Вероятно, в духовке остались остатки пищи от предыдущего использования. При нагревании особенно жирные остатки пищи могут выделять дым. Тщательно очистите духовку.
Это было полезно (559)
- Manuals
- Brands
- Rational Manuals
- Oven
- CombiMaster Plus
Manuals and User Guides for Rational CombiMaster Plus. We have 4 Rational CombiMaster Plus manuals available for free PDF download: Original Operating Instructions, Original Installation Instructions, Original Installation Manual
Личный кабинет
Авторизация
Регистрация
RUB, руб.
- EUR, €
- RUB, руб.
Сервис-партнёр RATIONAL
Запчасти Rational, аксессуары. Гарантийный ремонт. Проддажа пароконвектоматов по специальным программам.
Рады общению с 10 до 19 часов в рабочие дни
+79049845111
0
Корзина
Пустая
Главная страница » Инструкции pdf
Инструкции pdf

Руководство по эксплуатации пароконвектомата RATIONAL iCombi Pro с 2020 года.

Руководство по эксплуатации пароконвектомата RATIONAL iCombi Classic с 2020 года.

Руководство по эксплуатации пароконвектомата RATIONAL SelfCooking Center whitefficiency/ 5Senses 2011-2017

Руководство по эксплуатации пароконвектомата RATIONAL Combi Master Plus 2011-2017

Руководство по эксплуатации пароконвектомата RATIONAL SelfCooking Center 2004-2011

Руководство по эксплуатации пароконвектомата RATIONAL Combi Master 2004-2011

Книга рецептов для ручной эксплуатации
Воспользуйтесь уникальным опытом лучших шеф паворов.

Руководство по применению. Ночное приготовление, смешанная загрузка, вакуумная упаковка.
Коллектив отдыхает а оборудование работает

Руководство по применению. Finishing
Уникальные алгоритмы оптимизации процессов подготовки и подачи блюд.
Подготовка к банкету без стресса.

Моющие средства RATIONAL
Использование оригинальных моющих средств защитит ваше оборудование от вредных воздействий и обеспечит бесперебойную работу в течении всего срока эксплуатации.
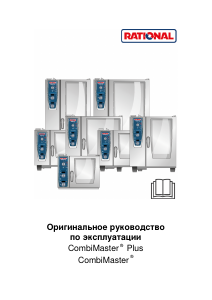
CombiMaster
®
Plus
Original Operating Instructions
RATIONAL ServicePlus
2 / 112
The all-inclusive package for an all-round service.
We want to maximize your return on investment from the very start.
Over the entire service life and without any hidden costs.
FREE OF CHARGE! — On-site training
We demonstrate to your kitchen team in your own kitchen how our appliances work and
how they can be best deployed to suit your specific requirements.
FREE OF CHARGE! — RATIONAL ConnectedCooking
Connecting your RATIONAL units is easy thanks to the world’s most
state-of-the-art cloud-based networking solution for professional
kitchens. ConnectedCooking helps you keep everything under
control: manage your units efficiently, access them remotely
via smartphone (iOS and Android devices), document HACCP
information automatically, and load recipes from the RATIONAL
library onto your units quickly and easily.
Simply log in at ConnectedCooking.com
FREE OF CHARGE! — Chef✆Line
®
We offer a telephone consulting service to answer any questions you have about
applications or recipes. Fast, uncomplicated, and from one chef to another, 365 days a
year. You can contact the ChefLine
®
at
USA 866-306-2433 / Canada +1-844-405-6211
RATIONAL ServicePlus
3 / 112
RATIONAL Service Partner
Our appliances are reliable and have a long service life. However if
you should encounter technical difficulties, the RATIONAL Service
Partner can provide swift and efficient help. Guaranteed spare parts
supply and a weekend call-out team included:
USA 866-891-3528 / Canada +1 855-701-5777
2-year Warranty
We offer a 24-month warranty valid from the date of initial installation, provided
that your appliance is fully and correctly registered with us. You can do this
comfortably online at www.rational-online.com/warranty or by sending us
the postcard attached to this manual. The warranty excludes glass damage,
light bulbs, and seals as well as damage caused by improper installation, use,
maintenance, repair, or descaling.
Simply log in at www.rational-online.com/warranty
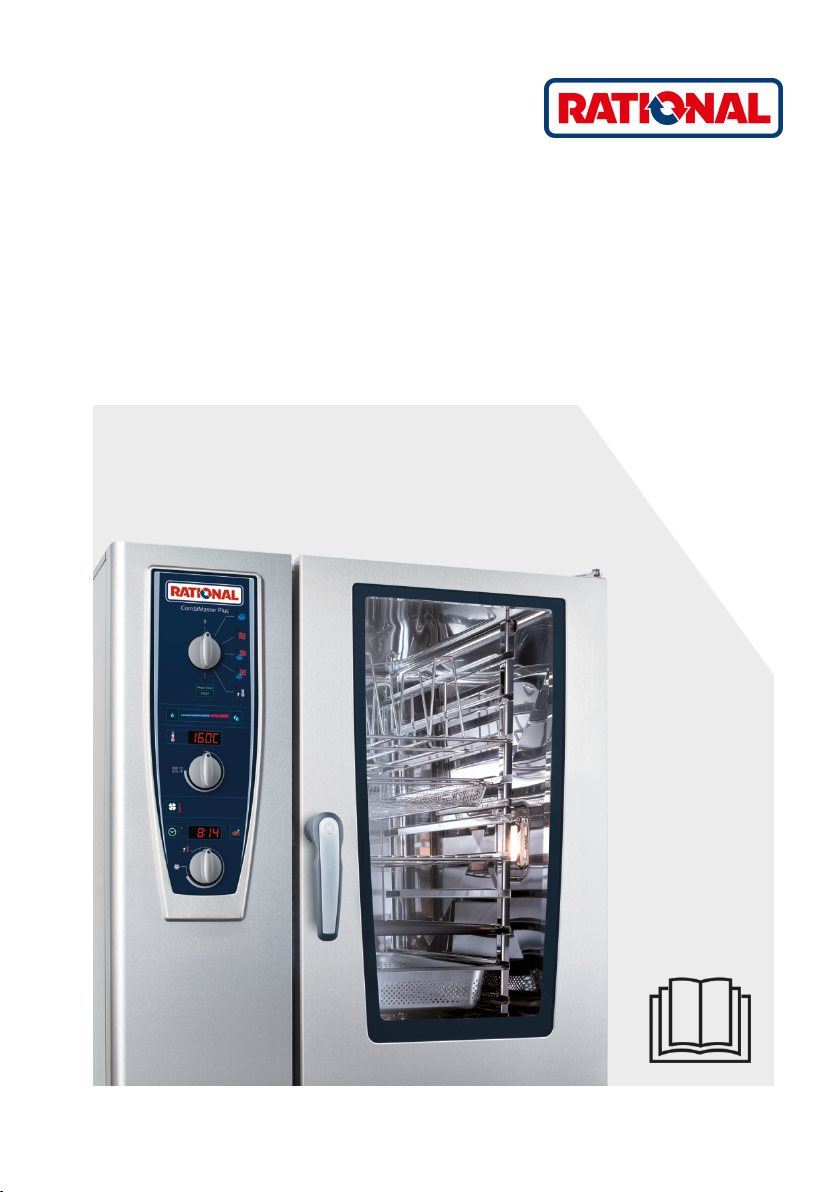
CombiMaster – the power pack
Dear user,
Congratulations on your decision to purchase a CombiMaster
®
Plus!
The CombiMaster
®
Plus stands for mature technology and excellent workmanship, and
offers entincing functions that ensure outstanding cooking results every time: crispy crusts,
succulent roasts, intensive flavors and colors. The rotary button operation is easy, clear,
and robust. Your CombiMaster
®
Plus will give you many years of reliable service in your
kitchen.
We give a 24 month warranty calculated from the date of initial installation, providing you
have filled in the warranty registration for your appliance completely and correctly. You can
do this conveniently online at www.rational-online.com/warranty or using the enclosed
postcard. The warranty excludes glass damage, light bulbs and seals as well as damage
caused by improper installation, use, maintenance, repair, or descaling.
Happy cooking!
Your,
RATIONAL AG
We reserve the right to make technical changes in the interest of progress!
Dealer: Installer:
installed on:
Unit number:
Contents
Explanation of the Pictograms 7
Initial start-up 8
Safety Instructions 10
Liability 13
Care, inspection, maintenance and repair 15
Function parts 18
Notes on using your appliance 19
Working with the Core Temperature Probe 22
Notes on using the USB interface 24
Working with the Hand Shower 25
Operating controls 26
General Notes 28
ClimaPlus ® 30
Overview of modes 32
Steam Mode 34
Dry Heat Mode 38
Combination Mode 42
Finishing ® Cooking Mode 46
Cool Down 50
Program Mode 51
Create program 51
Check program 54
Check program 56
Delete program 57
Download Program 58
Upload Program 60
HACCP 62
Contents
Software Update 64
Settings Celsius/Fahrenheit 65
Settings Time/Date 67
Cleaning CombiMaster ® Plus 69
Start clean 69
Cleaning programmes 75
CleanJet ® abort 77
Cleaning CombiMaster ® 82
Steam generator descaling display 86
LAN cable connection 87
Network settings 89
Building services — steam generator descaling 91
Building services — steam generator drainage 97
Building services 98
Cleaning the cooking cabinet seal 98
Cleaning glass surfaces 98
Cleaning the LED covers (only XS units 6 2/3 GN) 98
Rinsing the drip pan and drain channel (tabletop units only) 98
Servicing the air filter 98
Replacing the door seal 98
Replacing lights 98
Replacing halogen bulbs 98
Service notifications 104
Before You Call Service: 107
EU Declaration of Conformity for Electrical Appliances 109
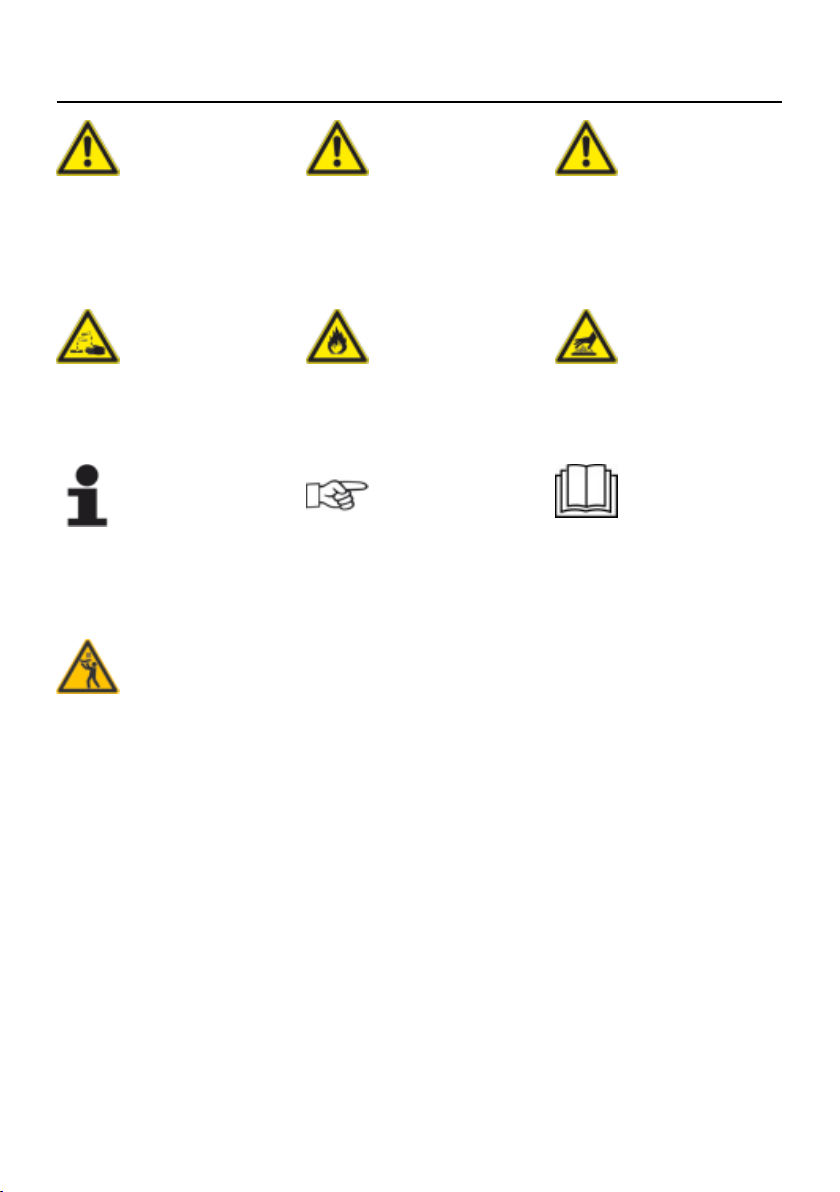
Explanation of the Pictograms
7 / 112
Danger!
Imminently hazardous
situation, which, if not
avoided, will result in severe
injuries or death.
Warning!
Potentially hazardous
situation, which, if not
avoided, may result in
serious injury or death.
Caution!
Potentially hazardous
situation, which, if not
avoided, may result in slight
or minor injuries.
Corrosive
substances
Risk of fire! Risk of burning!
Note:
Damage may be caused if
this is ignored.
Handy tips for everyday
use.
Read the manual carefully
prior to initial start-up.
The maximum rack height is
160 cm.

Initial start-up
8 / 112
Please read the manual carefully prior to initial start-up.
During initial start-up of your new appliance, you will be requested to start an automatic one-
off self-test. This self-test takes about 45 minutes and is used to adapt the appliance to the
specific environmental conditions. Please note the following:
— For the self-test to be carried out, all the packaging materials must be have been removed
from the appliance; check the grid shelves and the air baffle for a correct fit.
— The appliance must be connected in accordance with the installation instructions.
— For appliance sizes 6 x 2/3, 6 x 1/1, 10 x 1/1, 6 x 2/1 and 10 x 2/1 GN place a flat GN
container with the opening facing downwards into the centre of the grid shelves.
— For the appliance size 20 x 1/1 and 20 x 2/1 GN place two GN containers in the mobile
oven rack. Place one flat GN container with the opening facing downwards in the centre
in front of both the upper and lower fan wheel.
— For further details please follow the instructions shown on the display and the installation
manual.
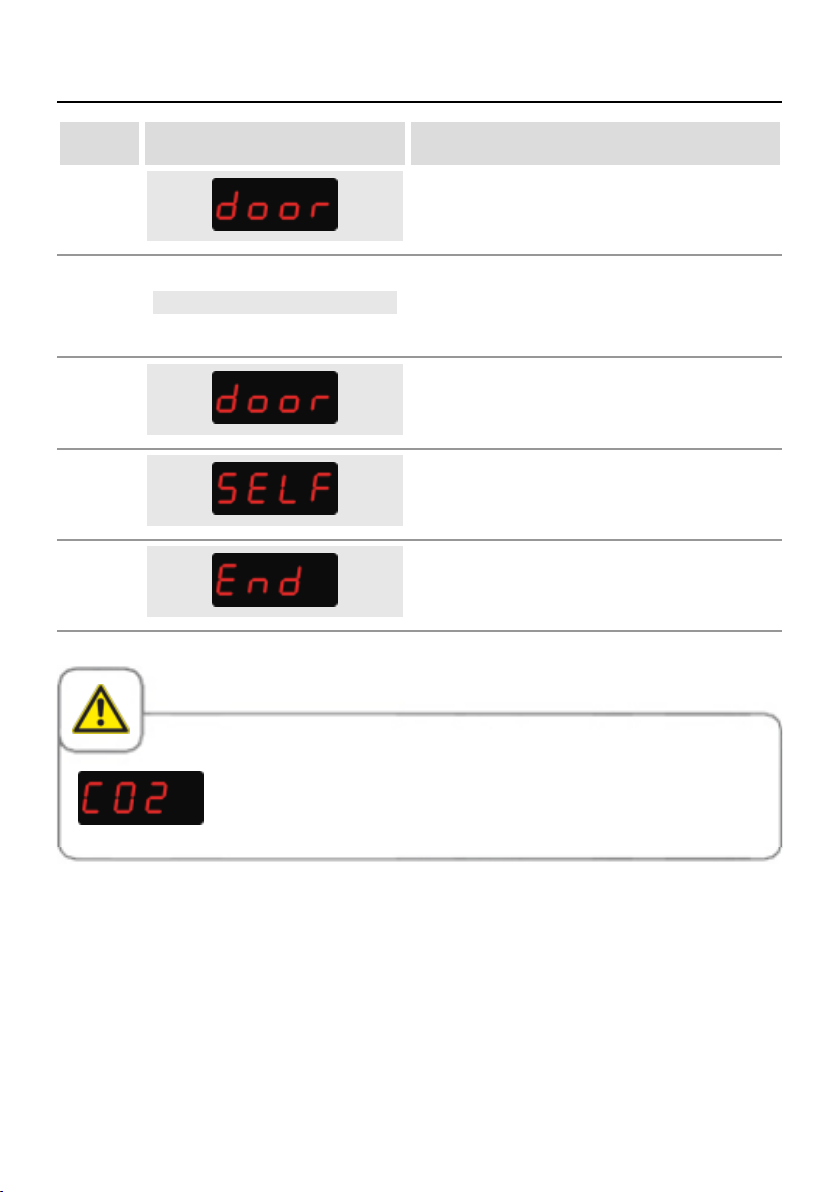
Risk of fire!
Remove the packaging material, starter kit as well as grids and containers.
The cooking chamber door must not be opened during the self-test. Opening the cooking
chamber door will lead to failure of the self-test. Restart the self-test by switching the appliance
off. Always allow a hot appliance to cool down first. If the test is interrupted you will be
requested next day by the appliance to start the self-test again.
Step Info/Button Instructions
Initial start-up
9 / 112
Step Info/Button Instructions
1
Open the cooking chamber door and remove
the packaging material, starter kit, grids and
containers.
2
Insert an empty GN sheet with the opening
facing downwards into the rack in front of
every fan wheel. Please read the installation
instructions for more details.
3
Close the cooking chamber door to start the
self-test.
4
The following test will take place automatically.
The display indicates «self» — «test».
5
The self test is completed after approx. 45
minutes.
Where gas appliances are used, exhaust gas measurement must always
be carried out when the self-test has been completed.

Safety Instructions
10 / 112
Keep this manual in a safe place so that it can always be consulted by anyone using the
appliance.
This appliance may not be used by children or people with limited physical, sensor or mental
capacity or those without the necessary experience and/or knowledge, unless such people
are supervised by a person who is responsible for their safety. Unless such persons are
supervised by a person responsible for safety, and have been instructed as to the potential
dangers in operating the unit. Surfaces and accessories may be hot — please note when
supervising. Cleaning and maintenance work may not be performed by children, even if
supervised.
Operate using hands only. Damage caused by the use of pointed, sharp or other objects will
invalidate the warranty.
We recommend regular training of your staff to avoid the risk of accident or damage to the
appliance. Operators must also receive regular safety instruction.
In the event that the connection cable becomes damaged, it must be replaced by the
manufacturer, a service agent or qualified specialists to prevent any hazards or damages
to the appliance.
If the appliance is installed in a position where the highest rack is higher than 160 cm, the
supplied sticker must be affixed to the appliance.
Warning!
Daily checks before switching on and use
— Lock the air baffle at the top and bottom as per the instructions — risk of injury from the
rotating fan wheel.
— Make sure that the hanging racks or mobile oven rack are correctly locked in place in the
cooking chamber — containers with hot liquids can fall through or slip out of the cooking
chamber — risk of combustion.
— Make sure that there are no cleaning tab residues in the cooking chamber before you start
cooking with the appliance. Thoroughly rinse away any cleaning tab residues with the hand
shower — risk of chemical burns.
Safety Instructions
11 / 112
Warning!
Specific national and regional standards and regulations which concern the installation and
operation of commercial cooking appliances must be complied with.
Incorrect installation, servicing, maintenance, cleaning or modifications to the appliance
may result in damage, injury or death. Read these operating instructions carefully before
you start to use the appliance.
This appliance must only be used to cook food in commercial kitchens. Any other use is not
intended and is therefore considered dangerous.
It must not be used to cook food containing flammable materials (such as food with
alcohol). Substances with a low flash point can ignite spontaneously — risk of fire.
Cleaning and descaling products and the associated accessories must only be used for
the purposes described in this manual. Any other use is not intended and is therefore
considered dangerous.
In case of damage to the glass plate, please replace the entire plate immediately.
IEC 60417-6332 certification allows the setting up of the electric version of the combi-
steamer in humid and warm environments.
Warning!
Smoking food in the appliance
Smoking food in the appliance may only be done using the original RATIONAL smoking
accessory, VarioSmoker.
Warning!
No objects on the appliance ceiling.
Do not place any objects on the appliance ceiling. Risk of injury if they fall down.
Safety Instructions
12 / 112
Warning!
Gas appliances only
— If your appliance is installed under an extractor hood, this must be switched on when the
appliance is in use — combustion gases!
— If your appliance is connected to a chimney, the flue duct must be cleaned in compliance
with specific regional regulations — risk of fire! (Contact your installer).
— Do not put objects on your appliance’s exhaust pipes — risk of fire!
— Do not let objects block or obstruct the area below the appliance’s base — risk of fire!
— The appliance must only be used in still conditions — risk of fire!
What to do if you smell gas:
— Shut off the gas supply immediately!
— Do not touch any electrical controls!
— Make sure the room is well ventilated!
— Avoid naked flames or sparking!
— Use an external telephone to notify the appropriate gas supplier (if the gas supplier is
unobtainable call the nearest fire station)

Safety instructions and liability
13 / 112
Warning!
Safety instructions during use
— When filling containers with liquids or if containers fill up with liquid food products during
cooking, only use the rack levels where the user can easily look into the inserted container
— risk of burns! Information sticker is enclosed with the unit.
— Always open the cooking cabinet door very slowly (hot vapours) — risk of burns!
— Always wear heat protective clothing when handling accessories and other objects in the
hot cooking cabinet with — risk of burns!
— The exterior temperatures of the unit can reach above 60 °C, only touch the appliance on
the operating controls — risk of burns!
— The hand shower and the water coming out of the hand shower can be hot — risk of burns!
— Cool Down operation — only activate the Cool Down function if the air baffle has been
locked as per instructions — risk of injury!
— Do not reach into the wheel fan — risk of injury!
— Cleaning — aggressive chemicals — risk of chemical burns! Appropriate protective clothing,
protective glasses, gloves and protective face masks must be worn for cleaning. Please
observe the safety instructions in the «Cleaning» section.
— Do not store any flammable or combustible substances near the unit — risk of fire!
— Apply the brakes on mobile units and mobile oven racks when not moving them. The racks
could roll away on uneven floors — risk of injury!
— During mobile use of mobile oven racks, you must always close the container locks. Cover
containers with liquids to prevent hot liquids from spilling out — risk of burns!
— The transport trolley must be properly fixed to the appliance when loading and unloading
the mobile plate rack and the mobile oven rack — risk of injury.
— Mobile oven racks, mobile plate racks, transport trolleys and units mounted on castors may
tip over during transportation over sloping surfaces or bumps — risk of injury!

Safety instructions and liability
14 / 112
Liability
Installations and repairs that are not carried out by authorised specialists or using original
spare parts, and any technical modification that is not approved by the manufacturer will void
the manufacturer’s warranty and product liability.
Care, inspection, maintenance and repair
15 / 112
In order to retain the high quality of the stainless steel, for hygienic reasons and to avoid
interferences to operation, the appliance must be cleaned daily or when prompted to clean.
Follow the instructions in the «Cleaning» section.
Constant operation at high cooking cabinet temperatures (≥ 260°C), the use of high browning
levels (browning 4/5) and preparation of food with high fat and gelatin content can subject
the press-fit door gasket to faster wear.
Cleaning the press-fit door gasket daily with a non-abrasive rinsing agent will extend the
service life.
Warning!
If the appliance is not cleaned or is not cleaned well enough, deposits of grease or
food residues in the cooking cabinet may catch fire — Risk of fire.
— If fat deposits and/or food waste in the cooking cabinet ignite, shut down the appliance
immediately and keep the cooking cabinet door closed to put out the fire! If further
extinguishing is required, disconnect the appliance from the mains and use a fire
extinguisher (do not use water to extinguish a fat fire!).
— To avoid corrosion in the cooking cabinet, your appliance must be cleaned every day, even
if it is only operated in “Moist Heat” (steaming) mode.
— Do not use a high pressure cleaner, steam cleaner or a direct water jet to clean the
appliance. Observe the protection class IPx5.
— Do not treat the appliance with acids or expose to acid fumes – this will damage the
passivated coating of the nickel-chromium steel and the appliances might discolour.
— To clean the exterior panelling, only use mild household cleaning agents such as
dishwashing detergent on a damp soft cloth. Corrosive or irritating substances must not
be used.
— Only use cleaning agents from the appliance manufacturer. Cleaning agents from other
manufacturers can damage the appliance. Damage to a device that has been caused by
using different cleaning and care products than those recommended by the manufacturer
is not covered under warranty.
— Do not use scouring products or abrasive cleaning agents.

Care, inspection, maintenance and repair
16 / 112
Warning!
Inlet filter maintenance The device automatically detects if the air filter is dirty. You will receive
a service message and prompt to clean or replace the air filter when it is dirty. The appliance
may only be operated without an air filter. When replacing the air filter, please take into account
the following specifications:
Appliance size 6 x 2/3 GN, 6 x 1/1 GN, 6 x 2/1 GN, 10 x 1/1 GN
and 10 x 2/1 GN
Air filter article number 6 x 2/3 GN: 40.04.771
Air filter article number
6 x 1/1 GN, 6 x 2/1 GN, 10 x 1/1 GN, 10 x 2/1 GN: 40.03.461
This air filter may only be removed and cleaned by the user. When replacing the filter, make
sure that the air filter carefully locks into the correct position. To replace the air filter, please
follow the instructions in the «Domestic technology» section.
Appliance size 20 x 1/1 GN and 20 x 2/1 GN
This air filter may only be replaced by an authorised service partner.
Attention! The appliance is only guaranteed protection against sprayed water if the filter and
cover are assembled correctly.

Care, inspection, maintenance and repair
17 / 112
Inspection, maintenance and repair
Danger — high voltage
— Inspection, maintenance and repair work must only be carried out by trained technicians.
—
The appliance must be disconnected from the mains for cleaning (apart from CleanJet
®
cleaning) and for inspection, maintenance or repair work.
— If the appliance is installed on casters (mobile), freedom of movement must be restricted
so that power, water and drainage pipes cannot be damaged when the appliance is
moved. If the appliance is moved, make sure that power, water and drainage lines are
correctly disconnected. If the appliance is returned to its original position, make sure that
the retention device, energy, water and drainage pipes are correctly attached.
— Your appliance should be serviced by an authorised service partner at least once a year
to ensure that it remains in perfect working order.
Function parts
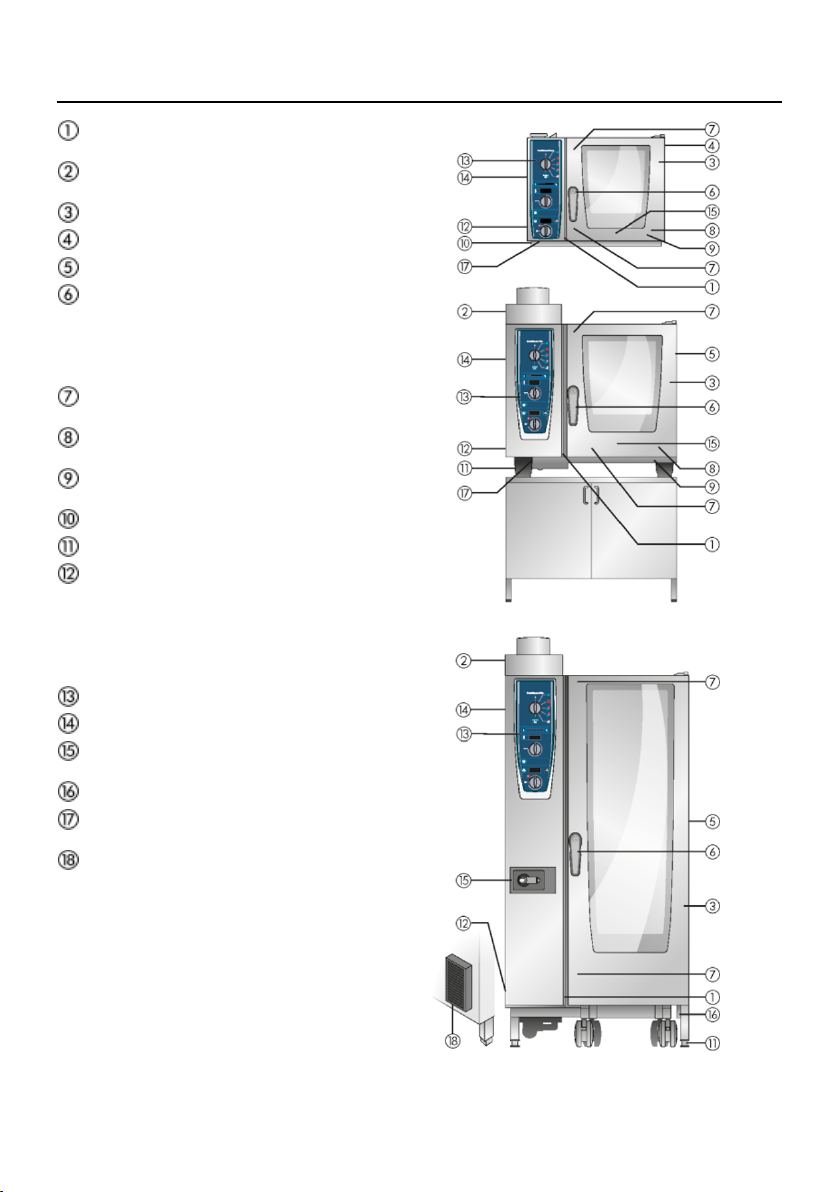
18 / 112
Appliance number
(only visible when the door is open)
Flow guard (optional)
(for gas appliances only)
Cooking cabinet lighting
Appliance door with triple glazing
Appliance door with double glazing
Door handle
Tabletop units: One-handed operation
with sure-shut function
Standalone appliances: One-handed
operation
Unlocking mechanism to open the
glass pane (inside)
Integrated and self-emptying door drip
pan (inside)
Unit drip pan with direct connection to
the drain
Appliance plinth
Unit feet (height adjustable)
Type plate
(contains important data such as power
consumption, gas type, voltage, number
of phases and frequency as well as
appliance type, appliance number and
option number)
Control panel
Cover for the electric installation space
Hand shower (optional)
(with automatic return)
Positioning aid (standalone units)
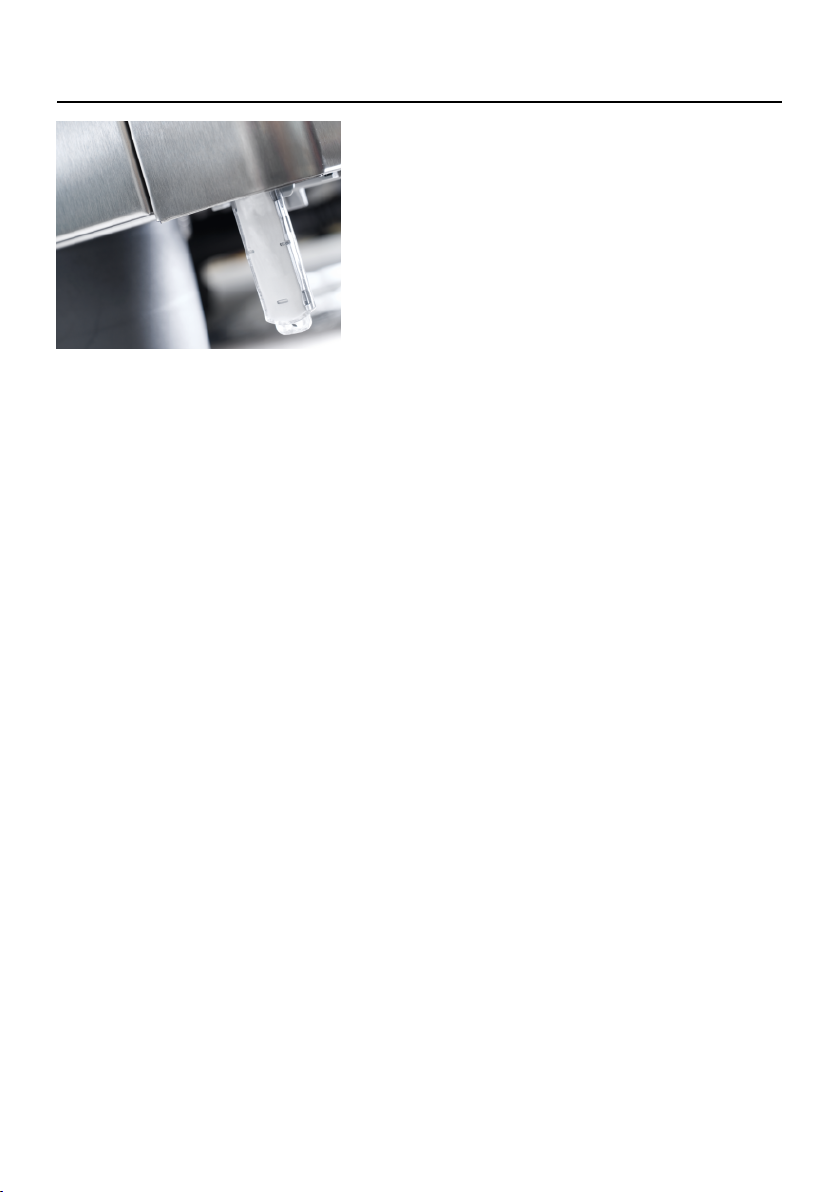
Air filter for table-top unit (installation
space air inlet)
Air filter for standalone unit (installation
space air inlet, rear of unit)
CombiMaster Plus 61 on thermocabinet

Notes on using your appliance
19 / 112
— Avoid having heat sources (e.g. grill plates, deep-fat fryers etc.) near the appliance.
— Only use the appliance in areas with a room temperature of > 5 °C. For ambient
temperatures of less than + 5 °C, you must heat the cooking cabinet to room temperature
(> + 5 °C) before starting.
— As soon as you open the cooking cabinet door, the heating and fan wheel shut down
automatically. The integral fan wheel brake is activated. The fan wheel keeps running for
a brief period only.
— With grilling and roasting applications (e.g. chickens) a fat collector should always be
pushed under the food which is cooking.
— Only use heat-resistant original accessories from the appliance manufacturer.
— Always clean accessories before use.
— Leave the appliance door slightly open if it is going to be idle for a prolonged period (e.g.
overnight).
— The cooking cabinet door has a sure shut function; the door of the floor appliance is not
closed tight unless the door handle is vertical.
— For long stoppages (e.g. non-work day), shut off the water, power and gas supplies to
the appliance.
— At the end of its service life, the appliance must not be disposed of with the general waste
or used electrical appliances at municipal collection points. We would be pleased to assist
you in disposing of the device.
Max. load sizes depending on appliance size
6 x 2/3 GN 20 kg (max. 10 kg for each rack)
6 x 1/1 GN 30 kg (max. 15 kg for each rack)
6 x 2/1 GN 60 kg (max. 30 kg for each rack)
10 x 1/1 GN 45 kg (max. 15 kg for each rack)
10 x 2/1 GN 90 kg (max. 30 kg for each rack)
20 x 1/1 GN 90 kg (max. 15 kg for each rack)
20 x 2/1 GN 180 kg (max. 30 kg for each rack)
Notes on using your appliance
20 / 112
If the maximum load sizes are exceeded, this can damage the appliance.
Please also note the maximum load sizes for food in the «Manual Cookbook».
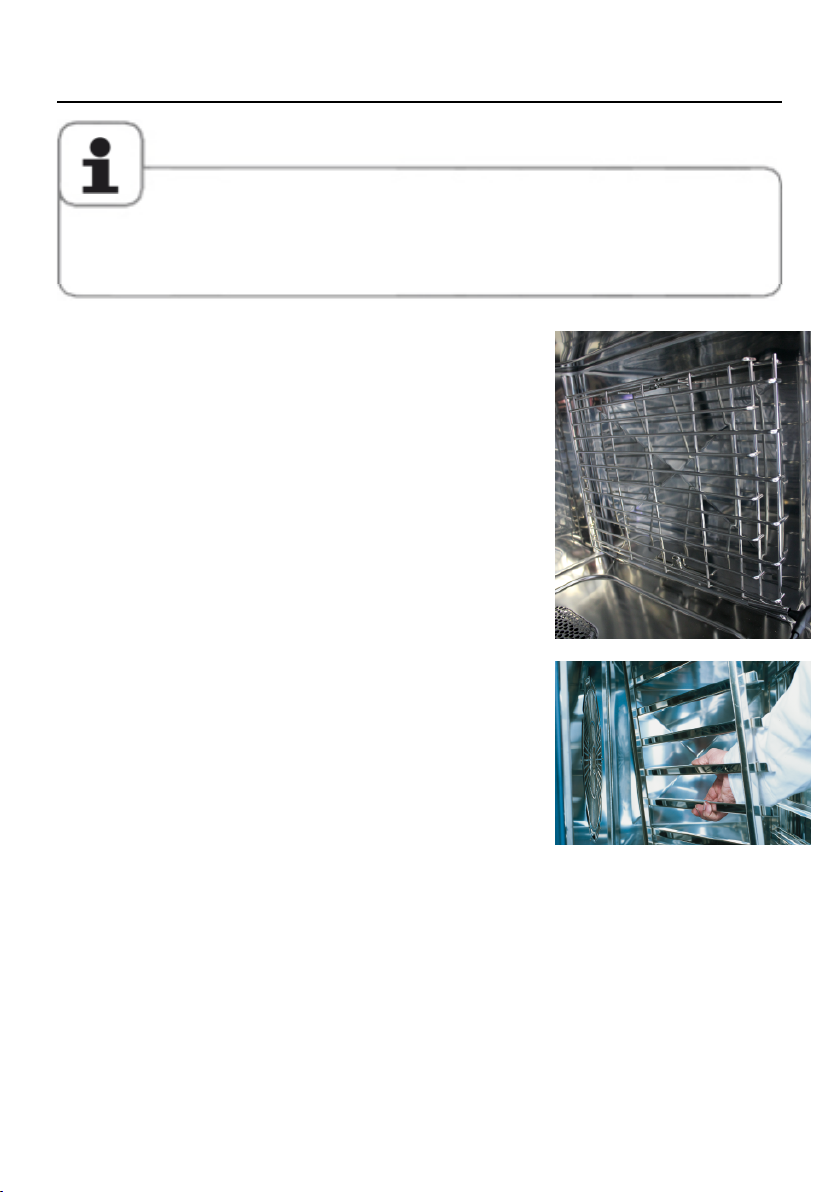
Table-top appliance 6 x 2/3 GN with hinging rack
— To remove the right hinging rack, hold the top of the
hinging rack and press it upwards. The hinging rack
releases from the 2 locking pins and can now be
removed.
— To install the hinging rack, align the hooks on the
hinging rack with the locking pins and press down on
the hooks until they engage in the locking bolts.
— To remove the left hinging rack, raise it slightly and
swivel it right into th cooking cabinet to release both
locking pins from the air baffle. Use a screwdriver to
loosen the upper and lower locking hooks on the air
baffle. You can now remove the hinging rack together
with the air baffle. The left hinging rack can now be
removed together with the air baffle.
Table-top appliances with hinging racks
(6 x 1/1 GN, 6 x 2/1 GN, 10 x 1/1 GN, 10 x 2/1 GN)
— To remove, raise the hinging rack slightly in the middle.
Pull it out of the front, lower locking mechanism and
then from the top locking mechanism.
— Swivel the hinging rack to the middle of the cooking
cabinet.
— Lift the hinging rack out of its fixing by lifting it up.
Reverse the above sequence to reset.
Notes on using your appliance
21 / 112
Working with mobile oven racks, mobile plate racks
and transport trolleys for table-top units (option)
— Remove the hinging rack as described above.
— Place the run-in rail on the fixing provided on the
appliance’s base. Make sure it is fixed accurately in
place (4 pins).
— Remember that the appliance must be matched to
the exact height of the transport trolley and must be
levelled.
— Move the transport trolley as far as it will go on the
run-in rail and make sure that the transport trolley is
correctly locked on the appliance.
— Push the mobile oven rack or mobile plate rack into the
appliance as far as it will go, and check that the locking
mechanism in the appliance is working correctly.
— To remove the mobile oven rack or mobile plate rack,
release the locking mechanism and pull the rack out of
the cooking cabinet. First insert the core temperature
probe with the run-in rail in the park position.
— Make sure that the mobile oven rack or mobile plate
rack is securely locked on the transport trolley during
transportation.
Notes on Using Your Unit
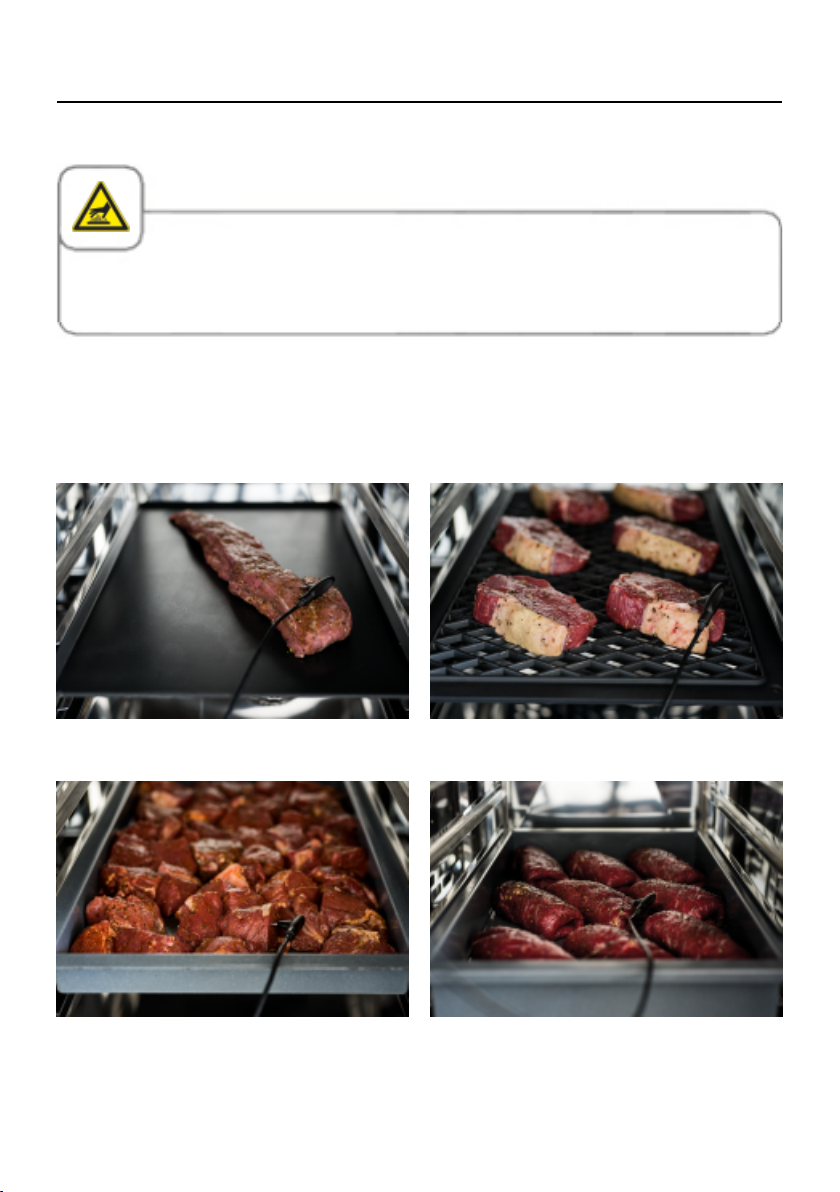
22 / 112
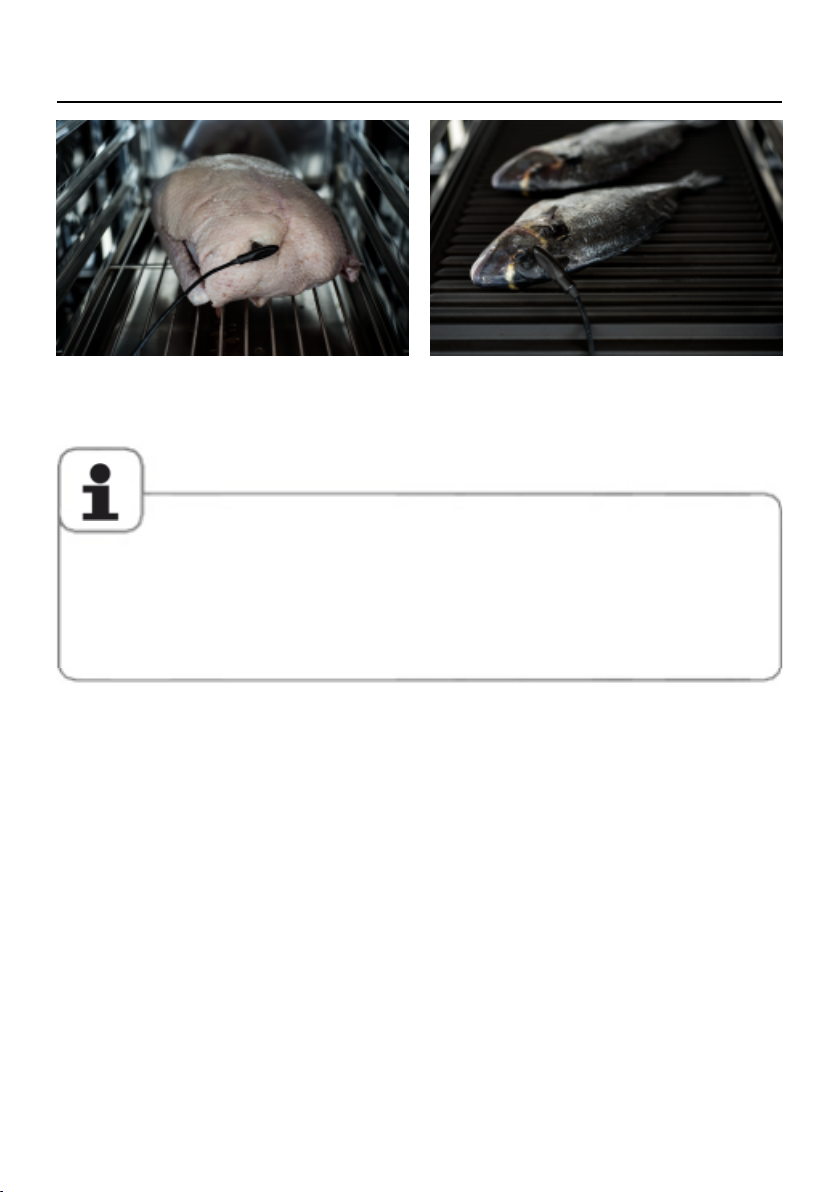
Working with the Core Temperature Probe
Caution!
The core temperature probe can be hot – Risk of burns.
Always insert the core temperature probe into the thickest point on the product. Make sure
that a large part of the probe needle is in the product. Insert the core temperature probe at
an angle into the product. For bakery products that rise a long way during baking, position
the CT probe vertically in the middle of the product.
At the thickest point Position at an angle
Insert into several pieces of meat Position at an angle
Notes on Using Your Unit
23 / 112
Into the breast meat At the thickest point on the product
— Always correctly position the core temperature probe in the park position provided – Risk of
damage!
— Do not let the core temperature probe hang out of cooking cabinet – risk of damage.
— Remove the core temperature probe from the food before you take the food from the cooking
cabinet – risk of damage.
Notes on using the USB interface
24 / 112
The USB interface is designed to be used only for
importing and exporting data, and for performing
software updates using USB drives.
It is not suitable for charging or operating other
electronic equipment, such as cellular phones.
Notes on Using Your Unit
25 / 112
Working with the Hand Shower
— If you use the hand shower, please pull the hose at least 7.78 Inches (20 cm) out of the
park position.
— You can select 2 jet strengths by pressing the control button.
— Always let the hand shower slide slowly back into the park position.
Caution!
The hand shower and water from the hand shower may be hot – risk of burns.
— If you pull hard on the hand shower and it exceeds the maximum available hose length, it will
damage the hose.
— Make sure that the hand shower hose is fully rewound after use.
— You must not use the hand shower to cool the cooking cabinet. – Risk of damage to the cooking
cabinet and air baffle, or of the cooking cabinet glass cracking.
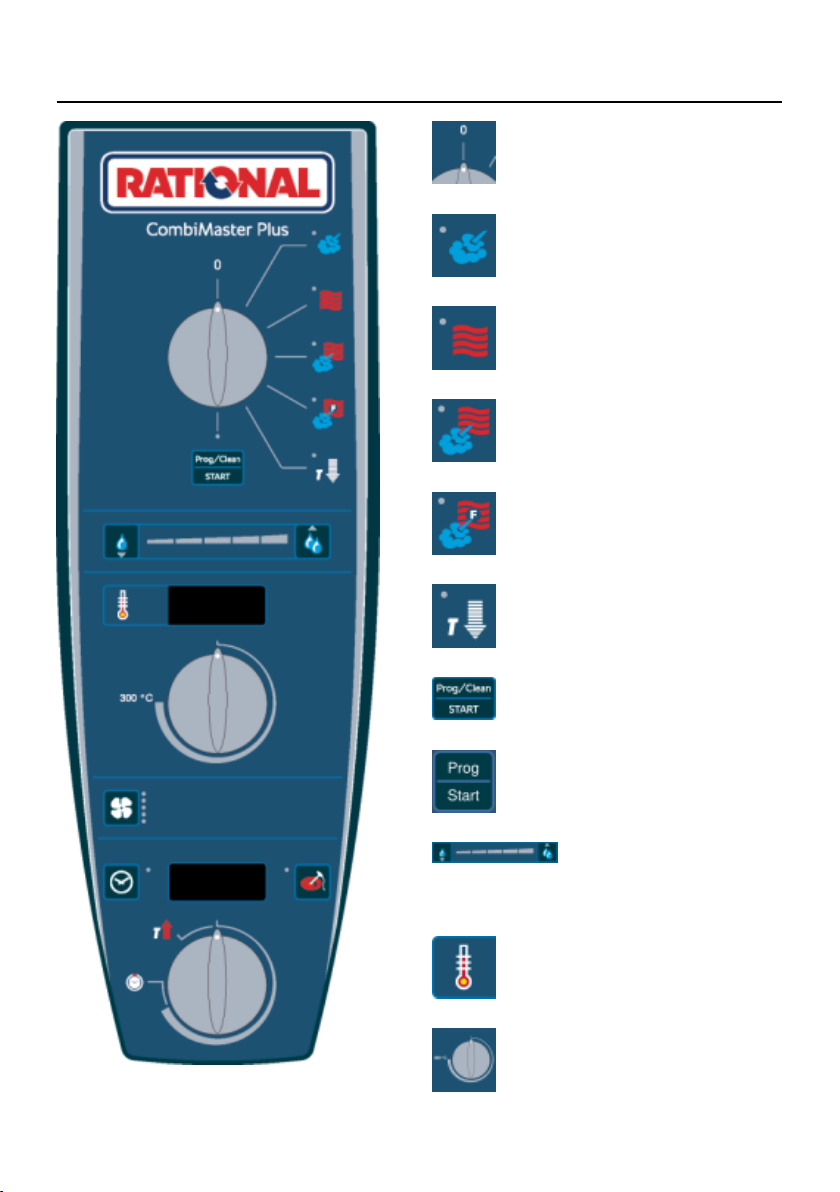
Operating controls
26 / 112
Operating mode switches
Steam (30 °C to 130 °C)
Convection (30 °C to 300 °C)
Combination of steam and
convection (30 °C to 300 °C)
Finishing (30 °C to 300 °C)
Cool down
Programming / Start programme
and clean
Sets humidity / displays
number of cleaner and
rinse aid tabs
Set the cooking cabinet
temperature
Selector switch for cooking
cabinet temperature
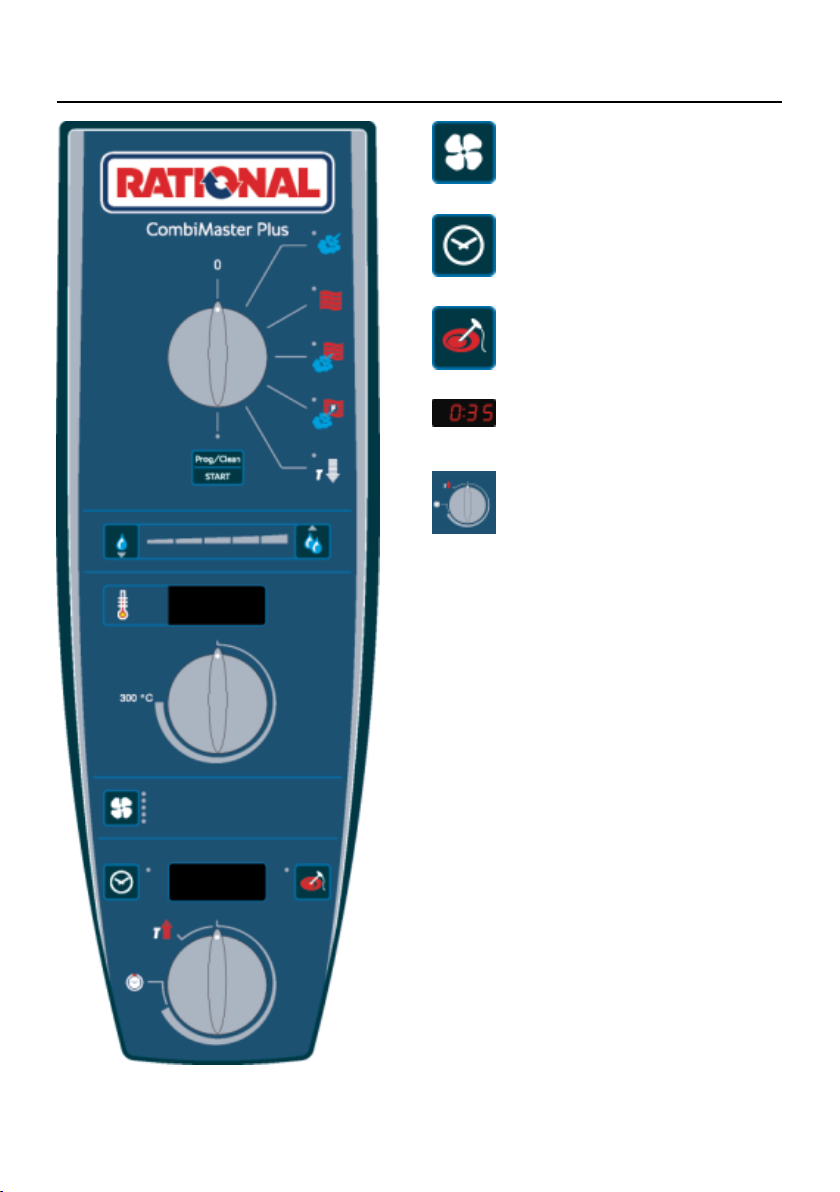
Operating controls
27 / 112
Air speed
Set the cooking time
(0 to 23 h 59 min)
Set the core temperature
(0 °C to 99 °C)
Displays cooking time/core
temperature/cleaning time
Selector switch for cooking time/
core temperature

General Notes
28 / 112
Operation:
Choose the required
cooking mode.
Choose the required
cooking cabinet
temperature.
Choose the required
cooking time/core
temperature. The cooking
time can be set in minutes
for times between 0 and 2
hours, in 5-minute intervals
for times between 2 and 3
hours, in 15-minute intervals
for times between 3 and
6 hours and in 30-minute
intervals for times between
6 and 24 hours.
Choose the required
cooking cabinet humidity
using the arrow buttons.
Choose the required air
speed.
Turn the selection button
clockwise as far as it will go.

General Notes
29 / 112
Notes:
The cooking mode display
flashes when the cooking
cabinet is too hot (see
the “Cool Down” section
on cooling the cooking
cabinet).
Button lights up when the
heating is active.
A buzzer signals the end of
cooking.
Fault messages:
Low water level – Open the
water tap. Display goes out
after filling.
“Gas burner fault”: Press
the “cooking time” button –
New ignition process. If the
display lights up repeatedly,
inform Service!

ClimaPlus
®
30 / 112
ClimaPlus
®
measures and regulates the humidity in the cooking cabinet. You can set the
exact product-specific climate for each food in the climate window.
Steam:
The factory setting for
ClimaPlus
®
is 100%
humidity.
Dry heat:
ClimaPlus
®
allows you to
limit the humidity in the
cooking cabinet. Red bars
and associated percentages
show the maximum
permitted humidity level in
the cooking cabinet. The
more red visible on the
display, the drier the cabinet
atmosphere and the lower
the humidity level.
Steam + dry heat:
You can set the mixture
of steam and dry heat.
The more blue visible in
the climate window, the
moister the cooking cabinet
atmosphere and the higher
the humidity level.
Up arrow lit – moisture entering
cooking cabinet.
Down arrow lit — moisture being
removed from cooking cabinet.

ClimaPlus
®
31 / 112
Press the cooking time or core temperature button to display the current
humidity in the cooking cabinet.
For continuous operation that is as resource-friendly as possible, we recommend using
standard cooking cabinet humidity, for example 100% for dry heat.

Overview of modes
32 / 112
Steam mode (30 °C to 130 °C)
The high performance fresh steam generator with new steam control always
produces hygienic fresh steam. You can cook without adding water and without
waiting for the water to boil. Constant cooking cabinet temperatures and
maximum possible steam saturation guarantee a uniform and highly gentle
cooking process. Appetising colours, bite and retained nutrients and vitamins
are guaranteed, particularly for vegetables. The steaming mode is ideal for
stewing, blanching, steaming, poaching, heating through, simmering, brewing
and soaking.
Convection mode (30 °C to 300 °C)
The hot air circulated at high speed flows around the food from all sides. The
meat protein sets immediately, so it remains wonderfully succulent on the inside.
Constant hot air at up to 300 °C is not simply a technical detail; the necessary
reserve power is there even for full loads. This is the only way to get succulently
browned pan-fried dishes, frozen convenience or light baked goods.
Combination of steam and convection mode (30 °C to 300 °C)
Combination mode marries all the benefits of the hot steam, such as short
cooking time, minimal cooking losses, succulence, with the advantages of
convection, which is responsible for creating the intense aroma, appetising colour
and crispy crusts. In this way you will avoid up to 50 % of the normal cooking
losses, without turning the food and with considerably shorter cooking times.
Finishing mode (30 °C to 300 °C)
Finishing means the conscious separation of production and service. From side
dishes through to the complete menu, with the optimum climate you will heat
the food you prepared and then chilled up to serving temperature very quickly
— whether it is on trays, plates or in containers. You gain flexibility, and your
customers enjoy the experience more as the food is no longer kept warm for long
periods, thus losing quality.

Overview of modes
33 / 112
«Cool down»
With the Cool Down function, you can quickly and gently cool a hot cooking
cabinet, e.g. for low temperature cooking or manual cleaning.
Programming/Programme Start/ Cleaning»
Using the programming function, create and save manual programmes. For
recurring cooking processes, there are 100 programme slots with up to 6 cooking
steps available. This ensures consistent quality — even when using temporary
staff.
The automatic cleaning programme restores the hygienic initial condition of your
appliance without additional staff expenditure.

Steam Mode
34 / 112
In the “steam” cooking mode, the steam generator generates hygienic fresh steam. You can
set the cooking cabinet temperature from 86 °F — 266 °F / 30 °C -130 ℃ .
Cooking methods: Steaming, stewing, blanching, simmering, soaking, vacuum cooking,
thawing, preserving
Step Info/Button Instructions
1 Choose the “steam” mode.
2
To preheat, turn the selection button anti-
clockwise as far as it will go. “PreEH” is shown
on the display. The end of preheating is
indicated by an acoustic signal and “LoAd” on
the display.
3
Set the required temperature. The standard
value is boiling temperature.
4 Press the button to set the cooking time.
5
Set the required cooking time: e.g. 1 h and 6
min. For continuous operation turn the selection
button clockwise as far as it will go.
4
Or alternatively press the “core temperature”
button and set the required core temperature.
5 Choose the required core temperature.
 Loading…
4.0
Rated 4 out of 5
4 out of 5 stars (based on 1 review)
Your overall rating
RATIONAL COMBIMASTER PLUS (03) PDF MANUAL
Click here to download RATIONAL COMBIMASTER PLUS (03) PDF MANUAL
RATIONAL COMBIMASTER PLUS (03) PDF MANUAL
FREE ENGLISH PDF
OPERATING INSTRUCTIONS
USER GUIDE – USER MANUAL
OWNER GUIDE – OWNER MANUAL
REFERENCE GUIDE – REFERENCE MANUAL
INSTRUCTION GUIDE – INSTRUCTION MANUAL
Your overall rating
- YouTube
RATIONAL COMBIMASTER PLUS (03) PDF MANUAL
RATIONAL COMBIMASTER PLUS (03) PDF MANUAL