Используйте свой продукт максимально эффективно

Порядок чистки эспрессо-кофемашины Philips серии EP4300 LatteGo
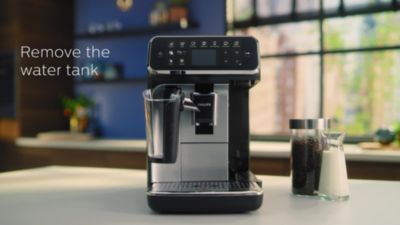
Порядок снятия и установки варочной группы эспрессо-кофемашины Philips серии 4300 LatteGo
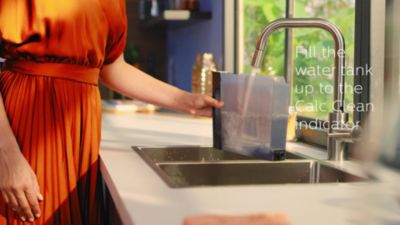
Порядок чистки эспрессо-кофемашины Philips серии EP4300 LatteGo от накипи
Устранение неисправностей и ремонт
Ваш продукт не работает должным образом? Найдите решение здесь.
Выберите продукт
Дополнительная информация
-
Руководство пользователя PDF
файл,
1.8 MB
25 апреля 2021 г. -
Руководство пользователя PDF
файл,
1.8 MB
25 апреля 2021 г. -
Руководство пользователя PDF
файл,
5.0 MB
11 января 2022 г. -
Руководство пользователя PDF
файл,
5.0 MB
11 января 2022 г. -
Руководство пользователя PDF
файл,
5.0 MB
11 января 2022 г. -
Руководство пользователя PDF
файл,
5.0 MB
11 января 2022 г. -
Руководство пользователя PDF
файл,
4.8 MB
4 мая 2021 г. -
Руководство пользователя PDF
файл,
4.8 MB
4 мая 2021 г. -
Руководство пользователя PDF
файл,
4.8 MB
4 мая 2021 г. -
Руководство пользователя PDF
файл,
4.8 MB
4 мая 2021 г. -
Руководство пользователя PDF
файл,
4.8 MB
4 мая 2021 г. -
Руководство пользователя PDF
файл,
4.8 MB
4 мая 2021 г. -
Руководство пользователя PDF
файл,
4.8 MB
4 мая 2021 г. -
Руководство пользователя PDF
файл,
4.8 MB
4 мая 2021 г. -
Руководство пользователя PDF
файл,
4.8 MB
4 мая 2021 г. -
Руководство пользователя PDF
файл,
4.8 MB
4 мая 2021 г. -
Руководство пользователя PDF
файл,
4.8 MB
4 мая 2021 г. -
Руководство пользователя PDF
файл,
3.1 MB
4 ноября 2021 г. -
Руководство пользователя PDF
файл,
3.1 MB
4 ноября 2021 г. -
Руководство пользователя PDF
файл,
3.1 MB
4 ноября 2021 г. -
Руководство пользователя PDF
файл,
3.1 MB
4 ноября 2021 г. -
Руководство пользователя PDF
файл,
3.1 MB
4 ноября 2021 г. -
Руководство пользователя PDF
файл,
4.5 MB
13 апреля 2022 г. -
Руководство пользователя PDF
файл,
4.5 MB
13 апреля 2022 г. -
Руководство пользователя PDF
файл,
5.8 MB
3 мая 2021 г. -
Руководство пользователя PDF
файл,
5.8 MB
3 мая 2021 г. -
Руководство пользователя PDF
файл,
5.8 MB
3 мая 2021 г. -
Руководство пользователя PDF
файл,
5.8 MB
3 мая 2021 г. -
Руководство пользователя PDF
файл,
5.8 MB
3 мая 2021 г. -
Руководство пользователя PDF
файл,
5.8 MB
3 мая 2021 г. -
Руководство пользователя PDF
файл,
5.8 MB
3 мая 2021 г. -
Руководство пользователя PDF
файл,
5.8 MB
3 мая 2021 г. -
Руководство пользователя PDF
файл,
5.8 MB
3 мая 2021 г. -
Руководство пользователя PDF
файл,
5.8 MB
3 мая 2021 г. -
Руководство пользователя PDF
файл,
5.8 MB
3 мая 2021 г. -
Руководство пользователя PDF
файл,
5.8 MB
3 мая 2021 г. -
Руководство пользователя PDF
файл,
5.8 MB
3 мая 2021 г. -
Руководство пользователя PDF
файл,
5.8 MB
3 мая 2021 г. -
Руководство пользователя PDF
файл,
4.4 MB
5 июля 2022 г. -
Руководство пользователя PDF
файл,
4.4 MB
5 июля 2022 г. -
Руководство с важными сведениями PDF
файл,
596.2 kB
27 мая 2021 г. -
Руководство с важными сведениями PDF
файл,
596.2 kB
27 мая 2021 г. -
Руководство с важными сведениями PDF
файл,
596.2 kB
27 мая 2021 г. -
Руководство с важными сведениями PDF
файл,
596.2 kB
27 мая 2021 г. -
Руководство с важными сведениями PDF
файл,
596.2 kB
27 мая 2021 г. -
Руководство с важными сведениями PDF
файл,
596.2 kB
27 мая 2021 г. -
Руководство с важными сведениями PDF
файл,
596.2 kB
27 мая 2021 г. -
Руководство с важными сведениями PDF
файл,
596.2 kB
27 мая 2021 г. -
Руководство с важными сведениями PDF
файл,
596.2 kB
27 мая 2021 г. -
Руководство с важными сведениями PDF
файл,
596.2 kB
27 мая 2021 г. -
Руководство с важными сведениями PDF
файл,
596.2 kB
27 мая 2021 г. -
Руководство с важными сведениями PDF
файл,
596.2 kB
27 мая 2021 г. -
Руководство с важными сведениями PDF
файл,
596.2 kB
27 мая 2021 г. -
Руководство с важными сведениями PDF
файл,
596.2 kB
27 мая 2021 г. -
Руководство с важными сведениями PDF
файл,
1.2 MB
19 апреля 2022 г. -
Руководство с важными сведениями PDF
файл,
596.2 kB
25 апреля 2021 г. -
Руководство с важными сведениями PDF
файл,
596.2 kB
25 апреля 2021 г. -
Руководство с важными сведениями PDF
файл,
393.0 kB
4 ноября 2021 г. -
Руководство с важными сведениями PDF
файл,
393.0 kB
4 ноября 2021 г. -
Руководство с важными сведениями PDF
файл,
393.0 kB
4 ноября 2021 г. -
Руководство с важными сведениями PDF
файл,
393.0 kB
4 ноября 2021 г. -
Руководство с важными сведениями PDF
файл,
1.7 MB
31 августа 2022 г. -
Руководство с важными сведениями PDF
файл,
1.7 MB
31 августа 2022 г. -
Руководство с важными сведениями PDF
файл,
1.7 MB
31 августа 2022 г. -
Руководство с важными сведениями PDF
файл,
1.7 MB
31 августа 2022 г. -
Руководство с важными сведениями PDF
файл,
1.7 MB
31 августа 2022 г. -
Руководство с важными сведениями PDF
файл,
1.7 MB
31 августа 2022 г. -
Руководство с важными сведениями PDF
файл,
1.7 MB
31 августа 2022 г. -
Руководство с важными сведениями PDF
файл,
1.7 MB
31 августа 2022 г. -
Руководство с важными сведениями PDF
файл,
1.7 MB
31 августа 2022 г. -
Руководство с важными сведениями PDF
файл,
1.7 MB
31 августа 2022 г. -
Руководство с важными сведениями PDF
файл,
1.7 MB
31 августа 2022 г. -
Руководство с важными сведениями PDF
файл,
1.7 MB
31 августа 2022 г. -
UK Declaration of conformity PDF
файл,
468.1 kB
15 августа 2023 г. -
Локализованная торговая брошюра PDF
файл,
716.2 kB
30 августа 2023 г.
Зарегистрируйте продукт и получите
- Электронную гарантию
- Информацию о скидках и акциях
- Простой доступ к поддержке продуктов
Популярные компоненты и аксессуары для этого продукта
Обращение в компанию Philips
Мы всегда рады помочь вам
Предлагаемые продукты
Machine overview
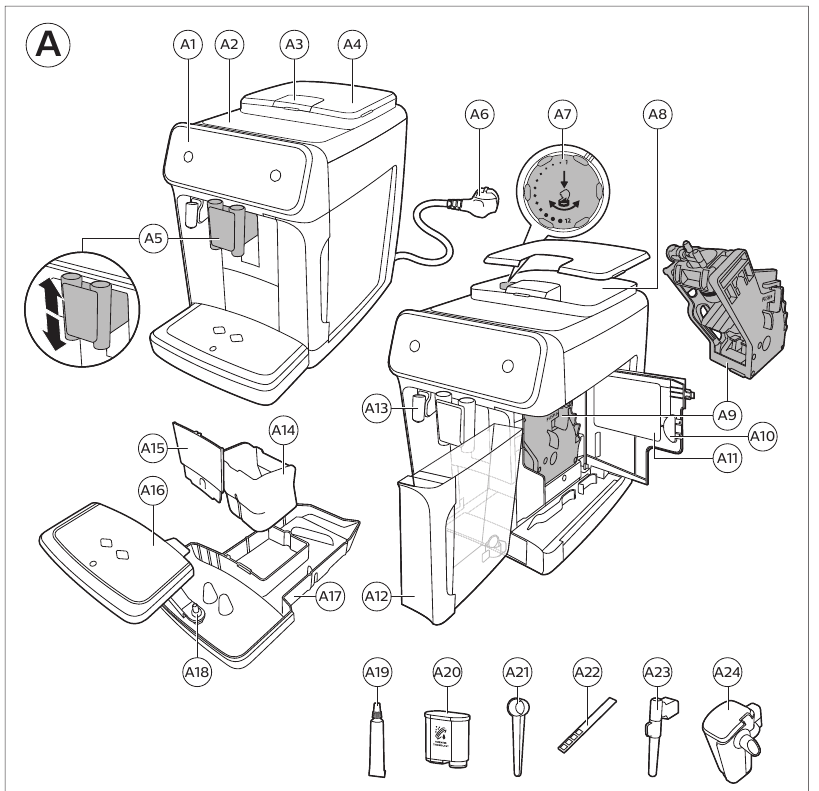
A1 Control panel
A2 Cup holder
A3 Pre-ground coffee compartment
A4 Lid of bean hopper
A5 Adjustable coffee spout
A6 Mains plug
A7 Grind setting knob
A8 Coffee bean hopper
A9 Brew group
A10 Service door
A11 Data label with type number
A12 Water tank
A13 Hot water spout
A14 Coffee grounds container
A15 Front panel of coffee grounds container
A16 Drip tray cover
A17 Drip tray
A18 ‘Drip tray full’ indicator
Accessories
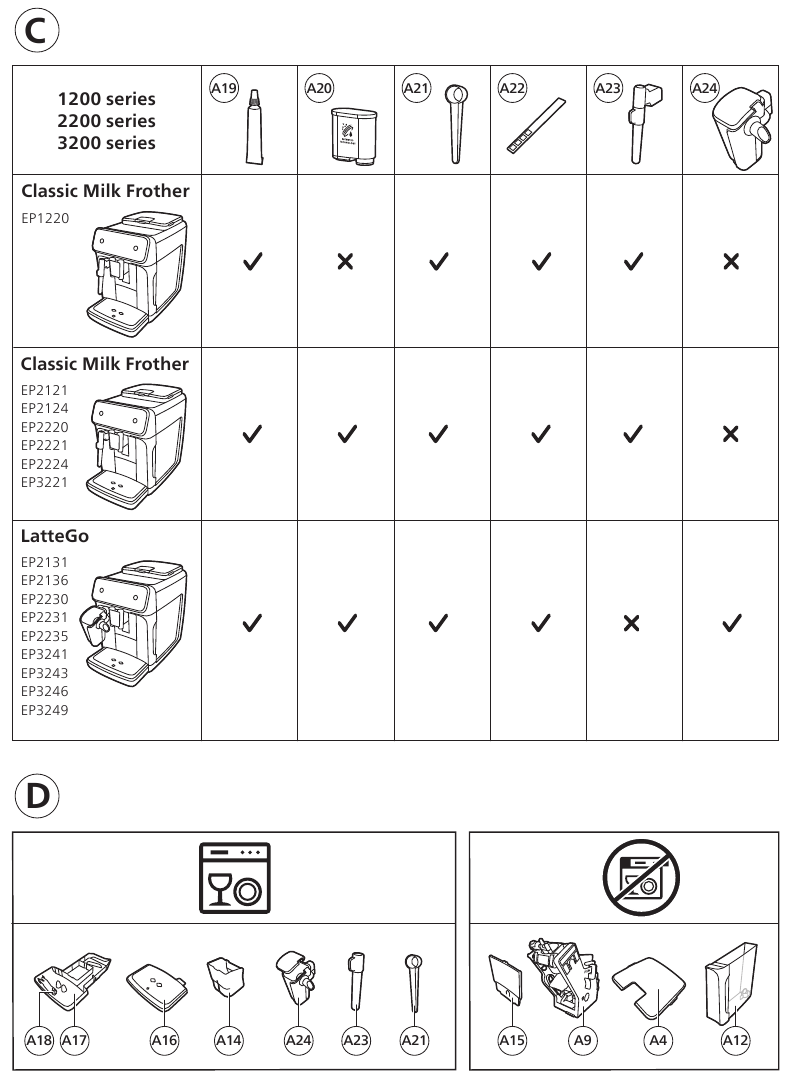
A19 Grease tube
A20 AquaClean water filter
A21 Measuring scoop
A22 Water hardness test strip
A23 Classic milk frother (specific types only)
A24 LatteGo (milk container) (specific types only)
Control panel
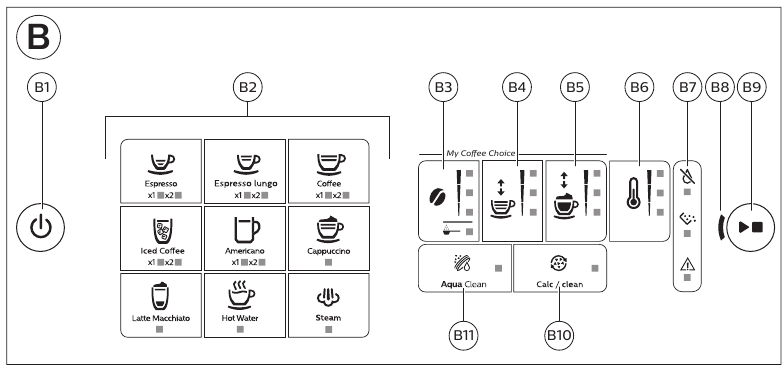
Refer to figure B for an overview of all buttons and icons. Below you find the description.Some of the buttons/icons are for specific types only.
B1 On/off button
B2 Drink icons*
B3 Aroma strength/pre-ground coffee icon
B4 Drink quantity icon
B5 Milk quantity icon (specific types only)
B6 Coffee temperature icon (specific types only)
B7 Warning icons
B8 Start light
B9 Start/stop  button
B10 Calc / Clean icon
B11 AquaClean icon
* Drink icons: espresso, espresso lungo, coffee, americano, cappuccino, latte macchiato, hot water, steam, iced coffee (specific types only)
Introduction
To fully benefit from the support that Philips offers, please register your product at www.philips.com/welcome. Read the separate safety booklet carefully before you use the machine for the first time and save it for future reference. To help you get started and to get the best out of your machine, Philips offers support in multiple ways. In the box you find:
- This user manual with picture-based usage instructions and more detailed information on cleaning and maintenance.
There are multiple versions of this espresso machine, which all have different features. Each version has its own type number. You can find the type number on the data label on the inside of the service door (see fig A11).
- The separate safety booklet with instructions on how to use the machine in a safe way.
- For online support (frequently asked questions, movies etc.), scan the QR code on the cover of this booklet or visit www.philips.com/coffee-care
This machine has been tested with coffee. Although it has been carefully cleaned, there may be some coffee residues left. We guarantee, however, that the machine is absolutely new.
The machine automatically adjusts the amount of ground coffee that is used to make the best-tasting coffee. You should brew 5 coffees initially to allow the machine to complete its self-adjustment. Make sure you rinse the LatteGo (milk container) or the classic milk frother before first use.
Before first use
- Rinsing the machine

- Activating the AquaClean water filter (5 min.)
For more information see chapter ‘AquaClean water filter’.
- Setting the water hardness
For more information see chapter ‘Setting the water hardness’.
- Assembling LatteGo (specific types only)

- Assembling the classic milk frother (specific types only)
Brewing drinks
General steps
- Fill the water tank with tap water and fill the bean hopper with beans.
- Press the on/off button to switch on the machine.
- The machine starts heating up and performs the automatic rinsing cycle. During heating up, the lights in the drinks icons light up and go out slowly one by one.
- When all lights in the drink icons light up continuously, the machine is ready for use.
- Place a cup under the coffee dispensing spout. Slide the coffee dispensing spout up or down to adjust its height to the size of the cup or glass you are using (Fig. 1).

Personalizing drinks
This machine allows you to adjust the settings of a drink to your own preference. After selecting a drink you can:
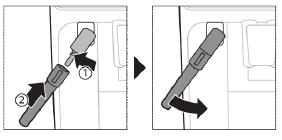
- Adjust the aroma strength by tapping the aroma strength icon (Fig. 2). There are 3 strengths, the lowest is the mildest and the highest is the strongest.
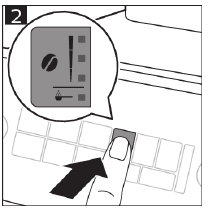
- Adjust the drink quantity by tapping the drink quantity (Fig. 3) and/or the milk quantity icon (specific types only). There are 3 quantities: low, medium and high.
You can also adjust the coffee temperature to your own preference (see ‘Adjusting the coffee temperature’).
Brewing coffee with beans
- To brew a coffee, tap the drink icon of your choice.
- The aroma strength and quantity lights go on and show the previously selected setting.
- You can now adjust the drink to your preferred taste (see ‘Personalizing drinks’).
- Press the start/stop button.
- The light in the drink icon flashes while the drink is being dispensed.
Specific types only: An americano is made of espresso and water. When you brew an americano, the machine first dispenses an espresso and then water.
- The light in the drink icon flashes while the drink is being dispensed.
- To stop dispensing coffee before the machine is finished, press the start/stop
 button again.
To brew 2 coffees at the same time, tap the drink icon twice. The 2x light lights up.
Brewing milk-based drinks with LatteGo (milk container)
LatteGo consists of a milk container, a frame and a storage lid. To avoid leakage, make sure the frame and the milk container are properly assembled before you fill the milk container.
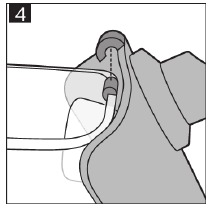
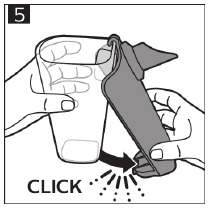
- To assemble LatteGo, first insert the top of the milk container under the hook at the top of the frame (Fig. 4). Then press home the bottom part of the milk container. You hear a click when it locks into place (Fig. 5). Note: Make sure that the milk container and the frame are clean before you connect them.
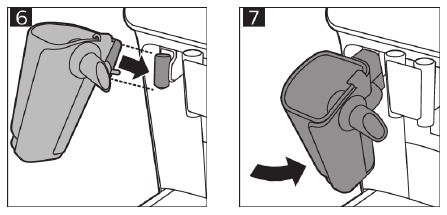
- Slightly tilt LatteGo and put it on the hot water spout (Fig. 6). Then press it home until it locks into place (Fig. 7).
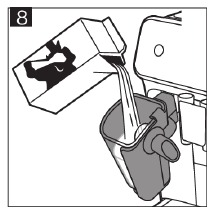
- Fill LatteGo with milk up to the level indicated on the milk container for the drink you are brewing (Fig. 8). Do not fill the milk container beyond the maximum indication.
If you have personalized the milk quantity, you may need to fill the milk container with more or less milk than indicated for this drink on LatteGo.
 Always use milk coming directly from the fridge for optimal results.
 - Place a cup on the drip tray.
- Tap the milk-based drink icon of your choice.
- You can now adjust the drink to your own preference (see ‘Personalizing drinks’).
- Press the start/stop
 button.
- The light in the drink icon flashes while the drink is being dispensed. When you brew a cappuccino or latte macchiato, the machine first dispenses milk and then coffee.
- To stop dispensing milk before the machine has dispensed the preset amount, press the start/stop
 button.
- To stop dispensing the complete drink (milk and coffee) before the machine is finished, press and hold the start/stop
 button.
Frothing milk with classic milk frother Always use milk coming directly from the fridge for the best foam quality.
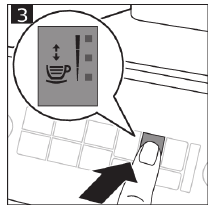
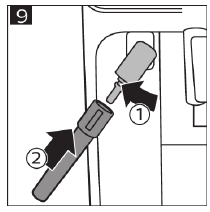
- Tilt the black silicone handle on the machine to the left and slide the milk frother onto it (Fig. 9).
- Fill a milk jug with with approx. 100 ml milk for cappuccino and approx. 150 ml milk for latte macchiato.
- Insert the milk frother approx. 1 cm into the milk.
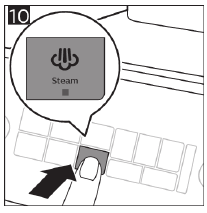
- Tap the steam icon (Fig. 10).
- The light in the steam icon goes on and the start light starts pulsing.
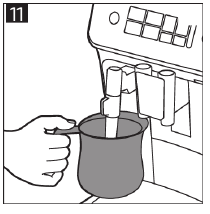
- Press the start/stop
 button to froth the milk (Fig. 11).
- The machine starts heating up, steam is forced into the milk and the milk is frothed.
- When the milk foam in the milk jug has reached the required volume, press the start/stop
 button again to stop frothing milk.
Never froth milk longer than 90 seconds. The frothing automatically stops after 90 seconds.
You do not have to move the milk jug during milk frothing to get the best milk froth quality.
Brewing coffee with pre-ground coffee
You can choose to use pre-ground coffee instead of beans, for example if you prefer a different coffee variety or decaffeinated coffee.
- Press the on/off button to switch on the machine and wait until it is ready for use.
- Open the lid of the pre-ground coffee compartment and pour one leveled measuring scoop of preground coffee into it (Fig. 12). Then close the lid.

- Place a cup under the coffee dispensing spout.
- Select a single drink.
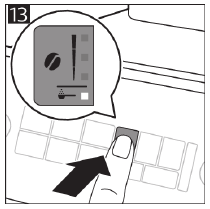
- Press the aroma strength icon for 3 seconds (Fig. 13).
- The pre-ground coffee light goes on and the start light starts pulsing.
- Press the start/stop
 button.
 - To stop dispensing coffee before the machine is finished, press the start/stop
 button again.
With pre-ground coffee you can only brew one coffee at a time.
Pre-ground coffee is not a setting that is saved as a previous selected strength setting. Each time you want to use pre-ground coffee, you need to press the aroma strength icon for 3 seconds.
When you select pre-ground coffee, you cannot select a different aroma strength.
Brewing iced coffee (specific types only) The coffee is brewed with warm water. Brew over ice cubes for optimal results.
- Take a glass and fill it halfway with ice cubes.
- Place the glass under the coffee dispensing spout.
- Tap the iced coffee icon (Fig. 14).

- The aroma strength and quantity lights go on.
- You can now adjust the drink to your preferred taste. We recommend using aroma strength 3.
- Press the start/stop
 button.
 - To stop dispensing coffee before the machine is finished, press the start/stop
 button again.
 - For a special iced coffee treat, top it up with cold milk.
Dispensing hot water
- If attached, remove LatteGo or the milk frother.
- Tap the hot water icon (Fig. 15).
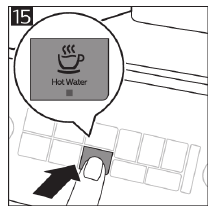
- The drink quantity lights go on and show the previous selected drink setting for hot water.
- Adjust the hot water quantity to your preference by tapping the drink quantity icon (Fig. 3).
- Press the start/stop
 button.
- The light in the hot water icon flashes and hot water is dispensed from the hot water spout (Fig. 16).

- The light in the hot water icon flashes and hot water is dispensed from the hot water spout (Fig. 16).
- To stop dispensing hot water before the machine is finished, press the start/stop
 button again.
Adjusting machine settings
Adjusting the stand-by time
- Press the on/off button to switch off the machine.
- When the machine is switched off: press and hold the Calc / Clean icon (Fig. 17) until the Calc / Clean light and the Aroma strength lights go on (Fig. 18).
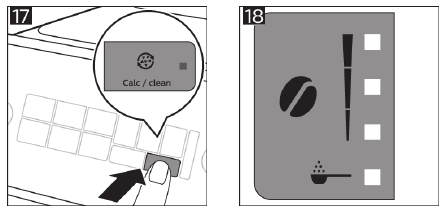
- Tap the Aroma strength icon to select the required stand-by time: 15, 30, 60 or 180 minutes. Respectively 1, 2, 3 or 4 lights of the Aroma strength icon light up.
- When you have finished setting the stand-by time, press the start/stop button. The machine switches off.
- Press the on/off button to switch on the machine again.
Programming the highest default setting of your drinks
The machine has 3 default settings for each drink: low, medium, high. You can only adjust the quantity of the highest setting. The new quantity can be stored as soon as the start light starts to pulse.Before you start programming the quantity of a milk drink, assemble LatteGo and pour milk in it.
- To adjust the highest quantity setting, press and hold the icon of the drink you want to adjust for 3 seconds.
- The upper light of the drinks quantity icon and the upper light of the milk quantity icon (specific types only) starts to pulse and the start/stop
 button starts to pulse, indicating that you are in programming mode.
- The upper light of the drinks quantity icon and the upper light of the milk quantity icon (specific types only) starts to pulse and the start/stop
- Press the start/stop
 button. The machine starts to brew the selected beverage.
- The start light lights up continuously at first. When the machine is ready to store the adjusted volume, the start/stop light starts to pulse.
- Press the start/stop
 button again when the cup contains the desired quantity of coffee or milk.
After you have programmed the new highest default quantity for a drink, the machine will dispense this new amount each time you select the highest quantity of this drink.You can only adjust the highest default quantity level.
If you want to go back to the default quantity settings, see ‘ Restoring factory settings’.
Adjusting the coffee temperature
Machines without temperature icon
- Press the on/off button to switch off the machine.
- When the machine is switched off: press and hold the coffee quantity icon until the lights in this icon go on (Fig. 19).
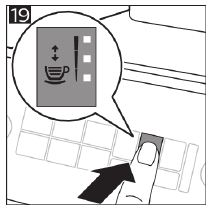
- Tap the quantity icon to select the required temperature: normal, high or max.
- Respectively 1, 2 or 3 lights are on.
- When you have finished setting the coffee temperature, press the start/stop
 button.
 - Press the on/off button to switch on the machine again.
If you do not switch off the machine yourself, it will switch off automatically after some time.
Machines with temperature icon (EP3221 only)
- Tap the coffee temperature icon repeatedly to select the desired temperature.
Restoring factory settings
The machine offers you the possibility to restore the drinks default settings at any moment.You can only restore the default settings when the machine is switched off.
- Press the on/off button to switch the machine off.
- Press and hold the espresso icon for 3 seconds.
- The middle lights in the drink setting icons light up. The start/stop light starts to pulse, indicating that the settings are ready to be restored.
- Press the start/stop
 button to confirm you want to restore the settings.
 - Press the on/off button to switch on the machine again.
Adjusting grinder settings
You can change the coffee strength with the grind setting knob inside the bean container. The lower the grind setting, the finer the coffee beans are ground and the stronger the coffee. There are 12 different grind settings you can choose from. The machine has been set up to get the best taste out of your coffee beans. Therefore we advise you not to adjust the grind setting until you have brewed 100-150 cups (approx. 1 month of use).You can only adjust the grind settings when the machine is grinding coffee beans. You need to brew 2 to 3 drinks before you can taste the full difference.
Do not turn the grind setting knob more than one notch at a time to prevent damage to the grinder.
- Place a cup under the coffee dispensing spout.
- Open the lid of the coffee bean hopper.
- Tap the espresso icon and then press the start/stop
 button.
 - When the grinder starts grinding, press down the grind setting knob and turn it to the left or right. (Fig. 20)
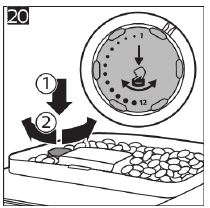
Removing and inserting the brew group
Go to www.philips.com/coffee-care for detailed video instructions on how to remove, insert and clean the brew group.
Removing the brew group from the machine
- Switch off the machine.
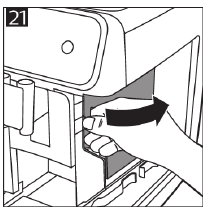
- Remove the water tank and open the service door (Fig. 21).
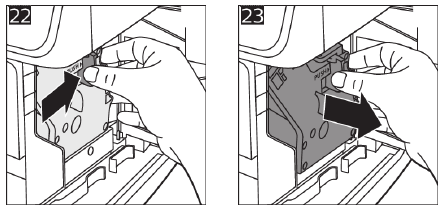
- Press the PUSH handle (Fig. 22) and pull at the grip of the brew group to remove it from the machine (Fig. 23).
Reinserting the brew group
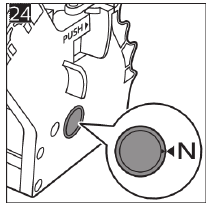
Before you slide the brew group back into the machine, make sure it is in the correct position.
- Check if the brew group is in the correct position. The arrow on the yellow cylinder on the side of the brew group has to be aligned with the black arrow and N (Fig. 24).
- If they are not aligned, push down the lever until it is in contact with the base of the brew group (Fig. 25).
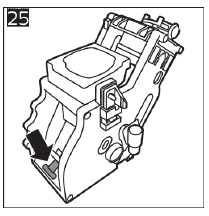
- If they are not aligned, push down the lever until it is in contact with the base of the brew group (Fig. 25).
- Slide the brew group back into the machine along the guiding rails on the sides (Fig. 26) until it locks into position with a click (Fig. 27). Do not press the PUSH button.
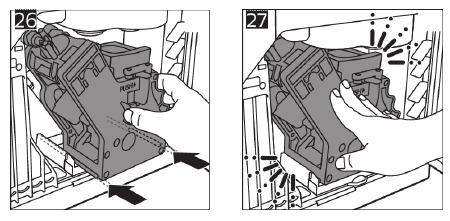
- Close the service door and place back the water tank.
Cleaning and maintenance
Regular cleaning and maintenance keeps your machine in top condition and ensures good-tasting coffee for a long time with a steady coffee flow. Consult the table below for a detailed description on when and how to clean all detachable parts of the machine. You can find more detailed information and video instructions on www.philips.com/coffee-care. See figure D for an overview of which parts can be cleaned in the dishwasher.
| Detachable parts | When to clean | How to clean |
| Brew group | Weekly | Remove the brew group from the machine (see ‘Removing and inserting the brew group’). Rinse it under the tap (see ‘Cleaning the brew group under the tap’). |
| Classic milk frother | After every use | First dispense hot water with the milk frother attached to the machine for thorough cleaning. Then remove the milk frother from the machine and disassemble it. Clean all parts under the tap or in the dishwasher. |
| Pre-ground coffee compartment | Check the pre-ground coffee compartment weekly to see if it is clogged. | Unplug the machine and remove the brew group. Open the lid of the pre-ground coffee compartment and insert the spoon handle into it. Move the handle up and down until the clogged ground coffee falls down (Fig. 28). Go to www.philips.com/coffee-care for detailed video instructions. |
| Coffee grounds container | Empty the coffee grounds container when prompted by the machine. Clean it weekly. | Remove the coffee grounds container while the machine is switched on. Rinse it under the tap with some washing-up liquid or clean it in the dishwasher. The front panel of the coffee grounds container is not dishwasher-safe. |
| Drip tray | Empty the drip tray daily or as soon as the red ‘drip tray full’ indicator pops up through the drip tray (Fig. 29). Clean the drip tray weekly.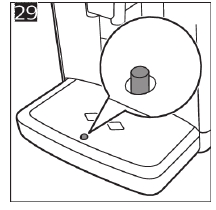 |
Remove the drip tray (Fig. 30) and rinse it under the tap with some washing-up liquid. You can also clean the drip tray in the dishwasher. The front panel of the coffee grounds container (fig. A15) is not dishwasher-safe.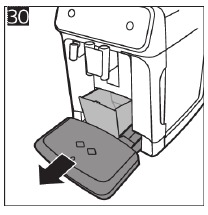 |
| LatteGo | After every use | Rinse LatteGo under the tap or clean it in the dishwasher. |
| Lubrication of the brew group | Every 2 months | Consult the lubrication table and lubricate the brew group with the Philips grease (see ‘Lubricating the brew group’). |
| Water tank | Weekly | Rinse the water tank under the tap |
Cleaning the brew group
Regular cleaning of the brew group prevents coffee residues from clogging up the internal circuits. Visit www.philips.com/coffee-care for support videos on how to remove, insert and clean the brew group.
Cleaning the brew group under the tap
- Remove the brew group (see ‘Removing and inserting the brew group’).
- Rinse the brew group thoroughly with water. Carefully clean the upper filter (Fig. 31) of the brew group.
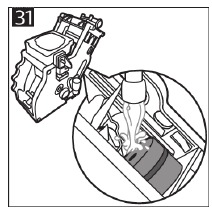
- Let the brew group air-dry before you place it back. Do not dry the brew group with a cloth to prevent fibers from collecting inside the brew group.
Lubricating the brew group
Lubricate the brew group every 2 months, to ensure that the moving parts continue to move smoothly.
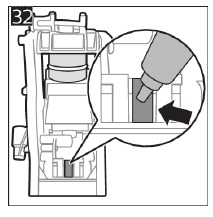
- Apply a thin layer of grease on the piston (grey part) of the brew group (Fig. 32).
- Apply a thin layer of grease around the shaft (grey part) in the bottom of the brew group (Fig. 33).

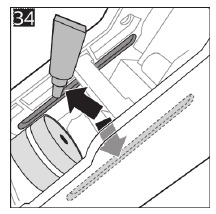
- Apply a thin layer of grease to the rails on both sides (Fig. 34).
Cleaning LatteGo (milk container)
Cleaning LatteGo after every use
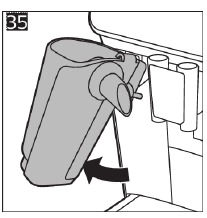
- Remove LatteGo from the machine (Fig. 35).
- Pour out any remaining milk.
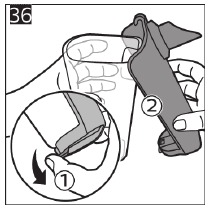
- Press the release button and remove the milk container from the frame of LatteGo (Fig. 36).
- Clean all parts in the dishwasher or under the tap with lukewarm water and some washing-up liquid.
Cleaning the classic milk frother
Cleaning the classic milk frother after every use
Clean the milk frother each time you use it for hygiene reasons and to avoid the build-up of milk residues.
- Place a cup under the milk frother.
- Tap the steam icon and then press the start/stop
 button to start dispensing steam and to remove any milk that may be left inside the milk frother.
 - To stop dispensing steam after a few seconds, press the start/stop
 button again.
 - Clean the milk frother with a damp cloth.
Daily cleaning of the classic milk frother
- Let the milk frother cool down completely.
- Tilt the milk frother to the left (Fig. 37) and remove both the metal part and the silicone part (Fig. 38).
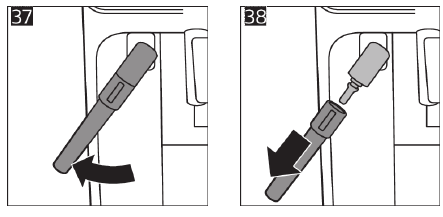
- Disassemble the two parts (Fig. 39) and rinse them with fresh water or clean them in the dishwasher. Make sure that the small hole on the metal tube is completely clean and not clogged by milk residues.
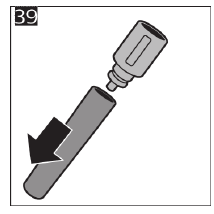
- Reassemble the two milk frother parts and reattach the milk frother to the machine.
AquaClean water filter
The AquaClean water filter can be placed in the water tank to preserve the taste of your coffee. It also diminishes the need for descaling by reducing limescale build-up in your machine.
AquaClean icon and light
Your machine is equipped with an AquaClean water filter light (Fig. 40) to indicate the status of the filter. Use the table below to see what actions are required when the light is on or when it is flashing.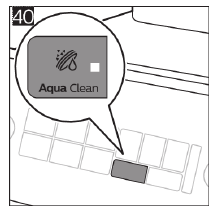
Activating the AquaClean water filter (5 min.)The machine does not automatically detect that a filter has been placed in the water tank. Therefore you need to activate each new AquaClean water filter that you install with the AquaClean icon.
When the orange AquaClean light is off, you can still activate an AquaClean water filter, but you will need to descale the machine first.Your machine has to be completely limescale-free before you start to use the AquaClean water filter.
Before activating the AquaClean water filter, it has to be prepared by soaking it in water as described below. If you don’t do this, air might be drawn into the machine instead of water, which makes a lot of noise and prevents the machine from being able to brew coffee.
- Make sure that the machine is switched on.
- Shake the filter for about 5 seconds (Fig. 41).
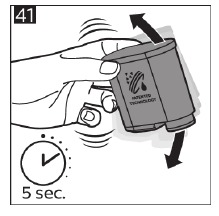
- Immerse the filter upside down in a jug with cold water and shake/press it (Fig. 42).
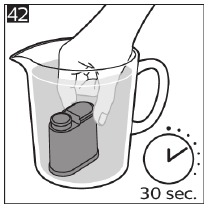
- The filter is now prepared for use and can be inserted into the water tank.
- Insert the filter vertically onto the filter connection in the water tank. Press it down to the lowest possible point (Fig. 43).
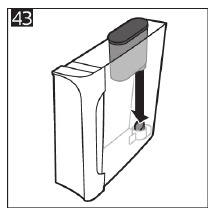
- Fill the water tank with fresh water and place it back into the machine.
- If attached, remove the LatteGo.
- Place a bowl under the hot water spout/milk frother.
- Press the AquaClean icon for 3 seconds (Fig. 44). The start light starts to pulse.
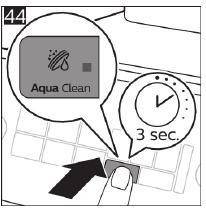
- Press the start/stop
 button to start the activation process.
 - Hot water will be dispensed from the hot water spout/milk frother (3 min.).
- When the activation process is finished, the blue AquaClean light goes on to confirm that the AquaClean water filter has been activated correctly.
Replacing the AquaClean water filter (5 min.)
After 95 liters of water have flowed through the filter, the filter will cease to work. The AquaClean light turns orange and starts to flash to remind you to replace the filter. As long as it flashes, you can replace the filter without having to descale the machine first. If you do not replace the AquaClean water filter, the orange light will go out eventually. In that case you can still replace the filter but you first need to descale the machine.
When the orange AquaClean light flashes:
- Take out the old AquaClean water filter.
- Install a new filter and activate it as described in chapter ‘Activating the AquaClean water filter (5 min.)’.
Replace the AquaClean water filter at least every 3 months, even if the machine does not yet indicate that replacement is required.
Setting the water hardness
 We advise you to adjust the water hardness to the water hardness in your region for optimal performance and a longer lifetime of the machine. This also prevents you from having to descale the machine too often. The default water hardness setting is 4: hard water.
Use the water hardness test strip supplied in the box to determine the water hardness in your region:
- Immerse the water hardness test strip in tap water or hold it under the tap for 1 second (Fig. 45).
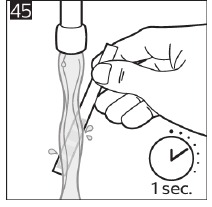
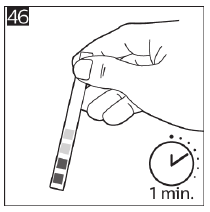
- Wait 1 minute. The number of squares on the test strip that turn red indicate the water hardness (Fig. 46).
Set the machine to the correct water hardness:
- Press the on/off button to switch off the machine.
- When the machine is switched off, tap and hold the aroma strength icon until all lights in the icon go on (Fig. 2).
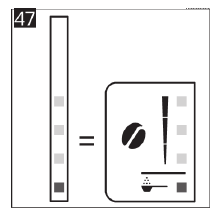
- Tap the aroma strength icon 1, 2, 3 or 4 times. The number of lights that are on should be the same as the number of red squares on the test strip (Fig. 47). When there are no red squares on the test strip (so all squares are green) please select 1 light.
- When you have set the correct water hardness, press the start/stop
 button.
 - Press the on/off icon to switch on the machine.
Since you only set the water hardness once, the aroma strength function is used to select the water hardness. This does not affect the aroma strength of the drinks you make afterwards.
Descaling procedure (30 min.)
Please use Philips descaler only. Under no circumstances should you use a descaler based on sulfuric acid, hydrochloric acid, sulfamic or acetic acid (vinegar) as this may damage the water circuit in your machine and not dissolve the limescale properly. Not using the Philips descaler will void your warranty. Failure to descale the appliance will also void your warranty. You can buy Philips descaling solution in the online shop at www.philips.com/coffee-care.
When the Calc / Clean light starts to flash slowly, you need to descale the machine.
- Make sure that the machine is switched on.
- If attached remove LatteGo or milk frother.
- Remove the drip tray and the coffee grounds container, empty them and put them back into place.
- Remove the water tank and empty it. Then remove the AquaClean water filter.
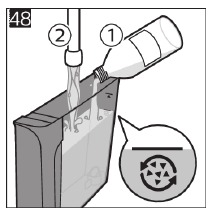
- Pour the whole bottle of Philips descaler in the water tank and then fill it with water up to the Calc / Clean indication (Fig. 48). Then place it back into the machine.
- Place a large container (1.5 l) under the coffee dispensing spout and the water spout.
- Press the Calc / Clean icon for 3 sec. and then press the start/stop
 button.
 - The first phase of the descaling procedure starts. The descaling procedure lasts approx. 30 minutes and consists of a descaling cycle and a rinsing cycle. During the descaling cycle the Calc / Clean light flashes to show that the descaling phase is in progress.
- Let the machine dispense the descaling solution until the display reminds you that the water tank is empty.
- Empty the water tank, rinse it and then refill it with fresh water up to the Calc / Clean indication.
- Empty the container and place it back under the coffee dispensing spout and the water spout. Press the start/stop
 button again.
 - The second phase of the descaling cycle, the rinsing phase, starts and lasts 3 minutes. During this phase the lights on the control panel go on and off to show that the rinsing phase is in progress.
- Wait until the machine stops dispensing water. The descaling procedure is finished when the machine stops dispensing water.
- The machine will now heat up again. When the lights in the drink icons light up continuously, the machine is ready for use again.
- Install and activate a new AquaClean water filter in the water tank (see ‘Activating the AquaClean water filter (5 min.)’). — When the descaling procedure is finished, the AquaClean light flashes for a while to remind you to install a new AquaClean water filter.
 Tip: Using the AquaClean filter reduces the need for descaling!
What to do if the descaling procedure is interrupted
You can exit the descaling procedure by pressing the on/off button on the control panel. If the descaling procedure is interrupted before it is completely finished, do the following:
- Empty and rinse the water tank thoroughly.
- Fill the water tank with fresh water up to the Calc / Clean level indication and switch the machine back on. The machine will heat up and perform an automatic rinsing cycle.
- Before brewing any drinks, perform a manual rinsing cycle. To perform a manual rinsing cycle, first dispense half a water tank of hot water by repeatedly tapping the hot water icon (Fig. 15) and then brew 2 cups of pre-ground coffee without adding ground coffee.
If the descaling procedure was not completed, the machine will require another descaling procedure as soon as possible.
Ordering accessories
To clean and descale the machine, only use the Philips maintenance products. These products can be purchased from your local retailer, from the authorized service centers or online at www.philips.com/parts-and-accessories. To find a full list of spare parts online, enter the model number of your machine. You can find the model number on the inside of the service door.
Maintenance products and type numbers:
- Descaling solution CA6700
- AquaClean water filter CA6903
- Brew group grease HD5061
Troubleshooting
This chapter summarizes the most common problems you could encounter with the machine. Support videos and a complete list of frequently asked questions are available on www.philips.com/coffee-care. If you are unable to solve the problem, contact the Consumer Care Center in your country. For contact details, see the warranty leaflet.
Warning icons
Troubleshooting table
This chapter summarizes the most common problems you could encounter with the machine. Support videos and a complete list of frequently asked questions are available on www.philips.com/coffee-care. If you are unable to solve the problem, contact the Consumer Care Center in your country. For contact details, see the warranty leaflet.
| Problem | Cause | Solution |
| The drip tray fills up quickly. | This is normal. The machine uses water to rinse the internal circuit and brew group. Some water flows through the internal system directly into the drip tray. | Empty the drip tray daily or as soon as the red ‘drip tray full’ indicator pops up through the drip tray cover. Tip: place a cup under the dispensing spout to collect rinsing water that comes out of it. |
| The ’empty coffee grounds container’ light remains on. | You emptied the coffee grounds container while the machine was switched off. | Always empty the coffee grounds container while the machine is switched on. Remove the coffee grounds container, wait at least 5 sec. and then insert it again. |
| The machine prompts to empty the coffee grounds container even though the container is not full. | The machine did not reset the counter the last time you emptied the coffee grounds container. | Always wait approx. 5 seconds when you place back the coffee grounds container. In this way the coffee grounds counter will be reset to zero. |
| Always empty the coffee grounds container while the machine is switched on. If you empty the coffee grounds container when the machine is switched off, the coffee grounds counter won’t reset. | ||
| The coffee grounds container is too full and the ’empty coffee grounds container’ light did not go on. | You removed the drip tray without emptying the grounds container. | When you remove the drip tray, also empty the coffee grounds container even if it contains only a few coffee pucks. In this way the coffee grounds counter will be reset to zero, re-starting to correctly count the coffee pucks. |
| I cannot remove the brew group. | The brew group is not in the correct position. | Reset the machine in the following way: close the service door and place back the water tank. Switch the machine off and back on again. Try again to remove the brew group. See chapter ‘Removing and inserting the brew group’ for step by step instructions. |
| I cannot insert the brew group. | The brew group is not in the correct position. | Reset the machine in the following way: close the service door and place back the water tank. Leave the brew group out. Switch the machine off and unplug it. Wait for 30 sec. and then plug the machine back in and switch it on. Then put the brew group in the correct position and reinsert it into in the machine. See chapter ‘Removing and inserting the brew group’ for step by step instructions. |
| The coffee is watery. | The brew group is dirty or needs to be lubricated. | Remove the brew group (see ‘Removing the brew group from the machine’), rinse it under the tap and leave it to dry. Then lubricate the moving parts (see ‘Lubricating the brew group’). |
| The machine is performing its selfadjustment procedure. This procedure is started automatically when you use the machine for the first time, when you change to another type of coffee beans or after a long period of non-use. | Brew 5 cups of coffee initially to allow the machine to complete its self-adjustment procedure. | |
| The grinder is set to a too coarse setting. | Set the grinder to a finer (lower) setting. Brew 2 to 3 drinks to be able to before taste the full difference. | |
| The coffee is not hot enough. | The temperature is set too low. | Set the temperature to the maximum (see ‘Adjusting the coffee temperature’). |
| A cold cup reduces the temperature of the drink. | Preheat the cups by rinsing them with hot water. | |
| Adding milk reduces the temperature of the drink. | Regardless of whether you add hot or cold milk, adding milk always reduces the temperature of the coffee. Preheat the cups by rinsing them with hot water. | |
| Coffee does not come out or coffee comes out slowly. | The AquaClean water filter was not prepared properly for installation. | Remove the AquaClean water filter and try to brew a coffee again. If this works, make sure that you have prepared the AquaClean water filter properly before you place it back. See chapter ‘AquaClean water filter’ for step-by-step instructions. |
| After a long period of non-use, you need to prepare the AquaClean water filter for use again and then place it back. See step 1 — 3 of chapter ‘Activating the AquaClean water filter’. | ||
| The AquaClean water filter is clogged. | Replace the AquaClean water filter every 3 months. A filter that is older than 3 months can become clogged. | |
| The grinder is set to a too fine setting. | Set the grinder to a coarser (higher) setting. Note that this will impact the coffee taste. | |
| The brew group is dirty. | Remove the brew group and rinse it under the tap (see ‘Cleaning the brew group under the tap’). | |
| The coffee dispensing spout is dirty. | Clean the coffee dispensing spout and its holes with a pipe cleaner or needle. | |
| The pre-ground coffee compartment is clogged | Switch off the machine and remove the brew group. Open the lid of the preground coffee compartment and insert the spoon handle into it. Move the handle up and down until the clogged ground coffee falls down (Fig. 28). | |
| The machine circuit is blocked by limescale. | Descale the machine with Philips descaler. Always descale the machine when the descaling light starts to flash. | |
| The machine grinds the coffee beans, but coffee does not come out. | The pre-ground coffee compartment is clogged. | Switch off the machine and remove the brew group. Open the lid of the preground coffee compartment and insert the spoon handle into it. Move the handle up and down until the clogged ground coffee falls down (Fig. 28). |
| The milk does not froth. | Machines with LatteGo: LatteGo is incorrectly assembled. | Make sure that the milk container is properly assembled to the frame of LatteGo (‘click’). |
| Machines with LatteGo: the milk container and/or frame of LatteGo are dirty. | Disassemble LatteGo and rinse both parts under the tap or clean them in the dishwasher (see ‘Cleaning LatteGo after every use’). | |
| Machines with classic milk frother: the milk frother is dirty. | Thoroughly clean the milk frother (see ‘Cleaning the classic milk frother ‘). | |
| The type of milk used is not suitable for frothing. | Different types of milk result in different amounts of froth and different froth qualities. We have tested the following milk types which proved to deliver a good milk froth result: semi-skimmed or full-fat cow’s milk and lactose-free milk. | |
| Milk is leaking from the bottom of the LatteGo milk container. | The frame and the milk container are not assembled properly. | First insert the top of the milk container under the hook at the top of the frame. Then press home the bottom part of the milk container. You hear a click when it locks into place. |
| The machine seems to be leaking. | The machine uses water to rinse the internal circuit and brew group. This water flows through the internal system directly into the drip tray. This is normal. | Empty the drip tray every day or as soon as the ‘drip tray full’ indicator pops up through the drip tray cover. Tip: Place a cup under the dispensing spout to collect rinsing water and reduce the amount of water in the drip tray. |
| The drip tray is too full and has overflowed which makes it look like the machine is leaking. | Empty the drip tray every day or as soon as the ‘drip tray full’ indicator pops up through the drip tray cover. | |
| The water tank is not fully inserted and air is drawn into the machine. | Make sure the water tank is in the correct position: remove it and insert it again pushing it as far as possible. | |
| The brew group is dirty/clogged. | Rinse the brew group. | |
| The machine is not placed on a horizontal surface. | Place the machine on a horizontal surface so that the drip tray does not overflow and the ‘drip tray full’ indicator works properly. | |
| The water tank is not fully inserted and air is drawn into the machine. | Make sure the water tank is in the correct position: remove it and insert it again pushing it as far as possible. | |
| I cannot activate the AquaClean water filter and the machine asks for descaling. | The filter has not been installed or replaced in time after the AquaClean water filter light started to flash. This means your machine is not completely limescale free. | Descale your machine first and then install the AquaClean water filter. |
| The new water filter does not fit. | You are trying to install another filter than the AquaClean water filter. | Only the AquaClean water filter fits into the machine. |
| The rubber ring on the AquaClean water filter is not in place. | Place back the rubber ring on the AquaClean water filter. | |
| The machine is making a loud noise. | It is normal that your machine makes noise during use. | If the machine starts to make a different kind of noise, clean the brew group and lubricate it (see ‘Lubricating the brew group’). |
| The AquaClean water filter was not prepared properly and air is now drawn into the machine. | Remove the AquaClean water filter from the water tank and properly prepare it for use before you place it back. See chapter ‘AquaClean water filter’ for step-by-step instructions. | |
| The water tank is not fully inserted and air is drawn into the machine. | Make sure the water tank is in the correct position: remove it and insert it again pushing it as far as possible. |
Technical specifications
The manufacturer reserves the right to improve the technical specifications of the product. All the preset quantities are approximate.
| Description | Value |
| Size (w x h x d) | 246 x 372 x 433 mm (9.6 x 14.6 x 17 in) |
| Weight | 7 — 7.5 kg (15.4 — 16.5 lbs) |
| Power cord length | 1000 mm (39.4 in) |
| Water tank | 1.8 litres (60.9 oz), removable |
| Coffee bean hopper capacity | 275 g (9.7 oz) |
| Coffee grounds container capacity | 12 pucks |
| LatteGo (milk container) capacity | 250 ml (8.5 oz) |
| Adjustable spout height | 85-145 mm (3.4 — 5.7 in) |
| Nominal voltage — Power rating — Power supply | See data label on inside of service door (fig. A11) |
Here you can download full pdf version of manual, it may contain additional safety instructions, warranty information, FCC rules, etc.
инструкцияPhilips LatteGo EP2030

Fully automatic
espresso machine
1200 series
2200 series
3200 series
RU RU РУКОВОДСТВО ПОЛЬЗОВАТЕЛЯ
KK ПАЙДАЛАНУШЫ НҰСҚАУЛЫҒЫ
www.philips.com/coee-care
OMNIA COVER_FRONT_A5_WE/EE/RCA.indd 3 03-12-18 15:38
Посмотреть инструкция для Philips LatteGo EP2030 бесплатно. Руководство относится к категории кофеварки, 3 человек(а) дали ему среднюю оценку 9.6. Руководство доступно на следующих языках: русский. У вас есть вопрос о Philips LatteGo EP2030 или вам нужна помощь? Задайте свой вопрос здесь
- Оглавление
- Обзор кофемашины (рис. A)
- Панель управления (рис. B)
- Введение
- Перед первым использованием
- Приготовление напитков
- Настройка параметров кофемашины
- Удаление и установка варочной группы
- Очистка и уход
- Фильтр для очистки воды AquaClean
- Установка степени жесткости воды
- Процедура очистки от накипи (продолжительность 30 мин.)
- Заказ аксессуаров
- Поиск и устранение неисправностей
- Технические характеристики
- Мазмұны
- Құрылғыға шолу (A суреті)
- Бақылау панелі (B суреті)
- Кіріспе
- Бірінші рет пайдалану алдында
- Сусындар қайнату
- Құрылғы параметрлерін реттеу
- Қайнату құралын алу және салу
- Тазалау және техникалық қызмет көрсету
- AquaClean су сүзгісі
- Судың қаттылығын таңдау
- Қақ түсіру процедурасы (ұзақтығы: 30 мин)
- Қосалқы құрылғыларға тапсырыс беру
- Ақаулықтарды жою
- Техникалық ерекшеліктер
Главная
| Philips | |
| LatteGo EP2030 | EP2030/10 | |
| кофеварка | |
| 8710103894582 | |
| русский | |
| Руководство пользователя (PDF) |
Вес и размеры
| Вес | 8000 g |
| Ширина | 246 mm |
| Глубина | 433 mm |
| Высота | 371 mm |
Производительность
| Емкость водного резервуара | 1.8 L |
| Страна производства | Румыния |
| Вместимость кофейных зерен | 275 g |
| Количество настроек температуры | 3 |
| Количество режимов кофемолки | 12 |
| Контроль аромата до приготовления | Да |
| Размещение бытового устройства | Столешница |
| Тип продукта | Машина для эспрессо |
| Емкость резервуара для молока | 0.26 L |
| Емкость для молока | Да |
| Регулируемая крепость кофе | Да |
| Тип кофе | Кофе в зернах |
| Тип кофеварки | Автоматическая |
| Емкость для сваренного кофе | Чашка |
| Вместимость в чашках | — чашек |
| Регулируемые настройки кофемолки | Да |
| Тип кофемолки | Керамическая кофемолка |
| Встроенная мельница | Да |
| Количество мельниц | 1 шт |
| Максимальное рабочее давление | 15 бар |
| Система подачи горячей воды | Да |
| Регулируемая температура | Да |
| Комплектующие пригодны для мытья в посудомоечной машине | Да |
| Водяной фильтр | Да |
| Количество носиков | 2 |
| Количество настроек крепости кофе | 3 |
| Совместимость фильтра | AquaClean |
| Функция очистки от накипи | Да |
| Диапазон регулировки высоты носика | 85 — 145 mm |
Технические характеристики
| Максимальная высота чашки | 150 mm |
| Съемная варочная группа | Да |
| Автоматическая промывка и управляемое удаление накипи | Да |
Прочие свойства
| Упаковка пригодна для вторичной переработки | 95 % |
Энергопитание
| Мощность | 1500 W |
| Входящее напряжение сети | 230 V |
| Частота входящего переменного тока | 50 Hz |
| Класс энергоэффективности | A |
| Режим энергосбережения | Да |
| Максимальное потребление энергии | 1500 W |
Эргономика
| Длина шнура | 1 m |
| Цвет товара | Черный |
| Тип управления | Buttons, Touch |
| Встроенный экран | Да |
| Съемный лоток для капель | Да |
| Съемный резервуар для воды | Да |
| Индикатор накипи | Да |
| Емкость контейнера для использованных капсул | 12 шт |
| Съемный заварочный блок | Да |
| Сенсорный экран | Да |
Программы и функции приготовления пищи
| Приготовление кофе | Да |
| Приготовление эспрессо | Да |
| Приготовление капучино | Да |
показать больше
Не можете найти ответ на свой вопрос в руководстве? Вы можете найти ответ на свой вопрос ниже, в разделе часто задаваемых вопросов о Philips LatteGo EP2030.
Какой вес Philips LatteGo EP2030?
Philips LatteGo EP2030 имеет вес 8000 g.
Как часто следует очищать кофеварку от накипи?
Частота очистки кофеварки от накипи зависит от частоты ее использования и жесткости воды. При использовании воды высокой жесткости кофеварку рекомендуется очищать от накипи раз в месяц. При использовании воды низкой жесткости рекомендуется проводить чистку раз в квартал.
Какой лучший способ очистки кофеварки от накипи?
Для очистки кофеварки от накипи рекомендуется использовать жидкие средства на которых есть отметка о возможности использования их для чистки кофеварки.
Что такое эспрессо?
Эспрессо — небольшое количество концентрированного кофе.
Как долго можно хранить кофе в зернах?
Срок годности указывается на упаковке кофе в зернах. Данный срок годности действителен, пока упаковка не открыта.
Как лучше всего хранить кофе?
Кофе рекомендуется хранить в герметичной, чистой емкости.
Как помол сказывается на вкусе кофе?
Помол сильно влияет на вкус кофе. Если кофейные зерна измельчены очень мелко — это усилит вкус кофе, при более крупном помоле кофе будет иметь более мягкий вкус.
Какая высота Philips LatteGo EP2030?
Philips LatteGo EP2030 имеет высоту 371 mm.
Какая ширина Philips LatteGo EP2030?
Philips LatteGo EP2030 имеет ширину 246 mm.
Какая толщина Philips LatteGo EP2030?
Philips LatteGo EP2030 имеет толщину 433 mm.
Какую маркировку энергоэффективности Philips LatteGo EP2030 имеет?
Philips LatteGo EP2030 имеет маркировку энергоэффективности A.
Инструкция Philips LatteGo EP2030 доступно в русский?
Да, руководствоPhilips LatteGo EP2030 доступно врусский .
Не нашли свой вопрос? Задайте свой вопрос здесь
Кофемашина Philips EP3246 Series 3200 LatteGo – легко выбирайте любимый кофе!
Легко выбирайте любимый кофе
Неповторимый аромат и вкус кофе из свежемолотых зерен за одно касание. Простой сенсорный дисплей позволяет без труда выбирать любимый кофе.
Классический капучинатор
Классический капучинатор используется для приготовления с помощью пара нежной молочной пены для вашего капучино. Кроме того, очистка классического капучинатора не займет много времени, поскольку он состоит только из двух деталей.
Идеальная температура и аромат
Система Aroma Extract в интеллектуальном режиме находит оптимальный баланс между температурой варки и интенсивностью аромата кофе, поддерживая температуру воды между 90 и 98 °C, а также регулируя количество воды, чтобы вы всегда наслаждались самым вкусным кофе.
Пять превосходных видов кофе
Готовьте любимый кофе для любых случаев: бодрящий эспрессо, классический кофе или капучино — с помощью полностью автоматической кофемашины вы быстро и без лишних усилий сварите идеальный кофе.
От мелкого до крупного помола
Долговечные керамические жернова имеют 12 доступных режимов, чтобы вы могли выбрать нужный помол — от сверхмелкого до крупного.
Меню My Coffee Choice
Настраивайте крепость и объем порции кофе в меню My Coffee Choice. Легко выбирайте нужный параметр из трех доступных опций.
Герметичная конструкция контейнера
Герметичная конструкция нового типа сохраняет свежесть и аромат кофейных зерен, а также делает работу жерновов менее шумной.
Перейти к контенту

Русские электронные инструкции по эксплуатации
Постоянно обновляемый большой каталог документации по эксплуатации и использованию современных устройств и оборудования на русском языке. Бесплатное скачивание файлов.
Поиск:
Главная
♥ В закладки
Просмотр инструкции в pdf


Порядок чистки эспрессо-кофемашины Philips серии EP4300 LatteGo

Порядок снятия и установки варочной группы эспрессо-кофемашины Philips серии 4300 LatteGo

Порядок чистки эспрессо-кофемашины Philips серии EP4300 LatteGo от накипи
Устранение неисправностей и ремонт
Ваш продукт не работает должным образом? Найдите решение здесь.
Выберите продукт
Дополнительная информация
-
Руководство пользователя PDF
файл,
1.8 MB
25 апреля 2021 г. -
Руководство пользователя PDF
файл,
1.8 MB
25 апреля 2021 г. -
Руководство пользователя PDF
файл,
5.0 MB
11 января 2022 г. -
Руководство пользователя PDF
файл,
5.0 MB
11 января 2022 г. -
Руководство пользователя PDF
файл,
5.0 MB
11 января 2022 г. -
Руководство пользователя PDF
файл,
5.0 MB
11 января 2022 г. -
Руководство пользователя PDF
файл,
4.8 MB
4 мая 2021 г. -
Руководство пользователя PDF
файл,
4.8 MB
4 мая 2021 г. -
Руководство пользователя PDF
файл,
4.8 MB
4 мая 2021 г. -
Руководство пользователя PDF
файл,
4.8 MB
4 мая 2021 г. -
Руководство пользователя PDF
файл,
4.8 MB
4 мая 2021 г. -
Руководство пользователя PDF
файл,
4.8 MB
4 мая 2021 г. -
Руководство пользователя PDF
файл,
4.8 MB
4 мая 2021 г. -
Руководство пользователя PDF
файл,
4.8 MB
4 мая 2021 г. -
Руководство пользователя PDF
файл,
4.8 MB
4 мая 2021 г. -
Руководство пользователя PDF
файл,
4.8 MB
4 мая 2021 г. -
Руководство пользователя PDF
файл,
4.8 MB
4 мая 2021 г. -
Руководство пользователя PDF
файл,
3.1 MB
4 ноября 2021 г. -
Руководство пользователя PDF
файл,
3.1 MB
4 ноября 2021 г. -
Руководство пользователя PDF
файл,
3.1 MB
4 ноября 2021 г. -
Руководство пользователя PDF
файл,
3.1 MB
4 ноября 2021 г. -
Руководство пользователя PDF
файл,
3.1 MB
4 ноября 2021 г. -
Руководство пользователя PDF
файл,
4.5 MB
13 апреля 2022 г. -
Руководство пользователя PDF
файл,
4.5 MB
13 апреля 2022 г. -
Руководство пользователя PDF
файл,
5.8 MB
3 мая 2021 г. -
Руководство пользователя PDF
файл,
5.8 MB
3 мая 2021 г. -
Руководство пользователя PDF
файл,
5.8 MB
3 мая 2021 г. -
Руководство пользователя PDF
файл,
5.8 MB
3 мая 2021 г. -
Руководство пользователя PDF
файл,
5.8 MB
3 мая 2021 г. -
Руководство пользователя PDF
файл,
5.8 MB
3 мая 2021 г. -
Руководство пользователя PDF
файл,
5.8 MB
3 мая 2021 г. -
Руководство пользователя PDF
файл,
5.8 MB
3 мая 2021 г. -
Руководство пользователя PDF
файл,
5.8 MB
3 мая 2021 г. -
Руководство пользователя PDF
файл,
5.8 MB
3 мая 2021 г. -
Руководство пользователя PDF
файл,
5.8 MB
3 мая 2021 г. -
Руководство пользователя PDF
файл,
5.8 MB
3 мая 2021 г. -
Руководство пользователя PDF
файл,
5.8 MB
3 мая 2021 г. -
Руководство пользователя PDF
файл,
5.8 MB
3 мая 2021 г. -
Руководство пользователя PDF
файл,
4.4 MB
5 июля 2022 г. -
Руководство пользователя PDF
файл,
4.4 MB
5 июля 2022 г. -
Руководство с важными сведениями PDF
файл,
596.2 kB
27 мая 2021 г. -
Руководство с важными сведениями PDF
файл,
596.2 kB
27 мая 2021 г. -
Руководство с важными сведениями PDF
файл,
596.2 kB
27 мая 2021 г. -
Руководство с важными сведениями PDF
файл,
596.2 kB
27 мая 2021 г. -
Руководство с важными сведениями PDF
файл,
596.2 kB
27 мая 2021 г. -
Руководство с важными сведениями PDF
файл,
596.2 kB
27 мая 2021 г. -
Руководство с важными сведениями PDF
файл,
596.2 kB
27 мая 2021 г. -
Руководство с важными сведениями PDF
файл,
596.2 kB
27 мая 2021 г. -
Руководство с важными сведениями PDF
файл,
596.2 kB
27 мая 2021 г. -
Руководство с важными сведениями PDF
файл,
596.2 kB
27 мая 2021 г. -
Руководство с важными сведениями PDF
файл,
596.2 kB
27 мая 2021 г. -
Руководство с важными сведениями PDF
файл,
596.2 kB
27 мая 2021 г. -
Руководство с важными сведениями PDF
файл,
596.2 kB
27 мая 2021 г. -
Руководство с важными сведениями PDF
файл,
596.2 kB
27 мая 2021 г. -
Руководство с важными сведениями PDF
файл,
1.2 MB
19 апреля 2022 г. -
Руководство с важными сведениями PDF
файл,
596.2 kB
25 апреля 2021 г. -
Руководство с важными сведениями PDF
файл,
596.2 kB
25 апреля 2021 г. -
Руководство с важными сведениями PDF
файл,
393.0 kB
4 ноября 2021 г. -
Руководство с важными сведениями PDF
файл,
393.0 kB
4 ноября 2021 г. -
Руководство с важными сведениями PDF
файл,
393.0 kB
4 ноября 2021 г. -
Руководство с важными сведениями PDF
файл,
393.0 kB
4 ноября 2021 г. -
Руководство с важными сведениями PDF
файл,
1.7 MB
31 августа 2022 г. -
Руководство с важными сведениями PDF
файл,
1.7 MB
31 августа 2022 г. -
Руководство с важными сведениями PDF
файл,
1.7 MB
31 августа 2022 г. -
Руководство с важными сведениями PDF
файл,
1.7 MB
31 августа 2022 г. -
Руководство с важными сведениями PDF
файл,
1.7 MB
31 августа 2022 г. -
Руководство с важными сведениями PDF
файл,
1.7 MB
31 августа 2022 г. -
Руководство с важными сведениями PDF
файл,
1.7 MB
31 августа 2022 г. -
Руководство с важными сведениями PDF
файл,
1.7 MB
31 августа 2022 г. -
Руководство с важными сведениями PDF
файл,
1.7 MB
31 августа 2022 г. -
Руководство с важными сведениями PDF
файл,
1.7 MB
31 августа 2022 г. -
Руководство с важными сведениями PDF
файл,
1.7 MB
31 августа 2022 г. -
Руководство с важными сведениями PDF
файл,
1.7 MB
31 августа 2022 г. -
UK Declaration of conformity PDF
файл,
468.1 kB
15 августа 2023 г. -
Локализованная торговая брошюра PDF
файл,
716.2 kB
30 августа 2023 г.
Зарегистрируйте продукт и получите
- Электронную гарантию
- Информацию о скидках и акциях
- Простой доступ к поддержке продуктов
Популярные компоненты и аксессуары для этого продукта
Обращение в компанию Philips
Мы всегда рады помочь вам
Предлагаемые продукты
Machine overview


A1 Control panel
A2 Cup holder
A3 Pre-ground coffee compartment
A4 Lid of bean hopper
A5 Adjustable coffee spout
A6 Mains plug
A7 Grind setting knob
A8 Coffee bean hopper
A9 Brew group
A10 Service door
A11 Data label with type number
A12 Water tank
A13 Hot water spout
A14 Coffee grounds container
A15 Front panel of coffee grounds container
A16 Drip tray cover
A17 Drip tray
A18 ‘Drip tray full’ indicator
Accessories
A19 Grease tube
A20 AquaClean water filter
A21 Measuring scoop
A22 Water hardness test strip
A23 Classic milk frother (specific types only)
A24 LatteGo (milk container) (specific types only)
Control panel

Refer to figure B for an overview of all buttons and icons. Below you find the description.Some of the buttons/icons are for specific types only.
B1 On/off button
B2 Drink icons*
B3 Aroma strength/pre-ground coffee icon
B4 Drink quantity icon
B5 Milk quantity icon (specific types only)
B6 Coffee temperature icon (specific types only)
B7 Warning icons
B8 Start light
B9 Start/stop  button
B10 Calc / Clean icon
B11 AquaClean icon
* Drink icons: espresso, espresso lungo, coffee, americano, cappuccino, latte macchiato, hot water, steam, iced coffee (specific types only)
Introduction
To fully benefit from the support that Philips offers, please register your product at www.philips.com/welcome. Read the separate safety booklet carefully before you use the machine for the first time and save it for future reference. To help you get started and to get the best out of your machine, Philips offers support in multiple ways. In the box you find:
- This user manual with picture-based usage instructions and more detailed information on cleaning and maintenance.
There are multiple versions of this espresso machine, which all have different features. Each version has its own type number. You can find the type number on the data label on the inside of the service door (see fig A11).
- The separate safety booklet with instructions on how to use the machine in a safe way.
- For online support (frequently asked questions, movies etc.), scan the QR code on the cover of this booklet or visit www.philips.com/coffee-care
This machine has been tested with coffee. Although it has been carefully cleaned, there may be some coffee residues left. We guarantee, however, that the machine is absolutely new.
The machine automatically adjusts the amount of ground coffee that is used to make the best-tasting coffee. You should brew 5 coffees initially to allow the machine to complete its self-adjustment. Make sure you rinse the LatteGo (milk container) or the classic milk frother before first use.
Before first use
- Rinsing the machine

- Activating the AquaClean water filter (5 min.)
For more information see chapter ‘AquaClean water filter’.
- Setting the water hardness
For more information see chapter ‘Setting the water hardness’.
- Assembling LatteGo (specific types only)

- Assembling the classic milk frother (specific types only)

Brewing drinks
General steps
- Fill the water tank with tap water and fill the bean hopper with beans.
- Press the on/off button to switch on the machine.
- The machine starts heating up and performs the automatic rinsing cycle. During heating up, the lights in the drinks icons light up and go out slowly one by one.
- When all lights in the drink icons light up continuously, the machine is ready for use.
- Place a cup under the coffee dispensing spout. Slide the coffee dispensing spout up or down to adjust its height to the size of the cup or glass you are using (Fig. 1).

Personalizing drinks
This machine allows you to adjust the settings of a drink to your own preference. After selecting a drink you can:
- Adjust the aroma strength by tapping the aroma strength icon (Fig. 2). There are 3 strengths, the lowest is the mildest and the highest is the strongest.

- Adjust the drink quantity by tapping the drink quantity (Fig. 3) and/or the milk quantity icon (specific types only). There are 3 quantities: low, medium and high.

You can also adjust the coffee temperature to your own preference (see ‘Adjusting the coffee temperature’).
Brewing coffee with beans
- To brew a coffee, tap the drink icon of your choice.
- The aroma strength and quantity lights go on and show the previously selected setting.
- You can now adjust the drink to your preferred taste (see ‘Personalizing drinks’).
- Press the start/stop button.
- The light in the drink icon flashes while the drink is being dispensed.
Specific types only: An americano is made of espresso and water. When you brew an americano, the machine first dispenses an espresso and then water.
- The light in the drink icon flashes while the drink is being dispensed.
- To stop dispensing coffee before the machine is finished, press the start/stop
 button again.
To brew 2 coffees at the same time, tap the drink icon twice. The 2x light lights up.
Brewing milk-based drinks with LatteGo (milk container)
LatteGo consists of a milk container, a frame and a storage lid. To avoid leakage, make sure the frame and the milk container are properly assembled before you fill the milk container.
- To assemble LatteGo, first insert the top of the milk container under the hook at the top of the frame (Fig. 4). Then press home the bottom part of the milk container. You hear a click when it locks into place (Fig. 5). Note: Make sure that the milk container and the frame are clean before you connect them.


- Slightly tilt LatteGo and put it on the hot water spout (Fig. 6). Then press it home until it locks into place (Fig. 7).

- Fill LatteGo with milk up to the level indicated on the milk container for the drink you are brewing (Fig. 8). Do not fill the milk container beyond the maximum indication.

If you have personalized the milk quantity, you may need to fill the milk container with more or less milk than indicated for this drink on LatteGo.
 Always use milk coming directly from the fridge for optimal results.
 - Place a cup on the drip tray.
- Tap the milk-based drink icon of your choice.
- You can now adjust the drink to your own preference (see ‘Personalizing drinks’).
- Press the start/stop
 button.
- The light in the drink icon flashes while the drink is being dispensed. When you brew a cappuccino or latte macchiato, the machine first dispenses milk and then coffee.
- To stop dispensing milk before the machine has dispensed the preset amount, press the start/stop
 button.
- To stop dispensing the complete drink (milk and coffee) before the machine is finished, press and hold the start/stop
 button.
Frothing milk with classic milk frother Always use milk coming directly from the fridge for the best foam quality.
- Tilt the black silicone handle on the machine to the left and slide the milk frother onto it (Fig. 9).

- Fill a milk jug with with approx. 100 ml milk for cappuccino and approx. 150 ml milk for latte macchiato.
- Insert the milk frother approx. 1 cm into the milk.
- Tap the steam icon (Fig. 10).

- The light in the steam icon goes on and the start light starts pulsing.
- Press the start/stop
 button to froth the milk (Fig. 11).
- The machine starts heating up, steam is forced into the milk and the milk is frothed.
- When the milk foam in the milk jug has reached the required volume, press the start/stop
 button again to stop frothing milk.
Never froth milk longer than 90 seconds. The frothing automatically stops after 90 seconds.
You do not have to move the milk jug during milk frothing to get the best milk froth quality.
Brewing coffee with pre-ground coffee
You can choose to use pre-ground coffee instead of beans, for example if you prefer a different coffee variety or decaffeinated coffee.
- Press the on/off button to switch on the machine and wait until it is ready for use.
- Open the lid of the pre-ground coffee compartment and pour one leveled measuring scoop of preground coffee into it (Fig. 12). Then close the lid.

- Place a cup under the coffee dispensing spout.
- Select a single drink.
- Press the aroma strength icon for 3 seconds (Fig. 13).

- The pre-ground coffee light goes on and the start light starts pulsing.
- Press the start/stop
 button.
 - To stop dispensing coffee before the machine is finished, press the start/stop
 button again.
With pre-ground coffee you can only brew one coffee at a time.
Pre-ground coffee is not a setting that is saved as a previous selected strength setting. Each time you want to use pre-ground coffee, you need to press the aroma strength icon for 3 seconds.
When you select pre-ground coffee, you cannot select a different aroma strength.
Brewing iced coffee (specific types only) The coffee is brewed with warm water. Brew over ice cubes for optimal results.
- Take a glass and fill it halfway with ice cubes.
- Place the glass under the coffee dispensing spout.
- Tap the iced coffee icon (Fig. 14).

- The aroma strength and quantity lights go on.
- You can now adjust the drink to your preferred taste. We recommend using aroma strength 3.
- Press the start/stop
 button.
 - To stop dispensing coffee before the machine is finished, press the start/stop
 button again.
 - For a special iced coffee treat, top it up with cold milk.
Dispensing hot water
- If attached, remove LatteGo or the milk frother.
- Tap the hot water icon (Fig. 15).

- The drink quantity lights go on and show the previous selected drink setting for hot water.
- Adjust the hot water quantity to your preference by tapping the drink quantity icon (Fig. 3).
- Press the start/stop
 button.
- The light in the hot water icon flashes and hot water is dispensed from the hot water spout (Fig. 16).

- The light in the hot water icon flashes and hot water is dispensed from the hot water spout (Fig. 16).
- To stop dispensing hot water before the machine is finished, press the start/stop
 button again.
Adjusting machine settings
Adjusting the stand-by time
- Press the on/off button to switch off the machine.
- When the machine is switched off: press and hold the Calc / Clean icon (Fig. 17) until the Calc / Clean light and the Aroma strength lights go on (Fig. 18).

- Tap the Aroma strength icon to select the required stand-by time: 15, 30, 60 or 180 minutes. Respectively 1, 2, 3 or 4 lights of the Aroma strength icon light up.
- When you have finished setting the stand-by time, press the start/stop button. The machine switches off.
- Press the on/off button to switch on the machine again.
Programming the highest default setting of your drinks
The machine has 3 default settings for each drink: low, medium, high. You can only adjust the quantity of the highest setting. The new quantity can be stored as soon as the start light starts to pulse.Before you start programming the quantity of a milk drink, assemble LatteGo and pour milk in it.
- To adjust the highest quantity setting, press and hold the icon of the drink you want to adjust for 3 seconds.
- The upper light of the drinks quantity icon and the upper light of the milk quantity icon (specific types only) starts to pulse and the start/stop
 button starts to pulse, indicating that you are in programming mode.
- The upper light of the drinks quantity icon and the upper light of the milk quantity icon (specific types only) starts to pulse and the start/stop
- Press the start/stop
 button. The machine starts to brew the selected beverage.
- The start light lights up continuously at first. When the machine is ready to store the adjusted volume, the start/stop light starts to pulse.
- Press the start/stop
 button again when the cup contains the desired quantity of coffee or milk.
After you have programmed the new highest default quantity for a drink, the machine will dispense this new amount each time you select the highest quantity of this drink.You can only adjust the highest default quantity level.
If you want to go back to the default quantity settings, see ‘ Restoring factory settings’.
Adjusting the coffee temperature
Machines without temperature icon
- Press the on/off button to switch off the machine.
- When the machine is switched off: press and hold the coffee quantity icon until the lights in this icon go on (Fig. 19).

- Tap the quantity icon to select the required temperature: normal, high or max.
- Respectively 1, 2 or 3 lights are on.
- When you have finished setting the coffee temperature, press the start/stop
 button.
 - Press the on/off button to switch on the machine again.
If you do not switch off the machine yourself, it will switch off automatically after some time.
Machines with temperature icon (EP3221 only)
- Tap the coffee temperature icon repeatedly to select the desired temperature.
Restoring factory settings
The machine offers you the possibility to restore the drinks default settings at any moment.You can only restore the default settings when the machine is switched off.
- Press the on/off button to switch the machine off.
- Press and hold the espresso icon for 3 seconds.
- The middle lights in the drink setting icons light up. The start/stop light starts to pulse, indicating that the settings are ready to be restored.
- Press the start/stop
 button to confirm you want to restore the settings.
 - Press the on/off button to switch on the machine again.
Adjusting grinder settings
You can change the coffee strength with the grind setting knob inside the bean container. The lower the grind setting, the finer the coffee beans are ground and the stronger the coffee. There are 12 different grind settings you can choose from. The machine has been set up to get the best taste out of your coffee beans. Therefore we advise you not to adjust the grind setting until you have brewed 100-150 cups (approx. 1 month of use).You can only adjust the grind settings when the machine is grinding coffee beans. You need to brew 2 to 3 drinks before you can taste the full difference.
Do not turn the grind setting knob more than one notch at a time to prevent damage to the grinder.
- Place a cup under the coffee dispensing spout.
- Open the lid of the coffee bean hopper.
- Tap the espresso icon and then press the start/stop
 button.
 - When the grinder starts grinding, press down the grind setting knob and turn it to the left or right. (Fig. 20)

Removing and inserting the brew group
Go to www.philips.com/coffee-care for detailed video instructions on how to remove, insert and clean the brew group.
Removing the brew group from the machine
- Switch off the machine.
- Remove the water tank and open the service door (Fig. 21).

- Press the PUSH handle (Fig. 22) and pull at the grip of the brew group to remove it from the machine (Fig. 23).

Reinserting the brew group
Before you slide the brew group back into the machine, make sure it is in the correct position.
- Check if the brew group is in the correct position. The arrow on the yellow cylinder on the side of the brew group has to be aligned with the black arrow and N (Fig. 24).

- If they are not aligned, push down the lever until it is in contact with the base of the brew group (Fig. 25).

- If they are not aligned, push down the lever until it is in contact with the base of the brew group (Fig. 25).
- Slide the brew group back into the machine along the guiding rails on the sides (Fig. 26) until it locks into position with a click (Fig. 27). Do not press the PUSH button.

- Close the service door and place back the water tank.
Cleaning and maintenance
Regular cleaning and maintenance keeps your machine in top condition and ensures good-tasting coffee for a long time with a steady coffee flow. Consult the table below for a detailed description on when and how to clean all detachable parts of the machine. You can find more detailed information and video instructions on www.philips.com/coffee-care. See figure D for an overview of which parts can be cleaned in the dishwasher.
| Detachable parts | When to clean | How to clean |
| Brew group | Weekly | Remove the brew group from the machine (see ‘Removing and inserting the brew group’). Rinse it under the tap (see ‘Cleaning the brew group under the tap’). |
| Classic milk frother | After every use | First dispense hot water with the milk frother attached to the machine for thorough cleaning. Then remove the milk frother from the machine and disassemble it. Clean all parts under the tap or in the dishwasher. |
| Pre-ground coffee compartment | Check the pre-ground coffee compartment weekly to see if it is clogged. | Unplug the machine and remove the brew group. Open the lid of the pre-ground coffee compartment and insert the spoon handle into it. Move the handle up and down until the clogged ground coffee falls down (Fig. 28). Go to www.philips.com/coffee-care for detailed video instructions. |
| Coffee grounds container | Empty the coffee grounds container when prompted by the machine. Clean it weekly. | Remove the coffee grounds container while the machine is switched on. Rinse it under the tap with some washing-up liquid or clean it in the dishwasher. The front panel of the coffee grounds container is not dishwasher-safe. |
| Drip tray | Empty the drip tray daily or as soon as the red ‘drip tray full’ indicator pops up through the drip tray (Fig. 29). Clean the drip tray weekly. |
Remove the drip tray (Fig. 30) and rinse it under the tap with some washing-up liquid. You can also clean the drip tray in the dishwasher. The front panel of the coffee grounds container (fig. A15) is not dishwasher-safe. |
| LatteGo | After every use | Rinse LatteGo under the tap or clean it in the dishwasher. |
| Lubrication of the brew group | Every 2 months | Consult the lubrication table and lubricate the brew group with the Philips grease (see ‘Lubricating the brew group’). |
| Water tank | Weekly | Rinse the water tank under the tap |
Cleaning the brew group
Regular cleaning of the brew group prevents coffee residues from clogging up the internal circuits. Visit www.philips.com/coffee-care for support videos on how to remove, insert and clean the brew group.
Cleaning the brew group under the tap
- Remove the brew group (see ‘Removing and inserting the brew group’).
- Rinse the brew group thoroughly with water. Carefully clean the upper filter (Fig. 31) of the brew group.

- Let the brew group air-dry before you place it back. Do not dry the brew group with a cloth to prevent fibers from collecting inside the brew group.
Lubricating the brew group
Lubricate the brew group every 2 months, to ensure that the moving parts continue to move smoothly.
- Apply a thin layer of grease on the piston (grey part) of the brew group (Fig. 32).

- Apply a thin layer of grease around the shaft (grey part) in the bottom of the brew group (Fig. 33).

- Apply a thin layer of grease to the rails on both sides (Fig. 34).

Cleaning LatteGo (milk container)
Cleaning LatteGo after every use
- Remove LatteGo from the machine (Fig. 35).

- Pour out any remaining milk.
- Press the release button and remove the milk container from the frame of LatteGo (Fig. 36).

- Clean all parts in the dishwasher or under the tap with lukewarm water and some washing-up liquid.
Cleaning the classic milk frother
Cleaning the classic milk frother after every use
Clean the milk frother each time you use it for hygiene reasons and to avoid the build-up of milk residues.
- Place a cup under the milk frother.
- Tap the steam icon and then press the start/stop
 button to start dispensing steam and to remove any milk that may be left inside the milk frother.
 - To stop dispensing steam after a few seconds, press the start/stop
 button again.
 - Clean the milk frother with a damp cloth.
Daily cleaning of the classic milk frother
- Let the milk frother cool down completely.
- Tilt the milk frother to the left (Fig. 37) and remove both the metal part and the silicone part (Fig. 38).

- Disassemble the two parts (Fig. 39) and rinse them with fresh water or clean them in the dishwasher. Make sure that the small hole on the metal tube is completely clean and not clogged by milk residues.

- Reassemble the two milk frother parts and reattach the milk frother to the machine.
AquaClean water filter
The AquaClean water filter can be placed in the water tank to preserve the taste of your coffee. It also diminishes the need for descaling by reducing limescale build-up in your machine.
AquaClean icon and light
Your machine is equipped with an AquaClean water filter light (Fig. 40) to indicate the status of the filter. Use the table below to see what actions are required when the light is on or when it is flashing.
Activating the AquaClean water filter (5 min.)The machine does not automatically detect that a filter has been placed in the water tank. Therefore you need to activate each new AquaClean water filter that you install with the AquaClean icon.
When the orange AquaClean light is off, you can still activate an AquaClean water filter, but you will need to descale the machine first.Your machine has to be completely limescale-free before you start to use the AquaClean water filter.
Before activating the AquaClean water filter, it has to be prepared by soaking it in water as described below. If you don’t do this, air might be drawn into the machine instead of water, which makes a lot of noise and prevents the machine from being able to brew coffee.
- Make sure that the machine is switched on.
- Shake the filter for about 5 seconds (Fig. 41).

- Immerse the filter upside down in a jug with cold water and shake/press it (Fig. 42).

- The filter is now prepared for use and can be inserted into the water tank.
- Insert the filter vertically onto the filter connection in the water tank. Press it down to the lowest possible point (Fig. 43).

- Fill the water tank with fresh water and place it back into the machine.
- If attached, remove the LatteGo.
- Place a bowl under the hot water spout/milk frother.
- Press the AquaClean icon for 3 seconds (Fig. 44). The start light starts to pulse.

- Press the start/stop
 button to start the activation process.
 - Hot water will be dispensed from the hot water spout/milk frother (3 min.).
- When the activation process is finished, the blue AquaClean light goes on to confirm that the AquaClean water filter has been activated correctly.
Replacing the AquaClean water filter (5 min.)
After 95 liters of water have flowed through the filter, the filter will cease to work. The AquaClean light turns orange and starts to flash to remind you to replace the filter. As long as it flashes, you can replace the filter without having to descale the machine first. If you do not replace the AquaClean water filter, the orange light will go out eventually. In that case you can still replace the filter but you first need to descale the machine.
When the orange AquaClean light flashes:
- Take out the old AquaClean water filter.
- Install a new filter and activate it as described in chapter ‘Activating the AquaClean water filter (5 min.)’.
Replace the AquaClean water filter at least every 3 months, even if the machine does not yet indicate that replacement is required.
Setting the water hardness
 We advise you to adjust the water hardness to the water hardness in your region for optimal performance and a longer lifetime of the machine. This also prevents you from having to descale the machine too often. The default water hardness setting is 4: hard water.
Use the water hardness test strip supplied in the box to determine the water hardness in your region:
- Immerse the water hardness test strip in tap water or hold it under the tap for 1 second (Fig. 45).

- Wait 1 minute. The number of squares on the test strip that turn red indicate the water hardness (Fig. 46).

Set the machine to the correct water hardness:
- Press the on/off button to switch off the machine.
- When the machine is switched off, tap and hold the aroma strength icon until all lights in the icon go on (Fig. 2).
- Tap the aroma strength icon 1, 2, 3 or 4 times. The number of lights that are on should be the same as the number of red squares on the test strip (Fig. 47). When there are no red squares on the test strip (so all squares are green) please select 1 light.

- When you have set the correct water hardness, press the start/stop
 button.
 - Press the on/off icon to switch on the machine.
Since you only set the water hardness once, the aroma strength function is used to select the water hardness. This does not affect the aroma strength of the drinks you make afterwards.
Descaling procedure (30 min.)
Please use Philips descaler only. Under no circumstances should you use a descaler based on sulfuric acid, hydrochloric acid, sulfamic or acetic acid (vinegar) as this may damage the water circuit in your machine and not dissolve the limescale properly. Not using the Philips descaler will void your warranty. Failure to descale the appliance will also void your warranty. You can buy Philips descaling solution in the online shop at www.philips.com/coffee-care.
When the Calc / Clean light starts to flash slowly, you need to descale the machine.
- Make sure that the machine is switched on.
- If attached remove LatteGo or milk frother.
- Remove the drip tray and the coffee grounds container, empty them and put them back into place.
- Remove the water tank and empty it. Then remove the AquaClean water filter.
- Pour the whole bottle of Philips descaler in the water tank and then fill it with water up to the Calc / Clean indication (Fig. 48). Then place it back into the machine.

- Place a large container (1.5 l) under the coffee dispensing spout and the water spout.
- Press the Calc / Clean icon for 3 sec. and then press the start/stop
 button.
 - The first phase of the descaling procedure starts. The descaling procedure lasts approx. 30 minutes and consists of a descaling cycle and a rinsing cycle. During the descaling cycle the Calc / Clean light flashes to show that the descaling phase is in progress.
- Let the machine dispense the descaling solution until the display reminds you that the water tank is empty.
- Empty the water tank, rinse it and then refill it with fresh water up to the Calc / Clean indication.
- Empty the container and place it back under the coffee dispensing spout and the water spout. Press the start/stop
 button again.
 - The second phase of the descaling cycle, the rinsing phase, starts and lasts 3 minutes. During this phase the lights on the control panel go on and off to show that the rinsing phase is in progress.
- Wait until the machine stops dispensing water. The descaling procedure is finished when the machine stops dispensing water.
- The machine will now heat up again. When the lights in the drink icons light up continuously, the machine is ready for use again.
- Install and activate a new AquaClean water filter in the water tank (see ‘Activating the AquaClean water filter (5 min.)’). — When the descaling procedure is finished, the AquaClean light flashes for a while to remind you to install a new AquaClean water filter.
 Tip: Using the AquaClean filter reduces the need for descaling!
What to do if the descaling procedure is interrupted
You can exit the descaling procedure by pressing the on/off button on the control panel. If the descaling procedure is interrupted before it is completely finished, do the following:
- Empty and rinse the water tank thoroughly.
- Fill the water tank with fresh water up to the Calc / Clean level indication and switch the machine back on. The machine will heat up and perform an automatic rinsing cycle.
- Before brewing any drinks, perform a manual rinsing cycle. To perform a manual rinsing cycle, first dispense half a water tank of hot water by repeatedly tapping the hot water icon (Fig. 15) and then brew 2 cups of pre-ground coffee without adding ground coffee.
If the descaling procedure was not completed, the machine will require another descaling procedure as soon as possible.
Ordering accessories
To clean and descale the machine, only use the Philips maintenance products. These products can be purchased from your local retailer, from the authorized service centers or online at www.philips.com/parts-and-accessories. To find a full list of spare parts online, enter the model number of your machine. You can find the model number on the inside of the service door.
Maintenance products and type numbers:
- Descaling solution CA6700
- AquaClean water filter CA6903
- Brew group grease HD5061
Troubleshooting
This chapter summarizes the most common problems you could encounter with the machine. Support videos and a complete list of frequently asked questions are available on www.philips.com/coffee-care. If you are unable to solve the problem, contact the Consumer Care Center in your country. For contact details, see the warranty leaflet.
Warning icons
Troubleshooting table
This chapter summarizes the most common problems you could encounter with the machine. Support videos and a complete list of frequently asked questions are available on www.philips.com/coffee-care. If you are unable to solve the problem, contact the Consumer Care Center in your country. For contact details, see the warranty leaflet.
| Problem | Cause | Solution |
| The drip tray fills up quickly. | This is normal. The machine uses water to rinse the internal circuit and brew group. Some water flows through the internal system directly into the drip tray. | Empty the drip tray daily or as soon as the red ‘drip tray full’ indicator pops up through the drip tray cover. Tip: place a cup under the dispensing spout to collect rinsing water that comes out of it. |
| The ’empty coffee grounds container’ light remains on. | You emptied the coffee grounds container while the machine was switched off. | Always empty the coffee grounds container while the machine is switched on. Remove the coffee grounds container, wait at least 5 sec. and then insert it again. |
| The machine prompts to empty the coffee grounds container even though the container is not full. | The machine did not reset the counter the last time you emptied the coffee grounds container. | Always wait approx. 5 seconds when you place back the coffee grounds container. In this way the coffee grounds counter will be reset to zero. |
| Always empty the coffee grounds container while the machine is switched on. If you empty the coffee grounds container when the machine is switched off, the coffee grounds counter won’t reset. | ||
| The coffee grounds container is too full and the ’empty coffee grounds container’ light did not go on. | You removed the drip tray without emptying the grounds container. | When you remove the drip tray, also empty the coffee grounds container even if it contains only a few coffee pucks. In this way the coffee grounds counter will be reset to zero, re-starting to correctly count the coffee pucks. |
| I cannot remove the brew group. | The brew group is not in the correct position. | Reset the machine in the following way: close the service door and place back the water tank. Switch the machine off and back on again. Try again to remove the brew group. See chapter ‘Removing and inserting the brew group’ for step by step instructions. |
| I cannot insert the brew group. | The brew group is not in the correct position. | Reset the machine in the following way: close the service door and place back the water tank. Leave the brew group out. Switch the machine off and unplug it. Wait for 30 sec. and then plug the machine back in and switch it on. Then put the brew group in the correct position and reinsert it into in the machine. See chapter ‘Removing and inserting the brew group’ for step by step instructions. |
| The coffee is watery. | The brew group is dirty or needs to be lubricated. | Remove the brew group (see ‘Removing the brew group from the machine’), rinse it under the tap and leave it to dry. Then lubricate the moving parts (see ‘Lubricating the brew group’). |
| The machine is performing its selfadjustment procedure. This procedure is started automatically when you use the machine for the first time, when you change to another type of coffee beans or after a long period of non-use. | Brew 5 cups of coffee initially to allow the machine to complete its self-adjustment procedure. | |
| The grinder is set to a too coarse setting. | Set the grinder to a finer (lower) setting. Brew 2 to 3 drinks to be able to before taste the full difference. | |
| The coffee is not hot enough. | The temperature is set too low. | Set the temperature to the maximum (see ‘Adjusting the coffee temperature’). |
| A cold cup reduces the temperature of the drink. | Preheat the cups by rinsing them with hot water. | |
| Adding milk reduces the temperature of the drink. | Regardless of whether you add hot or cold milk, adding milk always reduces the temperature of the coffee. Preheat the cups by rinsing them with hot water. | |
| Coffee does not come out or coffee comes out slowly. | The AquaClean water filter was not prepared properly for installation. | Remove the AquaClean water filter and try to brew a coffee again. If this works, make sure that you have prepared the AquaClean water filter properly before you place it back. See chapter ‘AquaClean water filter’ for step-by-step instructions. |
| After a long period of non-use, you need to prepare the AquaClean water filter for use again and then place it back. See step 1 — 3 of chapter ‘Activating the AquaClean water filter’. | ||
| The AquaClean water filter is clogged. | Replace the AquaClean water filter every 3 months. A filter that is older than 3 months can become clogged. | |
| The grinder is set to a too fine setting. | Set the grinder to a coarser (higher) setting. Note that this will impact the coffee taste. | |
| The brew group is dirty. | Remove the brew group and rinse it under the tap (see ‘Cleaning the brew group under the tap’). | |
| The coffee dispensing spout is dirty. | Clean the coffee dispensing spout and its holes with a pipe cleaner or needle. | |
| The pre-ground coffee compartment is clogged | Switch off the machine and remove the brew group. Open the lid of the preground coffee compartment and insert the spoon handle into it. Move the handle up and down until the clogged ground coffee falls down (Fig. 28). | |
| The machine circuit is blocked by limescale. | Descale the machine with Philips descaler. Always descale the machine when the descaling light starts to flash. | |
| The machine grinds the coffee beans, but coffee does not come out. | The pre-ground coffee compartment is clogged. | Switch off the machine and remove the brew group. Open the lid of the preground coffee compartment and insert the spoon handle into it. Move the handle up and down until the clogged ground coffee falls down (Fig. 28). |
| The milk does not froth. | Machines with LatteGo: LatteGo is incorrectly assembled. | Make sure that the milk container is properly assembled to the frame of LatteGo (‘click’). |
| Machines with LatteGo: the milk container and/or frame of LatteGo are dirty. | Disassemble LatteGo and rinse both parts under the tap or clean them in the dishwasher (see ‘Cleaning LatteGo after every use’). | |
| Machines with classic milk frother: the milk frother is dirty. | Thoroughly clean the milk frother (see ‘Cleaning the classic milk frother ‘). | |
| The type of milk used is not suitable for frothing. | Different types of milk result in different amounts of froth and different froth qualities. We have tested the following milk types which proved to deliver a good milk froth result: semi-skimmed or full-fat cow’s milk and lactose-free milk. | |
| Milk is leaking from the bottom of the LatteGo milk container. | The frame and the milk container are not assembled properly. | First insert the top of the milk container under the hook at the top of the frame. Then press home the bottom part of the milk container. You hear a click when it locks into place. |
| The machine seems to be leaking. | The machine uses water to rinse the internal circuit and brew group. This water flows through the internal system directly into the drip tray. This is normal. | Empty the drip tray every day or as soon as the ‘drip tray full’ indicator pops up through the drip tray cover. Tip: Place a cup under the dispensing spout to collect rinsing water and reduce the amount of water in the drip tray. |
| The drip tray is too full and has overflowed which makes it look like the machine is leaking. | Empty the drip tray every day or as soon as the ‘drip tray full’ indicator pops up through the drip tray cover. | |
| The water tank is not fully inserted and air is drawn into the machine. | Make sure the water tank is in the correct position: remove it and insert it again pushing it as far as possible. | |
| The brew group is dirty/clogged. | Rinse the brew group. | |
| The machine is not placed on a horizontal surface. | Place the machine on a horizontal surface so that the drip tray does not overflow and the ‘drip tray full’ indicator works properly. | |
| The water tank is not fully inserted and air is drawn into the machine. | Make sure the water tank is in the correct position: remove it and insert it again pushing it as far as possible. | |
| I cannot activate the AquaClean water filter and the machine asks for descaling. | The filter has not been installed or replaced in time after the AquaClean water filter light started to flash. This means your machine is not completely limescale free. | Descale your machine first and then install the AquaClean water filter. |
| The new water filter does not fit. | You are trying to install another filter than the AquaClean water filter. | Only the AquaClean water filter fits into the machine. |
| The rubber ring on the AquaClean water filter is not in place. | Place back the rubber ring on the AquaClean water filter. | |
| The machine is making a loud noise. | It is normal that your machine makes noise during use. | If the machine starts to make a different kind of noise, clean the brew group and lubricate it (see ‘Lubricating the brew group’). |
| The AquaClean water filter was not prepared properly and air is now drawn into the machine. | Remove the AquaClean water filter from the water tank and properly prepare it for use before you place it back. See chapter ‘AquaClean water filter’ for step-by-step instructions. | |
| The water tank is not fully inserted and air is drawn into the machine. | Make sure the water tank is in the correct position: remove it and insert it again pushing it as far as possible. |
Technical specifications
The manufacturer reserves the right to improve the technical specifications of the product. All the preset quantities are approximate.
| Description | Value |
| Size (w x h x d) | 246 x 372 x 433 mm (9.6 x 14.6 x 17 in) |
| Weight | 7 — 7.5 kg (15.4 — 16.5 lbs) |
| Power cord length | 1000 mm (39.4 in) |
| Water tank | 1.8 litres (60.9 oz), removable |
| Coffee bean hopper capacity | 275 g (9.7 oz) |
| Coffee grounds container capacity | 12 pucks |
| LatteGo (milk container) capacity | 250 ml (8.5 oz) |
| Adjustable spout height | 85-145 mm (3.4 — 5.7 in) |
| Nominal voltage — Power rating — Power supply | See data label on inside of service door (fig. A11) |
Here you can download full pdf version of manual, it may contain additional safety instructions, warranty information, FCC rules, etc.
инструкцияPhilips LatteGo EP2030

Fully automatic
espresso machine
1200 series
2200 series
3200 series
RU RU РУКОВОДСТВО ПОЛЬЗОВАТЕЛЯ
KK ПАЙДАЛАНУШЫ НҰСҚАУЛЫҒЫ
www.philips.com/coee-care
OMNIA COVER_FRONT_A5_WE/EE/RCA.indd 3 03-12-18 15:38
Посмотреть инструкция для Philips LatteGo EP2030 бесплатно. Руководство относится к категории кофеварки, 3 человек(а) дали ему среднюю оценку 9.6. Руководство доступно на следующих языках: русский. У вас есть вопрос о Philips LatteGo EP2030 или вам нужна помощь? Задайте свой вопрос здесь
- Оглавление
- Обзор кофемашины (рис. A)
- Панель управления (рис. B)
- Введение
- Перед первым использованием
- Приготовление напитков
- Настройка параметров кофемашины
- Удаление и установка варочной группы
- Очистка и уход
- Фильтр для очистки воды AquaClean
- Установка степени жесткости воды
- Процедура очистки от накипи (продолжительность 30 мин.)
- Заказ аксессуаров
- Поиск и устранение неисправностей
- Технические характеристики
- Мазмұны
- Құрылғыға шолу (A суреті)
- Бақылау панелі (B суреті)
- Кіріспе
- Бірінші рет пайдалану алдында
- Сусындар қайнату
- Құрылғы параметрлерін реттеу
- Қайнату құралын алу және салу
- Тазалау және техникалық қызмет көрсету
- AquaClean су сүзгісі
- Судың қаттылығын таңдау
- Қақ түсіру процедурасы (ұзақтығы: 30 мин)
- Қосалқы құрылғыларға тапсырыс беру
- Ақаулықтарды жою
- Техникалық ерекшеліктер
Главная
| Philips | |
| LatteGo EP2030 | EP2030/10 | |
| кофеварка | |
| 8710103894582 | |
| русский | |
| Руководство пользователя (PDF) |
Вес и размеры
| Вес | 8000 g |
| Ширина | 246 mm |
| Глубина | 433 mm |
| Высота | 371 mm |
Производительность
| Емкость водного резервуара | 1.8 L |
| Страна производства | Румыния |
| Вместимость кофейных зерен | 275 g |
| Количество настроек температуры | 3 |
| Количество режимов кофемолки | 12 |
| Контроль аромата до приготовления | Да |
| Размещение бытового устройства | Столешница |
| Тип продукта | Машина для эспрессо |
| Емкость резервуара для молока | 0.26 L |
| Емкость для молока | Да |
| Регулируемая крепость кофе | Да |
| Тип кофе | Кофе в зернах |
| Тип кофеварки | Автоматическая |
| Емкость для сваренного кофе | Чашка |
| Вместимость в чашках | — чашек |
| Регулируемые настройки кофемолки | Да |
| Тип кофемолки | Керамическая кофемолка |
| Встроенная мельница | Да |
| Количество мельниц | 1 шт |
| Максимальное рабочее давление | 15 бар |
| Система подачи горячей воды | Да |
| Регулируемая температура | Да |
| Комплектующие пригодны для мытья в посудомоечной машине | Да |
| Водяной фильтр | Да |
| Количество носиков | 2 |
| Количество настроек крепости кофе | 3 |
| Совместимость фильтра | AquaClean |
| Функция очистки от накипи | Да |
| Диапазон регулировки высоты носика | 85 — 145 mm |
Технические характеристики
| Максимальная высота чашки | 150 mm |
| Съемная варочная группа | Да |
| Автоматическая промывка и управляемое удаление накипи | Да |
Прочие свойства
| Упаковка пригодна для вторичной переработки | 95 % |
Энергопитание
| Мощность | 1500 W |
| Входящее напряжение сети | 230 V |
| Частота входящего переменного тока | 50 Hz |
| Класс энергоэффективности | A |
| Режим энергосбережения | Да |
| Максимальное потребление энергии | 1500 W |
Эргономика
| Длина шнура | 1 m |
| Цвет товара | Черный |
| Тип управления | Buttons, Touch |
| Встроенный экран | Да |
| Съемный лоток для капель | Да |
| Съемный резервуар для воды | Да |
| Индикатор накипи | Да |
| Емкость контейнера для использованных капсул | 12 шт |
| Съемный заварочный блок | Да |
| Сенсорный экран | Да |
Программы и функции приготовления пищи
| Приготовление кофе | Да |
| Приготовление эспрессо | Да |
| Приготовление капучино | Да |
показать больше
Не можете найти ответ на свой вопрос в руководстве? Вы можете найти ответ на свой вопрос ниже, в разделе часто задаваемых вопросов о Philips LatteGo EP2030.
Какой вес Philips LatteGo EP2030?
Philips LatteGo EP2030 имеет вес 8000 g.
Как часто следует очищать кофеварку от накипи?
Частота очистки кофеварки от накипи зависит от частоты ее использования и жесткости воды. При использовании воды высокой жесткости кофеварку рекомендуется очищать от накипи раз в месяц. При использовании воды низкой жесткости рекомендуется проводить чистку раз в квартал.
Какой лучший способ очистки кофеварки от накипи?
Для очистки кофеварки от накипи рекомендуется использовать жидкие средства на которых есть отметка о возможности использования их для чистки кофеварки.
Что такое эспрессо?
Эспрессо — небольшое количество концентрированного кофе.
Как долго можно хранить кофе в зернах?
Срок годности указывается на упаковке кофе в зернах. Данный срок годности действителен, пока упаковка не открыта.
Как лучше всего хранить кофе?
Кофе рекомендуется хранить в герметичной, чистой емкости.
Как помол сказывается на вкусе кофе?
Помол сильно влияет на вкус кофе. Если кофейные зерна измельчены очень мелко — это усилит вкус кофе, при более крупном помоле кофе будет иметь более мягкий вкус.
Какая высота Philips LatteGo EP2030?
Philips LatteGo EP2030 имеет высоту 371 mm.
Какая ширина Philips LatteGo EP2030?
Philips LatteGo EP2030 имеет ширину 246 mm.
Какая толщина Philips LatteGo EP2030?
Philips LatteGo EP2030 имеет толщину 433 mm.
Какую маркировку энергоэффективности Philips LatteGo EP2030 имеет?
Philips LatteGo EP2030 имеет маркировку энергоэффективности A.
Инструкция Philips LatteGo EP2030 доступно в русский?
Да, руководствоPhilips LatteGo EP2030 доступно врусский .
Не нашли свой вопрос? Задайте свой вопрос здесь
Кофемашина Philips EP3246 Series 3200 LatteGo – легко выбирайте любимый кофе!
Легко выбирайте любимый кофе
Неповторимый аромат и вкус кофе из свежемолотых зерен за одно касание. Простой сенсорный дисплей позволяет без труда выбирать любимый кофе.
Классический капучинатор
Классический капучинатор используется для приготовления с помощью пара нежной молочной пены для вашего капучино. Кроме того, очистка классического капучинатора не займет много времени, поскольку он состоит только из двух деталей.
Идеальная температура и аромат
Система Aroma Extract в интеллектуальном режиме находит оптимальный баланс между температурой варки и интенсивностью аромата кофе, поддерживая температуру воды между 90 и 98 °C, а также регулируя количество воды, чтобы вы всегда наслаждались самым вкусным кофе.
Пять превосходных видов кофе
Готовьте любимый кофе для любых случаев: бодрящий эспрессо, классический кофе или капучино — с помощью полностью автоматической кофемашины вы быстро и без лишних усилий сварите идеальный кофе.
От мелкого до крупного помола
Долговечные керамические жернова имеют 12 доступных режимов, чтобы вы могли выбрать нужный помол — от сверхмелкого до крупного.
Меню My Coffee Choice
Настраивайте крепость и объем порции кофе в меню My Coffee Choice. Легко выбирайте нужный параметр из трех доступных опций.
Герметичная конструкция контейнера
Герметичная конструкция нового типа сохраняет свежесть и аромат кофейных зерен, а также делает работу жерновов менее шумной.
Перейти к контенту

Русские электронные инструкции по эксплуатации
Постоянно обновляемый большой каталог документации по эксплуатации и использованию современных устройств и оборудования на русском языке. Бесплатное скачивание файлов.
Поиск:
Главная
♥ В закладки
Просмотр инструкции в pdf


Инструкция по эксплуатации кофемашины Philips EP2030-10 Series 2200 LatteGo.
Скачать инструкцию к кофемашине Philips EP2030-10 Series 2200 LatteGo (1,89 МБ)

Инструкции кофемашин Philips
« Инструкция к кофемашине Krups Intuition Preference EA873810
» Инструкция к кофемашине Jura E8 Moonlight Silver
Вам также может быть интересно

Инструкция к наушникам Philips Bass+ SHL3070 Black

Инструкция к телевизору Philips 55PUS7406-60

Инструкция к миксеру Philips HR3750-00

Инструкция к наушникам Philips SHP2600TV-10

Инструкция к пылесосу Philips FC9351 01

Инструкция к беспроводным наушникам Philips SHB7250_00

Инструкция к телевизору Philips 48PFT4100-60

Инструкция к пылесосу Philips XB2122-08
Добавить комментарий
Имя *
Email *
Сайт
Комментарий


Сохранить моё имя, email и адрес сайта в этом браузере для последующих моих комментариев.
- Добавить инструкцию
- Заказать инструкцию
- Политика конфиденциальности
