Pioneer MVH-S120UI/UIG/UB/UBG/UBA/UBW MVH-S12UI Quick Start Guide

Before You Start
Thank you for purchasing this PIONEER product
To ensure proper use, please read through this guide before using this product. It is especially important that you read and observe WARNINGS and CAUTIONS in this guide. Please keep the guide in a safe and accessible place for future reference.

If you want to dispose this product, do not mix it with general household waste. There is a separate collection system for used electronic products in accordance with legislation that requires proper treatment, recovery and recycling.
Private households in the member states of the EU, in Switzerland and Norway may return their used electronic products free of charge to designated collection facilities or to a retailer (if you purchase a similar new one).
For countries not mentioned above, please contact your local authorities for the correct method of disposal. By doing so you will ensure that your disposed product undergoes the necessary treatment, recovery and recycling and thus prevent potential negative effects on the environment and human health.
- Do not attempt to install or service this product by yourself. Installation or servicing of this product by persons without training and experience in electronic equipment and automotive accessories may be dangerous and could expose you to the risk of electric shock, injury or other hazards.
- Do not attempt to operate the unit while driving. Make sure to pull off the road and park your vehicle in a safe location before attempting to use the controls on the device.
- Do not allow this unit to come into contact with moisture and/or liquids. Electrical shock could result. Also, damage to this unit, smoke, and overheating could result from contact with liquids.
- Always keep the volume low enough to hear outside sounds.
- The Pioneer CarStereo-Pass is for use only in Germany.
- This product is evaluated in moderate and tropical climate condition under the Audio, video and similar electronic apparatus — Safety requirements, IEC 60065.
If you experience problems
Should this unit fail to work properly, please contact your dealer or nearest authorized PIONEER Service Station.
Connections
- When installing this unit in a vehicle without an ACC (accessory) position on the ignition switch, failure to connect the red cable to the terminal that detects operation of the ignition key may result in battery drain.

- Use of this unit in conditions other than the following could result in fire or malfunction.
- Vehicles with a 12-volt battery and negative grounding.
- When speaker output is used by 4 channels, use speakers over 50 W (maximum input power) and between 4 Ω to 8 Ω (impedance value). Do not use 1 Ω to 3 Ω speakers for this unit.
- When rear speaker output is used by 2 Ω of subwoofer, use speakers over 70 W (maximum input power).
* Please refer to connections for a connection method.
- To prevent a short-circuit, overheating or malfunction, be sure to follow the directions below.
- Disconnect the negative terminal of the battery before installation.
- Secure the wiring with cable clamps or adhesive tape. Wrap adhesive tape around wiring that comes into contact with metal parts to protect the wiring.
- Place all cables away from moving parts, such as the shift lever and seat rails.
- Place all cables away from hot places, such as near the heater outlet.
- Do not connect the yellow cable to the battery by passing it through the hole to the engine compartment.
- Cover any disconnected cable connectors with insulating tape.
- Do not shorten any cables.
- Never cut the insulation of the power cable of this unit in order to share the power with other devices. The current capacity of the cable is limited.
- Use a fuse of the rating prescribed.
- Never wire the negative speaker cable directly to ground.
- Never band together negative cables of multiple speakers.
- When this unit is on, control signals are sent through the blue/white cable. Connect this cable to the system remote control of an external power amp or the vehicle’s auto-antenna relay control terminal (max. 300mA 12 V DC). If the vehicle is equipped with a glass antenna, connect it to the antenna booster power supply terminal.
- Never connect the blue/white cable to the power terminal of an external power amp. Also, never connect it to the power terminal of the auto antenna. Doing so may result in battery drain or a malfunction.
- The graphical symbol
 placed on the product means direct current.
 - The function and audio settings other than the setting of RCA pre-outs are stored in memory if the unit is disconnected from power supply.
This unit
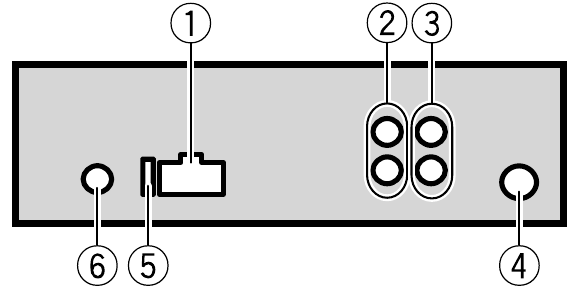
- Power cord input
- Rear output or subwoofer output
- Front output (Only for MVH-S120UI/S120UIG/S12UI)
- Antenna input
- Fuse (10 A)
- Wired remote input (Only for MVH-S120UI/S120UIG/S12UI)
Hard-wired remote control adapter can be connected (sold separately).
Power cord
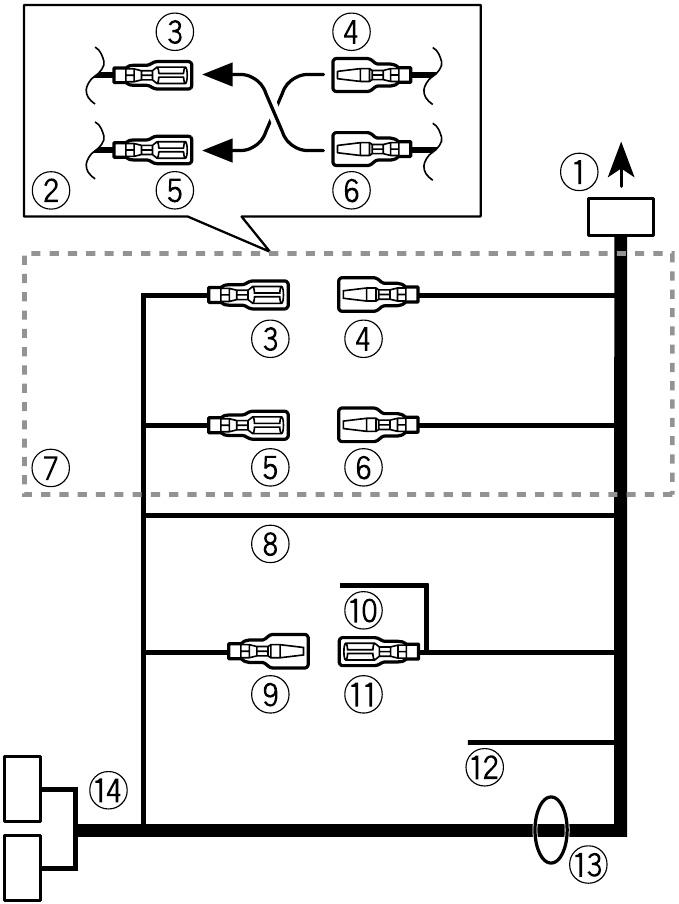
- To power cord input
- Depending on the kind of vehicle, the function of
 and
and  may be different.
In this case, be sure to connect to
to  and
and  to
to  .
. - Yellow
Back-up (or accessory) - Yellow
Connect to the constant 12 V supply terminal. - Red
Accessory (or back-up) - Red
Connect to terminal controlled by the ignition switch (12 V DC). - Connect leads of the same colour to each other.
- Black (chassis ground)
- Blue/white
The pin position of the ISO connector will differ depending on the type of vehicle. Connect and
and  when Pin 5 is an antenna control type. In another type of vehicle, never connect
  and
and  .
. - Blue/white
Connect to the system control terminal of the power amp (max. 300 mA 12 V DC). - Blue/white
Connect to the auto-antenna relay control terminal (max. 300 mA 12 V DC). - Yellow/black (Only for MVH-S120UI/S120UIG/S12UI)
If you use equipment with a Mute function, wire this lead to the Audio Mute lead on that equipment. If not, keep the Audio Mute lead free of any connections. - Speaker leads
White: Front left
White/black: Front left
Gray: Front right
Gray/black: Front right
Green: Rear left or subwoofer
Green/black: Rear left or subwoofer
Violet: Rear right or subwoofer
Violet/black: Rear right or subwoofer
- ISO connector
In some vehicles, the ISO connector may be divided into two. In this case, be sure to connect to both connectors.
NOTES
- Change the initial menu of this unit. Refer to [SP-P/O MODE]. The subwoofer output of this unit is monaural.
- When using a subwoofer of 2 Ω, be sure to connect the subwoofer to the violet and violet/ black leads of this unit. Do not connect anything to the green and green/black leads.
Power amp (sold separately)
Perform these connections when using the optional amplifier.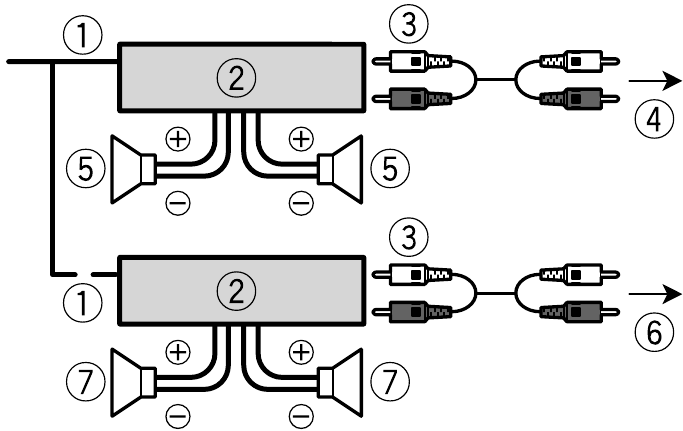
- System remote control
Connect to blue/white cable. - Power amp (sold separately)
- Connect with RCA cables (sold separately)
- To front output*
- Front speaker*
- To rear output or subwoofer output
- Rear speaker or subwoofer
* Only for MVH-S120UI/S120UIG/S12UI
Installation
DIN mount installation
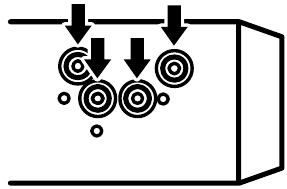
- Insert the supplied mounting sleeve into the dashboard.
- Secure the mounting sleeve by using a screwdriver to bend the metal tabs (90°) into place.
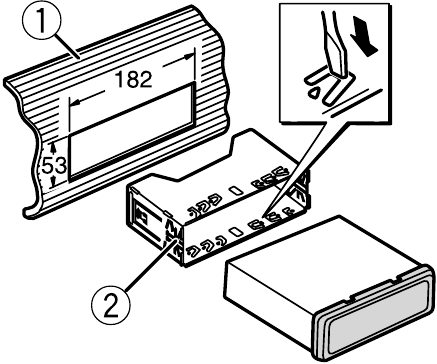
- Dashboard
- Mounting sleeve
- Make sure that the unit is installed securely in place. An unstable installation may cause skipping or other malfunctions.
When not using the supplied mounting sleeve
- Line up the holes on the mounting bracket with the holes on the sides of the unit to attach the bracket.
- Screw in one screw on each side to hold the unit in place.
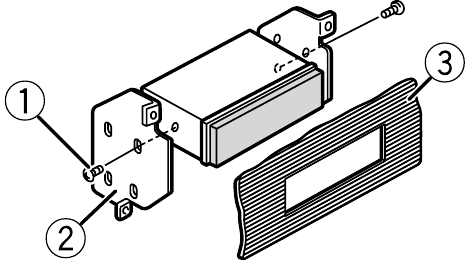
- Tapping screw (5 mm × 9 mm, not supplied with product)
- Mounting bracket
- Dashboard or console
Using the included bracket
Check to make sure that the included bracket matches your particular model of vehicle and then attach it to the unit as shown below.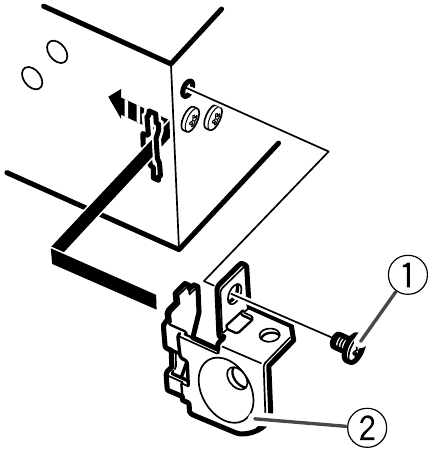
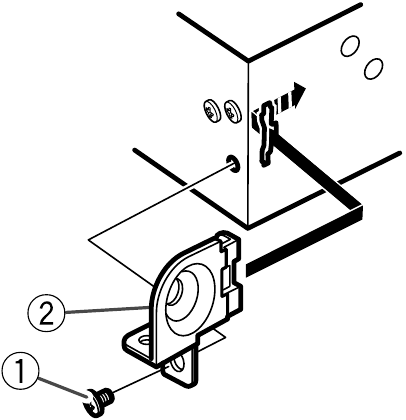
- Screw
- Bracket
Removing the unit (installed with the supplied mounting sleeve)
- Remove the trim ring.
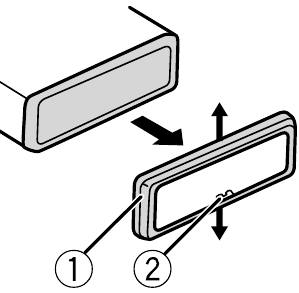
- Trim ring
- Notched tab
- Releasing the front panel allows easier access to the trim ring.
- When reattaching the trim ring, point the side with the notched tab down.
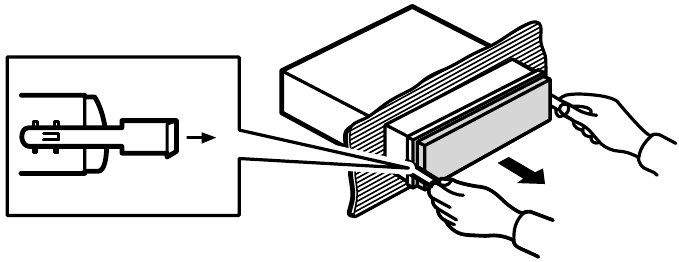
- Insert the supplied extraction keys into both sides of the unit until they click into place.
- Pull the unit out of the dashboard.
Basic operation
MVH-S120UI/S120UIG/S12UI/S120UB/S120UBG/S120UBA/S120UBW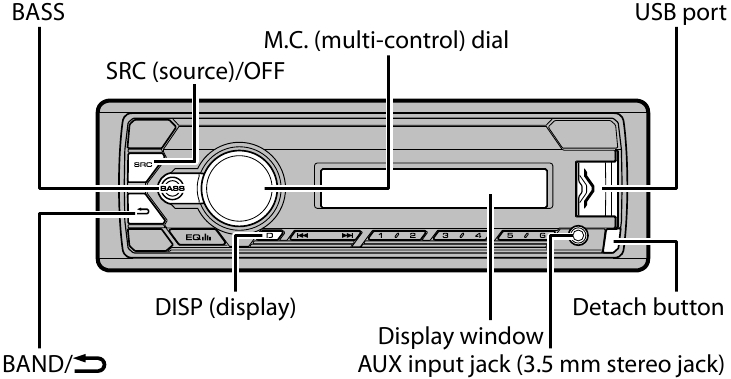
About the main menu
You can adjust various settings in the main menu.
- Press the M.C. dial to display the main menu.
- Turn the M.C. dial to select one of the categories below, then press to confirm.
- FUNCTION settings
- AUDIO settings
- SYSTEM settings
- ILLUMINATION settings
- Turn the M.C. dial to select the options, then press to confirm.
Frequently used operations
| Purpose | Operation |
| Turn on the power | Press SRC/OFF to turn on the power. Press and hold SRC/OFF to turn off the power. |
| Adjust the volume | Turn the M.C. dial. |
| Select a source | Press SRC/OFF repeatedly. |
| Change the display information | Press DISP repeatedly. |
| Return to the previous display/list | Press BAND/ . . |
| Return to the normal display from the menu | Press and hold BAND/ . . |
| Change the display brightness | Press and hold BAND/ . . |
| Boost the bass level | Press BASS.
|
Setup operation
When you turn the ignition switch to ON after installation, [SET UP:YES] appears in the display.
- Press the M.C. dial.
- Turn the M.C. dial to select the options, then press to confirm.
To proceed to the next menu option, you need to confirm your selection.
| Menu Item | Description |
|
LANGUAGE [ENG](English), |
Select the language to display the text information from a compressed audio file. |
| CLOCK SET | Set the clock.
|
| FM STEP [100], [50] |
Select the FM tuning step from 100 kHz or 50 kHz. |
- [QUIT:YES] appears when all the settings have been made.
To return to the first item of the setup menu, turn the M.C. dial to select [QUIT:NO], then press to confirm. - Press the M.C. dial to confirm the settings.
Tuner operation
Receiving preset stations
- Press SRC/OFF to select [RADIO].
- Press BAND/
 to select the band.
[FM1] [FM2]
[FM2]  [FM3]
[FM3] [MW]/[LW]
 - Press a number button (1/
 to 6/
to 6/ ).
).
Best stations memory (BSM)
- After selecting the band, press the M.C. dial to display the main menu.
- Turn the M.C. dial to select [FUNCTION], then press to confirm.
- Turn the M.C. dial to select [BSM], then press to confirm.
To store stations manually
- While receiving the station you want to store, press and hold one of the number buttons (1/
 to 6/
to 6/ ) until it stops flashing.
USB/iPod®/AUX operation
NOTE
MVH-S120UB/S120UBG/S120UBA/S120UBW is not compatible with Apple® devices.
USB/iPod
- Open the USB port cover.
- Plug in the USB device/iPod using an appropriate cable.
MTP connection
A device installed with Android OS 4.0 or most of later versions can be connected to the unit via MTP, using the cable supplied with the Android device. However, depending on the connected device, OS version or the numbers of the files in the device, audio files/songs may not be able to be played back via MTP. NOTE
If you use an MTP connection, [ANDROID WIRED] needs to be set to [MEMORY] in the SYSTEM settings.
AUX
- Insert the stereo mini plug into the AUX input jack.
- Press SRC/OFF to select [AUX] as the source.
Making a connection with Pioneer ARC APP
Pioneer’s Advanced app converts your compatible smartphone into a powerful touchscreen remote control.
NOTE
MVH-S120UB/S120UBG/S120UBA/S120UBW is not compatible with Apple devices.
Do not attempt to operate the application while driving. Make sure to pull off the road and park your vehicle in a safe location before attempting to use the controls on the application.
When making a connection with an Android device
NOTE
This function is compatible with a phone that runs Android 4.1 up to 7.1.2 and also supports AOA (Android Open Accessory) 2.0, but the compatibility depends on the smartphone.
- Enter the SYSTEM menu (refer to «About the main menu»).
- Turn the M.C. dial to select [ANDROID WIRED], then press to confirm.
- Turn the M.C. dial to select [APP CONTROL], then press to confirm.
- Turn the M.C. dial to select [P.APP AUTO ON], then press to confirm.
- Turn the M.C. dial to select [ON], then press to confirm.
- Connect this unit with the device via USB.
Pioneer ARC APP on the Android device starts automatically.
When making a connection with an iPhone
- Connect this unit with the iPhone via USB.
- Press SRC/OFF to select any source.
- Press and hold the M.C. dial.
Pioneer ARC APP on the iPhone starts.NOTE
If the connection fails, launch Pioneer ARC APP on the iPhone.
Listening to Spotify®
(Only compatible with Spotify installed on iPhone)
NOTE
MVH-S120UB/S120UBG/S120UBA/S120UBW is not compatible with Apple devices.
Update the firmware of the Spotify application to the latest version before use.
Before you start, connect this unit with the mobile device via USB (iPhone only).
- Press SRC/OFF to select [SPOTIFY].
- Launch the Spotify application on the mobile device and start playback.

Documents / Resources
Download manual
Here you can download full pdf version of manual, it may contain additional safety instructions, warranty information, FCC rules, etc.
Download Pioneer MVH-S120UI/UIG/UB/UBG/UBA/UBW MVH-S12UI Quick Start Guide
Support for MVH-S120UBW | Pioneer
- Главная
- Продукция
- Автомобильные ресиверы
- Support for MVH-S120UBW
Support for MVH-S120UBW
Автомобильный цифровой ресивер с тюнером, USB, Aux-входом, поддержкой аудиоформата FLAC, совместимый с смартфонами на Android
- Программное обеспечение
- Руководства
- Назад к обзору
Программное обеспечение
Для данного продукта нет файлов, доступных для загрузки
Руководства
На чтение 6 мин Просмотров 5.6к. Опубликовано
Содержание
- Технические характеристики
- Функции
- Преимущества и недостатки
- Совместимость с другими устройствами
- Схема соединения
- Инструкция и настройка
- Отзывы
Бюджетное головное устройство Pioneer MVH-S100UB оснащается жидкокристаллическим монохромным дисплеем и подсветкой функциональных клавиш. Для изменения громкости звучания используется цифровой регулятор, оборудование позволяет подключать внешние накопители и смартфоны. Проигрыватель выпускается с осени 2016 года, средняя стоимость магнитолы на осень 2018 года составляет 2,8 тыс. руб.
Технические характеристики
Параметры головного устройства S100UB:
- напряжение питания — 14,4 В (допускается падение значения до 10,8 В и рост до 15,1 В);
- тип заземления — при помощи отрицательного полюса;
- читаемые форматы музыкальных файлов — MP3, WMA, WAV, FLAC;
- тип фронтальной панели — быстросъемная;
- цвет подсветки экрана — красный;
- габариты корпуса — 1 din;
- монтажная глубина — 97 мм;
- вес с монтажными узлами — 0,5 кг:
- размер тары полный — 200*50*100 мм.

If you want to dispose this product, do not mix it with general household waste. There is a separate collection system for used electronic products in accordance with legislation that requires proper treatment, recovery and recycling.
Private households in the member states of the EU, in Switzerland and Norway may return their used electronic products free of charge to designated collection facilities or to a retailer (if you purchase a similar new one).
For countries not mentioned above, please contact your local authorities for the correct method of disposal. By doing so you will ensure that your disposed product undergoes the necessary treatment, recovery and recycling and thus prevent potential negative effects on the environment and human health.
- Do not attempt to install or service this product by yourself. Installation or servicing of this product by persons without training and experience in electronic equipment and automotive accessories may be dangerous and could expose you to the risk of electric shock, injury or other hazards.
- Do not attempt to operate the unit while driving. Make sure to pull off the road and park your vehicle in a safe location before attempting to use the controls on the device.
- Do not allow this unit to come into contact with moisture and/or liquids. Electrical shock could result. Also, damage to this unit, smoke, and overheating could result from contact with liquids.
- Always keep the volume low enough to hear outside sounds.
- The Pioneer CarStereo-Pass is for use only in Germany.
- This product is evaluated in moderate and tropical climate condition under the Audio, video and similar electronic apparatus — Safety requirements, IEC 60065.
If you experience problems
Should this unit fail to work properly, please contact your dealer or nearest authorized PIONEER Service Station.
Connections
- When installing this unit in a vehicle without an ACC (accessory) position on the ignition switch, failure to connect the red cable to the terminal that detects operation of the ignition key may result in battery drain.

- Use of this unit in conditions other than the following could result in fire or malfunction.
- Vehicles with a 12-volt battery and negative grounding.
- When speaker output is used by 4 channels, use speakers over 50 W (maximum input power) and between 4 Ω to 8 Ω (impedance value). Do not use 1 Ω to 3 Ω speakers for this unit.
- When rear speaker output is used by 2 Ω of subwoofer, use speakers over 70 W (maximum input power).
* Please refer to connections for a connection method.
- To prevent a short-circuit, overheating or malfunction, be sure to follow the directions below.
- Disconnect the negative terminal of the battery before installation.
- Secure the wiring with cable clamps or adhesive tape. Wrap adhesive tape around wiring that comes into contact with metal parts to protect the wiring.
- Place all cables away from moving parts, such as the shift lever and seat rails.
- Place all cables away from hot places, such as near the heater outlet.
- Do not connect the yellow cable to the battery by passing it through the hole to the engine compartment.
- Cover any disconnected cable connectors with insulating tape.
- Do not shorten any cables.
- Never cut the insulation of the power cable of this unit in order to share the power with other devices. The current capacity of the cable is limited.
- Use a fuse of the rating prescribed.
- Never wire the negative speaker cable directly to ground.
- Never band together negative cables of multiple speakers.
- When this unit is on, control signals are sent through the blue/white cable. Connect this cable to the system remote control of an external power amp or the vehicle’s auto-antenna relay control terminal (max. 300mA 12 V DC). If the vehicle is equipped with a glass antenna, connect it to the antenna booster power supply terminal.
- Never connect the blue/white cable to the power terminal of an external power amp. Also, never connect it to the power terminal of the auto antenna. Doing so may result in battery drain or a malfunction.
- The graphical symbol
 placed on the product means direct current.
 - The function and audio settings other than the setting of RCA pre-outs are stored in memory if the unit is disconnected from power supply.
This unit

- Power cord input
- Rear output or subwoofer output
- Front output (Only for MVH-S120UI/S120UIG/S12UI)
- Antenna input
- Fuse (10 A)
- Wired remote input (Only for MVH-S120UI/S120UIG/S12UI)
Hard-wired remote control adapter can be connected (sold separately).
Power cord

- To power cord input
- Depending on the kind of vehicle, the function of
 and
and  may be different.
In this case, be sure to connect to
to  and
and  to
to  .
. - Yellow
Back-up (or accessory) - Yellow
Connect to the constant 12 V supply terminal. - Red
Accessory (or back-up) - Red
Connect to terminal controlled by the ignition switch (12 V DC). - Connect leads of the same colour to each other.
- Black (chassis ground)
- Blue/white
The pin position of the ISO connector will differ depending on the type of vehicle. Connect and
and  when Pin 5 is an antenna control type. In another type of vehicle, never connect
  and
and  .
. - Blue/white
Connect to the system control terminal of the power amp (max. 300 mA 12 V DC). - Blue/white
Connect to the auto-antenna relay control terminal (max. 300 mA 12 V DC). - Yellow/black (Only for MVH-S120UI/S120UIG/S12UI)
If you use equipment with a Mute function, wire this lead to the Audio Mute lead on that equipment. If not, keep the Audio Mute lead free of any connections. - Speaker leads
White: Front left
White/black: Front left
Gray: Front right
Gray/black: Front right
Green: Rear left or subwoofer
Green/black: Rear left or subwoofer
Violet: Rear right or subwoofer
Violet/black: Rear right or subwoofer
- ISO connector
In some vehicles, the ISO connector may be divided into two. In this case, be sure to connect to both connectors.
NOTES
- Change the initial menu of this unit. Refer to [SP-P/O MODE]. The subwoofer output of this unit is monaural.
- When using a subwoofer of 2 Ω, be sure to connect the subwoofer to the violet and violet/ black leads of this unit. Do not connect anything to the green and green/black leads.
Power amp (sold separately)
Perform these connections when using the optional amplifier.
- System remote control
Connect to blue/white cable. - Power amp (sold separately)
- Connect with RCA cables (sold separately)
- To front output*
- Front speaker*
- To rear output or subwoofer output
- Rear speaker or subwoofer
* Only for MVH-S120UI/S120UIG/S12UI
Installation
DIN mount installation
- Insert the supplied mounting sleeve into the dashboard.
- Secure the mounting sleeve by using a screwdriver to bend the metal tabs (90°) into place.

- Dashboard
- Mounting sleeve
- Make sure that the unit is installed securely in place. An unstable installation may cause skipping or other malfunctions.
When not using the supplied mounting sleeve
- Line up the holes on the mounting bracket with the holes on the sides of the unit to attach the bracket.

- Screw in one screw on each side to hold the unit in place.

- Tapping screw (5 mm × 9 mm, not supplied with product)
- Mounting bracket
- Dashboard or console
Using the included bracket
Check to make sure that the included bracket matches your particular model of vehicle and then attach it to the unit as shown below.

- Screw
- Bracket
Removing the unit (installed with the supplied mounting sleeve)
- Remove the trim ring.

- Trim ring
- Notched tab
- Releasing the front panel allows easier access to the trim ring.
- When reattaching the trim ring, point the side with the notched tab down.
- Insert the supplied extraction keys into both sides of the unit until they click into place.
- Pull the unit out of the dashboard.

Basic operation
MVH-S120UI/S120UIG/S12UI/S120UB/S120UBG/S120UBA/S120UBW
About the main menu
You can adjust various settings in the main menu.
- Press the M.C. dial to display the main menu.
- Turn the M.C. dial to select one of the categories below, then press to confirm.
- FUNCTION settings
- AUDIO settings
- SYSTEM settings
- ILLUMINATION settings
- Turn the M.C. dial to select the options, then press to confirm.
Frequently used operations
| Purpose | Operation |
| Turn on the power | Press SRC/OFF to turn on the power. Press and hold SRC/OFF to turn off the power. |
| Adjust the volume | Turn the M.C. dial. |
| Select a source | Press SRC/OFF repeatedly. |
| Change the display information | Press DISP repeatedly. |
| Return to the previous display/list | Press BAND/ . . |
| Return to the normal display from the menu | Press and hold BAND/ . . |
| Change the display brightness | Press and hold BAND/ . . |
| Boost the bass level | Press BASS.
|
Setup operation
When you turn the ignition switch to ON after installation, [SET UP:YES] appears in the display.
- Press the M.C. dial.
- Turn the M.C. dial to select the options, then press to confirm.
To proceed to the next menu option, you need to confirm your selection.
| Menu Item | Description |
|
LANGUAGE [ENG](English), |
Select the language to display the text information from a compressed audio file. |
| CLOCK SET | Set the clock.
|
| FM STEP [100], [50] |
Select the FM tuning step from 100 kHz or 50 kHz. |
- [QUIT:YES] appears when all the settings have been made.
To return to the first item of the setup menu, turn the M.C. dial to select [QUIT:NO], then press to confirm. - Press the M.C. dial to confirm the settings.
Tuner operation
Receiving preset stations
- Press SRC/OFF to select [RADIO].
- Press BAND/
 to select the band.
[FM1] [FM2]
[FM2]  [FM3]
[FM3] [MW]/[LW]
 - Press a number button (1/
 to 6/
to 6/ ).
).
Best stations memory (BSM)
- After selecting the band, press the M.C. dial to display the main menu.
- Turn the M.C. dial to select [FUNCTION], then press to confirm.
- Turn the M.C. dial to select [BSM], then press to confirm.
To store stations manually
- While receiving the station you want to store, press and hold one of the number buttons (1/
 to 6/
to 6/ ) until it stops flashing.
USB/iPod®/AUX operation
NOTE
MVH-S120UB/S120UBG/S120UBA/S120UBW is not compatible with Apple® devices.
USB/iPod
- Open the USB port cover.
- Plug in the USB device/iPod using an appropriate cable.
MTP connection
A device installed with Android OS 4.0 or most of later versions can be connected to the unit via MTP, using the cable supplied with the Android device. However, depending on the connected device, OS version or the numbers of the files in the device, audio files/songs may not be able to be played back via MTP. NOTE
If you use an MTP connection, [ANDROID WIRED] needs to be set to [MEMORY] in the SYSTEM settings.
AUX
- Insert the stereo mini plug into the AUX input jack.
- Press SRC/OFF to select [AUX] as the source.
Making a connection with Pioneer ARC APP
Pioneer’s Advanced app converts your compatible smartphone into a powerful touchscreen remote control.
NOTE
MVH-S120UB/S120UBG/S120UBA/S120UBW is not compatible with Apple devices.
Do not attempt to operate the application while driving. Make sure to pull off the road and park your vehicle in a safe location before attempting to use the controls on the application.
When making a connection with an Android device
NOTE
This function is compatible with a phone that runs Android 4.1 up to 7.1.2 and also supports AOA (Android Open Accessory) 2.0, but the compatibility depends on the smartphone.
- Enter the SYSTEM menu (refer to «About the main menu»).
- Turn the M.C. dial to select [ANDROID WIRED], then press to confirm.
- Turn the M.C. dial to select [APP CONTROL], then press to confirm.
- Turn the M.C. dial to select [P.APP AUTO ON], then press to confirm.
- Turn the M.C. dial to select [ON], then press to confirm.
- Connect this unit with the device via USB.
Pioneer ARC APP on the Android device starts automatically.
When making a connection with an iPhone
- Connect this unit with the iPhone via USB.
- Press SRC/OFF to select any source.
- Press and hold the M.C. dial.
Pioneer ARC APP on the iPhone starts.NOTE
If the connection fails, launch Pioneer ARC APP on the iPhone.
Listening to Spotify®
(Only compatible with Spotify installed on iPhone)
NOTE
MVH-S120UB/S120UBG/S120UBA/S120UBW is not compatible with Apple devices.
Update the firmware of the Spotify application to the latest version before use.
Before you start, connect this unit with the mobile device via USB (iPhone only).
- Press SRC/OFF to select [SPOTIFY].
- Launch the Spotify application on the mobile device and start playback.

Documents / Resources
Download manual
Here you can download full pdf version of manual, it may contain additional safety instructions, warranty information, FCC rules, etc.
Download Pioneer MVH-S120UI/UIG/UB/UBG/UBA/UBW MVH-S12UI Quick Start Guide


