-
Contents
-
Table of Contents
-
Troubleshooting
-
Bookmarks
Quick Links
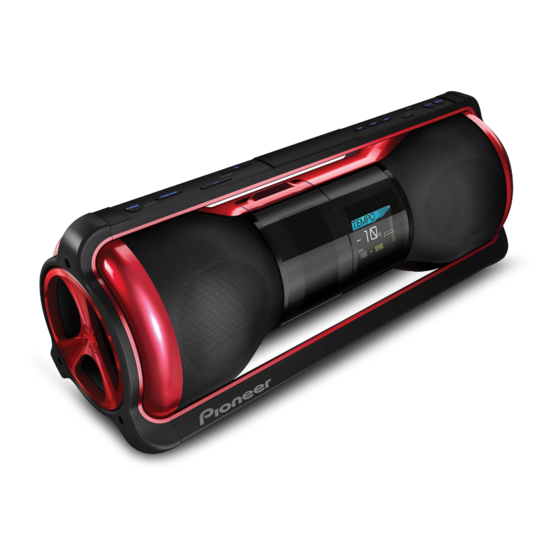
PORTABLE MUSIC SYSTEM
STZ-D10Z
-R
Operating Instructions
Related Manuals for Pioneer Steez STZ-D10Z-R
Summary of Contents for Pioneer Steez STZ-D10Z-R
-
Page 1
PORTABLE MUSIC SYSTEM STZ-D10Z Operating Instructions… -
Page 2: Operating Environment
IMPORTANT CAUTION RISK OF ELECTRIC SHOCK DO NOT OPEN The lightning flash with arrowhead symbol, The exclamation point within an equilateral CAUTION: TO PREVENT THE RISK OF ELECTRIC within an equilateral triangle, is intended to triangle is intended to alert the user to the SHOCK, DO NOT REMOVE COVER (OR alert the user to the presence of uninsulated presence of important operating and…
-
Page 3
[U.S. model only] Only use attachments/accessories specified by the Read these instructions. manufacturer. Keep these instructions. Use only with the cart, stand, tripod, bracket, or table Heed all warnings. specified by the manufacturer, or sold with the apparatus. Follow all instructions. When a cart is used, use caution when moving the Do not use this apparatus near water. -
Page 4
(2) this device must accept any interference received, including interference that may cause undesired operation. Product Name: PORTABLE MUSIC SYSTEM Model Number: STZ-D10Z-R Responsible Party Name: PIONEER ELECTRONICS (USA) INC. SERVICE SUPPORT DIVISION Address: 1925 E. DOMINGUEZ ST. LONG BEACH, CA 90810-1003, U.S.A. Phone: 1-800-421-1404 URL: http://www.pioneerelectronics.com… -
Page 5: Table Of Contents
Thank you for buying this Pioneer product. Please read through these operating instructions so you will know how to operate your model properly. After you have finished reading the instructions, put them away in a safe place for future reference.
-
Page 6: Introduction
Introduction Checking what’s in the box ! Remote control unit ! Lithium battery (CR2025) ! USB cable ! AC adapter ! Power cord ! Warranty card ! Quick start guide Installing the unit ! When installing this unit, make sure to put it on a level and stable surface. Don’t install it on the following places: –…
-
Page 7: When In Use
When in use Noise and etiquette Playing music is fun but depending on circumstances, annoying. Please be considerate of others when using the device. It is up to your consideration whether the volume is turned high or low. In particular, even the smallest noise can be a nuisance in public places and during the night when it’s quiet. Be considerate of others and create a pleasurable environment.
-
Page 8: Before You Start
Before you start Before using the remote control The battery supplied with this unit is stored in the battery casing. Remove the protective seal from the battery casing. Note When you notice a decrease in the operating range, replace the battery. Replace the battery When replacing the battery, use a commercially available Lithium CR2025 battery.
-
Page 9: Connecting The Unit To The Ac Adapter / Installing Batteries
A damaged power cord can cause a fire or give you an electric shock. Check the power cord once in a while. If you find it damaged, ask your nearest Pioneer authorized independent service company for a replacement. ! Make sure to grasp the body of the AC adapter when removing it from the power outlet. If you pull the power cord, it may become damaged which could lead to fire and/or electrocution.
-
Page 10: Installing Batteries
Installing batteries WARNING Incorrect use of batteries may result in such hazards as leakage and bursting. Observe the following precautions: ! Never use new and old batteries together. ! Do not mix and use nickel hydride battery with different charges. ! Insert the plus and minus sides of the batteries properly according to the marks in the battery case.
-
Page 11: Controls And Displays
Controls and displays Remote control unit STANDBY/ON FUNC TEMPO TOOLS 8 SKIP 8 SKIP ENTER TEMPO MENU CALL BATTLE DJ MIX MEMO RHYTHM EXIT 1 uSTANDBY/ON 7 FUNC Switches the unit between standby and on. (page 14) Use to change the input function. The source changes as below. Memory (internal memory) d USB/STEEZ PORTABLE d iPod d Memory USB STEEZ…
-
Page 12: Front/Top Panel
Front/Top panel TEMPO DJ MIX BATTLE POWER FUNCTION VOLUME 1 POWER 10 iPod cover Switches the unit between standby and on. (page 14) 11 Lock lever 2 Power indicator If you raise the lock lever from the behind the frame, the iPod cover will When the power is on, this indicator lights.
-
Page 13: Rear Panel
Rear panel 5V 500mA DC IN 18 V PHONES AUX IN PC connect 1 Battery cover 2 Microphone volume knob Use to adjust the volume of the sound inputted through the microphone. The sound from the microphone is always outputted when the device’s power is on, but not outputted when headphones are connected.
-
Page 14: Basic Playback
Basic playback How to use This is the device’s basic playback operation. If you select a different function at step 3, the device will switch to a sound source from an external input, USB or iPod. 1 Press uSTANDBY/ON on the remote control (or POWER on the main unit) to turn on the power of this unit. The display will show the volume after the STEEZ logo, then the screen will finally show the input function last selected.
-
Page 15: Playing Tracks From An Internal Memory Or Usb Memory
! This unit may not recognize a USB memory device, play files or supply power to a USB memory device. For details, see page 28. ! Pioneer does not guarantee that any file recorded on a USB memory device will play or that power will be supplied to a USB memory device. Also note that Pioneer will accept no responsibility whatsoever for loss of files on USB memory devices caused by connection to this unit.
-
Page 16: Select A Playback Mode
5 Start a track playback. The following will be displayed on the playback screen. Memory Song2 Artist1 +10% 1:40 5:25 1 Function 2 Song name 3 Artist name 4 BPM (tempo) 5 Elapsed time 6 Cue location 7 Cue settings ON 8 Dance function OFF 9 Playback status a Playback mode (…
-
Page 17: Playback In A Folder Mode
Playback in a Folder mode You can playback tracks stored in a USB memory device by selecting a folder. ! The dance function cannot be used in a folder mode playback. ! This unit can display folders up to 20 hierarchies. 1 Select Folder in the initial screen of the USB memory and select folders and tracks for a playback.
-
Page 18: Connecting Your Ipod/Iphone
— Asia, Middle East, and Oceania ! Installing software versions other than indicated on the website of Pioneer to your iPod/iPhone may result in incompatibility with this device. ! iPod and iPhone are licensed for reproduction of non-copyrighted materials or materials the user is legally permitted to reproduce.
-
Page 19: Connecting Auxiliary Components
iPod Song3 Artist2 2:20 4:45 1 Song name 2 Artist name 3 Elapsed time 4 Playback status 5 Total time About iPhone playback ! Sound will only switch from iPhone to the device after authentication process is completed in approximately 10 seconds. ! Incoming calls will pause the playback and iPhone ringtones will be heard from the device speakers only.
-
Page 20: Various Dance Functions
Various dance functions The product features excellent dance functions that allows you to enjoy dancing using your own music data. The dance function can be used using the music stored in the internal memory or your own USB memory device. However, to exploit all functions, you must analyze the music data in advance on a PC using the music software [MIXTRAX].
-
Page 21: Start A Battle In A Battle Mode
! There is a five-second countdown (for preparation) before the battle begins (the track from the selected Genre will start playing back). ! When the battle is finished, a voice will playback announcing the completion of the battle (randomly selected from multiple voices). ! A time call announcing the remaining 1 minute and 10 seconds of the battle and another declaring its completion will be played back.
-
Page 22: Using The Dj Mix Mode
Using the DJ Mix mode Memory/USB/STEEZ Playback of music tracks from a pre-selected genre. All tracks of the Dance Genre will be played back in an order that allows continuous dancing. 1 With the power turned on, press MENU. Menu screen appears on the front panel display. Menu Battle Battle…
-
Page 23: Use Various Playback Control Functions
2 Use a/b to select ‘Rhythm Machine’, then press ENTER. A Rhythm Sequence selection screen for the Rhythm Machine mode will be shown. Rhythm Machine Preset 1 Preset 1 Preset 2 Preset 3 Preset 4 Preset 5 3 Start a track playback by selecting a rhythm sequence. ! To end the Rhythm Machine playback, press the EXIT button.
-
Page 24: Connecting A Pc
Connecting a PC Installing the music management software MIXTRAX onto your PC will and then transferring music data analyzed by MIXTRAX across to the device will allow you to use various dance functions. 1. In order to download MIXTRAX, execute “MIXTRAX Download” from the root folder in this device via the PC connected to this device. 2.
-
Page 25: Updating The Firmware
Updating the firmware Important ! Cannot be updated if the unit is using batteries. Connect the unit to an AC adaptor, and update after connecting the unit to a PC. ! Do not in any circumstances unplug the power cord until “Update completed.” is displayed when the firmware is being updated in accordance with the 7 steps below.
-
Page 26: Using The Setup Menu
Using the Setup menu Configure setting such as audio quality for tracks that are played back on the device, the playback method, power, and display. 1 With the power turned on, press MENU. Menu screen appears on the front panel display. Menu Battle Battle…
-
Page 27: Configure The Power Saving Settings
Configure the power saving settings By configuring the power saving settings, you can save the battery’s power and reduce the amount of power used. To configure the power saving settings, select Power Save in the Setup menu. You can set Display Off, Auto Power Off and Key Light Off separately for when operating by battery or AC adapter. Settings for battery Settings for AC adapter powered use…
-
Page 28: Additional Information
Take a look at the other components and electrical appliances being used, because sometimes the problem may lie there. If the trouble isn’t sorted out even after going through the checks below, ask your nearest Pioneer authorized independent service company to carry out repair work.
-
Page 29: Ipod/Iphone
iPod/iPhone The device doesn’t recognize iPod touch/iPhone. ! Try the following. 1. Simultaneously keep pressing the sleep button and home button on the iPod touch or iPhone for over 10 seconds to restart. 2. Turn on the device. 3. Connect the iPod touch/iPhone to the device. “Communication error.”…
-
Page 30: Playable Music File Formats
Playable music file formats The music files that the device can play back from the internal memory and USB memory devices are as follows. Sampling Category Extension Stream Bitrate frequency [CBR] 32, 40, 48, 56, 64, 80, 96, 112, 128, 160, 192, 224, 256, 320 kbps MPEG-1 Audio Layer3 32 kHz, 44.1 kHz, 48 kHz [VBR] 8 kbps to 320 kbps…
-
Page 31: Cleaning The Unit
Cleaning the unit ! Use a polishing cloth or dry cloth to wipe off dust and dirt. ! When the surface is dirty, wipe with a soft cloth dipped in some neutral cleanser diluted five or six times with water, and wrung out well, and then wipe again with a dry cloth.
-
Page 32
253 Alexandra Road, #04-01, Singapore 159936 TEL: 65-6472-7555 PIONEER ELECTRONICS AUSTRALIA PTY. LTD. 5 Arco Lane, Heatherton, Victoria, 3202, Australia, TEL: (03) 9586-6300 PIONEER ELECTRONICS DE MEXICO S.A. DE C.V. Blvd.Manuel Avila Camacho 138 10 piso Col.Lomas de Chapultepec, Mexico, D.F. 11000 TEL: 55-9178-4270 K002_B3_En…

CREW
STZ-D10Z-R
SERIOUS DANCE GEAR
MEET STEEZ, THE FIRST AUDIO SYSTEMS DESIGNED SPECIFICALLY FOR THE EMERGING DANCE SCENE. BY COMBINING AN EXCLUSIVE SET OF DANCE FEATURES WITH PIONEER’S RENOWNED HISTORY IN SOUND QUALITY, STEEZ IS ABLE TO UNLOCK AND EXTEND THE MOST IMPORTANT QUALITIES DANCERS NEED TO TAKE THEIR SKILL TO THE NEXT LEVEL.
DANCE FEATURES*1
FROM THE BATTLE—HARDENED DANCE CREW TO A BEGINNING STUDENT, STEEZ GIVES CONTROL LIKE NO OTHER AUDIO SYSTEM AVAILABLE, PERSONALIZING THE EXPERIENCE FOR PRACTICE, DEMOS, OR EVEN FULL—ON COMPETITION, INCLUDING UNIQUE FEATURES SUCH AS:
Tempo Control: Ideal for practicing choreography, Tempo Control let’s you adjust the tempo of any track without changing pitch.
Dance Cue:Practice makes perfect. Set a cue point anywhere in a song to go back to easily and at any time.
8-Beat Skip: Dancing is all about the beat, more specifically 8-counts. 8-Beat Skip let’s the dancer rewind and fast forward by 8-counts, assuring the beat is never interrupted.
Auto Battle Mode: Automatically create group or 1-on-1 battles on the fly, complete with countdown and voice prompts
DJ Mix: Eliminates the need for a DJ. DJ Mix automatically puts together non-stop mixes by genre, complete with transition effects between tracks.
Dance Boost: Perfect for loud environments or when you have to keep the volume down without missing the beat, Dance Boost emphasizes instruments like the hi-hat and bass drum for a more pronounced beat.
Remote Control: An ultra-thin and compact remote insures all the control is conveniently in the dancer’s hand. No need to run to and from the player.
AUDIO FEATURES
›› Tweeters (25 mm x 2) ›› Woofers (75 mm x 2)
›› Dedicated Subwoofer (135mm) ›› 40 Watts Total Power Output
›› Support for MP3, WMA, AAC, LPCM
PERFORMANCE FEATURES
›› Covered Dock for iPod & iPhone ›› 4GB Internal Memory
›› Large 3.5” LED QVGA Screen ›› 10-D Batteries or AC Adapter
Док Станции Pioneer STZ-D10Z-R
Технические характеристики
| Звук | 2.1 |
| Мощность динамиков | 2×10 Вт |
| Мощность сабвуфера | 20 Вт |
| Питание | от сети, от батарей |
| Диапазон воспроизводимых частот | 50 — 20000 Гц |
| Количество полос AC | 2 |
| ВЧ динамик | 26 мм |
| НЧ динамик | 80 мм |
| Динамик сабвуфера | 135 мм |
| Пульт дистанционного управления | есть |
| Дисплей | есть |
| Тип элементов питания | D |
| Входы | линейный (разъем mini jack) |
| Выходы | на наушники |
| Интерфейсы | USB Type A (для флэшки), USB (для подключения к компьютеру) |
| Функции | будильник |
| Размеры (ШxВxГ) | 632x245x221 мм |
| Вес устройства | 7.40 кг |
DCS-505

Pioneer DCS-505 Manual del usuario,
76 pages
PDR-F10
Pioneer PDR-F10 Manual del usuario,
162 pages
DCS-525

Pioneer DCS-525 User Manual,
82 pages
VSX-909RDS
Pioneer VSX-909RDS User Manual,
96 pages
MEP-7000
Pioneer MEP-7000 Manual del usuario,
6 pages
VSX-AX5i-S
Pioneer VSX-AX5i-S Manual del usuario,
120 pages
DVR-220-S
Pioneer DVR-220-S Manual del usuario,
106 pages
SC-2022-K
Pioneer SC-2022-K Manual del usuario,
118 pages
SC-LX72
Pioneer SC-LX72 User Manual,
146 pages
PDX-Z9
Pioneer PDX-Z9 Manual del usuario,
87 pages
SC-LX71
Pioneer SC-LX71 User Manual,
134 pages
VSX-2016AV-S
Pioneer VSX-2016AV-S Manual del usuario,
79 pages
DVR-3100-S
Pioneer DVR-3100-S User Manual,
112 pages
VSX-2016AV-S
Pioneer VSX-2016AV-S Manual del usuario,
80 pages
VSX-S300
Pioneer VSX-S300 Manual del usuario,
36 pages
CT-S250
Pioneer CT-S250 User Manual,
16 pages
SE-DRF41M

Pioneer SE-DRF41M User Manual,
1 pages
DV-939A


Pioneer DV-939A User Manual,
168 pages
DCS-333
Инструкция по эксплуатации Pioneer DCS-333,
2 pages
S-H610V
Pioneer S-H610V User Manual,
8 pages