
- Manuals
- Brands
- Beko Manuals
- Dishwasher
- DIN48430
- User manual
-
Contents
-
Table of Contents
-
Troubleshooting
-
Bookmarks
Quick Links
Dishwasher
User’s Manual
DIN48430
EN
Document Number :
18 7376 0100_AB_BEKO_E9_EN/ 31-07-19.(10:39)
Related Manuals for Beko DIN48430
Summary of Contents for Beko DIN48430
-
Page 1
Dishwasher User’s Manual DIN48430 Document Number : 18 7376 0100_AB_BEKO_E9_EN/ 31-07-19.(10:39) -
Page 2
Please read this user manual first! Dear Customer, We hope that you get the best results from your product which has been manufactured with high quality and state-of-the-art technology. Therefore, please read this entire user manual and all other accompanying documents carefully before using the product and keep it as a reference for future use. -
Page 3
Dishwasher User’s Manual DIN48430 Document Number : 18 7376 0100_AB_BEKO_E9_EN/ 31-07-19.(10:39) -
Page 4
Please read this user manual first! Dear Customer, We hope that you get the best results from your product which has been manufactured with high quality and state-of-the-art technology. Therefore, please read this entire user manual and all other accompanying documents carefully before using the product and keep it as a reference for future use. -
Page 5: Table Of Contents
CONTENTS 1 INSTRUCTIONS FOR SAFETY Lower basket bottle wire ….26 Upper basket height adjustable rack 26 AND ENVIRONMENT Upper basket multipurpose service General safety ……..4 rack …………26 Intended use ……….4 Adjusting the height of the upper Children’s safety ……..5 basket ………..27 Disposing of packaging material ..5 Collapsible upper basket wires ..
-
Page 6: Instructions For Safety And Environment
instructions for safety and environment This section contains safety Never touch the plug with • instructions that will help to get wet hands! Never unplug by protected from risk of personal pulling on the cable, always injury or property damage. Failure pull out by grabbing the plug.
-
Page 7: Children’s Safety
instructions for safety and environment Children’s safety This appliance is intended • to be used in household and Electrical products are • similar applications such as: dangerous for the children. — Staff kitchen areas in shops, Keep children away from the offices and other working product when it is in use.
-
Page 8: Compliance With Weee Directive And Disposing Of The Waste Product
instructions for safety and environment Package information 1. Unplug the product before transporting it. Packaging materials of the 2. Remove water drainage and product are manufactured water supply connections. from recyclable materials in accordance with our National 3. Drain the remaining water in Environment Regulations.
-
Page 9: Dishwasher Overview
Dishwasher Overview Upper basket Cutlery basket Lower basket Automatic Liquid/Gel Detergent and Rinse Aid Dosing System Type Label Control panel Door Lower impeller Salt reservoir lid 10. Filters 11. Upper impeller 12. Upper basket rail 13. Upper cutlery basket ( depends on model ) 14.
-
Page 10: Fan Drying System
Dishwasher Technical specifications Compliance to standards and test data / EC declaration of conformity This product complies with the following EU directives; Development, production and sales stages of this product comply with the safety rules included in all pertaining European Community regulations. 2014/35/EU, 2014/30/EU, 93/68/EC, IEC 60436/DIN 44990, EN 50242 Power input 220-240 V, 50 Hz (see rating label)
-
Page 11: Installation
Installation Appropriate installation Refer to the nearest Authorised Service Agent for installation of your product. To location make the product ready for use, make sure Place the product on a solid and flat • that the electricity, tap water supply and floor that has sufficient load carrying water drainage systems are appropriate capacity! The product must be…
-
Page 12: Connection To The Drain
Installation Permitted water temperature: up must be min. 50 cm and max. 100 cm from to 25°C the floor. A discharge hose longer than 4 The dishwasher may not be connected to meters causes dirty washing. open warm water devices or flow-through Attach the water discharge hose to the water heaters.
-
Page 13: Aquasafe
Installation Aquasafe+ The voltage and allowed fuse or breaker • protection are specified in the “Technical (depends on model) specifications” section. If the current The Aquasafe+ system protects against value of the fuse or breaker in the house water leaks that may occur at the hose is less than 16 Amps, have a qualified inlet.Water contact with the valve box of electrician install a 16 Amp fuse.
-
Page 14: Preparation Tips For Energy Saving
PreparatIon Tips for energy saving Following information will help you use the product in an ecological and energy- efficient manner. Wipe away any coarse food remnants on the dishes before putting them in the product. Operate the product after filling it completely.
-
Page 15: Adjusting The Water Softening System
PreparatIon Adjusting the water softening system Cleaning, rinsing and drying performance of your dishwasher will increase when water softening system is adjusted properly. Adjust the new water hardness level according to the Water hardness level instruction in this booklet. Use the test strip supplied with the product according to the steps given below to determine hardness level of your supply water.
-
Page 16: Adding Salt
PreparatIon 4. Add salt to the salt compartment. To If your machine is equipped speed up dissolution rate of salt in with “Automatic Water water, stir it with a spoon. Hardness Detection System”, water hardness adjustment You can put about 2 kg of will be made by the service/ softening salt into the salt user as standard during first…
-
Page 17: Adding Liquid/Gel Detergent And Rinse Aid
PreparatIon In addition to liquid/gel Thanks to this system, the amount of rinse detergents that function only aid and liquid/gel detergent required for the as a detergent, there are also selected washing programme is adjusted liquid/gel detergents that act as automatically.
-
Page 18
PreparatIon Using the Automatic Liquid/Gel After fully opening the door of the Detergent Dosing System dishwasher, open the decorative cover as In order to use the Automatic Liquid/ shown with arrows 1 and Gel Detergent Dosing function, select Automatic Liquid/Gel Detergent Dosing function on the control panel. -
Page 19
PreparatIon Liquid/gel detergents must be used in a Fill the rinse air box only with short time once they have been unpacked. rinse aid, and the detergent box Unpacked liquid/gel detergents may lose only with liquid/gel detergent. their fluidity in time. If you fill it inappropriately, When the detergent warning immediately remove the boxes,… -
Page 20: Powder Detergents
PreparatIon Powder Detergents Poor quality detergent Hard water area without the use of Rinse You can find the correct amount of powder detergent for the Old or scratched crockery. (If you have selected programme in the any kind of surface damage to cups, you table «Programme Data and are far more likely to see stains.) Consumption Values».
-
Page 21
PreparatIon When you switch to powder detergent from tablet detergent: Make sure that salt and rinse aid reservoirs are full. 2. Set the water hardness to the highest level and perform an empty run. 3. After the empty washing cycle, review the user manual and readjust the water hardness level so as to suit the water Place the tablet detergent into… -
Page 22
PreparatIon Wipe away any coarse food remnants • (bones, seeds, etc.) on the dishes before placing them in the dishwasher. Place thin, narrow pieces in the middle • sections of baskets if possible. Place the heavily soiled and bigger • items in the lower basket and smaller, delicate and light items in the upper basket. -
Page 23
PreparatIon Suggestions for loading the dishwasher Improper Loading Of Dishware Lower basket Upper basket Improper Loading Of Dishware Dishwasher / User’s Manual 21 / 47 EN… -
Page 24: Cutlery Basket
PreparatIon Cutlery basket Cutlery basket (depends on model) (depends on model) Cutlery basket is designed to wash your Cutlery basket is designed to wash your dishes such as knife, fork, spoon, etc. in an dishes such as knife, fork, spoon, etc. in an efficient manner.
-
Page 25: Collapsible Lower Basket Tines
PreparatIon Collapsible lower basket Bringing the tines to the tines horizontal position by holding them from the tips may cause (depends on model) them to bend. Therefore, it There are foldable tines (A) located at the will be appropriate to bring the tines in the middle to horizontal lower basket of the machine are designed or vertical position by holding…
-
Page 26: Tray Wash Supports
PreparatIon SoftTouch Accessory (depends on model) The SoftTouch Accessory found in the lower basket of your machine enables a safe washing for your fragile glasses. Bringing the tines to the horizontal position by holding them from the tips may cause them to bend.
-
Page 27: Lower Basket Multipurpose / Height Adjustable Service Rack
PreparatIon Lower basket multipurpose Make sure that the impeller / height adjustable service does not touch the dishes you rack placed on the racks. (depends on model) To close the racks: This accessory located at the lower basket Fold the rack (A). of your machine allows you to easily wash 2.
-
Page 28: Lower Basket Bottle Wire
PreparatIon Lower basket bottle wire Upper basket multipurpose service rack (depends on model) The bottle wire is designed for easier (depends on model) washing of long pieces with wide mouths. This accessory located at the upper basket You may take out the bottle wire from the of your machine allows you to easily wash basket when not in use by pulling it out pieces such as extra long ladles and bread…
-
Page 29: Adjusting The Height Of The Upper Basket
PreparatIon Adjusting the height of the To lower the basket, while it is in the uppermost position; upper basket Hold the upper basket wires with both (depends on model) hands, slightly lift up the basket and The upper basket height adjustment simultaneously push and release the mechanism has been designed for you to latches shown in the figure (B).
-
Page 30: Collapsible Upper Basket Wires
PreparatIon Collapsible upper basket Height setting with empty wires basket (depends on model) (depends on model) You can use collapsible wires when you In this model, the height setting of the need a larger space for your dishes in the upper basket may be changed using the upper basket of your machine.
-
Page 31: Ceiling Cutlery Basket
PreparatIon Ceiling cutlery basket (depends on model) Ceiling cutlery basket is designed to wash your cutlery items such as forks, spoons and etc. by placing them between the bars on the basket. When the central tray is in the lower position, you can load long/high items such as coffee cups, ladles, etc.
-
Page 32: Operating The Product
Operating the product 7. Function Selection Keys On / Off Key TrayWash Function 2. Menu Key Fast+ Function 3. Time Delay Selection SteamGloss Function / Menu Direction Selection Keys Half Load function 4. Selection / Confirmation Key 5. Display 8. Programme Selection Keys 6.
-
Page 33: Programme Selection / Programme Cancel Key
Operating the product On/Off Key Programme selection When you press the On/Off key, the Press the On/Off button to turn on indicator lights illuminate on the display your machine. for ON position. The lights turn off in OFF 2. Check the Salt and Rinse Aid indicators position.
-
Page 34
Operating the product /47 EN Dishwasher / User’s Manual… -
Page 35: Auxiliary Functions
Operating the product Auxiliary functions TrayWash Function Select Intensive 70°C programme and press Washing programmes of your dishwasher function key to run this function. are designed to obtain the best cleaning effect, considering the type of the soiling, SteamGloss Function soiling degree and properties of the dishes It provides superior drying performance.
-
Page 36
Operating the product Functions Under the Settings EverClean Function Off/On Menu (depends on the model) Under the settings menu of your product, there are some additional functions that depend on the model. To access these functions, press and hold the Menu key for 3 seconds. Use <- and +>… -
Page 37
Operating the product Liquid Dosing Function detergent use Changing Warning Sound Volume setting: After switching on your machine, press Level 1: 10 cc lower than the default value the Menu key for 1 second. Level 2: 5 cc lower than the default value 2. -
Page 38: Scheduling The Washing Time
Operating the product Tablet detergent function 4. Close the door of your machine after Allows to obtain a better drying setting the Delayed Start. Once the delay time is over, the selected performance from the multi-purpose programme will start automatically. detergents called as all in one detergents such as 2in1, 3in1, 4in1, 5in1 and etc., Changing the settings while Time…
-
Page 39: Cancelling The Programme
Operating the product Salt indicator ( ) Your machine performs water softening depending on the Please check the salt indicator on the hardness level of the supply display to see whether there is adequate water. Washing time can amount of softening salt in the dishwasher change while the programme or not.
-
Page 40: End Of Programme
Operating the product End of programme Overflowing warning If the machine intakes too much water or When the programme you have there is leakage at any of the components selected comes to an end, an then the machine will detect this and E:01 audible warning signal will warn icon will flash on the Programme indicator.
-
Page 41: Maintenance And Cleaning
Maintenance and cleaning Cleaning the filters Service life of the product extends and frequently faced problems decrease if it is Clean the filters at least once a week in cleaned at regular intervals. order for the machine operates efficiently. Unplug the product and turn off Check if food residues are left on the filters.
-
Page 42: Cleaning The Hose Filter
Maintenance and cleaning Cleaning the hose filter Damages on the machine that may be caused by impurities coming from the urban supply water or your own water installation (such as sand, dirt, rust, etc.) can be prevented by means of the filter attached to the water inlet hose.
-
Page 43: Cleaning The Impellers
Maintenance and cleaning Cleaning the impellers Upper impeller Clean the impellers for the machine to work Check if the holes on the upper impeller (1) efficiently. are clogged. If they are clogged, remove and clean the impeller. Turn its nut to left to remove the upper impeller.
-
Page 44: Troubleshooting
Troubleshooting Machine does not start. • Power cable is unplugged. >>> Check if the power cable is plugged in. • Fuse is blown. >>> Check the fuses in your house. • Water is cut. >>> Make sure that the water inlet tap is open. •…
-
Page 45
Troubleshooting • Rinse aid is not sufficient. >>> Check the rinse aid indicator and add rinse aid if necessary. Increase the rinse aid setting if there is enough amount of rinse aid in the machine. • Machine is unloaded right after the programme is over. >>> Do not unload your machine right after washing process is completed. -
Page 46
Troubleshooting the filling process. Run the prewash programme to remove the salt that spilled inside the machine. Since the salt granules that will remain under the lid will dissolve during prewash, causing the lid loosen, check the lid once again at the end of the programme. There is a different odour in the machine A new machine has a peculiar odour. -
Page 47
Troubleshooting Detergent remains in detergent dispenser. • Detergent dispenser was damp when adding detergent. >>> Make sure that the detergent dispenser is dried well prior to filling it with detergent. • Detergent is added long before the washing process. >>> Pay attention to add detergent shortly before start-up of the washing. -
Page 48
Troubleshooting A smear remains on glasses that resembles milk stain which can not be removed when wiped by hand. A bluish / rainbow appearance occurs when the glass is pointed to light. • Excessive rinse aid is used. >>>Lower rinse aid setting. Clean the spilled rinse aid when adding rinse aid.
Cпецификация
| Модель | DIN48430 |
| Цвет | Серебристый |
| SAP код | 7624668377 |
| Код EAN | 8690842202315 |
| Размеры | |
|---|---|
| Высота |
81.8 см |
| Ширина |
59.8 см |
| Глубина |
55 см |
| Вес нетто |
43 кг |
| Глубина с открытой дверцей |
115 см |
| Рекомендованный вес навешиваемой двери |
3.0-9.0 кг |
| Высота ниши для встраивания |
82-87 см |
| Техническая характеристика | |
| Максимальная загрузка (комплекты посуды) | 15 |
| Количество программ | 8 |
| Температуры мытья |
35-40-45-50-65-70 °С |
| Технология дозировки жидкого моющего средства AutoDose | + |
| Сенсор загрязнения | + |
| Внутренняя подсветка | + |
| Защита стекла GlassCare | + |
| Тип сушки |
Интенсивная
|
| Дисплей | LCD |
| Блокировка от детей | — |
| Антибактериальная прокладка | — |
| Фильтр | Частично металлический |
| Индикатор отсутствия соли | + |
| Индикатор отсутствия ополаскивателя | + |
| Индикатор протечки | + |
| Система смягчения воды | + |
| Количество степеней мойки посуды |
3
|
| Световой индикатор на полу LedSpot | + |
| Инверторный двигатель ProSmart | + |
| Система интенсивного мытья Aquaintense | + |
| Система интенсивного мытья CornerIntense | + |
| Панель управления | Сенсор |
| Параметры | |
| Класс энергопотребления | A (-20%) |
| Расход электроэнергии |
0.84 кВт/ч |
| Расход воды |
9.5 л |
| Уровень шума |
42 дБ |
| Класс сушки |
A
|
| Автоматическое открытие дверцы после завершения работы | + |
| Очистка камеры | — |
| Оборудование | |
| Складные держатели для тарелок в верхней корзине | 3 |
| Полка для длинных приборов | — |
| Регулировка высоты верхней корзины | 3-х позиционная регулировка |
| Количество полок в верхней корзине |
2 шт |
| Складные держатели в нижней корзине | 4 |
| Тип корзины для столовых приборов | Скользящая |
| Третья корзина |
+
|
| Программы | |
| Самоочистка | — |
| Экономичная 50° | + |
| Автоматическая 40-65° | + |
| Интенсивная 70° | + |
| Quick&Shine | + |
| Мини 30′ 35° | + |
| Предварительная | + |
| AquaFlex | + |
| GlassCare 40° | + |
| Clean&Shine |
—
|
| Функции | |
| Половинная загрузка | + |
| Быстрая функция | + |
| Экстра Ополаскивание | — |
| Экстра Сушка | — |
| AquaIntense | — |
| SteamGloss | + |
| TrayWash | + |
Гарантия
Гарантия на бытовую технику Beko составляет 2 года
Подробнее об условиях принятия в гарантийное обслуживание в разделе «Гарантия»
{
Tехнологии
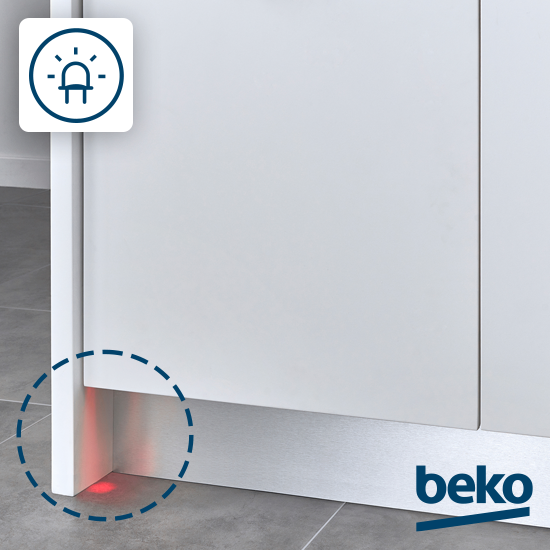
Световой индикатор на полу LedSpot
Включите любую программу и вернитесь к другим делам или отдыху – специальный световой индикатор на полу автоматически погаснет по ее завершению, не отвлекая вас раньше времени.

Инверторный мотор ProSmart
Вы можете включать посудомоечную машину на ночь и не беспокоиться, что ее будет слышно. Для снижения уровня шума, а также энергопотребления в машинке установлен надежный и долговечный инверторный мотор ProSmart. Beko дает гарантию 10 лет на эффективную и бесшумную работу мотора.

Третья корзина для посуды
Посудомоечная машина Beko оснащена тремя корзинами. Это значит, что благодаря «умной» эргономике пространства вы сможете загрузить еще больше посуды – от столовых приборов до мелкой кухонной посуды и чашек для эспрессо.

Защита стекла GlassCare
Особый режим для хрупкой посуды. Технология GlassCare деликатно отмоет бокалы и тарелки со всех сторон благодаря низкой температуре 40 °C и сниженному напору воды.

Автодозировка моющего средства AutoDose
Минимум времени и максимум экономии – благодаря инновационной технологии AutoDose машина автоматически рассчитывает оптимальное количество жидкого моющего средства, соблюдая баланс между его расходом и эффективностью мытья. ВЗаправлять отсек средством необходимо всего лишь 1 раз в месяц.

Защита от протечек WaterSafe
Защита от протечек. WaterSafe контролирует уровень воды в посудомоечной машине и в случае ее избытка прекращает подачу. Вы можете включать посудомоечную машину даже перед тем, как уйти из дома, и быть уверенными, что в ваше отсутствие машинка точно не затопит соседей.

Гарантия производителя 2 года
На всю продукцию Beko действует официальная гарантия в течение 24 месяцев с момента покупки. Выезд специалиста, диагностика и ремонт при наступлении гарантийного случая будет бесплатным.
Похожие товары
- Manuals
- Brands
- Beko Manuals
- Dishwasher
- DIN48430
- User manual
-
Contents
-
Table of Contents
-
Troubleshooting
-
Bookmarks
Quick Links
Dishwasher
User’s Manual
DIN48430
EN
Document Number :
18 7343 0100_AA_BEKO_E9_EN/ 12-11-18.(9:14)
Related Manuals for Beko DIN48430
Summary of Contents for Beko DIN48430
-
Page 1
Dishwasher User’s Manual DIN48430 Document Number : 18 7343 0100_AA_BEKO_E9_EN/ 12-11-18.(9:14) -
Page 2
Dishwasher User’s Manual DIN48430 Document Number : 18 7343 0100_AA_BEKO_E9_EN/ 12-11-18.(9:14) -
Page 3
Please read these instructions first before using your appliance Thank you for choosing a Beko appliance. Please take some time to read this user manual before using your appliance, to ensure you know how to safely operate the controls and functions. -
Page 4
Please read these instructions first before using your appliance Thank you for choosing a Beko appliance. Please take some time to read this user manual before using your appliance, to ensure you know how to safely operate the controls and functions. -
Page 5: Table Of Contents
CONTENTS 1 INSTRUCTIONS FOR SAFETY Cutlery basket ……..21 Collapsible lower basket tines ..21 AND ENVIRONMENT Adjusting the height of the upper General safety ……..4 basket ……….22 Intended use ……….4 Children’s safety ……..5 5 OPERATING THE PRODUCT 23 Disposing of packaging material ..5 Programme Selection / Programme Transportation of the product ….5 Cancel key ……….
-
Page 6: Instructions For Safety And Environment
Instructions for safety and envIronment This section contains safety Never touch the plug with • instructions that will help to give wet hands! Never unplug by protection from risk of personal pulling on the cable, always injury or property damage. Failure pull out by grabbing the plug.
-
Page 7: Children’s Safety
Instructions for safety and envIronment This appliance is intended • Store all detergents and • to be used in household and additives in a safe place away similar applications such as: from the reach of the children. — Staff kitchen areas in shops, Disposing of packaging offices and other working material…
-
Page 8: Compliance With Weee Directive And Disposing Of The Waste Product
Instructions for safety and envIronment Compliance with WEEE Directive and Disposing of the Waste Product This product complies with EU WEEE Directive (2012/19/EU). This product bears a classification symbol for waste electrical and electronic equipment (WEEE).This product has been manufactured with high quality parts and materials which can be reused and are suitable for recycling.
-
Page 9: Dishwasher Overview
Dishwasher Overview 1. Upper basket 2. Upper impeller 3. Lower impeller 4. Silverware basket 5. Door 6. Rating Label 7. Control panel 8. Detergent dispenser 9. Lower basket 10. Filters 11. Salt reservoir lid 12. Upper basket rail 13. Upper cutlery basket (depends on model) 14.
-
Page 10: Fan Drying System
Dishwasher Technical specifications Compliance to standards and test data / EC declaration of conformity This product complies with the following EU directives; Development, production and sales stages of this product comply with the safety rules included in all pertaining European Community regulations. 2014/35/EU, 2014/30/EU, 93/68/EC, IEC 60436/DIN 44990, EN 50242 Power input 220-240 V, 50 Hz (see rating label)
-
Page 11: Installation
Installation To make the product ready for use, make Do not install the product at places • sure that the electricity, tap water supply where temperature may fall below 0ºC. and water drainage systems are appropriate Place the product on a rigid floor. Do •…
-
Page 12: Connection To The Drain
Installation Connection to the drain Drainpipe must be connected to the foul water system and it Water discharge hose can directly be should not be connected to any connected to the drain hole or sink’s surface water drain. drainage. The length of this connection must be min.
-
Page 13: This Appliance Must Be Earthed
Installation This appliance must Green and yellow be earthed or green If the fitted moulded plug is not suitable for your socket, then the plug should be cut off and an appropriate plug fitted. Destroy the old plug, which is cut off as a plug with a bared cord could cause a shock hazard if inserted into a socket…
-
Page 14: Preparation Tips For Energy Saving
Preparation Tips for energy saving Adjusting the water softening system Following information will help you use the product in an ecological and energy- Cleaning, rinsing and drying performance of efficient manner. your dishwasher will increase when water Wipe away any coarse food remnants on the softening system is adjusted properly.
-
Page 15
Preparation Remove the test Turn on the tap and Hold the test strip in Remove the test Wait for 1 minute. The test strip shows strip from the let the water run for the water for about strip from the water you the hardness packet. -
Page 16: Adding Salt
Preparation If the hardness level of the supply water Salt reservoir will be filled is above 90 °dF or if you are using well with water when you start water, then it is recommended to use water the product. For this reason, purification devices and special filters.
-
Page 17: Detergent
Preparation Put the detergent into the detergent You need to add salt right before dispenser just before operating the machine starting the machine. Thus, the as illustrated below. overflowing salty water will be Push the latch to right to open the flushed immediately, preventing detergent dispenser lid (A).
-
Page 18: Tablet Detergents
Preparation 3. Push the lid of the detergent dispenser with the detergent if the water hardness to close it. A «click» will be heard when level is above the mentioned level. the lid is closed. The best washing performance in dishwashers is obtained by using detergent, rinse aid and water softening salt individually.
-
Page 19: Rinse Aid
Preparation Rinse aid 4. If there are stains on tableware items after washing, level must be increased The rinse aid used in and if there is a blue trace after wiping dishwashers is a special them by hand, it must be decreased. combination that aims to This is set to position 3 as factory increase drying efficiency and…
-
Page 20: Placing The Dishes Into The Dishwasher
Preparation Placing the dishes into the dishwasher You can use your dishwasher in the optimum way with respect to energy consumption and washing and drying performance only if you place the dishes in an orderly way. Wipe away any coarse food remnants •…
-
Page 21
Preparation Suggestions for loading the dishwasher Improper Loading Of Dishware Lower basket Upper basket Improper Loading Of Dishware Dishwasher / User’s Manual 19 / 46 EN… -
Page 22: Collapsible Upper Basket Wires
Preparation Collapsible upper basket Upper basket height wires adjustable rack You can use collapsible wires when you Use the lower and upper parts of the height need a larger space for your dishes in the adjustable racks in the upper basket of upper basket of your machine.
-
Page 23
Preparation Upper basket multipurpose service rack This accessory located at the upper basket of your machine allows you to easily wash pieces such as extra long ladles and bread knives. You can lift up the upper basket multipurpose service rack to remove it if you do not want to use it. -
Page 24: Cutlery Basket
Preparation Cutlery basket Collapsible lower basket tines Cutlery basket is designed to wash your There are foldable tines (A) located at the dishes such as knife, fork, spoon, etc. in an lower basket of the machine are designed for efficient manner. an easier placement of large pieces such as Since the cutlery basket can be moved (A, pans, bowls, etc.
-
Page 25: Adjusting The Height Of The Upper Basket
Preparation Adjusting the height of the To lower the basket, while it is in the uppermost position; upper basket Hold the upper basket wires with both The upper basket height adjustment hands, slightly lift up the basket and mechanism has been designed for you to simultaneously push and release the create large spaces in the lower or upper latches shown in the figure (B).
-
Page 26: Operating The Product
Operating the product 7. Function Selection Keys On / Off Key AquaIntense Function 2. Menu Key Fast+ Function 3. Time Delay Selection SteamGloss Function / Menu Direction Selection Keys Half Load function 4. Selection / Confirmation Key 5. Display 8. Programme Selection Keys 6.
-
Page 27: Programme Selection / Programme Cancel Key
Operating the product On/Off Key Programme selection When you press the On/Off key, the Press the On/Off button to turn on your indicator lights illuminate on the display machine. for ON position. The lights turn off in OFF 2. Check the Salt and Rinse Aid indicators position.
-
Page 28
Operating the product /46 EN Dishwasher / User’s Manual… -
Page 29: Auxiliary Functions
Operating the product Auxiliary functions Half Load function It is used to operate the machine without Washing programmes of your dishwasher loading it completely. are designed to obtain the best cleaning Load your dishes in the machine as you effect, considering the type of the soiling, like.
-
Page 30
Operating the product 4. Press the Menu key to exit the settings EverClean Function Off/On menu. Your setting will be saved automatically. Your machine is set to “S:2” as factory default. Functions Under the Settings Menu (depends on the model) IonGuard Function Off/On Under the settings menu of your product, there are some additional functions that… -
Page 31: Scheduling The Washing Time
Operating the product You can delay the start of the selected programme until 24 hours. Press the Time Delay function key after selecting the washing programme and other auxiliary functions. 2. Once you press the Time Delay key, Display Information Line will show «0:30″…
-
Page 32: Starting The Programme
Operating the product Cancelling the programme You can select and start a new programme following Open the door of the product Press and the cancellation of Time Delay hold the Programme Selection / Programme function. Cancel keys for 3 seconds. After the 3 — 2 — 1 countdown, 0:01 is displayed, close the door Time Delay function cannot be of the product and wait for the draining…
-
Page 33: End Of Programme
Operating the product Adjusting the amount of For energy saving, the machine rinse aid is automatically turned off following the completion of the After switching on your machine, press programme or if the programme the Menu key for 1 second. is not started.
-
Page 34: Maintenance And Cleaning
Maintenance and cleaning Cleaning the filters Service life of the product extends and frequently faced problems decrease if it is Clean the filters at least once a week in cleaned at regular intervals. order for the machine operates efficiently. Unplug the product and turn off Check if food residues are left on the filters.
-
Page 35: Cleaning The Hose Filter
Maintenance and cleaning Cleaning the hose filter Damages on the machine that may be caused by impurities coming from the urban supply water or your own water installation (such as sand, dirt, rust, etc.) can be prevented by means of the filter attached to the water inlet hose.
-
Page 36: Cleaning The Impellers
Maintenance and cleaning Cleaning the impellers Upper impeller Clean the impellers at least once a week in Check if the holes on the upper impeller (1) order for the machine operates efficiently. are clogged. If they are clogged, remove and clean the impeller. Turn its nut to left to Lower impeller remove the upper impeller.
-
Page 37: Troubleshooting
Troubleshooting Machine does not start. • Power cable is unplugged. >>> Check if the power cable is plugged in. • Fuse is blown. >>> Check the fuses in your house. • Water is cut. >>> Make sure that the water inlet tap is open. •…
-
Page 38
Troubleshooting • Rinse aid is not sufficient. >>> Check the rinse aid indicator and add rinse aid if necessary. Increase the rinse aid setting if there is enough amount of rinse aid in the machine. • Machine is unloaded right after the programme is over. >>> Do not unload your machine right after washing process is completed. -
Page 39
Troubleshooting There is a different odour in the machine A new machine has a peculiar odour. It will fade out after a couple of washes. • Filters are clogged. >>> Check if the filter system is clean. Clean the filter system regularly as illustrated in section “Cleaning and Care”. -
Page 40
Troubleshooting Detergent remains in detergent dispenser. • Detergent dispenser was damp when adding detergent. >>> Make sure that the detergent dispenser is dried well prior to filling it with detergent. • Detergent is added long before the washing process. >>> Pay attention to add detergent shortly before start-up of the washing. -
Page 41
Troubleshooting A smear remains on glasses that resembles milk stain which can not be removed when wiped by hand. A bluish / rainbow appearance occurs when the glass is pointed to light. • Excessive rinse aid is used. >>>Lower rinse aid setting. Clean the spilled rinse aid when adding rinse aid. -
Page 42: Guarantee
Repairs necessary as a direct or indirect result of: Accidental damage, misuse or abuse of a product. An attempted repair of a product by anyone other than a Beko Approved Engineer (the “Engineer”). Installation or use of a product where such installation or use fails to meet the requirements contained in this guarantee or the User Instructions Booklet.
-
Page 43
Guarantee • Repairs to a product operated at any time on commercial or non-residential household premises (unless we have previously agreed to the installation environment). This guarantee is limited to the cost of repairing the product. To the extent permitted by law, the Manufacturer does not accept and will not be held liable for any financial loss incurred in connection with the failure of any product to operate in accordance with the expected standards. -
Page 44
If you are resident in the Republic of Ireland, this guarantee will be governed by Irish law and the Irish courts will have jurisdiction. This guarantee is provided by Beko plc. Beko House, 1 Greenhill Crescent, Watford, Hertfordshire. WD18 8QU. -
Page 45
Beko.co.uk/register and by following the online instructions. Beko Free standing appliances come with a 12 month parts and labour guarantee as standard, Beko Built-in appliances come with a 12 month parts and labour guarantee as standard. -
Page 46
Please take a few moments to complete the details below, as you will need this information when you call us, or to use our online services. When you call us you may be required to input your serial number into your telephone keypad. For help please visit beko.co.uk/ support/model-finder •… -
Page 47
Contact Us and choose a product support topic from the list of options. Complete the required details and click send message. Product registrations For UK registrations please visit beko.co.uk/register and for the Republic of Ireland visit beko. ie/register. Dishwasher / User’s Manual…
Beko DIN48430 Dishwasher PDF User Guides and Manuals for Free Download: Found (1) Manuals for Beko DIN48430 Device Model (Operation & User’s Manual)
More Dishwasher Device Models:
-
GE
GSD2800L-20
——contentsAir Gap21POTSCRUBBERCycle4, 13Appliance Registration2ProblemSolver18-20Care and Cleaning21RinseAgent12China, Crystal,Sterling17SafetyInstructions3Consumer Services23SystemsMonitor7-10CycleFeatures11UserMaintenance Instructions 21Detergent, Detergent Guide 12,13WarrantyBackCoverDispenser cups13WaterTempera …
GSD2800L-20 Dishwasher, 24
-
Hotpoint Ariston
Aquarius LTF 8B019
Istruzioni per l’usoLAVASTOVIGLIEItaliano, 1ITLTF 8B019SommarioScheda prodotto, 2Precauzioni e consigli, 3Sicurezza generaleSmaltimentoRisparmiare e rispettare l’ambienteInstallazione e Assistenza, 4-5Posizionamento e livellamentoCollegamenti idraulici ed elettriciDati tecniciAvvertenze per il primo lavaggioAssist …
Aquarius LTF 8B019 Dishwasher, 44
-
Electrolux
EIDW6105
Before You BeginRead all instructions before installing dishwasher.For your safety, please read and observe all safetyinstructions. This guide will help you anticipate drain, water, andelectrical connections, and help you select the best location for thedishwasher.Tip Over HazardDo not use dishwasher until completely i …
EIDW6105 Dishwasher, 2
-
saro
440-1015
Professionelle GeschirrspülerBEDIENUNGS UND MONTAGEANLEITUNG DES GESCHIRRSPÜLERS ORIGINALOPERATING AND INSTALLATION INSTRUCTIONS TRANSLATION OF THE ORIGINALINSTRUCTIONS DES INSTALLATION ET DES OPERATION PUR LES LAVEVAISSELLE TRANSLATION OF THE ORIGINALMANUAL DE INSTRUCCIONES TRANSLATION OF THE …
440-1015 Dishwasher, 52
Recommended Documentation:

DIN 48430 AD
|
Vestavná myčka integrovaná Atlantis: |
14 sad nádobí |
|
Energetická třída: |
A+++ |
Auto Dosing – automatické dávkování mycího prostředku
Direct Access ovládání – přímá volba programů
|
• |
Spotřeba el. energie: |
237 kWh/rok |
|
• |
Spotřeba vody: |
9,5litrů / 2660 l/rok |
|
• |
Hlučnost: |
44 dB |
•VxŠxH: 81,9-87 x 60 x 55cm
•8 programů: Auto program, Předmytí, Glass Care 40, Mini 30, Eco 50,
Quick & Shine, Intensive 70, AquaFlex
•6 teplot
•Odložený start 0,5 – 24 hod
•Poloviční náplň, Fast+, Extra sušení Steam Gloss, AquaIntense
•Funkce Tablety All in one
•speciální dolní zóna AquaIntense pro intenzivní mytí
•mechanický Glass Care systém na ochranu skla
•3 sprchovací úrovně, LCD 2-řádkový displej
•držáky na mytí plechů, SoftTouch, koš na mytí sklenic
•Výškově nastavitelný horní koš Acrobat se 3 polohami
|
• |
ProSmart invertorový motor s 10 lety záruky |
detaily produktu na dalších stranách |
|
• Samonastavovací panty na dveře o hmotnosti 3 – 9 kg” |
||
|
• SlideFit kluzné uložení dveří |
||
|
• Senzor čistoty vody, Aquasafe+ (AquaStop) |
||
|
• |
Horkovzdušné sušení |
Stock code: 7619463977, EAN 8690842209536

Horní koš Acrobat se 3 polohami
3 polohy pro maximální flexibilitu.
3 polohový horní koš Acrobat pro jakékoliv velikosti nádobí nabízí maximální variabilitu.
SlideFit kluzné uložení dveří
bez nutnosti prořezávat sokl kuchyňské linky.
 Loading…