![]()
MG2400 series
Онлайн-руководство
Устранение неполадок
Русский (Russian)
Содержание
Устранение неполадок. . . . . . . . . . . . . . . . . . . . . . . . . . . . . . . . . . . . . . . . . . . . 5
Проблемы с печатью. . . . . . . . . . . . . . . . . . . . . . . . . . . . . . . . . . . . . . . . . . . . . . . . . . . . . 6
Печать не начинается. . . . . . . . . . . . . . . . . . . . . . . . . . . . . . . . . . . . . . . . . . . . . . . . . . . . . . . . . . . . . . . 7
Замятие бумаги. . . . . . . . . . . . . . . . . . . . . . . . . . . . . . . . . . . . . . . . . . . . . . . . . . . . . . . . . . . . . . . . . . . . 9
Бумага подается неправильно или появилось сообщение об отсутствии бумаги. . . . . . . . . . . . . . 10
Копирование/Печать прерывается, не завершившись. . . . . . . . . . . . . . . . . . . . . . . . . . . . . . . . . . . . 12
Проблемы с качеством печати. . . . . . . . . . . . . . . . . . . . . . . . . . . . . . . . . . . . . . . . . . . . 13
Неудовлетворительные результаты печати. . . . . . . . . . . . . . . . . . . . . . . . . . . . . . . . . . . . . . . . . . . . 14
Не удается напечатать задание до конца. . . . . . . . . . . . . . . . . . . . . . . . . . . . . . . . . . . . . . . . . . 16
Печать не начинается/Нечеткая печать/Неверные цвета/Белые полосы. . . . . . . . . . . . . . . . 17
Неверные цвета. . . . . . . . . . . . . . . . . . . . . . . . . . . . . . . . . . . . . . . . . . . . . . . . . . . . . . . . . . . . . . . 20
Линии не выровнены. . . . . . . . . . . . . . . . . . . . . . . . . . . . . . . . . . . . . . . . . . . . . . . . . . . . . . . . . . . 21
Линия не печатается или печатается частично. . . . . . . . . . . . . . . . . . . . . . . . . . . . . . . . . . . . . 22
Изображение не печатается или печатается частично. . . . . . . . . . . . . . . . . . . . . . . . . . . . . . . 23
Бумага после печати сворачивается или на ней появляются чернильные пятна. . . . . . . . . . 24
Бумага испачкана/Отпечатанная поверхность поцарапана. . . . . . . . . . . . . . . . . . . . . . . . . . . . 25
Обратная сторона бумаги испачкана. . . . . . . . . . . . . . . . . . . . . . . . . . . . . . . . . . . . . . . . . . . . . . 28
Цвета передаются неравномерно. . . . . . . . . . . . . . . . . . . . . . . . . . . . . . . . . . . . . . . . . . . . . . . . 29
Чернила не подаются. . . . . . . . . . . . . . . . . . . . . . . . . . . . . . . . . . . . . . . . . . . . . . . . . . . . . . . . . . . . . . 31
Затруднения со сканированием. . . . . . . . . . . . . . . . . . . . . . . . . . . . . . . . . . . . . . . . . . . . 32
Затруднения со сканированием. . . . . . . . . . . . . . . . . . . . . . . . . . . . . . . . . . . . . . . . . . . . . . . . . . . . . . 33
Сканер не работает. . . . . . . . . . . . . . . . . . . . . . . . . . . . . . . . . . . . . . . . . . . . . . . . . . . . . . . . . . . . 34
Программа ScanGear (драйвер сканера) не запускается. . . . . . . . . . . . . . . . . . . . . . . . . . . . . . 35
Отображается сообщение об ошибке, и окно программы ScanGear (драйвера сканера) не открывается. . . . . . . . . . . . . . . . . . . . . . . . . . . . . . . . . . . . . . . . . . . . . . . . . . . . . . . . . . . . . . . . . . 36
Не удается одновременно отсканировать несколько исходных документов. . . . . . . . . . . . . . 37
Не удается правильно выполнить сканирование с помощью функции автоматического сканирования. . . . . . . . . . . . . . . . . . . . . . . . . . . . . . . . . . . . . . . . . . . . . . . . . . . . . . . . . . . . . . . . . 38
Низкая скорость сканирования. . . . . . . . . . . . . . . . . . . . . . . . . . . . . . . . . . . . . . . . . . . . . . . . . . . 39
Появляется сообщение «Недостаточно памяти.». . . . . . . . . . . . . . . . . . . . . . . . . . . . . . . . . . . 40
Компьютер перестает работать во время сканирования. . . . . . . . . . . . . . . . . . . . . . . . . . . . . . 41
Сканер не работает после обновления Windows. . . . . . . . . . . . . . . . . . . . . . . . . . . . . . . . . . . . 42
Отсканированное изображение не открывается. . . . . . . . . . . . . . . . . . . . . . . . . . . . . . . . . . . . . 44
Неудовлетворительные результаты сканирования. . . . . . . . . . . . . . . . . . . . . . . . . . . . . . . . . . . . . . 45
Плохое качество сканирования (изображение, отображаемое на мониторе). . . . . . . . . . . . . 46
Белые области вокруг отсканированного изображения. . . . . . . . . . . . . . . . . . . . . . . . . . . . . . . 48
Не удается отсканировать изображение в правильном размере. . . . . . . . . . . . . . . . . . . . . . . 49
Исходный документ установлен правильно, но отсканированное изображение наклонено. . 50
Отсканированное изображение на мониторе компьютера увеличено (уменьшено). . . . . . . . 51
Неполадки программного обеспечения. . . . . . . . . . . . . . . . . . . . . . . . . . . . . . . . . . . . . . . . . . . . . . . . 52
Требуемый почтовый клиент не отображается на экране выбора почтового клиента. . . . . . 53
Проблемы с устройством. . . . . . . . . . . . . . . . . . . . . . . . . . . . . . . . . . . . . . . . . . . . . . . . . 54
Питание устройства не включается. . . . . . . . . . . . . . . . . . . . . . . . . . . . . . . . . . . . . . . . . . . . . . . . . . . 55
Устройство неожиданно выключается. . . . . . . . . . . . . . . . . . . . . . . . . . . . . . . . . . . . . . . . . . . . . . . . . 56
Не удается правильно установить соединение с компьютером. . . . . . . . . . . . . . . . . . . . . . . . . . . . 57
Держатель картриджа FINE не встает в положение для замены. . . . . . . . . . . . . . . . . . . . . . . . . . . 58
Не отображается окно монитора состояния принтера. . . . . . . . . . . . . . . . . . . . . . . . . . . . . . . . . . . . 59
Проблемы при установке или загрузке. . . . . . . . . . . . . . . . . . . . . . . . . . . . . . . . . . . . . . 60
Не удается установить драйверы MP Drivers. . . . . . . . . . . . . . . . . . . . . . . . . . . . . . . . . . . . . . . . . . . 61
Не запускается приложение Easy-WebPrint EX или не появляется меню Easy-WebPrint EX. . . . . 64
Об отображаемых ошибках и сообщениях. . . . . . . . . . . . . . . . . . . . . . . . . . . . . . . . . . . 65
Если произошла ошибка. . . . . . . . . . . . . . . . . . . . . . . . . . . . . . . . . . . . . . . . . . . . . . . . . . . . . . . . . . . . 66
Отображается сообщение. . . . . . . . . . . . . . . . . . . . . . . . . . . . . . . . . . . . . . . . . . . . . . . . . . . . . . . . . . . 69
Если не удается устранить неполадку. . . . . . . . . . . . . . . . . . . . . . . . . . . . . . . . . . . . . . 74
Список кодов поддержки. . . . . . . . . . . . . . . . . . . . . . . . . . . . . . . . . . . . . . . . . . 75
Список кодов поддержки (при замятии бумаги). . . . . . . . . . . . . . . . . . . . . . . . . . . . . . . 76
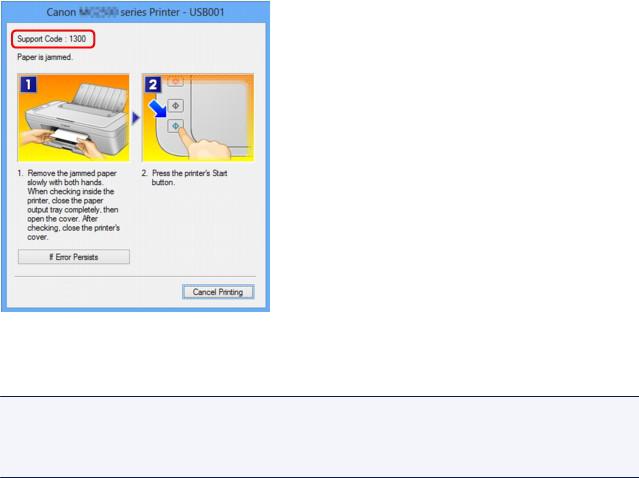
1300. . . . . . . . . . . . . . . . . . . . . . . . . . . . . . . . . . . . . . . . . . . . . . . . . . . . . . . . . . . . . . . . . . . . . . . . . . . . . 77
Бумага застряла внутри устройства. . . . . . . . . . . . . . . . . . . . . . . . . . . . . . . . . . . . . . . . . . . . . . . . . . . 79
В других случаях. . . . . . . . . . . . . . . . . . . . . . . . . . . . . . . . . . . . . . . . . . . . . . . . . . . . . . . . . . . . . . . . . . 82
1000. . . . . . . . . . . . . . . . . . . . . . . . . . . . . . . . . . . . . . . . . . . . . . . . . . . . . . . . . . . . . . . . . . 83 1200. . . . . . . . . . . . . . . . . . . . . . . . . . . . . . . . . . . . . . . . . . . . . . . . . . . . . . . . . . . . . . . . . . 84
1203. . . . . . . . . . . . . . . . . . . . . . . . . . . . . . . . . . . . . . . . . . . . . . . . . . . . . . . . . . . . . . . . . . 85 1401. . . . . . . . . . . . . . . . . . . . . . . . . . . . . . . . . . . . . . . . . . . . . . . . . . . . . . . . . . . . . . . . . . 86 1403. . . . . . . . . . . . . . . . . . . . . . . . . . . . . . . . . . . . . . . . . . . . . . . . . . . . . . . . . . . . . . . . . . 87 1485. . . . . . . . . . . . . . . . . . . . . . . . . . . . . . . . . . . . . . . . . . . . . . . . . . . . . . . . . . . . . . . . . . 88 1682. . . . . . . . . . . . . . . . . . . . . . . . . . . . . . . . . . . . . . . . . . . . . . . . . . . . . . . . . . . . . . . . . . 89 1684. . . . . . . . . . . . . . . . . . . . . . . . . . . . . . . . . . . . . . . . . . . . . . . . . . . . . . . . . . . . . . . . . . 90 1686. . . . . . . . . . . . . . . . . . . . . . . . . . . . . . . . . . . . . . . . . . . . . . . . . . . . . . . . . . . . . . . . . . 91 1687. . . . . . . . . . . . . . . . . . . . . . . . . . . . . . . . . . . . . . . . . . . . . . . . . . . . . . . . . . . . . . . . . . 92 1688. . . . . . . . . . . . . . . . . . . . . . . . . . . . . . . . . . . . . . . . . . . . . . . . . . . . . . . . . . . . . . . . . . 93
1700. . . . . . . . . . . . . . . . . . . . . . . . . . . . . . . . . . . . . . . . . . . . . . . . . . . . . . . . . . . . . . . . . . 94 1701. . . . . . . . . . . . . . . . . . . . . . . . . . . . . . . . . . . . . . . . . . . . . . . . . . . . . . . . . . . . . . . . . . 95 1890. . . . . . . . . . . . . . . . . . . . . . . . . . . . . . . . . . . . . . . . . . . . . . . . . . . . . . . . . . . . . . . . . . 96 2900. . . . . . . . . . . . . . . . . . . . . . . . . . . . . . . . . . . . . . . . . . . . . . . . . . . . . . . . . . . . . . . . . . 97 2901. . . . . . . . . . . . . . . . . . . . . . . . . . . . . . . . . . . . . . . . . . . . . . . . . . . . . . . . . . . . . . . . . . 98 4100. . . . . . . . . . . . . . . . . . . . . . . . . . . . . . . . . . . . . . . . . . . . . . . . . . . . . . . . . . . . . . . . . . 99 4102. . . . . . . . . . . . . . . . . . . . . . . . . . . . . . . . . . . . . . . . . . . . . . . . . . . . . . . . . . . . . . . . . 100 5011. . . . . . . . . . . . . . . . . . . . . . . . . . . . . . . . . . . . . . . . . . . . . . . . . . . . . . . . . . . . . . . . . 101 5012. . . . . . . . . . . . . . . . . . . . . . . . . . . . . . . . . . . . . . . . . . . . . . . . . . . . . . . . . . . . . . . . . 102 5100. . . . . . . . . . . . . . . . . . . . . . . . . . . . . . . . . . . . . . . . . . . . . . . . . . . . . . . . . . . . . . . . . 103 5200. . . . . . . . . . . . . . . . . . . . . . . . . . . . . . . . . . . . . . . . . . . . . . . . . . . . . . . . . . . . . . . . . 104 5400. . . . . . . . . . . . . . . . . . . . . . . . . . . . . . . . . . . . . . . . . . . . . . . . . . . . . . . . . . . . . . . . . 105 5B00. . . . . . . . . . . . . . . . . . . . . . . . . . . . . . . . . . . . . . . . . . . . . . . . . . . . . . . . . . . . . . . . . 106 5B01. . . . . . . . . . . . . . . . . . . . . . . . . . . . . . . . . . . . . . . . . . . . . . . . . . . . . . . . . . . . . . . . . 107 6000. . . . . . . . . . . . . . . . . . . . . . . . . . . . . . . . . . . . . . . . . . . . . . . . . . . . . . . . . . . . . . . . . 108 6800. . . . . . . . . . . . . . . . . . . . . . . . . . . . . . . . . . . . . . . . . . . . . . . . . . . . . . . . . . . . . . . . . 109 6801. . . . . . . . . . . . . . . . . . . . . . . . . . . . . . . . . . . . . . . . . . . . . . . . . . . . . . . . . . . . . . . . . 110 6930. . . . . . . . . . . . . . . . . . . . . . . . . . . . . . . . . . . . . . . . . . . . . . . . . . . . . . . . . . . . . . . . . 111 6931. . . . . . . . . . . . . . . . . . . . . . . . . . . . . . . . . . . . . . . . . . . . . . . . . . . . . . . . . . . . . . . . . 112 6932. . . . . . . . . . . . . . . . . . . . . . . . . . . . . . . . . . . . . . . . . . . . . . . . . . . . . . . . . . . . . . . . . 113 6933. . . . . . . . . . . . . . . . . . . . . . . . . . . . . . . . . . . . . . . . . . . . . . . . . . . . . . . . . . . . . . . . . 114 6936. . . . . . . . . . . . . . . . . . . . . . . . . . . . . . . . . . . . . . . . . . . . . . . . . . . . . . . . . . . . . . . . . 115 6937. . . . . . . . . . . . . . . . . . . . . . . . . . . . . . . . . . . . . . . . . . . . . . . . . . . . . . . . . . . . . . . . . 116 6938. . . . . . . . . . . . . . . . . . . . . . . . . . . . . . . . . . . . . . . . . . . . . . . . . . . . . . . . . . . . . . . . . 117 6940. . . . . . . . . . . . . . . . . . . . . . . . . . . . . . . . . . . . . . . . . . . . . . . . . . . . . . . . . . . . . . . . . 118
6941. . . . . . . . . . . . . . . . . . . . . . . . . . . . . . . . . . . . . . . . . . . . . . . . . . . . . . . . . . . . . . . . . 119 6942. . . . . . . . . . . . . . . . . . . . . . . . . . . . . . . . . . . . . . . . . . . . . . . . . . . . . . . . . . . . . . . . . 120 6943. . . . . . . . . . . . . . . . . . . . . . . . . . . . . . . . . . . . . . . . . . . . . . . . . . . . . . . . . . . . . . . . . 121 6944. . . . . . . . . . . . . . . . . . . . . . . . . . . . . . . . . . . . . . . . . . . . . . . . . . . . . . . . . . . . . . . . . 122 6945. . . . . . . . . . . . . . . . . . . . . . . . . . . . . . . . . . . . . . . . . . . . . . . . . . . . . . . . . . . . . . . . . 123 6946. . . . . . . . . . . . . . . . . . . . . . . . . . . . . . . . . . . . . . . . . . . . . . . . . . . . . . . . . . . . . . . . . 124 B200. . . . . . . . . . . . . . . . . . . . . . . . . . . . . . . . . . . . . . . . . . . . . . . . . . . . . . . . . . . . . . . . . 125 B201. . . . . . . . . . . . . . . . . . . . . . . . . . . . . . . . . . . . . . . . . . . . . . . . . . . . . . . . . . . . . . . . . 126

Устранение неполадок
Питание устройства не включается Печать не начинается
Бумага подается неправильно или появилось сообщение об отсутствии бумаги Неудовлетворительные результаты печати Чернила не подаются Замятие бумаги Если произошла ошибка
Поиск каждой функции
Проблемы с печатью Проблемы с качеством печати Затруднения со сканированием Проблемы с устройством
Проблемы при установке или загрузке Об отображаемых ошибках и сообщениях Если не удается устранить неполадку
5

Проблемы с печатью
Печать не начинается Замятие бумаги
Бумага подается неправильно или появилось сообщение об отсутствии бумаги Копирование/Печать прерывается, не завершившись
6

Печать не начинается
Проверка 1 Убедитесь, что кабель питания надежно подключен, затем включите
устройство кнопкой ВКЛ (ON).
Если индикатор ВКЛ (ON) мигает, устройство инициализируется. Дождитесь, когда индикатор ВКЛ (ON) перестанет мигать и начнет светиться.
 Примечание.
•При печати большого объема данных (например, фотографий или рисунков) требуется больше времени для подготовки к печати. Если мигает индикатор ВКЛ (ON), это значит, что компьютер обрабатывает и отправляет на устройство данные. Дождитесь начала печати.
Проверка 2 Убедитесь, что USB-кабель надежно подключен к устройству и к
компьютеру.
Если устройство подключено к компьютеру с помощью USB-кабеля, проверьте следующее.
•Если используется ретранслятор (например, USB-концентратор), отключите его, подключите устройство напрямую к компьютеру и попробуйте еще раз выполнить печать. Если принтер начал печатать, неполадка связана с ретранслятором. Обратитесь за помощью к поставщику ретранслятора.
•Возможна также неисправность USB-кабеля. Замените USB-кабель и попытайтесь выполнить печать еще раз.
Проверка 3 Если выполняется печать с компьютера и имеются какие-либо ненужные задания печати, удалите их.
 Удаление ненужного задания печати
Проверка 4 Убедитесь, что в диалоговом окне «Печать» выбрано имя устройства.
Правильная работа устройства невозможна при использовании драйвера другого принтера.
Убедитесь, что в диалоговом окне печати выбрано имя устройства.
 Примечание.
•Чтобы задать устройство по умолчанию, выберите пункт Использовать по умолчанию (Set as Default Printer).
Проверка 5 Правильно настройте порт принтера.
Убедитесь в том, что порт принтера настроен надлежащим образом.
1.Войдите в систему с полномочиями администратора.
2.Выберите пункты, как показано ниже.
•В операционной системе Windows 8 выберите Панель управления (Control Panel), нажав чудо-
кнопку Параметры (Settings) на рабочем столе (Desktop), а затем Оборудование и звук
(Hardware and Sound) и Устройства и принтеры (Devices and Printers).
•В ОС Windows 7 выберите пункт Устройства и принтеры (Devices and Printers) в меню Пуск
(Start).
•В ОС Windows Vista выберите меню Пуск (Start) > Панель управления (Control Panel) > Оборудование и звук (Hardware and Sound) > Принтеры (Printers).
7

•В ОС Windows XP выберите меню Пуск (Start) > Панель управления (Control Panel) >
Принтеры и другое оборудование (Printers and Other Hardware) > Принтеры и факсы
(Printers and Faxes).
3.Откройте свойства драйвера принтера для устройства.
•В операционной системе Windows 8 или Windows 7 щелкните правой кнопкой мыши значок «Canon XXX Printer» (где «XXX» соответствует имени устройства), а затем выберите Свойства принтера (Printer properties).
•В Windows Vista или Windows XP щелкните правой кнопкой мыши значок «Canon XXX Printer» (где «XXX» — это имя устройства), затем выберите Свойства (Properties).
4.Щелкните вкладку Порты (Ports) для настройки порта.
Убедитесь, что порт с именем «USBnnn» (где «n» — номер), для которого «Canon XXX Printer» появляется в столбце Принтер (Printer), установлен для параметра Выберите один или несколько портов для печати (Print to the following port(s)).
•Если установлена неправильная настройка:
Переустановите драйверы MP Drivers, используя драйверы установочного компакт-диска или с нашего веб-сайта.
•Печать не начинается, хотя устройство подключено к компьютеру с помощью USB-кабеля и выбран порт «USBnnn»:
Чтобы запустить программу My Printer, в Windows 8 на Начальном (Start) экране выберите My Printer. Если программа My Printer не отображается на Начальном (Start) экране, нажмите чудо-кнопку Поиск (Search), затем введите «My Printer».
Установите правильный порт принтера в Диагн. и исправление принтера (Diagnose and Repair Printer). Установите правильный порт принтера, следуя отображаемым на экране инструкциям, затем выберите имя устройства.
В операционной системе Windows 7, Windows Vista или Windows XP нажмите кнопку Пуск (Start)
и последовательно выберите Все программы (All programs), Canon Utilities, Canon My Printer, Canon My Printer и Диагн. и исправление принтера (Diagnose and Repair Printer).
Установите правильный порт принтера, следуя отображаемым на экране инструкциям, затем выберите имя устройства.
Если проблема не была устранена, переустановите драйверы MP Drivers, используя драйверы установочного компакт-диска или с нашего веб-сайта.
Проверка 6 Объем данных для печати слишком большой?
Щелкните Параметры печати (Print Options) на вкладке Страница (Page Setup) драйвера принтера.
Затем установите для параметра Предотвращение потери данных для печати (Prevention of Print Data Loss) в открывшемся диалоговом окне значение Вкл. (On).
* Если для параметра Предотвращение потери данных для печати (Prevention of Print Data Loss)
выбрано значение Вкл. (On), качество печати может снизиться.
Проверка 7 Если выполняется печать с компьютера, перезагрузите его.
8
Замятие бумаги
Если происходит замятие бумаги, индикатор Аварийный сигнал (Alarm) мигает оранжевым, а на экран компьютера автоматически выводится сообщение с рекомендациями по устранению неполадок. Выполните соответствующие действия, указанные в сообщении.
 Просмотр фильма
Сведения об извлечении замятой бумаги см. в разделе Список кодов поддержки (при замятии бумаги).
 Примечание.
•Действия можно сопоставлять с кодами поддержки на компьютере, найдя нужный код поддержки.
 Щелкните для поиска
9
Бумага подается неправильно или появилось сообщение об отсутствии бумаги
Проверка 1 Убедитесь, что бумага загружена.
 Загрузка бумаги
Проверка 2 При загрузке бумаги в принтер выполните указанные ниже действия.
•Перед загрузкой нескольких листов выровняйте их края.
•При закладке нескольких листов убедитесь, что стопка бумаги не превышает отметку максимальной загрузки бумаги.
Однако бумага может подаваться неправильно и при этом количестве в зависимости от ее типа и условий эксплуатации аппарата (высокой температуры/влажности или низкой температуры/ влажности). В таких случаях следует уменьшить количество листов бумаги, загружаемых за один раз, таким образом, чтобы высота стопки была примерно в два раза ниже уровня предельной загрузки бумаги.
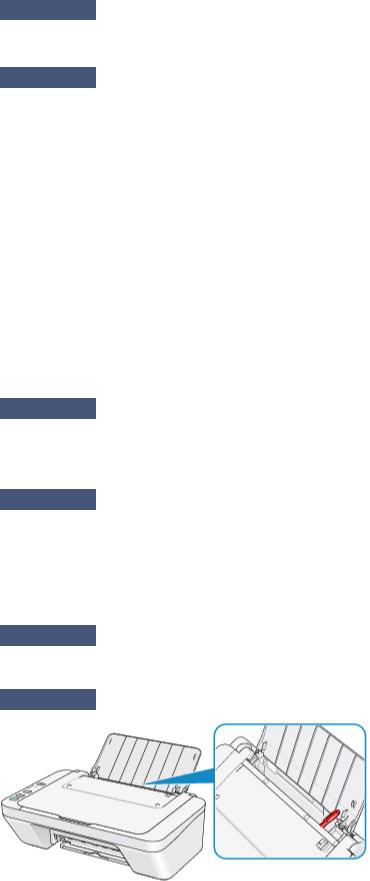
•Всегда укладывайте бумагу в книжной ориентации независимо от ориентации печати.
•Бумагу следует загружать стороной для печати вверх. Выровняйте стопку бумаги по правому краю заднего лотка и переместите направляющую бумаги так, чтобы она слегка касалась левого края стопки.
 Загрузка бумаги
Проверка 3 Проверьте, не используется ли слишком плотная или скрученная
бумага.
 Типы носителей, непригодные для использования
Проверка 4 При загрузке конвертов в принтер выполните указанные ниже
действия.
•При печати на конвертах обратитесь к разделу Загрузка бумаги и подготовьте конверты к печати.
После подготовки конвертов загружайте их в книжной ориентации. Конверты, загруженные в альбомной ориентации, будут подаваться неправильно.
Проверка 5 Убедитесь, что параметры типа носителя и размера страницы
соответствуют загруженной бумаге.
Проверка 6 Убедитесь, что в заднем лотке нет посторонних предметов.
Если бумага рвется в заднем лотке, сведения об устранении этой ошибки см. в разделе Замятие бумаги.
10
![]()
При попадании посторонних предметов в задний лоток необходимо выключить устройство, отключить от сети питания, затем удалить посторонний предмет.
Проверка 7 Очистите подающий ролик.
 Очистка подающих роликов
 Примечание.
• Очистка подающего ролика изнашивает его, поэтому делайте это только при необходимости.
11

Копирование/Печать прерывается, не завершившись
Проверка 1 Бумага загружена?
Убедитесь, что бумага загружена.
Если в устройстве закончилась бумага, загрузите ее.
Проверка 2 Выполняется печать документов с большим количеством фотографий
или изображений?
При печати большого объема данных (например, фотографий или рисунков) на их обработку устройством и компьютером требуется определенное время, и может показаться, что устройство простаивает.
Кроме того, при непрерывной печати на обычной бумаге с большим расходом чернил устройство может время от времени останавливаться. В обоих случаях следует дождаться возобновления печати.
 Примечание.
•Если выполняется печать документа с большой областью печати или распечатка большого количества копий, печать может остановиться, чтобы дать высохнуть чернилам.
Проверка 3 Устройство постоянно печатает в течение длительного времени?
Если устройство непрерывно выполняет печать в течение длительного времени, печатающая головка или другие компоненты, расположенные рядом с ней, могут перегреться. Устройство может временно остановить печать в целях защиты печатающей головки и через некоторое возобновить работу.
В этом случае подождите некоторое время, не выполняя никаких операций. Если печать не возобновляется, прервите задание печати в удобное время и выключите устройство по крайней мере на 15 минут.
 Осторожно!
•Печатающая головка и область вокруг нее внутри устройства может сильно нагреться. Не прикасайтесь к печатающей головке и расположенным рядом с ней деталям.
Проверка 4 Если копирование прерывается, не завершившись, повторите попытку.
По прошествии определенного времени после возникновения ошибок копирования устройство прекращает выполнение операции.
12

Проблемы с качеством печати
Неудовлетворительные результаты печати Чернила не подаются
13

Неудовлетворительные результаты печати
В случае неудовлетворительных результатов печати (белые линии, несовмещение линий, неравномерные цвета) в первую очередь проверьте настройки бумаги и качества печати.
Проверка 1 Соответствуют ли параметры размера страницы и типа носителя
размеру и типу загруженной бумаги?
Если эти параметры заданы неправильно, получить требуемый результат печати невозможно.
При печати фотографии или изображения неправильно установленное значение типа бумаги может привести к потере качества цветопередачи.
Кроме того, при печати с неправильно заданным типом бумаги поверхность печати может быть поцарапана.
Проверьте параметры размера страницы и типа носителя в драйвере принтера.
 Печать с применением простой настройки
Проверка 2 Убедитесь, что выбрано соответствующее качество печати с помощью
драйвера принтера.
Выберите вариант качества изображения, подходящий для печати данного изображения на данной бумаге. Если на отпечатке заметны размывание изображения или неравномерная цветопередача, задайте более высокое качество изображения и повторите печать.
Можно проверить параметры качества печати с помощью драйвера принтера.
 Изменение качества печати и коррекция графических данных
Проверка 3 Если неполадка не устранена, у нее могут быть другие причины.
См. также следующие разделы:
 Не удается напечатать задание до конца
 Печать не начинается/Нечеткая печать/Неверные цвета/Белые полосы
 Неверные цвета
 Линии не выровнены
 Линия не печатается или печатается частично
 Изображение не печатается или печатается частично
 Бумага после печати сворачивается или на ней появляются чернильные пятна
 Бумага испачкана/Отпечатанная поверхность поцарапана
 Обратная сторона бумаги испачкана
 Цвета передаются неравномерно
Если бумага после печати утрачивает цвет
При длительном хранении отпечатанных листов цвета могут потускнеть.
Дождитесь полного высыхания бумаги по завершении печати, не подвергайте бумагу воздействию высоких температур, повышенной влажности и прямых солнечных лучей, храните или используйте в помещениях при комнатной температуре и нормальной влажности
14
Рекомендуется хранить бумагу в альбоме, пластиковой папке, фоторамке и т. п., чтобы предотвратить непосредственное воздействие воздуха.
15

Не удается напечатать задание до конца
Проверка 1 Выберите настройку, не допускающую сжатия данных печати.
Если выбрать настройку, не допускающую сжатия данных печати, с используемым приложением, результат печати может улучшиться.
Щелкните Параметры печати (Print Options) на вкладке Страница (Page Setup) драйвера принтера.
Установите флажок Не разрешать прикладной программе сжатие данных печати (Do not allow application software to compress print data), затем нажмите кнопку OK.
* После завершения печати снимите флажок.
Проверка 2 Объем данных для печати слишком большой?
Щелкните Параметры печати (Print Options) на вкладке Страница (Page Setup) драйвера принтера.
Затем установите для параметра Предотвращение потери данных для печати (Prevention of Print Data Loss) в открывшемся диалоговом окне значение Вкл. (On).
* Если для параметра Предотвращение потери данных для печати (Prevention of Print Data Loss)
выбрано значение Вкл. (On), качество печати может снизиться.
Проверка 3 Достаточно ли места на жестком диске компьютера?
Удалите ненужные файлы, чтобы освободить дисковое пространство.
16

Печать не начинается/Нечеткая печать/Неверные цвета/Белые полосы
 Печать не начинается
 Нечеткая печать
 Неверные цвета
 Белые полосы
 Просмотр фильма
17

Проверка 4
Проверка 3
Проверка 1 Вы проверили параметры бумаги и качества печати?
 Неудовлетворительные результаты печати
Проверка 2 Напечатайте образец для проверки сопел и выполните необходимые меры обслуживания, такие как очистка печатающей головки.
Чтобы проверить, правильно ли выполняется подача чернил из сопел печатающей головки, напечатайте образец для проверки сопел.
В разделе Если печать стала бледной или цвета печатаются некорректно изложены процедуры печати образца для проверки сопел, очистки печатающей головки и глубокой очистки печатающей головки.
•Если образец для проверки сопел печатается неправильно:
После очистки печатающей головки напечатайте образец для проверки сопел и оцените его.
•Если проблема не устранена после двукратной очистки печатающей головки:
Выполните глубокую очистку печатающей головки.
Если после глубокой очистки печатающей головки неполадка не устранена, выключите устройство и повторите глубокую очистку печатающей головки через 24 часа.
•Если неполадка не устранена после двукратной глубокой чистки печатающей головки:
Возможно, чернила закончились. Замените картридж FINE.

 Если в картридже FINE закончились чернила, замените его.

 При использовании бумаги, у которой для печати предназначена только одна поверхность, убедитесь, что бумага загружена стороной для печати вверх.
Загружайте бумагу стороной для печати вверх.
Подробные сведения о стороне для печати см. в руководстве, входящем в комплект поставки бумаги.
Проверка 5 Правильно ли установлен картридж FINE?
Если картридж FINE не установлен надежно, чернила могут подаваться неправильно.
Сложите дополнительный лоток приема бумаги и лоток приема бумаги, откройте крышку и извлеките картриджи FINE.
Затем снова установите картриджи FINE. Нажмите на картридж FINE до щелчка.
После проверки правильности установки картриджа FINE закройте крышку.
При копировании см. также следующие разделы:
Проверка 6 Загрязнено ли стекло рабочей поверхности?
18

Очистите стекло рабочей поверхности.
 Очистка стекла рабочей поверхности и крышки сканера
Проверка 7 Убедитесь, что оригинал документа правильно загружен на стекло
рабочей поверхности.
 Загрузка оригиналов
Проверка 8 Расположен ли оригинал на стекле рабочей поверхности стороной для копирования вниз?
Проверка 9 Вы копировали отпечаток, выполненный данным устройством?
Если в качестве оригинала используется распечатка с этого устройства, качество печати может снизиться. Это зависит от состояния оригинала.
Повторите печать с компьютера, если есть такая возможность.
19

Неверные цвета
 Просмотр фильма
Проверка 1 Правильно ли напечатан образец для проверки сопел?
Чтобы проверить, правильно ли выполняется подача чернил из сопел печатающей головки, напечатайте образец для проверки сопел.
В разделе Если печать стала бледной или цвета печатаются некорректно изложены процедуры печати образца для проверки сопел, очистки печатающей головки и глубокой очистки печатающей головки.
•Если образец для проверки сопел печатается неправильно:
После очистки печатающей головки напечатайте образец для проверки сопел и оцените его.
•Если проблема не устранена после двукратной очистки печатающей головки:
Выполните глубокую очистку печатающей головки.
Если после глубокой очистки печатающей головки неполадка не устранена, выключите устройство и повторите глубокую очистку печатающей головки через 24 часа.
•Если неполадка не устранена после двукратной глубокой чистки печатающей головки:
Возможно, чернила закончились. Замените картридж FINE.
Если в картридже FINE закончились чернила, замените его.
Правильно ли установлен картридж FINE?
Если картридж FINE не установлен надежно, чернила могут подаваться неправильно.
Сложите дополнительный лоток приема бумаги и лоток приема бумаги, откройте крышку и извлеките картриджи FINE.
Затем снова установите картриджи FINE. Нажмите на картридж FINE до щелчка.
После проверки правильности установки картриджа FINE закройте крышку.
 Примечание.
•Напечатанные цвета могут отличаться от цветов на экране из-за различий в способах формирования цвета. Параметры управления цветом и условия окружающей среды также могут влиять на цвета, отображаемые на экране. Поэтому цвета результатов печати могут отличаться от цветов на экране.
20
![]()
Линии не выровнены
Проверка 1 Вы проверили параметры бумаги и качества печати?
 Неудовлетворительные результаты печати
Проверка 2 Выполните выравнивание печатающих головок.
При печати прямых линий со смещением или при неудовлетворительных результатах печати необходимо отрегулировать положение печатающей головки.
 Выравнивание печатающей головки
 Примечание.
•Если путем выравнивания печатающих головок проблему устранить не удалось, обратитесь к разделу Выравнивание печатающих головок с компьютера, чтобы выполнить выравнивание печатающих головок вручную.
Проверка 3 Задайте более высокое качество печати и повторите печать.
Результаты печати можно улучшить путем повышения качества печати в драйвере принтера.
21

Линия не печатается или печатается частично
Проверка 1 Выполняется ли печать с функцией разметки страницы или полей
переплета?
Если используются функции разметки страницы или полей переплета, тонкие линии могут не отображаться в печати. Попробуйте сделать линии в документе более толстыми.
Проверка 2 Объем данных для печати слишком большой?
Щелкните Параметры печати (Print Options) на вкладке Страница (Page Setup) драйвера принтера.
Затем установите для параметра Предотвращение потери данных для печати (Prevention of Print Data Loss) в открывшемся диалоговом окне значение Вкл. (On).
* Если для параметра Предотвращение потери данных для печати (Prevention of Print Data Loss)
выбрано значение Вкл. (On), качество печати может снизиться.
22

Изображение не печатается или печатается частично
Проверка 1 Выберите настройку, не допускающую сжатия данных печати.
Если выбрать настройку, не допускающую сжатия данных печати, с используемым приложением, результат печати может улучшиться.
Щелкните Параметры печати (Print Options) на вкладке Страница (Page Setup) драйвера принтера.
Установите флажок Не разрешать прикладной программе сжатие данных печати (Do not allow application software to compress print data), затем нажмите кнопку OK.
* После завершения печати снимите флажок.
Проверка 2 Объем данных для печати слишком большой?
Щелкните Параметры печати (Print Options) на вкладке Страница (Page Setup) драйвера принтера.
Затем установите для параметра Предотвращение потери данных для печати (Prevention of Print Data Loss) в открывшемся диалоговом окне значение Вкл. (On).
* Если для параметра Предотвращение потери данных для печати (Prevention of Print Data Loss)
выбрано значение Вкл. (On), качество печати может снизиться.
23
Бумага после печати сворачивается или на ней появляются чернильные пятна
 После печати на бумаге появляются чернильные пятна
 После печати бумага сворачивается
Проверка 1 Вы проверили параметры бумаги и качества печати?
 Неудовлетворительные результаты печати
Проверка 2 Если установлено высокое значение параметра интенсивности, уменьшите его и повторите попытку печати.
При печати изображения на обычной бумаге с высокой интенсивностью бумага может впитать слишком много чернил и стать волнистой, что приведет к ее истиранию.
Можно проверить интенсивность с помощью драйвера принтера.
 Настройка интенсивности
Проверка 3 Используется ли фотобумага для печати фотографий?
При печати фотографий и изображений с высокой цветонасыщенностью рекомендуется использовать бумагу Фотобумага для печати Plus Glossy II или другую специализированную бумагу производства компании Canon.
 Подходящие типы носителей
24

Бумага испачкана/Отпечатанная поверхность поцарапана
 Бумага испачкана
Углы бумаги пачкаются Отпечатанная поверхность испачкана
 Отпечатанная поверхность поцарапана
Проверка 1 Вы проверили параметры бумаги и качества печати?
 Неудовлетворительные результаты печати
Проверка 2 Подходит ли тип бумаги для печати? Проверьте следующее:
Проверьте, используется ли бумага, соответствующая типу печати.
 Подходящие типы носителей
Проверка 3 Распрямив бумагу, загрузите ее.
Рекомендуем убирать неиспользуемую бумагу в упаковку и держать ее на ровной поверхности.
•Для обычной бумаги
Поверните бумагу и уложите ее в принтер другой стороной.
Бумага, пролежавшая в заднем лотке длительное время, может изогнуться. В этом случае уложите бумагу другой стороной вверх. Это может устранить неполадку.
•Для другой бумаги
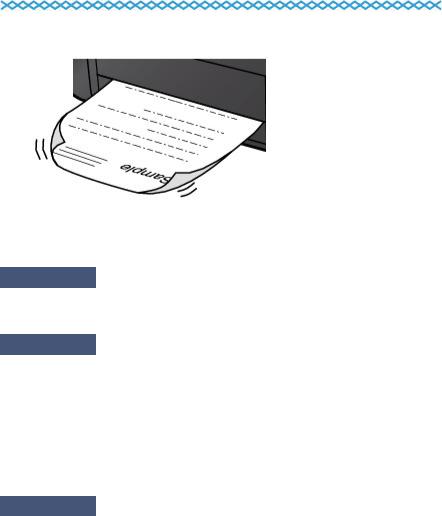
Если скручивание на углах бумаги превышает 3 мм или 0,1 дюйма (A) в высоту, бумага может пачкаться или неправильно подаваться. В таких случаях для исправления скручивания следуйте приведенным ниже инструкциям.
1.Сверните бумагу в направлении, противоположном направлению скручивания, как показано ниже.
25

2.Убедитесь, что бумага не скручена.
При печати на бумаге с ликвидированным скручиванием рекомендуется подавать по одному листу.
 Примечание.
•В зависимости от типа носителя бумага может пачкаться или неправильно подаваться, даже если она не скручивается внутрь. В таком случае перед печатью следуйте приведенным ниже инструкциям, чтобы скрутить углы бумаги наружу на 3 мм или 0,1 дюйма (B) в высоту. Это может улучшить результаты печати.
(C) Лицевая сторона
Если бумага скручивается наружу, рекомендуется печатать по одному листу.
Проверка 4 Если установлено высокое значение параметра интенсивности,
уменьшите его и повторите попытку печати.
При печати изображения на обычной бумаге с высокой интенсивностью бумага может впитать слишком много чернил и стать волнистой, что приведет к ее истиранию.
Уменьшите значение параметра интенсивности в драйвере принтера и повторите печать.
1.Откройте окно настройки драйвера принтера.
 Как открыть окно настройки драйвера принтера
2.На вкладке Главная (Main) выберите значение Вручную (Manual) для параметра Цвет/
интенсивность (Color/Intensity), а затем нажмите кнопку Задать… (Set…).
3.Перетащите регулятор Интенсивность (Intensity) на вкладке Настройка цветов (Color Adjustment) для выбора интенсивности.
Проверка 5 Выполняется ли печать вне рекомендованной области?
При печати вне рекомендованной области листа на нижнем краю бумаги могут появиться чернильные пятна.
Измените настройки размера источника в соответствующей программе.
 Область печати
Проверка 6 Загрязнено ли стекло рабочей поверхности?
Очистите стекло рабочей поверхности.
 Очистка стекла рабочей поверхности и крышки сканера
26

Проверка 7 Загрязнен ли подающий ролик?
Выполните очистку подающего ролика.
 Очистка подающих роликов
 Примечание.
• Очистка подающего ролика изнашивает его, поэтому делайте это только при необходимости.
Проверка 8 Загрязнена ли внутренняя часть устройства?
При двухсторонней печати внутренние детали устройства могут пачкаться чернилами, в свою очередь пачкая распечатки.
В этом случае почистите внутреннюю часть устройства, выполнив процедуру очистки поддона.
 Очистка внутренних компонентов устройства (очистка поддона)
 Примечание.
•Для предотвращения загрязнения внутренних компонентов устройства чернилами задайте правильный размер бумаги.
Проверка 9 Установите более длительное время высыхания отпечатанной
поверхности.
В этом случае отпечатанная поверхность успевает высохнуть, что предотвращает появление царапин на бумаге и появление на ней пятен чернил.
1.Убедитесь, что устройство включено.
2.Откройте окно настройки драйвера принтера.
 Как открыть окно настройки драйвера принтера
3.Щелкните вкладку Обслуживание (Maintenance), затем Специальные параметры (Custom Settings).
4.Ползунком Задержка на сушку (Ink Drying Wait Time) установите время ожидания, а затем нажмите кнопку OK.
5.Проверьте сообщение и щелкните OK.
27

Обратная сторона бумаги испачкана
Проверка 1 Вы проверили параметры бумаги и качества печати?
 Неудовлетворительные результаты печати
Проверка 2 Почистите внутреннюю часть устройства, очистив поддон.
 Очистка внутренних компонентов устройства (очистка поддона)
 Примечание.
•При двухсторонней печати или при больших объемах печати внутренние детали принтера могут пачкаться чернилами.
28

Цвета передаются неравномерно
 Цвета передаются неравномерно
 Цвета образуют полосы
 Просмотр фильма
Проверка 1 Вы проверили параметры бумаги и качества печати?
 Неудовлетворительные результаты печати
Проверка 2 Напечатайте образец для проверки сопел и выполните необходимые меры обслуживания, такие как очистка печатающей головки.
Чтобы проверить, правильно ли выполняется подача чернил из сопел печатающей головки, напечатайте образец для проверки сопел.
В разделе Если печать стала бледной или цвета печатаются некорректно изложены процедуры печати образца для проверки сопел, очистки печатающей головки и глубокой очистки печатающей головки.
•Если образец для проверки сопел печатается неправильно:
После очистки печатающей головки напечатайте образец для проверки сопел и оцените его.
•Если проблема не устранена после двукратной очистки печатающей головки:
Выполните глубокую очистку печатающей головки.
Если после глубокой очистки печатающей головки неполадка не устранена, выключите устройство и повторите глубокую очистку печатающей головки через 24 часа.
•Если неполадка не устранена после двукратной глубокой чистки печатающей головки:
Возможно, чернила закончились. Замените картридж FINE.
29

Проверка 3 Выполните выравнивание печатающих головок.
 Выравнивание печатающей головки
 Примечание.
•Если путем выравнивания печатающих головок проблему устранить не удалось, обратитесь к разделу Выравнивание печатающих головок с компьютера, чтобы выполнить выравнивание печатающих головок вручную.
30
![]()
Чернила не подаются
Если в картридже FINE закончились чернила, замените его.
Правильно ли установлен картридж FINE?
Если картридж FINE не установлен надежно, чернила могут подаваться неправильно.
Сложите дополнительный лоток приема бумаги и лоток приема бумаги, откройте крышку и извлеките картриджи FINE.
Затем снова установите картриджи FINE. Нажмите на картридж FINE до щелчка.
После проверки правильности установки картриджа FINE закройте крышку.
Проверка 3 Сопла печатающей головки закупорены?
Чтобы проверить, правильно ли выполняется подача чернил из сопел печатающей головки, напечатайте образец для проверки сопел.
В разделе Если печать стала бледной или цвета печатаются некорректно изложены процедуры печати образца для проверки сопел, очистки печатающей головки и глубокой очистки печатающей головки.
•Если образец для проверки сопел печатается неправильно:
После очистки печатающей головки напечатайте образец для проверки сопел и оцените его.
•Если проблема не устранена после двукратной очистки печатающей головки:
Выполните глубокую очистку печатающей головки.
Если после глубокой очистки печатающей головки неполадка не устранена, выключите устройство и повторите глубокую очистку печатающей головки через 24 часа.
•Если неполадка не устранена после двукратной глубокой чистки печатающей головки:
Возможно, чернила закончились. Замените картридж FINE.
31

Затруднения со сканированием
Затруднения со сканированием Неудовлетворительные результаты сканирования Неполадки программного обеспечения
32
Затруднения со сканированием
 Сканер не работает
 Программа ScanGear (драйвер сканера) не запускается
 Отображается сообщение об ошибке, и окно программы ScanGear (драйвера сканера) не открывается
 Не удается одновременно отсканировать несколько исходных документов
 Не удается правильно выполнить сканирование с помощью функции автоматического сканирования
 Низкая скорость сканирования
 Появляется сообщение «Недостаточно памяти.»
 Компьютер перестает работать во время сканирования
 Сканер не работает после обновления Windows
 Отсканированное изображение не открывается
33
Сканер не работает
Проверка 1. Убедитесь, что сканер или принтер включен.
Проверка 2. Подключите USB-кабель к другому USB-порту компьютера.
Проверка 3. Если USB-кабель подключен к USBконцентратору, отсоедините его от USB-концентратора и подключите к USB-порту компьютера.
Проверка 4. Перезагрузите компьютер.
34

Программа ScanGear (драйвер сканера) не запускается
Проверка 1. Убедитесь, что драйверы MP Drivers установлены.
Если драйвер сканера не установлен, установите MP Drivers с установочного компактдиска или с веб-страницы.
Проверка 2. Выберите сканер или принтер в меню приложения.
 Внимание!
 Если название сканера или принтера отображается несколько раз, выберите то из них, которое не включает WIA.
 Примечание.
 В зависимости от используемого приложения, порядок действий может быть различным.
 При сканировании из приложения, совместимого с WIA, используйте WIAдрайвер.
 Сканирование с помощью WIA-драйвера
Проверка 3. Удостоверьтесь, что приложение поддерживает
TWAIN.
Программу ScanGear (драйвер сканера) нельзя запустить из приложений, не поддерживающих TWAIN.
Проверка 4. Отсканируйте и сохраните изображения с помощью программы IJ Scan Utility, а затем откройте файлы в своем приложении.
35

Отображается сообщение об ошибке, и окно программы ScanGear (драйвера сканера) не открывается
Проверка 1. Убедитесь, что сканер или принтер включен.
Проверка 2. Выключите сканер или принтер, затем повторно подсоедините USB-кабель и шнур питания.
Проверка 3. Подключите USB-кабель к другому USB-порту компьютера.
Проверка 4. Если USB-кабель подключен к USBконцентратору, отсоедините его от USB-концентратора и подключите к USB-порту компьютера.
Проверка 5. Убедитесь, что драйверы MP Drivers установлены.
Если драйвер сканера не установлен, установите MP Drivers с установочного компактдиска или с веб-страницы.
Проверка 6. Выберите сканер или принтер в меню приложения.
 Примечание.
 В зависимости от используемого приложения, порядок действий может быть различным.
Проверка 7. Удостоверьтесь, что приложение поддерживает
TWAIN.
Программу ScanGear (драйвер сканера) нельзя запустить из приложений, не поддерживающих TWAIN.
Проверка 8. Закройте программу ScanGear, если она работает с другим приложением.
36
Не удается одновременно отсканировать несколько исходных документов
Проверка 1. Убедитесь, что исходные документы размещены правильно.
 Размещение исходных документов (при сканировании с компьютера)
Проверка 2. Проверьте, можно ли отсканировать надлежащим образом один исходный документ.
Некоторые приложения не поддерживают сканирование нескольких изображений в один прием. В таком случае отсканируйте каждое изображение отдельно.
37
Не удается правильно выполнить сканирование с помощью функции автоматического сканирования
Проверка 1. Убедитесь, что исходные документы размещены правильно.
 Размещение исходных документов (при сканировании с компьютера)
Проверка 2. Сканирование нескольких исходных документов может не поддерживаться.
Некоторые приложения не поддерживают сканирование нескольких изображений в один прием. В таком случае отсканируйте каждое изображение отдельно.
38
 Loading…
- Manuals
- Brands
- Canon Manuals
- Color printers
- Pixma MG2400 Series
- Online manual
-
Contents
-
Table of Contents
-
Troubleshooting
-
Bookmarks
Quick Links
MG2400 series
Online Manual
Troubleshooting
English
Related Manuals for Canon mg2400 series
Summary of Contents for Canon mg2400 series
-
Page 1
MG2400 series Online Manual Troubleshooting English… -
Page 2: Table Of Contents
Contents Troubleshooting……….. 5 Problems with Printing.
-
Page 3
Scanned Image Is Enlarged (Reduced) on the Computer Monitor……50 Software Problems…………..51 The E-mail Client You Want to Use Does Not Appear in the Screen for Selecting an E-mail Client 52 Problems with the Machine. -
Page 4
1890…………..93 2900. -
Page 5: Troubleshooting
Troubleshooting The Machine Cannot Be Powered On Printing Does Not Start Paper Does Not Feed Properly/»No Paper» Error Occurs Print Results Not Satisfactory Ink Is Not Ejected Paper Jams If an Error Occurs Search Each Function Problems with Printing Problems with Printing Quality Problems with Scanning Problems with the Machine Problems with Installation/Downloading…
-
Page 6: Problems With Printing
Problems with Printing Printing Does Not Start Paper Jams Paper Does Not Feed Properly/»No Paper» Error Occurs Copying/Printing Stops Before It Is Completed…
-
Page 7: Printing Does Not Start
Faxes. 3. Open the properties of the printer driver for the machine. • In Windows 8 or Windows 7, right-click the «Canon XXX Printer» icon (where «XXX» is your machine’s name), then select Printer properties. • In Windows Vista or Windows XP, right-click the «Canon XXX Printer» icon (where «XXX» is your…
-
Page 8
4. Click the Ports tab to confirm the port settings. Make sure that a port named «USBnnn» (where «n» is a number) with «Canon XXX Printer» appearing in the Printer column is selected for Print to the following port(s). • If the setting is incorrect: Reinstall the MP Drivers with the Setup CD-ROM or install them from our website. -
Page 9: Paper Jams
Paper Jams When paper is jammed, the Alarm lamp flashes orange and a troubleshooting message is displayed on the computer screen automatically. Take the appropriate action described in the message. Watch the movie For details on how to remove the jammed paper, refer to Support Code List (When Paper Is Jammed).
-
Page 10: Paper Does Not Feed Properly/»No Paper» Error Occurs
Paper Does Not Feed Properly/»No Paper» Error Occurs Make sure that paper is loaded. Check1 Loading Paper Make sure of the following when you load paper. Check2 • When loading two or more sheets of paper, align the edges of the sheets before loading. •…
-
Page 11
Clean the paper feed roller. Check7 Cleaning the Paper Feed Roller Note • Cleaning the paper feed roller will wear the roller, so perform this procedure only when necessary. -
Page 12: Copying/Printing Stops Before It Is Completed
Copying/Printing Stops Before It Is Completed Is the paper loaded? Check1 Make sure that paper is loaded. If the machine has run out of paper, load paper. Do the printing documents have lots of photographs or illustrations? Check2 As printing large data such as photos or graphics takes time for the machine and the computer to process, the machine may appear to have stopped operating.
-
Page 13: Problems With Printing Quality
Problems with Printing Quality Print Results Not Satisfactory Ink Is Not Ejected…
-
Page 14: Print Results Not Satisfactory
Print Results Not Satisfactory If the print result is not satisfactory due to white streaks, misaligned lines, or uneven colors, confirm the paper and print quality settings first. Do the page size and media type settings match the size and type of the loaded Check1 paper? When these settings are incorrect, you cannot obtain a proper print result.
-
Page 15: Cannot Print To End Of Job
Cannot Print to End of Job Select the setting not to compress the printing data. Check1 If you select the setting not to compress the printing data with an application software you are using, the printing result may be improved. Click Print Options on the Page Setup sheet on the printer driver.
-
Page 16: No Printing Results/Printing Is Blurred/Colors Are Wrong/White Streaks
No Printing Results/Printing Is Blurred/Colors Are Wrong/White Streaks No Printing Results Printing Is Blurred Colors Are Wrong White Streaks Watch the movie…
-
Page 17
Did you confirm the paper and print quality settings? Check1 Print Results Not Satisfactory Print the Nozzle Check Pattern and perform any necessary maintenance Check2 operations such as Print Head Cleaning. Print the Nozzle Check Pattern to determine whether the ink ejects properly from the print head nozzles. Refer to When Printing Becomes Faint or Colors Are Incorrect for the Nozzle Check Pattern printing, Print Head Cleaning, and Print Head Deep Cleaning. -
Page 18
Make sure that the original is properly loaded on the platen glass. Check7 Loading Originals Is the original loaded with the side to be copied facing down on the platen Check8 glass? Did you copy a printout done by this machine? Check9 If you use a printout done by this machine as the original, print quality may be reduced depending on the condition of the original. -
Page 19: Colors Are Unclear
Colors Are Unclear Watch the movie Is the Nozzle Check Pattern printed properly? Check1 Print the Nozzle Check Pattern to determine whether the ink ejects properly from the print head nozzles. Refer to When Printing Becomes Faint or Colors Are Incorrect for the Nozzle Check Pattern printing, Print Head Cleaning, and Print Head Deep Cleaning.
-
Page 20: Lines Are Misaligned
Lines Are Misaligned Did you confirm the paper and print quality settings? Check1 Print Results Not Satisfactory Perform Print Head Alignment. Check2 If printed lines are misaligned or print results are otherwise unsatisfactory, adjust the print head position. Aligning the Print Head Note •…
-
Page 21: Line Does Not Print Or Prints Partially
Line Does Not Print or Prints Partially Is the Page Layout Printing performed or the Binding margin function used? Check1 When the Page Layout Printing or Binding margin function is being used, thin lines may not be printed. Try thickening the lines in the document. Is the size of the print data extremely large? Check2 Click Print Options on the Page Setup sheet on the printer driver.
-
Page 22: Image Does Not Print Or Prints Partially
Image Does Not Print or Prints Partially Select the setting not to compress the printing data. Check1 If you select the setting not to compress the printing data with an application software you are using, the printing result may be improved. Click Print Options on the Page Setup sheet on the printer driver.
-
Page 23: Printed Paper Curls Or Has Ink Blots
Is Photo Paper used for printing photographs? Check3 When printing data with high color saturation such as photographs or images in deep color, we recommend using Photo Paper Plus Glossy II or other Canon speciality paper. Media Types You Can Use…
-
Page 24: Paper Is Smudged/Printed Surface Is Scratched
Paper Is Smudged/Printed Surface Is Scratched Paper Is Smudged The Edges of Paper Are Smudged Printed Surface Is Smudged Printed Surface Is Scratched Did you confirm the paper and print quality settings? Check1 Print Results Not Satisfactory Is the appropriate type of paper used? Check the followings: Check2 Check to see if the paper you are printing on is suitable for your printing purpose.
-
Page 25
2. Check that the paper is now flat. We recommend printing curl-corrected paper one sheet at a time. Note • Depending on the media type, the paper may be smudged or may not be fed properly even if it is not curled inward. -
Page 26
Note • Cleaning the paper feed roller will wear the roller, so perform this procedure only when necessary. Is the inside of the machine dirty? Check8 When performing duplex printing, the inside of the machine may become stained with ink, causing the printout to become smudged. -
Page 27: Back Of The Paper Is Smudged
Back of the Paper Is Smudged Did you confirm the paper and print quality settings? Check1 Print Results Not Satisfactory Perform the Bottom Plate Cleaning to clean the inside of the machine. Check2 Cleaning the Inside of the Machine (Bottom Plate Cleaning) Note •…
-
Page 28: Colors Are Uneven Or Streaked
Colors Are Uneven or Streaked Colors Are Uneven Colors Are Streaked Watch the movie Did you confirm the paper and print quality settings? Check1 Print Results Not Satisfactory Print the Nozzle Check Pattern and perform any necessary maintenance Check2 operations such as Print Head Cleaning. Print the Nozzle Check Pattern to determine whether the ink ejects properly from the print head nozzles.
-
Page 29
Perform Print Head Alignment. Check3 Aligning the Print Head Note • If the problem is not resolved after performing the Print Head Alignment, perform Print Head Alignment manually referring to Aligning the Print Head Position from Your Computer. -
Page 30: Ink Is Not Ejected
Ink Is Not Ejected When a FINE cartridge runs out of ink, replace it with a new one. Check1 Is the FINE cartridge installed properly? Check2 If the FINE cartridge is not installed securely, ink may not be ejected correctly. Retract the output tray extension and the paper output tray, open the cover, then remove the FINE cartridges.
-
Page 31: Problems With Scanning
Problems with Scanning Problems with Scanning Scan Results Not Satisfactory Software Problems…
-
Page 32: Problems With Scanning
Problems with Scanning Scanner Does Not Work ScanGear (Scanner Driver) Does Not Start Error Message Appears and the ScanGear (Scanner Driver) Screen Does Not Appear Cannot Scan Multiple Items at One Time Cannot Scan Properly with Auto Scan Slow Scanning Speed «There is not enough memory.»…
-
Page 33: Scanner Does Not Work
Scanner Does Not Work Check 1: Make sure that your scanner or printer is turned on. Check 2: Connect the USB cable to a different USB port on the computer. Check 3: If the USB cable is connected to a USB hub, remove it from the USB hub and connect it to a USB port on the computer.
-
Page 34: Scangear (Scanner Driver) Does Not Start
ScanGear (Scanner Driver) Does Not Start Check 1: Make sure that MP Drivers is installed. If not installed, install MP Drivers from the Setup CD-ROM or the web page. Check 2: Select your scanner or printer on the application’s menu. Important If your scanner or printer name is displayed multiple times, select the one that does not include WIA.
-
Page 35: Error Message Appears And The Scangear (Scanner Driver) Screen Does Not Appear
Error Message Appears and the ScanGear (Scanner Driver) Screen Does Not Appear Check 1: Make sure that your scanner or printer is turned on. Check 2: Turn off your scanner or printer, then reconnect the USB cable and replug the power cord. Check 3: Connect the USB cable to a different USB port on the computer.
-
Page 36: Cannot Scan Multiple Items At One Time
Cannot Scan Multiple Items at One Time Check 1: Make sure that the items are placed correctly. Placing Items (When Scanning from a Computer) Check 2: Check if you can properly scan one item. Some applications do not support multiple image scanning. In that case, scan each item individually.
-
Page 37: Cannot Scan Properly With Auto Scan
Cannot Scan Properly with Auto Scan Check 1: Make sure that the items are placed correctly. Placing Items (When Scanning from a Computer) Check 2: Multiple items scanning may not be supported. Some applications do not support multiple image scanning. In that case, scan each item individually.
-
Page 38: Slow Scanning Speed
Slow Scanning Speed Check 1: To view the image on a monitor, set the output resolution to around 150 dpi. To print, set it to around 300 dpi. Resolution Check 2: Set Fading Correction, Grain Correction, etc. to None. Refer to «Image Settings» for your model from Home of the Online Manual for details. Check 3: In IJ Scan Utility, deselect the Correct slanted text document / Detect the orientation of text document and rotate image checkbox and scan again.
-
Page 39: There Is Not Enough Memory.» Message Is Displayed
«There is not enough memory.» Message Is Displayed Check 1: Exit other applications and try again. Check 2: Reduce the resolution or output size and scan again. Resolution…
-
Page 40: Computer Stops Operating During Scanning
Computer Stops Operating during Scanning Check 1: Restart the computer, reduce the output resolution in ScanGear (scanner driver) and scan again. Refer to «Output Settings» for your model from Home of the Online Manual for details. Check 2: Delete unnecessary files to obtain sufficient free hard disk space, then scan again.
-
Page 41: Scanner Does Not Work After Upgrading Windows
• Step 2: Uninstall IJ Scan Utility. • Windows 8: Click the Settings charm > Control Panel > Programs > Uninstall a program. Double-click Canon IJ Scan Utility. When a confirmation appears, click Yes. When uninstallation is complete, click OK. IJ Scan Utility is deleted.
-
Page 42
• Windows XP: From the Start menu, select Control Panel > Add or Remove Programs. Select Canon IJ Scan Utility, then click Change/Remove. When a confirmation appears, click Yes. When uninstallation is complete, click OK. IJ Scan Utility is deleted. -
Page 43: Scanned Image Does Not Open
Scanned Image Does Not Open Check: If the data format is not supported by the application, scan the image again and select a popular data format such as JPEG when saving it. Refer to the application’s manual for details. If you have any questions, contact the manufacturer of the application.
-
Page 44: Scan Results Not Satisfactory
Scan Results Not Satisfactory Scan Quality (Image Displayed on the Monitor) Is Poor Scanned Image Is Surrounded by Extra White Areas Cannot Scan at the Correct Size Item Is Placed Correctly, but the Scanned Image Is Slanted Scanned Image Is Enlarged (Reduced) on the Computer Monitor…
-
Page 45: Scan Quality (Image Displayed On The Monitor) Is Poor
Scan Quality (Image Displayed on the Monitor) Is Poor Check 1: Increase the scanning resolution if the image is jagged. Resolution Check 2: Set the display size to 100 %. Some applications do not display images clearly if the display size is too small. Check 3: If moire (stripe pattern) appears, take the following measures and scan again.
-
Page 46
Correction, etc. in Image Settings on the Advanced Mode tab of ScanGear. Refer to «Image Settings» for your model from Home of the Online Manual for details. Check 7: If the color tone of images is different from the original document, take the following measures and scan again. -
Page 47: Scanned Image Is Surrounded By Extra White Areas
Scanned Image Is Surrounded by Extra White Areas Check: Specify the scan area. Click (Auto Crop) in whole image view of ScanGear (scanner driver) to automatically display the cropping frame (scan area) according to the item size. You can also manually specify the scan area in thumbnail view or when there are white margins along the item (for example, in photos), or when you want to create custom cropping frames.
-
Page 48: Cannot Scan At The Correct Size
Cannot Scan at the Correct Size Check: Make sure that the items are placed correctly. Placing Items (When Scanning from a Computer)
-
Page 49: Item Is Placed Correctly, But The Scanned Image Is Slanted
Item Is Placed Correctly, but the Scanned Image Is Slanted Check: When Document or Magazine is selected for the item type, deselect the Correct slanted text document checkbox and scan the item again. Settings (Document Scan) Dialog Box Settings (Custom Scan) Dialog Box…
-
Page 50: Scanned Image Is Enlarged (Reduced) On The Computer Monitor
Scanned Image Is Enlarged (Reduced) on the Computer Monitor Check 1: Change the display setting in the application. Refer to the application’s manual for details. If you have any questions, contact the manufacturer of the application. Note You cannot reduce the image size in Paint. To reduce the display size, open the images in an application.
-
Page 51: Software Problems
Software Problems The E-mail Client You Want to Use Does Not Appear in the Screen for Selecting an E- mail Client…
-
Page 52: The E-Mail Client You Want To Use Does Not Appear In The Screen For Selecting An E-Mail Client
The E-mail Client You Want to Use Does Not Appear in the Screen for Selecting an E-mail Client Check: Check that the e-mail client’s MAPI is enabled. Refer to the e-mail client’s manual for how to set MAPI. If the problem is not solved even when MAPI is enabled, select None (Attach Manually) in the screen for selecting an e-mail client, then manually attach the image to the outgoing e- mail.
-
Page 53: Problems With The Machine
Problems with the Machine The Machine Cannot Be Powered On The Machine Turns Off Unintendedly Cannot Connect to Computer Properly FINE Cartridge Holder Does Not Move to the Position for Replacing Printer Status Monitor Is Not Displayed…
-
Page 54: The Machine Cannot Be Powered On
The Machine Cannot Be Powered On Press the ON button. Check1 Make sure that the power plug is securely plugged into the power cord Check2 connector of the machine, then turn it back on. Unplug the machine from the power supply, then plug the machine back in and Check3 turn the machine back on after leaving it for at least 2 minutes.
-
Page 55: The Machine Turns Off Unintendedly
The Machine Turns Off Unintendedly Deactivate the setting to turn the unit off automatically. Check The machine turns off automatically according to the elapsed time you specified if you activate the setting to turn the unit off automatically. If you do not want the machine to turn off automatically, open the printer driver setup window and in Auto Power under the Maintenance sheet, select Disable for Auto Power Off.
-
Page 56: Cannot Connect To Computer Properly
Cannot Connect to Computer Properly Printing or Scanning Speed Is Slow/Hi-Speed USB Connection Does Not Work/»This device can perform faster» Message Is Displayed If your system environment is not fully compatible with Hi-Speed USB, the machine will operate at a lower speed provided under USB 1.1.
-
Page 57: Fine Cartridge Holder Does Not Move To The Position For Replacing
FINE Cartridge Holder Does Not Move to the Position for Replacing Is the ON lamp off? Check1 Check if the ON lamp is lit. The FINE cartridge holder will not move unless the power is on. If the ON lamp is off, close the cover and turn the machine on.
-
Page 58: Printer Status Monitor Is Not Displayed
Printer Status Monitor Is Not Displayed Is the printer status monitor enabled? Check1 Make sure that Enable Status Monitor is selected on the Option menu of the printer status monitor. 1. Open the printer driver setup window. How to Open the Printer Driver Setup Window 2.
-
Page 59: Problems With Installation/Downloading
Problems with Installation/Downloading Cannot Install the MP Drivers Easy-WebPrint EX Does Not Start Up or Easy-WebPrint EX Menu Does Not Appear…
-
Page 60: Cannot Install The Mp Drivers
Cannot Install the MP Drivers • If the installation does not start even after the Setup CD-ROM is inserted into your computer’s disc drive: Start the installation following the procedure below. 1. Select items as shown below. ◦ In Windows 8, select the Explorer icon in Taskbar on Desktop, then select Computer from the list on the left.
-
Page 61
Note • The printer is not detected. Check the connection. may be displayed depending on the computer you use. Make sure that the USB cable is securely plugged in to the machine and the Check1 computer. Follow the procedure below to connect the machine and the computer Check2 again. -
Page 62: Easy-Webprint Ex Does Not Start Up Or Easy-Webprint Ex Menu Does Not Appear
Is Canon Easy-WebPrint EX displayed on the Toolbars menu in the Internet Check1 Explorer’s View menu? If Canon Easy-WebPrint EX is not displayed, Easy-WebPrint EX is not installed on your computer. Install the latest Easy-WebPrint EX onto your computer from our website. Note •…
-
Page 63: About Errors/Messages Displayed
About Errors/Messages Displayed If an Error Occurs A Message Is Displayed…
-
Page 64: If An Error Occurs
If an Error Occurs When an error occurs in printing such as the machine is out of paper or paper is jammed, a troubleshooting message is displayed automatically. Take the appropriate action described in the message. When an error occurs, the Alarm lamp flashes orange and a Support Code (error number) is displayed on the computer screen.
-
Page 65
Support Code Corresponding to the Number of Alternate Flashes of the ON Lamp and the Alarm Lamp Example of 2 times flashing: (A) Flashes (B) Goes off Number of flashes Cause Support Code 2 flashes Printer error has occurred. 5100 7 flashes Printer error has occurred. -
Page 66
For details on how to resolve errors without Support Codes, see A Message Is Displayed. -
Page 67: A Message Is Displayed
Properties. 4. Click the Ports tab to confirm the port settings. Make sure that a port named «USBnnn» (where «n» is a number) with «Canon XXX Printer» appearing in the Printer column is selected for Print to the following port(s).
-
Page 68
Set the correct printer port on Diagnose and Repair Printer. Follow the on-screen instructions to set the correct printer port, then select your machine’s name. In Windows 7, Windows Vista, or Windows XP, click Start and select All programs, Canon Utilities, Canon My Printer, Canon My Printer, then select Diagnose and Repair Printer. Follow the on-screen instructions to set the correct printer port, then select your machine’s name. -
Page 69
Other Error Messages If an error message is displayed outside the printer status monitor, check the Check following: • «Could not spool successfully due to insufficient disk space» Delete any unnecessary files to increase the amount of free space on the disk. •… -
Page 70
This dialog box appears when administrative rights are required to perform a task. If you are logged on to an administrator account, follow the on-screen instructions. 2. Select Canon Inkjet Printer/Scanner/Fax Extended Survey Program. 3. Select Change. If you select Yes after you have followed the on-screen instructions, the confirmation screen will be displayed at the time of the next survey. -
Page 71: If You Cannot Resolve The Problem
If you cannot resolve the problem with any of the workarounds in this chapter, please contact the seller of the machine or the service center. Canon support staff are trained to be able to provide technical support to satisfy customers. Caution •…
-
Page 72: Support Code List
Support Code List The support code appears on the computer screen when an error occurs. «Support Code» means the error number and appears with an error message. When an error occurs, check the support code displayed on the computer screen and take the appropriate action.
-
Page 73: Support Code List (When Paper Is Jammed)
Support Code List (When Paper Is Jammed) If the paper is jammed, remove it following the procedure appropriate for each case. Watch the movie (Windows) Watch the movie (Mac) • If you can see the jammed paper at the paper output slot or the rear tray: 1300 •…
-
Page 74
1300 Cause Paper is jammed in the paper output slot or in the rear tray. Action Remove the jammed paper following the procedure below. Watch the movie (Windows) Watch the movie (Mac) Note • If you need to turn off the machine to remove jammed paper during printing, press the Stop button to cancel print jobs before turning off the machine. -
Page 75
If you cannot remove the paper or the paper tears inside the machine, or if the paper jam error continues after removing the paper, contact the service center. -
Page 76: Paper Is Jammed Inside The Machine
Paper Is Jammed inside the Machine If the jammed paper tears and you cannot remove the paper either from the paper output slot or from the rear tray, or if the jammed paper remains inside the machine, remove the paper following the procedure below.
-
Page 77
4. Hold the jammed paper with your hands. If the paper is rolled up, pull it out. 5. Pull the paper slowly not to tear it, then pull the paper out. 6. Make sure that all the jammed paper is removed. If the paper is torn, a piece of paper may remain inside the machine. -
Page 78
7. Close the cover. All print jobs in the queue are canceled. Reprint if necessary. Note • When reloading the paper, confirm that you are using the paper suited for printing and are loading it correctly. If the message about paper jam is displayed on the computer screen when you resume printing after removing all the jammed paper, a piece of paper may remain inside the machine. -
Page 79: In Other Cases
In Other Cases Make sure of the following: Are there any foreign objects around the paper output slot? Check1 Are there any foreign objects in the rear tray? Check2 If there are any foreign objects in the rear tray, be sure to turn off the machine, unplug it from the power supply, then remove the foreign object.
-
Page 80
1000 Cause There is no paper in the rear tray. Action Reload the paper on the rear tray and press the machine’s Black or Color button. -
Page 81
1200 Cause The cover is open. Action Close the cover and wait for a while. Do not close it while you are replacing a FINE cartridge. -
Page 82
1203 Cause The cover is opened while printing is in progress. Action If paper is left inside the machine, remove the paper slowly with both hands and close the cover. Press the machine’s Black or Color button to dismiss the error. The machine ejects the blank paper and resumes printing from the next paper. -
Page 83
1401 Cause The FINE cartridge is not installed. Action Install the FINE cartridge. If the error is not resolved, the FINE cartridge may be damaged. Contact the service center. -
Page 84
1403 Cause Appropriate FINE cartridge is not installed. Action Install the appropriate FINE cartridge. If the error is not resolved, the FINE cartridge may be damaged. Contact the service center. -
Page 85
1485 Cause Appropriate ink cartridge is not installed. Action Printing cannot be executed because the ink cartridge is not compatible with this machine. Install the appropriate ink cartridge. If you want to cancel printing, press the machine’s Stop button. -
Page 86
1682 Cause The FINE cartridge cannot be recognized. Action Replace the FINE cartridge. If the error is not resolved, the FINE cartridge may be damaged. Contact the service center. -
Page 87
1684 Cause The ink cartridge cannot be recognized. Action Printing cannot be executed because the ink cartridge may not be installed properly or may not be compatible with this machine. Install the appropriate ink cartridge. If you want to cancel printing, press the machine’s Stop button. -
Page 88
If you want to continue printing without this function, press the machine’s Stop button for at least 5 seconds. Canon recommends to use new genuine Canon cartridges in order to obtain optimum qualities. Please be advised that Canon shall not be liable for any malfunction or trouble caused by continuation of printing under the ink out condition. -
Page 89
1687 Cause The FINE cartridge is not installed properly. Action Retract the output tray extension and the paper output tray, open the cover, then remove the FINE cartridges. Then install the FINE cartridges again. Push the FINE cartridge until it clicks into place. After installing, close the cover. -
Page 90
1688 Cause The ink has run out. Action Replace the ink cartridge and close the cover. If printing is in progress and you want to continue printing, press the machine’s Stop button for at least 5 seconds with the ink cartridge installed. Then printing can continue under the ink out condition. The function for detecting the remaining ink level will be disabled. -
Page 91
1700 Cause The ink absorber is almost full. Action Press the machine’s Black or Color button to continue printing. Contact the service center. -
Page 92
1701 Cause The ink absorber is almost full. Action Press the machine’s Black or Color button to continue printing. Contact the service center. -
Page 93
1890 Cause The protective material for the FINE Cartridge holder or the tape may remain attached to the holder. Action Make sure that the protective material or the tape does not remain attached to the FINE cartridge holder. If you find the protective material or the tape remains attached, retract the output tray extension and the paper output tray to remove the protective material or the tape. -
Page 94
2900 Cause Scanning the print head alignment sheet has failed. Action Press the machine’s Black or Color button to dismiss the error. Check the following points, perform Automatic Print Head Alignment again. • Make sure that the print head alignment sheet is set in the correct position and orientation on the platen glass. -
Page 95
2901 Cause Printing of the print head alignment pattern is complete and the machine is in waiting for scanning the sheet. Action Proceed to scan the printed alignment pattern. 1. Load the print head alignment sheet on the platen glass. Load the print head alignment sheet with the printed side facing down and align the mark on the upper left corner of the sheet with the alignment mark… -
Page 96
4100 Cause The specified data cannot be printed. Action When you print the contents on CREATIVE PARK PREMIUM, confirm the message on the computer screen, make sure that genuine Canon FINE cartridges are all installed properly, then start printing again. -
Page 97
4102 Cause The media type and paper size are not set correctly. Action Press the machine’s Stop button, to cancel printing, change the media type or paper size setting, then print again. • When the media type is set to Photo Paper Plus Glossy II: Set the paper size to 4″x6″… -
Page 98
5011 Cause Printer error has occurred. Action Turn off the machine, and unplug the power cord of the machine from the power supply. Plug the machine back in and turn the machine back on. If the problem is not resolved, contact the service center. -
Page 99
5012 Cause Printer error has occurred. Action Turn off the machine, and unplug the power cord of the machine from the power supply. Plug the machine back in and turn the machine back on. If the problem is not resolved, contact the service center. -
Page 100
5100 Cause Printer error has occurred. Action Cancel printing, turn off the machine. Then clear the jammed paper or protective material that is preventing the FINE cartridge holder from moving, and turn on the machine again. If the problem is not resolved, contact the service center. Important •… -
Page 101
5200 Cause Printer error has occurred. Action Turn off the machine, and unplug the power cord of the machine from the power supply. Plug the machine back in and turn the machine back on. If the problem is not resolved, contact the service center. -
Page 102
5400 Cause Printer error has occurred. Action Turn off the machine, and unplug the power cord of the machine from the power supply. Plug the machine back in and turn the machine back on. If the problem is not resolved, contact the service center. -
Page 103
5B00 Cause Printer error has occurred. Action Contact the service center. -
Page 104
5B01 Cause Printer error has occurred. Action Contact the service center. -
Page 105
6000 Cause Printer error has occurred. Action Turn off the machine, and unplug the power cord of the machine from the power supply. Plug the machine back in and turn the machine back on. If the problem is not resolved, contact the service center. -
Page 106
6800 Cause Printer error has occurred. Action Turn off the machine, and unplug the power cord of the machine from the power supply. Plug the machine back in and turn the machine back on. If the problem is not resolved, contact the service center. -
Page 107
6801 Cause Printer error has occurred. Action Turn off the machine, and unplug the power cord of the machine from the power supply. Plug the machine back in and turn the machine back on. If the problem is not resolved, contact the service center. -
Page 108
6930 Cause Printer error has occurred. Action Turn off the machine, and unplug the power cord of the machine from the power supply. Plug the machine back in and turn the machine back on. If the problem is not resolved, contact the service center. -
Page 109
6931 Cause Printer error has occurred. Action Turn off the machine, and unplug the power cord of the machine from the power supply. Plug the machine back in and turn the machine back on. If the problem is not resolved, contact the service center. -
Page 110
6932 Cause Printer error has occurred. Action Turn off the machine, and unplug the power cord of the machine from the power supply. Plug the machine back in and turn the machine back on. If the problem is not resolved, contact the service center. -
Page 111
6933 Cause Printer error has occurred. Action Turn off the machine, and unplug the power cord of the machine from the power supply. Plug the machine back in and turn the machine back on. If the problem is not resolved, contact the service center. -
Page 112
6936 Cause Printer error has occurred. Action Turn off the machine, and unplug the power cord of the machine from the power supply. Plug the machine back in and turn the machine back on. If the problem is not resolved, contact the service center. -
Page 113
6937 Cause Printer error has occurred. Action Turn off the machine, and unplug the power cord of the machine from the power supply. Plug the machine back in and turn the machine back on. If the problem is not resolved, contact the service center. -
Page 114
6938 Cause Printer error has occurred. Action Turn off the machine, and unplug the power cord of the machine from the power supply. Plug the machine back in and turn the machine back on. If the problem is not resolved, contact the service center. -
Page 115
6940 Cause Printer error has occurred. Action Turn off the machine, and unplug the power cord of the machine from the power supply. Plug the machine back in and turn the machine back on. If the problem is not resolved, contact the service center. -
Page 116
6941 Cause Printer error has occurred. Action Turn off the machine, and unplug the power cord of the machine from the power supply. Plug the machine back in and turn the machine back on. If the problem is not resolved, contact the service center. -
Page 117
6942 Cause Printer error has occurred. Action Turn off the machine, and unplug the power cord of the machine from the power supply. Plug the machine back in and turn the machine back on. If the problem is not resolved, contact the service center. -
Page 118
6943 Cause Printer error has occurred. Action Turn off the machine, and unplug the power cord of the machine from the power supply. Plug the machine back in and turn the machine back on. If the problem is not resolved, contact the service center. -
Page 119
6944 Cause Printer error has occurred. Action Turn off the machine, and unplug the power cord of the machine from the power supply. Plug the machine back in and turn the machine back on. If the problem is not resolved, contact the service center. -
Page 120
6945 Cause Printer error has occurred. Action Turn off the machine, and unplug the power cord of the machine from the power supply. Plug the machine back in and turn the machine back on. If the problem is not resolved, contact the service center. -
Page 121
6946 Cause Printer error has occurred. Action Turn off the machine, and unplug the power cord of the machine from the power supply. Plug the machine back in and turn the machine back on. If the problem is not resolved, contact the service center. -
Page 122
B200 Cause An error requiring you to contact the service center has occurred. Action Turn off the machine, and unplug the power cord of the machine from the power supply. Contact the service center. -
Page 123
B201 Cause An error requiring you to contact the service center has occurred. Action Turn off the machine, and unplug the power cord of the machine from the power supply. Contact the service center.
Specifications:1224/1224327-pixma_mg2400_series.pdf file (18 Apr 2023) |
Accompanying Data:
Canon Pixma MG2400 Series All in One Printer, Color printers PDF Manual (Updated: Tuesday 18th of April 2023 09:59:06 AM)
Rating: 4.7 (rated by 82 users)
Compatible devices: imageCLASS MF4450, E4500 Series, TS8100 Series, PIXMA MX360, PIXMA MP960, imageRUNNER C3170 series, imageFormula DR-7090C, 4235i.
Recommended Documentation:
Manual (Text Version):
(Ocr-Read Summary of Contents of some pages of the Canon Pixma MG2400 Series Document (Main Content), UPD: 18 April 2023)
-
1, Canon Pixma MG2400 Series 3 2 1 XXXXXXXX © CANON INC. 2013 1 2 4 1 2 3 4 1 2 1 2 3 4 1 2 3 1 2 QT5-6397-V02 PRINTED IN XXXXXXXX
…
-
Canon Pixma MG2400 Series User Manual
-
Canon Pixma MG2400 Series User Guide
-
Canon Pixma MG2400 Series PDF Manual
-
Canon Pixma MG2400 Series Owner’s Manuals
Recommended: CL2909, Aficio SP 4310N, LT18542, UCC
Operating Impressions, Questions and Answers:
-
Page 1: Online Manual
MG2400 series Online Manual Read Me First Useful Functions Available on the Machine Overview of the Machine English…
-
Page 2: Table Of Contents
Contents Read Me First……….. . 5 How to Use the Online Manual.
-
Page 3
Envelopes…………..51 Loading Originals. -
Page 4
Changing the Machine Operation Mode……….110 Changing the Machine Settings Using the Operation Panel. -
Page 5: Read Me First
In addition, Canon may suspend or stop the disclosure of this guide due to unavoidable reasons. Canon shall not be liable for any damage suffered by customers as a result of changes in or deletion of information in this guide, or suspension/stoppage of disclosure of this guide.
-
Page 6: How To Use The Online Manual
How to Use the Online Manual Symbols Used in This Document Warning Instructions that, if ignored, could result in death or serious personal injury caused by incorrect operation of the equipment. These must be observed for safe operation. Caution Instructions that, if ignored, could result in personal injury or material damage caused by incorrect operation of the equipment.
-
Page 7: Trademarks And Licenses
• Photo Rag is a trademark of Hahnemühle FineArt GmbH. • Bluetooth is a trademark of Bluetooth SIG, Inc., U.S.A. and licensed to Canon Inc. • All other company names and products mentioned herein may be trademarks or registered trademarks of their respective companies.
-
Page 8: Search Tips
Enter keywords in the search window and click (Search). You can search for target pages in this guide. Entry example: «(your product’s model name) load paper», «(your product’s model name) 1000» Search Tips You can search for target pages by entering keywords in the search window. Note •…
-
Page 9
Note • The displayed screen varies depending on your product. • Searching for Application Functions You can find target pages easily by entering your application’s name and a keyword for the function you want to learn about. Example: When you want to learn how to print collages with My Image Garden Enter «My Image Garden collage»… -
Page 10: Window Used In Operation Explanation
Window Used in Operation Explanation In this guide, most of the operations are described based on the windows displayed when Windows 8 operating system (called Windows 8 below) is used.
-
Page 11: Useful Functions Available On The Machine
Useful Functions Available on the Machine The following useful functions are available on the machine. Enjoy pleasant photography experience by utilizing various functions. Useful Functions Available from Applications and the Main Unit You can create items such as collages easily or download delightful printing materials, and print them.
-
Page 12: Useful Functions Available From Applications And The Main Unit
Useful Functions Available from Applications and the Main Unit On the machine, the following useful functions are available from applications and the main unit. • Print Photos Easily • Download Content Materials • Print Photos on Facebook Print Photos Easily Using an Application Organize Images Easily In My Image Garden, you can register the names of people and events to photos.
-
Page 13
If there is an item you like, you can easily print it in just two steps. 1. In Image Display of Quick Menu, select the item you want to print. 2. Print the item with My Image Garden. Place Photos Automatically Delightful items are created easily as the selected photos are placed automatically according to the theme. -
Page 14
PREMIUM Contents can be downloaded easily via My Image Garden. Downloaded PREMIUM Contents can be printed directly with My Image Garden. To download PREMIUM Contents, make sure that genuine Canon ink tanks/ink cartridges are installed for all colors on a supported printer. -
Page 15: Overview Of The Machine
Overview of the Machine Safety Guide Safety Precautions Regulatory and Safety Information Main Components and Basic Operations Main Components About the Power Supply of the Machine Loading Paper / Originals Loading Paper Loading Originals Replacing a FINE Cartridge Replacing a FINE Cartridge Checking the Ink Status Maintenance When Printing Becomes Faint or Colors Are Incorrect…
-
Page 16: Safety Guide
Safety Guide Safety Precautions Regulatory and Safety Information…
-
Page 17: Safety Precautions
Safety Precautions Choosing a location Do not install the machine in a location that is unstable or subject to excessive vibration. Do not install the machine in locations that are very humid or dusty, in direct sunlight, outdoors, or close to a heating source.
-
Page 18: Regulatory And Safety Information
Regulatory and Safety Information ® International ENERGY STAR Program As an ENERGY STAR Partner, Canon Inc. has determined that this product meets the ENERGY STAR guidelines for efficiency. About the disposal of the battery (For models containing lithium battery) Dispose of used batteries according to the local regulations.
-
Page 19
WEEE scheme or your household waste disposal service. For more information regarding return and recycling of WEEE products, please visit www.canon-europe.com/environment. (EEA: Norway, Iceland and Liechtenstein) India only. -
Page 20: Environmental Information
Save Mode, please consider that this device may then only switch to a lower energy level after a longer period of time or not at all. Canon does not recommend extending the Activation Times from the optimum ones set as default.
-
Page 21: Main Components And Basic Operations
Main Components and Basic Operations Main Components About the Power Supply of the Machine…
-
Page 22: Main Components
Main Components Front View Rear View Inside View Operation Panel…
-
Page 23: Front View
Front View document cover Open to load an original on the platen glass. paper support Open to load paper in the rear tray. paper guide Slide to align with the left side of the paper stack. rear tray Load various sizes or types of paper which you can use on the machine. Two or more sheets of the same size and type of paper can be loaded at the same time, and fed automatically one sheet at a time.
-
Page 24
operation panel Use to change the settings of the machine or to operate it. Operation Panel platen glass Load an original to copy or scan. -
Page 25: Rear View
Rear View power cord connector Plug in the supplied power cord. USB port Plug in the USB cable to connect the machine with a computer. Important Do not touch the metal casing. Do not plug in or unplug the USB cable while the machine is printing or scanning originals with the computer.
-
Page 26: Inside View
Inside View FINE cartridge (ink cartridges) A replaceable cartridge that integrates print head and ink tank. FINE cartridge holder Install the FINE cartridge. The color FINE cartridge should be installed into the left slot and the black FINE cartridge should be installed into the right slot. Note For details on replacing a FINE cartridge, see Replacing a FINE…
-
Page 27: Operation Panel
Operation Panel * All lamps on the operation panel are shown lit in the illustration below for explanatory purposes. ON button Turns the power on or off. Before turning on the power, make sure that the document cover is closed. Turning the Machine On and Off ON lamp Lights green after flashing when the power is turned on.
-
Page 28
Lights or flashes orange when an error occurs, such as paper-out or ink-out. When performing machine maintenance or machine settings, options can be selected according to the number of flashes. ink lamps Light or flash orange when ink runs out, etc. The upper lamp indicates the black FINE cartridge status, the lower lamp the color FINE cartridge status. -
Page 29: About The Power Supply Of The Machine
About the Power Supply of the Machine Confirming that the Power Is On Turning the Machine On and Off Notice for the Power Plug/Power Cord Notice for Unplugging the Power Cord…
-
Page 30: Confirming That The Power Is On
Confirming that the Power Is On The ON lamp is lit green when the machine is turned on. Note It may take a while for the machine to start printing immediately after you turn on the machine.
-
Page 31: Turning The Machine On And Off
Turning the Machine On and Off Turning on the machine Press the ON button to turn on the machine. The ON lamp flashes and then remains lit green. Confirming that the Power Is On Note It may take a while for the machine to start printing immediately after you turn on the machine.
-
Page 32
Important When you unplug the power cord after turning off the machine, be sure to confirm that the ON lamp is off. Notice for Unplugging the Power Cord Note Auto power off feature You can set the machine to automatically turn off when no operations are performed or no print jobs are sent to the machine for a certain interval. -
Page 33: Notice For The Power Plug/Power Cord
Notice for the Power Plug/Power Cord Unplug the power cord once a month to confirm that the power plug/power cord does not have anything unusual described below. The power plug/power cord is hot. The power plug/power cord is rusty. The power plug/power cord is bent. The power plug/power cord is worn.
-
Page 34: Notice For Unplugging The Power Cord
Notice for Unplugging the Power Cord To unplug the power cord, follow the procedure below. Important When you unplug the power cord, press the ON button, then confirm that the ON lamp is off. Unplugging the power cord while the ON lamp is lit or flashing may cause drying or clogging of the print head and print quality may be reduced.
-
Page 35: Loading Paper / Originals
Loading Paper / Originals Loading Paper Loading Originals…
-
Page 36: Loading Paper
Loading Paper Loading Plain Paper / Photo Paper Loading Envelopes Media Types You Can Use Media Types You Cannot Use Printing Area…
-
Page 37: Loading Plain Paper / Photo Paper
If you cut plain paper into small size such as 4″ x 6″ (10 x 15 cm) or 5″ x 7″ (13 x 18 cm) to perform trial print, it can cause paper jams. Note We recommend Canon genuine photo paper for printing photos. For details on the Canon genuine paper, see Media Types You Can Use.
-
Page 38
Slide the paper guide to the left, and load the paper against the far right of the rear tray WITH THE PRINT SIDE FACING YOU. Slide the paper guide to align it with the paper stack. Do not slide the paper guide too hard against the paper. The paper may not be fed properly. -
Page 39
Note Do not load sheets of paper higher than the load limit mark (D). Note The machine may make operating noise when feeding paper. After loading paper Select the size and type of the loaded paper on the print settings screen of the printer driver. -
Page 40: Loading Envelopes
Loading Envelopes You can load Envelope DL and Envelope Com 10. The address is automatically rotated and printed according to the envelope’s direction by specifying with the printer driver properly. Important Printing of envelopes from the operation panel is not supported. Do not use the following envelopes.
-
Page 41
Open the paper support. Pull out the paper output tray and the output tray extension. Slide the paper guide to the left, and load the envelopes against the far right of the rear tray WITH THE PRINT SIDE FACING YOU. The folded flap of the envelope will be faced up on the left side. -
Page 42
Note Do not load sheets of paper higher than the load limit mark. Note The machine may make operating noise when feeding paper. After loading envelopes Select the size and type of the loaded envelopes on the print settings screen of the printer driver. -
Page 43: Media Types You Can Use
Envelopes Canon genuine papers The Model Number of Canon genuine paper is shown in brackets. Refer to the instruction manual supplied with the paper for detailed information on the printable side and notes on handling paper. For information on the page sizes available for each Canon genuine paper, access our website.
-
Page 44: Paper Weight
You can use paper in the following weight range. 17 to 28 lb (64 to 105 g /m ) (except for Canon genuine paper) Do not use heavier or lighter paper (except for Canon genuine paper), as it could jam in the machine. Notes on Storing Paper Take out only the necessary number of paper from the package, just before printing.
-
Page 45: Paper Load Limit
Plain Paper (including recycled paper) Approx. 60 sheets Approx. 10 sheets Envelopes 5 envelopes Canon Genuine Papers Note We recommend that you remove the previously printed sheet from the paper output tray before continuously printing to avoid blurs and discoloration. Paper for printing photos: Media Name <Model No.>…
-
Page 46: Media Types You Cannot Use
Paper that is too thin (weighing less than 17 lb (64 g /m Paper that is too thick (weighing more than 28 lb (105 g /m ), except for Canon genuine paper) Paper thinner than a postcard, including plain paper or notepad paper cut to a small…
-
Page 47: Printing Area
Printing Area Printing Area Other Sizes than Letter, Legal, Envelopes Letter, Legal Envelopes…
-
Page 48: Printing Area
To ensure the best print quality, the machine allows a margin along each edge of media. The actual printable area will be the area inside these margins. Recommended printing area : Canon recommends that you print within this area. Printable area : The area where it is possible to print.
-
Page 49: Other Sizes Than Letter, Legal, Envelopes
Other Sizes than Letter, Legal, Envelopes Size Printable Area (width x height) 5.56 x 7.49 inches (141.2 x 190.3 mm) 8.00 x 10.92 inches (203.2 x 277.3 mm) 6.90 x 9.34 inches (175.2 x 237.3 mm) 4″ x 6″ (10 x 15 cm) 3.73 x 5.22 inches (94.8 x 132.7 mm) 5″…
-
Page 50: Letter, Legal
Letter, Legal Size Printable Area (width x height) Letter 8.00 x 10.22 inches (203.2 x 259.7 mm) Legal 8.00 x 13.22 inches (203.2 x 335.9 mm) Recommended printing area 1.24 inches (31.6 mm) 1.15 inches (29.2 mm) Printable area 0.12 inches (3.0 mm) 0.66 inches (16.7 mm) 0.25 inches (6.4 mm) 0.25 inches (6.3 mm)
-
Page 51: Envelopes
Envelopes Size Recommended Printing Area (width x height) Envelope DL 3.88 x 7.06 inches (98.8 x 179.5 mm) Envelope Com 10 3.68 x 7.90 inches (93.5 x 200.8 mm) Recommended printing area 0.31 inches (8.0 mm) 1.28 inches (32.5 mm) 0.22 inches (5.6 mm) 0.22 inches (5.6 mm)
-
Page 52: Loading Originals
Loading Originals Loading Originals on the Platen Glass Originals You Can Load…
-
Page 53: Loading Originals On The Platen Glass
Loading Originals on the Platen Glass You can load originals to copy or scan on the platen glass. Load an original on the platen glass. Open the document cover. Important Do not place any object on the document cover. It will fall into the rear tray when the document cover is opened and cause the machine to malfunction.
-
Page 54
Close the document cover gently. Important After loading the original on the platen glass, be sure to close the document cover before starting to copy or scan. -
Page 55: Originals You Can Load
Originals You Can Load The originals you can load on the platen glass are as follows. Item Details — Text document, magazine, or newspaper Types of originals — Printed photo, postcard, business card, or disc (BD/DVD/CD, etc.) Size (width x height) Max.
-
Page 56: Replacing A Fine Cartridge
Replacing a FINE Cartridge Replacing a FINE Cartridge Checking the Ink Status…
-
Page 57: Replacing A Fine Cartridge
Replacing a FINE Cartridge When remaining ink cautions or errors occur, the ink lamps and the Alarm lamp will flash orange to inform you of the error. Count the number of flashes and take appropriate action. If an Error Occurs Note For information on the compatible FINE cartridge, refer to the printed manual: Safety and Important Information.
-
Page 58
Even when printing with one ink only, print with leaving the empty FINE cartridge installed. If either of the color FINE cartridge or black FINE cartridge is not installed, an error occurs and the machine cannot print. For information on how to configure this setting, see Setting the Ink Cartridge to be Used. -
Page 59
Push down the FINE cartridge until it clicks. Remove the FINE cartridge. Important Handle the FINE cartridge carefully to avoid staining of clothing or the surrounding area. Discard the empty FINE cartridge according to the local laws and regulations regarding disposal of consumables. Prepare a new FINE cartridge. -
Page 60
Important If you shake a FINE cartridge, ink may spill out and stain your hands and the surrounding area. Handle a FINE cartridge carefully. Be careful not to stain your hands and the surrounding area with ink on the removed protective tape. -
Page 61
Important Insert the FINE cartridge gently so that it does not hit the electrical contacts on the FINE cartridge holder. Push the FINE cartridge in and up firmly until it snaps into place. -
Page 62
Important Check if the FINE cartridge is installed correctly. The machine cannot print unless both the color FINE cartridge and black FINE cartridge are installed. Be sure to install both cartridges. Close the cover. Note If the Alarm lamp lights or flashes orange after the cover is closed, take appropriate action. -
Page 63: Checking The Ink Status
Checking the Ink Status Checking the Ink Status with the Ink Lamps on the Operation Panel You can also check the ink status on the computer screen. Checking the Ink Status from Your Computer…
-
Page 64: Checking The Ink Status With The Ink Lamps On The Operation Panel
Checking the Ink Status with the Ink Lamps on the Operation Panel Note The ink level detector is mounted on the machine to detect the remaining ink level. The machine considers as ink is full when a new FINE cartridge is installed, and then starts to detect a remaining ink level.
-
Page 65
Checking the Ink Status from Your Computer… -
Page 66: Maintenance
Maintenance When Printing Becomes Faint or Colors Are Incorrect Performing Maintenance from a Computer Cleaning the Machine…
-
Page 67: When Printing Becomes Faint Or Colors Are Incorrect
When Printing Becomes Faint or Colors Are Incorrect Maintenance Procedure Printing the Nozzle Check Pattern Examining the Nozzle Check Pattern Cleaning the Print Head Cleaning the Print Head Deeply Aligning the Print Head…
-
Page 68: Maintenance Procedure
Maintenance Procedure If print results are blurred or colors are not printed correctly, the print head nozzle (FINE cartridge) is probably clogged. Follow the procedure below to print the nozzle check pattern, check the print head nozzle condition, then clean the print head. If printed ruled lines are misaligned or print results are otherwise unsatisfactory, aligning the print head may improve print quality.
-
Page 69: Clean The Print Head
When the Print Results Are Blurred or Uneven: Step 1 Print the nozzle check pattern. From the machine Printing the Nozzle Check Pattern From the computer Use Your Computer to Print a Nozzle Check Pattern Examine the nozzle check pattern. After cleaning the print head, Examining the Nozzle Check Pattern print and examine the nozzle…
-
Page 70
Step 4 Replace a FINE cartridge. Replacing a FINE Cartridge Note If the problem is still not resolved after replacing the FINE cartridge, contact the service center. When the Print Results Are Not Even such as the Ruled Lines Are Misaligned: Align the print head. -
Page 71: Printing The Nozzle Check Pattern
Printing the Nozzle Check Pattern Print the nozzle check pattern to determine whether the ink ejects properly from the print head nozzle. Watch the movie Note If the remaining ink level is low, the nozzle check pattern will not be printed correctly. Replace the FINE cartridge whose ink is low.
-
Page 72: Examining The Nozzle Check Pattern
Examining the Nozzle Check Pattern Examine the nozzle check pattern, and clean the print head if necessary. Check if there are missing lines in the pattern or horizontal white streaks in the pattern (B). Number of sheets printed so far If there are missing lines in the pattern (A): Cleaning the print head is required.
-
Page 73: Cleaning The Print Head
Cleaning the Print Head Clean the print head if lines are missing or if horizontal white streaks are present in the printed nozzle check pattern. Cleaning unclogs the nozzles and restores the print head condition. Cleaning the print head consumes ink, so clean the print head only when necessary.
-
Page 74: Cleaning The Print Head Deeply
Cleaning the Print Head Deeply If print quality does not improve by the standard cleaning of the print head, clean the print head deeply. Cleaning the print head deeply consumes more ink than the standard cleaning of the print head, so clean the print head deeply only when necessary. Make sure that the power is turned on.
-
Page 75: Aligning The Print Head
Aligning the Print Head If printed ruled lines are misaligned or print results are otherwise unsatisfactory, adjust the print head position. Note If the remaining ink level is low, the print head alignment sheet will not be printed correctly. Replace the FINE cartridge whose ink is low. Replacing a FINE Cartridge You need to prepare: a sheet of A4 or Letter-sized plain paper (including recycled paper)*…
-
Page 76
Important Do not touch any printed part on the print head alignment sheet. Be careful not to get the print head alignment sheet dirty. If the sheet is stained or wrinkled, it may not be scanned properly. If the print head alignment sheet was not printed correctly, press the Stop button, then redo this procedure from the beginning. -
Page 77
Close the document cover gently, then press the Color button or the Black button. The machine starts scanning the print head alignment sheet, and the print head position will be adjusted automatically. The print head position adjustment will be complete when the ON lamp lights green after flashing. -
Page 78: Performing Maintenance From A Computer
Performing Maintenance from a Computer Cleaning the Print Heads from Your Computer Cleaning the Paper Feed Rollers from Your Computer Aligning the Print Head Aligning the Print Head Position Automatically from Your Computer Aligning the Print Head Position from Your Computer Use Your Computer to Print a Nozzle Check Pattern Cleaning Inside the Machine…
-
Page 79: Cleaning The Print Heads From Your Computer
Cleaning the Print Heads from Your Computer The print head cleaning function allows you to clear up clogged print head nozzle. Perform print head cleaning if printing is faint or a specific color fails to print, even though there is enough ink.
-
Page 80
Deep Cleaning Deep Cleaning is more thorough than cleaning. Perform deep cleaning when two Cleaning attempts do not resolve the print head problem. Open the printer driver setup window Click Deep Cleaning on the Maintenance tab When the Deep Cleaning dialog box opens, select the ink group for which deep cleaning is to be performed. -
Page 81: Cleaning The Paper Feed Rollers From Your Computer
Cleaning the Paper Feed Rollers from Your Computer Cleans the paper feed rollers. Perform feed roller cleaning when there are paper particles sticking to the paper feed rollers and paper is not fed properly. The procedure for performing the feed roller cleaning is as follows: Roller Cleaning Prepare the machine Remove all sheets of paper from the rear tray.
-
Page 82: Aligning The Print Head
Aligning the Print Head When you perform head position adjustment, errors in the print head adjustment position are corrected and conditions such as color and line streaking are improved. If the print results appear uneven because of line shifts or other conditions, adjust the position of the print head.
-
Page 83: Aligning The Print Head Position From Your Computer
Aligning the Print Head Position from Your Computer Print head alignment corrects the installation positions of the print head and improves deviated colors and lines. This machine supports two head alignment methods: automatic head alignment and manual head alignment. The procedure for performing manual print head alignment is as follows: Print Head Alignment Open the printer driver setup window Click Custom Settings on the Maintenance tab…
-
Page 84
When you have entered all the necessary values, click OK. Note If it is difficult to pick the best pattern, pick the setting that produces the least noticeable vertical streaks. (A) Least noticeable vertical streaks (B) Most noticeable vertical streaks If it is difficult to pick the best pattern, pick the setting that produces the least noticeable horizontal streaks. -
Page 85
When you have entered all the necessary values, click OK. Note If it is difficult to pick the best pattern, pick the setting that produces the least noticeable vertical streaks. (A) Least noticeable vertical streaks (B) Most noticeable vertical streaks Confirm the displayed message and click OK The third pattern is printed. -
Page 86
When you have entered all the necessary values, click OK. Note If it is difficult to pick the best pattern, pick the setting that produces the least noticeable horizontal stripes. (A) Least noticeable horizontal stripes (B) Most noticeable horizontal stripes Note To print and check the current setting, open the Start Print Head Alignment dialog box, and click Print Alignment Value. -
Page 87: Aligning The Print Head Position Automatically From Your Computer
Aligning the Print Head Position Automatically from Your Computer Print head alignment corrects the installation positions of the print head and improves deviated colors and lines. This machine supports two head alignment methods: automatic head alignment and manual head alignment. Normally, the machine is set for automatic head alignment. If the printing results of automatic print head alignment are not satisfactory, perform manual head alignment.
-
Page 88
Note To print and check the current setting, open the Start Print Head Alignment dialog box, and click Print Alignment Value. -
Page 89: Use Your Computer To Print A Nozzle Check Pattern
Use Your Computer to Print a Nozzle Check Pattern The nozzle check function allows you to check whether the print head is working properly by printing a nozzle check pattern. Print the pattern if printing becomes faint, or if a specific color fails to print.
-
Page 90: Cleaning Inside The Machine
Cleaning Inside the Machine Perform bottom plate cleaning before you execute duplex printing to prevent smudges on the back side of the paper. Also perform bottom plate cleaning if ink smudges caused by something other than print data appear on the printed page. The procedure for performing bottom plate cleaning is as follows: Bottom Plate Cleaning Open the printer driver setup window…
-
Page 91: Cleaning The Machine
Cleaning the Machine Cleaning the Exterior of the Machine Cleaning the Platen Glass and Document Cover Cleaning the Paper Feed Roller Cleaning the Inside of the Machine (Bottom Plate Cleaning) Cleaning the Protrusions inside the Machine…
-
Page 92: Cleaning The Exterior Of The Machine
Cleaning the Exterior of the Machine Be sure to use a soft and dry cloth such as eyeglasses cleaning cloth and wipe off dirt on the surface gently. Smooth out wrinkles on the cloth if necessary before cleaning. Important Be sure to turn off the power and disconnect the power plug before cleaning the machine.
-
Page 93: Cleaning The Platen Glass And Document Cover
Cleaning the Platen Glass and Document Cover Important Be sure to turn off the power and disconnect the power plug before cleaning the machine. Do not use tissue paper, paper towels, rough-textured cloth, or similar materials for cleaning so as not to scratch the surface. Be sure to use a soft and dry cloth. Never use volatile liquids such as thinners, benzene, acetone, or any other chemical cleaner to clean the machine, as this may cause a malfunction or damage the surface of the machine.
-
Page 94: Cleaning The Paper Feed Roller
Cleaning the Paper Feed Roller If the paper feed rollers are dirty or paper powder is attached to it, paper may not be fed properly. In this case, clean the paper feed rollers. Cleaning will wear out the paper feed rollers, so perform this only when necessary.
-
Page 95
After cleaning the paper feed rollers, turn on the power, then clean the paper feed rollers again. If the problem is not resolved after cleaning the paper feed rollers, contact the service center. -
Page 96: Cleaning The Inside Of The Machine (Bottom Plate Cleaning)
Cleaning the Inside of the Machine (Bottom Plate Cleaning) Remove stains from the inside of the machine. If the inside of the machine becomes dirty, printed paper may get dirty, so we recommend performing cleaning regularly. You need to prepare: a sheet of A4 or Letter-sized plain paper* * Be sure to use a new piece of paper.
-
Page 97
The paper cleans the inside of the machine as it feeds through the machine. Check the folded parts of the ejected paper. If they are smudged with ink, perform Bottom Plate Cleaning again. If the problem is not resolved after performing cleaning again, the protrusions inside the machine may be stained. -
Page 98: Cleaning The Protrusions Inside The Machine
Cleaning the Protrusions inside the Machine Important Be sure to turn off the power and disconnect the power plug before cleaning the machine. You need to prepare: cotton swab If the protrusions inside the machine are stained, wipe off any ink from the protrusions using a cotton swab or the like.
-
Page 99: Changing The Machine Settings
Changing the Machine Settings Changing Machine Settings from Your Computer Changing the Machine Settings Using the Operation Panel…
-
Page 100: Changing Machine Settings From Your Computer
Changing Machine Settings from Your Computer Changing the Print Options Registering a Frequently Used Printing Profile Setting the Ink Cartridge to be Used Managing the Machine Power Reducing the Machine Noise Changing the Machine Operation Mode…
-
Page 101: Changing The Print Options
Changing the Print Options You can change the detailed print driver settings for print data that is sent from an application software. Specify this option if you encounter print failures such as part of an image data being cut off. The procedure for changing the print options is as follows: Open the printer driver setup window Click Print Options…
-
Page 102
Change the individual settings If necessary, change the setting of each item, and then click OK. The Page Setup tab is displayed again. -
Page 103: Registering A Frequently Used Printing Profile
Registering a Frequently Used Printing Profile You can register the frequently used printing profile to Commonly Used Settings on the Quick Setup tab. Unnecessary printing profiles can be deleted at any time. The procedure for registering a printing profile is as follows: Registering a Printing Profile Open the printer driver setup window Set the necessary items…
-
Page 104
Enter a name in the Name field. If necessary, click Options…, set the items, and then click OK. In the Save Commonly Used Settings dialog box, click OK to save the print settings and return to the Quick Setup tab. The name and icon are displayed in Commonly Used Settings. -
Page 105: Setting The Ink Cartridge To Be Used
Setting the Ink Cartridge to be Used This feature enables you to specify the most appropriate FINE cartridge among installed cartridges according to an intended use. When one of the FINE cartridges becomes empty and cannot be replaced immediately by a new one, you can specify the other FINE cartridge that still has ink and continue printing.
-
Page 106: Managing The Machine Power
Managing the Machine Power This function allows you to manage the machine power from the printer driver. The procedure for managing the machine power is as follows: Power Off The Power Off function turns off the machine. When you use this function, you will not be able to turn the machine on from the printer driver.
-
Page 107
If necessary, complete the following settings: Auto Power On Specifying Enable from the list will turn the machine on upon receipt of print data. Auto Power Off Specify the time from the list. When this time lapses without any operations from the printer driver or the machine, the machine is turned off automatically. -
Page 108: Reducing The Machine Noise
Reducing the Machine Noise The silent function allows you to reduce the operating noise of this machine. Select when you wish to reduce the operating noise of the printer at night, etc. Using this function may lower the print speed. The procedure for using the quiet mode is as follows: Quiet Settings Open the printer driver setup window…
-
Page 109
perform operations from the operation panel of the machine or printing and scanning from the computer. If you specify a time for Use quiet mode during specified hours, quiet mode is not applied to operations (copy, direct print, etc.) performed directly from the machine. -
Page 110: Changing The Machine Operation Mode
Changing the Machine Operation Mode If necessary, switch between various modes of machine operation. The procedure for configuring Custom Settings is as follows: Custom Settings Open the printer driver setup window Make sure that the machine is on, and then click Custom Settings on the Maintenance tab The Custom Settings dialog box opens.
-
Page 111
Ink Drying Wait Time You can set the length of the machine rest time until printing of the next page begins. Moving the slider to the right increases the pause time, and moving the slider to the left decreases the time. If the paper gets stained because the next page is ejected before the ink on the printed page dries, increase the ink drying wait time. -
Page 112: Changing The Machine Settings Using The Operation Panel
Changing the Machine Settings Using the Operation Panel About Quiet setting Turning on/off the Machine Automatically…
-
Page 113: About Quiet Setting
About Quiet setting Enables this function on the machine if you want to reduce the operating noise, such as when printing at night. Follow the procedure below to perform setting. Make sure that the machine is turned on. 2. Press and hold the Stop button until the Alarm lamp flashes 9 times. 3.
-
Page 114: Turning On/Off The Machine Automatically
Turning on/off the Machine Automatically You can enable the machine to turn on/off automatically considering the environment Turning on the Machine Automatically Turning off the Machine Automatically Turning on the Machine Automatically You can enable the machine to turn on automatically when you perform printing or scanning operations from the computer.
-
Page 115: Tips For Ensuring Optimal Printing Quality
Tips for Ensuring Optimal Printing Quality Useful Information about Ink Key Points to Successful Printing Be Sure to Make Paper Settings after Loading Paper Canceling a Print Job Storing Printed Images Machine Handling Precautions Key to Enjoying Consistent Printing Quality Precautions for Safe Transport of the Machine…
-
Page 116: Useful Information About Ink
Useful Information about Ink How is ink used for various purposes other than printing? Ink may be used for purposes other than printing. Ink is not only used for printing, but also for cleaning the print head to maintain the optimal printing quality. The machine has the function to automatically clean the ink jet nozzles to prevent clogging.
-
Page 117: Key Points To Successful Printing
Key Points to Successful Printing Check the machine status before printing! Is the print head OK? If a print head nozzle is clogged, print will be faint and papers will be wasted. Print the nozzle check pattern to check the print head. Maintenance Procedure Is the inside of the machine smeared with ink? After printing large quantities of paper, the area where papers go through may get…
-
Page 118: Be Sure To Make Paper Settings After Loading Paper
Be Sure to Make Paper Settings after Loading Paper If the media type setting is not the one for the loaded paper, printing results may not be satisfactory. After loading paper, be sure to select the appropriate media type setting for the loaded paper.
-
Page 119: Canceling A Print Job
Canceling a Print Job Never press the ON button! If you press the ON button while printing is in progress, the print data sent from the computer queues in the machine and you may not be able to continue to print. Press the Stop button to cancel printing.
-
Page 120: Storing Printed Images
Storing Printed Images Store printed images in albums, clear photo sleeves, or glass frames to protect them from direct exposure to air. Note Storing printed images without sufficient drying may cause blurring or discoloration.
-
Page 121: Machine Handling Precautions
Machine Handling Precautions Do not place any object on the document cover! Do not place any object on the document cover. It will fall into the rear tray when the document cover is opened and cause the machine to malfunction. Also, place the machine where objects will not fall on it.
-
Page 122: Key To Enjoying Consistent Printing Quality
Key to Enjoying Consistent Printing Quality The key to printing with the optimal printing quality is to prevent the print head from drying or clogging. Always observe the following rules for optimal printing quality. Never disconnect the power plug until the power is turned off! If you press the ON button to turn off the power, the machine caps the print head (nozzles) automatically to prevent from drying.
-
Page 123: Precautions For Safe Transport Of The Machine
Precautions for Safe Transport of the Machine When relocating the machine, make sure of the following. Important When sending the machine for repair Pack the machine in a sturdy box so that it is placed with its bottom facing down, using sufficient protective material to ensure safe transport.
-
Page 124
Use adhesive tape to secure all the covers on the machine to keep them from opening during transportation. Then pack the machine in the plastic bag. Attach the protective material to the machine when packing the machine in the box. -
Page 125: Legal Limitations On Use Of Your Product And Use Of Images
Legal Limitations on Use of Your Product and Use of Images It may be unlawful to make copies of, scan, print, or use reproductions of the following documents. The list provided is non-exhaustive. When in doubt, check with a legal representative in your jurisdiction.
-
Page 126: Specifications
* With the Paper Support and Paper Output Tray retracted. Approx. 7.6 lb (Approx. 3.5 kg) Weight * With the FINE Cartridges installed. Canon FINE Cartridge Total 1280 nozzles (BK 320 nozzles, C/M/Y each 320 nozzles) Copy Specifications Multiple copy max.
-
Page 127: Minimum System Requirements
XGA 1024 x 768 Other Supported OS Some functions may not be available with each OS. Refer to the manual or the Canon web site for details on operation with Windows RT. An internet connection is required to view the Online Manual.
-
Page 128
Windows: A CD-ROM Drive or internet connection is required during software installation. Windows: Internet Explorer 8, 9 or 10 is required to install Easy-WebPrint EX. Easy-WebPrint EX for Internet Explorer 10 can be downloaded from the Canon web site. Windows: Some functions may not be available with Windows Media Center.
инструкцияCanon Pixma MG2400

XXXXXXXX © CANON INC. 2013
1
2
4
3
1
2
3
4
5
6
QT5-6353-V01 PRINTED IN XXXXXXXX
Посмотреть инструкция для Canon Pixma MG2400 бесплатно. Руководство относится к категории принтеры, 1 человек(а) дали ему среднюю оценку 9.2. Руководство доступно на следующих языках: английский. У вас есть вопрос о Canon Pixma MG2400 или вам нужна помощь? Задайте свой вопрос здесь
- Manuals
- Brands
- Canon Manuals
- Color printers
- Pixma MG2400 Series
- Online manual
-
Contents
-
Table of Contents
-
Troubleshooting
-
Bookmarks
Quick Links
MG2400 series
Online Manual
Troubleshooting
English
Related Manuals for Canon mg2400 series
Summary of Contents for Canon mg2400 series
-
Page 1
MG2400 series Online Manual Troubleshooting English… -
Page 2: Table Of Contents
Contents Troubleshooting……….. 5 Problems with Printing.
-
Page 3
Scanned Image Is Enlarged (Reduced) on the Computer Monitor……50 Software Problems…………..51 The E-mail Client You Want to Use Does Not Appear in the Screen for Selecting an E-mail Client 52 Problems with the Machine. -
Page 4
1890…………..93 2900. -
Page 5: Troubleshooting
Troubleshooting The Machine Cannot Be Powered On Printing Does Not Start Paper Does Not Feed Properly/»No Paper» Error Occurs Print Results Not Satisfactory Ink Is Not Ejected Paper Jams If an Error Occurs Search Each Function Problems with Printing Problems with Printing Quality Problems with Scanning Problems with the Machine Problems with Installation/Downloading…
-
Page 6: Problems With Printing
Problems with Printing Printing Does Not Start Paper Jams Paper Does Not Feed Properly/»No Paper» Error Occurs Copying/Printing Stops Before It Is Completed…
-
Page 7: Printing Does Not Start
Faxes. 3. Open the properties of the printer driver for the machine. • In Windows 8 or Windows 7, right-click the «Canon XXX Printer» icon (where «XXX» is your machine’s name), then select Printer properties. • In Windows Vista or Windows XP, right-click the «Canon XXX Printer» icon (where «XXX» is your…
-
Page 8
4. Click the Ports tab to confirm the port settings. Make sure that a port named «USBnnn» (where «n» is a number) with «Canon XXX Printer» appearing in the Printer column is selected for Print to the following port(s). • If the setting is incorrect: Reinstall the MP Drivers with the Setup CD-ROM or install them from our website. -
Page 9: Paper Jams
Paper Jams When paper is jammed, the Alarm lamp flashes orange and a troubleshooting message is displayed on the computer screen automatically. Take the appropriate action described in the message. Watch the movie For details on how to remove the jammed paper, refer to Support Code List (When Paper Is Jammed).
-
Page 10: Paper Does Not Feed Properly/»No Paper» Error Occurs
Paper Does Not Feed Properly/»No Paper» Error Occurs Make sure that paper is loaded. Check1 Loading Paper Make sure of the following when you load paper. Check2 • When loading two or more sheets of paper, align the edges of the sheets before loading. •…
-
Page 11
Clean the paper feed roller. Check7 Cleaning the Paper Feed Roller Note • Cleaning the paper feed roller will wear the roller, so perform this procedure only when necessary. -
Page 12: Copying/Printing Stops Before It Is Completed
Copying/Printing Stops Before It Is Completed Is the paper loaded? Check1 Make sure that paper is loaded. If the machine has run out of paper, load paper. Do the printing documents have lots of photographs or illustrations? Check2 As printing large data such as photos or graphics takes time for the machine and the computer to process, the machine may appear to have stopped operating.
-
Page 13: Problems With Printing Quality
Problems with Printing Quality Print Results Not Satisfactory Ink Is Not Ejected…
-
Page 14: Print Results Not Satisfactory
Print Results Not Satisfactory If the print result is not satisfactory due to white streaks, misaligned lines, or uneven colors, confirm the paper and print quality settings first. Do the page size and media type settings match the size and type of the loaded Check1 paper? When these settings are incorrect, you cannot obtain a proper print result.
-
Page 15: Cannot Print To End Of Job
Cannot Print to End of Job Select the setting not to compress the printing data. Check1 If you select the setting not to compress the printing data with an application software you are using, the printing result may be improved. Click Print Options on the Page Setup sheet on the printer driver.
-
Page 16: No Printing Results/Printing Is Blurred/Colors Are Wrong/White Streaks
No Printing Results/Printing Is Blurred/Colors Are Wrong/White Streaks No Printing Results Printing Is Blurred Colors Are Wrong White Streaks Watch the movie…
-
Page 17
Did you confirm the paper and print quality settings? Check1 Print Results Not Satisfactory Print the Nozzle Check Pattern and perform any necessary maintenance Check2 operations such as Print Head Cleaning. Print the Nozzle Check Pattern to determine whether the ink ejects properly from the print head nozzles. Refer to When Printing Becomes Faint or Colors Are Incorrect for the Nozzle Check Pattern printing, Print Head Cleaning, and Print Head Deep Cleaning. -
Page 18
Make sure that the original is properly loaded on the platen glass. Check7 Loading Originals Is the original loaded with the side to be copied facing down on the platen Check8 glass? Did you copy a printout done by this machine? Check9 If you use a printout done by this machine as the original, print quality may be reduced depending on the condition of the original. -
Page 19: Colors Are Unclear
Colors Are Unclear Watch the movie Is the Nozzle Check Pattern printed properly? Check1 Print the Nozzle Check Pattern to determine whether the ink ejects properly from the print head nozzles. Refer to When Printing Becomes Faint or Colors Are Incorrect for the Nozzle Check Pattern printing, Print Head Cleaning, and Print Head Deep Cleaning.
-
Page 20: Lines Are Misaligned
Lines Are Misaligned Did you confirm the paper and print quality settings? Check1 Print Results Not Satisfactory Perform Print Head Alignment. Check2 If printed lines are misaligned or print results are otherwise unsatisfactory, adjust the print head position. Aligning the Print Head Note •…
-
Page 21: Line Does Not Print Or Prints Partially
Line Does Not Print or Prints Partially Is the Page Layout Printing performed or the Binding margin function used? Check1 When the Page Layout Printing or Binding margin function is being used, thin lines may not be printed. Try thickening the lines in the document. Is the size of the print data extremely large? Check2 Click Print Options on the Page Setup sheet on the printer driver.
-
Page 22: Image Does Not Print Or Prints Partially
Image Does Not Print or Prints Partially Select the setting not to compress the printing data. Check1 If you select the setting not to compress the printing data with an application software you are using, the printing result may be improved. Click Print Options on the Page Setup sheet on the printer driver.
-
Page 23: Printed Paper Curls Or Has Ink Blots
Is Photo Paper used for printing photographs? Check3 When printing data with high color saturation such as photographs or images in deep color, we recommend using Photo Paper Plus Glossy II or other Canon speciality paper. Media Types You Can Use…
-
Page 24: Paper Is Smudged/Printed Surface Is Scratched
Paper Is Smudged/Printed Surface Is Scratched Paper Is Smudged The Edges of Paper Are Smudged Printed Surface Is Smudged Printed Surface Is Scratched Did you confirm the paper and print quality settings? Check1 Print Results Not Satisfactory Is the appropriate type of paper used? Check the followings: Check2 Check to see if the paper you are printing on is suitable for your printing purpose.
-
Page 25
2. Check that the paper is now flat. We recommend printing curl-corrected paper one sheet at a time. Note • Depending on the media type, the paper may be smudged or may not be fed properly even if it is not curled inward. -
Page 26
Note • Cleaning the paper feed roller will wear the roller, so perform this procedure only when necessary. Is the inside of the machine dirty? Check8 When performing duplex printing, the inside of the machine may become stained with ink, causing the printout to become smudged. -
Page 27: Back Of The Paper Is Smudged
Back of the Paper Is Smudged Did you confirm the paper and print quality settings? Check1 Print Results Not Satisfactory Perform the Bottom Plate Cleaning to clean the inside of the machine. Check2 Cleaning the Inside of the Machine (Bottom Plate Cleaning) Note •…
-
Page 28: Colors Are Uneven Or Streaked
Colors Are Uneven or Streaked Colors Are Uneven Colors Are Streaked Watch the movie Did you confirm the paper and print quality settings? Check1 Print Results Not Satisfactory Print the Nozzle Check Pattern and perform any necessary maintenance Check2 operations such as Print Head Cleaning. Print the Nozzle Check Pattern to determine whether the ink ejects properly from the print head nozzles.
-
Page 29
Perform Print Head Alignment. Check3 Aligning the Print Head Note • If the problem is not resolved after performing the Print Head Alignment, perform Print Head Alignment manually referring to Aligning the Print Head Position from Your Computer. -
Page 30: Ink Is Not Ejected
Ink Is Not Ejected When a FINE cartridge runs out of ink, replace it with a new one. Check1 Is the FINE cartridge installed properly? Check2 If the FINE cartridge is not installed securely, ink may not be ejected correctly. Retract the output tray extension and the paper output tray, open the cover, then remove the FINE cartridges.
-
Page 31: Problems With Scanning
Problems with Scanning Problems with Scanning Scan Results Not Satisfactory Software Problems…
-
Page 32: Problems With Scanning
Problems with Scanning Scanner Does Not Work ScanGear (Scanner Driver) Does Not Start Error Message Appears and the ScanGear (Scanner Driver) Screen Does Not Appear Cannot Scan Multiple Items at One Time Cannot Scan Properly with Auto Scan Slow Scanning Speed «There is not enough memory.»…
-
Page 33: Scanner Does Not Work
Scanner Does Not Work Check 1: Make sure that your scanner or printer is turned on. Check 2: Connect the USB cable to a different USB port on the computer. Check 3: If the USB cable is connected to a USB hub, remove it from the USB hub and connect it to a USB port on the computer.
-
Page 34: Scangear (Scanner Driver) Does Not Start
ScanGear (Scanner Driver) Does Not Start Check 1: Make sure that MP Drivers is installed. If not installed, install MP Drivers from the Setup CD-ROM or the web page. Check 2: Select your scanner or printer on the application’s menu. Important If your scanner or printer name is displayed multiple times, select the one that does not include WIA.
-
Page 35: Error Message Appears And The Scangear (Scanner Driver) Screen Does Not Appear
Error Message Appears and the ScanGear (Scanner Driver) Screen Does Not Appear Check 1: Make sure that your scanner or printer is turned on. Check 2: Turn off your scanner or printer, then reconnect the USB cable and replug the power cord. Check 3: Connect the USB cable to a different USB port on the computer.
-
Page 36: Cannot Scan Multiple Items At One Time
Cannot Scan Multiple Items at One Time Check 1: Make sure that the items are placed correctly. Placing Items (When Scanning from a Computer) Check 2: Check if you can properly scan one item. Some applications do not support multiple image scanning. In that case, scan each item individually.
-
Page 37: Cannot Scan Properly With Auto Scan
Cannot Scan Properly with Auto Scan Check 1: Make sure that the items are placed correctly. Placing Items (When Scanning from a Computer) Check 2: Multiple items scanning may not be supported. Some applications do not support multiple image scanning. In that case, scan each item individually.
-
Page 38: Slow Scanning Speed
Slow Scanning Speed Check 1: To view the image on a monitor, set the output resolution to around 150 dpi. To print, set it to around 300 dpi. Resolution Check 2: Set Fading Correction, Grain Correction, etc. to None. Refer to «Image Settings» for your model from Home of the Online Manual for details. Check 3: In IJ Scan Utility, deselect the Correct slanted text document / Detect the orientation of text document and rotate image checkbox and scan again.
-
Page 39: There Is Not Enough Memory.» Message Is Displayed
«There is not enough memory.» Message Is Displayed Check 1: Exit other applications and try again. Check 2: Reduce the resolution or output size and scan again. Resolution…
-
Page 40: Computer Stops Operating During Scanning
Computer Stops Operating during Scanning Check 1: Restart the computer, reduce the output resolution in ScanGear (scanner driver) and scan again. Refer to «Output Settings» for your model from Home of the Online Manual for details. Check 2: Delete unnecessary files to obtain sufficient free hard disk space, then scan again.
-
Page 41: Scanner Does Not Work After Upgrading Windows
• Step 2: Uninstall IJ Scan Utility. • Windows 8: Click the Settings charm > Control Panel > Programs > Uninstall a program. Double-click Canon IJ Scan Utility. When a confirmation appears, click Yes. When uninstallation is complete, click OK. IJ Scan Utility is deleted.
-
Page 42
• Windows XP: From the Start menu, select Control Panel > Add or Remove Programs. Select Canon IJ Scan Utility, then click Change/Remove. When a confirmation appears, click Yes. When uninstallation is complete, click OK. IJ Scan Utility is deleted. -
Page 43: Scanned Image Does Not Open
Scanned Image Does Not Open Check: If the data format is not supported by the application, scan the image again and select a popular data format such as JPEG when saving it. Refer to the application’s manual for details. If you have any questions, contact the manufacturer of the application.
-
Page 44: Scan Results Not Satisfactory
Scan Results Not Satisfactory Scan Quality (Image Displayed on the Monitor) Is Poor Scanned Image Is Surrounded by Extra White Areas Cannot Scan at the Correct Size Item Is Placed Correctly, but the Scanned Image Is Slanted Scanned Image Is Enlarged (Reduced) on the Computer Monitor…
-
Page 45: Scan Quality (Image Displayed On The Monitor) Is Poor
Scan Quality (Image Displayed on the Monitor) Is Poor Check 1: Increase the scanning resolution if the image is jagged. Resolution Check 2: Set the display size to 100 %. Some applications do not display images clearly if the display size is too small. Check 3: If moire (stripe pattern) appears, take the following measures and scan again.
-
Page 46
Correction, etc. in Image Settings on the Advanced Mode tab of ScanGear. Refer to «Image Settings» for your model from Home of the Online Manual for details. Check 7: If the color tone of images is different from the original document, take the following measures and scan again. -
Page 47: Scanned Image Is Surrounded By Extra White Areas
Scanned Image Is Surrounded by Extra White Areas Check: Specify the scan area. Click (Auto Crop) in whole image view of ScanGear (scanner driver) to automatically display the cropping frame (scan area) according to the item size. You can also manually specify the scan area in thumbnail view or when there are white margins along the item (for example, in photos), or when you want to create custom cropping frames.
-
Page 48: Cannot Scan At The Correct Size
Cannot Scan at the Correct Size Check: Make sure that the items are placed correctly. Placing Items (When Scanning from a Computer)
-
Page 49: Item Is Placed Correctly, But The Scanned Image Is Slanted
Item Is Placed Correctly, but the Scanned Image Is Slanted Check: When Document or Magazine is selected for the item type, deselect the Correct slanted text document checkbox and scan the item again. Settings (Document Scan) Dialog Box Settings (Custom Scan) Dialog Box…
-
Page 50: Scanned Image Is Enlarged (Reduced) On The Computer Monitor
Scanned Image Is Enlarged (Reduced) on the Computer Monitor Check 1: Change the display setting in the application. Refer to the application’s manual for details. If you have any questions, contact the manufacturer of the application. Note You cannot reduce the image size in Paint. To reduce the display size, open the images in an application.
-
Page 51: Software Problems
Software Problems The E-mail Client You Want to Use Does Not Appear in the Screen for Selecting an E- mail Client…
-
Page 52: The E-Mail Client You Want To Use Does Not Appear In The Screen For Selecting An E-Mail Client
The E-mail Client You Want to Use Does Not Appear in the Screen for Selecting an E-mail Client Check: Check that the e-mail client’s MAPI is enabled. Refer to the e-mail client’s manual for how to set MAPI. If the problem is not solved even when MAPI is enabled, select None (Attach Manually) in the screen for selecting an e-mail client, then manually attach the image to the outgoing e- mail.
-
Page 53: Problems With The Machine
Problems with the Machine The Machine Cannot Be Powered On The Machine Turns Off Unintendedly Cannot Connect to Computer Properly FINE Cartridge Holder Does Not Move to the Position for Replacing Printer Status Monitor Is Not Displayed…
-
Page 54: The Machine Cannot Be Powered On
The Machine Cannot Be Powered On Press the ON button. Check1 Make sure that the power plug is securely plugged into the power cord Check2 connector of the machine, then turn it back on. Unplug the machine from the power supply, then plug the machine back in and Check3 turn the machine back on after leaving it for at least 2 minutes.
-
Page 55: The Machine Turns Off Unintendedly
The Machine Turns Off Unintendedly Deactivate the setting to turn the unit off automatically. Check The machine turns off automatically according to the elapsed time you specified if you activate the setting to turn the unit off automatically. If you do not want the machine to turn off automatically, open the printer driver setup window and in Auto Power under the Maintenance sheet, select Disable for Auto Power Off.
-
Page 56: Cannot Connect To Computer Properly
Cannot Connect to Computer Properly Printing or Scanning Speed Is Slow/Hi-Speed USB Connection Does Not Work/»This device can perform faster» Message Is Displayed If your system environment is not fully compatible with Hi-Speed USB, the machine will operate at a lower speed provided under USB 1.1.
-
Page 57: Fine Cartridge Holder Does Not Move To The Position For Replacing
FINE Cartridge Holder Does Not Move to the Position for Replacing Is the ON lamp off? Check1 Check if the ON lamp is lit. The FINE cartridge holder will not move unless the power is on. If the ON lamp is off, close the cover and turn the machine on.
-
Page 58: Printer Status Monitor Is Not Displayed
Printer Status Monitor Is Not Displayed Is the printer status monitor enabled? Check1 Make sure that Enable Status Monitor is selected on the Option menu of the printer status monitor. 1. Open the printer driver setup window. How to Open the Printer Driver Setup Window 2.
-
Page 59: Problems With Installation/Downloading
Problems with Installation/Downloading Cannot Install the MP Drivers Easy-WebPrint EX Does Not Start Up or Easy-WebPrint EX Menu Does Not Appear…
-
Page 60: Cannot Install The Mp Drivers
Cannot Install the MP Drivers • If the installation does not start even after the Setup CD-ROM is inserted into your computer’s disc drive: Start the installation following the procedure below. 1. Select items as shown below. ◦ In Windows 8, select the Explorer icon in Taskbar on Desktop, then select Computer from the list on the left.
-
Page 61
Note • The printer is not detected. Check the connection. may be displayed depending on the computer you use. Make sure that the USB cable is securely plugged in to the machine and the Check1 computer. Follow the procedure below to connect the machine and the computer Check2 again. -
Page 62: Easy-Webprint Ex Does Not Start Up Or Easy-Webprint Ex Menu Does Not Appear
Is Canon Easy-WebPrint EX displayed on the Toolbars menu in the Internet Check1 Explorer’s View menu? If Canon Easy-WebPrint EX is not displayed, Easy-WebPrint EX is not installed on your computer. Install the latest Easy-WebPrint EX onto your computer from our website. Note •…
-
Page 63: About Errors/Messages Displayed
About Errors/Messages Displayed If an Error Occurs A Message Is Displayed…
-
Page 64: If An Error Occurs
If an Error Occurs When an error occurs in printing such as the machine is out of paper or paper is jammed, a troubleshooting message is displayed automatically. Take the appropriate action described in the message. When an error occurs, the Alarm lamp flashes orange and a Support Code (error number) is displayed on the computer screen.
-
Page 65
Support Code Corresponding to the Number of Alternate Flashes of the ON Lamp and the Alarm Lamp Example of 2 times flashing: (A) Flashes (B) Goes off Number of flashes Cause Support Code 2 flashes Printer error has occurred. 5100 7 flashes Printer error has occurred. -
Page 66
For details on how to resolve errors without Support Codes, see A Message Is Displayed. -
Page 67: A Message Is Displayed
Properties. 4. Click the Ports tab to confirm the port settings. Make sure that a port named «USBnnn» (where «n» is a number) with «Canon XXX Printer» appearing in the Printer column is selected for Print to the following port(s).
-
Page 68
Set the correct printer port on Diagnose and Repair Printer. Follow the on-screen instructions to set the correct printer port, then select your machine’s name. In Windows 7, Windows Vista, or Windows XP, click Start and select All programs, Canon Utilities, Canon My Printer, Canon My Printer, then select Diagnose and Repair Printer. Follow the on-screen instructions to set the correct printer port, then select your machine’s name. -
Page 69
Other Error Messages If an error message is displayed outside the printer status monitor, check the Check following: • «Could not spool successfully due to insufficient disk space» Delete any unnecessary files to increase the amount of free space on the disk. •… -
Page 70
This dialog box appears when administrative rights are required to perform a task. If you are logged on to an administrator account, follow the on-screen instructions. 2. Select Canon Inkjet Printer/Scanner/Fax Extended Survey Program. 3. Select Change. If you select Yes after you have followed the on-screen instructions, the confirmation screen will be displayed at the time of the next survey. -
Page 71: If You Cannot Resolve The Problem
If you cannot resolve the problem with any of the workarounds in this chapter, please contact the seller of the machine or the service center. Canon support staff are trained to be able to provide technical support to satisfy customers. Caution •…
-
Page 72: Support Code List
Support Code List The support code appears on the computer screen when an error occurs. «Support Code» means the error number and appears with an error message. When an error occurs, check the support code displayed on the computer screen and take the appropriate action.
-
Page 73: Support Code List (When Paper Is Jammed)
Support Code List (When Paper Is Jammed) If the paper is jammed, remove it following the procedure appropriate for each case. Watch the movie (Windows) Watch the movie (Mac) • If you can see the jammed paper at the paper output slot or the rear tray: 1300 •…
-
Page 74
1300 Cause Paper is jammed in the paper output slot or in the rear tray. Action Remove the jammed paper following the procedure below. Watch the movie (Windows) Watch the movie (Mac) Note • If you need to turn off the machine to remove jammed paper during printing, press the Stop button to cancel print jobs before turning off the machine. -
Page 75
If you cannot remove the paper or the paper tears inside the machine, or if the paper jam error continues after removing the paper, contact the service center. -
Page 76: Paper Is Jammed Inside The Machine
Paper Is Jammed inside the Machine If the jammed paper tears and you cannot remove the paper either from the paper output slot or from the rear tray, or if the jammed paper remains inside the machine, remove the paper following the procedure below.
-
Page 77
4. Hold the jammed paper with your hands. If the paper is rolled up, pull it out. 5. Pull the paper slowly not to tear it, then pull the paper out. 6. Make sure that all the jammed paper is removed. If the paper is torn, a piece of paper may remain inside the machine. -
Page 78
7. Close the cover. All print jobs in the queue are canceled. Reprint if necessary. Note • When reloading the paper, confirm that you are using the paper suited for printing and are loading it correctly. If the message about paper jam is displayed on the computer screen when you resume printing after removing all the jammed paper, a piece of paper may remain inside the machine. -
Page 79: In Other Cases
In Other Cases Make sure of the following: Are there any foreign objects around the paper output slot? Check1 Are there any foreign objects in the rear tray? Check2 If there are any foreign objects in the rear tray, be sure to turn off the machine, unplug it from the power supply, then remove the foreign object.
-
Page 80
1000 Cause There is no paper in the rear tray. Action Reload the paper on the rear tray and press the machine’s Black or Color button. -
Page 81
1200 Cause The cover is open. Action Close the cover and wait for a while. Do not close it while you are replacing a FINE cartridge. -
Page 82
1203 Cause The cover is opened while printing is in progress. Action If paper is left inside the machine, remove the paper slowly with both hands and close the cover. Press the machine’s Black or Color button to dismiss the error. The machine ejects the blank paper and resumes printing from the next paper. -
Page 83
1401 Cause The FINE cartridge is not installed. Action Install the FINE cartridge. If the error is not resolved, the FINE cartridge may be damaged. Contact the service center. -
Page 84
1403 Cause Appropriate FINE cartridge is not installed. Action Install the appropriate FINE cartridge. If the error is not resolved, the FINE cartridge may be damaged. Contact the service center. -
Page 85
1485 Cause Appropriate ink cartridge is not installed. Action Printing cannot be executed because the ink cartridge is not compatible with this machine. Install the appropriate ink cartridge. If you want to cancel printing, press the machine’s Stop button. -
Page 86
1682 Cause The FINE cartridge cannot be recognized. Action Replace the FINE cartridge. If the error is not resolved, the FINE cartridge may be damaged. Contact the service center. -
Page 87
1684 Cause The ink cartridge cannot be recognized. Action Printing cannot be executed because the ink cartridge may not be installed properly or may not be compatible with this machine. Install the appropriate ink cartridge. If you want to cancel printing, press the machine’s Stop button. -
Page 88
If you want to continue printing without this function, press the machine’s Stop button for at least 5 seconds. Canon recommends to use new genuine Canon cartridges in order to obtain optimum qualities. Please be advised that Canon shall not be liable for any malfunction or trouble caused by continuation of printing under the ink out condition. -
Page 89
1687 Cause The FINE cartridge is not installed properly. Action Retract the output tray extension and the paper output tray, open the cover, then remove the FINE cartridges. Then install the FINE cartridges again. Push the FINE cartridge until it clicks into place. After installing, close the cover. -
Page 90
1688 Cause The ink has run out. Action Replace the ink cartridge and close the cover. If printing is in progress and you want to continue printing, press the machine’s Stop button for at least 5 seconds with the ink cartridge installed. Then printing can continue under the ink out condition. The function for detecting the remaining ink level will be disabled. -
Page 91
1700 Cause The ink absorber is almost full. Action Press the machine’s Black or Color button to continue printing. Contact the service center. -
Page 92
1701 Cause The ink absorber is almost full. Action Press the machine’s Black or Color button to continue printing. Contact the service center. -
Page 93
1890 Cause The protective material for the FINE Cartridge holder or the tape may remain attached to the holder. Action Make sure that the protective material or the tape does not remain attached to the FINE cartridge holder. If you find the protective material or the tape remains attached, retract the output tray extension and the paper output tray to remove the protective material or the tape. -
Page 94
2900 Cause Scanning the print head alignment sheet has failed. Action Press the machine’s Black or Color button to dismiss the error. Check the following points, perform Automatic Print Head Alignment again. • Make sure that the print head alignment sheet is set in the correct position and orientation on the platen glass. -
Page 95
2901 Cause Printing of the print head alignment pattern is complete and the machine is in waiting for scanning the sheet. Action Proceed to scan the printed alignment pattern. 1. Load the print head alignment sheet on the platen glass. Load the print head alignment sheet with the printed side facing down and align the mark on the upper left corner of the sheet with the alignment mark… -
Page 96
4100 Cause The specified data cannot be printed. Action When you print the contents on CREATIVE PARK PREMIUM, confirm the message on the computer screen, make sure that genuine Canon FINE cartridges are all installed properly, then start printing again. -
Page 97
4102 Cause The media type and paper size are not set correctly. Action Press the machine’s Stop button, to cancel printing, change the media type or paper size setting, then print again. • When the media type is set to Photo Paper Plus Glossy II: Set the paper size to 4″x6″… -
Page 98
5011 Cause Printer error has occurred. Action Turn off the machine, and unplug the power cord of the machine from the power supply. Plug the machine back in and turn the machine back on. If the problem is not resolved, contact the service center. -
Page 99
5012 Cause Printer error has occurred. Action Turn off the machine, and unplug the power cord of the machine from the power supply. Plug the machine back in and turn the machine back on. If the problem is not resolved, contact the service center. -
Page 100
5100 Cause Printer error has occurred. Action Cancel printing, turn off the machine. Then clear the jammed paper or protective material that is preventing the FINE cartridge holder from moving, and turn on the machine again. If the problem is not resolved, contact the service center. Important •… -
Page 101
5200 Cause Printer error has occurred. Action Turn off the machine, and unplug the power cord of the machine from the power supply. Plug the machine back in and turn the machine back on. If the problem is not resolved, contact the service center. -
Page 102
5400 Cause Printer error has occurred. Action Turn off the machine, and unplug the power cord of the machine from the power supply. Plug the machine back in and turn the machine back on. If the problem is not resolved, contact the service center. -
Page 103
5B00 Cause Printer error has occurred. Action Contact the service center. -
Page 104
5B01 Cause Printer error has occurred. Action Contact the service center. -
Page 105
6000 Cause Printer error has occurred. Action Turn off the machine, and unplug the power cord of the machine from the power supply. Plug the machine back in and turn the machine back on. If the problem is not resolved, contact the service center. -
Page 106
6800 Cause Printer error has occurred. Action Turn off the machine, and unplug the power cord of the machine from the power supply. Plug the machine back in and turn the machine back on. If the problem is not resolved, contact the service center. -
Page 107
6801 Cause Printer error has occurred. Action Turn off the machine, and unplug the power cord of the machine from the power supply. Plug the machine back in and turn the machine back on. If the problem is not resolved, contact the service center. -
Page 108
6930 Cause Printer error has occurred. Action Turn off the machine, and unplug the power cord of the machine from the power supply. Plug the machine back in and turn the machine back on. If the problem is not resolved, contact the service center. -
Page 109
6931 Cause Printer error has occurred. Action Turn off the machine, and unplug the power cord of the machine from the power supply. Plug the machine back in and turn the machine back on. If the problem is not resolved, contact the service center. -
Page 110
6932 Cause Printer error has occurred. Action Turn off the machine, and unplug the power cord of the machine from the power supply. Plug the machine back in and turn the machine back on. If the problem is not resolved, contact the service center. -
Page 111
6933 Cause Printer error has occurred. Action Turn off the machine, and unplug the power cord of the machine from the power supply. Plug the machine back in and turn the machine back on. If the problem is not resolved, contact the service center. -
Page 112
6936 Cause Printer error has occurred. Action Turn off the machine, and unplug the power cord of the machine from the power supply. Plug the machine back in and turn the machine back on. If the problem is not resolved, contact the service center. -
Page 113
6937 Cause Printer error has occurred. Action Turn off the machine, and unplug the power cord of the machine from the power supply. Plug the machine back in and turn the machine back on. If the problem is not resolved, contact the service center. -
Page 114
6938 Cause Printer error has occurred. Action Turn off the machine, and unplug the power cord of the machine from the power supply. Plug the machine back in and turn the machine back on. If the problem is not resolved, contact the service center. -
Page 115
6940 Cause Printer error has occurred. Action Turn off the machine, and unplug the power cord of the machine from the power supply. Plug the machine back in and turn the machine back on. If the problem is not resolved, contact the service center. -
Page 116
6941 Cause Printer error has occurred. Action Turn off the machine, and unplug the power cord of the machine from the power supply. Plug the machine back in and turn the machine back on. If the problem is not resolved, contact the service center. -
Page 117
6942 Cause Printer error has occurred. Action Turn off the machine, and unplug the power cord of the machine from the power supply. Plug the machine back in and turn the machine back on. If the problem is not resolved, contact the service center. -
Page 118
6943 Cause Printer error has occurred. Action Turn off the machine, and unplug the power cord of the machine from the power supply. Plug the machine back in and turn the machine back on. If the problem is not resolved, contact the service center. -
Page 119
6944 Cause Printer error has occurred. Action Turn off the machine, and unplug the power cord of the machine from the power supply. Plug the machine back in and turn the machine back on. If the problem is not resolved, contact the service center. -
Page 120
6945 Cause Printer error has occurred. Action Turn off the machine, and unplug the power cord of the machine from the power supply. Plug the machine back in and turn the machine back on. If the problem is not resolved, contact the service center. -
Page 121
6946 Cause Printer error has occurred. Action Turn off the machine, and unplug the power cord of the machine from the power supply. Plug the machine back in and turn the machine back on. If the problem is not resolved, contact the service center. -
Page 122
B200 Cause An error requiring you to contact the service center has occurred. Action Turn off the machine, and unplug the power cord of the machine from the power supply. Contact the service center. -
Page 123
B201 Cause An error requiring you to contact the service center has occurred. Action Turn off the machine, and unplug the power cord of the machine from the power supply. Contact the service center.
Specifications:1224/1224327-pixma_mg2400_series.pdf file (18 Apr 2023) |
Accompanying Data:
Canon Pixma MG2400 Series All in One Printer, Color printers PDF Manual (Updated: Tuesday 18th of April 2023 09:59:06 AM)
Rating: 4.7 (rated by 82 users)
Compatible devices: imageCLASS MF4450, E4500 Series, TS8100 Series, PIXMA MX360, PIXMA MP960, imageRUNNER C3170 series, imageFormula DR-7090C, 4235i.
Recommended Documentation:
Manual (Text Version):
(Ocr-Read Summary of Contents of some pages of the Canon Pixma MG2400 Series Document (Main Content), UPD: 18 April 2023)
-
1, Canon Pixma MG2400 Series 3 2 1 XXXXXXXX © CANON INC. 2013 1 2 4 1 2 3 4 1 2 1 2 3 4 1 2 3 1 2 QT5-6397-V02 PRINTED IN XXXXXXXX
…
-
Canon Pixma MG2400 Series User Manual
-
Canon Pixma MG2400 Series User Guide
-
Canon Pixma MG2400 Series PDF Manual
-
Canon Pixma MG2400 Series Owner’s Manuals
Recommended: CL2909, Aficio SP 4310N, LT18542, UCC
Operating Impressions, Questions and Answers:
-
Page 1: Online Manual
MG2400 series Online Manual Read Me First Useful Functions Available on the Machine Overview of the Machine English…
-
Page 2: Table Of Contents
Contents Read Me First……….. . 5 How to Use the Online Manual.
-
Page 3
Envelopes…………..51 Loading Originals. -
Page 4
Changing the Machine Operation Mode……….110 Changing the Machine Settings Using the Operation Panel. -
Page 5: Read Me First
In addition, Canon may suspend or stop the disclosure of this guide due to unavoidable reasons. Canon shall not be liable for any damage suffered by customers as a result of changes in or deletion of information in this guide, or suspension/stoppage of disclosure of this guide.
-
Page 6: How To Use The Online Manual
How to Use the Online Manual Symbols Used in This Document Warning Instructions that, if ignored, could result in death or serious personal injury caused by incorrect operation of the equipment. These must be observed for safe operation. Caution Instructions that, if ignored, could result in personal injury or material damage caused by incorrect operation of the equipment.
-
Page 7: Trademarks And Licenses
• Photo Rag is a trademark of Hahnemühle FineArt GmbH. • Bluetooth is a trademark of Bluetooth SIG, Inc., U.S.A. and licensed to Canon Inc. • All other company names and products mentioned herein may be trademarks or registered trademarks of their respective companies.
-
Page 8: Search Tips
Enter keywords in the search window and click (Search). You can search for target pages in this guide. Entry example: «(your product’s model name) load paper», «(your product’s model name) 1000» Search Tips You can search for target pages by entering keywords in the search window. Note •…
-
Page 9
Note • The displayed screen varies depending on your product. • Searching for Application Functions You can find target pages easily by entering your application’s name and a keyword for the function you want to learn about. Example: When you want to learn how to print collages with My Image Garden Enter «My Image Garden collage»… -
Page 10: Window Used In Operation Explanation
Window Used in Operation Explanation In this guide, most of the operations are described based on the windows displayed when Windows 8 operating system (called Windows 8 below) is used.
-
Page 11: Useful Functions Available On The Machine
Useful Functions Available on the Machine The following useful functions are available on the machine. Enjoy pleasant photography experience by utilizing various functions. Useful Functions Available from Applications and the Main Unit You can create items such as collages easily or download delightful printing materials, and print them.
-
Page 12: Useful Functions Available From Applications And The Main Unit
Useful Functions Available from Applications and the Main Unit On the machine, the following useful functions are available from applications and the main unit. • Print Photos Easily • Download Content Materials • Print Photos on Facebook Print Photos Easily Using an Application Organize Images Easily In My Image Garden, you can register the names of people and events to photos.
-
Page 13
If there is an item you like, you can easily print it in just two steps. 1. In Image Display of Quick Menu, select the item you want to print. 2. Print the item with My Image Garden. Place Photos Automatically Delightful items are created easily as the selected photos are placed automatically according to the theme. -
Page 14
PREMIUM Contents can be downloaded easily via My Image Garden. Downloaded PREMIUM Contents can be printed directly with My Image Garden. To download PREMIUM Contents, make sure that genuine Canon ink tanks/ink cartridges are installed for all colors on a supported printer. -
Page 15: Overview Of The Machine
Overview of the Machine Safety Guide Safety Precautions Regulatory and Safety Information Main Components and Basic Operations Main Components About the Power Supply of the Machine Loading Paper / Originals Loading Paper Loading Originals Replacing a FINE Cartridge Replacing a FINE Cartridge Checking the Ink Status Maintenance When Printing Becomes Faint or Colors Are Incorrect…
-
Page 16: Safety Guide
Safety Guide Safety Precautions Regulatory and Safety Information…
-
Page 17: Safety Precautions
Safety Precautions Choosing a location Do not install the machine in a location that is unstable or subject to excessive vibration. Do not install the machine in locations that are very humid or dusty, in direct sunlight, outdoors, or close to a heating source.
-
Page 18: Regulatory And Safety Information
Regulatory and Safety Information ® International ENERGY STAR Program As an ENERGY STAR Partner, Canon Inc. has determined that this product meets the ENERGY STAR guidelines for efficiency. About the disposal of the battery (For models containing lithium battery) Dispose of used batteries according to the local regulations.
-
Page 19
WEEE scheme or your household waste disposal service. For more information regarding return and recycling of WEEE products, please visit www.canon-europe.com/environment. (EEA: Norway, Iceland and Liechtenstein) India only. -
Page 20: Environmental Information
Save Mode, please consider that this device may then only switch to a lower energy level after a longer period of time or not at all. Canon does not recommend extending the Activation Times from the optimum ones set as default.
-
Page 21: Main Components And Basic Operations
Main Components and Basic Operations Main Components About the Power Supply of the Machine…
-
Page 22: Main Components
Main Components Front View Rear View Inside View Operation Panel…
-
Page 23: Front View
Front View document cover Open to load an original on the platen glass. paper support Open to load paper in the rear tray. paper guide Slide to align with the left side of the paper stack. rear tray Load various sizes or types of paper which you can use on the machine. Two or more sheets of the same size and type of paper can be loaded at the same time, and fed automatically one sheet at a time.
-
Page 24
operation panel Use to change the settings of the machine or to operate it. Operation Panel platen glass Load an original to copy or scan. -
Page 25: Rear View
Rear View power cord connector Plug in the supplied power cord. USB port Plug in the USB cable to connect the machine with a computer. Important Do not touch the metal casing. Do not plug in or unplug the USB cable while the machine is printing or scanning originals with the computer.
-
Page 26: Inside View
Inside View FINE cartridge (ink cartridges) A replaceable cartridge that integrates print head and ink tank. FINE cartridge holder Install the FINE cartridge. The color FINE cartridge should be installed into the left slot and the black FINE cartridge should be installed into the right slot. Note For details on replacing a FINE cartridge, see Replacing a FINE…
-
Page 27: Operation Panel
Operation Panel * All lamps on the operation panel are shown lit in the illustration below for explanatory purposes. ON button Turns the power on or off. Before turning on the power, make sure that the document cover is closed. Turning the Machine On and Off ON lamp Lights green after flashing when the power is turned on.
-
Page 28
Lights or flashes orange when an error occurs, such as paper-out or ink-out. When performing machine maintenance or machine settings, options can be selected according to the number of flashes. ink lamps Light or flash orange when ink runs out, etc. The upper lamp indicates the black FINE cartridge status, the lower lamp the color FINE cartridge status. -
Page 29: About The Power Supply Of The Machine
About the Power Supply of the Machine Confirming that the Power Is On Turning the Machine On and Off Notice for the Power Plug/Power Cord Notice for Unplugging the Power Cord…
-
Page 30: Confirming That The Power Is On
Confirming that the Power Is On The ON lamp is lit green when the machine is turned on. Note It may take a while for the machine to start printing immediately after you turn on the machine.
-
Page 31: Turning The Machine On And Off
Turning the Machine On and Off Turning on the machine Press the ON button to turn on the machine. The ON lamp flashes and then remains lit green. Confirming that the Power Is On Note It may take a while for the machine to start printing immediately after you turn on the machine.
-
Page 32
Important When you unplug the power cord after turning off the machine, be sure to confirm that the ON lamp is off. Notice for Unplugging the Power Cord Note Auto power off feature You can set the machine to automatically turn off when no operations are performed or no print jobs are sent to the machine for a certain interval. -
Page 33: Notice For The Power Plug/Power Cord
Notice for the Power Plug/Power Cord Unplug the power cord once a month to confirm that the power plug/power cord does not have anything unusual described below. The power plug/power cord is hot. The power plug/power cord is rusty. The power plug/power cord is bent. The power plug/power cord is worn.
-
Page 34: Notice For Unplugging The Power Cord
Notice for Unplugging the Power Cord To unplug the power cord, follow the procedure below. Important When you unplug the power cord, press the ON button, then confirm that the ON lamp is off. Unplugging the power cord while the ON lamp is lit or flashing may cause drying or clogging of the print head and print quality may be reduced.
-
Page 35: Loading Paper / Originals
Loading Paper / Originals Loading Paper Loading Originals…
-
Page 36: Loading Paper
Loading Paper Loading Plain Paper / Photo Paper Loading Envelopes Media Types You Can Use Media Types You Cannot Use Printing Area…
-
Page 37: Loading Plain Paper / Photo Paper
If you cut plain paper into small size such as 4″ x 6″ (10 x 15 cm) or 5″ x 7″ (13 x 18 cm) to perform trial print, it can cause paper jams. Note We recommend Canon genuine photo paper for printing photos. For details on the Canon genuine paper, see Media Types You Can Use.
-
Page 38
Slide the paper guide to the left, and load the paper against the far right of the rear tray WITH THE PRINT SIDE FACING YOU. Slide the paper guide to align it with the paper stack. Do not slide the paper guide too hard against the paper. The paper may not be fed properly. -
Page 39
Note Do not load sheets of paper higher than the load limit mark (D). Note The machine may make operating noise when feeding paper. After loading paper Select the size and type of the loaded paper on the print settings screen of the printer driver. -
Page 40: Loading Envelopes
Loading Envelopes You can load Envelope DL and Envelope Com 10. The address is automatically rotated and printed according to the envelope’s direction by specifying with the printer driver properly. Important Printing of envelopes from the operation panel is not supported. Do not use the following envelopes.
-
Page 41
Open the paper support. Pull out the paper output tray and the output tray extension. Slide the paper guide to the left, and load the envelopes against the far right of the rear tray WITH THE PRINT SIDE FACING YOU. The folded flap of the envelope will be faced up on the left side. -
Page 42
Note Do not load sheets of paper higher than the load limit mark. Note The machine may make operating noise when feeding paper. After loading envelopes Select the size and type of the loaded envelopes on the print settings screen of the printer driver. -
Page 43: Media Types You Can Use
Envelopes Canon genuine papers The Model Number of Canon genuine paper is shown in brackets. Refer to the instruction manual supplied with the paper for detailed information on the printable side and notes on handling paper. For information on the page sizes available for each Canon genuine paper, access our website.
-
Page 44: Paper Weight
You can use paper in the following weight range. 17 to 28 lb (64 to 105 g /m ) (except for Canon genuine paper) Do not use heavier or lighter paper (except for Canon genuine paper), as it could jam in the machine. Notes on Storing Paper Take out only the necessary number of paper from the package, just before printing.
-
Page 45: Paper Load Limit
Plain Paper (including recycled paper) Approx. 60 sheets Approx. 10 sheets Envelopes 5 envelopes Canon Genuine Papers Note We recommend that you remove the previously printed sheet from the paper output tray before continuously printing to avoid blurs and discoloration. Paper for printing photos: Media Name <Model No.>…
-
Page 46: Media Types You Cannot Use
Paper that is too thin (weighing less than 17 lb (64 g /m Paper that is too thick (weighing more than 28 lb (105 g /m ), except for Canon genuine paper) Paper thinner than a postcard, including plain paper or notepad paper cut to a small…
-
Page 47: Printing Area
Printing Area Printing Area Other Sizes than Letter, Legal, Envelopes Letter, Legal Envelopes…
-
Page 48: Printing Area
To ensure the best print quality, the machine allows a margin along each edge of media. The actual printable area will be the area inside these margins. Recommended printing area : Canon recommends that you print within this area. Printable area : The area where it is possible to print.
-
Page 49: Other Sizes Than Letter, Legal, Envelopes
Other Sizes than Letter, Legal, Envelopes Size Printable Area (width x height) 5.56 x 7.49 inches (141.2 x 190.3 mm) 8.00 x 10.92 inches (203.2 x 277.3 mm) 6.90 x 9.34 inches (175.2 x 237.3 mm) 4″ x 6″ (10 x 15 cm) 3.73 x 5.22 inches (94.8 x 132.7 mm) 5″…
-
Page 50: Letter, Legal
Letter, Legal Size Printable Area (width x height) Letter 8.00 x 10.22 inches (203.2 x 259.7 mm) Legal 8.00 x 13.22 inches (203.2 x 335.9 mm) Recommended printing area 1.24 inches (31.6 mm) 1.15 inches (29.2 mm) Printable area 0.12 inches (3.0 mm) 0.66 inches (16.7 mm) 0.25 inches (6.4 mm) 0.25 inches (6.3 mm)
-
Page 51: Envelopes
Envelopes Size Recommended Printing Area (width x height) Envelope DL 3.88 x 7.06 inches (98.8 x 179.5 mm) Envelope Com 10 3.68 x 7.90 inches (93.5 x 200.8 mm) Recommended printing area 0.31 inches (8.0 mm) 1.28 inches (32.5 mm) 0.22 inches (5.6 mm) 0.22 inches (5.6 mm)
-
Page 52: Loading Originals
Loading Originals Loading Originals on the Platen Glass Originals You Can Load…
-
Page 53: Loading Originals On The Platen Glass
Loading Originals on the Platen Glass You can load originals to copy or scan on the platen glass. Load an original on the platen glass. Open the document cover. Important Do not place any object on the document cover. It will fall into the rear tray when the document cover is opened and cause the machine to malfunction.
-
Page 54
Close the document cover gently. Important After loading the original on the platen glass, be sure to close the document cover before starting to copy or scan. -
Page 55: Originals You Can Load
Originals You Can Load The originals you can load on the platen glass are as follows. Item Details — Text document, magazine, or newspaper Types of originals — Printed photo, postcard, business card, or disc (BD/DVD/CD, etc.) Size (width x height) Max.
-
Page 56: Replacing A Fine Cartridge
Replacing a FINE Cartridge Replacing a FINE Cartridge Checking the Ink Status…
-
Page 57: Replacing A Fine Cartridge
Replacing a FINE Cartridge When remaining ink cautions or errors occur, the ink lamps and the Alarm lamp will flash orange to inform you of the error. Count the number of flashes and take appropriate action. If an Error Occurs Note For information on the compatible FINE cartridge, refer to the printed manual: Safety and Important Information.
-
Page 58
Even when printing with one ink only, print with leaving the empty FINE cartridge installed. If either of the color FINE cartridge or black FINE cartridge is not installed, an error occurs and the machine cannot print. For information on how to configure this setting, see Setting the Ink Cartridge to be Used. -
Page 59
Push down the FINE cartridge until it clicks. Remove the FINE cartridge. Important Handle the FINE cartridge carefully to avoid staining of clothing or the surrounding area. Discard the empty FINE cartridge according to the local laws and regulations regarding disposal of consumables. Prepare a new FINE cartridge. -
Page 60
Important If you shake a FINE cartridge, ink may spill out and stain your hands and the surrounding area. Handle a FINE cartridge carefully. Be careful not to stain your hands and the surrounding area with ink on the removed protective tape. -
Page 61
Important Insert the FINE cartridge gently so that it does not hit the electrical contacts on the FINE cartridge holder. Push the FINE cartridge in and up firmly until it snaps into place. -
Page 62
Important Check if the FINE cartridge is installed correctly. The machine cannot print unless both the color FINE cartridge and black FINE cartridge are installed. Be sure to install both cartridges. Close the cover. Note If the Alarm lamp lights or flashes orange after the cover is closed, take appropriate action. -
Page 63: Checking The Ink Status
Checking the Ink Status Checking the Ink Status with the Ink Lamps on the Operation Panel You can also check the ink status on the computer screen. Checking the Ink Status from Your Computer…
-
Page 64: Checking The Ink Status With The Ink Lamps On The Operation Panel
Checking the Ink Status with the Ink Lamps on the Operation Panel Note The ink level detector is mounted on the machine to detect the remaining ink level. The machine considers as ink is full when a new FINE cartridge is installed, and then starts to detect a remaining ink level.
-
Page 65
Checking the Ink Status from Your Computer… -
Page 66: Maintenance
Maintenance When Printing Becomes Faint or Colors Are Incorrect Performing Maintenance from a Computer Cleaning the Machine…
-
Page 67: When Printing Becomes Faint Or Colors Are Incorrect
When Printing Becomes Faint or Colors Are Incorrect Maintenance Procedure Printing the Nozzle Check Pattern Examining the Nozzle Check Pattern Cleaning the Print Head Cleaning the Print Head Deeply Aligning the Print Head…
-
Page 68: Maintenance Procedure
Maintenance Procedure If print results are blurred or colors are not printed correctly, the print head nozzle (FINE cartridge) is probably clogged. Follow the procedure below to print the nozzle check pattern, check the print head nozzle condition, then clean the print head. If printed ruled lines are misaligned or print results are otherwise unsatisfactory, aligning the print head may improve print quality.
-
Page 69: Clean The Print Head
When the Print Results Are Blurred or Uneven: Step 1 Print the nozzle check pattern. From the machine Printing the Nozzle Check Pattern From the computer Use Your Computer to Print a Nozzle Check Pattern Examine the nozzle check pattern. After cleaning the print head, Examining the Nozzle Check Pattern print and examine the nozzle…
-
Page 70
Step 4 Replace a FINE cartridge. Replacing a FINE Cartridge Note If the problem is still not resolved after replacing the FINE cartridge, contact the service center. When the Print Results Are Not Even such as the Ruled Lines Are Misaligned: Align the print head. -
Page 71: Printing The Nozzle Check Pattern
Printing the Nozzle Check Pattern Print the nozzle check pattern to determine whether the ink ejects properly from the print head nozzle. Watch the movie Note If the remaining ink level is low, the nozzle check pattern will not be printed correctly. Replace the FINE cartridge whose ink is low.
-
Page 72: Examining The Nozzle Check Pattern
Examining the Nozzle Check Pattern Examine the nozzle check pattern, and clean the print head if necessary. Check if there are missing lines in the pattern or horizontal white streaks in the pattern (B). Number of sheets printed so far If there are missing lines in the pattern (A): Cleaning the print head is required.
-
Page 73: Cleaning The Print Head
Cleaning the Print Head Clean the print head if lines are missing or if horizontal white streaks are present in the printed nozzle check pattern. Cleaning unclogs the nozzles and restores the print head condition. Cleaning the print head consumes ink, so clean the print head only when necessary.
-
Page 74: Cleaning The Print Head Deeply
Cleaning the Print Head Deeply If print quality does not improve by the standard cleaning of the print head, clean the print head deeply. Cleaning the print head deeply consumes more ink than the standard cleaning of the print head, so clean the print head deeply only when necessary. Make sure that the power is turned on.
-
Page 75: Aligning The Print Head
Aligning the Print Head If printed ruled lines are misaligned or print results are otherwise unsatisfactory, adjust the print head position. Note If the remaining ink level is low, the print head alignment sheet will not be printed correctly. Replace the FINE cartridge whose ink is low. Replacing a FINE Cartridge You need to prepare: a sheet of A4 or Letter-sized plain paper (including recycled paper)*…
-
Page 76
Important Do not touch any printed part on the print head alignment sheet. Be careful not to get the print head alignment sheet dirty. If the sheet is stained or wrinkled, it may not be scanned properly. If the print head alignment sheet was not printed correctly, press the Stop button, then redo this procedure from the beginning. -
Page 77
Close the document cover gently, then press the Color button or the Black button. The machine starts scanning the print head alignment sheet, and the print head position will be adjusted automatically. The print head position adjustment will be complete when the ON lamp lights green after flashing. -
Page 78: Performing Maintenance From A Computer
Performing Maintenance from a Computer Cleaning the Print Heads from Your Computer Cleaning the Paper Feed Rollers from Your Computer Aligning the Print Head Aligning the Print Head Position Automatically from Your Computer Aligning the Print Head Position from Your Computer Use Your Computer to Print a Nozzle Check Pattern Cleaning Inside the Machine…
-
Page 79: Cleaning The Print Heads From Your Computer
Cleaning the Print Heads from Your Computer The print head cleaning function allows you to clear up clogged print head nozzle. Perform print head cleaning if printing is faint or a specific color fails to print, even though there is enough ink.
-
Page 80
Deep Cleaning Deep Cleaning is more thorough than cleaning. Perform deep cleaning when two Cleaning attempts do not resolve the print head problem. Open the printer driver setup window Click Deep Cleaning on the Maintenance tab When the Deep Cleaning dialog box opens, select the ink group for which deep cleaning is to be performed. -
Page 81: Cleaning The Paper Feed Rollers From Your Computer
Cleaning the Paper Feed Rollers from Your Computer Cleans the paper feed rollers. Perform feed roller cleaning when there are paper particles sticking to the paper feed rollers and paper is not fed properly. The procedure for performing the feed roller cleaning is as follows: Roller Cleaning Prepare the machine Remove all sheets of paper from the rear tray.
-
Page 82: Aligning The Print Head
Aligning the Print Head When you perform head position adjustment, errors in the print head adjustment position are corrected and conditions such as color and line streaking are improved. If the print results appear uneven because of line shifts or other conditions, adjust the position of the print head.
-
Page 83: Aligning The Print Head Position From Your Computer
Aligning the Print Head Position from Your Computer Print head alignment corrects the installation positions of the print head and improves deviated colors and lines. This machine supports two head alignment methods: automatic head alignment and manual head alignment. The procedure for performing manual print head alignment is as follows: Print Head Alignment Open the printer driver setup window Click Custom Settings on the Maintenance tab…
-
Page 84
When you have entered all the necessary values, click OK. Note If it is difficult to pick the best pattern, pick the setting that produces the least noticeable vertical streaks. (A) Least noticeable vertical streaks (B) Most noticeable vertical streaks If it is difficult to pick the best pattern, pick the setting that produces the least noticeable horizontal streaks. -
Page 85
When you have entered all the necessary values, click OK. Note If it is difficult to pick the best pattern, pick the setting that produces the least noticeable vertical streaks. (A) Least noticeable vertical streaks (B) Most noticeable vertical streaks Confirm the displayed message and click OK The third pattern is printed. -
Page 86
When you have entered all the necessary values, click OK. Note If it is difficult to pick the best pattern, pick the setting that produces the least noticeable horizontal stripes. (A) Least noticeable horizontal stripes (B) Most noticeable horizontal stripes Note To print and check the current setting, open the Start Print Head Alignment dialog box, and click Print Alignment Value. -
Page 87: Aligning The Print Head Position Automatically From Your Computer
Aligning the Print Head Position Automatically from Your Computer Print head alignment corrects the installation positions of the print head and improves deviated colors and lines. This machine supports two head alignment methods: automatic head alignment and manual head alignment. Normally, the machine is set for automatic head alignment. If the printing results of automatic print head alignment are not satisfactory, perform manual head alignment.
-
Page 88
Note To print and check the current setting, open the Start Print Head Alignment dialog box, and click Print Alignment Value. -
Page 89: Use Your Computer To Print A Nozzle Check Pattern
Use Your Computer to Print a Nozzle Check Pattern The nozzle check function allows you to check whether the print head is working properly by printing a nozzle check pattern. Print the pattern if printing becomes faint, or if a specific color fails to print.
-
Page 90: Cleaning Inside The Machine
Cleaning Inside the Machine Perform bottom plate cleaning before you execute duplex printing to prevent smudges on the back side of the paper. Also perform bottom plate cleaning if ink smudges caused by something other than print data appear on the printed page. The procedure for performing bottom plate cleaning is as follows: Bottom Plate Cleaning Open the printer driver setup window…
-
Page 91: Cleaning The Machine
Cleaning the Machine Cleaning the Exterior of the Machine Cleaning the Platen Glass and Document Cover Cleaning the Paper Feed Roller Cleaning the Inside of the Machine (Bottom Plate Cleaning) Cleaning the Protrusions inside the Machine…
-
Page 92: Cleaning The Exterior Of The Machine
Cleaning the Exterior of the Machine Be sure to use a soft and dry cloth such as eyeglasses cleaning cloth and wipe off dirt on the surface gently. Smooth out wrinkles on the cloth if necessary before cleaning. Important Be sure to turn off the power and disconnect the power plug before cleaning the machine.
-
Page 93: Cleaning The Platen Glass And Document Cover
Cleaning the Platen Glass and Document Cover Important Be sure to turn off the power and disconnect the power plug before cleaning the machine. Do not use tissue paper, paper towels, rough-textured cloth, or similar materials for cleaning so as not to scratch the surface. Be sure to use a soft and dry cloth. Never use volatile liquids such as thinners, benzene, acetone, or any other chemical cleaner to clean the machine, as this may cause a malfunction or damage the surface of the machine.
-
Page 94: Cleaning The Paper Feed Roller
Cleaning the Paper Feed Roller If the paper feed rollers are dirty or paper powder is attached to it, paper may not be fed properly. In this case, clean the paper feed rollers. Cleaning will wear out the paper feed rollers, so perform this only when necessary.
-
Page 95
After cleaning the paper feed rollers, turn on the power, then clean the paper feed rollers again. If the problem is not resolved after cleaning the paper feed rollers, contact the service center. -
Page 96: Cleaning The Inside Of The Machine (Bottom Plate Cleaning)
Cleaning the Inside of the Machine (Bottom Plate Cleaning) Remove stains from the inside of the machine. If the inside of the machine becomes dirty, printed paper may get dirty, so we recommend performing cleaning regularly. You need to prepare: a sheet of A4 or Letter-sized plain paper* * Be sure to use a new piece of paper.
-
Page 97
The paper cleans the inside of the machine as it feeds through the machine. Check the folded parts of the ejected paper. If they are smudged with ink, perform Bottom Plate Cleaning again. If the problem is not resolved after performing cleaning again, the protrusions inside the machine may be stained. -
Page 98: Cleaning The Protrusions Inside The Machine
Cleaning the Protrusions inside the Machine Important Be sure to turn off the power and disconnect the power plug before cleaning the machine. You need to prepare: cotton swab If the protrusions inside the machine are stained, wipe off any ink from the protrusions using a cotton swab or the like.
-
Page 99: Changing The Machine Settings
Changing the Machine Settings Changing Machine Settings from Your Computer Changing the Machine Settings Using the Operation Panel…
-
Page 100: Changing Machine Settings From Your Computer
Changing Machine Settings from Your Computer Changing the Print Options Registering a Frequently Used Printing Profile Setting the Ink Cartridge to be Used Managing the Machine Power Reducing the Machine Noise Changing the Machine Operation Mode…
-
Page 101: Changing The Print Options
Changing the Print Options You can change the detailed print driver settings for print data that is sent from an application software. Specify this option if you encounter print failures such as part of an image data being cut off. The procedure for changing the print options is as follows: Open the printer driver setup window Click Print Options…
-
Page 102
Change the individual settings If necessary, change the setting of each item, and then click OK. The Page Setup tab is displayed again. -
Page 103: Registering A Frequently Used Printing Profile
Registering a Frequently Used Printing Profile You can register the frequently used printing profile to Commonly Used Settings on the Quick Setup tab. Unnecessary printing profiles can be deleted at any time. The procedure for registering a printing profile is as follows: Registering a Printing Profile Open the printer driver setup window Set the necessary items…
-
Page 104
Enter a name in the Name field. If necessary, click Options…, set the items, and then click OK. In the Save Commonly Used Settings dialog box, click OK to save the print settings and return to the Quick Setup tab. The name and icon are displayed in Commonly Used Settings. -
Page 105: Setting The Ink Cartridge To Be Used
Setting the Ink Cartridge to be Used This feature enables you to specify the most appropriate FINE cartridge among installed cartridges according to an intended use. When one of the FINE cartridges becomes empty and cannot be replaced immediately by a new one, you can specify the other FINE cartridge that still has ink and continue printing.
-
Page 106: Managing The Machine Power
Managing the Machine Power This function allows you to manage the machine power from the printer driver. The procedure for managing the machine power is as follows: Power Off The Power Off function turns off the machine. When you use this function, you will not be able to turn the machine on from the printer driver.
-
Page 107
If necessary, complete the following settings: Auto Power On Specifying Enable from the list will turn the machine on upon receipt of print data. Auto Power Off Specify the time from the list. When this time lapses without any operations from the printer driver or the machine, the machine is turned off automatically. -
Page 108: Reducing The Machine Noise
Reducing the Machine Noise The silent function allows you to reduce the operating noise of this machine. Select when you wish to reduce the operating noise of the printer at night, etc. Using this function may lower the print speed. The procedure for using the quiet mode is as follows: Quiet Settings Open the printer driver setup window…
-
Page 109
perform operations from the operation panel of the machine or printing and scanning from the computer. If you specify a time for Use quiet mode during specified hours, quiet mode is not applied to operations (copy, direct print, etc.) performed directly from the machine. -
Page 110: Changing The Machine Operation Mode
Changing the Machine Operation Mode If necessary, switch between various modes of machine operation. The procedure for configuring Custom Settings is as follows: Custom Settings Open the printer driver setup window Make sure that the machine is on, and then click Custom Settings on the Maintenance tab The Custom Settings dialog box opens.
-
Page 111
Ink Drying Wait Time You can set the length of the machine rest time until printing of the next page begins. Moving the slider to the right increases the pause time, and moving the slider to the left decreases the time. If the paper gets stained because the next page is ejected before the ink on the printed page dries, increase the ink drying wait time. -
Page 112: Changing The Machine Settings Using The Operation Panel
Changing the Machine Settings Using the Operation Panel About Quiet setting Turning on/off the Machine Automatically…
-
Page 113: About Quiet Setting
About Quiet setting Enables this function on the machine if you want to reduce the operating noise, such as when printing at night. Follow the procedure below to perform setting. Make sure that the machine is turned on. 2. Press and hold the Stop button until the Alarm lamp flashes 9 times. 3.
-
Page 114: Turning On/Off The Machine Automatically
Turning on/off the Machine Automatically You can enable the machine to turn on/off automatically considering the environment Turning on the Machine Automatically Turning off the Machine Automatically Turning on the Machine Automatically You can enable the machine to turn on automatically when you perform printing or scanning operations from the computer.
-
Page 115: Tips For Ensuring Optimal Printing Quality
Tips for Ensuring Optimal Printing Quality Useful Information about Ink Key Points to Successful Printing Be Sure to Make Paper Settings after Loading Paper Canceling a Print Job Storing Printed Images Machine Handling Precautions Key to Enjoying Consistent Printing Quality Precautions for Safe Transport of the Machine…
-
Page 116: Useful Information About Ink
Useful Information about Ink How is ink used for various purposes other than printing? Ink may be used for purposes other than printing. Ink is not only used for printing, but also for cleaning the print head to maintain the optimal printing quality. The machine has the function to automatically clean the ink jet nozzles to prevent clogging.
-
Page 117: Key Points To Successful Printing
Key Points to Successful Printing Check the machine status before printing! Is the print head OK? If a print head nozzle is clogged, print will be faint and papers will be wasted. Print the nozzle check pattern to check the print head. Maintenance Procedure Is the inside of the machine smeared with ink? After printing large quantities of paper, the area where papers go through may get…
-
Page 118: Be Sure To Make Paper Settings After Loading Paper
Be Sure to Make Paper Settings after Loading Paper If the media type setting is not the one for the loaded paper, printing results may not be satisfactory. After loading paper, be sure to select the appropriate media type setting for the loaded paper.
-
Page 119: Canceling A Print Job
Canceling a Print Job Never press the ON button! If you press the ON button while printing is in progress, the print data sent from the computer queues in the machine and you may not be able to continue to print. Press the Stop button to cancel printing.
-
Page 120: Storing Printed Images
Storing Printed Images Store printed images in albums, clear photo sleeves, or glass frames to protect them from direct exposure to air. Note Storing printed images without sufficient drying may cause blurring or discoloration.
-
Page 121: Machine Handling Precautions
Machine Handling Precautions Do not place any object on the document cover! Do not place any object on the document cover. It will fall into the rear tray when the document cover is opened and cause the machine to malfunction. Also, place the machine where objects will not fall on it.
-
Page 122: Key To Enjoying Consistent Printing Quality
Key to Enjoying Consistent Printing Quality The key to printing with the optimal printing quality is to prevent the print head from drying or clogging. Always observe the following rules for optimal printing quality. Never disconnect the power plug until the power is turned off! If you press the ON button to turn off the power, the machine caps the print head (nozzles) automatically to prevent from drying.
-
Page 123: Precautions For Safe Transport Of The Machine
Precautions for Safe Transport of the Machine When relocating the machine, make sure of the following. Important When sending the machine for repair Pack the machine in a sturdy box so that it is placed with its bottom facing down, using sufficient protective material to ensure safe transport.
-
Page 124
Use adhesive tape to secure all the covers on the machine to keep them from opening during transportation. Then pack the machine in the plastic bag. Attach the protective material to the machine when packing the machine in the box. -
Page 125: Legal Limitations On Use Of Your Product And Use Of Images
Legal Limitations on Use of Your Product and Use of Images It may be unlawful to make copies of, scan, print, or use reproductions of the following documents. The list provided is non-exhaustive. When in doubt, check with a legal representative in your jurisdiction.
-
Page 126: Specifications
* With the Paper Support and Paper Output Tray retracted. Approx. 7.6 lb (Approx. 3.5 kg) Weight * With the FINE Cartridges installed. Canon FINE Cartridge Total 1280 nozzles (BK 320 nozzles, C/M/Y each 320 nozzles) Copy Specifications Multiple copy max.
-
Page 127: Minimum System Requirements
XGA 1024 x 768 Other Supported OS Some functions may not be available with each OS. Refer to the manual or the Canon web site for details on operation with Windows RT. An internet connection is required to view the Online Manual.
-
Page 128
Windows: A CD-ROM Drive or internet connection is required during software installation. Windows: Internet Explorer 8, 9 or 10 is required to install Easy-WebPrint EX. Easy-WebPrint EX for Internet Explorer 10 can be downloaded from the Canon web site. Windows: Some functions may not be available with Windows Media Center.
инструкцияCanon Pixma MG2400
XXXXXXXX © CANON INC. 2013
1
2
4
3
1
2
3
4
5
6
QT5-6353-V01 PRINTED IN XXXXXXXX
Посмотреть инструкция для Canon Pixma MG2400 бесплатно. Руководство относится к категории принтеры, 1 человек(а) дали ему среднюю оценку 9.2. Руководство доступно на следующих языках: английский. У вас есть вопрос о Canon Pixma MG2400 или вам нужна помощь? Задайте свой вопрос здесь
Главная
| Canon | |
| Pixma MG2400 | |
| принтер | |
| английский | |
| Руководство пользователя (PDF) |
Не можете найти ответ на свой вопрос в руководстве? Вы можете найти ответ на свой вопрос ниже, в разделе часто задаваемых вопросов о Canon Pixma MG2400.
Как удалить замятую бумагу из принтера?
Лучше всего аккуратно вытянуть бумагу из принтера. Выключите принтер и убедитесь, что печатающий узел не нависает над бумагой и что в принтере не осталось бумаги.
Почему после установки оригинального картриджа принтер не работает?
Принтер может не распознать неоригинальный картридж. В этом случае вы получите сообщение о том, что картридж пуст. В инструкции к приобретенному картриджу обычно указаны способы устранения проблемы. Если это сделать не удалось, рекомендуется обратиться к продавцу.
Чем обусловлено плохое качество печати?
Причины плохого качества печати могут быть разными. Убедитесь, что картридж заполнен, а тонер имеется в достаточном количестве. Если такой проблемы нет, причина может заключаться в том, что струйному принтеру требуется чистка, высох картридж или сломан печатающий узел. Для лазерного принтера рекомендуется выполнить калибровку.
В чем разница между лазерным и струйным принтером?
Лазерный принтер печатает тонером, а струйный — чернилами.
Почему при печати на струйном принтере появляются черные полосы?
В большинстве случаев это обусловлено поломкой картриджа струйного принтера. Необходимо заменить картридж.
Что означает аббревиатура DPI?
DPI обозначает Dots Per Inch и представляет собой количество капель чернил (на дюйм), которые подаются на бумагу при печати.
Инструкция Canon Pixma MG2400 доступно в русский?
К сожалению, у нас нет руководства для Canon Pixma MG2400, доступного в русский. Это руководство доступно в английский.
Не нашли свой вопрос? Задайте свой вопрос здесь