c
Caution: Cautions must be observed to avoid damage to your equipment.
Replacing Ink Cartridges / Замена чернильных картриджей / Заміна чорнильних картриджів /
: , .
/
: , .
EN
User’s Guide
-for use without a computer-
. :
When the B light is on, one or more ink cartridges are expended. Replace the appropriate
A B
-для использования без
cartridges.
RU
Руководство пользователя
компьютера—
B, .
.
-для використання без
B, , .
UK
Посібник користувача
комп’ютера—
.
. . ,
B
AR
- -
B
FA
Open.
Press.
.
.
.
.
© 2011 Seiko Epson Corporation. All rights reserved.
.
.
Printed in XXXXXX
C D E F
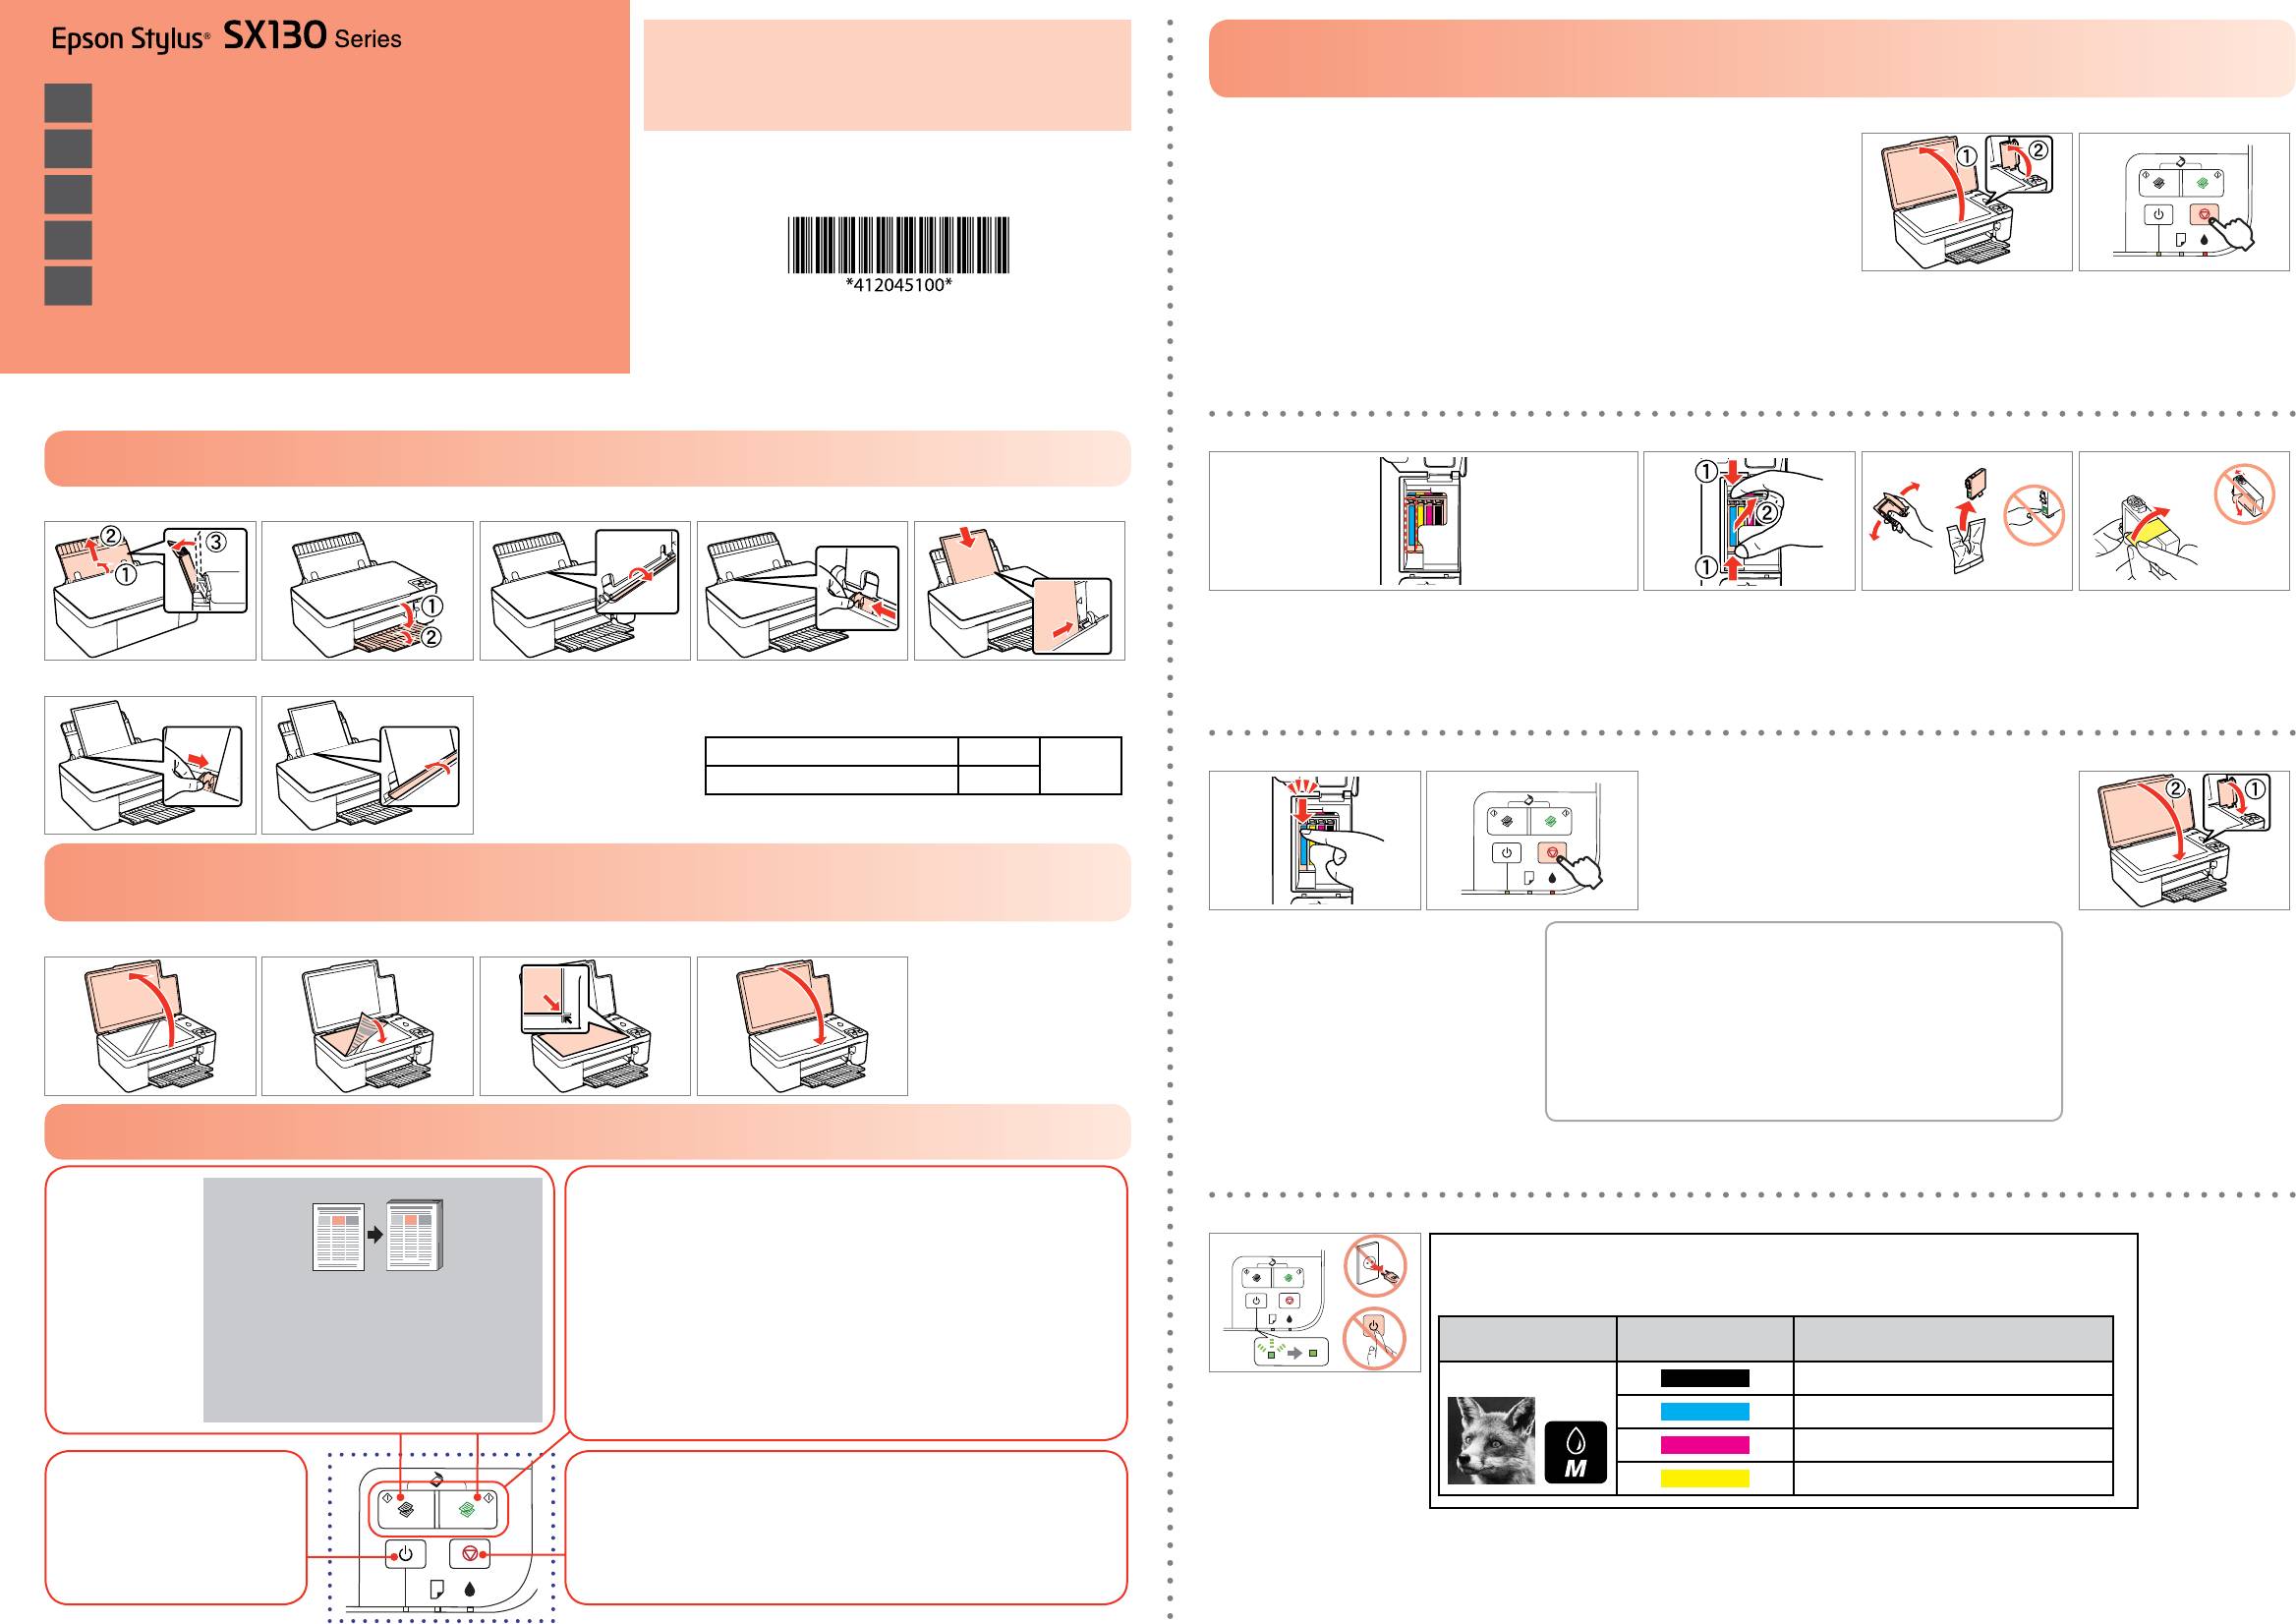
Loading Paper / Загрузка бумаги / Завантаження паперу / /
A B C D E
The expended cartridge appears.
Remove.
Shake and unpack.
Remove yellow tape.
.
.
.
.
.
.
,
.
.
.
.
.
F G
.
Loading Capacity (sheets)
()
()
Plain Paper 100
( )
A4
G H I
Epson Bright White Ink Jet Paper 80
Placing an original / Размещение оригинала / Розташування оригіналу /
/
Insert and press down.
Press.
A B C D
.
.
If more than one cartridge is expended, the next expended cartridge appears in
Close.
the replacement position. Repeat steps C to H for other cartridges.
.
.
.
,
.
.
.
. C—H
.
.
,
. C—H .
.
. H C
H
C
Using buttons / Кнопки / Використання кнопок / /
Copies in B&W or color.
20
-
Press both buttons simultaneously to scan your original and save it as a PDF on your PC.
For more details, refer to the online User’s Guide.
J
.
-
Epson Ink Cartridges / Чернильные картриджи Epson /
PDF, . .
.
.
Чорнильні картриджі Epson /
Press for three seconds to make 20 copies.
PDF ’,
Epson / Epson
.
,
. .
20 .
.
20 ,
Fox / / /
Color / / /
Part numbers / / /
. PDF
.
/
/
/
.
. 20
PDF
T1281
20
Wait approximately 1.5 mins.
1,5 .
T1282
1,5
.
T1283
.
1.5
Cancels the operation. Press for three seconds to start head cleaning.
1.5
T1284
Turns the printer on/o.
.
.
.
.
. ,
. /
.
.
.
Troubleshooting / Устранение неисправностей / Пошук та усунення несправностей /
Print Quality Problems / Проблемы с качеством печати / Проблеми якості друку /
/
/
Error Indicators / Индикаторы ошибок / Індикатори помилок / /
Banding/Blurring/Missing colors ➡ Checking/Cleaning the Print Head.
, ➡
c
.
When the B light is ashing, the ink cartridge is not expended and you cannot use the instructions on the front page to replace
/ / ➡
cartridges. See the table below for details.
.
B , , .
. /
//
. .
B , , , , ,
. . .
. ,
B
.
B
Checking/Cleaning the Print Head / Проверка и чистка печатающей головки /
Виконайте перевірку і прочищення друкувальної головки /
: ashing / / /
/
/ /
: on / / /
/
(a) Good.
A B C D
(a) .
(a) .
(a)
.
(a)
)a
The paper is jammed. See
No paper is loaded, or
Ink cartridge is running
Ink cartridge is expended
Fatal error. See “Paper Jam”
Waste ink pad in the
(b)
Not good. Clean the print
“Paper Jam” on the right to
multiple pages have been
low on ink. From your
or not installed correctly.
on the right to clear the
printer is saturated.
head. ➡ EF
clear the jam.
fed into the sheet feeder.
computer you can check
Replace the ink cartridge.
jam, and then turn the
Contact Epson Support to
Load paper in the sheet
the ink status or replace
printer back on. If the error
replace ink pads.
(b) .
feeder correctly.
cartridges before they are
does not clear, contact
(b)
. ➡ EF
Press a copy button to
expended.
Epson Support.
(b) .
resume printing.
. ➡ EF
Turn o.
Load A4-size plain paper.
While pressing y, press P.
Check the pattern.
.
. (b)
.
.
EF
y,
)b
.
.
.
A4.
P.
.
EF
.
.
y,
.
.
4.
P.
. «
.
«
.A4
.P ,y
» .
.
.
» ,
Epson
A4
y
.
.
.
.
P
,
,
,
.
.
Epson.
’ . ,
.
,
,
.
,
,
’, .
.
, ’, .
.
E F
“’ ”
.
’
.
“’ ”
.
,
Epson,
.
,
.
.
Try steps A to D again.
,
.
A—D.
,
A—D
.
Epson.
.
. D A
“ ” .
.
“ ” .
.
.
.
D
A
.
.
.
Epson
.
.
.Epson
.
Press for
three seconds to start cleaning.
Wait until head cleaning nishes.
.
.
трех секунд.
, .
,
.
три секунди.
.
Epson
Epson
Paper Jam / Замятие бумаги / Зім’явся папір / /
A B C D
If the paper is not ejected,
go to B.
,
B.
,
B.
.B ,
Eject jammed paper.
.
B
Turn o.
Push lever and remove.
Open cover and remove.
.
’ .
.
.
.
.
.
.
.
.
.
Страницы и текст этой инструкции
 Epson Stylus SX130. Страница №1") Руководство пользователя МФУ (многофункционального устройства) Epson Stylus SX130
Руководство пользователя МФУ (многофункционального устройства) Epson Stylus SX130
 Epson Stylus SX130. Страница №2") Информация отображена на картинке
Информация отображена на картинке
 Epson Stylus SX130. Страница №3") Информация отображена на картинке
Информация отображена на картинке
 Epson Stylus SX130. Страница №4") Информация отображена на картинке
Информация отображена на картинке
 Epson Stylus SX130. Страница №5") Информация отображена на картинке
Информация отображена на картинке
Как использовать наш сайт инструкций OnlineManuals.ru
Наша цель состоит в том, чтобы предоставить вам быстрый доступ к содержанию инструкции для МФУ (многофункционального устройства) Epson Stylus SX130.
С помощью онлайн просмотра, Вы можете быстро просмотреть содержимое инструкции и найти решение проблемы с МФУ (многофункционального устройства) Epson Stylus SX130.
Для Вашего удобства
Если листать руководство пользователя МФУ (многофункционального устройства) Epson Stylus SX130 прямо на сайте, не очень удобно для Вас, есть два возможных решения:
• Просмотр в полноэкранном режиме — легко просмотреть руководство пользователя (без загрузки его на свой компьютер), Вы можете использовать режим полноэкранного просмотра.
Для просмотра инструкции пользователя МФУ (многофункционального устройства) Epson Stylus SX130 на полном экране, используйте кнопку «Открыть в Pdf-viewer».
• Загрузка на компьютер — Вы можете также скачать Руководство пользователя МФУ (многофункционального устройства) Epson Stylus SX130 на свой компьютер и сохранить его в файлах.
Многие люди предпочитают читать документы не на экране, а в печатной версии.
Возможность печати руководства пользователя также была предусмотрена на нашем сайте,
и вы можете использовать ее, нажав на иконку «печать» в Pdf-viewer.
Нет необходимости печатать все руководство МФУ (многофункционального устройства) Epson Stylus SX130, можно выбрать только нужные страницы инструкции.
Setting Up Your Product
Enter the name of your product. e.g. XP-225
Method of confirming the product name.
The product name is shown on the body of the product.

▲
EN
Start Here
FR
Démarrez ici
DE
Hier starten
NL
Hier beginnen
IT
Inizia qui
ES
Para empezar
PT
Começar por aqui
1
Unpacking / Déballage / Auspacken / Uitpakken / Disimballaggio / Desembalaje /
Desembalar
Do not open the ink cartridge package until you are ready to install it in the printer. The cartridge is vacuum packed to
maintain its reliability.
N’ouvrez pas l’emballage de la cartouche d’encre avant d’être prêt à l’installer dans l’imprimante. La cartouche est
emballée sous vide pour conserver son efficacité.
Öffnen Sie die Tintenpatronenverpackung erst kurz bevor Sie die Patrone in den Drucker einsetzen. Die Patrone ist zur
Contents may vary by location.
besseren Haltbarkeit vakuumverpackt.
Le contenu peut varier selon le pays.
Open de verpakking van de cartridge pas op het moment waarop u de cartridge wilt installeren. De cartridge is vacuüm
Der Lieferumfang unterscheidet sich je
verpakt om de betrouwbaarheid te waarborgen.
nach Erwerbsland.
Non aprire la confezione della cartuccia di inchiostro fino a quando non si è pronti per la sua installazione nella
De inhoud kan per land verschillen.
stampante. La cartuccia viene fornita in confezione sottovuoto per preservarne l’affidabilità.
Il contenuto potrebbe variare a seconda
No abra el embalaje del cartucho de tinta hasta estar listo para instalarlo en la impresora. El cartucho está empaquetado
del Paese.
al vacío para mantener la fiabilidad.
El contenido puede variar en función
Abra a embalagem do tinteiro apenas quando estiver pronto para o instalar na impressora. O tinteiro é embalado a
del país.
vácuo para manter a fiabilidade.
O conteúdo pode variar consoante o
país.
2
Turning on / Mise sous tension / Einschalten / Aanzetten / Accensione / Encendido /
Ligar
A
B
Connect and plug in.
Turn on.
Connectez et branchez la fiche.
Mettez sous tension.
Schließen Sie das Netzkabel an.
Schalten Sie das Gerät ein.
Verbinden en aansluiten.
Aanzetten.
Collegare alla presa di corrente.
Accendere.
Conecte y enchufe.
Encienda.
Ligue na tomada e no interruptor.
Ligue.
Maschinenlarminformations-Verordnung 3. GPSGV: Der hochste
Schalldruckpegel betragt 70 dB(A) oder weniger gemass EN ISO
7779.
Das Gerät ist nicht für die Benutzung im unmittelbaren Gesichtsfeld
am Bildschirmarbeitsplatz vorgesehen.
Um störende Reflexionen am Bildschirmarbeitsplatz zu vermeiden,
darf dieses Produkt nicht im unmittelbaren Gesichtsfeld platziert
werden.
© 2011 Seiko Epson Corporation. All rights reserved.
Printed in XXXXXX
Remove all protective materials.
Retirez tous les matériaux de protection.
Entfernen Sie alle Verpackungsmaterialien.
Verwijder al het beschermingsmateriaal.
Rimuovere tutti i materiali protettivi.
Retire todos los materiales de protección.
Retire todos os materiais de protecção.
3
Installing the Ink Cartridges / Installation des cartouches d’encre /
Einsetzen der Tintenpatronen / De cartridges installeren / Installazione delle cartucce di
inchiostro / Instalación de los cartuchos de tinta / Instalar os Tinteiros
A
B
Open.
Shake and unpack.
Ouvrez.
Secouez et déballez.
Druckerabdeckung öffnen.
Patrone schütteln und auspacken.
Openen.
Schudden en uitpakken.
Aprire.
Agitare e aprire la confezione.
Abra.
Agite y desembale.
Abra.
Agite e desembale.
E
F
Press down (Click).
Press. The cartridge holder moves.
Appuyez sur la cartouche jusqu’au
Appuyez. Le support de cartouche
déclic.
bouge.
Patrone bis zum Klick drücken.
Taste drücken. Patronenhalterung
Indrukken (klik).
verschiebt sich.
Premere verso il basso
Drukken. De cartridgehouder wordt
(finché scatta in posizione).
verplaatst.
Presione hacia abajo (clic).
Premere. Il supporto della cartuccia si
Exerça pressão (clique).
muove.
Pulse. El soporte del cartucho se mueve.
Pressione. O suporte do tinteiro
desloca-se.
I
Wait approximately 2 mins. until ink charging completes.
Attendez environ 2 minutes jusqu’à la fin du chargement en encre.
Warten Sie ca. 2 Min., bis die Tintenbefüllung abgeschlossen ist.
Wacht ongeveer 2 minuten tot de inkt geladen is.
Attendere circa 2 minuti fino al completamento del caricamento
dell’inchiostro.
Espere aproximadamente 2 minutos hasta completarse la carga de tinta.
Aguarde cerca de 2 min. até o carregamento de tinta terminar.
The initial ink cartridges will be partly used to charge the print head. These cartridges may print fewer pages compared to subsequent ink cartridges.
Les cartouches d’encre initiales seront partiellement utilisées pour charger la tête d’impression. Ces cartouches peuvent imprimer moins de pages que les
cartouches d’encre suivantes.
Die Erstpatronen werden teilweise zum Erstbefüllen des Druckkopfs aufgebraucht. Deshalb können mit diesen Patronen weniger Seiten als mit nachfolgenden
Patronen gedruckt werden.
Bij de eerste cartridges wordt er inkt gebruikt om de printkop te laden. Met deze cartridges worden wellicht minder pagina’s afgedrukt dan met volgende
cartridges.
Le cartucce di inchiostro iniziali verranno in parte usate per caricare la testina di stampa. Queste cartucce potrebbero stampare meno pagine rispetto alle cartucce
di inchiostro successive.
Los cartuchos de tinta iniciales se utilizarán parcialmente para cargar los cabezales de impresión. Estos cartuchos probablemente imprimirán menos páginas que
los cartuchos utilizados después.
Os tinteiros iniciais serão parcialmente utilizados para carregar a cabeça de impressão. Comparando com os tinteiros seguintes, estes tinteiros iniciais podem
imprimir menos páginas.
C
D
Remove yellow tape.
Install cyan ink cartridge.
Retirez le ruban adhésif jaune.
Installez la cartouche d’encre cyan.
Gelbes Klebeband entfernen.
Cyan-Tintenpatrone einsetzen.
Gele tape verwijderen.
De cartridge voor cyaan inkt installeren.
Rimuovere il nastro giallo.
Installare la cartuccia di inchiostro
Saque el precinto amarillo.
ciano.
Retire a fita amarela.
Instale el cartucho de tinta cian.
Instale o tinteiro ciano.
G
H
Repeat steps D to F for other
Close.
Fermez.
cartridges.
Abdeckung schließen.
Répétez les étapes D à F pour les
Sluiten.
autres cartouches.
Chiudere.
Schritte D bis F zum Einsetzen der
restlichen Patronen wiederholen.
Cierre.
Feche.
Herhaal stap D t/m F voor de andere
cartridges.
Ripetere i passi da D a F per le altre
cartucce.
Repita los pasos D a F para otros
cartuchos.
Repita as operações D a F para os
outros tinteiros.