-
Драйверы
7
-
Инструкции по эксплуатации
36
Языки:

HP Smart Tank 510 Wireless All-in-One инструкция по эксплуатации
(146 страниц)
- Языки:Русский
-
Тип:
PDF -
Размер:
2.24 MB
Просмотр

HP Smart Tank 510 Wireless All-in-One инструкция по эксплуатации
(147 страниц)
- Языки:Русский
-
Тип:
PDF -
Размер:
2.53 MB
Просмотр

HP Smart Tank 510 Wireless All-in-One инструкция по эксплуатации
(138 страниц)
- Языки:Английский
-
Тип:
PDF -
Размер:
2.37 MB
Просмотр

HP Smart Tank 510 Wireless All-in-One инструкция по эксплуатации
(144 страницы)
- Языки:Португальский
-
Тип:
PDF -
Размер:
2.09 MB
Просмотр

HP Smart Tank 510 Wireless All-in-One инструкция по эксплуатации
(141 страница)
- Языки:Хорватский
-
Тип:
PDF -
Размер:
2.06 MB
Просмотр

HP Smart Tank 510 Wireless All-in-One инструкция по эксплуатации
(144 страницы)
- Языки:Испанский
-
Тип:
PDF -
Размер:
2.07 MB
Просмотр

HP Smart Tank 510 Wireless All-in-One инструкция по эксплуатации
(144 страницы)
- Языки:Французский
-
Тип:
PDF -
Размер:
2.11 MB
Просмотр

HP Smart Tank 510 Wireless All-in-One инструкция по эксплуатации
(146 страниц)
- Языки:Итальянский
-
Тип:
PDF -
Размер:
2.39 MB
Просмотр

HP Smart Tank 510 Wireless All-in-One инструкция по эксплуатации
(142 страницы)
- Языки:Словенский
-
Тип:
PDF -
Размер:
2.38 MB
Просмотр

HP Smart Tank 510 Wireless All-in-One инструкция по эксплуатации
(148 страниц)
- Языки:Украинский
-
Тип:
PDF -
Размер:
2.57 MB
Просмотр

HP Smart Tank 510 Wireless All-in-One инструкция по эксплуатации
(146 страниц)
- Языки:Венгерский
-
Тип:
PDF -
Размер:
2.4 MB
Просмотр

HP Smart Tank 510 Wireless All-in-One инструкция по эксплуатации
(145 страниц)
- Языки:Португальский
-
Тип:
PDF -
Размер:
2.39 MB
Просмотр

HP Smart Tank 510 Wireless All-in-One инструкция по эксплуатации
(141 страница)
- Языки:Корейский
-
Тип:
PDF -
Размер:
2.82 MB
Просмотр

HP Smart Tank 510 Wireless All-in-One инструкция по эксплуатации
(148 страниц)
- Языки:Болгарский
-
Тип:
PDF -
Размер:
2.57 MB
Просмотр

HP Smart Tank 510 Wireless All-in-One инструкция по эксплуатации
(142 страницы)
- Языки:Эстонский
-
Тип:
PDF -
Размер:
3.06 MB
Просмотр

HP Smart Tank 510 Wireless All-in-One инструкция по эксплуатации
(142 страницы)
- Языки:Хорватский
-
Тип:
PDF -
Размер:
2.37 MB
Просмотр

HP Smart Tank 510 Wireless All-in-One инструкция по эксплуатации
(136 страниц)
- Языки:Иврит
-
Тип:
PDF -
Размер:
3.01 MB
Просмотр

HP Smart Tank 510 Wireless All-in-One инструкция по эксплуатации
(141 страница)
- Языки:Латышский
-
Тип:
PDF -
Размер:
2.39 MB
Просмотр

HP Smart Tank 510 Wireless All-in-One инструкция по эксплуатации
(145 страниц)
- Языки:Румынский
-
Тип:
PDF -
Размер:
2.57 MB
Просмотр

HP Smart Tank 510 Wireless All-in-One инструкция по эксплуатации
(142 страницы)
- Языки:Датский
-
Тип:
PDF -
Размер:
2.38 MB
Просмотр

HP Smart Tank 510 Wireless All-in-One инструкция по эксплуатации
(136 страниц)
- Языки:Китайский
-
Тип:
PDF -
Размер:
2.58 MB
Просмотр

HP Smart Tank 510 Wireless All-in-One инструкция по эксплуатации
(145 страниц)
- Языки:Литовский
-
Тип:
PDF -
Размер:
2.4 MB
Просмотр

HP Smart Tank 510 Wireless All-in-One инструкция по эксплуатации
(145 страниц)
- Языки:Нидерландский
-
Тип:
PDF -
Размер:
2.38 MB
Просмотр

HP Smart Tank 510 Wireless All-in-One инструкция по эксплуатации
(18 страниц)
- Языки:Китайский
-
Тип:
PDF -
Размер:
3.21 MB
Просмотр

HP Smart Tank 510 Wireless All-in-One инструкция по эксплуатации
(140 страниц)
- Языки:Тайский
-
Тип:
PDF -
Размер:
2.82 MB
Просмотр

HP Smart Tank 510 Wireless All-in-One инструкция по эксплуатации
(143 страницы)
- Языки:Шведский
-
Тип:
PDF -
Размер:
2.37 MB
Просмотр

HP Smart Tank 510 Wireless All-in-One инструкция по эксплуатации
(145 страниц)
- Языки:Индонезийский
-
Тип:
PDF -
Размер:
2.36 MB
Просмотр

HP Smart Tank 510 Wireless All-in-One инструкция по эксплуатации
(145 страниц)
- Языки:Польский
-
Тип:
PDF -
Размер:
2.38 MB
Просмотр

HP Smart Tank 510 Wireless All-in-One инструкция по эксплуатации
(142 страницы)
- Языки:Чешский
-
Тип:
PDF -
Размер:
2.38 MB
Просмотр

HP Smart Tank 510 Wireless All-in-One инструкция по эксплуатации
(137 страниц)
- Языки:Арабский
-
Тип:
PDF -
Размер:
3.22 MB
Просмотр

HP Smart Tank 510 Wireless All-in-One инструкция по эксплуатации
(141 страница)
- Языки:Турецкий
-
Тип:
PDF -
Размер:
2.47 MB
Просмотр

HP Smart Tank 510 Wireless All-in-One инструкция по эксплуатации
(68 страниц)
- Языки:Сербский
-
Тип:
PDF -
Размер:
12.18 MB
Просмотр

HP Smart Tank 510 Wireless All-in-One инструкция по эксплуатации
(145 страниц)
- Языки:Испанский
-
Тип:
PDF -
Размер:
2.38 MB
Просмотр

HP Smart Tank 510 Wireless All-in-One инструкция по эксплуатации
(147 страниц)
- Языки:Французский
-
Тип:
PDF -
Размер:
2.41 MB
Просмотр

HP Smart Tank 510 Wireless All-in-One инструкция по эксплуатации
(142 страницы)
- Языки:Финский
-
Тип:
PDF -
Размер:
2.37 MB
Просмотр

HP Smart Tank 510 Wireless All-in-One инструкция по эксплуатации
(148 страниц)
- Языки:Греческий
-
Тип:
PDF -
Размер:
2.54 MB
Просмотр
На NoDevice можно скачать инструкцию по эксплуатации для HP Smart Tank 510 Wireless All-in-One. Руководство пользователя необходимо для ознакомления с правилами установки и эксплуатации HP Smart Tank 510 Wireless All-in-One. Инструкции по использованию помогут правильно настроить HP Smart Tank 510 Wireless All-in-One, исправить ошибки и выявить неполадки.
1 User Guide HP Smart Tank 510 series
2 HP company notices THE INFORMATION CONTAINED HEREIN IS SUBJECT TO CHANGE WITHOUT NOTICE. ALL RIGHTS RESERVED. REPRODUCTION, ADAPTATION, OR TRANSLATION OF THIS MATERIAL IS PROHIBITED WITHOUT PRIOR WRITTEN PERMISSION OF HP, EXCEPT AS ALLOWED UNDER THE COPYRIGHT LAWS. THE ONLY WARRANTIES FOR HP PRODUCTS AND SERVICES ARE SET FORTH IN THE EXPRESS WARRANTY STATEMENTS ACCOMPANYING SUCH PRODUCTS AND SERVICES. NOTHING HEREIN SHOULD BE CONSTRUED AS CONSTITUTING AN ADDITIONAL WARRANTY. HP SHALL NOT BE LIABLE FOR TECHNICAL OR EDITORIAL ERRORS OR OMISSIONS CONTAINED HEREIN. Copyright 2020 HP Development Company, L.P. Microsoft and Windows are either registered trademarks or trademarks of Microsoft Corporation in the United States and/or other countries. Mac, OS X, macos, and AirPrint are trademarks of Apple Inc., registered in the U.S. and other countries. ENERGY STAR and the ENERGY STAR mark are registered trademarks owned by the U.S. Environmental Protection Agency. Android and Chromebook are trademarks of Google LLC. Amazon and Kindle are trademarks of Amazon.com, Inc. or its affiliates. ios is a trademark or registered trademark of Cisco in the U.S. and other countries and is used under license.
3 Table of contents 1 Get started… 1 Printer parts… 2 Get to know the ink tank system… 4 Control panel features… 5 Control panel lights and display icons status… 7 Change the default paper settings detected by printer Paper basics Open the HP printer software (Windows) Use the HP Smart app to print, scan, and troubleshoot Sleep mode Quiet Mode Auto-Off Print Load media Print documents Print photos Print envelopes Print using the HP Smart app Print using the maximum dpi Print using a Mac desktop or laptop Print with mobile devices Tips for print success View print job status and manage print jobs (Windows) Customize your printer (Windows) Use Web Services What are Web Services? Set up Web Services Print with HP eprint Use the HP Connected website ENWW iii
4 Remove Web Services Copy and scan Copy documents Load original Scan using the HP Smart app Scan using the HP printer software Scan using Webscan Tips for successful scanning and copying Manage ink and printhead Ink levels Refill ink tanks Order ink supplies Print with black ink only Improve print quality Align printheads (cartridges) Clean printheads (cartridges) Clean printer Tips for working with ink and printhead Move printer Connect Before you begin To place the printer in setup mode Connect your printer to a wireless network with a router Connect wirelessly to the printer without a router (Wi-Fi Direct) Connect your printer by using the HP Smart app Change wireless settings Connect your printer to your computer with a USB cable (non-network connection) Change from a USB connection to a wireless network Use advanced printer management tools (for networked printers) Tips for setting up and using a networked printer Solve a problem Get help with HP online troubleshooting Get more help Printer control panel errors Get help from the HP Smart app Jams and paper-feed issues iv ENWW
5 Cartridge problem Printing issues Copy issues Scan issues Network and connection issues Printer hardware issues Solve problems using Web Services Restore original factory defaults and settings Maintain the printer HP support Appendix A Technical information Specifications Regulatory notices Environmental product stewardship program Index ENWW v
6 vi ENWW
7 1 Get started Printer parts Get to know the ink tank system Control panel features Control panel lights and display icons status Change the default paper settings detected by printer Paper basics Open the HP printer software (Windows) Use the HP Smart app to print, scan, and troubleshoot Sleep mode Quiet Mode Auto-Off ENWW 1
8 Printer parts 1 Paper-width guide 2 Input tray 3 Input tray shield 4 Scanner lid 5 Scanner glass 6 Printhead access door 7 Front door 8 Ink tank 9 Ink tank cap 10 Output tray 11 Output tray extender (also referred to as the tray extender) 12 Control panel 2 Chapter 1 Get started ENWW
9 13 Printheads 14 Printhead latch 15 USB port 16 Power connection ENWW Printer parts 3
10 Get to know the ink tank system Term Printheads Definition The printheads are the components in the print mechanism that apply ink to the paper. There are two printheads: a black ink printhead and a color ink printhead. CAUTION: After you have set up the printer, do not open the printhead latch unless instructed to do so. Printhead latch The printhead latch on the carriage secures the printheads in the carriage. Make sure the printhead latch is properly closed to avoid problems such as carriage jams. CAUTION: After you have set up the printer, do not open the printhead latch unless instructed to do so. Ink tanks There are four ink tanks. Each ink tank corresponds to an individual color: cyan, magenta, yellow and, black. Ink tank caps Alignment Ink tank caps are plugs that seal each ink tank. Alignment is a process of aligning the printheads to improve print quality. For more information about alignment, see Printhead Alignment icon on page Chapter 1 Get started ENWW
11 Control panel features Overview of buttons and lights Feature Description 1 Cancel button: Stops the current operation. 2 Resume button: Resumes a job after a disruption (for example, after loading paper or clearing a paper jam). Resume light: Indicates the printer is in a warning or error state. 3 Color Copy button: Starts a color copy job. To increase the number counter, press and hold the button. Copying starts two seconds after the last button press. 4 Black Copy button: Starts a black-and-white copy job. To increase the number counter, press and hold the button. Copying starts two seconds after the last button press. 5 Ink/Printhead light: Indicates ink tank or printhead problems. 6 Color Printhead icon and Black Printhead icon. 7 Control Panel Display: Indicates number counter, paper related issues, printhead problems, ink tank issues, Wi- Fi Direct status, wireless status, and signal strength. 8 Wireless button: Turns wireless capabilities on or off. Wireless light: Indicates whether the printer is connected to a wireless network. A blinking Wireless light indicates that the printer is not connected to a network or is trying to connect. During setup, it also indicates the printer is in setup mode. NOTE: If more than two hours have passed since you first turned on the printer and you have not set up the printer wirelessly, you can place the printer in network setup mode by restoring the printer network settings. The setup mode will last for two hours. For information on how to restore the printer network settings, see Restore original factory defaults and settings on page Information button: Press this button to print an information page. The page provides information on the printer, the printer address, Wi-Fi Direct, network connection, and mobile printing. 10 Power button: Turns the printer on or off. ENWW Control panel features 5
12 Control panel display icons Icon Description Number Counter icon: Shows the number counter when you are copying documents, changes to the letter A when the printer is doing printhead alignment, and shows the letter E and a number when the printer is in an error state. Paper Error icon: Indicates a paper-related error. Alert icon: Indicates an error. The CMYK icons and Ink icons are used to indicate status of the four ink tanks in the printer. Each set of icons corresponds to an ink tank: cyan, magenta, yellow and, black. Printhead icons: The left printhead icon flashing shows an error related to the tri-color printhead, and the right icon flashing shows an error related to the black printhead. Wi-Fi Direct icon: Indicates Wi-Fi Direct is on. Wireless status icons: Show the status of a wireless connection. The wireless status icons consist of three icons: (the Wireless icon), (the Wireless Attention icon), and (the Signal Bars icon) 6 Chapter 1 Get started ENWW
13 Control panel lights and display icons status Power button light Status On Off Dimmed Description The printer is on. The printer is powered off. Indicates the printer is in Sleep mode. The printer automatically enters Sleep mode after 5 minutes of inactivity. The printer automatically turns off after 2 hours of inactivity if: Printer is not connected to other devices through USB connection, and Wireless, Wi-Fi Direct, and Bluetooth are turned off. Blinking The printer is processing a job. To cancel the job, press (the Cancel button). Fast blinking If the printhead access door is open, close it. If the printhead access door is closed and the light is blinking fast, the printer is in an error state that you can resolve by following the on-screen messages from the computer. If you do not see any on-screen messages, try printing a document to generate an on-screen message. Wireless light and icons The Wireless light next to (the Wireless button) and the wireless status icons on the control panel display work together to indicate the status of a wireless connection. The Wireless light and Wireless status icons will only light up after alignment is completed during initial setup. Status The Wireless light, the Wireless icon, and the Signal Bars icon are on. Description The printer is connected to a wireless network. The Wireless light is off. The wireless capability of the printer is off. To turn on the wireless capability, press (the Wireless button). ENWW Control panel lights and display icons status 7
14 Status The Wireless light is blinking, the Wireless icon is on, and the Signal Bars icon are cycling. Description The printer is in Auto-wireless connect (AWC) mode. The Wireless light blinks for three seconds and then turns off. The wireless capability of the printer is disabled. Change the wireless settings. For more information, see Change wireless settings on page 77. The Wireless light is blinking, and the Wireless icon and Wireless Attention icon are on. There is no wireless signal. Make sure your wireless router or access point is powered on. Move the printer closer to the wireless router. The Wireless light is blinking, the Wireless icon is on, and the Wireless Attention icon is blinking. One of the following might have occurred. The printer has a problem connecting to the wireless network. An error occurs or an overlap session is detected when using WPS. Press (the Wireless button) and the (Information button) together to run the wireless test, and then review the test report for information on how to solve the problem. The Wireless light is blinking, the Wireless icon is on, and the Signal Bars are blinking together. The printer is in the Wi-Fi Protected Setup (WPS) push mode. The Wireless light is blinking, and the Wireless icon is on. The wireless capability of the printer is on, but has not been configured. The Wireless light is blinking, the Wireless icon is on, the Signal Bars are cycling, and the Wireless Attention light is on. The wireless capability of the printer is on and has been configured before, and the printer is trying to connect to the network. Wi-Fi Direct icon 8 Chapter 1 Get started ENWW
15 Status The Wi-Fi Direct icon is on. The Wi-Fi Direct icon is off. Description Wi-Fi Direct is turned on and ready to use. Wi-Fi Direct is off. To turn the feature on or off, see To turn Wi-Fi Direct on or off on page 73. Printhead icons and Ink/Printhead light The Alert icon, one of the Printhead icons, and the Ink/Printhead light are blinking. Cause One of the following might have occurred. The corresponding printhead is missing. The corresponding printhead is installed incorrectly. The corresponding printhead still has an orange plug or plastic tape on it. The corresponding printhead is incompatible or damaged. Solution Make sure both printheads are properly installed. Install any missing printhead. If both printheads are installed, remove the printhead indicated, make sure there is no orange plug or plastic tape on it, and then reinsert the printhead securely. Make sure that you are using the correct HP printheads for your printer. NOTE: For more information, see Cartridge problem on page 94. NOTE: Do not open the printhead latch unless instructed to do so. The Alert icon, both Printhead icons, and the Ink/Printhead light are blinking. ENWW Control panel lights and display icons status 9
16 Cause One of the following might have occurred. One or both printheads are missing. One or both printheads are installed incorrectly. One or both printheads still have an orange plug or plastic tape on them. One or both printheads are incompatible or damaged. Solution Make sure both printheads are properly installed. Install any missing printheads. If both printheads are installed, remove the printheads, make sure there is no orange plug or plastic tape on them, and then reinsert the printheads securely. Make sure that you are using the correct HP printheads for your printer. NOTE: For more information, see Cartridge problem on page 94. NOTE: Do not open the printhead latch unless instructed to do so. Printhead Alignment icon Alignment status icon The Number Counter icon shows an A or a blinking A. Cause The printer is doing printhead alignment. A blinking «A» appears when the alignment page is being printed or scanned. It stops blinking after the page is printed or scanned. «A» disappears after the scan when printhead alignment is complete. Solution Once the alignment page is printed, place the printed page printside down on the scanner glass, and then press one of the copy buttons on the control panel to scan the page. Printhead alignment is complete after the scan. NOTE: To learn how to load an original, see Load original on page 46. The Number Counter icon shows a blinking A. The Alert icon, Resume light, and Power light are blinking. Cause Printhead alignment failed. This occurs after you have scanned the alignment page. Solution Try one of the following: Press (the Resume button) to reprint the alignment page. Press one of the copy buttons to rescan the alignment page. If you do not do anything, printhead alignment gets canceled after some time. 10 Chapter 1 Get started ENWW
17 Alert icon, Paper Error icon, and Resume light The Alert icon, the Paper Error icon, and the Resume light are on. Cause There is no paper in the input tray. Solution Load paper in the input tray. For information about how to load paper, see Load media on page 23. The Alert icon, the Paper Error icon, and the Resume light are blinking. Cause The printer receives a printing job, and detects that there is no paper in the input tray. Solution Load paper, and then press printing. (the Resume button) to continue Number Counter icon The Number Counter icon is showing E1 or E2, and the Resume light is blinking. Cause Paper width mismatch (E1) or Paper length mismatch (E2) has occurred. When printing, the printer detects that the paper size of the printing job does not match the width or length of the paper loaded. Solution 1. Press (the Cancel button) to cancel printing. 2. Load paper that matches the size of the page you want to print, or change the paper size settings in your application to match the size of the paper you are using. 3. Print the document again. TIP: You can change the default paper size automatically detected by the printer. For more information, see Change the default paper settings detected by printer on page 14. The Number Counter icon is showing E3. At the same time, the Ink/Printhead light, and the Resume light are blinking. ENWW Control panel lights and display icons status 11
18 Cause Solution The carriage inside the printer has stalled. 1. Open the front door, then the printhead access door. 2. Make sure the printhead latch is properly closed and the print carriage is not obstructed. Do not open the printhead latch. 3. Remove any jammed paper or other objects blocking the carriage. 4. Close printhead access door and the front door. 5. Press (the Resume button) to continue printing or press (the Cancel button). See Jams and paper-feed issues on page 88 for more information. The Number Counter icon is showing E4, and the Resume light is blinking. Cause Solution There is a paper jam. Clear the jam, and then press (the Resume button) to continue printing. For more information, see Jams and paper-feed issues on page 88. CAUTION: Do not open the printhead latch. The Number Counter icon is showing E5. Cause The scanner is not working. Solution Turn the printer off, and then on again. If the problem persists, contact HP. The printer still prints even if the scanner is not working. The Number Counter icon is showing E6. 12 Chapter 1 Get started ENWW
19 Cause The printer is in an error state. Solution Reset the printer. 1. Turn off the printer. 2. Unplug the power cord. 3. Wait a minute, and then plug the power cord back in. 4. Turn on the printer. If the problem persists, contact HP. Ink icon, CMYK icon, and Ink/Printhead light The CMYK icons are on, and one or more Ink icons are blinking. Cause Ink tank is low on ink. Solution Refill the indicated ink tank that is low on ink. The CMYK icons are on, and one or more Ink icons are blinking. The Ink/Printhead light is on. Cause Ink tank is very low on ink. Solution Refill the indicated ink tank that is very low on ink. The Number Counter icon shows E7. The CMYK icons are on. The Ink/Printhead light, one or more Ink icons, and the Alert icon are blinking. Cause Ink tank is out of ink. Solution Refill the indicated ink tank that is out of ink. ENWW Control panel lights and display icons status 13
20 Change the default paper settings detected by printer The printer can automatically detect whether the input tray is loaded with paper and also detect whether the loaded paper width is large, small, or medium. You can change the default large, medium, or small paper size detected by the printer. To change the default paper settings from the embedded web server 1. Open the embedded web server (EWS). For more information, see Open the embedded web server on page Click the Settings tab. 3. From the left menu, click Preferences, click Tray and Paper Management, and then make the necessary changes. 4. Click Apply. 14 Chapter 1 Get started ENWW
21 Paper basics The printer is designed to work well with most types of office paper. It is best to test a variety of print paper types before buying large quantities. Use HP paper for optimum print quality. Visit the HP website at for more information about HP paper. HP recommends plain papers with the ColorLok logo for printing everyday documents. All papers with the ColorLok logo are independently tested to meet high standards of reliability and print quality, and produce documents with crisp, vivid color, bolder blacks, and that dry faster than ordinary plain papers. Look for papers with the ColorLok logo in a variety of weights and sizes from major paper manufacturers. This section contains the following topics: Recommended papers for printing Order HP paper supplies Recommended papers for printing Photo printing If you want the best print quality, HP recommends using HP papers that are specifically designed for the type of project you are printing. Depending on your country/region, some of these papers might not be available. HP Premium Plus Photo Paper HP Premium Plus Photo Paper is HP s highest-quality photo paper for your best photos. With HP Premium Plus Photo Paper, you can print beautiful photos that are instant-dry so you can share them right off the printer. It is available in several sizes, including A4, 8.5 x 11 inches, 4 x 6 inches (10 x 15 cm), 5 x 7 inches (13 x 18 cm), and in two finishes — glossy or soft gloss (semi-gloss). Ideal for framing, displaying, or gifting your best photos and special photo projects. HP Premium Plus Photo Paper delivers exceptional results with professional quality and durability. HP Advanced Photo Paper This glossy photo paper features an instant-dry finish for easy handling without smudging. It resists water, smears, fingerprints, and humidity. Your prints have a look and feel comparable to a store-processed photo. It is available in several sizes, including A4, 8.5 x 11 inches, 10 x 15 cm (4 x 6 inches), 13 x 18 cm (5 x 7 inches). It is acid-free for longer lasting documents. HP Everyday Photo Paper Print colorful, everyday snapshots at a low cost, using paper designed for casual photo printing. This affordable photo paper dries quickly for easy handling. Get sharp, crisp images when you use this paper with any inkjet printer. It is available in glossy finish in several sizes, including A4, 8.5 x 11 inches, 5 x 7 inches, and 4 x 6 inches (10 x 15 cm). It is acid-free for longer lasting documents. HP Photo Value Packs HP Photo Value Packs conveniently package original HP ink cartridges and HP Advanced Photo Paper to save you time and take the guesswork out of printing affordable, lab-quality photos with your HP printer. ENWW Paper basics 15
22 Business documents Everyday printing Original HP inks and HP Advanced Photo Paper have been designed to work together so your photos are long lasting and vivid, print after print. Great for printing out an entire vacation’s worth of photos or multiple prints to share. HP Premium Presentation Paper 120g Matte or HP Professional Paper 120 Matt This paper is a heavy two-sided matte paper perfect for presentation, proposals, reports, and newsletters. It is heavyweight for an impressive look and feel. HP Brochure Paper 180g Glossy or HP Professional Paper 180 Glossy These papers are glossy-coated on both sides for two-sided use. They are the perfect choice for nearphotographic reproductions and business graphics for report covers, special presentations, brochures, mailers, and calendars. HP Brochure Paper 180g Matte or HP Professional Paper 180 Matte These papers are matte-coated on both sides for two-sided use. They are the perfect choice for nearphotographic reproductions and business graphics for report covers, special presentations, brochures, mailers, and calendars. All the papers listed for everyday printing feature ColorLok Technology for less smearing, bolder blacks, and vivid colors. HP Bright White Inkjet Paper HP Bright White Inkjet Paper delivers high-contrast colors and sharp text. It is opaque enough for two-sided color usage with no show-through, which makes it ideal for newsletters, reports, and flyers. HP Printing Paper HP Printing Paper is a high-quality multifunction paper. It produces documents that look and feel more substantial than documents printed on standard multipurpose or copy paper. It is acid-free for longer lasting documents. HP Office Paper HP Office Paper is a high-quality multifunction paper. It is suitable for copies, drafts, memos, and other everyday documents. It is acid-free for longer lasting documents. HP Office Recycled Paper Order HP paper supplies HP Office Recycled Paper is a high-quality multifunction paper made with 30% recycled fiber. The printer is designed to work well with most types of office paper. Use HP paper for optimum print quality. To order HP papers and other supplies, go to At this time, some portions of the HP website are available in English only. HP recommends plain papers with the ColorLok logo for printing and copying of everyday documents. All papers with the ColorLok logo are independently tested to meet high standards of reliability and print quality, and produce documents with crisp, vivid color, bolder blacks and shorter dry-time than ordinary plain papers. Look for papers with the ColorLok logo in a variety of weights and sizes from major paper manufacturers. 16 Chapter 1 Get started ENWW
23 Open the HP printer software (Windows) You can use the HP printer software to configure the printer settings, check estimated ink levels, order printing supplies, maintain the printer, resolve printing issues, and more. More information about the available printer software options is provided throughout this guide. After installing the HP printer software, depending on your operating system, do one of the following: NOTE: If you are using the HP Smart app instead of the printer software, see Use the HP Smart app to print, scan, and troubleshoot on page 18. Windows 10: From the computer desktop, click Start, select HP from the app list, and then select the icon with the printer name. Windows 8.1: Click the down arrow in the lower left corner of the Start screen, and then select the printer name. Windows 8: Right-click an empty area on the Start screen, click All Apps on the app bar, and then select the printer name. Windows 7: From the computer desktop, click Start, select All Programs, click HP, click the folder for the printer, and then select the icon with the printer name. ENWW Open the HP printer software (Windows) 17
24 Use the HP Smart app to print, scan, and troubleshoot HP Smart helps you to set up, scan, print, share, and manage your HP printer. You can share documents and images through , text messages, and popular cloud and social media services (such as icloud, Google Drive, Dropbox, and Facebook). You can also set up new HP printers, as well as monitor and order supplies. NOTE: The HP Smart app is supported on ios, Android, Windows 10, OS X 10.11, and macos and later devices. The app might not be available in all languages. Some features might not be available with all printer models. Get more information about the HP Smart app For basic instructions on how to print, scan, and troubleshoot using HP Smart, see Print using the HP Smart app on page 30, Scan using the HP Smart app on page 47, and Get help from the HP Smart app on page 87. For more information, you can also visit: ios/android: Windows: Mac: To install the HP Smart app and connect to your printer 1. To get the HP Smart app, visit 123.hp.com to download and install the app. Users of ios, Android, and Windows 10 devices can also get the app from the device’s app store. 2. After installation, open the app. ios/android: From the device desktop or app menu, tap HP Smart. Windows 10: From the computer desktop, click Start, and then select HP Smart from the app list. Mac: From the Launchpad, select the HP Smart app. 3. Connect to your printer. For information, see Connect your printer by using the HP Smart app on page Chapter 1 Get started ENWW
25 Sleep mode Power usage is reduced while in Sleep mode. After initial setup of printer, the printer will enter Sleep mode after 5 minutes of inactivity. The Power button light is dimmed and the printer control panel display is off in Sleep mode. Pressing any button on the control panel, or sending a print or scan job can wake up the printer from sleep mode. To change the Sleep mode settings from the Embedded Web Server (EWS) 1. Open the embedded web server (EWS). For more information, see Open the embedded web server on page Click the Settings tab. 3. In the Power Management section, click Energy Save Mode, and select the desired option. 4. Click Apply. ENWW Sleep mode 19
26 Quiet Mode Quiet Mode slows down printing to reduce overall noise without affecting print quality. Quiet Mode only works for printing with Normal print quality on plain paper. To reduce printing noise, turn on Quiet Mode. To print at normal speed, turn Quiet Mode off. Quiet Mode is off by default. NOTE: In Quiet Mode, if you print on plain paper with the Draft or Best print quality, or if you print photos or envelopes, the printer works in the same way as when Quiet Mode is off. To turn Quiet Mode on or off from the printer software (Windows) 1. Open the HP printer software. For more information, see Open the HP printer software (Windows) on page Click the Quiet Mode tab. NOTE: The Quiet mode tab is available only if the printer is connected from the HP printer software. 3. Click On or Off. 4. Click Save Setting. To turn Quiet Mode on or off from the Embedded Web Server (EWS) 1. Open the EWS. For more information, see Open the embedded web server on page Click the Settings tab. 3. In the Preferences section, select Quiet Mode, and then select On or Off 4. Click Apply. 20 Chapter 1 Get started ENWW
27 Auto-Off This feature turns the printer off after 2 hours of inactivity to help reduce energy use. Auto-Off turns the printer off completely, so you must use the Power button to turn the printer back on. If your printer supports this energy saving feature, Auto-Off is automatically enabled or disabled depending on printer capabilities and connection options. Even when Auto-Off is disabled, the printer enters Sleep mode after 5 minutes of inactivity to help reduce energy use. Auto-Off is enabled when the printer is turned on, if the printer does not have network, fax or Wi-Fi Direct capability, or is not using these capabilities. Auto-Off is disabled when a printer s wireless or Wi-Fi Direct capability is turned on or when a printer with fax, USB, or Ethernet network capability establishes a fax, USB, or Ethernet network connection. TIP: To conserve battery power, you can enable Auto-Off, even when the printer is connected or wireless is turned on. ENWW Auto-Off 21
28 2 Print Load media Print documents Print photos Print envelopes Print using the HP Smart app Print using the maximum dpi Print using a Mac desktop or laptop Print with mobile devices Tips for print success View print job status and manage print jobs (Windows) Customize your printer (Windows) 22 Chapter 2 Print ENWW
29 Load media To load paper 1. Raise the input tray. 2. Slide the paper-width guide to the left. 3. Insert a stack of paper into the input tray with the short edge down and the print-side up, and slide the stack of paper down until it stops. If you are loading small-size paper (like photo paper), make sure the paper stack is aligned with the farright side of the tray. ENWW Load media 23
30 4. Slide the paper-width guide to the right until it stops at the edge of the paper. 5. Pull out the output tray and the tray extender. To load envelopes 1. Raise the input tray. 24 Chapter 2 Print ENWW
31 2. Slide the paper-width guide to the left. 3. Insert one or more envelopes into the far-right side of the input tray and slide the stack of envelopes down until it stops. The side to be printed on should face up. a. For envelope with flap on the long edge, insert the envelope vertically with the flap on the left side and facing down. b. For envelope with the flap on the short edge, insert the envelope vertically with the flap on the top and facing down. ENWW Load media 25
32 4. Slide the paper-width guide to the right against the stack of envelopes until it stops. 5. Pull out the output tray and the tray extender. 26 Chapter 2 Print ENWW
33 Print documents Before printing documents, make sure you have paper loaded in the input tray and the output tray is open. For more information about loading paper, see Load media on page 23. To print a document (Windows) 1. From the File menu in your software, select Print. 2. Make sure your printer is selected. 3. Click the button that opens the Properties dialog box. Depending on your software application, this button might be called Properties, Options, Printer Setup, Printer Properties, Printer, or Preferences. 4. Select the appropriate options on the Printing Shortcuts or Printing Shortcut tab. To change other print settings, click the other tabs. To learn more about the options in the printer driver, hover your mouse over each option to view the tooltips. NOTE: If you change the paper size, be sure to load the correct paper in the input tray. 5. Click OK to close the Properties dialog box. 6. Click Print or OK to begin printing. To print on both sides of the page (Windows) 1. From the File menu in your software, select Print. 2. Make sure your printer is selected. 3. Click the button that opens the Properties dialog box. Depending on your software application, this button might be called Properties, Options, Printer Setup, Printer Properties, Printer, or Preferences. 4. On the Printing Shortcuts or Printing Shortcut tab, select the Two-sided (Duplex) Printing shortcut, and then select an option from the Print On Both Sides Manually drop-down list. To change other print settings, click the other tabs. To learn more about the options in the printer driver, hover your mouse over each option to view the tooltips. NOTE: If you change the paper size, be sure to load the correct paper in the input tray. 5. Click OK to close the Properties dialog box. 6. Click Print or OK to begin printing. ENWW Print documents 27
34 Print photos Before printing photos, make sure you have photo paper loaded in the input tray and the output tray is open. For more information about loading paper, see Load media on page 23. To print a photo on photo paper (Windows) 1. From the File menu in your software, select Print. 2. Make sure your printer is selected. 3. Click the button that opens the Properties dialog box. Depending on your software application, this button might be called Properties, Options, Printer Setup, Printer Properties, Printer, or Preferences. 4. Select the appropriate options on the Printing Shortcuts or Printing Shortcut tab. To change other print settings, click the other tabs. To learn more about the options in the printer driver, hover your mouse over each option to view the tooltips. NOTE: If you change the paper size, be sure to load the correct paper in the input tray. 5. Click OK to close the Properties dialog box. 6. Click Print or OK to begin printing. NOTE: After the printing is finished, remove unused photo paper from the input tray. Store the photo paper so it does not start to curl, which could reduce the quality of your printout. 28 Chapter 2 Print ENWW
35 Print envelopes Before printing envelopes, make sure you have envelopes loaded in the input tray and the output tray is open. You can load one or more envelopes into the input tray. Do not use shiny or embossed envelopes or envelopes that have clasps or windows. For more information about loading envelopes, see Load media on page 23. NOTE: For details on how to format text for printing on envelopes, refer to the documentation of the application that you are using. To print an envelope (Windows) 1. From the File menu in your software, select Print. 2. Make sure your printer is selected. 3. Click the button that opens the Properties dialog box. Depending on your software application, this button might be called Properties, Options, Printer Setup, Printer Properties, Printer, or Preferences. 4. Select the appropriate options on the Printing Shortcuts or Printing Shortcut tab. To change other print settings, click the other tabs. To learn more about the options in the printer driver, hover your mouse over each option to view the tooltips. NOTE: If you change the paper size, be sure to load the correct paper in the input tray. 5. Click OK to close the Properties dialog box. 6. Click Print or OK to begin printing. ENWW Print envelopes 29
36 Print using the HP Smart app This section provides basic instructions for using the HP Smart app to print from your ios, Android, Windows, and Mac devices. For more information about the app, see Use the HP Smart app to print, scan, and troubleshoot on page 18. To begin using the HP Smart app to print 1. Load paper in the input tray. For more information, see Load media on page Open the HP Smart app on your device. 3. On the Home screen of HP Smart, make sure your printer is selected. TIP: If a printer is already set up, you can select it from the Home screen of HP Smart by swiping left or right and selecting it. To use a different printer, click or tap or add a new printer. (Plus icon) on the Home screen, and then select a different printer To print from Android or ios device 1. On the Home screen of HP Smart, tap a printing option (for example, Print Photos or Print Facebook Photos, etc.). You can print photos and documents from your device, cloud storage, or social media sites. 2. Select the photo or document you want to print. 3. Tap Print. To print from a Windows 10 device 1. On the Home screen of HP Smart, click or tap Print at the bottom of the screen. 2. Select Print Photo, locate a photo you want to print, and then click or tap Select Photos to Print. Select Print Document, locate a PDF document you want to print, and then click or tap Print. 3. Select the appropriate options. To view more settings, click or tap More settings. For more information about printing settings, see Tips for print success on page Click or tap Print to begin printing. To print from a Mac device 1. On the Home screen of HP Smart, click Print tile, and then click Print Document or Print Photo. 2. Locate the document or photo in the Documents folder or Pictures library, or browse to another folder where the file is saved. 3. Select the document or photo you want, and then click Print. 4. Select a different printer or make any changes to the print settings, such as paper size or output quality. 5. Click Print. 30 Chapter 2 Print ENWW
37 Print using the maximum dpi Use maximum dots per inch (dpi) to print high-quality, sharp images on photo paper. Printing in maximum dpi takes longer than printing with other settings and requires a large amount of disk space. For supported print resolutions, visit the printer support website at To print in maximum dpi mode (Windows) 1. From your software, select Print. 2. Make sure your printer is selected. 3. Click the button that opens the Properties dialog box. Depending on your software application, this button might be called Properties, Options, Printer Setup, Printer Properties, Printer, or Preferences. 4. Select the appropriate options. Windows 10, Windows 8.1, and Windows 8 Click the Paper/Quality tab. From the Paper Size drop-down list, select the appropriate paper size. From the Paper Type drop-down list, select the appropriate paper type. Click the Advanced tab, and then select Print in Max DPI. Windows 7 Click the Paper/Quality tab. From the Media drop-down list, select the appropriate paper type. Click the Advanced button. Select the appropriate paper size from the Paper Size drop-down list. In the Printer Features area, select Yes from the Print in Max DPI drop-down list. Then click OK to close the Advanced Options dialog. For more printing tips, see Printer settings tips on page Confirm the orientation on the Layout tab, and then click OK to print. ENWW Print using the maximum dpi 31
38 Print using a Mac desktop or laptop Instructions for HP AirPrint-compatible printers and Mac computers with OS X and macos and later. Printer connected to network If your printer is already set up and connected to your wireless network, you can enable printing from a Mac desktop or laptop using the System Preferences menu. 1. Open System Preferences and select Printers and Scanners. 2. Click Add + to set up the printer on your Mac. Choose your printer from the displayed list of network printers, then click Add. This will install the available print, scan, or fax drivers for your printer. These instructions let you print from your Mac. Continue to use the HP Smart app to monitor ink levels and printer alerts. Printer not connected to network If you have not set up or connected your printer to your network, go to 123.hp.com to install the necessary software. 32 Chapter 2 Print ENWW
39 Print with mobile devices Print from mobile devices You can print documents and photos directly from your mobile devices, including ios, Android, Windows Mobile, Chromebook and Amazon Kindle. NOTE: You can also use the HP Smart app to print from mobile devices. For more information, see Print using the HP Smart app on page 30. To print from mobile devices 1. Make sure your printer and device are turned on and connected to the same wireless network. TIP: If you want to print without connecting to a router, use Wi-Fi Direct to print from mobile device. For more information, see Connect wirelessly to the printer without a router (Wi-Fi Direct) on page Enable printing on your mobile device: ios: Use the Print option from the Share menu. NOTE: Devices running ios 4.2 or later have AirPrint preinstalled. Android: Download the HP Print Service Plugin (supported by Android 4.4 devices and later) from the Google Play Store and enable it on your device. Windows Mobile: Tap Print from the Device menu. No setup is required since the software is preinstalled. NOTE: If your printer is not listed, you might need to do a one-time setup of the printer using the Add Printer wizard. Chromebook: Download and install the HP Print for Chrome app from the Chrome Web Store to enable both Wi-Fi and USB printing. Amazon Kindle Fire HD9 and HDX: The first time you select Print on your device, the HP Print Service Plugin is automatically downloaded to enable mobile printing. NOTE: For detailed information about enabling printing from your mobile devices, visit the HP Mobile Printing website ( ). If a local version of this website is not available in your country/region or language, you might be directed to the HP Mobile Printing website in another country/ region or language. 3. Make sure the loaded paper matches the paper settings of the printer (see Load media on page 23 for more information). Accurately setting the paper size for the paper that is loaded enables your mobile device to know what paper size it is printing. NOTE: To change the default paper settings, see Change the default paper settings detected by printer on page 14. ENWW Print with mobile devices 33
40 Tips for print success Paper loading tips Printer settings tips To print successfully, the HP printheads should be functioning properly, the ink tanks should be filled with sufficient ink, the paper should be loaded correctly, and the printer should have the appropriate settings. For more information, see Tips for working with ink and printhead on page 66. Print settings do not apply to copying or scanning. Paper loading tips Load a stack of paper (not just one page). All of the paper in the stack should be in the same size and type to avoid a paper jam. Load the paper with side to be printed on facing up. Ensure that paper loaded in the input tray lays flat, and the edges are not bent or torn. Adjust the paper-width guide in the input tray to fit snugly against all paper. Make sure the paper-width guide does not bend the paper in the input tray. Printer settings tips Printer settings tips (Windows) For more information, see Load media on page 23. To change default print settings, open the HP printer software, click Print & Scan, and then click Set Preferences. For information how to open the printer software, see Open the HP printer software (Windows) on page 17. TIP: To learn more about the options in the printer driver, hover your mouse over each option to view the tooltips. You can use printing shortcuts to save time setting desired printing preferences. A printing shortcut stores the settings that are appropriate for a particular type of job, so that you can set all the options with a single click. To use a shortcut, go to the Printing Shortcuts or Printing Shortcut tab, select the desired shortcut, and then click OK. To add a new printing shortcut, set the desired printing preferences on the Paper/Quality, Layout, or Advanced tab, select the Printing Shortcuts or Printing Shortcut tab, click Save As and enter a name, and then click OK. To delete a printing shortcut, select it, and then click Delete. NOTE: You cannot delete the default printing shortcuts. To understand paper and paper tray settings: Paper Size: Select the paper size you loaded in the input tray. Paper Source: Select the paper tray you loaded the paper into. Paper Type or Media: Select the paper type you are using. 34 Chapter 2 Print ENWW
41 To understand color or black and white settings: Color: Uses black and color ink for full color prints. Black & White or Black Ink Only: Uses the black ink only for normal or lower quality black and white prints. High Quality Grayscale: Uses black and color ink to produce a wider range of black and grey tones for high quality black and white prints. To understand print quality settings: The print quality is measured in print resolution dots per inch (dpi). Higher dpi produces clearer and more detailed prints, but slows print speed and might use more ink. Draft: Lowest dpi typically used when ink levels are low or when high quality prints are not needed. Normal: Suitable for most print jobs. Best: Better dpi than Normal. Print in Max DPI: Highest dpi setting available for print quality. HP Real Life Technologies: This feature smooths and sharpens images and graphics for improved print quality. To understand page and layout settings: Orientation: Select Portrait for vertical prints or Landscape for horizontal prints. Print on Both Sides Manually: Manually flip the pages after one side of the paper prints out so that you can print on both sides of the paper. Flip on Long Edge: Select it if you want to flip pages by the long edge of the paper when printing on both sides of the paper. Flip on Short Edge: Select it if you want to flip pages by the short edge of the paper when printing on both sides of the paper. Booklet Layout or Booklet: Allows you to print a multiple-page document as a booklet. It places two pages on each side of a sheet that can then be folded into a booklet in half size of the paper. Left binding or Booklet-LeftBinding: The binding side after folded into a booklet appears at the left side. Select this option if your reading habit is from left to right. Right binding or Booklet-RightBinding: The binding side after folded into a booklet appears at the right side. Select this option if your reading habit is from right to left. Borderless or Page Borders: Allows you to add or remove borders to the pages if you print the document with two or more pages per sheet. Pages per Sheet Layout: Helps you specify the order of the pages if you print the document with more than two pages per sheet. Pages to Print: Allows you to print the odd pages only, print the even pages only, or print all pages. Reverse page order or Page Order: Allows you to print pages from front to back or in reverse order. ENWW Tips for print success 35
42 View print job status and manage print jobs (Windows) To view, pause, or cancel your print jobs, open the HP printer software (available from the Start menu), click Print & Scan, and then click See What s Printing. 36 Chapter 2 Print ENWW
43 Customize your printer (Windows) To change the printer name, security settings, or other properties, open the HP printer software (available from the Start menu), click Print & Scan, and then click Customize Your Printer. ENWW Customize your printer (Windows) 37
44 3 Use Web Services What are Web Services? Set up Web Services Print with HP eprint Use the HP Connected website Remove Web Services 38 Chapter 3 Use Web Services ENWW
45 What are Web Services? HP eprint HP eprint is a free service from HP that allows you to print to your HP eprint-enabled printer anytime, from any location. It’s as simple as sending an to the address assigned to your printer when you enable Web Services on the printer. No special drivers or software are needed. If you can send an , you can print from anywhere, using HP eprint. Once you have signed up for an account on HP Connected ( ; might not be available in all countries/regions), you can sign in to customize your printer s HP eprint address, control who can use the address to print, and get help for HP eprint. ENWW What are Web Services? 39
46 Set up Web Services Before you set up Web Services, make sure your printer is connected to the Internet using a wireless connection. To set up Web Services using the embedded web server 1. Open the embedded web server (EWS). For more information, see Open the embedded web server on page Click the Web Services tab. 3. In the Web Services Settings section, click Setup, click Continue, and follow the onscreen instructions to accept the terms of use. NOTE: If prompted for proxy settings and if your network uses proxy settings, follow the on-screen instructions to set up a proxy server. If you do not have the proxy details, contact your network administrator or the person who set up the network. 4. When the printer is connected to the server, the printer prints an information page. Follow the instructions on the information page to finish the setup. 40 Chapter 3 Use Web Services ENWW
47 Print with HP eprint HP eprint allows you to print to your HP eprint-enabled printer anytime, from any location. Before you can use HP eprint, make sure the printer is connected to an active network providing Internet access. To find the HP eprint address Press (the Information button) to print an information page, and then find the address for your printer from the page. To print a document using HP eprint 1. Make sure you have set up Web Services. For more information, see Set up Web Services on page your document to the printer. a. On your computer or mobile device, open your application. NOTE: For information about using the application on your computer or mobile device, see the documentation provided with the application. b. Create a new and attach the document to print. c. Send the to the printer address. The printer prints the attached document. NOTE: The will be printed once it is received. As with any , there is no guarantee when or whether it will be received. You can check the print status on HP Connected ( ;). This site might not be available in all countries/regions. NOTE: Documents printed with HP eprint may appear different from the original. Style, formatting, and text flow may differ from the original document. For documents that need to be printed with a higher quality (such as legal documents), we recommend that you print from the software application on your computer, where you will have more control over what your printout looks like. To turn off HP eprint using the embedded web server 1. Open the embedded web server (EWS). For more information, see Open the embedded web server on page Click the Web Services tab. 3. From the left menu, click Web Services Settings, and then click Summary. 4. In the Web Services Settings section, click Turn off for HP eprint. NOTE: To remove all Web Services, see Remove Web Services on page 43. Click here to go online for more information. ENWW Print with HP eprint 41
48 Use the HP Connected website Use HP s free HP Connected website to set up increased security for HP eprint, and specify the addresses that are allowed to send to your printer. You can also get product updates, and other free services. Go to the HP Connected website (might not be available in all countries/regions) for more information and specific terms and conditions: 42 Chapter 3 Use Web Services ENWW
49 Remove Web Services Use the following instructions to remove Web Services. To remove Web Services using the embedded web server 1. Open the embedded web server (EWS). For more information, see Open the embedded web server on page Click the Web Services tab. 3. From the left menu, click Web Services Settings, click Remove Web Services, and then follow the on-screen instructions. ENWW Remove Web Services 43
50 4 Copy and scan Copy documents Load original Scan using the HP Smart app Scan using the HP printer software Scan using Webscan Tips for successful scanning and copying 44 Chapter 4 Copy and scan ENWW
51 Copy documents To copy documents NOTE: All documents are copied in normal quality print mode. You cannot change the print mode quality when copying. You can also use the HP Smart app to copy from your mobile device. For information about this app, see Use the HP Smart app to print, scan, and troubleshoot on page Load paper in the input tray. For information about how to load paper, see Load media on page Load the original print-side down near the icon at the corner of the scanner glass. For more information, see Load original on page Press either (the Black Copy button) or (the Color Copy button) to make a copy. Copying will start two seconds after the last button press. TIP: You can increase the number counter by pressing, and holding a copy button. To change the paper settings when copying Current paper type Do this To change to this paper type Printer display shows this icon Plain paper Press and hold both copy buttons ( ) at the same time for three seconds. Photo paper Press and hold both copy buttons ( ) at the same time for three seconds. Photo paper Plain paper ENWW Copy documents 45
52 Load original To load an original on the scanner glass 1. Lift the scanner lid. 2. Load the original print-side down near the icon at the corner of the scanner glass. 3. Close the scanner lid. 46 Chapter 4 Copy and scan ENWW
53 Scan using the HP Smart app This section provides basic instructions for using the HP Smart app to scan from your ios, Android, Windows, and Mac devices. For more information about the app, see Use the HP Smart app to print, scan, and troubleshoot on page 18. You can use the HP Smart app to scan documents or photos from the printer’s scanner, and you can also scan using your device camera. HP Smart includes editing tools that allow you to adjust the scanned image before saving or sharing. You can print, save your scans locally or in cloud storage, and share them via , SMS, Facebook, Instagram, etc. To scan with HP Smart, follow the instructions provided in the appropriate section below, depending on the type of device you are using. Scan from an ios or Android device Scan from the printer to your Mac device Scan from a Windows 10 device Scan from an ios or Android device 1. Open the HP Smart app on your device. 2. On the Home screen of HP Smart, make sure your printer is selected. TIP: If a printer is already set up, you can select it from the Home screen of HP Smart by swiping left or right and selecting it. To use a different printer, click or tap or add a new printer. (Plus icon) on the Home screen, and then select a different printer 3. Tap the scanning option you want to use. If you are using the device camera, make sure you are in a well-lit area, and the photo or document does not blend in with the surface it rests on. If you are using the printer scanner, tap the Settings icon to select the input source and change the scan settings, and then tap the Scan icon. If you select the option for files and photos, follow onscreen instructions to select the desired file, make the desired changes, and save the changes. 4. When you have finished adjusting the scanned document or photo, save, share, or print it. Scan from the printer to your Mac device 1. Load the original print-side down near the icon at the corner of the scanner glass on the printer. 2. Open the HP Smart app on your device. 3. On the Home screen of HP Smart app, make sure your printer is selected. 4. Click the Scan tile. 5. From the Scan window, make the desired changes, and then click Scan. 6. In the scan preview, click Edit to make the desired changes, and then apply the changes. 7. Click Add Pages to add pages to your scan job, if necessary, and then print, save, or share the scan. ENWW Scan using the HP Smart app 47
54 Scan from a Windows 10 device To scan a document or photo using the printer scanner 1. Load the original print-side down near the icon at the corner of the scanner glass on the printer. 2. Open HP Smart. For more information, see Use the HP Smart app to print, scan, and troubleshoot on page Select Scan, and then select Scanner. 4. Click or tap the Settings icon to modify the basic settings. Select Glass from the Source drop-down list. 5. Click or tap the Preview icon to preview and adjust the image if necessary. 6. Click or tap the Scan icon. 7. Make other adjustments if necessary: Click or tap Add Pages to add more documents or photos. Click or tap Edit to rotate or crop the document or image, or adjust its contrast, brightness, saturation, or angle. 8. Select the file type you want, and then click or tap the Save icon to save it or click or tap the Share icon to share it with others. To scan a document or photo using the device camera If your device has a camera, you can use the HP Smart app to scan a printed document or photo with the device camera. You can then use HP Smart to edit, save, print or share the image. 1. Open HP Smart. For more information, see Use the HP Smart app to print, scan, and troubleshoot on page Select Scan, and then select Camera. 3. Put a document or photo in front of the camera, and then click or tap the round button at the bottom of the screen to take an image. 4. Adjust boundaries if needed. Click or tap the Apply icon. 5. Make other adjustments if necessary: Click or tap Add Pages to add more documents or photos. Click or tap Edit to rotate or crop the document or image, or adjust its contrast, brightness, saturation, or angle. 6. Select the file type you want, and then click or tap the Save icon to save it or click or tap the Share icon to share it with others. 48 Chapter 4 Copy and scan ENWW
55 To edit a previously scanned document or photo HP Smart provides editing tools, such as crop and rotate, which you can use to adjust a previously scanned document or photo on your device. 1. Open HP Smart. For more information, see Use the HP Smart app to print, scan, and troubleshoot on page Select Scan, and then select Import. 3. Select the document or photo that you want to adjust, and then click or tap Open. 4. Adjust boundaries if needed. Click or tap the Apply icon. 5. Make other adjustments if necessary: Click or tap Add Pages to add more documents or photos. Click or tap Edit to rotate or crop the document or image, or adjust its contrast, brightness, saturation, or angle. 6. Select the file type you want, and then click or tap Save or Share to save the file or share it with others. ENWW Scan using the HP Smart app 49
56 Scan using the HP printer software Scan from a computer Change scan settings (Windows) Create a new scan shortcut (Windows) Scan from a computer Before scanning from a computer, make sure you have already installed the HP recommended printer software. The printer and computer must be connected and turned on. To scan a document or photo to a file (Windows) 1. Load the original print-side down near the icon at the corner of the scanner glass. 2. In the HP printer software (available from the Start menu), click Scan, and then click Scan a Document or Photo. 3. Select the type of scan you want and then click Scan. Choose Save as PDF to save the document (or photo) as a PDF file. Choose Save as JPEG to save the photo (or document) as an image file. NOTE: scan. Click the More link at the top right corner of the Scan dialog to review and modify settings for any For more information, see Change scan settings (Windows) on page 50. If Show Viewer After Scan is selected, you can make adjustments to the scanned image in the preview screen. To scan a document or photo to (Windows) 1. Load the original print-side down near the icon at the corner of the scanner glass. 2. In the HP printer software, available from the Start menu, click Scan, and then click Scan a Document or Photo. 3. Select the type of scan you want and then click Scan. Choose as PDF or as JPEG to open your software with the scanned file as an attachment. NOTE: scan. Click the More link at the top right corner of the Scan dialog to review and modify settings for any For more information, see Change scan settings (Windows) on page 50. If Show Viewer After Scan is selected, you can make adjustments to the scanned image in the preview screen. Change scan settings (Windows) You can modify any of the scan settings either for a singular use or save the changes to use permanently. These settings include options such as page size and orientation, scan resolution, contrast, and the folder location for saved scans. 50 Chapter 4 Copy and scan ENWW
57 1. Load the original print-side down near the icon at the corner of the scanner glass. 2. In the HP printer software, available from the Start menu, click Scan, and then click Scan a Document or Photo. 3. Click the More link in the top right corner of the HP Scan dialog. The detailed settings pane appears on the right. The left column summarizes the current settings for each section. The right column allows you to change the settings in the highlighted section. 4. Click each section at the left of the detailed settings pane to review the settings in that section. You can review and change most settings using drop-down menus. Some settings allow greater flexibility by displaying a new pane. These are indicated by a + (plus sign) at the right of the setting. You must either click OK to accept or click Cancel to cancel any changes on this pane to return to the detailed settings pane. 5. When you have finished changing settings, do one of the following: Click Scan. You are prompted to save or reject the changes to the shortcut after the scan is finished. Click the save icon to the right of the shortcut, and then click Scan. Create a new scan shortcut (Windows) You can create your own scan shortcut to make scanning easier. For example, you might want to regularly scan and save photos in PNG format, rather than JPEG. 1. Load the original print-side down near the icon at the corner of the scanner glass. 2. In the HP printer software, available from the Start menu, click Scan, and then click Scan a Document or Photo. 3. Click Create New Scan Shortcut. 4. Enter a descriptive name, choose an existing shortcut on which to base your new shortcut, and then click Create. For example, if you are creating a new shortcut for photos, choose either Save as JPEG or as JPEG. This makes available the options for working with graphics when scanning. 5. Change the settings for your new shortcut to meet your needs, and then click the save icon to the right of the shortcut. NOTE: scan. Click the More link at the top right corner of the Scan dialog to review and modify settings for any For more information, see Change scan settings (Windows) on page 50. ENWW Scan using the HP printer software 51
58 Scan using Webscan Webscan is a feature of the embedded web server that lets you scan photos and documents from your printer to your computer using a web browser. This feature is available even if you did not install the printer software on your computer. NOTE: By default, Webscan is off. You can enable this feature from the EWS. To enable Webscan If you are unable to open Webscan in the EWS, your network administrator might have turned it off. For more information, contact your network administrator or the person who set up your network. 1. Open the embedded web server. For more information, see Open the embedded web server on page Click the Settings tab. 3. In the Security section, click Administrator Settings. 4. Select Webscan to enable Webscan. 5. Click Apply. To scan using Webscan Scanning using Webscan offers basic scan options. For additional scan options or functionality, scan from the HP printer software. 1. Load the original print-side down near the icon at the corner of the scanner glass. For more information, see Load original on page Open the embedded web server. For more information, see Open the embedded web server on page Click the Scan tab. 4. Click Webscan in the left pane, change any settings, and then click Start Scan. 52 Chapter 4 Copy and scan ENWW
59 Tips for successful scanning and copying Use the following tips to copy and scan successfully: Keep the glass and the back of the lid clean. The scanner interprets anything it detects on the glass as part of the image. Load the original print-side down near the icon at the corner of the scanner glass. To make a large copy of a small original, scan the original into the computer, resize the image in the scanning software, and then print a copy of the enlarged image. To avoid incorrect or missing scanned text, make sure the brightness is set appropriately in the software. You can also use the app to scan from your mobile device. For information about this app, see Use the HP Smart app to print, scan, and troubleshoot on page 18. ENWW Tips for successful scanning and copying 53
60 5 Manage ink and printhead This section contains the following topics: Ink levels Refill ink tanks Order ink supplies Print with black ink only Improve print quality Align printheads (cartridges) Clean printheads (cartridges) Clean printer Tips for working with ink and printhead Move printer 54 Chapter 5 Manage ink and printhead ENWW
61 Ink levels You can check the ink levels from the ink tanks on the printer. You can also check the HP printer software to determine when the tanks need to be refilled. To check the ink levels from the printer software (Windows) 1. In the HP printer software (available from the Start menu), click Estimated Levels at the top of the window. 2. In the Toolbox, click the Estimated Levels tab. ENWW Ink levels 55
62 Refill ink tanks NOTE: Product service or repairs required as a result of filling the ink tanks improperly and/or using non-hp ink will not be covered under warranty. To refill the ink tanks 1. Open the front door. 2. Open the cap of the ink tank you plan to refill. 3. Depending on the type of ink bottles you have, do one of following: Screw-cap bottles: Twist to remove the cap of the ink bottle. 56 Chapter 5 Manage ink and printhead ENWW
63 Flip-cap bottles: Twist to remove the cap of the ink bottle, remove the seal from the bottle, install the cap back onto the bottle, and then pull open the top part of the cap. 4. Match the color of the ink bottle with the color of the ink tank. Hold the bottle on the tank nozzle, making sure the tip of the bottle fits properly over the nozzle, and let the ink drain into the tank until the tank is full. If the ink does not drain immediately, remove the bottle and properly reinsert it on the tank. NOTE: Do not squeeze the ink bottles when filling ink. The ink bottles you have might vary. Screw-cap bottles Flip-cap bottles NOTE: If there is leftover ink in the bottle, store the bottle in an upright position in a cool and dry location. ENWW Refill ink tanks 57
64 5. Close the ink tank cap securely. 6. Repeat steps 2 to 5 to refill other ink tanks. 7. Close the front door of the printer. Precautions for working with ink bottles Use the following tips to work with ink bottles: Keep the ink bottles beyond the reach of children. Open the ink bottles only when you plan to fill the ink tanks. Do not tilt, shake, or squeeze the ink bottle when it is open to prevent ink leaks. Store the ink bottles in a cool, dark place. Do not drink or place in mouth. 58 Chapter 5 Manage ink and printhead ENWW
65 Order ink supplies Before ordering ink bottles, visually check the labels on the ink bottles to locate the ink bottle numbers. You can also find this information on the product label located on the inside of the front door. To order original HP supplies for the printer, go to If prompted, choose your country/ region, and then follow the prompts to find the right ink bottles for your printer. NOTE: Ordering ink bottles online is not supported in all countries/regions. If it is not available in your country/ region, you may still view supplies information and print a list for reference when shopping at a local HP reseller. ENWW Order ink supplies 59
66 Print with black ink only To print with black ink only(windows) 1. From your software, select Print. 2. Make sure your printer is selected. 3. Click the button that opens the Properties dialog box. Depending on your software application, this button might be called Properties, Options, Printer Setup, Printer Properties, Printer, or Preferences. 4. Select the appropriate options. Windows 10, Windows 8.1, and Windows 8 Click Paper/Quality tab. Under Print in Grayscale, select Black Ink Only from the list, and then click OK. Windows 7 On the Layout or Paper/Quality tab, click the Advanced button to open the Advanced Options dialog box. From the Print in Grayscale drop-down list, select Black Ink Only, and then click OK. 60 Chapter 5 Manage ink and printhead ENWW
67 Improve print quality From the printer software, you can print a diagnostics page to determine if cleaning or aligning the printheads (cartridges) is recommended to improve print quality. To print a print quality diagnostics page from the printer control panel 1. Load Letter or A4 unused plain white paper into the input tray. 2. Press (the Color Copy button), and (the Resume button) at the same time. To print a print quality diagnostics page (Windows) 1. Load Letter or A4 unused plain white paper into the input tray. 2. In the HP printer software (available from the Start menu), click Print & Scan at the top of the window. 3. In the Print section, click Maintain Your Printer to access the Toolbox. 4. In the Toolbox, click the Device Services tab, and then click Print Quality Diagnostics Page. 5. Review the cyan, magenta, yellow, and black boxes along with the other content on the diagnostics page. ENWW Improve print quality 61
68 6. Clean the printheads (cartridges), if the diagnostic page shows steaks or missing portions of the color and black boxes. For more information, see Clean printheads (cartridges) on page Align the printheads (cartridges) if straight lines appear jagged on printouts, or if the diagnostic page indicates aligning printheads might help. For more information, see Align printheads (cartridges) on page If print quality problems persist after cleaning and aligning printheads (cartridges), contact HP support. From the HP Smart app, you can also improve the print quality. For more information about the app, see Use the HP Smart app to print, scan, and troubleshoot on page Chapter 5 Manage ink and printhead ENWW
69 Align printheads (cartridges) Aligning the printheads (cartridges) can improve print quality. If you notice misaligned colors or lines in your printouts or on the print quality diagnostics page, you should perform an alignment. For more information about the print quality diagnostics page, see Improve print quality on page 61. To align the printheads (cartridges) (Windows) 1. Load Letter or A4 unused plain white paper into the input tray. 2. In the HP printer software (available from the Start menu), click Print & Scan at the top of the window. 3. In the Print section, click Maintain Your Printer to access the Toolbox. 4. In the Toolbox, click the Device Services tab, click the desired option, and then follow the onscreen instructions. ENWW Align printheads (cartridges) 63
70 Clean printheads (cartridges) If your prints are streaked or have incorrect or missing colors, the printheads might need to be cleaned. You can also check the print quality diagnostics page to determine if cleaning is recommended. The cleaning process prints one page to attempt to clean the printheads. For more information about the print quality diagnostics page, see Improve print quality on page 61. NOTE: Clean the printheads only when necessary. Unnecessary cleaning wastes ink and shortens the life of the printheads. To clean the printheads (cartridges) (Windows) 1. Load Letter or A4 unused plain white paper into the input tray. 2. In the HP printer software (available from the Start menu), click Print & Scan at the top of the window. 3. In the Print section, click Maintain Your Printer to access the Toolbox. 4. In the Toolbox, click the Device Services tab, click the desired option, and then follow the onscreen instructions. 64 Chapter 5 Manage ink and printhead ENWW
71 Clean printer You can run a cleaning routine from the printer software to prevent back of page smearing. To clean the printer from the printer software (Windows) 1. Load Letter or A4 unused plain white paper into the input tray. 2. In the HP printer software (available from the Start menu), click Print & Scan at the top of the window. 3. In the Print section, click Maintain Your Printer to access the Toolbox. 4. In the Toolbox, click the Device Services tab, click the desired option, and then follow the onscreen instructions. ENWW Clean printer 65
72 Tips for working with ink and printhead Printhead tips Ink tips Use the following tips to work with printheads: Use original HP printheads. To protect the printheads from drying out, always turn the printer off using the Power button, and wait until the Power button light goes out. Do not open or untape printheads until you are ready to install them. Leaving tape on the printheads reduces ink evaporation. Install both the black and color printheads correctly. For more information, see Cartridge problem on page 94. After you have set up the printer, do not open the printhead latch unless instructed to do so. Align the printer for best print quality. See Printing issues on page 101 for more information. If you remove a printhead from the printer for any reason, try to replace it again as soon as possible. Outside of the printer, if unprotected, the printhead may begin to dry out. Use the following tips to work with ink: Make sure the ink tanks are not low on ink before printing. For more information, see Ink levels on page 55. Refill the ink tanks when they are low on ink. Printing with the ink tanks low on ink may cause damage to your printer. Do not tilt the printer. NOTE: Original HP printheads and ink are designed and tested with HP printers and papers to help you easily produce great results, time after time. HP cannot guarantee the quality or reliability of non-hp supplies. Product service or repairs required as a result of using a non-hp supply will not be covered under warranty. 66 Chapter 5 Manage ink and printhead ENWW
73 Move printer To prevent damage to the printer or ink leakage, follow these instructions. If you are moving the printer within your home or office, keep the printhead latch closed, and keep the printer level. If you are moving the printer outside your home or office, see the instructions provided inbox for moving printer, or visit ENWW Move printer 67
74 6 Connect Before you begin To place the printer in setup mode Connect your printer to a wireless network with a router Connect wirelessly to the printer without a router (Wi-Fi Direct) Connect your printer by using the HP Smart app Change wireless settings Connect your printer to your computer with a USB cable (non-network connection) Change from a USB connection to a wireless network Use advanced printer management tools (for networked printers) Tips for setting up and using a networked printer 68 Chapter 6 Connect ENWW
75 Before you begin Ensure the following: The wireless network is set up and working properly. The printer and the computers that use the printer are on the same network (subnet). While connecting the printer, you might be prompted to enter the wireless network name (SSID) and a wireless password. The wireless network name is the name of your wireless network. The wireless password prevents other people from connecting to your wireless network without your permission. Depending on the level of security required, your wireless network might use either a WPA passphrase or WEP key. If you have not changed the network name or the security passkey since setting up your wireless network, you can sometimes find them on the back or side of the wireless router. If you cannot find the network name or the security password or cannot remember this information, see the documentation provided with your computer or with the wireless router. If you still cannot find this information, contact your network administrator or the person who set up the wireless network. ENWW Before you begin 69
76 To place the printer in setup mode If more than two hours have passed since you first turned on the printer and you have not set up the printer wirelessly, place the printer in network setup mode by restoring the printer network settings. The setup mode will last for two hours. For information on how to restore the printer network settings, see Restore original factory defaults and settings on page Chapter 6 Connect ENWW
77 Connect your printer to a wireless network with a router TIP: To print a wireless quick start guide, press (the Information button) for three seconds. TIP: To restore the printer network settings, see Restore original factory defaults and settings on page 111. Connect your printer to a wireless network using HP printer software Connect your printer to a wireless network using Wi-Fi Protected Setup (WPS) Connect your printer to a wireless network using HP printer software To connect the printer to an integrated wireless WLAN network, make sure you have the following: A wireless b/g/n network that includes a wireless router or access point. NOTE: The printer supports connections using 2.4GHz and 5GHz. A computer that is already connected to the wireless network that you want to use to connect your printer. Network name (SSID). WEP key or WPA Passphrase (if needed). To connect your printer using HP printer software (Windows) If connecting the printer wirelessly using HP software, place the printer in network setup mode by restoring the printer network settings. The setup mode will last for two hours. For information on how to restore the printer network settings, see Restore original factory defaults and settings on page In the HP printer software (available from the Start menu), click Tools. 2. Click Device Setup & Software. 3. Click Connect a new device, click Wireless, and then follow the onscreen instructions. Connect your printer to a wireless network using Wi-Fi Protected Setup (WPS) Before connecting your printer to a wireless network using WPS, make sure you have the following: A wireless b/g/n network that includes a WPS-enabled wireless router or access point. NOTE: The printer supports connections using 2.4GHz and 5GHz. A computer that is already connected to the wireless network that you want to use to connect your printer. Be sure you have installed the HP printer software on the computer. If you have a WPS router with a WPS push button, follow the Push Button method. If you are not certain your router has a push button, follow the PIN method. To use the Push Button Configuration (PBC) method 1. Press and hold (the Wireless button) on the printer for more than three seconds to start WPS push mode. The Wireless light starts blinking. ENWW Connect your printer to a wireless network with a router 71
78 2. Press the WPS button on your router. NOTE: The product begins a timer for approximately two minutes while a wireless connection is established. To use the PIN method 1. Find the WPS PIN by printing an information page. To print the page, press (the Wireless button) and (the Information button) at the same time, and hold them for five seconds. The WPS PIN is printed at the top of the information page. 2. Open the configuration utility or software for the wireless router or wireless access point, and then enter the WPS PIN. NOTE: For more information about using the configuration utility, see the documentation provided with the router or wireless access point. Wait for about two minutes. If the printer connects successfully, the Wireless light stops blinking but remains lit. 72 Chapter 6 Connect ENWW
79 Connect wirelessly to the printer without a router (Wi-Fi Direct) With Wi-Fi Direct, you can print wirelessly from a computer, smart phone, tablet, or other wireless-capable device without connecting to an existing wireless network. Guidelines for using Wi-Fi Direct NOTE: For more information about Wi-Fi Direct, visit Make sure Wi-Fi Direct for your printer is turned on. Make sure your computer or mobile device has the necessary software. If you are using a computer, make sure you have installed the printer software provided with the printer. If you have not installed the HP printer software on the computer, connect your computer to Wi-Fi Direct for your printer first and then install the printer software. Select Wireless when prompted by the printer software for a connection type. If you are using a mobile device, make sure you have installed a compatible printing app. Up to five computers and mobile devices can use the same Wi-Fi Direct connection. Wi-Fi Direct can be used while the printer is also connected either to a computer using a USB cable or to a network using a wireless connection. Wi-Fi Direct cannot be used to connect a computer, mobile device, or printer to the Internet. To turn Wi-Fi Direct on or off When Wi-Fi Direct is turned on, the follow these instructions. (Wi-Fi Direct icon) should appear on the printer display. If the icon is off, On the printer control panel, press (the Wireless button), and (the Resume button) at the same time, and hold them for three seconds. To turn off Wi-Fi Direct, follow the same instructions. NOTE: When you turn on Wi-Fi Direct the first time, the printer automatically prints a Wi-Fi Direct guide. The guide provides instructions about how to use Wi-Fi Direct. You can also press (the Resume button), and (the Information button) at the same time to print this guide. The guide may not be available in all languages. To find the Wi-Fi Direct name or password From the printer control panel, press (the Information button) to print the printer information page. NOTE: For other network details, press (the Wireless button), and (the Information button) at the same time to print the network configuration page. ENWW Connect wirelessly to the printer without a router (Wi-Fi Direct) 73
80 To change the Wi-Fi Direct connection security settings for the printer using the embedded web server 1. Open the embedded web server (EWS). For more information, see Open the embedded web server on page Click the Network tab. 3. From the left menu, click Wi-Fi Direct, and then click the Edit Settings button. 4. Make the necessary changes. 5. Click Apply. To print from a wireless-capable mobile device that supports Wi-Fi Direct For Google Android devices, make sure you have installed the latest version of HP Print Service Plugin on your mobile device. You can download this plugin from the Google Play application store. 1. Make sure you have turned on Wi-Fi Direct on the printer. 2. Turn on Wi-Fi Direct on your mobile device. For more information, see the documentation provided with the mobile device. 3. From your mobile device, select a document from a print enabled application, and then select the option to print the document. The list of available printers appears. 4. From the list of available printers, choose the Wi-Fi Direct name shown such as DIRECT-**-HP Smart Tank (where ** are the unique characters to identify your printer). If the Wi-Fi Direct connection security for the printer is Automatic (the default setting), the mobile device will connect to the printer automatically and send the print job. If the Wi-Fi Direct connection security for the printer is set to Manual: If the printer prints out a page with a PIN code, follow the instruction on the page. TIP: You can change the Wi-Fi Direct connection security setting for the printer from the embedded web server (EWS). For more information, see To change the Wi-Fi Direct connection security settings for the printer using the embedded web server on page 74. To print from a wireless-capable mobile device that does not support Wi-Fi Direct 1. Make sure you have installed a compatible printing app on your mobile device. For more information, visit 2. Make sure you have turned on Wi-Fi Direct on the printer. For more information, see To turn Wi-Fi Direct on or off on page Turn on the wireless (Wi-Fi) connection on your mobile device. For more information, see the documentation provided with the mobile device. 4. From the mobile device, connect to a new network. Use the process you normally use to connect to a new wireless network or hotspot. Choose the Wi-Fi Direct name from the list of wireless networks shown such as DIRECT-**-HP Smart Tank (where ** are the unique characters to identify your printer). 74 Chapter 6 Connect ENWW
81 NOTE: To find the Wi-Fi Direct name or password, see To find the Wi-Fi Direct name or password on page Enter the Wi-Fi Direct password of your printer when prompted. 6. Print your document. To print from a wireless-capable computer (Windows) 1. Make sure you have turned on Wi-Fi Direct on the printer. For more information, see To turn Wi-Fi Direct on or off on page Turn on the computer’s Wi-Fi connection. For more information, see the documentation provided with the computer. NOTE: If your computer does not support Wi-Fi, you are not able to use Wi-Fi Direct. 3. From the computer, connect to a new network. Use the process you normally use to connect to a new wireless network or hotspot. Choose the Wi-Fi Direct name from the list of wireless networks shown such as DIRECT-**-HP Smart Tank (where ** are the unique characters to identify your printer). Enter the Wi-Fi Direct password when prompted. To find the Wi-Fi Direct name or password, see To find the Wi-Fi Direct name or password on page Proceed to step 5 if the printer has been installed and connected to the computer over a wireless network. If the printer has been installed and connected to your computer with a USB cable, follow the steps below to install the printer software using the Wi-Fi Direct connection. a. Depending on your operating system, do one of the following: Windows 10: From the computer desktop, click Start, select HP from the app list, and then select the icon with the printer name. Windows 8.1: Click the down arrow in the lower left corner of the Start screen, and then select the printer name. Windows 8: Right-click an empty area on the Start screen, click All Apps on the app bar, and then select the printer name. Windows 7: From the computer desktop, click Start, select All Programs, click HP, click the folder for the printer, and then select the icon with the printer name. b. In the printer software, click Tools. c. Click Device Setup & Software, and then select Connect a new device. d. When the Connection Options software screen appears, select Wireless. Select your HP printer from the list of detected printers. e. Follow the onscreen instructions. 5. Print your document. ENWW Connect wirelessly to the printer without a router (Wi-Fi Direct) 75
82 Connect your printer by using the HP Smart app To set up using the HP Smart app You can use the HP Smart app to set up the printer on your wireless network. The HP Smart app is supported on ios, Android, Windows, and Mac devices. For information about the app, see Use the HP Smart app to print, scan, and troubleshoot on page Make sure your printer and device are turned on and connected to the same wireless network. 2. If more than two hours have passed since you first turned on the printer and you have not set up the printer wirelessly, place the printer in the network setup mode by restoring the printer network settings. For information on how to restore the printer network settings, see Restore original factory defaults and settings on page If you are using an ios or Android mobile device, make sure the device has Bluetooth turned on. NOTE: HP Smart uses Bluetooth for printer setup only. This helps to make the setup process faster and easier on ios and Android mobile devices. Printing using Bluetooth is not supported. 4. Open the HP Smart app on your device. 5. ios/android: On the Home screen of HP Smart, tap (Plus icon), and then select the printer. If the printer is not in the list, tap Add a new printer. Windows: On the Home screen of HP Smart, click or tap (Plus icon), and then select or add a printer. Mac: On the Home screen of HP Smart, click (Plus icon), and then select the printer. If the printer is not in the list, click Printer, and select Set up a new printer. Follow the onscreen instructions on your device to add the printer to your network. 76 Chapter 6 Connect ENWW
83 Change wireless settings You can set up and manage your printer wireless connection and perform a variety of network management tasks. This includes printing information about network settings, turning the wireless function on or off, and changing wireless settings. To turn on or off the wireless capability of the printer Press (the Wireless button) to turn on or off the printer wireless capabilities. If the printer has an active connection to a wireless network, the Wireless light is on solid blue, and the printer display shows the Wireless icon and the Signal Bars icon. If wireless is turned off, the Wireless light is off. For more information about the wireless status, see Control panel lights and display icons status on page 7. To print the wireless network test report and network configuration page Press (the Wireless button) and (the Information button) at the same time. The wireless network test report shows the diagnostics results for the status of the wireless network, wireless signal strength, detected networks, and more. The network configuration page shows the network status, hostname, network name, and more. To change wireless settings (Windows) This method is available if you have already installed the printer software. IMPORTANT: This method requires a USB cable. Do not connect the USB cable until prompted to do so. 1. In the HP printer software (available from the Start menu), click Tools. 2. Click Device Setup & Software. 3. Select Reconfigure Wireless Settings. Follow the onscreen instructions. To change wireless settings using the HP Smart app 1. If more than two hours have passed since you first turned on the printer and you have not set up the printer wirelessly, place the printer in network setup mode by restoring the printer network settings. The setup mode will last for two hours. For information on how to restore the printer network settings, see Restore original factory defaults and settings on page Tap (Plus icon) on the Home screen of HP Smart, and then select the option to add a new printer. ENWW Change wireless settings 77
84 Connect your printer to your computer with a USB cable (nonnetwork connection) The printer supports a rear USB 2.0 High Speed port for connection to a computer. If the printer software has been installed, the printer will operate as a plug-and-play device. If the software has not been installed, follow the steps below to connect the printer with the USB cable. To connect the printer with the USB cable 1. Enter 123.hp.com in a web browser on your computer to download and install the HP printer software. You can also use the HP printer software CD (if provided), or download the software from NOTE: Do not connect the USB cable to the printer until you are prompted to do so. 2. Follow the onscreen instructions. When you are prompted, connect the printer to the computer by selecting USB on the Connection Options screen. 3. Follow the onscreen instructions. 78 Chapter 6 Connect ENWW
85 Change from a USB connection to a wireless network If you first set up your printer and installed the software with a USB cable, directly connecting the printer to your computer, you can easily change to a wireless network connection. You will need a wireless b/g/n network that includes a wireless router or access point. Before changing from a USB connection to a wireless network, make sure that: The printer is connected to your computer with the USB cable until you are prompted to disconnect the cable. Your computer is already connected to the wireless network that you want to connect the printer. NOTE: If you are unable to set up the connection following the steps in this section, see Network and connection issues on page 107. To change from a USB connection to a wireless network (Windows) 1. In the HP printer software (available from the Start menu), click Tools. 2. Click Device Setup & Software. 3. Select Convert a USB connected device to wireless. Follow the onscreen instructions. To change from a USB connection to a wireless network using the HP Smart app on a Windows 10 computer (Windows) 1. Before you proceed, make sure your computer and printer meet the following requirements: Your printer is currently connected to your computer through USB. Your computer is currently connected to a wireless network. 2. Open the HP Smart app. For information, see Use the HP Smart app to print, scan, and troubleshoot on page Make sure your printer is selected. TIP: If a printer is already set up, you can select it from the Home screen of HP Smart by swiping left or right and selecting it. To use a different printer, click or tap or add a new printer. (Plus icon) on the Home screen, and then select a different printer 4. Click Learn More when you see Make printing easier by connecting your printer wirelessly on top of the home page of the app. ENWW Change from a USB connection to a wireless network 79
86 Use advanced printer management tools (for networked printers) When the printer is connected to a network, you can use the embedded web server (EWS) to view status information, change settings, and manage the printer from your computer. NOTE: You can open and use the EWS without being connected to the Internet. However, some features are not available. NOTE: To view or change some settings, you might need a password. Open the embedded web server About cookies Open the embedded web server You can use one of the following ways to open the embedded web server. To open the embedded web server through a network 1. Find the IP address or hostname of the printer by printing the printer information page. To print the page, press (the Information button) on the printer control panel. NOTE: The printer must be on a network and must have an IP address. 2. In a supported web browser on your computer, type the IP address or hostname assigned to the printer. For example, if the IP address is , type the following address into a Web browser: To open the embedded web server from the HP printer software (Windows) 1. Open the printer software. For more information, see Open the HP printer software (Windows) on page Click the Print & Scan tab, and then click Maintain Your Printer. 3. In Toolbox, click the Device Information tab. 4. After the printer information is retrieved, click Printer EWS Home Page near the bottom right of the page. To open the embedded web server through Wi-Fi Direct 1. Make sure you have turned on Wi-Fi Direct on the printer. To turn on Wi-Fi Direct, see Connect wirelessly to the printer without a router (Wi-Fi Direct) on page From your wireless computer, turn wireless on, search for and connect to the Wi-Fi Direct name, for example: DIRECT-**-HP Smart Tank (where ** are the unique characters to identify your printer). Enter the Wi-Fi Direct password when prompted. To find the Wi-Fi Direct name or password, see Connect wirelessly to the printer without a router (Wi-Fi Direct) on page In a supported web browser on your computer, type the following address: 80 Chapter 6 Connect ENWW
87 About cookies The embedded Web server (EWS) places very small text files (cookies) on your hard drive when you are browsing. These files let the EWS recognize your computer the next time you visit. For example, if you have configured the EWS language, a cookie helps remember which language you have selected so that the next time you access the EWS, the pages are displayed in that language. Some cookies (such as the cookie that stores customer-specific preferences) are stored on the computer until you clear them manually. You can configure your browser to accept all cookies, or you can configure it to alert you every time a cookie is offered, which allows you to decide which cookies to accept or refuse. You can also use your browser to remove unwanted cookies. NOTE: Depending on your printer, if you disable cookies, you also disable one or more of the following features: Starting where you left the application (especially useful when using setup wizards) Remembering the EWS browser language setting Personalizing the EWS Home page For information about how to change your privacy and cookie settings and how to view or delete cookies, see the documentation available with your Web browser. ENWW Use advanced printer management tools (for networked printers) 81
88 Tips for setting up and using a networked printer Use the following tips to set up and use a networked printer: When setting up the wireless networked printer, make sure your wireless router or access point is powered on. The printer searches for wireless routers, then lists the detected network names on the computer. If your computer is connected to a Virtual Private Network (VPN), you need to disconnect from the VPN before you can access any other device on your network, including the printer. Learn more about configuring your network and the printer for wireless printing. Click here to go online for more information. Learn how to find your network security settings. Click here to go online for more information. Make sure your wireless network provides an Internet connection. Make sure the printer is on the network. Make sure the printer and device are turned on and connected to the same wireless network. If more than two hours have passed since you first turned on the printer and you have not set up the printer wirelessly, place the printer in network setup mode by restoring the printer network settings. The setup mode will last for two hours. For information on how to restore the printer network settings, see Restore original factory defaults and settings on page 111. If you are using a mobile device, make sure the device has Bluetooth turned on. Learn about the HP Print and Scan Doctor. Click here to go online for more information. NOTE: This utility is only available for the Windows operating system. Learn how to change from a USB to wireless connection. Click here to go online for more information. Learn how to work with your firewall and antivirus programs during printer setup. Click here to go online for more information. 82 Chapter 6 Connect ENWW
89 7 Solve a problem This section contains the following topics: Get help with HP online troubleshooting Get more help Printer control panel errors Get help from the HP Smart app Jams and paper-feed issues Cartridge problem Printing issues Copy issues Scan issues Network and connection issues Printer hardware issues Solve problems using Web Services Restore original factory defaults and settings Maintain the printer HP support ENWW 83
90 Get help with HP online troubleshooting Use an HP online troubleshooting tool to solve your printer issues. Use the table below to identify your problem and click the appropriate link. NOTE: The HP online troubleshooting wizards might not be available in all languages. Online troubleshooting tool Troubleshoot paper jam issues Troubleshoot a print carriage jam Troubleshoot issues with print job not printing Troubleshoot copy and scan issues Troubleshoot print quality issues Find network settings for a wireless connection Troubleshoot wireless network connection issues Convert a USB connection to wireless Troubleshoot a firewall or antivirus issue Troubleshoot Wi-Fi Direct connection issues Troubleshoot mobile network issues HP Print and Scan Doctor Use this tool to learn how to: Clear jammed paper from the printer and resolve paper or paper feed issues. Clear obstructions that are blocking the print carriage. Resolve issues with printer responsiveness, pages not printing, or Unable to print errors. Determine why the printer will not copy or scan, or improve the quality of your copies or scans. Improve the quality of your prints. Find your wireless network name (SSID) and password. Resolve wireless networking issues, including issues with setting up a wireless connection for the first time or fixing a connection that is no longer working. Convert your printer-to-computer connection from USB to wireless. Determine if a firewall or antivirus program is preventing your computer from connecting to the printer and resolve the issue. Resolve Wi-Fi Direct problems or configure Wi-Fi Direct. Resolve issues with connecting a mobile device to your printer. Automatically diagnose and resolve printer issues. (For Windows operating systems only) HP Virtual Agent Chat with HP Virtual Agent to troubleshoot issues. 84 Chapter 7 Solve a problem ENWW
91 Get more help Solve printer issues with HP online troubleshooting tools Get help with HP online troubleshooting on page 84 Get printer documentation, troubleshooting information, software updates, and more Diagnose and resolve printer issues HP Print and Scan Doctor (For Windows operating systems only) Use my mobile device to print, scan, and manage my printer with the HP Smart app ios/android: Windows: Mac: Scan with HP Scan software HP Scan software Contact HP support Contact support website Order ink supplies HP Sure Supply Print from anywhere to my HP eprint-enabled printer HP eprint Register my product View printer warranty options ENWW Get more help 85
92 Printer control panel errors If the Number Counter icon on the printer display is alternating between the letter E and a number, it indicates the printer is in an error state. The letter E and the number work as error codes. For example, if the Number Counter icon is alternating between the letter E and the number 4, it indicates that a paper jam has occurred. For details on the errors and solutions, see Control panel lights and display icons status on page Chapter 7 Solve a problem ENWW
93 Get help from the HP Smart app The HP Smart app provides alerts for printer issues (jams and other problems), links to help content, and options to contact support for additional assistance. For more information about the app, see Use the HP Smart app to print, scan, and troubleshoot on page Open the HP Smart on your device. 2. On the Home screen of HP Smart, make sure your printer is selected. TIP: If a printer is already set up, you can select it from the Home screen of HP Smart by swiping left or right and selecting it. To use a different printer, click or tap or add a new printer. (Plus icon) on the Home screen, and then select a different printer 3. To view the printer status, click or tap the printer icon. ENWW Get help from the HP Smart app 87
94 Jams and paper-feed issues Clear a paper or print carriage jam Solve paper jam issues. Use an HP online troubleshooting wizard Get step-by-step instructions for clearing paper jams and resolving issues with paper or the paper feed. Resolve a print carriage jam. Use an HP online troubleshooting wizard If something is blocking the print carriage or it does not move easily, get step-by-step instructions. NOTE: The HP online troubleshooting wizards may not be available in all languages. Read general instructions in the Help for clearing jams Paper jams can occur in several locations. For print carriage jams, remove any objects, including paper, that are blocking the print carriage in the printhead access area. NOTE: Do not use any tools or other devices to remove jammed objects. Always use caution when removing jammed objects from inside the printer. To clear a paper jam from the input tray 1. Press (the Cancel button) to try to clear the jam automatically. If this does not work, complete the following steps to clear the jam manually. 2. Pull the paper gently out of the input tray. 3. Make sure there is no foreign object in the paper path, and then reload paper. NOTE: The input tray shield can prevent foreign debris from falling into the paper path and causing serious paper jams. Do not take down the input tray shield. 4. Press (the Resume button) on the control panel to continue the current job. To clear a paper jam from the output tray 1. Press (the Cancel button) to try to clear the jam automatically. If this does not work, complete the following steps to clear the jam manually. 88 Chapter 7 Solve a problem ENWW
95 2. Pull the paper gently out of the output tray. 3. Press (the Resume button) on the control panel to continue the current job. To clear paper or other objects from the printhead access area 1. Press (the Cancel button) to cancel printing. If this does not clear the error, complete the following steps to clear the jam manually. 2. Close the output tray extender, and then close the output tray. 3. Open the front door of the printer. ENWW Jams and paper-feed issues 89
96 4. Open the printhead access door. 5. Make sure the print carriage is not obstructed. You might need to slide the carriage to the right side. Remove any jammed paper or other objects blocking the carriage. 6. Make sure the printhead latch is properly closed. NOTE: After you have set up the printer, do not open the printhead latch unless instructed to do so. 7. Close the front door of the printer. 90 Chapter 7 Solve a problem ENWW
97 8. Pull out the output tray and the tray extender. To clear a paper jam inside of the printer NOTE: Follow the instructions in this section after you have tried other ways to clear paper jams. Before you begin, make sure the ink tank caps are firmly closed to prevent ink from leaking. 1. Press (the Cancel button) to cancel printing. If this does not clear the error, complete the following steps to clear the jam manually. 2. Press (the Power button) to turn off the printer. 3. Lift the front of the printer so that the printer is resting on its rear, to expose the bottom cleanout. Locate the cleanout door on the bottom of the printer, and then pull both tabs on the cleanout door to open it. NOTE: Do not keep the printer in a tilted position for too long to prevent ink from leaking. 4. Remove the jammed paper. ENWW Jams and paper-feed issues 91
98 5. Close the cleanout door. Gently push the door towards the printer until both latches snap into place. 6. Turn the printer upright, and then press (the Power button) to turn on the printer. Learn how to avoid paper jams To help avoid paper jams, follow these guidelines. Do not overfill the input tray, but make sure that you have at least 5 pages loaded, for best results. Keep your printer free of dust and debris by removing paper and closing the input tray when not in use. Remove printed papers from the output tray frequently. Ensure that paper loaded in the input tray lays flat, and the edges are not bent or torn. Do not combine different paper types and paper sizes in the input tray; the entire stack of paper in the input tray must be the same size and type. Use HP paper for optimum performance. See Paper basics on page 15 for more information about HP paper. Adjust the paper-width guide in the input tray to fit snugly against all paper. Make sure the paper-width guide does not bend the paper in the input tray. Do not force paper too far down in the input tray. Do not add paper while the printer is printing. If the printer is about to run out of paper, wait until the out of paper message appears before adding paper. Solve paper-feed problems What kind of problem are you having? Paper is not picked up from the input tray Make sure paper is loaded in the input tray. For more information, see Load media on page 23. Adjust the paper-width guide in the input tray to fit snugly against all paper. Make sure the paperwidth guide does not bend the paper in the input tray. Make sure paper in the input tray is not curled. Uncurl paper by bending it in the opposite direction of the curl. Clean the paper rollers. Pages are skewing 92 Chapter 7 Solve a problem ENWW
99 Make sure the paper is loaded in the far-right side of the input tray and the paper-width guide is fit against the left side of the paper. Load paper into the printer only when it is not printing. Multiple pages are being picked up Adjust the paper-width guide in the input tray to fit snugly against all paper. Make sure the paperwidth guide does not bend the paper in the input tray. Make sure the input tray is not overloaded with paper. Make sure the pieces of the loaded paper are not sticking together. Use HP paper for optimum performance and efficiency. Clean the paper rollers. To clean the paper rollers manually 1. Gather the following materials: A long, lint-free cotton swab Distilled, filtered, or bottled water (tap water might damage the printer) 2. Press (the Power button) to turn off the printer. 3. Disconnect the power cord from the rear of the printer. 4. Disconnect the USB cable, if it is not already disconnected. 5. Raise the input tray. 6. Lift and hold the input tray shield. NOTE: Do not remove the input tray shield. The input tray shield prevents foreign debris from falling into the paper path and causing paper jams. 7. Look down through the open input tray and find the gray paper pick rollers. You might need a flashlight to illuminate the area. 8. Dampen a long cotton swab with bottled or distilled water, and then squeeze any excess water from the cloth. 9. Press the swab against the rollers, and then rotate them upward with your fingers. Apply a moderate amount of pressure to remove dust or dirt buildup. 10. Lower the input tray shield. 11. Allow the rollers to dry for 10 or 15 minutes. 12. Reconnect the power cord to the rear of the printer. 13. Reconnect the USB cable to the printer if necessary. 14. Press the Power button to turn on the printer. ENWW Jams and paper-feed issues 93
100 Cartridge problem If a message indicates a printhead (cartridge) problem, try the following in order: 1. Verify that the indicated printhead is correctly installed. 2. Clean the printhead contacts. 3. Contact HP support for assistance. Go to NOTE: For more information on printhead problem, see Printhead icons and Ink/Printhead light on page 9. To verify the printhead installed properly NOTE: The instructions here are only applicable in this section. After you have set up the printer, do not open the printhead latch unless instructed to do so. 1. Make sure the printer is turned on. 2. Close the output tray extender, and then close the output tray. 3. Remove and reinsert the printhead. a. Open the front door of the printer. 94 Chapter 7 Solve a problem ENWW
101 b. Open the printhead access door. NOTE: After you have set up the printer, do not open the printhead latch unless instructed to do so. c. Push down to open the printhead latch. d. Remove the printhead from the carriage. e. Check if there is a plug on top of the printhead or plastic tape on the printhead contacts. If there is, remove the plug from top of the printhead and the plastic tape from contacts. NOTE: Do not touch the electrical contacts on the printhead. ENWW Cartridge problem 95
102 f. Slide the printhead into the slot until it clicks into place. g. Close the printhead latch. Make sure the printhead latch is properly closed to avoid problems such as carriage jams. h. Close the front door of the printer. 4. Pull out the output tray and the tray extender. 96 Chapter 7 Solve a problem ENWW
103 To clean printhead contacts NOTE: Open the printhead latch and clean printhead contacts only when necessary; for example, if a printhead cannot be detected. The instructions here are only applicable in this section. After you have set up the printer, do not open the printhead latch unless instructed to do so. The cleaning procedure should take only a few minutes. Make sure that the printheads are reinstalled in the printer as soon as possible. It is not recommended to leave the printheads outside of the printer longer than 30 minutes. This could result in damage to the printheads. 1. Make sure the printer is turned on. 2. Close the output tray extender, and then close the output tray. 3. Open the front door of the printer. ENWW Cartridge problem 97
104 4. Open the printhead access door. NOTE: After you have set up the printer, do not open the printhead latch unless instructed to do so. 5. Push down to open the printhead latch. 6. Remove the printhead indicated in the error message. 7. Clean the printhead contacts and printer contacts. a. Hold the printhead by its sides and locate the electrical contacts on the printhhead. The electrical contacts are the small gold-colored dots on the printhead. 98 Chapter 7 Solve a problem ENWW
105 b. Wipe only the contacts with a dry swab or lint-free cloth. NOTE: Be careful to wipe only the contacts, and do not smear any of the ink or other debris elsewhere on the printhead. c. On the inside of the printer, locate the contacts for the printhead. The printer contacts are the set of gold-colored bumps positioned to meet the contacts on the printhead. d. Use a dry swab or lint-free cloth to wipe the contacts. 8. Reinstall the printhead. 9. Close the printhead latch. Make sure the printhead latch is properly closed to avoid problems such as carriage jams. ENWW Cartridge problem 99
106 10. Close the front door of the printer. 11. Check if the error message has gone away. If you still receive the error message, turn the printer off, and then on. 100 Chapter 7 Solve a problem ENWW
107 Printing issues Fix problems with page not printing (unable to print) HP Print and Scan Doctor The HP Print and Scan Doctor is a utility that will try to diagnose and fix the issue automatically. NOTE: This utility is only available for the Windows operating system. Troubleshoot problems with print jobs not printing. Use an HP online troubleshooting wizard Get step-by-step instructions if the printer is not responding or printing. NOTE: The HP Print and Scan Doctor and the HP online troubleshooting wizards may not be available in all languages. Read general instructions in the Help for unable to print issues To resolve print issues (Windows) Make sure that the printer is turned on and that there is paper in the input tray. If you are still unable to print, try the following in order: 1. Check for error messages from the printer software and resolve them by following the on-screen instructions. 2. If your computer is connected to the printer with a USB cable, disconnect and reconnect the USB cable. If your computer is connected to the printer with a wireless connection, confirm that the connection is working. 3. Verify that the printer is not paused or offline. To verify that the printer is not paused or offline a. Depending upon your operating system, do one of the following: Windows 10: From the Windows Start menu, select Windows System from the app list, select Control Panel, and then click View devices and printers under Hardware and Sound. Windows 8.1 and Windows 8: Point to or tap the upper-right corner of the screen to open the Charms bar, click the Settings icon, click or tap Control Panel, and then click or tap View devices and printers. Windows 7: From the Windows Start menu, click Devices and Printers. b. Either double-click or right-click the icon for your printer and select See what’s printing to open the print queue. c. On the Printer menu, make sure there are no check marks next to Pause Printing or Use Printer Offline. d. If you made any changes, try to print again. 4. Verify that the printer is set as the default printer. ENWW Printing issues 101
108 To verify that the printer is set as the default printer a. Depending upon your operating system, do one of the following: Windows 10: From the Windows Start menu, select Windows System from the app list, select Control Panel, and then click View devices and printers under Hardware and Sound. Windows 8.1 and Windows 8: Point to or tap the upper-right corner of the screen to open the Charms bar, click the Settings icon, click or tap Control Panel, and then click or tap View devices and printers. Windows 7: From the Windows Start menu, click Devices and Printers. b. Make sure the correct printer is set as the default printer. The default printer has a check mark in a black or green circle next to it. c. If the wrong printer is set as the default printer, right-click the correct printer and select Set as Default Printer. d. Try using your printer again. 5. Restart the print spooler. To restart the print spooler a. Depending upon your operating system, do one of the following: Windows 10 : From the Windows Start menu, click Windows System, and then click Control Panel. Windows 8.1 and Windows 8 : i. Point to or tap the upper-right corner of the screen to open the Charms bar, and then click the Settings icon. ii. Click or tap Control Panel. Windows 7: From the Windows Start menu, click Control Panel. b. Click System and Security, and then click Administrative Tools. c. Double-click Services. d. Right-click the Print Spooler, and then click Properties. e. On the General tab, make sure Automatic is selected from the Startup type drop-down list. f. Under Service status, check the status. If the service is not running, click Start. If the service is running, click Stop, and then click Start to restart the service. Then click OK. 6. Restart the computer. 7. Clear the print queue. 102 Chapter 7 Solve a problem ENWW
109 To clear the print queue a. Depending upon your operating system, do one of the following: Windows 10: From the Windows Start menu, click Windows System, and then click Control Panel. Under Hardware and Sound, click View devices and printers. Windows 8.1 and Windows 8: Point to or tap the upper-right corner of the screen to open the Charms bar, click the Settings icon, click or tap Control Panel, and then click or tap View devices and printers. Windows 7: From the Windows Start menu, click Devices and Printers. b. Right-click the printer, and then select the option to see what is printing. c. On the Printer menu, click Cancel all documents or Purge Print Document, and then click Yes to confirm. d. If there are still documents in the queue, restart the computer and try printing again after the computer has restarted. e. Check the print queue again to make sure it is clear, and then try to print again. To resolve print issues (OS X and macos) 1. Check for error messages and resolve. 2. Disconnect and reconnect the USB cable. 3. Verify that the product is not paused or offline. To verify that the product is not paused or offline a. In System Preferences, click Printers & Scanners. b. Click the Open Print Queue button. c. Click a print job to select it. Use the following buttons to manage the print job: Delete: Cancel the selected print job. Hold: Pause the selected print job. Resume: Continue a paused print job. Pause Printer: Pause all print jobs in the print queue. d. If you made any changes, try to print again. 4. Restart the computer. Fix print quality issues Step-by-step instructions for resolving most print quality issues. Troubleshoot print quality issues online ENWW Printing issues 103
110 Read general instructions in the Help for resolving print quality issues NOTE: To avoid print quality problems, always turn the printer off using the Power button, and wait until the Power button light goes out before you pull the plug or turn off a power strip. This allows the printer to move the printheads to a capped position, where they are protected from drying out. To improve print quality, see Improve print quality on page Chapter 7 Solve a problem ENWW
111 Copy issues For more information, see Tips for successful scanning and copying on page 53. Troubleshoot copy problems. Use an HP online troubleshooting wizard Get step-by-step instructions if the printer does not create a copy, or if your printouts are low quality. NOTE: The HP online troubleshooting wizards may not be available in all languages. ENWW Copy issues 105
112 Scan issues For more information, see Tips for successful scanning and copying on page 53. HP Print and Scan Doctor Solve scan problems The HP Print and Scan Doctor is a utility that will try to diagnose and fix the issue automatically. NOTE: This utility is only available for the Windows operating system. Use an HP online troubleshooting wizard. Get step-by-step instructions if you cannot scan or if your scans are low quality. NOTE: The HP Print and Scan Doctor and the HP online troubleshooting wizards might not be available in all languages. 106 Chapter 7 Solve a problem ENWW
113 Network and connection issues Fix network connection issues Choose one of the following troubleshooting options. HP Print and Scan Doctor Use an HP online troubleshooting wizard The HP Print and Scan Doctor is a utility that will try to diagnose and fix the issue automatically. NOTE: This utility is only available for the Windows operating system. Troubleshoot your wireless problem, whether your printer has never been connected or it was connected and is no longer working. Troubleshoot a firewall or antivirus issue, if you suspect that it is preventing your computer from connecting to the printer. Find network settings for a wireless connection, if you do not remember your wireless network name (SSID) or password. Convert a USB connection to wireless, to eliminate the USB cable between your devices and operate the printer over a wireless network. NOTE: The HP Print and Scan Doctor and the HP online troubleshooting wizards may not be available in all languages. Read general instructions in the Help for wireless troubleshooting Print the wireless network test report and network configuration page. For more information, see Change wireless settings on page 77. Find network settings for wireless connection Choose one of the following troubleshooting options. HP Print and Scan Doctor The HP Print and Scan Doctor is a utility that can tell you the network name (SSID) and password (network key). NOTE: This utility is only available for the Windows operating system. Use an HP online troubleshooting wizard Learn how to find your network name (SSID) and wireless password. NOTE: The HP Print and Scan Doctor and the HP online troubleshooting wizards may not be available in all languages. Fix Wi-Fi Direct connection For more information on Wi-Fi Direct, see Connect wirelessly to the printer without a router (Wi-Fi Direct) on page 73. Use an HP online troubleshooting wizard Troubleshoot your Wi-Fi Direct problem or learn how to configure Wi-Fi Direct. ENWW Network and connection issues 107
114 NOTE: The HP online troubleshooting wizards may not be available in all languages. Read general instructions in the Help for Wi-Fi Direct troubleshooting 1. Make sure that the Wi-Fi Direct icon on the printer display is on. To turn on Wi-Fi Direct, see Connect wirelessly to the printer without a router (Wi-Fi Direct) on page From your wireless computer or mobile device, turn on the wireless (Wi-Fi) connection, and then search for and connect to the Wi-Fi Direct name of your printer. 3. Enter the Wi-Fi Direct password when prompted. 4. If you are using a mobile device, make sure you have installed a compatible printing app. For more information about mobile printing, visit Convert USB connection to wireless To change the connection type, see Change from a USB connection to a wireless network on page 79. Choose one of the following troubleshooting options. HP Print and Scan Doctor The HP Print and Scan Doctor is a utility that will try to diagnose and fix the issue automatically. NOTE: This utility is only available for the Windows operating system. Use an HP online troubleshooting wizard Convert a USB connection to wireless or Wi-Fi Direct. NOTE: The HP Print and Scan Doctor and the HP online troubleshooting wizards may not be available in all languages. 108 Chapter 7 Solve a problem ENWW
115 Printer hardware issues Close printer door Make sure the printhead access door and the front door are properly closed. The printer shuts down unexpectedly Check the power and power connections. Make sure the printer’s power cord is connected firmly to a functioning power outlet. NOTE: When Auto-Off is enabled, the printer will automatically turn off after 2 hours of inactivity to help reduce energy use. For more information, see Auto-Off on page 21. Resolve printer failure Turn the printer off, then on. If that does not resolve the problem, contact HP. ENWW Printer hardware issues 109
116 Solve problems using Web Services If you are having problems using Web Services, such as HP eprint, check the following: Make sure the printer is connected to the Internet using a wireless connection. Make sure the latest product updates have been installed on the printer. Make sure Web Services is enabled on the printer. For more information, see Set up Web Services on page 40. Make sure the network hub, switch, or router is turned on and working correctly. If you are connecting the printer using a wireless connection, make sure the wireless network is functioning properly. For more information, see Network and connection issues on page 107. If you are using HP eprint, check the following: Make sure the printer’s address is correct. Make sure that the printer’s address is the only address listed in the To line of the message. If other addresses are listed in the To line, the attachments you are sending might not print. Make sure you are sending documents that meet the HP eprint requirements. For more information, visit (might not be available in all countries/regions). If your network uses proxy settings when connecting to the Internet, make sure the proxy settings you are entering are valid: Check the settings being used by the web browser you are using (such as Internet Explorer, Firefox, or Safari). Check with the IT administrator or person who set up your firewall. If the proxy settings used by your firewall have changed, you must update these settings in either the printer control panel or the embedded web server. If these settings are not updated, you will not be able to use Web Services. For more information, see Set up Web Services on page 40. TIP: For additional help on setting up and using Web Services, visit (might not be available in all countries/regions). 110 Chapter 7 Solve a problem ENWW
117 Restore original factory defaults and settings If you have made changes to the printer or network settings, you can restore the printer to the original factory settings or network settings. If more than two hours have passed since you first turned on the printer and you have not set up the printer wirelessly, place the printer in network setup mode by restoring the printer network settings. The setup mode will last for two hours. You can also troubleshoot network connection issues by restoring the printer network settings. CAUTION: network. If you restore the printer network settings, you will need to reconnect the printer to the To restore the printer network settings from the printer control panel Press (the Wireless button) and (the Cancel button) at the same time, and hold them for five seconds. To restore the printer factory settings or network settings from the embedded web server (EWS) 1. Open the embedded web server (EWS). For more information, see Open the embedded web server on page Click the Settings tab. 3. Click Restore Defaults, and select the option to restore the factory default settings or network settings. 4. Click the button on the selected page to continue. To restore printer factory defaults from the printer control panel While holding (the Power button), press and hold (the Black Copy button) and (the Resume button) at the same time, until (spinning wheel) appears on the display. ENWW Restore original factory defaults and settings 111
118 Maintain the printer Clean the scanner glass Clean the exterior Clean the scanner glass Dust or dirt on the scanner glass, scanner lid backing, or scanner frame can slow down performance, degrade the quality of scans, and affect the accuracy of special features such as fitting copies to a certain page size. To clean the scanner glass WARNING! Before cleaning the printer, turn the printer off by pressing (the Power button), and unplug the power cord from the electrical socket. 1. Lift the scanner lid. 2. Clean the scanner glass and lid backing by using a soft, lint-free cloth that has been sprayed with a mild glass cleaner. CAUTION: Use only glass cleaner to clean the scanner glass. Avoid cleaners that contain abrasives, acetone, benzene, and carbon tetrachloride, all of which can damage the scanner glass. Avoid isopropyl alcohol because it can leave streaks on the scanner glass. CAUTION: Do not spray the glass cleaner directly on the scanner glass. If too much glass cleaner is applied, the cleaner could leak under the scanner glass and damage the scanner. 3. Close the scanner lid, and turn on the printer. 112 Chapter 7 Solve a problem ENWW
119 Clean the exterior WARNING! Before cleaning the printer, turn the printer off by pressing the power button (the Power button), and unplugging the power cord from the electrical socket. Use a soft, damp, lint-free cloth to wipe dust, smudges, and stains off of the case. Keep fluids away from the interior of the printer, as well as from the printer control panel. ENWW Maintain the printer 113
120 HP support For the latest product updates and support information, visit HP online support provides a variety of options for help with your printer: Drivers & downloads: Download software drivers and updates, as well as product manuals and documentation that came in the box with your printer. HP support forums: Visit HP Support Forums for answers to common questions and issues. You can view questions posted by other HP customers, or sign in and post your own questions and comments. Troubleshooting: Use HP online tools to detect your printer and find recommended solutions. Contact HP NOTE: You can also use the HP Smart app to check printer errors and get troubleshooting assistance. For information about this app, see Use the HP Smart app to print, scan, and troubleshoot on page 18. If you need help from an HP technical support representative to solve a problem, visit the Contact Support website. The following contact options are available at no cost for in-warranty customers (HP agent-assisted support for out-of warranty customers may require a fee): Chat with an HP support agent online. Call an HP support agent. When contacting HP support, be prepared to provide the following information: Product name (located on the printer). Product number (located inside the front door) Serial number (located on the back or bottom of the printer) 114 Chapter 7 Solve a problem ENWW
121 Register printer By taking just a few quick minutes to register, you can enjoy quicker service, more efficient support, and product support alerts. If you did not register your printer while installing the software, you can register now at Additional warranty options Extended service plans are available for the printer at additional costs. Go to select your country/region and language, then explore the extended warranty options available for your printer. ENWW HP support 115
122 A Technical information This section provides regulatory and environmental information for the printer, as well as HP Company notices. The information contained herein is subject to change without notice. Visit to get user guides, troubleshooting help, and product support. To find environmental and regulatory information (including the European Union Regulatory Notice, North America EMC, Wireless and Telecom statements, and other compliance statements), see the Technical information section of the User Guide. To fix common printer problems, see the Solve a problem section of the User Guide. This section contains the following topics: Specifications Regulatory notices Environmental product stewardship program 116 Appendix A Technical information ENWW
123 Specifications System requirements For more information, visit For information about future operating system releases and support, visit Environmental specifications Input tray capacity Output tray capacity Paper type and size Paper weights Recommended operating temperature range: 15 to 30 (59 to 86 ) Operating temperature range: 5 C to 40 C (41 F to 104 F) Recommended Operating Humidity range: 20% to 80% RH non-condensing Operating Humidity range: 15% to 80% RH non-condensing Nonoperating (Storage) temperature range: -40 to 60 (-40 to 140 ) In the presence of high electromagnetic fields, it is possible the output from the printer may be slightly distorted HP recommends using a USB cable less than or equal to 3 m (10 feet) in length to minimize injected noise due to potential high electromagnetic fields Plain paper sheets (75 g/m2 [20lb]): Up to 100 Envelopes: Up to 10 Index cards: Up to 30 Photo paper sheets: Up to 30 Plain paper sheets (75 g/m2 [20lb]): Up to 30 Envelopes: Up to 10 Index cards: Up to 30 Photo paper sheets: Up to 30 For a complete list of supported media, see the printer software or the embedded web server (EWS). To open EWS, see Open the embedded web server on page 80. Plain Paper: 60 to 90 g/m² (16 to 24 lb) Envelopes: 75 to 90 g/m² (20 to 24 lb) ENWW Specifications 117
124 Cards: Up to 200 g/m² (110-lb index maximum) Photo Paper: Up to 300 g/m² (80 lb) Print specifications Print speeds vary according to the complexity of the document Method: drop-on-demand thermal inkjet Language: PCL3 GUI Copy specifications Resolution: up to 600 dpi Digital image processing Copy speeds vary according to the complexity of the document and model Scan specifications Resolution: up to 1200 x 1200 ppi optical For more information about ppi resolution, see the scanner software. Color: 24-bit color, 8-bit grayscale (256 levels of gray) Maximum scan size from glass: 21.6 x 29.7 cm (8.5 x 11.7 inches) Print resolution For supported print resolutions, visit Acoustic information If you have Internet access, you can access acoustic information from the HP website. 118 Appendix A Technical information ENWW
125 Regulatory notices The printer meets product requirements from regulatory agencies in your country/region. This section contains the following topics: Regulatory model number Power cord instructions Visual display workplaces statement for Germany Noise emission statement for Germany European Union Regulatory Notice Declaration of conformity Regulatory wireless and wired statements Regulatory model number For regulatory identification purposes, your product is assigned with a Regulatory Model Number. The regulatory model number should not be confused with the marketing names or product numbers. Power cord instructions Make sure your power source is adequate for the product voltage rating. The voltage rating is on the product. The product uses either Vac or Vac and 50/60 Hz. CAUTION: To prevent damage to the product, use only the power cord that is provided with the product. Visual display workplaces statement for Germany GS-Erklärung (Deutschland) Das Gerät ist nicht für die Benutzung im unmittelbaren Gesichtsfeld am Bildschirmarbeitsplatz vorgesehen. Um störende Reflexionen am Bildschirmarbeitsplatz zu vermeiden, darf dieses Produkt nicht im unmittelbaren Gesichtsfeld platziert werden. Noise emission statement for Germany Geräuschemission LpA < 70 db am Arbeitsplatz im Normalbetrieb nach DIN T. 19 European Union Regulatory Notice ENWW Regulatory notices 119
126 Products bearing the CE marking comply to applicable EU Directives and related European Harmonised Standards. The full Declaration of Conformity can be found at the following website: (Search with the product model name or its Regulatory Model Number (RMN), which may be found on the regulatory label.) The point of contact for regulatory matters is HP Deutschland GmbH, HQ-TRE, 71025, Boeblingen, Germany. Products with wireless functionality EMF This product meets international guidelines (ICNIRP) for exposure to radio frequency radiation. Wireless functionality in Europe If it incorporates a radio transmitting and receiving device that in normal use, a separation distance of 20 cm ensures that radio frequency exposure levels comply with EU requirements. For products with b/g/n or Bluetooth radio: This product operates on radio frequency between 2400 MHz and MHz, with a transmit power of 20 dbm (100 mw) or less. For products with a/b/g/n radio: This product operates on radio frequencies between 2400 MHz and MHz, and between 5170 MHz and 5710 MHz, with a transmit power of 20 dbm (100 mw) or less. CAUTION: IEEE x wireless LAN with GHz frequency band is restricted for indoor use only for all countries reflected in the matrix. Using this WLAN application outdoor might lead to interference issues with existing radio services. Declaration of conformity Declaration of conformity can be found at Regulatory wireless and wired statements This section contains the following regulatory information pertaining to wireless and wired products: Notice to users in Brazil Notice to users in Taiwan Notice to users in Mexico Notice to users in Ukraine Notice to users in Taiwan (5 GHz) Notice to users in Serbia (5 GHz) 120 Appendix A Technical information ENWW
127 Notice to users in Thailand (5 GHz) Notice to users in Brazil Este equipamento não tem direito à proteção contra interferência prejudicial e não pode causar interferência em sistemas devidamente autorizados. Notice to users in Taiwan 低功率電波輻射性電機管理辦法 第十二條 經型式認證合格之低功率射頻電機, 非經許可, 公司 商號或使用者均不得擅自變更頻率 加大功率或變更設計之特性及功能 第十四條 低功率射頻電機之使用不得影響飛航安全及干擾合法通信 ; 經發現有干擾現象時, 應立即停用, 並改善至無干擾時方得繼續使用 前項合法通信, 指依電信法規定作業之無線電通信 低功率射頻電機須忍受合法通信或工業 科學及醫藥用電波輻射性電機設備之干擾 Notice to users in Mexico La operación de este equipo está sujeta a las siguientes dos condiciones: (1) es posible que este equipo o dispositivo no cause interferencia perjudicial y (2) este equipo o dispositivo debe aceptar cualquier interferencia, incluyendo la que pueda causar su operación no deseada. Para saber el modelo de la tarjeta inalámbrica utilizada, revise la etiqueta regulatoria de la impresora. Notice to users in Ukraine Повідомлення для користувачів в Україні Технологія, що використовується Радіочастотні діапазони Максимальна потужність передавання WLAN Wi-Fi x (2,4 ГГц) ,5 МГц < 100 мвт (20 дбм) ЕІВП Bluetooth з низьким енергоспоживанням (2,4 ГГц) ,5 МГц < 100 мвт (20 дбм) ЕІВП Bluetooth (2,4 ГГц) ,5 МГц < 100 мвт (20 дбм) ЕІВП WLAN Wi-Fi x (5 ГГц) МГц МГц < 100 мвт (20 дбм) ЕІВП NOTE: Відповідні частотні діапазони та максимальна потужність передавання застосовуються, лише якщо в пристрої використовується зазначена технологія підключення. Notice to users in Taiwan (5 GHz) 在 秭赫頻帶內操作之無線資訊傳輸設備, 限於室內使用 應避免影響附近雷達系統之操作 ENWW Regulatory notices 121
128 Notice to users in Serbia (5 GHz) Upotreba ovog uredjaja je ogranicna na zatvorene prostore u slucajevima koriscenja na frekvencijama od MHz. Notice to users in Thailand (5 GHz) เคร องว ทย คมนาคมน ม ระด บการแผ คล นแม เหล กไฟฟ าสอดคล องตามมาตรฐานความปลอดภ ยต อส ขภาพของมน ษย จากการ ใช เคร องว ทย คมนาคมท คณะกรรมการก จการโทรคมนาคมแห งชาต ประกาศก าหนด This radio communication equipment has the electromagnetic field strength in compliance with the Safety Standard for the Use of Radio Communication Equipment on Human Health announced by the National Telecommunications Commission. 122 Appendix A Technical information ENWW
129 Environmental product stewardship program Eco-Tips HP is committed to providing quality products in an environmentally sound manner. Design for recycling has been incorporated into this product. The number of materials has been kept to a minimum while ensuring proper functionality and reliability. Dissimilar materials have been designed to separate easily. Fasteners and other connections are easy to locate, access, and remove using common tools. High priority parts have been designed to access quickly for efficient disassembly and repair. For more information, visit HP’s Commitment to the Environment Web site at: www8.hp.com/us/en/hp-information/global-citizenship/index.html. Eco-Tips European Union Commission Regulation 1275/2008 Paper Plastics Safety data sheets Recycling program HP inkjet supplies recycling program Power consumption Disposal of waste equipment by users Waste disposal for Brazil Chemical substances The Table of Hazardous Substances/Elements and their Content (China) Declaration of the Presence Condition of the Restricted Substances Marking (Taiwan) Restriction of hazardous substance (India) Regulation on the Control of Waste Electrical and Electronic Equipment (Turkey) EPEAT SEPA Ecolabel User Information (China) China Energy Label for Printer, Fax and Copier Battery disposal in Taiwan European Union Battery Directive Battery notice for Brazil California Perchlorate Material Notice HP is committed to helping customers reduce their environmental footprint. Please visit the HP Eco Solutions website for more information on HP s environmental initiatives. ENWW Environmental product stewardship program 123
130 European Union Commission Regulation 1275/2008 Paper Plastics For product power data, including the power consumption of the product in networked standby if all wired network ports are connected and all wireless network ports are activated, please refer to section P15 Additional Information of the product IT ECO Declaration at productdata/itecodesktop-pc.html. This product is suited for the use of recycled paper according to DIN and EN 12281:2002. Plastic parts over 25 grams are marked according to international standards that enhance the ability to identify plastics for recycling purposes at the end of product life. Safety data sheets Safety Data Sheets, product safety and environmental information are available at or on request. Recycling program HP offers an increasing number of product return and recycling programs in many countries/regions, and partners with some of the largest electronic recycling centers throughout the world. HP conserves resources by reselling some of its most popular products. For more information regarding recycling of HP products, please visit: HP inkjet supplies recycling program HP is committed to protecting the environment. The HP Inkjet Supplies Recycling Program is available in many countries/regions, and lets you recycle used print cartridges and ink cartridges free of charge. For more information, go to the following website: Power consumption HP printing and imaging equipment marked with the ENERGY STAR logo is certified by the U.S. Environmental Protection Agency. The following mark will appear on ENERGY STAR certified imaging products: Additional ENERGY STAR certified imaging product model information is listed at: Appendix A Technical information ENWW
131 Disposal of waste equipment by users This symbol means do not dispose of your product with your other household waste. Instead, you should protect human health and the environment by handing over your waste equipment to a designated collection point for the recycling of waste electrical and electronic equipment. For more information, please contact your household waste disposal service, or go to Waste disposal for Brazil Este produto eletrônico e seus componentes não devem ser descartados no lixo comum, pois embora estejam em conformidade com padrões mundiais de restrição a substâncias nocivas, podem conter, ainda que em quantidades mínimas, substâncias impactantes ao meio ambiente. Ao final da vida útil deste produto, o usuário deverá entregá-lo à HP. A não observância dessa orientação sujeitará o infrator às sanções previstas em lei. Após o uso, as pilhas e/ou baterias dos produtos HP deverão ser entregues ao estabelecimento comercial ou rede de assistência técnica autorizada pela HP. Não descarte o produto eletronico em lixo comum Para maiores informações, inclusive sobre os pontos de recebimento, acesse: Chemical substances HP is committed to providing our customers with information about the chemical substances in our products as needed to comply with legal requirements such as REACH (Regulation EC No 1907/2006 of the European Parliament and the Council). A chemical information report for this product can be found at: reach. The Table of Hazardous Substances/Elements and their Content (China) 产品中有害物质或元素的名称及含量 根据中国 电器电子产品有害物质限制使用管理办法 有害物质 部件名称 铅 汞 镉 六价铬 多溴联苯 多溴二苯醚 (Pb) (Hg) (Cd) (Cr(VI)) (PBB) (PBDE) 外壳和托盘 电线 印刷电路板 X 打印系统 X ENWW Environmental product stewardship program 125
132 有害物质 部件名称 铅 汞 镉 六价铬 多溴联苯 多溴二苯醚 (Pb) (Hg) (Cd) (Cr(VI)) (PBB) (PBDE) 显示器 X 喷墨打印机墨盒 驱动光盘 X 扫描仪 X 网络配件 X 电池板 X 自动双面打印系统 外部电源 X 本表格依据 SJ/T 的规定编制 : 表示该有害物质在该部件所有均质材料中的含量均在 GB/T 规定的限量要求以下 X: 表示该有害物质至少在该部件的某一均质材料中的含量超出 GB/T 规定的限量要求 此表中所有名称中含 X 的部件均符合中国 RoHS 达标管理目录限用物质应用例外清单的豁免 此表中所有名称中含 X 的部件均符合欧盟 RoHS 立法 注 : 环保使用期限的参考标识取决于产品正常工作的温度和湿度等条件 126 Appendix A Technical information ENWW
133 Declaration of the Presence Condition of the Restricted Substances Marking (Taiwan) 台灣限用物質含有情況標示聲明書 Taiwan Declaration of the Presence Condition of the Restricted Substances Marking 限用物質及其化學符號 單元 Restricted substances and its chemical symbols Unit 鉛 汞 鎘 六價鉻 多溴聯苯 多溴二苯醚 (Pb) (Hg) (Cd) (Cr +6 ) (PBB) (PBDE) 列印引擎 Print engine 外殼和紙匣 External casing and trays 電源供應器 Power supply 電線 Cables 印刷電路板 Print printed circuit board 控制面板 Control panel 墨水匣 Cartridge 掃描器組件 Scanner assembly 備考 1. 超出 0.1 wt % 及 超出 0.01 wt % 係指限用物質之百分比含量超出百分比含量基準值 Note 1: Exceeding 0.1 wt % and exceeding 0.01 wt % indicate that the percentage content of the restricted substance exceeds the reference percentage value of presence condition. 備考 2. 係指該項限用物質之百分比含量未超出百分比含量基準值 Note 2: indicates that the percentage content of the restricted substance does not exceed the percentage of reference value of presence. 備考 3. 係指該項限用物質為排除項目 Note 3: indicates that the restricted substance corresponds to the exemption. 若要存取產品的最新使用指南或手冊, 請前往 選取搜尋您的產品, 然後依照畫面上的指示繼續執行 To access the latest user guides or manuals for your product, go to Select Find your product, and then follow the onscreen instructions. ENWW Environmental product stewardship program 127
134 Restriction of hazardous substance (India) This product, as well as its related consumables and spares, complies with the reduction in hazardous substances provisions of the «India E-waste Rule 2016.» It does not contain lead, mercury, hexavalent chromium, polybrominated biphenyls or polybrominated diphenyl ethers in concentrations exceeding 0.1 weight % and 0.01 weight % for cadmium, except where allowed pursuant to the exemptions set in Schedule 2 of the Rule. Regulation on the Control of Waste Electrical and Electronic Equipment (Turkey) EPEAT Türkiye Cumhuriyeti: AEEE Yönetmeliğine uygundur Most HP products are designed to meet EPEAT. EPEAT is a comprehensive environmental rating that helps identify greener electronics equipment. For more information on EPEAT go to For information on HP’s EPEAT registered products go to SEPA Ecolabel User Information (China) 中国环境标识认证产品用户说明 噪声大于 63.0 db(a) 的办公设备不宜放置于办公室内, 请在独立的隔离区域使用 如需长时间使用本产品或打印大量文件, 请确保在通风良好的房间内使用 如您需要确认本产品处于零能耗状态, 请按下电源关闭按钮, 并将插头从电源插座断开 您可以使用再生纸, 以减少资源耗费 China Energy Label for Printer, Fax and Copier 复印机 打印机和传真机能源效率标识实施规则 依据 复印机 打印机和传真机能源效率标识实施规则, 该打印机具有中国能效标识 标识上显示的能效等级和操作模式值根据 复印机 打印机和传真机能效限定值及能效等级 标准 ( GB ) 来确定和计算 1. 能效等级 产品能效等级分 3 级, 其中 1 级能效最高 能效限定值根据产品类型和打印速度由标准确定 能效等级则根据基本功耗水平以及网络接口和内存等附加组件和功能的功率因子之和来计算 2. 能效信息 喷墨打印机 操作模式功率 睡眠状态的能耗按照 GB 的标准来衡量和计算 该数据以瓦特 (W) 表示 待机功率 待机状态是产品连接到电网电源上功率最低的状态 该状态可以延续无限长时间, 且使用者无法改变此状态下产品的功率 对于 成像设备 产品, 待机 状态通常相当于 关闭 状态, 但也可能相当于 准备 状态或者 睡眠 状态 该数据以瓦特 (W) 表示 睡眠状态预设延迟时间 128 Appendix A Technical information ENWW
135 出厂前由制造商设置的时间决定了该产品在完成主功能后进入低耗模式 ( 例如睡眠 自动关机 ) 的时间 该数据以分钟表示 附加功能功率因子之和 网络接口和内存等附加功能的功率因子之和 该数据以瓦特 (W) 表示 标识上显示的能耗数据是根据典型配置测量得出的数据, 此类配置包含登记备案的打印机依据复印机 打印机和传真机能源效率标识实施规则所选的所有配置 因此, 该特定产品型号的实际能耗可能与标识上显示的数据有所不同 要了解规范的更多详情, 请参考最新版的 GB 标准 Battery disposal in Taiwan European Union Battery Directive This product contains a battery that is used to maintain data integrity of real time clock or product settings and is designed to last the life of the product. Any attempt to service or replace this battery should be performed by a qualified service technician. Battery notice for Brazil A bateria deste equipamento nao foi projetada para ser removida pelo cliente. California Perchlorate Material Notice Perchlorate material — special handling may apply. See: This product’s real-time clock battery or coin cell battery may contain perchlorate and may require special handling when recycled or disposed of in California. ENWW Environmental product stewardship program 129
![]()
Серия HP Smart Tank 510

Руководство по установке
1


Включите принтер.


Заполните емкости для чернил.

Закройте двери.
Открытые двери. Подождите, пока каретка переместится в центр и остановится. Поверните оранжевую ручку.
Нажмите на синюю защелку, чтобы открыть.

Удалите и выбросьте оранжевые пластиковые кусочки. Обращайтесь осторожно, чтобы не испачкать чернильные пятна.


Установите печатающие головки. Закройте синюю защелку и дверцы.
Загрузить бумагу.
Отсканируйте страницу выравнивания, напечатанную, нажав ![]() (Кнопка цветного копирования).
(Кнопка цветного копирования).

https://123.hp.com
![]()
Установите программное обеспечение HP Smart с сайта 123.hp.com или в магазине приложений (обязательно). Используйте компьютер или мобильное устройство.
hp.com/support/printer-setup

Проблемы с началом работы? Найдите информацию о настройке и видео в Интернете. После настройки не открывайте синюю защелку, если это не требуется.
Если вы перемещаете принтер из дома или офиса с заполненными чернилами, см. «Перемещение принтера?» направляющую, чтобы предотвратить утечку чернил или повреждение принтера.
Внимание: При первой распаковке принтера сохраните упаковочные материалы для повторной упаковки.
hp.com/support/smarttankmoving
![]()

Логотип Apple является товарным знаком Apple Inc., зарегистрированным в США и других странах. App Store является знаком обслуживания Apple Inc.
Android, Google Play и логотип Google Play являются товарными знаками Google Inc.
Напечатано в Китае
Impreso в Китае
Impresso в Китае
© Авторское право 2020 HP Development Company, LP
Документы / Ресурсы
МФУ HP Smart Tank 510 — это универсальное устройство, которое позволяет печатать, сканировать и копировать документы, а также заполнять картриджи. Это очень удобно для тех, кто занимается бизнесом или просто любит работать в домашних условиях. Однако, некоторые пользователи могут столкнуться с проблемой настройки, поэтому мы решили написать пошаговую инструкцию.
Перед тем как приступить к настройке МФУ, необходимо убедиться, что все необходимые компоненты на месте. В комплекте должны быть: МФУ, экстремально большие картриджи, диск с драйверами, шнур питания и кабель USB для подключения к компьютеру.
После того, как все компоненты подготовлены, можно начинать установку. Сначала необходимо подключить питание к МФУ. Оно находится на задней панели устройства, рядом с входом USB. Кабель питания подключаем в розетку, а другой конец к МФУ. Желательно, чтобы розетка находилась достаточно близко к устройству, чтобы не пользоваться удлинителями.
После подключения питания, необходимо подключить устройство к компьютеру. Это делается при помощи кабеля USB, который входит в комплект. Один конец кабеля подключаем к МФУ, а другой в место USB на компьютере. После того, как устройство подключено, компьютер сам должен определить установленное устройство. Если этого не происходит автоматически, то необходимо запустить установку драйверов с компакт-диска, который идет в комплекте.
Содержание
- Настройка МФУ HP Smart Tank 510: пошаговая инструкция
- Первоначальная установка МФУ HP Smart Tank 510
- Настройка Wi-Fi
- Настройка сканирования
- Настройка печати
- Шаг 1: Установка драйверов
- 1.1. Скачивание драйверов
- 1.2. Установка драйверов
- Шаг 2: Подключение устройства к компьютеру
- 1. Выберите тип подключения
- 2. Подключите МФУ к компьютеру
- 3. Проверьте работу устройства
- Шаг 3: Заправка резервуаров чернилами
- 1. Откройте крышку МФУ
- 2. Откройте бутылку с чернилами
- 3. Заправьте резервуары чернилами
- 4. Закройте баки и крышку МФУ
- Шаг 4: Выбор языка и настройка часового пояса
- Выбор языка
- Настройка часового пояса
- Шаг 5: Подключение к Wi-Fi сети
- 1. Выберите Wi-Fi сеть
- 2. Введите пароль Wi-Fi
- 3. Подключение к Wi-Fi
- 4. Проверьте подключение
- Шаг 6: Печать тестового листа и калибровка принтера
- Печать тестового листа
- Калибровка принтера
- Шаг 7: Использование МФУ HP Smart Tank 510
- Печать документов и фотографий
- Сканирование документов и фотографий
- Копирование документов и фотографий
- Использование функции Wi-Fi
- Вопрос-ответ
Настройка МФУ HP Smart Tank 510: пошаговая инструкция
Первоначальная установка МФУ HP Smart Tank 510
1. Распакуйте устройство и установите картриджи с чернилами.
2. Подключите МФУ к сети электропитания и компьютеру при помощи кабелей, поставляемых в комплекте.
3. Включите МФУ и дождитесь, пока он проинициализируется.
4. Загрузите на компьютер драйвера принтера с официального сайта HP.
5. Установите драйвера и перезагрузите компьютер.
Настройка Wi-Fi
1. Включите Wi-Fi на МФУ и на вашем маршрутизаторе.
2. На МФУ выберите опцию Wi-Fi и введите имя и пароль вашей сети.
3. На компьютере откройте панель настроек Wi-Fi и найдите сеть МФУ.
4. Подключитесь к сети МФУ и введите пароль, если он требуется.
Настройка сканирования
1. На компьютере откройте программу сканирования.
2. Выберите МФУ из списка устройств и нажмите «Сканировать».
3. Выберите настройки сканирования — цвет, разрешение и т.д.
4. Сохраните файл в нужном формате и по нужному пути.
Настройка печати
1. Откройте документ, который нужно распечатать.
2. Выберите МФУ из списка устройств в настройках печати.
3. Выберите нужные настройки печати — кол-во копий, формат бумаги, качество, и т.д.
4. Нажмите кнопку «Печать».
Следуя этим инструкциям, вы настроите МФУ HP Smart Tank 510 и сможете его использовать в полном объеме.
Шаг 1: Установка драйверов
1.1. Скачивание драйверов
Перед тем, как установить драйверы, необходимо их скачать на официальном сайте производителя. Чтобы скачать драйверы для МФУ HP Smart Tank 510, зайдите на сайт hp.com и перейдите в раздел «Поддержка». Введите название своей модели МФУ и выберите операционную систему, на которой установлен компьютер.
1.2. Установка драйверов
После скачивания драйверов на компьютер их необходимо установить. Для этого запустите загруженный файл с драйверами и следуйте инструкциям установщика. Обычно установка драйверов происходит автоматически, но в некоторых случаях может потребоваться ввод дополнительной информации.
Установка драйверов необходима для того, чтобы компьютер мог общаться с МФУ и выполнять печать, сканирование и другие функции МФУ. После установки драйверов можно переходить к следующему этапу настройки МФУ HP Smart Tank 510.
Шаг 2: Подключение устройства к компьютеру
1. Выберите тип подключения
Для подключения МФУ HP Smart Tank 510 к компьютеру имеются два варианта: через USB или Wi-Fi.
- USB-подключение позволяет передавать данные между устройствами с помощью кабеля USB, который поставляется в комплекте.
- Wi-Fi-подключение позволяет использовать беспроводную сеть и управлять МФУ через приложение на мобильном устройстве.
2. Подключите МФУ к компьютеру
Если вы выбрали USB-подключение, то подключите кабель USB к МФУ и компьютеру. Убедитесь, что устройства включены.
Если вы выбрали Wi-Fi-подключение, то настройте беспроводную сеть на МФУ и компьютере, а затем установите приложение для управления устройством.
3. Проверьте работу устройства
После подключения МФУ к компьютеру проверьте его работоспособность. Для этого запустите установленное на компьютере приложение или драйвер устройства и выполните тестовую печать.
Шаг 3: Заправка резервуаров чернилами
1. Откройте крышку МФУ
Перед началом заправки убедитесь, что МФУ выключен. Откройте крышку МФУ и выньте баки с чернилами из коробки.
2. Откройте бутылку с чернилами
Распакуйте бутылку с чернилами, снимите защитную пломбу и откройте крышку. Убедитесь, что крышка установлена плотно.
3. Заправьте резервуары чернилами
Используя воронку, налейте чернила в соответствующий резервуар до уровня, указанного на бачке. Повторите процедуру для остальных баков.
4. Закройте баки и крышку МФУ
После заправки убедитесь, что баки плотно закрыты. Закройте крышку МФУ и включите ее. Вы можете проверить уровень чернил на экране МФУ или на компьютере.
Шаг 4: Выбор языка и настройка часового пояса
Выбор языка
После первого включения МФУ HP Smart Tank 510, вам будет предложено выбрать язык отображения на экране. Выберите язык, который подходит вам лучше всего, используя клавиши со стрелками и подтвердите свой выбор, нажав кнопку «ОК». Если вы случайно выбрали неправильный язык, нажмите кнопку «Power», чтобы выключить МФУ, а затем включите его снова.
Настройка часового пояса
Для правильной работы функции сканирования по расписанию вам нужно настроить часовой пояс на МФУ HP Smart Tank 510. Для этого выберите в главном меню пункт «Настройки» (Settings), затем «Основные настройки» (General Settings) и «Часовой пояс» (Time Zone). Выберите свой часовой пояс из списка, используя клавиши со стрелками и подтвердите свой выбор, нажав кнопку «ОК».
Если вашего часового пояса нет в списке, выберите ближайший пояс и отрегулируйте время на МФУ в соответствии с вашим часовым поясом.
Шаг 5: Подключение к Wi-Fi сети
1. Выберите Wi-Fi сеть
Для подключения к Wi-Fi сети, выберите имя вашей сети из списка доступных сетей на экране МФУ HP Smart Tank 510.
2. Введите пароль Wi-Fi
Введите пароль для подключения к выбранной сети. Проверьте правильность ввода пароля перед подключением.
3. Подключение к Wi-Fi
После ввода пароля, нажмите на кнопку «Подключиться» на экране МФУ HP Smart Tank 510. Устройство должно успешно подключиться к выбранной сети.
4. Проверьте подключение
Для проверки подключения к Wi-Fi, выведите страницу с настройками принтера. В настройках вы должны увидеть, что устройство подключено к выбранной вами Wi-Fi сети.
Шаг 6: Печать тестового листа и калибровка принтера
Печать тестового листа
После успешного подключения МФУ HP Smart Tank 510 к вашему компьютеру и настройки на нужный язык, необходимо распечатать тестовый лист, который поможет вам убедиться в правильном функционировании устройства.
Для этого нужно перейти в папку с настройками принтера и выбрать пункт «Печать тестовой страницы». После этого МФУ распечатает тестовый лист, который вам следует тщательно изучить.
Калибровка принтера
Если вы заметили на тестовом листе какие-либо ошибки в печати, то для устранения проблемы необходимо провести калибровку принтера. Этот процесс заключается в тщательной настройке принтера на определенном уровне, который обеспечивает лучшее качество печати.
- Перейдите в настройки принтера
- Выберите пункт «Калибровка принтера»
- Следуйте инструкциям на экране
После завершения процесса калибровки, следует распечатать новый тестовый лист и проверить качество печати. Если результат удовлетворительный, то принтер готов к работе и может использоваться в повседневной жизни.
Шаг 7: Использование МФУ HP Smart Tank 510
Печать документов и фотографий
Для печати документов и фотографий первым шагом необходимо открыть документ или фотографию на компьютере и выбрать печать. В качестве принтера выберите МФУ HP Smart Tank 510. Выберите нужные параметры печати, такие как формат бумаги и качество печати, и запустите печать. Проверьте, что бумага в принтере не закончилась.
Сканирование документов и фотографий
Для сканирования документов и фотографий необходимо поместить их на стекло сканера МФУ HP Smart Tank 510. На компьютере запустите программу сканирования, выберите тип сканирования и запустите сканирование. Результат сканирования можно сохранить на компьютере или отправить по электронной почте.
Копирование документов и фотографий
Для копирования документов и фотографий поместите их на стекло сканера МФУ HP Smart Tank 510 и запустите копирование. Выберите нужные параметры копирования, например, количество копий и размер бумаги, и запустите копирование. Копии будут выведены на бумаге из принтера.
Использование функции Wi-Fi
МФУ HP Smart Tank 510 имеет встроенный модуль Wi-Fi, что позволяет использовать его в сети без проводных соединений. Для того, чтобы использовать функцию Wi-Fi, необходимо настроить сетевые параметры МФУ, подключить его к Wi-Fi сети и настроить подключение на компьютере или другом устройстве. После этого МФУ можно будет использовать для печати, сканирования и копирования документов и фотографий с любого устройства в сети.
Вопрос-ответ

Руководство  пользователя
HP Smart Tank 510 series
Уведомления компании HP
ИНФОРМАЦИЯ В ЭТОМ ДОКУМЕНТЕ МОЖЕТ БЫТЬ ИЗМЕНЕНА БЕЗ ПРЕДВАРИТЕЛЬНОГО УВЕДОМЛЕНИЯ.
ВСЕ ПРАВА ЗАЩИЩЕНЫ. ВОСПРОИЗВЕДЕНИЕ, АДАПТАЦИЯ И ПЕРЕВОД БЕЗ ПРЕДВАРИТЕЛЬНОГО ПИСЬМЕННОГО РАЗРЕШЕНИЯ HP ЗАПРЕЩЕНЫ, ЗА ИСКЛЮЧЕНИЕМ СЛУЧАЕВ, ПРЕДУСМОТРЕННЫХ ЗАКОНОДАТЕЛЬСТВОМ ПО ЗАЩИТЕ АВТОРСКИХ ПРАВ. ВСЕ ГАРАНТИИ В ОТНОШЕНИИ ПРОДУКТОВ И УСЛУГ КОМПАНИИ HP ВЫРАЖЕНЫ ИСКЛЮЧИТЕЛЬНО В ЯВНОМ ВИДЕ В ГАРАНТИЙНЫХ ОБЯЗАТЕЛЬСТВАХ, ПРИЛАГАЕМЫХ К ЭТИМ ПРОДУКТАМ И УСЛУГАМ. НИКАКИЕ СВЕДЕНИЯ В ЭТОМ ДОКУМЕНТЕ НЕ МОГУТ РАССМАТРИВАТЬСЯ КАК ДОПОЛНИТЕЛЬНЫЕ ГАРАНТИЙНЫЕ ОБЯЗАТЕЛЬСТВА. HP НЕ НЕСЕТ ОТВЕТСТВЕННОСТИ ЗА ТЕХНИЧЕСКИЕ, РЕДАКТОРСКИЕ И ИНЫЕ ОШИБКИ В ДАННОМ ДОКУМЕНТЕ.
© Copyright 2019 HP Development Company, L.P.
Microsoft и Windows являются товарными знаками или зарегистрированными товарными знаками корпорации Microsoft в США и (или) других странах.
Mac, OS X, macOS и AirPrint — товарные знаки корпорации Apple, зарегистрированные в США и других странах.
ENERGY STAR и логотип ENERGY STAR являются зарегистрированными товарными знаками Агентства по охране окружающей среды США.
Android и Chromebook — товарные знаки Google LLC.
Amazon и Kindle — товарные знаки компании Amazon.com Inc. или ее филиалов.
Intel — зарегистрированный товарный знак Intel Corporation в США и других странах, используется по лицензии.

Содержание
|
1 Начало работы ………………………………………………………………………………………………………………………….. |
1 |
|
Компоненты принтера ……………………………………………………………………………………………………………………….. |
2 |
|
Знакомство с системой подачи чернил ……………………………………………………………………………………………….. |
4 |
|
Функции панели управления ……………………………………………………………………………………………………………… |
5 |
|
Индикаторы панели управления и состояние значков на экране ………………………………………………………… |
7 |
|
Обнаружение принтером измененных параметров бумаги по умолчанию …………………………………………. |
15 |
|
Основные сведения о бумаге ……………………………………………………………………………………………………………. |
16 |
|
Откройте программное обеспечение принтера HP (Windows) ……………………………………………………………. |
19 |
|
Использование приложения HP Smart для печати, сканирования и устранения неполадок ………………. |
20 |
|
Спящий режим …………………………………………………………………………………………………………………………………. |
21 |
|
Тихий режим ……………………………………………………………………………………………………………………………………. |
22 |
|
Автоотключение ……………………………………………………………………………………………………………………………… |
23 |
|
2 Печать ……………………………………………………………………………………………………………………………………. |
24 |
|
Загрузка бумаги ……………………………………………………………………………………………………………………………….. |
25 |
|
Печать документов ………………………………………………………………………………………………………………………….. |
29 |
|
Печать фотографий …………………………………………………………………………………………………………………………. |
30 |
|
Печать на конвертах ………………………………………………………………………………………………………………………… |
31 |
|
Печать с помощью приложения HP Smart ………………………………………………………………………………………… |
32 |
|
Печать в режиме Максимум dpi ………………………………………………………………………………………………………… |
34 |
|
Печать с компьютера или ноутбука Mac …………………………………………………………………………………………… |
35 |
|
Печать с мобильных устройств ………………………………………………………………………………………………………… |
36 |
|
Советы по успешной печати …………………………………………………………………………………………………………….. |
37 |
|
Просмотр состояния заданий печати и управление заданиями печати (Windows) ……………………………… |
40 |
|
Настройка принтера (Windows) ………………………………………………………………………………………………………… |
41 |
|
3 Использование веб-служб ………………………………………………………………………………………………………….. |
42 |
|
Что такое веб-службы? ……………………………………………………………………………………………………………………. |
43 |
|
Настройка веб-служб ………………………………………………………………………………………………………………………. |
44 |
|
Печать с помощью службы HP ePrint ……………………………………………………………………………………………….. |
45 |
|
Использование веб-сайта HP Connected …………………………………………………………………………………………… |
47 |
|
Удаление веб-служб ………………………………………………………………………………………………………………………… |
48 |
|
4 Копирование и сканирование ……………………………………………………………………………………………………… |
49 |
|
Копирование документов ………………………………………………………………………………………………………………… |
50 |
|
Загрузка оригинала ………………………………………………………………………………………………………………………….. |
51 |
|
Сканирование с помощью приложения HP Smart ……………………………………………………………………………… |
52 |
|
Сканирование с помощью HP программное обеспечение принтера …………………………………………………… |
55 |
|
Сканирование с помощью функции WebScan (веб-сканирование) …………………………………………………….. |
58 |
|
Советы по сканированию и копированию …………………………………………………………………………………………. |
59 |
|
5 Управление чернилами и печатающими головками ………………………………………………………………………… |
60 |
|
Уровень чернил ……………………………………………………………………………………………………………………………….. |
61 |
|
Повторная заправка емкостей для чернил ……………………………………………………………………………………….. |
62 |
|
Заказ расходных материалов …………………………………………………………………………………………………………… |
65 |
|
Печать с использованием только черных чернил …………………………………………………………………………….. |
66 |
|
Повышение качества печати ……………………………………………………………………………………………………………. |
67 |
|
Выравнивание печатающих головок (картриджей) ………………………………………………………………………….. |
69 |
|
Очистка печатающих головок (картриджей) ……………………………………………………………………………………. |
70 |
|
Чистка принтера ………………………………………………………………………………………………………………………………. |
71 |
|
Советы по работе с чернилами и печатающими головками ………………………………………………………………. |
72 |
|
Перемещение принтера …………………………………………………………………………………………………………………… |
73 |
|
6 Подключение …………………………………………………………………………………………………………………………… |
74 |
|
Перед началом работы ……………………………………………………………………………………………………………………. |
75 |
|
Перевод принтера в режим настройки ……………………………………………………………………………………………… |
76 |
|
Подключение принтера к беспроводной сети через маршрутизатор ………………………………………………… |
77 |
|
Беспроводное подключение к принтеру без маршрутизатора (Wi-Fi Direct) ………………………………………. |
79 |
|
Подключение принтера с помощью приложения HP Smart ………………………………………………………………. |
83 |
|
Изменение параметров беспроводной связи …………………………………………………………………………………….. |
84 |
|
Подключите принтер к компьютеру с помощью USB-кабеля (подключение не по сети) …………………… |
85 |
|
Переход с USB-соединения на подключение по беспроводной сети …………………………………………………. |
86 |
|
Использование дополнительных средств управления принтером (для сетевых принтеров) …………….. |
87 |
|
Советы по настройке и использованию сетевого принтера ……………………………………………………………….. |
89 |
|
7 Решение проблемы …………………………………………………………………………………………………………………… |
90 |
|
Как получить справку по интерактивным средствам HP для устранения неполадок …………………………. |
91 |
|
Дополнительная справка …………………………………………………………………………………………………………………. |
92 |
|
Ошибки панели управления …………………………………………………………………………………………………………….. |
93 |
|
Вызов справки в приложении HP Smart ……………………………………………………………………………………………. |
94 |
|
Замятие и ошибки подачи бумаги …………………………………………………………………………………………………….. |
95 |
|
Проблема с картриджем ………………………………………………………………………………………………………………… |
102 |
|
Проблемы печати ………………………………………………………………………………………………………………………….. |
109 |
|
Проблемы копирования …………………………………………………………………………………………………………………. |
113 |
|
Проблемы сканирования ……………………………………………………………………………………………………………….. |
114 |
|
Проблемы с сетью и подключением ………………………………………………………………………………………………. |
115 |
|
Аппаратные проблемы принтера ……………………………………………………………………………………………………. |
117 |
|
Решение проблем, возникающих при использовании веб-служб ……………………………………………………. |
118 |
|
Восстановите настройки по умолчанию ………………………………………………………………………………………….. |
119 |
|
Обслуживание принтера ………………………………………………………………………………………………………………… |
120 |
|
Служба поддержки HP …………………………………………………………………………………………………………………… |
122 |
|
Приложение А Техническая информация ………………………………………………………………………………………. |
124 |
|
Технические характеристики …………………………………………………………………………………………………………. |
125 |
|
Соответствие нормам …………………………………………………………………………………………………………………….. |
127 |
|
Программа охраны окружающей среды …………………………………………………………………………………………. |
131 |
|
Указатель …………………………………………………………………………………………………………………………………. |
139 |

1Начало работы
●Компоненты принтера
●Знакомство с системой подачи чернил
●Функции панели управления
●Индикаторы панели управления и состояние значков на экране
●Обнаружение принтером измененных параметров бумаги по умолчанию
●Основные сведения о бумаге
●Откройте программное обеспечение принтера HP (Windows)
●Использование приложения HP Smart для печати, сканирования и устранения неполадок
●Спящий режим
●Тихий режим
●Автоотключение

Компоненты принтера
|
1 |
Направляющая ширины бумаги |
|
2 |
Входной лоток |
|
3 |
Крышка входного лотка |
|
4 |
Крышка сканера |
|
5 |
Стекло сканера |
|
6 |
Крышка доступа к печатающим головкам |
|
7 |
Передняя крышка |
|
8 |
Емкость для чернил |
|
9 |
Колпачок емкости для чернил |
|
10 |
Выходной лоток |
|
11 |
Удлинитель выходного лотка (также называется удлинителем лотка) |
|
12 |
Панель управления |
|
2 Глава 1 Начало работы |
RUWW |
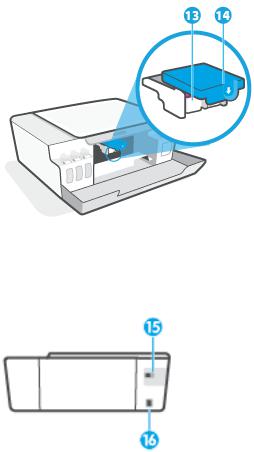
|
13 |
Печатающие головки |
|
14 |
Фиксатор печатающей головки |
|
15 |
Порт USB |
|
16 |
Разъем питания |
|
RUWW |
Компоненты принтера 3 |

Знакомство с системой подачи чернил
|
Термин |
Определение |
|
Печатающие головки |
Печатающие головки — это составные части печатающего механизма, которые наносят чернила на |
|
бумагу. В устройстве установлены две печатающие головки: для черных и цветных чернил. |
|
|
ПРЕДУПРЕЖДЕНИЕ. После настройки принтера не открывайте фиксатор печатающей головки без |
|
|
соответствующих инструкций. |
|
Фиксатор печатающей |
Фиксатор печатающей головки, находящийся на каретке, закрепляет печатающую головку в |
|
головки |
каретке. Убедитесь, что фиксатор печатающей головки правильно закрыт, чтобы избежать таких |
|
проблем, как застревание каретки. |
|
|
ПРЕДУПРЕЖДЕНИЕ. После настройки принтера не открывайте фиксатор печатающей головки без |
|
|
соответствующих инструкций. |
|
Емкости для чернил |
Всего имеется четыре емкости для чернил. Каждая из них предназначена для определенного цвета: |
|
голубого, пурпурного, желтого или черного. |
|
Колпачки емкостей для |
Колпачки емкостей для чернил представляют собой пробки, которыми закрывается каждая емкость. |
|
чернил |
|
|
Выравнивание |
Выравнивание — это процесс выравнивания печатающих головок для улучшения качества печати. |
|
Дополнительную информацию о выравнивании см. в разделе Значок выравнивания печатающих |
|
|
головок на стр. 10. |
|
|
4 Глава 1 Начало работы |
RUWW |
![]()
Функции панели управления
Обзор кнопок и индикаторов
|
Функция |
Описание |
|
1 |
Кнопка Отмена. Останавливает текущую операцию. |
|
2 |
Кнопка Возобновить. Восстанавливает работу после прерывания (например, после загрузки бумаги |
|
или устранения замятия). |
|
|
Индикатор Возобновить. оповещает о наличии проблемы в работе принтера или ошибки. |
|
|
3 |
Кнопка Цветное копирование: используется для запуска цветного копирования. Нажмите и |
|
удерживайте эту кнопку, чтобы увеличить количество копий. Копирование начинается через две |
|
|
секунды после последнего нажатия. |
|
|
4 |
Кнопка Черно-белое копирование: Запуск черно-белого копирования. Нажмите и удерживайте эту |
|
кнопку, чтобы увеличить количество копий. Копирование начинается через две секунды после |
|
|
последнего нажатия. |
|
|
5 |
Индикатор Чернила/печатающая головка: оповещает о наличии проблем с емкостями для чернил |
|
или печатающими головками. |
|
|
6 |
Значок Цветная печатающая головка и значок Черная печатающая головка |
|
7 |
Дисплей панели управления: содержит информацию о количестве копий, проблемах с бумагой, |
|
печатающими головками, емкостями с чернилами, а также о состоянии Wi-Fi Direct, состоянии |
|
|
беспроводного подключения и уровне сигнала. |
|
|
8 |
Кнопка Беспроводная связь. позволяет включить и отключить беспроводную связь. |
|
Индикатор беспроводной связи: показывает, что принтер подключен к беспроводной сети. |
|
|
Мигающий индикатор беспроводной связи указывает, что принтер не подключен или пытается |
|
|
подключиться к сети. Во время настройки он также указывает, что принтер находится в режиме |
|
|
настройки. |
|
|
ПРИМЕЧАНИЕ. Если прошло более двух часов после включения принтера, а беспроводное |
|
|
подключение устройства еще не настроено, его можно перевести в режим настройки, восстановив |
|
|
сетевые параметры. Принтер будет находиться в режиме настройки два часа. Инструкции по |
|
|
восстановлению сетевых параметров см. в разделе Восстановите настройки по умолчанию |
|
|
на стр. 119. |
|
|
9 |
Кнопка Информация: Нажмите эту кнопку, чтобы напечатать страницу сведений. Она содержит |
|
данные о принтере, его адрес эл. почты, а также информацию о Wi-Fi Direct, сетевом подключении и |
|
|
мобильной печати. |
|
|
10 |
Кнопка Питание. Используется для включения и выключения принтера. |
|
RUWW |
Функции панели управления 5 |

Значки на дисплее панели управления
|
Значок |
Описание |
|
|
Значок Количество копий: показывает число копий при копировании документов. Его значение |
||
|
меняется на букву «A» во время выравнивания печатающей головки и на букву «Е» с |
||
|
соответствующей цифрой при наличии ошибки в работе принтера. |
||
|
Значок Проблема с бумагой: указывает на наличие ошибки, связанной с бумагой. |
||
|
Значок Оповещение: указывает на ошибку. |
||
|
Значки CMYK и значки чернил отражают состояние четырех емкостей для чернил. |
||
|
Каждой емкости — с голубыми, пурпурными, желтыми или черными чернилами — |
||
|
присваивается по одному значку каждого типа. |
||
|
Значки Печатающая головка: мигающий левый значок печатающей головки указывает на |
||
|
наличие ошибки с трехцветной печатающей головкой, а мигающий правый значок указывает на |
||
|
наличие ошибки с черной печатающей головкой. |
||
|
Значок Wi-Fi Direct: сообщает о том, что функция Wi-Fi Direct включена. |
||
|
Значки состояния беспроводной связи: указывают на состояние беспроводного соединения |
||
|
принтера. |
||
|
Существуют следующие значки состояния беспроводного соединения: |
(значок |
беспроводного соединения),  (значок Проблема с беспроводным соединением и
  (значок Уровень сигнала)
|
6 Глава 1 Начало работы |
RUWW |

Индикаторы панели управления и состояние значков на экране
Индикатор кнопки Характеристики
|
Состояние |
Описание |
||
|
Вкл. |
Принтер включен. |
||
|
Не светится |
Питание принтера выключено. |
||
|
Светится тусклым светом |
Принтер находится в спящем режиме. |
||
|
● Принтер автоматически переходит в спящий режим после 5 минут бездействия. |
|||
|
● Принтер выключится автоматически через 2 часа отсутствия активности, если: |
|||
|
– |
он не подключен к другим устройствам через USB, а |
||
|
– |
беспроводная связь, Wi-Fi Direct и Bluetooth выключены. |
||
|
Мигает |
Принтер обрабатывает задание. Чтобы отменить задание, нажмите кнопку |
(Отмена). |
|
|
Быстро мигает |
Если крышка доступа к печатающим головкам открыта, закройте ее. Если крышка доступа к |
||
|
печатающим головкам закрыта, а индикатор часто мигает, в работе принтера произошла |
|||
|
ошибка, которую можно устранить, следуя инструкциям на экране. Если на экране нет |
|||
|
сообщений, попробуйте напечатать документ, чтобы появилось сообщение. |
|||
Индикатор и значки Беспроводное соединение
Индикатор Беспроводное соединение рядом с кнопкой  (Беспроводное соединение) и значки
состояния беспроводного подключения на экране панели управления указывают на состояние беспроводного подключения.
Индикатор Беспроводное соединение и значки состояния Беспроводное соединение загорятся, только когда завершится выравнивание во время первоначальной настройки.
|
Состояние |
Описание |
|
Индикатор Беспроводное соединение, значок Беспроводное |
Принтер подключен к беспроводной сети. |
|
соединение и значок Уровень сигнала горят. |
|
Индикатор Беспроводное соединение не горит. |
Беспроводная связь отключена. Чтобы включить |
|
|
беспроводную связь, нажмите кнопку |
(Беспроводное |
|
|
соединение). |
||
|
RUWW |
Индикаторы панели управления и состояние значков на экране |
7 |
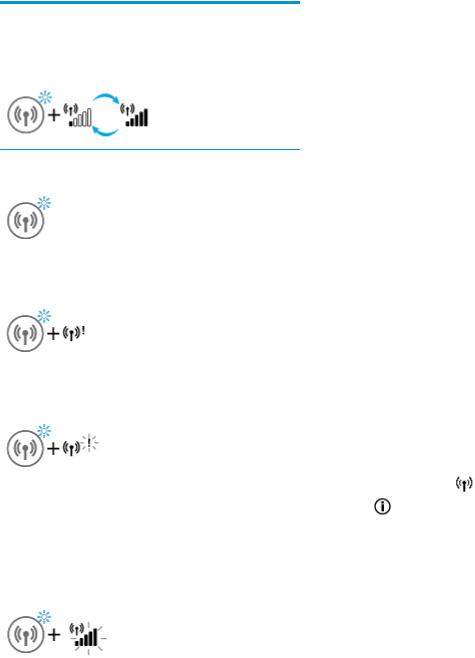
|
Состояние |
Описание |
|
Индикатор Беспроводное соединение мигает, значок |
Принтер находится в режиме автоматического беспроводного |
|
Беспроводное соединение горит, значок Уровень сигнала |
подключения (AWC). |
|
отображается. |
|
Индикатор Беспроводное соединение мигает в течение трех |
Беспроводная связь отключена. |
|||
|
секунд и гаснет. |
Измените параметры беспроводного подключения. |
|||
|
Дополнительную информацию см. в разделе Изменение |
||||
|
параметров беспроводной связи на стр. 84. |
||||
|
Индикатор Беспроводное соединение мигает, значки |
Беспроводной сигнал отсутствует. |
|||
|
Беспроводное соединение и Проблема с беспроводным |
● |
Убедитесь, что беспроводной маршрутизатор или точка |
||
|
соединением горят. |
||||
|
доступа включены. |
||||
|
● |
Разместите принтер ближе к беспроводному |
|||
|
маршрутизатору. |
||||
|
Индикатор Беспроводное соединение мигает, значок |
Могло произойти одно из указанных ниже событий. |
|||
|
Беспроводное соединение горит, значок Проблема с |
● |
Принтеру не удалось подключиться к беспроводной |
||
|
беспроводным соединением мигает. |
||||
|
сети. |
||||
|
● |
При использовании WPS возникает ошибка или |
|||
|
регистрируется наложение сеансов. |
||||
|
Одновременно нажмите кнопки |
(Беспроводное |
|||
|
соединение) и |
(Информация), чтобы запустить проверку |
|||
|
состояния беспроводного подключения, а затем ознакомьтесь |
||||
|
с полученным отчетом, чтобы устранить проблему. |
||||
|
Индикатор Беспроводное соединение мигает, значок |
Включен режим WPS (Wi-Fi Protected Setup). |
|||
|
Беспроводное соединение горит и одновременно мигает |
||||
|
Уровень сигнала. |
||||
|
8 Глава 1 Начало работы |
RUWW |

|
Состояние |
Описание |
|
Индикатор Беспроводное соединение мигает и значок |
Беспроводная связь принтера включена, но не настроена. |
|
Беспроводное соединение горит. |
Индикатор Беспроводное соединение мигает, значок Беспроводное соединение светится, Уровень сигнала поочередно отображает разные значения и светится индикатор Проблема с беспроводным соединением.
Беспроводная связь принтера включена, была предварительно настроена и принтер пытается подключиться к сети.
Значок Wi-Fi Direct
|
Состояние |
Описание |
|
Значок Wi-Fi Direct горит. |
Функция Wi-Fi Direct включена и готова к использованию. |
Значок Wi-Fi Direct не горит.
Функция Wi-Fi Direct отключена.
Инструкции по включению и выключению этой функции см. в разделе Включение и выключение функции Wi-Fi Direct
на стр. 79.
Значки Печатающая головка и индикатор Чернила/печатающая головка
●Значок Оповещение, один из значков Печатающая головка и индикатор Чернила/печатающая головка мигают.
|
RUWW |
Индикаторы панели управления и состояние значков на экране |
9 |

|
Причина |
Решение |
|||
|
Могло произойти одно из указанных ниже событий. |
– |
Убедитесь, что обе печатающие головки правильно |
||
|
– |
Отсутствует печатающая головка с |
установлены. |
||
|
– |
||||
|
соответствующими чернилами. |
Установите недостающую печатающую головку. |
|||
|
– |
Печатающая головка с соответствующими чернилами |
– |
Если установлены обе печатающие головки, |
|
|
установлена неправильно. |
извлеките указанную головку, убедитесь, что на ней |
|||
|
– |
На печатающей головке с соответствующими |
нет оранжевой заглушки или пластиковой ленты, а |
||
|
затем надежно установите печатающую головку на |
||||
|
чернилами осталась оранжевая заглушка или |
место. |
|||
|
пластиковая лента. |
– |
Убедитесь, что используются печатающие головки |
||
|
– |
Соответствующая печатающая головка несовместима |
|||
|
HP, подходящие для данного принтера. |
||||
|
с устройством или неисправна. |
ПРИМЕЧАНИЕ. Дополнительную информацию см. в разделе Проблема с картриджем на стр. 102.
ПРИМЕЧАНИЕ. Не открывайте фиксатор печатающей головки без соответствующих инструкций.
●Значок Оповещение, оба значка Печатающая головка и индикатор Чернила/печатающая головка мигают.
|
Причина |
Решение |
|||
|
Могло произойти одно из указанных ниже событий. |
– |
Убедитесь, что обе печатающие головки правильно |
||
|
– |
Нет одной или обеих печатающих головок. |
установлены. |
||
|
– |
Установите недостающие печатающие головки. |
|||
|
– |
Одна или обе печатающие головки установлены |
|||
|
– |
||||
|
неправильно. |
Если установлены обе печатающие головки, |
|||
|
– |
На одной или обеих печатающих головках осталась |
извлеките их, убедитесь, что на них нет оранжевых |
||
|
заглушек или пластиковой ленты, а затем надежно |
||||
|
оранжевая заглушка или пластиковая лента. |
установите печатающие головки на место. |
|||
|
– |
Одна или обе печатающие головки несовместимы или |
– |
Убедитесь, что используются печатающие головки |
|
|
повреждены. |
HP, подходящие для данного принтера. |
ПРИМЕЧАНИЕ. Дополнительную информацию см. в разделе Проблема с картриджем на стр. 102.
ПРИМЕЧАНИЕ. Не открывайте фиксатор печатающей головки без соответствующих инструкций.
Значок выравнивания печатающих головок
Значок состояния выравнивания
●На месте значка количества копий горит или мигает буква «A».
|
10 Глава 1 Начало работы |
RUWW |

Необходимо выполнить выравнивание печатающих головок.
Во время печати или сканирования страницы выравнивания «A» мигает.
После окончания процесса буква перестает мигать и начинает гореть.
Она исчезает с завершением выравнивания печатающих головок.
Поместите страницу выравнивания на стекло сканера отпечатанной стороной вниз и нажмите одну из кнопок копирования на панели управления, чтобы запустить сканирование.
После сканирования выравнивание печатающих головок будет завершено.
ПРИМЕЧАНИЕ. Инструкции по правильному расположению оригинала см. в разделе Загрузка оригинала на стр. 51.
●На месте количества копий отображается мигающая буква «A», а также мигают значок «Предупреждение», индикатор «Возобновить» и индикатор «Питание».
Не удалось выполнить выравнивание печатающих головок. Эта проблема может возникнуть после сканирования страницы выравнивания.
Выполните одно из указанных ниже действий.
–Нажмите кнопку  (Возобновить), чтобы заново напечатать страницу выравнивания.
–Нажмите одну из кнопок копирования, чтобы заново отсканировать страницу выравнивания.
При бездействии через некоторое время выравнивание печатающих головок отменится.
Значок Оповещение, значок Проблема с бумагой и индикатор Возобновить
●Значок Оповещение, значок Проблема с бумагой и индикатор Возобновить горят.
|
Причина |
Решение |
|
Во входном лотке отсутствует бумага. |
Загрузите бумагу во входной лоток. |
|
Информацию о том, как загружать бумагу, см. в разделе |
|
|
Загрузка бумаги на стр. 25. |
|
●Значок Оповещение, значок Проблема с бумагой и индикатор Возобновить мигают.
|
RUWW |
Индикаторы панели управления и состояние значков на экране 11 |
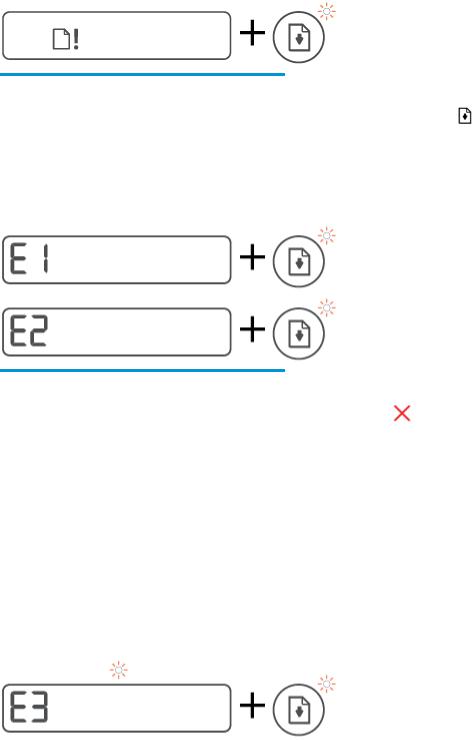
|
Причина |
Решение |
|
|
Принтер получает задание на печать, однако во входном |
Загрузите бумагу и нажмите кнопку |
(Возобновить), |
|
лотке отсутствует бумага. |
чтобы продолжить печать. |
|
Значок Количество копий
●На месте значка Количество копий отображается E1 или E2, а индикатор Возобновить мигает.
|
Причина |
Решение |
||
|
Загружена бумага неподходящей ширины (E1) или длины |
1. Нажмите кнопку |
(Отмена), чтобы отменить |
|
|
(E2). Во время печати принтер обнаруживает, что размер |
|||
|
бумаги не соответствует указанному в задании печати по |
печать. |
|
ширине или длине. |
2. Загрузите бумагу нужного размера или измените |
|
параметры размера бумаги в своем приложении в |
|
|
соответствии с размерами используемой бумаги. |
|
|
3. Повторите печать документа. |
|
|
СОВЕТ: Можно также изменить размер бумаги по |
|
|
умолчанию, который определяется принтером |
|
|
автоматически. Дополнительную информацию см. в |
|
|
разделе Обнаружение принтером измененных |
|
|
параметров бумаги по умолчанию на стр. 15. |
|
●На месте значка Количество копий отображается код «Е3». При этом индикаторы «Чернила/ печатающая головка» и Возобновить мигают.
|
12 Глава 1 Начало работы |
RUWW |
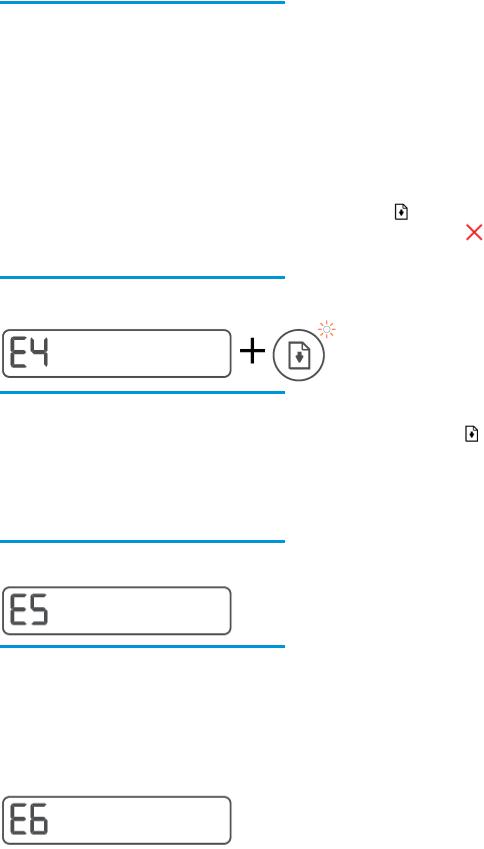
|
Причина |
Решение |
||
|
Каретка в принтере остановилась. |
1. |
Откройте переднюю крышку принтера и крышку |
|
|
доступа к печатающим головкам. |
|||
|
2. |
Убедитесь, что фиксатор печатающей головки |
||
|
закрыт и на пути каретки нет препятствий. Не |
|||
|
открывайте фиксатор печатающих головок. |
|||
|
3. |
Удалите мятую бумагу или другие объекты, которые |
||
|
мешают перемещению каретки. |
|||
|
4. |
Закройте крышку доступа к печатающим головкам и |
||
|
переднюю крышку принтера. |
|||
|
5. |
Нажмите кнопку |
(Возобновить), чтобы |
|
|
продолжить печать, или кнопку |
(Отмена). |
Дополнительную информацию см. в разделе Замятие и ошибки подачи бумаги на стр. 95.
●На месте значка Количество копий отображается код «E4»и мигает индикатор Возобновить.
|
Причина |
Решение |
|
|
Замятие бумаги. |
Устраните замятие и нажмите кнопку |
(Возобновить), |
чтобы продолжить печать.
Дополнительную информацию см. в разделе Замятие и ошибки подачи бумаги на стр. 95.
ПРЕДУПРЕЖДЕНИЕ. Не открывайте фиксатор печатающих головок.
●На месте значка Количество копий отображается код «Е5».
|
Причина |
Решение |
|
Сканер не работает. |
Выключите принтер и снова включите его. |
|
Если проблема остается, обратитесь в компанию HP. |
|
|
Принтер будет выполнять печать, даже если сканер не |
|
|
работает. |
|
●На месте значка Количество копий отображается код «Е6».
|
RUWW |
Индикаторы панели управления и состояние значков на экране 13 |

|
Причина |
Решение |
|
|
Принтер находится в состоянии ошибки. |
Выполните сброс параметров принтера. |
|
|
1. |
Выключите принтер. |
|
|
2. |
Отсоедините шнур питания. |
|
|
3. |
Подождите минуту, а затем снова подключите кабель |
|
|
питания к розетке. |
||
|
4. |
Включите принтер. |
|
|
Если проблема остается, обратитесь в компанию HP. |
||
Значок «Чернила», значок «CMYK» и индикатор «Чернила/печатающая головка»
●Горят значки CMYK, а также мигает как минимум один значок «Чернила».
|
Причина |
Решение |
|
В картридже мало чернил. |
Пополните картридж, в котором мало чернил. |
●Горят значки CMYK, а также мигает как минимум один значок «Чернила». Горит индикатор «Чернила/печатающая головка».
|
Причина |
Решение |
|
В картридже очень мало чернил. |
Пополните картридж, в котором мало чернил. |
●На месте количества копий отображается код «E7». Горят значки CMYK. Мигают индикатор «Чернила/печатающая головка», один или несколько значков «Чернила» и значок Оповещение.
|
Причина |
Решение |
|
В емкости закончились чернила. |
Пополните емкость, в которой закончились чернила. |
|
14 Глава 1 Начало работы |
RUWW |
Обнаружение принтером измененных параметров бумаги по умолчанию
Принтер может автоматически определять, загружена ли бумага во входной лоток и какова ее ширина (большая, средняя, маленькая). Размер бумаги по умолчанию (большой, средний или маленький), определяемый принтером, можно изменить.
Изменение параметров бумаги на встроенном веб-сервере
1.Откройте встроенный веб-сервер (EWS). Дополнительную информацию см. в разделе Откройте встроенный веб-сервер на стр. 87.
2.Перейдите на вкладку Параметры.
3.В меню слева нажмите Предпочтения, затем Управление лотками и бумагой и измените необходимые настройки.
4.Нажмите кнопку Применить.
|
RUWW |
Обнаружение принтером измененных параметров бумаги по умолчанию 15 |

Основные сведения о бумаге
Принтер хорошо работает практически с любым видом офисной бумаги. Перед закупкой больших партий бумаги попробуйте различные типы носителей. Оптимальное качество печати достигается при использовании бумаги компании HP. Подробнее о бумаге HP см. на веб-сайте компании HP по адресу www.hp.com .
Компания HP рекомендует использовать для повседневной печати документов обычную бумагу с логотипом ColorLok. Вся бумага с логотипом ColorLok проходит независимую проверку на соответствие высоким стандартам качества печати и надежности, позволяет получать документы с четкими и яркими цветами, более насыщенным черным и высыхает быстрее стандартной обычной бумаги. Бумага с логотипом ColorLok поставляется крупнейшими производителями бумаги с различными показателями плотности и размера.
Этот раздел содержит указанные ниже темы.
●Типы бумаги, рекомендуемые для печати
●Заказ бумаги и других расходных материалов HP
Типы бумаги, рекомендуемые для печати
Для обеспечения наилучшего качества печати компания HP рекомендует использовать бумагу HP, которая создана специально для различных заданий печати.
В зависимости от страны (региона) некоторые типы бумаги могут быть недоступны.
Фотопечать
●Фотобумага HP высшего качества
Фотобумага HP высшего качества обеспечит наилучшее качество фотографий. Используя фотобумагу HP высшего качества, вы сможете печатать качественные быстросохнущие фотографии, которыми можно поделиться сразу после печати. Доступны различные размеры бумаги, в том числе A4, 8,5 x 11 дюймов, 10 x 15 см (4 x 6 дюймов), 13 x 18 см (5 x 7 дюймов), а также различные покрытия — глянцевое и полуглянцевое (полуматовое). Эта бумага идеально подходит для того, чтобы вставлять ваши фотографии и специальные фотопроекты в рамки, демонстрировать и дарить их. Фотобумага HP высшего качества — это отличный результат, профессиональное качество и долговечность.
●Улучшенная фотобумага HP
Эта глянцевая фотобумага имеет специальное покрытие, обеспечивающее мгновенное высыхание чернил и исключающее смазывание изображений. Эта бумага устойчива к воздействию воды, загрязнений, отпечатков пальцев и влажности. Напечатанные на этой бумаге изображения выглядят как профессионально отпечатанные фотографии. Доступно несколько форматов этой бумаги, включая форматы A4, 8,5 x 11 дюймов, 10 x 15 см (4 x 6 дюймов), 13 x 18 см (5 x 7 дюймов). Бумага не содержит кислот, что позволяет получать более долговечные фотографии.
●Фотобумага HP для повседневного использования
Эта бумага предназначена для экономичной повседневной печати полноцветных фотографий на обычной фотобумаге. Кроме того, эта доступная фотобумага быстро высыхает, что облегчает работу с ней. При использовании этой бумаги на любом струйном принтере будут получаться
|
16 Глава 1 Начало работы |
RUWW |
четкие и резкие изображения. Доступны различные размеры бумаги с глянцевым покрытием, включая A4, 8,5 x 11 дюймов, 5 x 7 дюймов и 4 x 6 дюймов (10 х 15 см). Бумага не содержит кислот, что позволяет получать более долговечные фотографии.
●Экономичные пакеты фотоматериалов HP
В экономичных пакетах фотоматериалов HP содержатся оригинальные картриджи HP и улучшенная фотобумага HP. Это позволяет сэкономить время и гарантированно получать при печати доступные профессиональные фотографии с помощью принтера HP. Оригинальные чернила HP и улучшенная фотобумага HP специально разработаны для совместного использования, что позволяет получать долговечные и яркие фотографии. Такой набор идеально подходит для печати всех отпускных фотографий или большого количества копий фотографий.
Деловые документы
●Бумага HP повышенного качества для презентаций, мат. 120 г или Профессиональная бумага
HP, мат. 120 г
Этот тип бумаги представляет собой плотную двустороннюю бумагу, идеально подходящую для печати презентаций, предложений, отчетов и информационных бюллетеней. Большая плотность придает им выразительный внешний вид.
●Бумага HP для брошюр, глянц. 180 г или Профессиональная бумага HP, глянц. 180 г
Эти типы бумаги имеют глянцевое покрытие с обеих сторон, что делает их подходящими для двусторонней печати. Этот тип бумаги обеспечивает качество, близкое к фотографическому, и наиболее подходит для воспроизведения изображений и деловой графики для обложек отчетов, специальных презентаций, брошюр, почтовой корреспонденции и календарей.
●Бумага HP для брошюр, мат. 180 г или Профессиональная бумага HP, мат. 180 г
Эти типы бумаги имеют матовое покрытие с обеих сторон, что делает их подходящими для двусторонней печати. Этот тип бумаги обеспечивает качество, близкое к фотографическому, и наиболее подходит для воспроизведения изображений и деловой графики для обложек отчетов, специальных презентаций, брошюр, почтовой корреспонденции и календарей.
Повседневная печать
Все типы бумаги предназначены для ежедневной печати, для их производства используется технология ColorLok, которая снижает вероятность появления пятен и обеспечивает насыщенный черный цвет и яркие другие цвета.
●Ярко-белая бумага HP для струйной печати
Ярко-белая бумага HP для струйной печати обеспечивает высокую контрастность цветов и четкость текста. Она достаточно непрозрачная, подходит для двусторонней цветной печати и не просвечивает, что делает ее наиболее подходящей для создания газет, отчетов и рекламных листков.
●Бумага HP для печати
Бумага HP для печати — бумага высокого качества для широкого круга задач. При печати на этой бумаге документы имеют более качественный вид по сравнению с обычной или копировальной бумагой. Бумага не содержит кислот, что позволяет получать более долговечные фотографии.
●Офисная бумага HP
|
RUWW |
Основные сведения о бумаге 17 |
Офисная бумага HP — бумага высокого качества для широкого круга задач. Она подходит для копий, черновиков, служебных записок и других повседневных документов. Бумага не содержит кислот, что позволяет получать более долговечные фотографии.
●Офисная бумага HP из макулатуры
Офисная бумага HP из макулатуры представляет собой высококачественную бумагу для широкого набора задач, содержащую 30 % вторичного волокна.
Заказ бумаги и других расходных материалов HP
Принтер хорошо работает практически с любым видом офисной бумаги. Оптимальное качество печати достигается при использовании бумаги компании HP.
Бумагу и расходные материалы HP можно заказать по адресу: www.hp.com . В настоящее время некоторые разделы веб-сайта HP доступны только на английском языке.
Компания HP рекомендует использовать для повседневной печати и копирования документов обычную бумагу с логотипом ColorLok. Все типы бумаги с логотипом ColorLok проходят независимые испытания на соответствие высоким стандартам надежности и качества печати. Отпечатки на этой бумаге отличаются высокой контрастностью, яркостью цветов и насыщенными оттенками черного. Кроме того, они высыхают быстрее, чем документы, напечатанные на стандартных типах обычной бумаги. Бумага с логотипом ColorLok поставляется крупнейшими производителями бумаги с различными показателями плотности и размера.
|
18 Глава 1 Начало работы |
RUWW |

Откройте программное обеспечение принтера HP (Windows)
С помощью программного обеспечения принтера HP можно настроить параметры принтера, узнать приблизительные уровни чернил, заказать расходные материалы для печати, провести обслуживание принтера, устранить проблемы печати и т.д. В этом руководстве вы найдете дополнительные сведения о доступных функциях программного обеспечения принтера.
После установки программного обеспечения принтера HP выполните одно из следующих действий в зависимости от операционной системы.
 ПРИМЕЧАНИЕ. Если вместо ПО принтера вы используете приложение HP Smart, см. раздел Использование приложения HP Smart для печати, сканирования и устранения неполадок на стр. 20.
●Windows 10: на рабочем столе компьютера вызовите меню Пуск, из списка приложений выберите HP и нажмите на значок с именем принтера.
●Windows 8.1. Щелкните стрелку вниз в левом нижнем углу начального экрана и выберите название принтера.
●Windows 8. На начальном экране щелкните правой кнопкой мыши пустое пространство, на панели приложений щелкните Все приложения и выберите название принтера.
●Windows 7. На рабочем столе компьютера щелкните Пуск, Все программы, HP и выберите папку данного принтера. Затем нажмите значок с именем принтера.
|
RUWW |
Откройте программное обеспечение принтера HP (Windows) 19 |

Использование приложения HP Smart для печати, сканирования и устранения неполадок
HP Smart помогает настроить принтер HP, выполнить сканирование, печать, предоставить к нему общий доступ и управлять им. Можно отправлять документы и изображения с помощью электронной почты, текстовых сообщений, популярных облачных служб и социальных сетей (таких как iCloud, Google Drive, Dropbox и Facebook). Также можно настраивать новые принтеры HP, отслеживать наличие расходных материалов и осуществлять их заказ.
 ПРИМЕЧАНИЕ. Приложение HP Smart поддерживается устройствами на базе iOS, Android, Windows 10, OS X 10.11 и macOS 10.12 и более поздних версий. Приложение может быть доступно не на всех языках. Некоторые функции доступны не во всех моделях принтера.
Дополнительная информация о приложении HP Smart
Общие инструкции по печати, сканированию и устранению неполадок с помощью HP Smart см. в разделах Печать с помощью приложения HP Smart на стр. 32, Сканирование с помощью приложения HP Smart на стр. 52 и Вызов справки в приложении HP Smart на стр. 94. Для получения дополнительной информации посетите веб-сайты:
●iOS/Android: www.hp.com/go/hpsmart-help
●Windows: www.hp.com/go/hpsmartwin-help
●Mac. www.hp.com/go/hpsmartmac-help
Установка приложения HP Smart и подключение к принтеру
1.Перейдите на сайт 123.hp.com, чтобы загрузить и установить приложение HP Smart.
Пользователи iOS, Android и Windows 10 могут также сделать это в магазине приложений.
2.После завершения установки откройте приложение.
●iOS/Android: В меню компьютера или мобильного устройства нажмите HP Smart.
●Windows 10. Нажмите на рабочем столе устройства значок Пуск и выберите HP Smart из списка приложений.
●Mac. На панели запуска выберите приложение HP Smart.
3.Подключитесь к принтеру. Информацию см. в разделе Подключение принтера с помощью приложения HP Smart на стр. 83.
|
20 Глава 1 Начало работы |
RUWW |
Спящий режим
●В спящем режиме расход электроэнергии снижается.
●После начальной настройки принтер автоматически переходит в спящий режим после 5 минут бездействия.
●Подсветка кнопки «Питание» затухает и экран панели управления принтера отключается, когда принтер находится в спящем режиме.
●Нажатие любой кнопки на панели управления, отправка задания печати или сканирования может вывести принтер из спящего режима.
Изменение параметров спящего режима на встроенном веб-сервере (EWS)
1.Откройте встроенный веб-сервер (EWS). Дополнительную информацию см. в разделе Откройте встроенный веб-сервер на стр. 87.
2.Перейдите на вкладку Параметры.
3.В разделе Управление питанием нажмите Энергосберегающий режим и выберите необходимый параметр.
4.Нажмите кнопку Применить.

Тихий режим
В тихом режиме скорость печати замедляется, чтобы снизить общий уровень шума без ухудшения качества печати. Печать в бесшумном режиме возможна только при использовании Обычного качества печати и простой бумаги. Чтобы снизить шум при печати, включите тихий режим. Чтобы выполнить печать на обычной скорости, выключите тихий режим. По умолчанию тихий режим выключен.
 ПРИМЕЧАНИЕ. При выполнении печати на простой бумаге в бесшумном режиме с качеством печати Черновая печать или Высокое либо при печати фотографий или конвертов принтер работает так, как если бы бесшумный режим был выключен.
Включение и выключение бесшумного режима с помощью программного обеспечения принтера (Windows)
1.Откройте программное обеспечение принтера HP. Дополнительную информацию см. в разделе Откройте программное обеспечение принтера HP (Windows) на стр. 19.
2.Перейдите на вкладку Бесшумный режим.
 ПРИМЕЧАНИЕ. Вкладка «Бесшумный режим» отображается, только если принтер подключен через ПО HP.
3.Нажмите Вкл. или Выкл.
4.Щелкните Сохранить параметры.
Включение и выключение бесшумного режима с помощью встроенного веб-сервера (EWS)
1.Откройте встроенный веб-сервер. Дополнительную информацию см. в разделе Откройте встроенный веб-сервер на стр. 87.
2.Перейдите на вкладку Параметры.
3.В разделе «Предпочтения» выберите пункт Бесшумный режим, а затем нажмите Вкл. или Выкл.
4.Нажмите кнопку Применить.
|
22 Глава 1 Начало работы |
RUWW |

Автоотключение
Данная функция автоматически отключает принтер после 2 часов бездействия для уменьшения расхода электроэнергии. Поскольку функция автоотключения полностью выключает принтер, необходимо использовать кнопку питания, чтобы снова включить его.
Если принтер поддерживает функцию автоотключения для экономии энергии, ее работа будет зависеть от возможностей принтера и параметров подключения. Даже если функция автоотключения не работает, принтер переходит в спящий режим автоматически после 5 минут бездействия для уменьшения расхода электроэнергии.
●Функция автоотключения активируется при включении принтера, если он не поддерживает сеть, факс и Wi-Fi Direct либо не использует эти функции.
●Автоотключение запрещено, когда включена функция беспроводной связи или функция Wi-Fi Direct либо когда принтер, поддерживающий факс, USB или сеть Ethernet, устанавливает соединение через факс, USB или сеть Ethernet.
СОВЕТ: Для экономии электроэнергии можно активировать функцию автоотключения, даже когда принтер подключен к другим устройствам или когда включена функция беспроводной связи.

2Печать
●Загрузка бумаги
●Печать документов
●Печать фотографий
●Печать на конвертах
●Печать с помощью приложения HP Smart
●Печать в режиме Максимум dpi
●Печать с компьютера или ноутбука Mac
●Печать с мобильных устройств
●Советы по успешной печати
●Просмотр состояния заданий печати и управление заданиями печати (Windows)
●Настройка принтера (Windows)
![]()
Загрузка бумаги
Загрузка бумаги
1.Поднимите входной лоток.
2.Сдвиньте направляющую ширины бумаги влево.
3.Поместите стопку бумаги во входной лоток коротким краем вниз и стороной для печати вверх. Сдвиньте стопку бумаги вперед до упора.
При загрузке бумаги малого размера (например, фотобумаги) убедитесь, что стопка бумаги выровнена про правой крайней стороне лотка.

4.Сдвиньте направляющую ширины бумаги вправо так, чтобы она плотно прилегала к краю бумаги.
5.Выдвиньте выходной лоток и удлинитель лотка.
Загрузка конвертов
1.Поднимите входной лоток.

2.Сдвиньте направляющую ширины бумаги влево.
3.Поместите один или несколько конвертов в правый дальний угол входного лотка и сдвиньте стопку конвертов вниз до упора.
Сторона для печати должна быть расположена сверху.
а. Если клапан находится на длинной стороне конверта, вставьте конверт вертикально, при этом клапан должен находиться слева лицевой стороной вниз.
б. Если клапан находится на короткой стороне конверта, вставьте конверт вертикально, при этом клапан должен находиться сверху лицевой стороной вниз.

4.Переместите направляющую ширины бумаги вплотную к стопке конвертов.
5.Выдвиньте выходной лоток и удлинитель лотка.

Печать документов
Перед печатью документов убедитесь, что во входном лотке есть бумага, а выходной лоток открыт. Дополнительную информацию о загрузке бумаги см. в разделе Загрузка бумаги на стр. 25.
Печать документа (Windows)
1.В используемой программе откройте меню Файл и выберите Печать.
2.Убедитесь, что выбран принтер нужной модели.
3.Щелкните кнопку, с помощью которой открывается диалоговое окно Свойства.
В зависимости от используемой программы эта кнопка может называться Свойства, Параметры,
Настройка принтера, Свойства принтера, Принтер или Предпочтения.
4.Выберите соответствующие параметры на вкладке Профили печати или Профиль печати.
Изменить значения других настроек печати можно на дополнительных вкладках.
Для получения дополнительных сведений о параметрах драйвера принтера наведите указатель мыши на каждый параметр, чтобы посмотреть подсказки.
 ПРИМЕЧАНИЕ. При изменении размера бумаги убедитесь, что во входной лоток загружена бумага соответствующего размера.
5.Щелкните ОК, чтобы закрыть диалоговое окно Свойства.
6.Щелкните Печать или ОК, чтобы начать печать.
Печать на обеих сторонах листа (Windows)
1.В используемой программе откройте меню Файл и выберите Печать.
2.Убедитесь, что выбран этот принтер.
3.Щелкните кнопку, с помощью которой открывается диалоговое окно Свойства.
В зависимости от используемой программы эта кнопка может называться Свойства, Параметры,
Настройка принтера, Свойства принтера, Принтер или Предпочтения.
4.На вкладке Ярлыки печати или Ярлык печати выберите ярлык Двусторонняя печать (дуплекс),
а затем выберите параметр «Вручную» из раскрывающегося списка Печать на 2 сторонах.
Изменить значения других настроек печати можно на дополнительных вкладках.
Для получения дополнительных сведений о параметрах драйвера принтера наведите указатель мыши на каждый параметр, чтобы посмотреть подсказки.
 ПРИМЕЧАНИЕ. При изменении размера бумаги убедитесь, что во входной лоток загружена бумага соответствующего размера.
5.Щелкните ОК, чтобы закрыть диалоговое окно Свойства.
6.Щелкните Печать или ОК, чтобы начать печать.
|
RUWW |
Печать документов 29 |

Печать фотографий
Перед печатью фотографий убедитесь, что во входном лотке есть фотобумага, а выходной лоток открыт. Дополнительную информацию о загрузке бумаги см. в разделе Загрузка бумаги на стр. 25.
Печать фотографий на фотобумаге (Windows)
1.В используемой программе откройте меню Файл и выберите Печать.
2.Убедитесь, что выбран принтер нужной модели.
3.Щелкните кнопку, с помощью которой открывается диалоговое окно Свойства.
В зависимости от используемой программы эта кнопка может называться Свойства, Параметры,
Настройка принтера, Свойства принтера, Принтер или Предпочтения.
4.Выберите соответствующие параметры на вкладке Профили печати или Профиль печати.
Изменить значения других настроек печати можно на дополнительных вкладках.
Для получения дополнительных сведений о параметрах драйвера принтера наведите указатель мыши на каждый параметр, чтобы посмотреть подсказки.
 ПРИМЕЧАНИЕ. При изменении размера бумаги убедитесь, что во входной лоток загружена бумага соответствующего размера.
5.Щелкните OK, чтобы закрыть диалоговое окно Свойства.
6.Нажмите кнопку Печать или OK, чтобы начать печать.
 ПРИМЕЧАНИЕ. После завершения печати удалите неиспользованную фотобумагу из входного лотка. Храните фотобумагу таким образом, чтобы исключить ее скручивание, иначе это приведет к снижению качества печати.

Печать на конвертах
Перед печатью конвертов убедитесь, что во входном лотке есть конверты, а выходной лоток открыт. Во входной лоток принтера можно загрузить один или несколько конвертов. Не используйте глянцевые или тисненые конверты, а также конверты с застежками или окнами. Дополнительную информацию о загрузке конвертов см. в разделе Загрузка бумаги на стр. 25.
 ПРИМЕЧАНИЕ. Подробную информацию о форматировании текста для печати на конвертах см. в документации к используемому приложению.
Печать на конверте (Windows)
1.В используемой программе откройте меню Файл и выберите Печать.
2.Убедитесь, что выбран принтер нужной модели.
3.Щелкните кнопку, с помощью которой открывается диалоговое окно Свойства.
В зависимости от используемой программы эта кнопка может называться Свойства, Параметры,
Настройка принтера, Свойства принтера, Принтер или Предпочтения.
4.Выберите соответствующие параметры на вкладке Профили печати или Профиль печати.
Изменить значения других настроек печати можно на дополнительных вкладках.
Для получения дополнительных сведений о параметрах драйвера принтера наведите указатель мыши на каждый параметр, чтобы посмотреть подсказки.
 ПРИМЕЧАНИЕ. При изменении размера бумаги убедитесь, что во входной лоток загружена бумага соответствующего размера.
5.Щелкните ОК, чтобы закрыть диалоговое окно Свойства.
6.Щелкните Печать или ОК, чтобы начать печать.
|
RUWW |
Печать на конвертах 31 |

Печать с помощью приложения HP Smart
В этом разделе приведены общие инструкции по использованию приложения HP Smart для печати с устройств на базе iOS, Android, Windows и Mac. Дополнительную информацию о приложении см. в разделе Использование приложения HP Smart для печати, сканирования и устранения неполадок на стр. 20.
Начало использования HP Smart для печати
1.Загрузите бумагу во входной лоток. Дополнительную информацию см. в разделе Загрузка бумаги на стр. 25.
2.Откройте приложение HP Smart на устройстве.
3.Убедитесь, что на главном экране HP Smart выбран нужный принтер.
СОВЕТ: Если принтер уже настроен, его можно выбрать из списка на главном экране HP Smart, пролистав влево или вправо.
Чтобы использовать другой принтер, нажмите значок  («Плюс») на главном экране, выберите нужное устройство из списка или добавьте новое.
Печать с устройства на базе Android или iOS
1.На главном экране HP Smart выберите один из вариантов печати (например, Печать фотографий или Печать фотографий Facebook и т. д.). Вы можете печатать фотографии и документы с вашего устройства, из облачного хранилища или из социальных сетей.
2.Выберите фотографию или документ, который требуется напечатать.
3.Коснитесь Печать.
Печать с устройства на Windows 10
1.В нижней части главного экрана HP Smart нажмите Печать.
2.Выберите Печать фотографий, найдите фотографию, которую хотите напечатать, а затем щелкните или коснитесь Выберите фотографии для печати.
Выберите Печать документов, найдите документ PDF, который хотите напечатать, а затем щелкните или коснитесь Печать.
3.Выберите соответствующие параметры. Чтобы просмотреть другие параметры, щелкните или коснитесь Другие параметры.
Дополнительную информацию о параметрах печати см. в разделе Советы по успешной печати на стр. 37.
4.Чтобы начать печать, щелкните или коснитесь Печать.
Печать с устройства на базе Mac
1.На главном экране HP Smart нажмите Печать и выберите Печать документов или Печать фото.
2.В папке «Документы» или библиотеке изображений найдите нужный документ или фотографию. Также можно перейти в другую папку, в которой находится файл.
3.Выберите документ или фотографию и щелкните Печать.
4.Вы также можете выбрать другой принтер или изменить параметры, например размер бумаги или качество печати.
5.Щелкните Печать.
|
RUWW |
Печать с помощью приложения HP Smart 33 |
Печать в режиме Максимум dpi
Используйте режим максимального разрешения (макс. количество точек на дюйм) для печати высококачественных четких изображений на фотобумаге.
Печать в режиме максимального разрешения выполняется дольше, чем в других режимах, а также требует большего объема дискового пространства.
Поддерживаемые разрешения печати см. на веб-сайте технической поддержки по адресу www.support.hp.com.
Печать в режиме максимального разрешения (Windows)
1.В используемой программе выберите Печать.
2.Убедитесь, что выбран требуемый принтер.
3.Щелкните кнопку, с помощью которой открывается диалоговое окно Свойства.
В зависимости от используемой программы эта кнопка может называться Свойства, Параметры,
Настройка принтера, Свойства принтера, Принтер или Предпочтения.
4.Выберите соответствующие параметры.
Windows 10, Windows 8.1 и Windows 8
● Щелкните вкладку Бумага/качество. В раскрывающемся списке Размер бумаги выберите подходящий размер бумаги. В раскрывающемся списке Тип бумаги выберите подходящий тип бумаги.
● Перейдите на вкладку Дополнительно, а затем выберите Печать с максимальным разрешением.
Windows 7.
● Щелкните вкладку Бумага/качество. Выберите подходящий тип бумаги в раскрывающемся списке Носители.
● Щелкните кнопку Дополнительно. В раскрывающемся списке Размер бумаги выберите подходящий размер бумаги. В области Параметры принтера выберите Да в списке Печать с максимальным разрешением. Затем нажмите OK, чтобы закрыть диалоговое окно
Дополнительные параметры.
Дополнительные советы см. в разделе Советы по настройке принтера на стр. 37.
5.На вкладке Макет подтвердите ориентацию и щелкните ОК, чтобы начать печать.
Печать с компьютера или ноутбука Mac
Здесь представлены инструкции для принтеров, совместимых с технологией HP AirPrint, и компьютеров Mac с OS X 10.11 и macOS 10.12 или более поздних версий.
Принтер подключен к сети
Если ваш принтер уже настроен и подключен к беспроводной сети, можно печатать с компьютера или ноутбука Mac через меню Системные настройки.
1.Откройте меню Системные настройки и выберите пункт Принтеры и сканеры.
2.Нажмите Добавить +, чтобы настроить данный принтер на компьютере Mac. Из открывшегося списка сетевых принтеров выберите ваш принтер и нажмите Добавить. При этом будут установлены доступные драйверы печати, сканирования и факса для вашего принтера.
Следующие инструкции помогут вам печатать с вашего компьютера Mac. Продолжайте использовать приложение HP Smart, чтобы контролировать уровни чернил и получать оповещения принтера.
Принтер не подключен к сети
▲Если вы еще не настроили или не подключили принтер к своей сети, перейдите на веб-сайт 123.hp.com, чтобы установить необходимое программное обеспечение.
|
RUWW |
Печать с компьютера или ноутбука Mac 35 |

Печать с мобильных устройств
Печать с мобильных устройств
Вы можете печатать документы и фотографии напрямую с ваших мобильных устройств, включая устройства iOS, Android, Windows Mobile, Chromebook и Amazon Kindle.
 ПРИМЕЧАНИЕ. С помощью приложения HP Smart также можно выполнять печать с мобильных устройств. Дополнительную информацию см. в разделе Печать с помощью приложения HP Smart на стр. 32.
Как печатать с мобильных устройств
1.Убедитесь, что принтер и устройство включены и подключены к одной беспроводной сети.
СОВЕТ: Для печати с мобильного устройства без подключения к маршрутизатору используйте Wi-Fi Direct. Дополнительную информацию см. в разделе Беспроводное подключение к принтеру без маршрутизатора (Wi-Fi Direct) на стр. 79.
2.Включите печать на мобильном устройстве:
● iOS: Используйте пункт Печать из меню Поделиться.
 ПРИМЕЧАНИЕ. На устройствах под управлением iOS 4.2 и более поздних версий приложение AirPrint® уже установлено.
●Android. Загрузите «Подключаемый модуль HP для печати» (поддерживается устройствами на базе Android 4.4 и более поздних версий) из Google Play и включите его на устройстве.
●Windows Mobile: Коснитесь Печать в меню Устройство. Дополнительной настройки не требуется, поскольку программное обеспечение уже установлено.
 ПРИМЕЧАНИЕ. Если вашего принтера нет в списке, может потребоваться однократная настройка принтера с помощью мастера установки принтера.
●Chromebook: Загрузите и установите приложение HP Print для Chrome из интернет-магазина Chrome, чтобы активировать печать по Wi-Fi и USB.
●Amazon Kindle Fire HD9 и HDX: Когда вы первый раз нажимаете Печать на вашем устройстве, «Подключаемый модуль для печати HP» автоматически загружается, позволяя печатать с мобильного устройства.
 ПРИМЕЧАНИЕ. Подробную информацию о включении мобильной печати на мобильных устройствах см. на веб-сайте мобильной печати HP ( www.hp.com/go/mobileprinting ). Если локальная версия сайта для вашей страны, региона или языка недоступна, вы будете перенаправлены на веб-сайт о возможностях мобильной печати для другой страны, региона или на другом языке.
3.Убедитесь, что загруженная бумага соответствует параметрам принтера (подробнее см. Загрузка бумаги на стр. 25).
Установка точного размера загруженной бумаги позволяет мобильному устройству определить, на какой бумаге будет выполнена печать.
 ПРИМЕЧАНИЕ. Для изменения параметров бумаги по умолчанию см. раздел Обнаружение принтером измененных параметров бумаги по умолчанию на стр. 15.

Советы по успешной печати
●Советы по загрузке бумаги
●Советы по настройке принтера
Для успешной печати печатающие головки HP должны работать правильно, в емкостях должно быть достаточное количество чернил, бумага должна быть загружена согласно инструкциям, а настройки печати установлены в соответствии с вашими потребностями. Дополнительную информацию см. в разделе Советы по работе с чернилами и печатающими головками на стр. 72.
Параметры печати не применяются к копированию и сканированию.
Советы по загрузке бумаги
●Загружайте листы не по отдельности, а стопкой. Для предотвращения замятия все листы в стопке должны быть одинакового размера и типа.
●Бумага должна быть расположена стороной для печати вверх.
●Убедитесь, что бумага, загруженная во входной лоток, не имеет изгибов, загнутых краев и разрывов.
●Отрегулируйте направляющую ширины бумаги во входном лотке, чтобы она вплотную прилегала к бумаге. Убедитесь, что направляющая ширины не сгибает бумагу во входном лотке.
Дополнительную информацию см. в разделе Загрузка бумаги на стр. 25.
Советы по настройке принтера
Советы по настройке принтера (Windows)
●Для изменения параметров печати по умолчанию откройте программу HP программное обеспечение принтера, щелкните Печать и сканирование , а затем выберите пункт Установка параметров. Информацию о том, как открыть программу программное обеспечение принтера, см. в разделе Откройте программное обеспечение принтера HP (Windows) на стр. 19.
СОВЕТ: Для получения дополнительных сведений о параметрах драйвера принтера наведите указатель мыши на каждый параметр, чтобы посмотреть подсказки.
●Профили печати можно использовать, чтобы не тратить время на настройку параметров. С помощью профиля печати можно сохранить параметры, соответствующие определенному типу задания, и выполнять настройку одним щелчком мыши. Чтобы использовать профиль печати, перейдите на вкладку Профили печати или Профиль печати, выберите необходимый профиль и нажмите OK.
Чтобы добавить профиль печати, настройте параметры на вкладке Бумага/Качество, Макет или
Дополнительно, выберите Профили печати или Профиль печати, нажмите Сохранить как,
введите название и нажмите OK.
Чтобы удалить профиль печати, выберите его и щелкните Удалить.
 ПРИМЕЧАНИЕ. Профили печати по умолчанию удалить невозможно.
●Значение настроек бумаги и лотка
|
RUWW |
Советы по успешной печати 37 |
–Размер бумаги: выберите формат бумаги, загруженной в лоток.
–Источник бумаги: выберите лоток, в который загружена бумага.
–Тип бумаги или Носитель: выберите тип используемой бумаги.
●Значение настроек цветной и черно-белой бумаги
–Цвет: используются черные и цветные чернила для создания полноцветных отпечатков.
–Черно-белая или Только черные чернила: используются только черно-белые чернила для обычной или черно-белой печати невысокого качества.
–Высокое качество оттенков серого: используются черные и цветные чернила для улучшенной передачи оттенков черного и серого при черно-белой печати высокого качества.
●Значение настроек качества печати
Качество печати измеряется в количестве точек на дюйм (dpi). Чем выше количество точек на дюйм, тем более четким и детализированным получается отпечаток, но тем ниже скорость печати и выше расход чернил.
–Черновик: печать с самым низким количеством точек на дюйм используется, если заканчиваются чернила или нет необходимости в печати высокого качества.
–Обычное: подходит для большинства заданий печати.
–Наилучшее: в этом режиме количество точек на дюйм выше, чем в режиме Обычное.
–Печать с максимальным разрешением: самое большое количество точек на дюйм, доступное для печати.
–Технологии HP Real Life. Данная функция позволяет выравнивать и делать более четкими изображения и графику для повышенного качества печати.
●Значение настроек страницы и макета
–Ориентация: выберите Книжная для вертикальных отпечатков или Альбомная для горизонтальных отпечатков.
–Печать на обеих сторонах (вручную): для печати на обеих сторонах переверните лист, после того как будет напечатана первая сторона.
○Переворот по длинному краю: выберите данный параметр, чтобы при печати на обеих сторонах листа бумага переворачивалась по длинному краю.
○Переворот по короткому краю: выберите данный параметр, чтобы при печати на обеих сторонах листа бумага переворачивалась по короткому краю.
–Макет буклета или Буклет: позволяет печатать многостраничный документ в виде буклета. С помощью данной функции две страницы помещаются на лист, который в последствии можно согнуть пополам в виде буклета.
○Переплет слева или Буклет/Переплет слева: после сгиба в виде буклета переплет будет с левой стороны. Выберите данный параметр для чтения слева направо.
○Переплет справа или Буклет/Переплет справа: после сгиба в виде буклета переплет будет с правой стороны. Выберите данный параметр для чтения справа налево.
–Без границ или Границы страниц: позволяет добавить или удалить границы страниц при печати документа с более чем двумя страницами на одном листе.
–Макет расположения страниц на листе. Позволяет указывать порядок страниц при печати документа с более чем двумя страницами на одном листе.
–Выбор страниц для печати: позволяет печатать все страницы, только четные или только нечетные.
–Обратный порядок страниц или Порядок страниц: позволяет печатать в обратном порядке.
|
RUWW |
Советы по успешной печати 39 |
 Loading…