Посмотреть инструкция для Pantum P2200 бесплатно. Руководство относится к категории принтеры, 1 человек(а) дали ему среднюю оценку 8.7. Руководство доступно на следующих языках: русский. У вас есть вопрос о Pantum P2200 или вам нужна помощь? Задайте свой вопрос здесь
Не можете найти ответ на свой вопрос в руководстве? Вы можете найти ответ на свой вопрос ниже, в разделе часто задаваемых вопросов о Pantum P2200.
Как удалить замятую бумагу из принтера?
Лучше всего аккуратно вытянуть бумагу из принтера. Выключите принтер и убедитесь, что печатающий узел не нависает над бумагой и что в принтере не осталось бумаги.
Почему после установки оригинального картриджа принтер не работает?
Принтер может не распознать неоригинальный картридж. В этом случае вы получите сообщение о том, что картридж пуст. В инструкции к приобретенному картриджу обычно указаны способы устранения проблемы. Если это сделать не удалось, рекомендуется обратиться к продавцу.
Чем обусловлено плохое качество печати?
Причины плохого качества печати могут быть разными. Убедитесь, что картридж заполнен, а тонер имеется в достаточном количестве. Если такой проблемы нет, причина может заключаться в том, что струйному принтеру требуется чистка, высох картридж или сломан печатающий узел. Для лазерного принтера рекомендуется выполнить калибровку.
В чем разница между лазерным и струйным принтером?
Лазерный принтер печатает тонером, а струйный — чернилами.
Почему при печати на струйном принтере появляются черные полосы?
В большинстве случаев это обусловлено поломкой картриджа струйного принтера. Необходимо заменить картридж.
Что означает аббревиатура DPI?
DPI обозначает Dots Per Inch и представляет собой количество капель чернил (на дюйм), которые подаются на бумагу при печати.
Инструкция Pantum P2200 доступно в русский?
Да, руководствоPantum P2200 доступно врусский .
Не нашли свой вопрос? Задайте свой вопрос здесь
-
Contents
-
Table of Contents
-
Troubleshooting
-
Bookmarks
Related Manuals for Pantum P2200 Series
Summary of Contents for Pantum P2200 Series
-
Page 1
User Guide Pantum P2200/P2500 Series Pantum P2 6 00 Series Monochrome Laser Printer It is recommended to carefully read this Guide before using the printer… -
Page 2
Zhuhai Pantum Electronics Co.,Ltd. Disclaimer Version: V1.4 For a better user experience, Zhuhai Pantum Electronics Co.,Ltd. reserves the right to make changes to the User Guide. The information contained herein is subject to change without notice. -
Page 3
Safety Precautions Disconnect the power supply The product should be placed close to or easily accessible to power sockets, so as to allow easy disconnection of power supply! Laser Safety The laser radiation is harmful to the human body. Since laser components are completely sealed in the printer, laser radiation will not leak. -
Page 4
Safety Warning Please note the following safety warnings before using the printer: Warning There is high-voltage electrode inside the printer. Before cleaning the printer, make sure the power is turned off! Plugging and unplugging the power cord plug with a wet hand can result in an electric shock. -
Page 5
23. This product is sold as a complete machine. The consumers can go to Pantum Aftersales Service Centre to purchase parts they need. If the product sold is inconsistent with the package list, please go to the specified Aftersales Service Centre to solve the problem;… -
Page 6
Member States relating to electromagnetic compatibility and safety of electrical equipment designed for use within certain voltage limits. The manufacturer of this product is: Zhuhai Pantum Electronics Co.,Ltd., No.3883,Zhuhai Avenue,Zhuhai,Guangdong,China A declaration of conformity to the requirements of the Directives is available upon request from the Authorized Representative. -
Page 7: Table Of Contents
5.2.3. How to disable the Wi-Fi Direct ………………5-8 5.3. Wireless network setup FAQs ………………..5-8 6. Pantum Mobile Print ……………………6-2 6.1. What’s Pantum Mobile Print ………………..6-2 6.2. Download Pantum Mobile Print ………………..6-2 6.3. Supported Mobile Operating System ………………6-2 6.4. How to use mobile devices for the mobile printing …………..6-2 6.4.1.
-
Page 8
8. Control Panel ……………………..8-2 8.1. Control Panel Overview ………………….8-2 8.1.1. Functions of Buttons on the Control Panel …………..8-2 8.1.2. Function of LED Indicators on the Control Panel ………….8-3 9. Routine Maintenance ……………………9-2 9.1.Cleaning the Printer …………………….9-2 9.2. Maintenance of Laser Toner Cartridge ……………….9-4 9.2.1. -
Page 9: Before Using The Printer
Before Using the Printer Chapter 1. Before Using the Printer ……………………1-2 1.1. Packing List ……………………..1-2 1.2. Components of the Printer ………………….1-3 1.3. Laser Toner Cartridge …………………..1-4…
-
Page 10: Packing List
When you open the package, make sure that the following parts are included in the carton: P2200/P2500 Series Name P2600 Series Quantity Printer Laser Toner Cartridge USB Interface Cable Power Cord CD-ROM Quick Setup Guide Pantum Warranty Note: • The Pantum Warranty may not be attached in some regions.
-
Page 11: Components Of The Printer
1.2. Components of the Printer | Front View Serial No. P2200/P2500 Series P2600 Series Output Bin Output Bin Control Panel Control Panel Output Tray Output Tray Automatic Feed Guide Manual Feed Guide Paper Stop Automatic Feed Guide Feeder Tray Paper Stop Automatic Feeder Tray Manual Feeder Tray Automatic Feeder Tray…
-
Page 12: Laser Toner Cartridge
• Consumables capacity may vary depending on the types used. • The Company does not recommend using consumables other than that of the original Pantum consumables. • Any damages caused by using non-Pantum original consumables are not covered by the Warranty.
-
Page 13: Paper And Print Media
Paper and Print Media Chapter 2. Paper and Print Media ……………………2-2 2.1. Paper Specification ……………………2-2 2.2. Special Paper ………………………2-3 2.3. Loading Paper ……………………..2-4 2.3.1. Loading into the Automatic Feeder Tray …………….2-4 2.3.2. Loading into the Manual Feeder Tray …………….2-5 2.4. Nonprinting Area ……………………2-7 2.5.
-
Page 14: Paper Specification
This may be due to incorrect operation, inappropriate temperature and humidity, or other factors beyond the control of Pantum. Before purchasing large quantities of print media, make sure that the print media meets the specifications specified in this User Guide.
-
Page 15: Special Paper
2.2. Special Paper This printer supports using the special paper for printing. Special paper includes: label, envelope, transparency, thick, cardstock, etc. Note: • When using special paper or print media, be sure to select matched print type and size in the print settings so as to get the best print effect. •…
-
Page 16: Loading Paper
2.3. Loading Paper 2.3.1. Loading into the Automatic Feeder Tray a) Open the feeder tray. P2500 Series P2600 Series b) Slide the automatic feed guides to match both sides of the paper. P2500 Series P2600 Series c) Raise the output tray to avoid the paper from slipping and falling. P2500 Series P2600 Series d) Load the paper into the automatic feeder tray with the print-side up.
-
Page 17: Loading Into The Manual Feeder Tray
Note: • Before loading paper, please unfold the stacked paper to avoid a paper jam or feed error,and then load the paper into the tray print-side up. e) Adjust the paper stop to keep the paper in position. To ensure normal paper feeding, adjust the bottom paper stop ①…
-
Page 18
b) Slide the manual feed guides to match both sides of the paper. c) Raise the output tray to avoid the paper from slipping and falling. d) Put the print media like an envelope or transparency into the manual feeder tray with two hands until the front end of the envelope or transparency contacts the correction roller. -
Page 19: Nonprinting Area
2.4. Nonprinting Area The shaded section indicates the nonprinting area. Top and Bottom Left and Right Usage Paper Size Margins (A) Margins (B) 5 mm (0.197 inch) 5 mm (0.197 inch) Printing Letter 5 mm (0.197 inch) 5 mm (0.197 inch) 2.5.
-
Page 20: Driver Installation And Uninstallation
Driver installation and uninstallation Chapter 3.Driver installation and uninstallation ………………..3-2 3.1.Driver installation based on Windows system …………….3-2 3.1.1.Installation via USB connection ………………3-2 3.1.2.One-key wireless network installation …………….3-16 3.1.3.Installation via wired network connection ……………..3-22 3.2.Driver installation based on Mac system …………….3-23 3.2.1.Driver installation………………….3-23 3.3.Add printer to Mac system ………………….3-25 3.3.1.Add in USB connection mode ………………3-25…
-
Page 21: How To Install Windows Printer Driver
3. Driver installation and uninstallation 3.1. How to install Windows printer driver Windows driver installation software provides two installing methods: one-click installation and manual installation.We recommend one-click installation, which can help to install driver automatically in a faster and more convenient way.If you have any difficulty in using one-click installation, please try manual installation.
-
Page 22
5. After the installation, click “Print &Test Page” button. If your printer prints the test page successfully, it means that you have installed the driver correctly. 3.1.1.2. Method II: Connect the printer via wired network 1. Turn the power of printer and computer on. 2. -
Page 23
• Windows 10 system: When the “DVD RW driver” window pops up from the right top corner of computer desktop, click anywhere in the window, then click “Autorun.exe” to run the installation procedure. Note: • Some computers may be unable to auto play the CD beacase of system configuration. -
Page 24
• If your software has searched several printers, click on the”One-click intallation” button, and the printer list interface will pop up. Please select the printer that you need according to your printer wired network IP address or host ID. -
Page 25
Note:• If the printer you need is not shown in the list, please click “Refresh” button to search again. If it is not found, please check if the printer and computer are in the same network. (Please see Chapter 5.3 for how to check). -
Page 26
4. Click on the “I agree” button on the right buttom corner after reading the license agreement and enter into driver installation interface. 5. Click the “One-click installation” button in Method III to install driver software. Note: • You can put your mouse cursor in the “One-click installation” button to check the popup information in order to confirm if the current printer is the one you need to install through IP address before you click the button. -
Page 27
• If your software has searched several printers, click “One-click intallation” button, and the printer list interface will pop up. Please select “Configure printer with Wi-Fi via USB and install” and select USB printer, click “Confirm” button and enter into installation process to complete automatic network configuration and driver installation. -
Page 28
II. Connect computer to router via network cable 1. Connect computer to router via network cable. 2. Connect the printer to computer via USB cable, then power the printer on. 3. Place the attached installation CD in the computer CD-ROM: •… -
Page 29
• Click on the “One-click installation” button if your software has only searched only one printe, and the wireless network configuration interface will pop up, input the SSID and password that you need, then click “Confirm” button, and enter into installation process. The process may need some time, and the duration is related to your computer configuration, please wait patiently. -
Page 30
Note:• When the printer IP address changes under printer driver installed with host ID , you can also directly print without re-installing the driver. If you need to install the printer driver with the host ID, please check the option «Install the printer in the list with host ID». -
Page 31
2. Connect computer to the Wi-Fi Direct network of the printer (please refer to Chapter 5.2.2 for setup method). 3. Place the attached installation CD in the computer CD-ROM: • Windows XP system: automatically run the installation procedure. • Windows 7/Vista/Server 2008 system: Pop up “Autoplay” interface, click “Autorun.exe” to run the installation procedure. -
Page 32
6. After the installation, click “Print &Test Page” button. If your printer prints the test page successfully, it means that you have installed the driver correctly. 3.1.1.3.2. The printer is already connected to wireless network 1. The printer is already connected to wireless network, you can print the “Network configuration page”… -
Page 33
Note:• You can put your mouse cursor in the “One-click installation” button to check the popup information in order to confirm if the current printer is the one you need to install through IP address before you click the button. •… -
Page 34
• If the software has searched several printers, the printer list interface will pop up. Please select the printer you need according to your printer wired network IP address or host ID . Note:• If the printer you need is not shown in the list, please click “Refresh” button to search again. -
Page 35: Manual Installation
6. After the installation, click “Print &Test Page” button. If your printer prints the test page successfully, it means that you have installed the driver correctly. 3.1.2. Manual installation • Before installing the drive, you need to learn about printer model by printing printer information page out and check the product name (please refer to Chapter 8.1.1.3 printing methods).
-
Page 36: Installation Via Wired Network Connection
7. The software installs the driver automatically and the installation process may need some time. The duration is related to your computer configuration, please wait patiently. 8. After the installation, click “Print &Test Page” button. If your printer prints the test page successfully, it means that you have installed the driver correctly.
-
Page 37
9. The installation software will search the printer automatically and the searching process may need some time. 10. After finishing searching, select the printer that needs to be connected and click “Next”. Note: • If the printer you need to connect is not in the list of printers searched, please click “Refresh”… -
Page 38
3.1.2.3.1. Installation in basic structure mode 1. Connect computer to access point (wireless router). 2. Connect the printer to computer via USB cable, then power the printer on. 3. Place the attached installation CD in the computer CD-ROM: • Windows XP system: automatically run the installation procedure. •… -
Page 39
8. 8. Select “Yes, I want to configurate the printer’s wireless network” on the wireless setup window popped out, and operate according to the prompts to set up the printer to wireless network (please refer to Chapter 5.1.1 for setup method). 9. -
Page 40
11. The software installs the driver automatically and the installation process may need some time. The duration is related to your computer configuration, please wait patiently. 12. After the installation, click “Print &Test Page” button. If your printer prints the test page successfully, it means that you have installed the driver correctly. -
Page 41
8. Select “No, the printer has been connected to wireless network” on the wireless setup window popping out, and then click “Next”. 9. The installation software will search the printer automatically and the searching process may need some time. 10. Select the printer needs to be connected and click “Next”. Note: •… -
Page 42: Method Of Driver Unistallation
1. Click the Start menu of computer and then click All programs. 2. Click Pantum, and then Click Pantum XXX Series. Pantum XXX Series where XXX represents product model. 3. Click uninstall to delete the driver according to instructions on uninstall window.
-
Page 43: Mac System Driver Installation
1. Turn the power of printer and computer on. 2. Insert the CD companying with printer in the CD driver of your computer, and double click Pantum XXX Series installation package. (XXX in Pantum XXX Series represents product model.) 3. Click “Continue”.
-
Page 44
5. Click “Agree” on the prompt window popping out to accept the licensing agreement. 6. Click “Install”. 7. Input computer password and click “Install Software”. 8. Click “Continue Installation” on the prompt window popping out. 9. The system will finish driver installation automaticall . •… -
Page 45: Add Printer To Mac System
3.3.Add printer to Mac system 3.3.1.Add up the printer via USB 1. Connect the printer to computer with USB cable and then turn power on. 2. Enter the “System Preferences” – “Printers & Scanners” of computer. 3. Click button to select “Add Printer or Scanner”. 4.
-
Page 46
Wired Network Settings (For wired network printer models) Chapter 4. Wired Network Settings (For wired network printer models) …………4-2 4.1. Set IP Address ……………………..4-2 4.2. Install the Printer to Network …………………4-3 4.3. Setting Network Products ………………….4-4 4.3.1. View or Change Network Settings ………………4-4 4.3.2. -
Page 47: Wired Network Settings (For Wired Network Printer Models)
4. Wired Network Settings (For wired network printer models) You may need to set some network parameters on the printer. These parameters can be set from the embedded Web server. 4.1. Set IP Address The IP address of the printer may be automatically obtained through DHCP function or set manually.
-
Page 48: Install The Printer To Network
4.2. Install the Printer to Network In this setting, the printer is directly connected to the network and can be set to allow all computers on the network to print directly on the printer. 1. Before starting the printer, first connect the network cable to the network port of the printer to establish direct connection to the network.
-
Page 49: Setting Network Products
4.3. Setting Network Products 4.3.1. View or Change Network Settings You can use the embedded Web server to view or change IP settings. 1. Long press the «Cancel/Continue» button on the control panel to print Demo information page, and view the IP address of the printer. Demo page can be printed by long pressing the button on the control panel (as shown in the figure below) in the idle status.
-
Page 50: Wireless Network Setup (Applicable To Wi-Fi Models)
Wireless network setup (applicable to Wi-Fi models) Chapter 5.Wireless network setup (applicable to Wi-Fi models) …………..5-2 5.1.Basic structure mode ……………………5-2 5.1.1.Wireless network setup tools …………………5-2 5.1.2.Wi-Fi Protected Setup (WPS) setup……………….5-7 5.1.3.How to disable the Wi-Fi network connected …………..5-7 5.2.Wi-Fi hotspot mode ……………………5-8 5.2.1.Preliminary preparations ………………..5-8 5.2.2.Wi-Fi Hot Connection ………………….5-8 5.2.3.
-
Page 51: Basic Structure Mode
5.Wireless network setup (applicable to Wi-Fi models) Depending on model, the printer with Wi-Fi printing function supports the two types of wireless network connection of both infrastructure connection mode and Soft-AP, while there is usually only one connection between computer and printer at a time. If you have problems during wireless network setup, please refer to Chapter 5.3 Wireless…
-
Page 52
5.1.1.2.Setup methods of wireless network setup tools 1. Take the wireless network setup tool in computer. 1) Windows system: Click the “Start menu” – “All programs” — “Pantum”- Product name – “Wireless network setup tool”. 2) Mac system: click “Go” — “Applications” — “Pantum” — “Utilities” — “Wireless Network Configuration Tool”… -
Page 53
Note: • The SSID you selected should be consistent with the SSID of access point (wireless router) connected to your computer. 2) Please tick “No” to configure other wireless network needed to connect to. Complete configuration according to interface prompt. Note: •… -
Page 54
2.2 The computer is not connected to wireless network Input the SSID (case sensitive) and password of access point (wireless router) in the interface below. Complete configuration according to interface prompt. Note: • If you do not know the SSID of access point (wireless router), please click “Print Wireless Network Information Page”… -
Page 55
1) Use WPS method to perform steps below to start wireless network on printer. (Please refer Chapter 5.1.2 for detailed WPS configuration) 2) Judge if the printer is successfully connected according to the status of Wi-Fi indicator on printer. If configuration failed, please click “Previous” to configure again; if configuration succeeded, please click “Done”… -
Page 56: Wi-Fi Protected Setup (Wps) Setup
5.1.2.Wi-Fi Protected Setup (WPS) setup If the access point (wireless router) supports Wi-Fi Protected Setup (WPS), the Wi-Fi key on the control panel of printer and WPS key on access point (wireless router) can be pressed in order to connect the printer to wireless network. 5.1.2.1.Preliminary preparations 1.
-
Page 57: Preliminary Preparations
5.2.Wi-Fi hotspot mode You can establish a connection between a wireless network-enabled computer and a wireless network-enabled printer without using an access point (wireless route). 5.2.1.Preliminary preparations 1.Printer with Wi-Fi hotspot function. 2.Computer with wireless network function. 5.2.2.Wi-Fi Hot Connection Enable Wi-Fi-Hot of the printer before connecting the printer hot.
-
Page 58
4. The following aspects should be inspected if the printer has problems while they are used in network: • Inspect if the firewall software blocks communication. If the computer and printer ar connected in the same network but they cannot be searched, the communication might be blocked by firewall software. -
Page 59: Pantum Mobile Print
Pantum Mobile Print Chapter 6. Pantum Mobile Print ……………………6-2 6.1. What’s Pantum Mobile Print…………………6-2 6.2. Download Pantum Mobile Print ………………..6-2 6.3. Supported Mobile Operating System ………………6-2 6.4. How to use mobile devices for the mobile printing …………..6-2 6.4.1. For Android Devices ………………….6-2…
-
Page 60: What’s Pantum Mobile Print
6.4.1.1. Preliminary preparations 1. A printer that has wireless network function. 2. Android mobile device. 6.4.1.2. Operation steps 1. Turn on printer power. 2. Click “PANTUM” icon on the main screen of an Android device and the following interface will pop out.
-
Page 61
3. Click “Add printer” button at the top of interface, then select the way according to your habit to add the printer. 4. Select the function you want and then do relevant settings to meet your functional demands. Note: • If failure of operation, please check if your Android mobile device has access to the wireless network into which your printer is connected. -
Page 62: Print
Print Chapter 7. Print …………………………7-2 7.1. Print Function ……………………..7-2 7.2. Opening Help Document ………………….7-3 7.3. Manual Duplex ……………………..7-4 7.4. Cancel Print Job ……………………7-7…
-
Page 63: Print Function
7. Print 7.1. Print Function The print function can be achieved through the settings of various properties in the Printing Preferences, and some of the functions are as follows. Functions Diagram 1 2 1 Manual Duplex Collate Reverse Print N-in-1 Poster Print (for Windows system only)
-
Page 64: Opening Help Document
Note: • You can select the 2 x 2 Poster Print in N-in-1 to enable the poster printing function. • You can open the Printing Preferences and click Help button to view the specific function explanation. For information about how to open the help document, see Section 7.2. 7.2. Opening Help Document You can open the Printing Preferences and click Help button (for Windows system only). The help document contains the user guide where you can find the information on print settings.
-
Page 65: Manual Duplex
7.3. Manual Duplex 1. The printer driver supports manual duplex. Note: •If the paper is thin, it may wrinkle. • If the paper is curled, make it flat and put it back into the manual feeder tray or automatic feeder tray. •…
-
Page 66
Select Pantum printer Click Preferences to set up for printing. c) Check Manual Duplex in the Basic tab and click OK after completing the settings… -
Page 67
d) Click Print. Note: • It is recommended to raise the output tray to prevent the paper from sliding out of it. If you choose not to raise the output tray, we recommend that you immediately remove the printed paper output from the printer. e) Send the print job after choosing Manual Duplex, then the following prompt window will appear, telling you the next specific operations. -
Page 68: Cancel Print Job
f) After turning over the paper according to the prompt, press Continue button of the printer to go on printing the other side. g) You can click Close button to close this prompt window, and it will not appear until the next Manual Duplex job comes in.
-
Page 69: Control Panel Overview
Control Panel Chapter 8. Control Panel ………………………8-2 8.1. Control Panel Overview for P2500 Series …………….8-2 8.1.1. Functions of Buttons on the Control Panel ……………8-2 8.1.2. Function of LED Indicators on the Control Panel ……………8-3…
-
Page 70: Control Panel Overview
8. Control Panel 8.1. Control Panel Overview for P2500 Series The printer control panel layout includes 2 buttons and 2 multi-colored LED indicators as shown below. The diagram on the left shows the control panel of the printer with USB+Wi-Fi interface, while the one on the right displays the control panel of the printer with USB interface only: Serial No.
-
Page 71: Function Of Led Indicators On The Control Panel
8.1.2. Function of LED Indicators on the Control Panel 8.1.2.1. LED1 Status Indication The meanings of the status indication of LED1 are as follows: Paper/Wi-Fi Status Description Status Description Serial Multi-colored (For printers with USB+Wi- (For printers with USB LED1 Status Fi interface) interface) Indication…
-
Page 72
8.1.2.2. LED2 Status Indication The meanings of the status indication of LED2 are as follows: Data/ Cartridge Status Description Serial Multi-colored (For printers with USB+ Wi-Fi interface and the ones with LED2 Status USB interface only) Indication Starting and warming up the printer, waking up and warming up the printer, and warming up the printer by opening and closing its cover. -
Page 73
8.1.2.3. Indication of LED1 and LED2 Combination Status You can refer to the indicator combination list for information on the working status of the printer. Some of the LED1 and LED2 combined indications are as follows: Status Serial Paper/Wi-Fi Data/Cartridge Status Description (Multi-colored (Multi-colored… -
Page 74
Routine Maintenance Chapter 9. Routine Maintenance……………………9-2 9.1. Cleaning the Printer ……………………9-2 9.2. Maintenance of Laser Toner Cartridge ………………9-4 9.2.1. Use and Maintenance of Laser Toner Cartridge …………..9-4 9.2.2. Service Life of Laser Toner Cartridge ……………..9-4 9.2.3. Replace Laser Toner Cartridge ………………9-5… -
Page 75: Cleaning The Printer
9. Routine Maintenance 9.1. Cleaning the Printer Note: • Please use mild detergents. Please clean the printer in accordance with the following steps: 1. Turn off the main power switch and unplug the power cord and USB cable. P2200/P2500 Series P2600 Series 2.
-
Page 76
3. Open the upper cover and take out the laser toner cartridge. P2200/P2500 Series P2600 Series Note: • When removing the laser toner cartridge, put the cartridge in a protective bag or wrap it with thick paper to avoid direct light damaging the photosensitive drum. 4. -
Page 77: Maintenance Of Laser Toner Cartridge
9.2. Maintenance of Laser Toner Cartridge 9.2.1. Use and Maintenance of Laser Toner Cartridge For better print quality, please use the original Pantum laser toner cartridge. Note: when using the laser toner cartridge, please pay attention to the following: • Unless used immediately, otherwise, do not remove the laser toner cartridge from the package.
-
Page 78: Replace Laser Toner Cartridge
9.2.3. Replace Laser Toner Cartridge Note: before replacing the laser toner cartridge, please pay attention to the following: • The laser toner cartridge surface may contain toner. Please remove it carefully to avoid spilling. • Put the removed laser toner cartridge on a piece of paper to avoid the toner from accidently spilling.
-
Page 79
3. Remove the protective cover, and put the laser toner cartridge into the printer along the guides P2200/P2500 Series P2600 Series Note: • Check whether there is any seal on it before installing the laser toner cartridge into the printer; if there is any, please tear off the seal and then install the cartridge. P2200/P2500 Series P2600 Series 4. -
Page 80: Troubleshooting
Troubleshooting Chapter 10. Troubleshooting …………………….10-2 10.1. Clearing Jammed Paper ………………….10-2 10.1.1. Paper Jam in the Feed Port ……………….10-3 10.1.2. Paper Jam inside the Printer………………10-3 10.2. Common Troubleshooting …………………10-6 10.2.1. Common Trouble ………………….10-6 10.2.2. Image Defects ………………….10-8 10-1…
-
Page 81: Clearing Jammed Paper
10. Troubleshooting Please read this section carefully. It can help you solve common trouble in the printing process. If the problems appeared cannot be solved, please contact Pantum Aftersales Service Center. Prior to handling common trouble, first check that: • The power cord is connected correctly and the printer is powered on.
-
Page 82: Paper Jam In The Feed Port
10.1.1. Paper Jam in the Feed Port If the output bin is open, please close it first. Gently pull the jammed paper straight out. P2600 Series (automatic feeder tray and P2200/P2500 Series manual feeder tray) If the paper does not move while being pulled, or there is no paper in this area, please check the inside of the printer.
-
Page 83
2. Open the upper fuser guide to decrease the pressure of compression spring. P2200/P2500 Series P2600 Series 3. Pull the jammed paper out of the fuser unit. P2200/P2500 Series P2600 Series If no jammed paper is found, please go to the next step. 4. -
Page 84
5. Slowly pull the jammed paper out along the paper output orientation. P2200/P2500 Series P2600 Series 6. After removing the jammed paper, insert the laser toner cartridge into the printer along the guides until you hear a click assuring you that the cartridge is fully inserted. P2200/P2500 Series P2600 Series 7. -
Page 85: Common Troubleshooting
10.2. Common Troubleshooting 10.2.1. Common Trouble Trouble Cause Solution Printer Problems The cable between the computer Disconnect and then reconnect the printer and the printer is not connected cable. properly. Check the printer settings to ensure that the print job is sent to the correct port. Error in specifying the print port.
-
Page 86
Then consult Pantum support center. It may causes the fire or the electric shock if you continue to use the printer under this situation. Note: • If the problem remains, please contact Pantum Customer Service. 10-7… -
Page 87: Image Defects
10.2.2. Image Defects Trouble Cause Solution • Toner is low. • Please properly use the print • The print media does not meet media within the specification usage specification, such as the range. A B C D media is damp or too rough. •…
-
Page 88
• Clean the laser toner cartridge • The internal part of the laser toner or replace it with a new one. cartridge is damaged. • Please contact Pantum • The fuser component is damaged. Customer Service to repair and replace the fuser component. -
Page 89
Trouble Cause Solution • The laser toner cartridge is • Ensure to install the cartridge installed incorrectly. correctly. • The internal part of the laser toner cartridge is damaged. • Abnormal charge inside the printer; the laser toner cartridge is not charged. -
Page 90: Product Specification
Product Specification Chapter 11. Product Speci ication ……………………11-2 11.1. P2200/P2500 Series Speci ication ……………….11-2 11.1.1. Speci ication Overview ………………….11-2 11.1.2. Printing Speci ication ………………….11-3 11.2. P2600 Series Speci ication ………………….11-4 11.2.1. Speci ication Overview ………………….11-4 11.2.2. Printing Speci ication ………………….11-5 11-1…
-
Page 91: P2200/P2500 Series Specification
Note: • Specification values are slightly different for different models of printers with different functions. These values are based on the initial data. For more information about the latest specification, please visit: www.pantum.com 11.1.1. Speci ication Overview Processor 600MHZ Memory…
-
Page 92: Printing Specification
11.1.2. Printing Specification Print Speed 20/22ppm Letter 21/23ppm First Page Print Time 7.8s Print Language Maximum print size Legal (216mm*355.6mm) Paper Input Standard Tray 150 pieces (80g/m²) Capacity Paper Output Print-side down 100 pieces (80g/m²) Capacity Print Media Media Type Plain paper, thin paper, thick paper, transparent film, card paper, label paper, envelope Media size…
-
Page 93: P2600 Series Specification
Note: • Specification values are slightly different for different models of printers with different functions. These values are based on the initial data. For more information about the latest specification, please visit: www.pantum.com 11.2.1. Speci ication Overview Processor 600MHz Memory…
-
Page 94: Printing Specification
11.2.2. Printing Specification Print Speed 24ppm Letter 25ppm First Page Print Time < 8.5s Print Language Maximum print size Legal (216mm*355.6mm) Paper Input Standard Tray 150 pieces (80g/m²) Capacity Multipurpose 1 piece (60~163g/m²) Tray Paper Output Print-side down 100 pieces (80g/m²) Capacity Print Media Media Type…

Руководство по установке Apansepa npuntepa B Windows ogHum kamkom.
Пожалуйста, выберите один из нижеприведе
FAN TUM
[TEL] Установите драйвер для беспроводного принтера (подходит для моделей с
Wi-Fi) un соедините KoMNbIOTEP C poyrepom uepez Wi-Fi.
| Ш Подсоедините устройство 1] Приобретите и установите программное обеспечение
e | Y Приобретите и установите программное обеспечени
EE Подсоедините устройство 1 Приобретите и установите программное обеспечение | !-loxanyücta, coeauHuTe у Po N
|
i
|
|
|
=
нных способов для установки драйвера принтера.
Установите драйвер USB-npuwrepa (подходит для всех моделей)
компьютер с роутером как в шаге 2 Способа 1. Установите драйвер USB-npuxTepa.
Подключите ПК к принтеру при Способ 1: установка с СО диска TT. EX Нажмите на “Установка в один щелчок" a3 Установка завершена
помощи кабеля 05В "Система Мтдоуив ХР: автоматически начните установку
2.Подключите ПК к принтеру
при помощи кабеля USB PANTUM x PANTUM >
Вобро ложаловать В продукт Рапыт! Установите драйвар посредством следующих этапов
E Питание актиочено
> Cuctemb! Windows 7/Vista/Server 2008: включите автозапуск,
нажмите на “Autorun.exe” для начала установки, Поздравляем! Вы завершили установку драйвера Pantum oo Seres 0000
"Система Мпаомс 8: Когда окно "DVD RW apar появится в правом Ш A
El Выберите слособ подключения
верхнем углу рабочего стола, нажмите в любом месте всплывающего (7 просмотрела SHS, § opto *OTEIsHes, щелкните по, @ чтобы
= = a просмотреть видео, в котором будет показано, как подключить
окна, а затем нажмите Ha “Autorun.exe” для начала установки. тело A 7
‘Cucrema Windows 10: Korga появится окно "DVD RW райвер" | LZ fs y E
в правом верхнем углу рабочего стола, нажмите в любом месте | << с To 2 ~~
всплывающего окна, а затем нажмите на "Autorun exe” nos ene | =
для начала установки, Seno eau ди a 2 Get лук | »
a. e La > fe: = = RE TE 6 e E Mea ll Core: Если установка В обин шелчек HE COOTSETCTEYVET Les CUGHIOHSE TEs mame a AU Eo
Способ 2; Скачайте установщик программного обеспечения с официального сайта, испельзований, вы можете попробовать ®, установку вручную на С EE
Руководство пользователя (Пробная печать) [Готово
= IC) MANUAL
http://www. pantum. com/ CSI PRINTER == iaa я TT
e P | = Cnoco6 3 (B) Установите драйвер для беспроводного принтера (подходит для моделей с
Borah Te agpec www pantum.com в адресную Si ; rs Wi-Fi) un coeguxnre kKomnbioTep c роутером через проводную сеть
строку браузера и найдите страницу
Драйверы и Загрузки | SE Autorun. exe] Ш] Подсоедините устройство Я Приобретите и установите программное обеспечение
Найдите установщик программного обеспечения м
рН >> между на своем компьютере, после сделайте двойной 1.Пожалуйста, соедините Le ae программное обеспечение,
продукт имеет преимущественную силу. щелчок на файле “Autorun.exe” компьютер с роутером через как в шаге 2 Способа 1. Установите драивер USB-npuHTepa.
| г se Е Нажмите на “Установка в один щелчок"
Е] Нажмите на “Установка в один щелчок Ш Установка завершена
2.Подключите ПК к при нтеру PANTUM x
PANTUM я PANTUM при помощи кабеля USB
Дебро-пожалавать в продукт Рапйит! Установите драйвер посредством следующих эталов
Питание включено
Добро пожаловать в продукт Рамигт! Установите драйвер посредством следующих этапов
Поздравляем! Вы завершили установку драйвера Pantum x00x Series. El Выберите способ подключения
[| Питание включено / Rn Если отображается кнопка «Отключение», щелкните по, чтобы
Выберите способ подключения a просмотреть видео, в котором будет показано, как подключиться
Если отображается кнопка «Отключение», щелкните по. @ чтобы TP-Test-oc
просмотреть видео. в котором будет показано, ках подключиться
<A = | Сосо 1: Подключение Стосой 2: Подключение Способ % чение
NE поревствем ШВ посредством Проводной сети rapes ством МАНЫ,
Ту = т F, г. Fr в ry il |r
Способ 2; Подключение Croco 3: Поделкчание > - a.
Посредством. проволной (ати посредством МА,
Севеты: Если установка в один щелчок x соответствует вашему сценарию
использования, вы можете попробовать установку вручную
Напечатайте тестовую страницу, чтобы убедиться в том,
Советы; Если установка E OOWA Heros ME соответствует аашему сценарижю
использования, вы можетв попробовать установку вручную что принтер может нормально использоваться. Руководство пользователя
Руководство пользователя Пробная печать) mea]
ЕЯ Введите сетевой 10 и пароль EN Установка завершена
E e ea mesa 5 aA RA a rame a E PANTUM x PANTUM x
Cnoco6 2 Установите сетевой драивер принтера (Подходит ДЛЯ моделей с сетевым интерфейсом) Гете «Печать страда TT ое =
Золучить имя сети и метод шифрования. Если вам известны ямя сети м Поздравляем! Вы завершили установку Apañeepa Pantum xo Series 0000,
метод шифрования, пропустите этот этап, A: eri Ar a dri da = KA
Печать сеёдений о баслрожадных сетих
= = Zs
Bibl MOET Tb KON. Lab
ШИ Подсоедините устройство 1 Приобретите и установите программное обеспечение
1. Пожалуйста, соедините Приобретите и установите программное обеспечение,
как в шаге 2 Способа 1. Установите драйвер USB-npuHTepa.
компьютер с роутером через
сетевой кабель.
à. Ваадете имя попьзователя беспроводной сати и пароль
Номар 5540
Методашефрования
= es
АГЕНТЫ ИНФОРМАЦИЯ
Со ОСО "Дофин",
sorry as" = — ao e 140573, РФ, Московская обл,
‚ Озерский район, с. Бояркино
Телефон; +7 495 223 6008
BEN Нажмите на "Установка в один щелчок" Ш) Установка завершена
2.Подключите принтер к тому
Показать пархль
Напечатайте тестовую страницу, чтобы убедиться в том,
просмотреть видеа, в котором будет показано как ПОДКЛЮЧИТЬСЯ
|
|
|
Cnocn6 Kanes Слособ 2. Подключение Способ 3 Подключение |
. MDENCTECA VHA |
|
|
|
|
| что принтер может нормально использоваться, Факс: +7 495 223 6008
же роутеру при помощи x PANTUM x :
роутеру пр Li FANTUM | DN = Marre] [Tas ae apo | He почта;
Ч 0 a. в продукт Рапаит! Установите драйнер посредством следующих эталов Поздравляем! Вы завершили установку драйвера Рапит xxx Seres 0000 | de meca
ATEO BOTH |
|
Е Выберите способ подключения =
Если отображается кнопка «Отключение», щелкните ги, 3) чтобы | Заявление O торговой марке
Microsoft®, Windows®, Windows Server ® Windows Vista® являются товарными знаками корпорации Мисгозой в США или других странах и регионах.
Все остальные упомянутые здесь продукты и торговые названия могут быть зарегистрированными товарными знаками, товарными знаками или
знаками обслуживания соответствующих владельцев и упоминаются исключительно для инструкций,
Узнайте больше
Чтобы узнать больше подробной информации, обратитесь к инструкции на компакт-диске, идущем в комплекте к принтеру.
Для получения дополнительных услуг и поддержки, зайдите на официальный веб cañr Pantum.
посредством USA посредством POS! oem
IE TE Pr E E 7 a
Напечатайте тестовую страницу, чтобы убедиться в том,
советы: Если установка в один щелчок не соответствует вашему сценарию A wn т Pantum International Limited
использования, вы можете полробсаать ©, установку вручную “TO принтер может нормально использоваться. Manufacturer; Zhuhai Pantum Electronics Co.Ltd,
e a Er © Website: ¡pantum.
Руководство пользователя Пробная печать Готово | ebsite:www.pantum.com
= : : Address/Adresse:No.3883 Zhuhai Avenue, Zhuhai,
(© Copyright Zhuhai Pantum Electronics Co. ‚Lid. Guangdong, 519060 China
PANTUM y
ec PykoBoacTBo no ObICTpOM yCTaHOBKE |
Te #2 Загрузка бумаги
|
|
|
|
|
|
|
|
|
|
|
|
|
|
|
|
|
|
|
|
|
|
|
|
|
|
|
|
|
|
|
|
|
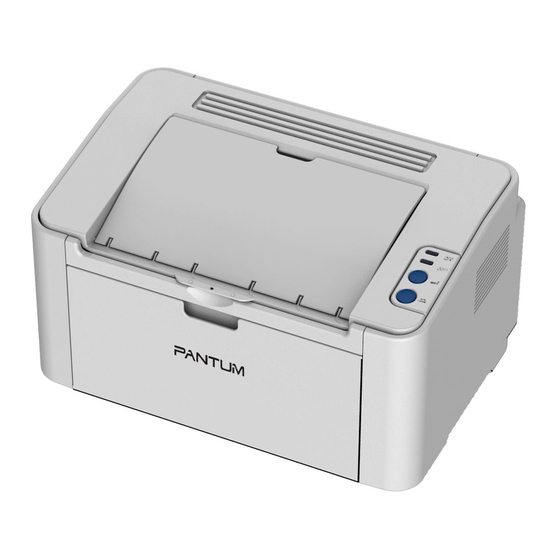
Принтер лазерный Pantum P2200 черно-белая печать, A4, цвет серый
- Технология: лазерный, черно-белый, A4,
- Разрешение: ч/б x 1200 dpi1200,
- Скорость печати: ч/б (A4) до 20 стр/мин;
- Лотки: подача 150 листов, выход 100 листов;
- Подключение: USB,
Появились вопросы о товаре?

- Технология: лазерный, черно-белый, A4,
- Разрешение: ч/б x 1200 dpi1200,
- Скорость печати: ч/б (A4) до 20 стр/мин;
- Лотки: подача 150 листов, выход 100 листов;
- Подключение: USB,
Появились вопросы о товаре?
Хочу быть в курсе акций и новинок
Контакты
- Журнал
- Акции
- Покупателям
- Информация
- Доставка
- Гарантия
- Кредит и рассрочка
- Сервисные центры
- Услуги
- Корпоративным клиентам
- Аренда помещений
- Партнёрская программа
- Обзоры
- Форум
- Клуб Ситилинк
- Конфигуратор
- Подбор расходных материалов
- Ситилинк
- Новости
- Вакансии
- Документы
Мы используем файлы cookie. Подробнее
Мы используем файлы cookie для вашего удобства пользования сайтом и повышения качества рекомендаций. Подробнее

-
Contents
Table of Contents -
Bookmarks
Quick Links
Related Manuals for Pantum P2200 series
Summary of Contents for Pantum P2200 series
-
Page 2: Print
Zhuhai Pantum Electronics Co.,Ltd. Version: V1.1 EN Disclaimer For a better user experience, Zhuhai Pantum Electronics Co.,Ltd. reserves the right to make changes to the User Guide. The information contained herein is subject to change without notice.
-
Page 4: Before Using The Printer
23. This product is sold as a complete machine. The consumers can go to Pantum Aftersales Service Centre to purchase parts they need. If the product sold is inconsistent with the package list, please 24.
-
Page 5: Regulatory Information
Member States relating to electromagnetic compatibility and safety of electrical equipment designed for use within certain voltage limits. The manufacturer of this product is: Zhuhai Pantum Electronics Co.,Ltd., Area A,3rd A declaration of conformity to the requirements of the Directives is available upon request from the Authorized Representative.
-
Page 6: Table Of Contents
5.2. Turn off the Wireless Device ………………….5-8 6. Pantum Mobile Print ……………………6-2 6.1. What’s Pantum Mobile Print…………………6-2 6.2. Download Pantum Mobile Print ………………..6-2 6.3. Supported Mobile Operating System ………………6-2 6.4. How to use mobile devices for the mobile printing …………..6-2 6.4.1.
-
Page 7
9.2.1. Use and Maintenance of Laser Toner Cartridge …………..9-4 9.2.2. Service Life of Laser Toner Cartridge ………………9-4 9.2.3. Replace Laser Toner Cartridge ………………..9-5 10. Troubleshooting ……………………10-2 10.1. Clearing Jammed Paper ………………….10-2 10.1.1. -
Page 9
P2200/… -
Page 10
P2200/ P2200/… -
Page 11
P2200/… -
Page 13: Paper And Print Media
2. Paper and Print Media Plain, thin, special paper (transparency, Media Type cardstock, label, envelope, thick, etc.). A4, A5, JIS B5, IS0 B5, A6, Letter, Legal, Postcard, Monarch Env, DL Env, C5 Env, C6, Media Size Env, No.10 Env, ZL, Big 16K, Big 32K, 16K, P2200/P2500 32K, B6, Yougata4, Postcard, Younaga3, Series P2600…
-
Page 14
P2200 /… -
Page 15: Loading Paper
2.3. Loading Paper 2.3.1. Loading into the Automatic Feeder Tray a) Open the feeder tray. P2500 Series P2600 Series b) Slide the automatic feed guides to match both sides of the paper. P2500 Series P2600 Series c) Raise the output tray to avoid the paper from slipping and falling. P2500 Series P2600 Series…
-
Page 16
P2200/ P2200/… -
Page 17: Loading Into The Manual Feeder Tray
d) Load the paper into the automatic feeder tray with the print-side up. P2500 Series P2600 Series Note: feed error,and then load the paper into the tray print-side up. e) Adjust the paper stop to keep the paper in position. To ensure normal paper feeding, adjust P2500 Series P2600 Series Note:…
-
Page 25
d) Printer List When the searching completes, the Printer List interface appears where you can choose one or more network printer(s) you want to install. 4) Installation Process This interface is mainly used for the installation of driver softwares. -
Page 37
………………………………………………Soft-AP …………………………………. -
Page 38
Soft-AP Soft-AP… -
Page 44
Soft-AP eature escription IP Address bner 255.255.255.0 by default nabled by default tart P2500W Series-XXXXX Can be modidfied in WebPage by default Can be modidfied in WebPage… -
Page 45: Pantum Mobile Print
Pantum Mobile Print 6. Pantum Mobile Print ……………………..2 6.1. What’s Pantum Mobile Print………………….2 6.2. Download Pantum Mobile Print ………………..2 6.3. Supported Mobile Operating System ………………2 6.4. How to use mobile devices for the mobile printing …………..2…