 Данное руководство содержит подробные инструкции и сведения о функционировании и использовании принтера Ricoh SP 150 / SP 150w / SP 150SU / SP 150 SUw. Перед использованием устройства внимательно ознакомьтесь с данным руководством для получения информации о его возможностях и мерах безопасности.
Содержание руководства:
1. Описание компонентов;
2. Настройка принтера;
3. Материалы для печати;
4. Идет печать;
5. Драйверы;
6. Печать по Wi-Fi;
7. Кнопки и индикаторы;
8. Обслуживание устройства;
9. Устранение неисправностей;
10. Конфигурации принтера (ВЕБ-страница);
11. Приложение.
Скачать руководство
Все материалы на сайте представлены исключительно для ознакомления. Все торговые марки и права на публикуемые материалы принадлежат их владельцам.
All materials on the site are presented solely for information. All trademarks and copyrights in the published materials belong to their respective owners.
- Manuals
- Brands
- Ricoh Manuals
- Printer
- SP150 series
- User manual
-
Contents
-
Table of Contents
-
Troubleshooting
-
Bookmarks
Quick Links
User Guide
for «RICOH
Printer»
Overview
Windows version
Mac version
Android/iOS version
Troubleshooting
series
Related Manuals for Ricoh SP150 series
Summary of Contents for Ricoh SP150 series
-
Page 1: User Guide
User Guide Overview for “RICOH Windows version Printer” Mac version Android/iOS version Troubleshooting…
-
Page 3: Table Of Contents
TABLE OF CONTENTS How to Read the Manual ……………………..2 1. Overview Introduction to “RICOH Printer” ……………………4 Operating environments ……………………..4 2. Windows version Installation ………………………….. 5 Starting the program ……………………….6 Functions Page …………………………8 Print ……………………………10 Copy (Supported on SP 150SU/SP 150SUw only) ………………13 Scan (Supported on SP 150SU/SP 150SUw only) ………………18…
-
Page 4: How To Read The Manual
How to Read the Manual Symbols Used in the Manual The symbols used in this manual have the following meanings. Indicates an explanation containing points to pay attention to when operating the software, restric- tions, or other information. Be sure to read the explanation. Indicates an explanation containing information that is useful to know, a supplementary operating procedure, or other information.
-
Page 5
Disclaimer Contents of this manual are subject to change without prior notice. In no event will the company be liable for direct, indirect, special, incidental, or consequential damages as a result of handling or operating the machine. To the maximum extent permitted by applicable laws, in no event will the manufacturer be liable for any damages whatsoever arising out of failures of this machine, losses of the registered data, or the use or non-use of this product and operation manuals provided with it. -
Page 6: Overview
1. Overview Introduction to “RICOH Printer” “RICOH Printer” is a software specially designed for this series of RICOH printers. As an improve- ment over using the conventional control panel on the printer, “RICOH Printer” lets you control the printer from your computer or tablet for a seamless, integrated user experience.
-
Page 7: Windows Version
Install the software on your computer in any of the following ways: • Run the installation program in the CD ROM provided with the printer, and then select the ap- propriate installation option. • Download and install the software from the RICOH official website at: http://www.ricoh.com/printers/sp150/support/gateway/…
-
Page 8: Starting The Program
2. Windows version Starting the program 1. Click the icon on the desktop to open “RICOH Printer”. After the program starts, it displays the welcome screen below and begins searching for available printers in the background. 2. The program first searches for available printers and displays them as a list.
-
Page 9
3. If no online printers are found, the program will prompt you to check for con- nection errors before searching for available printers again. -
Page 10: Functions Page
The Model dropdown list shows all printers in the system’s “Devices and Printers” that are compatible with “RICOH Printer”. If a single-function printer (SP 150/SP 150w) is selected, the Print and Settings icons will display.
-
Page 11
The Status page shows the current status of the printer, which can be Ready, Busy, Sleep, Error or Offline. The printer’s status is described in words at the bottom of the window. When the printer en- counters an error, these words will be in red. If a question mark appears next to “Device Status”, click it and troubleshoot the error as instructed by the animation. -
Page 12: Print
2. Windows version Print Picture Print 1. Click [Picture Print] on the Print page to enter the picture selection page. 2. You can select a single or multiple images for printing from the picture selection page. The program supports the printing of images in TIFF, BMP, PNG and JPEG formats.
-
Page 13
File Print 1. Click [File Print] on the Print page to enter the file selection page. 2. From the file selection page, select the file you want to print. If the Windows sys- tem does not support the printing of the selected file, the user will be notified. 3. -
Page 14
2. Windows version Manual Duplex Printing If you wish to print more than 2 pages, you can choose to use manual duplex printing. 1. After selecting your print content, click the [More Settings] button on the Print page. 2. In the More Settings page, check the [Duplex] option and select the type of duplex printing, then click [OK]. -
Page 15: Copy (Supported On Sp 150Su/Sp 150Suw Only)
Copy (Supported on SP 150SU/SP 150SUw only) • The settings made with this application will only apply when the printer is operated using the application. For example, even if you press the Start key on the printer after setting Combine Printing using this application, Combine Printing will not be executed.
-
Page 16
2. Windows version ID Card Copy To copy both the front and back of an ID card on the same page of A4 paper, do the following: 1. On the Copy page, toggle the ID Card Copy switch to the right, then click the [ID Card Copy] button. -
Page 17
3. After the front of the ID card is copied, 2 green LED lights on the printer will start flashing. Within 1 minute, replace the ID card with its back downwards in the original position, then press the Start button on the printer. 4. -
Page 18
2. Windows version N in 1 Copy To copy multiple pages onto a single sheet of paper, do the following: 1. On the Copy page, click the [More Settings] button. On the More Setting page, check the [N in 1 copy] option, and then click the [OK] button. 2. -
Page 19
3. When the first page of the original document is copied, 2 green LED lights on the printer will start flashing. Within 1 minute, place the next page of the orig- inal document on the printer as instructed in the popup animation, and then press the Start button on the printer. -
Page 20: Scan (Supported On Sp 150Su/Sp 150Suw Only)
2. Windows version Scan (Supported on SP 150SU/SP 150SUw only) Scanning Place the document to be scanned on the scanning area of the printer, and then do the following: 1. After setting the scan parameters on the Scan page, click the [Scan] button. 2.
-
Page 21
3. After scanning, you can check the scanned images on the Scan page. 4. Double-click an image to browse, rotate or print it. -
Page 22: Settings 3
2. Windows version Settings You can set the required scan parameters before scanning. Click the [More Settings] button, select the required scan options, and then click the [OK] button. Saving Click the [Save] button to save the selected scanned image(s). If a single picture is selected, the picture may be saved in JPG, TIF or PDF format;…
-
Page 23: Settings
Settings Setting Printer Wi-Fi (Supported on SP 150w and SP 150SUw only) Select a wireless network from the list, enter the corresponding password, and then click “Connect” to configure the wireless settings for the printer. Toggle the WLAN switch to turn on or turn off Wi-Fi. The printer must be restarted for any change in Wi-Fi status to take effect.
-
Page 24
2. Windows version Setting Printer IP Address (Supported on SP 150w and SP 150SUw only) You can choose to obtain the printer’s IP address, or set a fixed IP address for the printer. To set a fixed IP ad- dress for the printer, consult your network administrator for assistance. Setting Soft AP (Supported on SP 150w and SP 150SUw only) Enter the Service Set Identifier (SSID) and password for the Soft AP network, then toggle the ON/ OFF switch to turn on or off Soft AP. -
Page 25: Power Save
Power Save Use this function to set the idle time after which the printer goes to sleep. The idle time can be be- tween 1 minute to 30 minutes.
-
Page 26
2. Windows version More Settings Use this function to set specific parameters for the printer. Unless necessary, do not change the value for any of the options. -
Page 27
Modify Password Use this function to change the administrator’s password. The administrator’s password is mainly for identity authentication purpose. If authentication fails, you will be informed that the password is wrong and be prompted for the right password. You may re-enter the password for an unlimited number of times. After successful authenti- cation, you can change the parameters on the Wi-Fi, Soft AP, TCP/IP, Power Save, and More Set- tings pages. -
Page 28: Mac Version
3. Mac version 3. Mac version Installation Install the software by running the installation program on the CD-ROM provided with the printer. Copy (Supported on SP 150SU/SP 150SUw only) • The settings made with this application will only apply when the printer is operated using the application.
-
Page 29
ID Card Copy To copy both the front and back of an ID card on the same page of A4 paper, do the following: 1. Place the ID card with its front facing downwards on the left-center region of the scanning panel. -
Page 30: Setting (Supported On Sp 150W/Sp 150Suw Only)
3. Mac version Setting (Supported on SP 150w/SP 150SUw only) Wi-Fi Settings (Supported on SP 150w and SP 150SUw only) Select a wireless network from the dropdown list, enter the corresponding password, and then click [Apply] to configure the wireless settings for the printer.
-
Page 31: Android/Ios Version
4. Android/iOS version Installation Install the software that is available on the RICOH official website at: http://www.ricoh.com/printers/sp150/support/gateway/ Starting the program 1. Tap the icon to open “RICOH Printer”. It displays the screen below and be- gins searching for available printers.
-
Page 32
4. Android/iOS version 2. If an online printer is found, the function page is displayed. 3. If no online printers are found, the program will prompt you to search for avail- able printers again. -
Page 33: Functions Page
Functions Page Select and tap a function icon (Print, Copy, Scan, Settings) at the bottom of the page to display the page corresponding to the function selected. If a single-function printer (SP 150/SP 150w) is selected, Print and Settings icons are only available. If a Multi-Function Laser Printer (SP 150SU/SP 150SUw) is selected, all the icons are available.
-
Page 34: Print
4. Android/iOS version Print Regular Print 1. Tap [Please select print files…] to enter the file selection page. 2. Select a file you want to print on the file selection page. 3. After selecting a file, set the printing parameters required. Preview the file by tapping the [Preview] button as necessary, then tap the [Print] button to start printing.
-
Page 35: Copy (Supported On Sp 150Su/Sp 150Suw Only)
Copy (Supported on SP 150SU/SP 150SUw only) • The settings made with this application will only apply when the printer is operated using the application. For example, even if you press the Start key on the printer after setting Combine Printing using this application, Combine Printing will not be executed.
-
Page 36
4. Android/iOS version N in 1 Copy To copy multiple pages onto a single sheet of paper, do the following: 1. On the Copy page, tap [N in 1]. 2. On the [N in 1] page, select an option. 3. Tap the [Copy] button on Functions Page and place the first page of the original document on the printer, and then tap the [OK] button. -
Page 37: Scan (Supported On Sp 150Su/Sp 150Suw Only)
Scan (Supported on SP 150SU/SP 150SUw only) Scanning Place the document to be scanned on the scanning area of the printer, and then do the following: 1. On the Scan page, set all the required parameters, and then tap the [Scan] button.
-
Page 38: Settings
4. Android/iOS version Settings Setting Printer Wi-Fi (Supported on SP 150w and SP 150SUw only) 1. On the Settings page, tap [Wi-Fi]. 2. Toggle the [WLAN] switch to turn on or off Wi-Fi. The printer must be restarted for any change in Wi-Fi status to take effect. 3.
-
Page 39
Setting Soft AP (Supported on SP 150w and SP 150SUw only) 1. On the Settings page, tap [Soft AP]. 2. Toggle the [Soft AP] switch to turn on or off Soft AP. The printer must be restart- ed for any change in Soft AP status to take effect. 3. -
Page 40
4. Android/iOS version Setting Printer IP Address (Supported on SP 150w and SP 150SUw only) You can choose to obtain the printer’s IP address, or set a fixed IP address for the printer. To set a fixed IP address for the printer, consult your network administrator for assistance. 1. -
Page 41
Power Save Use this function to set the idle time after which the printer goes to sleep. 1. On the Settings page, tap [Power Save]. 2. Set idle time between 1 to 30 minutes. Tap [Done] to save the setting. The printer must be restarted for the power save setting change to take effect. -
Page 42: Advanced Settings
4. Android/iOS version Advanced Settings Use this function to set specific parameters for the printer. Unless necessary, do not change the value for any of the options. 1. On the Settings page, tap [Advanced Settings]. 2. Specify the parameters as necessary. The printer must be restarted for any change in advanced settings to take effect.
-
Page 43
Modifying the Password Use this function to change the administrator’s password. The administrator’s password is mainly for identity authentication purpose. If authentication fails, you will be informed that the password is wrong and be prompted for the right password. You may re-enter the password for an unlimited number of times. After successful authen- tication, you can change the parameters on the Wi-Fi, Soft AP, IP Address, Power Save, and Ad- vanced Settings pages. -
Page 44: Troubleshooting
5. Troubleshooting Common problems encountered Unable to connect to the printer Under such circumstances, “RICOH Printer” (Windows) will display the page below. Follow the instructions on screen to troubleshoot network connection problems, and then search for available printers again. Administrator’s password is lost Restore the printer to its factory settings (refer to the user manual), and then enter the default pass- word “888888”.
-
Page 45
Right click the files in these formats, and then check if the [Print] option is available on the right-click menu. If the [Print] option is not available, the file format is not supported by “RICOH Printer”. Toner is at 0%, and the printer cannot be used Replace the empty toner cartridge with a new cartridge. -
Page 46: Error Messages On The Screen
Troubleshooting Error Messages on the Screen Message Causes Solutions Open the maintenance cover, remove the toner cartridge, then remove the jammed Jammed paper still remain- Paper Jam: Paper Remained paper. ing inside. Do not expose the toner cartridge to light. 1.
-
Page 47: Error Codes On The Screen
SC530 Fan motor error. SC541 SC542 Please try switching the power off and on to clear the error. SC543 Contact a dealer or RICOH technical Fusing unit error. support if the error continues to occur. SC544 SC545 SC559 SC560 Low voltage.
-
Page 48: Tips To Avoid Paper Jams
Troubleshooting Tips to Avoid Paper Jams • The occurrence of paper jams can be significantly reduced by using the recommended types of print media. In the event of paper jams, follow the instructions described in “Removing Paper Jams” in the User Guide. •…
-
Page 49
© 2016… -
Page 50
M290-8632A…
This manual is also suitable for:
Sp150 series
![]()
User Guide
Guide to Components
Setting up the Printer
Print Media
Printing
Copying
Scanning
Drivers
Print Over Wi-Fi
Keys and Indicators
Machine Maintenance
Troubleshooting
Printer Configurations (WEB page)
Appendix
For safe and correct use, be sure to read Safety Information before using the machine.

TABLE OF CONTENTS |
|
|
How to Read the Manual……………………………………………………………………………………………………………….. |
3 |
|
Important Safety Instructions ……………………………………………………………………………………. |
5 |
|
Important Safety Instructions ……………………………………………………………………………………. |
8 |
|
ENERGY STAR Program……………………………………………………………………………………………………………….. |
10 |
1.Guide to Components
2.Setting up the Printer
|
Opening the Paper Feed………………………………………………………………………………………………………………. |
13 |
|
|
Loading Paper……………………………………………………………………………………………………………………………… |
14 |
|
|
Connecting the Printer to a Power Socket……………………………………………………………………………………… |
16 |
|
|
Starting the Printer……………………………………………………………………………………………………………………….. |
17 |
|
|
Installing Printer Drivers and “RICOH Printer” Software……………………………………………………………….. |
18 |
|
|
Printing a Test Page………………………………………………………………………………………………………………………. |
2 5 |
|
|
Printing a Configuration Page………………………………………………………………………………………………………. |
26 |
|
|
3. |
Print Media |
|
|
Supported Paper………………………………………………………………………………………………………………………….. |
2 7 |
|
|
Non-Recommended Paper Types…………………………………………………………………………………………………. |
28 |
|
|
Print Area…………………………………………………………………………………………………………………………………….. |
2 9 |
|
|
4. |
Printing |
|
|
Print Jobs……………………………………………………………………………………………………………………………………… |
3 0 |
|
|
Canceling Print Jobs…………………………………………………………………………………………………………………….. |
32 |
|
|
5. |
Copying |
|
|
Placing Originals…………………………………………………………………………………………………………………………. |
3 4 |
|
|
Basic Copying……………………………………………………………………………………………………………………………… |
36 |
|
|
Copying Both sides of an ID Card onto one side of Paper…………………………………………………………….. |
38 |
|
|
Canceling a Copying…………………………………………………………………………………………………………………… |
41 |
|
|
6. |
Scanning |
|
|
Scanning with a PC……………………………………………………………………………………………………………………… |
42 |
|
|
7. |
Drivers |
|
|
Supported System Environment…………………………………………………………………………………………………….. |
4 8 |
1

|
Drivers Used in Windows……………………………………………………………………………………………………………… |
49 |
|
Drivers Used in Mac…………………………………………………………………………………………………………………….. |
62 |
|
8. Print Over Wi-Fi |
|
|
Wi-Fi Configuration and Installation…………………………………………………………………………………………….. |
6 6 |
|
Installation of Wireless Driver Program in Mac OS System……………………………………………………………. |
73 |
|
Print over Wi-Fi……………………………………………………………………………………………………………………………. |
78 |
|
9. Keys and Indicators |
|
|
Introduction…………………………………………………………………………………………………………………………………. |
79 |
|
LED Indicator and Status Description……………………………………………………………………………………………. |
8 0 |
|
10. Machine Maintenance |
|
|
Maintaining the Toner Cartridge………………………………………………………………………………………………….. |
8 5 |
|
Replacing the Toner Cartridge……………………………………………………………………………………………………… |
87 |
|
Cleaning the Printer……………………………………………………………………………………………………………………… |
89 |
|
11. Troubleshooting |
|
|
FAQs……………………………………………………………………………………………………………………………………………. |
91 |
|
Paper Feed Problems……………………………………………………………………………………………………………………. |
9 2 |
|
Removing Paper Jams…………………………………………………………………………………………………………………… |
9 3 |
|
Print Quality Problems………………………………………………………………………………………………………………… |
101 |
|
Printing Problems………………………………………………………………………………………………………………………. |
102 |
|
Scanning Problems……………………………………………………………………………………………………………………. |
104 |
|
LED Indicator Status for Errors and Operation Guide…………………………………………………………………. |
105 |
|
12.Printer Configurations (WEB page) |
|
|
Overview………………………………………………………………………………………………………………………………….. |
106 |
|
13. Appendix |
|
|
Precautions about Toner…………………………………………………………………………………………………………….. |
109 |
|
Moving and Transporting the Machine……………………………………………………………………………………….. |
110 |
|
Toner Cartridge………………………………………………………………………………………………………………………….. |
111 |
|
Specifications of the Machine…………………………………………………………………………………………………….. |
112 |
|
Trademark………………………………………………………………………………………………………………………………….. |
115 |
2

How to Read the Manual
Symbols Used in the Manual
The symbols used in this manual have the following meanings.
Indicates an explanation containing points to pay attention to when operating the software, restrictions, or other information. Be sure to read the explanation.
Indicates an explanation containing information that is useful to know, a supplementary operating procedure, or other information.
Indicates reference information that may be helpful. [ ]
Indicates a screen item or button name.

 (mainly Europe and Asia)


 (mainly North America)
Differences in the functions of Region A and Region B models are indicated by two symbols. Read the information indicated by the symbol that corresponds to the region of the model you are using.
Introduction
This manual contains detailed instructions and notes on the operation and use of this machine. For your safety and benefit, read this manual carefully before using the machine. Keep this manual in a handy place for quick reference.
Legal Prohibition
Do not copy or print any item for which reproduction is prohibited by law. Copying or printing the following items is generally prohibited by local law:
bank notes, revenue stamps, bonds, stock certificates, bank drafts, checks, passports, driver’s licenses.
The preceding list is meant as a guide only and is not inclusive. We assume no responsibility for its completeness or accuracy. If you have any questions concerning the legality of copying or printing certain items, consult with your legal advisor.
This machine is equipped with a function that prevents making counterfeit bank bills. Due to this function the original images similar to bank bills may not be copied properly.
3

Disclaimer
Contents of this manual are subject to change without prior notice. In no event will the company be liable for direct, indirect, special, incidental, or consequential damages as a result of handling or operating the machine.
To the maximum extent permitted by applicable laws, in no event will the manufacturer be liable for any damages whatsoever arising out of failures of this machine, losses of the registered data, or the use or non-use of this product and operation manuals provided with it.
Make sure that you always copy or have backups of the data registered in this machine. Documents or data might be erased due to your operational errors or malfunctions of the machine.
In no event will the manufacturer be responsible for any documents created by you using this machine or any results from the data executed by you.
For good output quality, the manufacturer recommends that you use genuine toner from the manufacturer.
The manufacturer shall not be responsible for any damage or expense that might result from the use of parts other than genuine parts from the manufacturer with your office products.
Two kinds of size notation are employed in this manual.
Some illustrations or explanations in this guide may differ from your product due to improvement or change in the product.
4
Important Safety Instructions


User Information on Electrical & Electronic Equipment
Users in the countries where this symbol shown in this section has been specified in national law on collection and treatment of E-waste
Our Products contain high quality components and are designed to facilitate recycling. Our products or product packaging are marked with the symbol below.
The symbol indicates that the product must not be treated as municipal waste. It must be disposed of separately via the appropriate return and collection systems available. By following these instructions you ensure that this product is treated correctly and help to reduce potential impacts on the environment and human health, which could otherwise result from inappropriate handling. Recycling of products helps to conserve natural resources and protect the environment.
For more detailed information on collection and recycling systems for this product, please contact the shop where you purchased it, your local dealer or sales/service representatives.
All Other Users
If you wish to discard this product, please contact your local authorities, the shop where you bought this product, your local dealer or sales/service representatives.
For Users in India
This product complies with the “India E-waste Rule 2011” and prohibits use of lead, mercury, hexavalent chromium, polybrominated biphenyls or polybrominated diphenyl ethers in concentrations exceeding 0.1 weight % and 0.01 weight % for cadmium, except for the exemptions set in Schedule 2 of the Rule.
5

For Turkey only
Üretici:
Ricoh Company, Ltd. 8-13-1 Ginza,
Chuo-ku, Tokyo 104-8222 Japan
+81-36278-2111(English only/Sadece İngilizce)
Environmental Advice for Users
Users in the EU, Switzerland and Norway
Consumables yield
Please refer to either the User’s Manual for this information or the packaging of the consumable.
Recycled paper
The machine can use recycled paper which is produced in accordance with European standard EN 12281:2002 or DIN 19309. For products using EP printing technology, the machine can print on 64g/m2 paper, which contains less raw materials and represents a significant resource reduction.
Duplex printing (if applicable)
Duplex printing enables both sides of a sheet of paper to be used. This saves paper and reduces the size of printed documents so that fewer sheets are used. We recommend that this feature is enabled whenever you print.
Toner and ink cartridge return program
Toner and ink cartridge for recycling will be accepted free of charge from users in accordance with local regulations.
For details about the return program, please refer to the Web page below or consult your service person.
https://www.ricoh-return.com/
6

Energy efficiency
The amount of electricity a machine consumes depends as much on its specifications as it does on the way you use it. The machine is designed to allow you to reduce electricity costs by switching to Ready mode after it prints the last page. If required, it can immediately print again from this mode.
If no additional prints are required and a specified period of time passes, the device switches to an energy saving mode.
In these modes, the machine consumes less power (watts). If the machine is to print again, it needs a little longer to return from an energy saving mode than from Ready mode.
For maximum energy savings, we recommend that the default setting for power management is used.
Products that comply with the Energy Star requirement are always energy efficient.
7

Important Safety Instructions


Notes to Users in the State of California
Perchlorate Material — special handling may apply. See: www.dtsc.ca.gov/hazardouswaste/perchlorate
Notes to USA Users of FCC Requirements
Part 15 of the FCC Rules
Note
This equipment has been tested and found to comply with the limits for a Class B digital device, pursuant to Part 15 of the FCC Rules. These limits are designed to provide reasonable protection against harmful interference in a residential installation. This equipment generates, uses and can radiate radio frequency energy and, if not installed and used in accordance with the instructions, may cause harmful interference to radio communications. However, there is no guarantee that interference will not occur in a particular installation. If this equipment does cause harmful interference to radio or television reception, which can be determined by turning the equipment off and on, the user is encouraged to try to correct the interference by one more of the following measures:
•Reorient or relocate the receiving antenna.
•Increase the separation between the equipment and receiver.
•Connect the equipment into an outlet on a circuit different from that to which the receiver is connected.
•Consult the dealer or an experienced radio /TV technician for help.
This device complies with part 15 of the FCC Rules.
Operation is subject to the following two conditions:
(1)This device may not cause harmful interference, and
(2)This device must accept any interference received, including interference that may cause undesired operation.
Changes or modifications not expressly approved by the party responsible for compliance could void the user’s authority to operate the equipment.
Caution
Changes or modifications not expressly approved by the party responsible for compliance could void the user’s authority to operate the equipment.
Country Code Statement
For product available in the USA/Canada market, only channel 1~11 can be operated. Selection of other channels is not possible.
8
![]()
CAUTION:
Any changes or modifications not expressly approved by the grantee of this device could void the user’s authority to operate the equipment. This transmitter must not be co-located or operating in conjunction with any other antenna or transmitter.
Federal Communication Commission (FCC) Radiation Exposure Statement
This equipment complies with FCC radiation exposure limits set forth for an uncontrolled environment and meets the FCC radio frequency (RF) Exposure Guidelines. This equipment has very low levels of RF energy that it deemed to comply without maximum permissive exposure evaluation (MPE). But it is desirable that it should be installed and operated keeping the radiator at least 20cm or more away from person’s body (excluding extremities: hands, wrists, feet and ankles).
9

ENERGY STAR Program
ENERGY STAR® Program Requirements for Imaging Equipment
The ENERGY STAR® Program Requirements for Imaging Equipment encourage energy conservation by promoting energy efficient computers and other office equipment.
The program backs the development and dissemination of products that feature energy saving functions.
It is an open program in which manufacturers participate voluntarily.
Targeted products are computers, monitors, printers, facsimiles, copiers, scanners, and multifunction devices. Energy Star standards and logos are internationally uniform.
This machine is equipped with the following Energy Saver mode: The machine recovers from Energy Saver mode when it receives a print job or when any key is pressed.
This machine automatically enters Energy Saver mode about 60 seconds after the last operation is completed.
Specifications
|
Energy Saver mode |
Power Consumption*1 |
1.2 W or less |
|
Default Interval |
60 seconds |
|
|
Recovery Time*1 |
25 seconds or less |
*1 Recovery time and power consumption may differ depending on the conditions and environment of the machine.
10

1. Guide to Components
This section introduces the names of the parts in front, at the back and inside the machine.
Exterior
Scanner glass
Scanner cover
|
Start key |
|
|
Paper exit |
Power key |
 USB port
•Please see “9. Keys and Indicators” for details of key functions and how indicators display the printer device status.
11
1. Guide to Components
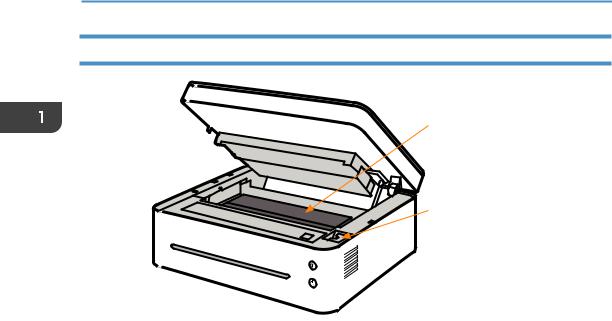
Interior
Toner cartridge
Paper jam release lever
12

2. Setting up the Printer
Opening the Paper Feed
1. Open the feed tray.
DPJ011
2. Pull out the Extension Panel 1.
 Extension Panel 1
DPJ012
3. Flip open the Extension Panel 2.
Extension Panel 2
DPJ013
13

2. Setting up the Printer
Loading Paper
This section explains how to load paper into the paper feed.
•Please see “3. Print Media” for details of print media.
1.Before loading the paper, bend the sheets back and forth and fan the stack.
Use a flat surface such as a desk to line up the edges of the sheets.
DPJ103
•Doing this helps to prevent paper jams.
2.Slide the paper guides outward, then load paper with the print side up.
2
1
1
DPJ204
3.Do not load too much paper at a time. The feed tray can hold 50 sheets (A4 70g/m²) maximum.
14

4. Pinch the paper guide clip and slide it to fit the paper size.
DPJ203
•Please make sure to set the paper size and type when loading paper. When printing, please specify the paper size and type in the printer driver so the settings can be used for printing the loaded paper.
•Please see “3. Print Media” for how to specify the paper size and type in the printer driver.
•Curled paper may cause paper jams. Please flatten curled paper before loading it.
•Do not push the paper guide too far. This may cause the paper to bend.
•Failure to adjust the paper guide may cause a paper jam.
•If you need to add paper to the paper feed while printing, remove any remaining paper in the paper feed first and then add new paper. Adding new sheets to the feed tray while there is paper remaining may cause paper jams or concurrent feeding of multiple sheets.
15
2. Setting up the Printer
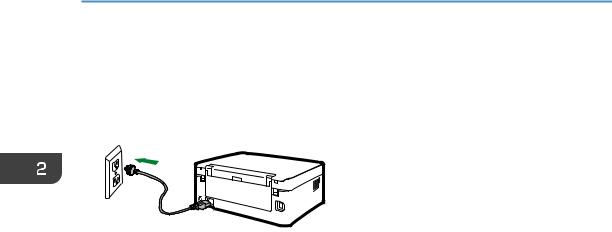
Connecting the Printer to a Power Socket
1.Plug the power cable into the power port at the back of the printer.
DPJ010
2.Plug the other end of the power cable into a properly grounded AC power supply socket.
16

Starting the Printer
Hold the  power key for 0.5 seconds or longer to start the printer.
The indicator display shown below indicates that the printer is ready.
Start indicator is off.
Power indicator is green.
•After the printer starts, the scanner will perform auto calibration. Please wait for the process to complete.
17

2. Setting up the Printer
Installing Printer Drivers and “RICOH Printer”
Software
Different Models
Some functions may not be available on all models or in all countries/regions. Drivers and “RICOH Printer” software are listed below.
|
Drivers and “RICOH Printer” |
SP 150SU |
SP 150SUw |
||||
|
software |
||||||
|
Printer Driver |
4 |
4 |
||||
|
Scanner Driver |
4 |
4 |
||||
|
“RICOH Printer” |
4 |
4 |
||||
|
(Windows & Mac) |
||||||
|
“RICOH Printer” (Android & iOS) |
4 |
|||||
|
Three ways to install drivers |
Quick Installation (USB) |
|||||
|
Wi-Fi Configure and Installation |
||||||
|
Network Installation |
||||||
|
Installing “RICOH Printer” soft- |
“RICOH Printer” software will be installed on your device by |
|||||
|
ware |
default when you choose Quick Install (USB), or Wi-Fi Config- |
|||||
|
ure and Installation. |
||||||
|
Install “RICOH Printer” separately using the Software option |
||||||
|
when you choose Network Installation for installing a printer |
||||||
|
driver. |
||||||
|
• Please see the User Guide for “RICOH Printer” for details. |
||||||
|
Before installing printer drivers |
Please confirm the following items: |
• Your computer has 128MB or more of internal memory.
• Your computer has 200 MB or more free space available on the hard disk.
• Your computer has a Windows or Apple Mac operating system which supported by this printer.
18
![]()
• Please see “7. Drivers” for more information about compatible operating systems.
Quick Installation (USB)
Installing drivers on Windows
Here the example is Windows 7. Your specific operating system decides the steps you will take.
1.Start the printer and connect the computer and printer with the USB cable.
2.Insert the CD-ROM supplied with this product into the computer’s CD-ROM drive.
3.Select proper installation directory for your printer model. Click “setup.exe” to start the installation.
4.Select a language when the installation program interface comes up.
5.Click [Quick Installation (USB)]. Please study the Agreement. If you accept the agreement, please tick the box in front of [I have agreed…] and then click [Next].
6.The program will start installing automatically.
19

2.Setting up the Printer
7.Click [Finish] after the installation is completed.
The printer is ready for use after the printer driver program is installed.
Installing drivers on Mac OS
1.Start the printer and connect the computer and printer with the USB cable.
2.Insert the CD-ROM supplied with this product into the computer’s CD-ROM drive.
3.Double click the CD disk icon on the computer desktop.
4.Double click the Install icon. A window will pop up as shown in the screenshot below.
5.Click [Continue] in the introduction window.
6.When the License Agreement interface appears, please select the required language.
20

7.Please carefully read the software License Agreement, and click [Continue].
8.If you accept the terms of the license agreement, please click [Agree] to continue installation.
9.Click [Install], and the system will perform a default install of the software.
21
2. Setting up the Printer
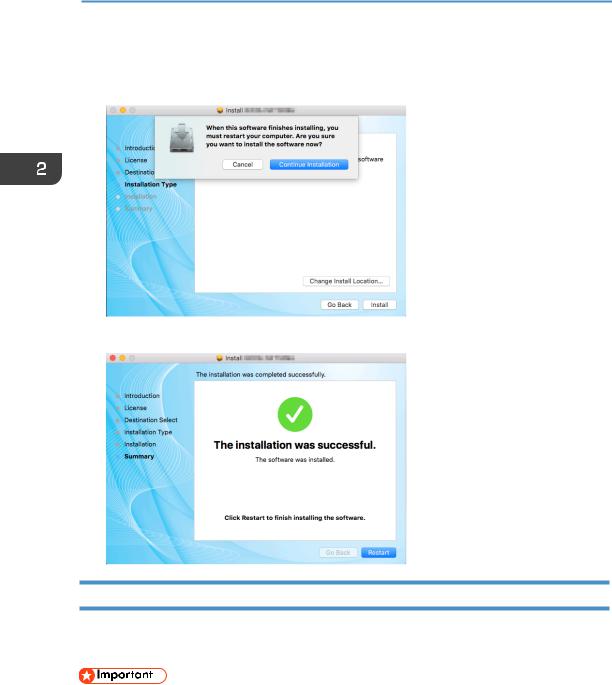
10.For Mac OS X, enter the administrator name and password and click [Install
Software].
11.Click [Continue Installation].
12. Click [Restart] to complete the installation.
Wi-Fi Configure and Installation
If you want the wireless features when you use the printer for the first time, you need to set up the wireless configuration before you can operate the printer wirelessly.
•Some features are unavailable to a certain model or in a certain country/region.
•Regarding specific configurations and features of a model, please see “Different Models”.
•Regarding the installation of the wireless printer driver, please see “8. Print Over Wi-Fi”.
22

Network Installation
Please install the wireless printer driver the first time you use a printer that already has wireless configuration.
• Some functions and optional items may not be available on all models or in all countries/regions.
•Regarding specific configurations and features of a model, please see “Different Models”.
•Regarding the installation of the wireless printer driver, please see “8. Print Over Wi-Fi”.
Upgrading Printer Drivers
You can upgrade the installed printer driver by following the steps below.
1.In the [Start] menu, click [Devices and Printers].
•Windows Server 2003/2003 R2:
In the [Start] menu, select [Printers and Faxes].
•Windows Vista, Windows Server 2008:
In the [Start] menu, select [Control Panel] and click [Hardware and Sound]-[Printer]
•Windows 8/8.1/10, Windows Server 2012/2012 R2:
Click [Settings] on the charm bar, and then click [Control Panel]. When the window pops up, click [View devices and printers].
2.Right click the icon of the printer you want to modify, and click [Printer Properties].
•Windows Vista, Windows Server 2003/2008: Right click the icon, and click [Properties].
3.Click the [Advanced] tab.
4.Click [New Driver…], and click [Next].
5.Click [Have Disk….].
6.Click [Browse…], and select the location of the printer driver.
7.Click [OK] and specify the printer model.
8.Click [Next].
9.Click [Finish].
10.Click [OK] to close Printer Properties window.
11.Restart the computer.
23

2. Setting up the Printer
Uninstalling Printer Drivers
You can use the uninstall program also can uninstall the printer driver by following the steps below.
1.In the [Start] menu, click [Devices and Printers].
•Windows Server 2003/2003 R2:
In the [Start] menu, select [Printers and Faxes].
•Windows Vista, Windows Server 2008:
In the [Start] menu, select [Control Panel] and click [Hardware and Sound]-[Printer].
•Windows 8/8.1/10, Windows Server 2012/2012 R2:
Click [Settings] on the charm bar, and then click [Control Panel]. When the window pops up, click [View devices and printers].
2.Right click the icon of the printer you want to delete, and click [Remove Device].
•Windows Vista, Windows Server 2003/2003 R2/2008: Right click the icon you want to delete and click [Delete].
3.Click [Yes].
4.Click any printer icon, and click [Print Server Properties].
5.Click the [Driver] tab.
6.If [Change Driver Settings] is displayed, please click it.
7.Select the type of printer that you want to delete, and then click Click [Delete].
8.Select [Remove Driver And Driver Package] and click [OK].
9.Click [Yes].
10.Click [Delete].
11.Click [OK].
12.Click [Close] to close the Print Server Properties window.
24

Printing a Test Page
At the end of driver installation,there will be a print test page option,and you can also print the test page by the following.
1.Click [Start], then [Devices and Printers]. Right click your printer and select
[Printer Properties] to display the properties dialog box (As shown below).
2.Click [Print Test Page].
If the test page is successfully printed, the RICOH SP 150SU/SP 150SUw has been configured correctly.
25

2. Setting up the Printer
Printing a Configuration Page
The configuration page shows your printer settings, such as printer model name, network parameters, name and password of Soft AP, Toner Volume, Waste Toner Box and Print Count.
When the printer is in the state of standby, quickly press the power key three times in 1.5 seconds and observe the indicator light.
Start indicator is off.
Power indicator alternates between green and off every second.
26

3. Print Media
Supported Paper
Paper Sizes
|
• A4 |
|
|
• Letter |
8½” × 11 |
|
• Legal |
8½” × 14 |
|
• B5 |
|
|
• A5 LEF |
|
|
• A5 SEF |
|
|
• B6 LEF |
|
|
• B6 SEF |
|
|
• A6 |
|
|
• Executive |
7¼” × 10½ |
•16K
•Custom Paper Size
Custom Paper Size supports the following sizes:
|
• Width |
Approx. 76.2-216mm (3-8.5 inches) |
|
• Length |
Approx. 116-355.6mm (4.57-14 inches) |
Paper Types
|
• Plain Paper |
(70-90 g/m²) |
|
• Recycled Paper |
(70-90 g/m²) |
|
• Thick Paper |
(90-105 g/m²) |
|
• Thin Paper |
(60-70 g/m²) |
Paper Capacity
• Paper tray 50 sheets (70 g/m²)
27

3. Print Media
Non-Recommended Paper Types
Do not use the following types of paper:
•Special paper for ink-jet printers
•Special paper for viscous inks
•Curled, folded or creased paper
•Twisted paper
•Corrugated paper
•Wet paper
•Dirty or torn paper
•Excessively dry paper that may produce static
•Printed paper except that with header/footer designs
•Paper printed by non-laser printers (e.g. monochrome or color copiers, ink-jet printers, etc) in particular may cause failures
•Special paper such as thermal paper and carbon paper
•Paper weighing heavier or lighter than the limit
•Paper with windows, holes, perforations, cutouts, or embossing
•Paper with clips or staples
•Envelopes
•Poorly stored paper can cause paper misfeeds, print quality degradation, or malfunctions.
•Use of any of the paper types listed above may damage the product. Such damage is not covered by the warranty.
28
![]()
Print Area
The picture below shows the area of the paper that the machine can print on.
4.2 mm (0.2 inches)
 4.2 mm (0.2 inches)
Print Area
4.2mm (0.2 inches) 


4.2mm (0.2 inches)
•The print area may vary depending on the paper size and printer driver settings.
29

4. Printing
4. Printing
Print Jobs
This printer offers two options for handling printing:
•Printing with a Printer Driver
•Printing with “RICOH Printer”
Printing with a Printer Driver
This option allows you to print files on the computer using printer drivers.
The steps needed to print may be different for other software or environments. Please see the software you are using to print for the actual steps you need to follow.
1.Please confirm the printer is connected.
2.Open the file your want to print.
3.Select Print in the File menu.
The print dialog box is displayed. (Dialog box may be different for other software.) Select basic print settings in the print dialog box.
The settings include number of copies, paper size and orientation.
If no other print requirements are needed, click [Print] to start printing.
•Click the [Properties] button in the print dialog box to display another dialog box with more printer settings.
•Any changes made will apply only to the software currently in use.
If you want your printer to always use the settings, please follow the steps below:
1.Click the Windows [Start] button.
2.Select [Devices and Printers] to open the window.
3.Select your printer, right click, and select [Printing Preferences].
4.Configure the printer settings here and click [OK]. These settings will be effective for all printing on this computer.
•Please see “7. Drivers” about the printer settings.
•Please see “10. Machine Maintenance” for details of key functions and how indicators display the printer device status.
30

Printing with “RICOH Printer”
For details, see >> the section on Print in the User Guide for “RICOH Printer”.
31

4. Printing
Canceling Print Jobs
The steps for canceling a print job are different for jobs that are not yet printing or currently printing.
Canceling a Print Job before Printing has started
1.Double click the printer icon on the taskbar at the bottom right of the computer desktop. The print queue is displayed.
2. Click the print task. Then right click it and click [Cancel].
3. Click [Yes] to cancel the task.
32

Canceling a Print Job during Printing
Press and hold the power key for one second or longer.
The LED indicator display shown below indicates the current task is being canceled.
|
Start indicator is off. |
||
|
<-> |
Power indicator alternates between red |
|
|
and green every 0.5 seconds. |
||
•If you cancel a print job that has already been processed, printing may continue for a few pages before being canceled.
•It may take a while to cancel large print jobs.
33

5. Copying
5. Copying
Placing Originals
This section describes the types of originals you use set and how to place them.
About Originals
• Recommended size of originals
|
Scanner glass: |
no wider than 216 mm (8.5 inches) |
|
no longer than 297 mm (11.7 inches) |
•Unscannable image area
Even if you correctly place originals,margins of a few millimeters on all four sides of the original may not be scanned.
•Margins when using scanner glass.
 1 mm
1 mm
Scan Area
Placing Originals on the Scanner Glass
1.Raise the scanner cover.
2.Place the original face down on the scanner glass.
The original should be aligned to the rear left corner.
34
 Loading…
Types of Manuals:
The main types of Ricoh SP 150 Series SP 150SU instructions:
- User guide — rules of useing and characteristics
- Service manual — repair, diagnostics, maintenance
- Operation manual — description of the main functions of equipment
Printer Instructions by Ricoh:
-
Xerox WorkCentre 4265
111 2 3 4 52 3 4 5 6 7233 4 51 3 4 5242.3 kg93.3 lb.17.8 cm(7 in.)151.6 cm(59.6 in.)50 cm(19.7 in.)50 cm(19.7 in.)95.25 cm(37.5 in.)162.2 cm(63.8 in.)17.8 cm(7 in.)151.6 cm(59.6 in.)50 cm(19.7 in.)88.4 cm(34.8 in.)151.76 cm(59.75 in.)200.5 cm(78.9 in.) Xerox WorkCentre 4265Multifunction PrinterXerox® WorkCentre® 4265 …
WorkCentre 4265 Printer, 2
-
Intermec UBI EasyCoder 601 E
1 EasyCoder 601 – Installation InstructionsPRINTHEAD REPLACEMENT1-960351-51EasyCoder 601Printhead Replacement InstructionsEdition 2, September 1998The quick-mount thermal printhead is designed to beeasy to replace:• Turn off the printer.• Open the front hatch and right-hand door.• Lift the printhead.• Turn th …
UBI EasyCoder 601 E Printer, 1
-
HP CP6015dn — Color LaserJet Laser Printer
HP printers supported in Citrix XenApp Server environments November 2008 Executive summary………………………………………………………………………………………………………………. 2 What’s new ………………………………………………………………………….. …
CP6015dn — Color LaserJet Laser Printer Printer, 37
-
Sharp AR-C260P
• BEFORE USING THE PRODUCT•MANAGING THE MACHINE•OPERATION CONDITION SETTINGS•PRINTING FROM THE OPERATION PANEL• PERIPHERAL DEVICES• SPECIFICATIONS 1-12-13-14-15-16-1PageMODELAR-C260PDIGITAL FULL COLOUR PRINTEROPERATION MANUAL(for general information)Be sure to become thoroughly familiar with this manual …
AR-C260P Printer, 78
-
Siemens SIREMOBIL Iso-C
SIREMOBIL Iso-C EnglishPrint No.: SPR2-230.076.01.01.02 Doc. Gen. Date: 02/99Replaces: n.a. © Siemens AG 1999The reproduction, transmission oruse of this document or its contentsis not permitted without expresswritten authority. Offenders will beliable for damages. All rights,including rights created by patentgrant o …
SIREMOBIL Iso-C Medical Equipment, 16
-
HP Business Inkjet 2300
getting started guidekomme i gang-håndbokaloitusopaskomma igångopsætningsvejledningbefore setup• Windows: Install the printer software first.Only connect the USB or parallel cable whenprompted.• Network and Mac OS: Connect the printer before installing the printer software.før installering• Windows: I …
Business Inkjet 2300 All in One Printer, 32
-
Lexmark X500N
Lexmark X500n-X502n MFP7100-XXX• Table of contents• Start diagnostics• Safety and notices• Trademarks•IndexLexmark and Lexmark with diamond design are trademarks of Lexmark international, inc., registered in the United States and/or other countries. …
X500N All in One Printer, 244
Приветствую участников Клуба Экспертов, а также всех гостей, которые посетили данную страничку.
Сегодня я хочу рассказать вам о новой модели в сегменте бюджетной оргтехники под названием Ricoh SP 150SU. Данное МФУ, как я уже сказал, привлекает в первую очередь своей низкой ценой, поэтому такое устройство подойдет для использования в небольшом офисе или дома.
Технические характеристики
Общие характеристики
Тип: МФУ лазерное;
Модель: Ricoh SP 150SU;
Цвет: серый;
Принтер
Технология печати: лазерная;
Цветность печати: черно-белая;
Максимальный формат: А4;
Автоматическая двусторонняя печать: нет;
Максимальное разрешение черно-белой печати: 1200х600 dpi;
Скорость черно-белой печати: 22 стр/мин (А4);
Время выхода первого черно-белого отпечатка: 11 с;
Количество страниц в месяц: 10000;
Сканер
Оптическое разрешение: 1200х300 dpi;
Скорость копирования: 16 стр/мин;
Изменение масштаба: 25-400 %;
Шаг масштабирования: 1 %;
Максимальное количество копий за цикл: 99 %;
Лотки
Емкость подачи: 50 листов;
Емкость выходного лотка: 50 листов;
Емкость лотка ручной подачи: 50 листов;
Расходные материалы
Поддерживаемая плотность носителей: 60-105 г/м2;
Количество картриджей: 1;
Модели оригинальных картриджей:LE;
Ресурс черного картриджа: 700 страниц;
Печатает на (материалы): глянцевой бумаге, пленках, этикетках, матовой бумаге, конвертах;
Память/процессор
Объем памяти: 128 Мб;
Частота процессора: 295 МГц;
Интерфейсы
Интерфейсы: USB;
Шрифты и языки управления
Поддержка языков управления: GDI;
Дополнительная информация
Потребляемая мощность в работе: 350 Вт;
Потребляемая мощность в режиме ожидания: 50 Вт;
Уровень шума при работе: 62 Дб;
Уровень шума в режиме ожидания: 30 Дб;
Габаритные размеры, вес
Длина: 266 мм;
Ширина: 350 мм;
Высота: 106 мм;
Вес 7.5 кг.
Упаковка
Поставляется Ricoh SP 150SU в картонной коробке бело-синего цвета. Упаковка имеет небольшие габаритные размеры: 370 х 230 х 480 миллиметров, а ее вес составляет 8 кг.
Оформление упаковки выполнено в фирменном стиле Ricoh. На лицевой стороне размещено изображение МФУ и название модели, сбоку можно увидеть яркие иконки с основными преимуществами устройства.

На обратной стороне также изображен принтер с описанием главных характеристик печати.

На левом и правом боках представлен краткий список основных технических характеристик на нескольких языках, в том числе и на русском.
На внутренней части верхней крышки показана комплектация Ricoh SP 150SU.

Внутри принтер упакован в прозрачный пластиковый пакет. Для более сохранной транспортировки производители предусмотрели пенопластовые уплотнители по всем четырем углам.

Единственным недостатком упаковки можно считать отсутствие ручки для переноски.
Комплектация
Комплект поставки Ricoh SP 150SU минимальный, в него входит:
— МФУ Ricoh SP 150SU;
— Диск с программным обеспечением;
— Кабель питания с европейской розеткой;
— Документация (руководство по безопасности, руководство пользователя, гарантийный талон).

К сожалению, в комплектации отсутствует USB-кабель для подключения к компьютеру (хотя на картинке комплектации он изображен). Так как я определенно не первый, кто вскрывал коробку, судьбу кабеля определить не представляется возможным.
Внешний вид
Корпус Ricoh SP 150SU выполнен из матового пластика черного и серого цветов. Данный материал довольно практичный, пыль не так сильно заметна. Что касается отпечатков пальцев, то они остаются, но при этом легко стираются. Сборка корпуса хорошего качества, посторонних скрипов при использовании не выявлено. Дизайн корпуса выполнен в строгом стиле, сильно выделяющиеся элементы на корпусе отсутствуют, исключение составляют две кнопки управления. МФУ не выглядит громоздким, хоть и имеет не самые компактные габариты. Высота корпуса Ricoh SP 150SU составляет 106 миллиметров, глубина 266 миллиметров, а ширина 350 миллиметров, при этом весит МФУ всего 7,5 килограммов.
Таким образом, Ricoh SP 150SU прекрасно подойдёт как для небольшого офиса, так и для домашнего использования. МФУ не будет занимать много места на полке или столе, что обычно бывает крайне важно.
На лицевой стороне Ricoh SP 150SU первое, что бросается в глаза, это отверстие для вывода бумаги. Аккуратная щель прекрасно вписывается в строгий дизайн МФУ.

В центре также можно увидеть название модели.

В левом нижнем углу находится наклейка, сообщающая о том, что устройство соответствует международным стандартам энергоэффективности.

В правом углу размещены две круглые кнопки, в центре каждой из них нанесены соответствующие пиктограммы.

На левом боку находится вентилятор, благодаря которому горячий воздух удаляется из корпуса.

На правом боку также имеется решетка, в нее попадает свежий воздух.

На задней стороне также расположено минимальное количество элементов.

В левом нижнем углу находится гнездо для подключения сетевого кабеля IEC C14, рядом расположилась наклейка с кратким списком данных о названии модели, месте сборки, серийном номере и электрическими характеристиками.

Справа можно увидеть разъем для подключения USB-кабеля Type B к персональному компьютеру.

На нижней части присутствует несколько рядов продольных отверстий для отвода горячего воздуха из корпуса.

Для более устойчивой установки устройства на столе производители предусмотрели резиновые ножки.

Верхняя крышка Ricoh SP 150SU изготовлена из матового пластика черного цвета. В центре находится фирменный логотип Ricoh.

Лоток для подачи бумаги складной. Для приведения его в рабочее положение необходимо вытянуть лоток под небольшим наклоном и поднять верхнюю часть. Для того чтобы сложить лоток, все операции следует провести в обратном порядке.

Крышка МФУ крепится в двух местах на задней стороне корпуса. Механизм креплений позволяет приподнять крышку над поверхностью в случае сканирования толстых журналов или книг.


Приподняв верхнюю часть корпуса, можно увидеть интегрированный тонер-картридж. Здесь же представлена инструкция по правильному извлечению картриджа. Как заявляет производитель, данного тонер-картриджа хватит на печать до 700 страниц. Что касается конструкции тракта подачи, то он позволяет использовать в Ricoh SP 150SU бумагу размером от 76,2 × 116 до 216 × 355,6 миллиметров, при этом ее плотность должна быть в пределах от 60 до 105 г/м2.


Для извлечения застрявшей бумаги производители предусмотрели специальный рычаг. Подняв его, можно вытянуть лист бумаги.


Подключение и копирование без использования ПК
Подключение Ricoh SP 150SU ничем не отличается от подключения МФУ других фирм и моделей. Первоначально необходимо соединить силовой кабель с соответствующим разъемом, который находится сзади на корпусе. После чего следует подключить USB-кабель.

Ricoh SP 150SU способен копировать документы даже без использования фирменного программного обеспечения. Для этого надо всего лишь поместить образец на область планшета и нажать кнопку запуска (ромбик с черточкой). Время, затраченное на копирование, составляет 15 секунд, если же копир находится в спящем режиме, то длительность процесса увеличивается вдвое.
Программное обеспечение
С диска, который шел в комплекте с Ricoh SP 150SU, я установил все необходимые драйверы, а также фирменную виртуальную панель.

Первым делом начну с драйвера печати. Его интерфейс состоит из трех вкладок: «Общие», «Дополнительные» и «Профили печати».
Во вкладке «Общие» присутствуют настройки по выбору размера, ориентации и типу бумаги, помимо этого здесь предусмотрена возможность определить качество печати, сделать двухстороннюю печать и установить режим экономии тонера.

Во вкладке «Дополнительные» можно включить функцию автоматического подгона текста под бумагу, а также масштабировать текст в диапазоне от 20 % до 400 %.

Последняя вкладка «Профили печати» предназначена для сохранения текущих настроек. Данная функция необходима для быстрого доступа к оптимальным настройкам текущего задания печати. Первоначально в драйвере уже есть несколько предустановленных профилей печати.

Теперь стоит сказать пару слов о фирменной виртуальной панели Ricoh Printer. Данная панель состоит из четырех вкладок. При этом левая часть основного экрана остается неизменной. Тут присутствует название модели МФУ, которое определил компьютер, состояние устройства и количество оставшегося тонера в процентах.
Во вкладке «Печать» пользователю предлагают два варианта: печать с сохранением документов в изображение, либо печать в файл.

В пункте меню «Копирование» предусмотрена возможность настроить плотность и количество копий (от 1 до 99).

Помимо этого в дополнительных параметрах присутствуют инструменты по настройке масштаба, типа, размера документа и размещению нескольких копий на одном листе бумаги.

Во вкладке «Сканирование» находятся инструменты по настройке типа документа, разрешающей способности, контрастности, цветовому режиму, яркости и размеру области сканирования.


Во вкладке «Параметры» можно установить тайм-аут перехода в спящий режим, изменить пароль доступа к МФУ и просмотреть сведения о программе.

Тестирование
Сканирование
Для проверки скорости сканирования были использованы цветная иллюстрация и черно-белый документ формата А4, в настройках было выставлено разрешение 300х300 dpi, яркость и контрастность — 50.
На переход из спящего режима в рабочий потребовалось около 5 секунд. Время, затраченное на сканирование цветного изображения, составило 15 секунд, а черно-белого документа — 12 секунд.
Оценка качества сканирования
Слева оригинал, справа полученное изображение.


Копирование
Для получения одной копии оригинала с разрешением 300 dpi Ricoh SP 150SU затрачивает 17 секунд времени. Копирование в разрешении 600 dpi – 26 секунд.
Оценка качества копирования
Слева оригинал, справа полученное изображение.


Печать
Время перехода из спящего режима в рабочее состояние составило 19 секунд. Печать одной страницы документа с использованием стандартных настроек равно 10 секундам. В среднем за минуту Ricoh SP 150SU смог напечатать 21,9 страницы формата А4.
Оценка качества печати
Слева оригинал, справа полученное изображение.


Оригиналы
Единственное, что мне не понравилось при использовании устройства, это отсутствие приемного лотка для бумаги.
В целом, я остался доволен качеством печати, сканирования и копирования. МФУ полностью оправдало заявленные производителем временные характеристики.
Вывод
Ricoh SP 150SU отлично показал себя в работе. Такое устройство подойдет, прежде всего, школьникам и студентам, которым необходимо время от времени печатать небольшое количество документов. В любом случае, данное МФУ является прекрасным вариантом за минимальную цену.
На этом у меня все, делайте разумные покупки и радуйтесь новым приобретениям.
Выражаю отдельную благодарность администрации Клуба Экспертов за возможность размещения данного обзора.