Первый опыт использования на «iPhone 7 Plus» приложения ProCam 8
Автор: Накрошаев Олег. Дата публикации: . Категория: Разное.
Первый опыт использования на «iPhone 7 Plus» приложения ProCam 8
Давно хотел себе установить какое-нибудь приложение, чтобы можно было делать снимки на своем стареньком «iPhone 7 Plus» в формате Raw.
Наконец-то дошли руки, купил и установил приложения под названием ProCam 8.
У него довольно большие возможности.
Программа дает возможность работать с расстоянием, экспозицией, скоростью затвора, ISO и балансом белого.
Она позволяет фиксировать фокус, чтобы добиться интересного творческого эффекта.
А еще с помощью данного приложения можно увеличивать выдержку от 1/8 до 1 секунды.
Отдельного внимания заслуживает работа с композицией.
Кроме традиционной сетки по правилу третей приложение также предлагает использовать золотое сечение и другие варианты.
Результаты съемки можно сохранять в RAW для дальнейшей детальной обработки, а также в TIFF для сокращения потерь при сжатии.
Возможностей заложено много, все описывать не буду, кому интересно – легко найдет информацию в Интернете.

На прошедших выходных удалось выехать на базу отдыха на Каспийское море.
Сделал несколько снимков в формате RAW.
С остальными богатыми возможностями приложения пока еще только разбираюсь, их столько, что разобраться с ходу не получается.
Дома открыл снимки, якобы формата Raw, в фотошопе и что оказалось.
Никакого специального Raw формата для айфона нет.
ProCam сразу сохраняет результат в формате DNG.
Что тоже очень неплохо.
Просто я предполагал, что будет какой-то специальный Raw формат, как к примеру у Canon, который выдает Raw файлы, имеющие расширение (.CR2).
Формат DNG так же сразу открывается в фотошопе, и Вы получаете «сырые» данные.
Удивило то, что на вкладках «Основные» и «Детализация» автоматом включаются некоторые настройки:


Приходится их принудительно сбрасывать в ноль.
Публикую маленькую часть снимков, сделанных на базе отдыха.
Фото не обрабатывалось в фотошопе и, по условиям сайта, размер файла был уменьшен с 4032 px по ширине до 600 px.
Качество при этом, конечно, сильно страдает.
С раннего утра ходил по берегу моря и спасал мальков, выкидывая их обратно в море. 
Почему-то волной их выбросило на песок.

Вот так провожали день.


А вот так встречали.


Вот что осталось, от популярного в Советское время, санатория «Леззет «.

Первая трава и цветы.


Зацвели плодовые деревья.


Печать
Временно закрыто комментирование для гостей, нужна обязательная регистрация, ввиду засилья спамботов.
зарегистрируйтесь на сайте, что бы оставлять комментарии!
Introduction: Nowadays, people are becoming increasingly interested in digital photography and the various tools that can be used to improve their photographic skills. As such, the Procam 8 Mod IPA is a revolutionary addition to the photography scene.
Procam 8 IPA FOR ALL DEVICE
It is a professional imaging application that combines powerful functionality and editing tools with a user-friendly interface that is designed to help amateur and professional photographers alike capture beautiful stills. Read on to learn more about this powerful application and its capabilities.
A Revolutionary Addition: Procam 8 Mod IPA
Procam 8 Mod IPA is a professional imaging application that provides users with an array of powerful tools and features. By being built on a comprehensive iOS platform, the application has the power to create amazing visuals and provide unparalleled functionality. It is a revolutionary addition to the world of digital photography, as it simplifies the editing process and opens up a wealth of possibilities.
Unleashing the Power of Professional Photography
The Procam 8 Mod IPA is a comprehensive photography tool and boasts an array of features that are designed to help provide users with a professional quality experience. With the application, users can access manual settings such as shutter speed, ISO, and white balance to help capture beautiful stills. Additionally, users can take advantage of additional features such as long exposure, depth of field, and high dynamic range (HDR) for more creative control.
Developing Your Skills with the Procam 8
With the Procam 8, users can also take their photography to the next level. The application includes tutorials to help users gain an understanding of the different shooting modes and various parameters. Whether you’re a beginner or a professional photographer, you can benefit from the informative tutorials and get to grips with the various shooting modes.
Procam 8 Mod IPA: Professional Photography at Its Finest
Once the photograph is taken, users can then begin to enhance their work with the powerful photo editing features of the Procam 8. The user-friendly interface enables users to edit the photos with ease, whilst the intuitive sliders and presets help to simplify the process. Additionally, users can control the intensity of their edits and apply effects without the need for complex menus.
Simplify Editing with Intuitive Sliders and Presets
In the Procam 8 Mod IPA, users benefit from intuitive sliders and presets that allow them to make edits quickly and easily.
Procam 8 IPA MOD
With these sliders, users can quickly adjust the exposure, contrast, saturation, and sharpness of their photographs without any complexity. Presets can also be used to achieve various effects quickly and with minimal effort.
Capturing Beautiful Stills with Procam 8
No matter the level of experience, the Procam 8 Mod IPA provides users with a comprehensive suite of features and tools to help capture stunning photographs. With manual shooting modes, sliders, and presets, users can tweak and enhance their shots to get the perfect shot.
Well-Crafted Interface for the Perfect Picture
The user-friendly interface of the Procam 8 helps to make photography fun and easy. With an array of straightforward menus and settings, users can quickly and easily access the various features and tools available. Additionally, the application auto-saves images to ensure that all your work is saved in case of any mishaps.
Unlocking the Potential of Professional Photography With Procam 8
The Procam 8 Mod IPA is the perfect tool for those looking to discover the true capabilities of professional photography. The application provides users with a comprehensive set of features that help to make photography easier and more enjoyable, whilst unlocking the potential of digital photography. With the Procam 8, users can utilise the myriad of features and tools to capture amazing stills and then enhance them with the intuitive photo editing functions. Conclusion: The Procam 8 Mod IPA is a professional imaging application that combines powerful imaging and editing tools with a user-friendly interface.
Procam 8 IPA IOS
From shooting stunning stills to comprehensive editing features, the app unlocks the potential of professional photography and provides users with an unparalleled experience. With its innovative tools and features, the Procam 8 Mod IPA can help you take your photography skills to the next level.
What’s new update
— Major bugs fixed for Android 10+
— Add lens switcher button for multi camera device
— Add photo mode : bokeh, night-sight & beautify on supported device
Любите фотографировать с мобильного телефона, но стандартное приложение не дает нужного размаха? Решаем все проблемы одним приложением.
Наверное, каждый из нас любит фотографировать что-то интересное на свой мобильный телефон. Это может быть что угодно начиная со своего друга, лезущего на памятник, и заканчивая прикольными рекламными баннерами. Иногда, правда, приходится фотографировать что-то реально интересное и в таких случаях хочется сделать кадр как можно красивее. Обычное приложение камеры ничем уникальным не обладает, только пара стандартных фильтров и все. Другое дело приложение ProCam – огромное количество настроек, много фильтров, переключателей, специальных функций и прочих плюшек, делающих из обычного фото конфетку. Научится всем этим пользоваться получится далеко не у каждого, но это и не обязательно, так как для хорошего кадра иногда нужно просто нажать затвор. Сейчас мы рассмотрим, почему это приложение считается лучшим в своем роде, ведь конкуренция огромная и выделиться их толпы конкурентов очень тяжело.

Съемка
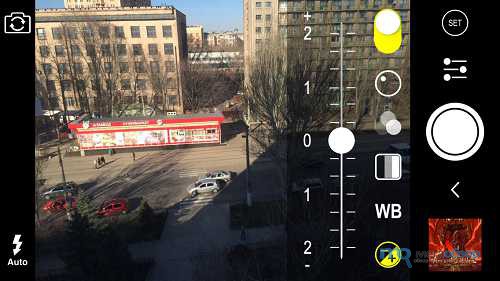
Снять кадр это даже не половина дела – профессиональные фотографы сегодня больше сидят за компьютером обрабатывая фотографию, чем находятся непосредственно на съемке. Мы попытаемся настроить камеру так, что бы хотя бы начальный продукт был качественным. Для этого есть несколько простых инструментов – первый это рассечение экрана на области. Если Вы снимаете какой-то объект на большом расстоянии, то подойдет золотое сечение, если делаете портрет, то крест на экране позволит поместить лицо в нужном месте. Есть и сетка, делящая фото на 9 частей для того, что бы Вы точно рассчитали все элементы. Очень полезная опция, без которой снимать очень тяжело. Кроме того приложение имеет очень качественные настройки стабилизации изображения и хороший, понятный человеку, индикатор стабилизации. Снимать при помощи этих бонусов очень просто и при этом получается гораздо лучше.
Фильтры
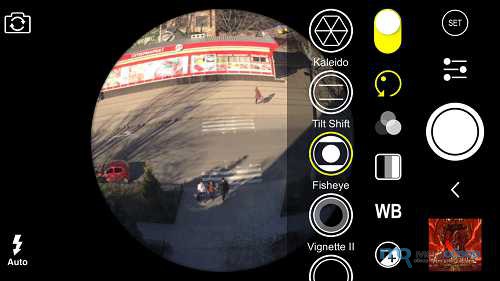
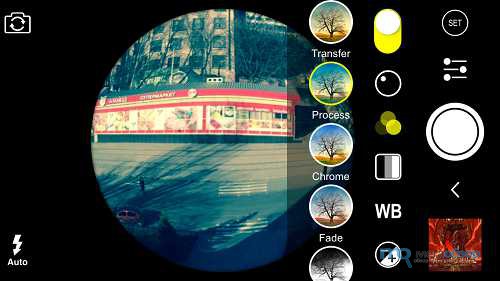
Иногда хочется снять какие-то моменты с мероприятия или прогулки и потом скинуть в сеть, предварительно сделав все фотов одном стиле. Редактировать каждое фото теперь не нужно, ведь Вы просто выбираете стиль, настройки яркости, выбираете насыщенность и делаете кучу снимков в одном и том же тоне. Можно применить линзы, рамки и так далее, но все фото будут одного стиля и редактировать их уже не нужно. Это заметно сокращает время обработки, да и сами кадры получаются интересными, живыми, насыщенными. Выбирайте стили, пытайтесь понять под какую съемку какой лучше всего. Это увлекает.
Тонкая настройка
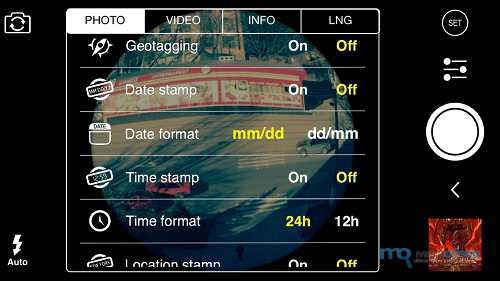
Заранее можно выбрать не только стиль. Вы можете выбрать качество фотографии выбирая межу мегапикселями – от одного, до максимального значения. Это поможет, если снимать издалека, а памяти мало на смартфоне. Можно так же добавить дату на кадр, выбрать формат фотографии. Настройке поддается так же яркость, контраст, насыщенность, количество определенного цвета на фото. При желании можно добавить надпись геолокации, копирайт со своим именем, поменять формат изображения, выбрать стиль кадров. Это мелочи, но именно из них Вы создадите идеал.
Итог
Приложение невероятное, от него не хочется отходить, появляется желание снимать все подряд. Конечно, профессиональным фотографом Вы не станете делая кадры на смартфон, но научиться постить правильные фото в социальные сети можно. Тренируйтесь с разными настройками, учитесь применять настройки яркости и контраста, выбирайте подходящий стиль. Да, возможностей много и их тяжело освоить сразу, но никто же не спешит – постепенно можно прийти к успеху. Вот увидите – через два месяца эффект будет на лицо.
With the release of iOS 8 came the latest update to the fantastic camera replacement app, Procamera 8. The previous version of Procamera was good but this new version has taken the camera app to a whole new level. The app now offers iPhone photographer unprecedented levels of control over the images they capture.
New additions to Procamera 8 include:-
- VividHDR advanced three-shot HDR capture
- Exposure swipe control
- Full control over exposure time, ISO sensitivity, white balance and tint
- Slow motion video player
In this article I’ll take a look at Procamera 8 and show you step by step, how to use Procamera 8 to take great iPhone photos.
The interface
The first thing you’ll notice is that Procamera 8 opens quickly and once open you’re presented with a large viewfinder with an array of controls, all of which can be customised to display as much or as little as you need.
The first time you open the app you will probably want to customise the features and settings. To do this tap the settings icon in the bottom right corner of the viewfinder. A small pop up window will appear with 12 icons that offer quick access to the most common features and functions used in Procamera. From here you can customise the settings to meet your liking and style of shooting. Want to dig deeper into the app settings? Then the bottom left icon will open up more in depth confirmation settings.

Съемка
Снять кадр это даже не половина дела – профессиональные фотографы сегодня больше сидят за компьютером обрабатывая фотографию, чем находятся непосредственно на съемке. Мы попытаемся настроить камеру так, что бы хотя бы начальный продукт был качественным. Для этого есть несколько простых инструментов – первый это рассечение экрана на области. Если Вы снимаете какой-то объект на большом расстоянии, то подойдет золотое сечение, если делаете портрет, то крест на экране позволит поместить лицо в нужном месте. Есть и сетка, делящая фото на 9 частей для того, что бы Вы точно рассчитали все элементы. Очень полезная опция, без которой снимать очень тяжело. Кроме того приложение имеет очень качественные настройки стабилизации изображения и хороший, понятный человеку, индикатор стабилизации. Снимать при помощи этих бонусов очень просто и при этом получается гораздо лучше.
Фильтры
Иногда хочется снять какие-то моменты с мероприятия или прогулки и потом скинуть в сеть, предварительно сделав все фотов одном стиле. Редактировать каждое фото теперь не нужно, ведь Вы просто выбираете стиль, настройки яркости, выбираете насыщенность и делаете кучу снимков в одном и том же тоне. Можно применить линзы, рамки и так далее, но все фото будут одного стиля и редактировать их уже не нужно. Это заметно сокращает время обработки, да и сами кадры получаются интересными, живыми, насыщенными. Выбирайте стили, пытайтесь понять под какую съемку какой лучше всего. Это увлекает.
Тонкая настройка
Заранее можно выбрать не только стиль. Вы можете выбрать качество фотографии выбирая межу мегапикселями – от одного, до максимального значения. Это поможет, если снимать издалека, а памяти мало на смартфоне. Можно так же добавить дату на кадр, выбрать формат фотографии. Настройке поддается так же яркость, контраст, насыщенность, количество определенного цвета на фото. При желании можно добавить надпись геолокации, копирайт со своим именем, поменять формат изображения, выбрать стиль кадров. Это мелочи, но именно из них Вы создадите идеал.
Итог
Приложение невероятное, от него не хочется отходить, появляется желание снимать все подряд. Конечно, профессиональным фотографом Вы не станете делая кадры на смартфон, но научиться постить правильные фото в социальные сети можно. Тренируйтесь с разными настройками, учитесь применять настройки яркости и контраста, выбирайте подходящий стиль. Да, возможностей много и их тяжело освоить сразу, но никто же не спешит – постепенно можно прийти к успеху. Вот увидите – через два месяца эффект будет на лицо.
With the release of iOS 8 came the latest update to the fantastic camera replacement app, Procamera 8. The previous version of Procamera was good but this new version has taken the camera app to a whole new level. The app now offers iPhone photographer unprecedented levels of control over the images they capture.
New additions to Procamera 8 include:-
- VividHDR advanced three-shot HDR capture
- Exposure swipe control
- Full control over exposure time, ISO sensitivity, white balance and tint
- Slow motion video player
In this article I’ll take a look at Procamera 8 and show you step by step, how to use Procamera 8 to take great iPhone photos.
The interface
The first thing you’ll notice is that Procamera 8 opens quickly and once open you’re presented with a large viewfinder with an array of controls, all of which can be customised to display as much or as little as you need.
The first time you open the app you will probably want to customise the features and settings. To do this tap the settings icon in the bottom right corner of the viewfinder. A small pop up window will appear with 12 icons that offer quick access to the most common features and functions used in Procamera. From here you can customise the settings to meet your liking and style of shooting. Want to dig deeper into the app settings? Then the bottom left icon will open up more in depth confirmation settings.
Going back to the viewfinder you can’t help but notice that it makes full use of the iPhone’s screen with the main app controls being located on the edges of the top and bottom of the screen.
Controlling focus and exposure
One of the key features of Procamera is the ability to separate out the focus from the exposure and it was this feature that made Procamera so appealing to me when I started out taking pictures with my iPhone.
To focus and expose for the same point, tap and hold the screen. A small blue square and yellow circle will appear and your focus and exposure points will be set.
To separate out these points simply tap and hold then drag before moving them around the screen to the desired locations. The yellow circle locks the exposure. The blue square locks the focus.
Sometimes though you may find the exposure needs a little refinement. Procamera 8 now sees the introduction of the exposure compensation slider in the bottom edge of the screen. To adjust simply move the slider from left to right to fine tune the exposure of the image.

While we are on the subject of exposure, one of the new additions of Procamera 8 is the HDR feature. To access the HDR camera mode tap the icon to the left of the shutter release button (the one with two opposing arrows). This will show a pop up window of options that includes video, photo, HDR, Night or QR Code scan. By selecting HDR the images you subsequently take in this mode will be processed as HDR (high dynamic range) photographs. This means the app will take three images at differing exposures and combine them into one image. The resulting image will provide a beautifully exposed photograph which can be further enhanced by the new integration with, VividHDR.
Controlling white balance
In digital photography white balance is the process of removing unrealistic colour casts from a photograph in order that objects that are white in reality, appear white in your photo. Different light sources will emit light at various frequency levels which translate into different colour casts on a photograph. Digital cameras use auto white balance compensation which work out the colour temperature of a scene and automatically makes adjustments that neutralise these colour casts.
To gain more control over the white balance settings you will need to enable the white balance control from the settings menu. Once enabled the letters, ‘AWB’ will be displayed on the screen. Tapping ‘AWB’ will display a colour temperature slider at the bottom of the screen. To adjust this simply move the slider left or right until the desired colour tone is achieved.

Releasing the shutter
When taking your photographs there are three ways you can release the shutter in Procamera. The first is to tap the shutter release button on the bottom edge of the screen. It’s worth noting that the shutter is only released once you take your finger off the button which is a handy feature that helps to reduce camera shake.
The second way is to simply tap on the screen. To enable this feature you’ll need to enable full screen trigger in the settings menu. It is my favourite method of taking photos as its so easy especially when shooting street photography.
The third method is by pressing the volume buttons on the side of the phone. The shutter can also be triggered by using the volume control on the iPhone’s headphones, this is another discreet way of shooting street photography. Again this is an option that needs enabling in the settings menu.
Editing your photos within Procamera 8
Procamera offers a range of built-in editing tools. To access these and edit your photo within the app you first need to select the image you want to work with. This is done by tapping the gallery icon in the bottom left corner, selecting the photo from the camera roll and tapping edit in the bottom right.

Procamera 8 has a selection of 76 preset filters and effects. You can scroll through the filters to see how the photo will look as the filter is applied in the preview. These presets are grouped into categories for easy navigation and also has a few extra in-app purchase options for added bonus filters.
With a filter chosen you can now dig a little deeper and adjust the photo even further via the three settings icons at the bottom of the screen.
The first icon option is the filter selection tool (the screen we have just talked about). The next offers additional control over the brightness, contrast, exposure, saturation, color temperature, vignette, boost, sharpen, shadows and highlights. The third icon allows you to crop the photo to the desired composition and ratio.

To walk you through this process I chose to edit photo I shot on a recent family day out. The photo in question sees a couple sat on the seafront with their dog. I started by cropping the image to a 3:2 ratio before converting the image to black and white and selecting the ‘Hard Gray’ filter.


I then increased the sharpness of the image to around 50% before adding a vignette to the outer edges in order to focus the eye more on the subjects. Finally, I saved the image to the camera roll by tapping save in the top right corner.

Once you have your photo just as you want it you can now share the image across your social networks. To do this tap the share icon in the bottom left of the screen, select how you want to share the image and away you go.
In summary I have always been a big fan of Procamera. I have tried several other camera replacement apps but Procamera has always been one that has gelled with my style of photography and workflow. It is a versatile and easy to use app and the recent improvements now provide a whole new level of control to the photographs I take.
Download Procamera 8 from the App Store – Download
ProCam++ iPA by Lê Tí – iOS CodeVN.
ProCam 8++ unlock all paid features of ProCam 8 app.
How to unlock: press Buy then press Cancel.
SHOOTING MODES
– Photo
– Burst Mode
– Slow Shutter
– Portrait Mode – supported on all dual lens camera system as well as iPhone XR and iPhone SE 2020
– 3D Photo – requires dual lens camera system
– Video
– Time Lapse
PHOTO SHUTTER RELEASE OPTIONS
– Self-Timer
– Anti-Shake
– Screen Shutter / Big Button
– Interval
VIDEO FRAME RATES AND RESOLUTIONS
– VGA, 720p, 1080p
– 4K Ultra HD – 3264×1836 upscaled to 3840×2160 – in-app purchase – iPhone 5s / iPad Air 2 and later
– 4K Ultra HD – 3840×2160 – native support on iPhone 6s / Plus and later
– 4K Max – 4032×2268 – in-app purchase – iPhone 6s / Plus and later
– High frame rate:
* 48 / 50 / 60 fps 720p – iPhone 5 / iPad mini and later
* 96 / 100 /120 fps 720p – iPhone 5s / iPad Air 2 and later
* 192 / 200 / 240 fps 720p – iPhone 6 and later
* 48 / 50 / 60 fps 1080p – iPhone 6 and later
* 96 / 100 / 120 fps 1080p – iPhone 6s / Plus and later
* 192 / 200 / 240 fps 1080p – iPhone 8 and later
* 48 / 50 / 60 fps 4K – iPhone 8 and later
TIME LAPSE FRAME RATES AND RESOLUTIONS
– VGA, 720p, 1080p
– 4K Ultra HD – 3264×1836 upscaled to 3840×2160 – in-app purchase – iPhone 5 / iPad Air 2 and later
– 4K Ultra HD – 3840×2160 – native support on iPhone 6s / Plus and later
– 4K Max – 4032×2268 – in-app purchase – iPhone 6s / Plus and later
– High frame rate:
* 48 / 50 / 60 fps 720p – all devices
* 48 / 50 / 60 fps 1080p – all devices
* 48 / 50 / 60 fps 4K – iPhone 5 / iPad Air 2 and later
* 48 / 50 / 60 fps 4K Max – iPhone 6s / Plus and later
MANUAL CONTROLS
– Manual exposure, shutter speed, ISO, focus, and white balance controls
– Scroll and steppers system inspired by DSLR cameras
– Tap location accurate manual focus assist
– True focus peaking
– Zebra stripes – overexposure warning
– Live shutter speed, ISO, focus, and WB values
– Manual controls are supported in all photo and video modes
MAIN CAMERA FEATURES
– RAW (DNG) iOS 10 – iPhone 6s / iPad Pro 9.7 and later
– Lossless TIFF file format support
– Intelligent 3-shot HDR
– AEB (Auto Exposure Bracketing) with RAW support for high contrast conditions
– Live light level histogram
– Adjustable aspect ratio (4:3 / 3:2 / 16:9 / 1:1)
– Video pause/resume functionality
– Video audio meter (Avg. / Peak signal levels)
– Still photo capture during video recording
– Realtime video stabilization (ON/OFF)
– Video disk space indicator
– Thirds grid and horizontal tiltmeter.
– Date / time / location / Copyright stamp
PHOTO / VIDEO EDITOR & PHOTO EDITING EXTENSION
– Nondestructive editing – all edits, including cropping, are completely amendable / reversible
– 60 expertly crafted filters
– 17 lenses: Vignette / White Vignette / Fisheye / Tilt Shift / Macro / Tiny Planet / Wormhole / Split / Kaleidoscope I, II, III, IV, V / Ripple / Striped / Hatched / Halftone
– 19 comprehensive adjustment tools
– Trimming, cropping, rotating, mirroring, straightening, and perspective correction
– Extremely accurate timeline with the ability to review videos frame by frame
– Ability to add background music
Information
| Version |
14.1.0 |
| Last updated |
02/27/2023 |
| Tags |
Paid, Tweaked |