- Manuals
- Brands
- Keeler Manuals
- Medical Equipment
- Pulsair intelliPuff
- Instructions for use manual
-
Contents
-
Table of Contents
-
Bookmarks
Quick Links
Instructions for use
Next
Related Manuals for Keeler Pulsair intelliPuff
Summary of Contents for Keeler Pulsair intelliPuff
-
Page 1
Instructions for use Next… -
Page 2: Table Of Contents
Contents 1. Copyright and Trademarks ……..p3 10. Measurement procedures ……..p15 2. Introduction …………… p4 10.1 Preparing the device ……..p15 3. Symbols …………..p5 10.2 Preparing the patient ……..p16 4. Safety …………….p6 10.3 Taking the reading ………. p17 4.1 Device Classification ……….
-
Page 3: Copyright And Trademarks
Description of the product The information contained within this manual must not be reproduced in whole or part without the manufacturer’s prior The Pulsair intelliPuff Non-Contact Tonometer is indicated for written approval. measuring intraocular pressure without contacting the eye to aid in the screening and diagnosis of glaucoma.
-
Page 4: Introduction
2. Introduction Thank you for purchasing the Keeler Pulsair intelliPuff™. The product has been designed and manufactured to ensure that you will enjoy many years of trouble free and safe use. Please follow the User Instructions to ensure optimum performance.
-
Page 5: Symbols
3. Symbols Read user instructions for Warnings, Cautions and Power input port additional information On/Off The CE mark on this product indicates it has been tested to and conforms with the provisions noted 0088 within the 93/42/EEC Medical Device Directive Fragile Double insulated This way up…
-
Page 6: Safety
• Only mount on wall according to Keeler Instructions. • USA Federal law restricts this device to sale by or order of a • Before using the Pulsair intelliPuff, press the Demo button physician. to dispel any minute particles of dust.
-
Page 7: Cleaning Instructions
5. Cleaning instructions Only manual non-immersion cleaning as described should be used for this instrument. Do not autoclave or immerse in cleaning fluids. Always disconnect power supply from source before cleaning. a Wipe the external surface with a clean absorbent, non- shedding cloth dampened with a water / detergent solution (2% detergent by volume) or water / isopropyl alcohol solution (70% IPA by volume).
-
Page 8: Power Supply Assembly
6. Power supply assembly Set Plug Replace the blanking plate with the appropriate mains plug adapter if required, or use IEC 60320 TYPE 7 connector (not supplied). IEC 60320 TYPE 7 connector Home Back Next…
-
Page 9: Wall Mounting
7. Wall mounting Your Pulsair intelliPuff is supplied with a sturdy wall mounting bracket. 1. The bracket has four holes allowing it to be securely fixed to an appropriate wall or vertical surface. 2. Choose carefully the intended location for your intelliPuff with…
-
Page 10: Tonometry Pressure Variations In The Human Eye
Up to 4 readings may be required in order to reduce the impact of these variants to a constant IOP. Pulsair intelliPuff software will recognise the readings and give a sound notification when two consecutive readings are +/- 1mmHg of each other indicating that further measurements may not be required.
-
Page 11: Names Of Controls And Components
5. Serial port The serial port is used for calibration, systems checking and data output (located on rear of instrument). 6. Power input Insert the low voltage power lead (located on rear of instrument) Home Back Next use only Keeler power supplies.
-
Page 12
9. Names of controls and components 9. Display When all the required readings have been taken the figure The display shows the recorded IOP reading and the averaged displayed is the IOP that is recorded for the patient. When two consecutive readings are within 1mmHg an audible IOP reading. -
Page 13
9. Names of controls and components Main control buttons To initiate Easy Pulse mode hold the review button for greater than one second; the display will show 10. Print / Menu button ‘easy’, it will beep once and the unit will be ready A press of less than one second will print the acquired data;… -
Page 14
9. Names of controls and components 15. Puff tube and lens The puff tube and puff lens is the part of the Pulsair intelliPuff through which the Pulsair is aligned and a gentle puff of air is emitted. 16. Alignment LEDs The two green LED’s located on the front of the hand unit act as a guide when you are lining up the patient’s eye to take a… -
Page 15: Measurement Procedures
‘OK’, refer to section 13 for a full list of display data. 6. Before using the Pulsair intelliPuff press the Demo button to dispel any minute particles of dust or moisture which may have settled whilst the Pulsair intelliPuff was not in use.
-
Page 16: Preparing The Patient
10.2 Preparing the patient Before taking a reading you should: Before using the Pulsair intelliPuff you should make your patient feel at ease and ensure they are located in an optimum reading location, preferably with their head supported. This is because 1.
-
Page 17: Taking The Reading
1. The Pulsair intelliPuff is set to automatically select the right 6. Continue to move closer, a red reflex appears. eye as the first eye to be measured. If you wish to select the left eye, press the OD/OS button on the hand unit.
-
Page 18
10. Measurement procedures 10.3 Taking the reading 9. When two consecutive readings are within 1mmHg an audible sound will be heard indicating that sufficient readings may have been taken. 10. If a reading is recorded as a non event or bad event, a bad event long high pitch tone will be heard. -
Page 19: Display Examples
11. Display examples The unit will display STBY when power is on. When a pressure (IOP) of greater than 25mmHg is detected, the unit will display >25, the puff intensity will automatically be increased from the soft puff to the normal puff level for subsequent measurements.
-
Page 20: Printing
12. Printing The results can be printed by pressing the print button on the handpiece, or if the user menu is set to automatically print by replacing the handpiece in the cradle. Name: Sample print Date: The reading in brackets (20) indicates a discarded value (not taking into account in the average calculations).
-
Page 21: Replacing The Printer Paper
13. Replacing the printer paper 1. Access to the printer paper is via the printer cover, use your finger in the lip on the top of the cover and gently pull towards you to open the printer cover. Remove the empty paper roll. 2.
-
Page 22: User Menu Options
5. Use the CHANGE (OD/OS) button to make your preferred selection. Note: to run the self test press the DEMO button, not the CHANGE button. CHANGE 6. Continue to repeat steps 4 and 5 until ‘OK’ is displayed, your Pulsair intelliPuff is now ready to use with your preferred settings. Menu option Display Change options Printer control…
-
Page 23: Calibration, Maintenance And Inspection
15. Calibration, maintenance and inspection Clean the puff tube lens on a weekly basis: 1. Moisten a cotton bud with Isopropyl Alcohol. 2. Move the tip of the bud around the lens in a circular motion. 3. After one circle the bud should be discarded to avoid smearing on the lens.
-
Page 24
The unit performs a self function check when switched on and will indicate if a fault is found. There are no user serviceable parts in this instrument. Service manuals will be available to authorised Keeler service centres and Keeler trained service personnel. Home… -
Page 25: Specifications And Electrical Ratings
16. Specifications and electrical ratings Console dimensions 260 x 215 x 220mm (H x D x W) Complies with Safety (Medical) EN 60601-1:1990 plus amendments A1:1993, A11:1993, Hand Unit dimensions 315 x 150 x 46mm (H x D x W) A12:1993, A2:1995 and A13:1996. Console weight 2.465Kg EN ISO 15004-1:2006, Clause 6.3…
-
Page 26
16. Specifications and electrical ratings It is well established that exposure of the eye to intense light sources for extended periods of time poses a risk of retinal photic injury. Many ophthalmic instruments illuminate the eye with intense light. The light levels on the Pulsair have been set at the lowest level possible. -
Page 27
1. Portable or mobile-type radio frequency communication units may have an adverse effect on this instrument, resulting in malfunctioning. Guidance and manufacturer’s declaration – electromagnetic emissions The Keeler Pulsair intelliPuff is intended for use in the electromagnetic environment specified below. The customer or user should assure that it is used in such an environment. Emissions test… -
Page 28
16. Specifications and electrical ratings Guidance and manufacturer’s declaration – electromagnetic immunity The Keeler Pulsair intelliPuff is intended for use in the electromagnetic environment specified below. The customer or user should assure that it is used in such an environment. Immunity test IEC 60601 Test level Compliance level Electromagnetic environment — guidance Electrostatic ± 6 kV contact ±… -
Page 29
If the measured field strength in the location in which the Keeler Pulsair intelliPuff is used exceeds the applicable RF compliance level above, the Keeler Pulsair intelliPuff should be observed to verify normal operation. -
Page 30
16. Specifications and electrical ratings Recommended separation distances between portable and mobile RF communications equipment and the Keeler Pulsair intelliPuff The Keeler Pulsair intelliPuff is intended for the use in an electromagnetic environment in which radiated RF disturbances are controlled. The customer or the user of the Keeler Pulsair intelliPuff can help prevent electromagnetic interference by maintaining a minimum distance between portable and mobile RF communications equipment (transmitters) and the Keeler Pulsair intelliPuff as recommended below, according to the maximum output power of the communications equipment. -
Page 31: Accessories And Warranty
Within alterations made by those other than the manufacturer or his 2 years from delivery by Keeler, the manufacturer shall at no authorized representative). charge to the customer, upon written notice from the customer,…
-
Page 32: Contact, Packaging And Disposal Information
18. Contact, packaging and disposal information Manufacturer USA Sales Office Keeler Limited Keeler Instruments Inc Clewer Hill Road 3222 Phoenixville Pike Windsor Building #50 Berkshire Malvern, PA 19355 SL4 4AA Freephone: 0800 521251 Toll Free: 1 800 523 5620 Tel: +44 (0) 1753 857177…
-
Page 1
Instructions for use Next… -
Page 2: Table Of Contents
Contents 1. Copyright and Trademarks ……..p3 10. Measurement procedures ……..p15 2. Introduction …………… p4 10.1 Preparing the device ……..p15 3. Symbols …………..p5 10.2 Preparing the patient ……..p16 4. Safety …………….p6 10.3 Taking the reading ………. p17 4.1 Device Classification ……….
-
Page 3: Copyright And Trademarks
Description of the product The information contained within this manual must not be reproduced in whole or part without the manufacturer’s prior The Pulsair intelliPuff Non-Contact Tonometer is indicated for written approval. measuring intraocular pressure without contacting the eye to aid in the screening and diagnosis of glaucoma.
-
Page 4: Introduction
2. Introduction Thank you for purchasing the Keeler Pulsair intelliPuff™. The product has been designed and manufactured to ensure that you will enjoy many years of trouble free and safe use. Please follow the User Instructions to ensure optimum performance.
-
Page 5: Symbols
3. Symbols Read user instructions for Warnings, Cautions and Power input port additional information On/Off The CE mark on this product indicates it has been tested to and conforms with the provisions noted 0088 within the 93/42/EEC Medical Device Directive Fragile Double insulated This way up…
-
Page 6: Safety
• Only mount on wall according to Keeler Instructions. • USA Federal law restricts this device to sale by or order of a • Before using the Pulsair intelliPuff, press the Demo button physician. to dispel any minute particles of dust.
-
Page 7: Cleaning Instructions
5. Cleaning instructions Only manual non-immersion cleaning as described should be used for this instrument. Do not autoclave or immerse in cleaning fluids. Always disconnect power supply from source before cleaning. a Wipe the external surface with a clean absorbent, non- shedding cloth dampened with a water / detergent solution (2% detergent by volume) or water / isopropyl alcohol solution (70% IPA by volume).
-
Page 8: Power Supply Assembly
6. Power supply assembly Set Plug Replace the blanking plate with the appropriate mains plug adapter if required, or use IEC 60320 TYPE 7 connector (not supplied). IEC 60320 TYPE 7 connector Home Back Next…
-
Page 9: Wall Mounting
7. Wall mounting Your Pulsair intelliPuff is supplied with a sturdy wall mounting bracket. 1. The bracket has four holes allowing it to be securely fixed to an appropriate wall or vertical surface. 2. Choose carefully the intended location for your intelliPuff with…
-
Page 10: Tonometry Pressure Variations In The Human Eye
Up to 4 readings may be required in order to reduce the impact of these variants to a constant IOP. Pulsair intelliPuff software will recognise the readings and give a sound notification when two consecutive readings are +/- 1mmHg of each other indicating that further measurements may not be required.
-
Page 11: Names Of Controls And Components
5. Serial port The serial port is used for calibration, systems checking and data output (located on rear of instrument). 6. Power input Insert the low voltage power lead (located on rear of instrument) Home Back Next use only Keeler power supplies.
-
Page 12
9. Names of controls and components 9. Display When all the required readings have been taken the figure The display shows the recorded IOP reading and the averaged displayed is the IOP that is recorded for the patient. When two consecutive readings are within 1mmHg an audible IOP reading. -
Page 13
9. Names of controls and components Main control buttons To initiate Easy Pulse mode hold the review button for greater than one second; the display will show 10. Print / Menu button ‘easy’, it will beep once and the unit will be ready A press of less than one second will print the acquired data;… -
Page 14
9. Names of controls and components 15. Puff tube and lens The puff tube and puff lens is the part of the Pulsair intelliPuff through which the Pulsair is aligned and a gentle puff of air is emitted. 16. Alignment LEDs The two green LED’s located on the front of the hand unit act as a guide when you are lining up the patient’s eye to take a… -
Page 15: Measurement Procedures
‘OK’, refer to section 13 for a full list of display data. 6. Before using the Pulsair intelliPuff press the Demo button to dispel any minute particles of dust or moisture which may have settled whilst the Pulsair intelliPuff was not in use.
-
Page 16: Preparing The Patient
10.2 Preparing the patient Before taking a reading you should: Before using the Pulsair intelliPuff you should make your patient feel at ease and ensure they are located in an optimum reading location, preferably with their head supported. This is because 1.
-
Page 17: Taking The Reading
1. The Pulsair intelliPuff is set to automatically select the right 6. Continue to move closer, a red reflex appears. eye as the first eye to be measured. If you wish to select the left eye, press the OD/OS button on the hand unit.
-
Page 18
10. Measurement procedures 10.3 Taking the reading 9. When two consecutive readings are within 1mmHg an audible sound will be heard indicating that sufficient readings may have been taken. 10. If a reading is recorded as a non event or bad event, a bad event long high pitch tone will be heard. -
Page 19: Display Examples
11. Display examples The unit will display STBY when power is on. When a pressure (IOP) of greater than 25mmHg is detected, the unit will display >25, the puff intensity will automatically be increased from the soft puff to the normal puff level for subsequent measurements.
-
Page 20: Printing
12. Printing The results can be printed by pressing the print button on the handpiece, or if the user menu is set to automatically print by replacing the handpiece in the cradle. Name: Sample print Date: The reading in brackets (20) indicates a discarded value (not taking into account in the average calculations).
-
Page 21: Replacing The Printer Paper
13. Replacing the printer paper 1. Access to the printer paper is via the printer cover, use your finger in the lip on the top of the cover and gently pull towards you to open the printer cover. Remove the empty paper roll. 2.
-
Page 22: User Menu Options
5. Use the CHANGE (OD/OS) button to make your preferred selection. Note: to run the self test press the DEMO button, not the CHANGE button. CHANGE 6. Continue to repeat steps 4 and 5 until ‘OK’ is displayed, your Pulsair intelliPuff is now ready to use with your preferred settings. Menu option Display Change options Printer control…
-
Page 23: Calibration, Maintenance And Inspection
15. Calibration, maintenance and inspection Clean the puff tube lens on a weekly basis: 1. Moisten a cotton bud with Isopropyl Alcohol. 2. Move the tip of the bud around the lens in a circular motion. 3. After one circle the bud should be discarded to avoid smearing on the lens.
-
Page 24
The unit performs a self function check when switched on and will indicate if a fault is found. There are no user serviceable parts in this instrument. Service manuals will be available to authorised Keeler service centres and Keeler trained service personnel. Home… -
Page 25: Specifications And Electrical Ratings
16. Specifications and electrical ratings Console dimensions 260 x 215 x 220mm (H x D x W) Complies with Safety (Medical) EN 60601-1:1990 plus amendments A1:1993, A11:1993, Hand Unit dimensions 315 x 150 x 46mm (H x D x W) A12:1993, A2:1995 and A13:1996. Console weight 2.465Kg EN ISO 15004-1:2006, Clause 6.3…
-
Page 26
16. Specifications and electrical ratings It is well established that exposure of the eye to intense light sources for extended periods of time poses a risk of retinal photic injury. Many ophthalmic instruments illuminate the eye with intense light. The light levels on the Pulsair have been set at the lowest level possible. -
Page 27
1. Portable or mobile-type radio frequency communication units may have an adverse effect on this instrument, resulting in malfunctioning. Guidance and manufacturer’s declaration – electromagnetic emissions The Keeler Pulsair intelliPuff is intended for use in the electromagnetic environment specified below. The customer or user should assure that it is used in such an environment. Emissions test… -
Page 28
16. Specifications and electrical ratings Guidance and manufacturer’s declaration – electromagnetic immunity The Keeler Pulsair intelliPuff is intended for use in the electromagnetic environment specified below. The customer or user should assure that it is used in such an environment. Immunity test IEC 60601 Test level Compliance level Electromagnetic environment — guidance Electrostatic ± 6 kV contact ±… -
Page 29
If the measured field strength in the location in which the Keeler Pulsair intelliPuff is used exceeds the applicable RF compliance level above, the Keeler Pulsair intelliPuff should be observed to verify normal operation. -
Page 30
16. Specifications and electrical ratings Recommended separation distances between portable and mobile RF communications equipment and the Keeler Pulsair intelliPuff The Keeler Pulsair intelliPuff is intended for the use in an electromagnetic environment in which radiated RF disturbances are controlled. The customer or the user of the Keeler Pulsair intelliPuff can help prevent electromagnetic interference by maintaining a minimum distance between portable and mobile RF communications equipment (transmitters) and the Keeler Pulsair intelliPuff as recommended below, according to the maximum output power of the communications equipment. -
Page 31: Accessories And Warranty
Within alterations made by those other than the manufacturer or his 2 years from delivery by Keeler, the manufacturer shall at no authorized representative). charge to the customer, upon written notice from the customer,…
-
Page 32: Contact, Packaging And Disposal Information
18. Contact, packaging and disposal information Manufacturer USA Sales Office Keeler Limited Keeler Instruments Inc Clewer Hill Road 3222 Phoenixville Pike Windsor Building #50 Berkshire Malvern, PA 19355 SL4 4AA Freephone: 0800 521251 Toll Free: 1 800 523 5620 Tel: +44 (0) 1753 857177…
Артикул:
Keeler Pulsair intelliPuff
Цена действительна только для интернет-магазина и может отличаться от цен в розничных магазинах
- Описание
- Как купить
- Оплата
- Доставка
- Отзывы
- Задать вопрос
-
Дополнительно
Описание
Бесконтактный тонометр Keeler Pulsair IntelliPuff
Тонометр Pulsair intelliPuff с принадлежностями – диагностическое оборудование для офтальмолога. Ручной аппарат отличается удобством и простотой работы. Портативный прибор не требует установки подбородка пациента в подставку. Тонометр имеет компактные размеры и повышает уровень доверия со стороны посетителей кабинета врача.
Установка на стене и ручное использование
Являясь портативным прибором, Pulsair intelliPuff позволяет избежать необходимости устанавливать подбородок пациента в подставку, удаляя целый процесс из посещения пациента – простота и удобство использования при размещении пациента в кресле для обследования, экономия пространства и времени.
Преимущества тонометра Pulsair intelliPuff
- Самый компактный размер бесконтактного тонометра на Российском рынке
- Возможность размещения прибора на стене
- Отображение точности измерения до десятичного разряда, например 15,6 мм.рт.ст.
- Автоматическое срабатывание при наведении на глаз пациента
- Для обследования не нужны никакие расходные материалы
- Самый бюджетный вариант бесконтактного тонометра на Российском рынке
- Автоматическая регулировка потока воздуха
- Наличие порта RS-232
- Встроенный термопринтер
Предназначение тонометра Pulsair intelliPuff
Тонометр Keeler Pulsair intelliPuff предназначен для измерения внутриглазного давления путем направления мягкого воздушного импульса на роговицу глаза пациента. Единичного измерения может оказаться недостаточно, поскольку ВГД подвержено колебаниям под действием изменений пульса, а также респираторных и суточных факторов. Кроме того, на ВГД могут оказывать влияние моргание, сдавливание глазного яблока, прием жидкости, физическая активность, положение тела и даже направление взгляда. Для получения стабильного значения ВГД с учетом этих факторов может потребоваться до четырех измерений.
Программное обеспечение тонометра анализирует результаты измерений. Если разница между результатами двух последовательных измерений не превышает +/- 1 мм рт. ст., то звучит сигнал, указывающий на вероятную достаточность выполненных измерений.
Как купить
Оформить заказ на нашем сайте легко. Просто добавьте выбранные товары в корзину, а затем перейдите на страницу Корзина, проверьте правильность заказанных позиций и нажмите кнопку «Оформить заказ» или «Быстрый заказ».
Быстрый заказ
Функция «Быстрый заказ» позволяет покупателю не проходить всю процедуру оформления заказа самостоятельно. Вы заполняете форму, и через короткое время вам перезвонит менеджер магазина. Он уточнит все условия заказа, ответит на вопросы, касающиеся качества товара, его особенностей. А также подскажет о вариантах оплаты и доставки.
По результатам звонка, пользователь либо, получив уточнения, самостоятельно оформляет заказ, укомплектовав его необходимыми позициями, либо соглашается на оформление в том виде, в котором есть сейчас. Получает подтверждение на почту или на мобильный телефон и ждёт доставки.
Оформление заказа в стандартном режиме
Если вы уверены в выборе, то можете самостоятельно оформить заказ, заполнив по этапам всю форму.
Заполнение адреса
Выберите из списка название вашего региона и населённого пункта. Если вы не нашли свой населённый пункт в списке, выберите значение «Другое местоположение» и впишите название своего населённого пункта в графу «Город». Введите правильный индекс.
Доставка
В зависимости от места жительства вам предложат варианты доставки. Выберите любой удобный способ.
Оплата
Выберите оптимальный способ оплаты.
Покупатель
Введите данные о себе: ФИО, адрес доставки, номер телефона. В поле «Комментарии к заказу» введите сведения, которые могут пригодиться курьеру, например: подъезды в доме считаются справа налево.
Оформление заказа
Проверьте правильность ввода информации: позиции заказа, выбор местоположения, данные о покупателе. Нажмите кнопку «Оформить заказ».
Наш сервис запоминает данные о пользователе, информацию о заказе и в следующий раз предложит вам повторить к вводу данные предыдущего заказа. Если условия вам не подходят, выбирайте другие варианты.
Оплата
Вы можете выбрать один из трёх вариантов оплаты:
Оплата наличными
При выборе варианта оплаты наличными, вы дожидаетесь приезда курьера и передаёте ему сумму за товар в рублях. Курьер предоставляет товар, который можно осмотреть на предмет повреждений, соответствие указанным условиям. Покупатель подписывает товаросопроводительные документы, вносит денежные средства и получает чек.
Также оплата наличными доступна при самовывозе из магазина, оплаты по почте или использовании постамата.
Безналичный расчёт
При оформлении заказа в корзине вы можете выбрать вариант безналичной оплаты. Мы принимаем карты Visa и Master Card. Чтобы оплатить покупку, вас перенаправит на сервер системы ASSIST, где вы должны ввести номер карты, срок действия, имя держателя.
Вам могут отказать от авторизации в случае:
- если ваш банк не поддерживает технологию 3D-Secure;
- на карте недостаточно средств для покупки;
- банк не поддерживает услугу платежей в интернете;
- истекло время ожидания ввода данных;
- в данных была допущена ошибка.
В этом случае вы можете повторить авторизацию через 20 минут, воспользоваться другой картой или обратиться в свой банк для решения вопроса.
Безналичным расчётом можно воспользоваться при курьерской доставке, использовании постамата или самовывоза из магазина.
Электронные системы
Для оплаты вы можете воспользоваться одной из электронных платёжных систем:
- PayPal;
- WebMoney;
- Яндекс.Деньги.
Вас перенаправит на страницу платежного сервиса, следуя инструкциям, заполните правильную форму.
Доставка
Наш интернет-магазин предлагает несколько вариантов доставки:
- курьерская;
- самовывоз из магазина;
- постаматы;
- почта России.
Курьерская доставка*
Вы можете заказать доставку товара с помощью курьера, который прибудет по указанному адресу в будние дни и субботу с 9.00 до 19.00. Курьерская служба, после поступления товара на склад, свяжется с вами и предложит выбрать удобное время доставки. Уточнит адрес.
Вы вскрываете упаковку при курьере, осматриваете на целостность и соответствие указанной комплектации. Если речь идёт об одежде, допустима примерка. Время осмотра и примерки ограничено 15 минутами. После вы можете отказаться частично или полностью от покупки.
Доставка бесплатна при заказе от 3000 рублей.
*Действует ли в вашем городе курьерская служба, уточняйте у менеджера магазина.
Самовывоз из магазина
Вы можете забрать товар в одном из магазинов, сотрудничающих с нами. Список торговых точек, которые принимают заказы от нашей компании появится у вас в корзине. Когда заказ поступит в ваш город, вам придёт уведомление. Вы просто идёте в этот магазин, обращаетесь к сотруднику в кассовой зоне и называете номер заказа. Забрать покупку может ваш друг или родственник, который знает номер и имя, на кого он оформлен.
Постамат
Постамат – это терминал с автоматизированной системой для хранения заказанных товаров. Удобство в том, что человек может забрать заказ в любое удобное время.
Как работать с постаматом:
- в момент оформления заказа на сайте, вы выбираете удобный для себя постамат, если такая система работает в вашем городе;
- на ваш телефон или e-mail придет уникальный код, это значит, что товар доставлен в постамат;
- вы приходите к постамату, вводите полученный код и следует инструкциям автомата;
- оплачиваете заказ в терминале постамата;
- забираете товар.
Срок хранения в постамате 3 дня, но можно продлить ещё на аналогичный срок. Чтобы уточнить информацию и продлить время хранения зайдите на сайт нашего партнера, введите номер заказа и телефон и следуйте подсказкам на сайте.
Почтовая доставка
Если в вашем городе не действует курьерская служба и постаматы, то вы можете заказать доставку через почту России. Сразу по прибытии товара, на ваш адрес придет извещение о посылке.
Перед оплатой вы можете оценить состояние коробки (не вскрывая): вес, целостность. Если вам кажется, что заказ не соответствует параметрам или коробка повреждена, попросите сотрудника почты составить акт о вскрытии. Вскрывать коробку самостоятельно вы можете только после того, как оплатили заказ.
Один заказ может содержать не больше 10 позиций и его стоимость не должна превышать 100 тысяч рублей.
Задать вопрос
Вы можете задать любой интересующий вас вопрос по товару или работе магазина.
Наши квалифицированные специалисты обязательно вам помогут.
Задать вопрос
Дополнительно
Дополнительная вкладка, для размещения информации о магазине, доставке или любого другого важного контента. Поможет вам ответить на интересующие покупателя вопросы и развеять его сомнения в покупке. Используйте её по своему усмотрению.
Вы можете убрать её или вернуть обратно, изменив одну галочку в настройках компонента. Очень удобно.
Keeler Pulsair intelliPuff

Keeler (Великобритания)
Бесконтактный пневмотонометр
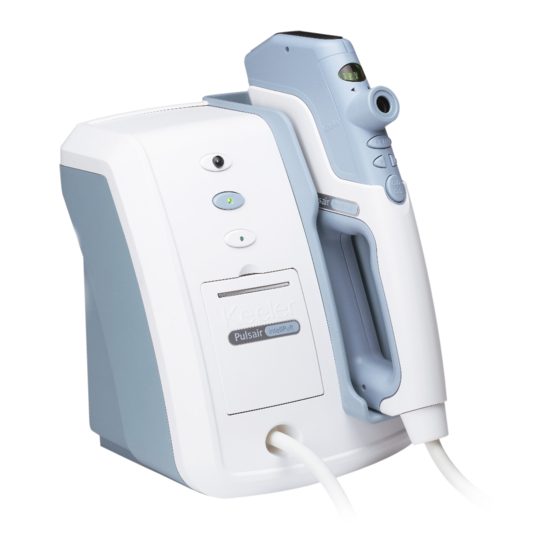
Компания Keeler реализовала бесконтактный пневмотонометр в необычном компактном форм-факторе, позволяющем разместить его на любой рабочей поверхности, включая вариант крепления на стену. Интерфейс измерения соединён с основным блоком с помощью шлангокабеля.

- Описание
- Материалы
![]()
-
Запросить
цену
Купить - Заказать
сервис - Лизинг
Пневмотонометр используется для бесконтактного измерения внутриглазного давления. Этот вид исследования необходим, в первую очередь, при глаукоме, когда повышенное внутриглазное давление является одним из основных критериев развития данной патологии. Используется для скрининга, поскольку погрешность метода достаточно велика по сравнению с классическими методами измерения по Гольдману или по Маклакову. Основное достоинство – простота, отсутствие контакта с глазом пациента, скорость проведения измерения, не требует анестезии.
Особенности
- Тонометр прост в обращении и со стороны медицинского сотрудника, и со стороны пациента
- Возможно размещение как на приборном столе, так и крепление на стене
- Усреднение 4 измерений для увеличения точности результата
- Встроенный термопринтер
- Передача данных через порт USB
Технические характеристики
| Наименование | Значение | |
|---|---|---|
| Диапазон измерений | 5 – 50 мм рт. ст. | |
| Длина шлангокабеля | 2 м | |
| Высота | Стационарный блок: 26,0 см | Ручной блок: 31,5 см |
| Ширина | Стационарный блок: 22,0 см | Ручной блок: 4,6 см |
| Длина (глубина) | Стационарный блок: 21,5 см | Ручной блок: 15,0 см |
| Масса | Стационарный блок: 2,465 кг | Ручной блок: 0,890 кг |
| Питание | 100/240 В, 50/60 Гц |
В наличии на складе по специальной цене
Все товары
Спецпредложения


Сервис
Квалифицированное техническое обслуживание, собственный сервисный центр, лицензированные инженеры


Доставка
Мы доставляем товар во все регионы страны, напрямую от производителя, прямо до двери клиента


Гарантии
Безопасная авторизация, своевременные консультации, надежная система резервирования товара
Получайте выгодные ценовые предложения первыми