Просмотров 5.2k.
Цифровое телевидение пользуется у населения большой популярностью, и через несколько лет может полностью заменить аналоговое вещание. Определенное количество каналов в высоком качестве изображения доступно в бесплатном режиме, но тем, кто хочет получить доступ к платному контенту, потребуется подключиться к услугам одного из провайдеров. Всего несколько операторов связи пользуются у потребителей высоким уровнем доверия, к таким относится и Билайн.
Использование пульта
Для подключения цифрового или IPTV телевидения понадобится определенное оборудование – специальная приставка, к которой прилагается и пульт управления. Данный провайдер предлагает абонентам ресиверы от двух производителей – Motorola или Cisco.

Универсальный девайс по умолчанию настроен на тюнеры Моторола, поэтому с другими ресиверами он может не коннектиться, и тогда потребуется дополнительная настройка. Пульт для приставки Билайн Cisco должен настраиваться мастером, но как показывает практика, этим вопросом часто вынуждены заниматься сами абоненты.
В последние годы провайдер поставляет пользователям изделия ДУ новой модели. Его легко узнать по внешнему облику, выполнен он в черном цвете, а внизу расположен логотип оператора. Наличие кнопки «SETUP» — еще одна отличительная характеристика. В редких случаях пользователю могут вручить устройство ДУ старого образца: клавиша «SETUP» на нем отсутствует или вместо нее предусмотрена кнопка «LEARN».

На нижней части девайса расположен логотип одного из двух вышеописанных производителей. При начальных настройках пульт будет привязан только к своей приставке и использование на других ресиверах невозможно. Девайс новой модели привязывается к телевизионной приставке Cisco следующим образом:
- включить ТВ приемник;
- далее нажать на кнопку «STB», удерживая ее несколько секунд;
- одновременно потребуется зажать клавиши «C» и «SETUP» и немного подождать;
- зажатые клавиши можно отпустить, если кнопка «STB» отреагировала двойным миганием;
- для проверки нажать на регулятор громкости;
- девайс готов к работе.
Если пользователь допустил ошибку на одном из этапов настройки, или что-то пошло не так, не стоит паниковать. Устройство ДУ всегда можно сбросить до заводских настроек. Стоит учесть нюанс: скорее всего, настройки по умолчанию будут действовать лишь на ресивер Motorola, поэтому для оборудования Cisco все настройки нужно будет выполнять заново.

Как разблокировать пульт от тюнера Билайн
Пульт дистанционного управления – это практичное и удобное изделие, с помощью которого можно управлять телевизором, приставкой и прочим оборудованием. Для управления ресивером Билайн Cisco используется универсальная модель. Производится она известной компанией Motorola, поэтому не стоит пугаться тому, что название марки пульта не совпадает с надписью на ресивере.
Некоторые абоненты сталкиваются с проблемой, что девайс заблокирован и не может выполнять поставленные перед ним задачи. Существует два основных метода, с помощью которых устройство ДУ можно разблокировать. Первый способ более сложный, следует самостоятельно перепрограммировать пульт в ручном режиме или обратиться за помощью к квалифицированному специалисту. Второй метод потребует выполнения определенных манипуляций в стандартном меню.

Для перепрограммирования изделия необходимо следовать следующей инструкции:
- Первым делом запустить все устройства, то есть тюнер и ТВ приемник. Главным помощником в процессе разблокирования должно стать руководство пользователя, которое поставляется вместе с тюнером.
- Документ содержит код устройства, его можно найти примерно на 19 или 20 странице эксплуатационной книжки. Данный код и будет использоваться для перепрограммирования устройства ДУ.
- Пользователь должен выбрать одну из комбинаций девайса, в зависимости от того, каким устройством он хочет управлять. Для работы с телевизором используется комбинация «SET» + «TV», для работы с приставкой — «SET» + «AUX». Независимо от комбинации, потребуется одновременное нажатие на кнопки. О том, что девайс подключился к режиму управления, скажет загоревшийся светодиодный индикатор.
- На экране должна появиться цифровая клавиатура, посредством которой вводится выбранный код устройства. После ввода найденных цифр пульт от ресивера нужно перезагрузить.
- После нажатия на настраиваемую клавишу световой индикатор должен мигнуть, а после погаснуть, что и будет означать завершение процесса.

Можно настроить пульт на приставку Cisco и другим способом. Первым шагом, как и в предыдущем случае, является включение настраиваемого оборудования. Одновременно удерживая кнопку «SET» и кнопку выбора устройства, нужно подождать около 3 секунд пока светодиодный индикатор не засветится.
Для настройки телеканалов используются клавиши со стрелками, обнаружение приставки должно произойти в автоматическом режиме. Для перехода в режим поиска нажать на одну из кнопок «Вверх» или «Вниз». Когда устройство будет найдено, пульт отключится. Одна из кнопок продолжит подсвечиваться, на нее следует нажать. Если лампочка погаснет, значит, код был введен автоматически, он сохранен в памяти устройства ДУ.
Where Do I Start?
Before you begin using your remote, complete the
following initial setup tasks.
Install the Batteries
The remote requires two AA batteries (alkaline
recommended). A diagram in the battery compartment
TV
DVD
of the remote indicates proper placement of the
STB
AUX
batteries. When batteries are properly installed, the
light on the remote blinks each time a key is
pressed.
Visit the Quick Reference Section
Use the Quick Reference section of this guide to
MENU
familiarize yourself with the remote and the functions
of its various keys. Knowing the function and location
of the keys on the remote will assist you when you are
programming the remote.
Program the Remote
TV
INFO
To learn how to program your remote, refer to the
A
B
sections What Devices Can I Control, What
Devices Do I Want to Control, and Program the
Remote to Control My Devices for further
CH
VOL
PG
MUTE
PREV
instructions.
Find a Place to Store Your Remote
1
2
3
ABC
DEF
Keeping up with one remote is much easier than
4
5
6
keeping up with four or five remotes. However, it is still
GHI
JKL
MNO
a good idea to find a storage location for your remote.
7
8
9
The AT6400 is not a toy. It should be kept out of the
PQRS
TUV
WXYZ
0
reach of children under the age of 6 years.
ENTER
DELETE
SPACE
OPTIONS
Program the Remote to
Control My Devices
Your remote is initially programmed to only operate
your set-top. You will need to set up the remote to
AT6400 AllTouch
operate your other devices using its TV, DVD, and
AUX modes. The TV key may be programmed to
operate a standard or high-definition television
IR Universal
(HDTV). The DVD key may be programmed to
operate a DVD player. The AUX key may be
Remote Control
programmed to operate a VCR, a receiver, an
amplifier, or a Home Theater in a Box (HTIB)
system. If the remote provides only limited
functionality for a device, you can look for a code
User Guide
that provides more functionality.
Welcome to the Ultimate
Quick Reference
Control Experience
Your new AT6400 AllTouch
®
Infrared (IR)
Universal Remote Control (remote) is a true
universal remote, functioning as four remotes in
TV
DVD
STB
one. As one example, you can use this remote
to operate your TELUS TV digital box (set-top),
your TV, and two other devices, such as a DVD
player and VCR.
Important Information
MENU
About Your Remote
Your remote is initially programmed to only operate
your set-top. Therefore, you must program the
remote to operate your TV, VCR, or other devices.
TV
INFO
See Program the Remote to Control My
A
C
Devices to learn how to enter device codes and
B
program your remote.
Sound
Control
VOL
Note: You must use the IR remote within line of
MUTE
PREV
sight of the set-top to operate the set-top
correctly.
1
2
3
ABC
DEF
4
5
6
How Does A Universal
GHI
JKL
MNO
7
8
9
Remote Control Work?
PQRS
TUV
WXYZ
Delete
0
ENTER
DELETE
SPACE
OPTIONS
You tell the remote which type of device you want
to operate using the four keys arched across the
top of the remote. These keys, known as mode
keys, are labeled STB, TV, DVD, and AUX.
Each mode key is associated with a specific
device. As an example, after programming the
remote, if you want the remote to operate your
TV, you simply press the TV key. Other keys you
press on the remote, thereafter, should operate
your TV. Want to switch the remote to operate a
different device? Just press the mode key for the
next device you want to operate. In this guide, you
will learn which types of devices you can control
and how to program the remote to control your
specific devices.
What If None of the Codes
Refer to the code tables at the end of this guide to
locate additional programming codes.
Work?
Note: You have the option to assign some remote
keys to operate one device type only. For example,
If none of the codes listed for your brand of device
you may want to assign volume control to the TV only.
operate the device correctly, or if your device is not
If this is the case, you can reprogram power, volume,
listed in the codes table, you can use the Auto-Search
and channel control using procedures found later in
function to search through the code library for a valid
this guide.
code. This section provides procedures for using the
Auto-Search function to search the code library for
Assigning a Device Code to a Mode
TV, DVD and AUX mode codes.
Key
Note: Read the procedures in this section thoroughly
1. Refer to the code tables at the end of this guide to
before beginning. You need to be prepared to
locate the information for the device you want to
observe the behavior of the remote.
program.
Auto-Search Features
Note: If your device is not listed, you may be able to
program the remote using the Auto-Search function.
Consider the following items when using Auto-
Go to What If None of the Codes Work for
Search:
instructions.
• The Auto-Search function begins searching from
2. Turn on the device that you want to assign to a
mode key.
the first code.
• If a valid code is not found, the green backlight blinks
3. Press and hold the appropriate mode key (TV,
twice and the remote returns to normal operation.
DVD, or AUX) on the remote, and then press and
hold the OK key.
• If any other key is pressed except PLAY, ENTER,
POWER, EXIT, REW, FF, or numeric keys 1 through
4. Release both keys and the mode keys blink twice.
4 (when programming the AUX mode key), the
5. Enter the first 4-digit setup code for the device using
mode key displays a long red flash (error message)
the numeric keys (0-9) on the remote. The mode key
and the remote returns to normal operation.
blinks three times to indicate that the code entry was
• Should the remote time out before you complete the
accepted.
Auto-Search function you must start over. This is
Notes:
indicated by one long flash of the red LED.
• When an invalid code is entered, the selected
• If the device is not listed and the Auto-Search function
mode key displays a long flash to indicate that
is unable to find a usable code, you may need to use
you have not entered the code correctly.
the original remote provided with the device.
• Should the remote time out before you complete
Auto-Searching the Code Library for
the code setup, you must start over. This is
indicated by one long flash of the red LED.
TV or DVD Mode Codes
6. Point the remote at the device, and press POWER
(Program Code 922)
to test the device.
7. Did the device power off?
Note: This procedure only applies to TVs and DVDs.
• If yes, write this code number in the table found
1. Turn on the device you that you want to assign to the
in this guide. You may need it again if the device
TV or DVD key.
code is accidentally erased.
2. Point the remote at the device.
• If no, repeat this procedure from step 3 using a
3. Press and while holding a selected mode key (TV or
different setup code.
DVD), press the OK key. For example, to search for
Note: If none of the codes listed for your brand of
a TV code, press and hold TV and OK at the same
device operate the device correctly, go to What If
time.
None of the Codes Work for instructions.
4. Release both keys and all the mode keys blink
8. Repeat this procedure for each mode key you want
twice.
to program.
Device Control
Viewing and Browsing Control
Turns devices on or off
Enables TELUS TV digital box mode
MENU
STB
functions
Device
Control
AUX
Enables TV mode functions
TV
PVR/VOD/
DVD/VCR
Control
DVD
Enables DVD mode functions
Enables AUX mode functions
AUX
Viewing
and
Browsing
PVR, VOD, DVD, VCR Control
Control
Notes:
• In STB mode, these keys control PVR and VOD
functions.
• In DVD and AUX modes, these keys may control
your DVD or VCR depending on how you have
CH
programmed the remote.
PG
TV
• Not all TELUS TV digital boxes are PVR-capable.
Records the selected program
A
Numeric
Keys
Stops DVD, VCR, VOD, or PVR content
B
Enter
Pauses DVD, VCR, VOD, or PVR content
C
Plays DVD, VCR, VOD, or PVR content
T14518
INFO
Scrolls through available TV or video input
sources
Rewinds or fast forwards through
PVR or VOD content
PREV
Skips backward or forward through
PVR or VOD content
5. Enter the programming code 9 2 2 by pressing the
numeric keys on the remote. The mode key you
selected in step 3 blinks twice to indicate a
successful entry.
6. Point the remote toward the device, and press
PLAY.
7. Your device powers off when it finds the correct
code. Then, choose one of the following options:
• Save code and exit – Press the ENTER key on
the remote to program the code in the remote and
the mode key flashes three times indicating
successful entry.
• Step forward – Press the fast-forward (FF) key
on the remote to step ahead through the codes
one at a time. Then, return to step 6.
• Step backward – Press the rewind (REW) key on
the remote to step back through the codes one at
a time. Then, return to step 6.
• Exit without saving the code – Press the EXIT
key on the remote. The selected mode key
flashes three times and returns to normal
operation.
• Send the current code – Press the POWER key
on the remote to send the current code. If the
device turns back on, press the ENTER key. If the
device does not turn on, return to step 6.
• Continue with auto-search function – Press the
PLAY key on the remote to continue with the auto-
search function. Then, return to step 6.
Auto-Searching the Code Library for
AUX Mode Codes (Program Code 922)
1. Turn on the device that you want to assign to the
AUX key.
2. Point the remote at the device.
3. Press and while holding the AUX key, press the OK
key.
4. Release both the AUX key and the OK key and all
the mode keys blink twice.
5. Enter the programming code 9 2 2 by pressing the
numeric keys on the remote. The AUX key blinks
twice indicating a successful entry.
6. Press the PLAY key, choose one of the following
device categories and then, using the number keys
on the remote, press its assigned number (1 – 4)
based on the following list:
1 = VCRs
2 = Receiver/Tuners
3 = Amplifiers
4 = HTIB
Note: The device categories are number-coded to
provide a more direct programming method.
Sound Control
Note: These keys are assigned to the TV when the
Accesses the On Demand menu
TV mode key is programmed with a valid code.
Accesses the Main Menu
Adjusts volume
VOL
Accesses the PVR list of recordings
MUTE
Mutes sound
Numeric Keys
Returns to previous screen
1
2
3
Enters channel numbers, text, and
ABC
DEF
Enables Interactive mode
4
5
6
remote codes. Also use to enter your
GHI
JKL
MNO
7
8
9
parental control PIN
PQRS
TUV
WXYZ
0
SPACE
Clears text and numbers in text fields
Moves through selections
DELETE
Enters and saves (stores) an entry or
ENTER
Selects and deselects screen items
accesses options menu
OPTIONS
Returns from menu screens and to viewing
What Devices Can I Control?
TV or video
The four mode keys arched across the top of the
remote tell the remote which device you want to
Application-defined
operate.
Application-defined / Accesses the Search
menu
TV
DVD
STB
Application-defined / Accesses Caller ID
Each mode key is associated with different types of
Displays text information about the selected
devices. You can use each mode key to control one
program
of its associated devices:
Mode Key
Associated Devices
Displays or closes the IPG
STB
TELUS TV digital box
Tunes to the previously selected channel
TV*
TVs (including HDTVs)
DVD*
DVD players
Selects the next channel, up or down, when
AUX*
VCRs, receivers, tuners, and Home
watching TV. Moves up or down one page
CH
Theater in a Box (HTIB)
PG
in the IPG and in some menu screens
*
These keys can be reassigned to control different
devices. Go to the Reassign Mode Keys section of
this guide for instructions.
7. Point the remote toward the device, and press
Some common examples:
• To program the AUX key to operate your DVD
PLAY.
player, press DVD and then AUX.
8. Your device powers off when it finds the correct
• To program the DVD key to operate your TV,
code. Then, choose one of the following options:
press TV and then DVD.
• Save code and exit – Press the ENTER key on
the remote to program the code in the remote and
Change Volume Control
the mode key flashes three times indicating
successful entry.
By default, once the TV mode key is programmed with
• Step forward – Press the fast-forward (FF) key
a valid code, the volume and mute buttons control
on the remote to step ahead through the codes
your TV. These keys adjust the volume of your TV
one at a time. Then, return to step 7.
higher, lower, or temporarily switch the volume off
(Mute), regardless of whether the remote is in STB,
• Step backward – Press the rewind (REW) key on
TV, DVD, or AUX mode.
the remote to step back through the codes one at
a time. Then, return to step 7.
If you prefer, you can choose to have the volume and
• Exit without saving the code – Press the EXIT
mute buttons always control a different device rather
key on the remote. The selected mode key
than your TV, such as a home theater receiver. (See
flashes three times and returns to normal
Controlling Volume for One Device below.) Note
operation.
that you must first program one of the mode keys,
• Send the current code – Press the POWER key
such as AUX, with a valid code for that device.
on the remote to send the current code. If the
Alternatively, you can choose to have the volume and
device turns back on, press the ENTER key. If the
mute buttons control different devices when the
device does not turn on, return to step 7.
remote is in different modes. For example, you might
• Continue with auto-search function – Press the
want to control the volume on your TV when in TV
PLAY key on the remote to continue with the auto-
mode, but the volume on your home theater receiver
search function. Then, return to step 7.
when in AUX mode. (See Controlling Volume for
Different Devices below.) Note that not all devices
Reassign Mode Keys
have volume controls, so if you choose this option, the
volume and mute buttons may do nothing in some
You can reassign a mode key to operate a different
modes, such as STB and DVD.
device. For example, you can reassign the AUX key
to operate a DVD player or a TV. If you reassign a
Controlling Volume for One Device
key, be sure you update the table found in this guide.
(Program Code 955)
Reassigning Mode Keys
1. Press and hold the STB mode key on the remote.
(Program Code 944)
2. Without releasing the STB key, press and hold the
OK key.
1. Press and hold the STB mode key on the remote.
3. Release both keys and all mode keys blink twice.
2. Without releasing the STB key, press and hold the
OK key.
4. Enter the programming code 9 5 5 by pressing the
number keys on the remote. The STB mode key
3. Release both the keys and all mode keys flash
blinks twice indicating a successful entry.
twice.
5. Press and release the mode key for the device you
4. Enter the programming code 9 4 4 by pressing the
want the volume keys to control. For example, if you
numeric keys on the remote. The STB mode key
want to control volume through your TV, press and
blinks twice indicating a successful entry.
release TV. The selected mode key blinks three
5. Press and release the mode key associated with the
times to indicate a successful entry.
type of device you want to control, the mode key
The volume keys now control only one device
should blink once. Then press and release the
whether you are in STB, TV, DVD, or AUX mode.
mode key that you want to change. The newly
assigned mode key blinks three times indicating a
Controlling Volume for Different
successful entry.
Devices (Program Code 955)
1. Complete steps 1 through 4 of the Controlling
Volume for One Device procedure.
2. Press and release the Enter key. The STB mode
LED Indicators
key blinks three times to indicate a successful entry.
There are red LEDs underneath each of the four
After you press the Enter key, the volume keys control
mode keys (STB, TV, DVD, and AUX) that flash
the device assigned to that mode. For example, in TV
each time a key is pressed to show which device
mode, the volume keys control volume for the TV only.
the key is currently controlling.
Notes:
There are also green LEDs that illuminate several
• If any other key is pressed except the Mode keys and
keys whenever the remote is in use. They stay
the ENTER key, the remote does not accept any
illuminated for a short time after a key is pressed.
changes or updates. The STB mode key displays a
long red flash and the remote returns to normal
During programming, if the remote times out before
operation.
you complete the code setup, you will need to start
over. This is indicated by one long flash of the red
• If the remote times out before you complete
LED.
programming volume control, the remote does not
accept any changes. You must start over from step
What Devices Do I Want to
1 of this procedure.
Change Channel Control
Control?
The remote is set by default to control channel
To help you keep track of the devices you want to
selection on the set-top. You can also program
control, list the type of devices you have (including
channel control to control any of the TV, DVD, or AUX
brand) in the following table. Then, use the code tables
mode devices provided the device allows for channel
at the end of this guide to locate the codes for your
control assignment. Or, you can set the channel
device. For example, look under TV Group if you
selection control programming to control channels (or
need to program the remote to operate your TV. If you
page up or down) for all of the devices programmed
have two devices that use the same key, you must
in the four mode keys. Otherwise, you can only
reassign the TV, DVD, or the AUX key. The STB key
control channels (or page up or down) on a specific
cannot be reassigned. Go to Reassign Mode Keys.
device, for example, the TV or DVD.
Otherwise, go to Program the Remote to Control
My Devices for additional instructions.
Note: The channel control keys include CH/Page,
Jump, and the numeric keys 0 through 9.
Mode
Device
AUX
Controlling Channels for One Device
Brand
Code
Key
Type
(Program Code 966)
T14519
Example:
DVD
Sony
2066
1. Press and hold the STB mode key on the remote.
DVD
2. Without releasing the STB key, press and hold the
OK key.
TV
3. Release both keys and all mode keys blink twice.
4. Enter the programming code 9 6 6 by pressing the
DVD
numeric keys on the remote. The STB mode key
blinks twice to indicate a successful entry.
5. Press and release the mode key for the device you
AUX
want the channel key to control. For example, if you
want to control channels on your TV, press and
release TV. The selected mode key blinks three
times to indicate a successful entry.
The channel key now always controls the device
associated with the mode you selected in this
procedure, whether in STB, TV, DVD, or AUX mode.
Controlling Channels for Different
Devices (Program Code 966)
1. Complete steps 1 through 4 of the Controlling
Channels for One Device procedure.
2. Press and release the Enter key. The STB mode
key blinks three times to indicate a successful
entry.
After you press the Enter key, the channel key now
controls the device associated with the mode key you
select. For example, in TV mode, the channel key
controls the TV, but in STB mode, the channel key
controls the set-top.
Notes:
• If any other key is pressed except the Mode keys
and the ENTER key, the remote does not accept
any changes or updates. The STB mode key
displays a long red flash and the remote returns to
normal operation.
• If the remote times out before you complete
programming channel selection control, the remote
does not accept any changes. You must start over
from step 1 of this procedure.
Change Power Control
The POWER key on the remote is set by default to
control the power switch on one device at a time, in
either mode (STB, TV, DVD, or AUX). When in STB
mode, the remote switches the set-top from OFF
(standby mode) to ON, or from ON to OFF (standby
mode). However, you can alternatively program the
POWER key to control the power switch on up to four
devices at the same time, instead of controlling one
device at a time. It is highly recommended that you
set up the POWER key to turn on and off your set-top
and your TV at the same time. Turning off the set-top
saves electricity and extends the life of the box. When
turned off, the set-top can still record scheduled
programs on its PVR and perform any other
necessary functions.
Controlling Power for Multiple
Devices at Once (Program Code 977)
1. Press and hold the STB mode key on the remote.
2. Without releasing the STB key, press and hold the
OK key.
3. Release both keys and all mode keys blink twice.
4. Enter the programming code 9 7 7 by pressing the
numeric keys on the remote. The STB mode key
blinks twice to indicate a successful entry.
5. For the first device, press the STB key. The STB
mode key blinks twice.
6. For the second device, press the applicable mode
key (TV, DVD, or AUX). The selected mode key
blinks twice.
7. Repeat step 6 for up to two more devices (total of
four devices).
8. Press the ENTER key to complete the power switch
control programming. The last selected mode key
blinks three times to indicate a successful entry.
Example: In an example scenario where you press
only TV in steps 6 and 7, the POWER key controls
both the set-top and the TV at the same time,
regardless of which mode the remote is in (STB, TV,
DVD, or AUX).
Controlling Power for One Device
at a Time (Program Code 977)
1. Complete steps 1 through 4 of the Controlling
Power for Multiple Devices at Once procedure.
2. Press the ENTER key to complete the power switch
control programming. The last selected mode key
blinks three times to indicate a successful entry.
After you select a mode, the POWER key controls the
device assigned to that mode. For example, in TV
mode, the remote controls power for the TV only.
Notes:
• If any other key is pressed except the Mode keys
and the ENTER key, the remote does not accept
any changes or updates. The STB mode key
displays a long red flash and the remote returns to
normal operation.
• If the remote times out before you complete
programming power switch control, the remote does
not accept any changes. You must start over from
step 1 of this procedure.
Обычно специалисты компании «Билайн», которые приходят в домой к абонентам для подключения цифрового ТВ, настраивают сразу и пульты. Но ситуации бывают разные, например, мастер, может просто забыть это сделать. Можно ли настроить универсальный пульт от приставки Билайн самостоятельно?
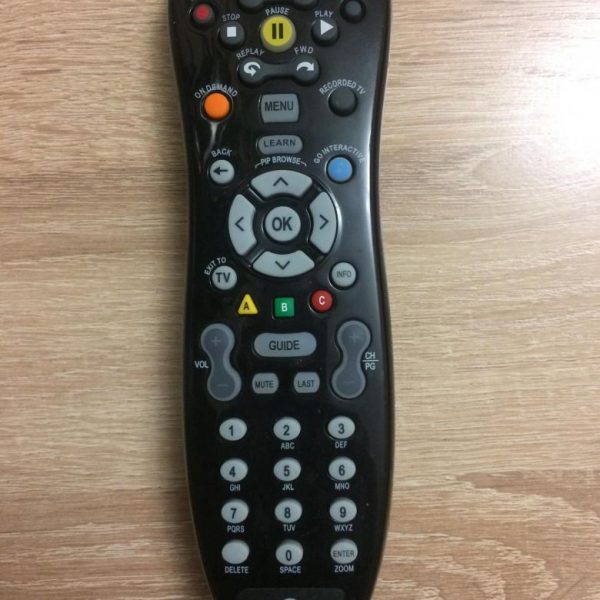
Разновидности универсального пульта от Билайна
Для просмотра цифрового ТВ от провайдера «Билайн» абоненты получают от компании специальные приставки: Motorola, Cisco или Tatung. В комплекте с устройством, конечно же, идёт пульт. Он универсальный: его можно настроить как под приставку, так и под ТВ, чтобы управлять телевизионными девайсами только одним, а не двумя пультами.
Пульты от приставок Билайна могут быть с кнопкой Setup или без неё
Есть несколько видов пультов от Билайна:
- С клавишей Setup — самые последние новые модели.
- Без клавиши Setup — устаревшие модели, поставляются уже гораздо реже. Они могут быть как чёрными, так и светлыми.
- С клавишей Learn — старые модели MXv3, где кнопка Learn занимает место Setup.
Изначально девайсы для управления привязаны только к приставке своей фирмы. Привязку легко узнать — на нижней панели устройства будет надпись: Motorola, Cisco или «Билайн».
Также с 2017 года провайдер стал поставлять своим клиентам приставки «Юпитер». Пульты Cisco, Motorola или Билайн под неё настроить нельзя — нужно использовать только пульт в её комплекте.
Подробная настройка пульта с клавишей Setup
Рассмотрим подробно процесс настройки современных моделей пульта — с клавишей Setup, которая находится под кнопкой Menu в верхней части устройства.
Достоинства пультов с кнопкой Setup
Инструменты для управления с клавишей Setup надёжнее, и их легче настраивать — кнопка Setup упрощает намного процесс. К тому же пульты с этой «волшебной» клавишей можно настроить на полное управление телевизором или плеером ДВД. Например, чтобы заходить в меню настроек ТВ без использования его родного пульта управления.
Кнопка Setup облегчает настройку пульта под телевизор, саму приставку или плеер DVD
Привязка пульта к приставкам разных фирм
Если оказалось, что ваша ТВ-приставка не реагирует на нажатия клавиш на пульте, привяжите его к устройству. Рассмотрим инструкции для приставок разных производителей.
Motorola
Начнём с более популярной приставки от компании Motorola:
- Нажмите на кнопку включения на телевизоре и на самой приставке. Подождите, пока они прогрузятся.
- Сперва вам нужно переключиться на режим приставки на пульте — для этого нажмите на кнопку STB один раз и тут же отпустите её.
- Нажмите одновременно и удерживайте пальцы на кнопке Setup и зелёной квадратной клавише В в течение нескольких секунд. Знак отпустить кнопки — двойное мигание клавиши STB. Проверьте, работает ли пульт для приставки Motorola.
Вам нужно зажать зелёный квадрат вместе с клавишей Setup
Tatung
Если у вас приставка от Tatung, сделайте следующее:
- Включите телевизионные устройства.
- Переключитесь на режим управления приставкой с помощью однократного нажатия на кнопку STB.
- Двумя пальцами нажмите одновременно на Setup и кнопку A в жёлтом треугольнике под клавишами, расположенными по кругу. Не отпускайте кнопки, пока STB не замигает (она должна загореться два раза подряд). Настройка завершена — приставка теперь должна распознавать знаки пульта.
Нажмите одновременно на жёлтый квадрат и клавишу Setup
Cisco
Как установить связь между приставкой Cisco и пультом «Билайн»:
- Включите свой телевизор и приставку.
- Щёлкните один раз по клавише STB (в самом верху, слева), чтобы включить режим управления приставкой, а не ТВ. При желании проверьте, активен ли режим управления приставкой (STB). Для этого нажмите на какую-либо клавишу на пульте — если загорится STB, значит, включён режим приставки.
Зажмите красный круг с буквой С и Setup
- Теперь сразу нажмите на две клавиши: Setup и красный круг С. Не отпускайте их до тех пор, пока кнопка STB не мигнёт вам два раза подряд.
- Проверьте, была ли активирована привязка — щёлкните по клавише громкости. Если пульт заработал для приставки, настройка завершена. Если нет, повторите все шаги снова.
Как связать клавиши для регулировки громкости с ТВ
Если вы хотите менять только уровень громкости на «телеке» с помощью пульта от приставки, сделайте следующее:
- Включите свой ТВ. Инфракрасный светодиод на пульте вверху направьте на телевизор.
- Зажмите одну клавишу Setup. Удерживайте её до тех пор, пока STB два раза не засветится. Отпускаем кнопку и кликаем по кнопке для увеличения уровня звука.
- Щёлкните по кнопке TV и тут же отпустите. Результат успешной настройки — двойное мигание клавиши TV вверху.
Удерживайте TV некоторое время — пока STB не загорится
Как «познакомить» клавиши для регулировки громкости с приставкой
Обычно клавиши громкости уже привязаны в ТВ-приставке. Но если вдруг вы поняли, что они не работают для устройства, сделайте следующее:
- Нажмите на клавишу Setup — задержите на ней палец на некоторое время. Когда STB вверху слева «подмигнёт» вам два раза, значит, пора отпустить Setup.
- Щёлкните по кнопке для увеличения уровня звука.
- Тут же нажмите на кнопку STB один раз — сразу уберите с неё палец. Посмотрите, мигнула ли клавиша STB два раза. Если да, настройка прошла успешно. Если нет, повторите процедуру.
Автоматическая настройка на полноценное управление TV или плеера DVD
Вы можете управлять телевизором с помощью пульта от Билайна. Выше мы рассмотрели привязку пульта только к громкости телевизора. Но чтобы получить полное управление телевизором или устройством DVD (например, чтобы заходить в меню с настройками, переключать каналы и прочее), нужно сделать вот что:
- Включите ТВ-устройство или DVD в зависимости от того, с каким девайсом вы хотите «познакомить» пульт.
- Один раз щёлкните по TV или DVD на пульте.
- Теперь наведите светодиод пульта на устройство.
- Зажмите и удерживайте центральную кнопку ОК, пока ТВ или DVD сам не выключится. Во время удержания система будет самостоятельно искать код управления для вашего девайса. Пульт должен быть направлен на него или хотя бы быть в зоне видимости.
- Включите обратно устройство и проверьте, работает ли пульт.
Ручная настройка пульта на полноценное управление TV или плеера DVD
Есть и ручной способ настройки полного управления. Его используйте, только если первый метод не сработал. Суть его в том, чтобы самому ввести код управления:
- Включите телевизор либо DVD-приставку.
- Направьте пульт на устройство.
- Зажмите Setup на несколько секунд — пока он не замигает два раза. После этого сразу (в течение максимум 4 секунд) напишите комбинацию цифр для вашего устройства (с учётом производителя). Комбинации для распространённых моделей представлены в таблице ниже. Если пройдёт более 4 секунд, повторите процедуру со второго шага этой инструкции.
- Если код будет правильным, клавиша Setup снова мигнёт дважды.
Таблица: коды управления для телевизоров и DVD-устройств популярных производителей
| Телевизор | Код | DVD | Код |
| Acer | 041 | Aiwa | 0037, 0000, 0032 |
| Agashi | 492 493 | Daewoo | 0278 |
| Daewoo | 002 004 005 013 015 016 097 106 135 155 193 206 213 259 362 373 379 408 410 432 443 487 492 493 500 506 527 528 529 564 592 610 640 708 | Fujitsu Siemens | 1972 |
| Dell | 141 142 146 | Hitachi | 0042, 0000, 0081, 0240 |
| Kenwood | 004 018 155 201 349 | HP | 1972 |
| Nesco | 453 522 536 | Nokia | 0104, 0046, 0048, 0042, 0081, 0240 |
| Nokia | 387 396 456 457 463 464 548 549 560 561 563 573 | Philips, Quelle, Tesla | 0081 |
| Optimus | 085 160 212 221 351 | Pioneer | 0081, 0067 |
| Orion | 023 033 107 214 363 379 391 393 395 408 412 418 448 464 475 476 498 500 502 506 515 521 542 543 544 552 636 | Samsung | 0240 |
| Panasonic | 003 010 046 049 053 096 123 140 152 203 212 226 235 242 246 247 248 250 258 265 271 273 274 291 292 322 336 339 346 348 350 351 364 365 366 367 369 387 413 414 415 435 449 463 464 467 468 482 489 498 506 526 531 537 574 580 587 594 598 600 602 619 625 632 644 680 701 | Sony | 0032, 0033, 1972 |
| Philips | 003 007 011 017 018 053 056 057 059 063 095 126 129 148 155 168 169 170 205 228 232 233 263 264 275 276 277 280 338 347 370 373 402 403 408 427 428 441 443 455 463 469 475 490 491 503 506 507 567 579 581 584 586 590 593 595 596 597 604 608 611 612 613 616 617 620 627 641 647 649 654 663 674 683 685 690 | Tashiko | 0000 |
| Phoenix | 370 408 475 492 497 506 512 527 543 | Thomson | 0060, 0067, 0278 |
| Sony | 002 037 109 128 137 199 227 230 236 240 251 255 279 284 287 304 306 327 332 356 357 374 379 392 394 395 419 439 452 454 473 479 480 501 502 505 515 577 578 589 599 605 615 629 643 661 667 699 | Toshiba | 0045, 0043, 0081 |
| Samsung | 004 005 011 014 018 019 072 073 078 094 097 098 155 180 201 210 222 244 269 307 324 343 354 368 285 288 289 290 294 295 301 305 307 343 368 372 373 374 379 395 408 424 429 431 437 438 470 473 475 477 488 492 493 494 497 500 506 512 527 528 567 569 614 618 631 637 642 705 | Texet | 0278 |
Сброс параметров к заводским
Если пульт перестал работать, но с батарейками всё в порядке, попробуйте сбросить его настройки до фабричных, а затем снова его настроить, используя инструкции выше:
- Для возврата исходных настроек сначала переключитесь на режим STB — просто щёлкните по одноимённой кнопке и сразу её отпустите.
- Задержите теперь палец на клавише Setup на некоторое время — пока она не мигнёт вам дважды.
- После этого уберите палец и нажмите поочерёдно на цифры 9, 7, 7. Клавиша STB должна «проморгать» 4 раза — это будет означать, что пульт вернулся к фабричным параметрам.
Подробная настройка пульта без клавиши Setup
Если вам попался пульт без «магической» кнопки Setup, которая мгновенно настраивает привязку, используйте инструкции ниже.
Недостатки этого типа пультов
Главный минус пультов без клавиши Setup — они не могут получить полную власть для управления телевизором или другим устройством (не приставкой). Заходить в меню настроек ТВ вы не сможете — только с использованием родного пульта телевизора. Тем не менее можно настроить привязку основных клавишей: для выключения устройства, смены громкости и каналов.
Эти устаревшие модели пультов способны полноценно работать только с приставкой (Motorola или Cisco — зависит от того, в комплекте с какой приставкой идёт пульт).
Кроме этого, настройка привязки более сложная, чем в случае с пультами с кнопкой Setup.
Как привязать пульт к TV или плееру DVD (чтобы можно было включать девайс, регулировать громкость и менять каналы)
Есть ручной и автоматический способ настройки. Второй метод работает в большинстве случаев, поэтому рассмотрим его:
- Включите телевизор или плеер DVD.
- Зажмите клавишу TV или DVD. Не отпуская её, щёлкните по ОК и тоже задержите на ней палец.
Нажмите на режим управления DVD или TV
- Обе клавиши отпустите через пару секунд. После этого индикаторы всех кнопок «моргнут» дважды.
- Напишите комбинацию 922. Кнопка TV или ДВД (зависит от того, что вы нажимали во втором шаге) дважды мигнёт.
- Снова направьте пульт на девайс и щёлкните по Play. Начнётся автоматический поиск кода управления для вашего устройства. Если девайс выключится, значит, код был подобран — нажмите на «Энтер» для сохранения настроек. Пульт продолжайте при этом направлять на ТВ или ДВД.
- Если в течение 5 минут устройство не выключилось, запустите ручной поиск. Снова выполните пять предыдущих шагов. Нажмите после этого на FF, а потом на кнопку питания Power. Через каждую секунду продолжайте щёлкать сначала по FF, а потом на центральную Power, пока девайс не отключится. Когда это произойдёт, щёлкните по «Энтер» для сохранения.
Как привязать клавишу управления громкостью
Если вы хотите использовать для телевизора только кнопки для увеличения или уменьшения громкости, сделайте следующее:
- Щёлкните сначала по STB, а затем с зажатой STB нажмите на ОК и подождите пару секунд. Отпускаем кнопки — они вам мигнули дважды.
- Напишите комбинацию 955. Кнопка STB дважды мигнёт.
- Щёлкаем по кнопке ТВ или ДВД на пульте в зависимости от устройства, с которым устанавливается связь. Кнопка мигнёт вам трижды. На этом настройка завершена.
Управление каналами
Если пульт вам нужен только для переключения между каналами на ТВ, выполните такие шаги:
- Зажмите кнопку STB. Не отпускайте её — щёлкните по ОК. Уберите пальцы уже с двух клавиш через пару секунд. В ответ они два раза загорятся.
- Напишите с помощью пульта комбинацию 966 — STB снова мигнёт два раза, но уже без кнопки ОК.
- Щёлкните по ТВ или ДВД на пульте в зависимости от того, что с ним связываете — телевизор или плеер. Эта же клавиша трижды заморгает. Теперь вы можете переключать каналы вне зависимости от режима, выбранного в данный момент на пульте.
Управление питанием
Настройте пульт на включение и выключение сразу и приставки, и телевизора вне зависимости от активного режима пульта:
- Щёлкните по STB. Удержите на ней палец и нажмите на ОК. Уберите пальцы с кнопок одновременно через пару секунд. Если индикаторы клавиши загорелись два раза, идём дальше.
- Набираем комбинацию 977 — кнопка STB сразу «проморгает» два раза.
Введите код 977 с помощью нижней панели пульта
- Щёлкните снова по ней же и дождитесь двойного мигания — это мы настроили кнопку Power на приставку ТВ.
- Теперь настраиваем на сам телевизор: щёлкните по TV вверху. Если хотите привязать к плееру, нажмите на DVD. Индикатор нажатой клавиши должен мигнуть и опять же два раза. Всего таким образом можно привязать до 4 девайсов.
- Чтобы закончить настройку, щёлкните по «Энтер» (сразу отпустите кнопку). Клавиша загорится трижды.
Сброс настроек к заводским
Если настроили пульт не так, как вам изначально хотелось, либо если он перестал работать, верните его фабричные параметры и настройте его заново:
- Включите режим настройки на пульте: с удержанной кнопкой STB щёлкните по ОК.
- Через две секунды отпустите кнопки — они загорятся.
- Напишите 900. Если всё сделали верно, кнопка STB мигнёт 4 раза.
Настройка устаревшей модели пульта от Билайна с кнопкой Learn
Пульты с клавишей Learn всё ещё могут быть у некоторых абонентов Билайна, несмотря на то, что они ещё старше моделей без кнопки Setup, так как эти пульты служат пользователям очень долго.
Программирование пульта для работы с устройствами
Сама кнопка Learn позволяет «обучать» универсальный пульт командам, которые вы обычно делаете через оригинальный пульт устройства. Подробно расскажем о том, как проходит запись команд:
- Задержите кнопку режима ТВ или ДВД — в зависимости от того, с каким девайсом вы хотите «познакомить» пульт. Всё ещё удерживая клавишу режима, щёлкните по Learn и так же задержите на ней палец. Две кнопки отпускаем через секунду.
- Клавиши всех режимов сверху на пульте загорятся, потом останется гореть только светодиод выбранной в начале кнопки.
- На пульте Билайна щёлкните по клавише, которую нужно «обучить» команде.
Кнопка Learn запускает процесс обучения универсального пульта
- Направьте родной пульт устройства на нижнюю панель пульта Билайна. Между двумя устройствами должно быть около 2 см.
- Щёлкните на оригинальном пульте по кнопке, которую нужно перенести на пульт Билайна. Удерживайте её, пока клавиша выбранного ранее режима (на пульте Билайна) не потухнет, а затем снова не загорится.
- Если клавиша режима станет мигать, повторите всё сначала — в обучении произошёл сбой. Таким же образом дайте пульту Билайна выучить все остальные клавиши с родного пульта ТВ или ДВД.
- Когда запишете все кнопки, щёлкните по Learn, чтобы завершить обучение пульта.
Программирование устройств для работы с пультом
Чтобы привязать какой-либо девайс к пульту Билайна, следуйте небольшой инструкции:
- Включите телевизор или плеер ДВД (то, что вы хотите связать с пультом). Направьте на него инфракрасный светодиод пульта.
- Зажмите сначала кнопку ТВ или ДВД, а затем и ОК вместе с ней. Одну секунду держим клавиши и убираем пальцы.
- В ответ клавиши с режимами замигают, а затем потухнут — ТВ или ДВД останется гореть.
- Зажмите клавишу Power на пульте, пока девайс не выключится.
- Чтобы сохранить параметры, щёлкните по ОК. Пульт определит код устройства — клавиша режима, которая раньше горела, погаснет.
Настройка громкости
Если вы хотите, чтобы пульт с кнопкой Learn регулировал громкость на всех ваших телевизионных устройствах, сделайте следующее:
- Зажмите клавишу TV. Удерживайте её и одновременно щёлкните по ОК. Не отпускайте кнопки ещё секунду — две.
- Когда уберёте пальцы с двух кнопок, все клавиши, посвящённые режимам пульта, загорятся. Затем все, кроме TV, потухнут.
- Щёлкните по Mute и задержите на ней палец, пока клавиша ТВ не потухнет, а затем вновь засветится (нужно не менее 3 секунд на это).
- Когда отпустите кнопку Mute, снова щёлкните по ней — так вы сохраните все настройки.
- После этого клавиша ТВ перестанет гореть — это будет означать успешное завершение настройки.
Настройка подсветки пульта
Чтобы заряд батареек в пульте так быстро не исчезал, вы можете деактивировать режим подсветки кнопок. Сделать это просто:
- Повторите первые два шага из предыдущей инструкции.
- Теперь просто щёлкните по Guide. Все индикаторы перестанут гореть.
- Если захотите включить свет для кнопок снова, выполните те же шаги.
Сброс настроек к заводским
Если возникли какие-либо неполадки с пультом, верните его к начальным настройкам:
- Повторите первые два шага из инструкции «Настройки громкости».
- Когда останется гореть TV, в течение 3 секунд задержите клавишу Delete.
- За это время клавиша TV мигнёт один раз, а затем потухнет. Это будет означать, что сброс был выполнен.
Проще всего настраивать современные модели пультов — с кнопкой Setup. Их плюс ещё в том, что они могут полноценно заменить родной пульт от телевизора или плеера ДВД. Таким образом, вам не нужно брать в руки сразу два пульта — выполняйте все манипуляции для приставки и ТВ с помощью устройства от Билайна. Пульты без кнопки Setup или с кнопкой Learn вместо Setup попадаются гораздо реже. Первые можно настроить только на включение ТВ, уменьшение его громкости или переключение каналов. Полное управление, активировать, увы, не получится.
- Распечатать
Оцените статью:
- 5
- 4
- 3
- 2
- 1
(9 голосов, среднее: 3 из 5)
Поделитесь с друзьями!
Если вы используете телевизионную приставку Билайн Cisco и не знаете, как настроить пульт дистанционного управления, то эта статья поможет вам.
Пульт дистанционного управления — важный атрибут телевизионной приставки. Настроив пульт, вы сможете управлять приставкой и не выходить из-под уютного пледа. Наша пошаговая инструкция поможет настроить пульт быстро и легко.
Для настройки пульта потребуется всего несколько шагов. Необходимо учесть, что процедура настройки может незначительно отличаться в зависимости от модели пульта. В любом случае, наша инструкция подойдет для большинства моделей.
Содержание
- Разборка пульта
- Шаг 1: Откройте заднюю крышку пульта
- Шаг 2: Выньте батареи
- Шаг 3: Разберите пульт на две части
- Шаг 4: Уберите пыль и грязь
- Шаг 5: Соберите пульт обратно
- Важно!
- Подготовка к пользованию
- Шаг 1: Проверка наличия всех необходимых элементов
- Шаг 2: Установка батареек
- Шаг 3: Проверка работы пульта
- Подключение к телевизору
- Шаг 1:
- Шаг 2:
- Шаг 3:
- Шаг 4:
- Шаг 5:
- Подключение к интернету
- Выбор провайдера
- Выбор тарифного плана
- Подключение к сети
- Установка настроек
- Шаг 1. Нажмите на кнопку «SETUP»
- Шаг 2. Выберите «TV»
- Шаг 3. Введите код телевизора
- Шаг 4. Проверьте работу пульта
- Шаг 5. Добавьте дополнительные настройки
- Программирование кнопок
- Шаг 1: Вход в меню настроек
- Шаг 2: Выбор кнопок
- Шаг 3: Программирование кнопок
- Решение возможных проблем
- Не работает пульт
- Не реагирует на нажатия
- Другие проблемы
- Вопрос-ответ
- Какой код нужно ввести на пульте, чтобы уменьшить громкость звука при просмотре на тв приставке Билайн Cisco?
- Что делать, если пульт не реагирует на нажатия кнопок?
- Где найти дополнительные настройки на пульте Билайн Cisco?
- Как настроить пульт на работу с телевизором другой марки?
- Могут ли кнопки на пульте быть переназначены для управления другими устройствами?
- Как настроить звук на приставке?
- Как настроить приставку для смотрения телевизора используя мобильный интернет?
Разборка пульта
Шаг 1: Откройте заднюю крышку пульта
Переверните пульт и найдите фиксатор, расположенный на задней крышке. Нажмите на него и одновременно отодвиньте крышку вверх.
Шаг 2: Выньте батареи
Выньте батареи из отверстий внутренней стороны пульта и положите их в безопасное место, чтобы не потерять.
Шаг 3: Разберите пульт на две части
Обращая внимание на небольшие заводские крепления, разберите пульт на две части: верхнюю и нижнюю. Верхнюю часть пульта можно особо не трогать, внимание обращайте на нижнюю.
Шаг 4: Уберите пыль и грязь
Осмотрите и выньте пластиковые кнопки. Определите наличие пыли, грязи или каких-то посторонних предметов. Если есть — очистите с помощью мягкой щетки.
Шаг 5: Соберите пульт обратно
Верните пластиковые кнопки на свои места и соберите пульт в обратном порядке. Закрепите две части пульта и убедитесь в их крепости.
Важно!
- Перед выполнением разборки пульта убедитесь, что он выключен.
- Не нажимайте слишком сильно на кнопки во избежание повреждения пульта.
- Никогда не используйте жесткие инструменты для разборки пульта, это может повредить детали.
Подготовка к пользованию
Шаг 1: Проверка наличия всех необходимых элементов
Перед тем, как использовать пульт от тв приставки Билайн Cisco, необходимо убедиться в наличии всех необходимых элементов. В состав пульта должны входить: сам пульт, батарейки и инструкция по пользованию. Если хоть один элемент отсутствует, свяжитесь с службой поддержки Билайн.
Шаг 2: Установка батареек
Для работы пульта необходимо установить батарейки. Убедитесь, что батарейки соответствуют типу, указанному в инструкции. Обычно это две батарейки типа AAA.
Чтобы установить батарейки, нужно найти отсек для батареек на задней стороне пульта. Отсек пульта может закрываться крышкой или иметь специальную защелку. Установите батарейки в соответствии с указаниями на отсеке и закройте крышку.
Шаг 3: Проверка работы пульта
После установки батареек пульт готов к работе. Проверьте его работоспособность, нажав любую из кнопок пульта. Если пульт работает, значит, он готов к использованию.
Следуя этим простым шагам, вы готовы начать пользоваться пультом от тв приставки Билайн Cisco. Удачного использования!
Подключение к телевизору
Шаг 1:
Для подключения телевизора и тв приставки необходимо использовать кабель HDMI.
Шаг 2:
Подключите один конец кабеля к разъему HDMI на телевизоре.
Шаг 3:
Подключите другой конец кабеля к соответствующему разъему на тв приставке билайн cisco.
Шаг 4:
Убедитесь, что телевизор и тв приставка включены.
Шаг 5:
Для настройки пульта от тв приставки билайн cisco следуйте инструкции, предоставленной в комплекте.
Подключение к интернету
Выбор провайдера
Первым шагом для подключения к интернету является выбор провайдера. Необходимо ознакомиться с тарифами и услугами различных компаний и выбрать наиболее подходящий вариант в соответствии со своими потребностями.
Выбор тарифного плана
После выбора провайдера необходимо выбрать тарифный план, который наилучшим образом соответствует потребностям пользователя. Необходимо обратить внимание на скорость интернета, количество трафика и стоимость услуг.
Подключение к сети
Для подключения к интернету необходимо иметь соответствующее оборудование — модем или роутер. После подключения оборудования провайдер предоставляет настройки, которые необходимо включить в настройки модема или роутера. После этого можно подключиться к интернету и начать пользоваться услугами провайдера.
- Необходимо следить за качеством и стабильностью интернет-соединения, чтобы не возникали проблемы со скоростью и качеством передачи данных.
- Также следует обращать внимание на безопасность при работе в интернете, используя антивирусное и антифишинговое программное обеспечение.
Установка настроек
Шаг 1. Нажмите на кнопку «SETUP»
Для начала установки настроек пульта нажмите на кнопку «SETUP».
Шаг 2. Выберите «TV»
На экране появится меню настроек, в котором необходимо выбрать пункт «TV».
Шаг 3. Введите код телевизора
Настройка пульта связывается с вашим телевизором. Для этого нужно ввести коды телевизора. Коды наиболее популярных брендов можно найти в инструкции к пульту или на сайте производителя пульта и телевизора. Введите код для вашего телевизора и нажмите «OK».
Шаг 4. Проверьте работу пульта
После ввода кода пульт должен заработать и вы должны убедиться в его работоспособности. Проверьте, работает ли пульт правильно, управляя телевизором.
Шаг 5. Добавьте дополнительные настройки
После установки основных настроек, вы можете добавить дополнительные, например, настройку звука, режима экрана или другие опции. Для этого выберите соответствующий пункт меню и следуйте инструкциям на экране.
Программирование кнопок
После успешного подключения пульта к тв-приставке, необходимо настроить кнопки для удобного использования. Благодаря функции программирования кнопок, можно присвоить определенные функции каждой кнопке на пульте.
Шаг 1: Вход в меню настроек
Нажмите на кнопку «Меню» на пульте и выберите пункт «Настройки» на экране тв-приставки.
Шаг 2: Выбор кнопок
В меню настроек выберите раздел «Программирование кнопок» или «Управление пультом». Однако, название может отличаться в зависимости от модели тв-приставки.
Шаг 3: Программирование кнопок
Выберите кнопку на пульте, которую нужно настроить и назначьте желаемые функции, используя опции в меню. Обычно, есть возможность выбрать функции из списка предустановленных опций. Если же требуется настроить определенную функцию, которой нету в списке, нужно ввести код на основе инструкции к устройству.
После программирования кнопок, сохраните настройки и проверьте их работу, нажимая на каждую кнопку на пульте и следите за реакцией тв-приставки.
Решение возможных проблем
Не работает пульт
Если пульт от тв приставки Билайн Cisco не работает, попробуйте:
- Проверить, вставлены ли батарейки в пульт и правильно ли они установлены
- Перезагрузить тв приставку, отключив ее от электрической розетки и подключив ее снова
- Проверить, не поврежден ли пульт, и не имеет ли он других видимых проблем
- Проверить, находится ли тв приставка и пульт в зоне видимости друг друга
Не реагирует на нажатия
Если пульт работает, но тв приставка не реагирует на нажатия, попробуйте:
- Проверить, что вы нажимаете на правильные кнопки и нажимаете их достаточно долго
- Проверить, не заблокирован ли пульт для работы с тв приставкой (некоторые пульты имеют такую функцию)
- Перезагрузить тв приставку и попробовать снова
- Проверить, нет ли других устройств в зоне видимости тв приставки и пульта, которые могут мешать работе
Другие проблемы
Если у вас также возникли другие проблемы с пультом от тв приставки Билайн Cisco, вы можете:
- Обратиться за помощью к технической поддержке Билайн
- Попробовать использовать другой пульт, если у вас есть такая возможность
- Проверить, что тв приставка работает нормально и что проблема не связана именно с пультом
Вопрос-ответ
Какой код нужно ввести на пульте, чтобы уменьшить громкость звука при просмотре на тв приставке Билайн Cisco?
На пульте нужно нажать кнопку «Vol -«.
Что делать, если пульт не реагирует на нажатия кнопок?
Попробуйте заменить батарейки в пульте или проверить его на работоспособность. Если проблема не исчезает, обратитесь в техническую поддержку Билайн Cisco.
Где найти дополнительные настройки на пульте Билайн Cisco?
Активируйте меню на пульте, нажав кнопку «Menu», и выберите в разделе «Settings».
Как настроить пульт на работу с телевизором другой марки?
Настройка пульта на другой марке телевизора может быть выполнена путем ввода кода на пульте, указанного в инструкции. Также, в настройках пульта может быть выполнено автоматическое сканирование.
Могут ли кнопки на пульте быть переназначены для управления другими устройствами?
Нет, на пульте можно настроить только работу с тв приставкой Билайн Cisco.
Как настроить звук на приставке?
Настройка звука на Билайн Cisco может быть выполнена из меню настроек пульта или в меню тв приставки, используя удаленный доступ.
Как настроить приставку для смотрения телевизора используя мобильный интернет?
Для настройки тв приставки на работу с мобильным интернетом следует обратиться в техническую поддержку Билайн Cisco или выполнить настройки автоматически.
Where Do I Start?
Before you begin using your remote, complete the
following initial setup tasks.
Install the Batteries
The remote requires two AA batteries (alkaline
recommended). A diagram in the battery compartment
of the remote indicates proper placement of the
TV
DVD
batteries. When batteries are properly installed, the
STB
AUX
light on the remote blinks each time a key is
pressed.
About HomeID
The set-top is equipped with an RF receiver.
Programming the HomeID in the remote is necessary
when RF is used to transmit signals to the set-top
MENU
from the remote in order to limit interference with
set-tops in other rooms or in your neighbors’ homes.
Go to the Program HomeID section of this guide for
instructions.
Note: The remote uses IR signals when programming
TV
the HomeID and to control devices other than the
C
set-top.
A
B
Program the Remote to Control
GUIDE
CH
VOL
PG
My Devices
MUTE
LAST
MUTE
LAST
Your remote is initially programmed to only operate
1
2
3
your set-top. You will need to set up the remote to
ABC
DEF
operate your other devices using its TV, DVD, and
4
5
6
AUX modes. The TV key may be programmed to
GHI
JKL
MNO
7
8
9
operate a standard or high-definition television
PQRS
TUV
WXYZ
(HDTV). The DVD key may be programmed to
0
ENTER
operate a DVD player. The AUX key may be
DELETE
SPACE
ZOOM
programmed to operate a VCR, a receiver, an
amplifier, or a Home Theater in a Box (HTIB)
system. If the remote provides only limited
functionality for a device, you can look for a code
that provides more functionality. Refer to the code
tables at the end of this guide to locate additional
programming codes.
AT6420 AllTouch
Note: You have the option to assign some remote
RF and IR Universal
keys to operate one device type only. For example,
you may want to assign volume control to the TV only.
If this is the case, you can reprogram power, volume,
Remote Control
and channel control using procedures found later in
this guide.
User Guide
Welcome to the Ultimate
Quick Reference
Control Experience
Notes:
• You must program a HomeID before using this
Your new AT6420 AllTouch
®
Radio Frequency
(RF) and Infrared (IR) Universal Remote Control
remote.
• You must also program a Decoder ID if you are
(remote) is a true universal remote, functioning as
four remotes in one. As one example, you can use
using multiple remotes per set-top.
this remote to operate your set-top, your TV, and
two other devices, such as a DVD player and
What Devices Can I Control?
VCR.
The four mode keys arched across the top of the
remote tell the remote which device you want to
Important Information About
operate.
Your Remote
Your remote is initially programmed to only operate
your set-top. Therefore, you must program the
TV
STB
remote to operate your TV, VCR, or other devices.
See Program the Remote to Control My
Devices to learn how to enter device codes and
program your remote.
Each mode key is associated with different types of
Notes:
devices. You can use each mode key to control one
• You must program a HomeID before using this
of its associated devices:
remote.
Mode Key
Associated Devices
• You must also program a Decoder ID if you are
STB
IP gateway set-top
using multiple remotes per set-top.
TV*
TVs (including HDTVs)
How Does A Universal Remote
DVD*
DVD players
Control Work?
AUX*
VCRs, receivers, tuners, and
Home Theater in a Box (HTIB)
You tell the remote which type of device you want
to operate using the four keys arched across the
* These keys can be reassigned to control different
top of the remote. These keys, known as mode
devices. Go to the Reassign Mode Keys section
keys, are labeled STB, TV, DVD, and AUX.
of this guide for instructions.
Each mode key is associated with a specific
device. As an example, after programming the
LED Indicators
remote, if you want the remote to operate your
There are red LEDs underneath each of the four mode
TV, you simply press the TV key. Other keys you
press on the remote, thereafter, should operate
keys (STB, TV, DVD, and AUX) that flash each time
a key is pressed to show which device the key is
your TV. Want to switch the remote to operate a
currently controlling.
different device? Just press the mode key for the
next device you want to operate. In this guide, you
There are also green LEDs that illuminate several
will learn which types of devices you can control
keys whenever the remote is in use. They stay
and how to program the remote to control your
illuminated for a short time after a key is pressed.
specific devices.
During programming, if the remote times out before
you complete the code setup, you will need to start
over. This is indicated by one long flash of the red
LED.
Assigning a Device Code to a Mode Key
Note: Read the procedures in this section thoroughly
before beginning. You need to be prepared to
1. Refer to the code tables at the end of this guide to
observe the behavior of the remote.
locate the information for the device you want to
program.
Auto-Search Features
Note: If your device is not listed, you may be able to
Consider the following items when using Auto-
program the remote using the Auto-Search function.
Search:
Go to What If None of the Codes Work for
instructions.
• The Auto-Search function begins searching from
2. Turn on the device that you want to assign to a
the first code.
mode key.
• If a valid code is not found, the green backlight blinks
3. Press and hold the appropriate mode key (TV,
twice and the remote returns to normal operation.
DVD, or AUX) on the remote, and then press and
• If any other key is pressed except PLAY, ENTER,
hold the OK key.
POWER, EXIT, REW, FF, or numeric keys 1 through
4. Release both keys and the mode keys blink twice.
4 (when programming the AUX mode key), the
mode key displays a long red flash (error message)
5. Enter the first 4-digit setup code for the device using
and the remote returns to normal operation.
the numeric keys (0-9) on the remote. The mode key
• Should the remote time-out before you complete the
blinks three times to indicate that the code entry was
accepted.
Auto-Search function you must start over. This is
indicated by one long flash of the red LED.
Notes:
• If the device is not listed and the Auto-Search function
• When an invalid code is entered, the selected
is unable to find a usable code, you may need to use
mode key displays a long flash to indicate that
the original remote provided with the device.
you have not entered the code correctly.
Auto-Searching the Code Library for
• Should the remote time-out before you complete
the code setup, you must start over. This is
TV or DVD Mode Codes
indicated by one long flash of the red LED.
(Program Code 922)
6. Point the remote at the device, and press POWER
to test the device.
Note: This procedure only applies to TVs and DVDs.
7. Did the device power off?
1. Turn on the device you that you want to assign to the
• If yes, write this code number in the table found
TV or DVD key.
in this guide. You may need it again if the device
2. Point the remote at the device.
code is accidentally erased.
3. Press and while holding a selected mode key (TV or
• If no, repeat this procedure from step 3 using a
DVD), press the OK key. For example, to search for
different setup code.
a TV code, press and hold TV and OK at the same
Note: If none of the codes listed for your brand of
time.
device operate the device correctly, go to What If
4. Release both keys and all the mode keys blink
None of the Codes Work for instructions.
twice.
8. Repeat this procedure for each mode key you want
5. Enter the programming code 9 2 2 by pressing the
to program.
numeric keys on the remote. The mode key you
What If None of the Codes Work?
selected in step 3 blinks twice to indicate a
successful entry.
If none of the codes listed for your brand of device
6. Point the remote toward the device, and press
operate the device correctly, or if your device is not
PLAY.
listed in the codes table, you can use the Auto-Search
7. Your device powers off when it finds the correct
function to search through the code library for a valid
code. Then, choose one of the following options:
code. This section provides procedures for using the
Auto-Search function to search the code library for
• Save code and exit – Press the ENTER key on
TV, DVD and AUX mode codes.
the remote to program the code in the remote and
the mode key flashes three times indicating
successful entry.
Device Control
Device
TV
DVD
STB
AUX
Control
STB
DVR/VOD/
DVD/VCR
TV
Control
DVD
MENU
Viewing
AUX
and
Browsing
Control
DVR, VOD, DVD, VCR Control
TV
Notes:
A
C
B
• In STB mode, these keys control DVR and VOD
Sound
functions.
DVD
Control
GUIDE
CH
• In DVD and AUX modes, these keys may control
VOL
AUX
PG
MUTE
LAST
MUTE
LAST
your DVD or VCR depending on how you have
programmed the remote.
1
2
3
T12121
ABC
DEF
Numeric
4
5
6
GHI
JKL
MNO
Keys
7
8
9
PQRS
TUV
WXYZ
Delete
0
Enter
ENTER
DELETE
SPACE
ZOOM
T12120
Device Program Codes
If you program codes to control your devices, record
the codes here for easy reference.
Mode
Device
Brand
Code
Key
Type
DVD
Sony
2066
Viewing and Browsing Control
Example:
TV
DVD
AUX
MENU
Record Your HomeID Code Here:
____________________________________
Record Your Decoder ID Code Here:
_____________________________
• Step forward – Press the fast-forward (FF) key
on the remote to step ahead through the codes
one at a time. Then, return to step 6.
• Step backward – Press the rewind (REW) key on
the remote to step back through the codes one at
a time. Then, return to step 6.
• Exit without saving the code – Press the EXIT
key on the remote. The selected mode key
flashes three times and returns to normal
operation.
• Send the current code – Press the POWER key
on the remote to send the current code. If the
device turns back on, press the ENTER key. If the
device does not turn on, return to step 6.
• Continue with auto-search function – Press the
PLAY key on the remote to continue with the auto-
search function. Then, return to step 6.
Auto-Searching the Code Library for
AUX Mode Codes (Program Code 922)
1. Turn on the device that you want to assign to the
AUX key.
2. Point the remote at the device.
3. Press and while holding the AUX key, press the OK
key.
4. Release both the AUX key and the OK key and all
the mode keys blink twice.
5. Enter the programming code 9 2 2 by pressing the
numeric keys on the remote. The AUX key blinks
twice indicating a successful entry.
6. Press the PLAY key, choose one of the following
device categories and then, using the number keys
on the remote, press its assigned number (1 – 4)
based on the following list:
1 = VCRs
2 = Receiver/Tuners
3 = Amplifiers
4 = HTIB
Note: The device categories are number-coded to
provide a more direct programming method.
7. Point the remote toward the device, and press
PLAY.
8. Your device powers off when it finds the correct
code. Then, choose one of the following options:
• Save code and exit – Press the ENTER key on
the remote to program the code in the remote and
the mode key flashes three times indicating
successful entry.
• Step forward – Press the fast-forward (FF) key
on the remote to step ahead through the codes
one at a time. Then, return to step 7.
Viewing and Browsing Control
Turns devices on or off
Moves through selections
Enables set-top mode functions
Selects and deselects screen items
Enables TV mode functions
Clears all menu screens and returns to
TV
broadcast TV
Enables DVD mode functions
Selects options in menus and the
C
A
B
program guide
Enables AUX mode functions
Displays text information about the
selected program
Displays or closes the IPG
Returns to last channel viewed
LAST
Selects the next channel, up or down,
when watching TV. Moves up or down
CH
PG
one pagein the IPG and in some menu
screens
Records the selected program
Sound Control
Stops DVD, VCR, VOD, or DVR content
Note: These keys are assigned to the TV when
the TV mode key is programmed with a valid
Pauses DVD, VCR, VOD, or DVR content
code.
Plays DVD, VCR, VOD, or DVR content
Adjusts volume
Scrolls through available TV or video input
VOL
sources
Mutes sound
MUTE
Rewinds or fast forwards through
DVR or VOD content
Numeric Keys
1
2
3
Skips backward or forward through
Enters channel numbers, text, and
ABC
DEF
4
5
6
DVR or VOD content
remote codes. Also use to enter your
GHI
JKL
MNO
7
8
9
parental control PIN
PQRS
TUV
WXYZ
0
SPACE
Clears text and numbers in text fields
DELETE
Enters and saves (stores) an entry. Sizes
Accesses the On Demand Menu
the picture for some high-definition
ENTER
ZOOM
television (HDTV) models
Returns to the previous screen
Accesses the Main Menu
Accesses the DVR list of recordings
Enables interactive mode
• Step backward – Press the rewind (REW) key on
Notes:
the remote to step back through the codes one at
• If any other key is pressed except the number keys
a time. Then, return to step 7.
and the ENTER key, the remote will not accept any
changes or updates. The STB mode key will display
• Exit without saving the code – Press the EXIT
key on the remote. The selected mode key
a long red flash and the remote returns to normal
operation.
flashes three times and returns to normal
operation.
• If the remote times out before you complete
programming the HomeID code, the remote will not
• Send the current code – Press the POWER key
on the remote to send the current code. If the
accept any changes. You will have to start over from
step 1 of this procedure.
device turns back on, press the ENTER key. If the
device does not turn on, return to step 7.
Program Decoder ID
• Continue with auto-search function – Press the
(Program Code 912)
PLAY key on the remote to continue with the auto-
search function. Then, return to step 7.
Programming the Decoder ID is necessary to identify
Reassign Mode Keys
each set-top box assigned to different rooms in the
home or office. All RF devices have the Decoder ID
You can reassign a mode key to operate a different
set to 00 by default. Complete the following steps to
device. For example, you can reassign the AUX key
set a new Decoder ID.
to operate a DVD player or a TV. If you reassign a
key, be sure you update the table found in this guide.
1. Ensure that the set-top is plugged into an electrical
outlet and that you have the remote in the same
Reassigning Mode Keys
room as the set-top.
(Program Code 944)
2. Press and hold the STB mode key on the remote.
3. Without releasing the STB mode key, press and
1. Press and hold the STB mode key on the remote.
hold the OK key.
2. Without releasing the STB key, press and hold the
4. Release both the STB mode key and the OK key.
OK key.
You should see all the mode keys flash red two
3. Release both the keys and all mode keys flash
times. This indicates that you are now ready to enter
twice.
the Decoder ID code.
4. Enter the programming code 9 4 4 by pressing the
5. Enter the 3-digit code 9 1 2 by pressing the number
numeric keys on the remote. The STB mode key
keys on the remote. You should see the STB mode
blinks twice indicating a successful entry.
key flash red two times. This indicates that you have
5. Press and release the mode key associated with the
successfully entered the code.
type of device you want to control, and then press
6. Now enter your own Decoder ID choice of either 1,
and release the mode key that you want to change.
2, or 3 by pressing the number keys on the remote.
The newly assigned mode key blinks one time
This will be your unique new Decoder ID code. Be
indicating a successful entry.
sure to record your new Decoder ID in the space
For example: To program the AUX key to operate
provided at the end of this section.
your DVD player, press DVD and then AUX.
Notes:
Program HomeID
• If a valid Decoder ID code is entered, the STB mode
key will flash red three times. This indicates that
(Program Code 914)
you have successfully entered a valid Decoder ID
code (1, 2, or 3). The new valid Decoder ID is
Programming the HomeID in the remote is necessary
stored into the EEPROM of the remote. The
when radio frequency (RF) is used to transmit signals
remote then returns to normal operation.
to the set-top from the remote.
• If an invalid Decoder ID code is entered, the STB
The set-top is equipped with an RF receiver. When
mode key will display a long red flash. This
using an RF remote, a HomeID is required for proper
indicates that you have not entered a valid
communication between the RF remote and the set-
Decoder ID code (1, 2, or 3). The remote then
top. After the appropriate assignment, the RF remote
returns to normal operation. You will have to start
will then be uniquely used for the assigned set-top.
over from step 1 of this procedure.
The use of RF in the remote enables «through walls»
Notes:
control of the set-top. It may be used to transmit
• If any key other than the required digit key and the
instructions from another room. The use of HomeID
on-display menu control keys are pressed during
also limits any interference with set-tops in other
the Decoder ID programming, the STB mode key
rooms or in your neighbors’ homes.
will display a long red flash and the remote will return
to normal operation.
All RF devices have the HomeID set to 000 by default.
• If the remote times out before you complete
Complete the following steps to set a new HomeID.
programming the Decoder ID code, the remote will
1. Ensure that the set-top is plugged into an electrical
not accept any changes. You will have to start over
outlet and that you have the remote in the same
from step 1 of this procedure.
room as the set-top.
• If you are unable to program a new Decoder ID, the
2. Press and hold the STB mode key on the remote.
previous Decoder ID is retained.
3. Without releasing the STB mode key, press and
Change Volume Control
hold the OK key.
4. Release both the STB mode key and the OK key.
By default, once the TV mode key is programmed with
You should see all the mode keys flash red two
a valid code, the volume and mute buttons control
times. This indicates that you are now ready to enter
your TV. These keys adjust the volume of your TV
the HomeID code.
higher, lower, or temporarily switch the volume off
5. Enter the 3-digit code 9 1 4 by pressing the number
(Mute), regardless of whether the remote is in STB,
TV, DVD, or AUX mode.
keys on the remote. You should see the STB mode
key flash red two times. This indicates that you have
If you prefer, you can choose to have the volume and
successfully entered the code.
mute buttons always control a different device rather
6. Now enter your own choice of a 3-digit code from
than your TV, such as a home theater receiver. (See
000 to 255 by pressing the number keys on the
Controlling Volume for One Device below.) Note
remote. This will be your unique new HomeID code.
that you must first program one of the mode keys,
Be sure to record your HomeID in the space
such as AUX, with a valid code for that device.
provided at the end of this section.
Alternatively, you can choose to have the volume and
Notes:
mute buttons control different devices when the
• If a valid HomeID code is entered, the STB mode
remote is in different modes. For example, you might
key will flash red two times. This indicates that you
want to control the volume on your TV when in TV
have successfully entered a valid HomeID code
mode, but the volume on your home theater receiver
(000 to 255). Go to step 7 of this procedure.
when in AUX mode. (See Controlling Volume for
• If an invalid HomeID code is entered, the STB
Different Devices below.) Note that not all devices
mode key will display a long red flash. This indicates
have volume controls, so if you choose this option, the
that you have not entered a valid HomeID code
volume and mute buttons may do nothing in some
(000 to 255). The remote then returns to normal
modes, such as STB and DVD.
operation. You will have to start over from step 1 of
Controlling Volume for One Device
this procedure.
7. Point the remote toward the set-top and then press
(Program Code 955)
the ENTER key on the remote. The remote
1. Press and hold the STB mode key on the remote.
transmits the HomeID code using IR. The red LED
will illuminate during transmission of the HomeID
2. Without releasing the STB key, press and hold the
OK key.
code.
3. Release both keys and all mode keys blink twice.
8. To store your new HomeID code into the remote
code, press the ENTER key on the remote again.
4. Enter the programming code 9 5 5 by pressing the
number keys on the remote. The STB mode key
blinks twice indicating a successful entry.
5. Press and release the mode key for the device you
want the volume keys to control. For example, if you
want to control volume through your TV, press and
release TV. The selected mode key blinks three
times to indicate a successful entry.
The volume keys now control only one device
whether you are in STB, TV, DVD, or AUX mode.
Controlling Volume for Different
Devices (Program Code 955)
1. Complete steps 1 through 4 of the Controlling
Volume for One Device procedure.
2. Press and release the Enter key. The STB mode
key blinks three times to indicate a successful entry.
After you press the Enter key, the volume keys control
the device assigned to that mode. For example, in TV
mode, the volume keys control volume for the TV only.
Notes:
• If any other key is pressed except the Mode keys and
the ENTER key, the remote does not accept any
changes or updates. The STB mode key displays a
long red flash and the remote returns to normal
operation.
• If the remote times out before you complete
programming volume control, the remote does not
accept any changes. You must start over from step
1 of this procedure.
Change Channel Control
The remote is set by default to control channel
selection on the set-top. You can also program
channel control to control any of the TV, DVD, or AUX
mode devices provided the device allows for channel
control assignment. Or, you can set the channel
selection control programming to control channels (or
page up or down) for all of the devices programmed
in the four mode keys. Otherwise, you can only
control channels (or page up or down) on a specific
device, for example, the TV or DVD.
Note: The channel control keys include CH/Page,
Jump, and the numeric keys 0 through 9.
Controlling Channels for One Device
(Program Code 966)
1. Press and hold the STB mode key on the remote.
2. Without releasing the STB key, press and hold the
OK key.
3. Release both keys and all mode keys blink twice.
4. Enter the programming code 9 6 6 by pressing the
numeric keys on the remote. The STB mode key
blinks twice to indicate a successful entry.
5. Press and release the mode key for the device you
want the channel key to control. For example, if you
want to control channels on your TV, press and
release TV. The selected mode key blinks three
times to indicate a successful entry.
The channel key now always controls the device
associated with the mode you selected in this
procedure, whether in STB, TV, DVD, or AUX mode.
Controlling Channels for Different
Devices (Program Code 966)
1. Complete steps 1 through 4 of the Controlling
Channels for One Device procedure.
2. Press and release the Enter key. The STB mode
key blinks three times to indicate a successful
entry.
After you press the Enter key, the channel key now
controls the device associated with the mode key you
select. For example, in TV mode, the channel key
controls the TV, but in STB mode, the channel key
controls the set-top.
Notes:
• If any other key is pressed except the Mode keys
and the ENTER key, the remote does not accept
any changes or updates. The STB mode key
displays a long red flash and the remote returns to
normal operation.
• If the remote times out before you complete
programming channel selection control, the remote
does not accept any changes. You must start over
from step 1 of this procedure.
Change Power Control
The POWER key on the remote is set by default to
control the power switch on one device at a time, in
either mode (STB, TV, DVD, or AUX). When in STB
mode, the remote switches the set-top from OFF
(standby mode) to ON, or from ON to OFF (standby
mode). However, you can alternatively program the
POWER key to control the power switch on up to four
devices at the same time, instead of controlling one
device at a time. It is highly recommended that you
set up the POWER key to turn on and off your set-top
and your TV at the same time. Turning off the set-top
saves electricity and extends the life of the box. When
turned off, the set-top can still record scheduled
programs on its DVR and perform any other
necessary functions.