
- Manuals
- Brands
- Stihl Manuals
- Vacuum Cleaner
- SE 62
- Instruction manual
-
Contents
-
Table of Contents
-
Troubleshooting
-
Bookmarks
Quick Links
{
STIHL SE 62
Instruction Manual
Related Manuals for Stihl SE 62
Summary of Contents for Stihl SE 62
-
Page 1
STIHL SE 62 Instruction Manual… -
Page 3: Table Of Contents
Main Parts Dr. Nikolas Stihl Specifications Maintenance and Repairs Disposal EC Declaration of Conformity This instruction manual is protected by copyright. All rights reserved, especially the rights to reproduce, translate and process with electronic systems. SE 62, SE 62 E…
-
Page 4: Guide To Using This Manual
When the machine is not in and improvements may not be covered in this manual. use, shut it off so that it does not endanger others. Ensure that the machine cannot be used without authorization; unplug the power plug. SE 62, SE 62 E…
-
Page 5
Only use high-quality parts safety parts. and attachments. Otherwise, there may be a risk of Inspect the connecting cord accidents and damage to the regularly for signs of damage machine. and aging. Never use the SE 62, SE 62 E… -
Page 6
Do not tilt the machine if there is liquid in the container. SE 62, SE 62 E… -
Page 7
– «Before starting work». Also against edges or pointed extension cord and electrical make certain that the safety or sharp objects plug connections with dry mechanisms are working hands. properly. Never continue SE 62, SE 62 E… -
Page 8
Such parts have been work on the optimized for the machine and machine: Always the user’s requirements. disconnect the STIHL recommends that machine from the maintenance and repair work mains power be carried out only by supply. SE 62, SE 62 E… -
Page 9: Packing List
SE 62 1x holder for power cord (6) SE 62 The following accessory parts must be additionally only for SE 62 E fitted before using the machine for the 1x suction hose 2.5 m first time. 1x adapter for electrical power tools (7)
-
Page 10
Slide the suction tube holder (1) via the retainer (4) on the hand tube – the suction tube (distance A approx. lock (5) must engage 8 cm / 3.150 in.) and secure it with the screw (2) SE 62, SE 62 E… -
Page 11: Connecting To Power Supply
Up to 20 m 1.5 mm 20 m to 50 m 2.5 mm 100 V – 127 V: Up to 10 m AWG 14 / 2.0 mm 10 m to 30 m AWG 12 / 3.5 mm SE 62, SE 62 E…
-
Page 12: Switching On
SE 62 E All-purpose tool Power tools can be plugged into the machine socket (1). Do not exceed the To clean upholstery or inside of vehicles. maximum connected load of the machine socket – see «Specifications». SE 62, SE 62 E…
-
Page 13
Adapter for electrical power tool NOTICE For difficult to reach areas and for all (supplied with the model SE 62 E) those applications where vacuuming is Never use the vacuum cleaner with a not possible or advisable. damaged filter element or without the filter element. -
Page 14: Switching Off
Roll up the power cord and hang it on the holder Fasten the extension tube, suction hose and accessories to the holders provided for this purpose The vacuum cleaner must be stored in a dry room and protected against unauthorized use SE 62, SE 62 E…
-
Page 15: Emptying The Container
Carefully remove filter bag from container and dispose of in accordance with statutory regulations Insert new filter bag (instructions on filter bag) Push filter bag sleeve onto intake port as far as possible SE 62, SE 62 E…
-
Page 16: Replacing The Filter Element
Check correct operation of the float: the float must move easily when the upper part of the vacuum cleaner is turned over Fit new filter element in the reverse sequence of steps Refit upper part of the vacuum cleaner SE 62, SE 62 E…
-
Page 17: Maintenance And Care
Ventilation slots in motor housing clean Filter bag change clean Filter element replace Container empty All accessible screws, nuts and bolts retighten Safety information labels replace STIHL recommends STIHL servicing dealers SE 62, SE 62 E…
-
Page 18: Minimize Wear And Avoid Damage
If these maintenance operations cannot be performed by the owner, they should be performed by a servicing dealer. STIHL recommends that you have servicing and repair work carried out exclusively by an authorized STIHL SE 62, SE 62 E…
-
Page 19
English Fault: No suction performance when wet-vacuuming Cause Remedy Container full See «Emptying the (intake port is container» sealed by float) SE 62, SE 62 E… -
Page 20: Main Parts
15 Socket outlet 16 Telescoping suction tube 17 Suction tubes 18 Extension tube holder SE 62 E 19 Kombi floor tool 20 Crevice tool 21 All-purpose tool Supplied with the model SE 62 E SE 62, SE 62 E…
-
Page 21: Specifications
When repairing the machine, only use SE 62 E replacement parts which have been Protection class SE 62: II E approved by STIHL for this power tool or Ready for operation: 8 kg Protection class SE 62 E: I are technically identical. Only use high-…
-
Page 22: Disposal
Services Make: STIHL Series: SE 62, SE 62 E Serial identification STIHL products must not be thrown in number: 4784 the garbage can. Take the product, conforms to the relevant requirements of accessories and packaging to an the Directives 2011/65/EU, 2006/42/EC, approved disposal site for environment- 2004/108/EC (up to 19.04.2016),…
-
Page 24
0458-659-0121-A englisch www.stihl.com *04586590121A* 0458-659-0121-A…
(Ocr-Read Summary of Contents of some pages of the Stihl SE 62 Document (Main Content), UPD: 19 August 2023)
-
396, SE 62, SE 62 E polski 394 N Wyłączanie odkurzacza N Wyjąć wtyczkę z gniazda sieciowego N Otworzyć zbiornik – patrz «Kompletowanie urządzenia» Przy zasysaniu suchych materiałów bez worka filtrującego i zasysaniu wilgotnych materiałów N Ściągnąć wąż ssący z króćca ssącego N Opróżnić zbiornik i utylizować zawartość zgodnie z obowiązującymi przepisami Przy zasysaniu suchych materiałów N Zdjąć mufę przyłącza worka filtrującego z króćc…
-
50, SE 62, SE 62 E français 48 Au cours du travail Ne pas endommager le cordon d’alimentation électrique en roulant dessus, en l’écrasant, en l’étirant etc. Pour sortir la fiche de la prise de courant, ne pas tirer sur le cordon d’alimentation électrique, mais toujours saisir la fiche. Saisir la fiche, le cordon d’alimentation électrique, la rallonge ou les connecteurs uniquement avec les mains sèches. Ne jamais nettoyer des …
-
237, Stihl SE 62 SE 62, SE 62 E magyar 235 Karbantartás és javítások FIGYELMEZTETÉS – Kizárólag nagyon jó minőségű alkatrészeket használjon. Különben balesetek történhetnek, vagy károsodhat a berendezés. Az ezzel kapcsolatos kérdéseikkel forduljanak a szállítóhoz. – A berendezésen történő munkálatokat (pl. a sérült csatlakozóvezeték cseréjét) csakis a márkaszerviz dolgozói elektromos szakemberek végezhetik…
-
407, Stihl SE 62 SE 62, SE 62 E eesti 405 ümberkäimises instrueeritud, või kes esitavad tõendi, et nad oskavad seadet turvaliselt käsitseda. Seadet tohivad kasutada piiratud füüsiliste, sensoorsete või vaimsete võimete või puuduliku kogemuse ning teadmistega isikud, kui nad viibivad järelevalve all ja neid on seadmega ümberkäimises instrueeritud, et nad mõistaksid sellega seonduvaid ohte. Kasutaja vastutab teistele isikutele või …
-
297, SE 62, SE 62 E Nederlands 295 aanbouwapparaten wordt veroorzaakt is STIHL niet aansprakelijk. Toepassingen Het opzuigen van droge, niet- brandbare materialen (stof, vuil, glassplinters, spanen, zand enz.) en niet-brandbare vloeistoffen (afvalwater, gemorste sappen e.d.) Het apparaat is niet geschikt voor het opzuigen van voor de gezondheid schadelijke stoffen. Het gebruik van het apparaat voor andere doeleinden is niet toegestaan en kan leiden tot ongelukken of schade aan het…
-
345, SE 62, SE 62 E latviešu 343 Pirms ierīces ekspluatācijas uzsākšanas jāpiemontē dažādas piederumu detaļas. BRĪDINĀJUMS Kontaktdakša jāpievieno elektrotīklam tikai tad, kad ierīce ir pilnībā samontēta. Jāatver un jāaizver tvertne. Atvēršana N Atveriet skavas (1). N Vertikāli uz augšu noņemiet sūcēja augšdaļu (2). N Izņemiet piederumus un ielieciet filtra maisiņu – skat. sad…
-
274, Originálny návod na obsluhu Vytlačené na bezchlórovo bielenom papieri. Tlačiarenské farby obsahujú rastlinné oleje, papier je recyklovateľný. © ANDREAS STIHL AG & Co. KG, 2015 0458-659-9921-A. VB5.A15. 0000006513_003_SK SE 62, SE 62 E slovensky 272 { Tento návod na obsluhu je chránený autorským právom. Všetky práva zostávajú vyhradené, najmä právo rozmnožovania, pre — kladan…
-
312, SE 62, SE 62 E Nederlands 310 1 Zuigslang 2 Handbuis 3 Adapter voor elektrisch gereedschap 1) 4 Handgreep 5 Knop filterreiniging 6 Schakelaar 7 Filter 8 Aansluiting zuigslang in de zuigstand 9 Blaasaansluitmond en de aansluiting zuigslang in de blaasstand 10 Houders voor zuigbuis 11 Klem 12 Tank 13 Houder voor netkabel 14 Elastiek – houder voor zuigslang 1) 15 Contactdoos 1) 16 Telescopische zuigbuis 1) …
-
78, Stihl SE 62 SE 62, SE 62 E español 76 potencia de conexión de la caja de enchufe para aparatos – véase «Datos técnicos». N Antes de conectar una herramienta eléctrica a la caja de enchufe para aparatos (1), desconectar la aspiradora y la herramienta eléctrica a conectar Al tratarse de herramientas eléctricas con regulación electrónica del número de revoluciones, se adapta la absorción de potencia de la…
-
369, SE 62, SE 62 E ελληνικά 367 Στερέωση παρελκομένων Τοποθετήστε τα παρελκόμενα στα προβλεπόμενα στηρίγματα, όπως φαίνεται στην εικόνα. Η τάση και η συχνότητα του μηχανήματος (βλέπε πινακίδα τύπου) πρέπει να συμφωνούν με την τάση και τη συχνότητα του δικτύου.…
-
465, SE 62, SE 62 E български 463 Двигателят Работни данни Размери SE 62 SE 62 E Тегло SE 62 SE 62 E Звукови характеристики Ниво на акустичното налягане L p по EN 60704-1 (на разстояние 1 м) Стойността на фактора «К» за нивото на акустичното налягане възлиз…
-
156, SE 62, SE 62 E italiano 154 SE 62 1x flessibile di aspirazione 2,5 m 1x tubo d’impugnatura 2x tubo di aspirazione a innesto SE 62 E 1x flessibile di aspirazione 3,5 m 1x tubo d’impugnatura 1x tubo di aspirazione telescopico Accessori nel contenitore 1x bocchetta Kombi per pavimenti (1) 1x bocchetta universale (2) 1x bocchetta per interstizi (3) 1x sacchetto filtrante (4) 1x supporto tubo di aspirazione (5) supplementare solo pe…
-
100, SE 62, SE 62 E hrvatski 98 Reškasta sapnica/mlaznica Za čišćenje teško dostupne nečistoće, npr. u kutovima ili fugama. Adapter za električni alat (sadržan u usporuci za SE 62 E) Za priključivanje električnih alata s uređajem za odsisavanje: N Adapter za električni alat priključiti na usisno crijevo umjesto na ručnu cijev N Usisnu snagu prilagoditi primjeni odnosno električnom alatu pomoću prstena za podešavanje (1) Usisavanje suhih materijala UPOZORENJE Z…
-
459, SE 62, SE 62 E български 457 N Сложете нова филтърна торбичка (инструкцията за поставяне се намира на самата филтърна торбичка) N Избутайте муфата на филтърната торбичка до упор върху смукателния щуцер Затворете контейнера N Почистете ръба на резервоара N Поставете горната…
-
478, SE 62, SE 62 E română 476 N În funcţie de utilizarea aspiratorului – alegeţi şi aplicaţi accesoriul pe tubul de aspiraţie, mânerul tubular sau furtunul aspiratorului (numai adaptor pentru electroutilaj) Duză pentru podea combinată N Poziţie pentru aspirarea mochetelor (1) N Poziţie pentru aspirarea podelelor netede (2) Duză universală Pentru curăţarea obiectelor de mobilă tapsiate sau incintelor autovehiculelor. Duză pentru rosturi Pentru curăţar…
-
47, SE 62, SE 62 E français 45 aucun risque pour d’autres personnes. Assurer l’appareil de telle sorte qu’il ne puisse pas être utilisé sans autorisation. Retirer la fiche de la prise de courant. L’appareil ne doit être utilisé que par des personnes qui ont reçu les instructions nécessaires pour son utilisation et sa manipulation ou peuvent fournir la preuve qu’elles sont capables de manier cet appareil en toute sé…

Summary of Content for Stihl SE 62 Instruction Manual PDF
WARNING Read Instruction Manual thoroughly before use and follow all safety precautions improper use can cause serious or fatal injury.
ADVERTENCIA Antes de usar la mquina lea y siga todas las precauciones de seguridad dadas en el manual de instrucciones el uso incorrecto puede causar lesiones graves o mortales.
Instruction Manual Manual de instrucciones
Instruction Manual 1 — 21 Manual de instrucciones 22 — 42
O rig
in al
In st
ru ct
io n
M an
ua l
Pr in
te d
on c
hl or
in e-
fre e
pa pe
r Pr
in tin
g in
ks c
on ta
in v
eg et
ab le
o ils
, p ap
er c
an b
e re
cy cl
ed .
A
N D
R EA
S ST
IH L
AG &
C o.
K G
, 2 02
0 04
58 -6
59 -8
62 1-
A. V
C 5.
G 20
. English
00
65 86
_0 07
_G B
This manual contains operating and safety instructions for the STIHL vacuum cleaner.
Allow only persons who fully understand this manual to operate your vacuum cleaner.
To receive maximum performance and satisfaction from your STIHL vacuum cleaner, it is important that you read, understand and follow the safety precautions and the operating and maintenance instructions before using your vacuum cleaner. For further information you can go to www.stihlusa.com.
Contact your STIHL dealer or the STIHL distributor for your area if you do not understand any of the instructions in this manual.
WARNING
Because a vacuum cleaner is a high- speed electric power tool, some special safety precautions must be observed to reduce the risk of personal injury. Careless or improper use may cause serious or even fatal injury.
Guide to Using this Manual 2 IMPORTANT SAFETY INSTRUCTIONS 2 Safety Precautions and Working Techniques 3 Packing List 8 Assembling the Unit 8 Connecting to Power Supply 9 Switching On 10 Working 10 Switching Off 12 After Finishing Work 12 Emptying the container 12 Cleaning the filter element 13 Replacing the filter element 13 Maintenance and Care 15 Troubleshooting 16 Main Parts 17 Specifications 18 Maintenance and Repairs 19 Disposal 19 Limited Warranty 20 Trademarks 20 Addresses 21
00 00
SE 62 1
This instruction manual is protected by copyright. All rights reserved, especially the rights to reproduce, translate and process with electronic systems.
Pictograms
All the pictograms attached to or embossed on the machine are shown and explained in this manual.
Symbols in Text
Many operating and safety instructions are supported by illustrations.
The individual steps or procedures described in the manual may be marked in different ways:
N A bullet marks a step or procedure.
A description of a step or procedure that refers directly to an illustration may contain item numbers that appear in the illustration. Example:
N Loosen the screw (1).
N Lever (2) …
In addition to the operating instructions, this manual may contain paragraphs that require your special attention. Such paragraphs are marked with the following symbols and signal words:
DANGER
Indicates a hazardous situation that, if not avoided, will result in death or serious injury.
WARNING
Indicates a hazardous situation that, if not avoided, could result in death or serious injury.
NOTICE Indicates a risk of property damage, including damage to the machine or its individual components.
Engineering Improvements
STIHLs philosophy is to continually improve all of its products. As a result, engineering changes and improvements are made from time to time. Therefore, some changes, modifications and improvements may not be covered in this manual. If the operating characteristics or the appearance of your machine differs from those described in this manual, please contact your STIHL dealer or the STIHL distributor for your area for assistance.
When using a vacuum cleaner, basic precautions should always be followed, including the following:
READ ALL INSTRUCTIONS BEFORE USING THIS STIHL VACUUM CLEANER!
WARNING! To reduce the risk of fire, electric shock, or other injury:
1. Do not leave the vacuum cleaner unattended when plugged in. Unplug from outlet when not in use and before servicing.
2. Do not expose to rain. Store indoors.
3. Do not allow to be used as a toy. Close attention is necessary when used near children.
4. Use only as described in this manual. Use only manufacturer’s recommended attachments.
5. Do not use with damaged power supply cord or plug. If the vacuum cleaner is not working as it should, has been dropped, left outdoors, or dropped into water, return it to your STIHL servicing dealer.
Guide to Using this Manual IMPORTANT SAFETY INSTRUCTIONS
6. Do not pull or carry by power supply cord, use power supply cord as a handle, close a door on power supply cord, or pull power supply cord around sharp edges or corners. Do not operate while power supply cord is coiled. Keep power supply cord away from heated surfaces.
7. Do not unplug by pulling on power supply cord. To unplug, grasp the plug, not the power supply cord.
8. Do not handle plug or unit with wet hands.
9. Do not put any object into openings. Do not use with any opening blocked; keep free of dust, lint, hair, and anything that may reduce air flow.
10. Keep hair, loose clothing, fingers and all parts of body away from openings and moving parts.
11. Turn off all controls before unplugging.
12. Use extra care when cleaning on stairs.
13. Do not use to pick up flammable or combustible liquids such as gasoline or use in areas where they may be present.
14. This vacuum is provided with double insulation. Use only identical replacement parts. See instructions for «Maintenance and Repairs.»
15. Do not pick up anything that is burning or smoking, such as cigarettes, matches, or hot ashes.
16. Do not use with a damaged or missing filter element.
17. Regularly examine the power supply cord for damage, such as cracking or ageing. If damage is found, replace the cord before further use.
SAVE THESE INSTRUCTIONS
WARNING
Do not lend or rent your vacuum cleaner without the instruction manual. Be sure that anyone using it understands the information contained in this manual.
A first-time operator should obtain practical instruction before using the vacuum cleaner. Employers should establish a training program for operators to assure safe operation of these machines. These safety precautions and warnings apply to the use of all STIHL vacuum cleaners.
Be thoroughly familiar with the controls and the proper use of the equipment. Know how to stop the unit and disengage the controls quickly.
Safety Precautions and Working Techniques
Because the use of vac- uum cleaners may be dangerous, special safety precautions must be observed to reduce the risk of personal injury.
It is important that you read, fully understand and observe preceding «Important Safety Instruc- tions» and the following safety precautions and warnings. Read the instruction manual and the safety precautions periodically. Careless or improper use may cause serious or fatal injury.
Have your STIHL dealer show you how to operate your vacuum cleaner. Observe all applicable local safety regulations, standards and ordinances.
Use your vacuum cleaner for vacuuming of dry, non-flammable materials (dust, dirt, broken glass, wood or metal shavings, sand, etc.) and non- flammable liquids (dirty water, spilled juices, etc.)
The vacuum cleaner is suitable for more demanding commercial or industrial use, as e.g., in hotels, schools, hospitals, factories, shops, offices and stores.
WARNING
Do not use the vacuum cleaner for other purposes, since misuse may result in personal injury or property damage, including damage to the vacuum cleaner. The vacuum cleaner must not be modified in any way this may also lead to accidents or damage to the vacuum cleaner.
WARNING
Minors should never be allowed to use this vacuum cleaner. Bystanders, especially children, and animals should not be allowed in the area where it is in use.
WARNING
To reduce the risk of injury to bystanders and damage to property, never let your vacuum cleaner run unattended. When it is not in use (e.g. during a work break), shut it off and disconnect it from the power supply and make sure that unauthorized persons do not use it.
Most of these safety precautions and warnings apply to the use of all STIHL vacuum cleaners. Different models may have different parts and controls. See the appropriate section of your instruction manual for a description of the controls and the function of the parts of your model.
Safe use of a vacuum cleaner involves
1. the operator
2. the vacuum cleaner
3. the use of the vacuum cleaner
THE OPERATOR
Physical Condition
You must be in good physical condition and mental health and not under the influence of any substance (drugs, alcohol, etc.) which might impair vision, dexterity or judgment. Do not operate this vacuum cleaner when you are fatigued.
WARNING
Be alert if you get tired, take a break. Tiredness may result in loss of control. Working with any vacuum cleaner can be strenuous. If you have any condition that might be aggravated by strenuous work, check with your doctor before operating this vacuum cleaner.
THE VACUUM CLEANER
For illustrations and definitions of the vacuum cleaner parts see the chapter on «Main Parts and Controls.»
WARNING
Never modify the vacuum cleaner in any way. Only attachments supplied by STIHL or expressly approved by STIHL for use with the specific STIHL model are authorized. Although certain unauthorized attachments are useable with STIHL vacuum cleaners, their use may, in fact, be extremely dangerous.
If this unit is subjected to unusually high loads for which it was not designed (e.g. heavy impact or a fall), always check that it is in good condition before continuing work. Check in particular that the controls and safety devices are working properly.
WARNING
Never operate your vacuum cleaner if it is damaged or not completely and securely assembled. In case of doubt, have it checked by your STIHL servicing dealer.
The vacuum cleaner may only be used when all parts are in proper working order.
Ensure that the filter element is always in place and undamaged.
Do not use with a damaged or missing filter element.
The machine may only be operated in an upright position. Do not cover the machine and ensure adequate motor ventilation.
WARNING
To avoid the risk of short-circuiting, never spray the upper part of the vacuum cleaner with water.
Do not clean your vacuum cleaner with a pressure washer. The solid jet of water may damage parts of the vacuum cleaner.
THE USE OF THE VACUUM CLEANER
Electrical Precautions
See also the electrical safety precautions listed under «Important Safety Instructions» at the beginning of this manual.
WARNING
Special precautions for vacuum cleaners must be observed to reduce the risk of personal injury and property damage from fire and electric shock.
WARNING
Inspect the power supply cord and the plug regularly for signs of damage and ageing.
WARNING
Only connect the machine to a correctly installed power socket.
WARNING
The voltage and frequency of the power supply must agree with the voltage and frequency specified on the vacuum cleaners rating plate. Improper voltage will damage the vacuum cleaners motor and may cause personal injury.
The vacuum cleaner should only be connected to the power supply via a ground-fault circuit interrupter rated for at least 120 V, 60 Hz.
WARNING
Be sure the power switch is off when plugging the unit into the power supply in order to reduce the risk of fire or electrical shock from arcing and the risk of injury from unintended vacuuming.
WARNING
WARNING
When using the vacuum cleaner, always keep the power supply cord behind you. Always ensure that your power supply cord does not become entangled with obstacles or objects. Keep cord away from heat, oil, and sharp edges. Do not close a door on the cord. Never pull or carry vacuum cleaner by power supply cord or jerk power supply cord to disconnect the plug from the wall outlet.
To unplug, grasp the plug not the cord. Damaged cords may cause electrocution. Always disconnect the plug from the power supply when you take a break.
Electrical Cords
When using extension cords, ensure that the minimum conductor cross- sections are maintained see «Connecting to Power Supply.»
Appropriate extension cords are available in special stores for electrical equipment. Use only extension cords that comply with the specifications for the respective application.
Unsuitable extension cords may be dangerous.
If an extension cord is coiled on a cord reel, always unroll completely to reduce the risk of fire due to overheating.
When using extension cords, the connector and coupling must be waterproof or routed in such a way that they cannot come into contact with water.
Transporting the vacuum cleaner
Before transporting the container, close all the latches.
When transporting your unit in a vehicle, properly secure it to prevent turnover and damage to the vacuum cleaner.
Do not tilt the vacuum cleaner if there is liquid in the container.
Do not use a crane hook to lift the vacuum cleaner.
Before using
Always make sure the vacuum cleaner is in proper condition before starting.
In order to reduce the risk of serious injury from electrocution, never use your vacuum cleaner if the power supply cord or plug is cut, cracked, worn or damaged.
Have your STIHL servic- ing dealer replace such a power supply cord.
To reduce the risk of electric shock, do not use the vacuum cleaner in damp or wet locations. Do not expose to or use in rain. Do not handle the plug or the unit with wet hands.
WARNING
Inspect the power supply cord, extension cords and plugs before and after each use for signs of damage or ageing. Never operate your vacuum cleaner with damaged cords or plugs.
Working Conditions
WARNING
WARNING
WARNING
To reduce risk of personal injury or death, do not vacuum hazardous or toxic material.
WARNING
Some dust created by sanding, ginding, drilling and other workshop activities contains chemicals known to the State of California and other authorities to cause cancer and birth defects and other reproductive harm. Some examples of these chemicals are:
1 lead from lead-based paint
2 crystalline silica from bricks and cement, other masonry products and many types of stone, and
3 arsenic and chromium from chemically treated lumber.
If these or similar dusts are on the surfaces where you are cleaning, small particles may become airborne as a result of the vacuuming process. Control dust at the source where possible. Use good work practices. When the inhalation of dust cannot be substantially controlled, i.e., kept at or near the ambient (background) level, the operator and any bystanders should wear a respirator approved by NIOSH/MSHA for the type of dust encountered.
WARNING
If the substance being vacuumed is a commercial substance, review, understand and follow all warnings and instructions in the product literature and material safety data sheet for that substance and/or consult the material manufacturer/supplier.
WARNING
Breathing asbestos dust is dangerous and can cause severe or fatal injury, respiratory illness or cancer. The use and disposal of asbestos-containing products have been strictly regulated by OSHA and the Environmental Protection Agency. If you have any reason to believe that you might be vacuuming or otherwise disturbing asbestos, immediately contact EPA, your employer or a local OSHA representative.
Vacuuming unsuitable materials may block the suction hose. Switch off the unit immediately and disconnect the plug from the power supply. Then clear the blockage.
Remove the filter bag and check correct operation of the float before vacuuming liquids or wet materials. Never work without the filter element.
WARNING
If foam develops or liquid escapes from the appliance, stop work immediately, unplug the power cord and empty the container.
When working with the vacuum cleaner, always wrap your fingers tightly around the handle tube. Keep your hand in this position to have your vacuum cleaner under control at all times. Make sure your handle tube is in good condition and free of moisture, pitch, oil or grease.
In order to turn the vacuum cleaner on after you have plugged the power supply cord into the outlet, push the power switch from position «0» to position «I.»
Never use the vacuum cleaner to pick up hot materials (hot ash, glow- ing cigarette butts, matches etc.). Never vac- uum flammable or combustible liquids (gas- oline, thinner, etc.) as well as aggressive liquids (acids, lye) Risk of seri- ous or fatal injury from fire or explosion!
To reduce the risk of per- sonal injury from fire and explosion, never attempt to vacuum flammable explosive dust (e.g. mag- nesium or aluminium dust, etc.)
To reduce the risk of stumbling and loss of control, do not walk backward while operating the vacuum cleaner.
Dispose of the dirt, filter bag and filter element in accordance with applicable regulations.
MAINTENANCE, REPAIR AND STORING
Servicing of double-insulated Appliance
Your STIHL vacuum cleaner is double- insulated. In a double-insulated appliance, two systems of insulation are provided instead of grounding. No grounding means are provided on a double-insulated appliance, nor should a means for grounding be added to the appliance. Servicing a double-insulated appliance requires extreme care and knowledge of the system, and should be done only by qualified service personnel. Replacement parts for a double-insulated appliance must be identical to the parts they replace.
Use only identical STIHL replacement parts for maintenance and repair. Use of parts manufactured by others may cause serious or fatal injury. Follow the maintenance and repair instructions in the appropriate section of your instruction manual.
WARNING
Service the vacuum cleaner regularly.
Always repair a damaged unit before further use.
STIHL recommends that you have servicing and repair work carried out exclusively by an authorized STIHL servicing dealer.
STIHL recommends the use of genuine STIHL replacement parts. They are specifically designed to match your unit and meet your performance requirements.
Never attempt to modify your vacuum cleaner in any way since this will increase the risk of personal injury.
Regularly inspect the power supply cord and plug for signs of damage and ageing.
Have damaged cords replaced by your authorized STIHL servicing dealer only.
Clean plastic components with a cloth. Do not use any strong detergents on the plastic housing or handle. These parts
can be attacked by certain house-hold cleaners containing aromatic oils such as pine or lemon, or by solvents such as kerosene.
Never spray water on the vacuum cleaner, moisture can cause an electric shock hazard. Wipe moisture off the unit with a cloth.
Store vacuum cleaner in a dry and high or locked location out of reach of children.
Aways switch off the motor, disconnect the plug from the power sup- ply and make sure that the fan wheel is stopped before doing any mainte- nance or repair work or cleaning the vacuum cleaner. Do not attempt any maintenance or repair work not described in your instruction man- ual. Have such work performed at your STIHL service shop only.
1x suction hose 2.5 m
1x hand tube
2x insertable suction tube
Accessories in container
1x Kombi floor tool (1)
1x all-purpose tool (2)
1x crevice tool (3)
1x filter bag (4)
1x suction tube holder (5)
1x holder for power cord (6)
The following accessory parts must be fitted before using the machine for the first time.
WARNING
Do not plug the power cord into the outlet until the machine is completely assembled.
Opening and closing the container
Opening
N Release the spring latches (1)
N Lift the upper part of the vacuum cleaner (2) vertically up and off
N Remove accessories and insert filter bag see «Inserting filter bag»
Closing
N Refit the upper part of the vacuum cleaner (2) and close the latches (1) ensure that the latches engage properly
Fitting the filter bag
N Push filter bag sleeve onto intake port as far as possible
Mounting suction hose and hand tube
N Insert sleeve (1) of suction hose into the intake port (2)
N Slide clutch (3) of suction hose into the retainer (4) on the hand tube lock (5) must engage
Packing List
6
08 09
BA 03
0 KN
1 2
3
5
4
Assembling the Unit
08 09
BA 03
1 KN
1 1
08 09
BA 00
4 KN
1
08 09
BA 03
2 KN
34
08 09
BA 03
3 KN5
Holders for power cord
N Connect holder for power cord via the support on the upper part of the vacuum cleaner
Suction tube
N Connect suction tubes (1) and (2)
Mount suction tube holder
N Slide the suction tube holder (1) via the suction tube (distance A approx. 8 cm / 3.150 in.) and secure it with the screw (2)
Fastening accessories
Fasten accessories on the holders provided as shown in picture.
The voltage and frequency of your power supply and the voltage and frequency specified on the unit must be the same.
The connection to the power supply must be protected by a fuse or a circuit breaker with a minimum rating in accordance with the specifications see «Specifications.»
The power tool must be connected to the power supply via a Ground Fault Circuit Interrupter (GFCI). Receptacles are available having built-in GFCI protection and may be used for this measure of safety.
The electrical power supply connection must comply with all applicable standards and regulations.
Extension Cords
Make sure your electrical cord set is in good condition and suitable for outdoor use. When using an extension cord, be sure to use one heavy enough to carry the current your product will draw. An undersized extension cord may cause a drop in line voltage resulting in loss of power and overheating. The table below shows the correct size (AWG) to use for your machine (Cord types SJW or SJTW) depending on cord length and nameplate ampere rating. If in doubt, use the next heavier gauge. The smaller the gauge number, the heavier the cord.
08 09
BA 02
6 KN
08 09
BA 00
7 KN
1 2
A
2
08 09
BA 00
9 KN
1
08 09
BA 03
4 KN
Connecting to Power Supply
Appropriate extension cords are available in special stores for electrical equipment or from your STIHL dealer.
Connection to the power supply socket
Before connection to the power supply, check that the machine is switched off see «Switching off the machine»
N Plug the power cord or extension cord into a properly installed outlet
Switch positions:
N To switch on, set master switch to I
N Depending on the intended use of vacuum cleaner select the appropriate accessory and fit to end of suction tube or hand tube
Kombi floor tool
N Position for vacuuming carpets (1)
N Position for vacuuming hard floors (2)
All-purpose tool
To clean upholstery or inside of vehicles.
Cord length (ft) Wire gage (AWG) 50 16 100 14 150 12
Switching On
vacuum cleaner is switched on
vacuum cleaner is switched off
08 09
BA 01
1 KN
Working
08 09
BA 01
3 KN
1
2
08 09
BA 01
4 KN
Crevice tool
To clean ingrained dirt, e. g. in corners or joints.
Vacuuming dry materials
WARNING
Flammable materials must not be vacuumed.
Always make sure that the filter bag has been fitted in the container before vacuuming dry materials. The vacuumed material can then be disposed of without difficulty. Dry materials can also be vacuumed without filter bag.
NOTICE Never use the vacuum cleaner with a damaged filter element or without the filter element.
Vacuuming liquids
WARNING
Flammable liquids must not be vacuumed.
Always remove the filter bag and check operation of the float before vacuuming liquids. The float switches off the air stream when the container is full. If the machine is exclusively used for wet- vacuuming, the filter element should be replaced by a special insert (special accessory).
The filter element is damp after vacuuming liquids. The filter element is likely to clog up more quickly if dry material is vacuumed while it is still damp. For this reason, the filter element should be dried or replaced by a dry filter element before vacuuming dry materials.
Blower mode
For difficult to reach areas and for all those applications where vacuuming is not possible or advisable.
N Remove suction hose from intake port
N Connect suction hose (1) in exhaust opening (2)
Adjusting the suction power
The suction power can be adjusted with the adjusting ring if required to avoid lifting light carpets etc. from the floor:
N Turn adjusting ring (1) and adapt suction power to the relevant cleaning task
08 09
BA 01
5 KN
1
08 09
BA 03
5 KN
08 09
BA 01
8 KN
1
N Turn the master switch to O
N Unplug the power plug from the socket
N Empty the container and clean the machine
After vacuuming liquids:
N Remove the upper part of the vacuum cleaner so that the filter element can dry
N Roll up the power cord and hang it on the holder
N Fasten the extension tube, suction hose and accessories to the holders provided for this purpose
N The vacuum cleaner must be stored in a dry room and protected against unauthorized use
N Switch off the vacuum cleaner
N Unplug the power plug from the socket
N Open the container see Assembling the machine
When dry-vacuuming without filter bag and when wet-vacuuming
N Remove suction hose from intake port
N Empty the container and dispose of its contents in accordance with the applicable regulations
When dry-vacuuming with filter bag
N Pull filter bag sleeve off intake port and seal filter bag sleeve with slide
N Carefully remove filter bag from container and dispose of in accordance with statutory regulations
N Insert new filter bag (instructions on filter bag)
N Push filter bag sleeve onto intake port as far as possible
Switching Off
08 09
BA 03
6 KN
After Finishing Work
08 09
BA 02
8 KN
Emptying the container
08 09
BA 02
2 KN
Close the container
N Clean the edge of the container
N Fit the upper part of the vacuum cleaner see Assembling the machine
N before fitting the suction hose: Clean the sleeve of the suction hose and intake port
N Close slide on hand tube
N Switch on machine
N Press opening of hand tube firmly against a level surface or close by hand
N Press the button (1) to clean filter 3x
Dust deposits are removed from the filter element.
N Unplug the power plug from the socket
N Remove upper part of vacuum cleaner and turn it over
N Turn the cover (1) in the direction of the arrow and remove it
N Remove filter element (2) and dispose of it in accordance with the local regulations
N Check correct operation of the float: the float must move easily when the upper part of the vacuum cleaner is turned over
N Fit new filter element in the reverse sequence of steps
N Refit upper part of the vacuum cleaner
Cleaning the filter element
1
08 09
BA 03
7 KN
Replacing the filter element
1
08 09
BA 03
8 KN
2
NOTICE Never use the vacuum cleaner with a damaged filter element or without the filter element.
Maintenance and Care
The following intervals apply for normal operating conditions. The specified intervals must be shortened accordingly when working for longer than normal or under difficult cutting conditions (extensive dust, etc.).
Be fo
re s
ta rti
ng w
or k
At th
e en
d of
w or
k an
d/ or
da
ily
W ee
kl y
M on
th ly
If fa
ul ty
If da
m ag
ed
As re
qu ire
d
Complete unit visual inspection (condition) X
Clean X
Connecting cable check X
Have replaced by servicing dealer1) X
Switch Function test X
Have replaced by servicing dealer1) X X
Ventilation slots in motor housing Clean X
Filter bag change X
Filter element Clean X
replace X
Container Drain X
Accessible screws, nuts and bolts Tighten X
Safety information label replace X 1) STIHL recommends STIHL dealers
Problem: Motor does not start
Problem: Poor suction performance
Problem: No suction performance when wet-vacuumingTroubleshooting
Cause Remedy Electric circuit- breaker has been tripped
Check and reset electric circuit breaker
Cause Remedy Filter bag is full See «Emptying the
container» Suction hose / tool is clogged
Clean suction hose / tool
Filter element is fouled
See «Cleaning the filter element» and «Replacing the fil- ter element»
Gasket between upper part of vac- uum cleaner and container is fouled or faulty
Clean or replace gasket
Cause Remedy Container full (intake port is sealed by float)
See «Emptying the container»
1 Suction Hose 2 Handle Tube 3 Handle 4 Filter Cleaning Button 5 Switch 6 Filter Element 7 Vacuum Intake Port 8 Exhaust Opening and Suction Hose
Connection in Blower Mode 9 Holder for Extension Tube 10 Latch 11 Container 12 Suction Hose Holder 13 Extension Tube 14 Extension Tube Holder 15 Kombi Floor Tool 16 Crevice Tool 17 All-purpose Tool
Main Parts
3
9 12
86
08 09
BA 03
9 KN
1 2
5
14
15
17
16
13
13
4
11 7
10
Definitions
1 Suction Hose Directs collected dirt and/or liquid into the container.
2 Handle Tube For holding and guiding the respective tool.
3 Handle For holding and carrying the vacuum cleaner.
4 Filter Cleaning Button Press to clear the filter of deposited dust.
5 Switch To switch the machine in positions ON and OFF.
6 Filter Element Filters the dust from the airstream.
7 Vacuum Intake Port Connection between container and suction hose.
8 Exhaust Opening and Suction Hose Connection in Blower Mode For difficult to reach areas and for all those applications where vacuuming is not possible or advisable.
9 Holder for Extension Tube Accommodates extension tube on the vacuum cleaner.
10 Latch Holds upper half onto the container.
11 Container Captures and stores collected dirt and/or liquid.
12 Suction Hose Holder For storing the suction hose.
13 Extension Tube Directs collected dirt and/or liquids from the tool to the suction hose.
14 Extension Tube Holder For storing the extension tube.
15 Combi Floor Tool For cleaning smooth surfaces and carpets.
16 Crevice Tool For cleaning places that are hard to reach.
17 All-purpose Tool Tool for numerous potential uses.
Motor
Performance data
Dimensions
Weight
Specifications
Power Supply: 120 V Frequency: 60 Hz Electrical Rating: 1000 W Circuit Breaker: 15 A Insulation: Double Insula-
tion E
Max. intake capacity, air:
3200 l/min (112 cf/min)
Max. vacuum: 210 mbar / 84 in H2O
Length approx.: 385 mm (15,16 in)
Width approx.: 377 mm (14,84 in)
Height approx.: 506 mm (19,92 in)
Container capacity: 25 l (6,6 gal) Length of suction hose: 2.5 m (98 in) Inside diameter: 32 mm (1,25 in)
Ready for operation: 7.5 kg (16,5 lbs)
Noise values
Sound pressure level Lp to EN 60704-1 (at a distance of 1 m)
Users of this unit should carry out only the maintenance operations described in this manual. STIHL recommends that other repair work be performed only by authorized STIHL servicing dealers using genuine STIHL replacement parts.
Genuine STIHL parts can be identified by the STIHL part number, the { logo and, in some cases, by the STIHL parts symbol K. The symbol may appear alone on small parts.
For repairs of any component of this units air emissions control system, please refer to the air emissions systems warranty in this manual.
Observe all country-specific waste disposal rules and regulations.
STIHL products must not be thrown in the garbage can. Take the product, accessories and packaging to an approved disposal site for environment- friendly recycling.
Contact your STIHL servicing dealer for the latest information on waste disposal.
70 dB(A)
Maintenance and Repairs Disposal
00 0B
A0 73
K N
STIHL Incorporated Limited Warranty Policy for Non-Emission-Related Parts and Components
This product is sold subject to the STIHL Incorporated Limited Warranty Policy, available at
www.stihlusa.com/warranty.html.
It can also be obtained from your authorized STIHL dealer or by calling 1-800-GO-STIHL (1-800-467-8445).
A separate emissions control system warranty is provided for emission- related components.
STIHL Registered Trademarks
STIHL
{
K
The color combination orange-grey (U.S. Registrations #2,821,860; #3,010,057, #3,010,058, #3,400,477; and #3,400,476)
AutoCut
FARM BOSS
iCademy
MAGNUM
MasterWrench Service
MotoMix
OILOMATIC
ROCK BOSS
STIHL Cutquik
STIHL DUROMATIC
STIHL Quickstop
STIHL ROLLOMATIC
STIHL WOOD BOSS
TIMBERSPORTS
WOOD BOSS
YARD BOSS
Some of STIHLs Common Law Trademarks
4-MIX
BioPlus
Easy2Start
EasySpool
ElastoStart
Ematic
FixCut
IntelliCarb
Master Control Lever
Micro
Pro Mark
Quiet Line
STIHL M-Tronic
Limited Warranty Trademarks
TM
STIHL Injection
STIHL OUTFITTERS
STIHL PICCO
STIHL PolyCut
STIHL PowerSweep
STIHL Precision Series
STIHL RAPID
STIHL SuperCut
TapAction
TrimCut
This listing of trademarks is subject to change.
Any unauthorized use of these trademarks without the express written consent of ANDREAS STIHL AG & Co. KG, Waiblingen is strictly prohibited.
STIHL Inc. 536 Viking Drive P.O. Box 2015 Virginia Beach, VA 23452-2015
Addresses
M anual de instrucciones original
Im preso en papel libre de cloro.
Las tintas contienen aceites vegetales, el papel es reciclable.
AN D
R EAS STIH
L AG & C
o. KG , 2020
0458-659-8621-A. VC 5.G
20.
0000006586_007_EA
Este manual contiene instrucciones de funcionamiento y de seguridad para la aspiradora STIHL.
Permita que solamente las personas que comprenden la materia tratada en este manual manejen su aspiradora.
Para obtener el rendimiento y satisfaccin mximos de la aspiradora STIHL, es importante leer y comprender las precauciones de seguridad y las instrucciones de funcionamiento y mantenimiento antes de usarla. Para obtener ms informacin, puede visitar el sitio www.stihlusa.com.
Comunquese con su concesionario STIHL o con el distribuidor STIHL de su regin si no entiende alguna de las instrucciones incluidas en este manual.
ADVERTENCIA
Dado que la aspiradora es una herramienta elctrica que funciona a gran velocidad, es necesario tomar medidas especiales de seguridad para reducir el riesgo de incendios, sacudidas elctricas y lesiones. El uso descuidado o inapropiado puede causar lesiones graves e incluso la muerte.
Acerca de este manual de instrucciones 23 INSTRUCCIONES IMPORTANTES DE SEGURIDAD 23 Medidas de seguridad y tcnicas de manejo 24 Lista de embalaje 29 Armado de la mquina 29 Conexin elctrica de la mquina 31 Encendido de la mquina 31 Trabajo 32 Apagado de la mquina 33 Despus de completar el trabajo 33 Vaciado del recipiente 34 Limpieza del elemento del filtro 34 Sustitucin del elemento del filtro 35 Informacin para mantenimiento 36 Localizacin de averas 37 Componentes importantes 38 Especificaciones 39 Informacin de reparacin 40 Desecho 40 Garanta limitada 41 Marcas comerciales 41 Direcciones 42
SE 6222
Este manual de instrucciones est protegido por derechos de propiedad intelectual. Todos los derechos reservados, especial- mente los derechos de reproduccin, traduccin y procesamiento con sistemas electrnicos.
Pictogramas
Todos los pictogramas que se encuentran fijados o grabados en la mquina se muestran y explican en este manual.
Smbolos en el texto
Muchas de las instrucciones de uso y seguridad vienen acompaadas de ilustraciones.
Los pasos individuales o procedimientos descritos en el manual pueden estar sealados en diferentes maneras:
N Se usa un punto para denotar un paso o procedimiento.
Una descripcin de un paso o procedimiento que se refiere directamente a una ilustracin puede contener nmeros de referencia que aparecen en la ilustracin. Ejemplo:
N Suelte el tornillo (1).
N Palanca (2)…
Adems de las instrucciones de uso, en este manual pueden encontrarse prrafos a los que usted debe prestar atencin especial. Tales prrafos estn marcados con los smbolos y las palabras identificadoras:
PELIGRO
Identifica una situacin de peligro que, de no evitarse, causar lesiones graves o mortales.
ADVERTENCIA
Identifica una situacin de peligro que, de no evitarse, podra causar lesiones graves o mortales.
INDICACIN Indica el riesgo de daos a la propiedad, incluidos la mquina o sus componentes.
Mejoramientos tcnicos
La filosofa de STIHL es mejorar continuamente todos sus productos. Como resultado de ello, peridicamente se introducen cambios de diseo y mejoras. Por lo tanto, es posible que algunos cambios, modificaciones y mejoras no se describan en este manual. Si las caractersticas de funcionamiento o la apariencia de su mquina difieren de las descritas en este manual, comunquese con el concesionario STIHL para obtener la ayuda que requiera.
Cuando usa una aspiradora, debe tomar ciertas precauciones bsicas, tal como las siguientes:
LEA TODAS LAS INSTRUCCIONES ANTES DE USAR LA ASPIRADORA STIHL!
ADVERTENCIA! Para reducir el riesgo de incendios, sacudidas elctricas u otras lesiones:
1. No deje la aspiradora desatendida cuando est enchufada. Desenchfela del tomacorriente cuando no est en uso y antes de ejecutar tareas de mantenimiento.
2. No lo exponga a lluvia. Gurdela bajo techo.
3. No permite el uso del aparato como juguete. Hay que prestar mucha atencin al usarlo cerca de los nios.
4. Utilice el aparato solamente de la manera descrita en este manual. Utilice exclusivamente los accesorios recomendados por el fabricante.
5. No utilice un aparato que tenga un cordn o enchufe daado. Si la aspiradora no funciona de la manera debida, se ha cado, fue dejada a la intemperie o ha cado en agua, devulvala al concesionario de STIHL para servicio.
Acerca de este manual de instrucciones
INSTRUCCIONES IMPORTANTES DE SEGURIDAD
6. No tire ni acarree la mquina por su cordn elctrico, no utilice el cordn elctrico como manija, no cierre una puerta sobre el cordn ni tire del mismo sobre bordes filosos o esquinas. No utilice mientras el cordn elctrico se enrolla. Mantenga el cordn elctrico alejado de las superficies calientes.
7. No tire del cordn para desenchufar el aparato. Para desenchufarlo, sujete el enchufe y no el cordn.
8. No manipule el enchufe ni el aparato con manos mojadas.
9. No coloque ningn objeto en las aberturas. No utilice con una abertura taponada; mantenga el aparato libre de polvo, pelusa, pelo u otros materiales que pueden reducir la corriente de aire.
10. Mantenga el pelo, la ropa suelta, los dedos y los dems partes del cuerpo lejos de las aberturas y las piezas en movimiento.
11. Apague todos los controles antes de desenchufar el aparato.
12. Tenga mucho cuidado al limpiar en escaleras.
13. No utilice el aparato para recoger lquidos inflamables o combustibles, tal como la gasolina, ni en un lugar donde los mismos pueden estar presentes.
14. Esta aspiradora tiene aislamiento doble. Utilice solamente los repuestos idnticos. Consulte las instrucciones de «Mantenimiento y reparaciones».
15. No recoja objetos ardientes o que estn echando humo, tales como los cigarrillos, los fsforos o las cenizas calientes.
16. No utilice el aparato si el elemento del filtro est daado o hace falta.
17. Examine el cordn elctrico peridicamente en busca de daos, tales como agrietaciones o envejecimiento. Si se descubren daos, reemplace el cordn antes de continuar usando el aparato.
GUARDE ESTAS INSTRUCCIONES
ADVERTENCIA
No preste ni alquile nunca su aspiradora sin el manual de instrucciones. Asegrese de que todas las personas que utilicen la mquina hayan comprendido la informacin que contiene este manual.
Un operador novato deber recibir capacitacin prctica antes de utilizar la aspiradora. La empresa deber establecer un programa de capacitacin de operadores para asegurar el uso seguro de estas mquinas. Estas
Medidas de seguridad y tcnicas de manejo
Puesto que el uso de una aspiradora puede resultar peligroso, es necesario tomar precauciones de seguridad especiales para reducir el riesgo de lesiones personales.
Es importante que lea, comprenda y se atenga a las «Instrucciones impor- tantes de seguridad» dadas previamente y a las precauciones y adver- tencias de seguridad dadas a continuacin. Lea el manual de instruc- ciones y las precauciones de seguri- dad peridicamente. El uso descuidado o inade- cuado puede causar lesiones graves o incluso la muerte.
medidas de seguridad y avisos se refieren al uso de todas las aspiradoras de STIHL.
Familiarcese completamente con los controles y con el modo de empleo adecuado del equipo. Sepa cmo apagar la mquina y desengranar los controles con rapidez.
Pida a su concesionario STIHL que le ensee el manejo de la aspiradora. Respete todas las disposiciones, reglamentos y normas de seguridad locales del caso.
Utilice la aspiradora para recoger materiales secos y no inflamables (polvo, tierra, vidrio roto, partculas de madera o metlicas, arena, etc.) y lquidos no inflamables (agua sucia, jugos derramados, etc.).
La aspiradora es adecuada para los usos comerciales o industriales ms exigentes, por ejemplo, en hoteles, escuelas, hospitales, fbricas, talleres, oficinas y almacenes.
ADVERTENCIA
No utilice la aspiradora para ningn otro propsito ya que el uso indebido puede resultar en lesiones personales o daos a la propiedad, incluso daos de la aspiradora. No modifique la aspiradora en manera alguna — esto tambin puede causar accidentes o daar la aspiradora.
ADVERTENCIA
Nunca se debe permitir a los nios que usen esta aspiradora. No se debe permitir la proximidad de otras
personas, especialmente de nios, ni de animales en los lugares donde se est utilizando la mquina.
ADVERTENCIA
Para reducir el riesgo de ocasionar lesiones a las personas en la cercana y daos a la propiedad, nunca deje la aspiradora en marcha desatendida. Cuando no est en uso (por ejemplo durante el descanso), apguela y asegrese que las personas no autorizadas no puedan usarla.
La mayora de las medidas de seguridad y avisos contenidos en este manual se refieren al uso de todas las aspiradoras de STIHL. Los distintos modelos pueden contar con piezas y controles diferentes. Vea la seccin correspondiente de su manual de instrucciones para tener una descripcin de los controles y la funcin de los componentes de su modelo.
El uso seguro de una aspiradora involucra a:
1. el operador
2. la aspiradora
3. el uso de la aspiradora
EL OPERADOR
Condicin fsica
Usted debe estar en buenas condiciones fsicas y psquicas y no encontrarse bajo la influencia de ninguna sustancia (drogas, alcohol, etc.) que le pueda restar visibilidad, destreza o juicio. No maneje esta aspiradora cuando est fatigado.
ADVERTENCIA
Est alerta. Si se cansa, tmese un descanso. El cansancio puede provocar una prdida del control. El uso de cualquier aspiradora puede ser fatigoso. Si usted padece de alguna dolencia que pueda ser agravada por la fatiga, consulte a su mdico antes de utilizar esta aspiradora.
LA ASPIRADORA
Para las ilustraciones y definiciones de los componentes de la aspiradora, vea el captulo «Piezas principales y controles».
ADVERTENCIA
No modifique la aspiradora en manera alguna. Utilice nicamente los accesorios y repuestos suministrados por STIHL o expresamente autorizados por STIHL para usarse con el modelo especfico de STIHL. Si bien es posible conectar a la aspiradora de STIHL ciertos accesorios no autorizados, su uso puede ser, en la prctica, extremadamente peligroso.
Si la mquina experimenta cargas excesivas para las cuales no fue diseada (por ejemplo, impactos severos o una cada), siempre asegrese que la mquina est en buenas condiciones antes de seguir con el trabajo. Compruebe especficamente que los controles y dispositivos de seguridad funcionen correctamente.
ADVERTENCIA
No maneje nunca una aspiradora que est daada o que no fue armada debidamente. En caso de dudas, pida que el concesionario de servicio de STIHL la revise.
Utilice la aspiradora nicamente cuando todos sus componentes estn en buenas condiciones de trabajo.
Verifique que el elemento del filtro est en su lugar y libre de daos.
No utilice el aparato si el elemento del filtro est daado o hace falta.
La mquina slo debe ponerse en marcha en posicin vertical. No cubra la mquina y asegure que el motor tenga ventilacin adecuada.
ADVERTENCIA
Para evitar los riesgos de formar cortocircuitos, nunca roce la parte superior de la aspiradora con agua.
No limpie la aspiradora con una lavadora a presin. El chorro fuerte de agua puede daar las piezas de la aspiradora.
EL USO DE LA ASPIRADORA
Precauciones elctricas
Vea tambin las precauciones de seguridad de electricidad listadas bajo «Precauciones importantes de seguridad», al principio de este manual.
ADVERTENCIA
Es necesario tomar precauciones especiales al usar aspiradoras para reducir el riesgo de sufrir lesiones personales y causar daos a la propiedad como resultado de incendios y sacudidas elctricas.
ADVERTENCIA
Inspeccione el cordn elctrico y su enchufe peridicamente en busca de desgaste y daos.
ADVERTENCIA
Conecte la mquina nicamente a un tomacorriente debidamente instalado.
ADVERTENCIA
El voltaje y frecuencia de la alimentacin elctrica deber corresponder con el voltaje y frecuencia especificados en la chapa de capacidades de la aspiradora. Un voltaje incorrecto daar el motor de la aspiradora y puede causar lesiones personales.
Conecte la aspiradora a la alimentacin elctrica nicamente a travs de un circuito con interruptor por prdidas a tierra con capacidad mnima de 120 V, 60 Hz.
ADVERTENCIA
Asegrese que el interruptor est en posicin de apagado al enchufar la mquina al suministro de energa elctrica para evitar los riesgos de incendios y sacudidas elctricas causados por los arcos elctricos y para evitar las lesiones causadas por el funcionamiento imprevisto de la aspiradora.
ADVERTENCIA
ADVERTENCIA
Cuando use la aspiradora, siempre mantenga el cordn elctrico detrs suyo. Asegrese que el cordn elctrico no se enrede con obstculos ni objetos. Mantenga el cordn alejado de fuentes de calor, aceite y bordes afilados. No cierre una puerta sobre el cordn. Nunca tire ni acarree la aspiradora por su cordn elctrico, ni tire del mismo para desconectarlo de un tomacorriente. Para desenchufarlo, sujete el enchufe y no el cordn. Los
Para reducir el riesgo de sufrir lesiones graves causadas por electrocu- cin, nunca use la aspiradora si el cordn o enchufe elctrico est cortado, agrietado, des- gastado o daado.
Solicite al concesionario de servicio STIHL que reemplace un cordn elctrico en tales condiciones.
Para evitar el riesgo de sacudidas elctricas, no use la aspiradora en lugares hmedos ni mojados. No exponga ni use el aparato bajo la llu- via. No manipule el enchufe ni la mquina con manos mojadas.
cordones daados pueden causar la electrocucin. Siempre desconecte el enchufe del tomacorriente elctrico al tomar un descanso.
Cordones elctricos
Cuando se utilizan cordones de extensin, compruebe que sus conductores tengan el dimetro mnimo especificado — consulte «Conexin al suministro de energa elctrica».
Se pueden obtener cordones de extensin apropiados en establecimientos de venta de equipos elctricos. Utilice nicamente cordones de extensin que satisfagan con las especificaciones de la tarea a realizarse.
Un cordn de extensin no adecuado puede resultar peligroso.
Si el cordn de extensin est enrollado en un carrete, siempre desenrllelo completamente para reducir el riesgo de producir un incendio por sobrecalentamiento.
Cuando se utilizan cordones de extensin, su enchufe y acoplamiento debern ser a prueba de agua, o colocarse de manera tal que no puedan entrar en contacto con el agua.
Transporte de la aspiradora
Antes de transportar el recipiente, asegure todos sus pestillos.
Cuando transporte la aspiradora en un vehculo, sujtela firmemente para impedir que se vuelque y ocasionarle daos..
No incline la aspiradora si el recipiente contiene lquido.
No utilice un gancho de gra para levantar la aspiradora.
Antes del uso
Siempre compruebe que la aspiradora est en buenas condiciones antes de arrancarla.
ADVERTENCIA
Inspeccione el cordn elctrico, los cordones de extensin y los enchufes en busca de daos y envejecimiento. Nunca use la aspiradora con cordones o enchufes daados.
Condiciones de trabajo
ADVERTENCIA
ADVERTENCIA
ADVERTENCIA
Para reducir el riesgo de sufrir lesiones personales o la muerte, no aspire materiales peligrosos ni txicos.
ADVERTENCIA
Algunos polvos que se producen al limar, esmerilar, taladrar y otras actividades de taller contienen sustancias qumicas consideradas por el Estado de California y otras autoridades como causantes de cncer, defectos de nacimiento u otros daos a los rganos de la reproduccin. Algunos ejemplos de estas sustancias qumicas son:
1 plomo de pintura a base de plomo
2 slice cristalina de ladrillos y hormign, otros productos de mampostera y muchos tipos de piedra, y
3 arsnico y cromo hallado en madera con tratamientos qumicos
Si estos polvos y otros similares se encuentran en las superficies que se limpiarn, algunas partculas pequeas podran suspenderse en el aire como resultado del proceso de aspiracin. Controle el polvo en su fuente, siempre que sea posible. Emplee buenas prcticas de trabajo. Cuando sea imposible eliminar significativamente la inhalacin del polvo, es decir mantener el nivel cerca del valor ambiente, el operador y las personas que se encuentren en la cercana siempre debern usar un respirador aprobado por NIOSH/MSHA para el tipo de polvo presente en el lugar.
Nunca utilice la aspira- dora para recoger materiales calientes (cenizas calientes, ciga- rrillos encendidos, fsforos, etc.). Nunca aspire lquidos inflama- bles o combustibles (gasolina, adelgazado- res, etc.) ni lquidos agresivos (cidos, leja) Riesgo de lesiones gra- ves o mortales por incendios o explosiones!
Para reducir los riesgos de sufrir lesiones perso- nales causadas por incendios y explosiones, nunca aspire polvos infla- mables o explosivos (por ejemplo, polvo de mag- nesio o de aluminio, etc.).
ADVERTENCIA
Si la sustancia que se est aspirando es un producto comercial, repase, entienda y respete todas las advertencias e instrucciones contenidas en la hoja de datos de seguridad de materiales de la sustancia y/o consulte al fabricante/proveedor del producto.
ADVERTENCIA
La aspiracin del polvo de asbesto es peligrosa y puede causar lesiones graves o mortales, enfermedades de las vas respiratorias o cncer. El uso y la eliminacin de los productos que contienen asbesto estn estrictamente reglamentados por OSHA y el Organismo para la Proteccin del Medio Ambiente (EPA) de los EE.UU. Si por cualquier motivo cree que est aspirando o perturbando asbesto, pngase en contacto inmediatamente con la EPA, su empleador o un representante de OSHA local.
La aspiracin de materiales no adecuados puede obstruir la manguera de aspiracin. Apague la unidad inmediatamente y desconecte el enchufe del suministro de energa elctrica. Luego, elimine el bloqueo.
Retire la bolsa de filtro y compruebe que el flotador funcione correctamente antes de aspirar lquidos o materiales hmedos. Nunca ponga la mquina en marcha sin el elemento del filtro instalado.
ADVERTENCIA
Si el aparato produce espuma o tiene fugas de lquido, suspenda el trabajo de inmediato, desconecte el cordn elctrico y vace el recipiente.
Cuando utilice la aspiradora, siempre sujete el tubo del mango firmemente con sus dedos. Mantenga la mano en esta posicin, para que siempre tenga la aspiradora bien controlada. Asegrese que el tubo del mango est en buenas condiciones y sin humedad, resina, aceite o grasa.
Para encender la aspiradora despus de haber enchufado el cordn elctrico a un tomacorriente, mueva el interruptor de encendido de la posicin «0» a «I.»
Para reducir el riesgo de tropezarse y de perder el control, no camine hacia atrs mientras est utilizando la aspiradora.
Deseche la tierra, la bolsa de filtro y el elemento del filtro conforme a los reglamentos vigentes.
MANTENIMIENTO, REPARACIN Y ALMACENAMIENTO
Mantenimiento de un aparato con aislamiento doble
La aspiradora STIHL tiene aislamiento doble. Tales aparatos tienen dos sistemas de aislamiento en lugar de la puesta a tierra. No existe una conexin a tierra en un aparato de aislamiento doble, y no es necesario aadir un dispositivo de conexin a tierra al mismo. El mantenimiento de un aparato con aislamiento doble requiere cuidado adicional y buen conocimiento del sistema, y debe ser efectuado
nicamente por personal calificado de mantenimiento. Los repuestos para el aparato con aislamiento doble deben ser idnticos a las piezas que reemplazan.
Utilice solamente las piezas de repuesto idnticas de STIHL para el mantenimiento y la reparacin. La utilizacin de piezas fabricadas por otras empresas puede causar lesiones graves o mortales. Siga las instrucciones de mantenimiento y reparacin dadas en la seccin correspondiente del manual de instrucciones.
ADVERTENCIA
Dele mantenimiento peridico a la aspiradora.
Siempre repare una unidad daada antes de seguir usndola.
Siempre apague el motor, desconecte el enchufe del suministro de energa elctrica y ase- grese que la turbina del ventilador est detenida antes de hacer cualquier trabajo de manteni- miento, reparacin o limpieza de la aspiradora. No intente hacer ningn trabajo de manteni- miento o reparacin que no est descrito en su manual de instrucciones. Este tipo de trabajo debe realizarse nicamente en el taller de servicio de STIHL.
STIHL recomienda que un concesionario STIHL autorizado efecte los trabajos de mantenimiento y reparacin.
STIHL recomienda el uso piezas de repuesto originales de STIHL. Han sido diseadas especficamente para usar con su mquina y satisfacen sus necesidades de rendimiento.
Nunca intente modificar la aspiradora en manera alguna, ya que esto puede causar lesiones personales.
Inspeccione el cordn elctrico y su enchufe peridicamente en busca de desgaste y daos.
Su concesionario de servicio STIHL es el nico que deber sustituir un cordn elctrico daado.
Limpie los componentes de plstico con un trapo. No use detergentes fuertes para limpiar la caja de plstico ni el mango. Estos pueden verse atacados por ciertos limpiadores domsticos que contienen aceites aromticos, tales como el pino o el limn, o por disolventes tales como el keroseno.
Nunca roce la aspiradora con agua; la humedad puede crear riesgos de sacudidas elctricas. Quite la humedad del aparato con un trapo.
Guarde la aspiradora en un lugar seco y elevado o con llave, lejos del alcance de los nios.
1x suction hose 2.5 m
1x hand tube
2x insertable suction tube
Accessories in container
1x Kombi floor tool (1)
1x all-purpose tool (2)
1x crevice tool (3)
1x filter bag (4)
1x suction tube holder (5)
1x holder for power cord (6)
The following accessory parts must be fitted before using the machine for the first time.
ADVERTENCIA
No enchufe el cordn elctrico al tomacorriente hasta que la mquina est completamente armada.
Opening and closing the container
Apertura
N Release the spring catches (1)
N Lift the upper part of the vacuum cleaner (2) vertically up and off
N Remove accessories and insert filter bag see «Inserting filter bag»
Cierre
N Refit the upper part of the vacuum cleaner (2) and close the latches (1) ensure that the latches engage properly
Lista de embalaje
6
08 09
BA 03
0 KN
1 2
3
5
4
Armado de la mquina
08 09
BA 03
1 KN
1 1
Fitting the filter bag
N Empuje el manguito de la bolsa de filtro sobre la lumbrera de entrada hasta donde sea posible
Mounting suction hose and hand tube
N Insert sleeve (1) of suction hose into the intake port (2)
N Slide clutch (3) of suction hose into the retainer (4) on the hand tube lock (5) must engage
Holders for power cord
N Connect holder for power cord via the support on the upper part of the vacuum cleaner
Suction tube
N Connect suction tubes (1) and (2)
Mount suction tube holder
N Slide the suction tube holder (1) via the suction tube (distance A approx. 8 cm / 3.150 in.) and secure it with the screw (2)
Sujecin de accesorios
Sujete los accesorios en los sujetadores provistos tal como se muestra en la ilustracin.
08 09
BA 00
4 KN
1
08 09
BA 03
2 KN
34
08 09
BA 03
3 KN5
08 09
BA 02
6 KN
08 09
BA 00
7 KN
1 2
A
2
08 09
BA 00
9 KN
1
08 09
BA 03
4 KN
El voltaje y la frecuencia de la fuente de alimentacin elctrica y el voltaje y la frecuencia especificados en la mquina debern corresponder.
La conexin a la fuente de alimentacin se debe proteger por un fusible o un disyuntor con una capacidad mnima de acuerdo con las especificaciones — vea «Especificaciones.»
La herramienta motorizada debe conectarse a la fuente de alimentacin por va de un interruptor diferencial (GFCI). Hay tomacorrientes que incorporan proteccin por medio de un interruptor diferencial (GFCI) y que pueden usarse como medida de seguridad.
La conexin a la fuente de alimentacin elctrica debe conformarse con todas las normas y reglamentos vigentes.
Alargadores
Compruebe que el alargador elctrico se encuentre en buenas condiciones y sea adecuado para uso a la intemperie. Cuando se usa un alargador, asegrese de que sea suficientemente grueso para conducir la corriente que el producto consumir. Un alargador de capacidad insuficiente puede causar una cada de voltaje de lnea, lo cual produce una prdida de potencia y sobrecalentamiento. La tabla ms abajo muestra el tamao (AWG) correcto a usarse con la mquina (cordones tipo SJW o SJTW), segn el largo del cordn y la capacidad de corriente de la placa
de identificacin de la mquina. En caso de duda, utilice el calibre inmediatamente ms grueso. Cuanto menor el nmero de calibre, tanto ms grueso el cordn.
Se pueden obtener alargadores apropiados en establecimientos de equipos elctricos, o a travs del concesionario STIHL.
Conexin al tomacorriente de alimentacin
Antes de conectar la fuente de alimentacin elctrica, verifique que la mquina est apagada consulte «Apagado de la mquina»
N Enchufe el cordn elctrico o cordn de extensin a un tomacorriente debidamente instalado
Switch positions:
N To switch on, set master switch to I
Conexin elctrica de la mquina
Largo del cordn (pies)
Calibre de alambre (AWG)
50 16 100 14 150 12
Encendido de la mquina
vacuum cleaner is switched on
vacuum cleaner is switched off
08 09
BA 01
1 KN
N Depending on the intended use of vacuum cleaner select the appropriate accessory and fit to end of suction tube or hand tube
Kombi floor tool
N Position for vacuuming carpets (1)
N Position for vacuuming hard floors (2)
All-purpose tool
To clean upholstery or inside of vehicles.
Crevice tool
To clean ingrained dirt, e. g. in corners or joints.
Aspiracin de materiales secos
ADVERTENCIA
Los materiales inflamables no deben aspirarse.
Siempre compruebe que la bolsa de filtro ha sido colocada en el recipiente antes de aspirar materiales secos. Esto permite desechar los materiales aspirados sin dificultades. Los materiales secos tambin pueden aspirarse sin la bolsa de filtro instalada.
INDICACIN Nunca utilice una aspiradora con un elemento daado en el filtro, o sin tener el elemento instalado.
Aspiracin de lquidos
ADVERTENCIA
Flammable liquids must not be vacuumed.
Siempre retire la bolsa de filtro y compruebe que el flotador funciona antes de aspirar lquidos. El flotador corta el torrente de aire cuando el recipiente se llena. Si la mquina se usa exclusivamente para aspirar lquidos, sustituya el elemento del filtro por un inserto especial (accesorio especial).
El elemento del filtro queda hmedo despus de aspirar lquidos. El elemento del filtro probablemente se obturar con mayor rapidez si se aspiran materiales secos mientras est hmedo. Por este motivo, seque el elemento de filtro o reemplcelo por un elemento seco antes de aspirar materiales secos.
Modo de soplador
For difficult to reach areas and for all those applications where vacuuming is not possible or advisable.
N Remove suction hose from intake port
N Connect suction hose (1) in exhaust opening (2)
Trabajo
08 09
BA 01
3 KN
1
2
08 09
BA 01
4 KN
08 09
BA 01
5 KN
1
08 09
BA 03
5 KN
Ajuste de intensidad de aspiracin
The suction power can be adjusted with the adjusting ring if required to avoid lifting light carpets etc. from the floor:
N Turn adjusting ring (1) and adapt suction power to the relevant cleaning task
N Turn the master switch to O
N Desconecte el enchufe de alimentacin del tomacorriente
N Vace el recipiente y limpie la mquina
Despus de haber aspirado lquidos:
N Retire la parte superior de la aspiradora para permitir que el elemento del filtro se seque
N Enrolle el cordn elctrico y culgalo en el sujetador
N Fije el tubo de extensin, la manguera de aspiracin y los accesorios a los sujetadores provistos para este fin
N Guarde la aspiradora en un recinto seco que ofrezca proteccin contra el uso no autorizado
08 09
BA 01
8 KN
1
Apagado de la mquina
08 09
BA 03
6 KN
Despus de completar el trabajo
08 09
BA 02
8 KN
N Apague la aspiradora
N Desconecte el enchufe de alimentacin del tomacorriente
N Open the container see Assembling the machine
Al aspirar materiales secos sin bolsa de filtro y aspirar materiales hmedos
N Remove suction hose from intake port
N Vace el recipiente y deseche su contenido conforme a los reglamentos vigentes
Al aspirar materiales secos con bolsa de filtro
N Extraiga la bolsa de filtro de la lumbrera de admisin y cierre el manguito de la bolsa de filtro con la corredera
N Saque la bolsa de filtro cuidadosamente del recipiente y deschela segn los reglamentos del caso
N Instale una nueva bolsa de filtro (las instrucciones estn en la bolsa)
N Empuje el manguito de la bolsa de filtro sobre la lumbrera de entrada hasta donde sea posible
Close the container
N Limpie el borde del recipiente
N Fit the upper part of the vacuum cleaner see Assembling the machine
N before fitting the suction hose: Clean the sleeve of the suction hose and intake port
N Cierre la corredera en el tubo de mano
N Encienda la mquina
N Press opening of hand tube firmly against a level surface or close by hand
N Press the button (1) to clean filter 3x
Los depsitos de polvo se eliminan del elemento del filtro.
Vaciado del recipiente
08 09
BA 02
2 KN
Limpieza del elemento del filtro
1
08 09
BA 03
7 KN
N Desconecte el enchufe de alimentacin del tomacorriente
N Retire la parte superior de la aspiradora y colquela en posicin invertida
N Turn the cover (1) in the direction of the arrow and remove it
N Remove filter element (2) and dispose of it in accordance with the statutory regulations
N Check correct operation of the float: the float must move easily when the upper part of the vacuum cleaner is turned over
N Coloque un elemento de filtro nuevo invirtiendo el orden de los pasos de retiro
N Vuelva a instalar la parte superior de la aspiradora
INDICACIN Nunca utilice una aspiradora con un elemento daado en el filtro, o sin tener el elemento instalado.
Sustitucin del elemento del filtro
1
08 09
BA 03
8 KN
2
Informacin para mantenimiento
Los intervalos que se dan a continuacin son aplicables en condiciones de trabajo normales. Los inter- valos especificados debern acortarse como corresponda si se trabaja durante periodos ms largos de lo normal o en condiciones de corte difciles (polvo excesivo, etc.).
An te
s de
e m
pe za
r a tr
ab aj
ar
Tr as
fi na
liz ar
e l t
ra ba
jo y
/o a
di
ar io
Se m
an al
m en
te
M en
su al
m en
te
En c
as o
de a
ve ra
En c
as o
de d
a os
C ua
nd o
se a
ne ce
sa rio
Mquina completa Inspeccin visual (estado general) X
Limpiar X
Cable de conexin Revisar X
Solicitar sustitucin al concesionario de servicio1) X
Interruptor Prueba de funcionamiento X
Solicitar sustitucin al concesionario de servicio1) X X
Ranuras de ventilacin de la carcasa del motor Limpiar X
Bolsa de filtro Cambiar X
Elemento del filtro Limpiar X
Cambiar X
Depsito Vaciar X
Los tornillos, tuercas y pernos accesibles Apretar X
Etiqueta de informacin de seguridad Cambiar X 1) STIHL recomienda acudir a un concesionario STIHL
Falla: El motor no arranca
Falla: Aspiracin deficiente
Falla: No hay fuerza de aspiracin cuando se aspiran materiales hmedosLocalizacin de averas
Causa Solucin El disyuntor de ali- mentacin se ha disparado
Revise y reponga el disyuntor de alimentacin
Causa Solucin La bolsa de filtro est llena
Consulte «Vaciado del recipiente»
Obturacin en man- guera de aspiracin/herra- mienta
Limpiar la man- guera de aspiracin/herra- mienta
Suciedad en ele- mento del filtro
Consulte «Lim- pieza del elemento del filtro» y «Susti- tucin del elemento del filtro»
La empaquetadura entre la parte supe- rior de la aspiradora y el recipiente est sucia o averiada
Limpie o sustituya la empaquetadura
Causa Solucin Recipiente lleno (la lumbrera de entrada ha sido cerrada por el flotador)
Consulte «Vaciado del recipiente»
1 Manguera de aspiracin 2 Tubo de mango 3 Mango 4 Botn de limpieza de filtro 5 Interruptor 6 Elemento del filtro 7 Lumbrera de entrada de aspiracin 8 Abertura de escape y conexin de
manguera de aspiracin en modo soplador
9 Portador de tubo de extensin 10 Pestillo 11 Recipiente 12 Portador de manguera de
aspiracin 13 Tubo de extensin 14 Portador de tubo de extensin 15 Herramienta Kombi de piso 16 Herramienta para hendiduras 17 Herramienta universal
Componentes importantes
3
9 12
86
08 09
BA 03
9 KN
1 2
5
14
15
17
16
13
13
4
11 7
10
Definiciones
1 Manguera de aspiracin Dirige la tierra y/o lquidos aspirados hacia el recipiente.
2 Tubo de mango Sujeta y gua la herramienta utilizada.
3 Mango Para sujetar y acarrear la aspiradora.
4 Botn de limpieza de filtro Oprmalo para despejar los depsitos de polvo del filtro.
5 Interruptor Para encender y apagar la mquina.
6 Elemento del filtro Filtra el polvo de la corriente de aire.
7 Lumbrera de entrada de aspiracin Conexin entre el recipiente y la lumbrera de aspiracin.
8 Abertura de escape y conexin de manguera de aspiracin en modo soplador Se usa para zonas difciles de alcanzar y situaciones en las cuales el aspirado no es posible o no es recomendable.
9 Portador de tubo de extensin Permite el uso del tubo de extensin en la aspiradora.
10 Pestillo Sujeta la mitad superior al recipiente.
11 Recipiente Captura y almacena los polvos y/o lquidos aspirados.
12 Portador de manguera de aspiracin Para almacenar la manguera de aspiracin.
13 Tubo de extensin Dirige la tierra y/o los lquidos aspirados de la herramienta a la manguera de aspiracin.
14 Portador de tubo de extensin Para almacenar el tubo de extensin.
15 Herramienta Kombi de piso Para limpiar superficies lisas y alfombras.
16 Herramienta para hendiduras Para limpiar lugares difciles de alcanzar.
17 Herramienta universal Herramienta para muchos usos diversos.
Motor
Datos de rendimiento
Dimensiones
Especificaciones
Fuente de alimentacin: 120 V Frecuencia: 60 Hz Capacidad elctrica: 1000 W Disyuntor: 15 A Aislamiento: Aislamiento
doble E
Capacidad mx. de admisin de aire:
3200 l/min (112 pies cb./min)
Aspiracin mx.: 210 mbar / 84 pulg H2O
Largo aproximado: 385 mm (15,16 pulg)
Ancho aproximado: 377 mm (14,84 pulg)
Altura aproximada: 506 mm (19,92 pulg)
Capacidad del recipiente: 25 l (6,6 gal) Largo de manguera de aspiracin: 2,5 m (98 pulg) Dimetro interior: 32 mm
(1,25 pulg)
Peso
Valores de ruido
Intensidad de presin sonora Lp segn EN 60704-1 (a una distancia de 1 m)
Los usuarios de esta mquina deben efectuar nicamente los trabajos de mantenimiento descritos en este manual. STIHL recomienda que un concesionario de servicio STIHL efecte los dems trabajos de reparacin utilizando piezas de repuesto genuinas de STIHL.
Es posible identificar las piezas originales de STIHL por el nmero de pieza STIHL, el logotipo de { y, en ciertos casos, el smbolo K de piezas STIHL. En las piezas pequeas el smbolo puede aparecer solo.
Para reparar algn componente del sistema de control de emisiones de aire, consulte la garanta de sistemas de emisiones dada en este manual.
Respete todas las leyes y los reglamentos sobre eliminacin de desechos que correspondan a su pas.
No se debe botar los aparatos STIHL en el basurero. Lleve el producto, los accesorios y el embalaje a un vertedero autorizado para reciclarlos y contribuir al cuidado del medio ambiente.
Comunquese con un concesionario de servicio de STIHL para obtener la informacin ms actualizada sobre la eliminacin de desechos.
Lista para funcionar: 7,5 kg (16,5 lb)
70 dB(A)
Informacin de reparacin Desecho
00 0B
A0 73
K N
Poltica de garanta limitada de STIHL Incorporated para piezas y componentes no relacionados con las emisiones
Este producto se vende sujeto a la Poltica de garanta limitada de STIHL Incorporated, disponible en
www.stihlusa.com/warranty.html.
Tambin puede obtenerlo de un concesionario de servicio STIHL autorizado o llamando al 1-800-GO- STIHL (1-800-467-8445).
Se proporciona una garanta aparte para el sistema de control de emisiones y para los componentes relacionados con el sistema de emisiones.
Marcas registradas de STIHL
STIHL
{
K
La combinacin de colores anaranjado- gris (Nmeros de registro EE.UU. 2,821,860; 3,010,057, 3,010,058, 3,400,477; y 3,400,476)
AutoCut
FARM BOSS
iCademy
MAGNUM
MasterWrench Service
MotoMix
OILOMATIC
ROCK BOSS
STIHL Cutquik
STIHL DUROMATIC
STIHL Quickstop
STIHL ROLLOMATIC
STIHL WOOD BOSS
TIMBERSPORTS
WOOD BOSS
YARD BOSS
Algunos de las marcas comerciales de STIHL por ley comn
4-MIX
BioPlus
Easy2Start
EasySpool
ElastoStart
Ematic
FixCut
IntelliCarb
Master Control Lever
Micro
Pro Mark
Quiet Line
STIHL M-Tronic
Garanta limitada Marcas comerciales
TM
STIHL Injection
STIHL OUTFITTERS
STIHL PICCO
STIHL PolyCut
STIHL PowerSweep
STIHL Precision Series
STIHL RAPID
STIHL SuperCut
TapAction
TrimCut
Esta lista de marcas comerciales est sujeta a cambios.
Queda terminantemente prohibido todo uso de estas marcas comerciales sin el consentimiento expreso por escrito de ANDREAS STIHL AG & Co. KG, Waiblingen.
STIHL Inc. 536 Viking Drive P.O. Box 2015 Virginia Beach, VA 23452-2015
Direcciones
www.stihl.com
0458-659-8621-A
englisch / spanisch USA U
lisc / s isc
ADVERTENCIA Este producto puede dispersar polvo que
contiene sustancias qumicas consideradas por el Estado de California como causantes de cncer,
defectos de nacimiento u otros daos a los rganos de la reproduccin.
WARNING
This product can disperse dust containing chemicals known to the State
of Californinia to cause cancer, birth defects or other reproductive harm.
WARNING
This product contains chemicals known to the State of California to cause
cancer, birth defects or other reproductive harm.
ADVERTENCIA
Este producto contiene sustancias qumicas consideradas por el Estado de California como causantes de cncer,
Manualsnet FAQs
If you want to find out how the SE 62 Stihl works, you can view and download the Stihl SE 62 Instruction Manual on the Manualsnet website.
Yes, we have the Instruction Manual for Stihl SE 62 as well as other Stihl manuals. All you need to do is to use our search bar and find the user manual that you are looking for.
The Instruction Manual should include all the details that are needed to use a Stihl SE 62. Full manuals and user guide PDFs can be downloaded from Manualsnet.com.
The best way to navigate the Stihl SE 62 Instruction Manual is by checking the Table of Contents at the top of the page where available. This allows you to navigate a manual by jumping to the section you are looking for.
This Stihl SE 62 Instruction Manual consists of sections like Table of Contents, to name a few. For easier navigation, use the Table of Contents in the upper left corner.
You can download Stihl SE 62 Instruction Manual free of charge simply by clicking the “download” button in the upper right corner of any manuals page. This feature allows you to download any manual in a couple of seconds and is generally in PDF format. You can also save a manual for later by adding it to your saved documents in the user profile.
To be able to print Stihl SE 62 Instruction Manual, simply download the document to your computer. Once downloaded, open the PDF file and print the Stihl SE 62 Instruction Manual as you would any other document. This can usually be achieved by clicking on “File” and then “Print” from the menu bar.

Пылесос STIHL SE 62
Пылесос Штиль SE-62
Удаляет пыль, грязь и жидкости как изнутри, так и снаружи. Выбор режима сухой и влажной уборки, функция продувки за счёт перестановки всасывающей трубы на подключение к воздушной системе, многоступенчатая система фильтрации, система очистки фильтра, переключаемая насадка для пола, универсальная насадка, щелевая насадка.
Технические данные
| Мощность Р(макс.) Вт | 1.400 |
| Вес кг | 7,5 |
| Емкость резервуара л | 20 |
| Всасываемое количество воздуха л/мин | 3.600 |
| Шланг для всасывания м | 2,5 |
| Макс. разряжение мбар | 210 |
Серийное оснащение
Насадка для уборки в щелях
Насадка для пола и щелевая насадка при необходимости всегда под рукой, они быстро и легко справляются с самыми различными задачами очистки
Нет комментариев
Добавить комментарий
Высококачественный пылесос для влажной и сухой уборки
Общая информация
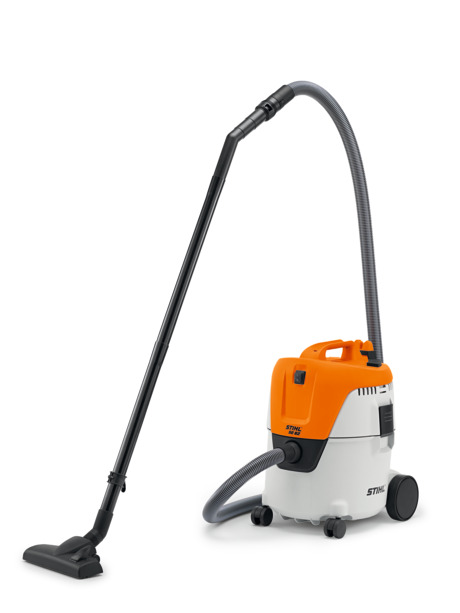
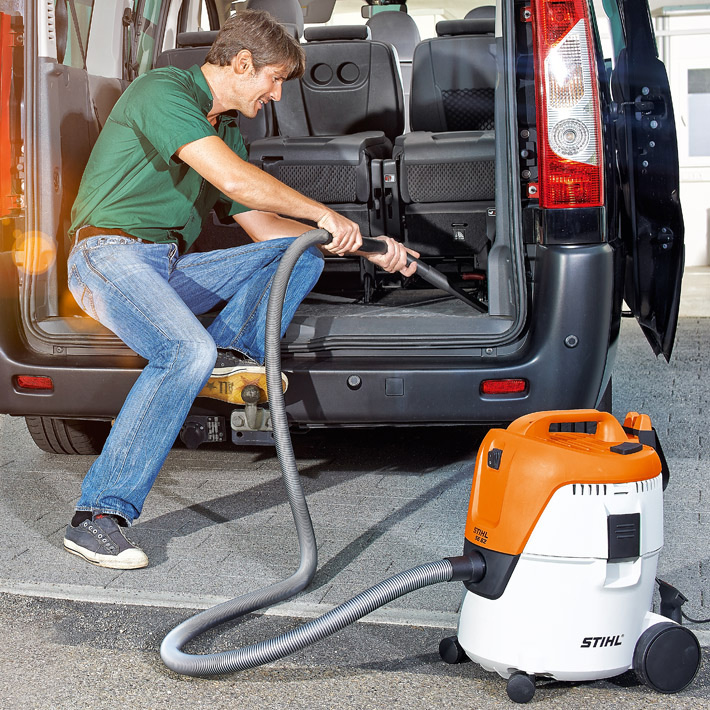
Компактный пылесос для влажной и сухой уборки с высококачественным оснащением. С функцией продувки для очистки труднодоступных мест. Функция очистки фильтра, переключаемая насадка для пола, щелевая насадка, универсальная насадка и пылесборник из нетканого материала. Незаменим для уборки в доме, подвале, на придомовой территории и в небольших мастерских.
Варианты исполнения
Цена
-
SE 62
—.—**
** Цену уточняйте в магазинах дилеров STIHL.
Ассортимент изделий и данные сведения могут отличаться в зависимости от экспортного исполнения. Возможны конструктивные и технологические модификации инструмента и оснастки, а также изменение цены.
Технические данные

Технические данные
| Технические данные | Значение |
|---|---|
|
Мощность Р(макс.)
Вт |
1.400 |
|
Вес
кг |
7,5 |
|
Макс. разрежение
мбар |
210 |
|
Емкость резервуара
л |
20 |
|
Всасываемое количество воздуха
л/мин |
3.600 |
|
Шланг для всасывания
м |
2,5 |
|
Объём резервуара
л |
20 |
Ассортимент изделий и данные сведения могут отличаться в зависимости от экспортного исполнения. Возможны конструктивные и технологические модификации инструмента и оснастки, а также изменение цены.
Оснащение
Серийное оснащение
-


Насадка для уборки в щелях
Насадка для пола и щелевая насадка при необходимости всегда под рукой, они быстро и легко справляются с самыми различными задачами очистки (см. иллюстрацию).
Ассортимент изделий и данные сведения могут отличаться в зависимости от экспортного исполнения. Возможны конструктивные и технологические модификации инструмента и оснастки, а также изменение цены.
Принадлежности
Принадлежности
-
-

Фильтр-мешки для SE 62, SE 62 E
.
Варианты исполнения
Цена
-
Фильтр-мешок, SE 62, SE 62 E
Цена
** Цену уточняйте в магазинах дилеров STIHL.
-
-
-

ПЭТ-фильтр SE 62 – SE 122 E
Прочный бумажный фильтр для моделей SE 62 – SE 122 E.
Варианты исполнения
Цена
-
ПЭТ-фильтр SE 62 – SE 122 E
Цена
** Цену уточняйте в магазинах дилеров STIHL.
-
-
-

Фильтр для влажной уборки для SE 62 – SE 122 E
Для регулярной длительной работы в режиме сбора жидкости. Для моделей SE 62-SE 122 E.
Варианты исполнения
Цена
-
Фильтр для влажной уборки для SE 62 – SE 122 E
Цена
** Цену уточняйте в магазинах дилеров STIHL.
-
-
-

Насадки для пола большой площади
Для уборки больших поверхностей. Алюминий, с регулировкой по высоте, со сменной вставкой. Ширина 450 мм. Диаметр соединения 36 мм. Для моделей SE 62 — SE 133 ME.
Варианты исполнения
Цена
-
Насадка для пола большой площади с щеточной вставкой
Цена
** Цену уточняйте в магазинах дилеров STIHL.
-
-
-
Насадки для пола большой площади
Для уборки больших поверхностей. Алюминий, с регулировкой по высоте, со сменной вставкой. Ширина 450 мм. Диаметр соединения 36 мм. Для моделей SE 62 — SE 133 ME.
Варианты исполнения
Цена
-
Насадка для пола большой площади со вставкой с резиновой кромкой
Цена
** Цену уточняйте в магазинах дилеров STIHL.
-
-
-

Универсальная насадка для пола, ширина 400 мм
Для влажной уборки больших поверхностей, с регулировкой по высоте, ширина 400 мм, соединительный патрубок диаметром 36 мм для SE 61-SE 122 E.
Варианты исполнения
Цена
-
Универсальная насадка для пола, ширина 400 мм
Цена
** Цену уточняйте в магазинах дилеров STIHL.
-
-
-

Алюминиевая насадка для пола
Для сухой уборки. Съёмная щеточная вставка. Ширина 330 мм. Диаметр соединения 36 мм. Для моделей SE 62-SE 133 ME..
Варианты исполнения
Цена
-
Алюминиевая насадка для пола
Цена
** Цену уточняйте в магазинах дилеров STIHL.
-
-
-

Насадка для отопительных радиаторов
Для удобной чистки отопительных радиаторов или жалюзи. Вычистит все до последнего уголка.
Варианты исполнения
Цена
-
Насадка для чистки отопительных радиаторов D36
Цена
** Цену уточняйте в магазинах дилеров STIHL.
-
-
-

Резиновая насадка со скошенным отверстием, длина 185 мм
Для очистки легко повреждаемых поверхностей, длина 185 мм, соединительный патрубок диаметром 36 мм для SE 61-SE 122 E.
Варианты исполнения
Цена
-
Резиновая насадка со скошенным отверстием, длина 185 мм
Цена
** Цену уточняйте в магазинах дилеров STIHL.
-
-
-

Щёточная насадка, длина 230 мм
Для очистки легко повреждаемых элементов (например, обивки мебели), длина 230 мм, соединительный патрубок диаметр 36 мм для SE 61-SE 122 E.
Варианты исполнения
Цена
-
Щёточная насадка, длина 230 мм
Цена
** Цену уточняйте в магазинах дилеров STIHL.
-
-
-

Щелевая насадка, 300 мм
Пластик, для очистки труднодоступных мест, длина 300 мм, соединительный патрубок диаметр 36 мм. Для SE 61-SE 122 E.
Варианты исполнения
Цена
-
Щелевая насадка, 300 мм
Цена
** Цену уточняйте в магазинах дилеров STIHL.
-
-
-

Щелевая насадка, длинная, длина 920 мм
Металл, для очистки отопительных котлов и печей, длина 920 мм, соединительный патрубок диаметром 36 мм
Варианты исполнения
Цена
-
Щелевая насадка, длинная, длина 920 мм
Цена
** Цену уточняйте в магазинах дилеров STIHL.
-
-
-

Удлинительные трубки
В качестве дополнительного оснащения
Варианты исполнения
Цена
-
Удлинительные трубки, длина 500 мм, 2 шт
Цена
** Цену уточняйте в магазинах дилеров STIHL.
-
-
-

Комплект для влажной уборки
Для уборки и удаления жидкостей. Состоит из насадки для сбора жидкостей, резиновой насадки со скошенным отверстием и фильтрующего элемента из нержавеющей стали. Для SE 62-SE 122 E.
Варианты исполнения
Цена
-
Комплект для влажной уборки
Цена
** Цену уточняйте в магазинах дилеров STIHL.
-
-
-
ПЭТ-фильтр моющийся для SE 62 – SE 122 E
Износостойкий моющийся ПЭТ-флис, прекрасно подходит для работы в режиме сбора жидкости.
Варианты исполнения
Цена
-
ПЭТ-фильтр моющийся для SE 62 – SE 122 E
Цена
** Цену уточняйте в магазинах дилеров STIHL.
-
-
-

Телескопические хромированные удлинительные трубки
Пластик, телескопическая, для SE 61 – SE 122 E.
Варианты исполнения
Цена
-
Телескопические хромированные удлинительные трубки
Цена
** Цену уточняйте в магазинах дилеров STIHL.
-
Ассортимент изделий и данные сведения могут отличаться в зависимости от экспортного исполнения. Возможны конструктивные и технологические модификации инструмента и оснастки, а также изменение цены.