Xiaomi Mi Vacuum Cleaner G10 Manual
Safety Instructions
This product is for household use only. Read this manual carefully before use, and retain it for future reference.
This appliance can be used by children aged from 8 years and above and persons with reduced physical, sensory or mental capabilities or lack of experience and knowledge if they have been given supervision or instruction concerning use of the appliance in a safe way and understand the hazards involved. Children shall not play with the appliance. Cleaning and user maintenance shall not be made by children without supervision.
The appliance is only to be used with the power supply unit provided with the appliance.
The vacuum cleaner is not a toy. Children may not play with or operate this product. Please exercise caution when using the vacuum cleaner near children. Do not allow children to clean or maintain the vacuum cleaner unless supervised by a parent or guardian.
Only use the vacuum cleaner on dry indoor surfaces. Do not install, charge, or use this product outdoors, such as in bathrooms, or near a pool.
Do not touch the plug or any part of the vacuum cleaner with wet hands. To reduce the risk of fire, explosion, or personal injury, check to make sure the lithium-ion battery and charger are undamaged before use. Do not use the vacuum cleaner if either the battery or charger is damaged.
The smart high torque brush bar, mini electric brush, battery, extension rod, and the vacuum cleaner are electrically conductive and should not be immersed in water or other liquid. Make sure all parts are thoroughly dry after you carry out cleaning on them.
To prevent injury caused by moving parts, turn off the vacuum cleaner before cleaning the smart high torque brush bar and mini electric brush. The smart high torque brush bar, dust compartment, and filter must all be properly installed before using the vacuum cleaner.
Only use the BLJ24W308080P-V battery charger provided with the appliance.
Only use the P2046-7S1P-BC/P2046-7S1P-BCA battery pack provided with the appliance.
If the charger or battery becomes damaged, it must be replaced with a genuine component purchased from the manufacturer or after-sales service department.
Do not use the vacuum cleaner to pick up flammable or combustible liquids, such as gasoline, bleach, ammonia, or drain cleaners; nor other liquids like water.
Do not use the vacuum cleaner to pick up drywall particles, ashes like fireplace ash, or smoking or burning materials such as coal, cigarette butts or matches.
Do not use the vacuum cleaner to pick up sharp or hard objects, such as glass, nails, screws, or coins, which may damage the product.
Keep hair, loose clothing, fingers, and other parts of the body away from the vacuum cleaner’s openings and moving parts. Do not point the suction opening, extension rod, or other accessories at your eyes or ears or put them in your mouth.
Do not put any object into the vacuum cleaner’s openings, nor use the vacuum cleaner with any opening blocked. Keep free of dust, lint, hair, or other items which may reduce airflow.
Do not rest the vacuum cleaner against a chair, table, or other unstable surfaces, as this may cause damage to the product or personal injury. If the vacuum cleaner malfunctions because of being knocked over or damaged, please contact the authorized service department. Never attempt to disassemble the vacuum cleaner on your own.
Only use the original charger to charge the product in environments with an ambient temperature of 0°C to 40°C. Otherwise, the battery may damage.
The dust compartment cover, pre-filter, cyclone assembly, and HEPA filter must all be properly installed prior to using the vacuum cleaner.
Make sure the vacuum cleaner is unplugged when not used for extended periods as well as prior to performing any maintenance or repairs.
Please be extra careful when using the vacuum cleaner to clean stairs.
Do not apply any type of fragrance to the vacuum cleaner’s filter. These types of products are known to contain flammable chemicals which may cause the vacuum cleaner to catch fire. When Battery is not in use, keep it away from all metal objects, such as paper clips, coins, keys, nails, or screws. Shorting the battery terminals together increases the risk of fire or burns.
Under abusive conditions, liquid may be ejected from the battery. Avoid contact with liquid, as it may cause irritation or burns. If contact occurs, flush with water. If liquid contacts eyes, seek medical help.
DO NOT expose the battery and appliance to fire as it may cause explosion.
DO NOT expose or submerge the battery and appliance in any water, salt water, or other liquids. Please strictly follow the instructions in this user manualwhen using the vacuum cleaner. Users are responsible for any loss or damage that may arise from improper use of the vacuum cleaner.
We Dreame (Tianjin) Information Technology Co., Ltd., hereby, declare that this equipment is in compliance with the applicable Directives and European Norms, and amendments. The full text of the EU declaration of conformity is available at the following internet address: http://www.mi.com/global/service/support/declaration.html
For detailed e-manual, please go to www.mi.com/global/service/userguide
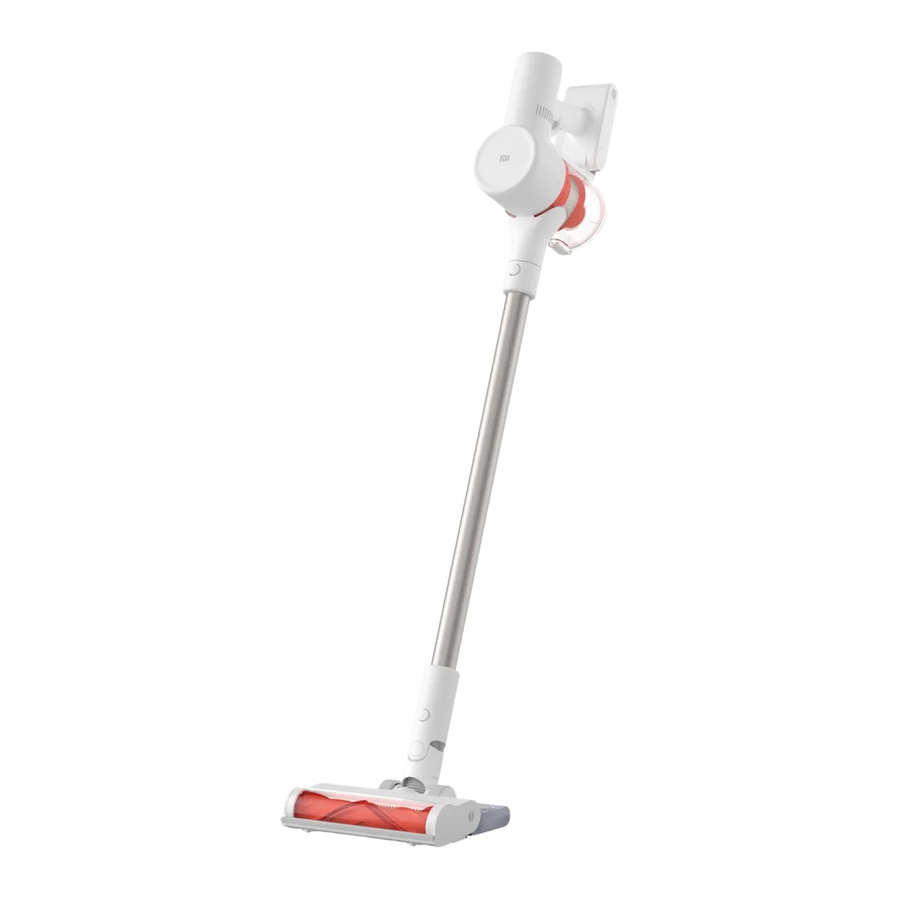
Product Overview
Accessories List

Note: Illustrations of product, accessories, and user interface in the user manual are for reference purposes only. Actual product and functions may vary due to product enhancements.
Component Name

Display Screen

Battery Level Indicator
Green: Battery level > 20%
Red: Battery level ≤ 20%
Note: If the vacuum cleaner experiences a malfunction, the display screen will show an error message. For a solution, please refer to the Troubleshooting section.
How to Install
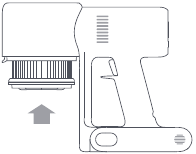
Installing the Accessories onto the Device

 Insert until it clicks into place
Note: Mini electric brush should not be used with the extension rod.
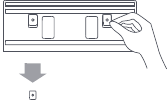
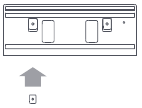
Installing the 2-in-1 Charging & Storage Mount
- The 2-in-1 charging & storage mount should be installed in a cool, dry place with an electrical outlet nearby. Prior to installing, ensure that there are not any wires or pipes in the space directly behind where the mount will be installed.
- The bottom of the mounting template sticker should be level and at least 1.03 m from the ground, and its top should have at least 30 cm of clearance above it.

Extended Dock
You can simultaneously charge the replaceable battery* when charging the vacuum cleaner on the 2-in-1 charging & storage mount.
* The replaceable battery is not included and purchased separately. - Use a power drill with an 8 mm drill bit to drill a hole into each hole marker on the mounting template sticker, then insert a wall plug into each hole.
- Align the mounting holes on the 2-in-1 charging & storage mount to the holes on the wall, then attach the mount to the wall using the included screws.

Recommended Height: At least 1.03 meters from the ground
Charging
Battery Status Indicator
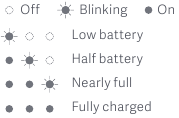
Once the vacuum cleaner is fully charged, the indicator will turn off after 5 minutes, and the vacuum cleaner will then enter the energy-saving mode.
Display Screen
The number on the display screen represents the current battery level in a percentage during charging. When the number turns into 100, the battery is fully charged.
Charging the vacuum cleaner with the charger
Notes:
- Fully charge the vacuum cleaner before using it for the first time.
This will take about 4 hours. - The vacuum cleaner cannot be used while charging.
- Vacuuming at the highest suction level for a prolonged period will cause the battery to heat up, which may increase the charging time. Before charging the vacuum cleaner, it is better to cool it down for 30 minutes.

Charging the vacuum cleaner on the charging mount
How to Use
Setting Language
Press and hold the button ![]() for 3 seconds to open the language list, then press the button
for 3 seconds to open the language list, then press the button ![]() to scroll through the language to select the desired one. Press and hold the button
to scroll through the language to select the desired one. Press and hold the button ![]() for 2 seconds to use the selected language.
for 2 seconds to use the selected language.
Note: The display screen will go off if there is no operation for more than 10 seconds.
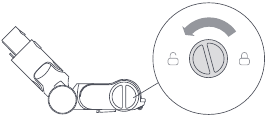
Switching Suction Levels
Press the button ![]() to switch suction levels of eco, standard/ auto, and high power. The corresponding suction level will be highlighted on the display screen.
to switch suction levels of eco, standard/ auto, and high power. The corresponding suction level will be highlighted on the display screen.
Only when using the smart high torque brush bar, the auto mode will be activated and the notification of «Auto» will appear on the display screen. The vacuum cleaner will then automatically switch the suction level between the floor/tile and the carpet.
Note: Stop the vacuum cleaner at any time while cleaning, it will continue to use the last selected suction level when started again.
Working Modes
The vacuum cleaner has two working modes, you can select the desired one based on your cleaning needs.
- Non-continuous Mode
Hold down the power button to start the vacuum cleaner, then release to stop it.
Non-continuous Mode - Continuous Mode
Press the button to enable Continuous Mode, then press the power button to turn the vacuum cleaner on. To exit Continuous Mode, press the button .
Enabling the Continuous Mode allows the vacuum cleaner to run continuously without having to hold down the power button, which can help release your fingers.
Continuous Mode
Notes:
- In Continuous Mode, the vacuum cleaner will enter into standby mode when pressing the power button, and resume running if pressing the button again.
- When the vacuum cleaner keeps in standby mode for more than 10 seconds, its display screen will go off and the vacuum cleaner will then exit the Continuous Mode.
Using Different Accessories
2-in-1 Brush Nozzle: For vacuuming curtains, sofas, vehicle interiors, coffee tables, etc.
Mini Electric Brush: For vacuuming dirt, pet hair, and other stubborn debris from sofas, bedding, and other fabric surfaces.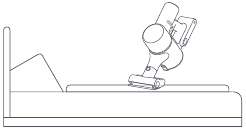
Notes:
- If any rotating part becomes stuck, the vacuum cleaner may shut off automatically. Remove any trapped foreign objects, then resume use.
- When the motor runs overheated, the vacuum cleaner will automatically shut off. Wait until the battery temperature returns to normal, then resume use.
Using Different Accessories
Crevice Nozzle: For vacuuming narrow crevices and areas around doors, windows, baseboards, corners, stairs, etc.
Smart High Torque Brush Bar: For cleaning different types of flooring such as wood, marble, tile, and short carpet. When Auto Mode is activated, the vacuum cleaner can automatically adjust its suction level depending on the surface type.
Note: The smart high torque brush bar can be attached directly to the vacuum cleaner.
Using the Mopping Function
Notes:
- Do not step on the water tank, as this could permanently damage it. Heavily soiled floors should be vacuumed prior to mopping for a better result.
- Do not use the mopping function on carpet.
- Do not use any cleaning agents or disinfectants.
- Dampen the mop pad and wring out excess water, then attach it securely to the bottom of the water tank.

- Open the water tank plug, add an appropriate amount of clean water, then close the plug.

- Attach the smart high torque brush bar to the water tank by lining up the magnets on each component until they snap together.
- This function is designed for vacuuming and wiping down hardwood and tile floors.

Notes:
- The ball valve in the water tank controls how much water is dispensed. The ball is a moving part and may make a rolling sound when starting and stopping. This is normal.
- When not in use, please keep the switch to the OFF position.
Care & Maintenance
Maintenance Precautions
- Always use genuine parts to keep your warranty from being voided.
- If the filter, extension rod, or smart torque brush bar becomes clogged, the vacuum cleaner will stop working shortly. To restore its functionality, clean the clogged component.
- If the vacuum cleaner will not be used for an extended period, fully charge it and disconnect it from the power then store it in a cool, low-humidity environment away from direct sunlight. To avoid over-discharging the battery, recharge the vacuum cleaner at least once every three months.
Cleaning the Vacuum Cleaner
Wipe the vacuum cleaner with a soft, dry cloth.
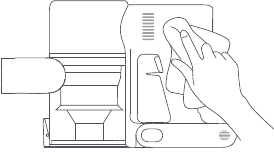
Cleaning the Dust Compartment, Pre-filter, and Cyclone Assembly
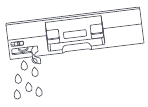
- The vacuum cleaner’s cleaning ability will be reduced if the dust compartment is filled to the «MAX» mark. To regain performance, empty the dust compartment in a timely manner. Before emptying the compartment, make sure the vacuum cleaner is disconnected from the power, and do not press its power button.

- Press the dust compartment bottom cover release button, then empty the contents.

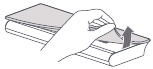
- Push the dust compartment release switch in the direction indicated by the arrow, then gently remove the dust compartment from the vacuum cleaner.
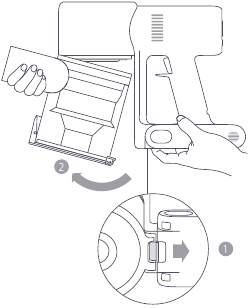
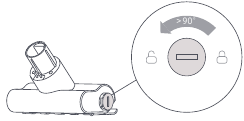
Dust Compartment Release Switch - Remove the pre-filter first, then lift the handle of the cyclone assembly and turn to counterclockwise until it stops, then pull to lift out the cyclone assembly.

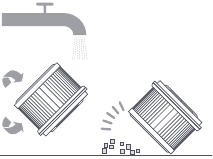
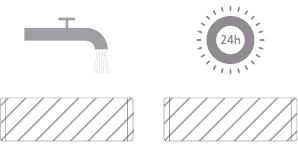
- Rinse the pre-filter, cyclone assembly, and dust compartment with water until they are clean, then set each component aside to thoroughly dry for at least 24 hours.

Notes:
- The dust compartment should be rinsed out at least once a month.
- The pre-filter and cyclone assembly should be cleaned once every 3 to 4 months.
Wipe the contact points of the vacuum cleaner with a soft dry cloth if they are dirty.
Notes:
- Do not use detergents, polishes, or air fresheners to clean the dust compartment.
- Do not clean the dust compartment, pre-filter, or cyclone assembly in a dishwasher or washing machine, nor attempt to dry any component in a tumble dryer, oven, microwave, or near an open fire.
Installing the Dust Compartment, Pre-filter, and Cyclone Assembly
- Insert the cyclone assembly vertically into the dust compartment, and make sure that the handle of the cyclone assembly line up with the slot on the left side of the dust compartment. Turn the handle clockwise until it locks, then flip the handle down.
- Place the pre-filter with its front side facing up into the cyclone assembly.

- Slightly tilt the dust compartment so its slot aligns with the clip on the vacuum cleaner. Then gently push the dust compartment until it clicks into place.

Cleaning the HEPA Filter
Note: It is recommended to clean the HEPA filter once every 4 to 6 months.
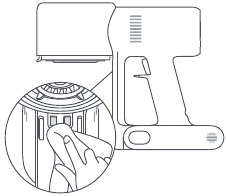
- Remove the dust compartment as shown in the figure.

Dust Compartment Release Switch - Remove the HEPA filter from the vacuum cleaner by pulling it down in the direction shown in the figure.
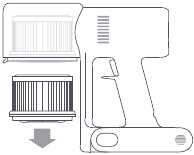
- Clean the HEPA filter with clean water. Make sure you rotate the HEPA filter 360° to thoroughly remove all dust caught in the filter. Lightly tap the filter several times to remove any excess dirt.
Notes:
- Only use clean water to clean the filter. Do not use detergent.
- Do not attempt to clean the HEPA filter with a brush or finger.
- Allow the HEPA filter to thoroughly dry for at least 24 hours.
Installing the HEPA Filter
- Insert the HEPA filter into the vacuum cleaner and gently press down, as illustrated.
- Reinstall the dust compartment.

Cleaning the Smart High Torque Brush Bar
- Turn the lock counterclockwise until it stops, then remove the roller brush from the smart high torque brush bar.
- Use scissors to cut and pick out any hair or other debris tangled around the roller brush. Wipe away excess dust from the slot and clear plastic cover using a dry cloth or paper towel.

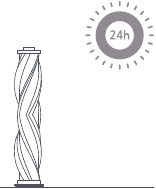
- After extended use, the roller brush may become dirty and should be washed.

- After washing, allow the roller brush to dry thoroughly by standing it upright in a well-ventilated area for at least 24 hours.
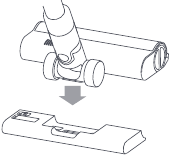
Cleaning the Mini Electric Brush
- Use a coin to turn the lock counterclockwise until you hear a click.
- After unlocking the roller brush, remove it from the mini electric brush, then rinse and clean the roller brush.

- After washing, allow the roller brush to dry thoroughly by standing it upright in a well-ventilated area for at least 24 hours.

- Once the roller brush is dry, reinstall it by following the disassembly steps in reverse.

Cleaning the Water Tank and Mop Pad
Notes:
- When the vacuum cleaner is charging or not in use, remove the water tank and drain any remaining water to prevent mildew or lingering odor.
- A worn or damaged mop pad that no longer sticks to the water tank should be replaced to ensure optimal cleaning performance.
- Slide the water tank down to detach it from the smart high torque brush bar.

- Empty the water tank.
- Remove the mop pad from the water tank.
- Clean and dry the mop pad.
Water Dispenser Filter
The water dispenser filter should be replaced if the water tank dispenses water too slowly or becomes clogged.
To ensure optimal mopping effectiveness, it is recommended to replace water dispenser filters once every 3 to 6 months depending on water quality and frequency of use.
- Use your fingers to slide out old water dispenser filters on the left and right sides of each slot.
- Insert the new water dispenser filters and check to ensure they are installed correctly.
Battery Pack
The vacuum cleaner contains a removable rechargeable lithium-ion battery pack which has a limited number of recharge cycles. After extended use, the battery pack may no longer hold a charge. If this happens, it means the battery pack has reached the end of its life cycle and needs to be replaced.
- Press down the battery pack release button and slide the battery pack to the right, as illustrated, to remove it.
- Install the new battery pack.

Specifications
| Vacuum Cleaner | |||
| Model | MJSCXCQPT | Rated Voltage | 25.2 V  |
| Charging Voltage | 30.8 V |
Nominal Capacity | 3000 mAh |
| Rated Power | 450 W | Dust Compartment Capacity | Max. 0.6 L |
| Charging Time | Approx. 4 hours | Net Weight | 4.2 kg |
| Item Dimensions | 1286 × 214 × 256 mm | ||
| Smart High Torque Brush Bar | Mini Electric Brush | ||
| Model | G10-01 | Model | 1C-02 |
| Rated Power | 40 W | Rated Power | 20 W |
| Rated Voltage | 25.2 V |
Rated Voltage | 25.2 V |
| Charger | |||
| Manufactured by | Zhongshan Baolijin Electronic Co., Ltd. | Average Active Efficiency | 87.5% |
| Model | BLJ24W308080P-V | Efficiency at Low Load (10%) | 77.9% |
| Input | 100–240 V~ 50/60 Hz 0.8 A | No-load Power Consumption | 0.10 W |
| Output | 30.8 V 0.8 A 24.6 W |
||
| Rechargeable Lithium-ion Battery Pack | |||
| Battery Model | P2046-7S1P-BC/P2046-7S1P-BCA | Nominal Capacity | 3000 mAh |
| Nominal Voltage | 25.2 V |
Rated Capacity | 2800 mAh |
| Energy | 70.56 Wh |
The lithium-on battery pack contains substances that are hazardous to the environment. Before disposing of the vacuum cleaner, please first remove the battery pack, then discard, or recycle it in accordance with local laws and regulations of the country or region it is used in.
WEEE Information

All products bearing this symbol are waste electrical and electronic equipment (WEEE as in directive 2012/19/EU) which should not be mixed with unsorted household waste. Instead, you should protect human health and the environment by handing over your waste equipment to a designated collection point for the recycling of waste electrical and electronic equipment, appointed by the government or local authorities. Correct disposal and recycling will help prevent potential negative consequences to the environment and human health. Please contact the installer or local authorities for more information about the location as well as terms and conditions of such collection points.
FAQ
| Error | Possible Cause | Solution |
| The vacuum cleaner does not work. | It is out of battery or has low battery. | Fully charge the vacuum cleaner, then resume use. |
| It enters into overheat protection mode triggered by a blockage. | Wait until the vacuum cleaner cools down, then reactivate it. | |
| Its suction opening or airway passage is blocked. | Clear any blockages from suction opening or airway passage. | |
| The suction power reduces. | The dust compartment is full and/or the filter is clogged. | Empty the dust compartment and clean the filter. |
| The smart high torque brush bar and/or the extension rod are blocked. | Clear any blockages from the smart high torque brush bar and/or the extension rod. | |
| The motor makes a strange noise. | The main suction opening or the extension rod is blocked. | Clear any blockages in the main suction opening or the extension rod. |
| The first indicator is red after turning on the vacuum cleaner. | Battery pack is damaged. | Please contact after-sales service to arrange maintenance. |
| The first indicator blinks red when charging the vacuum cleaner. | The charger is incompatible. | Only use the original charger to charge the vacuum cleaner. |
| The battery indicator does not light up while charging. |
The charger is not connected to the vacuum cleaner. | Make sure the charger is plugged in correctly. |
| The battery is fully charged and went into sleep mode. | The vacuum cleaner can be used normally. | |
| If the problem still persists after ruling out the above two possibilities, please contact aftersales service for help. | ||
| The battery charges slowly. | The battery temperature is too low or too high. | Wait until the battery temperature normalizes, then resume use. |
| The water tank does not dispense water, or dispenses water slowly. | The water dispenser filter is clogged. | Clean or replace the water dispenser filter. |
| The mop pad is dirty. | Clean or replace the mop pad. |
Troubleshooting
If the vacuum cleaner is not working properly, the screen display will show an error message. Please refer to the troubleshooting table below to find your solution based on the error message.
| Error Icon | Error Message | Solution |
 |
Airway Blocked |
Clear any blockages from the dust compartment, extension rod, and/or smart high torque brush bar. |
 |
Low Battery |
Recharge soon. |
 |
Roller Brush Stuck |
Refer to «Cleaning the smart high torque brush bar» under the Care & Maintenance section for directions on how to clean out hair and other debris caught in the roller brush. |
 |
Battery Depleted |
Recharge soon. |
 |
Battery Overheated |
Wait until the battery temperature normalizes before resuming use. |
Error |
Please contact after-sales service to arrange maintenance. | |
 |
Filter Not Installed |
Ensure that the HEPA filter and pre-filter are installed correctly. |
- For further information, please go to www.mi.com
Manufactured for: Xiaomi Communications Co., Ltd.
Manufactured by: Dreame (Tianjin) Information Technology Co., Ltd. (a Mi Ecosystem company)
Address: Room 2112-1-1, South District, Finance and Trade Center, No.6975 Yazhou Road, Dongjiang Bonded Port Area, Tianjin Pilot Free Trade Zone, Tianjin, China

Documents / Resources
References
Download manual
Here you can download full pdf version of manual, it may contain additional safety instructions, warranty information, FCC rules, etc.
Download Xiaomi Mi Vacuum Cleaner G10 Manual
 for 3 seconds to open the language list, then press the button
  to scroll through the language to select the desired one. Press and hold the button for 2 seconds to use the selected language.
Note: The display screen will go off if there is no operation for more than 10 seconds.
Switching Suction Levels
Press the button ![]() to switch suction levels of eco, standard/ auto, and high power. The corresponding suction level will be highlighted on the display screen.
to switch suction levels of eco, standard/ auto, and high power. The corresponding suction level will be highlighted on the display screen.
Only when using the smart high torque brush bar, the auto mode will be activated and the notification of «Auto» will appear on the display screen. The vacuum cleaner will then automatically switch the suction level between the floor/tile and the carpet.
Note: Stop the vacuum cleaner at any time while cleaning, it will continue to use the last selected suction level when started again.
Working Modes
The vacuum cleaner has two working modes, you can select the desired one based on your cleaning needs.
- Non-continuous Mode
Hold down the power button to start the vacuum cleaner, then release to stop it.
Non-continuous Mode - Continuous Mode
Press the button to enable Continuous Mode, then press the power button to turn the vacuum cleaner on. To exit Continuous Mode, press the button .
Enabling the Continuous Mode allows the vacuum cleaner to run continuously without having to hold down the power button, which can help release your fingers.
Continuous Mode
Notes:
- In Continuous Mode, the vacuum cleaner will enter into standby mode when pressing the power button, and resume running if pressing the button again.
- When the vacuum cleaner keeps in standby mode for more than 10 seconds, its display screen will go off and the vacuum cleaner will then exit the Continuous Mode.
Using Different Accessories
2-in-1 Brush Nozzle: For vacuuming curtains, sofas, vehicle interiors, coffee tables, etc.
Mini Electric Brush: For vacuuming dirt, pet hair, and other stubborn debris from sofas, bedding, and other fabric surfaces.
Notes:
- If any rotating part becomes stuck, the vacuum cleaner may shut off automatically. Remove any trapped foreign objects, then resume use.
- When the motor runs overheated, the vacuum cleaner will automatically shut off. Wait until the battery temperature returns to normal, then resume use.
Using Different Accessories
Crevice Nozzle: For vacuuming narrow crevices and areas around doors, windows, baseboards, corners, stairs, etc.
Smart High Torque Brush Bar: For cleaning different types of flooring such as wood, marble, tile, and short carpet. When Auto Mode is activated, the vacuum cleaner can automatically adjust its suction level depending on the surface type.
Note: The smart high torque brush bar can be attached directly to the vacuum cleaner.
Using the Mopping Function
Notes:
- Do not step on the water tank, as this could permanently damage it. Heavily soiled floors should be vacuumed prior to mopping for a better result.
- Do not use the mopping function on carpet.
- Do not use any cleaning agents or disinfectants.
- Dampen the mop pad and wring out excess water, then attach it securely to the bottom of the water tank.
- Open the water tank plug, add an appropriate amount of clean water, then close the plug.
- Attach the smart high torque brush bar to the water tank by lining up the magnets on each component until they snap together.
- This function is designed for vacuuming and wiping down hardwood and tile floors.
Notes:
- The ball valve in the water tank controls how much water is dispensed. The ball is a moving part and may make a rolling sound when starting and stopping. This is normal.
- When not in use, please keep the switch to the OFF position.
Care & Maintenance
Maintenance Precautions
- Always use genuine parts to keep your warranty from being voided.
- If the filter, extension rod, or smart torque brush bar becomes clogged, the vacuum cleaner will stop working shortly. To restore its functionality, clean the clogged component.
- If the vacuum cleaner will not be used for an extended period, fully charge it and disconnect it from the power then store it in a cool, low-humidity environment away from direct sunlight. To avoid over-discharging the battery, recharge the vacuum cleaner at least once every three months.
Cleaning the Vacuum Cleaner
Wipe the vacuum cleaner with a soft, dry cloth.
Cleaning the Dust Compartment, Pre-filter, and Cyclone Assembly
- The vacuum cleaner’s cleaning ability will be reduced if the dust compartment is filled to the «MAX» mark. To regain performance, empty the dust compartment in a timely manner. Before emptying the compartment, make sure the vacuum cleaner is disconnected from the power, and do not press its power button.
- Press the dust compartment bottom cover release button, then empty the contents.
- Push the dust compartment release switch in the direction indicated by the arrow, then gently remove the dust compartment from the vacuum cleaner.
Dust Compartment Release Switch - Remove the pre-filter first, then lift the handle of the cyclone assembly and turn to counterclockwise until it stops, then pull to lift out the cyclone assembly.
- Rinse the pre-filter, cyclone assembly, and dust compartment with water until they are clean, then set each component aside to thoroughly dry for at least 24 hours.
Notes:
- The dust compartment should be rinsed out at least once a month.
- The pre-filter and cyclone assembly should be cleaned once every 3 to 4 months.
Wipe the contact points of the vacuum cleaner with a soft dry cloth if they are dirty.
Notes:
- Do not use detergents, polishes, or air fresheners to clean the dust compartment.
- Do not clean the dust compartment, pre-filter, or cyclone assembly in a dishwasher or washing machine, nor attempt to dry any component in a tumble dryer, oven, microwave, or near an open fire.
Installing the Dust Compartment, Pre-filter, and Cyclone Assembly
- Insert the cyclone assembly vertically into the dust compartment, and make sure that the handle of the cyclone assembly line up with the slot on the left side of the dust compartment. Turn the handle clockwise until it locks, then flip the handle down.
- Place the pre-filter with its front side facing up into the cyclone assembly.
- Slightly tilt the dust compartment so its slot aligns with the clip on the vacuum cleaner. Then gently push the dust compartment until it clicks into place.
Cleaning the HEPA Filter
Note: It is recommended to clean the HEPA filter once every 4 to 6 months.
- Remove the dust compartment as shown in the figure.
Dust Compartment Release Switch - Remove the HEPA filter from the vacuum cleaner by pulling it down in the direction shown in the figure.
- Clean the HEPA filter with clean water. Make sure you rotate the HEPA filter 360° to thoroughly remove all dust caught in the filter. Lightly tap the filter several times to remove any excess dirt.
Notes:
- Only use clean water to clean the filter. Do not use detergent.
- Do not attempt to clean the HEPA filter with a brush or finger.
- Allow the HEPA filter to thoroughly dry for at least 24 hours.
Installing the HEPA Filter
- Insert the HEPA filter into the vacuum cleaner and gently press down, as illustrated.
- Reinstall the dust compartment.
Cleaning the Smart High Torque Brush Bar
- Turn the lock counterclockwise until it stops, then remove the roller brush from the smart high torque brush bar.
- Use scissors to cut and pick out any hair or other debris tangled around the roller brush. Wipe away excess dust from the slot and clear plastic cover using a dry cloth or paper towel.
- After extended use, the roller brush may become dirty and should be washed.
- After washing, allow the roller brush to dry thoroughly by standing it upright in a well-ventilated area for at least 24 hours.
Cleaning the Mini Electric Brush
- Use a coin to turn the lock counterclockwise until you hear a click.
- After unlocking the roller brush, remove it from the mini electric brush, then rinse and clean the roller brush.
- After washing, allow the roller brush to dry thoroughly by standing it upright in a well-ventilated area for at least 24 hours.
- Once the roller brush is dry, reinstall it by following the disassembly steps in reverse.
Cleaning the Water Tank and Mop Pad
Notes:
- When the vacuum cleaner is charging or not in use, remove the water tank and drain any remaining water to prevent mildew or lingering odor.
- A worn or damaged mop pad that no longer sticks to the water tank should be replaced to ensure optimal cleaning performance.
- Slide the water tank down to detach it from the smart high torque brush bar.
- Empty the water tank.
- Remove the mop pad from the water tank.
- Clean and dry the mop pad.
Water Dispenser Filter
The water dispenser filter should be replaced if the water tank dispenses water too slowly or becomes clogged.
To ensure optimal mopping effectiveness, it is recommended to replace water dispenser filters once every 3 to 6 months depending on water quality and frequency of use.
- Use your fingers to slide out old water dispenser filters on the left and right sides of each slot.
- Insert the new water dispenser filters and check to ensure they are installed correctly.
Battery Pack
The vacuum cleaner contains a removable rechargeable lithium-ion battery pack which has a limited number of recharge cycles. After extended use, the battery pack may no longer hold a charge. If this happens, it means the battery pack has reached the end of its life cycle and needs to be replaced.
- Press down the battery pack release button and slide the battery pack to the right, as illustrated, to remove it.
- Install the new battery pack.
Specifications
| Vacuum Cleaner | |||
| Model | MJSCXCQPT | Rated Voltage | 25.2 V |
| Charging Voltage | 30.8 V |
Nominal Capacity | 3000 mAh |
| Rated Power | 450 W | Dust Compartment Capacity | Max. 0.6 L |
| Charging Time | Approx. 4 hours | Net Weight | 4.2 kg |
| Item Dimensions | 1286 × 214 × 256 mm | ||
| Smart High Torque Brush Bar | Mini Electric Brush | ||
| Model | G10-01 | Model | 1C-02 |
| Rated Power | 40 W | Rated Power | 20 W |
| Rated Voltage | 25.2 V |
Rated Voltage | 25.2 V |
| Charger | |||
| Manufactured by | Zhongshan Baolijin Electronic Co., Ltd. | Average Active Efficiency | 87.5% |
| Model | BLJ24W308080P-V | Efficiency at Low Load (10%) | 77.9% |
| Input | 100–240 V~ 50/60 Hz 0.8 A | No-load Power Consumption | 0.10 W |
| Output | 30.8 V 0.8 A 24.6 W |
||
| Rechargeable Lithium-ion Battery Pack | |||
| Battery Model | P2046-7S1P-BC/P2046-7S1P-BCA | Nominal Capacity | 3000 mAh |
| Nominal Voltage | 25.2 V |
Rated Capacity | 2800 mAh |
| Energy | 70.56 Wh |
The lithium-on battery pack contains substances that are hazardous to the environment. Before disposing of the vacuum cleaner, please first remove the battery pack, then discard, or recycle it in accordance with local laws and regulations of the country or region it is used in.
WEEE Information
All products bearing this symbol are waste electrical and electronic equipment (WEEE as in directive 2012/19/EU) which should not be mixed with unsorted household waste. Instead, you should protect human health and the environment by handing over your waste equipment to a designated collection point for the recycling of waste electrical and electronic equipment, appointed by the government or local authorities. Correct disposal and recycling will help prevent potential negative consequences to the environment and human health. Please contact the installer or local authorities for more information about the location as well as terms and conditions of such collection points.
FAQ
| Error | Possible Cause | Solution |
| The vacuum cleaner does not work. | It is out of battery or has low battery. | Fully charge the vacuum cleaner, then resume use. |
| It enters into overheat protection mode triggered by a blockage. | Wait until the vacuum cleaner cools down, then reactivate it. | |
| Its suction opening or airway passage is blocked. | Clear any blockages from suction opening or airway passage. | |
| The suction power reduces. | The dust compartment is full and/or the filter is clogged. | Empty the dust compartment and clean the filter. |
| The smart high torque brush bar and/or the extension rod are blocked. | Clear any blockages from the smart high torque brush bar and/or the extension rod. | |
| The motor makes a strange noise. | The main suction opening or the extension rod is blocked. | Clear any blockages in the main suction opening or the extension rod. |
| The first indicator is red after turning on the vacuum cleaner. | Battery pack is damaged. | Please contact after-sales service to arrange maintenance. |
| The first indicator blinks red when charging the vacuum cleaner. | The charger is incompatible. | Only use the original charger to charge the vacuum cleaner. |
| The battery indicator does not light up while charging. |
The charger is not connected to the vacuum cleaner. | Make sure the charger is plugged in correctly. |
| The battery is fully charged and went into sleep mode. | The vacuum cleaner can be used normally. | |
| If the problem still persists after ruling out the above two possibilities, please contact aftersales service for help. | ||
| The battery charges slowly. | The battery temperature is too low or too high. | Wait until the battery temperature normalizes, then resume use. |
| The water tank does not dispense water, or dispenses water slowly. | The water dispenser filter is clogged. | Clean or replace the water dispenser filter. |
| The mop pad is dirty. | Clean or replace the mop pad. |
Troubleshooting
If the vacuum cleaner is not working properly, the screen display will show an error message. Please refer to the troubleshooting table below to find your solution based on the error message.
| Error Icon | Error Message | Solution |
|
Airway Blocked |
Clear any blockages from the dust compartment, extension rod, and/or smart high torque brush bar. |
|
Low Battery |
Recharge soon. |
|
Roller Brush Stuck |
Refer to «Cleaning the smart high torque brush bar» under the Care & Maintenance section for directions on how to clean out hair and other debris caught in the roller brush. |
|
Battery Depleted |
Recharge soon. |
|
Battery Overheated |
Wait until the battery temperature normalizes before resuming use. |
Error |
Please contact after-sales service to arrange maintenance. | |
|
Filter Not Installed |
Ensure that the HEPA filter and pre-filter are installed correctly. |
- For further information, please go to www.mi.com
Manufactured for: Xiaomi Communications Co., Ltd.
Manufactured by: Dreame (Tianjin) Information Technology Co., Ltd. (a Mi Ecosystem company)
Address: Room 2112-1-1, South District, Finance and Trade Center, No.6975 Yazhou Road, Dongjiang Bonded Port Area, Tianjin Pilot Free Trade Zone, Tianjin, China
Documents / Resources
References
Download manual
Here you can download full pdf version of manual, it may contain additional safety instructions, warranty information, FCC rules, etc.
Download Xiaomi Mi Vacuum Cleaner G10 Manual
Пылесос Xiaomi G10

Инструкции по технике безопасности
Этот продукт предназначен только для домашнего использования. Внимательно прочтите это руководство перед использованием и сохраните его для использования в будущем.
Данным прибором могут пользоваться дети в возрасте от 8 лет и старше, а также лица с ограниченными физическими, сенсорными или умственными способностями или с недостатком опыта и знаний, если они находятся под наблюдением или инструктированы относительно безопасного использования прибора и понимают опасности. участвует. Не разрешайте детям играть с устройством. Дети не должны производить чистку и техническое обслуживание без присмотра.
Пылесос — это не игрушка. Детям запрещается играть с этим изделием или пользоваться им. Соблюдайте осторожность при использовании пылесоса рядом с детьми. Не позволяйте детям чистить или обслуживать пылесос без присмотра родителей или опекунов.
Используйте пылесос только на сухих внутренних поверхностях. Не устанавливайте, не заряжайте и не используйте этот продукт на открытом воздухе, например в ванных комнатах или около бассейна.
Не прикасайтесь к вилке или какой-либо части пылесоса мокрыми руками.
Чтобы снизить риск возгорания, взрыва или травм, перед использованием убедитесь, что литий-ионный аккумулятор и зарядное устройство не повреждены. Не используйте пылесос, если аккумулятор или зарядное устройство повреждены.
Интеллектуальная щетка с высоким крутящим моментом, мини-электрическая щетка, аккумулятор, удлинитель и пылесос
являются электропроводными, и их нельзя погружать в воду или другую жидкость. После очистки убедитесь, что все детали полностью высохли.
Во избежание травм, вызванных движущимися частями, выключите пылесос перед очисткой планки интеллектуальной щетки с высоким крутящим моментом и мини-электрической щетки. Перед использованием пылесоса необходимо правильно установить интеллектуальную щетку с высоким крутящим моментом, пылесборник и фильтр.
Используйте только зарядное устройство BLJ24W308080P-V, входящее в комплект поставки устройства.
Используйте только аккумуляторную батарею P2046-7S1P-BC, поставляемую с устройством.
В случае повреждения зарядного устройства или аккумулятора их необходимо заменить оригинальными компонентами, приобретенными у производителя или в отделе послепродажного обслуживания.
Не используйте пылесос для сбора легковоспламеняющихся или горючих жидкостей, таких как бензин, отбеливатель, аммиак или очистители канализации; ни другие жидкости, такие как вода.
Не используйте пылесос для сбора частиц гипсокартона, золы, такой как каминный пепел, или дымящихся или горящих материалов, таких как уголь, окурки или спички.
Не используйте пылесос для сбора острых или твердых предметов, таких как стекло, гвозди, шурупы или монеты, которые могут повредить изделие.
Держите волосы, свободную одежду, пальцы и другие части тела подальше от отверстий и движущихся частей пылесоса. Не направляйте всасывающее отверстие, удлинительный стержень или другие аксессуары на глаза или уши и не кладите их в рот.
Не вставляйте какие-либо предметы в отверстия пылесоса и не используйте пылесос с заблокированными отверстиями. Не допускайте попадания пыли, ворса, волос или других предметов, которые могут уменьшить поток воздуха.
Не ставьте пылесос на стул, стол или другие неустойчивые поверхности, так как это может привести к повреждению продукта или травмам. Если пылесос неисправен из-за падения или повреждения, обратитесь в авторизованный сервисный центр. Никогда не пытайтесь самостоятельно разбирать пылесос.
Используйте только оригинальное зарядное устройство для зарядки продукта при температуре окружающей среды от 0 ° C до 40 ° C. В противном случае аккумулятор может выйти из строя.
Перед использованием пылесоса крышка отсека для пыли, предварительный фильтр, циклонный узел и HEPA-фильтр должны быть правильно установлены.
Убедитесь, что пылесос отключен от сети, если он не используется в течение длительного времени, а также перед выполнением любого технического обслуживания или ремонта.
Будьте особенно осторожны при чистке лестницы пылесосом.
Предупреждение об опасности возгорания: не наносите какие-либо ароматизаторы на фильтр пылесоса. Известно, что эти типы продуктов содержат легковоспламеняющиеся химические вещества, которые могут вызвать возгорание пылесоса. Когда аккумулятор не используется, держите его подальше от любых металлических предметов, таких как канцелярские скрепки, монеты, ключи, гвозди или винты. Замыкание клемм аккумулятора вместе увеличивает риск возгорания или ожогов.
При неправильных условиях из аккумулятора может вытечь жидкость. Избегайте контакта с жидкостью, так как это может вызвать раздражение или ожоги. В случае контакта промойте водой. Если жидкость попала в глаза, обратитесь за медицинской помощью.
ЗАПРЕЩАЕТСЯ подвергать батарею и устройство воздействию огня, так как это может привести к взрыву.
ЗАПРЕЩАЕТСЯ подвергать воздействию и погружать аккумулятор и устройство в воду, соленую воду или другие жидкости.
Пожалуйста, строго следуйте инструкциям в этом руководстве пользователя при использовании пылесоса. Пользователи несут ответственность за любые убытки или ущерб, которые могут возникнуть в результате неправильного использования пылесоса.
We Dreame Technology (Tianjin) Limited настоящим заявляет, что это оборудование соответствует применимым директивам, европейским нормам и поправкам. Полный текст декларации соответствия ЕС доступен по следующему адресу в Интернете:
http://www.mi.com/global/service/support/declaration.html
Продукт закончилсяview
Список аксессуаров
Примечание: Иллюстрации продукта, аксессуаров и пользовательского интерфейса в руководстве пользователя служат только для справки. Фактический продукт и функции могут отличаться из-за улучшений продукта.
Название компонента
Экран дисплея
Примечание: Если пылесос неисправен, на экране дисплея появится сообщение об ошибке. Чтобы найти решение, обратитесь к разделу «Устранение неполадок».
Как установить
Установка принадлежностей на пылесос
Примечание: Мини-электрическую щетку нельзя использовать с удлинителем.
Установка крепления 2-в-1 для зарядки и хранения
- Крепление для зарядки и хранения 2-в-1 следует устанавливать в прохладном, сухом месте, рядом с электрической розеткой. Перед установкой убедитесь, что в пространстве непосредственно за местом установки крепления нет никаких проводов или труб.
- Нижняя часть наклейки с монтажным шаблоном должна быть ровной и находиться на высоте не менее 1.03 м от земли, а ее верх должен иметь зазор не менее 30 см над ней.

Примечание * Сменный аккумулятор не входит в комплект и приобретается отдельно. - Используйте дрель с 8-миллиметровым сверлом, чтобы просверлить отверстие в каждом маркере отверстия на наклейке с монтажным шаблоном, затем вставьте дюбель в каждое отверстие.
- Совместите монтажные отверстия на креплении для зарядки и хранения 2-в-1 с отверстиями на стене, затем прикрепите крепление к стене с помощью прилагаемых винтов.

Примечание. Рекомендуемая высота: не менее 1.03 метра от земли.
Зарядка
После полной зарядки пылесоса индикатор погаснет через 5 минут, и пылесос перейдет в режим энергосбережения.
Экран дисплея
Число на экране дисплея представляет текущий уровень заряда батареи в процентах.tage во время зарядки. Когда число превращается в 100, аккумулятор полностью заряжен.
Ноты:
- Перед первым использованием полностью зарядите пылесос. Это займет около 4 часов.
- Пылесос нельзя использовать во время зарядки.
- Работа с пылесосом на самом высоком уровне всасывания в течение продолжительного периода времени приведет к нагреву аккумулятора, что может увеличить время зарядки. Перед зарядкой пылесоса лучше 30 минут остудить.

Как использовать
Установка языка
Нажмите и удерживайте кнопку в течение 3 секунд, чтобы открыть список языков, затем нажмите кнопку, чтобы пролистать язык и выбрать нужный. Нажмите и удерживайте кнопку в течение 2 секунд, чтобы использовать выбранный язык.
Примечание: Экран дисплея погаснет, если в течение более 10 секунд не выполняется никаких действий.
Переключение уровней всасывания
Нажмите кнопку, чтобы переключить уровни всасывания: экономичный, стандартный / автоматический и высокая мощность. Соответствующий уровень всасывания будет выделен на экране дисплея.
Только при использовании интеллектуальной щетки с высоким крутящим моментом будет активирован автоматический режим, и на экране дисплея появится уведомление «Авто». Затем пылесос автоматически переключит уровень всасывания между полом / плиткой и ковром.
Примечание: Остановите пылесос в любой момент во время уборки, он продолжит использовать последний выбранный уровень всасывания при следующем запуске.
Рабочие режимы
Пылесос имеет два режима работы, вы можете выбрать желаемый, исходя из ваших потребностей в уборке.
- Непрерывный режим
Удерживайте кнопку питания, чтобы запустить пылесос, затем отпустите, чтобы остановить его.
- Непрерывный режим
Нажмите кнопку, чтобы включить непрерывный режим, затем нажмите кнопку питания, чтобы включить пылесос. Чтобы выйти из непрерывного режима, нажмите кнопку.
Включение непрерывного режима позволяет пылесосу работать непрерывно без необходимости удерживать кнопку питания, что может помочь освободить пальцы.
Ноты:
- В непрерывном режиме пылесос переходит в режим ожидания при нажатии кнопки питания и возобновляет работу при повторном нажатии кнопки.
- Когда пылесос остается в режиме ожидания более 10 секунд, его экран дисплея гаснет, а затем пылесос выходит из непрерывного режима.
Использование различных аксессуаров
Насадка-щетка 2-в-1: для чистки штор, диванов, салонов автомобилей, журнальных столиков и т. Д.
Мини-электрическая щетка: для удаления грязи, шерсти домашних животных и другого стойкого мусора с диванов, постельных принадлежностей и других тканевых поверхностей.

Ноты:
- Если какая-либо вращающаяся часть застрянет, пылесос может отключиться автоматически. Удалите все застрявшие посторонние предметы и возобновите использование.
- При перегреве двигателя пылесос автоматически отключается. Подождите, пока температура аккумулятора не вернется к норме, затем продолжите использование.
Щелевая насадка: Для очистки узких щелей и участков вокруг дверей, окон, плинтусов, углов, лестниц и т. Д.
Щетка Smart High Torque Brush Bar: Для чистки различных типов полов, таких как дерево, мрамор, плитка и короткие ковровые покрытия. Когда активирован автоматический режим, пылесос может автоматически регулировать уровень всасывания в зависимости от типа поверхности.
Примечание: Интеллектуальную щетку с высоким крутящим моментом можно прикрепить непосредственно к пылесосу.
Использование функции мытья полов
Ноты:
- Не наступайте на резервуар для воды, это может привести к его необратимому повреждению.
- Сильно загрязненные полы следует пропылесосить перед мытьем шваброй для лучшего результата.
- Не используйте функцию мытья полов на ковре.
- Не используйте чистящие или дезинфицирующие средства.
- Dampen подушечкой для швабры и отожмите лишнюю воду, затем надежно прикрепите ее ко дну резервуара для воды.

- Откройте пробку бака для воды, добавьте необходимое количество чистой воды, затем закройте пробку.

- Присоедините интеллектуальную щетку с высоким крутящим моментом к резервуару для воды, совместив магниты на каждом компоненте, пока они не защелкнутся.

- Эта функция предназначена для уборки пылесосом и протирки деревянных и плиточных полов.

Ноты:
- Шаровой кран в резервуаре для воды контролирует, сколько воды подается. Мяч является подвижной деталью и может издавать звук качения при трогании с места и остановке. Это нормально.
- Когда он не используется, держите переключатель в положении ВЫКЛ.
Уход и обслуживание
Меры предосторожности при обслуживании
- Всегда используйте оригинальные запчасти, чтобы гарантия не была аннулирована.
- Если фильтр, удлинительный стержень или планка интеллектуальной динамометрической щетки засоряются, пылесос вскоре перестанет работать. Чтобы восстановить его работоспособность, очистите забитый компонент.
- Если пылесос не будет использоваться в течение длительного периода, полностью зарядите его и отключите от источника питания, а затем храните его в прохладной среде с низкой влажностью вдали от прямых солнечных лучей. Чтобы избежать чрезмерной разрядки аккумулятора, заряжайте пылесос не реже одного раза в три месяца.
Очистка пылесоса
Протрите пылесос мягкой сухой тканью.
Очистка пылесборника, предварительного фильтра и циклонного узла
- Чистящая способность пылесоса будет снижена, если пылесборник заполнен до отметки «MAX». Для восстановления работоспособности своевременно опорожняйте пылесборник. Перед опорожнением отсека убедитесь, что пылесос отключен от источника питания, и не нажимайте кнопку включения.

- Нажмите кнопку открывания нижней крышки отсека для пыли, затем вылейте содержимое.

- Нажмите переключатель отсека для пыли в направлении, указанном стрелкой, затем осторожно извлеките отсек для пыли из пылесоса.

- Сначала снимите предварительный фильтр, затем поднимите ручку блока циклона и поверните против часовой стрелки до упора, затем потяните, чтобы вынуть блок циклона.

- Промойте предварительный фильтр, узел циклона и отсек для пыли водой до тех пор, пока они не станут чистыми, затем отложите каждый компонент, чтобы он полностью просушился, по крайней мере, на 24 часа.

Ноты:
- Пылесборник следует промывать не реже одного раза в месяц.
- Блок предварительного фильтра и циклона следует очищать каждые 3-4 месяца.
Если места контакта пылесоса загрязнены, протрите их мягкой сухой тканью.
Ноты:
- Не используйте моющие средства, полироли или освежители воздуха для очистки отсека для пыли.
- Не очищайте отсек для пыли, предварительный фильтр или циклонный узел в посудомоечной или стиральной машине, а также не пытайтесь сушить какие-либо компоненты в сушильной машине, духовке, микроволновой печи или возле открытого огня.
- Вставьте узел циклона вертикально в отсек для пыли и убедитесь, что ручка узла циклона совмещена с прорезью на левой стороне отсека для пыли. Поверните ручку по часовой стрелке до фиксации, затем переверните ручку вниз.
- Поместите предварительный фильтр передней стороной вверх в блок циклона.

- Слегка наклоните пылесборник, чтобы его прорезь совпала с зажимом на пылесосе. Затем осторожно нажмите на пылесборник до щелчка.

Очистка HEPA-фильтра
Примечание: Рекомендуется очищать HEPA-фильтр каждые 4-6 месяцев.
- Снимите пылесборник, как показано на рисунке.

- Снимите HEPA-фильтр с пылесоса, потянув его вниз в направлении, показанном на рисунке.

- Очистите HEPA-фильтр чистой водой. Убедитесь, что вы повернули фильтр HEPA на 360 °, чтобы тщательно удалить всю пыль, захваченную фильтром. Слегка постучите по фильтру несколько раз, чтобы удалить излишки грязи.
Ноты:- Для очистки фильтра используйте только чистую воду. Не используйте моющее средство.
- Не пытайтесь чистить HEPA-фильтр кистью или пальцем.

- Дайте HEPA-фильтру полностью высохнуть в течение как минимум 24 часов.

Установка HEPA-фильтра
- Вставьте HEPA-фильтр в пылесос и осторожно надавите, как показано на рисунке.

- Установите пылесборник на место.

Очистка планки интеллектуальной щетки с высоким крутящим моментом
- Поверните фиксатор против часовой стрелки до упора, затем снимите роликовую щетку со стержня интеллектуальной щетки с высоким крутящим моментом.

- С помощью ножниц срежьте и удалите все волосы или другой мусор, запутавшийся вокруг роликовой щетки. Сотрите излишки пыли с гнезда и очистите пластиковую крышку сухой тканью или бумажным полотенцем.

- После продолжительного использования роликовая щетка может загрязняться, и ее следует вымыть.

- После мытья дайте роликовой щетке полностью высохнуть, поставив ее вертикально в хорошо проветриваемом помещении не менее 24 часов.

Очистка мини-электрической щетки
- С помощью монеты поверните замок против часовой стрелки до щелчка.

- После разблокировки роликовой щетки снимите ее с мини-электрической щетки, затем промойте и очистите роликовую щетку.

- После мытья дайте роликовой щетке полностью высохнуть, поставив ее вертикально в хорошо проветриваемом помещении не менее 24 часов.

- Когда роликовая щетка высохнет, установите ее на место, выполнив действия по разборке в обратном порядке.

Очистка бака для воды и насадки для швабры
Ноты:
- Когда пылесос заряжается или не используется, снимите резервуар для воды и слейте оставшуюся воду, чтобы предотвратить появление плесени или стойкого запаха.
- Изношенную или поврежденную подушку для швабры, которая больше не прилипает к резервуару для воды, следует заменить, чтобы обеспечить оптимальную эффективность очистки.
- Сдвиньте резервуар для воды вниз, чтобы отсоединить его от интеллектуального высокого крутящего момента 4. Очистите и просушите подушку для швабры. кисть.

- Слейте воду из бака.

- Снимите подушку для швабры с резервуара для воды.

- Очистите и высушите подушку для швабры.

Фильтр диспенсера для воды
Фильтр дозатора воды следует заменить, если резервуар для воды подает воду слишком медленно или забивается.
Чтобы обеспечить оптимальную эффективность мытья полов, рекомендуется заменять фильтры диспенсера для воды каждые 3-6 месяцев в зависимости от качества воды и частоты использования.
- Пальцами выдвиньте старые фильтры диспенсера для воды с левой и правой стороны каждого слота.

- Вставьте новые фильтры в диспенсер для воды и убедитесь, что они установлены правильно.

Аккумулятор
Пылесос содержит съемный литий-ионный аккумулятор, который имеет ограниченное количество циклов перезарядки. После продолжительного использования аккумулятор может перестать держать заряд. Если это произойдет, это означает, что срок службы аккумуляторной батареи подошел к концу и ее необходимо заменить.
- Нажмите кнопку фиксатора аккумуляторного блока и сдвиньте аккумулятор вправо, как показано на рисунке, чтобы извлечь его.
- Установите новую аккумуляторную батарею.

Характеристики
| Пылесос | |||
|
Модель |
MJSCXCQPT |
Номинальный объемtage |
25.2 V |
|
Зарядка Voltage |
30.8 V |
Номинальная мощность |
3000 мАч |
|
Номинальная мощность |
450 W |
Емкость пылесборника |
Максимум. 0.6 л |
|
Время зарядки |
Прибл. 4 часов |
вес нетто |
4.2 кг |
|
Пункт Размеры |
1286 × × 214 256 мм |
|
Щетка Smart High Torque Brush Bar |
Мини-электрическая щетка |
||
|
Модель |
G10-01 |
Модель |
1C-02 |
|
Номинальная мощность |
40 W |
Номинальная мощность |
20 W |
|
Номинальный объемtage |
25.2 V |
Номинальный объемtage |
25.2 V |
| зарядное устройство | |||
|
Изготовлены по |
Компания Zhongshan Baolijin Electronic Co., Ltd. |
Средняя активная эффективность |
87.5% |
| Модель | БЛДЖ24В308080П-В | КПД при низкой нагрузке (10%) | 77.9% |
| вход | 100–240 В ~ 50/60 Гц 0.8 A | Потребляемая мощность без нагрузки | 0.10 W |
| Результат | 30.8 В 0.8 А 24.6 Вт |
| Перезаряжаемый литий-ионный аккумулятор 7INR19 / 66 | |||
| Модель батареи | П2046-7С1П-БК | Номинальная мощность | 3000 мАч |
| Номинальный объемtage | 25.2 V | номинальная мощность | 2800 мАч |
| Энергия | 70.56 Wh |
Литиевый аккумулятор содержит вещества, опасные для окружающей среды. Перед утилизацией пылесоса сначала извлеките аккумулятор, затем выбросьте или утилизируйте его в соответствии с местными законами и правилами страны или региона, в котором он используется.
Информация о WEEE
Все продукты, отмеченные этим символом, являются отходами электрического и электронного оборудования (WEEE согласно директиве 2012/19 / EU), которые нельзя смешивать с несортированными бытовыми отходами. Вместо этого вам следует защищать здоровье человека и окружающую среду, передавая свое использованное оборудование в специальный пункт сбора отходов электрического и электронного оборудования, назначенный правительством или местными властями. Правильная утилизация и переработка помогут предотвратить возможные негативные последствия для окружающей среды и здоровья человека. Пожалуйста, свяжитесь с установщиком или местными властями для получения дополнительной информации о местонахождении, а также об условиях использования таких пунктов сбора.
FAQ
| Ошибка | Возможная причина | Решения |
| Пылесос не работает. | Батарея разряжена или разряжена. | Полностью зарядите пылесос, затем возобновите его использование. |
| Он переходит в режим защиты от перегрева из-за блокировки. | Подождите, пока пылесос остынет, затем снова включите его. | |
| Его всасывающее отверстие или дыхательные пути заблокированы. | Устраните любые засорения всасывающего отверстия или воздуховода. | |
| Мощность всасывания снижается. | Отсек для пыли заполнен и / или засорен фильтр. | Опустошите пылесборник и очистите фильтр. |
| Блокируется интеллектуальная щетка с высоким крутящим моментом и / или удлинительный стержень. | Устраните любые засоры на планке интеллектуальной щетки с высоким крутящим моментом и / или удлинительной штанге. | |
| Мотор издает странный шум. | Основное всасывающее отверстие или удлинительный стержень заблокированы. | Устраните любые засоры в основном всасывающем отверстии или удлинительном стержне. |
|
Первый индикатор горит красным после включения пылесоса. |
Аккумулятор поврежден. | Пожалуйста, свяжитесь с отделом послепродажного обслуживания, чтобы организовать техническое обслуживание. |
| Первый индикатор мигает красным во время зарядки пылесоса. | Зарядное устройство несовместимо. | Для зарядки пылесоса используйте только оригинальное зарядное устройство. |
| Ошибка | Возможная причина | Решения |
| Индикатор батареи не загорается во время зарядки. | Зарядное устройство не подключено к пылесосу. | Убедитесь, что зарядное устройство подключено правильно. |
| Аккумулятор полностью зарядился и перешел в спящий режим. | Пылесос можно использовать в обычном режиме. | |
| Если проблема не исчезнет после исключения двух вышеупомянутых возможностей, обратитесь за помощью в службу послепродажного обслуживания. | ||
| Аккумулятор заряжается медленно. | Температура аккумулятора слишком низкая или слишком высокая. | Подождите, пока температура аккумулятора не нормализуется, а затем возобновите использование. |
| Резервуар для воды не подает воду или подает воду медленно. | Забит фильтр дозатора воды. | Очистите или замените фильтр диспенсера для воды. |
| Подушечка для швабры грязная. | Очистите или замените подушку для швабры. |
Решение Проблем
Если пылесос не работает должным образом, на экране отображается сообщение об ошибке. См. Приведенную ниже таблицу устранения неполадок, чтобы найти решение на основе сообщения об ошибке.
| Сообщение об ошибке | Решения |
| Дыхательные пути заблокированы | Очистите пылесборник, удлинительный стержень и / или интеллектуальную щетку с высоким крутящим моментом от любых засоров. |
| Низкая батарея | Скоро зарядитесь. |
| Роликовая щетка застряла | См. «Очистка планки интеллектуальной щетки с высоким крутящим моментом» в разделе «Уход и обслуживание», чтобы узнать, как очистить волосы и другой мусор, захваченный роликовой щеткой. |
| Батарея разряжена | Скоро зарядитесь. |
| Батарея перегрета | Подождите, пока температура аккумулятора не нормализуется, прежде чем продолжить использование. |
| Ошибка | Пожалуйста, свяжитесь с отделом послепродажного обслуживания, чтобы организовать техническое обслуживание. |
| Фильтр не установлен | Убедитесь, что HEPA-фильтр и предварительный фильтр установлены правильно. |
![]()
Документы / Ресурсы
Рекомендации
Пылесос Xiaomi Mi Handheld Vacuum Cleaner G10 белый
450 Вт, уборка: влажная, сухая, объем пылесборника — 0.6 л, объем бака для жидкости — 0.23 л, питание — от аккумулятора, время работы от АКБ max — 65 мин
подробнее

1.5k98,10
Код товара: 4729456

Made in China
Ga voor meer informatie naar www.mi.com
Geproduceerd voor: Xiaomi Communications Co., Ltd.
Geproduceerd door: Dreame (Tianjin) Information Technology Co., Ltd. (een Mi Ecosystem-bedrijf)
Adres: Room 2112-1-1, South District, Finance and Trade Center, No.6975 Yazhou Road, Dongjiang Bonded Port Area, Tianjin Pilot Free Trade Zone, Tianjin, China
Mi Vacuum Cleaner G10 User Manual
· 01
Manual de usuario de Mi Vacuum Cleaner G10
· 29
Manuale utente Mi Vacuum Cleaner G10
· 57
Manuel d’utilisation de MiVacuumCleanerG10
· 85
Mi Handstaubsauger G10 Benutzerhandbuch
· 113
Mi ハンディクリーナー G10 取扱説明書
· 169
Mi 무선청소기 G10 사용 설명서
· 197
Instrukcja obsługi odkurzacza Mi G10
· 225
Mi G10
Gebruikershandleiding Mi Stofzuiger G10
· 253
· 281
· 141
For further information, please go to www.mi.com
Manufactured for: Xiaomi Communications Co., Ltd.
Manufactured by: Dreame (Tianjin) Information Technology Co., Ltd. (a Mi Ecosystem company)
Address: Room 2112-1-1, South District, Finance and Trade Center, No.6975 Yazhou Road, Dongjiang Bonded Port Area, Tianjin Pilot Free Trade Zone, Tianjin, China
Para más información, visite la página web www.mi.com.
Fabricado para: Xiaomi Communications Co., Ltd.
Fabricado por: Dreame (Tianjin) Information Technology Co., Ltd. (una compañía de Mi Ecosystem)
Dirección: Room 2112-1-1, South District, Finance and Trade Center, No.6975 Yazhou Road, Dongjiang Bonded Port Area, Tianjin Pilot Free Trade Zone, Tianjin, China
Per ulteriori informazioni, visitare il sito www.mi.com
Fabbricato per: Xiaomi Communications Co., Ltd.
Fabbricato da: Dreame (Tianjin) Information Technology Co., Ltd. (una società Mi Ecosystem)
Indirizzo: Room 2112-1-1, South District, Finance and Trade Center, No.6975 Yazhou Road, Dongjiang Bonded Port Area, Tianjin Pilot Free Trade Zone, Tianjin, Cina
Pour en savoir plus, rendez-vous sur le site www.mi.com.
Fabriqué pour: Xiaomi Communications Co., Ltd.
Fabricant: Dreame (Tianjin) Information Technology Co., Ltd. (une société MiEcosystem)
Adresse: Room 2112-1-1, South District, Finance and Trade Center, No.6975 Yazhou Road, Dongjiang Bonded Port Area, Tianjin Pilot Free Trade Zone, Tianjin, Chine
A/S 가 필요하시면 구매처나 현지 공식 A/S 센터로 연락하거나 www.mi.com/kr/ 에 방문하여 확인하십시오 .
의뢰업체 : Xiaomi Communications Co., Ltd.
제조업체 : Dreame (Tianjin) Information Technology Co., Ltd. (Mi 에코시스템 컴퍼니 )
주소 : Room 2112—1—1, South District, Finance and Trade Center, No.6975 Yazhou Road, Dongjiang Bonded Port Area, Tianjin Pilot Free Trade Zone, Tianjin, China
詳細については、www.mi.com をご覧ください。
販売元:Xiaomi Communications Co., Ltd.
製造元:Dreame (Tianjin) Information Technology Co., Ltd. (Mi Ecosystem 企業)
所在地:Room 2112—1—1, South District, Finance and Trade Center, No.6975 Yazhou Road, Dongjiang Bonded Port Area, Tianjin Pilot Free Trade Zone, Tianjin, China
Дополнительную информацию см. на веб-сайте www.mi.com.
Изготовлено для: Сяоми Техкоммуникации Ко., Лтд.(Китай)
Изготовитель: Dreame (Tianjin) Information Technology Co., Ltd. (компания MiEcosystem)
Адрес: Room 2112-1-1, South District, Finance and Trade Center, No.6975 Yazhou Road, Dongiang Bonded Port Area, Tianjin Pilot Free Trade Zone, Tianjin, China (Тяньцзинь, Китай)
Więcej informacji: www.mi.com
Wyprodukowano dla: Xiaomi Communications Co., Ltd.
Producent: Dreame (Tianjin) Information Technology Co., Ltd. (spółka Mi Ecosystem)
Adres: Room 2112-1-1, South District, Finance and Trade Center, No.6975 Yazhou Road, Dongjiang Bonded Port Area, Tianjin Pilot Free Trade Zone, Tianjin, Chiny
Für weitere Informationen besuchen Sie bitte www.mi.com.
Hergestellt für: Xiaomi Communications Co., Ltd.
Hersteller: Dreame (Tianjin) Information Technology Co., Ltd. (ein Unternehmen von Mi Ecosystem)
Adresse: Room 2112-1-1, South District, Finance and Trade Center, No.6975 Yazhou Road, Dongjiang Bonded Port Area, Tianjin Pilot Free Trade Zone, Tianjin, China
www.mi.com
Xiaomi Communications Co., Ltd :
.
(Mi Ecosystem ) Dreame (Tianjin) Information Technology Co., Ltd :
.
,Room 2112-1-1, South District, Finance and Trade Center, No.6975 Yazhou Road, Dongiang Bonded Port Area, Tianjin Pilot Free Trade Zone :
Ручной пылесос (handstick) Xiaomi Mi Handheld Vacuum Cleaner G10, 450Вт, белый/оранжевый [bhr4307gl]
Нет в наличии
Последний раз товар был 7 марта
- Тип уборки: сухая/влажная;
- Мощность: потребляемая 450 Вт; всасывания 150 Вт/
- Пылесборник: контейнер; объем пылесборника: 0.6 л;
- Аккамулятор: Li-Ion; 3000 мAч;
- Насадки: для пола и ковров, щелевая, для мягкой мебели, турбощетка, для паркета, для влажной уборки ковров/полов,
- Особенности: с фильтром тонкой очистки;
Появились вопросы о товаре?
Нет в наличии
Последний раз товар был 7 марта
Нет в наличии
Последний раз товар был 7 марта
Хочу быть в курсе акций и новинок
Контакты
- Журнал
- Акции
- Покупателям
- Информация
- Доставка
- Гарантия
- Кредит и рассрочка
- Сервисные центры
- Услуги
- Корпоративным клиентам
- Аренда помещений
- Партнёрская программа
- Обзоры
- Форум
- Клуб Ситилинк
- Конфигуратор
- Подбор расходных материалов
- Ситилинк
- Новости
- Вакансии
- Документы
Мы используем файлы cookie. Подробнее
Мы используем файлы cookie для вашего удобства пользования сайтом и повышения качества рекомендаций. Подробнее