Retevis RA685 — Walkie Talkie Manual
FEATURE
- Frequency range: 144-146MHZ(RX/TX) 430-440MHZ(RX/TX)
- Dual band, Dual Display, Dual Standby, U/V band relay cross-band transmission and reception, convenient for users to set network at any time.
- High, middle, and low power switching to meet the power requirements of users at different distances, more energy-saving and power-saving
- Up to 128 memory channels for programming frequency and other various data
- Multiple display modes such as channel number, frequency, channel frequency, channel name, etc.
- CTCSS/DCS, DTMF signaling, reject redundant calls from other stations
- The tail tone is eliminated to avoid the impact noise from the speaker after the call is over
- VOX voice-activated transmission, no need to press the PTT button to talk normally
- Emergency alarm, ANI identification and other functions through DTMF
- DTMF, CTCSS (60.0 -259.9 HZ), DCS signaling codec function
- 8 step frequency selection (2.5K, 5.0K, 6.25K, 10.0K, 12.5K, 20.0K, 25.0K, 50.0K)
- Automatic power saving function to extend battery life
- SOS emergency alert function
- Computer programming function
- Wide/narrow band (25KHz/12.5KHz) selection function
- Digital FM radio (receiving 65-108MHz)
- Direct selection of keyboard numbers for menu items, the transmit and receive frequency can be manually input
- Strong flashlight lighting function
- Frequency test function, copy the frequency of other devices at any time
- USB charging function, you can use the USB charging cable to charge
- Special CTCSS/DCS (frequency hopping function)
Check the contents of the package
The box contains the following items. If any items are missing or damaged, please contact the dealer where you purchased the product.
| Article | Quantity | Article | Quantity |
| Host | 1 | Charging base | 1 |
| Battery | 1 | Belt clip | 1 |
| Antenna | 1 | Manual | 1 |
| Sling | 1 |
Note: The antenna varies with the frequency band. Please refer to the color ring label at the bottom of the antenna for the antenna frequency band. If the label does not indicate the frequency band, please refer to the specific frequency band on the host label.
Familiar with this machine

Status indication
Status Icons![]()
| No. | Icon | Product Status |
| 1 |  |
Channel strength indicator, the more the number, the stronger the signal |
| 2 |  |
The current transmitting power is high power (the longest communication distance, the largest power consumption); |
 |
The current transmitting power is medium power (more power saving, relatively moderate communication distance); | |
 |
The current transmitting power is low power (the most power saving, relatively close distance) | |
| 3 |  |
When the side tone switch is set to key side tone/key + ID/ID, this symbol appears |
| 4 |  |
This symbol indicates that the current subtone is a digital subtone |
 |
This symbol indicates that the current subtone is an analog subtone | |
| 5 |  |
When this symbol appears in frequency mode, it means that the transmitting frequency is the receiving frequency plus a frequency difference frequency. The frequency difference frequency is set in menu 26 |
 |
When this symbol appears in frequency mode, it means that the transmitting frequency is the receiving frequency minus a frequency difference frequency. The frequency difference frequency is set in menu 26 | |
| 6 |  |
The appearance of this symbol indicates that the dual-band standby is on, and it is in the dual-standby state. It can be watched at the frequency points of the two frequency bands displayed on the screen |
| 7 |  |
The symbol appears when the keyboard is locked; press and hold the [#] key to unlock, and the symbol disappears |
| 8 |  |
Indicates that the voice-activated emission function is activated, and the emission will start when the sound pressure level of the microphone reaches the set value |
| 9 |  |
Receiving and transmitting frequency inversion in frequency mode/channel mode |
| 10 |  |
This symbol appears when the channel is working in narrowband mode |
| 11 |  |
Display the current remaining battery power; the more bars, the more battery power |
| 12 |  |
A/B band pointer, indicating the current working frequency or working channel |
| 13 | Aranbic No. | Digital channel mode, the channel number of the A band |
| 14 | Aranbic No. | Digital In channel mode, the channel number of the B band |
LED indicator light
This machine is equipped with LED indicators to let you easily grasp the current operating status of the machine.
| Indicator status | Native status |
| Steady Red light | Launching |
| Steady green light | Receiving |
Preparation before use
Install the antenna
Install the battery
- Align the battery with the battery mount on the back of the walkie-talkie.
- Press the battery forcefully into the walkie-talkie, and slide the battery up until the lock plate is locked to the correct position. If you need to remove the battery, turn off the walkie-talkie. Press the battery lock to the unlocked position and hold it down, then slide the battery down and away from the battery mount.
Install the belt clip
Align the two screw holes of the belt clip with the screw holes above the battery, install and tighten the screws.
If you need to remove the belt clip, loosen and remove the screws from the belt clip.
Install an external headset/microphone (optional purchase separately)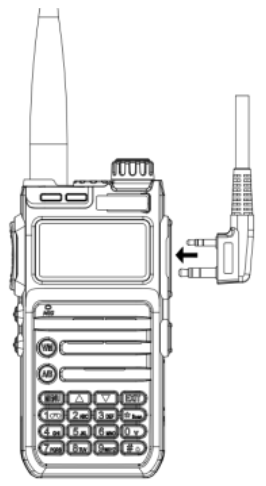
- Open the earphone cover.
- Insert the headphone plug into the headphone jack. When you don’t need to use the earphones, pull out the earphone plug from the earphone hole and put on the earphone cover. When the universal interface is not used, please put on the dust cover.
Attention:
- Please use the charging equipment designated by our company to charge. When charging the whole device, it is recommended to turn off the walkie-talkie first.
- According to the 2016 new requirements of the International Civil Aviation (IATA) «Technical Regulations for the Safe Air Transport of Dangerous Goods», the state of charge of lithium-ion batteries (cells) for air transport shall not exceed 30% of their rated capacity. Therefore, the first time the battery is used with the host, there will be a low battery warning with the voice prompt «please charge». Phenomenon, please charge the battery before use.
- When the battery is charged in the charger, the red light may keep flashing. This is the pre-charging process performed by the charger to protect the battery when the battery power is too low. It is a normal phenomenon. Generally, it can turn to red after 30 seconds. Normal charging state when the light is on.
Walkie-talkie charging
When using the terminal for the first time, a low battery alarm may appear. Please charge the battery before using the terminal, the steps are as follows: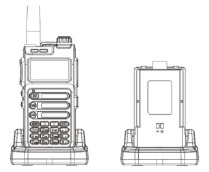
- Insert the power adapter interface into the jack on the back of the charging base.
- Insert the plug of the power adapter into the power outlet.
- Put the battery into the charging cradle.
- Observe the LED indicator of the charging base to understand the current charging status, as shown in the table below.
| The charging indicator light shows | The current charging status |
| Red light flashes | Battery voltage is too low |
| Red light is on | Charging |
| Green light is on | Charging is complete |
Check battery
This function allows you to know the current battery voltage and remaining power.
Long press  key to display the current voltage.
The current battery level is displayed on the upper right of the screen, and the battery icon is as follows:
Basic operation
| Knobs, switches, buttons | Instructions |
| Power/volume switch |
|
| Select channel | The channel is the channel through which the signal is transmitted. After power on, press the [V/M] key to switch to the channel mode, press [/] to select the channel, and the channel number will be displayed on the right side of the screen. If the channel broadcast function is turned on, the intercom will broadcast the current channel mode. |
| PTT button call |
|
| Side Key 1 | The side buttons have two modes: short press and long press, and the following functions can be selected: off, flashlight, alarm, radio, NOAA weather forecast, monitoring, and scan. Off: No function Flashlight function: Short press the [SK1] key to turn on the flashlight function and the flashlight light is always on; short press the [SK1] key again to turn off the flashlight function. If you choose to operate the flashlight function in the menu mode, short press the [SK1] key to turn on the flashlight for the first time, short press the second flashlight to keep flashing, and short press three times to turn off the flashlight. Alarm: SOS emergency alarm function: Short press the [SK1] key to turn on the alarm function. At this time, the green indicator light and the red indicator light flash at the same time. Short press the [SK1] key again to release the alarm. Radio: Short press the [SK1] key to turn on the radio function, and short press the [SK1] key again to turn off the radio. The radio frequency can be entered through the keyboard or tap the «#» key to automatically search for radio stations. In radio mode, press the [EXIT] key to switch between 65-75/76-108MHz frequency band. NOAA weather forecast: Short press the [SK1] key to turn on the NOAA function, and short press the [SK1] key again to turn off the NOAA function. Press the up and down keys to select the channel: 10 channels for selection: see Appendix 1 for details Monitoring function: Short press the [SK1] key to turn on the monitoring function, and release the [SK1] key to cancel the monitoring. Sweep: Short press [SK1] key to turn on the sweep function, and directly measure the frequency of other devices. |
| Side Key 2 | The same side key SK1 has a short press and long press function to choose |
| V/M key | Frequency mode or channel mode switching.
|
| A/B key | A/B upper and lower frequency band switch selection. Press the PTT button to transmit in the frequency band pointed to by the pointer. |
| Keyboard lock and unlock | Manual lock: Long press # key to lock the intercom. Automatic lock: After the automatic keyboard lock is turned on, when there is no operation on the buttons and knobs, the automatic lock will be delayed for 10 seconds. Unlock: Long press the # key to unlock the keyboard. |
Function Description
Menu Settings
You can enter «Menu Settings» through the menu key of the terminal to set some common functions. The specific instructions and operation methods are as follows:
| Menu number display characters | First-level menu | Secondary menu display characters | Description of secondary menu setting |
| 0 | Squelch | 0,…,9 | Squelch level, the lower the level, the easier it is to interfere, the higher the level the worse the sensitivity, the default value is 3. |
| 1 | Step | 2.5KHz | In frequency mode, press  key to change the step value of frequency, the value range is 2.5~50KHz key to change the step value of frequency, the value range is 2.5~50KHz |
| 5.0KHz | |||
| 6.25KHz | |||
| 10.00KHz | |||
| 12.50KHz | |||
| 20.0KHz | |||
| 25.0KHz | |||
| 50.0KHz | |||
| 2 | Tx Power | High | High power |
| Middle | Middle Power | ||
| Low | Low Power | ||
| 3 | Power save | OFF | Turn off power saving mode |
| ON | Turn on power saving mode | ||
| 4 | Vox Level | OFF | Turn off voice control |
| 1,2,… 10 | Start the sound control level intensity, value range | ||
| 5 | Bandwidth | Wide | Wide band working |
| Narrow | Narrow band working | ||
| 6 | Backlight | Bright | Backlight is always on |
| 5Sec, 10Sec,… 60Sec | Automatic backlight delay time, the value range is 5~60 seconds | ||
| 7 | Menu Exit Time | 5Sec, 10Sec,… 60Sec | Menu exit time, the value range is 5~60 seconds |
| 8 | Dual Standby | OFF | OFF |
| ON | ON | ||
| 9 | Beep Prompt | OFF | OFF |
| ON | ON | ||
| 10 | VOICE | OFF | OFF |
| ON | ON | ||
| 11 | Tx over time | OFF | Press and hold the PTT button to keep launching |
| 15,30,…600 | Value range 15~600, step value 15 | ||
| 12 | Rx DCS | OFF | NO DCS |
| D023N,…,D754I | Standard sequence of DCS | ||
| 13 | Rx CTCSS | OFF | NO CTCSS |
| 67.0HZ,…,254.1HZ | Simulate the standard sequence of mute, at the same time, you can directly type standard or non-standard analog mute through the keyboard | ||
| 14 | Tx DCS | OFF | NO DCS |
| D023N,…,D754I | Standard sequence of DCS | ||
| 15 | Tx CTCSS | OFF | NO CTCSS |
| 67.0HZ,…,254.1HZ | Simulate the standard sequence of mute, at the same time, you can directly type standard or non-standard analog mute through the keyboard | ||
| 16 | DTMFST | OFF | OFF |
| DT-ST | DT-ST | ||
| ANI-ST | ANI-ST | ||
| DT+ANI | DT+ANI | ||
| 17 | TONE | 1000hz, 1450hz, 1750hz, 2100hz | Repeater activation audio |
| 18 | S-CODE g | 1,2…,15 | When needed, send out this group of information codes (information codes can only be written by frequency writing software) |
| 19 | Scan Mode | TO | Time Scan |
| CO | Carrier Scan | ||
| SE | Search Scan | ||
| 20 | PTT-ID | OFF | Press PTT to not send ID code |
| BOT | Press PTT to send ID code (ID code is set by frequency writing software) | ||
| EOT | Release PTT to send ID code | ||
| BOTH | ID code is sent when you press and release the PTT button | ||
| 21 | MDF-A | Frequency | In the channel mode of the A segment, the channel displays the frequency |
| Name | In the channel mode of section A, the channel displays the channel name (the specific name is set in the frequency writing software) | ||
| 22 | MDF-B | Frequency | Band B is in channel mode, the channel displays the frequency |
| Name | In the channel mode of section B, the channel displays the channel name (the specific name is set in the frequency writing software) | ||
| 23 | Busy Lockout | OFF | Channel is occupied and allowed to transmit |
| ON | Channel is occupied and transmission is prohibited | ||
| 24 | Key Auto Lock | OFF | Turn off automatic keyboard lock |
| ON | Turn on the keyboard auto-lock function | ||
| 25 | Direction | None | In frequency mode, there is no frequency difference between the transmitting frequency and the receiving frequency |
| Plus | In frequency mode, the transmitting frequency is equal to the receiving frequency plus the frequency difference frequency | ||
| Minus | In frequency mode, the transmitting frequency is equal to the receiving frequency minus the frequency difference frequency | ||
| 26 | Offset | 00.000,…,99.998 | In frequency mode, the difference between the transmitting and receiving frequencies |
| 27 | Key1 sp | OFF | No function |
| LAMP | Turn on the flashlight function | ||
| SOS | Turn on the alarm function | ||
| FM | Turn on the radio function | ||
| NOAA | Enable NOAA weather forecast function | ||
| MONI | Turn on the monitoring function | ||
| Scan | Turn on the sweep function | ||
| 28 | Key1 LP | Same function as side key 1 short press | |
| 29 | Key2 sp | Same function as side key 1 short press | |
| 30 | Key2 LP | Same function as side key 1 short press | |
| 31 | Memory | 1,…,128 | When storing a channel, it is used to indicate the channel number to be stored. If the word CH- is displayed in front of the number, it means that the channel originally has channel parameters |
| 32 | Delete | 1,…,128 | Delete the channel parameters of the specified channel, if there is no CH- in front, it means that the channel has no parameters and the operation is invalid |
| 33 | Alarm Mode | On site | On-site alarm |
| Send sound | Send sound | ||
| Send code | Send code | ||
| 34 | TAIL | OFF | After the PTT is released, the machine does not send a shutdown code, usually when it is relayed through the relay, let it make noise to confirm whether the signal of the machine is relayed |
| ON | After releasing the PTT button, the machine sends a shutdown code to suppress the instantaneous noise of the listener | ||
| 35 | PROGER | OFF | Turn off the call end alert tone |
| ON | Turn on the call end alert tone | ||
| 36 | Language | Chinese | |
| English | |||
| 37 | Reset | VFO | Menu initialization only |
| ALL | Menu and channel initialization | ||
| 38 | SPECIAL DCS | OFF | Close special DCS |
| ON | Open Menu and channel initialization, only with same DCS can communicate |
Common function description
The functions supported by the walkie-talkie are shown in the table below.
| Name | Function description |
| Squelch level adjustment | Squelch level adjustment is to adjust the signal strength required when receiving a signal. The squelch level (0 open to 9 is the highest) is selected by the local environment, and 3 is generally selected. |
| CTCSS/DCS | CTCSS/DCS is used to avoid listening to irrelevant calls of the same frequency. Only when the transmitted CTCSS/DCS matches the received CTCSS/DCS digital, the walkie-talkie can listen to the voice through the speaker. |
| TOT | Timeout prohibition TOT timeout prohibition can limit the single transmission time (the default is 60 seconds) to prevent the communication parties from occupying channel resources for a long time, and to prevent the terminal from being damaged due to overheating. After the duration of pressing the [PTT] key expires, the terminal will automatically terminate the transmission and emit a warning tone. If you need to talk again, please transmit after the preset time. |
| Power saving | When the walkie-talkie has no receiving or transmitting, no button or knob operation reaches the power saving time, it will automatically enter the power saving mode. |
| Low battery warning | It is used to remind the battery to charge in time when the battery power is low. When the battery is too low, transmission will be prohibited. |
| Emergency Alarm | An emergency alarm is when you encounter an emergency, you can ask your companion or the control center for help. |
| SCAN | After scanning is turned on, the terminal will scan according to the scan list. When there is activity on a certain channel, it will stay on the channel to listen, so as to understand the current activity status of related group members. |
| BCL | Busy channel lock BCL can prevent interference from other terminals on the same channel during transmission. When other terminals occupy the current channel, press and hold the [PTT] key, and the terminal will emit a «beep» tone, indicating that it cannot be transmitted. If the current channel is free, press and hold the [PTT] key to start transmission. |
| Power level | The power level refers to the transmit power level of the walkie-talkie, which can be set to high power or low power. High power can increase the signal strength of the current transmitted voice of the terminal, and it can also communicate with the remote terminal. Low power can save power. |
| MONI | Monitoring MONI monitoring is a listening method used to receive more signals or weak signals. It helps to distinguish and listen to the faint sounds in the speakers. |
| Channel broadcast | Channel broadcast is used to indicate the sequence of the current channel. |
| VOX | Voice-activated transmission VOX After turning on the voice-activated, when the voice detected by the microphone meets the transmission conditions, the terminal will automatically transmit the voice, and you can speak directly without pressing the [PTT] key. The voice control gain is used to control the sensitivity of the microphone’s voice control emission, which is configured by the dealer. |
Voice-activated emission (VOX)
After turning on this function, if the user’s speaking volume level reaches the level selected by the walkie-talkie, the walkie-talkie can also start the transmission operation by voice without pressing the [PTT] key. In some work situations, the user can not freely press the [PTT] key to call, then this function can be enabled. Operation method:
- In the standby mode, press the [MENU] key, the voice prompt «menu setting», enter the function menu setting;
- Press [
 ] or [
 ] key to select 4 menu number forward or backward; or directly enter the number 4 to enter 4 menu number;
 - Press the [MENU] key, the voice prompt «Voice-activated emission», press the [] or [] key, select 1~10 (the larger the value, the higher the sensitivity; such as selecting 3)
- Press the [MENU] key, the voice prompt «OK», save and return to the previous menu.
- Repeat the above operation, select OFF to turn off the voice-activated transmission function. After turning on the voice-activated transmission function, speak into the microphone, and the voice can be sent out; stop speaking, and the transmission will also stop. You can select the VOX sensitivity level according to the quietness of the use environment. If the environment noise is too large, there will be long emission after the VOX function is activated. If the dual-wait function is enabled on this machine, the VOX function is turned off by default, and the VOX function cannot be activated.
Keyboard lock
The keyboard lock function disables the number keys to prevent you from activating a function by mistake. This machine can be set to automatic keyboard lock function, the operation is as follows:
- In the standby mode, press the [MENU] key, the voice prompt «menu setting», enter the function menu setting;
- Press or key to select 24 menu number forward or backward; or directly enter number 2 and 4 to enter 24 menu number;
- Press [MENU] key, press [] or [] key to select ON;
- Press the [MENU] key, the voice prompt «OK», save and return to the previous menu. The automatic keyboard lock function is activated.
- Repeat the above operation, select OFF to turn off the automatic keyboard lock function, and select manual keyboard lock. The operation is as follows:
- In the standby state, long press the «#» key for more than 2s, the keyboard lock function is activated (voice prompt «keyboard lock»);
- Long press the «#» key repeatedly for more than 2s, the keyboard lock function is closed (voice prompt «keyboard unlock»). After the automatic keyboard lock function is turned on, when it is not locked, the numeric keyboard is automatically locked without any keyboard operation for 10 seconds.
Dual Standby
When in dual standby mode, the two-way radio can receive the frequency set by the A or B channel. The operation is as follows:
- In the standby mode, press the [MENU] key, the voice prompt «menu setting», enter the function menu setting;
- Press [] or [] key to select 8 menu number forward or backward; or directly enter the number 8 to enter 8 menu number;
- Press the [MENU] key, the voice prompt «Dual frequency waiting», press [] or [] key, select ON
- Press the [MENU] key, the voice prompt «OK», save and return to the previous menu. The dual-frequency waiting function is turned on.
- Repeat the above operation, select OFF to turn off the dual-frequency standby function. In the menu mode, the dual-frequency standby is temporarily turned off, and after exiting, the dual-frequency standby will be restored.
- Since the dual-standby dual-save mode is in the main and sub-channel scanning state, in the dual-segment dual-save mode, even if the power saving function of the unit is turned on, its power saving function is still invalid, and the standby time of the walkie-talkie will be shortened.
Channel delete
You may want to delete a memory channel due to setting errors or changing other settings. The operation is as follows:
- In the standby mode, press the [MENU] key, the voice prompt «menu setting», enter the function menu setting;
- Press [] or [] key to select 32 menu number forward or backward; or directly enter numbers 3 and 2 to enter 32 menu number;
- Press the [MENU] key, the voice prompt «channel delete»;
- Press [] or [] key to select the channel to be deleted forward or backward.
- If the number prefix displays the character «CH-«, it means that the channel number originally has channel parameters and can be deleted.
- If the number prefix does not display the character «CH-«, it means that the channel number is empty and can be stored directly without deleting it.
- Press the [MENU] key, the voice prompt «OK», delete the stored channel parameters, save and return to the previous menu.
- If the channel is empty, press the [MENU] key to directly return to the previous menu.
Channel storage
The parameters to be included in a complete channel include receiving frequency, transmitting frequency, receiving sub-audio, transmitting sub-audio, transmitting power, channel bandwidth, PTT-ID, busy lock, signaling code, scan addition, channel name, etc. Except for scanning addition and channel name editing through the frequency writing software, other parameters can be set in the frequency mode, and then store them in the designated channel number through the menu 31 Store Channel.
Example: The channel storage parameters are required as follows, and they are stored in the channel number with channel number 001.
- Receiving frequency 440.5 MHZ
- Transmission frequency 4 30.5 MHZ
- Receive mute digital D031N
- Transmit mute digital D031N
- High transmit power
- Channel bandwidth Broadband
The channel name is written in the frequency writing software when needed
Steps:
- Short press [V/M] key to switch to VFO mode, the screen displays
 .
. - In the frequency mode, press the [A/B] key to make the pointer point to A (upstream frequency point)
- Press the number keys 4, 4, 0, 5, 0, 0 in turn to adjust the frequency to 440.500MHZ, and the screen displays .
- Power setting: press
 → (number key 2) →→ [] or [] to select the power (HIGH/MID/LOW) as HIGH→ ,
 - Bandwidth setting: Press → (number key 5) →→ [] or [] to select the channel bandwidth (NARR/WIDE) as WIDE→ ,
- Receive digital tone setting: press → (number keys 1, 2) → [] or [] to select the tone value D031N→ ,
- Transmitting digital sub-tone setting: press → (number keys 1, 4) → → [] or [] to select sub-tone value D031N→,
- PTT-ID button transmission setting: press → (number keys 2, 0) → → [] or [] to select the transmission mode (OFF/BOT/EOT/BOTH) as OFF→ ,
- Channel storage settings for receiving and transmitting the same frequency:
- Press → (number keys 3, 1), the screen displays:

- Press , the voice prompt «storage channel», the screen displays :
- Press or key to select empty channel forward or backward, the screen displays :
- Press , the voice prompts «receive storage», the screen displays : press the voice prompts «storage channel».
- Press , the voice prompt «transmit storage», the screen displays :
- Press EXIT key to return to frequency mode.
- Press
- Channel storage settings for receiving and transmitting different frequencies:
- Press → (number keys 3, 1), the screen displays :
- Press , the voice prompt «storage channel», the screen displays :
- Press the [] or [] key to select the empty channel forward or backward, and the screen displays: .
- Press , the voice prompt «receive storage», the screen displays: ;
- Press EXIT key to return to frequency mode.
- Perform step 3, enter the desired transmit frequency;
- Press → (number keys 3, 1), the screen displays: ,
- Press , the voice prompt «storage channel», the screen displays: ,
- Press , the voice prompt «transmit storage», the screen displays: ;
- Press EXIT key to return to frequency mode.
- Press
Analog sub-audio (CTCSS)/digital sub-audio (CDCSS)
Analog sub-audio (CTCSS)/digital sub-audio (CDCSS) is mainly used to avoid listening to unrelated calls on the same frequency. If CTCSS/CDCSS is set, within the effective communication range, only calls with the same subtone signaling set in the channel can be received; but if CTCSS/CDCSS signaling is not set, you can listen to the effective communication range All calls on the same channel.
Side tone switch
Key side tone: The machine emits key side tone when sending key side tone
ID code side tone: When sending the ID code, the machine will emit the ID code side tone
Button side tone + ID code side tone: When sending button side tone and ID code side tone, the machine emits the corresponding sound
Note: Button side tone, including number key side tone and TONE tone
USB charging
The walkie-talkie can be directly plugged into the USB charging cable and charging with a power bank.
Frequency measurement function
Press +〖*〗key to enter the frequency measurement mode, press【】or【】key to select U segment or V segment. When a signal is received, if the current frequency has a mute tone, it will be displayed on the screen at the same time, press the key The current frequency can be saved. Or you can select the shortcut operation method by pressing the side button.
Special digital mute
The special digital mute is a mute encryption function, which can prevent other machines from copying the mute of this machine. After this function is turned on, only the same DCS code can talk to each other. The mute encryption function is effective only when the DCS mute code is set. Only the same machines with special digital mute on can talk to each other.
Optional accessories
Please use the accessories specified by our company.
If you use unauthorized accessories without authorization, all consequences caused by this are the responsibility of the user.
Please consult your local dealer for optional accessories of the walkie-talkie.
Main Specifications
| TOTAL | Frequency Range | 144-146MHZ(RX/TX) 430-440MHZ(RX/TX) |
| Channel No. | 16 | |
| Channel Spacing | 25/12.5kHz | |
| Input voltage | 7.4 VDC | |
| Battery (standard configuration) | 1800mAH(Li-Ion) | |
| Battery Life(5-5-90, High power transmission) | About 14 Hours | |
| Current: Standby | ≤65mA | |
| Receive | ≤450 mA | |
| Transmit | ≤1.8 A @high power, 850 mA @ low power | |
| Frequency stability | ±2.5ppm | |
| Operating temperature | -20℃ to +60℃ | |
| Antenna impedance | 50Ω | |
| Walkie-talkie size(With battery, but without antenna) | 121×61×33mm | |
| Walkie-talkie weight(Including antenna and battery) | 223g | |
| TRANMIT PART | Transmit output power | 5W/3W/1W |
| Modulation | 16K0F3E@25KHz, 11K0F3E@12.5KHz | |
| Spurious emission | -36dBm1GHz | |
| FM signal-to-noise ratio | 45dB@25KHz, 40dB @12.5KHz | |
| Audio distortion | ≤5% | |
| Modulation limit | ±5.0 KHz@25 KHz, ±2.5 KHz@12.5 KHz | |
| Adjacent channel power | 70dB @ 25KHz, 60dB @ 12.5KHz | |
| (300-3000Hz) Audio response | +1~3dB | |
| RECEIVE | Receiving sensitivity | 0.25μV (12dB SINAD) |
| Adjacent channel selectivity | ≥60dB@25KHz, ≥55dB@12.5KHz | |
| Intermodulation immunity | ≥60dB@25KHz, ≥55dB@12.5KHz | |
| Conducted spurious emissions | ≤-57dB@25KHz, ≤-57dB @12.5KHz | |
| FM signal-to-noise ratio | ≥45dB@25KHz, ≥40dB @12.5KHz | |
| Audio output power | 1W @16ohms | |
| Audio distortion | ≤5% | |
| Audio response(300-3000Hz) | +1~-3dB |
All specifications are subject to change without notice or responsibility.
Disclaimer
This manual strives for the accuracy and completeness of the content during the compilation process, but the company does not assume any responsibility for possible errors or omissions. Due to the continuous development of technology, the company reserves the right to change product design and specifications without notice. Without the company’s prior written authorization, this manual may not be copied, modified, translated and distributed in any form. The third-party products and content involved in this manual are owned by the third party, and our company does not provide guarantees for their accuracy, validity, timeliness, legality or completeness.

Videos
Retevis RA685 — VHF/UHF FM transceiver Review Video
Documents / Resources
Download manual
Here you can download full pdf version of manual, it may contain additional safety instructions, warranty information, FCC rules, etc.
Download Retevis RA685 — Walkie Talkie Manual
-
Скачать себе
-
Оставить отзыв
-
Сообщить неисправную ссылку
Описание:
Перевод инструкции по эксплуатации DMR-радиостанции Retevis RT3S на русский язык. Формат MS Word, 32 страницы
В отличие от своих разговорников, здесь я не всё перевёл дословно и сократил там, где посчитал нужным, так как, надеюсь, данные рации будут в руках тех, кто имеют элементарные знания о радиосвязи. Хочу помочь тем, кто не могут понять прилагаемую производителем инструкцию. В заводской инструкции, которую, как я понял, составлял человек, для которого, как и для меня, английский язык не является родным, много ошибок.
Кое что мне пришлось додумывать самому. Также, из- за модернизации, кое- где , инструкция может не соответствовать действительности. Думаю, что мой перевод того, что приготовил производитель, актуален на 90- 95%. С остальным пользователь, надеюсь, разберётся сам.
Характеристики радиостанции
- Аналог + DMR
- 2 диапазона VHF:136-174MHz и UHF:400-480MHz
- Три уровня мощность передатчика: High 5W, Middle 3W, Low 1W
- Чувствительность приёмника 0.2µV
- Память на 3 тыс. каналов и 120 тыс. контактов
- Встроенный диктофон (запись переговоров) до 8 часов.
- Вес (с батареей и антенной) 258 г
- Аккумулятор 2000 mAh (li-ion)
- Open the earphone cover.
- Insert the headphone plug into the headphone jack. When you don’t need to use the earphones, pull out the earphone plug from the earphone hole and put on the earphone cover. When the universal interface is not used, please put on the dust cover.
Attention:
- Please use the charging equipment designated by our company to charge. When charging the whole device, it is recommended to turn off the walkie-talkie first.
- According to the 2016 new requirements of the International Civil Aviation (IATA) «Technical Regulations for the Safe Air Transport of Dangerous Goods», the state of charge of lithium-ion batteries (cells) for air transport shall not exceed 30% of their rated capacity. Therefore, the first time the battery is used with the host, there will be a low battery warning with the voice prompt «please charge». Phenomenon, please charge the battery before use.
- When the battery is charged in the charger, the red light may keep flashing. This is the pre-charging process performed by the charger to protect the battery when the battery power is too low. It is a normal phenomenon. Generally, it can turn to red after 30 seconds. Normal charging state when the light is on.
Walkie-talkie charging
When using the terminal for the first time, a low battery alarm may appear. Please charge the battery before using the terminal, the steps are as follows:
- Insert the power adapter interface into the jack on the back of the charging base.
- Insert the plug of the power adapter into the power outlet.
- Put the battery into the charging cradle.
- Observe the LED indicator of the charging base to understand the current charging status, as shown in the table below.
The charging indicator light shows The current charging status Red light flashes Battery voltage is too low Red light is on Charging Green light is on Charging is complete Check battery
This function allows you to know the current battery voltage and remaining power.
Long press
The current battery level is displayed on the upper right of the screen, and the battery icon is as follows:Basic operation
Knobs, switches, buttons Instructions Power/volume switch
- Power on/off: Turn the [Power/Volume Switch] knob clockwise to turn on the radio and adjust the volume to the maximum.
- Turn the [Power/Volume Switch] knob counterclockwise to adjust the volume to the minimum until the radio is turned off.
- If the voice broadcast function is turned on, the startup voice will be broadcast.
Select channel The channel is the channel through which the signal is transmitted. After power on, press the [V/M] key to switch to the channel mode, press [/] to select the channel, and the channel number will be displayed on the right side of the screen. If the channel broadcast function is turned on, the intercom will broadcast the current channel mode. PTT button call
- Channel mode to initiate a call: After selecting a channel, press and hold the [PTT] key to initiate a call to the current channel. Speak into the microphone in a normal tone. When a call is initiated, the red LED light is always on.
- Manually input frequency to initiate a call: Press [V/M] key to switch to frequency mode, enter a frequency within the allowable range, and hold down the [PTT] key to initiate a call to the current channel. Speak into the microphone in a normal tone. When a call is initiated, the red LED light is always on.
- Receiving a call: After releasing the [PTT] key, you can answer it without any operation. When receiving a call, the green LED light is always on. To ensure the best receiving volume, please keep the distance between the microphone and your mouth at 2.5 cm ~ 5 cm when transmitting.
Side Key 1 The side buttons have two modes: short press and long press, and the following functions can be selected: off, flashlight, alarm, radio, NOAA weather forecast, monitoring, and scan.
Off: No function Flashlight function: Short press the [SK1] key to turn on the flashlight function and the flashlight light is always on; short press the [SK1] key again to turn off the flashlight function. If you choose to operate the flashlight function in the menu mode, short press the [SK1] key to turn on the flashlight for the first time, short press the second flashlight to keep flashing, and short press three times to turn off the flashlight.
Alarm: SOS emergency alarm function: Short press the [SK1] key to turn on the alarm function. At this time, the green indicator light and the red indicator light flash at the same time. Short press the [SK1] key again to release the alarm.
Radio: Short press the [SK1] key to turn on the radio function, and short press the [SK1] key again to turn off the radio. The radio frequency can be entered through the keyboard or tap the «#» key to automatically search for radio stations. In radio mode, press the [EXIT] key to switch between 65-75/76-108MHz frequency band. NOAA weather forecast: Short press the [SK1] key to turn on the NOAA function, and short press the [SK1] key again to turn off the NOAA function. Press the up and down keys to select the channel: 10 channels for selection: see Appendix 1 for details
Monitoring function: Short press the [SK1] key to turn on the monitoring function, and release the [SK1] key to cancel the monitoring.
Sweep: Short press [SK1] key to turn on the sweep function, and directly measure the frequency of other devices.Side Key 2 The same side key SK1 has a short press and long press function to choose V/M key Frequency mode or channel mode switching.
- Frequency mode: Manually enter the frequency. Channel mode: Press [
A/B key A/B upper and lower frequency band switch selection. Press the PTT button to transmit in the frequency band pointed to by the pointer. Keyboard lock and unlock Manual lock: Long press # key to lock the intercom.
Automatic lock: After the automatic keyboard lock is turned on, when there is no operation on the buttons and knobs, the automatic lock will be delayed for 10 seconds.
Unlock: Long press the # key to unlock the keyboard.Function Description
Menu Settings
You can enter «Menu Settings» through the menu key of the terminal to set some common functions. The specific instructions and operation methods are as follows:
Menu number display characters First-level menu Secondary menu display characters Description of secondary menu setting 0 Squelch 0,…,9 Squelch level, the lower the level, the easier it is to interfere, the higher the level the worse the sensitivity, the default value is 3. 1 Step 2.5KHz In frequency mode, press 5.0KHz 6.25KHz 10.00KHz 12.50KHz 20.0KHz 25.0KHz 50.0KHz 2 Tx Power High High power Middle Middle Power Low Low Power 3 Power save OFF Turn off power saving mode ON Turn on power saving mode 4 Vox Level OFF Turn off voice control 1,2,… 10 Start the sound control level intensity, value range 5 Bandwidth Wide Wide band working Narrow Narrow band working 6 Backlight Bright Backlight is always on 5Sec, 10Sec,… 60Sec Automatic backlight delay time, the value range is 5~60 seconds 7 Menu Exit Time 5Sec, 10Sec,… 60Sec Menu exit time, the value range is 5~60 seconds 8 Dual Standby OFF OFF ON ON 9 Beep Prompt OFF OFF ON ON 10 VOICE OFF OFF ON ON 11 Tx over time OFF Press and hold the PTT button to keep launching 15,30,…600 Value range 15~600, step value 15 12 Rx DCS OFF NO DCS D023N,…,D754I Standard sequence of DCS 13 Rx CTCSS OFF NO CTCSS 67.0HZ,…,254.1HZ Simulate the standard sequence of mute, at the same time, you can directly type standard or non-standard analog mute through the keyboard 14 Tx DCS OFF NO DCS D023N,…,D754I Standard sequence of DCS 15 Tx CTCSS OFF NO CTCSS 67.0HZ,…,254.1HZ Simulate the standard sequence of mute, at the same time, you can directly type standard or non-standard analog mute through the keyboard 16 DTMFST OFF OFF DT-ST DT-ST ANI-ST ANI-ST DT+ANI DT+ANI 17 TONE 1000hz, 1450hz, 1750hz, 2100hz Repeater activation audio 18 S-CODE g 1,2…,15 When needed, send out this group of information codes (information codes can only be written by frequency writing software) 19 Scan Mode TO Time Scan CO Carrier Scan SE Search Scan 20 PTT-ID OFF Press PTT to not send ID code BOT Press PTT to send ID code (ID code is set by frequency writing software) EOT Release PTT to send ID code BOTH ID code is sent when you press and release the PTT button 21 MDF-A Frequency In the channel mode of the A segment, the channel displays the frequency Name In the channel mode of section A, the channel displays the channel name (the specific name is set in the frequency writing software) 22 MDF-B Frequency Band B is in channel mode, the channel displays the frequency Name In the channel mode of section B, the channel displays the channel name (the specific name is set in the frequency writing software) 23 Busy Lockout OFF Channel is occupied and allowed to transmit ON Channel is occupied and transmission is prohibited 24 Key Auto Lock OFF Turn off automatic keyboard lock ON Turn on the keyboard auto-lock function 25 Direction None In frequency mode, there is no frequency difference between the transmitting frequency and the receiving frequency Plus In frequency mode, the transmitting frequency is equal to the receiving frequency plus the frequency difference frequency Minus In frequency mode, the transmitting frequency is equal to the receiving frequency minus the frequency difference frequency 26 Offset 00.000,…,99.998 In frequency mode, the difference between the transmitting and receiving frequencies 27 Key1 sp OFF No function LAMP Turn on the flashlight function SOS Turn on the alarm function FM Turn on the radio function NOAA Enable NOAA weather forecast function MONI Turn on the monitoring function Scan Turn on the sweep function 28 Key1 LP Same function as side key 1 short press 29 Key2 sp Same function as side key 1 short press 30 Key2 LP Same function as side key 1 short press 31 Memory 1,…,128 When storing a channel, it is used to indicate the channel number to be stored. If the word CH- is displayed in front of the number, it means that the channel originally has channel parameters 32 Delete 1,…,128 Delete the channel parameters of the specified channel, if there is no CH- in front, it means that the channel has no parameters and the operation is invalid 33 Alarm Mode On site On-site alarm Send sound Send sound Send code Send code 34 TAIL OFF After the PTT is released, the machine does not send a shutdown code, usually when it is relayed through the relay, let it make noise to confirm whether the signal of the machine is relayed ON After releasing the PTT button, the machine sends a shutdown code to suppress the instantaneous noise of the listener 35 PROGER OFF Turn off the call end alert tone ON Turn on the call end alert tone 36 Language Chinese English 37 Reset VFO Menu initialization only ALL Menu and channel initialization 38 SPECIAL DCS OFF Close special DCS ON Open Menu and channel initialization, only with same DCS can communicate Common function description
The functions supported by the walkie-talkie are shown in the table below.
Name Function description Squelch level adjustment Squelch level adjustment is to adjust the signal strength required when receiving a signal. The squelch level (0 open to 9 is the highest) is selected by the local environment, and 3 is generally selected. CTCSS/DCS CTCSS/DCS is used to avoid listening to irrelevant calls of the same frequency. Only when the transmitted CTCSS/DCS matches the received CTCSS/DCS digital, the walkie-talkie can listen to the voice through the speaker. TOT Timeout prohibition TOT timeout prohibition can limit the single transmission time (the default is 60 seconds) to prevent the communication parties from occupying channel resources for a long time, and to prevent the terminal from being damaged due to overheating. After the duration of pressing the [PTT] key expires, the terminal will automatically terminate the transmission and emit a warning tone. If you need to talk again, please transmit after the preset time. Power saving When the walkie-talkie has no receiving or transmitting, no button or knob operation reaches the power saving time, it will automatically enter the power saving mode. Low battery warning It is used to remind the battery to charge in time when the battery power is low. When the battery is too low, transmission will be prohibited. Emergency Alarm An emergency alarm is when you encounter an emergency, you can ask your companion or the control center for help. SCAN After scanning is turned on, the terminal will scan according to the scan list. When there is activity on a certain channel, it will stay on the channel to listen, so as to understand the current activity status of related group members. BCL Busy channel lock BCL can prevent interference from other terminals on the same channel during transmission. When other terminals occupy the current channel, press and hold the [PTT] key, and the terminal will emit a «beep» tone, indicating that it cannot be transmitted. If the current channel is free, press and hold the [PTT] key to start transmission. Power level The power level refers to the transmit power level of the walkie-talkie, which can be set to high power or low power. High power can increase the signal strength of the current transmitted voice of the terminal, and it can also communicate with the remote terminal. Low power can save power. MONI Monitoring MONI monitoring is a listening method used to receive more signals or weak signals. It helps to distinguish and listen to the faint sounds in the speakers. Channel broadcast Channel broadcast is used to indicate the sequence of the current channel. VOX Voice-activated transmission VOX After turning on the voice-activated, when the voice detected by the microphone meets the transmission conditions, the terminal will automatically transmit the voice, and you can speak directly without pressing the [PTT] key. The voice control gain is used to control the sensitivity of the microphone’s voice control emission, which is configured by the dealer. Voice-activated emission (VOX)
After turning on this function, if the user’s speaking volume level reaches the level selected by the walkie-talkie, the walkie-talkie can also start the transmission operation by voice without pressing the [PTT] key. In some work situations, the user can not freely press the [PTT] key to call, then this function can be enabled. Operation method:
- In the standby mode, press the [MENU] key, the voice prompt «menu setting», enter the function menu setting;
- Press [
- Press the [MENU] key, the voice prompt «Voice-activated emission», press the [
- Press the [MENU] key, the voice prompt «OK», save and return to the previous menu.
- Repeat the above operation, select OFF to turn off the voice-activated transmission function. After turning on the voice-activated transmission function, speak into the microphone, and the voice can be sent out; stop speaking, and the transmission will also stop. You can select the VOX sensitivity level according to the quietness of the use environment. If the environment noise is too large, there will be long emission after the VOX function is activated. If the dual-wait function is enabled on this machine, the VOX function is turned off by default, and the VOX function cannot be activated.
Keyboard lock
The keyboard lock function disables the number keys to prevent you from activating a function by mistake. This machine can be set to automatic keyboard lock function, the operation is as follows:
- In the standby mode, press the [MENU] key, the voice prompt «menu setting», enter the function menu setting;
- Press or key to select 24 menu number forward or backward; or directly enter number 2 and 4 to enter 24 menu number;
- Press [MENU] key, press [] or [] key to select ON;
- Press the [MENU] key, the voice prompt «OK», save and return to the previous menu. The automatic keyboard lock function is activated.
- Repeat the above operation, select OFF to turn off the automatic keyboard lock function, and select manual keyboard lock. The operation is as follows:
- In the standby state, long press the «#» key for more than 2s, the keyboard lock function is activated (voice prompt «keyboard lock»);
- Long press the «#» key repeatedly for more than 2s, the keyboard lock function is closed (voice prompt «keyboard unlock»). After the automatic keyboard lock function is turned on, when it is not locked, the numeric keyboard is automatically locked without any keyboard operation for 10 seconds.
Dual Standby
When in dual standby mode, the two-way radio can receive the frequency set by the A or B channel. The operation is as follows:
- In the standby mode, press the [MENU] key, the voice prompt «menu setting», enter the function menu setting;
- Press [] or [] key to select 8 menu number forward or backward; or directly enter the number 8 to enter 8 menu number;
- Press the [MENU] key, the voice prompt «Dual frequency waiting», press [] or [] key, select ON
- Press the [MENU] key, the voice prompt «OK», save and return to the previous menu. The dual-frequency waiting function is turned on.
- Repeat the above operation, select OFF to turn off the dual-frequency standby function. In the menu mode, the dual-frequency standby is temporarily turned off, and after exiting, the dual-frequency standby will be restored.
- Since the dual-standby dual-save mode is in the main and sub-channel scanning state, in the dual-segment dual-save mode, even if the power saving function of the unit is turned on, its power saving function is still invalid, and the standby time of the walkie-talkie will be shortened.
Channel delete
You may want to delete a memory channel due to setting errors or changing other settings. The operation is as follows:
- In the standby mode, press the [MENU] key, the voice prompt «menu setting», enter the function menu setting;
- Press [] or [] key to select 32 menu number forward or backward; or directly enter numbers 3 and 2 to enter 32 menu number;
- Press the [MENU] key, the voice prompt «channel delete»;
- Press [] or [] key to select the channel to be deleted forward or backward.
- If the number prefix displays the character «CH-«, it means that the channel number originally has channel parameters and can be deleted.
- If the number prefix does not display the character «CH-«, it means that the channel number is empty and can be stored directly without deleting it.
- Press the [MENU] key, the voice prompt «OK», delete the stored channel parameters, save and return to the previous menu.
- If the channel is empty, press the [MENU] key to directly return to the previous menu.
Channel storage
The parameters to be included in a complete channel include receiving frequency, transmitting frequency, receiving sub-audio, transmitting sub-audio, transmitting power, channel bandwidth, PTT-ID, busy lock, signaling code, scan addition, channel name, etc. Except for scanning addition and channel name editing through the frequency writing software, other parameters can be set in the frequency mode, and then store them in the designated channel number through the menu 31 Store Channel.
Example: The channel storage parameters are required as follows, and they are stored in the channel number with channel number 001.
- Receiving frequency 440.5 MHZ
- Transmission frequency 4 30.5 MHZ
- Receive mute digital D031N
- Transmit mute digital D031N
- High transmit power
- Channel bandwidth Broadband
The channel name is written in the frequency writing software when needed
Steps:
- Short press [V/M] key to switch to VFO mode, the screen displays .
- In the frequency mode, press the [A/B] key to make the pointer point to A (upstream frequency point)
- Press the number keys 4, 4, 0, 5, 0, 0 in turn to adjust the frequency to 440.500MHZ, and the screen displays .
- Power setting: press → (number key 2) →→ [] or [] to select the power (HIGH/MID/LOW) as HIGH→ ,
- Bandwidth setting: Press → (number key 5) →→ [] or [] to select the channel bandwidth (NARR/WIDE) as WIDE→ ,
- Receive digital tone setting: press → (number keys 1, 2) → [] or [] to select the tone value D031N→ ,
- Transmitting digital sub-tone setting: press → (number keys 1, 4) → → [] or [] to select sub-tone value D031N→,
- PTT-ID button transmission setting: press → (number keys 2, 0) → → [] or [] to select the transmission mode (OFF/BOT/EOT/BOTH) as OFF→ ,
- Channel storage settings for receiving and transmitting the same frequency:
- Press → (number keys 3, 1), the screen displays:
- Press , the voice prompt «storage channel», the screen displays :
- Press or key to select empty channel forward or backward, the screen displays :
- Press , the voice prompts «receive storage», the screen displays : press the voice prompts «storage channel».
- Press , the voice prompt «transmit storage», the screen displays :
- Press EXIT key to return to frequency mode.
- Press
- Channel storage settings for receiving and transmitting different frequencies:
- Press → (number keys 3, 1), the screen displays :
- Press , the voice prompt «storage channel», the screen displays :
- Press the [] or [] key to select the empty channel forward or backward, and the screen displays: .
- Press , the voice prompt «receive storage», the screen displays: ;
- Press EXIT key to return to frequency mode.
- Perform step 3, enter the desired transmit frequency;
- Press → (number keys 3, 1), the screen displays: ,
- Press , the voice prompt «storage channel», the screen displays: ,
- Press , the voice prompt «transmit storage», the screen displays: ;
- Press EXIT key to return to frequency mode.
- Press
Analog sub-audio (CTCSS)/digital sub-audio (CDCSS)
Analog sub-audio (CTCSS)/digital sub-audio (CDCSS) is mainly used to avoid listening to unrelated calls on the same frequency. If CTCSS/CDCSS is set, within the effective communication range, only calls with the same subtone signaling set in the channel can be received; but if CTCSS/CDCSS signaling is not set, you can listen to the effective communication range All calls on the same channel.
Side tone switch
Key side tone: The machine emits key side tone when sending key side tone
ID code side tone: When sending the ID code, the machine will emit the ID code side tone
Button side tone + ID code side tone: When sending button side tone and ID code side tone, the machine emits the corresponding sound
Note: Button side tone, including number key side tone and TONE tone
USB charging
The walkie-talkie can be directly plugged into the USB charging cable and charging with a power bank.
Frequency measurement function
Press +〖*〗key to enter the frequency measurement mode, press【】or【】key to select U segment or V segment. When a signal is received, if the current frequency has a mute tone, it will be displayed on the screen at the same time, press the key The current frequency can be saved. Or you can select the shortcut operation method by pressing the side button.
Special digital mute
The special digital mute is a mute encryption function, which can prevent other machines from copying the mute of this machine. After this function is turned on, only the same DCS code can talk to each other. The mute encryption function is effective only when the DCS mute code is set. Only the same machines with special digital mute on can talk to each other.
Optional accessories
Please use the accessories specified by our company.
If you use unauthorized accessories without authorization, all consequences caused by this are the responsibility of the user.
Please consult your local dealer for optional accessories of the walkie-talkie.
Main Specifications
| TOTAL | Frequency Range | 144-146MHZ(RX/TX) 430-440MHZ(RX/TX) |
| Channel No. | 16 | |
| Channel Spacing | 25/12.5kHz | |
| Input voltage | 7.4 VDC | |
| Battery (standard configuration) | 1800mAH(Li-Ion) | |
| Battery Life(5-5-90, High power transmission) | About 14 Hours | |
| Current: Standby | ≤65mA | |
| Receive | ≤450 mA | |
| Transmit | ≤1.8 A @high power, 850 mA @ low power | |
| Frequency stability | ±2.5ppm | |
| Operating temperature | -20℃ to +60℃ | |
| Antenna impedance | 50Ω | |
| Walkie-talkie size(With battery, but without antenna) | 121×61×33mm | |
| Walkie-talkie weight(Including antenna and battery) | 223g | |
| TRANMIT PART | Transmit output power | 5W/3W/1W |
| Modulation | 16K0F3E@25KHz, 11K0F3E@12.5KHz | |
| Spurious emission | -36dBm1GHz | |
| FM signal-to-noise ratio | 45dB@25KHz, 40dB @12.5KHz | |
| Audio distortion | ≤5% | |
| Modulation limit | ±5.0 KHz@25 KHz, ±2.5 KHz@12.5 KHz | |
| Adjacent channel power | 70dB @ 25KHz, 60dB @ 12.5KHz | |
| (300-3000Hz) Audio response | +1~3dB | |
| RECEIVE | Receiving sensitivity | 0.25μV (12dB SINAD) |
| Adjacent channel selectivity | ≥60dB@25KHz, ≥55dB@12.5KHz | |
| Intermodulation immunity | ≥60dB@25KHz, ≥55dB@12.5KHz | |
| Conducted spurious emissions | ≤-57dB@25KHz, ≤-57dB @12.5KHz | |
| FM signal-to-noise ratio | ≥45dB@25KHz, ≥40dB @12.5KHz | |
| Audio output power | 1W @16ohms | |
| Audio distortion | ≤5% | |
| Audio response(300-3000Hz) | +1~-3dB |
All specifications are subject to change without notice or responsibility.
Disclaimer
This manual strives for the accuracy and completeness of the content during the compilation process, but the company does not assume any responsibility for possible errors or omissions. Due to the continuous development of technology, the company reserves the right to change product design and specifications without notice. Without the company’s prior written authorization, this manual may not be copied, modified, translated and distributed in any form. The third-party products and content involved in this manual are owned by the third party, and our company does not provide guarantees for their accuracy, validity, timeliness, legality or completeness.
Videos
Retevis RA685 — VHF/UHF FM transceiver Review Video
Documents / Resources
Download manual
Here you can download full pdf version of manual, it may contain additional safety instructions, warranty information, FCC rules, etc.
Download Retevis RA685 — Walkie Talkie Manual
-
Скачать себе
-
Оставить отзыв
-
Сообщить неисправную ссылку
Описание:
Перевод инструкции по эксплуатации DMR-радиостанции Retevis RT3S на русский язык. Формат MS Word, 32 страницы
В отличие от своих разговорников, здесь я не всё перевёл дословно и сократил там, где посчитал нужным, так как, надеюсь, данные рации будут в руках тех, кто имеют элементарные знания о радиосвязи. Хочу помочь тем, кто не могут понять прилагаемую производителем инструкцию. В заводской инструкции, которую, как я понял, составлял человек, для которого, как и для меня, английский язык не является родным, много ошибок.
Кое что мне пришлось додумывать самому. Также, из- за модернизации, кое- где , инструкция может не соответствовать действительности. Думаю, что мой перевод того, что приготовил производитель, актуален на 90- 95%. С остальным пользователь, надеюсь, разберётся сам.
Характеристики радиостанции
- Аналог + DMR
- 2 диапазона VHF:136-174MHz и UHF:400-480MHz
- Три уровня мощность передатчика: High 5W, Middle 3W, Low 1W
- Чувствительность приёмника 0.2µV
- Память на 3 тыс. каналов и 120 тыс. контактов
- Встроенный диктофон (запись переговоров) до 8 часов.
- Вес (с батареей и антенной) 258 г
- Аккумулятор 2000 mAh (li-ion)
Ли Люе Retevis является экспертом по двусторонней радиосвязи, аксессуарам и услугам связи, специализирующимся на деловом, открытом, любительском и детском радио. Их официальный webсайт РЕТЕВИС.com
Каталог руководств пользователя и инструкций для продуктов RETEVIS можно найти ниже. Продукция RETEVIS запатентована и зарегистрирована под торговой маркой. Ли Люе
Контактная информация:
Отрасли: Телекоммуникации
Размер компании: сотрудники 51-200
Главное управление: Шэньчжэнь, провинция Гуандун
Модель: Частная
Основана: 2008
Специальности: рация, двусторонняя радиосвязь, беспроводная связь, любительское радио, любительское радио, рация для детей, рация для улицы, коммерческая рация с двусторонней связью, водонепроницаемая рация и рация на месте
Местонахождение: Научный и технологический парк Чжунхайсинь, № 12 Ганли 6-я дорога, улица Цзихуа, район Лунган Шэньчжэнь, Гуандун 518112, Китай
Проложить маршрут
Найти
Узнайте о функциях и технических характеристиках носимых радиостанций двусторонней связи Retevis RT20 в этом подробном руководстве пользователя. Узнайте о таких функциях, как сканирование, мониторинг, голосовая связь, FM-радио и блокировка клавиатуры. Узнайте, как переключаться между голосовыми подсказками на китайском и английском языках. Будьте в курсе событий с помощью функции TOT, обеспечивающей эффективное использование канала.
Откройте для себя руководство пользователя RB45 Dual PTT USB-C Charge Mini FRS Walkie Talkie с подробными инструкциями и функциями. Узнайте о таких функциях, как голосовое вещание на английском языке, функция экономии заряда батареи и передача VOX. Ознакомьтесь с моделью RB45 для оптимального использования.
Откройте для себя функции и инструкции по использованию рации T-388 Walkie Talkie. В данном руководстве пользователя содержится подробная информация о размерах, мощности и содержимом упаковки. Следуйте пошаговому руководству по эффективному использованию duqlqj и изучите различные функции этой модели RETEVIS. Получите максимальную отдачу от рации T-388 с помощью этого подробного руководства.
Узнайте все о двусторонней Bluetooth-радиостанции RB39P с помощью этого руководства пользователя. Узнайте о его функциях, спецификациях и инструкциях по зарядке. Обеспечьте безопасное использование с помощью прилагаемой информации о гарантии и предупреждений. Загрузите дополнительные ресурсы с retevis.com.
Узнайте, как использовать метеорологическую радиостанцию RB67 One Key Group Call FRS NOAA с помощью этого подробного руководства пользователя. Откройте для себя его функции, аксессуары и инструкции по использованию для беспрепятственного общения. С легкостью выбирайте каналы, CTCSS/DCS и многое другое. Получите свой RB67 сегодня!
Узнайте, как с легкостью использовать радиостанцию GMRS высокой мощности RB89 с наушником Bluetooth, прочитав руководство пользователя. Этот продукт имеет 30 каналов и диапазон частот от 462.5500 МГц до 467.7250 МГц. Он также включает в себя зарядный порт Type-C и сопротивление антенны 50 Ом. Получите технические индикаторы, инструкции по использованию и многое другое.
Узнайте все о двухсторонней рации RT27 Long Distance Walkie Talkie из этого подробного руководства пользователя. Получите технические характеристики, инструкции по использованию и информацию о гарантии для этой мощной двусторонней радиостанции. Идеально подходящий для приключений на открытом воздухе, групповых мероприятий или профессионального использования, RT2 представляет собой надежный инструмент связи с выходной мощностью 27 Вт и частотой FRS. Прочтите сейчас, чтобы узнать больше.
Узнайте, как правильно использовать мобильную радиостанцию RB66 с помощью этого руководства пользователя. Соблюдайте меры предосторожности и инструкции по зарядке, чтобы обеспечить оптимальную производительность. Загрузите дополнительные ресурсы на retevis.com.
Узнайте, как работать с мобильной двусторонней радиостанцией RETEVIS RA86 GMRS, с помощью этого руководства пользователя. Откройте для себя функции этого мобильного радио, такие как 15 каналов GMRS, 10 каналов погоды NOAA и 260 кодов конфиденциальности. Обеспечьте безопасность себе и другим с помощью важных советов по использованию и инструкций по установке.
В этом руководстве пользователя приведены инструкции по эксплуатации безлицензионной двусторонней радиостанции NR10 с шумоподавлением от RETEVIS. Он включает важные меры предосторожности и рекомендации по зарядке для обеспечения оптимальной работы продукта.
Retevis rt628 инструкция на русском
4.6 (91.11%) 9 votes
Всем привет на днях я получил посылку с сайте алиэкспресс, дошла посылка достаточно быстро за 19 дней и здесь у нас находятся две рации стоимости всего 16 долларов, цена как вы видите за две рации очень невысокая ну а качество обещает быть неплохим. Итак в этой коробке находятся две рации фирмы Retevis travel, как бы рации для путешествий, хотя на самом деле варианты использования рации очень большие, их можно купить как на подарок детям так и взрослым, например для связи на какой то площадке или в том же самом походе или на рыбалке на охоте в общем эти рации пригодятся во многих случаях.

И так модели рации RT 628 но и давайте посмотрим уже и по функциям и посмотрим непосредственно на сами рацияи. На нижней стороне коробки указан цвет в данном случае это будут серебристые рации восьмиканальные также есть варианты двадцати двух канальных. Две рации сильвер как должно быть серебристые и еще у нас в комплекте есть инструкция больше ничего, инструкция на английском языке поэтому посидев немного в гугле можно в принципе без проблем все перевести, но если вы смотрите это видео то вам ничего скорее всего переводить не придется, потому что сейчас я вам все расскажу. И так как вы видите рации сами по себе достаточно небольшие выполнены они неплохо такой достаточно прочный пластик, кнопочка вот работает достаточно хорошо мягко, вот эти кнопочки тоже все работает мягенько. Сверху у нас есть два разъема, слева разъем под гарнитуру ее можно приобрести отдельно, а второй разъем используется для подключения блока питания чтобы заряжать аккумуляторы, разъем достаточно специфический, также можно использовать их с батарейками. Для того чтобы снять заднюю крышку нужно для начала снять защелку, после этого снимается задняя крышка отсека батареи.

Рации retevis rt628
После того как мы вставляем батарейки рация издает характерные звуки и включается подсветка. Ну что ж давайте пройдемся по пунктам рации посмотрим на ее возможности первое о чем я забыл упомянуть это то что питается рация от трех пальчиковых батареек или аккумуляторные батареи типа АА. Также на дисплее присутствует индикатор заряда батареи что весьма удобно включается и выключается рация удержанием, вот этой кнопки удерживая 3 секунды, отключается и так же удерживая 3 секунды рация включается, автоматически включается подсветка громкость динамика можно отрегулировать кнопками со стрелочками вверх или вниз соответственно громче или тише будет громкость динамика. Зафиксировать выбранная значение можно нажав кнопку сбоку PTT помимо выключения-включения эта кнопка также имеет вторую пункцию это сканирование нажатия один раз отключается этой же кнопкой.

Рации retevis rt 628
Кнопка с изображениям нотки и надписью MON также имеет две функции если кратко нажать и отпустить эту клавишу, то произойдет вызов абонента. А если нажать и удерживать то таким образом можно просканировать свободна ли часта в данном диапазоне, если на этой частоте идет однотонные шум который мы только что слышали значит это чистота свободна для вещания. Кнопка по центру отвечает за переключение меню, а также блокировку остальных кнопок, для того чтобы заблокировать другие кнопки необходимо нажать и удержать три секунды кнопку меню появляется значок блокировки, такой вот замочек теперь кнопки не будут реагировать, и изменить настройки будет невозможно за исключением вызова и кнопки push to talk, отключить блокировку так же следует удержанием 3 секунды

Retevis rt628 2 шт мини walkie talkie
Теперь давайте кратко пройдемся по меню, нажав один раз на кнопку меню у вас есть возможность выбрать канал, всего их предоставлено здесь восемь, для того чтобы зафиксировать свой выбор нажмите кнопку PTT, если нажать два раза то мигает значение изменения суб канал или под канала. Изменять их можно также в диапазоне от одного до ста двадцати одного но помните что эти два значения основного канала и суб канала должны также быть аналогично выставлены на второй рации. Нажав на кнопку меню три раза вы попадаете в надстройку CA, в которой есть значения от 0 до 10, таким образом вы можете выбрать мелодию или тон с помощью которого будет происходить звонок. Сохраняем выбраную мелодии нажатием кнопки PTT.

Rt 628 рация
Также в рации присутствует функция VOK или свободные руки то есть рация будет включаться автоматически после того как вы начинаете говорить и отключаться так же после окончания вашей речи, для того чтобы включить этот режим необходимо выключить рацию нажать и удерживать кнопку PTT и после этого включить рацию появится значок вот видно говорящий человечек. Отключить эту функцию можно нажатием кнопки PTT следующим вменю идет установка чувствительности микрофона ее можно установить в значении от одного до трех, а 3 это высокая чувствительность 2 это средняя чувствительность пика, 1 это низкая чувствительность, сохраняем.

Retevis rt628 алиэкспресс
Следующая настройка у нас называется настройка двухканального монитора, она имеет значения OFF и от одного до восьми, честно говоря я не совсем разобрался что это за функцию двухканального монитора, поэтому если вам известно это пожалуйста опишите в комментариях. Следующая настройка она обозначает значком SL и означает шумоподавления 3 вперед скорее всего это шумоподавление при передаче, она находится в диапазоне от одного до шести, 1 это высокий уровень шумоподавления от 2 до 5 это средний уровень шумоподавления и 6 это низкий уровень шума подавления. И последующая функция у нас мощность передатчика на может быть либо HI высокая либо LOW низкая. Ставлю HI и сохраняюсь. По сути это все что необходимо знать для того чтобы настроить эту рацию.

Рация retevis rt628
Сейчас отправлюсь на прогулку для того чтобы определить на каком растоянии они смогут работать без помех и мы подведем с вами итоги, правда, по сути на расстоянии 500 метров это растояние с помехой это не прямая видимость, но связь вот сейчас в печатных и 500 метров немного прервалась. Выйдем чуть выше на тротуар метров на 20, подойдем посмотрим может перепад растояний что-то поменяет. Мы вышли на дорогу. И так 500 метров, в общем связь достаточно не плоха, небольших помехи присутствуют есть небольшие шумы передачи информации но отлично точно работает, тоесть понять о чем говорит собеседник можем.

Инструкция на русском рации retevis
На 800 метров связь восстанавливается плохо, она пропала в общем на 800м еще связь может быть. ну а вы так понимаем что уже дальше будет все хуже и хуже. Растояние 800 метров с помехами извилистыми дорогами, также большими перепадами по высоте все таки эти рации справляются, а что касается больше 800 метров то тут уже а они нас не выручат. В общем рации справляются заявленная свои мощности с заявленным расстоянием на 800 метров они абсолютно справляется и поэтому однозначно можно ставить зачет этим рациям так что смело можете их брать.Подводя итог хочу сказать что рации действительно честно отрабатывают свои заявленные 800 метров на открытом пространстве даже наверное чуть больше чем 800 метров.
Частотомер
Главная необычность Retevis RA685 — это Частотомер.
Что даёт наличие Частотомера?
Удобство и скорость стыковки с группой случайных радиостанций со случайными частотами.
Зачастую, владельцы радиостанций имеют весма смутное представление на каких частотах работают их балалайки, какие имеют настройки.
Просто, покупают комплект из двух-трёх одинаковых радиостанций и используют магазинные настройки по-умолчанию…
В полевых условиях присоединиться к такой группе почти не реально:
Не известны Частоты, не известны настройки тонального шумоподавления CTCSS/DCS…
Retevis RA685 позволяет отсканировать эти настройки за секунду.
Инструкция
по использованию Частотомера в Retevis RA685:
1. Нажать МЕНЮ, затем *Scan
2. Стрелочками ▲ или ▼ выбрать предполагаемый диапазон UHF (400-520MHz) или VHF (136-174MHz)
3. Приблизить Retevis RA685 к передающей радиостанции (источнику) на расстояние 0,5 – 35 метров.
(Это не описка. У меня стабильно срабатывает на 35 метров, через всё здание, на всю длину коридора (!!!если выключены ВСЕ электроприборы, светильники и т.п.).
Срабатывает и дальше 35 метров, с улицы, но уже не всегда.)
4. На дисплее Retevis RA685 отобразится Частота и CTCSS/DCS код (если используется)
5. Если в этот момент нажать кнопку МЕНЮ, эти настройки сразу пропишутся в память Retevis RA685
* Если RA685 находилась в режиме VFO, новые настройки пропишутся в ячейку VFO
* Если RA685 находилась в Канальном режиме, новые настройки пропишутся в текущий Канал
(поэтому, ещё до включения режима Частотомера, на RA685 необходимо выбрать Канал, куда мы хотим прописать Новые настройки.
Иначе, текущая полезная ячейка (какая нибудь LPD или PMR) будет переписана!)
6. Если текущие показания Частотомера не нужно сохранять, для выхода просто нажмите EXIT
Текущие настройки каналов в Retevis RA685 (частота, порог шумодава, ширина полосы и т.д.) на чувствительность Частотомера, вроде, никак не влияют.
Зато, однозначно, на дальность обнаружения (измерения) сильно влияет наличие фоновых помех (Компьютеры, сотовые, вай-фай, светильники, бытовые приборы и т.п.)
У меня стабильно срабатывает на 35 метров внутри здания (!!!если практически все электроприборы выключены)
В лесу, я уверен, дальность обнаружения (измерения) будет ещё больше.
Проверю когда нибудь…
Примечание:
Радиостанция не является лабораторным измерительным прибором. Потому, глупо ожидать стабильной высочайшей точности измерений.
Частотомер в Retevis RA685 является простым Индикатором без какого либо класса точности.
От экземпляра к экземпляру, кому-то повезёт больше, кому-то меньше)))
Некоторые экземпляры Retevis RA685 покажут абсолютно истинное значение измеряемой частоты. У других, возможна погрешность на величину плюс-минус 1,25 кГц, или даже 2,5 кГц.
(Например: вместо 145.70000 МГц может отобразиться 145.69875 МГц)
У меня измеряет = идеально.
Но на Ютубе я видел ролики, что у кого-то подвирает, слегка.
Внимание!!!
На Передаче,
не следует подносить одну радиостанцию к другой ближе пол-метра !!!
Можно пожечь входные цепи Приёмника.
Очень высокая вероятность!
Видео:
Пример работы Частотомера в Retevis RA685
Последний раз редактировалось Россиянин 29 июн 2022, 08:57, всего редактировалось 4 раз(а).