-
Contents
-
Table of Contents
-
Bookmarks
Quick Links
H-1613
PORTABLE RADIO RECEIVER
Instruction manual
Related Manuals for Hyundai H-1613
Summary of Contents for Hyundai H-1613
-
Page 1
H-1613 PORTABLE RADIO RECEIVER Instruction manual… -
Page 2
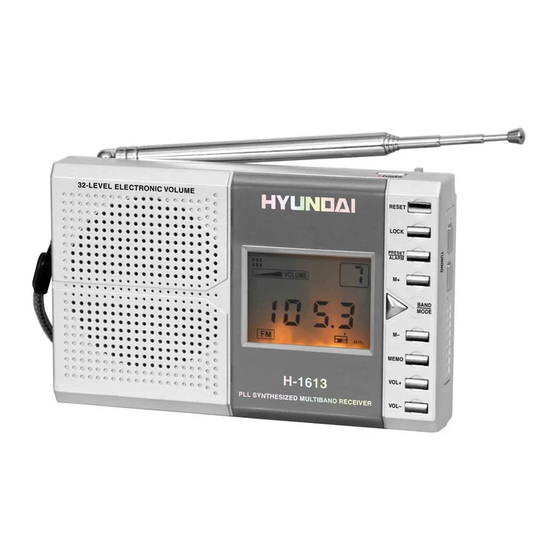
Description 1. Display Screen 2. Lock button 3. Power Switch/Sleep button 4. Reset Button 5. Up Tuning 6. Store Scan /Alarm button 7. Down Tuning 8. Memory + 9. Band / Mode 10. Memory 11. Store Station 12. Volume- 13. Volume+ 14. -
Page 3: Important Safeguards
Important safeguards · Prefer servicing to qualified service personnel. · ATTENTION: The owner s manual contains important operating and maintenance instructions for your safety, it is necessary to refer the manual. Power supply Battery operation · Open the battery compartment cover. ·…
-
Page 4
· Automatic searching station mode is fit to search strong signal station. · In the course of automatic searching, if the digit on the display screen varies slowly, it means that there is weak signal station nearby, you can change to use manual to search station. -
Page 5: Time Setting
Night Illumination Button The button on the face all have illumination function, press any of them and the lamp lights up, it will automatically go out after several seconds, which is convenient for you to operate the radio in darkness. Supporting Buckle It is convenient for you to place the radio.
-
Page 6: Alarm Function
Alarm function Setting the alarm · In the clock state, press the band / Mode button three times, the symbol » » will display on the screen, which means the radio is in alarm hour set state. Press up tuning/down tuning to set the alarm on hour. ·…
-
Page 7: Maintenance And Care
Maintenance and care · Check your batteries regularly, old or discharged batteries should be replaced. If the unit is not going to be used for some time, remove the batteries to avoid leakage and damage. · When the temperature is under -10C in winter, it will cause the leakage of LCD, in general, please avoid using the radio under low temperature. ·…
-
Page 8
1. LCD… -
Page 9
· · · · · · · DC 3 · · VOL+ / VOL- , FM, MW, SW. ·… -
Page 10
· · · · · 0.005 · · · · · «PRESS». · » » ·… -
Page 11
· · · · · «12:00». · ·… -
Page 12
· » «, · · » «, · · · «SLEEP» «90» , · 90-80-70-60-50-40-30-20-10- · · · · ·… -
Page 13
· · 10 , · · FM: 64-108 M MW: 522-1611 SW: 5,95 17,90 DC 3V ( 0,158 / 0,341 x 132 x 53…
Инструкция и руководство для
Hyundai H-1541
9 страниц подробных инструкций и пользовательских руководств по эксплуатации на русском на английском
 24:11
24:11
Hyundai H1 2018. Качественнее Citroen Spacetourer.
 21:46
21:46
Новый Solaris: катализатор, докатка, гарантия, цены? Вопросы производителю и тест-драйв
 15:02
15:02
Hyundai H LED55EU7008 первые впечатления
 04:46
04:46
Hyundai h-1625 часть 2
РАДИОПРИЕМНИК С БУДИЛЬНИКОМ RADIO WITH ALARM Руководство по …
Часы Hyundai
- Изображение
- Текст
РАДИОПРИЕМНИК
С БУДИЛЬНИКОМ
RADIO WITH ALARM
Руководство по эксплуатации
Instruction manual
H-1541

2
3
Instruction manual
Instruction manual
Dear customer!
Thank you for purchasing our product. For safety, it is strongly recommended to read
this manual carefully before connecting, operating and/or adjusting the product and keep
the manual for reference in future.
Description
1. BAND button
2. TEMP/
button
3. Y-M-D/
button
4. AL.1 button
5. DIMMER switch
6. SNOOZE/SLEEP button
7. LIGHT switch
8. AL.2 button
9. AL.SET button
10. MODE button
11. button
Important safeguards
• The instruction manual contains important
operating and maintenance instructions. For
your safety, it is necessary to refer the manual.
Keep the manual for use in future.
• Do not hit or drop the unit.
• Do not expose the unit to vibration,
direct sunlight, too high or low temperature or
humidity.
• If you are not going to use the unit within
a long period of time, remove the batteries to
avoid their leakage.
• Do not disassemble the unit yourselves.
Refer servicing to qualified service personnel.
Power supply
Battery operation
• Insert 1 x 3 V lithium battery CR2032 (not
included) to the terminal inside the battery
compartment according to the polarity marks (+
and -). Your set will not work normally from the
battery supply, but there is now the advantage
that, in case there is a mains current failure,
your clock will continue to work. The clock
display will not light up, the clock time and
alarm setting will be held in the clock memory
by the battery back-up system.
This enables you to move the set from place to
place without re-setting the clock every time. The
battery back-up system is only meant to be used
from short temporary power failures. For longer
1 2 3 4 5
6
7
8 9 10 11
Not indicated: power cord (back panel), FM antenna (back panel), temperature sensor (back
panel), line input (back panel), battery compartment (bottom), TUNER regulator (right panel),
VOLUME regulator (right panel), RESET button hole (left panel), display (front panel).

2
3
Instruction manual
Instruction manual
durations the battery may become exhausted or
there may be some deviation in accuracy.
• When the battery is exhausted, it should
be removed from the set to prevent leakage.
If you do not wish to take advantage of the
battery back-up system, your set will work
normally without a battery. However, if
disconnected from the mains, the clock figures
will flash when the mains are re-connected and
you must re-set the clock.
AС operation
• The appliance is for household use only.
• Before the first connecting of the appliance
check that voltage indicated on the rating label
corresponds the mains voltage in your home.
• Insert the plug into the power supply.
• The set is now working as electronic clock.
General operations
Setting the clock and calendar
• Press and hold MODE button. Press it
repeatedly to cycle through time and calendar
settings in following order: Year => Month =>
Day => 12/24H mode => Current hours =>
Current minutes. The selected setting will blink.
• Press repeatedly TEMP/
button or
press and hold it to decrease the setting; press
repeatedly Y-M-D/
button or press and hold
it to increase the setting.
• In normal mode, press repeatedly Y-M-D/
button to switch the display between
current time, year and month and day. Each
indication will be on for 5 seconds, the the
display returns to initial mode.
Dimmer function
To adjust the brightness of the display, slide
DIMMER switch to HIGH or LOW position.
Bottom backlight
To switch on/off backlight of the unit bottom,
slide LIGHT switch to ON or OFF position.
Reset
To reset all settings of the unit to default
settings, press the RESET hole with a pointed
object (e.g., a ballpoint pen). This measure is
needed when you changed the batteries in the
unit or if the unit does not function correctly.
Daylight saving time
Press and hold Y-M-D/
button to
switch on or off the DST (Daylight Saving
Time) mode. This enables to observe 1-hour
difference between summer and winter time.
Thermometer
Press TEMP/
button to show the current
temperature. The temerature indicatoin will
be on for 5 seconds, the the display returns to
initial mode. Press and hold TEMP/
button
to switch between Celsius and Fahrenheit
temperature modes.
Line input
• You can connect the audio output of an
external device to this unit, to listen to the
sound of that device through the amplifier of
this unit.
• To connect an external audio device (eg.
MP3 player), please use a standard stereo
cable (not included) with 3.5 mm to 3.5 mm
plugs to connect the headphone out or audio
line-out of the external device to the Line input
socket of this unit.
Radio operation
Tuner operations
• Press button to turn the radio on or off.
• Press BAND button to switch between AM
and FM radio bands.
• Adjust the program by rotating TUNER
regulator.
• Use VOLUME regulator to adjust volume
level.
• To obtain better FM signal reception,

4
Instruction manual
After that the sound will mute and start at the
same time the following day.
• When the alarm is on, press SNOOZE/
SLEEP button to interrupt the alarm signal.
After 9 minutes the alarm will be on again.
• If you want to stop the alarm, press
button. The alarm will resume in 24 hours.
Maintenance and care
Switch off the appliance, unplug from the
power supply. The outside of the appliance can
be cleaned with a slightly damp cloth.
Accessories
Receiver
1 pc
Instruction manual
1 pc
Warranty card
1 pc
Consumer information
1 pc
extend the FM wire antenna to its full length.
• The AM signal is picked up through the
built-in antenna. The unit should be placed to a
position for the best reception.
Sleep to music
• In Radio mode, press SNOOZE/SLEEP
button to turn on sleep mode. The default sleep
time of 90 minutes will be set. Press this button
repeatedly to select 60, 30 or 15 minutes of
sleep time period. The figures will blink on
the display for 5 seconds. “SLEEP” will be
displayed meaning that the sleep function is
activated. The radio will turn off automatically
after the preset time period elapses.
• To cancel the sleep function, press
button.
Alarm operation
Setting the alarm
• Press and hold AL.SET button. Press
it repeatedly to cycle through alarm settings
in following order: Alarm 1 hours => Alarm 1
minutes => Alarm 1 weekend => Alarm 2 hours
=> Alarm 2 minutes => Alarm 2 weekend. The
selected setting will blink.
• Press repeatedly TEMP/
button or
press and hold it to decrease the setting; press
repeatedly Y-M-D/
button or press and hold
it to increase the setting.
• In normal mode, press repeatedly AL.SET
button to show the alarm settings.
Alarm signal selection
Press repeatedly AL.1 button (for Alarm 1)
or AL.2 button (for Alarm 2) to select alarm
sound. Press once to select buzzer ( will
be on), press twice to select radio ( will be
on), press thrice to disable alarm signal (no
indication will be on).
Snooze control
• When the alarm time comes, the signal will
sound for 30 minutes if no button is pressed.

5
Instruction manual
Radio operation
Nominal voltage
220 V, 50 Hz
Nominal power consumption
5 W
Output power
400 mW
Stabilizer
Quartz
Display
1.8” height of symbols, LED
FM radio frequency
64 — 108 MHz
AM radio frequency
531 — 1629 kHz
Net/Gross weight
0.597 kg/0.681 kg
Unit dimensions
228 x 66 x 92 mm
Gift box dimensions
264 x 94 x 134 mm
Specifications and functions are subject to change without notice. It is connected with continual
improvement of the device.

6
Руководство по эксплуатации
Уважаемый покупатель!
Благодарим Вас за покупку нашего изделия. Чтобы понять, как правильно и без-
опасно пользоваться Вашей моделью изделия, рекомендуется тщательно изучить
настоящее руководство перед включением, регулировкой и эксплуатацией изделия.
Сохраняйте руководство для использования в будущем.
Описание
1. Кнопка BAND
2. Кнопка TEMP/
3. Кнопка Y-M-D/
4. Кнопка AL.1
5. Переключатель DIMMER
6. Кнопка SNOOZE/SLEEP
7. Переключатель LIGHT
8. Кнопка AL.2
9. Кнопка AL.SET
10. Кнопка MODE
11. Кнопка
Меры безопасности
• В руководстве присутствуют важные
указания по эксплуатации и уходу. Перед
использованием устройства ознакомьтесь с
руководством и сохраните его для после-
дующего использования.
• Не наносите ударов по устройству, не
роняйте его.
• Не подвергайте устройство вибрации,
воздействию прямых солнечных лучей, вы-
соких или низких температур и влажности.
Не включайте устройство в ванных комна-
тах, около кухонных плит, отопительного
оборудования.
• Если Вы не будете использовать
устройство в течение длительного времени,
извлеките батарею во избежание их про-
текания.
• Не демонтируйте корпус устройства
самостоятельно. Доверяйте ремонт устрой-
ства только квалифицированным спе-
циалистам. В приборе находятся оголенные
провода высокого напряжения. Напряжение
внутри прибора достаточно высокое, чтобы
вызвать удар электрическим током.
Источники питания
Работа от батарей
• Вставьте 1 литиевую батарею 3 В
1 2 3 4 5
6
7
8 9 10 11
Не показано на рисунке: кабель питания (на задней панели), FM-антенна (на задней
панели), датчик температуры (на задней панели), линейный вход (на задней панели), отсек
для батарей (нижняя панель), регулятор TUNER (на правой панели), регулятор VOLUME (на
правой панели), кнопка-отверстие RESET (на левой панели), дисплей (на передней панели).

7
Руководство по эксплуатации
майте кнопку Y-M-D/
или нажмите и
удерживайте ее для увеличения значения
выбранного параметра.
• В нормальном режиме работы часов
или радио нажимайте кнопку Y-M-D/
для поочередного отображения на дисплее
текущего времени, года, месяца и дня. При
отсутствии каких-либо операций каждая
выбранная индикация будет отображаться
на дисплее в течение 5 секунд, после чего
дисплей вернется в исходное состояние.
Яркость подсветки дисплея
Для установки яркости подсветки дисплея
установите переключатель DIMMER в поло-
жение LOW (низкая) или HIGH (высокая).
Подсветка основания корпуса
Для включения/отключения подсветки
основания корпуса устройства установите
переключатель LIGHT в положение ON или
OFF соответственно.
Сброс
Чтобы выполнить сброс всех настроек
до исхдоных значений, нажмите отверстие-
кнопку RESET остроконечным предметом
(например, шариковой ручкой). Данная
мера необходима при замене батареи в
устройстве, либо в случае если устройство
работает некорректно.
Режим летнего времени
Нажмите и удерживайте кнопку Y-M-D/
для переключения часов в режим летнего
или зимнего времени.
Термометр
Нажмите кнопку TEMP/
для отображе-
ния на дисплее текущей температуры. По-
кащания температуры будут отображаться
на дисплее в течение 5 секунд, после чего
дисплей вернется в исходное состояние.
Нажмите и удерживайте кнопку TEMP/
для переключения между температурными
шкалами по Цельсию и по Фаренгейту.
(CR2032) в отсек для батарей с соблюдени-
ем полярности. В процессе работы радио-
приемника от батареи его дисплей переста-
ет светиться и включается режим памяти.
Благодаря включению режима памяти Вы
можете не переустанавливать время и
настройки будильника каждый раз. Режим
памяти используется при возникновении
кратковременных сбоев в сети питания.
При длительном отсутствии питания в сети
батарея может разрядиться, что повлияет
на точность хода часов.
• Извлеките батарею, если она разряди-
лась или если устройство не будет исполь-
зоваться на протяжении долгого времени.
Устройство будет нормально работать и без
батареи, но при этом в случае повторного
подключения устройства к сети питания
цифры на дисплее будут мигать, и Вам при-
дется заново устанавливать нужное время.
Питание от сети переменного тока
• Устройство предназначено только для
домашнего использования.
• Перед первым использованием
устройства проверьте, соответствует ли
его электропитание, указанное в таблице,
техническим характеристикам и электропи-
танию Вашей локальной сети.
• Подключите устройство к сети питания
с помощью встроенного кабеля питания.
Теперь доступны все функции устройства.
Общие операции
Настройка часов и календаря
• Нажмите и удерживайте кнопку MODE.
Нажимайте кнопку для поочередного выбора
параметра для настройки в следующем по-
рядке: год => месяц => день => 12/24-часовой
режим часов => часы => минуты. Выбранный
параметр будет мигать на дисплее.
• Нажимайте кнопку TEMP/
или на-
жмите и удерживайте ее для уменьшения
значения выбранного параметра; нажи-

8
Руководство по эксплуатации
Линейный вход
• Вы можете прослушивать внешнее
аудио устройство (напр., MP3-плеер),
подключив его к данному устройству при
помощи линейного разъема.
• Чтобы подключить внешнее устройство,
используйте стандартный кабель со штеке-
рами 3,5 мм (не входит в комплект) для под-
соединения разъема для наушников или ли-
нейного разъема внешнего аудио устройства
к линейному разъему данного устройства.
Операции с радио
Использование радиоприемника
• Нажмите кнопку , чтобы включить
или выключить радио.
• Нажимайте кнопку BAND для переклю-
чения между AM- и FM-диапазоном.
• Вращайте регулятор TUNER, чтобы на-
строиться на нужную радиоволну.
• При помощи регулятора VOLUME уста-
новите нужный уровень громкости.
• Для получения оптимального качества
приема FM-сигнала вытяните проводную
FM-антенну на всю длину.
• Для приема AМ сигнала устройство
оснащено втроенной антенной; для лучшего
приема вращайте устройство в различных
направлениях.
Автоматическое выключение
радио
• В режиме радио нажмите кнопку
SNOOZE/SLEEP для перехода к выбору
интервала автоотключения. По умолчанию
будет установлен период в 90 минут. На-
жимайте кнопку SNOOZE/SLEEP, чтобы
выбрать период в 60, 30 или 15 минут.
Цифры на дисплее будут мигать в течение
5 секунд. Также на дисплее отобразится
надпись “SLEEP”, означающая, что режим
автоотключения активен. По истечении
заданного периода времени радио автома-
тически выключится.
• Для отмены функции автоотключения
нажмите кнопку .
Операции с будильником
Установка будильника
• Нажмите и удерживайте кнопку AL.SET.
Нажимайте эту кнопку для поочередного вы-
бора параметра будильника для настройки в
следующем порядке: часы первого будиль-
ника => минуты первого будильника => дни
недели первого будильника (“1-5” означает,
что будильник будет срабатывать с поне-
дельника по пятницу включительно, “1-6“ — с
понедельника по субботу, “1-7“ — с поне-
дельника по воскресенье) => часы второго
будильника => минуты второго будильника
=> дни недели второго будильника. Выбран-
ный параметр будет мигать на дисплее.
• Нажимайте кнопку TEMP/
или на-
жмите и удерживайте ее для уменьшения
значения выбранного параметра; нажи-
майте кнопку Y-M-D/
или нажмите и
удерживайте ее для увеличения значения
выбранного параметра.
• В нормальном режиме работы часов или
радио нажимайте кнопку AL.SET для отобра-
жения на дисплее настроек будильника.
Выбор сигнала будильника
Нажимайте кнопку AL.1 (для первого
будильника) или кнопку AL.2 (для второго
будильника), чтобы выбрать звук сигнала
будильника. Нажмите один раз для выбора
встроенного звукового сигнала (на дисплее
отобразится индикатор ), нажмите два раза
для выбора радио (на дисплее отобразится
индикатор ), нажмите кнопку три раза для
отключения сигнала будильника (на дисплее
не будит отображаться никакой индикатор).
Повторный сигнал будильника
• После срабатыванию будильника
устройство будет подавать выбранный
звуковой сигнал в течение 30 минут (при от-

9
Руководство по эксплуатации
сутствии каких-либо операций). После этого
подача сигнала автоматически остановится,
и будильник сработает вновь в установлен-
ное время на следующие сутки.
• При срабатывании будильника нажмите
кнопку SNOOZE/SLEEP, чтобы прервать
сигнал. Повторный сигнал будильника
произойдет через 9 минут.
• Для прекращения сигнала будильника
нажмите кнопку . Сигнал будильника
сработает через 24 часа.
Чистка и уход
Перед чисткой убедитесь, что прибор
отключен от сети питания. Протрите корпус
прибора при помощи влажной материи.
Комплект поставки
Радиоприемник с часами
1 шт
Руководство по эксплуатации
1 шт
Гарантийный талон
1 шт
Информация для потребителя
1 шт
Технические характеристики
Номинальное напряжение питания
220 В, 50 Гц
Номинальная потребляемая мощность
5 Вт
Выходная мощность
400 мВт
Стабилизатор
Кварцевый
Дисплей
Светодиодный, высота символов 1,8” (4,5 см)
FM-диапазон частот
64 — 108 МГц
AM-диапазон частот
531 — 1629 кГц
Вес нетто / брутто
0,597 кг/0,681 кг
Габариты устройства
228 х 66 х 92 мм
Размеры коробки
264 х 94 х 134 мм
Технические характеристики и функции могут быть изменены заводом-изготовителем
без предварительного уведомления в связи с постоянным усовершенствованием и улуч-
шением данного устройства.

Нажмите на кнопку для помощи


Комментарии
|
Инструкция HYUNDAI Electronics H-1549 для устройства радиоприемник содержит страницы на русском языке. Размер файла: 141.46 kB. Состоит из 11 стр. Вы можете скачать pdf файл этой инструкции: Скачать PDF
Комментарии
Радиоприемник с часами Hyundai H-1549
|

