 держать


 держать,
 «Language»
 «русский язык»
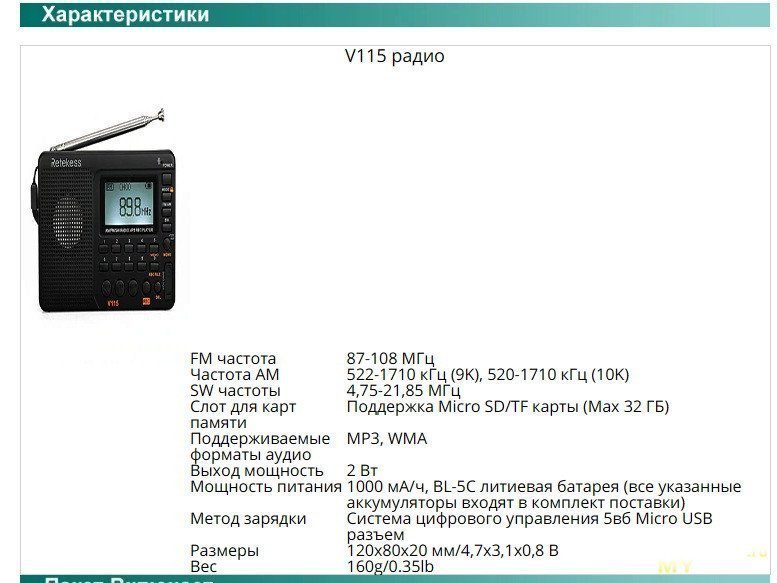
диапазон 64-108 МГц
 держать,
«FM настройки»
FM1 64-108MHZ
4750 — 60 метров (SW1); 5950 — 49 метров (SW2);
7100 — 41 метров (SW3); 9500 — 31 метров (SW4)
11650 — 25 метров (SW5)); 13600 — 22 метров (SW6)
15100 — 19 метров (SW7); 17500 — 16 метров (SW8)
21450 — 13 метров (SW9)

* при занесённых в память частотах
Использовать с осторожностью !!!
Ячейки памяти перезаписываются!
держать держать держать
в режиме SW доступный диапазон ячеек памяти 000-299
 держать,
в режиме SW доступный диапазон ячеек памяти 000-299
держать, 
в режиме SW доступный диапазон ячеек памяти 001-299
держать, 

* шаг 9 кГц в диапазоне 522-1710 кГц,
то есть фиксированные частоты 522 — 531 — 540 — 549 … 1701 — 1710 кГц


в режиме FM
* доступный диапазон ячеек памяти CH01-CH79
держать в режиме FM
держать  держать, держать,
 держать держать держать или
  держать держать держать держать держать держать держать
(на карте памяти должны лежать файлы *.mp3)
— на дисплее буква «A» — на дисплее цифра «1» — на дисплее буква «F» — на дисплее буква «R» держать держать«режим игры»
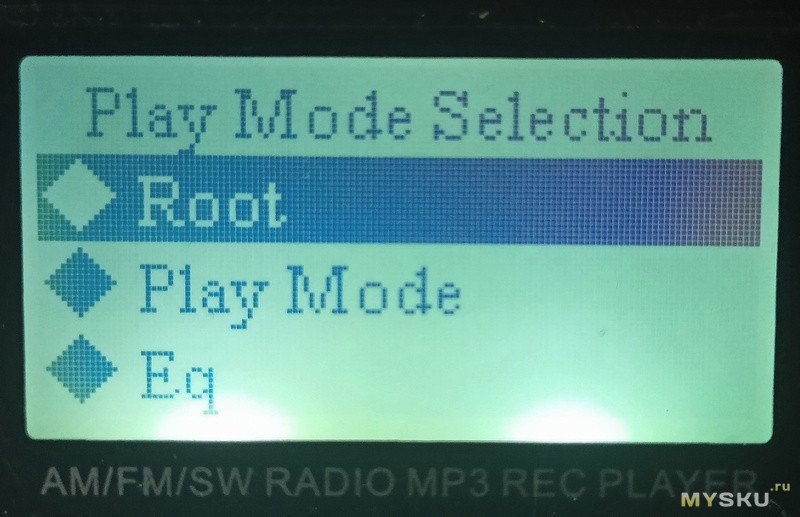
держать«Главная каталог»
«UP LEVEL»
«UP LEVEL»
Retekess V115 Manual

Please read the manual thoroughly before operating and keep this book in a safe place for future reference.
Included items: V115, Lithium battery, USB cable, Operational manual
Precautions
Before using this pocket-sized radio recorder, be sure to follow the basis safety tips to guarantee safe and liable use of the product.
- Read and understand all safety guidelines and use information.
- Recommended to use the original lithium battery.
- Please Use the charging device with the output voltage 5V, 500mA-1000A to avoid damaging the lithium battery and device.
- If the lithium battery will not be used for an extended period of time, please remove it, store it separately, and remember to charge it once a month.
- Do not allow the radio to come into direct contact with rain, moisture, or any liquid drops.
- Avoid direct heat sources. Do not bake or blow dry the product.
- Do not expose the device to direct sunshine for an extended period of time.
- Do not drop the product or applying heavy pressure.
| 中 文 | English | Espanol |
| 定 时 关 机 | Auto power | Off Time |
| 对 比 调 节 | Contrast | Contraste |
| 背 光 时 间 | Back light time | Tiempo brillante |
| 语 言 选 择 | Language | Idioma |
| 录 音 设 置 | Record set | Record set |
| AM 步 进 设 置 | AM Stepping set | AM Stepping set |
| 返 回 主 界 面 | Back | Espada |
Screen Display
Displaying on TF Music Play Screen
Displaying on the Radio Screen
Diagram Location of Controls

Introduction
AM/FM/SW Pocket-sized Full Band Radio Recorder is an integrated digital electric tuning radio that can play MP3 and WMA files, Multilingual menu operation, that display lyric synchronously, supports MIC Recording, Radio Recording, LINE IN Recording, and stereo earphone output, with a rechargeable lithium battery (battery can be replaceabled with a larger capacity BL-5C battery to achieve longer playtime).
Definition of key operations
There are 3 operation ways of pressing the keys: short press, long press and hold on. Unless expressly stated all the operations are short press.
Short press: press the key once, and the function starts to work.
Long press: press and hold for more than 1.2 seconds and the function starts to work, and works only one time.
Hold on: press the key and hold on till stop, the function works several times in a certain frequency, such as fast forward/backward.
Battery Power Supply
Install/Replace the battery:
- Open the battery cover.
- Insert the lithium battery according to the polarity indicated.
- Close the battery cover.
- Prior to using for the first time charge the lithium battery for 6 hours. After the first charge, charge time should be about 4 hours.
- Recommend: use the 5V, 500mA charger provided.
- In normal cases, before charging the battery, please make sure the product is in the radio OFF mode. During charging the LCD displays the «Charging Screen». The flashing battery power icon indicates that the charging is in progress. When the battery is fully charged
,the battery power icon will not flash and will show full battery power. At this moment, it is suggested to continue to charge for 1-2 hours to guarantee the lithium battery reaches the maximum charging capacity.
Battery Consumption indicator:
- Full

- Medium

- Low

- Exhausted

Charging the Lithium Battery:
- External Adapter (not included). Please use a matched adapter (5V DC/500mA, USB port) to charge the radio.
- Install the lithium battery.
- To charge the battery, connect the Micro-USB cable to the radio, the other end to a USB adapter.
- While charging, the battery symbol shown on the displaymoves from right to left, and stops when the battery is full charged. Then disconnect the radio and the adapter.
Note: When charging, alternating current can interfere with receive radio signals, so it is not recommended to use the radio when charging.
Do not use AC adapter or computer to power the radio to play music or listen to the radio when the battery is unloaded.
Please unload the battery or fully charge it once in 2 months if the radio is not used for a long time.
Charged by PC:
- Connect the radio to the computer with the provided USB cable.
- While charging, the battery symbol shown on the display moves from right to left.
- The battery symbol stops moving when the battery is full charged.
Radio Operation
Power on/off radio:
- Long press the Power button to turn on the device.
- Extend the antenna.
- Press the AM/FM or SW key to select the band.
- Long press the Power button again to turn off the device.
Automatically search and store Station:
In the radio mode, long press the ![]() key to enter Automatic search and store Stations. The available stations have been automatically numbered and stored from low to high frequencies. When stations have finished storing, press the
key to enter Automatic search and store Stations. The available stations have been automatically numbered and stored from low to high frequencies. When stations have finished storing, press the ![]() or
or ![]() key to invoke the radio stations stored and begin listen. If any interfering radio station is saved automatically, long press the DEL key to delete it.
key to invoke the radio stations stored and begin listen. If any interfering radio station is saved automatically, long press the DEL key to delete it.
To save a radio station manually:
- In radio mode, long press the
 or
or  key to search radio stations forward or backward. When a radio station is received, the search will stop and the radio station received will begin to play.
 - Directly input the frequency of a radio station: For example, the frequency of the radio station is 88.5MHz. Press the number keys 8, 8 and 5, then press the
 key to confirm the input. The radio will jump to 88.5MHz.
*AM: the numbers that are 522+Multiples of 9 are valid; for North America 520+ Multiples of 10 are valid - Shortwave Operation: Press the SW key to invoke metric waves in order:
60m (4.750MHz), 49m (5.950MHz), 41m (7.100MHz), 31m (9.500MHz), 25m (11.650MHz), 22m (13.600MHz), 19m (15.100MHz), 16m (17.500MHz), 13m (21.45MHz)
After selecting a metric wave, long press the key to search radio stations.
Invoke a radio station with the method described in the following A, B or C, and long press the MEMO «5» key, when the «CH00» flashing on the display, press the numeric keys to enter the location of the storage station, and press the «PLAY» button, the screen prompts to save, then press the «PLAY» button again to confirm can be stored in the specified location.
Note: There is a limit on the number of preset stations in each band. (FM: 80 presets, MW: 60 prestes, SW: 300 presets)
AM Stepping set:
In the AM radio mode, long press MENU key to the system main menu, press ![]() or
or ![]() key, to select AM Stepping submenu choose step 9 KHz or 10 KHz (North America), Press the
key, to select AM Stepping submenu choose step 9 KHz or 10 KHz (North America), Press the ![]() key to confirm.
key to confirm.
To delete a radio station:
Invoke a radio station and long press the DEL key, the display will display radio station deletion confirmation. Press the ![]() key to confirm the deletion of the current radio station.
key to confirm the deletion of the current radio station.
* If the above operation is not finished within 5 seconds, the system will return to the radio mode.
To mute the radio:
In the radio mode, press the ![]() key and the
key and the ![]() icon will flash on the screen, which indicates the radio is in the mute mode. Press the
icon will flash on the screen, which indicates the radio is in the mute mode. Press the ![]() key again to deactivate mute.
key again to deactivate mute.
Music Play Operation
- Correctly insert the music TF card in MP3 or WMA format.
- Press the Power key to turn on the device.
- Press the MODE key to enter the play mode. The screen will display the music name, format, time lapsed, etc.
- Press the or key to select the next or previous song or press the numeric keys to select a song, and then Press the key to confirm the selection. The radio will directly jump to the song number to play the corresponding song.
- Press the Repeat key to repeat a song (
 indicates repeating a song) or repeat all songs in order (
 indicates repeating all songs).
Play Setup:
*This has been set in the factory. It is not recommended to set it again.
- In the play mode, long press the key to enter the main screen of Play.
- Main Directory (Select this item to select the songs in the folders under the directory)
- Play Mode: Repeat All, Repeat One, Repeat Directory (select this option to play the songs in the selected folder only)
- Sound effect (NATURAL, POP, ROCK, JAZZ, COUNTRY, HEAVY BASS)
- Return to the main screen
- Press the or key to select the sub-menu and press the key to enter the submenu. Press the or key to select the corresponding sub-item and press the key to confirm the selection. The setup will be successful and the system will exit the setup mode.
Computer Data Transmission:
Turn on the device, and connect to the computer with the Micro USB cable. Press any key of the device and the computer will install the driver software automatically. The screen of the device will display the computer connected icon to indicate the connection is successful. Here the computer can read, copy, and delete the files in the TF card in the device (can be used as a card reader) and can also be used as an external USB speaker of the computer. (Certain computers of different configuration may not be compatible)
Recording Operation
MIC Recording:
Insert the TF card and turn on the device. Press the MODE key to enter the play mode. Long press the REC key to enter the MIC recording mode. During recording press the REC key to finish and exit the recording mode.
LINE IN Recording:
Connect the external audio cable («Line in» is identified automatically) Make sure an external song is being played. Adjust the volume of the external audio and long press the REC key to enter «LINE IN Recording». During recording press the REC key to finish and exit.
Radio Recording:
Press the FM key to enter the radio mode and adjust the radio station. Long press the REC key to enter the radio recording mode. During recording, Press ![]() key can Pause recording, Press
key can Pause recording, Press ![]() key again can Resume recording. Press the REC key to finish the recording and exit the recording mode.
key again can Resume recording. Press the REC key to finish the recording and exit the recording mode.
*In the recording mode the volume is locked at the level set before recording. If you press the Volume key the volume will not be changed.
Recording File Invoking Operation:
Long press the REC FILE «0» key to invoke recording file. Press the ![]() or
or ![]() key to select the recording file to be played. The file name «MIC» indicates a MIC Recording file; «LIN» indicates a LINE I n Recording file; «RAD» indicates a Radio Recording file.
key to select the recording file to be played. The file name «MIC» indicates a MIC Recording file; «LIN» indicates a LINE I n Recording file; «RAD» indicates a Radio Recording file.
Recording File Deletion Operation:
Long press the REC FILE «0» key to invoke a recording file. Press the or key to select the recording file to be deleted. Long press the «DEL» key and the screen will pop up «Are you sure to delete the file» Press the ![]() key to delete the recording file.
key to delete the recording file.
Key Locking Operation:
Long press the MODE key, the lock icon will appear on the screen, which indicates the system has entered the keys locked mode. If you press other keys they will not function and the lock icon will appear on the screen. Long press the MODE key and the unlock icon will appear on the screen, which indicates the keys have been unlocked.
System Setup
- Long press the MENU key to enter the System Setup screen(The system will return to the main screen automatically if no operation within 5 seconds.)
System Screen:- Auto power (the time of automatic shutdown can be set to 0-90 min)
- Contrast (the contrast ratio of the screen can be set to 1-15 level)
- Back light Time (the back light can be set to Normal ON, OFF or a duration)
- Language (Chinese/English/Spanish)
- Record set (compression ratio: Simple record 64kbps / Quality record 96 kbps / Super record 128kbps )
- Back (Return to the main screen)
Note: For the convenience of customers use, the machine default language setting is English
- After the system enters the System Setup screen, press the or key to select the corresponding sub-item and press the key to enter the sub-menu. Press the or key to select the corresponding sub-item and press the key to confirm the selection to finish the setup.
Sleep Shutdown Setup Operation
Enter the system setup screen, press the ![]() or
or ![]() key to select «Auto Power» and press the.
key to select «Auto Power» and press the. ![]() key to enter the sub-item. Press the
key to enter the sub-item. Press the ![]() or
or ![]() key to set the time (00-90 minutes) and press The
key to set the time (00-90 minutes) and press The ![]() key to confirm the setup. When the sleep shutdown is successfully set the timing shutdown icon
key to confirm the setup. When the sleep shutdown is successfully set the timing shutdown icon ![]() will appear on the screen, which indicates the system has entered the timing shutdown mode. The timer will begin countdown till the time set arrives and then the device will shut down automatically. When the time is set to 00 or when you turn off the power switch
will appear on the screen, which indicates the system has entered the timing shutdown mode. The timer will begin countdown till the time set arrives and then the device will shut down automatically. When the time is set to 00 or when you turn off the power switch, the sleep shutdown function will be canceled.
Troubleshooting
Q: Can not turn on the radio.
A: Possibly the battery drained, please charge the battery.
Q: Can not be connected to a computer.
A: Please do the connection in radio off mode. The USB cable maybe damaged, please try another one.
Q: Speaker does not sound.
A: Check if the volume level is too low, turn it up.
Q: Can not play audio from the Micro SD(TF) card or USB drive.
A: Check if the card or the USB drive has poor compatibility, try another card or USB drive. The files are damaged or with incorrect format, delete the file and try again.
Q: Can not charge the radio.
A: Check if the external adapter or the USB cable was connected correctly. Check if the adapter or USB cable is damaged.
Q: Why the radio sound out of the speaker, when using ear buds?
A: Because the ear buds have MIC function, in fact, this radio can’t work with the ear buds which have MIC function. So you can try a ear buds without MIC function, if still can’t solve, please email me freely
Q: Why the SW reception is not good?
A: Shortwave is a delicate medium. Little things like time of day, the sunspot cycle, weather and atmospheric issues can play the devil with reception. But once the sun goes down, the shortwave bands come alive with music, news, propaganda and even some pirate radio stations. so the signal strength will be weak indoors than outdoors. So the best way to listen to shortwave should be: extend antenna, in night, and outdoor.
Videos
Retekess V115 — Features and How to Use Video
Documents / Resources
Download manual
Here you can download full pdf version of manual, it may contain additional safety instructions, warranty information, FCC rules, etc.
Download Retekess V115 Manual
Retekess V115 Manual
Please read the manual thoroughly before operating and keep this book in a safe place for future reference.
Included items: V115, Lithium battery, USB cable, Operational manual
Precautions
Before using this pocket-sized radio recorder, be sure to follow the basis safety tips to guarantee safe and liable use of the product.
- Read and understand all safety guidelines and use information.
- Recommended to use the original lithium battery.
- Please Use the charging device with the output voltage 5V, 500mA-1000A to avoid damaging the lithium battery and device.
- If the lithium battery will not be used for an extended period of time, please remove it, store it separately, and remember to charge it once a month.
- Do not allow the radio to come into direct contact with rain, moisture, or any liquid drops.
- Avoid direct heat sources. Do not bake or blow dry the product.
- Do not expose the device to direct sunshine for an extended period of time.
- Do not drop the product or applying heavy pressure.
| 中 文 | English | Espanol |
| 定 时 关 机 | Auto power | Off Time |
| 对 比 调 节 | Contrast | Contraste |
| 背 光 时 间 | Back light time | Tiempo brillante |
| 语 言 选 择 | Language | Idioma |
| 录 音 设 置 | Record set | Record set |
| AM 步 进 设 置 | AM Stepping set | AM Stepping set |
| 返 回 主 界 面 | Back | Espada |
Screen Display
Displaying on TF Music Play Screen
Displaying on the Radio Screen
Diagram Location of Controls
Introduction
AM/FM/SW Pocket-sized Full Band Radio Recorder is an integrated digital electric tuning radio that can play MP3 and WMA files, Multilingual menu operation, that display lyric synchronously, supports MIC Recording, Radio Recording, LINE IN Recording, and stereo earphone output, with a rechargeable lithium battery (battery can be replaceabled with a larger capacity BL-5C battery to achieve longer playtime).
Definition of key operations
There are 3 operation ways of pressing the keys: short press, long press and hold on. Unless expressly stated all the operations are short press.
Short press: press the key once, and the function starts to work.
Long press: press and hold for more than 1.2 seconds and the function starts to work, and works only one time.
Hold on: press the key and hold on till stop, the function works several times in a certain frequency, such as fast forward/backward.
Battery Power Supply
Install/Replace the battery:
- Open the battery cover.
- Insert the lithium battery according to the polarity indicated.
- Close the battery cover.
- Prior to using for the first time charge the lithium battery for 6 hours. After the first charge, charge time should be about 4 hours.
- Recommend: use the 5V, 500mA charger provided.
- In normal cases, before charging the battery, please make sure the product is in the radio OFF mode. During charging the LCD displays the «Charging Screen». The flashing battery power icon indicates that the charging is in progress. When the battery is fully charged
,the battery power icon will not flash and will show full battery power. At this moment, it is suggested to continue to charge for 1-2 hours to guarantee the lithium battery reaches the maximum charging capacity.
Battery Consumption indicator:
- Full
- Medium
- Low
- Exhausted
Charging the Lithium Battery:
- External Adapter (not included). Please use a matched adapter (5V DC/500mA, USB port) to charge the radio.
- Install the lithium battery.
- To charge the battery, connect the Micro-USB cable to the radio, the other end to a USB adapter.
- While charging, the battery symbol shown on the displaymoves from right to left, and stops when the battery is full charged. Then disconnect the radio and the adapter.
Note: When charging, alternating current can interfere with receive radio signals, so it is not recommended to use the radio when charging.
Do not use AC adapter or computer to power the radio to play music or listen to the radio when the battery is unloaded.
Please unload the battery or fully charge it once in 2 months if the radio is not used for a long time.
Charged by PC:
- Connect the radio to the computer with the provided USB cable.
- While charging, the battery symbol shown on the display moves from right to left.
- The battery symbol stops moving when the battery is full charged.
Radio Operation
Power on/off radio:
- Long press the Power button to turn on the device.
- Extend the antenna.
- Press the AM/FM or SW key to select the band.
- Long press the Power button again to turn off the device.
Automatically search and store Station:
In the radio mode, long press the ![]() key to enter Automatic search and store Stations. The available stations have been automatically numbered and stored from low to high frequencies. When stations have finished storing, press the
key to enter Automatic search and store Stations. The available stations have been automatically numbered and stored from low to high frequencies. When stations have finished storing, press the ![]() or
or ![]() key to invoke the radio stations stored and begin listen. If any interfering radio station is saved automatically, long press the DEL key to delete it.
key to invoke the radio stations stored and begin listen. If any interfering radio station is saved automatically, long press the DEL key to delete it.
To save a radio station manually:
- In radio mode, long press the or key to search radio stations forward or backward. When a radio station is received, the search will stop and the radio station received will begin to play.
- Directly input the frequency of a radio station: For example, the frequency of the radio station is 88.5MHz. Press the number keys 8, 8 and 5, then press the key to confirm the input. The radio will jump to 88.5MHz.
*AM: the numbers that are 522+Multiples of 9 are valid; for North America 520+ Multiples of 10 are valid - Shortwave Operation: Press the SW key to invoke metric waves in order:
60m (4.750MHz), 49m (5.950MHz), 41m (7.100MHz), 31m (9.500MHz), 25m (11.650MHz), 22m (13.600MHz), 19m (15.100MHz), 16m (17.500MHz), 13m (21.45MHz)
After selecting a metric wave, long press the key to search radio stations.
Invoke a radio station with the method described in the following A, B or C, and long press the MEMO «5» key, when the «CH00» flashing on the display, press the numeric keys to enter the location of the storage station, and press the «PLAY» button, the screen prompts to save, then press the «PLAY» button again to confirm can be stored in the specified location.
Note: There is a limit on the number of preset stations in each band. (FM: 80 presets, MW: 60 prestes, SW: 300 presets)
AM Stepping set:
In the AM radio mode, long press MENU key to the system main menu, press ![]() or
or ![]() key, to select AM Stepping submenu choose step 9 KHz or 10 KHz (North America), Press the
key, to select AM Stepping submenu choose step 9 KHz or 10 KHz (North America), Press the ![]() key to confirm.
key to confirm.
To delete a radio station:
Invoke a radio station and long press the DEL key, the display will display radio station deletion confirmation. Press the ![]() key to confirm the deletion of the current radio station.
key to confirm the deletion of the current radio station.
* If the above operation is not finished within 5 seconds, the system will return to the radio mode.
To mute the radio:
In the radio mode, press the ![]() key and the
key and the ![]() icon will flash on the screen, which indicates the radio is in the mute mode. Press the
icon will flash on the screen, which indicates the radio is in the mute mode. Press the ![]() key again to deactivate mute.
key again to deactivate mute.
Music Play Operation
- Correctly insert the music TF card in MP3 or WMA format.
- Press the Power key to turn on the device.
- Press the MODE key to enter the play mode. The screen will display the music name, format, time lapsed, etc.
- Press the or key to select the next or previous song or press the numeric keys to select a song, and then Press the key to confirm the selection. The radio will directly jump to the song number to play the corresponding song.
- Press the Repeat key to repeat a song ( indicates repeating a song) or repeat all songs in order ( indicates repeating all songs).
Play Setup:
*This has been set in the factory. It is not recommended to set it again.
- In the play mode, long press the key to enter the main screen of Play.
- Main Directory (Select this item to select the songs in the folders under the directory)
- Play Mode: Repeat All, Repeat One, Repeat Directory (select this option to play the songs in the selected folder only)
- Sound effect (NATURAL, POP, ROCK, JAZZ, COUNTRY, HEAVY BASS)
- Return to the main screen
- Press the or key to select the sub-menu and press the key to enter the submenu. Press the or key to select the corresponding sub-item and press the key to confirm the selection. The setup will be successful and the system will exit the setup mode.
Computer Data Transmission:
Turn on the device, and connect to the computer with the Micro USB cable. Press any key of the device and the computer will install the driver software automatically. The screen of the device will display the computer connected icon to indicate the connection is successful. Here the computer can read, copy, and delete the files in the TF card in the device (can be used as a card reader) and can also be used as an external USB speaker of the computer. (Certain computers of different configuration may not be compatible)
Recording Operation
MIC Recording:
Insert the TF card and turn on the device. Press the MODE key to enter the play mode. Long press the REC key to enter the MIC recording mode. During recording press the REC key to finish and exit the recording mode.
LINE IN Recording:
Connect the external audio cable («Line in» is identified automatically) Make sure an external song is being played. Adjust the volume of the external audio and long press the REC key to enter «LINE IN Recording». During recording press the REC key to finish and exit.
Radio Recording:
Press the FM key to enter the radio mode and adjust the radio station. Long press the REC key to enter the radio recording mode. During recording, Press ![]() key can Pause recording, Press
key can Pause recording, Press ![]() key again can Resume recording. Press the REC key to finish the recording and exit the recording mode.
key again can Resume recording. Press the REC key to finish the recording and exit the recording mode.
*In the recording mode the volume is locked at the level set before recording. If you press the Volume key the volume will not be changed.
Recording File Invoking Operation:
Long press the REC FILE «0» key to invoke recording file. Press the ![]() or
or ![]() key to select the recording file to be played. The file name «MIC» indicates a MIC Recording file; «LIN» indicates a LINE I n Recording file; «RAD» indicates a Radio Recording file.
key to select the recording file to be played. The file name «MIC» indicates a MIC Recording file; «LIN» indicates a LINE I n Recording file; «RAD» indicates a Radio Recording file.
Recording File Deletion Operation:
Long press the REC FILE «0» key to invoke a recording file. Press the or key to select the recording file to be deleted. Long press the «DEL» key and the screen will pop up «Are you sure to delete the file» Press the ![]() key to delete the recording file.
key to delete the recording file.
Key Locking Operation:
Long press the MODE key, the lock icon will appear on the screen, which indicates the system has entered the keys locked mode. If you press other keys they will not function and the lock icon will appear on the screen. Long press the MODE key and the unlock icon will appear on the screen, which indicates the keys have been unlocked.
System Setup
- Long press the MENU key to enter the System Setup screen(The system will return to the main screen automatically if no operation within 5 seconds.)
System Screen:- Auto power (the time of automatic shutdown can be set to 0-90 min)
- Contrast (the contrast ratio of the screen can be set to 1-15 level)
- Back light Time (the back light can be set to Normal ON, OFF or a duration)
- Language (Chinese/English/Spanish)
- Record set (compression ratio: Simple record 64kbps / Quality record 96 kbps / Super record 128kbps )
- Back (Return to the main screen)
Note: For the convenience of customers use, the machine default language setting is English
- After the system enters the System Setup screen, press the or key to select the corresponding sub-item and press the key to enter the sub-menu. Press the or key to select the corresponding sub-item and press the key to confirm the selection to finish the setup.
Sleep Shutdown Setup Operation
Enter the system setup screen, press the ![]() or
or ![]() key to select «Auto Power» and press the.
key to select «Auto Power» and press the. ![]() key to enter the sub-item. Press the
key to enter the sub-item. Press the ![]() or
or ![]() key to set the time (00-90 minutes) and press The
key to set the time (00-90 minutes) and press The ![]() key to confirm the setup. When the sleep shutdown is successfully set the timing shutdown icon
key to confirm the setup. When the sleep shutdown is successfully set the timing shutdown icon ![]() will appear on the screen, which indicates the system has entered the timing shutdown mode. The timer will begin countdown till the time set arrives and then the device will shut down automatically. When the time is set to 00 or when you turn off the power switch
will appear on the screen, which indicates the system has entered the timing shutdown mode. The timer will begin countdown till the time set arrives and then the device will shut down automatically. When the time is set to 00 or when you turn off the power switch, the sleep shutdown function will be canceled.
Troubleshooting
Q: Can not turn on the radio.
A: Possibly the battery drained, please charge the battery.
Q: Can not be connected to a computer.
A: Please do the connection in radio off mode. The USB cable maybe damaged, please try another one.
Q: Speaker does not sound.
A: Check if the volume level is too low, turn it up.
Q: Can not play audio from the Micro SD(TF) card or USB drive.
A: Check if the card or the USB drive has poor compatibility, try another card or USB drive. The files are damaged or with incorrect format, delete the file and try again.
Q: Can not charge the radio.
A: Check if the external adapter or the USB cable was connected correctly. Check if the adapter or USB cable is damaged.
Q: Why the radio sound out of the speaker, when using ear buds?
A: Because the ear buds have MIC function, in fact, this radio can’t work with the ear buds which have MIC function. So you can try a ear buds without MIC function, if still can’t solve, please email me freely
Q: Why the SW reception is not good?
A: Shortwave is a delicate medium. Little things like time of day, the sunspot cycle, weather and atmospheric issues can play the devil with reception. But once the sun goes down, the shortwave bands come alive with music, news, propaganda and even some pirate radio stations. so the signal strength will be weak indoors than outdoors. So the best way to listen to shortwave should be: extend antenna, in night, and outdoor.
Documents / Resources
Download manual
Here you can download full pdf version of manual, it may contain additional safety instructions, warranty information, FCC rules, etc.
Download Retekess V115 Manual
Здравствуйте. Обзор неплохого приемника, вернее магнитолы RETEKESS V115. Наверное это наиболее совершенное и универсальное устройство по этой цене. Правда приемник подорожал за полгода, я его покупал за US $15.50
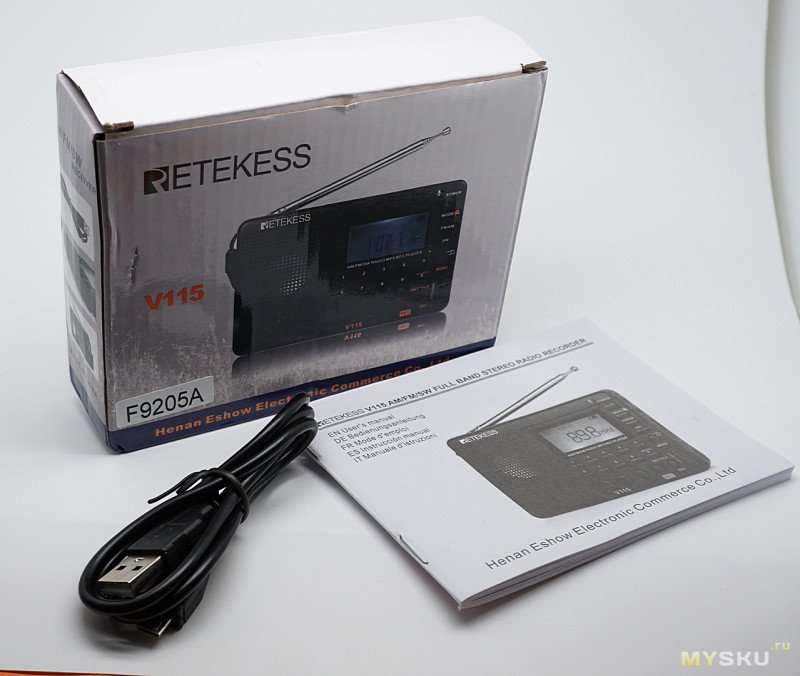
Приемник присылают в нормальной коммерческой упаковке. Имеется инструкция на нескольких языках, русского нет. Прилагается шнур для зарядки.
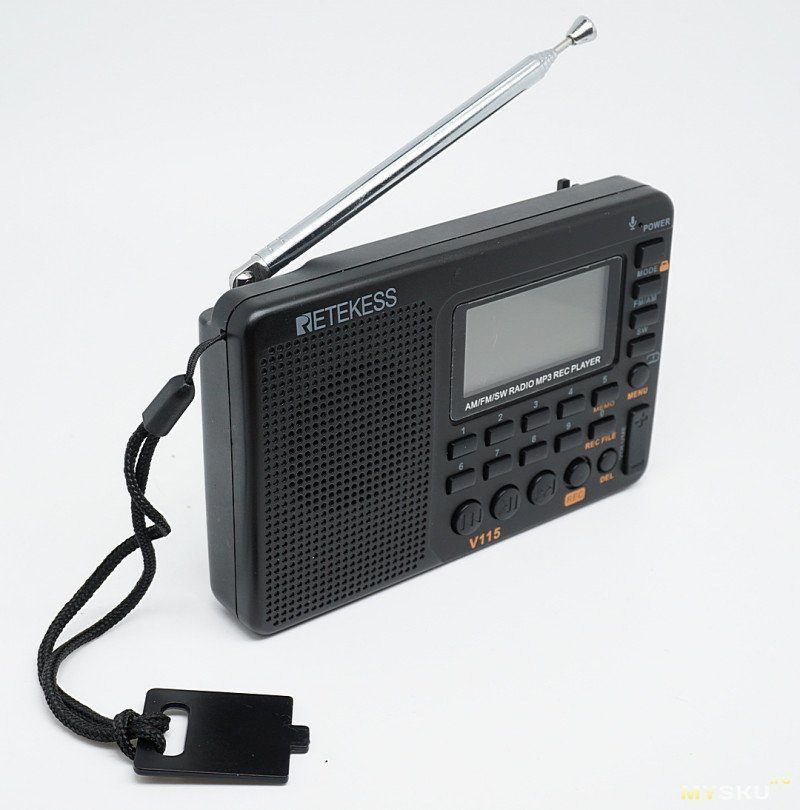
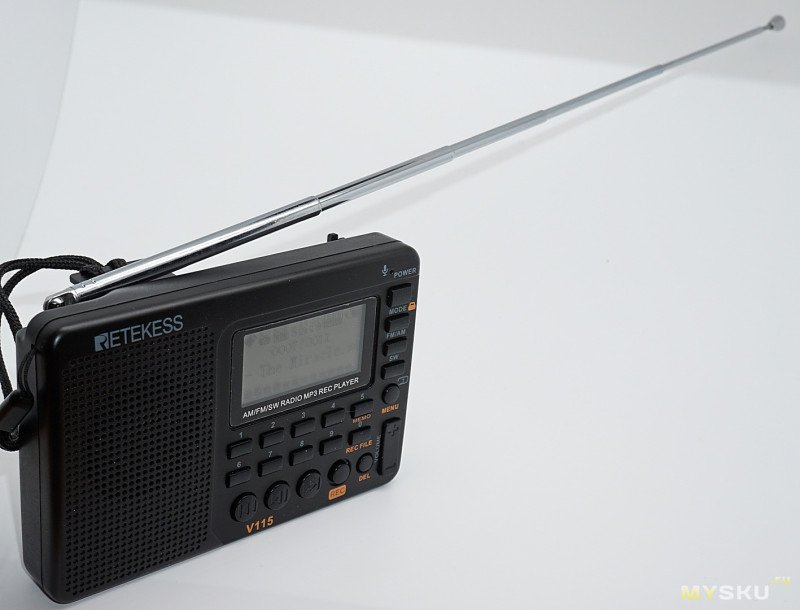
Размеры приемника 120х80х20 мм и он действительной карманный. Обилие кнопочек внушает уважение. Имеется большой графический дисплей.
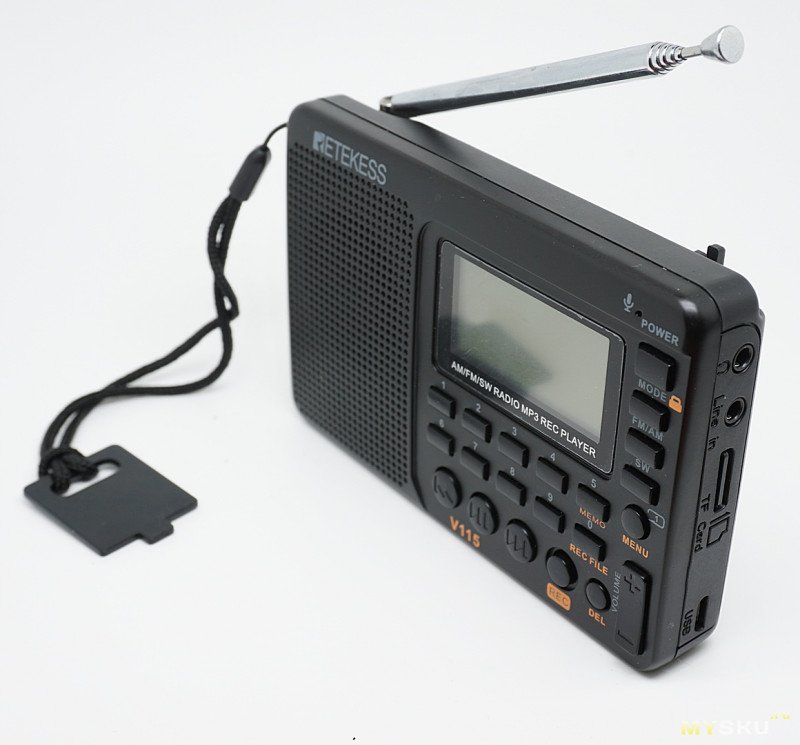
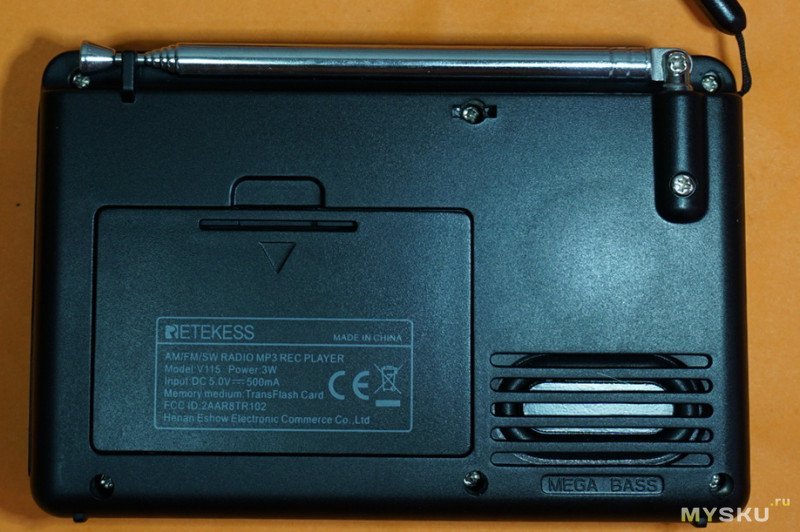
С этой стороны видны разъемы выхода на наушники, линейного входа, слот для карты памяти, разъем микро USB для зарядки.
Антенна здесь не декоративная, как обычно бывает в таких устройствах, вытягивается на 40 см.
Вид сзади. Справа за решеткой виден пассивный излучатель. Он придает солидность звуку. Голос через приемник звучит очень естественно.
Питание приемника получает от аккумулятора BL-5C. Длительность автономной работы я специально не проверял. Но если слушать аудиокниги на небольшой громкости по часу — полтора, энергии хватит дней на десять.
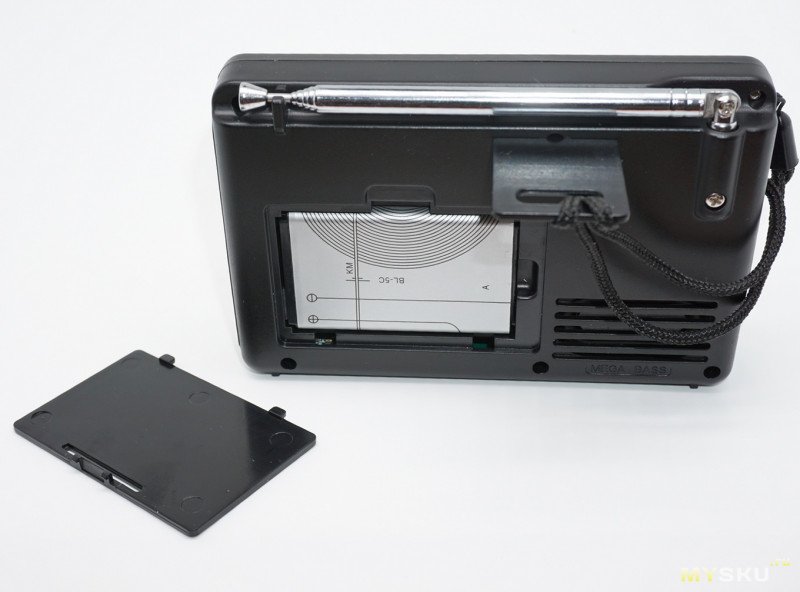
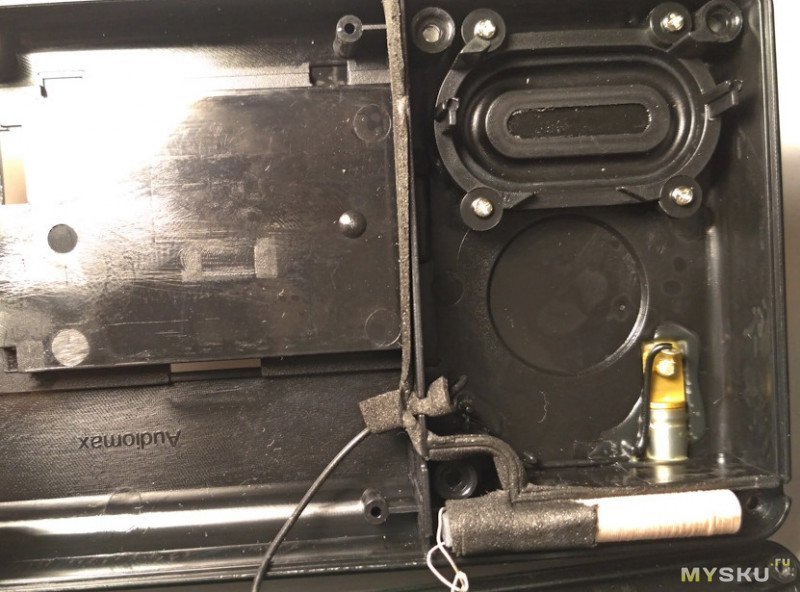
К темляку привязана пластиковая пластинка. И не зря. Приемник плоский и неустойчивый. Пластинка вставляется в специальной отверстие на задней стенке и получается подставка. Причем в таком положении акустика улучшается, так как басовые волны от излучателя сзади отражаются от поверхности.
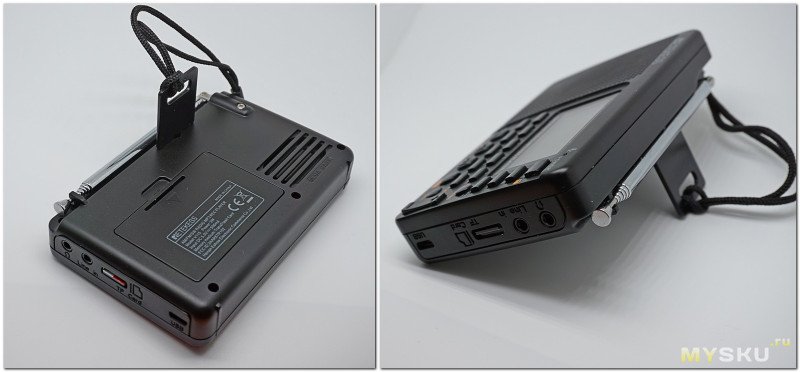
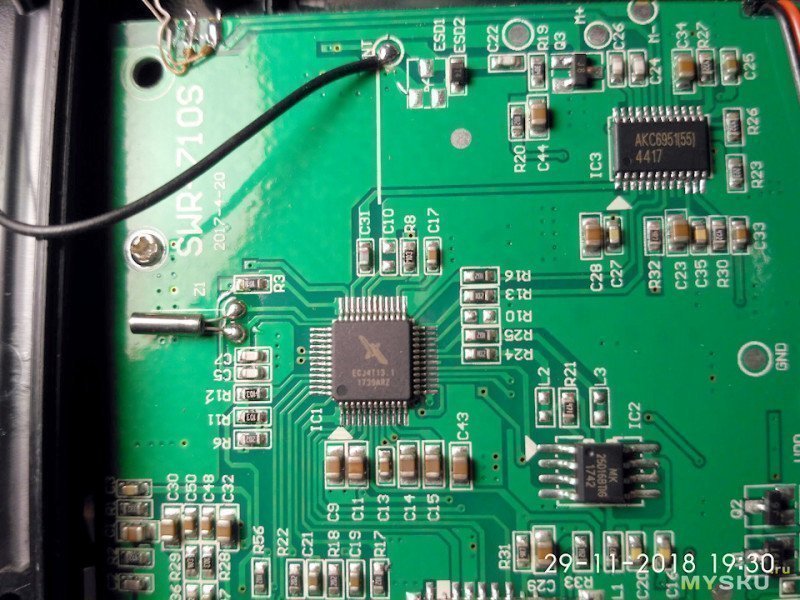
Вид со снятой крышкой. Фото взято отсюда и отсюда
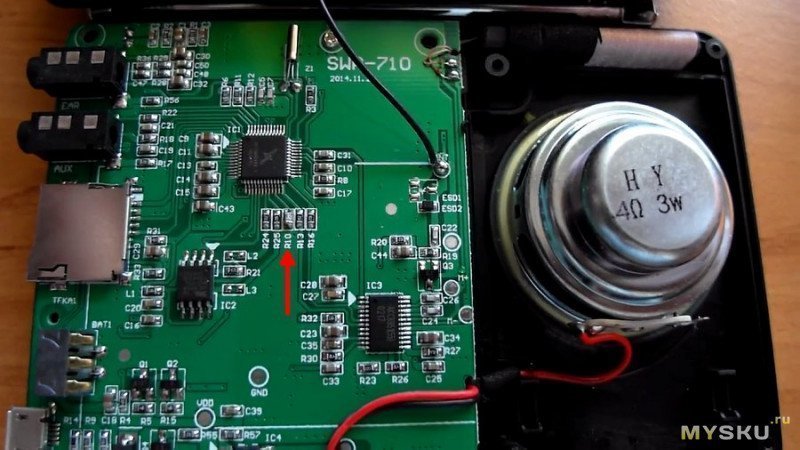
Обилие кнопок сначала обескураживает. Но постепенно привыкаешь. Удобно что каждая кнопка имеет прямой выход на свою функцию.
Только кнопка пауза -плей двойная, при длительном нажатии выход в дерево папок и настройки звука.
Есть еще одна кнопка меню. С помощью ее можно установить автовыключение, изменить яркость экрана, настроить диктофон.

Встроенный мп3 плеер довольно функциональный. Имеется эквалайзер с установленными пресетами. Режим проигрывания треков можно менять — вразброс, последовательно, зацикливать. Имеется проводник с помощью которого можно найти любой нужный файл. Звук для такого маленького устройства довольно солидный, есть верхние басы, средние и высокие разборчивые и без заметных искажений
Поиск по станциям здесь не такой как например в старом добром ВЭФе. Не надо крутить валкодер, здесь просто набирается частота станции цифровыми клавишами, короткие ли это волны или УКВ — без разницы. Частоты ищем в интернете, типа международные КВ станции Китая. Кнопками набирать станцию удобней, но нет тех романтических ощущений которые получаешь с крутилкой.
Короткие волны этот приемник вполне ловит, все зависит от места жительства и времени суток. Для улучшения чувствительности к антенне можно подсоединить дополнительный провод.
FM диапазон приемник играет без нареканий. Чувствительность отличная. Можно выбрать диапазон либо от 87 МГц, либо от 64 МГц. При хорошем приеме звук-стерео, конечно через наушники. Все станции можно запомнить нажав кнопку МЕМО и присвоив номер. Запомнить можно до 100 станций
Приемник можно подключить не только к наушникам, но и активным колонкам. Также и сам приемник можно использовать как колонку, имеется линейный вход. Звук заметно лучше чем у смартфона.

Но больше всего эта магнитолка понравилась в роли рассказчика аудиокниг. Очень естественная передача голоса, без гула и сибилянтов. Кажется что актер озвучивающий аудиокнигу находится с вами в одной комнате.
Повествование можно в любой момент остановить на полуслове просто выключив приемник. И с этого же полуслова начать прослушивание хоть через месяц. Нужное место также можно найти выбрав файл и быстро прокрутить его нажимая кнопки со стрелками.
Хотя у приемника нет механического выключения, но саморазряд у него очень маленький. Пролежал у меня 2 месяца, включил — как было четыре палки на индикаторе, так и осталось( вернее здесь сплошная плоска).
Есть еще у приемника функции диктофона и магнитофона для записи радио. Эти функции приемник выполняет, но посредственно, на эту тему распространятся не буду.
Полезная опция — режим автоотключения. Его можно включить от 10 до 90 минут, после истечении которых приемник автоматически отключится. Очень кстати когда хочется послушать сказочку перед сном.
Так что рекомендую.
Спасибо за внимание.
Содержание
- Комплектация:
- Обзор устройства
- Мультимедийные возможности
- Аудиозапись
- Итог
Retekess V115 – приемник китайского производства улавливающий радиостанции в FM, AM, SW волновых диапазонах с медиаплеером и удобным интуитивно понятным управлением. Возможность воспроизведения треков в MP3 и WMA формате с micro SD карт памяти позволят владельцу слушать музыку даже в труднодоступных для приема радиосигнала местах. Встроенный диктофон позволит записать радиопередачи на съёмный носитель.
 key to enter Automatic search and store Stations. The available stations have been automatically numbered and stored from low to high frequencies. When stations have finished storing, press the
 ![]() or
or ![]() key to invoke the radio stations stored and begin listen. If any interfering radio station is saved automatically, long press the DEL key to delete it.
key to invoke the radio stations stored and begin listen. If any interfering radio station is saved automatically, long press the DEL key to delete it.
To save a radio station manually:
- In radio mode, long press the or key to search radio stations forward or backward. When a radio station is received, the search will stop and the radio station received will begin to play.
- Directly input the frequency of a radio station: For example, the frequency of the radio station is 88.5MHz. Press the number keys 8, 8 and 5, then press the key to confirm the input. The radio will jump to 88.5MHz.
*AM: the numbers that are 522+Multiples of 9 are valid; for North America 520+ Multiples of 10 are valid - Shortwave Operation: Press the SW key to invoke metric waves in order:
60m (4.750MHz), 49m (5.950MHz), 41m (7.100MHz), 31m (9.500MHz), 25m (11.650MHz), 22m (13.600MHz), 19m (15.100MHz), 16m (17.500MHz), 13m (21.45MHz)
After selecting a metric wave, long press the key to search radio stations.
Invoke a radio station with the method described in the following A, B or C, and long press the MEMO «5» key, when the «CH00» flashing on the display, press the numeric keys to enter the location of the storage station, and press the «PLAY» button, the screen prompts to save, then press the «PLAY» button again to confirm can be stored in the specified location.
Note: There is a limit on the number of preset stations in each band. (FM: 80 presets, MW: 60 prestes, SW: 300 presets)
AM Stepping set:
In the AM radio mode, long press MENU key to the system main menu, press ![]() or
or ![]() key, to select AM Stepping submenu choose step 9 KHz or 10 KHz (North America), Press the
key, to select AM Stepping submenu choose step 9 KHz or 10 KHz (North America), Press the ![]() key to confirm.
key to confirm.
To delete a radio station:
Invoke a radio station and long press the DEL key, the display will display radio station deletion confirmation. Press the ![]() key to confirm the deletion of the current radio station.
key to confirm the deletion of the current radio station.
* If the above operation is not finished within 5 seconds, the system will return to the radio mode.
To mute the radio:
In the radio mode, press the ![]() key and the
key and the ![]() icon will flash on the screen, which indicates the radio is in the mute mode. Press the
icon will flash on the screen, which indicates the radio is in the mute mode. Press the ![]() key again to deactivate mute.
key again to deactivate mute.
Music Play Operation
- Correctly insert the music TF card in MP3 or WMA format.
- Press the Power key to turn on the device.
- Press the MODE key to enter the play mode. The screen will display the music name, format, time lapsed, etc.
- Press the or key to select the next or previous song or press the numeric keys to select a song, and then Press the key to confirm the selection. The radio will directly jump to the song number to play the corresponding song.
- Press the Repeat key to repeat a song ( indicates repeating a song) or repeat all songs in order ( indicates repeating all songs).
Play Setup:
*This has been set in the factory. It is not recommended to set it again.
- In the play mode, long press the key to enter the main screen of Play.
- Main Directory (Select this item to select the songs in the folders under the directory)
- Play Mode: Repeat All, Repeat One, Repeat Directory (select this option to play the songs in the selected folder only)
- Sound effect (NATURAL, POP, ROCK, JAZZ, COUNTRY, HEAVY BASS)
- Return to the main screen
- Press the or key to select the sub-menu and press the key to enter the submenu. Press the or key to select the corresponding sub-item and press the key to confirm the selection. The setup will be successful and the system will exit the setup mode.
Computer Data Transmission:
Turn on the device, and connect to the computer with the Micro USB cable. Press any key of the device and the computer will install the driver software automatically. The screen of the device will display the computer connected icon to indicate the connection is successful. Here the computer can read, copy, and delete the files in the TF card in the device (can be used as a card reader) and can also be used as an external USB speaker of the computer. (Certain computers of different configuration may not be compatible)
Recording Operation
MIC Recording:
Insert the TF card and turn on the device. Press the MODE key to enter the play mode. Long press the REC key to enter the MIC recording mode. During recording press the REC key to finish and exit the recording mode.
LINE IN Recording:
Connect the external audio cable («Line in» is identified automatically) Make sure an external song is being played. Adjust the volume of the external audio and long press the REC key to enter «LINE IN Recording». During recording press the REC key to finish and exit.
Radio Recording:
Press the FM key to enter the radio mode and adjust the radio station. Long press the REC key to enter the radio recording mode. During recording, Press ![]() key can Pause recording, Press
key can Pause recording, Press ![]() key again can Resume recording. Press the REC key to finish the recording and exit the recording mode.
key again can Resume recording. Press the REC key to finish the recording and exit the recording mode.
*In the recording mode the volume is locked at the level set before recording. If you press the Volume key the volume will not be changed.
Recording File Invoking Operation:
Long press the REC FILE «0» key to invoke recording file. Press the ![]() or
or ![]() key to select the recording file to be played. The file name «MIC» indicates a MIC Recording file; «LIN» indicates a LINE I n Recording file; «RAD» indicates a Radio Recording file.
key to select the recording file to be played. The file name «MIC» indicates a MIC Recording file; «LIN» indicates a LINE I n Recording file; «RAD» indicates a Radio Recording file.
Recording File Deletion Operation:
Long press the REC FILE «0» key to invoke a recording file. Press the or key to select the recording file to be deleted. Long press the «DEL» key and the screen will pop up «Are you sure to delete the file» Press the ![]() key to delete the recording file.
key to delete the recording file.
Key Locking Operation:
Long press the MODE key, the lock icon will appear on the screen, which indicates the system has entered the keys locked mode. If you press other keys they will not function and the lock icon will appear on the screen. Long press the MODE key and the unlock icon will appear on the screen, which indicates the keys have been unlocked.
System Setup
- Long press the MENU key to enter the System Setup screen(The system will return to the main screen automatically if no operation within 5 seconds.)
System Screen:- Auto power (the time of automatic shutdown can be set to 0-90 min)
- Contrast (the contrast ratio of the screen can be set to 1-15 level)
- Back light Time (the back light can be set to Normal ON, OFF or a duration)
- Language (Chinese/English/Spanish)
- Record set (compression ratio: Simple record 64kbps / Quality record 96 kbps / Super record 128kbps )
- Back (Return to the main screen)
Note: For the convenience of customers use, the machine default language setting is English
- After the system enters the System Setup screen, press the or key to select the corresponding sub-item and press the key to enter the sub-menu. Press the or key to select the corresponding sub-item and press the key to confirm the selection to finish the setup.
Sleep Shutdown Setup Operation
Enter the system setup screen, press the ![]() or
or ![]() key to select «Auto Power» and press the.
key to select «Auto Power» and press the. ![]() key to enter the sub-item. Press the
key to enter the sub-item. Press the ![]() or
or ![]() key to set the time (00-90 minutes) and press The
key to set the time (00-90 minutes) and press The ![]() key to confirm the setup. When the sleep shutdown is successfully set the timing shutdown icon
key to confirm the setup. When the sleep shutdown is successfully set the timing shutdown icon ![]() will appear on the screen, which indicates the system has entered the timing shutdown mode. The timer will begin countdown till the time set arrives and then the device will shut down automatically. When the time is set to 00 or when you turn off the power switch
will appear on the screen, which indicates the system has entered the timing shutdown mode. The timer will begin countdown till the time set arrives and then the device will shut down automatically. When the time is set to 00 or when you turn off the power switch, the sleep shutdown function will be canceled.
Troubleshooting
Q: Can not turn on the radio.
A: Possibly the battery drained, please charge the battery.
Q: Can not be connected to a computer.
A: Please do the connection in radio off mode. The USB cable maybe damaged, please try another one.
Q: Speaker does not sound.
A: Check if the volume level is too low, turn it up.
Q: Can not play audio from the Micro SD(TF) card or USB drive.
A: Check if the card or the USB drive has poor compatibility, try another card or USB drive. The files are damaged or with incorrect format, delete the file and try again.
Q: Can not charge the radio.
A: Check if the external adapter or the USB cable was connected correctly. Check if the adapter or USB cable is damaged.
Q: Why the radio sound out of the speaker, when using ear buds?
A: Because the ear buds have MIC function, in fact, this radio can’t work with the ear buds which have MIC function. So you can try a ear buds without MIC function, if still can’t solve, please email me freely
Q: Why the SW reception is not good?
A: Shortwave is a delicate medium. Little things like time of day, the sunspot cycle, weather and atmospheric issues can play the devil with reception. But once the sun goes down, the shortwave bands come alive with music, news, propaganda and even some pirate radio stations. so the signal strength will be weak indoors than outdoors. So the best way to listen to shortwave should be: extend antenna, in night, and outdoor.
Videos
Retekess V115 — Features and How to Use Video
Documents / Resources
Download manual
Here you can download full pdf version of manual, it may contain additional safety instructions, warranty information, FCC rules, etc.
Download Retekess V115 Manual
Retekess V115 Manual
Please read the manual thoroughly before operating and keep this book in a safe place for future reference.
Included items: V115, Lithium battery, USB cable, Operational manual
Precautions
Before using this pocket-sized radio recorder, be sure to follow the basis safety tips to guarantee safe and liable use of the product.
- Read and understand all safety guidelines and use information.
- Recommended to use the original lithium battery.
- Please Use the charging device with the output voltage 5V, 500mA-1000A to avoid damaging the lithium battery and device.
- If the lithium battery will not be used for an extended period of time, please remove it, store it separately, and remember to charge it once a month.
- Do not allow the radio to come into direct contact with rain, moisture, or any liquid drops.
- Avoid direct heat sources. Do not bake or blow dry the product.
- Do not expose the device to direct sunshine for an extended period of time.
- Do not drop the product or applying heavy pressure.
| 中 文 | English | Espanol |
| 定 时 关 机 | Auto power | Off Time |
| 对 比 调 节 | Contrast | Contraste |
| 背 光 时 间 | Back light time | Tiempo brillante |
| 语 言 选 择 | Language | Idioma |
| 录 音 设 置 | Record set | Record set |
| AM 步 进 设 置 | AM Stepping set | AM Stepping set |
| 返 回 主 界 面 | Back | Espada |
Screen Display
Displaying on TF Music Play Screen
Displaying on the Radio Screen
Diagram Location of Controls
Introduction
AM/FM/SW Pocket-sized Full Band Radio Recorder is an integrated digital electric tuning radio that can play MP3 and WMA files, Multilingual menu operation, that display lyric synchronously, supports MIC Recording, Radio Recording, LINE IN Recording, and stereo earphone output, with a rechargeable lithium battery (battery can be replaceabled with a larger capacity BL-5C battery to achieve longer playtime).
Definition of key operations
There are 3 operation ways of pressing the keys: short press, long press and hold on. Unless expressly stated all the operations are short press.
Short press: press the key once, and the function starts to work.
Long press: press and hold for more than 1.2 seconds and the function starts to work, and works only one time.
Hold on: press the key and hold on till stop, the function works several times in a certain frequency, such as fast forward/backward.
Battery Power Supply
Install/Replace the battery:
- Open the battery cover.
- Insert the lithium battery according to the polarity indicated.
- Close the battery cover.
- Prior to using for the first time charge the lithium battery for 6 hours. After the first charge, charge time should be about 4 hours.
- Recommend: use the 5V, 500mA charger provided.
- In normal cases, before charging the battery, please make sure the product is in the radio OFF mode. During charging the LCD displays the «Charging Screen». The flashing battery power icon indicates that the charging is in progress. When the battery is fully charged
,the battery power icon will not flash and will show full battery power. At this moment, it is suggested to continue to charge for 1-2 hours to guarantee the lithium battery reaches the maximum charging capacity.
Battery Consumption indicator:
- Full
- Medium
- Low
- Exhausted
Charging the Lithium Battery:
- External Adapter (not included). Please use a matched adapter (5V DC/500mA, USB port) to charge the radio.
- Install the lithium battery.
- To charge the battery, connect the Micro-USB cable to the radio, the other end to a USB adapter.
- While charging, the battery symbol shown on the displaymoves from right to left, and stops when the battery is full charged. Then disconnect the radio and the adapter.
Note: When charging, alternating current can interfere with receive radio signals, so it is not recommended to use the radio when charging.
Do not use AC adapter or computer to power the radio to play music or listen to the radio when the battery is unloaded.
Please unload the battery or fully charge it once in 2 months if the radio is not used for a long time.
Charged by PC:
- Connect the radio to the computer with the provided USB cable.
- While charging, the battery symbol shown on the display moves from right to left.
- The battery symbol stops moving when the battery is full charged.
Radio Operation
Power on/off radio:
- Long press the Power button to turn on the device.
- Extend the antenna.
- Press the AM/FM or SW key to select the band.
- Long press the Power button again to turn off the device.
Automatically search and store Station:
In the radio mode, long press the ![]() key to enter Automatic search and store Stations. The available stations have been automatically numbered and stored from low to high frequencies. When stations have finished storing, press the
key to enter Automatic search and store Stations. The available stations have been automatically numbered and stored from low to high frequencies. When stations have finished storing, press the ![]() or
or ![]() key to invoke the radio stations stored and begin listen. If any interfering radio station is saved automatically, long press the DEL key to delete it.
key to invoke the radio stations stored and begin listen. If any interfering radio station is saved automatically, long press the DEL key to delete it.
To save a radio station manually:
- In radio mode, long press the or key to search radio stations forward or backward. When a radio station is received, the search will stop and the radio station received will begin to play.
- Directly input the frequency of a radio station: For example, the frequency of the radio station is 88.5MHz. Press the number keys 8, 8 and 5, then press the key to confirm the input. The radio will jump to 88.5MHz.
*AM: the numbers that are 522+Multiples of 9 are valid; for North America 520+ Multiples of 10 are valid - Shortwave Operation: Press the SW key to invoke metric waves in order:
60m (4.750MHz), 49m (5.950MHz), 41m (7.100MHz), 31m (9.500MHz), 25m (11.650MHz), 22m (13.600MHz), 19m (15.100MHz), 16m (17.500MHz), 13m (21.45MHz)
After selecting a metric wave, long press the key to search radio stations.
Invoke a radio station with the method described in the following A, B or C, and long press the MEMO «5» key, when the «CH00» flashing on the display, press the numeric keys to enter the location of the storage station, and press the «PLAY» button, the screen prompts to save, then press the «PLAY» button again to confirm can be stored in the specified location.
Note: There is a limit on the number of preset stations in each band. (FM: 80 presets, MW: 60 prestes, SW: 300 presets)
AM Stepping set:
In the AM radio mode, long press MENU key to the system main menu, press ![]() or
or ![]() key, to select AM Stepping submenu choose step 9 KHz or 10 KHz (North America), Press the
key, to select AM Stepping submenu choose step 9 KHz or 10 KHz (North America), Press the ![]() key to confirm.
key to confirm.
To delete a radio station:
Invoke a radio station and long press the DEL key, the display will display radio station deletion confirmation. Press the ![]() key to confirm the deletion of the current radio station.
key to confirm the deletion of the current radio station.
* If the above operation is not finished within 5 seconds, the system will return to the radio mode.
To mute the radio:
In the radio mode, press the ![]() key and the
key and the ![]() icon will flash on the screen, which indicates the radio is in the mute mode. Press the
icon will flash on the screen, which indicates the radio is in the mute mode. Press the ![]() key again to deactivate mute.
key again to deactivate mute.
Music Play Operation
- Correctly insert the music TF card in MP3 or WMA format.
- Press the Power key to turn on the device.
- Press the MODE key to enter the play mode. The screen will display the music name, format, time lapsed, etc.
- Press the or key to select the next or previous song or press the numeric keys to select a song, and then Press the key to confirm the selection. The radio will directly jump to the song number to play the corresponding song.
- Press the Repeat key to repeat a song ( indicates repeating a song) or repeat all songs in order ( indicates repeating all songs).
Play Setup:
*This has been set in the factory. It is not recommended to set it again.
- In the play mode, long press the key to enter the main screen of Play.
- Main Directory (Select this item to select the songs in the folders under the directory)
- Play Mode: Repeat All, Repeat One, Repeat Directory (select this option to play the songs in the selected folder only)
- Sound effect (NATURAL, POP, ROCK, JAZZ, COUNTRY, HEAVY BASS)
- Return to the main screen
- Press the or key to select the sub-menu and press the key to enter the submenu. Press the or key to select the corresponding sub-item and press the key to confirm the selection. The setup will be successful and the system will exit the setup mode.
Computer Data Transmission:
Turn on the device, and connect to the computer with the Micro USB cable. Press any key of the device and the computer will install the driver software automatically. The screen of the device will display the computer connected icon to indicate the connection is successful. Here the computer can read, copy, and delete the files in the TF card in the device (can be used as a card reader) and can also be used as an external USB speaker of the computer. (Certain computers of different configuration may not be compatible)
Recording Operation
MIC Recording:
Insert the TF card and turn on the device. Press the MODE key to enter the play mode. Long press the REC key to enter the MIC recording mode. During recording press the REC key to finish and exit the recording mode.
LINE IN Recording:
Connect the external audio cable («Line in» is identified automatically) Make sure an external song is being played. Adjust the volume of the external audio and long press the REC key to enter «LINE IN Recording». During recording press the REC key to finish and exit.
Radio Recording:
Press the FM key to enter the radio mode and adjust the radio station. Long press the REC key to enter the radio recording mode. During recording, Press ![]() key can Pause recording, Press
key can Pause recording, Press ![]() key again can Resume recording. Press the REC key to finish the recording and exit the recording mode.
key again can Resume recording. Press the REC key to finish the recording and exit the recording mode.
*In the recording mode the volume is locked at the level set before recording. If you press the Volume key the volume will not be changed.
Recording File Invoking Operation:
Long press the REC FILE «0» key to invoke recording file. Press the ![]() or
or ![]() key to select the recording file to be played. The file name «MIC» indicates a MIC Recording file; «LIN» indicates a LINE I n Recording file; «RAD» indicates a Radio Recording file.
key to select the recording file to be played. The file name «MIC» indicates a MIC Recording file; «LIN» indicates a LINE I n Recording file; «RAD» indicates a Radio Recording file.
Recording File Deletion Operation:
Long press the REC FILE «0» key to invoke a recording file. Press the or key to select the recording file to be deleted. Long press the «DEL» key and the screen will pop up «Are you sure to delete the file» Press the ![]() key to delete the recording file.
key to delete the recording file.
Key Locking Operation:
Long press the MODE key, the lock icon will appear on the screen, which indicates the system has entered the keys locked mode. If you press other keys they will not function and the lock icon will appear on the screen. Long press the MODE key and the unlock icon will appear on the screen, which indicates the keys have been unlocked.
System Setup
- Long press the MENU key to enter the System Setup screen(The system will return to the main screen automatically if no operation within 5 seconds.)
System Screen:- Auto power (the time of automatic shutdown can be set to 0-90 min)
- Contrast (the contrast ratio of the screen can be set to 1-15 level)
- Back light Time (the back light can be set to Normal ON, OFF or a duration)
- Language (Chinese/English/Spanish)
- Record set (compression ratio: Simple record 64kbps / Quality record 96 kbps / Super record 128kbps )
- Back (Return to the main screen)
Note: For the convenience of customers use, the machine default language setting is English
- After the system enters the System Setup screen, press the or key to select the corresponding sub-item and press the key to enter the sub-menu. Press the or key to select the corresponding sub-item and press the key to confirm the selection to finish the setup.
Sleep Shutdown Setup Operation
Enter the system setup screen, press the ![]() or
or ![]() key to select «Auto Power» and press the.
key to select «Auto Power» and press the. ![]() key to enter the sub-item. Press the
key to enter the sub-item. Press the ![]() or
or ![]() key to set the time (00-90 minutes) and press The
key to set the time (00-90 minutes) and press The ![]() key to confirm the setup. When the sleep shutdown is successfully set the timing shutdown icon
key to confirm the setup. When the sleep shutdown is successfully set the timing shutdown icon ![]() will appear on the screen, which indicates the system has entered the timing shutdown mode. The timer will begin countdown till the time set arrives and then the device will shut down automatically. When the time is set to 00 or when you turn off the power switch
will appear on the screen, which indicates the system has entered the timing shutdown mode. The timer will begin countdown till the time set arrives and then the device will shut down automatically. When the time is set to 00 or when you turn off the power switch, the sleep shutdown function will be canceled.
Troubleshooting
Q: Can not turn on the radio.
A: Possibly the battery drained, please charge the battery.
Q: Can not be connected to a computer.
A: Please do the connection in radio off mode. The USB cable maybe damaged, please try another one.
Q: Speaker does not sound.
A: Check if the volume level is too low, turn it up.
Q: Can not play audio from the Micro SD(TF) card or USB drive.
A: Check if the card or the USB drive has poor compatibility, try another card or USB drive. The files are damaged or with incorrect format, delete the file and try again.
Q: Can not charge the radio.
A: Check if the external adapter or the USB cable was connected correctly. Check if the adapter or USB cable is damaged.
Q: Why the radio sound out of the speaker, when using ear buds?
A: Because the ear buds have MIC function, in fact, this radio can’t work with the ear buds which have MIC function. So you can try a ear buds without MIC function, if still can’t solve, please email me freely
Q: Why the SW reception is not good?
A: Shortwave is a delicate medium. Little things like time of day, the sunspot cycle, weather and atmospheric issues can play the devil with reception. But once the sun goes down, the shortwave bands come alive with music, news, propaganda and even some pirate radio stations. so the signal strength will be weak indoors than outdoors. So the best way to listen to shortwave should be: extend antenna, in night, and outdoor.
Documents / Resources
Download manual
Here you can download full pdf version of manual, it may contain additional safety instructions, warranty information, FCC rules, etc.
Download Retekess V115 Manual
Здравствуйте. Обзор неплохого приемника, вернее магнитолы RETEKESS V115. Наверное это наиболее совершенное и универсальное устройство по этой цене. Правда приемник подорожал за полгода, я его покупал за US $15.50
Приемник присылают в нормальной коммерческой упаковке. Имеется инструкция на нескольких языках, русского нет. Прилагается шнур для зарядки.
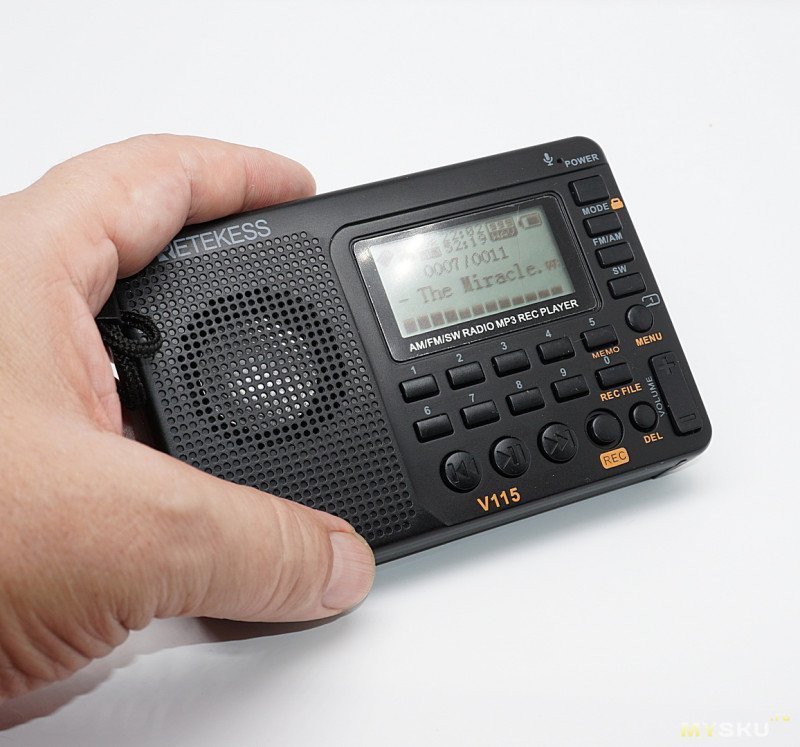
Размеры приемника 120х80х20 мм и он действительной карманный. Обилие кнопочек внушает уважение. Имеется большой графический дисплей.
С этой стороны видны разъемы выхода на наушники, линейного входа, слот для карты памяти, разъем микро USB для зарядки.
Антенна здесь не декоративная, как обычно бывает в таких устройствах, вытягивается на 40 см.
Вид сзади. Справа за решеткой виден пассивный излучатель. Он придает солидность звуку. Голос через приемник звучит очень естественно.
Питание приемника получает от аккумулятора BL-5C. Длительность автономной работы я специально не проверял. Но если слушать аудиокниги на небольшой громкости по часу — полтора, энергии хватит дней на десять.
К темляку привязана пластиковая пластинка. И не зря. Приемник плоский и неустойчивый. Пластинка вставляется в специальной отверстие на задней стенке и получается подставка. Причем в таком положении акустика улучшается, так как басовые волны от излучателя сзади отражаются от поверхности.
Вид со снятой крышкой. Фото взято отсюда и отсюда
Обилие кнопок сначала обескураживает. Но постепенно привыкаешь. Удобно что каждая кнопка имеет прямой выход на свою функцию.
Только кнопка пауза -плей двойная, при длительном нажатии выход в дерево папок и настройки звука.
Есть еще одна кнопка меню. С помощью ее можно установить автовыключение, изменить яркость экрана, настроить диктофон.
Встроенный мп3 плеер довольно функциональный. Имеется эквалайзер с установленными пресетами. Режим проигрывания треков можно менять — вразброс, последовательно, зацикливать. Имеется проводник с помощью которого можно найти любой нужный файл. Звук для такого маленького устройства довольно солидный, есть верхние басы, средние и высокие разборчивые и без заметных искажений
Поиск по станциям здесь не такой как например в старом добром ВЭФе. Не надо крутить валкодер, здесь просто набирается частота станции цифровыми клавишами, короткие ли это волны или УКВ — без разницы. Частоты ищем в интернете, типа международные КВ станции Китая. Кнопками набирать станцию удобней, но нет тех романтических ощущений которые получаешь с крутилкой.
Короткие волны этот приемник вполне ловит, все зависит от места жительства и времени суток. Для улучшения чувствительности к антенне можно подсоединить дополнительный провод.
FM диапазон приемник играет без нареканий. Чувствительность отличная. Можно выбрать диапазон либо от 87 МГц, либо от 64 МГц. При хорошем приеме звук-стерео, конечно через наушники. Все станции можно запомнить нажав кнопку МЕМО и присвоив номер. Запомнить можно до 100 станций
Приемник можно подключить не только к наушникам, но и активным колонкам. Также и сам приемник можно использовать как колонку, имеется линейный вход. Звук заметно лучше чем у смартфона.
Но больше всего эта магнитолка понравилась в роли рассказчика аудиокниг. Очень естественная передача голоса, без гула и сибилянтов. Кажется что актер озвучивающий аудиокнигу находится с вами в одной комнате.
Повествование можно в любой момент остановить на полуслове просто выключив приемник. И с этого же полуслова начать прослушивание хоть через месяц. Нужное место также можно найти выбрав файл и быстро прокрутить его нажимая кнопки со стрелками.
Хотя у приемника нет механического выключения, но саморазряд у него очень маленький. Пролежал у меня 2 месяца, включил — как было четыре палки на индикаторе, так и осталось( вернее здесь сплошная плоска).
Есть еще у приемника функции диктофона и магнитофона для записи радио. Эти функции приемник выполняет, но посредственно, на эту тему распространятся не буду.
Полезная опция — режим автоотключения. Его можно включить от 10 до 90 минут, после истечении которых приемник автоматически отключится. Очень кстати когда хочется послушать сказочку перед сном.
Так что рекомендую.
Спасибо за внимание.
Содержание
- Комплектация:
- Обзор устройства
- Мультимедийные возможности
- Аудиозапись
- Итог
Retekess V115 – приемник китайского производства улавливающий радиостанции в FM, AM, SW волновых диапазонах с медиаплеером и удобным интуитивно понятным управлением. Возможность воспроизведения треков в MP3 и WMA формате с micro SD карт памяти позволят владельцу слушать музыку даже в труднодоступных для приема радиосигнала местах. Встроенный диктофон позволит записать радиопередачи на съёмный носитель.
Комплектация:
Устройство запечатано в полиэтиленовую пленку и упаковано в небольшую картонную коробку. На лицевой стороне упаковки изображено устройство и номер модели, а на торцах указаны основные его достоинства в виде пиктограмм.

На обратной стороне упаковки дублируется основная информация в более развернутом виде, там же указан адрес производителя на английском языке.

Внутри коробки покупатель обнаружит:
- радиоприемник;
- аккумулятор;
- кабель для зарядки;
- инструкцию по эксплуатации;
- Подставка на шнурке.

Аккумулятор в радиоприемнике используется универсальный, на 1000 мАч. Такие АКБ подходят для установки в большинство кнопочных телефонов марки «Nokia» и бюджетные радиоприемники. Блок питания в комплектацию, увы, не включён.

Инструкция по эксплуатации написана на нескольких языках, имеются иллюстрации. Несмотря на большую толщину брошюрки раздела с переводом на русский язык в ней не предусмотрен.

Обзор устройства
Дизайн устройства выполнен в стили советского радиоприемника.

Радиоприемник изготовлен из черного пластика и оснащён динамиком мощностью 2 Вт. Управление осуществляется при помощи кнопок расположенных на лицевой части корпуса. Над кнопочной панелью встроен черно-белый ЖК дисплей.

На задней стороне изделия расположен отсек для съёмной батареи, динамик «MEGA BASS» и углубление для подставки.

Сверху, в специальном желобке, скрывается выдвижная антенна. Все разъёмы для зарядки и подсоединения аксессуаров размещены на правом торце.

Радиоприемник достаточно легкий, с установленным аккумулятором и картой памяти, его вес составляет 165 грамм. Есть подсветка экрана, которую можно регулировать. По размеру, устройство приблизительно соответствует обычному смартфону. На ровной поверхности аппарат располагается устойчиво, но при полностью раскрытой антенны пошатывается при незначительной тряске.

Для более устойчивого размещения устройства, производитель предусмотрел опорную ножку, которую можно вставить в специальное углубление на обратной стороне корпуса. Таким образом можно разместить мультимедийную колонку полулежа не перекрывая звучание заднего сабвуфера.
Мультимедийные возможности
Радиоприемник уверено ловит радиостанции, вещающие в FM, AM, SW диапазонах.

В настройках меню доступна функция выбора языка, в том числе и русского. При отключении питания, настройки приемника сохраняются.

Поиск доступных каналов можно осуществить тремя способами: первый — зайти в меню и выбрать опцию авто-поиск, второй способ — с помощью удержания кнопки перемотка, и третий — задать частоты вручную, используя клавиши с цифрами. Сохранение нужной радиостанции осуществляется удержанием кнопки «MEMO», затем вводятся цифр которые вы хотите, после чего остаётся только подтвердить операцию нажав на кнопку плей/пауза. Несмотря на миниатюрность гаджета, звук в нём довольно качественный и объёмный, на максимальной громкости способен перебить шум работающей стиральной машины. Благодаря AUX входу, можно подключать различные внешние источники.

Переключать каналы и треки можно как цифрами на клавиатуре, так и с помощью клавиш перемотки. Плэйлист вы можете настроить: воспроизводить как весь контент на флэш накопителе, так и выбрать отдельную папку или трек для цикличного прослушивания. Заряда батареи радиоприемника хватает в среднем на 2-3 дня работы в режиме умеренного прослушивания.
Аудиозапись
Функция записи позволяет осуществлять запись звука с микрофона или с AUX входа. Качество встроенного микрофона довольно приличное. Диктофон также способен сохранять на накопитель транслируемые в эфире радиопередачи.
Итог
Retekess V115 – бюджетный радиоприемник с внушительным набором опции. Он понравится, как радиолюбителям слушающим зарубежные SW радиостанции, так и тем, кто ищет MP3 плеер и компактную колонку для прослушивания любимой музыки.

УЗНАТЬ ЦЕНУ НА АЛИЭКСПРЕСС
перейти к содержанию

Retekess V115 Цифровое радио AM FM, Портативные коротковолновые радиостанции

Характеристики
- Размеры
4.7 х 3.1 х 0.9 дюймов - Вес
5.6 унций - батареи
Требуется 1 литий-ионная батарея - Источник питания
DC - Поддерживаемые радиодиапазоны
AM/FM/SW - аппаратный интерфейс
MicroSD, наушники - Технология подключения
AUX - частота
108 МГц Громкостьtage
5 вольта - Бренд
Ретекесс
Введение
Портативное коротковолновое радио имеет размеры всего 4.7 x 3.1 x 0.9 дюйма, что делает его идеальным для карманов рубашки. Удивительно, сколько возможностей может быть вложено в такое маленькое радио. Басовый звук от цифрового радио с микрофоном и линейной записью; Чтобы записать свой голос или голос по радио, вставьте TF-карту; обратите внимание, что TF-карта не входит в комплектацию цифрового радиоприемника; Вы можете ввести частоту напрямую с помощью цифровых клавиш. V115 также позволяет искать радиостанции автоматически, вручную и сохранять их. Встроенный 5 языков. Пакет приращения настройки 9k/10k AM для китайского, английского, испанского, русского и японского языков не включает адаптер; в комплекте только шнур USB; Вы можете зарядить радиостанцию от компьютера или подключить телефонный адаптер. Радио, AM/FM/SW; FM-прием лучше всего на частоте 87–108 МГц; AM прием лучше всего на 520-1710 кГц (9/10K); Прием SW лучше всего на 4.75-21.85 МГц. При использовании внешней антенны или ночью прием КВ улучшается. Окружающая среда оказывает большое влияние на прием AM.
Что в коробке
https://m.media-amazon.com/images/I/C1uNGa217oS.pdf
https://m.media-amazon.com/images/I/61n1TNDCC5L.pdf
Здравствуйте. Обзор неплохого приемника, вернее магнитолы RETEKESS V115. Наверное это наиболее совершенное и универсальное устройство по этой цене. Правда приемник подорожал за полгода, я его покупал за US $15.50
Приемник присылают в нормальной коммерческой упаковке. Имеется инструкция на нескольких языках, русского нет. Прилагается шнур для зарядки.
Размеры приемника 120х80х20 мм и он действительной карманный. Обилие кнопочек внушает уважение. Имеется большой графический дисплей.
С этой стороны видны разъемы выхода на наушники, линейного входа, слот для карты памяти, разъем микро USB для зарядки.
Антенна здесь не декоративная, как обычно бывает в таких устройствах, вытягивается на 40 см.
Вид сзади. Справа за решеткой виден пассивный излучатель. Он придает солидность звуку. Голос через приемник звучит очень естественно.
Питание приемника получает от аккумулятора BL-5C. Длительность автономной работы я специально не проверял. Но если слушать аудиокниги на небольшой громкости по часу — полтора, энергии хватит дней на десять.
К темляку привязана пластиковая пластинка. И не зря. Приемник плоский и неустойчивый. Пластинка вставляется в специальной отверстие на задней стенке и получается подставка. Причем в таком положении акустика улучшается, так как басовые волны от излучателя сзади отражаются от поверхности.
Вид со снятой крышкой. Фото взято отсюда и отсюда
Обилие кнопок сначала обескураживает. Но постепенно привыкаешь. Удобно что каждая кнопка имеет прямой выход на свою функцию.
Только кнопка пауза -плей двойная, при длительном нажатии выход в дерево папок и настройки звука.
Есть еще одна кнопка меню. С помощью ее можно установить автовыключение, изменить яркость экрана, настроить диктофон.
Встроенный мп3 плеер довольно функциональный. Имеется эквалайзер с установленными пресетами. Режим проигрывания треков можно менять — вразброс, последовательно, зацикливать. Имеется проводник с помощью которого можно найти любой нужный файл. Звук для такого маленького устройства довольно солидный, есть верхние басы, средние и высокие разборчивые и без заметных искажений
Поиск по станциям здесь не такой как например в старом добром ВЭФе. Не надо крутить валкодер, здесь просто набирается частота станции цифровыми клавишами, короткие ли это волны или УКВ — без разницы. Частоты ищем в интернете, типа международные КВ станции Китая. Кнопками набирать станцию удобней, но нет тех романтических ощущений которые получаешь с крутилкой.
Короткие волны этот приемник вполне ловит, все зависит от места жительства и времени суток. Для улучшения чувствительности к антенне можно подсоединить дополнительный провод.
FM диапазон приемник играет без нареканий. Чувствительность отличная. Можно выбрать диапазон либо от 87 МГц, либо от 64 МГц. При хорошем приеме звук-стерео, конечно через наушники. Все станции можно запомнить нажав кнопку МЕМО и присвоив номер. Запомнить можно до 100 станций
Приемник можно подключить не только к наушникам, но и активным колонкам. Также и сам приемник можно использовать как колонку, имеется линейный вход. Звук заметно лучше чем у смартфона.
Но больше всего эта магнитолка понравилась в роли рассказчика аудиокниг. Очень естественная передача голоса, без гула и сибилянтов. Кажется что актер озвучивающий аудиокнигу находится с вами в одной комнате.
Повествование можно в любой момент остановить на полуслове просто выключив приемник. И с этого же полуслова начать прослушивание хоть через месяц. Нужное место также можно найти выбрав файл и быстро прокрутить его нажимая кнопки со стрелками.
Хотя у приемника нет механического выключения, но саморазряд у него очень маленький. Пролежал у меня 2 месяца, включил — как было четыре палки на индикаторе, так и осталось( вернее здесь сплошная плоска).
Есть еще у приемника функции диктофона и магнитофона для записи радио. Эти функции приемник выполняет, но посредственно, на эту тему распространятся не буду.
Полезная опция — режим автоотключения. Его можно включить от 10 до 90 минут, после истечении которых приемник автоматически отключится. Очень кстати когда хочется послушать сказочку перед сном.
Так что рекомендую.
Спасибо за внимание.