-
Contents
-
Table of Contents
-
Bookmarks
Quick Links
RADIO WITH ALARM
РАДИОПРИЁМНИК С БУДИЛЬНИКОМ
TF-1583UB
Instruction manual
Руководство по
эксплуатации
Related Manuals for Telefunken TF-1583UB
Summary of Contents for Telefunken TF-1583UB
-
Page 1
RADIO WITH ALARM РАДИОПРИЁМНИК С БУДИЛЬНИКОМ TF-1583UB Instruction manual Руководство по эксплуатации… -
Page 2: Standby Button
Instruction manual Dear customer! Thank you for purchasing our product. For safety, it is strongly recommended to read this manual carefully before connecting, operating and/or adjusting the product and keep the manual for reference in future. Description 8. NEXT button 14.
-
Page 3: Remote Control
Instruction manual Remote control Power supply Power adaptor • Plug the supplied Power adaptor into the microUSB port on the back of the unit. Connect the power cord to a household mains outlet. The LED indicator will light red, REPEAT SCAN meaning is in process.
-
Page 4: Setting The Alarm
Instruction manual Radio Setting the alarm • Press and hold STANDBY to power on • This device supports up to 2 alarms. the unit. Operations are as follows: • Press the MODE button to select the • Press and hold the STANDBY button the radio mode.
-
Page 5: Playback Operations
Instruction manual Playback operations General USB/microSD/TF notes • During playback press button to pause • This unit is equipped with a USB socket playback. Press this button again to resume that can accept and play MP3 files stored on playback. standard USB flash (compatible with USB version 2.0) up to 32 GB.
-
Page 6: Specifications
• Access the bluetooth interface on your Accessories phone or other device. The receiver will be shown as TF-1583UB. • You can now start playing music on your Receiver 1 pc device and it will be transmitted to the receiver.
-
Page 7: Руководство По Эксплуатации
Руководство по эксплуатации Уважаемый покупатель! Благодарим Вас за покупку нашего изделия. Чтобы понять, как правильно и без- опасно пользоваться Вашей моделью изделия, рекомендуется тщательно изучить настоящее руководство перед включением, регулировкой и эксплуатацией изделия. Сохраняйте руководство для использования в будущем. Описание 8.
-
Page 8: Пульт Дистанционного Управления
Руководство по эксплуатации самостоятельно. Доверяйте ремонт устрой- Пульт дистанционного управления ства только квалифицированным спе- циалистам. В приборе находятся оголенные провода высокого напряжения. Напряжение внутри прибора достаточно высокое, чтобы вызвать удар электрическим током. Питание устройства REPEAT SCAN LIGHT MODE SAVE Адаптер питания •…
-
Page 9: Настройка Часов
Руководство по эксплуатации Настройка часов Повторный сигнал будильника • Нажмите и удерживайте кнопку • После срабатывания будильника STANDBY, чтобы включить устройство будет подавать выбранный устройство. Снова нажмите эту кнопку звуковой сигнал при отсутствии каких-либо операций. Нажмите любую кнопку, кроме для отображения времени. SNOOZE, для…
-
Page 10: Общая Информация
Общая информация Операции с USB/microSD • Вставьте USB-накопитель в USB-порт • Во время воспроизведения нажмите данного устройства; вставьте карту памяти в кнопку MODE, чтобы выключить плеер и слот для карт памяти. Нажмите кнопку MODE вернуться в режим радио или Bluetooth. для…
-
Page 11: Автоматическое Отключение
включения Bluetooth и готовности соединения с другими устройствами. • Войдите в интерфейс Bluetooth в вашем телефоне или другом устройстве. Комплект поставки Приемник будет отображаться под именем TF-1583UB. Радиоприемник 1 шт • Теперь можно начинать Сетевой адаптер 1 шт воспроизведение музыки на устройстве, и…
-
Page 12
(ГОНГ КОНГ) ЛИМИТЕД ЮНИТ 3Б 5/Ф, ФАР ИСТ КОНСОРЦИУМ БИЛДИНГ, 121 ДЕС ВОКС РОАД ЦЕНТРАЛ ГК, Китай Под контролем «ТЕХНО ЭЛЕКТРИК ЛИМИТЕД» Сделано в Китае Аппратура приемная для радиовещания торговой марки TELEFUNKEN № сертификата соответствия RU C-CN.АЛ16.В.06921 Дата принятия сертификата: 25.09.2015 Сертификат соответствия действителен до: 24.09.2018 Выдан: ООО… -
Page 13
Общая информация Устранение неисправностей Ниже приводится таблица, в которой описаны простые меры, способные помочь Вам устранить большую часть проблем, могущих возникнуть при использовании данного устройства. Если нижеуказанные меры не помогли, обратитесь в сервисный центр. Неисправность Причина Решение Низкое качество приема FM-радиосигнала. Антенна… -
Page 14: Уважаемый Покупатель
высокое качество и надежную работу своей продукции при условии соблюдения технических требований, описанных в руководстве по эксплуатации. Руководство на русском языке прилагается. Срок службы изделия с товарным знаком TELEFUNKEN, при эксплуатации продукции в рамках бытовых нужд и соблюдении правил пользования, приведенных в руководстве по эксплуатации, составляет 5 (пять) лет со дня передачи изделия…
-
Page 15
Россия № Город Название СЦ Адрес Телефон Махачкала «РОСАМ» пр-т Шамиля, 20 (8722) 93-30-73 Москва «НАДЕЖДА» ул. Амундсена, 15 корп. 2 (499) 180-64-27 Москва «РУБИН» ул. Адмирала Макарова, 2 (925) 146-24-23 (499) 168-05-19, 168-47-15, Москва КВАНТ-9 бул. Маршала Рокосовского, 3 (495) 721-30-70 Москва… -
Page 16
Россия № Город Название СЦ Адрес Телефон «НООС ПЕРСОНАЛЬНЫЕ Хабаровск ул. Тихоокеанская, 165 (4212) 74-46-11, 74-45-90 КОМПЬЮТЕРЫ» Чебоксары «ТЕЛЕРАДИОСЕРВИС» ул. Гагарина, 36 (8352) 63-20-98 Челябинск «РЕМБЫТТЕХНИКА» ул. Производственная, 8Б (351) 239-39-33 Челябинск «РЕМБЫТТЕХНИКА» ул. Артиллерийская, 102 (351) 771-18-11 Челябинск «ЭЛЕКТРО-Н» пр-т… -
Page 17
Данная информация может быть изменена. Более точные сведения о сервисных центрах в Вашем регионе доступны на сайте www.telefunken-electronics.ru В случае возникновения проблем с обращением в Ваш региональный сервисный центр просим направить Ваши замечания, заполнив соответствующую форму в разделе «Обратная связь» на сайте компании.
RADIO WITH ALARM
РАДИОПРИЁМНИК С БУДИЛЬНИКОМ
TF-1583UB
Instruction manual
Руководство по
эксплуатации

Instruction manual
Dear customer!
Thank you for purchasing our product. For safety, it is strongly recommended to read
this manual carefully before connecting, operating and/or adjusting the product and keep
the manual for reference in future.
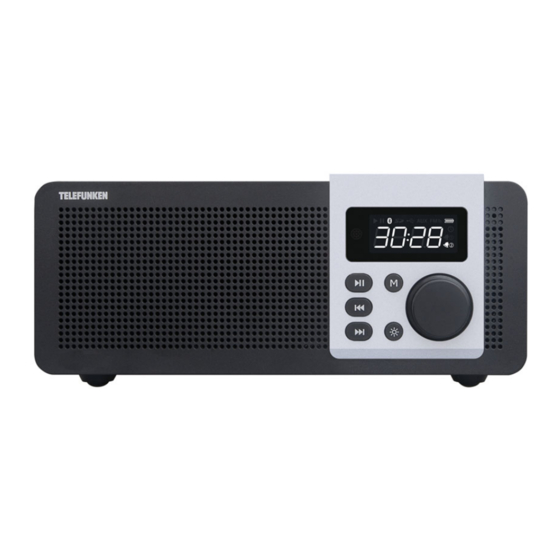
Description
01 0302
04 05
14 2015
1. Speaker
2. IR sensor
3. MODE button
4. Display
5. Microphone
6. PLAY/PAUSE button
7. PREVIOUS button
08 10090706
11 12 13
8. NEXT button
9. Brightness button
10. Volume knob
11. ALARM button
12. SNOOZE button
13. STANDBY button
19
18
17
16
14. Reset hole
15. AUX input
16. MicroSD/TF card slot
17. Slot
18. Indicator
19. USB port
20. Antenna
2
Instruction manual
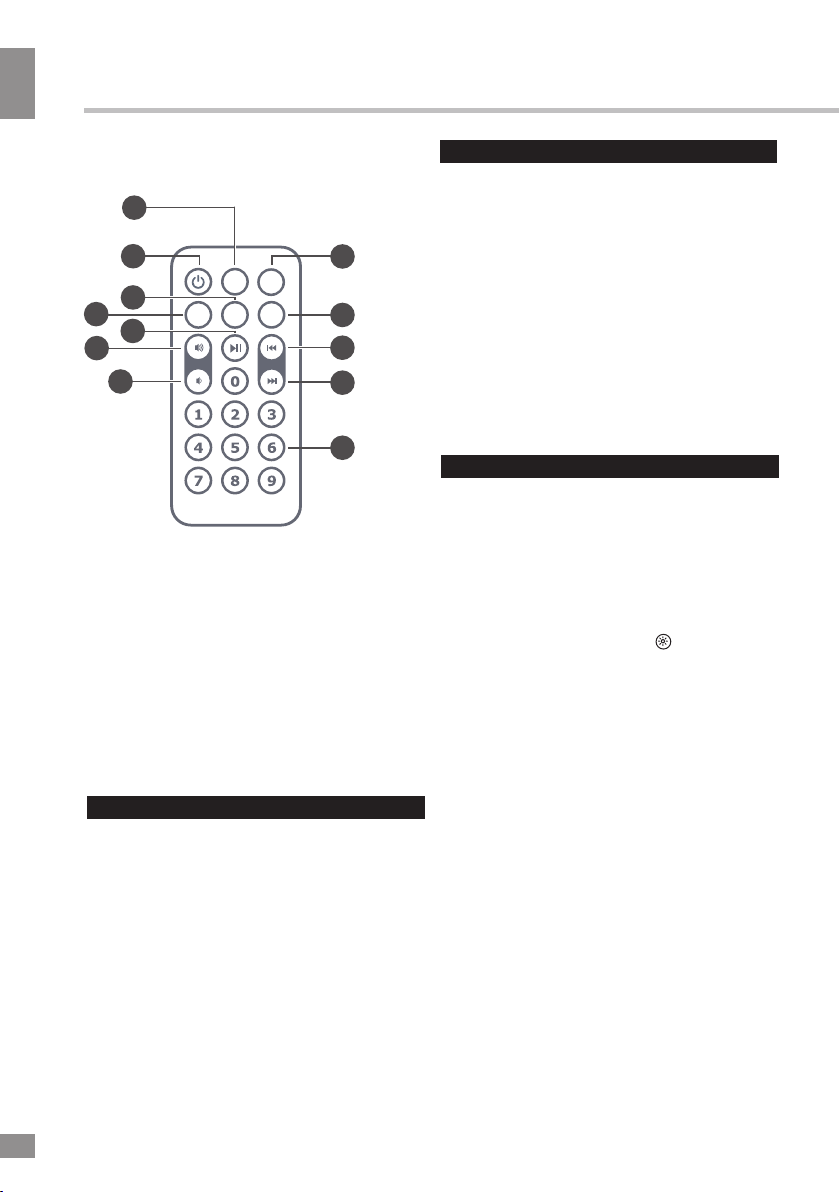
Remote control
01
04
06
07
05
02
03
SAVE
EQ/
REPEAT
LIGHT
SCAN
MODE
FM
1. REPEAT button
2. STANDBY button
3. LIGHT button
4. EQ/SAVE button
5. PLAY/PAUSE button
6. VOL+ button
7. VOL- button
8. FM/SCAN button
9. MODE button
10. PREVIOUS button
11. NEXT button
12. Number buttons
Important safeguards
•
The instruction manual contains important
operating and maintenance instructions. For
your safety, it is necessary to refer to the
manual. Keep the manual for future use.
• Do not hit or drop the unit
•
Do not expose the unit to vibration, direct
sunlight, too high or low temperatures or
humidity.
• Do not disassemble the unit yourselves
Refer servicing to qualified service personnel
All the illustrations in this manual are
schematic images, which may differ from
actual objects.
08
09
10
11
12
Power supply
Power adaptor
Plug the supplied Power adaptor into the
•
microUSB port on the back of the unit.
Connect the power cord to a household mains
outlet. The LED indicator will light red,
meaning is in process.
• Always remember to disconnect the power
cord from the mains before disconnecting it
from the unit.
• Disconnect the power cord from the mains
when not in use.
General operations
Turning On and Off
• Press and hold the STANDBY button to turn
the unit on. Press and hold this button to turn the
unit off.
Backlight brightness
• By default, the LED display backlight is set
to the 3rd level. Press the button on the
unit or LIGHT on the remote to choose one of
the 5 brightness levels.
Mode selection
• Press the MODE button to select the
operation mode. The mode cycle is as follows:
USB/SD/AUX/FM/BLUETOOTH.
Setting the clock
• Press and hold the STANDBY button
to power on the device. Then press this
button again to go to the clock mode.
• Press and hold the PLAY/PAUSE button.
Hour digits will flash. Rotate the volume knob to
adjust the hour setting.
• Press the PLAY/PAUSE button again.
Minute digits will flash. Rotate the volume knob
to adjust the minute setting.
• Press the PLAY/PAUSE button again
to confirm and go back to the clock mode.
3

Instruction manual
Setting the alarm
• This device supports up to 2 alarms.
Operations are as follows:
• Press and hold the STANDBY button
to turn the unit on.
• Short press the
to enter the alarm clock mode, press ALARM
again to select the alarm number (AL1/AL2).
• Press
Hour digits will flash. Rotate the volume knob to
adjust the hour setting.
• Press the PLAY/PAUSE button again.
Minute
to adjust the minute setting.
• Once the alarm setting is finished, press
the PLAY/PAUSE button to return to the
clock mode. An alarm indicator /
will appear on the screen.
• If you want to cancel the alarm,
press the ALARM button to select the alarm
you want to cancel and then press and hold
the ALARM button to switch it off. The
corresponding indicator will disappear from
the screen.
• When setting the alarm you can
select the alarm signal: BEEP (standard
buzzer ringing) or SONG (the last listened
FM radio station).
and hold the PLAY/PAUSE button.
digits will flash. Rotate the volume knob
ALARM button
Snooze control
• When the alarm time comes, the signal will
sound for 1 minute if no button is pressed.
Press any button except SNOOZE to stop the
ringing.
•
When the alarm is on, press the SNOOZE
button to interrupt the alarm signal. After
5 minutes the alarm will be on again.
• If you want to disable the alarm, press
and hold the SNOOZE button during the
alarm ringing.
Radio
• Press
and hold STANDBY to power on
the unit.
• Press the MODE button to select the
the radio mode. The display will show
the current frequency and the FM icon
will light on.
• To automatically scan and save
radio stations press and hold PLAY/PAUSE
on the unit or FM/SCAN on the RC. The unit
will scan and save up to 50 stations and save
them as P01, P02, P03… P50.
• Press NEXT or PREVIOUS to switch
to the next or previous radio station. Press and
hold these buttons to go to the nearest station
without saving.
Press the PLAY/PAUSE buttons to mute
•
or unmute the radio.
You can use the numeric buttons on the
•
remote control to directly input the frequency of
your favorite station. Press EQ/SAVE on the
RC to save the station.
USB/SD operation
• Insert a USB device into the USB port or
insert a memory card into the memory card
slot. The unit will start reading the device.
Press MODE button to select among USB
and SD modes, if several storage devices are
inserted.
4

Instruction manual
Playback operations
• During playback press button to pause
playback. Press this button again to resume
playback.
• During playback press or buttons
to go to previous or next track. Press and
hold the or buttons to decrease or
increase volume. Pressing and holding the
or buttons on the RC will scan the track
backwards or forwards.
• To adjust volume on the RC, press the
VOL+/- buttons.
• Press EQ/SAVE on the RC to select
among various sound modes: NORMAL/
ROCK/POP/CLASS/JAZZ/BASS.
• Press the REPEAT button on the RC to
choose between repeat all mode (ALL will
appear on display), random playback (rAnd)
and repeat single track (ONE). Press
REPEAT longer time to start repeating folder,
then “P-A” to be displayed, on screen “P—A”
is displayed, and that means has chosen this
time as for start repeating folder (this time the
speaker continues playing), repress REPEAT
longer time, “P—b” will be displayed on
screen, that means has chosen this time to
be the end
of repeating folder, then the unit will repeat
playing music from the chosen folder.
If want to cancel the repeat folder, repress
the key REPEAT longer time and then “P—E”
to be displayed on screen, then the repeating
folder is cancelled. Pressing REPEAT fast or
switching to other music also can cancel the
repeat folder.
• Press the number buttons on the RC to
choose the number of the track you wish to
play.
• In playback mode, press MODE to
switch off the player and go to radio/bluetooth
mode.
General USB/microSD/TF notes
• This unit is equipped with a USB socket
that can accept and play MP3 files stored on
standard USB flash (compatible with USB
version 2.0) up to 32 GB.
• This unit is also equipped with a
microSD/TF card socket that can accept and
play MP3 files stored on standard microSD/
TF cards up to 32GB.
Always switch off the unit or change
mode to another one before removing a USB
flash drive or microSD/TF card, to prevent
damage to your USB device or memory card.
Note: Although this product is fully
compatible with USB 2.0 and microSD/TF
card standard formats, a small percentage of
USB flash drives and cards might not be
readable, due to those device manufacturers’
non-compliance with the full (official) USB and
microSD/TF card standards.
• FAT32 file system is supported by USB
and microSD/TF of this unit.
According to the USB 1.1/2.0 Standard,
usage of a USB device with power current
consumption exceeding 500 mA is not
recommended without supplementary power
supply. Failure to use supplementary power for
connected USB drives with power consumption
exceeding this value as well as defective
USB drives may cause mechanical or thermal
changes of elements of this unit as well as
failure of internal elements of the USB port.
Such damages are not warranty cases.
Warning: usage of external USB drives
containing BIN files in the root directory may
cause malfunction of the unit or damage to the
software.
5
Instruction Manual
Bluetooth
• Press the MODE button until the
BLUE appears on the screen along with a
chime indicating the readiness for bluetooth
pairing.
• Access the bluetooth interface on your
phone or other device. The receiver will be
shown as TF-1583UB.
• You can now start playing music on your
device and it will be transmitted to the receiver.
Press the button to pause/resume playback.
Press the or buttons to choose the
previous or the next track.
Sleep to music
• In radio or music playback modes,
press the SNOOZE button to enter the sleep
mode. Sleep time will appear on the display.
Press SNOOZE to select the sleep time period
(10-120 minutes) or switch it off. The unit will
turn off automatically after the sleep time
period elapses.
AUX input
• To connect an external audio device
(e.g. MP3-player), please use a standard
stereo cable with 3.5 mm to 3.5 mm plugs to
connect the audio line-out of the external
device to the AUX input socket of this unit. You
can press the PLAY/PAUSE button to mute/
unmute the sound.
Maintenance and care
Switch off the unit, unplug from the power
supply. The outside of the appliance can be
cleaned with a slightly damp cloth.
Accessories
Receiver
Power adaptor
Remote control
AUX cable/Line in cable
Instruction manual
1 pc
1 pc
1 pc
1 pc
1 pc
Specifications
Input voltage of the adaptor
Nominal voltage
Power rating RMS 3 W x 2
Radio frequency FM: 87.5 — 108 MHz
Nominal power consumption 8 W
Unit dimensions
Net weight
Specifications and functions are subject to change without notice. It is connected with continual
improvement of the device.
4
~100 — 240 V, 50/60 Hz
5 V ≥ 2000 mA
230 x 135 x 95 mm
1.0 kg
6
 Loading…
Specifications:1527/1527082-tf1583ub.pdf file (13 Jun 2023) |
Accompanying Data:
Telefunken TF-1583UB Radio PDF Instruction Manual (Updated: Tuesday 13th of June 2023 04:03:25 PM)
Rating: 4.3 (rated by 32 users)
Compatible devices: TF-1594U, TF-1593, TF-SRP3461B, TF-1590, TF-1568U, TF-1596, TF-1505, TF-1551.
Recommended Documentation:
Instruction Manual (Text Version):
(Ocr-Read Summary of Contents of some pages of the Telefunken TF-1583UB Document (Main Content), UPD: 13 June 2023)
-
19, 1. Гарантийный срок 12 (двенадцать) месяцев со дня передачи изделия Потребителю. 2. Гарантийный ремонт производится в Авторизованных Сервисных Центрах. 3. Условия гаран…
-
9, Telefunken TF-1583UB 12 Руководство по эксплуатации 9 STANDBY, чтобы включить устройство. Снова нажмите эту кнопку для отображения времени. Настройка часов • Нажмите и удерживайте кнопку нажми…
-
2, Instruction manual 2 Dear customer! Thank you for purchasing our product. For safety, it is strongly recommended to read this manual carefully before connecting, operating and/or adjusting the product and keep the manual for reference in future. Description 1. Speaker 2. IR sensor 3. MODE button 4. Di…
-
13, Хранение и транспортировка Безопасная утилизация Упакованные изделия допускается транспортировать всеми видами транспорта в условиях 5 ГОСТ 15150 при температуре не ниже м…
-
17, Telefunken TF-1583UB Украина № Город Название СЦ Адрес Телефон 37 Днепропетровск «ЛОТОС» пр-т Кирова, 59 (0562) 35-04-09, 34-67-05 38 Запорожье «ЛОТОС» ул. Гоголя, 175 (061) 701-65-96, 787-50-51 39 Кировоград …
-
12, Общая информация Общая информация Технические характеристики Технические характеристики и функции могут быть изменены заводом-изготовителем без предварительного ув…
-
Telefunken TF-1583UB User Manual
-
Telefunken TF-1583UB User Guide
-
Telefunken TF-1583UB PDF Manual
-
Telefunken TF-1583UB Owner’s Manuals
Recommended: VP600, XMPF3E, Blade bc2000, SPF3470T
Operating Impressions, Questions and Answers:
Table of Contents for Telefunken TF-1583UB:
-
Instruction Manual 4 Maintenance and care Switch off the unit, unplug from the power supply. The outside of the appliance can be cleaned with a slightly damp cloth. Accessories 1 pc 1 pc Receiver Power adaptor Remote control AUX cable/Line in cable Instruction manual 1 pc Specifications Specifications and functions are subject to change without notice. It is connected with continual improvement of the device. Input voltage of the adaptor ~100 — 240 V, 50/60 Hz Nominal voltage 5 V ≥ 2000 mA Power rating RMS 3 W x 2 Net we
-
1. Гарантийный срок 12 (двенадцать) месяцев со дня передачи изделия Потребителю. 2. Гарантийный ремонт производится в Авторизованных Сервисных Центрах. 3. Условия гарантии не предусматривают периодическое те�
-
Instruction manual 2 Dear customer! Thank you for purchasing our product. For safety, it is strongly recommended to read this manual carefully before connecting, operating and/or adjusting the product and keep the manual for reference in future. Description 1. Speaker 2. IR sensor 3. MODE button 4. Display 5. Microphone 6. PLAY/PAUSE button 7. PREVIOUS button 8. NEXT button 9. Brightness button 10. Volume knob 11. ALARM button 12. SNOOZE b
-
Россия № Город Название СЦ Адрес Телефон 41 Махачкала «РОСАМ» пр-т Шамиля, 20 (8722) 93-30-73 42 Москва «НАДЕЖДА» ул. Амундсена, 15 корп. 2 (499) 180-64-27 43 Москва «РУБИН» ул. Адмирала Макарова, 2 (925) 146-24-23 44 Москва КВАНТ-9 бул. Маршала Рокосовского, 3 (4
-
RADIO WITH ALARM РАДИОПРИЁМНИК С БУДИЛЬНИКОМ TF-1583UB Instruction manual Руководство по эксплуатации
-
Хранение и транспортировка Безопасная утилизация Упакованные изделия допускается транспортировать всеми видами транспорта в условиях 5 ГОСТ 15150 при температуре не ниже минус 10 °С и при защите их от прямого воздействия атмосферных осадков и механичес�
-
Общая информация Общая информация 10 Операции с USB/microSD • Вставьте USB-накопитель в USB-порт данного устройства; вставьте карту памяти в слот для карт памяти. Нажмите кнопку MODE для активации режима USB/SD. Устройство начнет поиск и считывание подсоедине�
-
Instruction manual 5 Playback operations • During playback press button to pause playback. Press this button again to resume playback. • During playback press or buttons to go to previous or next track. Press and hold the or buttons to decrease or increase volume. Pressing and holding the or buttons on the RC will scan the track backwards or forwards. • To adjust volume on the RC, press the VOL+/- buttons. • Press the REPEAT button on the RC to choose between repeat all mode (ALL will appear on display), random playback (rAnd
-
Setting the alarm • Press and hold the STANDBY button to turn the unit on. to enter the alarm clock mode, press ALARM again to select the alarm number (AL1/AL2). • Short press the ALARM button • This device supports up to 2 alarms. Operations are as follows: • Once the alarm setting is finished, press the PLAY/PAUSE button to return to the clock mode. An alarm indicator / will appear on the screen. Instruction manual 4 Hour digits will flash. Rotate the volume knob to adjust the hour setting. • Press
-
Украина № Город Название СЦ Адрес Телефон 37 Днепропетровск «ЛОТОС» пр-т Кирова, 59 (0562) 35-04-09, 34-67-05 38 Запорожье «ЛОТОС» ул. Гоголя, 175 (061) 701-65-96, 787-50-51 39 Кировоград «ЛОТОС» ул.Короленко, 2 (0522) 35-79-23 40 Кривой Рог «ЛОТОС» ул. Косиора
-
Подпись продавца С условиями гарантийного обслуживания согласен, претензий по комплектности, внешнему виду и работоспособности не имею. Подпись покупателя Дата производства Серийный номер Дата продажи № Дата приема Дата выдачи Отметка СЦ Подпись заказчика 1 2 3 Сведения о ремонте Печать продавца Модел
-
Россия № Город Название СЦ Адрес Телефон 98 Хабаровск «НООС ПЕРСОНАЛЬНЫЕ КОМПЬЮТЕРЫ» ул. Тихоокеанская, 165 (4212) 74-46-11, 74-45-90 99 Чебоксары «ТЕЛЕРАДИОСЕРВИС» ул. Гагарина, 36 (8352) 63-20-98 100 Челябинск «РЕМБЫТТЕХНИКА» ул. Производственная, 8Б (351) 239-39-33 101 Челябинск «РЕМБЫТТЕХНИКА» ул. Артиллерийская, 102 (351) 7
-
8 Руководство по эксплуатации Общие операции руководством и сохраните его для после- дующего использования. • Не наносите ударов по устройству, не роняйте его. • Не подвергайте устройство вибрации, воздействию прямых солнечных лучей, вы- соких или низких температур и влажности. Не включайте уст�
-
Instruction manual 3 Important safeguards • The instruction manual contains important operating and maintenance instructions. For your safety, it is necessary to refer to the manual. Keep the manual for future use. • Do not hit or drop the unit • Do not expose the unit to vibration, direct sunlight, too high or low temperatures or humidity. • Do not disassemble the unit yourselves Refer servicing to qualified service personnel All the illustrations in this manual are schematic images, whi
-
12 Руководство по эксплуатации 9 STANDBY, чтобы включить устройство. Снова нажмите эту кнопку для отображения времени. Настройка часов • Нажмите и удерживайте кнопку нажмите PLAY/PAUSE для подтверждения и выхода в режим часов. • После установки времени снова PLAY
Questions, Opinions and Exploitation Impressions:
You can ask a question, express your opinion or share our experience of Telefunken TF-1583UB device using right now.