Посмотреть инструкция для Razer Kraken V3 Pro бесплатно. Руководство относится к категории hi-fi системы, 1 человек(а) дали ему среднюю оценку 7.5. Руководство доступно на следующих языках: русский. У вас есть вопрос о Razer Kraken V3 Pro или вам нужна помощь? Задайте свой вопрос здесь
Не можете найти ответ на свой вопрос в руководстве? Вы можете найти ответ на свой вопрос ниже, в разделе часто задаваемых вопросов о Razer Kraken V3 Pro.
Какой вес Razer Kraken V3 Pro?
Razer Kraken V3 Pro имеет вес 372 g.
Когда звук считается слишком громким?
Уровень звука выше 80 децибел может нанести вред слуху. Уровень звука выше 120 децибел может нанести прямое повреждение слуху. Вероятность повреждения слуха зависит от частоты и продолжительности прослушивания.
Могут ли устройства разных марок подключаться друг к другу при помощи Bluetooth?
Да, Bluetooth — универсальный метод, позволяющий различным устройствам, оснащенным Bluetooth, подключаться друг к другу.
Что такое Bluetooth?
Bluetooth — это способ обмена данными по беспроводной сети между электронными устройствами с помощью радиоволн. Расстояние между двумя устройствами обменивающимися данными в большинстве случаев составляет не более десяти метров.
Что такое HDMI?
HDMI расшифровывается как «интерфейс для мультимедиа высокой четкости». Кабель HDMI используется для передачи аудио- и видеосигналов между устройствами.
Как лучше всего выполнять чистку hi-fi система?
Для удаления отпечатков пальцев лучше всего использовать слегка влажную салфетку для уборки или мягкую чистую ткань. Пыль в труднодоступных местах лучше всего удаляется потоком сжатого воздуха.
Что такое Dolby Atmos?
Dolby Atmos — это технология, которая обеспечивает отражение звука от потолка к месту нахождения слушателя. Это позволяет создать эффект 5.1 при помощи всего лишь одного динамика.
Инструкция Razer Kraken V3 Pro доступно в русский?
Да, руководствоRazer Kraken V3 Pro доступно врусский .
Не нашли свой вопрос? Задайте свой вопрос здесь
To reach the ultimate depths of immersion, one must dive beyond sight and sound. Unlock a third sense for gaming with the Razer Kraken V3 Pro — a wireless haptic PC gaming headset powered by Razer HyperSense. With the ability to feel what you hear, gaming has never felt this intense or real.
WHAT’S NEEDED
Product requirements
- [Wireless] USB-A port
- [Wired] 3.5 mm audio + mic combined jack
Razer Synapse requirements
- Windows® 10 64-bit (or higher)
- Internet connection for software installation
Compatible with PC / Mac / PS4 / PS5 / Switch and Xbox (wired).
LET’S GET YOU COVERED
You’ve got a great device in your hands, complete with a 2-year limited warranty coverage. Now maximize its potential and score exclusive Razer benefits by registering at razerid.razer.com

Got a question? Ask the Razer Support Team at support.razer.com
TECHNICAL SPECIFICATIONS
HEADPHONES
- Frequency response: 20 Hz – 20 kHz
- Impedance: 32 Ω @ 1 kHz
- Sensitivity: 96dBSPL/mW@1KHz by HATS
- Drivers: Customized Dynamic 50mm Driver
- Inner ear cup diameter: 62 x 42mm
- Connection type: 2.4GHz wireless and 3.5mm
- Cable length: 1.3m / 4.27ft
- Approx. weight: 368g / 0.81lbs
- Oval ear cushions: Full-ear coverage with cooling fabric and plush leatherette, for comfort and optimized haptics
MICROPHONE
- Frequency response: 100 Hz – 10 kHz
- Signal-to-noise ratio: ≥ 60 dB
- Sensitivity (@1 kHz): -42 ± 3 dB
- Pick-up pattern: Unidirectional
ON-EARCUP CONTROLS
- Volume up and down
- Mic mute on/off toggle
- Haptics intensity levels
AUDIO USAGE
- Wireless audio usage: USB-A Dongle
- Wired audio usage: 3.5mm analog
- Surround sound: Only available on Windows 10 64-bit
HAPTIC DRIVERS
- 1 in each cup
- Frequency Response: 20-200Hz
- Maximum Generated Force: 4.3G
GETTING STARTED
CHARGING YOUR HEADSET
Connect the Razer Kraken V3 Pro to a powered USB port using the charging cable. For best results, please fully charge the headset before using it. A depleted headset will fully charge in about 3 hours.

While the headset is charging, earcup lighting is disabled and will only resume when you disconnect the headset from a USB port.
CONNECTING YOUR HEADSET
- To your PC
- Plug the wireless USB dongle to any of the USB-A ports on your PC.

- Press and hold the power button until the status indicator is lit, or until you hear a tone.

- Wait until the status indicator briefly becomes static green indicating that the headset is now connected to the wireless USB dongle.

- On your PC, right-click on the sound icon on the system tray, and then select Open Sound settings.

- Under Sound, set the Razer Kraken V3 Pro as the default Output and Input device.


- Use the Razer Synapse* app to customize your headset’s lighting and other features for an immersive gaming experience that’s truly yours.
*Install Razer Synapse when prompted or download the installer from razer.com/synapse.
- Plug the wireless USB dongle to any of the USB-A ports on your PC.
- To other devices via USB-A port
Plug the wireless USB dongle to your device and make sure the Razer Kraken V3 Pro is the default input and output audio device.

- To devices via 3.5 mm audio + mic jack
If your device has a 3.5mm audio + mic combined jack, simply plug the 3.5mm combo cable from your headset’s microphone jack to your device’s audio jack.
ACTIVATE THX SPATIAL AUDIO*
Unleash the full potential of the Razer Kraken V3 Pro by enabling 360° positional audio for a natural and lifelike experience through Razer Synapse.![]()
*Only available on Windows 10 64-bit and above.
USING THE HEADSET
POWER BUTTON
Power on or off the headset by holding the Power button until the status indicator is on; and holding the Power button again to turn off. Two distinct tones will help notify you that the headset is powered on or off.
Other power button functions are available when the headset is powered on and connected to your device. These functions operate based on your device’s current activity.
| Single press | Play/pause |
| Double press | Skip track |
| Triple press | Previous track |
BATTERY LEVEL
When unplugged and powered on, the status indicator will show the connection and battery status. While in use, you’ll hear a tone when the headset needs to be recharged; during such time, the indicator will continue showing the battery level until you charge the headset.
| Indicator | Prompt | Battery Level |
 |
Tone | Low |
HYPERSENSE BUTTON
With Razer HyperSense enabled, your headset will produce vibrations that flow in the direction of different sounds with varying intensities, making you hyper aware in your game. Simply press the HyperSense button to cycle through Low intensity, Medium intensity, High intensity, and Disable HyperSense. The headset will briefly vibrate and play a distinct tone as you cycle through its settings.
| Intensity | Vibration |
| Low | Short |
| Medium | |
| High | |
| Disable | Long |
Razer HyperSense also works on 3.5 mm analog connection when the headset is on. Distinct tones, however, are only available on wireless. By default, this feature is enabled and set to Medium intensity.
VOLUME CONTROL WHEEL
Rotate the volume control wheel to increase or decrease the volume.
RAZER HYPERCLEAR SUPERCARDIOID MIC
Plug the RazerTM HyperClear Supercardioid Mic to the headphone and bend until it is parallel to your mouth. Make sure the mic diaphragm is in front and the air vent is facing away from your mouth.


Press the mic mute button to mute or unmute the microphone.
COMFORT
It’s recommended to gently stretch the headset before placing it over your head to minimize headband stress however, don’t stretch the headset beyond its limits.
CONFIGURING YOUR RAZER KRAKEN V3 PRO
Internet connection is required for installation, updates and cloud-based features. Registering for a Razer ID account is recommended, but optional. All listed features are subject to change based on the current software version, connected device(s), and supported apps and software.
SYNAPSE TAB
The Synapse tab is your default tab when you first launch Razer Synapse. This tab allows you to navigate the Dashboard subtab.
Dashboard
The Dashboard subtab is an overview of your Razer Synapse where you can access all your Razer devices, modules, and online services.
Modules
The Modules subtab displays all installed and available modules for installation.

Global Shortcuts
Bind operations or Razer Synapse functions to custom key-combinations from any Razer Synapseenabled device inputs which apply across all device profiles. Learn more about Profiles
Only Razer Synapse-enabled device inputs will be recognized.

Make sure to select THX Spatial Audio as your default playback or output device from the Sound icon on the system tray.
The Audio tab is the main tab for your Razer Kraken V3 Pro. From here, you can customize your device’s settings to unleash its full potential. Changes made under this tab are automatically saved to your system and cloud storage.
Sound
The Sound subtab is for adjusting the overall system volume or individual volume of all active applications, changing the default fallback device, and accessing Windows Sound properties.
Profile
Profile is a data storage for keeping all your Razer peripheral’s settings. By default, the profile name is based on your system’s name. To add, rename, duplicate, or delete a profile, simply press the Miscellaneous button ( ![]() ).
).
Volume
Adjust the audio volume of the device. You may also access the Windows volume mixer of the current playback device where you can proportionally adjust the overall volume of the system or individually adjust the volume of each active application.
Haptic Intensity
Change the intensity of the vibrations produced by the headset.
Sound Properties
Set a default output device that the THX Spatial Audio will use when the Razer Kraken V3 Pro is not connected. You may also click on the Windows Sound Properties link to manage the sound settings of your system such as modifying the playback and recording device settings, sound scheme and default communications activity.
Mixer
The Mixer subtab allows you to enable or disable the THX Spatial Audio and its settings, as well as calibrate the audio positioning of all virtual speakers of the active spatial audio mode.
THX Spatial Audio
THX Spatial Audio technology is an advanced positional audio solution that delivers a heightened, immersive experience as you game.
Toggle this setting to enable or disable THX Spatial Audio and its settings. By default, this is set to Auto where all applications will use the recommended output setting. Using Manual will allow you to assign preferred spatial audio modes to specific application types and/or applications.
Spatial Audio Modes
Preview the calibration of each available spatial audio mode preset using the Listen button. Changing the position of any virtual speaker (in any preset mode) will automatically create a Custom Mode. Alternatively, you may also click on the Add button ( + ) to create a new Custom Mode.
On any Custom Mode, click on the miscellaneous button ( ![]() ) to rename, duplicate, or delete the selected custom mode. To revert the current mode to its original settings, click on the Reset button.
) to rename, duplicate, or delete the selected custom mode. To revert the current mode to its original settings, click on the Reset button.
Enhancement
The Enhancement subtab is for customizing the incoming audio settings and frequency response of your audio system.
Bass Boost
Enhances the low frequency response to improve the bass output of your headset
Sound Normalization
Reduces the loudest audio received to avoid sudden and unpleasant increase in volume from effects such as shouting or explosions.
Voice Clarity
Enhances the quality of incoming voice conversations by filtering the sound to improve its clarity and volume.
Audio Equalizer
Select any of the available equalizer presets created for the best audio experience designed for balance, gaming immersion, movie viewing, or enjoying your favorite music. Manually adjusting any equalizer preset will automatically set it to Custom.
Mic
The Mic subtab enables you to change the settings for all outgoing mic audio.
Microphone
Control the mic volume and amount of mic input for a clearer mic audio.
Mic Volume
Adjust the microphone input or mute the mic.
Voice Gate
Control the amount of mic input so that it cuts out background noises and isolates your voice. Any sound that registers below the threshold will be muted.
Enhancements
Improve the quality of the microphone by enabling any of the listed features below:
- Volume Normalization. Reduces the variation of loudness.
- Vocal Clarity. Emphasizes the voice frequency.
- Ambient Noise Reduction. Decreases environmental noise.
Mic Equalizer
Select any of the available mic equalizer presets which best fits your mic needs. Manually adjusting any equalizer preset will automatically set it as a Custom preset.
Mic Monitoring (Sidetone)
Enable this setting to monitor the microphone’s raw audio input through the headset with an additional option to increase or decrease the audio monitoring volume.
Lighting
The Lighting subtab enables you to modify your Razer device’s light settings.
Brightness
You can turn off your Razer device’s lighting by toggling the Brightness option or increase/decrease the luminance using the slider.
Switch Off Lighting
This is a power saving tool which allows you to disable your device’s lighting in response to your system’s display turning off.
Quick Effects
A number of quick effects can be selected and applied to your device’s lighting, as listed here:
| Name | Description | How to set up | |
 |
Audio meter | The earcups will light up according to the audio level with a default spectrum of colors | Select a Color Boost level |
 |
Breathing | The lighting will fade in and out of the selected color(s) | Select up to 2 colors or randomize colors |
 |
Spectrum cycling | The lighting will cycle between 16.8 million colors indefinitely | No further customization required |
 |
Static | The LEDs will remain lit in the selected color | Select a color |
If you have other supported Razer Chroma-enabled devices, you can synchronize their quick effects with your Razer device by clicking the Chroma Sync button ( ![]() ).
).
Only devices that support the selected lighting effect will synchronize.
Advanced Effects
The Advanced Effects option allows you to choose a Chroma Effect you want to use on your Razer Chroma-enabled peripheral. To start making your own Chroma Effect, simply press the Chroma Studio button (  ).
).
Power
The Power subtab allows you to manage your device’s energy consumption by setting it to power off when it has been idle for a certain amount of time.
PROFILES TAB
The Profiles tab is a convenient way of managing all your profiles and linking them to your games and applications.
Devices
View which games are linked to each device’s profiles or which Chroma Effect is linked to specific games using the Devices subtab.
You can import Profiles from your computer or from the cloud through the import button ( ![]() ) or create new profiles within the selected device using the add button (
) or create new profiles within the selected device using the add button ( ![]() ). To rename, duplicate, export, or delete a profile, simply press the Miscellaneous button (
). To rename, duplicate, export, or delete a profile, simply press the Miscellaneous button (  ). Each profile can be set to automatically activate when you run an application using the Linked Games option.
Linked Games
The Linked Games subtab gives you the flexibility to add games, view devices that are linked to games, or search for added games. You can also sort games based on alphabetical order, last played, or most played. Added games will still be listed here even if it is not linked to a Razer device.
To link games to connected Razer devices or Chroma Effects, simply click on any game from the list, and then click Select a device and its profile to launch automatically during gameplay to select the Razer device or Chroma Effect it will link with. Once linked, you may click on the Miscellaneous button ( ) of the corresponding Chroma Effect or device to select a specific Chroma Effect or profile.
SETTINGS WINDOW
The Settings window, accessible by clicking the ( ![]() ) button on Razer Synapse, enables you to configure the startup behavior and display language of Razer Synapse, view the master guides of each connected Razer device, or perform factory reset on any connected Razer device.
) button on Razer Synapse, enables you to configure the startup behavior and display language of Razer Synapse, view the master guides of each connected Razer device, or perform factory reset on any connected Razer device.
General tab
The default tab of the Settings window. The General tab enables you to change the software’s display language, start-up behavior, display theme, and on-screen notifications display. You may also manually sync your profiles to the cloud ( ![]() ) or view the master guide of all connected Razer devices and installed modules.
) or view the master guide of all connected Razer devices and installed modules.
Reset tab
The Reset tab allows you to perform a factory reset on all connected Razer devices with on-board memory and/or reset Razer Synapse tutorials to acquaint yourself again with Razer Synapse’s new features on its next launch.
By resetting a Razer device, all profiles stored on the selected device’s on-board memory will be erased.
About tab
The About tab displays brief software information, copyright statement and provides relevant links for its terms of use. You may also use this tab to check for software updates, or as a quick access to Razer’s social communities.
SAFETY AND MAINTENANCE
SAFETY GUIDELINES
In order to achieve maximum safety while using your Razer Kraken V3 Pro, we suggest that you adopt the following guidelines:
Should you have trouble operating the device properly and troubleshooting does not work, unplug the device and contact the Razer hotline or go to support.razer.com for assistance.
Do not use or wear the headset while charging. Some features will be disabled while the headset is charging, such as earcup lighting and the Razer HyperSense button.
Do not take apart the device and do not attempt to operate it under abnormal current loads. Doing so will void your warranty.
Keep the device away from liquid, humidity or moisture. Operate the device only within the specific temperature range of 0°C (32°F) to 40°C (104°F). Should the temperature exceed this range, unplug the device in order to let the temperature stabilize to an optimal level.
The device isolates external ambient sounds even at low volumes, resulting in lowered awareness of your external surroundings. Please remove the device when engaging in any activities that requires active awareness of your surroundings.
Listening to excessively loud volumes over extended periods of time can damage your hearing. Furthermore, legislation of certain countries permits a maximum sound level of 86db to affect your hearing for 8 hours a day. We therefore recommend that you reduce the volume to a comfortable level when listening for prolonged periods of time. Please, take good care of your hearing.
MAINTENANCE AND USE
The Razer Kraken V3 Pro requires minimum maintenance to keep it in optimum condition. Once a month we recommend you clean it using a soft cloth or cotton swab to prevent dirt buildup. Do not use soap or harsh cleaning agents.
BATTERY WARNING
The Razer Kraken V3 Pro contains a Li-ion rechargeable battery. In general, the life expectancy of such batteries is dependent upon usage. If you suspect that the Li-ion rechargeable battery inside the Razer Kraken V3 Pro may be drained (has a low charge), try charging it.
Caution: Do not open, mutilate, or expose to conducting materials (metal), moisture, liquid, fire, or heat. Doing so may cause batteries to leak or explode, resulting in personal injury. Battery life varies with usage.
LEGALESE
COPYRIGHT AND INTELLECTUAL PROPERTY INFORMATION
©2021 Razer Inc. All rights reserved. Razer, the triple-headed snake logo, Razer logo, «For Gamers. By Gamers.» and «Razer Chroma» are trademarks or registered trademarks of Razer Inc. and/or affiliated companies in the United States and other countries. Actual product may differ from pictures. All other trademarks are the property of their respective owners. Warranty not valid outside of product’s intended region.
Windows and the Windows logo are trademarks or registered trademarks of the Microsoft group of companies.
Razer Inc. («Razer») may have copyright, trademarks, trade secrets, patents, patent applications, or other intellectual property rights (whether registered or unregistered) concerning the product in this guide. Furnishing of this guide does not give you a license to any such copyright, trademark, patent or other intellectual property right. The Razer Kraken V3 Pro (the «Product») may differ from pictures whether on packaging or otherwise. Razer assumes no responsibility for such differences or for any errors that may appear. Information contained herein is subject to change without notice.
LIMITED PRODUCT WARRANTY
For the latest and current terms of the Limited Product Warranty, please visit razer.com/warranty.
LIMITATION OF LIABILITY
Razer shall in no event be liable for any lost profits, loss of information or data, special, incidental, indirect, punitive or consequential or incidental damages, arising in any way out of distribution of, sale of, resale of, use of, or inability to use the Product. In no event shall Razer’s liability exceed the retail purchase price of the Product.
GENERAL
These terms shall be governed by and construed under the laws of the jurisdiction in which the Product was purchased. If any term herein is held to be invalid or unenforceable, then such term (in so far as it is invalid or unenforceable) shall be given no effect and deemed to be excluded without invalidating any of the remaining terms. Razer reserves the right to amend any term at any time without notice.
Here you can download full pdf version of manual, it may contain additional safety instructions, warranty information, FCC rules, etc.
Tips to help you get started
- Pair your headset using the Razer Headset Pairing Utility
- Enable THX Spatial Audio
- What is Razer HyperSense?
- Configure your headset with Razer Synapse
You can view the video below for instructions or review a copy of the video transcript.
To reach the ultimate depths of immersion, one must dive beyond sight and sound. Unlock the third sense for gaming with the Razer Kraken V3 Pro—a wireless haptic PC gaming headset powered by Razer HyperSense. With the ability to feel what you hear; gaming has never felt this intense or real.

Device Layout

- Adjustable padded headband
- Backlit Razer logo Powered by Razer Chroma™ RGB
- Hybrid fabric and leatherette memory foam cushions
- HyperSense button
- Status indicator
- Microphone jack
- Charging port
- 3.5 mm audio + mic jack
- Power button
- Volume control wheel
- Mic mute button
Full Technical Specifications
| Category | Specification |
|---|---|
|
Surround Sound |
THX Spatial Audio |
|
Connection type |
|
|
Cable length |
1.3 m / 4.27 ft |
|
Approx. weight |
368 g / 0.81 lbs |
|
Lighting |
Razer Chroma RGB |
|
Compatibility |
|
|
Headphones |
Drivers: Razer TriForce Titanium 50 mm Drivers |
|
Frequency Response: 20 Hz – 20 kHz |
|
|
Impedance: 32 Ω @ 1 kHz |
|
|
Sensitivity: 96 dBSPL / mW @ 1 KHz by HATS |
|
|
Inner ear cup diameter: 62 x 42 mm |
|
|
Oval ear cushions: Full-ear coverage with cooling fabric and plush leatherette |
|
|
Microphone |
Frequency response: 100 Hz – 10 kHz |
|
Signal-to-noise ratio: ≥ 60 dB |
|
|
Sensitivity (@1 kHz): -42 ± 3 dB |
|
|
Pick-up pattern: Unidirectional |
|
|
On-earcup Controls |
|
|
Audio Usage |
|
|
Battery Life |
|
How To
How do I pair my headset using the Razer Headset Pairing Utility?
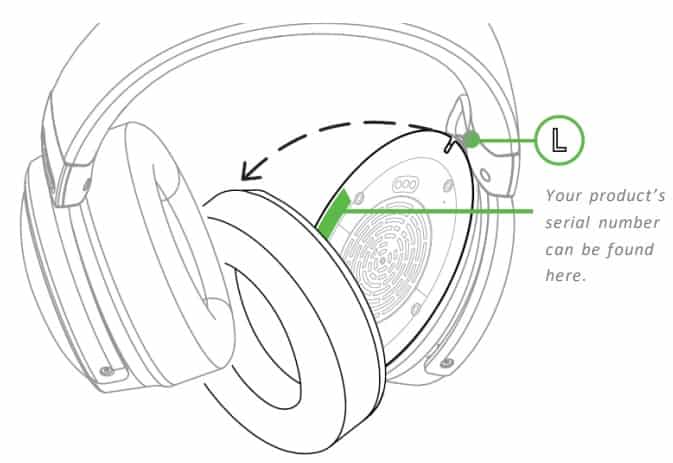
How to remove and reattach ear cushions on a Razer headset
Properly remove and reassemble the ear cushions on your Razer headset to prevent any damage to its parts.
You can view the video below for instructions or review a copy of the video transcript.
See the answer below for more details.
- How to remove and reattach ear cushions on a Razer headset
How do I improve or extend the battery life of my Razer headset?
Do not use the headset while charging to improve or extend its battery life.
How do I clean my Razer headset?
-
Use a lint-free, microfiber cloth and gently wet it with a mild soap and water solution.
-
Never use solvents such as thinner, benzene, or alcohol to avoid damaging the surface.
See the answer below for more details.
- How to clean your Razer devices
How do I use THX Spatial Audio?
After purchasing THX Spatial Audio, an activation code will be sent to your email.
See the answer below for more details.
- THX Spatial Audio Support
Troubleshooting
Razer Synapse does not recognize or detect my Razer device
-
Restart your PC if you have just installed Razer Synapse.
-
Install the latest Razer Synapse updates.
-
If your device is still not detected, see Razer Synapse does not recognize or detect my Razer device.
You can view the video below for instructions or review a copy of the video transcript.
How do I troubleshoot and resolve microphone issues on a Razer headset?
- Put the mic diaphragm in front and the air vent facing away from your mouth.
- Turn on mic access on the selected app.
- Set the device as a Default Recording Device.
- Adjust mic levels in Windows settings.
You can view the video below for instructions or review a copy of the video transcript.
- How to fix headset mic or microphone issues (too sensitive, distorted or buzzing sound, unresponsive or not picking up sound)
How do I remove echo or feedback from a Razer headset?
General Information
Does Razer Kraken V3 Pro work in wired mode?
Yes. Turn on the headset to power up the internal haptic drivers, and Razer Kraken V3 Pro will work in the same way with devices you’ve connected to via the 3.5mm cable.
Does Razer Kraken V3 Pro require any additional downloads?
No. Razer Kraken V3 Pro works out of the box with any game, music, or movie without requiring any additional software or integration.
Where can I recycle my Razer device?
-
Check out our comprehensive list of options to recycle your Razer device.
-
Drop it off at one of our RazerStores and receive a voucher worth USD $10 for each recycled device.
-
Visit OEM for programs to recycle your Razer devices for free.
-
Find your local recycling resource from Earth911.
-
Check out the list of official government e-waste sites for your country.
Applicable Products:
- RZ04-03460
Firmware update v1.06.00.1114_r1
- https://rzr.to/GxZttj | December 29, 2022
- Include FW v1.06.00
- Fix issue of no audio when replaying network audio.
- Fix issue where Chroma lighting does not return to Spectrum cycling when exiting Synapse.
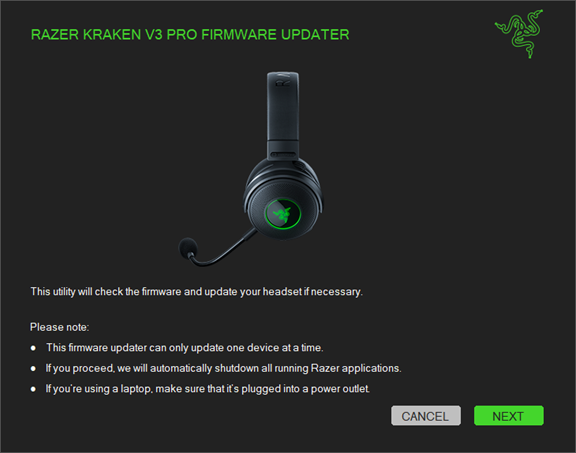
STEP-BY-STEP PROCESS
Before you start
-
If using a laptop, ensure it is plugged into a wall outlet. Do not let it run on battery alone.
-
Save any open documents on your computer.
-
Close all other programs.
-
Download the latest driver.
Update Process
Note: Ensure your antivirus software is up to date before updating the headset firmware to avoid false positive detection during installation.
-
Run the updater.
-
Click «Yes» if the User Account Control window pops up to proceed.
-
Click «NEXT» to proceed. The updater will close all running Razer applications.
-
Plug in the wireless USB dongle to PC then click «UPDATE».

-
Unplug and replug the dongle.

-
Wait until the update process is complete. Do not interrupt.

-
Unplug the dongle from the PC.

-
Power on your headset while plugging it directly into your PC using the charging cable.
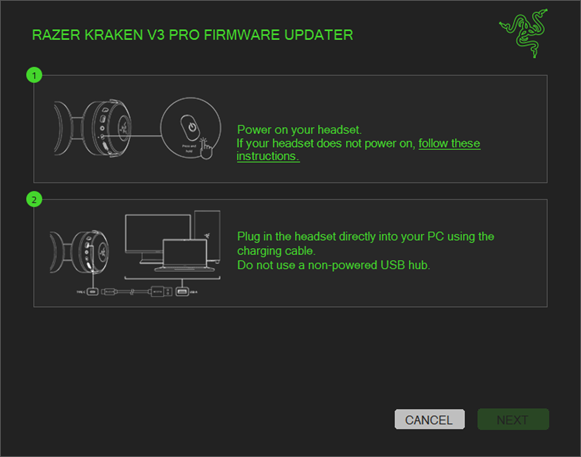
-
Click «NEXT».

-
Click «UPDATE».

-
Press and hold the Power and HyperSense buttons simultaneously for nine seconds.

-
Do not power off or unplug the cable while the device is updating.

-
Click «NEXT».

-
Click «UPDATE».

-
Wait until the update process is complete. Do not interrupt.

-
Click «CLOSE» once the update is complete.

Please see our warranty policy for a complete review of our warranty policy.
You are eligible for Limited Warranty support for the following periods of time commencing upon the date of retail purchase of your Product (Warranty Period).
| Product | Warranty Period |
|---|---|
| 2021 and Older Model Laptops | 1 yeara |
| 2022 and Newer Model Laptops | 1 yeara 2-year limited battery warrantya |
| Razer Viper Mini Signature Edition | 3 year |
| Razer Phone and Phone Accessories | 1 year |
| Razer Edge Gaming Handhelds | 1 year |
| Razer Mice | 2 years |
| Razer Keyboards and Keypads | 2 yearsb |
| Razer Headsets, Earphones and Earbuds | 2 yearsb |
| Razer Wireless Mouse and Mat Bundles | 2 yearsb |
| Razer Mouse Mats | 1 yearc |
| Razer Speaker Systems and Broadcaster Devices | 1 year |
| Razer Controllers and Chargers | 1 year |
| Razer Routers (except Singtel) | 1 year |
| Razer Routers (Singtel) | 2 years |
| Razer Monitors | 1 year |
| Smart Watches and Eyewear | 2 years |
| Razer Case Fans | 2 years |
| Razer Liquid Cooling | 2 years |
| Razer Power Supplies | 5 years |
| Razer Fan and RGB Controllers | 2 years |
| Razer Cases | 1 year |
| Razer System Accessories | 1 year |
| Razer Docks | 1 year |
| Wearable Air Purifiers | 1 year |
| Razer Gaming Accessories | 1 yearc |
| Razer Rechargeable Batteries for Wireless Devices | 1 yeard |
| Razer Gaming Chairs | 3 yearse |
All new Products will have the Warranty Periods listed above, subject to applicable local law. Certain «end of life», sell out or discontinued Products may have a shorter Warranty Period; this will be clearly marked at the time of purchase and the given Warranty Period will be stated at that time. Refurbished Products purchased from Razer.com will have the lesser of a 1 year warranty period or the warranty period as stated above. Refurbished products not purchased from Razer.com will have a 90 day warranty period. If you are uncertain whether your Product is eligible for Limited Warranty support, please contact our support team for clarification.
Please note that third-party products may be covered by the product manufacturer’s warranty and these warranty terms are exclusively provided by the product manufacturer. Razer does not offer a warranty for third-party products. If you need product or warranty support with your third-party product, please contact the product manufacturer. Please consult the product documentation provided by the product manufacturer for details.
If you are uncertain whether your Product is eligible for Limited Warranty support, please contact our support team for clarification.
[a] If you are a customer outside of the U.S. and have validly purchased a Razer Extended Warranty for your product, the Warranty Period shall be extended for another one (1) year period, to be a total of two (2) years commencing upon the date of retail purchase of your Razer Product. The Razer Extended Warranty does not apply to batteries. Aside from the change to Warranty Period, the Razer Extended Warranty does not alter any other terms and conditions of the Limited Warranty.
[b] Products purchased prior to October 1st, 2018 maintain the original 1 year warranty (keyboards with mechanical switches maintain original 2 year warranty).
[c] Warranty period for Razer Firefly HyperFlux is 2 years.
[d] Products purchased prior to October 1st, 2018 maintain the original 6 month warranty.
[e] Limited Warranty: The Razer Iskur is free from defects in workmanship, materials and construction for three years from the date of purchase. In the event that a defect is found, the manufacturer will either repair or replace the defective item, at its discretion. Exclusions and Limitations: This Limited Warranty does not cover cosmetic damage, minor cosmetic abnormalities and normal wear and tear, including without limitation scratches, dents, discoloration and tears in the head pillow, seat cushion, PU leather, Armrest and stiches of the upholstery.
We have Razer Kraken V3 Pro Headphones User Manual. So here we will review the razer kraken v3 pro headphones manual guide.
 ).
).
Volume
Adjust the audio volume of the device. You may also access the Windows volume mixer of the current playback device where you can proportionally adjust the overall volume of the system or individually adjust the volume of each active application.
Haptic Intensity
Change the intensity of the vibrations produced by the headset.
Sound Properties
Set a default output device that the THX Spatial Audio will use when the Razer Kraken V3 Pro is not connected. You may also click on the Windows Sound Properties link to manage the sound settings of your system such as modifying the playback and recording device settings, sound scheme and default communications activity.
Mixer
The Mixer subtab allows you to enable or disable the THX Spatial Audio and its settings, as well as calibrate the audio positioning of all virtual speakers of the active spatial audio mode.
THX Spatial Audio
THX Spatial Audio technology is an advanced positional audio solution that delivers a heightened, immersive experience as you game.
Toggle this setting to enable or disable THX Spatial Audio and its settings. By default, this is set to Auto where all applications will use the recommended output setting. Using Manual will allow you to assign preferred spatial audio modes to specific application types and/or applications.
Spatial Audio Modes
Preview the calibration of each available spatial audio mode preset using the Listen button. Changing the position of any virtual speaker (in any preset mode) will automatically create a Custom Mode. Alternatively, you may also click on the Add button ( + ) to create a new Custom Mode.
On any Custom Mode, click on the miscellaneous button ( ![]() ) to rename, duplicate, or delete the selected custom mode. To revert the current mode to its original settings, click on the Reset button.
) to rename, duplicate, or delete the selected custom mode. To revert the current mode to its original settings, click on the Reset button.
Enhancement
The Enhancement subtab is for customizing the incoming audio settings and frequency response of your audio system.
Bass Boost
Enhances the low frequency response to improve the bass output of your headset
Sound Normalization
Reduces the loudest audio received to avoid sudden and unpleasant increase in volume from effects such as shouting or explosions.
Voice Clarity
Enhances the quality of incoming voice conversations by filtering the sound to improve its clarity and volume.
Audio Equalizer
Select any of the available equalizer presets created for the best audio experience designed for balance, gaming immersion, movie viewing, or enjoying your favorite music. Manually adjusting any equalizer preset will automatically set it to Custom.
Mic
The Mic subtab enables you to change the settings for all outgoing mic audio.
Microphone
Control the mic volume and amount of mic input for a clearer mic audio.
Mic Volume
Adjust the microphone input or mute the mic.
Voice Gate
Control the amount of mic input so that it cuts out background noises and isolates your voice. Any sound that registers below the threshold will be muted.
Enhancements
Improve the quality of the microphone by enabling any of the listed features below:
- Volume Normalization. Reduces the variation of loudness.
- Vocal Clarity. Emphasizes the voice frequency.
- Ambient Noise Reduction. Decreases environmental noise.
Mic Equalizer
Select any of the available mic equalizer presets which best fits your mic needs. Manually adjusting any equalizer preset will automatically set it as a Custom preset.
Mic Monitoring (Sidetone)
Enable this setting to monitor the microphone’s raw audio input through the headset with an additional option to increase or decrease the audio monitoring volume.
Lighting
The Lighting subtab enables you to modify your Razer device’s light settings.
Brightness
You can turn off your Razer device’s lighting by toggling the Brightness option or increase/decrease the luminance using the slider.
Switch Off Lighting
This is a power saving tool which allows you to disable your device’s lighting in response to your system’s display turning off.
Quick Effects
A number of quick effects can be selected and applied to your device’s lighting, as listed here:
| Name | Description | How to set up | |
| |
Audio meter | The earcups will light up according to the audio level with a default spectrum of colors | Select a Color Boost level |
| |
Breathing | The lighting will fade in and out of the selected color(s) | Select up to 2 colors or randomize colors |
| |
Spectrum cycling | The lighting will cycle between 16.8 million colors indefinitely | No further customization required |
| |
Static | The LEDs will remain lit in the selected color | Select a color |
If you have other supported Razer Chroma-enabled devices, you can synchronize their quick effects with your Razer device by clicking the Chroma Sync button ( ![]() ).
).
Only devices that support the selected lighting effect will synchronize.
Advanced Effects
The Advanced Effects option allows you to choose a Chroma Effect you want to use on your Razer Chroma-enabled peripheral. To start making your own Chroma Effect, simply press the Chroma Studio button ( ).
Power
The Power subtab allows you to manage your device’s energy consumption by setting it to power off when it has been idle for a certain amount of time.
PROFILES TAB
The Profiles tab is a convenient way of managing all your profiles and linking them to your games and applications.
Devices
View which games are linked to each device’s profiles or which Chroma Effect is linked to specific games using the Devices subtab.
You can import Profiles from your computer or from the cloud through the import button ( ![]() ) or create new profiles within the selected device using the add button (
) or create new profiles within the selected device using the add button ( ![]() ). To rename, duplicate, export, or delete a profile, simply press the Miscellaneous button ( ). Each profile can be set to automatically activate when you run an application using the Linked Games option.
). To rename, duplicate, export, or delete a profile, simply press the Miscellaneous button ( ). Each profile can be set to automatically activate when you run an application using the Linked Games option.
Linked Games
The Linked Games subtab gives you the flexibility to add games, view devices that are linked to games, or search for added games. You can also sort games based on alphabetical order, last played, or most played. Added games will still be listed here even if it is not linked to a Razer device.
To link games to connected Razer devices or Chroma Effects, simply click on any game from the list, and then click Select a device and its profile to launch automatically during gameplay to select the Razer device or Chroma Effect it will link with. Once linked, you may click on the Miscellaneous button ( ) of the corresponding Chroma Effect or device to select a specific Chroma Effect or profile.
SETTINGS WINDOW
The Settings window, accessible by clicking the ( ![]() ) button on Razer Synapse, enables you to configure the startup behavior and display language of Razer Synapse, view the master guides of each connected Razer device, or perform factory reset on any connected Razer device.
) button on Razer Synapse, enables you to configure the startup behavior and display language of Razer Synapse, view the master guides of each connected Razer device, or perform factory reset on any connected Razer device.
General tab
The default tab of the Settings window. The General tab enables you to change the software’s display language, start-up behavior, display theme, and on-screen notifications display. You may also manually sync your profiles to the cloud ( ![]() ) or view the master guide of all connected Razer devices and installed modules.
) or view the master guide of all connected Razer devices and installed modules.
Reset tab
The Reset tab allows you to perform a factory reset on all connected Razer devices with on-board memory and/or reset Razer Synapse tutorials to acquaint yourself again with Razer Synapse’s new features on its next launch.
By resetting a Razer device, all profiles stored on the selected device’s on-board memory will be erased.
About tab
The About tab displays brief software information, copyright statement and provides relevant links for its terms of use. You may also use this tab to check for software updates, or as a quick access to Razer’s social communities.
SAFETY AND MAINTENANCE
SAFETY GUIDELINES
In order to achieve maximum safety while using your Razer Kraken V3 Pro, we suggest that you adopt the following guidelines:
Should you have trouble operating the device properly and troubleshooting does not work, unplug the device and contact the Razer hotline or go to support.razer.com for assistance.
Do not use or wear the headset while charging. Some features will be disabled while the headset is charging, such as earcup lighting and the Razer HyperSense button.
Do not take apart the device and do not attempt to operate it under abnormal current loads. Doing so will void your warranty.
Keep the device away from liquid, humidity or moisture. Operate the device only within the specific temperature range of 0°C (32°F) to 40°C (104°F). Should the temperature exceed this range, unplug the device in order to let the temperature stabilize to an optimal level.
The device isolates external ambient sounds even at low volumes, resulting in lowered awareness of your external surroundings. Please remove the device when engaging in any activities that requires active awareness of your surroundings.
Listening to excessively loud volumes over extended periods of time can damage your hearing. Furthermore, legislation of certain countries permits a maximum sound level of 86db to affect your hearing for 8 hours a day. We therefore recommend that you reduce the volume to a comfortable level when listening for prolonged periods of time. Please, take good care of your hearing.
MAINTENANCE AND USE
The Razer Kraken V3 Pro requires minimum maintenance to keep it in optimum condition. Once a month we recommend you clean it using a soft cloth or cotton swab to prevent dirt buildup. Do not use soap or harsh cleaning agents.
BATTERY WARNING
The Razer Kraken V3 Pro contains a Li-ion rechargeable battery. In general, the life expectancy of such batteries is dependent upon usage. If you suspect that the Li-ion rechargeable battery inside the Razer Kraken V3 Pro may be drained (has a low charge), try charging it.
Caution: Do not open, mutilate, or expose to conducting materials (metal), moisture, liquid, fire, or heat. Doing so may cause batteries to leak or explode, resulting in personal injury. Battery life varies with usage.
LEGALESE
COPYRIGHT AND INTELLECTUAL PROPERTY INFORMATION
©2021 Razer Inc. All rights reserved. Razer, the triple-headed snake logo, Razer logo, «For Gamers. By Gamers.» and «Razer Chroma» are trademarks or registered trademarks of Razer Inc. and/or affiliated companies in the United States and other countries. Actual product may differ from pictures. All other trademarks are the property of their respective owners. Warranty not valid outside of product’s intended region.
Windows and the Windows logo are trademarks or registered trademarks of the Microsoft group of companies.
Razer Inc. («Razer») may have copyright, trademarks, trade secrets, patents, patent applications, or other intellectual property rights (whether registered or unregistered) concerning the product in this guide. Furnishing of this guide does not give you a license to any such copyright, trademark, patent or other intellectual property right. The Razer Kraken V3 Pro (the «Product») may differ from pictures whether on packaging or otherwise. Razer assumes no responsibility for such differences or for any errors that may appear. Information contained herein is subject to change without notice.
LIMITED PRODUCT WARRANTY
For the latest and current terms of the Limited Product Warranty, please visit razer.com/warranty.
LIMITATION OF LIABILITY
Razer shall in no event be liable for any lost profits, loss of information or data, special, incidental, indirect, punitive or consequential or incidental damages, arising in any way out of distribution of, sale of, resale of, use of, or inability to use the Product. In no event shall Razer’s liability exceed the retail purchase price of the Product.
GENERAL
These terms shall be governed by and construed under the laws of the jurisdiction in which the Product was purchased. If any term herein is held to be invalid or unenforceable, then such term (in so far as it is invalid or unenforceable) shall be given no effect and deemed to be excluded without invalidating any of the remaining terms. Razer reserves the right to amend any term at any time without notice.
Here you can download full pdf version of manual, it may contain additional safety instructions, warranty information, FCC rules, etc.
Tips to help you get started
- Pair your headset using the Razer Headset Pairing Utility
- Enable THX Spatial Audio
- What is Razer HyperSense?
- Configure your headset with Razer Synapse
You can view the video below for instructions or review a copy of the video transcript.
To reach the ultimate depths of immersion, one must dive beyond sight and sound. Unlock the third sense for gaming with the Razer Kraken V3 Pro—a wireless haptic PC gaming headset powered by Razer HyperSense. With the ability to feel what you hear; gaming has never felt this intense or real.
Device Layout
- Adjustable padded headband
- Backlit Razer logo Powered by Razer Chroma™ RGB
- Hybrid fabric and leatherette memory foam cushions
- HyperSense button
- Status indicator
- Microphone jack
- Charging port
- 3.5 mm audio + mic jack
- Power button
- Volume control wheel
- Mic mute button
Full Technical Specifications
| Category | Specification |
|---|---|
|
Surround Sound |
THX Spatial Audio |
|
Connection type |
|
|
Cable length |
1.3 m / 4.27 ft |
|
Approx. weight |
368 g / 0.81 lbs |
|
Lighting |
Razer Chroma RGB |
|
Compatibility |
|
|
Headphones |
Drivers: Razer TriForce Titanium 50 mm Drivers |
|
Frequency Response: 20 Hz – 20 kHz |
|
|
Impedance: 32 Ω @ 1 kHz |
|
|
Sensitivity: 96 dBSPL / mW @ 1 KHz by HATS |
|
|
Inner ear cup diameter: 62 x 42 mm |
|
|
Oval ear cushions: Full-ear coverage with cooling fabric and plush leatherette |
|
|
Microphone |
Frequency response: 100 Hz – 10 kHz |
|
Signal-to-noise ratio: ≥ 60 dB |
|
|
Sensitivity (@1 kHz): -42 ± 3 dB |
|
|
Pick-up pattern: Unidirectional |
|
|
On-earcup Controls |
|
|
Audio Usage |
|
|
Battery Life |
|
How To
How do I pair my headset using the Razer Headset Pairing Utility?
How to remove and reattach ear cushions on a Razer headset
Properly remove and reassemble the ear cushions on your Razer headset to prevent any damage to its parts.
You can view the video below for instructions or review a copy of the video transcript.
See the answer below for more details.
- How to remove and reattach ear cushions on a Razer headset
How do I improve or extend the battery life of my Razer headset?
Do not use the headset while charging to improve or extend its battery life.
How do I clean my Razer headset?
-
Use a lint-free, microfiber cloth and gently wet it with a mild soap and water solution.
-
Never use solvents such as thinner, benzene, or alcohol to avoid damaging the surface.
See the answer below for more details.
- How to clean your Razer devices
How do I use THX Spatial Audio?
After purchasing THX Spatial Audio, an activation code will be sent to your email.
See the answer below for more details.
- THX Spatial Audio Support
Troubleshooting
Razer Synapse does not recognize or detect my Razer device
-
Restart your PC if you have just installed Razer Synapse.
-
Install the latest Razer Synapse updates.
-
If your device is still not detected, see Razer Synapse does not recognize or detect my Razer device.
You can view the video below for instructions or review a copy of the video transcript.
How do I troubleshoot and resolve microphone issues on a Razer headset?
- Put the mic diaphragm in front and the air vent facing away from your mouth.
- Turn on mic access on the selected app.
- Set the device as a Default Recording Device.
- Adjust mic levels in Windows settings.
You can view the video below for instructions or review a copy of the video transcript.
- How to fix headset mic or microphone issues (too sensitive, distorted or buzzing sound, unresponsive or not picking up sound)
How do I remove echo or feedback from a Razer headset?
General Information
Does Razer Kraken V3 Pro work in wired mode?
Yes. Turn on the headset to power up the internal haptic drivers, and Razer Kraken V3 Pro will work in the same way with devices you’ve connected to via the 3.5mm cable.
Does Razer Kraken V3 Pro require any additional downloads?
No. Razer Kraken V3 Pro works out of the box with any game, music, or movie without requiring any additional software or integration.
Where can I recycle my Razer device?
-
Check out our comprehensive list of options to recycle your Razer device.
-
Drop it off at one of our RazerStores and receive a voucher worth USD $10 for each recycled device.
-
Visit OEM for programs to recycle your Razer devices for free.
-
Find your local recycling resource from Earth911.
-
Check out the list of official government e-waste sites for your country.
Applicable Products:
- RZ04-03460
Firmware update v1.06.00.1114_r1
- https://rzr.to/GxZttj | December 29, 2022
- Include FW v1.06.00
- Fix issue of no audio when replaying network audio.
- Fix issue where Chroma lighting does not return to Spectrum cycling when exiting Synapse.
STEP-BY-STEP PROCESS
Before you start
-
If using a laptop, ensure it is plugged into a wall outlet. Do not let it run on battery alone.
-
Save any open documents on your computer.
-
Close all other programs.
-
Download the latest driver.
Update Process
Note: Ensure your antivirus software is up to date before updating the headset firmware to avoid false positive detection during installation.
-
Run the updater.
-
Click «Yes» if the User Account Control window pops up to proceed.
-
Click «NEXT» to proceed. The updater will close all running Razer applications.
-
Plug in the wireless USB dongle to PC then click «UPDATE».
-
Unplug and replug the dongle.
-
Wait until the update process is complete. Do not interrupt.
-
Unplug the dongle from the PC.
-
Power on your headset while plugging it directly into your PC using the charging cable.
-
Click «NEXT».
-
Click «UPDATE».
-
Press and hold the Power and HyperSense buttons simultaneously for nine seconds.
-
Do not power off or unplug the cable while the device is updating.
-
Click «NEXT».
-
Click «UPDATE».
-
Wait until the update process is complete. Do not interrupt.
-
Click «CLOSE» once the update is complete.
Please see our warranty policy for a complete review of our warranty policy.
You are eligible for Limited Warranty support for the following periods of time commencing upon the date of retail purchase of your Product (Warranty Period).
| Product | Warranty Period |
|---|---|
| 2021 and Older Model Laptops | 1 yeara |
| 2022 and Newer Model Laptops | 1 yeara 2-year limited battery warrantya |
| Razer Viper Mini Signature Edition | 3 year |
| Razer Phone and Phone Accessories | 1 year |
| Razer Edge Gaming Handhelds | 1 year |
| Razer Mice | 2 years |
| Razer Keyboards and Keypads | 2 yearsb |
| Razer Headsets, Earphones and Earbuds | 2 yearsb |
| Razer Wireless Mouse and Mat Bundles | 2 yearsb |
| Razer Mouse Mats | 1 yearc |
| Razer Speaker Systems and Broadcaster Devices | 1 year |
| Razer Controllers and Chargers | 1 year |
| Razer Routers (except Singtel) | 1 year |
| Razer Routers (Singtel) | 2 years |
| Razer Monitors | 1 year |
| Smart Watches and Eyewear | 2 years |
| Razer Case Fans | 2 years |
| Razer Liquid Cooling | 2 years |
| Razer Power Supplies | 5 years |
| Razer Fan and RGB Controllers | 2 years |
| Razer Cases | 1 year |
| Razer System Accessories | 1 year |
| Razer Docks | 1 year |
| Wearable Air Purifiers | 1 year |
| Razer Gaming Accessories | 1 yearc |
| Razer Rechargeable Batteries for Wireless Devices | 1 yeard |
| Razer Gaming Chairs | 3 yearse |
All new Products will have the Warranty Periods listed above, subject to applicable local law. Certain «end of life», sell out or discontinued Products may have a shorter Warranty Period; this will be clearly marked at the time of purchase and the given Warranty Period will be stated at that time. Refurbished Products purchased from Razer.com will have the lesser of a 1 year warranty period or the warranty period as stated above. Refurbished products not purchased from Razer.com will have a 90 day warranty period. If you are uncertain whether your Product is eligible for Limited Warranty support, please contact our support team for clarification.
Please note that third-party products may be covered by the product manufacturer’s warranty and these warranty terms are exclusively provided by the product manufacturer. Razer does not offer a warranty for third-party products. If you need product or warranty support with your third-party product, please contact the product manufacturer. Please consult the product documentation provided by the product manufacturer for details.
If you are uncertain whether your Product is eligible for Limited Warranty support, please contact our support team for clarification.
[a] If you are a customer outside of the U.S. and have validly purchased a Razer Extended Warranty for your product, the Warranty Period shall be extended for another one (1) year period, to be a total of two (2) years commencing upon the date of retail purchase of your Razer Product. The Razer Extended Warranty does not apply to batteries. Aside from the change to Warranty Period, the Razer Extended Warranty does not alter any other terms and conditions of the Limited Warranty.
[b] Products purchased prior to October 1st, 2018 maintain the original 1 year warranty (keyboards with mechanical switches maintain original 2 year warranty).
[c] Warranty period for Razer Firefly HyperFlux is 2 years.
[d] Products purchased prior to October 1st, 2018 maintain the original 6 month warranty.
[e] Limited Warranty: The Razer Iskur is free from defects in workmanship, materials and construction for three years from the date of purchase. In the event that a defect is found, the manufacturer will either repair or replace the defective item, at its discretion. Exclusions and Limitations: This Limited Warranty does not cover cosmetic damage, minor cosmetic abnormalities and normal wear and tear, including without limitation scratches, dents, discoloration and tears in the head pillow, seat cushion, PU leather, Armrest and stiches of the upholstery.
We have Razer Kraken V3 Pro Headphones User Manual. So here we will review the razer kraken v3 pro headphones manual guide.
TECHNICAL SPECIFICATIONS
HEADPHONES
| Frequency response | 20 Hz – 20 kHz |
| Impedance | 32 Ω @ 1 kHz |
| Sensitivity | 96dBSPL/mW@1KHz by HATS |
| Drivers | Customized Dynamic 50mm Driver |
| Inner ear cup diameter | 62 x 42mm |
| Connection type | 2.4GHz wireless and 3.5mm |
| Cable length | 1.3m / 4.27ft |
| Approx. weight | 368g / 0.81lbs |
| Oval ear cushions | Full-ear coverage with cooling fabric and plush leatherette, for comfort and optimized haptics |
MICROPHONE
| Frequency response | 100 Hz – 10 kHz |
| Signal-to-noise ratio | ≥ 60 dB |
| Sensitivity (@1 kHz) | -42 ± 3 dB |
| Pick-up pattern | Unidirectional |
ON-EARCUP CONTROLS
- Volume up and down
- Mic mute on/off toggle
- Haptics intensity levels
AUDIO USAGE
- Wireless audio usage: USB-A Dongle
- Wired audio usage: 3.5mm analog
- Surround sound: Only available on Windows 10 64-bit
HAPTIC DRIVERS
- 1 in each cup
- Frequency Response: 20-200Hz
- Maximum Generated Force: 4.3G
WHAT’S INSIDE
A. Adjustable padded headband
B. Backlit Razer logo Powered by Razer
ChromaTM RGB
C. Hybrid fabric and leatherette
memory foam cushions
D. HyperSense button
E. Status indicator
F. Microphone jack
G. Charging port
H. 3.5 mm audio + mic jack
I. Power button
J. Volume control wheel
K. Mic mute button

- Wireless USB dongle
- Type-C to Type-A charging cable
- 3.5 mm combo cable
- Detachable Razer HyperClear Supercardioid Mic
- Important Product Information Guide
WHAT’S NEEDED
Product requirements
- [Wireless] USB-A port
- [Wired] 3.5 mm audio + mic combined jack
Razer Synapse requirements
- Windows 10 64-bit (or higher)
- Internet connection for software installation
LET’S GET YOU COVERED
You’ve got a great device in your hands, complete with a 2-year limited warranty coverage. Now maximize its potential and score exclusive Razer benefits by registering at razerid.razer.com.
CHARGING YOUR HEADSET
Connect the Razer Kraken V3 Pro to a powered USB port using the charging cable. For best results, please fully charge the headset before using it. A depleted headset will fully charge in about 3 hours.
| Indicator | Battery level |
| Green Light | Fully charged |
| Yellow Light | Charging |
Note: While the headset is charging, earcup lighting is disabled and will only resume when you disconnect the headset from a USB port.
CONNECTING YOUR HEADSET
A. To your PC
- Plug the wireless USB dongle to any of the USB-A ports on your PC.
- Press and hold the power button until the status indicator is lit, or until you hear a tone.
- Wait until the status indicator briefly becomes static green indicating that the headset is now connected to the wireless USB dongle.
- On your PC, right-click on the sound icon on the system tray, and then select Open Sound settings.
- Under Sound, set the Razer Kraken V3 Pro as the default Output and Input device.
- Use the Razer Synapse* app to customize your headset’s lighting and other features for an immersive gaming experience that’s truly yours.
B. To other devices via USB-A port
Plug the wireless USB dongle to your device and make sure the Razer Kraken V3 Pro is the default input and output audio device.
C. To devices via 3.5 mm audio + mic jack
If your device has a 3.5mm audio + mic combined jack, simply plug the 3.5mm combo cable from your headset’s microphone jack to your device’s audio jack.
ACTIVATE THX SPATIAL AUDIO*
Unleash the full potential of the Razer Kraken V3 Pro by enabling 360° positional audio for a natural and lifelike experience through Razer Synapse.
USING THE HEADSET
POWER BUTTON: Power on or off the headset by holding the Power button until the status indicator is on; and holding the Power button again to turn off. Two distinct tones will help notify you that the headset is powered on or off.
Other power button functions are available when the headset is powered on and connected to your device. These functions operate based on your device’s current activity.
| Single press | Play/pause |
| Double press | Skip track |
| Triple press | Previous track |
BATTERY LEVEL
When unplugged and powered on, the status indicator will show the connection and battery status. While in use, you’ll hear a tone when the headset needs to be recharged; during such time, the indicator will continue showing the battery level until you charge the headset.
HYPERSENSE BUTTON
With Razer HyperSense enabled, your headset will produce vibrations that flow in the direction of different sounds with varying intensities, making you hyper aware in your game. Simply press the HyperSense button to cycle through Low intensity, Medium intensity, High intensity, and Disable HyperSense. The headset will briefly vibrate and play a distinct tone as you cycle through its settings.
| Intensity | Vibration |
| – Low – Medium – High |
Short |
| Disable | Long |
Note: Razer HyperSense also works on 3.5 mm analog connection when the headset is on. Distinct tones, however, are only available on wireless. By default, this feature is enabled and set to Medium intensity.
VOLUME CONTROL WHEEL
Rotate the volume control wheel to increase or decrease the volume.
RAZER HYPERCLEAR SUPERCARDIOID MIC
- Plug the Razer HyperClear Supercardioid Mic to the headphone and bend until it is parallel to your mouth. Make sure the mic diaphragm is in front and the air vent is facing away from your mouth.
- Press the mic mute button to mute or unmute the microphone.
COMFORT
It’s recommended to gently stretch the headset before placing it over your head to minimize headband stress however, don’t stretch the headset beyond its limits.
CONFIGURING YOUR RAZER KRAKEN V3 PRO
SYNAPSE TAB
The Synapse tab is your default tab when you first launch Razer Synapse. This tab allows you to navigate the Dashboard subtab.
Dashboard
The Dashboard subtab is an overview of your Razer Synapse where you can access all your Razer devices, modules, and online services.
Modules
The Modules subtab displays all installed and available modules for installation.
Global Shortcuts
Bind operations or Razer Synapse functions to custom key-combinations from any Razer Synapseenabled device inputs which apply across all device profiles.
The Audio tab is the main tab for your Razer Kraken V3 Pro. From here, you can customize your device’s settings to unleash its full potential. Changes made under this tab are automatically saved to your system and cloud storage.
Note: Only Razer Synapse-enable d device inputs will be recognized.
Sound
The Sound subtab is for adjusting the overall system volume or individual volume of all active applications, changing the default fallback device, and accessing Windows Sound properties.
- Profile: Profile is a data storage for keeping all your Razer peripheral’s settings. By default, the profile name is based on your system’s name. To add, rename, duplicate, or delete a profile, simply press the Miscellaneous button.
- Volume: Adjust the audio volume of the device. You may also access the Windows volume mixer of the current playback device where you can proportionally adjust the overall volume of the system or individually adjust the volume of each active application.
- Haptic Intensity: Change the intensity of the vibrations produced by the headset.
- Sound Properties: Set a default output device that the THX Spatial Audio will use when the Razer Kraken V3 Pro is not connected. You may also click on the Windows Sound Properties link to manage the sound settings of your system such as modifying the playback and recording device settings, sound scheme and default communications activity.
Mixer
The Mixer subtab allows you to enable or disable the THX Spatial Audio and its settings, as well as calibrate the audio positioning of all virtual speakers of the active spatial audio mode.
- THX Spatial Audio: THX Spatial Audio technology is an advanced positional audio solution that delivers a heightened, immersive experience as you game. Toggle this setting to enable or disable THX Spatial Audio and its settings. By default, this is set to Auto where all applications will use the recommended output setting. Using Manual will allow you to assign preferred spatial audio modes to specific application types and/or applications.
- Spatial Audio Modes: Preview the calibration of each available spatial audio mode preset using the Listen button. Changing the position of any virtual speaker (in any preset mode) will automatically create a Custom Mode. Alternatively, you may also click on the Add button ( + ) to create a new Custom Mode. On any Custom Mode, click on the miscellaneous button ( ) to rename, duplicate, or delete the selected custom mode. To revert the current mode to its original settings, click on the Reset button.
Enhancement
The Enhancement subtab is for customizing the incoming audio settings and frequency response of your audio system.
- Bass Boost: Enhances the low frequency response to improve the bass output of your headset.
- Sound Normalization: Reduces the loudest audio received to avoid sudden and unpleasant increase in volume from effects such as shouting or explosions.
- Voice Clarity: Enhances the quality of incoming voice conversations by filtering the sound to improve its clarity and volume.
- Audio Equalizer: Select any of the available equalizer presets created for the best audio experience designed for balance, gaming immersion, movie viewing, or enjoying your favorite music. Manually adjusting any equalizer preset will automatically set it to Custom.
Mic
The Mic subtab enables you to change the settings for all outgoing mic audio.
- Microphone: Control the mic volume and amount of mic input for a clearer mic audio.
- Mic Volume: Adjust the microphone input or mute the mic.
- Voice Gate: Control the amount of mic input so that it cuts out background noises and isolates your voice. Any sound that registers below the threshold will be muted.
- Enhancements: Improve the quality of the microphone by enabling any of the listed features below:
– Volume Normalization. Reduces the variation of loudness.
– Vocal Clarity. Emphasizes the voice frequency.
– Ambient Noise Reduction. Decreases environmental noise.
- Mic Equalizer: Select any of the available mic equalizer presets which best fits your mic needs. Manually adjusting any equalizer preset will automatically set it as a Custom preset.
- Mic Monitoring (Sidetone): Enable this setting to monitor the microphone’s raw audio input through the headset with an additional option to increase or decrease the audio monitoring volume.
Lighting
The Lighting subtab enables you to modify your Razer device’s light settings.
- Brightness: You can turn off your Razer device’s lighting by toggling the Brightness option or increase/decrease the luminance using the slider.
- Switch Off Lighting: This is a power saving tool which allows you to disable your device’s lighting in response to your system’s display turning off.
- Quick Effects: A number of quick effects can be selected and applied to your device’s lighting, as listed here:
| Name | Description | How to set up |
| Audio meter | The earcups will light up according to the audio level with a default spectrum of colors | Select a Color Boost level |
| Breathing | The lighting will fade in and out of the selected color(s) | Select up to 2 colors or randomize colors |
| Spectrum cycling | The lighting will cycle between 16.8 million colors indefinitely | No further customization required |
| Static | The LEDs will remain lit in the selected color | Select a color |
If you have other supported Razer Chroma-enabled devices, you can synchronize their quick effects with your Razer device by clicking the Chroma Sync button.
Note: Only devices that support the selected lighting effect will synchronize.
- Advanced Effects: The Advanced Effects option allows you to choose a Chroma Effect you want to use on your Razer Chroma-enabled peripheral. To start making your own Chroma Effect, simply press the Chroma Studio button.
Power
The Power subtab allows you to manage your device’s energy consumption by setting it to power off when it has been idle for a certain amount of time.
PROFILES TAB
The Profiles tab is a convenient way of managing all your profiles and linking them to your games and applications.
Devices
View which games are linked to each device’s profiles or which Chroma Effect is linked to specific games using the Devices subtab.
You can import Profiles from your computer or from the cloud through the import button, or create new profiles within the selected device using the add button (+). To rename, duplicate, export, or delete a profile, simply press the Miscellaneous button ( ). Each profile can be set to automatically activate when you run an application using the Linked Games option.
Linked Games
The Linked Games subtab gives you the flexibility to add games, view devices that are linked to games, or search for added games. You can also sort games based on alphabetical order, last played, or most played. Added games will still be listed here even if it is not linked to a Razer device.
To link games to connected Razer devices or Chroma Effects, simply click on any game from the list, and then click Select a device and its profile to launch automatically during gameplay to select the Razer device or Chroma Effect it will link with. Once linked, you may click on the Miscellaneous button of the corresponding Chroma Effect or device to select a specific Chroma Effect or profile.
SETTINGS WINDOW
The Settings window, accessible by clicking the Setting button on Razer Synapse, enables you to configure the startup behavior and display language of Razer Synapse, view the master guides of each connected Razer device, or perform factory reset on any connected Razer device.
General tab
The default tab of the Settings window. The General tab enables you to change the software’s display language, start-up behavior, display theme, and on-screen notifications display. You may also manually sync your profiles to the cloud or view the master guide of all connected Razer devices and installed modules.
Reset tab
The Reset tab allows you to perform a factory reset on all connected Razer devices with on-board memory and/or reset Razer Synapse tutorials to acquaint yourself again with Razer Synapse’s new features on its next launch.
Note: By resetting a Razer device, all profiles stored on the selected device’s on-board memory will be erased.
About tab
The About tab displays brief software information, copyright statement and provides relevant links for its terms of use. You may also use this tab to check for software updates, or as a quick access to Razer’s social communities.
SAFETY GUIDELINES
In order to achieve maximum safety while using your Razer Kraken V3 Pro, we suggest that you adopt the following guidelines:
- Should you have trouble operating the device properly and troubleshooting does not work, unplug the device and contact the Razer hotline or go to support.razer.com for assistance.
- Do not use or wear the headset while charging. Some features will be disabled while the headset is charging, such as earcup lighting and the Razer HyperSense button.
- Do not take apart the device and do not attempt to operate it under abnormal current loads. Doing so will void your warranty.
- Keep the device away from liquid, humidity or moisture. Operate the device only within the specific temperature range of 0°C (32°F) to 40°C (104°F). Should the temperature exceed this range, unplug the device in order to let the temperature stabilize to an optimal level.
- The device isolates external ambient sounds even at low volumes, resulting in lowered awareness of your external surroundings. Please remove the device when engaging in any activities that requires active awareness of your surroundings.
- Listening to excessively loud volumes over extended periods of time can damage your hearing. Furthermore, legislation of certain countries permits a maximum sound level of 86db to affect your hearing for 8 hours a day. We therefore recommend that you reduce the volume to a comfortable level when listening for prolonged periods of time. Please, take good care of your hearing.
MAINTENANCE AND USE
The Razer Kraken V3 Pro requires minimum maintenance to keep it in optimum condition. Once a month we recommend you clean it using a soft cloth or cotton swab to prevent dirt buildup. Do not use soap or harsh cleaning agents.
BATTERY WARNING
The Razer Kraken V3 Pro contains a Li-ion rechargeable battery. In general, the life expectancy of such batteries is dependent upon usage. If you suspect that the Li-ion rechargeable battery inside the Razer Kraken V3 Pro may be drained (has a low charge), try charging it.
Caution: Do not open, mutilate, or expose to conducting materials (metal), moisture, liquid, fire, or heat. Doing so may cause batteries to leak or explode, resulting in personal injury. Battery life varies with usage.
Source
- mysupport.razer.com
- Download User Manual – Download
- Product Page – Click Here
Read More
- Razer Kraken V3 HyperSense Headphones User Manual
- Razer Kaira Pro PS5 Headphones User Manual
- Razer BlackShark V2 ESL Edition User Manual