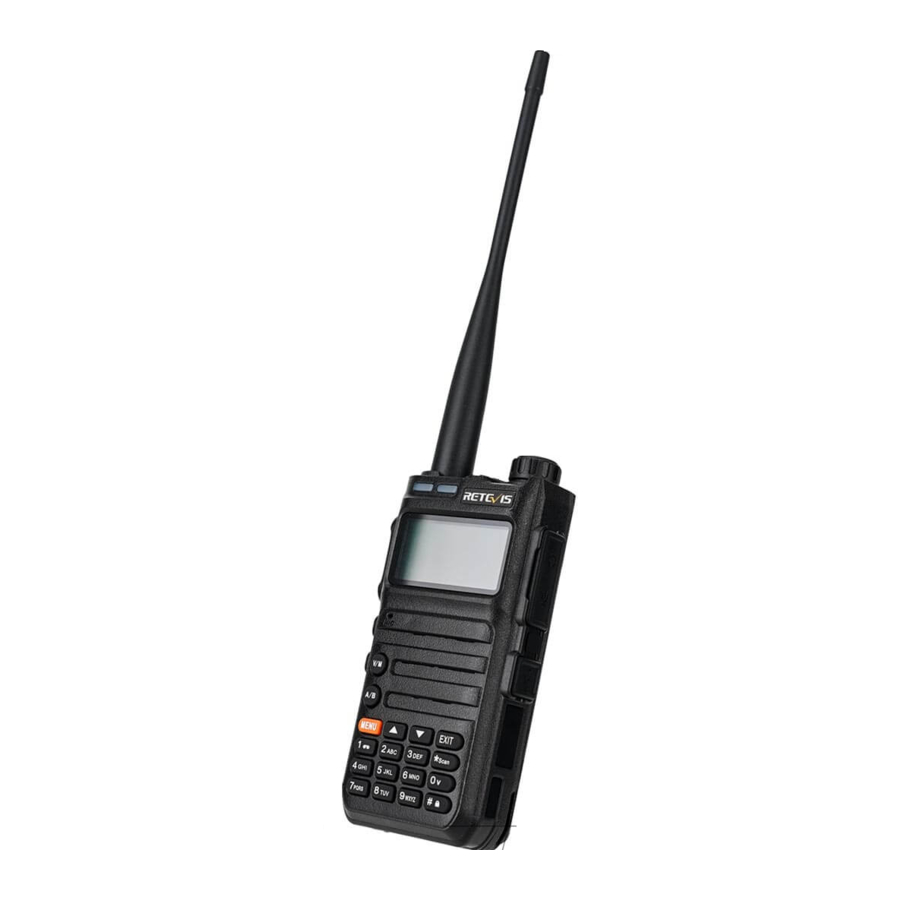
Retevis RA685 — Walkie Talkie Manual
FEATURE
- Frequency range: 144-146MHZ(RX/TX) 430-440MHZ(RX/TX)
- Dual band, Dual Display, Dual Standby, U/V band relay cross-band transmission and reception, convenient for users to set network at any time.
- High, middle, and low power switching to meet the power requirements of users at different distances, more energy-saving and power-saving
- Up to 128 memory channels for programming frequency and other various data
- Multiple display modes such as channel number, frequency, channel frequency, channel name, etc.
- CTCSS/DCS, DTMF signaling, reject redundant calls from other stations
- The tail tone is eliminated to avoid the impact noise from the speaker after the call is over
- VOX voice-activated transmission, no need to press the PTT button to talk normally
- Emergency alarm, ANI identification and other functions through DTMF
- DTMF, CTCSS (60.0 -259.9 HZ), DCS signaling codec function
- 8 step frequency selection (2.5K, 5.0K, 6.25K, 10.0K, 12.5K, 20.0K, 25.0K, 50.0K)
- Automatic power saving function to extend battery life
- SOS emergency alert function
- Computer programming function
- Wide/narrow band (25KHz/12.5KHz) selection function
- Digital FM radio (receiving 65-108MHz)
- Direct selection of keyboard numbers for menu items, the transmit and receive frequency can be manually input
- Strong flashlight lighting function
- Frequency test function, copy the frequency of other devices at any time
- USB charging function, you can use the USB charging cable to charge
- Special CTCSS/DCS (frequency hopping function)
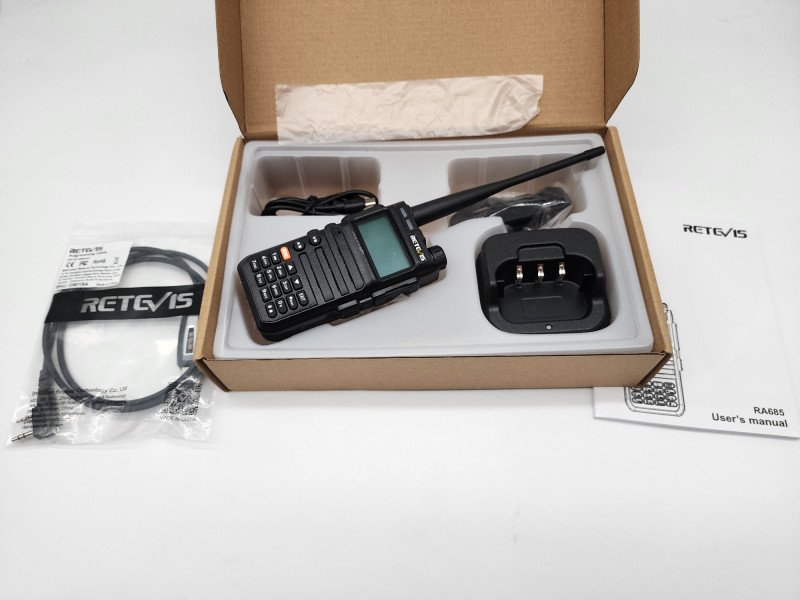
Check the contents of the package
The box contains the following items. If any items are missing or damaged, please contact the dealer where you purchased the product.
| Article | Quantity | Article | Quantity |
| Host | 1 | Charging base | 1 |
| Battery | 1 | Belt clip | 1 |
| Antenna | 1 | Manual | 1 |
| Sling | 1 |
Note: The antenna varies with the frequency band. Please refer to the color ring label at the bottom of the antenna for the antenna frequency band. If the label does not indicate the frequency band, please refer to the specific frequency band on the host label.
Familiar with this machine

Status indication
Status Icons![]()
| No. | Icon | Product Status |
| 1 |  |
Channel strength indicator, the more the number, the stronger the signal |
| 2 |  |
The current transmitting power is high power (the longest communication distance, the largest power consumption); |
 |
The current transmitting power is medium power (more power saving, relatively moderate communication distance); | |
 |
The current transmitting power is low power (the most power saving, relatively close distance) | |
| 3 |  |
When the side tone switch is set to key side tone/key + ID/ID, this symbol appears |
| 4 |  |
This symbol indicates that the current subtone is a digital subtone |
 |
This symbol indicates that the current subtone is an analog subtone | |
| 5 |  |
When this symbol appears in frequency mode, it means that the transmitting frequency is the receiving frequency plus a frequency difference frequency. The frequency difference frequency is set in menu 26 |
 |
When this symbol appears in frequency mode, it means that the transmitting frequency is the receiving frequency minus a frequency difference frequency. The frequency difference frequency is set in menu 26 | |
| 6 |  |
The appearance of this symbol indicates that the dual-band standby is on, and it is in the dual-standby state. It can be watched at the frequency points of the two frequency bands displayed on the screen |
| 7 |  |
The symbol appears when the keyboard is locked; press and hold the [#] key to unlock, and the symbol disappears |
| 8 |  |
Indicates that the voice-activated emission function is activated, and the emission will start when the sound pressure level of the microphone reaches the set value |
| 9 |  |
Receiving and transmitting frequency inversion in frequency mode/channel mode |
| 10 |  |
This symbol appears when the channel is working in narrowband mode |
| 11 |  |
Display the current remaining battery power; the more bars, the more battery power |
| 12 |  |
A/B band pointer, indicating the current working frequency or working channel |
| 13 | Aranbic No. | Digital channel mode, the channel number of the A band |
| 14 | Aranbic No. | Digital In channel mode, the channel number of the B band |
LED indicator light
This machine is equipped with LED indicators to let you easily grasp the current operating status of the machine.
| Indicator status | Native status |
| Steady Red light | Launching |
| Steady green light | Receiving |
Preparation before use
Install the antenna
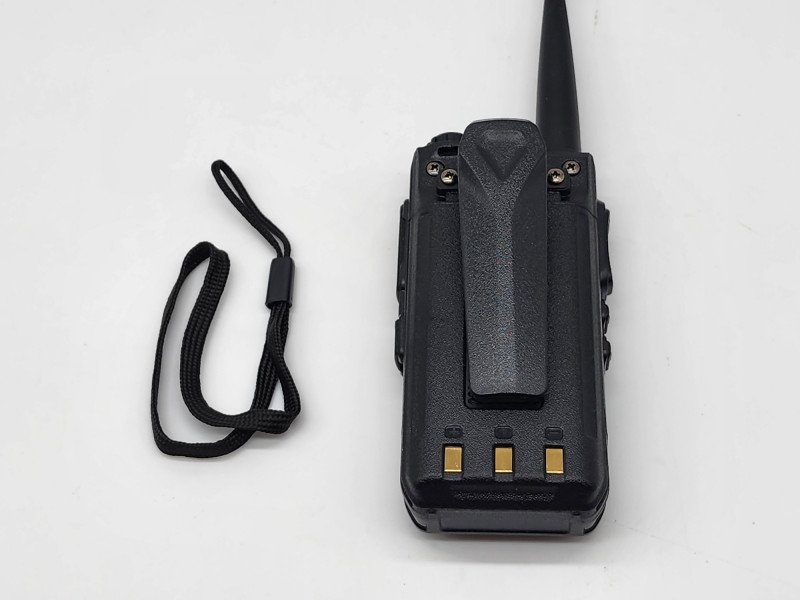
Install the battery
- Align the battery with the battery mount on the back of the walkie-talkie.
- Press the battery forcefully into the walkie-talkie, and slide the battery up until the lock plate is locked to the correct position. If you need to remove the battery, turn off the walkie-talkie. Press the battery lock to the unlocked position and hold it down, then slide the battery down and away from the battery mount.
Install the belt clip
Align the two screw holes of the belt clip with the screw holes above the battery, install and tighten the screws.
If you need to remove the belt clip, loosen and remove the screws from the belt clip.
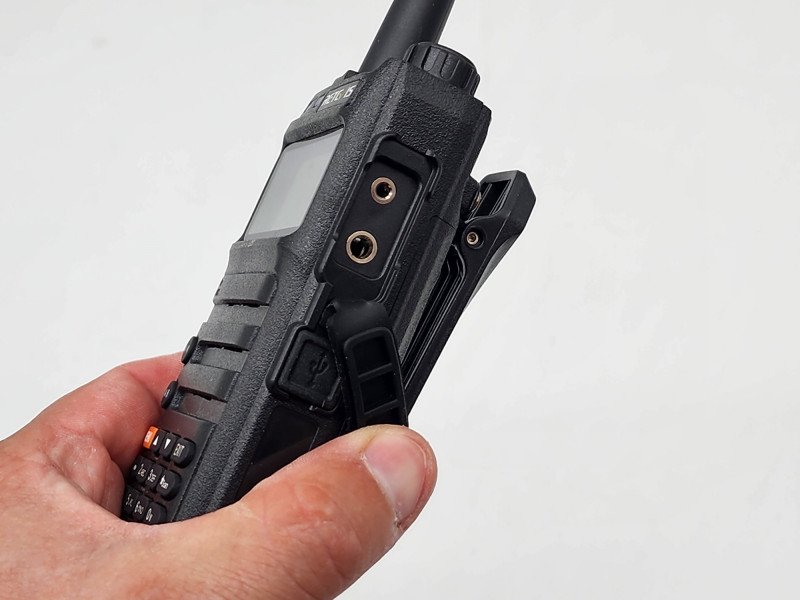
Install an external headset/microphone (optional purchase separately)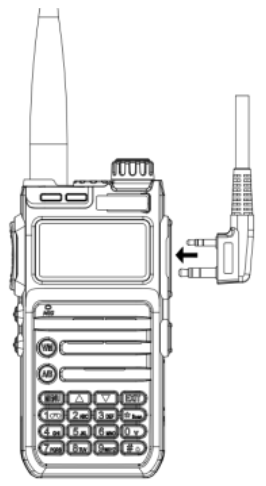
- Open the earphone cover.
- Insert the headphone plug into the headphone jack. When you don’t need to use the earphones, pull out the earphone plug from the earphone hole and put on the earphone cover. When the universal interface is not used, please put on the dust cover.
Attention:
- Please use the charging equipment designated by our company to charge. When charging the whole device, it is recommended to turn off the walkie-talkie first.
- According to the 2016 new requirements of the International Civil Aviation (IATA) «Technical Regulations for the Safe Air Transport of Dangerous Goods», the state of charge of lithium-ion batteries (cells) for air transport shall not exceed 30% of their rated capacity. Therefore, the first time the battery is used with the host, there will be a low battery warning with the voice prompt «please charge». Phenomenon, please charge the battery before use.
- When the battery is charged in the charger, the red light may keep flashing. This is the pre-charging process performed by the charger to protect the battery when the battery power is too low. It is a normal phenomenon. Generally, it can turn to red after 30 seconds. Normal charging state when the light is on.
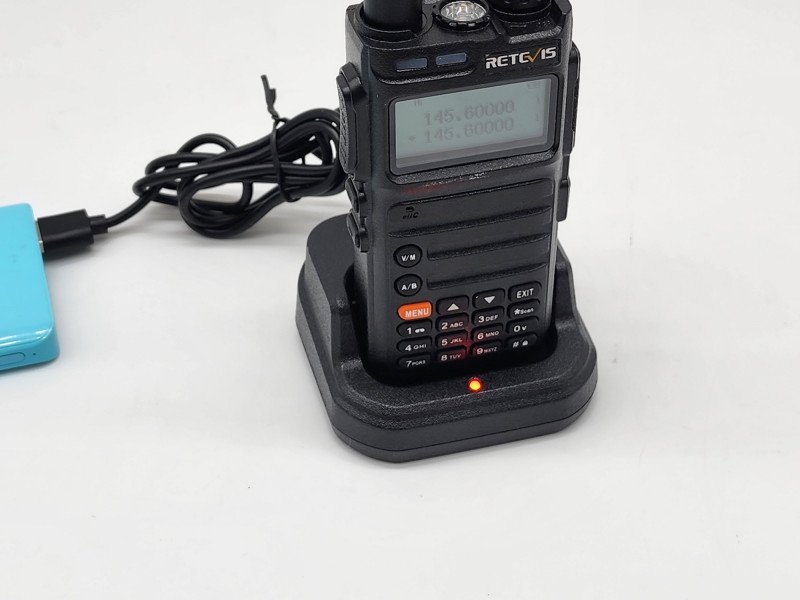
Walkie-talkie charging
When using the terminal for the first time, a low battery alarm may appear. Please charge the battery before using the terminal, the steps are as follows: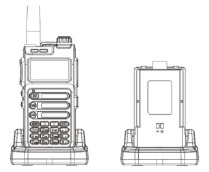
- Insert the power adapter interface into the jack on the back of the charging base.
- Insert the plug of the power adapter into the power outlet.
- Put the battery into the charging cradle.
- Observe the LED indicator of the charging base to understand the current charging status, as shown in the table below.
| The charging indicator light shows | The current charging status |
| Red light flashes | Battery voltage is too low |
| Red light is on | Charging |
| Green light is on | Charging is complete |
Check battery
This function allows you to know the current battery voltage and remaining power.
Long press  key to display the current voltage.
The current battery level is displayed on the upper right of the screen, and the battery icon is as follows:
Basic operation
| Knobs, switches, buttons | Instructions |
| Power/volume switch |
|
| Select channel | The channel is the channel through which the signal is transmitted. After power on, press the [V/M] key to switch to the channel mode, press [/] to select the channel, and the channel number will be displayed on the right side of the screen. If the channel broadcast function is turned on, the intercom will broadcast the current channel mode. |
| PTT button call |
|
| Side Key 1 | The side buttons have two modes: short press and long press, and the following functions can be selected: off, flashlight, alarm, radio, NOAA weather forecast, monitoring, and scan. Off: No function Flashlight function: Short press the [SK1] key to turn on the flashlight function and the flashlight light is always on; short press the [SK1] key again to turn off the flashlight function. If you choose to operate the flashlight function in the menu mode, short press the [SK1] key to turn on the flashlight for the first time, short press the second flashlight to keep flashing, and short press three times to turn off the flashlight. Alarm: SOS emergency alarm function: Short press the [SK1] key to turn on the alarm function. At this time, the green indicator light and the red indicator light flash at the same time. Short press the [SK1] key again to release the alarm. Radio: Short press the [SK1] key to turn on the radio function, and short press the [SK1] key again to turn off the radio. The radio frequency can be entered through the keyboard or tap the «#» key to automatically search for radio stations. In radio mode, press the [EXIT] key to switch between 65-75/76-108MHz frequency band. NOAA weather forecast: Short press the [SK1] key to turn on the NOAA function, and short press the [SK1] key again to turn off the NOAA function. Press the up and down keys to select the channel: 10 channels for selection: see Appendix 1 for details Monitoring function: Short press the [SK1] key to turn on the monitoring function, and release the [SK1] key to cancel the monitoring. Sweep: Short press [SK1] key to turn on the sweep function, and directly measure the frequency of other devices. |
| Side Key 2 | The same side key SK1 has a short press and long press function to choose |
| V/M key | Frequency mode or channel mode switching.
|
| A/B key | A/B upper and lower frequency band switch selection. Press the PTT button to transmit in the frequency band pointed to by the pointer. |
| Keyboard lock and unlock | Manual lock: Long press # key to lock the intercom. Automatic lock: After the automatic keyboard lock is turned on, when there is no operation on the buttons and knobs, the automatic lock will be delayed for 10 seconds. Unlock: Long press the # key to unlock the keyboard. |
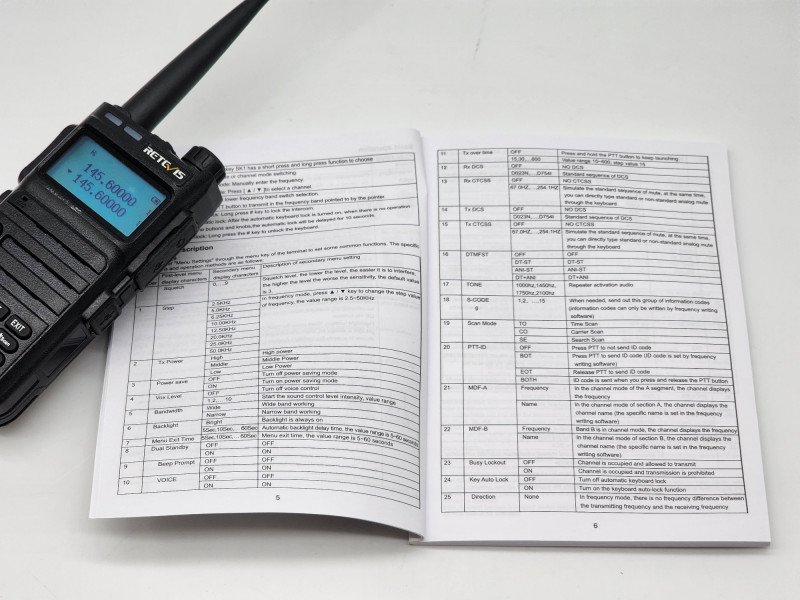
Function Description
Menu Settings
You can enter «Menu Settings» through the menu key of the terminal to set some common functions. The specific instructions and operation methods are as follows:
| Menu number display characters | First-level menu | Secondary menu display characters | Description of secondary menu setting |
| 0 | Squelch | 0,…,9 | Squelch level, the lower the level, the easier it is to interfere, the higher the level the worse the sensitivity, the default value is 3. |
| 1 | Step | 2.5KHz | In frequency mode, press  key to change the step value of frequency, the value range is 2.5~50KHz key to change the step value of frequency, the value range is 2.5~50KHz |
| 5.0KHz | |||
| 6.25KHz | |||
| 10.00KHz | |||
| 12.50KHz | |||
| 20.0KHz | |||
| 25.0KHz | |||
| 50.0KHz | |||
| 2 | Tx Power | High | High power |
| Middle | Middle Power | ||
| Low | Low Power | ||
| 3 | Power save | OFF | Turn off power saving mode |
| ON | Turn on power saving mode | ||
| 4 | Vox Level | OFF | Turn off voice control |
| 1,2,… 10 | Start the sound control level intensity, value range | ||
| 5 | Bandwidth | Wide | Wide band working |
| Narrow | Narrow band working | ||
| 6 | Backlight | Bright | Backlight is always on |
| 5Sec, 10Sec,… 60Sec | Automatic backlight delay time, the value range is 5~60 seconds | ||
| 7 | Menu Exit Time | 5Sec, 10Sec,… 60Sec | Menu exit time, the value range is 5~60 seconds |
| 8 | Dual Standby | OFF | OFF |
| ON | ON | ||
| 9 | Beep Prompt | OFF | OFF |
| ON | ON | ||
| 10 | VOICE | OFF | OFF |
| ON | ON | ||
| 11 | Tx over time | OFF | Press and hold the PTT button to keep launching |
| 15,30,…600 | Value range 15~600, step value 15 | ||
| 12 | Rx DCS | OFF | NO DCS |
| D023N,…,D754I | Standard sequence of DCS | ||
| 13 | Rx CTCSS | OFF | NO CTCSS |
| 67.0HZ,…,254.1HZ | Simulate the standard sequence of mute, at the same time, you can directly type standard or non-standard analog mute through the keyboard | ||
| 14 | Tx DCS | OFF | NO DCS |
| D023N,…,D754I | Standard sequence of DCS | ||
| 15 | Tx CTCSS | OFF | NO CTCSS |
| 67.0HZ,…,254.1HZ | Simulate the standard sequence of mute, at the same time, you can directly type standard or non-standard analog mute through the keyboard | ||
| 16 | DTMFST | OFF | OFF |
| DT-ST | DT-ST | ||
| ANI-ST | ANI-ST | ||
| DT+ANI | DT+ANI | ||
| 17 | TONE | 1000hz, 1450hz, 1750hz, 2100hz | Repeater activation audio |
| 18 | S-CODE g | 1,2…,15 | When needed, send out this group of information codes (information codes can only be written by frequency writing software) |
| 19 | Scan Mode | TO | Time Scan |
| CO | Carrier Scan | ||
| SE | Search Scan | ||
| 20 | PTT-ID | OFF | Press PTT to not send ID code |
| BOT | Press PTT to send ID code (ID code is set by frequency writing software) | ||
| EOT | Release PTT to send ID code | ||
| BOTH | ID code is sent when you press and release the PTT button | ||
| 21 | MDF-A | Frequency | In the channel mode of the A segment, the channel displays the frequency |
| Name | In the channel mode of section A, the channel displays the channel name (the specific name is set in the frequency writing software) | ||
| 22 | MDF-B | Frequency | Band B is in channel mode, the channel displays the frequency |
| Name | In the channel mode of section B, the channel displays the channel name (the specific name is set in the frequency writing software) | ||
| 23 | Busy Lockout | OFF | Channel is occupied and allowed to transmit |
| ON | Channel is occupied and transmission is prohibited | ||
| 24 | Key Auto Lock | OFF | Turn off automatic keyboard lock |
| ON | Turn on the keyboard auto-lock function | ||
| 25 | Direction | None | In frequency mode, there is no frequency difference between the transmitting frequency and the receiving frequency |
| Plus | In frequency mode, the transmitting frequency is equal to the receiving frequency plus the frequency difference frequency | ||
| Minus | In frequency mode, the transmitting frequency is equal to the receiving frequency minus the frequency difference frequency | ||
| 26 | Offset | 00.000,…,99.998 | In frequency mode, the difference between the transmitting and receiving frequencies |
| 27 | Key1 sp | OFF | No function |
| LAMP | Turn on the flashlight function | ||
| SOS | Turn on the alarm function | ||
| FM | Turn on the radio function | ||
| NOAA | Enable NOAA weather forecast function | ||
| MONI | Turn on the monitoring function | ||
| Scan | Turn on the sweep function | ||
| 28 | Key1 LP | Same function as side key 1 short press | |
| 29 | Key2 sp | Same function as side key 1 short press | |
| 30 | Key2 LP | Same function as side key 1 short press | |
| 31 | Memory | 1,…,128 | When storing a channel, it is used to indicate the channel number to be stored. If the word CH- is displayed in front of the number, it means that the channel originally has channel parameters |
| 32 | Delete | 1,…,128 | Delete the channel parameters of the specified channel, if there is no CH- in front, it means that the channel has no parameters and the operation is invalid |
| 33 | Alarm Mode | On site | On-site alarm |
| Send sound | Send sound | ||
| Send code | Send code | ||
| 34 | TAIL | OFF | After the PTT is released, the machine does not send a shutdown code, usually when it is relayed through the relay, let it make noise to confirm whether the signal of the machine is relayed |
| ON | After releasing the PTT button, the machine sends a shutdown code to suppress the instantaneous noise of the listener | ||
| 35 | PROGER | OFF | Turn off the call end alert tone |
| ON | Turn on the call end alert tone | ||
| 36 | Language | Chinese | |
| English | |||
| 37 | Reset | VFO | Menu initialization only |
| ALL | Menu and channel initialization | ||
| 38 | SPECIAL DCS | OFF | Close special DCS |
| ON | Open Menu and channel initialization, only with same DCS can communicate |
Common function description
The functions supported by the walkie-talkie are shown in the table below.
| Name | Function description |
| Squelch level adjustment | Squelch level adjustment is to adjust the signal strength required when receiving a signal. The squelch level (0 open to 9 is the highest) is selected by the local environment, and 3 is generally selected. |
| CTCSS/DCS | CTCSS/DCS is used to avoid listening to irrelevant calls of the same frequency. Only when the transmitted CTCSS/DCS matches the received CTCSS/DCS digital, the walkie-talkie can listen to the voice through the speaker. |
| TOT | Timeout prohibition TOT timeout prohibition can limit the single transmission time (the default is 60 seconds) to prevent the communication parties from occupying channel resources for a long time, and to prevent the terminal from being damaged due to overheating. After the duration of pressing the [PTT] key expires, the terminal will automatically terminate the transmission and emit a warning tone. If you need to talk again, please transmit after the preset time. |
| Power saving | When the walkie-talkie has no receiving or transmitting, no button or knob operation reaches the power saving time, it will automatically enter the power saving mode. |
| Low battery warning | It is used to remind the battery to charge in time when the battery power is low. When the battery is too low, transmission will be prohibited. |
| Emergency Alarm | An emergency alarm is when you encounter an emergency, you can ask your companion or the control center for help. |
| SCAN | After scanning is turned on, the terminal will scan according to the scan list. When there is activity on a certain channel, it will stay on the channel to listen, so as to understand the current activity status of related group members. |
| BCL | Busy channel lock BCL can prevent interference from other terminals on the same channel during transmission. When other terminals occupy the current channel, press and hold the [PTT] key, and the terminal will emit a «beep» tone, indicating that it cannot be transmitted. If the current channel is free, press and hold the [PTT] key to start transmission. |
| Power level | The power level refers to the transmit power level of the walkie-talkie, which can be set to high power or low power. High power can increase the signal strength of the current transmitted voice of the terminal, and it can also communicate with the remote terminal. Low power can save power. |
| MONI | Monitoring MONI monitoring is a listening method used to receive more signals or weak signals. It helps to distinguish and listen to the faint sounds in the speakers. |
| Channel broadcast | Channel broadcast is used to indicate the sequence of the current channel. |
| VOX | Voice-activated transmission VOX After turning on the voice-activated, when the voice detected by the microphone meets the transmission conditions, the terminal will automatically transmit the voice, and you can speak directly without pressing the [PTT] key. The voice control gain is used to control the sensitivity of the microphone’s voice control emission, which is configured by the dealer. |
Voice-activated emission (VOX)
After turning on this function, if the user’s speaking volume level reaches the level selected by the walkie-talkie, the walkie-talkie can also start the transmission operation by voice without pressing the [PTT] key. In some work situations, the user can not freely press the [PTT] key to call, then this function can be enabled. Operation method:
- In the standby mode, press the [MENU] key, the voice prompt «menu setting», enter the function menu setting;
- Press [
 ] or [
 ] key to select 4 menu number forward or backward; or directly enter the number 4 to enter 4 menu number;
 - Press the [MENU] key, the voice prompt «Voice-activated emission», press the [] or [] key, select 1~10 (the larger the value, the higher the sensitivity; such as selecting 3)
- Press the [MENU] key, the voice prompt «OK», save and return to the previous menu.
- Repeat the above operation, select OFF to turn off the voice-activated transmission function. After turning on the voice-activated transmission function, speak into the microphone, and the voice can be sent out; stop speaking, and the transmission will also stop. You can select the VOX sensitivity level according to the quietness of the use environment. If the environment noise is too large, there will be long emission after the VOX function is activated. If the dual-wait function is enabled on this machine, the VOX function is turned off by default, and the VOX function cannot be activated.
Keyboard lock
The keyboard lock function disables the number keys to prevent you from activating a function by mistake. This machine can be set to automatic keyboard lock function, the operation is as follows:
- In the standby mode, press the [MENU] key, the voice prompt «menu setting», enter the function menu setting;
- Press or key to select 24 menu number forward or backward; or directly enter number 2 and 4 to enter 24 menu number;
- Press [MENU] key, press [] or [] key to select ON;
- Press the [MENU] key, the voice prompt «OK», save and return to the previous menu. The automatic keyboard lock function is activated.
- Repeat the above operation, select OFF to turn off the automatic keyboard lock function, and select manual keyboard lock. The operation is as follows:
- In the standby state, long press the «#» key for more than 2s, the keyboard lock function is activated (voice prompt «keyboard lock»);
- Long press the «#» key repeatedly for more than 2s, the keyboard lock function is closed (voice prompt «keyboard unlock»). After the automatic keyboard lock function is turned on, when it is not locked, the numeric keyboard is automatically locked without any keyboard operation for 10 seconds.
Dual Standby
When in dual standby mode, the two-way radio can receive the frequency set by the A or B channel. The operation is as follows:
- In the standby mode, press the [MENU] key, the voice prompt «menu setting», enter the function menu setting;
- Press [] or [] key to select 8 menu number forward or backward; or directly enter the number 8 to enter 8 menu number;
- Press the [MENU] key, the voice prompt «Dual frequency waiting», press [] or [] key, select ON
- Press the [MENU] key, the voice prompt «OK», save and return to the previous menu. The dual-frequency waiting function is turned on.
- Repeat the above operation, select OFF to turn off the dual-frequency standby function. In the menu mode, the dual-frequency standby is temporarily turned off, and after exiting, the dual-frequency standby will be restored.
- Since the dual-standby dual-save mode is in the main and sub-channel scanning state, in the dual-segment dual-save mode, even if the power saving function of the unit is turned on, its power saving function is still invalid, and the standby time of the walkie-talkie will be shortened.
Channel delete
You may want to delete a memory channel due to setting errors or changing other settings. The operation is as follows:
- In the standby mode, press the [MENU] key, the voice prompt «menu setting», enter the function menu setting;
- Press [] or [] key to select 32 menu number forward or backward; or directly enter numbers 3 and 2 to enter 32 menu number;
- Press the [MENU] key, the voice prompt «channel delete»;
- Press [] or [] key to select the channel to be deleted forward or backward.
- If the number prefix displays the character «CH-«, it means that the channel number originally has channel parameters and can be deleted.
- If the number prefix does not display the character «CH-«, it means that the channel number is empty and can be stored directly without deleting it.
- Press the [MENU] key, the voice prompt «OK», delete the stored channel parameters, save and return to the previous menu.
- If the channel is empty, press the [MENU] key to directly return to the previous menu.
Channel storage
The parameters to be included in a complete channel include receiving frequency, transmitting frequency, receiving sub-audio, transmitting sub-audio, transmitting power, channel bandwidth, PTT-ID, busy lock, signaling code, scan addition, channel name, etc. Except for scanning addition and channel name editing through the frequency writing software, other parameters can be set in the frequency mode, and then store them in the designated channel number through the menu 31 Store Channel.
Example: The channel storage parameters are required as follows, and they are stored in the channel number with channel number 001.
- Receiving frequency 440.5 MHZ
- Transmission frequency 4 30.5 MHZ
- Receive mute digital D031N
- Transmit mute digital D031N
- High transmit power
- Channel bandwidth Broadband
The channel name is written in the frequency writing software when needed
Steps:
- Short press [V/M] key to switch to VFO mode, the screen displays
 .
. - In the frequency mode, press the [A/B] key to make the pointer point to A (upstream frequency point)
- Press the number keys 4, 4, 0, 5, 0, 0 in turn to adjust the frequency to 440.500MHZ, and the screen displays .
- Power setting: press
 → (number key 2) →→ [] or [] to select the power (HIGH/MID/LOW) as HIGH→ ,
 - Bandwidth setting: Press → (number key 5) →→ [] or [] to select the channel bandwidth (NARR/WIDE) as WIDE→ ,
- Receive digital tone setting: press → (number keys 1, 2) → [] or [] to select the tone value D031N→ ,
- Transmitting digital sub-tone setting: press → (number keys 1, 4) → → [] or [] to select sub-tone value D031N→,
- PTT-ID button transmission setting: press → (number keys 2, 0) → → [] or [] to select the transmission mode (OFF/BOT/EOT/BOTH) as OFF→ ,
- Channel storage settings for receiving and transmitting the same frequency:
- Press → (number keys 3, 1), the screen displays:

- Press , the voice prompt «storage channel», the screen displays :
- Press or key to select empty channel forward or backward, the screen displays :
- Press , the voice prompts «receive storage», the screen displays : press the voice prompts «storage channel».
- Press , the voice prompt «transmit storage», the screen displays :
- Press EXIT key to return to frequency mode.
- Press
- Channel storage settings for receiving and transmitting different frequencies:
- Press → (number keys 3, 1), the screen displays :
- Press , the voice prompt «storage channel», the screen displays :
- Press the [] or [] key to select the empty channel forward or backward, and the screen displays: .
- Press , the voice prompt «receive storage», the screen displays: ;
- Press EXIT key to return to frequency mode.
- Perform step 3, enter the desired transmit frequency;
- Press → (number keys 3, 1), the screen displays: ,
- Press , the voice prompt «storage channel», the screen displays: ,
- Press , the voice prompt «transmit storage», the screen displays: ;
- Press EXIT key to return to frequency mode.
- Press
Analog sub-audio (CTCSS)/digital sub-audio (CDCSS)
Analog sub-audio (CTCSS)/digital sub-audio (CDCSS) is mainly used to avoid listening to unrelated calls on the same frequency. If CTCSS/CDCSS is set, within the effective communication range, only calls with the same subtone signaling set in the channel can be received; but if CTCSS/CDCSS signaling is not set, you can listen to the effective communication range All calls on the same channel.
Side tone switch
Key side tone: The machine emits key side tone when sending key side tone
ID code side tone: When sending the ID code, the machine will emit the ID code side tone
Button side tone + ID code side tone: When sending button side tone and ID code side tone, the machine emits the corresponding sound
Note: Button side tone, including number key side tone and TONE tone
USB charging
The walkie-talkie can be directly plugged into the USB charging cable and charging with a power bank.
Frequency measurement function
Press +〖*〗key to enter the frequency measurement mode, press【】or【】key to select U segment or V segment. When a signal is received, if the current frequency has a mute tone, it will be displayed on the screen at the same time, press the key The current frequency can be saved. Or you can select the shortcut operation method by pressing the side button.
Special digital mute
The special digital mute is a mute encryption function, which can prevent other machines from copying the mute of this machine. After this function is turned on, only the same DCS code can talk to each other. The mute encryption function is effective only when the DCS mute code is set. Only the same machines with special digital mute on can talk to each other.
Optional accessories
Please use the accessories specified by our company.
If you use unauthorized accessories without authorization, all consequences caused by this are the responsibility of the user.
Please consult your local dealer for optional accessories of the walkie-talkie.
Main Specifications
| TOTAL | Frequency Range | 144-146MHZ(RX/TX) 430-440MHZ(RX/TX) |
| Channel No. | 16 | |
| Channel Spacing | 25/12.5kHz | |
| Input voltage | 7.4 VDC | |
| Battery (standard configuration) | 1800mAH(Li-Ion) | |
| Battery Life(5-5-90, High power transmission) | About 14 Hours | |
| Current: Standby | ≤65mA | |
| Receive | ≤450 mA | |
| Transmit | ≤1.8 A @high power, 850 mA @ low power | |
| Frequency stability | ±2.5ppm | |
| Operating temperature | -20℃ to +60℃ | |
| Antenna impedance | 50Ω | |
| Walkie-talkie size(With battery, but without antenna) | 121×61×33mm | |
| Walkie-talkie weight(Including antenna and battery) | 223g | |
| TRANMIT PART | Transmit output power | 5W/3W/1W |
| Modulation | 16K0F3E@25KHz, 11K0F3E@12.5KHz | |
| Spurious emission | -36dBm1GHz | |
| FM signal-to-noise ratio | 45dB@25KHz, 40dB @12.5KHz | |
| Audio distortion | ≤5% | |
| Modulation limit | ±5.0 KHz@25 KHz, ±2.5 KHz@12.5 KHz | |
| Adjacent channel power | 70dB @ 25KHz, 60dB @ 12.5KHz | |
| (300-3000Hz) Audio response | +1~3dB | |
| RECEIVE | Receiving sensitivity | 0.25μV (12dB SINAD) |
| Adjacent channel selectivity | ≥60dB@25KHz, ≥55dB@12.5KHz | |
| Intermodulation immunity | ≥60dB@25KHz, ≥55dB@12.5KHz | |
| Conducted spurious emissions | ≤-57dB@25KHz, ≤-57dB @12.5KHz | |
| FM signal-to-noise ratio | ≥45dB@25KHz, ≥40dB @12.5KHz | |
| Audio output power | 1W @16ohms | |
| Audio distortion | ≤5% | |
| Audio response(300-3000Hz) | +1~-3dB |
All specifications are subject to change without notice or responsibility.
Disclaimer
This manual strives for the accuracy and completeness of the content during the compilation process, but the company does not assume any responsibility for possible errors or omissions. Due to the continuous development of technology, the company reserves the right to change product design and specifications without notice. Without the company’s prior written authorization, this manual may not be copied, modified, translated and distributed in any form. The third-party products and content involved in this manual are owned by the third party, and our company does not provide guarantees for their accuracy, validity, timeliness, legality or completeness.

Videos
Retevis RA685 — VHF/UHF FM transceiver Review Video
Documents / Resources
Download manual
Here you can download full pdf version of manual, it may contain additional safety instructions, warranty information, FCC rules, etc.
Download Retevis RA685 — Walkie Talkie Manual
Частотомер
Главная необычность Retevis RA685 — это Частотомер.
Что даёт наличие Частотомера?
Удобство и скорость стыковки с группой случайных радиостанций со случайными частотами.
Зачастую, владельцы радиостанций имеют весма смутное представление на каких частотах работают их балалайки, какие имеют настройки.
Просто, покупают комплект из двух-трёх одинаковых радиостанций и используют магазинные настройки по-умолчанию…
В полевых условиях присоединиться к такой группе почти не реально:
Не известны Частоты, не известны настройки тонального шумоподавления CTCSS/DCS…
Retevis RA685 позволяет отсканировать эти настройки за секунду.
Инструкция
по использованию Частотомера в Retevis RA685:
1. Нажать МЕНЮ, затем *Scan
2. Стрелочками ▲ или ▼ выбрать предполагаемый диапазон UHF (400-520MHz) или VHF (136-174MHz)
3. Приблизить Retevis RA685 к передающей радиостанции (источнику) на расстояние 0,5 – 35 метров.
(Это не описка. У меня стабильно срабатывает на 35 метров, через всё здание, на всю длину коридора (!!!если выключены ВСЕ электроприборы, светильники и т.п.).
Срабатывает и дальше 35 метров, с улицы, но уже не всегда.)
4. На дисплее Retevis RA685 отобразится Частота и CTCSS/DCS код (если используется)
5. Если в этот момент нажать кнопку МЕНЮ, эти настройки сразу пропишутся в память Retevis RA685
* Если RA685 находилась в режиме VFO, новые настройки пропишутся в ячейку VFO
* Если RA685 находилась в Канальном режиме, новые настройки пропишутся в текущий Канал
(поэтому, ещё до включения режима Частотомера, на RA685 необходимо выбрать Канал, куда мы хотим прописать Новые настройки.
Иначе, текущая полезная ячейка (какая нибудь LPD или PMR) будет переписана!)
6. Если текущие показания Частотомера не нужно сохранять, для выхода просто нажмите EXIT
Текущие настройки каналов в Retevis RA685 (частота, порог шумодава, ширина полосы и т.д.) на чувствительность Частотомера, вроде, никак не влияют.
Зато, однозначно, на дальность обнаружения (измерения) сильно влияет наличие фоновых помех (Компьютеры, сотовые, вай-фай, светильники, бытовые приборы и т.п.)
У меня стабильно срабатывает на 35 метров внутри здания (!!!если практически все электроприборы выключены)
В лесу, я уверен, дальность обнаружения (измерения) будет ещё больше.
Проверю когда нибудь…
Примечание:
Радиостанция не является лабораторным измерительным прибором. Потому, глупо ожидать стабильной высочайшей точности измерений.
Частотомер в Retevis RA685 является простым Индикатором без какого либо класса точности.
От экземпляра к экземпляру, кому-то повезёт больше, кому-то меньше)))
Некоторые экземпляры Retevis RA685 покажут абсолютно истинное значение измеряемой частоты. У других, возможна погрешность на величину плюс-минус 1,25 кГц, или даже 2,5 кГц.
(Например: вместо 145.70000 МГц может отобразиться 145.69875 МГц)
У меня измеряет = идеально.
Но на Ютубе я видел ролики, что у кого-то подвирает, слегка.
Внимание!!!
На Передаче,
не следует подносить одну радиостанцию к другой ближе пол-метра !!!
Можно пожечь входные цепи Приёмника.
Очень высокая вероятность!
Видео:
- Open the earphone cover.
- Insert the headphone plug into the headphone jack. When you don’t need to use the earphones, pull out the earphone plug from the earphone hole and put on the earphone cover. When the universal interface is not used, please put on the dust cover.
Attention:
- Please use the charging equipment designated by our company to charge. When charging the whole device, it is recommended to turn off the walkie-talkie first.
- According to the 2016 new requirements of the International Civil Aviation (IATA) «Technical Regulations for the Safe Air Transport of Dangerous Goods», the state of charge of lithium-ion batteries (cells) for air transport shall not exceed 30% of their rated capacity. Therefore, the first time the battery is used with the host, there will be a low battery warning with the voice prompt «please charge». Phenomenon, please charge the battery before use.
- When the battery is charged in the charger, the red light may keep flashing. This is the pre-charging process performed by the charger to protect the battery when the battery power is too low. It is a normal phenomenon. Generally, it can turn to red after 30 seconds. Normal charging state when the light is on.
Walkie-talkie charging
When using the terminal for the first time, a low battery alarm may appear. Please charge the battery before using the terminal, the steps are as follows:
- Insert the power adapter interface into the jack on the back of the charging base.
- Insert the plug of the power adapter into the power outlet.
- Put the battery into the charging cradle.
- Observe the LED indicator of the charging base to understand the current charging status, as shown in the table below.
| The charging indicator light shows | The current charging status |
| Red light flashes | Battery voltage is too low |
| Red light is on | Charging |
| Green light is on | Charging is complete |
Check battery
This function allows you to know the current battery voltage and remaining power.
Long press key to display the current voltage.
The current battery level is displayed on the upper right of the screen, and the battery icon is as follows:
Basic operation
| Knobs, switches, buttons | Instructions |
| Power/volume switch |
|
| Select channel | The channel is the channel through which the signal is transmitted. After power on, press the [V/M] key to switch to the channel mode, press [/] to select the channel, and the channel number will be displayed on the right side of the screen. If the channel broadcast function is turned on, the intercom will broadcast the current channel mode. |
| PTT button call |
|
| Side Key 1 | The side buttons have two modes: short press and long press, and the following functions can be selected: off, flashlight, alarm, radio, NOAA weather forecast, monitoring, and scan. Off: No function Flashlight function: Short press the [SK1] key to turn on the flashlight function and the flashlight light is always on; short press the [SK1] key again to turn off the flashlight function. If you choose to operate the flashlight function in the menu mode, short press the [SK1] key to turn on the flashlight for the first time, short press the second flashlight to keep flashing, and short press three times to turn off the flashlight. Alarm: SOS emergency alarm function: Short press the [SK1] key to turn on the alarm function. At this time, the green indicator light and the red indicator light flash at the same time. Short press the [SK1] key again to release the alarm. Radio: Short press the [SK1] key to turn on the radio function, and short press the [SK1] key again to turn off the radio. The radio frequency can be entered through the keyboard or tap the «#» key to automatically search for radio stations. In radio mode, press the [EXIT] key to switch between 65-75/76-108MHz frequency band. NOAA weather forecast: Short press the [SK1] key to turn on the NOAA function, and short press the [SK1] key again to turn off the NOAA function. Press the up and down keys to select the channel: 10 channels for selection: see Appendix 1 for details Monitoring function: Short press the [SK1] key to turn on the monitoring function, and release the [SK1] key to cancel the monitoring. Sweep: Short press [SK1] key to turn on the sweep function, and directly measure the frequency of other devices. |
| Side Key 2 | The same side key SK1 has a short press and long press function to choose |
| V/M key | Frequency mode or channel mode switching.
|
| A/B key | A/B upper and lower frequency band switch selection. Press the PTT button to transmit in the frequency band pointed to by the pointer. |
| Keyboard lock and unlock | Manual lock: Long press # key to lock the intercom. Automatic lock: After the automatic keyboard lock is turned on, when there is no operation on the buttons and knobs, the automatic lock will be delayed for 10 seconds. Unlock: Long press the # key to unlock the keyboard. |
Function Description
Menu Settings
You can enter «Menu Settings» through the menu key of the terminal to set some common functions. The specific instructions and operation methods are as follows:
| Menu number display characters | First-level menu | Secondary menu display characters | Description of secondary menu setting |
| 0 | Squelch | 0,…,9 | Squelch level, the lower the level, the easier it is to interfere, the higher the level the worse the sensitivity, the default value is 3. |
| 1 | Step | 2.5KHz | In frequency mode, press key to change the step value of frequency, the value range is 2.5~50KHz |
| 5.0KHz | |||
| 6.25KHz | |||
| 10.00KHz | |||
| 12.50KHz | |||
| 20.0KHz | |||
| 25.0KHz | |||
| 50.0KHz | |||
| 2 | Tx Power | High | High power |
| Middle | Middle Power | ||
| Low | Low Power | ||
| 3 | Power save | OFF | Turn off power saving mode |
| ON | Turn on power saving mode | ||
| 4 | Vox Level | OFF | Turn off voice control |
| 1,2,… 10 | Start the sound control level intensity, value range | ||
| 5 | Bandwidth | Wide | Wide band working |
| Narrow | Narrow band working | ||
| 6 | Backlight | Bright | Backlight is always on |
| 5Sec, 10Sec,… 60Sec | Automatic backlight delay time, the value range is 5~60 seconds | ||
| 7 | Menu Exit Time | 5Sec, 10Sec,… 60Sec | Menu exit time, the value range is 5~60 seconds |
| 8 | Dual Standby | OFF | OFF |
| ON | ON | ||
| 9 | Beep Prompt | OFF | OFF |
| ON | ON | ||
| 10 | VOICE | OFF | OFF |
| ON | ON | ||
| 11 | Tx over time | OFF | Press and hold the PTT button to keep launching |
| 15,30,…600 | Value range 15~600, step value 15 | ||
| 12 | Rx DCS | OFF | NO DCS |
| D023N,…,D754I | Standard sequence of DCS | ||
| 13 | Rx CTCSS | OFF | NO CTCSS |
| 67.0HZ,…,254.1HZ | Simulate the standard sequence of mute, at the same time, you can directly type standard or non-standard analog mute through the keyboard | ||
| 14 | Tx DCS | OFF | NO DCS |
| D023N,…,D754I | Standard sequence of DCS | ||
| 15 | Tx CTCSS | OFF | NO CTCSS |
| 67.0HZ,…,254.1HZ | Simulate the standard sequence of mute, at the same time, you can directly type standard or non-standard analog mute through the keyboard | ||
| 16 | DTMFST | OFF | OFF |
| DT-ST | DT-ST | ||
| ANI-ST | ANI-ST | ||
| DT+ANI | DT+ANI | ||
| 17 | TONE | 1000hz, 1450hz, 1750hz, 2100hz | Repeater activation audio |
| 18 | S-CODE g | 1,2…,15 | When needed, send out this group of information codes (information codes can only be written by frequency writing software) |
| 19 | Scan Mode | TO | Time Scan |
| CO | Carrier Scan | ||
| SE | Search Scan | ||
| 20 | PTT-ID | OFF | Press PTT to not send ID code |
| BOT | Press PTT to send ID code (ID code is set by frequency writing software) | ||
| EOT | Release PTT to send ID code | ||
| BOTH | ID code is sent when you press and release the PTT button | ||
| 21 | MDF-A | Frequency | In the channel mode of the A segment, the channel displays the frequency |
| Name | In the channel mode of section A, the channel displays the channel name (the specific name is set in the frequency writing software) | ||
| 22 | MDF-B | Frequency | Band B is in channel mode, the channel displays the frequency |
| Name | In the channel mode of section B, the channel displays the channel name (the specific name is set in the frequency writing software) | ||
| 23 | Busy Lockout | OFF | Channel is occupied and allowed to transmit |
| ON | Channel is occupied and transmission is prohibited | ||
| 24 | Key Auto Lock | OFF | Turn off automatic keyboard lock |
| ON | Turn on the keyboard auto-lock function | ||
| 25 | Direction | None | In frequency mode, there is no frequency difference between the transmitting frequency and the receiving frequency |
| Plus | In frequency mode, the transmitting frequency is equal to the receiving frequency plus the frequency difference frequency | ||
| Minus | In frequency mode, the transmitting frequency is equal to the receiving frequency minus the frequency difference frequency | ||
| 26 | Offset | 00.000,…,99.998 | In frequency mode, the difference between the transmitting and receiving frequencies |
| 27 | Key1 sp | OFF | No function |
| LAMP | Turn on the flashlight function | ||
| SOS | Turn on the alarm function | ||
| FM | Turn on the radio function | ||
| NOAA | Enable NOAA weather forecast function | ||
| MONI | Turn on the monitoring function | ||
| Scan | Turn on the sweep function | ||
| 28 | Key1 LP | Same function as side key 1 short press | |
| 29 | Key2 sp | Same function as side key 1 short press | |
| 30 | Key2 LP | Same function as side key 1 short press | |
| 31 | Memory | 1,…,128 | When storing a channel, it is used to indicate the channel number to be stored. If the word CH- is displayed in front of the number, it means that the channel originally has channel parameters |
| 32 | Delete | 1,…,128 | Delete the channel parameters of the specified channel, if there is no CH- in front, it means that the channel has no parameters and the operation is invalid |
| 33 | Alarm Mode | On site | On-site alarm |
| Send sound | Send sound | ||
| Send code | Send code | ||
| 34 | TAIL | OFF | After the PTT is released, the machine does not send a shutdown code, usually when it is relayed through the relay, let it make noise to confirm whether the signal of the machine is relayed |
| ON | After releasing the PTT button, the machine sends a shutdown code to suppress the instantaneous noise of the listener | ||
| 35 | PROGER | OFF | Turn off the call end alert tone |
| ON | Turn on the call end alert tone | ||
| 36 | Language | Chinese | |
| English | |||
| 37 | Reset | VFO | Menu initialization only |
| ALL | Menu and channel initialization | ||
| 38 | SPECIAL DCS | OFF | Close special DCS |
| ON | Open Menu and channel initialization, only with same DCS can communicate |
Common function description
The functions supported by the walkie-talkie are shown in the table below.
| Name | Function description |
| Squelch level adjustment | Squelch level adjustment is to adjust the signal strength required when receiving a signal. The squelch level (0 open to 9 is the highest) is selected by the local environment, and 3 is generally selected. |
| CTCSS/DCS | CTCSS/DCS is used to avoid listening to irrelevant calls of the same frequency. Only when the transmitted CTCSS/DCS matches the received CTCSS/DCS digital, the walkie-talkie can listen to the voice through the speaker. |
| TOT | Timeout prohibition TOT timeout prohibition can limit the single transmission time (the default is 60 seconds) to prevent the communication parties from occupying channel resources for a long time, and to prevent the terminal from being damaged due to overheating. After the duration of pressing the [PTT] key expires, the terminal will automatically terminate the transmission and emit a warning tone. If you need to talk again, please transmit after the preset time. |
| Power saving | When the walkie-talkie has no receiving or transmitting, no button or knob operation reaches the power saving time, it will automatically enter the power saving mode. |
| Low battery warning | It is used to remind the battery to charge in time when the battery power is low. When the battery is too low, transmission will be prohibited. |
| Emergency Alarm | An emergency alarm is when you encounter an emergency, you can ask your companion or the control center for help. |
| SCAN | After scanning is turned on, the terminal will scan according to the scan list. When there is activity on a certain channel, it will stay on the channel to listen, so as to understand the current activity status of related group members. |
| BCL | Busy channel lock BCL can prevent interference from other terminals on the same channel during transmission. When other terminals occupy the current channel, press and hold the [PTT] key, and the terminal will emit a «beep» tone, indicating that it cannot be transmitted. If the current channel is free, press and hold the [PTT] key to start transmission. |
| Power level | The power level refers to the transmit power level of the walkie-talkie, which can be set to high power or low power. High power can increase the signal strength of the current transmitted voice of the terminal, and it can also communicate with the remote terminal. Low power can save power. |
| MONI | Monitoring MONI monitoring is a listening method used to receive more signals or weak signals. It helps to distinguish and listen to the faint sounds in the speakers. |
| Channel broadcast | Channel broadcast is used to indicate the sequence of the current channel. |
| VOX | Voice-activated transmission VOX After turning on the voice-activated, when the voice detected by the microphone meets the transmission conditions, the terminal will automatically transmit the voice, and you can speak directly without pressing the [PTT] key. The voice control gain is used to control the sensitivity of the microphone’s voice control emission, which is configured by the dealer. |
Voice-activated emission (VOX)
After turning on this function, if the user’s speaking volume level reaches the level selected by the walkie-talkie, the walkie-talkie can also start the transmission operation by voice without pressing the [PTT] key. In some work situations, the user can not freely press the [PTT] key to call, then this function can be enabled. Operation method:
- In the standby mode, press the [MENU] key, the voice prompt «menu setting», enter the function menu setting;
- Press [] or [] key to select 4 menu number forward or backward; or directly enter the number 4 to enter 4 menu number;
- Press the [MENU] key, the voice prompt «Voice-activated emission», press the [] or [] key, select 1~10 (the larger the value, the higher the sensitivity; such as selecting 3)
- Press the [MENU] key, the voice prompt «OK», save and return to the previous menu.
- Repeat the above operation, select OFF to turn off the voice-activated transmission function. After turning on the voice-activated transmission function, speak into the microphone, and the voice can be sent out; stop speaking, and the transmission will also stop. You can select the VOX sensitivity level according to the quietness of the use environment. If the environment noise is too large, there will be long emission after the VOX function is activated. If the dual-wait function is enabled on this machine, the VOX function is turned off by default, and the VOX function cannot be activated.
Keyboard lock
The keyboard lock function disables the number keys to prevent you from activating a function by mistake. This machine can be set to automatic keyboard lock function, the operation is as follows:
- In the standby mode, press the [MENU] key, the voice prompt «menu setting», enter the function menu setting;
- Press or key to select 24 menu number forward or backward; or directly enter number 2 and 4 to enter 24 menu number;
- Press [MENU] key, press [] or [] key to select ON;
- Press the [MENU] key, the voice prompt «OK», save and return to the previous menu. The automatic keyboard lock function is activated.
- Repeat the above operation, select OFF to turn off the automatic keyboard lock function, and select manual keyboard lock. The operation is as follows:
- In the standby state, long press the «#» key for more than 2s, the keyboard lock function is activated (voice prompt «keyboard lock»);
- Long press the «#» key repeatedly for more than 2s, the keyboard lock function is closed (voice prompt «keyboard unlock»). After the automatic keyboard lock function is turned on, when it is not locked, the numeric keyboard is automatically locked without any keyboard operation for 10 seconds.
Dual Standby
When in dual standby mode, the two-way radio can receive the frequency set by the A or B channel. The operation is as follows:
- In the standby mode, press the [MENU] key, the voice prompt «menu setting», enter the function menu setting;
- Press [] or [] key to select 8 menu number forward or backward; or directly enter the number 8 to enter 8 menu number;
- Press the [MENU] key, the voice prompt «Dual frequency waiting», press [] or [] key, select ON
- Press the [MENU] key, the voice prompt «OK», save and return to the previous menu. The dual-frequency waiting function is turned on.
- Repeat the above operation, select OFF to turn off the dual-frequency standby function. In the menu mode, the dual-frequency standby is temporarily turned off, and after exiting, the dual-frequency standby will be restored.
- Since the dual-standby dual-save mode is in the main and sub-channel scanning state, in the dual-segment dual-save mode, even if the power saving function of the unit is turned on, its power saving function is still invalid, and the standby time of the walkie-talkie will be shortened.
Channel delete
You may want to delete a memory channel due to setting errors or changing other settings. The operation is as follows:
- In the standby mode, press the [MENU] key, the voice prompt «menu setting», enter the function menu setting;
- Press [] or [] key to select 32 menu number forward or backward; or directly enter numbers 3 and 2 to enter 32 menu number;
- Press the [MENU] key, the voice prompt «channel delete»;
- Press [] or [] key to select the channel to be deleted forward or backward.
- If the number prefix displays the character «CH-«, it means that the channel number originally has channel parameters and can be deleted.
- If the number prefix does not display the character «CH-«, it means that the channel number is empty and can be stored directly without deleting it.
- Press the [MENU] key, the voice prompt «OK», delete the stored channel parameters, save and return to the previous menu.
- If the channel is empty, press the [MENU] key to directly return to the previous menu.
Channel storage
The parameters to be included in a complete channel include receiving frequency, transmitting frequency, receiving sub-audio, transmitting sub-audio, transmitting power, channel bandwidth, PTT-ID, busy lock, signaling code, scan addition, channel name, etc. Except for scanning addition and channel name editing through the frequency writing software, other parameters can be set in the frequency mode, and then store them in the designated channel number through the menu 31 Store Channel.
Example: The channel storage parameters are required as follows, and they are stored in the channel number with channel number 001.
- Receiving frequency 440.5 MHZ
- Transmission frequency 4 30.5 MHZ
- Receive mute digital D031N
- Transmit mute digital D031N
- High transmit power
- Channel bandwidth Broadband
The channel name is written in the frequency writing software when needed
Steps:
- Short press [V/M] key to switch to VFO mode, the screen displays .
- In the frequency mode, press the [A/B] key to make the pointer point to A (upstream frequency point)
- Press the number keys 4, 4, 0, 5, 0, 0 in turn to adjust the frequency to 440.500MHZ, and the screen displays .
- Power setting: press → (number key 2) →→ [] or [] to select the power (HIGH/MID/LOW) as HIGH→ ,
- Bandwidth setting: Press → (number key 5) →→ [] or [] to select the channel bandwidth (NARR/WIDE) as WIDE→ ,
- Receive digital tone setting: press → (number keys 1, 2) → [] or [] to select the tone value D031N→ ,
- Transmitting digital sub-tone setting: press → (number keys 1, 4) → → [] or [] to select sub-tone value D031N→,
- PTT-ID button transmission setting: press → (number keys 2, 0) → → [] or [] to select the transmission mode (OFF/BOT/EOT/BOTH) as OFF→ ,
- Channel storage settings for receiving and transmitting the same frequency:
- Press → (number keys 3, 1), the screen displays:
- Press , the voice prompt «storage channel», the screen displays :
- Press or key to select empty channel forward or backward, the screen displays :
- Press , the voice prompts «receive storage», the screen displays : press the voice prompts «storage channel».
- Press , the voice prompt «transmit storage», the screen displays :
- Press EXIT key to return to frequency mode.
- Press
- Channel storage settings for receiving and transmitting different frequencies:
- Press → (number keys 3, 1), the screen displays :
- Press , the voice prompt «storage channel», the screen displays :
- Press the [] or [] key to select the empty channel forward or backward, and the screen displays: .
- Press , the voice prompt «receive storage», the screen displays: ;
- Press EXIT key to return to frequency mode.
- Perform step 3, enter the desired transmit frequency;
- Press → (number keys 3, 1), the screen displays: ,
- Press , the voice prompt «storage channel», the screen displays: ,
- Press , the voice prompt «transmit storage», the screen displays: ;
- Press EXIT key to return to frequency mode.
- Press
Analog sub-audio (CTCSS)/digital sub-audio (CDCSS)
Analog sub-audio (CTCSS)/digital sub-audio (CDCSS) is mainly used to avoid listening to unrelated calls on the same frequency. If CTCSS/CDCSS is set, within the effective communication range, only calls with the same subtone signaling set in the channel can be received; but if CTCSS/CDCSS signaling is not set, you can listen to the effective communication range All calls on the same channel.
Side tone switch
Key side tone: The machine emits key side tone when sending key side tone
ID code side tone: When sending the ID code, the machine will emit the ID code side tone
Button side tone + ID code side tone: When sending button side tone and ID code side tone, the machine emits the corresponding sound
Note: Button side tone, including number key side tone and TONE tone
USB charging
The walkie-talkie can be directly plugged into the USB charging cable and charging with a power bank.
Frequency measurement function
Press +〖*〗key to enter the frequency measurement mode, press【】or【】key to select U segment or V segment. When a signal is received, if the current frequency has a mute tone, it will be displayed on the screen at the same time, press the key The current frequency can be saved. Or you can select the shortcut operation method by pressing the side button.
Special digital mute
The special digital mute is a mute encryption function, which can prevent other machines from copying the mute of this machine. After this function is turned on, only the same DCS code can talk to each other. The mute encryption function is effective only when the DCS mute code is set. Only the same machines with special digital mute on can talk to each other.
Optional accessories
Please use the accessories specified by our company.
If you use unauthorized accessories without authorization, all consequences caused by this are the responsibility of the user.
Please consult your local dealer for optional accessories of the walkie-talkie.
Main Specifications
| TOTAL | Frequency Range | 144-146MHZ(RX/TX) 430-440MHZ(RX/TX) |
| Channel No. | 16 | |
| Channel Spacing | 25/12.5kHz | |
| Input voltage | 7.4 VDC | |
| Battery (standard configuration) | 1800mAH(Li-Ion) | |
| Battery Life(5-5-90, High power transmission) | About 14 Hours | |
| Current: Standby | ≤65mA | |
| Receive | ≤450 mA | |
| Transmit | ≤1.8 A @high power, 850 mA @ low power | |
| Frequency stability | ±2.5ppm | |
| Operating temperature | -20℃ to +60℃ | |
| Antenna impedance | 50Ω | |
| Walkie-talkie size(With battery, but without antenna) | 121×61×33mm | |
| Walkie-talkie weight(Including antenna and battery) | 223g | |
| TRANMIT PART | Transmit output power | 5W/3W/1W |
| Modulation | 16K0F3E@25KHz, 11K0F3E@12.5KHz | |
| Spurious emission | -36dBm1GHz | |
| FM signal-to-noise ratio | 45dB@25KHz, 40dB @12.5KHz | |
| Audio distortion | ≤5% | |
| Modulation limit | ±5.0 KHz@25 KHz, ±2.5 KHz@12.5 KHz | |
| Adjacent channel power | 70dB @ 25KHz, 60dB @ 12.5KHz | |
| (300-3000Hz) Audio response | +1~3dB | |
| RECEIVE | Receiving sensitivity | 0.25μV (12dB SINAD) |
| Adjacent channel selectivity | ≥60dB@25KHz, ≥55dB@12.5KHz | |
| Intermodulation immunity | ≥60dB@25KHz, ≥55dB@12.5KHz | |
| Conducted spurious emissions | ≤-57dB@25KHz, ≤-57dB @12.5KHz | |
| FM signal-to-noise ratio | ≥45dB@25KHz, ≥40dB @12.5KHz | |
| Audio output power | 1W @16ohms | |
| Audio distortion | ≤5% | |
| Audio response(300-3000Hz) | +1~-3dB |
All specifications are subject to change without notice or responsibility.
Disclaimer
This manual strives for the accuracy and completeness of the content during the compilation process, but the company does not assume any responsibility for possible errors or omissions. Due to the continuous development of technology, the company reserves the right to change product design and specifications without notice. Without the company’s prior written authorization, this manual may not be copied, modified, translated and distributed in any form. The third-party products and content involved in this manual are owned by the third party, and our company does not provide guarantees for their accuracy, validity, timeliness, legality or completeness.
Videos
Retevis RA685 — VHF/UHF FM transceiver Review Video
Documents / Resources
Download manual
Here you can download full pdf version of manual, it may contain additional safety instructions, warranty information, FCC rules, etc.
Download Retevis RA685 — Walkie Talkie Manual
Частотомер
Главная необычность Retevis RA685 — это Частотомер.
Что даёт наличие Частотомера?
Удобство и скорость стыковки с группой случайных радиостанций со случайными частотами.
Зачастую, владельцы радиостанций имеют весма смутное представление на каких частотах работают их балалайки, какие имеют настройки.
Просто, покупают комплект из двух-трёх одинаковых радиостанций и используют магазинные настройки по-умолчанию…
В полевых условиях присоединиться к такой группе почти не реально:
Не известны Частоты, не известны настройки тонального шумоподавления CTCSS/DCS…
Retevis RA685 позволяет отсканировать эти настройки за секунду.
Инструкция
по использованию Частотомера в Retevis RA685:
1. Нажать МЕНЮ, затем *Scan
2. Стрелочками ▲ или ▼ выбрать предполагаемый диапазон UHF (400-520MHz) или VHF (136-174MHz)
3. Приблизить Retevis RA685 к передающей радиостанции (источнику) на расстояние 0,5 – 35 метров.
(Это не описка. У меня стабильно срабатывает на 35 метров, через всё здание, на всю длину коридора (!!!если выключены ВСЕ электроприборы, светильники и т.п.).
Срабатывает и дальше 35 метров, с улицы, но уже не всегда.)
4. На дисплее Retevis RA685 отобразится Частота и CTCSS/DCS код (если используется)
5. Если в этот момент нажать кнопку МЕНЮ, эти настройки сразу пропишутся в память Retevis RA685
* Если RA685 находилась в режиме VFO, новые настройки пропишутся в ячейку VFO
* Если RA685 находилась в Канальном режиме, новые настройки пропишутся в текущий Канал
(поэтому, ещё до включения режима Частотомера, на RA685 необходимо выбрать Канал, куда мы хотим прописать Новые настройки.
Иначе, текущая полезная ячейка (какая нибудь LPD или PMR) будет переписана!)
6. Если текущие показания Частотомера не нужно сохранять, для выхода просто нажмите EXIT
Текущие настройки каналов в Retevis RA685 (частота, порог шумодава, ширина полосы и т.д.) на чувствительность Частотомера, вроде, никак не влияют.
Зато, однозначно, на дальность обнаружения (измерения) сильно влияет наличие фоновых помех (Компьютеры, сотовые, вай-фай, светильники, бытовые приборы и т.п.)
У меня стабильно срабатывает на 35 метров внутри здания (!!!если практически все электроприборы выключены)
В лесу, я уверен, дальность обнаружения (измерения) будет ещё больше.
Проверю когда нибудь…
Примечание:
Радиостанция не является лабораторным измерительным прибором. Потому, глупо ожидать стабильной высочайшей точности измерений.
Частотомер в Retevis RA685 является простым Индикатором без какого либо класса точности.
От экземпляра к экземпляру, кому-то повезёт больше, кому-то меньше)))
Некоторые экземпляры Retevis RA685 покажут абсолютно истинное значение измеряемой частоты. У других, возможна погрешность на величину плюс-минус 1,25 кГц, или даже 2,5 кГц.
(Например: вместо 145.70000 МГц может отобразиться 145.69875 МГц)
У меня измеряет = идеально.
Но на Ютубе я видел ролики, что у кого-то подвирает, слегка.
Внимание!!!
На Передаче,
не следует подносить одну радиостанцию к другой ближе пол-метра !!!
Можно пожечь входные цепи Приёмника.
Очень высокая вероятность!
Видео:
Пример работы Частотомера в Retevis RA685
Последний раз редактировалось Россиянин 29 июн 2022, 08:57, всего редактировалось 4 раз(а).
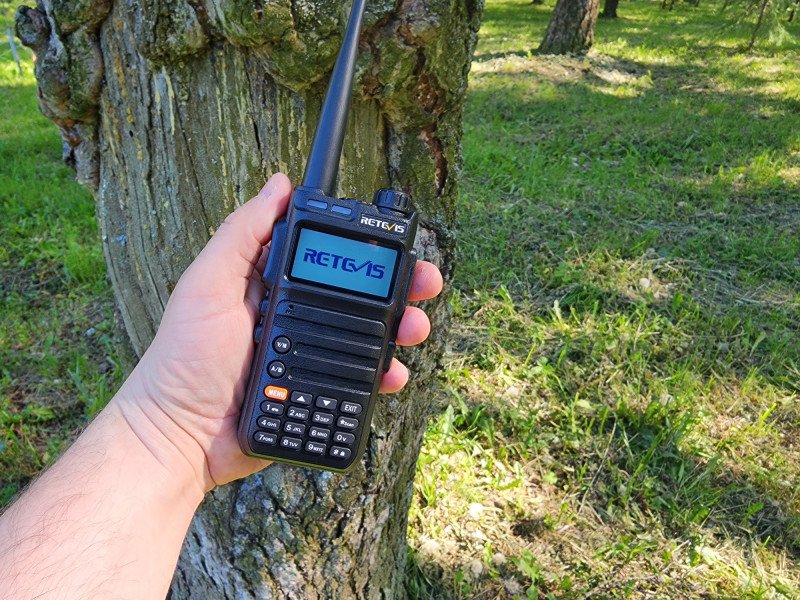
Retevis RA685 — простая двухдиапазонная рация с USB-C зарядкой. В Ютубе о ней неплохие отзывы. Проверил в работе — все заявленные функции работают. Подойдет для работы и отдыха, для профессионального применения, для охоты/рыбалки/туризма и т.д. Есть возможность прошивки частот (Chirp).
Большой плюс — заказывал рации из наличия со склада в РФ (пара дней в постомат). При выборе можно оформить, например, кабель или пару штук одним лотом.
 В комплекте с рацией идет подставка-кредл, USB-C кабель, подробное руководство пользователя. Также к самой рации — антенна, батарея, клипса, ремешок.
 В качестве подготовки к работе собираем рацию — батарейку, антенну, ремешок и клипсу. Рекомендую зарядить до 100% («из коробки» уровень заряда был примерно 70%).
 Кстати, клипсу или ремешок можно и не устанавливать — тут на ваш выбор. Лично мне ремешок не нравится, ставлю только клипсу — удобно цеплять на ремень или в карман.
 Подставка-кредл имеет USB-C вход, кабель подойдет любой.
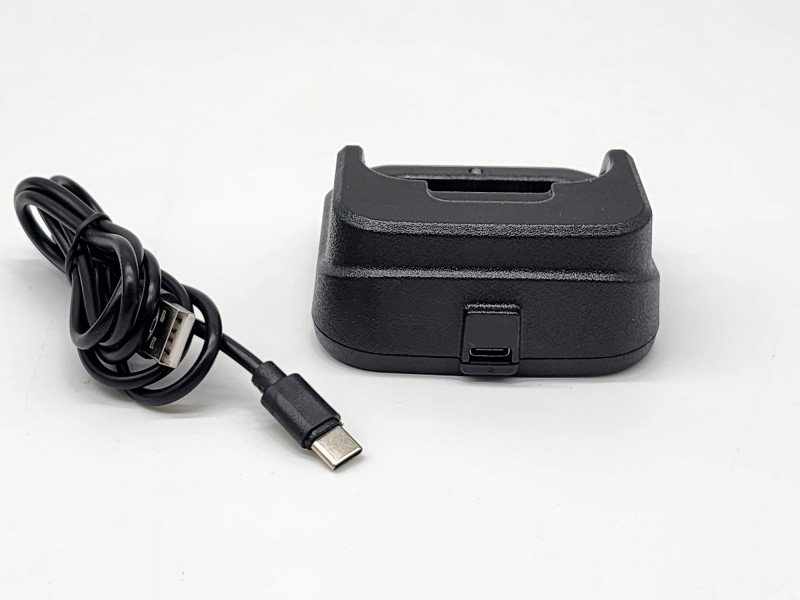 В самой рации имеется также USB-C вход, то есть можно заряжать рацию непосредственно от USB, без подставки. Довольно удобно, удобнее, чем различные оригинальные способы или нестандартные блоки питания.
 В отличие от большинства старый раций, которые у меня были, Retevis RA685 можно заряжать от павербанка. В ряде случаев серьезно выручает.
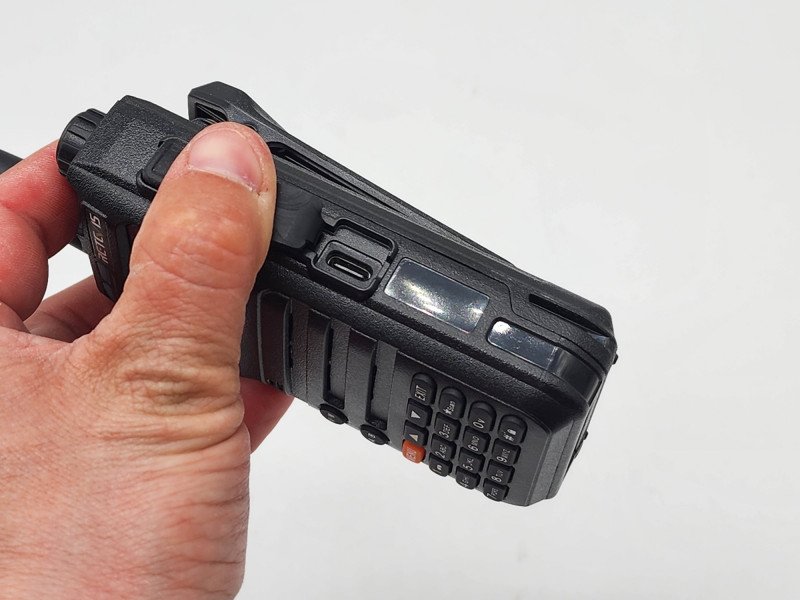
 Развесовка удобнее. Более привычный, на мой взгляд, только баофенги, но это всё субъективно.
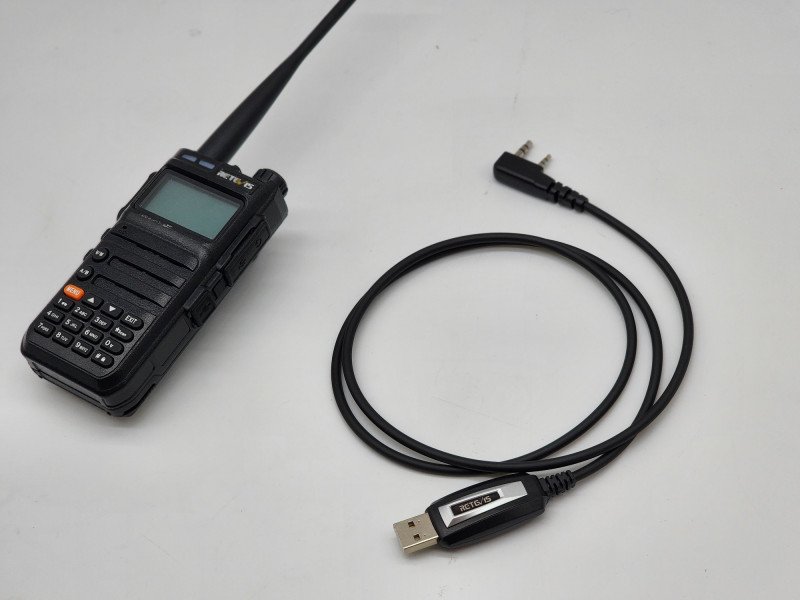
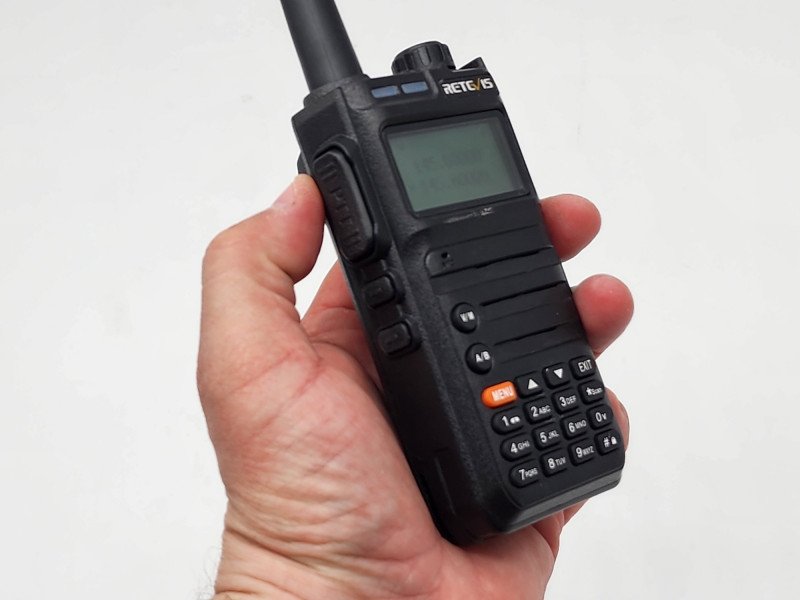 Кабель для прошивки подключается через двойной разъем для гарнитуры. Прошивка через USB-C не предусмотрена.
 А кабель сам по себе стандартный. Если у вас нет такого кабеля, рекомендую купить в комплекте с рацией. Дает возможность настроить рацию и прошить каналы по необходимости.
 Обратите внимание на широкие возможности по настройке рации. Подробное описание имеется в инструкции
С помощью кабеля и программы CHIRP записал все каналы LPD и PMR диапазона, с завода там были прописаны рандомные частоты (китайская сетка). Для легального использования нужно добавить частоты из сетки разрешенных LPD/PMR. Заодно можно настроить пару раций для работы друг с другом. Подключается стандартно — кабель эмулирует COM-порт, просто выбираем в программе CHIRP свой тип рации (RA685 имеется)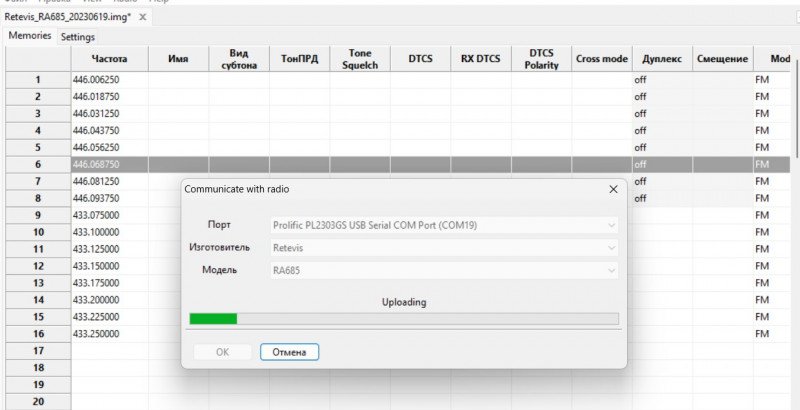 Буквально пару минут настройки и можно пользоваться. Рация довольно неплоха в плане удобства.
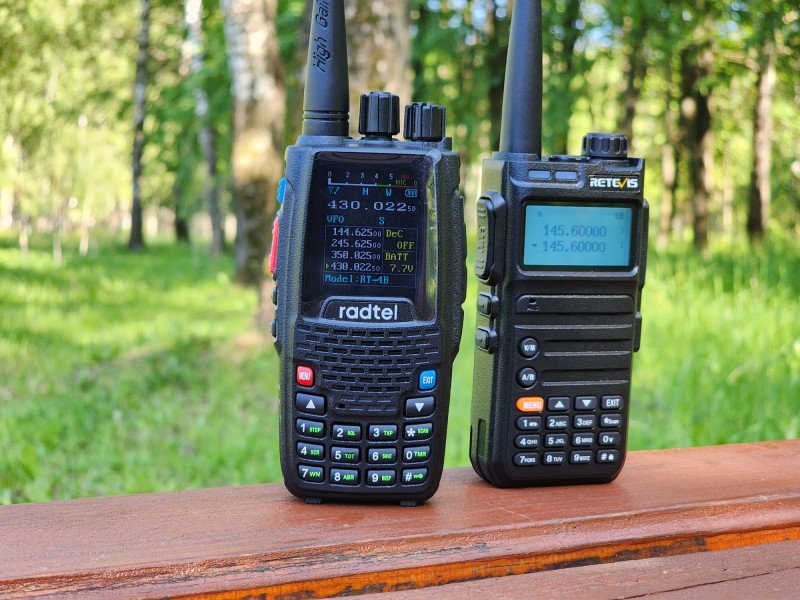
 По дальности пробовал на 1 км с аналогичной рацией. Берет уверено 1….1.5 км. В городской застройке ситуация может быть хуже. В чистом поле без помех — может быть лучше.
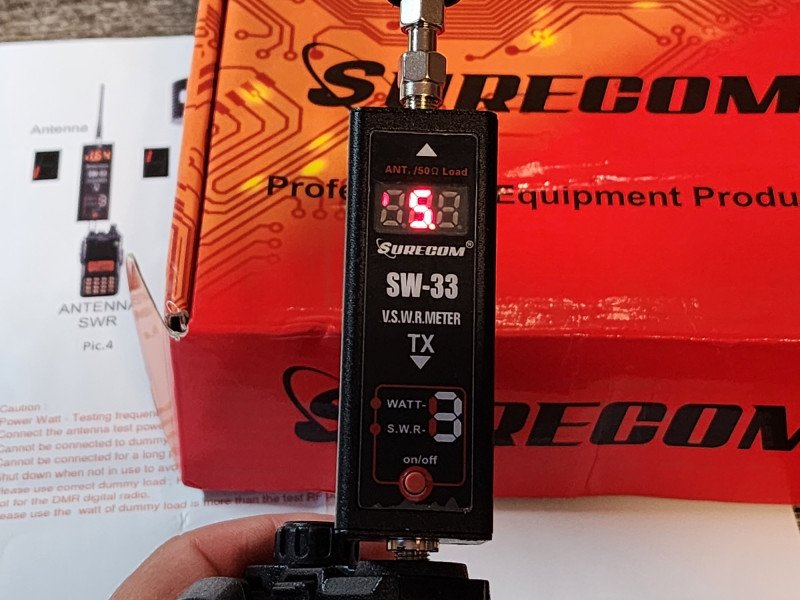
 Что касается дальности, небольшое замечание. Если планируете «выжать максимум» из рации, то выкидывайте стоковую антенну и покупайте что-то типа Nagoya-771. Провел замер КСВ (SNR) стоковой антенны — 2.5 раза. Все, что больше 2 раз — много. В идеале должно быть около 1.5 (согласованная антенна). Чем ближе к единице значение КСВ, тем лучше. Соответственно, выходная мощность и дальность со стоковой антенной будут хуже, чем потенциально может обеспечить рация.
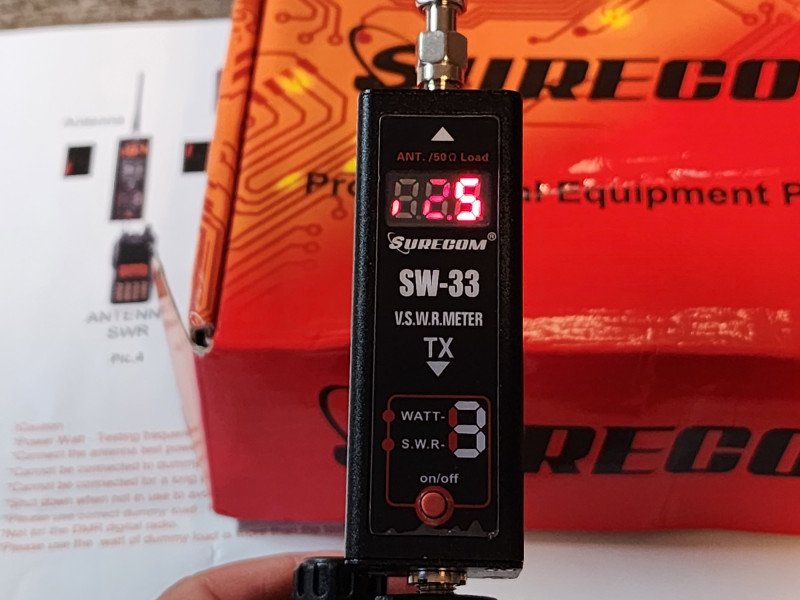 Кстати, заявленные 5 Вт рация выдает спокойно (на фото 5.5 Вт).
 Сравнивал с разными рациями, Retevis RA685 весьма удобная. Но как говорится, на вкус и цвет…
 Лично для меня основная масса удобства — возможность зарядки от USB-C и павербанка. А это значит, что можно «подкормить» рацию в пути, например, от автозарядки. Это просто «киллерфича», которой не хватает в баофенгах. Брать или нет — решать вам.
Товар для написания обзора предоставлен магазином. Обзор опубликован в соответствии с п.18 Правил сайта.
OverView
Retevis RA685 5W Dual band Two way Radios Amateur Radios

1, The dual band UHF and VHF amateur band Two way radio
Retevis RA685 with the frequency range: 144-146MHZ(RX/TX) 430-440MHZ(RX/TX). The Analog mode Ham radio.

2, High power long range walkie talkies for hams and outdoor activities
The RA685 amateur radio with the power 5w, make the radio’s communication range longer than the license-free radios. If you go out for hiking, camping or as your first ham radio, it will be a good choice.

3, Dual standby and dual band display
RA685 comes with the 1.6 inch display, and also supports dispaly two channels. So you can set two channels at the same time. Also dual standby function, can help you monitor two channels at the same time.

4, 128 Channels can be saved
RA685 allows you to save up to 128 channels. Also offers the multi CTCSS/DCS codes groups. It will easy to seek same frequencies which are talking. Or help you find the free channels to talk with your friends.

5, Easy to operate
RA685 offers the full keypad, so you can program your RA685 by its keypad. Very easy and convenient to set your radios when you are out.


Feature
1, Frequency range: 144-146MHZ(RX/TX) 430-440MHZ(RX/TX)
2. Dual band, Dual Display, Dual Standby
3. High, middle, and low power switching to meet the power requirements of users at different distances, more energy-saving and power-saving
4. Up to 128 memory channels for programming frequency and other various data
5. Multiple display modes such as channel number, frequency, channel frequency, channel name, etc.
6. CTCSS/DCS, DTMF signaling, reject redundant calls from other stations
7. The tail tone is eliminated to avoid the impact noise from the speaker after the call is over
8. VOX voice-activated transmission, no need to press the PTT button to talk normally
9. Emergency alarm, ANI identification and other functions through DTMF
10. DTMF, CTCSS (60.0 -259.9 HZ), DCS signaling codec function
11. 8 step frequency selection (2.5K, 5.0K, 6.25K, 10.0K, 12.5K, 20.0K, 25.0K, 50.0K)
12. Automatic power saving function to extend battery life
13. SOS emergency alert function
14. Computer programming function
15. Wide/narrow band (25KHz/12.5KHz) selection function
16. Digital FM radio (receiving 65-108MHz)
17. Direct selection of keyboard numbers for menu items, the transmit and receive frequency can be manually input
18. Special CTCSS/DCS (frequency hopping function)