
-
Contents
-
Table of Contents
-
Troubleshooting
-
Bookmarks
Quick Links
RIGOL
User’s Guide
DL3000 Series Programmable DC
Electronic Load
Aug. 2017
RIGOL TECHNOLOGIES, INC.
Related Manuals for Rigol DL3021
Summary of Contents for Rigol DL3021
-
Page 1
RIGOL User’s Guide DL3000 Series Programmable DC Electronic Load Aug. 2017 RIGOL TECHNOLOGIES, INC. -
Page 3
Notices RIGOL products are covered by P.R.C. and foreign patents, issued and pending. RIGOL reserves the right to modify or change parts of or all the specifications and pricing policies at the company’s sole decision. Information in this publication replaces all previously released materials. -
Page 4: Safety Requirement
RIGOL Safety Requirement General Safety Summary Please review the following safety precautions carefully before putting the instrument into operation so as to avoid any personal injury or damage to the instrument and any product connected to it. To prevent potential hazards, please follow the instructions specified in this manual to use the instrument properly.
-
Page 5
Do Not Operate With Suspected Failures. If you suspect that any damage may occur to the instrument, have it inspected by RIGOL authorized personnel before further operations. Any maintenance, adjustment or replacement especially to circuits or accessories must be performed by RIGOL authorized personnel. -
Page 6: Safety Notices And Symbols
RIGOL Safety Notices and Symbols Safety Notices in this Manual: WARNING Indicates a potentially hazardous situation or practice which, if not avoided, will result in serious injury or death. CAUTION Indicates a potentially hazardous situation or practice which, if not avoided, could result in damage to the product or loss of important data.
-
Page 7: Care And Cleaning
RIGOL Care and Cleaning Care Do not store or leave the instrument where it may be exposed to direct sunlight for long periods of time. Cleaning Clean the instrument regularly according to its operating conditions. Disconnect the instrument from all power sources.
-
Page 8: Dl3000 Series Overview
It can be widely used in various industries, such as automotive electronics, aerospace, and fuel cells. Main Features: DL3021/DL3021A: single channel, DC 150 V/40 A, total power up to 200 W DL3031/DL3031A: single channel, DC 150 V/60 A, total power up to 350 W …
-
Page 9: Document Overview
This chapter provides keyword search information, enabling you to quickly locate the desired information. For the latest version of this manual, download it from the official website of RIGOL (www.rigol.com). Format Conventions in this Manual 1. Key (1) The key on the front panel is denoted by the format of «Key Name (Bold) + Text Box»…
-
Page 10
Unless otherwise specified, this manual takes DL3031A as an example to illustrate the functions and operation methods of the DL3000 series. Model No. of Channels Voltage Current Power DL3021/DL3021A DC 150 V 40 A 200 W DL3031/DL3031A DC 150 V 60 A… -
Page 11: Table Of Contents
Contents RIGOL Contents Guaranty and Declaration …………….. I Safety Requirement …………….II General Safety Summary …………….II Safety Notices and Symbols …………..IV Care and Cleaning ………………V Environmental Considerations …………..V DL3000 Series Overview …………….VI Document Overview …………….VII Chapter 1 Quick Start ……………..
-
Page 12
RIGOL Contents Waveform Display Function …………..2-72 Input Control ………………2-76 Turn On/Off the Input …………..2-76 Von Latch Function ……………. 2-76 Short-circuit Operation …………..2-77 Trigger Operation …………….2-78 Protection Function …………….2-80 Sense Working Mode …………….2-82 Function of Terminals on the Rear Panel ……….2-84 Store and Recall ………………. -
Page 13: Chapter 1 Quick Start
Chapter 1 Quick Start RIGOL Chapter 1 Quick Start Contents in this chapter: General Inspection Appearance and Dimensions Front Panel Rear Panel Turn-on Checkout Fuse Replacement User Interface To Use the Built-in Help System …
-
Page 14: General Inspection
The consigner or carrier shall be liable for the damage to the instrument resulting from shipment. RIGOL would not be responsible for free maintenance/rework or replacement of the instrument. 2. Inspect the instrument In case of any mechanical damage, missing parts, or failure in passing the electrical and mechanical tests, contact your RIGOL sales representative.
-
Page 15: Appearance And Dimensions
Chapter 1 Quick Start RIGOL Appearance and Dimensions Figure 1-1 Front View Unit: mm Figure 1-2 Side View Unit: mm DL3000 User’s Guide…
-
Page 16: Front Panel
RIGOL Chapter 1 Quick Start Front Panel Figure 1-3 Front Panel 1. LCD 4.3-inch TFT LCD, used to display the system status, input parameters, menu setting, prompt message, etc. 2. Waveform Display Key Pressing this key can enter the waveform display interface. You can observe the changes of parameters from the dynamic waveform.
-
Page 17
Chapter 1 Quick Start RIGOL (3) CR key Pressing this key can enter the constant resistance (CR) mode. You can set parameters for the mode, such as resistance and range. (4) CP key Pressing this key can enter the constant power (CP) mode. You can set parameters for the mode, such as power and upper limit of the voltage. -
Page 18
RIGOL Chapter 1 Quick Start System Info Displays the manufacturer, device model, software and hardware versions, FPGA version, boot version, system boot times, calibration date, and product serial number. Reset Restores the instrument settings to its factory default settings, For default settings, refer to Table 2-3. -
Page 19
Chapter 1 Quick Start RIGOL 7. Control Keys Control keys include the arrow keys, numeric keys, and confirmation key. Pressing the control keys in different interfaces can produce different operation results. Note: Here introduces their common usage. For their other specific usages and operation methods, refer to details in relevant chapters. -
Page 20
RIGOL Chapter 1 Quick Start Channel Input Terminals Sense Terminals Figure 1-4 Channel Terminals (1) Channel input terminal: Connects with the device under test (DUT, such as battery and power supply), which is used for inputting voltage and current. Note: Connect the positive polarity of the load to the (+) terminal of the channel output, and the negative polarity of the load to the (-) terminal of the channel output. -
Page 21
Chapter 1 Quick Start RIGOL 10. Menu Keys You can press the specified menu key to execute the corresponding operation displayed at the bottom of the interface on the screen. 11. USB Host (1) The instrument is regarded as the «master device». You can use the data line to connect it to the USB storage device (e.g. -
Page 22: Rear Panel
RIGOL Chapter 1 Quick Start Rear Panel Figure 1-6 Rear Panel 1. Air Outlet Decrease the temperature inside the instrument to ensure its performance. When you place the instrument on the workbench or install it into the rack, keep the air outlet from a distance of 10 cm to ensure adequate ventilation.
-
Page 23
Chapter 1 Quick Start RIGOL When the switch lever is located at a different position, it indicates that a different voltage rating is selected. When the switch lever is at the left, it indicates that 230 V is selected. When the switch lever is at the right, it indicates that 115 V is selected. -
Page 24: Turn-On Checkout
RIGOL Chapter 1 Quick Start Turn-on Checkout To Connect to Power Supply Two kinds of AC power inputs are supported by the DL3000 series. When it is connected to different power sources, the AC selector setting on its rear panel is different, as shown in Table 1-1.
-
Page 25: To Power On The Instrument
If the instrument passes the self-test, the welcome interface is displayed; otherwise, self-test failure information will be displayed. At this time, please contact RIGOL distributors. CAUTION Ensure that the AC selector setting on the rear panel of the instrument matches the actual AC input voltage, otherwise, the electronic load will be burned out.
-
Page 26: Fuse Replacement
RIGOL Chapter 1 Quick Start Fuse Replacement The fuse specification is related to the actual input voltage, as shown in Table 1-2. Table 1-2 Fuse Rating Input Voltage Fuse Rating 115 Vac T0.315 A/250 V 230 Vac T0.20 A/250 V When leaving the factory, the instrument has installed a fuse that conforms to the local standard.
-
Page 27: User Interface
Chapter 1 Quick Start RIGOL User Interface The user interface of the DL3000 series consists of main interface, guide interface, and function interface. In the main interface, you can set and view the information about the channel input; in the guide interface, you can directly set the parameters according to the guide diagram and view the parameter information;…
-
Page 28: To Use The Built-In Help System
RIGOL Chapter 1 Quick Start To Use the Built-in Help System The built-in help system provides help information for any key on the front panel (except parameter input area) and menu keys, which are convenient for you to get the descriptions of the function keys or menus, as shown in Figure 1-9.
-
Page 29: Parameter Setting Method
Chapter 1 Quick Start RIGOL Parameter Setting Method Most parameters can be set by operating the keys on the front panel. The common setting methods are listed below. The setting method for certain parameters is different from the methods below, refer to the relevant chapters of this manual for the further explanation.
-
Page 31: Chapter 2 Front Panel Operations
Chapter 2 Front Panel Operations RIGOL Chapter 2 Front Panel Operations Contents in this chapter: Local/Remote Operation Mode Static Operation Mode Transient Test Function List Operation Function (List) Application Function Advanced Function Waveform Display Function …
-
Page 32: Local/Remote Operation Mode
RIGOL Chapter 2 Front Panel Operations Local/Remote Operation Mode The load provides two operation modes: local and remote. Local Operation Mode After you power on the instrument, it enters the local operation mode by default. In the local operation mode, all the keys on the front panel are available for you to use.
-
Page 33: Static Operation Mode
Chapter 2 Front Panel Operations RIGOL Static Operation Mode The static operation modes include the following 4 modes: Constant Current (CC) Mode Constant Voltage (CV) Mode Constant Resistance (CR) Mode Constant Power (CP) Mode Constant Current (CC) Mode In CC mode, the electronic load will sink a current in accordance with the programmed value regardless of the input voltage, as shown in Figure 2-1.
-
Page 34
The working ranges of current in CC mode are as follows. Different models have different ranges. DL3021/DL3021A: low range (0 to 4 A); high range (0 to 40 A) DL3031/DL3031A: low range (0 to 6 A); high range (0 to 60 A) (1) In the main interface, press Range to switch the parameter focus to «Range». -
Page 35
Chapter 2 Front Panel Operations RIGOL Note: The low range provides better resolution and accuracy at low current settings. If the set current value is greater than the maximum value of the low range, you must select a high range. -
Page 36
RIGOL Chapter 2 Front Panel Operations «C_Limit». (2) Enter a value by using the numeric keys, arrow keys, or the knob. For setting methods, refer to the descriptions of the help information or refer to the descriptions in «Parameter Setting Method». -
Page 37: Constant Voltage (Cv) Mode
Chapter 2 Front Panel Operations RIGOL Constant Voltage (CV) Mode In CV mode, the load will sink enough current to control the input voltage to the set value. The load acts as a shunt voltage regulator when operating in CV mode, as shown in Figure 2-5.
-
Page 38
RIGOL Chapter 2 Front Panel Operations Figure 2-6 Main Interface of CV Mode In CV mode, you need to set the following parameters: Voltage, Range, V_Limit, C_Limit. Set Voltage The constant voltage value in CV mode. The default unit for the voltage is V. -
Page 39
Chapter 2 Front Panel Operations RIGOL Set V_Limit The upper limit of the voltage working in CV mode. The default unit for V_Limit is V, and it ranges from 0 V to 180 V. (1) In the main interface, press V_Limit to switch the parameter focus to «V_Limit». -
Page 40
RIGOL Chapter 2 Front Panel Operations Figure 2-7 Waveform Display Interface of CV Mode 6. Exit CV mode Press any key on the front panel of the load to exit CV mode. 2-10 DL3000 User’s Guide… -
Page 41: Constant Resistance (Cr) Mode
Chapter 2 Front Panel Operations RIGOL Constant Resistance (CR) Mode In CR mode, the load is regarded as a constant resistance, and changes the current linearly proportional to the input voltage, as shown in Figure 2-8. Set Resistance (R=V/I) Load Current…
-
Page 42
RIGOL Chapter 2 Front Panel Operations Figure 2-9 Main Interface of CR Mode In CR mode, you need to set the following parameters: RES, Range, V_Limit, C_Limit. Set RES The constant resistance value in CR mode. The resistance unit is: Ω… -
Page 43
Chapter 2 Front Panel Operations RIGOL Set C_Limit The upper limit of the current working in CR mode. The default unit for C_Limit is A, and it ranges from 0 A to 70 A. (1) In the main interface, press C_Limit to switch the parameter focus to «C_Limit». -
Page 44: Constant Power (Cp) Mode
RIGOL Chapter 2 Front Panel Operations Constant Power (CP) Mode The load sinks a constant power in CP mode. The load current will change linearly proportional to the input voltage to keep sinking a constant power (P = V x I), as shown in Figure 2-11.
-
Page 45
Chapter 2 Front Panel Operations RIGOL Figure 2-12 Main Interface of CP Mode In CP mode, you need to set the following parameters: Power, V_Limit, C_Limit. Set Power The constant power value in CP mode. The default unit for power is W. -
Page 46
RIGOL Chapter 2 Front Panel Operations WARNING To avoid electric shock, ensure that the DUT is connected to the input terminals of the load properly before you turn on the channel input. CAUTION When the fan stops working, the channel is disabled. Then, a message is displayed, «Fan stops running!»… -
Page 47: Transient Test Function
Chapter 2 Front Panel Operations RIGOL Transient Test Function Transient test function enables the load to periodically switch between two set levels (Level A and Level B). It can be used to test the transient characteristics of the DUT. Transient operation can only be used in CC mode and supports the following 3…
-
Page 48
Set Range Working range for the current in Con mode. Two ranges are available. DL3021/DL3021A: low range (0 to 4 A); high range (0 to 40 A) DL3031/DL3031A: low range (0 to 6 A); high range (0 to 60 A) (1) In the guide interface, press the Up/Down arrow key to switch the parameter focus to «Range». -
Page 49
Chapter 2 Front Panel Operations RIGOL (2) Enter a value by using the numeric keys. For setting methods, refer to the descriptions in «Parameter Setting Method». Note: The input value of A_Level should be within the set range. Set B_Level The sink current toggles between a high value and a low value in Con mode. -
Page 50
RIGOL Chapter 2 Front Panel Operations (1) In the guide interface, press the Up/Down arrow key to switch the parameter focus to «Width/Duty». Then, press the Left/Right arrow key or the knob to select Width or Duty. (2) Enter a value by using the numeric keys. For setting methods, refer to the descriptions in «Parameter Setting Method». -
Page 51
Chapter 2 Front Panel Operations RIGOL Set Range (1) In the main interface, press Range to switch the parameter focus to «Range». (2) Press Range to switch the current working range. You can also use the Left/Right arrow key or the knob to switch it. -
Page 52
RIGOL Chapter 2 Front Panel Operations (2) Enter a value by using the numeric keys, arrow keys, or the knob. For setting methods, refer to the descriptions of the help information or refer to the descriptions in «Parameter Setting Method». -
Page 53
Chapter 2 Front Panel Operations RIGOL 6. View waveform display After you enter the main interface, press the waveform display key enter the waveform display interface, as shown in Figure 2-17. By default, the waveform is displayed in Fast mode. You can observe that the load current toggles continuously between Level A and Level B. -
Page 54: Cc Pulsed Mode (Pul)
RIGOL Chapter 2 Front Panel Operations CC Pulsed Mode (Pul) In the Pul mode, when you enable the transient test operation, the load current will switch from Level B to Level A once the load receives a trigger signal. After maintaining Level A for a specified pulse width, it will switch to Level B, as shown in Figure 2-18.
-
Page 55
Set Range The current working range in Pul mode. Two current ranges are available: DL3021/DL3021A: low range (0 to 4 A); high range (0 to 40 A) DL3031/DL3031A: low range (0 to 6 A); high range (0 to 60 A) (1) In the guide interface, press the Up/Down arrow key to switch the parameter focus to «Range». -
Page 56
RIGOL Chapter 2 Front Panel Operations Set B_Level The sink current toggles between a high value and a low value in Pul mode. B_Level indicates a low value. The default unit for B_Level is Ampere (A). (1) In the guide interface, press the Up/Down arrow key to switch the parameter focus to «B_Level». -
Page 57
Chapter 2 Front Panel Operations RIGOL successfully configured. «CC» and «Pulse» are active at the top of the main interface. Of which, «Pulse» is highlighted. In the guide interface, if you give up configuring parameters, you can press Cancel to exit the guide interface and enter the main interface. -
Page 58
RIGOL Chapter 2 Front Panel Operations Set Slew_RIS (1) In the main interface, press Slew_RIS to switch the parameter focus to «Slew_RIS». (2) Enter a value by using the numeric keys, arrow keys, or the knob. For setting methods, refer to the descriptions of the help information or refer to the descriptions in «Parameter Setting Method». -
Page 59
Chapter 2 Front Panel Operations RIGOL WARNING To avoid electric shock, ensure that the DUT is connected to the input terminals of the load properly before you enable the trigger. CAUTION When the fan stops working, the channel is disabled. Then, a message is displayed, «Fan stops running!»… -
Page 60
RIGOL Chapter 2 Front Panel Operations operation, refer to the descriptions in «Store and Recall». 8. Exit Pul mode Press any key on the front panel of the load to exit Pul mode. 2-30 DL3000 User’s Guide… -
Page 61: Cc Toggled Mode (Tog)
Chapter 2 Front Panel Operations RIGOL CC Toggled Mode (Tog) In Tog mode, when you enable the transient test, the load current will toggle for one time between Level A and Level B once the load receives a trigger signal, as shown in Figure 2-22.
-
Page 62
Set Range The current working range in Tog mode. Two current ranges are available: DL3021/DL3021A: low range (0 to 4 A); high range (0 to 40 A) DL3031/DL3031A: low range (0 to 6 A); high range (0 to 60 A) (1) In the guide interface, press the Up/Down arrow key to switch the parameter focus to «Range». -
Page 63
Chapter 2 Front Panel Operations RIGOL Set B_Level The sink current toggles between a high value and a low value in Tog mode. B_Level indicates a low value. The default unit for B_Level is Ampere (A). (1) In the guide interface, press the Up/Down arrow key to switch the parameter focus to «B_Level». -
Page 64
RIGOL Chapter 2 Front Panel Operations Figure 2-24 Main Interface of Tog Operation The menus of the main interface are displayed in two pages. Menu items on Page 1: Range, A_Level, B_Level, Slew_RIS, Slew_FAL, and Next. Menu items on Page 2: TRIG_SRC, Guide, Read, Save, and Back. -
Page 65
Chapter 2 Front Panel Operations RIGOL methods, refer to the descriptions of the help information or refer to the descriptions in «Parameter Setting Method». Set Slew_FAL (1) In the main interface, press Slew_FAL to switch the parameter focus to «Slew_FAL». -
Page 66
RIGOL Chapter 2 Front Panel Operations 6. View waveform display After you enter the main interface, press the waveform display key enter the waveform display interface, as shown in Figure 2-25. The load current will always stay at Level A and it will not switch to Level B unless you disable the trigger manually. -
Page 67: List Operation Function (List)
Chapter 2 Front Panel Operations RIGOL List Operation Function (List) In list operation mode, you can perform the complex current/voltage/resistance/power modes accurately and rapidly, which may be synchronized with internal or external signals. In this way, you can complete the sophisticated test.
-
Page 68
If «CC» is selected to be the working mode, the range selection is as follows: DL3021/DL3021A: low range (0 A to 4 A); high range (0 A to 40 A) DL3031/DL3031A: low range (0 A to 6 A); high range (0 A to 60 A) If «CV»… -
Page 69
Chapter 2 Front Panel Operations RIGOL (2) Press Range to switch the working range for different modes. You can also use the Left/Right arrow key or the knob to switch it. Note: The low range provides better resolution and accuracy at low settings. -
Page 70
RIGOL Chapter 2 Front Panel Operations (2) Press EndState to switch the last working state. You can also use the Left/Right arrow key or the knob to switch it. When the number of execution times (Circle) is set to «Infinite», «EndState» is disabled and grayed out. -
Page 71
Chapter 2 Front Panel Operations RIGOL (2) Enter Value In CC mode, the set value is for current, and its default unit is A. In CV mode, the set value is for voltage, and its default unit is V. -
Page 72
RIGOL Chapter 2 Front Panel Operations will input based on the current settings. If the trigger is turned off during the list operation, the next time you turn on the trigger, the load will continue inputting the last parameter where you stop the list operation. -
Page 73
Chapter 2 Front Panel Operations RIGOL and recall interface. The file is saved in «.LST» format. For detailed saving operation, refer to the descriptions in «Save». (2) Read Press Read to enter the storage and recall interface. Recall and read the files in «.LST»… -
Page 74: Application Function
RIGOL Chapter 2 Front Panel Operations Application Function The load supports the following three application functions. Press APP to switch among the three functions. OCP test function OPP test function Battery test function OCP Test Function OCP test principle (as shown in Figure 2-28)
-
Page 75
The current working range for the OCP test function. Two current ranges are available: DL3021/DL3021A: low range (0 to 4 A); high range (0 to 40 A) DL3031/DL3031A: low range (0 to 6 A); high range (0 to 60 A) (1) In the guide interface, press the Up/Down arrow key to switch the parameter focus to «Range». -
Page 76
RIGOL Chapter 2 Front Panel Operations Note: The low range provides better resolution and accuracy at low current settings. If the set current value is greater than the maximum value of the low range, you must select a high range. -
Page 77
Chapter 2 Front Panel Operations RIGOL Set OCP_V The protection voltage in the OCP test mode. The default unit for the value is V. (1) In the guide interface, press the Up/Down arrow key to switch the parameter focus to «OCP_V». -
Page 78
RIGOL Chapter 2 Front Panel Operations Figure 2-30 Main Interface of OCP Test Function The menus of the main interface are displayed in three pages. Menu items on Page 1: Range, Von, Delay_Von, C_Start, C_Step, and Next. Menu items on Page 2: Delay_Step, OCP_V, C_Max, C_Min, Back, and Next. -
Page 79
Chapter 2 Front Panel Operations RIGOL the descriptions in «Parameter Setting Method». Set C_Step (1) In the main interface, press C_Step to switch the parameter focus to «C_Step». (2) Enter a value by using the numeric keys, arrow keys, or the knob. For the setting methods, refer to the descriptions of the built-in help information or refer to the descriptions in «Parameter Setting Method». -
Page 80
RIGOL Chapter 2 Front Panel Operations In the guide interface, you can only use the numeric keys to input the value for the parameter; in the main interface, you can use the numeric keys, the arrow keys, or the knob to input the value for the parameter. -
Page 81
Chapter 2 Front Panel Operations RIGOL 7. Save and read files In the guide interface and main interface of OCP test mode, you can press Save to save the parameters for the OCP test mode to the internal or external memory, and you can read and recall it if necessary by pressing Read. -
Page 82: Opp Test Function
RIGOL Chapter 2 Front Panel Operations OPP Test Function OPP test principle (as shown in Figure 2-32): When the OPP test starts, after the input voltage reaches Von, the load will delay for a period, then the DUT starts to work according to the starting power. The power increases with increasing with incrementing steps at a certain interval.
-
Page 83
Chapter 2 Front Panel Operations RIGOL 2. Power on the instrument After the instrument is connected to the power source, press the Power key on the front panel to power on the instrument. 3. Set channel parameters in the guide interface Press APP to switch to the guide interface of the OPP test function, as shown in Figure 2-33. -
Page 84
RIGOL Chapter 2 Front Panel Operations Set P_Start The power value when the load starts in OPP test mode. The default unit for the value is W. (1) In the guide interface, press the Up/Down arrow key to switch the parameter focus to «P_Start». -
Page 85
Chapter 2 Front Panel Operations RIGOL Set T_Limit The maximum overpower protection time in OPP mode. If no action is performed during the protection time, the load will automatically stop sinking the current. The default unit for the value is μs… -
Page 86
RIGOL Chapter 2 Front Panel Operations Set Delay_Von (1) In the main interface, press Delay_Von to switch the parameter focus to «Delay_Von». (2) Enter a value by using the numeric keys, arrow keys, or the knob. For setting methods, refer to the descriptions of the help information or refer to the descriptions in «Parameter Setting Method». -
Page 87
Chapter 2 Front Panel Operations RIGOL setting methods, refer to the descriptions of the help information or refer to the descriptions in «Parameter Setting Method». Set T_Limit (1) In the main interface, press T_Limit to switch the parameter focus to «T_Limit». -
Page 88
RIGOL Chapter 2 Front Panel Operations Figure 2-35 OPP Waveform Display Interface 7. Save and read files In the guide interface and main interface of OPP test mode, you can press Save to save the parameters for the OPP test mode to the internal or external memory, and you can read and recall it if necessary by pressing Read. -
Page 89: Battery Test Function
Chapter 2 Front Panel Operations RIGOL Battery Test Function Battery test principle (as shown in Figure 2-36): A test for discharging the battery in CC mode. You can set the termination conditions: cut-off voltage value, battery capacity value, and discharge time. When any one of the three conditions is met, the discharge stops.
-
Page 90
Set Range Working range for the current in battery test mode. Two ranges are available. DL3021/DL3021A: low range (0 to 4 A); high range (0 to 40 A) DL3031/DL3031A: low range (0 to 6 A); high range (0 to 60 A) (1) In the main interface, press Range to switch the parameter focus to «Range». -
Page 91
Chapter 2 Front Panel Operations RIGOL (1) In the main interface, press V_Stop to switch the parameter focus to «V_Stop». (2) Press V_Stop to switch to «ON», and select the cut-off voltage to be the termination condition. (3) Enter a value by using the numeric keys, arrow keys, or the knob. For setting methods, refer to the descriptions of the help information or refer to the descriptions in «Parameter Setting Method». -
Page 92
RIGOL Chapter 2 Front Panel Operations «T_Stop». (2) Press T_Stop to switch to «ON», and select the discharge time to be the termination condition. (3) Enter a value by using the numeric keys, arrow keys, or the knob. For the setting methods, refer to the descriptions of the built-in help information or refer to the descriptions in «Parameter Setting Method». -
Page 93
Chapter 2 Front Panel Operations RIGOL Figure 2-38 Battery Waveform Display Interface 6. Exit the battery test function Press any key on the front panel of the load to exit the battery test function. DL3000 User’s Guide 2-63… -
Page 94: Advanced Function
RIGOL Chapter 2 Front Panel Operations Advanced Function The advanced functions include factory test function and CC+CV function. Press Option to enter the advanced function interface, as shown in Figure 2-39. Figure 2-39 Option Interface Factory Test Function In CC/CV mode, the load supports the factory test function, which is used to test the stability of the current and voltage of the DUT.
-
Page 95
Chapter 2 Front Panel Operations RIGOL Figure 2-40 Main Interface of Factory Test Function The menus of the main interface are displayed in two pages. Menu items on Page 1: Mode, Current, Range, Max, Min, and Next. Menu items on Page 2: Pass_Tip, Fail_Tip, Pass_Sound, Fail_Sound, and Back. -
Page 96
RIGOL Chapter 2 Front Panel Operations (1) In the main interface, press Range to switch the parameter focus to «Range». (2) Press Range to switch the current working range. You can also use the Left/Right arrow key or the knob to switch it. -
Page 97
Chapter 2 Front Panel Operations RIGOL Set Fail_Tip If the test is failed, you can determine whether to display the prompt message that indicates the test failure. (1) In the main interface, press Fail_Tip to switch the parameter focus to «Fail_Tip». -
Page 98: Cc+Cv Function
RIGOL Chapter 2 Front Panel Operations CC+CV Function The load supports CC+CV function that simulates two stages of charging: The load is set to be in CC mode and simulates constant current (CC) charging. When the readback voltage is detected and the detected value reaches the preset voltage, the load switches to the CV mode to simulate constant voltage (CV) charging.
-
Page 99
The working ranges of current in CC+CV mode are as follows. Different models have different ranges. DL3021/DL3021A: low range (0 to 4 A); high range (0 to 40 A) DL3031/DL3031A: low range (0 to 6 A); high range (0 to 60 A) (1) In the main interface, press C_Range to switch the parameter focus to «C_Range». -
Page 100
RIGOL Chapter 2 Front Panel Operations (0-15 V) and high range (0-150 V). (1) In the main interface, press V_Range to switch the parameter focus to «V_Range». (2) Press V_Range to switch the voltage working range. You can also use the Left/Right arrow key or the knob to switch it. -
Page 101
Chapter 2 Front Panel Operations RIGOL 5. View waveform display Press the waveform display key to enter the waveform display interface, as shown in Figure 2-42. For detailed operations, refer to the descriptions in «Waveform Display Function» section. Press the waveform display key again to exit the waveform display interface and return to the main interface of CC+CV function. -
Page 102: Waveform Display Function
RIGOL Chapter 2 Front Panel Operations Waveform Display Function The electronic load provides the waveform display function and supports the following operations for the waveform, such as pausing the waveform, recording the waveform, and capturing the waveform. Therefore, you can dynamically observe the trend of parameters changes.
-
Page 103
Chapter 2 Front Panel Operations RIGOL For the Con/Pul/Tog/OCP/OPP modes, in the guide interface, when you press the waveform display key , you cannot enter the waveform display interface. Only when you enter the main interface, can you press waveform display key to enter the waveform display interface. -
Page 104
RIGOL Chapter 2 Front Panel Operations In CC/CV/CR/CP/Pul/Tog/Battery/OCP/OPP/CC+CV modes, menu items under «Data» include I, U, R, and P. In Con mode, only I and U are included under «Data». (1) If «I» is selected to be the menu item under «Data», then the vertical axis indicates the current, and the current waveform is displayed in the interface. -
Page 105
Chapter 2 Front Panel Operations RIGOL and then «Record» is not displayed at the top of the interface. During recording, the filename of the data file is generated automatically. 8. Play Back After you insert the USB storage device, press Play Back to play back the recorded data files. -
Page 106: Input Control
RIGOL Chapter 2 Front Panel Operations Input Control Turn On/Off the Input Once you power on the load, it will not sink the current immediately, and you need to press the ON/OFF key to control the input of the load. When the input of the load is enabled, the ON/OFF key is illuminated.
-
Page 107: Short-Circuit Operation
When a short circuit occurs to the load in non-CC mode, it will automatically be switched to its original mode. The maximum short-circuit current for DL3021/DL3021A is 44 A; and that for DL3031/DL3031A is 64 A. Note: Enabling the short circuit function in CV mode may cause the load to sink large amounts of current, which may turn the input off.
-
Page 108: Trigger Operation
RIGOL Chapter 2 Front Panel Operations Turning the short circuit on does not affect the set values of the current parameters, and the load will return to the previously set state when the short circuit is turned off. Trigger Operation Trigger operation is commonly used in transient test function (Con, Pul, and Tog) and List function.
-
Page 109
Chapter 2 Front Panel Operations RIGOL Slew Rate 100% Expected Time Actual Time Figure 2-46 Slew Rate and Transition Time Note: In case where the transition from one setting to another is large, the minimum transition time can be calculated by dividing the current transition by the slew rate. -
Page 110: Protection Function
RIGOL Chapter 2 Front Panel Operations Protection Function The load includes the following protection features: overcurrent protection (OCP), overvoltage protection (OVP), overpower protection (OPP), overtemperature protection (OTP), as well as local/remote reverse voltage (LRV/RRV) protection. Once any of the above conditions is detected, the load will take the corresponding protection measures and enter its self-protection mode.
-
Page 111
Chapter 2 Front Panel Operations RIGOL the output terminals of the DUT are in wrong connection, the load’s input will be automatically turned off and the load will stop sinking the current. At this time, the beeper sounds, and a prompt message is displayed, «Reverse connection!»… -
Page 112: Sense Working Mode
RIGOL Chapter 2 Front Panel Operations Sense Working Mode When the DUT outputs great currents, the voltage drop on the load leads cannot be ignored. To ensure an accurate measurement for the output voltage of the DUT, the load provides Sense (remote sense) working mode.
-
Page 113
Chapter 2 Front Panel Operations RIGOL In case where the DUT outputs great currents, the load leads should be as short as possible. You’d better twisted the leads to get optimum output. Twisted-pair wires are recommended for Sense leads, but you’d better not … -
Page 114: Function Of Terminals On The Rear Panel
RIGOL Chapter 2 Front Panel Operations Function of Terminals on the Rear Panel External Trigger Function If you select the trigger signal over the digital I/O interface on the rear panel of the load, first select «DIGIO» to be the trigger source of the load. For details, refer to descriptions in «Trigger Operation».
-
Page 115: Store And Recall
Chapter 2 Front Panel Operations RIGOL Store and Recall The load allows you to save different types of files to the internal and external memories. You can recall and read them when necessary. The load provides an internal non-volatile memory (Disk C) and an external memory (Disk D).
-
Page 116: Cursor
RIGOL Chapter 2 Front Panel Operations Cursor Operation Procedures: 1. Press Store on the front panel of the load to enter the storage and recall interface. 2. Press Cursor to switch between the directory and the file. 3. Use the knob or press the Up/Down arrow key to select the desired directory or file.
-
Page 117
Chapter 2 Front Panel Operations RIGOL as an example, therefore, the filename takes «CC_» as the prefix.) After you input Pinyin for a Chinese character, use the numerical key on the front panel to select the number that corresponds to the desired Chinese character in the «Chinese Character Selection Area», and then the selected… -
Page 118: Read
RIGOL Chapter 2 Front Panel Operations The length of the filename is limited to 30 characters. While inputting the filename, you can continuously press Delete or the Backspace key delete the unnecessary letters that have been input in the «Filename Input Area».
-
Page 119: Delete
Chapter 2 Front Panel Operations RIGOL the load will enter its corresponding interface. (Note: The load will enter the guide interface (if any) first.) Delete You can delete the files in Disk C and D, as well as the empty folders in Disk D.
-
Page 120: System Utility Function
RIGOL Chapter 2 Front Panel Operations System Utility Function Press Utility to enter the system utility function interface, as shown in Figure 2-52. Tabs Figure 2-52 System Utility Function Interface The following table lists names of different tabs and their descriptions. You can view the information contained in each tab and the parameters that can be set.
-
Page 121: System
Chapter 2 Front Panel Operations RIGOL System Press Utility to enter the system utility function interface. By default, the system setting tab is selected. As shown in Figure 2-52, if the scrollbar is shown at the right side of the interface, it indicates that not all system settings are displayed in the current interface.
-
Page 122
RIGOL Chapter 2 Front Panel Operations Set Digital Input/Output A digital I/O interface on the rear panel of the load, supporting digital trigger input and trigger output. Digital input The data line of the Digital I/O interface can receive the external trigger signal. -
Page 123
Chapter 2 Front Panel Operations RIGOL Turn On/Off Current Monitoring Output Terminal The terminal outputs the 0-to-+10 V voltage signal, which indicates the zero-to-full scale real-time input current. In the system setting tab, press the Up/Down arrow key to switch the parameter focus to «Imon_EXT», and then press the Left/Right arrow key or use the knob to… -
Page 124
RIGOL Chapter 2 Front Panel Operations Set the Screen Brightness You can set the screen brightness by using the brightness slider label. Moving left decreases the brightness; and moving right increases the brightness. The setting is stored in the non-volatile memory, which will not be affected even if you restore the load to its factory defaults. -
Page 125: Communication Interface Setting
Chapter 2 Front Panel Operations RIGOL Communication Interface Setting Press Utility to enter the system utility function interface, and then press Interface to enter the interface tab. By default, «GPIB» is selected, as shown in Figure 2-53. Figure 2-53 «GPIB» Tab Interface The load supports GPIB (extended from the USB-GPIB interface converter), USB, RS232, and LAN.
-
Page 126
RIGOL Chapter 2 Front Panel Operations View USB ID Use the USB cable to connect the load to the PC via the USB DEVICE interface. Then, the load can be controlled remotely. Press Interface to enter the communication interface tab, and then press the USB key to select the «USB»… -
Page 127
Chapter 2 Front Panel Operations RIGOL Not connected SGND Signal ground Not connected CTS (Clear To Send) Clear to send RTS (Request To Send) Request to send Not connected Press Interface to enter the communication interface tab, and then press the RS232 key to select the «RS232″… -
Page 128
RIGOL Chapter 2 Front Panel Operations mode. 4. Stop Bits The available stop bits include 1 or 2. Press the Up/Down arrow key to switch the parameter focus to «Stop Bits», and then press the Left/Right arrow key or use the knob to select the desired stop bits. -
Page 129
Chapter 2 Front Panel Operations RIGOL 1. Connection status The status of the load will be displayed based on the current network connection status. Connected: indicates that the network has been successfully connected. Disconnected: indicates that the network is disconnected or network … -
Page 130
RIGOL Chapter 2 Front Panel Operations (3) ManualIP (manual configuration) In this mode, you can self-define the network parameters (such as the IP address) of the instrument. Press ManualIP to enable or disable the manual IP configuration mode. By default, it is «OFF». -
Page 131
Chapter 2 Front Panel Operations RIGOL If the input subnet mask is invalid, a prompt message «Invalid subnet mask. The subnet mask must be contiguous.» will be displayed. Set the default gateway In the manual IP mode, you need to acquire an available gateway address from the administrator, and then configure the default gateway manually. -
Page 132
RIGOL Chapter 2 Front Panel Operations to be modified. It can be used to identify the instrument when you assign the IP address to the instrument. A physical address is a 48-bit (6-byte) addressing scheme, usually represented in Hex. For example, 00-2A-A0-A5-E0-56. -
Page 133: System Info
Chapter 2 Front Panel Operations RIGOL System Info Press Utility to enter the system utility function interface. Then, press System Info to enter the system information tab, as shown in Figure 2-58. Figure 2-58 System Information Tab Interface In the interface, you can view the system information of the instrument, including manufacturer, device model, software and hardware versions, FPGA version, boot version, system boot times, calibration date, and product serial number.
-
Page 134
RIGOL Chapter 2 Front Panel Operations Starting Voltage (Von) V_Limit 180 V C_Limit 70 A Voltage Range 150 V V_Limit 180 V C_Limit 70 A Resistance Ω Range kΩ V_Limit 180 V C_Limit 70 A Power V_Limit 180 V C_Limit… -
Page 135
Chapter 2 Front Panel Operations RIGOL Trigger Source TRAN List Mode Range 60 A Circles Steps End State Trigger Source TRAN Step Value Step Duration Step Slew 0.1 A/μs Battery Current Range 60 A Cut-off Voltage OFF, 0 V Battery Capacity… -
Page 136
RIGOL Chapter 2 Front Panel Operations Factory Mode Current Range 60 A Maximum Value 10 A Minimum Value Pass_Tip Fail_Tip Pass_Sound Fail_Sound CC+CV Current Current Range 60 A Voltage Voltage Range 150 V V_Limit 180 V C_Limit 70 A System Setting Language* 简体中文… -
Page 137
Chapter 2 Front Panel Operations RIGOL LAN* DHCP AutoIP ManualIP Store Cursor Contents Contents File First File Note*: These parameters will not be affected by the default setting operations. (Press Utility System Power-on to select «Default», and then when you power on the instrument the next time, it will restore to its factory default settings.) -
Page 138: Option Configuration
Then, you can install the license according to the following steps. 1. Obtain an option license (1) Log in to the RIGOL official website (www.rigol.com), click SERVICE Software License Register to enter the «Registered product license code» interface.
-
Page 139
Chapter 2 Front Panel Operations RIGOL serial number of the instrument), and verification code. Then click Generate to obtain the option license. Note: The hyphens in the option license should be omitted. 2. Install the option Method 1: Front Panel Operations (1) Click the «Option»… -
Page 140
RIGOL Chapter 2 Front Panel Operations Filename Suffix Product Serial Number Option License Empty Line The filename suffix must be «.lic». Contents requirement: Line 1: product serial number (Press Utility System to obtain the product serial number);… -
Page 141: Chapter 3 Remote Control
(2) Send commands by programming in LabVIEW, MATLAB, etc. PC software Users can use the PC software to send commands to control the instrument remotely. RIGOL Ultra Sigma is recommended. You can download the software from RIGOL official website (www.rigol.com). Operation Procedures: (1) Set up communication between the instrument and PC.
-
Page 142: Remote Control Via Usb
RIGOL Chapter 3 Remote Control Remote Control via USB 1. Connect the load to the PC Use the USB cable to connect the load to the PC via the USB DEVICE interface on the rear panel of the load. 2. Install the USB driver This load is a USB-TMC device.
-
Page 143
Chapter 3 Remote Control RIGOL DL3000 User’s Guide… -
Page 144
4. View the device resource The searched instrument resource will be under the directory of «RIGOL Online Resource», with the model of the instrument and the USB information being displayed. 5. Control the instrument remotely Right-click the resource name «DL3031A… -
Page 145: Remote Control Via Lan
Chapter 3 Remote Control RIGOL Remote Control via LAN 1. Connect the load to the PC Use the network cable to connect the load to the PC or the local area network (LAN) where the PC resides. 2. Configure network parameters…
-
Page 146
Note: If you want to remove the resource, select the resource and then click to remove it. 4. View the device resource The searched instrument resource will be under the directory of «RIGOL Online Resource», as shown in the following figure. DL3000 User’s Guide… -
Page 147
Chapter 3 Remote Control RIGOL 5. Control the instrument remotely Right-click the resource name «DL3031A (TCPIP::172.16.3.93::INSTR)», and select «SCPI Panel Control» to open the remote command control panel, as shown in the following figure. Then you can send commands and read data through the panel. -
Page 148: Remote Control Via Gpib
RIGOL Chapter 3 Remote Control Remote Control via GPIB 1. Connect the load to the PC Use the USB-GPIB interface converter to extend the GPIB interface for the load, and then use the GPIB cable to connect the load to the PC to realize remote control.
-
Page 149
5. View the device resource The searched instrument resource will be under the directory of «RIGOL Online Resource», as shown in the following figure. 6. Control the instrument remotely Right-click the resource name «DL3031A (GPIB0::2::INSTR)», and select «SCPI… -
Page 150
RIGOL Chapter 3 Remote Control 3-10 DL3000 User’s Guide… -
Page 151: Remote Control Via Rs232
Chapter 3 Remote Control RIGOL Remote Control via RS232 1. Connect the load to the PC Use the 9-pin RS232 cable (female-to-female, cross-over) to connect the load with the PC via the RS232 interface on the rear panel of the load.
-
Page 152
Figure (c). Then, click OK to add the instrument resource. 4. View the device resource The searched instrument resource will be under the directory of «RIGOL Online Resource», as shown in the following figure. 5. Control the instrument remotely Right-click the resource name «DL3031A (ASRL1::INSTR)», and select «SCPI… -
Page 153
Chapter 3 Remote Control RIGOL DL3000 User’s Guide 3-13… -
Page 155: Chapter 4 Troubleshooting
This chapter lists the potential problems or failure, as well as the solutions in using the instrument. If the following problems occur, locate and resolve the problems according to the following steps. If the problems still persist, contact RIGOL and provide your instrument information to us. (For instrument information, press Utility …
-
Page 156
RIGOL Chapter 4 Troubleshooting (4) If the problem still persists, contact RIGOL. 4. An exception occurs to the input in CR mode. (1) Check whether the output of the DUT is normal, e.g. check whether an oscillation occurs to the DUT. -
Page 157: Chapter 5 Specifications
30 minutes under the specified operating temperature. DC Input (0℃~ 4 0 ℃) Minimum Operating Model Voltage Current Maximum Power Voltage (DC) DL3021 0 ~ 150 V 0 ~ 40 A 200 W 40 A@1 V DL3021A DL3031 0 ~ 150 V…
-
Page 158
RIGOL Chapter 5 Specifications CP Mode Model Range Resolution DL3021 0 ~ 200 W 100 mW DL3021A DL3031 0 ~ 350 W 100 mW DL3031A Con Mode Frequency Frequency Model Frequency Range Duty Cycle Range Resolution Accuracy DL3021 0.001 Hz~15 kHz DL3021A 0.001 Hz~30 kHz… -
Page 159
Chapter 5 Specifications RIGOL Readback Resistance Model Range Resolution DL3021 0.08 Ω~15 kΩ 2 mA/Vsense (0.0667 S~0.5 S) DL3021A DL3031 0.08 Ω~15 kΩ 2 mA/Vsense (0.0667 S~0.5 S) DL3031A Readback Power Model Range Resolution DL3021 0 ~ 200 W 100 mW… -
Page 160
RIGOL Chapter 5 Specifications Digital I/O 1 (optional) GPIB 1 (optional, USB-GPIB interface converter) Environment Cooling Method Fan Cooled Operating 0℃~40℃ Temperature -40℃~70℃ Storage Temperature Humidity 5%~80% RH (without condensation) Altitude Below 2,000 m Certification Information Complies with the requirements of the following directive and… -
Page 161: Chapter 6 Appendix
Appendix A: Order Information Description Order No. Programmable DC Electronic Load (single channel, DL3021 DC 150 V/40 A 200 W 15 kHz 2.5 A/μs) Programmable DC Electronic Load (single channel, DL3021A DC 150 V/40 A 200 W 30 kHz 3.0 A/μs)
-
Page 162
RIGOL Chapter 6 Appendix those models without A (DL3021/DL3031) are different. (3) For all the accessories and options, please contact the local office of RIGOL. Accessories Description 20 A/40 A/60 A Test Lead Model 20 A Test Lead 40 A Test Lead… -
Page 163
Chapter 6 Appendix RIGOL Rack Mount Kit for a single Rack Mount Kit for two instrument instruments It is used for installing a single instrument. It is used for installing two instruments. DL3000 User’s Guide… -
Page 164: Appendix B: Warranty
RIGOL guarantees free replacement or repair for the defective product. To get repair service, please contact with your nearest RIGOL sales or service office. There is no other warranty, expressed or implied, except such as is expressly set forth herein or other applicable warranty card.
-
Page 165: Index
Index RIGOL Index AC Selector …… 1-10, 1-12 Manual Configuration ….2-100 Air Outlet ……… 1-10 Minimum Transition Time … 2-78 Appearance and Dimensions ..1-3 OCP ……… 2-44 Battery ……..2-59 OPP ……… 2-52 Beeper ……..2-91 Option Configuration ….2-108 Built-in Help System ….
|
| Цитата |
|---|
| Иван пишет: Целенаправленно искал, сравнивал именно эту модель электронной нагрузки в различных магазинах, остановил выбор на этом, так как цена была ниже, чем в других. Аппарат бесшумный, достаточно надежная сборка, присутствует защита по всем направлениям, цена вполне оправдана. Сперва удивила долгая загрузка устройства после включения, думал, что он завис, и прислали неисправный, после оказалась что это самодиагностика. Мощности 200 Вт хватает для выполнения большинства задач. Нагрузкой очень даже доволен, магазин доставил быстро и без повреждений. |
Здравствуйте, Иван!
Большое спасибо, что нашли время поделиться своим опытом работы с нами и впечатлениями от покупки!
Будем и дальше усердно работать, чтобы продолжать радовать Вас.
Хорошего настроения и успехов!
С уважением, Администрация интернет-магазина Суперайс
Описание
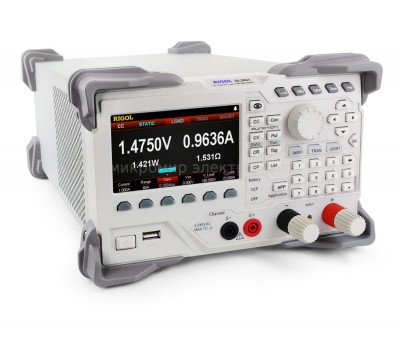
Описание программируемой электронной нагрузки RIGOL DL3021
DL3021 — программируемая электронная нагрузка постоянного тока, предназначенная для разработки источников питания. Данный прибор позволяет имитировать нагрузку в статических, динамических и специальных режимах работы и проводить измерения основных параметров источников питания. Устройство легко транспортируется и подключается, не требует сложной предварительной настройки. DL3021 предназначена для разработки и измерения параметров источников питания в производственных, лабораторных и учебных целях.
Особенности и преимущества
- Одноканальная нагрузка, 150 В/40 А, максимальная мощность до 200 Вт
- Динамический режим: до 30 кГц
- Регулируемая скорость нарастания тока: от 0,001 до 5 А/мкс
- Наилучшее разрешение по измеряемому напряжению/току: 0,1 мВ / 0,1 мА
- ЖК-экран 4,3 дюйма TFT, возможность одновременного отображения нескольких параметров и состояний
- Защита от перегрузки по напряжению, по току, по мощности, от перегрева, от напряжения другой полярности
- 4 статических режима: постоянный ток (CC), постоянное напряжение (CV), постоянное сопротивление (CR), постоянная мощность (CP)
- 3 динамических режима: непрерывный, импульсный, переключение
- Возможность программирования до 512 шагов
- Проверка батареи, проверка защиты от перегрузки по току (OCP), проверка защиты от перегрузки по мощности (OPP) и т.д.
- Проверка на короткое замыкание
- Функция сохранения настроек при выключении питания
- Встроенные интерфейсы RS232/USB/LAN (опция)
- Адаптер USB-GPIB (опция)


Непрерывный режим

Электрические параметры
Мы предлагаем купить программируемую электронную нагрузку RIGOL DL3021 в Москве и Санкт-Петербурге. Также осуществляем доставку в другие регионы России. Контрольно-измерительное оборудование RIGOL имеет сертификаты соответствия, подтверждающие его высокое качество, надежность и продолжительность службы. Все программируемые электронные нагрузки имеют официальные гарантии производителя — китайской компании RIGOL, заслужившей признание во многий европейских странах, благодаря оптимальному соотношению технических параметров, надежности и цены.
Заказать программируемую электронную нагрузку DL3021 можно через корзину сайта, по телефону или отправить запрос по эл.почте. Специалисты магазина расскажут более подробно о выбранном оборудовании, его возможностях, сфере применения, организуют доставку товара по России.
Характеристики
| Масса, кг |
7.58 |
| Размеры |
23.9 х 15.7 х 44.2 |
| Мощность |
200 Вт |
Пробники
К данной модели совместимых пробников не предусмотрено.
65 148,65 ₽
Мощность – 200 Вт; Напряжение – 150 В; Ток – 40 А; Частота – 15 кГц; Скорость нарастания – 2.5 А/мкс
Доступность:
1 в наличии
-
Описание
-
Документация
-
Комплект поставки
-
Оплата
-
Доставка
-
Гарантия
-
Отзывы (0)
Комплект поставки
- Кабель питания
-
Клеммный изолятор Fuse 50T-0200H 250 V 0.20 A
-
Предохранитель
-
Краткое руководство по эксплуатации
Оплата
Наша компания работает с юридическими лицами и индивидуальными предпринимателями по безналичному расчёту
Оплата приобретаемого оборудования осуществляется в соответствии с заключённым договором или офертой, указанной в счёте.
Запросить счёт на оборудование, а так же получить коммерческое предложение можно, отправив запрос
- на электронную почту: info@rigol-russia.com,
- или позвонив по телефону +7 (495) 363-77-09.
Доставка
ООО “НПК ЗНАМЯ” осуществляет доставку приобретённого у нас измерительного оборудования – бесплатно, на следующих условиях:
- г. Москва и Московская область в пределах ЦКАД – собственным транспортом.
- По территории России – пользуясь услугами транспортной компанией Деловые Линии.
- Сорок доставки оборудования, имеющегося в наличии на нашем складе, по г. Москва – составляет 1-2 рабочих дня.
Гарантия
Любой товар, купленный в компании ООО «НПК ЗНАМЯ», обеспечен заводской гарантией, срок которой зависит от модели товара и указывается в паспорте на товар или в руководстве по эксплуатации. Срок гарантии наступает с момента передачи товара Покупателю и подписания товарной накладной ТОРГ-12.
В течение гарантийного срока и в случае обнаружения в товаре скрытых недостатков, которые не могли быть выявлены Покупателем при получении товара, Покупатель вправе обменять, вернуть либо бесплатно отремонтировать данный товар.
Просим обратить внимание, что гарантия НЕ распространяется на:
- Элементы питания (батареи, аккумуляторы);
- Лампы;
- Предохранители;
- Обрывы в процессе эксплуатации сетевых шнуров, соединительных кабелей, пробников к осциллографам и других принадлежностей из комплекта поставки
- Тару, упаковку