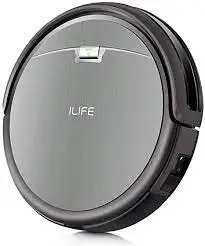
iLife A4S Robotic Vacuum Cleaner — Use Manual — Use Guide PDF.
Documents: Go to donwload!
- Owner’s manual — (English)
Table of contents
- Product Parts
- Produc Operating
- Product Maintaining
- Product Specifications
- Troubleshooting
User manual Robot Vacuum
Product Parts
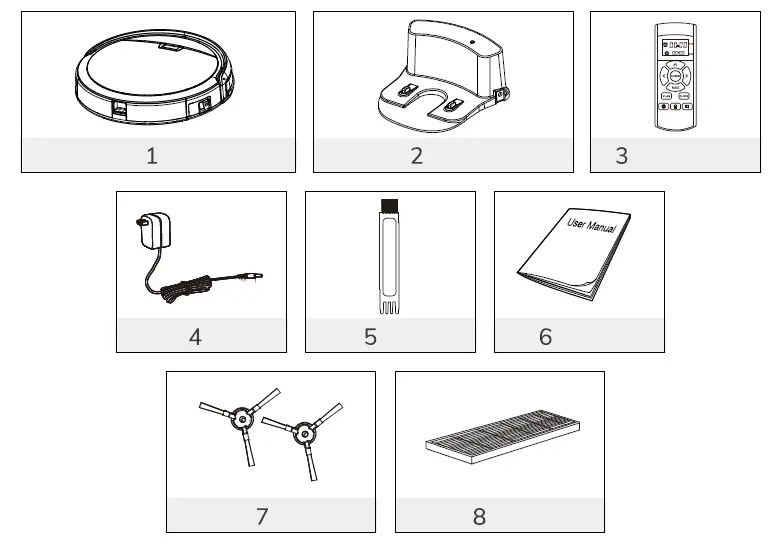
Main body and accsessories
-468131.png)
-104182.png)
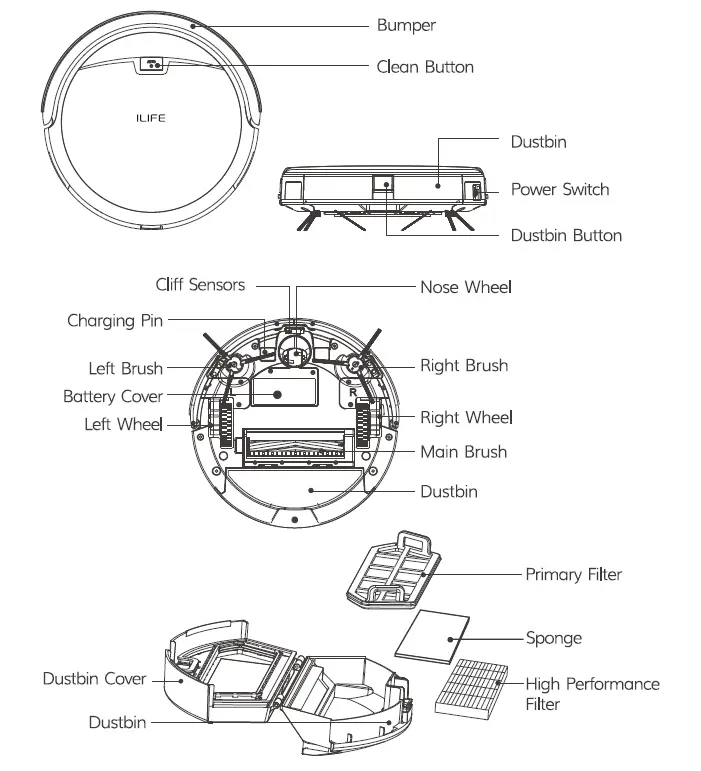
Robot anatomy
-811436.png)
-946088.png)
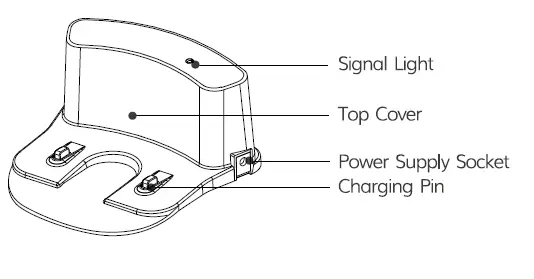
Charging home base
-495857.png)
Clearn button status
-152360.png)
Remote control
-882735.png)
1.-786589.png) Clean
Clean
Press this button to start deaning in selected mode.
Press this button to make the robot stop when it’s cleaning. • Press this button to exchange from sleeping mode to selected mode.
2. Directional Buttons
A. «-870132.png) «button:
«button:
- Press this button to increase number in scheduling or clock mode.
- Press this button to make robot move forward in selected mode and the robot will stop when it hits any objects.
B. «MAX «button:
- Press this button to decrease number in scheduling or dock mode.
- Press»MAX», the vacuum power will be the strongest.
C. «-951519.png) «button:
«button:
- Press this button to exchange from minute to hour in scheduling or clock mode.
- Press this button to make robot turn left.
D. » -857536.png) «button:
«button:
- Press this button to exchange from minute to hour in scheduling or clock mode.
- Press this button to make robot turn right.
3. Plan
- Press this button to enter scheduling mode when in selected mode.
- Press this button to confirm scheduling in scheduling mode.
4. Clock
- Press this button to enter clock mode when in selected mode.
- Press this button to confirm clock setting in clock mode.
5. -613899.png) HOME
HOME
Press this button to return robot to charging home base.
6.-467332.png) Edge
Edge
Press this button to make robot clean along wall.
7. -570321.png) Spot
Spot
Press this button to make robot start spot cleaning.
8-869562.png)
Shows the scheduling time.
9 -863701.png)
Shows the clock time.
Note:
- Install two AAA type batteries into the remote.
- Take out the batteries if the remote control is not used for long time.
Produc Operating
1. How to get started
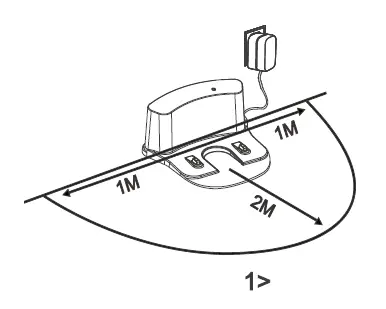
- Place charging home base, plug in adapter, signal light on charging home base will turn solid.
- Note: Put charging home base against the wall and remove obstacles about 1 meter at two sides and about 2 meters forward.
-424299.png)
- Turn on the Power Switch around power socket, then display panel will flash. (If no command received, the robot will turn to sleeping mode after 45 seconds.)
Note:
A. Please always keep the power switch turning on. If not, it is unable to make the robot work.
B. If power switch is turned off, all the scheduling will be lost.
Caution: Before charge the robot, please make sure the power switch is turned on, or else the robot can not be charged.
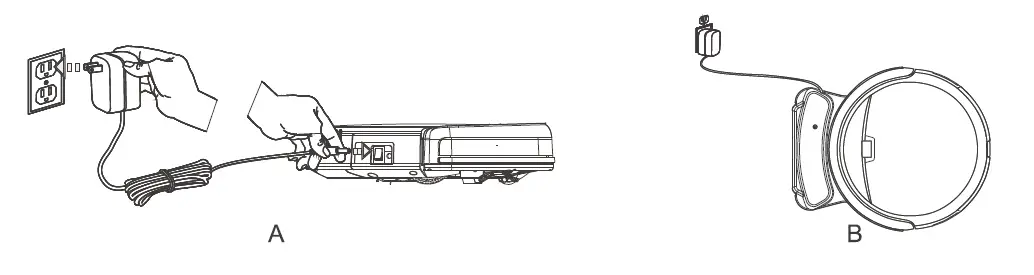
- 3. Charge the robot in either way as shown below:
A. Plug into an outlet.
B. Press button on remote control to make robot return to charging home base for charging itself.
-936377.png)
For better extending battery life:
A. Before first use, charge the robot overnight. When charging is finished, light around the main button will turn off.
B. In normal use, always store the robot on charging home base with base plugged in.
C. If the robot is not used for long time, turn the power switch off, fully charge the robot and store it in a cool, dry place.
4. Auto charging
The robot will automatically return to charging home base when battery is low.
2. Starting up/Pause/Sleeping
Sleeping mode: Robot is not working, light around main button are off and power switch is on.
Selected mode: Robot is not working, greenlight around main button flash.
Cleaning mode: Robot is working, green light around main button turn solid.
1. Starting up
A. Make sure the power switch is on.
B. Press -194884.png) button on main body or button on remote control to start cleaning.
button on main body or button on remote control to start cleaning.
Note: If robot is in sleeping mode, press button to wake the robot up from sleeping mode.
Then press button for a second time, the robot starting clearning automatically.
2. Pause
Press button on main body or button on remote control to exchange robot from cleaning mode to selected mode.
Note: When robot is paused, press button to make robot to re-start cleaning.
3. Sleeping
To turn robot into sleeping mode from selected mode:
A. Keep pressing button on main body for 3 seconds.
B. Robot will automatically enter sleeping mode if no command received for 45 seconds.
3. Scheduling
- Aim the remote toward the robot and press the «CLEAN» button to wake the robot when it is in sleeping mode. You will hear 1 beep tone.
- Please adjust the «clock «time on remote display to your local time.
- A Press CLOCK and then use directional buttons to set the correct time.
- B.Press CLOCK to save the setting.
- Note: During the schedule, let the remote get close to the vacuum for receiving the signal successfully.
- While still aiming the remote toward the robot, set the «plan» time on the remote that you want the robot to begin cleaning.
- When you are done setting the time, press the «PLAN» button on the remote to save your schedule program. You will hear 1 «beep» tone if you have successfully completed the schedule setting program.
- Note:
- Do not place the charge dock on the carpet.
- Please keep the robot on after scheduling.
- How to cancel the schedule?
- To cancel the schedule, Please turn off the robot.
- Restart the vacuum.
When you set the clock time or schedule, the final operation will be confirmed by beep from robot. If no tone received, your setting is unsuccessful.
4. Cleaning mode
1. Auto cleaning
The robot will dean a room automatically and adjust its deaning according to the situation.
Note: Press button on robot or button on remote control to start auto cleaning.
2. Spot cleaning
- Press Spot on the remote toward the robot when the robot is working. The robot will circle around and turn into Auto Clean mode after Spot clean is finished.
- Press Spot on the remote toward the robot when the robot is in selected mode and the robot will begin to circle around. The robot will turn into selected mode after Spot Clean is finished.
3. Edge cleaning
Put the robot near the edge (wall) and press EDGE on remote to start edge cleaning.
Note: Edge cleaning will automatically stop when robot could not detect any edges, or you could manually press CLEAN to stop edge cleaning.
4. Mini-Room mode
To do a small space or single room cleaning, Double Press «AUTO» button when the vacuum is in sleeping mode, closing the door of mini room could let A4s robot work effectively.
Product Maintaining
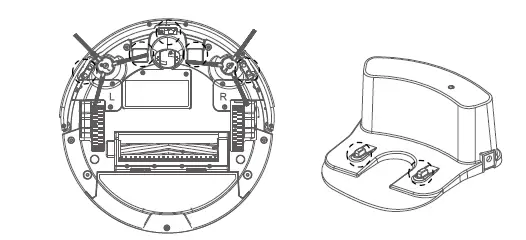
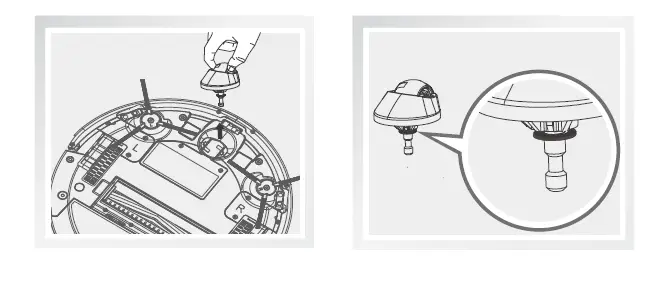
1. Cleaning side brushes
Clean the side brushes when it gets dirty and replace if it’s damaged.
Note: Before replacing side brushes, check and match «L» «R» mark on both side brush and bottom of robot.
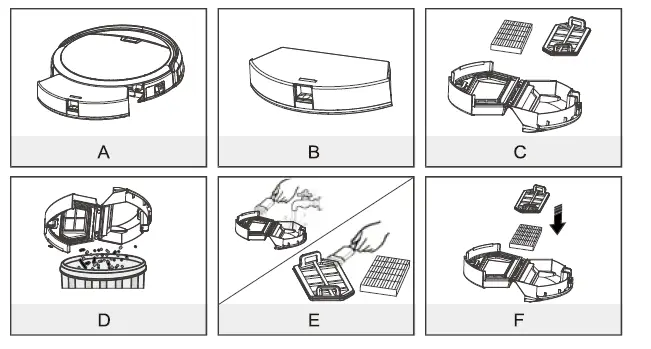
2. Cleaning dust bin and filter
Clean and empty dust bin after each use, steps are as shown in below figures.
Note:
- After taking out dust bin, check whether there is foreign matter stuck in suck passage and clean it.
- Clean HEPA filter after 15-30 days’ use. And replace it after use for 6 months at maximum.
- Install both HEPA and primary filters when they are dry.
- Dust bin and filters (including HEPA and primary filter) could be replaced if needed.
-392490.png)
3. Clearning cliff sensors and auto charging pins
Slightly clean the sensor window and auto charging pins with a soft dry cloth.
-591381.png)
Product Specifications
-661067.png)
Remark: The storage temperature of this product is -20 to 60 °C When you set the clock time or schedule, the final operation will be confirmed by beep from robot. If no tone received, your setting is unsuccessful
Troubleshooting
When the robot meets with some routine troubles, it will remind you by beep or weird movements.
1 beep
- Side wheels or side brushes issue
- Clean the side wheels and side brushes and ensure they can tum smoothly.
2 beeps
- Cliff sensor or bumper sensor failure
- Clean cliff sensor and check whether the bumper can move back and forth freely.
3 beeps
- Main body gets stuck
- Move the robot and start it again.
4 beeps
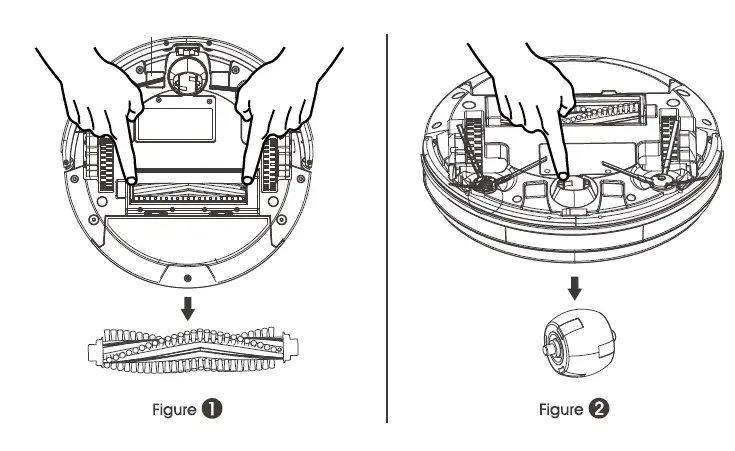
- Main rotating brush failure
- Remove the bristle brush. Clean the both ends of the bristle brush and the brush motion link.
Make short moves and repeatedly turn around in a small area
- Hairs/debris are clogged in front wheel’s housing
- Pull out the front wheel and clean hairs and debris in its cavity and axle.Then re-install it. Please clean it twice a week.
Moves backward and spins
- Bumper can’t move back and forth smoothly
- Re-intall the bumper and remove hairs and debris. Ensure that the bumper can move back and forth smoothly.
Move in endless circles
- Side Wheels get stuck
- Clean hair and debris tangled on the wheel. Push them in and out and confirm that they turn freely.
The noise level increased
- the bristle brush and the brush motion link are tangled with hairs
- Remove the main brush and clean the bristle brush and the brush motion link and then re-install it.
Suddenly stops and beeps
- the bristle brush and the brush motion link are tangled with hairs
- Remove the main brush and clean the bristle brush and the brush motion link with clean brush and then re-install it.
Do not pick up debris and spit them out
- Dust bin is full and the HEPA is dirty
- Tips: Clean the robot twice a week, change a new HEPA once every three months.
- Take out the dust bin and clean it.
- Remove HEPA filter and clean it; change a new HEPA regularly.
Side wheels do not work as usual
- Side wheels get stuck by pet hairs or any hair
- Clean hair and debris tangled on the wheel. Push them in and out and confirm that they turn freely.
Side brushes do not turn freely
- Side brushes get stuck
- Take apart the side brushes to clean the dust anh hair and ensure that the side brushes can turn freely.
Robot works for a short time
- Charge the robot for a short time or problems with battery
- Ensure the robot is fully charged by 5 hours.
- change a new battery.
See other models: V3s Pro