Пакет Rocscience Dips обладает множеством новых возможностей: обработка данных по трещиноватости (в том числе с возможностью кинематического анализа для оценки устойчивости скальных склонов, RQD анализ — для классификации скальных массивов), определение профиля по заданным данным на стереографической проекции и многое другое.
Программа предназначена как для начинающих, так и для опытных пользователей стереографических проекций, желающих использовать более совершенные средства при анализе геологических данных. Dips позволяет производить анализ грунтовых структур.
- Дамбы
- Грунтовые воды
- Набережные
- Горное дело
- Котлованы
- Подпорные стены
- Скальные склоны
- Населенные пункты
- Грунтовые откосы
- Туннели
-
Краткое руководство
Краткое руководство пользователя по функциям DIPS 7.0
-
Руководство пользователя DIPS
Построение, анализ и представление структурных данных с использованием методов сферической проекции
-
Урок 4.1
Обвал, плоскостной смыв, клиновое скольжение
-
Урок 5
Классификация ориентированного керна и горной породы
Обратите внимание на другие программы Rocscience
1 Dips Plotting, Analysis and Presentation of Structural Data Using Spherical Projection Techniques User s Guide 1989 — 2002 Rocscience Inc. Table of Contents i Table of Contents Introduction 1 About this Manual .. 1 Quick Tour of Dips 3 3 Pole 5 Convention .. 6 6 Scatter Plot .. 7 Contour Plot .. 8 Weighted Contour 9 Contour Options .. 9 Stereonet 10 Rosette Plot .. 11 Rosette Applications .. 12 Weighted Rosette Plot .. 12 Adding a Plane .. 13 Creating Sets .. 15 Mean Plane 17 Status Bar Display .. 17 Set 17 Wrapped Set 18 Set Information .. 22 Major Planes Plot .. 24 Major Planes 25 Plane Colours .. 25 Working with Multiple Views .. 26 Customizing Views .. 27 Show Planes ..27 Show 28 Display 28 ii Table of Contents Symbolic Pole Plot.
2 29 Symbolic Pole Plot 31 Creating a Chart from a Symbolic 31 Query Data .. 32 Query Example 33 The New 34 What About the Set Column?.. 35 Query Example 35 Creating a DIPS File 37 37 New 39 Job Control .. 40 Global Orientation Format .. 40 41 Quantity 41 42 Traverse 43 Traverse Orientation 43 Traverse Type .. 44 Traverse Orientation .. 44 Traverse 45 Traverse 45 Extra Columns .. 46 Add 47 Entering Data .. 49 Toppling, Planar Sliding, Wedge Sliding 51 52 Job Control .. 53 Traverses .. 53 Pole 54 Add Plane .. 55 Contour Plot .. 57 Overlay of Contours and Poles .. 58 Table of Contents iii Creating Sets .. 60 FAILURE 61 Surface 61 Statistical Info .. 62 Variability 63 65 Planar Sliding .. 68 Wedge Sliding .. 70 Discrete 73 Increased Local Pit Slope ..73 Other Pit Orientations.
3 74 References .. 74 Oriented Core and Rockmass Classification 75 File .. 75 Orientation Columns .. 76 Extra Columns .. 76 Job Control .. 77 Traverses .. 78 Rock Tunneling Quality Index Q .. 79 Determination of RQD .. 79 Determination of JN .. 79 Estimation of JR and JA .. 82 Calculation of Q Values ..83 References .. 84 Introduction 1 Introduction DIPS is a program designed for the interactive analysis of orientation based geological data. The program is a tool kit capable of many different applications and is designed both for the novice or occasional user, and for the accomplished user of stereographic projection who wishes to utilize more advanced tools in the analysis of geological data.
4 DIPS allows the user to analyse and visualise structural data following the same techniques used in manual stereonets. In addition, many computational features are available, such as statistical contouring of orientation clustering, mean orientation calculation and qualitative and quantitative feature attribute analysis. DIPS has been designed for the analysis of features related to the engineering analysis of rock structures, however, the free format of the DIPS data file permits the analysis of any orientation based data. About this Manual This manual consists of the following tutorials : 1. Two basic tutorials , to get new users acquainted with the basic features of the program: Quick Tour of DIPS Creating a DIPS File 2. Two advanced tutorials , to show how DIPS can be used for various types of analyses, which may not have been obvious without illustration: Toppling, Planar Sliding, Wedge Sliding Oriented Core and Rockmass Classification 2 DIPS User s Guide This manual is intended as a hands-on, getting started user s guide.
5 For more information on any DIPS options which are not discussed in these pages, consult the DIPS Help system. NOTE that the example files used in this manual, and provided with the DIPS program, are intended for use in training and education only. They should not be used as data sets for research. In this manual, instructions such as: Select: View Pole Plot are used to navigate the menu selections. When a toolbar button is displayed in the margin, as shown above, this indicates that the option is available in a DIPS toolbar. This is always the recommended and quickest way to use the option. Quick Tour of DIPS 3 Quick Tour of Dips This quick tour will familiarize the user with some of the basic features of DIPS. If you have not already done so, run DIPS by double-clicking on the DIPS icon in your installation folder.
6 Or from the Start menu, select Programs Rocscience Dips Dips. If the DIPS application window is not already maximized, maximize it now, so that the full screen is available for viewing the data. File In your DIPS installation folder you will find an Examples folder, containing several example DIPS files. This Quick Tour will use the file in the Examples folder. To open the file: 4 DIPS User s Guide Select: File Open Navigate to the Examples folder in your DIPS installation folder, and open the file. You should see the spreadsheet view shown in Figure 2-1. A DIPS file is always opened by displaying a spreadsheet view of the data. The DIPS spreadsheet is also called the Grid View throughout this manual. Maximize the Grid View. Figure 2-1: Grid View of file. We won t worry about the details of this file yet, except to note that it contains 40 rows, and the following columns: Two Orientation Columns A Quantity Column A Traverse Column Three Extra Columns In the next Tutorial , we will discuss how to create the file from scratch.
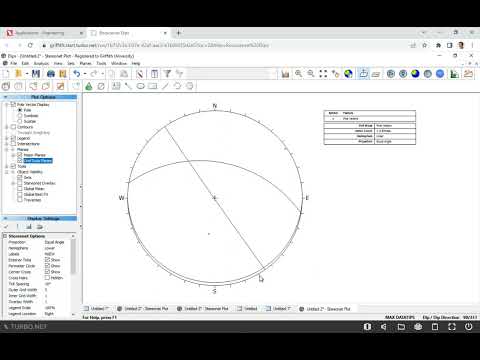
7 Quick Tour of DIPS 5 Pole Plot Creating a Pole Plot is just one mouse click away. Select the Pole Plot option in the View toolbar or the View menu. Select: View Pole Plot A new view displaying a Pole Plot will be generated, as shown below. Figure 2-2: Pole Plot of data. Each pole on a Pole Plot represents an orientation data pair in the first two columns of a DIPS file. The Pole Plot can also display feature attribute information, based on the data in any column of a DIPS file, with the Symbolic Pole Plot option. This is covered later in this Tutorial . 6 DIPS User s Guide Convention As you move the cursor around the stereonet, notice that the cursor orientation is displayed in the Status Bar. The format of these orientation coordinates can be toggled with the Convention option in the Setup menu: If the Convention is Pole Vector, the coordinates will be in Trend / Plunge format, and represent the cursor (pole) location directly.
8 This is the default setting. If the Convention is Plane Vector, the coordinates will correspond to the Global Orientation Format of the current document (eg. Dip/DipDirection , Strike/DipRight , Strike/DipLeft), and represent the PLANE corresponding to the cursor (pole) location. TIP the Convention can be quickly toggled by clicking on the box in the Status Bar to the left of the coordinate display, with the LEFT mouse button. This is the quickest and most convenient way of toggling the Convention. The Convention also affects the format of certain data listings in DIPS (eg. the Major Planes legend, the Edit Planes and Edit Sets dialogs), and the format of orientation data input for certain options (eg. Add Plane and Add Set Window dialogs). Finally note that in DIPS, poles are ALWAYS plotted using the Trend and Plunge of the pole vector with respect to the reference sphere.
9 THE CONVENTION OPTION DOES NOT AFFECT THE PLOTTING OF DATA, OR THE VALUES IN THE GRID IN ANY WAY !! Legend Note that the Legend for the Pole Plot (and all stereonet plots in DIPS) indicates the: Projection Type (Equal Angle) and Quick Tour of DIPS 7 Hemisphere (Lower Hemisphere). These can be changed using Stereonet Options in the Setup menu (Equal Area and Upper Hemisphere options can be used). However, for this Tutorial , we will use the default projection options. Note that the Legend also indicates 61 Poles, 40 Entries . The file has 40 rows, hence 40 entries . The Quantity Column in this file allows the user to record multiple identical data units in a single row of the file. Hence the 40 data entries actually represent 61 features, hence 61 poles . Let s move on to the Scatter Plot. Scatter Plot While the Pole Plot illustrates orientation data, single pole symbols may actually represent several unit measurements of similar orientation.
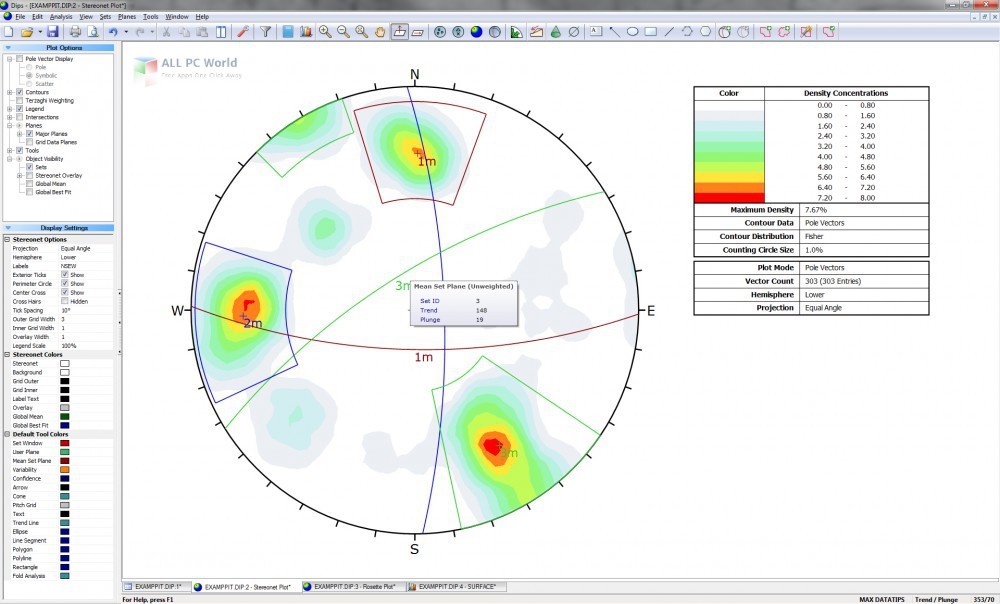
10 Select the Scatter Plot option in the View toolbar or the View menu, to generate a Scatter Plot. Select: View Scatter Plot A Scatter Plot allows the user to better view the numerical distribution of these measurements, since coincident pole and closely neighbouring pole measurements are grouped together with quantities plotted symbolically. The Scatter Plot Legend indicates the number of poles represented by each symbol. Let s move on to the Contour Plot, which is the main tool for analyzing pole concentrations on a stereonet. 8 DIPS User s Guide Contour Plot Select the Contour Plot option from the View toolbar or the View menu, and a Contour Plot will be generated. Select: View Contour Plot Figure 2-3: Contour Plot of data. The Contour Plot clearly shows the data concentrations. It can be seen that there are three data clusters in the file, including one that wraps around to the opposite side of the stereonet.
Dips is a stereographic projection program for the analysis and presentation of orientation-based geotechnical data with visualization of vectors, density contours, plane intersections and traverses. You can determine joint sets, perform kinematic analysis of slope stability, and more in this multi-purpose tool. You can also draw user-defined planes, sets and annotative tools for advanced analysis.
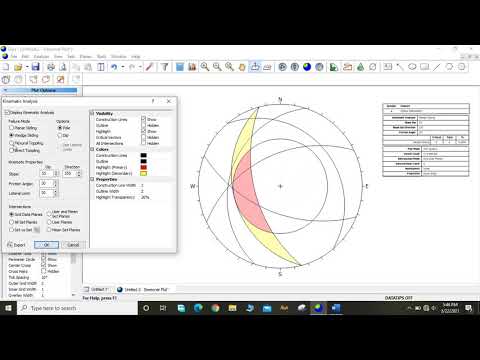
Kinematic analysis
The kinematic analysis capabilities of Dips allow you to identify critical zones, vectors, and intersections on a stereonet overlay with the kinematic analysis of planar and wedge sliding, or direct and flexural toppling failure modes. You can export kinematic results to excel, containing critical vectors and intersections for all failure modes.
Jointing analysis
Three built-in analysis options: Joint Spacing to calculate true or apparent spacing between joints within a set, RQD Analysis for assessing Rock Quality Designation, and Joint Frequency for counting the occurrence of joints along each 1D distance interval, on a linear or borehole traverse.
Integrates with —
SWedge: By using the integration between Dips and SWedge, you can easily transform your raw orientation data into Dip and Dip Direction format for import into SWedge. Identify critical discontinuities, joint sets, and kinematic properties with Dips to be further analyzed in SWedge.
UnWedge: This integration enables you to import orientation data and set statistics from Dips into UnWedge for Deterministic, or Probabilistic Analysis. By transferring and assigning statistical distributions to your orientation data from Dips to UnWedge, obtain the probability of failure for your rock models faster.
Learn Dips in detail.
Download Rocscience Dips 6.0 / Settle3D v2.0 / Slide 6.0 / Unwedge 3.0 free latest full version offline setup for Windows 32-bit and 64-bit. Rocscience Suite is a professional application for the geotechnical engineers that provide various geotechnical and geoscience tools.
A powerful application for the geoscientists and the geotechnical engineers, Rocscience Dips 6.0 / Settle3D v2.0 / Slide 6.0 / Unwedge 3.0 comes with a reliable solution to deal with various 2D and 3D analytics as well as soil mechanics along with geotechnical sciences. Make use of various advanced operations along with geomechanical operations.

With a professional solution and easily understandable environment, the users can effortlessly control various aspects of the geosciences. It provides a powerful solution for geomechanics and provides support for high degrees in engineering. The researchers can easily assess by getting feedback from the users and meets the needs of the users with very small development and user needs gap.
It is trusted globally by universities, agencies, corporations with a huge number of people from developers to engineers are there who uses this product. It also has a previous scientific research relationship with over 280 universities worldwide which makes it a reliable solution. All in a nutshell, it is a reliable application for the geotechnical engineers and geoscientists to work with 2D and 3D analytics.
Features of Rocscience Dips 6.0 / Settle3D v2.0 / Slide 6.0 / Unwedge 3.0
- A complete solution for the geotechnical engineers
- Provides a variety of tools and options for the geoscientists
- Complete support for 2D and 3D analytics
- Powerful tools for geoscientists and engineers
- Powerful tools for civil engineers, soil mechanics, and technicians
- Provides support for handling different user needs
- Assessment and feedback features
- Supports handling large teams
- Recognized around the globe with over 280 universities
- Geotechnical training programs
- Plays an important role in the research
- Many other powerful options and features
Technical Details of Rocscience Dips 6.0 / Settle3D v2.0 / Slide 6.0 / Unwedge 3.0
- Software Name: Dips 6.0 / Settle3D v2.0 / Slide 6.0 / Unwedge 3.0
- Software File Name: Rocscience.zip
- File Size: 146 MB
- Developer: Rocscience
System Requirements for Rocscience Dips 6.0 / Settle3D v2.0 / Slide 6.0 / Unwedge 3.0
- Operating System: Windows 10/8/7
- Free Hard Disk Space: 1 GB free HDD
- Installed Memory: 1 GB of minimum RAM
- Processor: Intel Core 2 Duo or higher
Rocscience Dips 6.0 / Settle3D v2.0 / Slide 6.0 / Unwedge 3.0 Free Download
Click on the below link to download the latest full version offline setup of Rocscience Dips 6.0 / Settle3D v2.0 / Slide 6.0 / Unwedge 3.0 for Windows x86 and x64 architecture.
Rocscience Webinar: Rock Stability Suite — Dips, RocPlane, Swedge, RocToppleПодробнее
Dips and SWedge Tutorial — Combinations AnalysisПодробнее
Dips Webinar — New features, Applications and Case StudiesПодробнее
How to use Dips Software for Slope Stability-Slope Failure AnalysisПодробнее
DESCARGAR e INSTALAR DeepSoil v7.0 ¿IT’S FREE? | GeohelpingПодробнее
Solution to Practice Class Questions on RocScience DIPSПодробнее
Tutorial 4: How to Plot Great Circles and Poles of Rock Mass Discontinuities using DipsПодробнее
How to use Dips Software for Kinematic Analysis/Stereographic projection ? [ Dips In Nepali ]Подробнее
![How to use Dips Software for Kinematic Analysis/Stereographic projection ? [ Dips In Nepali ]](https://img.youtube.com/vi/7FzcYCwRXLg/0.jpg)
How to perform slope analysis using Rocscience (Dips)?Подробнее
RSData vs RocData | User Interface Tutorial | RocscienceПодробнее