- Manuals
- Brands
- Roland Manuals
- Printer
- VS-640i
- Setup manual
-
Contents
-
Table of Contents
-
Bookmarks
Quick Links
Setup Guide
Read this first.
This describes the setup tasks and important conditions about the installation
location that must be met in order to enable use of this machine.
Related Manuals for Roland VersaCamm VS-640i
Summary of Contents for Roland VersaCamm VS-640i
-
Page 1: Setup Guide
Setup Guide Read this first. This describes the setup tasks and important conditions about the installation location that must be met in order to enable use of this machine.
-
Page 2
Roland DG Corp. assumes no responsibility for any direct or indirect loss or damage which may occur with respect to any article made using this product. -
Page 3: Table Of Contents
VS-540i — 54-inch model VS-300i — 30-inch model Also, most of the figures in this document depict the VS-640i. Company names and product names are trademarks or registered trademarks of their respective holders. Copyright © 2013 Roland DG Corporation http://www.rolanddg.com/…
-
Page 4: To Ensure Safe Use
To Ensure Safe Use Improper handling or operation of this machine may result in injury or damage to property. Points which must be observed to prevent such injury or damage are described as follows. About WARNING and CAUTION Notices Used for instructions intended to alert the user to the risk of death or WARNING severe injury should the unit be used improperly.
-
Page 5
To Ensure Safe Use Incorrect operation may cause injury. WARNING WARNING Be sure to follow the operation proce- Never attempt to disassemble, repair, or dures described in this documentation. modify the machine. Never allow anyone unfamiliar with the Doing so may result in fire, electrical shock, usage or handling of the machine to or injury. -
Page 6
If anything gets inside, immedi- ately disconnect the power cord and contact Do not use the supplied power supply your authorized Roland DG Corp. dealer. cord for other products. Never place any flammable object nearby. Never use a combustible aerosol spray nearby. -
Page 7
To Ensure Safe Use Important notes about the power cord, plug, and electrical outlet Never place any object on top or subject to Never allow to get wet. damage. Never bend or twist with undue force. Never make hot. Never pull with undue force. Dust may cause fire. -
Page 8
To Ensure Safe Use Ink, cleaning fluid, and discharged fluid are flammable and toxic. WARNING CAUTION Keep open flame away from the work Ensure adequate ventilation for the work area. area. Ink and discharged fluid are flammable. Failing to perform ventilation may result in a health hazard or danger of combustion due to ink fumes. -
Page 9
To Ensure Safe Use This machine weighs 225 kg (497 lbs). Media weighs 40 kg (88 lbs). WARNING WARNING Install the machine in a location that is Be sure to lock the stand’s casters. level, stable, and able to bear the weight If the machine should begin to topple, a ma- of the machine. -
Page 10: Warning Labels
To Ensure Safe Use Warning Labels Warning labels are affixed to make areas of danger immediately clear. The meanings of these labels are as follows. Be sure to heed their warnings. Also, never remove the labels or allow them to become obscured.
-
Page 11: Pour Utiliser En Toute Sécurité
Pour utiliser en toute sécurité La manipulation ou l’utilisation inadéquates de cet appareil peuvent causer des blessures ou des dommages matériels. Les précautions à prendre pour prévenir les blessures ou les dommages sont décrites ci-dessous. Avis sur les avertissements Utilisé pour avertir l’utilisateur d’un risque de décès ou de blessure grave ATTENTION en cas de mauvaise utilisation de l’appareil.
-
Page 12
Pour utiliser en toute sécurité L’utilisation incorrecte peut causer des blessures ATTENTION ATTENTION Débrancher le câble d’alimentation avant S’assurer de suivre les procédures de procéder au nettoyage ou à l’entretien d’utilisation décrites dans la documen- de l’appareil, et avant d’y fixer ou d’en tation. -
Page 13
Côté corps électrique. Si un objet ou du liquide s’infiltre dans l’appareil, débrancher immédiatement le câble d’alimentation et communiquer avec le représentant Roland DG Corp. autorisé. -
Page 14
Continuer à utiliser l’appareil peut causer un raient se produire. incendie, un choc électrique ou des bles- sures. Communiquer avec le représentant Roland DG Corp. Autorisé. Manipuler le câble d’alimentation, la fiche et la prise électrique correctement et avec soin. -
Page 15
Pour utiliser en toute sécurité Remarques importantes à propos du câble d’alimentation, de la fiche et de la prise électrique Ne jamais déposer aucun objet sur le câble, sur Ne jamais laisser l’eau toucher le câble, la fiche la fiche ou sur la prise car cela risque de les ou la prise. -
Page 16
Pour utiliser en toute sécurité L’encre, les liquides nettoyants et les liquides usées sont inflammables et toxiques ATTENTION ATTENTION Ne jamais boire l’encre, le liquide de Ne pas approcher une flamme nue de nettoyage ni les liquides usés, ne pas l’espace de travail. -
Page 17
Pour utiliser en toute sécurité Le poids de cet appareil est de 225 kg (497 lbs) Le poids du support est de 40 kg (88 lbs) ATTENTION ATTENTION S’assurer de verrouiller les roulettes de Installer l’appareil à un endroit stable et la base. -
Page 18
Pour utiliser en toute sécurité Vignettes d’avertissement Des vignettes d’avertissement sont apposées pour qu’il soit facile de repérer les zones dangereuses. La signification des vignettes est donnée ci-dessous. Respecter les avertissements. Ne jamais retirer les vignettes et ne pas les laisser s’encrasser. Attention : Risque de pincement Faire attention de ne pas coincer les doigts pendant le chargement… -
Page 19: Setup Guide
Setup Guide…
-
Page 20: Installation Environment
1. Installation Environment Deciding on an Installation Site Install in a quiet, stable location offering good operating conditions. An unsuitable location can cause accident, fire, faulty operation, or breakdown. WARNING Install the machine in a location that is level, stable, and able to bear the weight of the machine.
-
Page 21: Temperature And Humidity
1. Installation Environment Temperature and Humidity Maintain the specified temperature and humidity even when the machine is not in use. If temperatures are too high or too low, it may cause malfunction. During operation: Temperature 20 to 32˚C (68 to 90˚F), relative humidity 35 to 80% (no condensation) During non-operation: Temperature 5 to 40˚C (41 to 104˚F), relative humidity 20 to 80% (no conden- sation) Installation Space…
-
Page 22: Included Items
2. Included Items The following items are packed together with the unit. Make sure they are all present and accounted for. Arms (one for right and Stand legs (one for Power cord (1) Casters (2) left each) right and left each) Stand stay (1) Shafts (2) Shaft clamps (2)
-
Page 23
2. Included Items Setup guide User’s Manual (1) Cleaning liquid (1) Cleaning sticks (this document) (1) SPECIAL COLOR INK INKJET PRINTER MAIN- Software RIP (1) GUIDE (1) TENANCE GUIDE (1) -
Page 24: Assembling And Installing
3. Assembling and Installing Step 1: Assemble the Stand – Mount the Machine WARNING Perform this task with all power switches left switched off. Otherwise sudden movement of the machine may cause injury. CAUTION Unpacking and installation must be carried out by six or more personnel (by four or more personnel for the 30-inch model).
-
Page 25
3. Assembling and Installing Attach the casters onto the stand legs. Attach the casters to the end farther away from the stand stay. The casters have no particular front and rear orientation. Tighten the bolts securely (8 locations in total). Loose bolts may cause the stand to wobble. Hexagonal wrench Bolts Pipe… -
Page 26
3. Assembling and Installing Place the machine on the stand. Align the holes on the base surface of the machine to the protrusions of the arms. (8 locations in total) Tighten the bolts securely. Loose bolts may cause the stand to wobble. Align with the arms. -
Page 27: Step 2: Installing The Media Holder
3. Assembling and Installing Step 2: Installing the Media Holder WARNING Perform this task with all power switches left switched off. Otherwise sudden movement of the machine may cause injury. Procedure Place the shafts on the stand. Shafts Pass the left media holder onto the shaft.
-
Page 28
3. Assembling and Installing In the same way as the left media, pass the right media holder onto the shafts and at- tach the retaining screw. Only light tightening is necessary for the retaining screw. Retaining screws Tighten loosely. Attach the shaft clamps to secure the shafts in place. Do not place the media holders too close to the edge so that they will not get caught in the shaft clamps. -
Page 29: Step 3: Install The Drain Bottle
3. Assembling and Installing Step 3: Install the Drain Bottle WARNING Perform this task with all power switches left switched off. Otherwise sudden movement of the machine may cause injury. Procedure Remove the bottom plug. Please be careful as the fluid used in the inspection may still remain. Bottom plug …
-
Page 30: Step 4: Remove The Packing Materials
3. Assembling and Installing Step 4: Remove the Packing Materials Tape and other packing materials are attached to the machine to protect it from vibration during transporta- tion. When the installation is complete, remove these materials. WARNING Perform this task with all power switches left switched off. Otherwise sudden movement of the machine may cause injury.
-
Page 31: Connecting The Cables
4. Connecting the Cables Connecting the Power Cable and the Network Cable WARNING Connect to electrical outlet that complies with this machine’s ratings (for voltage, frequency, and current). Incorrect voltage or insufficient current may cause fire or electrical shock. WARNING Connect to ground.
-
Page 32: Installing The Ink Cartridges
5. Installing the Ink Cartridges Filling with Ink for the First Time Special procedures are required when installing ink cartridges for the first time. These are required only once, when installing ink cartridges for the first time after shipment from the factory. Firstly, clean the print heads with the cleaning cartridges, and then fill with the inks of each color.
-
Page 33
E-SOL MAX2 WMT * When «E-SOL MAX2 7C» is selected, one dedicated cleaning cartridge (ESL4-CL) for ECO-SOL MAX2 is needed. Contact your authorized Roland DG Corp. dealer or us. After selecting the Ink Type, press Confirm the Ink Type is correct, and then use… -
Page 34
5. Installing the Ink Cartridges Perform cleaning with a cleaning stick. When the screen shown on the left appears, open the cover R. OPEN COVER R Touch the location shown in the figure to discharge any static electricity. Screws Cover R Discharge static electricity Hook … -
Page 35
Insert each color ink cartridge into the slot labeled with the machining color. If you insert wrong cartridges, the color inks may be mixed. Be careful not to insert the wrong cartridges. Contact your authorized Roland DG Corp. dealer or us, if you wrong cartridges inserted and the color inks were mixed. -
Page 36
5. Installing the Ink Cartridges Follow the on-screen instructions to remove and insert the REMOVE SOL CL SOL INK cleaning cartridges. FILLING INK… SET SOLCL-LIQUID FILLING INK… Pull out the dummy cartridges from slot 3 and 4. REMOVE DUMMY CRT. Press By following the on-screen instructions, clean the print heads in the order of slots 3 and 4, slots 5 and 6, and slots 7 and 8. -
Page 37
5. Installing the Ink Cartridges Insert the ink cartridge for each color. Before you insert the ink cartridge for each color, gently shake the cartridge. Insert Ink cartridges into slots 7 and 8. SET SOL CRT. When «E-SOL MAX2 7C» is selected, insert a dedicated cleaning cartridge (ESL4-CL) for ECO-SOL MAX2 into slot 8. -
Page 38
5. Installing the Ink Cartridges Insert the ink cartridge for each color. SET SOL CRT. FILLING INK… Insert into the slot of the matching color. Discard the discharged ink in the drain bottle. E M P T Y D R A I N B O T T L E Be sure to discard. -
Page 39
5. Installing the Ink Cartridges When this screen appears, filling with ink is finished. SETUP SHEET… -
Page 40: Installing The Blade
6. Installing the Blade CAUTION Be sure to perform operations as specified by these instructions, and never touch any area not specified in the instructions. Sudden movement of the machine may cause injury. CAUTION Never touch the tip of the blade with your fingers. Doing so may result in injury, and the cutting performance of the blade will be impaired.
-
Page 41
6. Installing the Blade Install the blade holder. Loosen the screw as shown in the figure. Screw Support the screw from below and insert the blade holder. If you install the blade holder without supporting the screw from below, the cutting quality may be deteriorated. -
Page 42: Network Settings
7. Network Settings Introduction This machine has a built-in print server as a network interface. When you use the print server, you can send output data to the machine from anywhere on the network. TCP/IP is used as the protocol. Make sure the machine is connected to the network by an Ethernet cable.
-
Page 43
7. Network Settings Click [Properties]. Click [Allow] when the [User Account Control] dialog box appears. The [Local Area Connection Properties] dialog box will appear. Select [Internet Protocol Version 4 (TCP/IPv4)] (Win- dows Vista/7) or [Internet Protocol (TCP/IP) (Windows XP), and then click [Properties]. If the check box for [Internet Protocol] is unselected, then click and check the box. -
Page 44: Step 2: Make The Network Settings On The Printer
7. Network Settings Step 2: Make the Network Settings on the Printer Important The addresses used in this section are merely example settings. For detailed information about the settings, consult your network administrator. Set the IP address. Press Press several times until the screen shown on the MENU…
-
Page 45
7. Network Settings to select the address number. SUBNET MASK 000 . 000 . 000 . 000 [SUBNET MASK]: 255.255.255.000 For the subnet mask, make the setting the same value as the one used by the computer. Here, «255.255.255.000» is entered by way of example. Press SUBNET MASK 255 . -
Page 46: Step 3: Make The Port Settings For The Software Rip
7. Network Settings Step 3: Make the Port Settings for the Software RIP The settings for the software RIP will be made here. For the output destination, use the IP address set for the machine. For the setup procedures, refer to the documentation of the instructions for the software RIP. You can check whether the connection to the network has been complete by using the printing-test feature of the software.
-
Page 47: When Not In Use For A Prolonged Period
8. When Not in Use for a Prolonged Period Keep Performing Maintenance Switch on the power once every month. Switch on the sub power once every month. When you turn on the power, the machine automatically per- forms some operations such as those to keep the print heads from drying out. Allowing the machine to stand completely unused for a prolonged period may damage the print heads, so be sure to switch on the power to perform these automatic operations.
-
Page 48: When Moving The Unit
9. When Moving the Unit Procedures from Preparing to Move Through Reinstalling To transfer this machine, you need to secure the print heads in place with the retainers to protect them from damage. If your ink type is the W mode or WMT mode, you also need to circulate the ink manually then. If you transfer the machine without performing such steps, it may cause ink leakage, which can damage the internal devices of the machine, or cause damage to the head.
-
Page 49
9. When Moving the Unit Press MAINTENANCE DRAIN BOTTLE When the screen shown on the left appears, detach the bottle, EMPTY discard the discharged fluid to empty it. DRAIN BOTTLE CAUTION Before you detach the drain bottle, be sure to wait for the screen to display «EMPTY DRAIN BOTTLE.»… -
Page 50
9. When Moving the Unit Detach the blade holder. Detach the blade holder. Raise the loading lever. Secure the print heads in place. Secure the print heads in place using the retainer. For information on the method of securing the print heads, refer to P. 28, «Step 4: Remove the Pack- ing Materials»… -
Page 52
R2-130919…
Снят с производства, наличие уточняйте, бывают модели с небольшим пробегом.
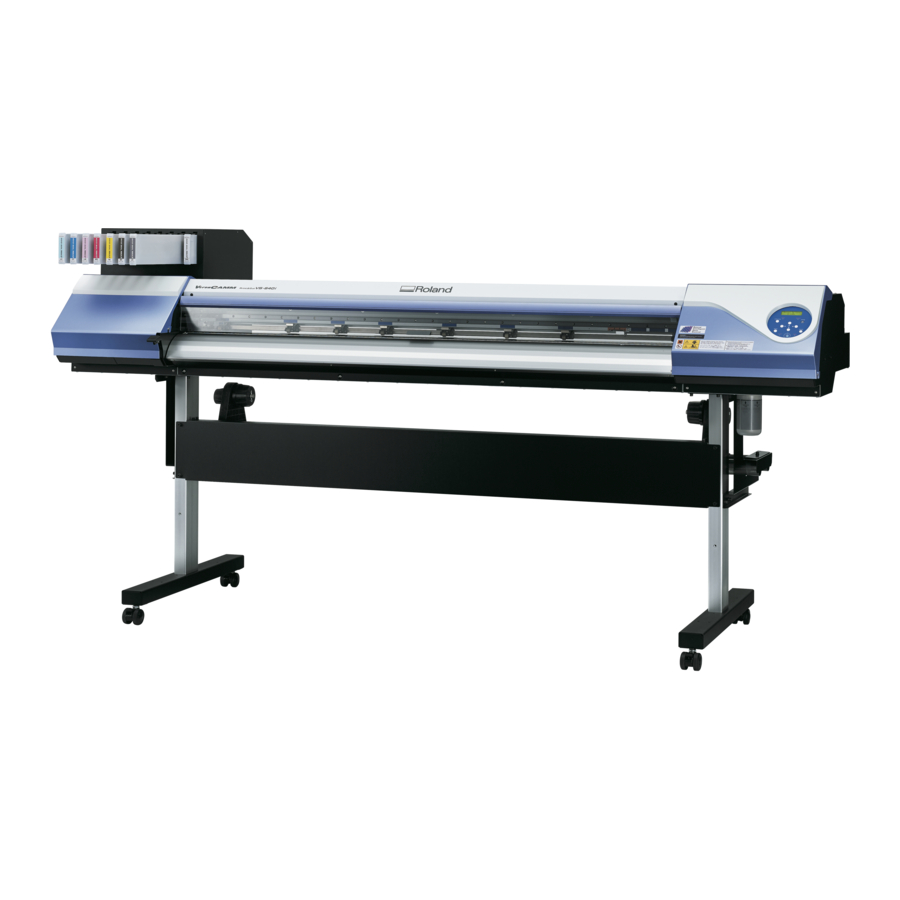
Roland VS-640i — принтер с функцией печати и резки, самый популярный в серии «print and cut» среди оборудования Roland. Этот принтер решает самый широкий спектр задач, среди прочих, он может печатать, печатать и вырезать, просто резать, печатать с белым цветом и металликом. Самая окупаемая ширина 1625 мм. позволяет использовать множество различных материалов для печати: баннер, ПВХ пленка, прозрачная пленка, постерная бумага, фотобумага, бэклит, натуральный или искусственный холст, автомобильные пленки, магнитный винил, фотообои и пр. Обширная база профилей позволяет подобрать настройки почти под любой материал, а надежная и самая качественная в классе печатная голова Epson DX6 позволит радовать ваших клиентов качеством отпечатков.
Отличительные особенности VS-640i:
- закрывает огромный перечень задач для типографии
- возможность печатать и резать, а также осуществлять резку по меткам
- возможность печати с белыми чернилами и металликом
- подходит как для небольшой типографии, так и для крупных печатных цехов
- большая база профилей под различные материалы
- автоматическая система циркуляции белого и металлика помогает предотвратить оседание чернил
- 7 силиконизированных роликов, 2 из них конусообразной формы, для более точной подачи материала при резке
- качественная печатная голова Epson DX6 с позолотой, что снижает влияние статичности материала на голову, и капли попадают точнее в нужное место на материале
Используемые чернила
В данном принтере используются специально разработанные чернила серии Eco Sol MAX. Они быстро сохнут, имеют широкий цветовой охват, не выгорают до 3 лет без использования ламинации, имеют меньший расход на квадратный метр благодаря насыщенности пигментом, не забивают дюзы печатной головы. Для данных чернил в программе установлена база основных профилей, поэтому вы можете не бояться за серый или красный цвет, либо за печать сложного градиента. С этими чернилами он печатает идеально со дня запуска.
Принтер возможно запустить изначально в 5-и цветовых конфигурациях:
- CMYKKYMC — если требуется более скоростная печать (11 кв.м./час при разрешении 720×720 dpi)
- CMYKLcLmWhMt — белый цвет дает возможность печатать на прозрачных материалах, создавать сложную графику и дает вам преимущество на конкурентном рынке, как и металлизированные чернила, используемые для создания уникальных наклеек с эффектом примеси серебра
- CMYKLcLmLk — дополнительные светло-черные чернила позволяют воспроизводить сложные серые градиенты в фотографическом качестве
- CMYKLcLmLkWh
- CMYKLcLmLkMt
Уникальное программное обеспечение
Бесплатное программное обеспечение Roland VersaWorks 6 работает на одной из последних версий Adobe CPSI. Библиотека программы содержит свыше 512 метализированных и более 1000 спотовых роландовских цветов, что позволяет получать максимально точные оттенки. Versa Work может использоваться на компьютерах с системами Win XP, Vista, 7, 8, 9, 10. Данный RIP считает количество нужных чернил для печати и сохраняет у себя в логе, а также обладает инструментом подбора и замены цветов для разных графических редакторов Spot Color Replacement Tool и встроенной библиотекой цветов PANTONE.
В Roland Versa Work 6 вы можете получать онлайн обновления автоматически, а еще вам будут приходить на почту сообщения об окончании чернил, если вы захотите. Еще в этой версии улучшено ядро для обработки файлов, улучшено определение слоев в PDF формате и увеличен дамп памяти используемый РИПом до 3 гБ.

Высокое качество печати и резки
На принтере Roland VS-640i установлена качественная печатная голова Epson DX6, с минимальной каплей 3 пкл., что позволяет печатать 1440 dpi. Поверхность данной головы позолочена, что уменьшает статичное воздействие на процесс печати и нее саму. Благодаря защитной планке вокруг печатной головы минимизирован риск повреждения печатной головы при печати, либо резке на самом высоком давлении 300 грамм. Если вдруг вам понадобится резать сплошные длинные линии, то скорость ножа у данной модели может развиваться до 300 мм/с, что достаточно быстро для печатающе-режущего принтера.
VS-640i имеет в арсенале 7 прижимных силиконизированных роликов, 2 из которых, а именно крайние, конусообразные, благодаря этим «малышам» у принтера достигается минимальное смещение материала при резке, в сравнении с другими конкурирующими моделями. Стоит не забывать, что им помогает вакуумная система прижима материала, которая способна присасывать даже тяжелый баннер или скользкий бэклит.
Возможности Roland VS-640i
Этот универсальный большой принтер, с большим набором настроек, возможностью печатать и резать, идеально подходит для печати широкоформатной графики, плакатов, различных наклеек, оконной графики, аппликаций, этикеток, наклеек на мотоциклы, мопеды, велосипеды, шильдики на оборудование или автомобили, изготовление трафаретов, изготовления любых рекламных материалов, фотообоев, бэклита, холстов, автомобильной графики, баннера, магнитного винила и т.д. Подойдет как для наружной, так и для интерьерной рекламы.
Вам нужен универсальный «полноприводный» принтер, чтобы начать или расширить свой бизнес? Тогда это Ваш выбор! В нем собраны скорость и качество, возможности и потенциал, а сравнительно низкая стоимость делает его лучшим предложением на рынке. Период окупаемости данной модели у наших клиентов составляет в среднем 12 месяцев, а если вы запускаете его без «экзотических» функций, белый и металлик, то в среднем около 8 месяцев. Не берем в расчет покупки «под определенный заказ», здесь ребята окупают его за 1-2 месяца, и берут еще 1 такой же, или просто печатающий.
Основные скорости печати
| 4 цвета CMYK | Режим печати | Разрешение [количество точек на дюйм] | Проходы | Производительность | ||
|---|---|---|---|---|---|---|
| VS-640i | VS-540i | VS-300i | ||||
| Стандартный баннер | Рекламный щит | 360×720 | 2 | 289 кв. футов/ч (26,9 кв. м/ч) |
278 кв. футов/ч (25,9 кв. м/ч) |
Не применимо |
| Высокая скорость | 360×720 | 3 | 194 кв. фута/ч (18 кв. м/ч) |
185 кв. футов/ч (17,2 кв. м/ч) |
Не применимо | |
| Стандарт | 720×720 | 5 | 141 кв. м/ч (13,1 кв. м/ч) |
132 кв. фута/ч (12,2 кв. м/ч) |
Не применимо | |
| Высокое качество | 1440×720 | 6 | 63 кв. фута/ч (5,9 кв. м/ч) |
61 кв. фут/ч (5,7 кв. м/ч) |
Не применимо | |
| Винил | Высокая скорость | 540 x 720 | 5 | 141 кв. м/ч (13,1 кв. м/ч) |
132 кв. фута/ч (12,2 кв. м/ч) |
106 кв. футов/ч (9,82 кв. м/ч) |
| Стандарт | 720 x 720 | 6 | 117 кв. футов/ч (10,9 кв. м/ч) |
110 кв. футов/ч (10,2 кв. м/ч) |
88 кв. футов/ч (8,18 кв. м/ч) |
|
| Высокое качество | 1440 x 720 | 6 | 47 кв. футов/ч (4,4 кв. м/ч) |
46 кв. футов/ч (4,3 кв. м/ч) |
39 кв. футов/ч (3,66 кв. м/ч) |
| 7 цветов (CMYKLcLmLk) / 6 цветов (CMYKLcLm) | Режим печати | Разрешение [количество точек на дюйм] | Проходы | Производительность | ||
|---|---|---|---|---|---|---|
| VS-640i | VS-540i | VS-300i | ||||
| Стандартный баннер | Высокая скорость | 360×720 | 6 | 96 кв. футов/ч (8,9 кв. м/ч) |
92 кв. фута/ч (8,5 кв. м/ч) |
Не применимо |
| Стандарт | 720×720 | 10 | 69 кв. футов/ч (6,4 кв. м/ч) |
66 кв. футов/ч (6,1 кв. м/ч) |
Не применимо | |
| Высокое качество | 1440×720 | 12 | 31 кв. фут/ч (2,9 кв. м/ч) |
31 кв. фут/ч (2,9 кв. м/ч) |
Не применимо | |
| Стандартный винил | Высокая скорость | 540 x 720 | 10 | 69 кв. футов/ч (6,4 кв. м/ч) |
66 кв. футов/ч (6,1 кв. м/ч) |
44 кв. фута/ч (4,9 кв. м/ч) |
| Стандарт | 720 x 720 | 12 | 58 кв. футов/ч (5,4 кв. м/ч) |
55 кв. футов/ч (5,1 кв. м/ч) |
44 кв. фута/ч (4,1 кв. м/ч) |
|
| Высокое качество | 1440 x 720 | 12 | 31 кв. фут/ч (2,9 кв. м/ч) |
31 кв. фут/ч (2,9 кв. м/ч) |
26 кв. футов/ч (2,4 кв. м/ч) |
| 7 цветов CMYKLcLmLk + Wh | Режим печати | Разрешение [количество точек на дюйм] | Режим использования чернил | Производительность | ||
|---|---|---|---|---|---|---|
| VS-640i | VS-540i | VS-300i | ||||
| Стандартная прозрачная пленка | Стандарт | 720×720 | Только белые | 36,9 кв. фута/ч (3,4 кв. м/ч) |
36,9 кв. фута/ч (3,4 кв. м/ч) |
30,2 кв. фута/ч (2,8 кв. м/ч) |
| W -> CMYKLcLmLk | 16,2 кв. фута/ч (1,5 кв. м/ч) |
16,2 кв. фута/ч (1,5 кв. м/ч) |
13,3 кв. фута/ч (1,2 кв. м/ч) |
|||
| CMYKLcLmLk -> W | ||||||
| Высокое качество | 1440×720 | Только белые | 26 кв. футов/ч (2,4 кв. м/ч) |
26 кв. футов/ч (2,4 кв. м/ч) |
15,6 кв. фута/ч (1,5 кв. м/ч) |
|
| W -> CMYKLcLmLk | 10 кв. футов/ч (.94 кв. м/ч) |
10 кв. футов/ч (.94 кв. м/ч) |
8,6 кв. фута/ч (0,8 кв. м/ч) |
|||
| CMYKLcLmLk -> W |
| 7 цветов CMYKLcLmLk + Mt | Режим печати | Разрешение [количество точек на дюйм] | Режим использования чернил | Производительность | ||
|---|---|---|---|---|---|---|
| VS-640i | VS-540i | VS-300i | ||||
| Стандартный винил и стандартный материал для печати баннеров [Mt] | Стандарт | 720×720 | Металлизированные серебристые | 39,9 кв. фута/ч (3,7 кв. м/ч) |
37,8 кв. фута/ч (3,5 кв. м/ч) |
32,4 кв. фута/ч (3 кв. м/ч) |
| CMYKLcLmLkMt | 30,2 кв. фута/ч (2,8 кв. м/ч) |
29,1 кв. фута/ч (2,7 кв. м/ч) |
24,8 кв. фута/ч (2,3 кв. м/ч) |
|||
| Mt -> CMYKLcLmLk | 17,3 кв. фута/ч (1,6 кв. м/ч) |
17,3 кв. фута/ч (1,6 кв. м/ч) |
14,0 кв. футов/ч (1,3 кв. м/ч) |
|||
| Высокое качество | 1440×720 | Металлизированные серебристые | 19,4 кв. фута/ч (1,8 кв. м/ч) |
19,4 кв. фута/ч (1,8 кв. м/ч) |
16,2 кв. фута/ч (1,5 кв. м/ч) |
|
| CMYKLcLmLkMt | 15,1 кв. фута/ч (1,4 кв. м/ч) |
14,0 кв. футов/ч (1,3 кв. м/ч) |
11,9 кв. фута/ч (1,1 кв. м/ч) |
|||
| Mt -> CMYKLcLmLk | 8,6 кв. фута/ч (0,8 кв. м/ч) |
8,6 кв. фута/ч (0,8 кв. м/ч) |
7,6 кв. фута/ч (0,7 кв. м/ч) |
инструкцияRoland VS-640

USER’S MANUAL
Thank you very much for purchasing this product.
To ensure correct and safe usage with a full understanding of this product’s performance, please be sure to read through
this manual completely and store it in a safe location.
Unauthorized copying or transferral, in whole or in part, of this manual is prohibited.
The contents of this document and the specications of this product are subject to change without notice.
The documentation and the product have been prepared and tested as much as possible. If you nd any misprint or
error, please inform us.
Roland DG Corp. assumes no responsibility for any direct or indirect loss or damage which may occur through use of this
product, regardless of any failure to perform on the part of this product.
Roland DG Corp. assumes no responsibility for any direct or indirect loss or damage which may occur with respect to
any article made using this product.
Посмотреть инструкция для Roland VS-640 бесплатно. Руководство относится к категории принтеры, 3 человек(а) дали ему среднюю оценку 8. Руководство доступно на следующих языках: английский. У вас есть вопрос о Roland VS-640 или вам нужна помощь? Задайте свой вопрос здесь
- Contents
- Chapter 1 Machine Highlights
- Chapter 2 Basic Operation
- Chapter 3 Maintenance: For always using the printer in the best condition
- Chapter 4 Part of Practice
- Chapter 5 To Administrators
- Chapter 6 Read this chapter whenever you face a problem. (FAQ)
- Chapter 7 Main Specifications
Главная
Не можете найти ответ на свой вопрос в руководстве? Вы можете найти ответ на свой вопрос ниже, в разделе часто задаваемых вопросов о Roland VS-640.
Как удалить замятую бумагу из принтера?
Лучше всего аккуратно вытянуть бумагу из принтера. Выключите принтер и убедитесь, что печатающий узел не нависает над бумагой и что в принтере не осталось бумаги.
Почему после установки оригинального картриджа принтер не работает?
Принтер может не распознать неоригинальный картридж. В этом случае вы получите сообщение о том, что картридж пуст. В инструкции к приобретенному картриджу обычно указаны способы устранения проблемы. Если это сделать не удалось, рекомендуется обратиться к продавцу.
Чем обусловлено плохое качество печати?
Причины плохого качества печати могут быть разными. Убедитесь, что картридж заполнен, а тонер имеется в достаточном количестве. Если такой проблемы нет, причина может заключаться в том, что струйному принтеру требуется чистка, высох картридж или сломан печатающий узел. Для лазерного принтера рекомендуется выполнить калибровку.
В чем разница между лазерным и струйным принтером?
Лазерный принтер печатает тонером, а струйный — чернилами.
Почему при печати на струйном принтере появляются черные полосы?
В большинстве случаев это обусловлено поломкой картриджа струйного принтера. Необходимо заменить картридж.
Что означает аббревиатура DPI?
DPI обозначает Dots Per Inch и представляет собой количество капель чернил (на дюйм), которые подаются на бумагу при печати.
Инструкция Roland VS-640 доступно в русский?
К сожалению, у нас нет руководства для Roland VS-640, доступного в русский. Это руководство доступно в английский.
Не нашли свой вопрос? Задайте свой вопрос здесь
-
Roland VS-640 — page 1
USER’S MANUAL Thank you very much for purchasing this pr oduct. T o ensure correct and safe usage with a full understanding of this produc t’s performance, please be sure to read through this manual completely and store it in a saf e location. Unauthorized copying or transf erral, in whole or in part, of this manual is prohibited. …
-
Roland VS-640 — page 2
For the USA FEDERAL COMMUNICA TIONS COMMIS — SION RADIO FREQUENCY INTERFERENCE ST A TEMENT This equipment has been tested and found to comply with the limits for a Class A digital device, pursuant to P art 15 of the FCC Rules . These limits are design ed to provid e reasonab le prote ction against har mful inter ference when the equipment is oper- …
-
Roland VS-640 — page 3
1 Contents Contents ……………………………………………………………………………………………………….. 1 Chapter 1 Machine Highlights ………………………………………………………………………………5 Part Names and Functions …………………………………………………….. …
-
Roland VS-640 — page 4
Contents 2 Disposing of Discharged Ink …………………………………………………………………………………………………………….70 Cleaning ………………………………………………………………………………………………………………………………………………. 72 About Ca …
-
Roland VS-640 — page 5
Contents 3 Viewing the A utomatic Envir onment Correction F unction Settings ………………………………………. 122 Performing Printing and Cutting Separately …………………………………………………….123 T o Perform Printing and C utting Separately …………………………………………………………… …
-
Roland VS-640 — page 6
Contents 4 http://www.rolanddg.com/ Copyright © 2010 Roland DG Corporation Company names and product names are trademarks or registered trademarks of their respective holders. Chapter 7 Main Specications …………………………………………………………………………..161 Printing/Cutting Area ………………………… …
-
Roland VS-640 — page 7
1 Machine Highlights Chapter 1 Machine Highlights Contents …………………………………………………………………………….. 1 Part Names and Functions …………………………………………………… 6 Printer Unit ………………………………………………………………………..6 Operation Pan …
-
Roland VS-640 — page 8
1 Machine Highlights 6 Part Names and Functions Printer Unit Front Rear Front cover Keep this closed except when neces- sar y , during when loading media. Cartridge slots There are wher e ink car — tridges are installed. Main power switch Power-cord connector Grit patterns These indicate the locations of the grit rollers. Y ou use them as guides fo …
-
Roland VS-640 — page 9
Part Names and Functions 7 Front cover inside/print head periphery Grit patterns These indicate the locations of the grit rollers. The pinch rollers must always be placed within the area indicated by each of these patt erns. Middle pinch rollers T h e s e a r e d e t a c h a b l e and rem oun tabl e pin ch rollers. The number that can be used varie …
-
Roland VS-640 — page 10
Part Names and Functions 8 Operation Panel Panel Notation In this document, the keys and lights on the operation panel are indica ted by the follo wing illustration. MENU key FUNCTION key ENTER key P AUSE key Cursor keys SETUP light BUSY light BASE POINT light HEA TER light SETUP light Thi s l igh ts up whe n media has been load — ed correctly. BAS …
-
Roland VS-640 — page 11
9 Menu List Main Menu MENU PRESE T PRESE T LOAD PRESE T S A VE LOAD NAME1 T o the [CUTTING MENU] menu T o the [SA VE] menu T o the [NAME8] menu T o the [NAME1] menu S A VE NAME1 T o the [NAME8] menu T o the [LOAD] menu Continue Press LOAD NAME8 S A VE NAME8 T o the [NAME1] menu MENU ADJUST BI-DIR ADJUST BI-DIR SIMPLE SETTING ADJUST BI-DIR DET AIL S …
-
Roland VS-640 — page 12
Menu List 10 Continue Continue INK CONTRO L EMP T Y MODE SUB MENU SLEE P SLEE P INTE R V A L SLEE P SETTING SETTING ENABLE ENABLE SUB MENU F AC T O RY DE F AU L T SUB MENU SYSTEM REPO RT SUB MENU INK CONTRO L EMP T Y MODE S T O P S T O P INTE R V A L 30min 30min T o the [SETTING] menu T o the [INTE R V AL] menu SUB MENU MEDI A RELEASE INK CONTROL C …
-
Roland VS-640 — page 13
Menu List 11 SYSTEM INFO. MODE L SYSTEM INFO. INK SYSTEM INFO. FIRM W ARE Continue MENU SYSTEM INFO. MODE L VS-640 SYSTEM INFO. SERI A L NO. SERI A L NO . ZS00001 INK E-SO L Max 4COLOR FIRM W ARE V e r .1.30 T o the [NETWORK] menu T o the [MODEL] menu MENU INK REMAINING SHEE T REMAIN SE T LENGTH MENU SHEE T REMAIN SHEE T REMAIN PRIN T MEMO SE T LEN …
-
Roland VS-640 — page 14
Menu List 12 Language and Unit Menu CUTTING MENU PRIN T -CU T ADJ. PRIN T -CU T ADJ. TES T PRIN T Continue MENU CUTTING MENU T o the [ AU T O EN V . M A TCH ] menu T o the [TES T PRINT] menu T o the [TES T PRIN T 2] menu T o the [PRESET] menu CUTTING MENU CALIBR A TION T o the [FEED SETTING] menu T o the [SCAN SETTING] menu FEED SETTING 0.00% SCAN …
-
Roland VS-640 — page 15
Menu List 13 Function Menu T o the [CUT CONFIG] menu T o the [POWERFUL CL.] menu CLEANING MEDIUM CL. T o the [TEST PRINT] menu CLEANING TEST PRINT T o the [UP-SPEED] menu T o the [TEST CUT] menu CLEANING NORMAL CL. CLEANING POWERFUL CL. FUNCTION CLEANING BASE POINT ALIGN POINT 1 FUNCTION HEA TER CONFIG T o the [PRINT] menu T o the [DRYER] menu FUNC …
-
Roland VS-640 — page 16
14 T o Ensure Safe Use Improp er han dling or operati on of this mach ine ma y resu lt in injury or damage to prope rty . Points which must be observed to prevent such injury or damage are described as follows. About W ARNING and CAUTION Notices W ARNING Used for instructions intended to alert the user to the risk of death or severe injury should t …
-
Roland VS-640 — page 17
T o Ensure Safe Use 15 Incorrect operation may cause injury . W ARNING Be sure to follow the operation proce — dures described in this documentation. Never allow anyone unfamiliar with the us a g e or ha n d l i n g o f t h e ma c h i n e t o touch it. Incorrect usage or handling may lead to an accident. Keep children away from the machine. The mac …
-
Roland VS-640 — page 18
T o Ensure Safe Use 16 Danger of electrical short, shock, electrocution, or re W ARNING Connect to an electrical outlet that com- pl i e s w i t h t h i s m a c h in e ‘ s r a t i n gs (f o r voltage, frequency , and current). Incorrect voltage or insufcient current may cause re or electrical shock. Never use out of doors or in any lo …
-
Roland VS-640 — page 19
T o Ensure Safe Use 17 Important notes about the power cord, plug, and electrical outlet Never place any object on top or subject to damage. Never bend or twist with undue force. Never pull with undue force. Never bundle, bind, or roll up. Never allow to get wet. Never make hot. Dust may cause re. 1 Machine Highlights …
-
Roland VS-640 — page 20
T o Ensure Safe Use 18 Ink, cleaning uid, and discharged uid are ammable and toxic. In the event of ingestion or physical distress In the ev ent of c ontact with the ey es, immediat ely ush with water f or at least 15 minutes . If eye irritation continues, seek tr eatment by a phy sician. In the event of contact with sk in, imme …
-
Roland VS-640 — page 21
T o Ensure Safe Use 19 This machine weighs 200 kg (441 lb.). Media weighs 40 kg (88 lb.). Danger of re, burns, or toxic gas emissions W ARNING Install the machine in a location that is level, stable, and able to bear the weight of the machine. The tot al wei ght may re ach ov er 2 00 k g ( 4 4 1 l b. ) f o r th e 6 4 — i n c h mo d e l ( , 17 0 …
-
Roland VS-640 — page 22
T o Ensure Safe Use 20 Caution: High V oltage Cover removal may pose hazard of shock or electrocution due to high voltage. Ink Is T oxic Ink and discharged uid are toxic. Avoid contact with the body . Use only in a well-ventilated area. Flammable Ink and discharged uid are am — mable. Keep away from open ame. W arning labels are afxe …
-
Roland VS-640 — page 23
21 Pour utiliser en toute sécurité La manipulation ou l’utilisation inadéquates de cet appareil peuvent causer des blessures ou des dommages matériels. Les précautions à prendre pour prévenir les blessures ou les dommages sont décrites ci-dessous. A vis sur les avertissements A TTENTION Utilisé pour avertir l’utilisateur d’u …
-
Roland VS-640 — page 24
Pour utiliser en toute sécurité 22 L’utilisation incorrecte peut causer des blessures A TTENTION S ‘ a s s u r e r d e s u i v r e l e s p r o c é d u r e s d’utilisation décrites dans la documen- tation. Ne jamais permettre à quiconque ne connaît pas le fonctionnement ou la manutention de l’appareil de le toucher . L’ut …
-
Roland VS-640 — page 25
Pour utiliser en toute sécurité 23 A TTENTION Brancher à une prise électrique conforme aux caractéristiques de cet appareil (ten- sion, fréquence et courant). Une tension incorrecte ou un courant insuf- sa nt p euv ent cau ser un ince ndi e o u un choc électrique. Risque de décharge ou de choc électrique, d’électrocution ou d&apos …
-
Roland VS-640 — page 26
Pour utiliser en toute sécurité 24 A TTENTION Ne jamais placer d’objet inammable à proximité de l’appareil. Ne jam ais utiliser d e p r od u i t i n f l a m m ab l e e n a é r o s o l à proximité de l’appareil. Ne jam ais utiliser l’a pp ar ei l d ans un e ndr oi t o ù d es ga z peuvent s’accumuler . Une combusti …
-
Roland VS-640 — page 27
Pour utiliser en toute sécurité 25 Remarques importantes à propos du câble d’alimentation, de la che et de la prise électrique Ne jamais déposer aucun objet sur le câble, sur la che ou sur la prise car cela risque de les endommager . Ne jamais plier ni tordre le câble avec une force excessive. Ne jamais tirer sur le câble ou la …
-
Roland VS-640 — page 28
Pour utiliser en toute sécurité 26 L’encre, les liquides nettoyants et les liquides usées sont inammables et toxiques PRUDENCE S’assurer que le lieu de travail est bien aéré. L’absence d’aération adéquate peut créer un e si t u a ti o n d a n g er e u s e p o u r l a s an t é ou un risque de combustion à cause des v …
-
Roland VS-640 — page 29
Pour utiliser en toute sécurité 27 Le poids de cet appareil est de 200 kg (441 lb.) Le poids du support est de 40 kg (88 lb.) A TTENTION Installer l’appareil à un endroit stable et plat et capable de supporter son poids. Le p oi ds t ot al d e l’ ap pa r ei l pe ut ê tr e de 200 kg (441 lb.) ou plus pour le modèle de 64 pouces (170 kg ( …
-
Roland VS-640 — page 30
Pour utiliser en toute sécurité 28 Attention : voltage élevé Il peut être dangereux de retirer le couvercle puisqu’il y aurait des risques de chocs électriques ou d’électrocution à cause du voltage élevé. Des vignettes d’avertissement sont apposées pour qu’il soit facile de repérer les zones dangere- uses. La signicatio …
-
Roland VS-640 — page 31
29 Important Notes on Handling and Use This machine is a precision device. T o ensure the full performance of this machine, be sure to observe the following important points. Failure to observe them may not only result in loss of performance, but may also cause malfunction or breakdown. Printer Unit This machine is a precision device. Handle ca …
-
Roland VS-640 — page 32
30 …
-
Roland VS-640 — page 33
2 Basic Operation Chapter 2 Basic Operation Prepare the Media …………………………………………………………….. 32 T ype of Media ………………………………………………………………….32 Usable Media …………………………………………………………………..33 Switch On! …………… …
-
Roland VS-640 — page 34
32 2 Basic Operation Prepare the Media T ype of Media In this manual, the paper used for output is called “ media. ” There are the following main t wo media types used in this machine. Roll media: Media wound onto a paper tube Sheet media: Media not wound onto a paper tube such as standard-siz e media V arious paper quality types of rol …
-
Roland VS-640 — page 35
Prepare the Media 2 Basic Operation 33 Usable Media This machine cannot necessarily print ev er y kind of media. When selecting media, be sur e to carr y out testing in advance to make sure tha t satisfactor y printing quality is obtained. Size Width (For both Roll Media and sheet media) 64-inch model: 210 to 1625 mm (8.3 to 64 inches) 54-inch mode …
-
Roland VS-640 — page 36
34 2 Basic Operation Switch On! Switch On! W ARNING When output is not being performed, remove any loaded media or switch off the sub power . The continued application of heat at a single location may cause the release of toxic gases from the media or pose a re hazard. Procedure Close the front cover . T urn on the main power switch. …
-
Roland VS-640 — page 37
35 2 Basic Operation Loading Media Loading Roll Media CAUTION Load roll media correctly . Otherwise the media may fall and cause injury . CAUTION Rol l me dia wei ghs abo ut 4 0 k g (8 8 lb .). T o a voi d i nju ry , han dle wit h care. CAUTION Never load media that weighs over 40 kg (88lb.) for the 64-inch model (, 30 kg (66lb.) for the 54-inch mo …
-
Roland VS-640 — page 38
Loading Media 2 Basic Operation 36 Fit the paper tube (core) onto the end cap of the media holder [Left]. Do not secure the media holder now . Move the media holder [Right] and t the media cap onto the paper tube core of the media. Fit it secur ely to prev ent the media from easy loose. Install conforming to the procedures. Load the media wh …
-
Roland VS-640 — page 39
Loading Media 2 Basic Operation 37 Hold the outer side of the media holder [Left] and position the left and right side edges of the media to match the grit patterns. When deciding the position, hold the both sides of media holders from the outer sides and move it. Do not hold the media directly to move . CAUTION Never attempt this operation whi …
-
Roland VS-640 — page 40
Loading Media 2 Basic Operation 38 2. Pass the media through the printer and secure the media holders. Pass the leading edge of the media between the pinch rollers and the grit rollers. Pull out the media over the platen. Check both edges of the media are placed on the grit rollers. Be sure to place the right edge of the media on the ri …
-
Roland VS-640 — page 41
Loading Media 2 Basic Operation 39 Place the left and right pinch rollers (afxed with blue stickers) on both edges of the media. Place them on the positions from the media edges b y about 10 mm respectively . Place the pinch rolls over all the grid rollers covered by the media. The grit patterns can be f ound at the place where g rit rol …
-
Roland VS-640 — page 42
Loading Media 2 Basic Operation 40 Hold the media at the center and pull it out, being sure to keep it straight and all areas of the media to be taut. Lower the loading lever to secure the media in place. starts to ash, and then the screen shown in the gure appears. …
-
Roland VS-640 — page 43
Loading Media 2 Basic Operation 41 3. Clamp the edges of the media with the media clamp. Move the left and right media clamps above the edges of the media. Line up the edges of the media with the centers of the holes of the media clamps. When you ’ re performing cutting only , never use the media clamps. P . 59, «Important Note on Cu …
-
Roland VS-640 — page 44
Loading Media 42 Loading the Sheet Media Procedure Move the media holders to the left and right. Move them to a location where they don’t disturb the media when the media is hung down from the rear of the machine. I f they disturb the media, remov e them with the shaf t. For information on how to remove , ref er to “Setup Guide. ” Pas …
-
Roland VS-640 — page 45
Loading Media 43 Lower the loading lever to secure the media in place. starts to ash, and then the screen shown in the gure appears. When you ’ re performing cutting only , never use the media clamps. P . 59, «Important Note on Cutting» Move the left and right media clamps above the edges of the media. Line up the edge …
-
Roland VS-640 — page 46
Loading Media 44 Performing the Initial Adjustment (Correcting for Misalignment in Bidirectional Printing More Precisely) Perform the initial adjustment (correction for misalignment in bidirectional printing more precisely) of this machine. In the following case , per form this adjustment. When using this machine for the rst time When ch …
-
Roland VS-640 — page 47
Loading Media 45 Press to select a correction value of No.3 Press . Set correction values of No.4 to No.10. in the same manner . When correction value settings end, press . Press to go back to the original screen. NO.3 NO.4 ‑ 6 ‑ 4 NO.9 NO.10 ‑ 6 ‑ 4 2 Basic Operation …
-
Roland VS-640 — page 48
46 Setup of Media About [Media Setting] menu T o ensure the optimal output ac cording to the media siz e and type, various setting items are provided in this machine. However , it is hard work to per form these settings one by one referring to this document. So, this machine provides the [M edia Setting] menu that guides these settings in the inter …
-
Roland VS-640 — page 49
Setup of Media 47 Use to set the temperature. Recommended temperature: 40 deg rees (104°F) Press to enable the setting. F or the individual setting method of this setting item and the description, refer to p. 100, «Mak ing the T emperature Setting for the Media Heating S ystem. » 3. Adjusting the Head Height Press to select [ …
-
Roland VS-640 — page 50
Setup of Media 48 4. Perform the position correction of feed direction (Alleviate Horizontal Stripes). Press to select [SET]. Press to enable the setting. The test pattern of f eed correction is output. When the left gure is displayed, press . Use to set the correction value. Press to enable the setting. [T o conrm again/T o a …
-
Roland VS-640 — page 51
Setup of Media 49 5. Performing the correction for misalignment in bidirectional printing Press to select [SET]. Press to enable the setting. The test pattern of bidir ectional correction is output. When the left gure is displayed, press . Use to set the correction value. Press to enable the setting. [T o conrm again/adjust ag …
-
Roland VS-640 — page 52
Setup of Media 50 6. Deciding to perform the setting for cutting or not [Only Printing] Press to select [NEXT]. Press to enable the setting. Go to Proc edure 10. [Print & Cut] Press to select [SET]. Press to enable the setting. Go to Proc edure 7. 7. Setting the blade force Press to select SET]. Press to enable the setting. The test pattern …
-
Roland VS-640 — page 53
Setup of Media 51 Use to adjust the blade force. If two shapes are peeled o together raise the blade for ce. If backing paper is cut too reduce the blade force . Press to enable the setting. Cut the test patt ern again. Check the result. [T wo shapes are peeled off separately] Press to select [COMPL]. Press to enable the setting. …
-
Roland VS-640 — page 54
Setup of Media 52 [Cutting position and printing position are aligned] Press to select [COMPL]. Press to enable the setting. Go to Proc edure 9. [Cutting position and printing position are not aligned] Press to select [EXEC]. Press to enable the setting. The test pattern (P&C2) for setting the correction values is printed and cut. Go to Pro …
-
Roland VS-640 — page 55
Setup of Media 53 [Cutting position and printing position are aligned] Press to select [COMPL]. Press to enable the setting. Go to Proc edure 9. [Cutting position and printing position are not aligned] Press to select [EXEC]. Press to enable the setting. Go back to Procedur e and set the correc tion val ues aga in. Rep eat Proc edure an …
-
Roland VS-640 — page 56
Setup of Media 54 [Cutting position and printing position are aligned] Press to select [COMPL]. Press to enable the setting. Go to Proc edure 10. [Cutting position and printing position are not aligned] Press to select [EXEC]. Press to enable the setting. The test pattern (C&C2) for setting the correction values is printed and cut. When …
-
Roland VS-640 — page 57
Setup of Media 55 [Cutting position and printing position are aligned] Press to select [COMPL]. Press to enable the setting. Go to Proc edure 10. [Cutting position and printing position are not aligned] Press to select [EXEC]. Press to enable the setting. Go back to Pr ocedure and set the correction values again. And repea t Proc edure …
-
Roland VS-640 — page 58
Setup of Media 56 Press to select the item. Press to enable the setting. F or the individual setting method of this setting it em and the description, r efer to p. 103, «Setting the Dry- ing Time after P rinting. » 1 1. Saving the Setting as Preset Press to select [SA VE]. Press to enable the setting. If y ou select [NEXT ], t …
-
Roland VS-640 — page 59
2 Basic Operation 57 Outputting Setting the Output-start Location Y ou can set the output-star t location at any location you pref er . ( Y ou can output if you do not set this.) Note, however , that this setting must be made for each individual page . Procedure Open the front cover . Use t o m o v e t h e c e n t e r o f t h e b l a d e w …
-
Roland VS-640 — page 60
2 Basic Operation Outputting 58 Printing T ests and Cleaning Before you car ry out actual printing, we recommend performing a printing test to ensure no dot drop-out occurs. If dot drop-out occurs, per form cleaning of the print head (Normal Cleaning). How to Perform a Printing T est Procedure Setting the Output-start Location P . 57, » …
-
Roland VS-640 — page 61
2 Basic Operation Outputting 59 How to Perform a Normal cleaning Procedure Press . Press to display the left gure. Press , and then . Press . Normal cleaning star ts. When it nishes, the screen sho wn in the gure appears again. Press to go back to the original screen Perform a printing test again to make sure the dot dr …
-
Roland VS-640 — page 62
2 Basic Operation Outputting 60 When you’re perfor ming cut ting only using the roll med ia, neve r allow the media to han g down from the rear of the machine. (or set the [PREFEED] menu to “ENABLE.”) This preven ts a motor error or fall of the roll because the media is pulled with ex cessive f orce . For the [PREFEED] menu, refer to p. 1 …
-
Roland VS-640 — page 63
2 Basic Operation Outputting 61 Peel off the cut shapes to verify the cutting quality . [T wo shapes are peeled off separately] Y ou do no t need to per form the setting because the blade forc e is appropriate. [T wo shapes are peeled off together/backing paper is also cut] Go to the next Procedur e to set the blade for ce. 2. Setting the blade …
-
Roland VS-640 — page 64
2 Basic Operation Outputting 62 Getting Ready to Receive Data from a Computer When p. 35, «Loading Media, » p. 46, «Setup of Media» are completed, get ready to receive the data from a computer . CAUTION Never touch the print heads while output is in progress. The print heads move at high speed. Contact may cause injury . Procedu …
-
Roland VS-640 — page 65
2 Basic Operation Outputting 63 Starting Output When the operation of p. 62, «Getting R eady to Receive Data from a Computer» is completed, you can star t output. T o output, the follo wing procedure is r equired Creating Output Data Create the output data using the applica tion software like Adobe Illustrator and like that. F or informat …
-
Roland VS-640 — page 66
2 Basic Operation Outputting 64 Pausing and Canceling Output Y ou can pause and cancel printing bef ore it nishes. We do not recommend r esuming printing because hori- zontal stripes are produc ed at the place where output stopped . Procedure Press before output nishes This pauses printing operation. Press again to resume printing. T o ca …
-
Roland VS-640 — page 67
2 Basic Operation Outputting 65 Press . The media is cut o . Y ou can make the setting in the sof tware RIP for automatic media cuto af ter printing or cutting has nished. For information on how to make the setting, refer to the documentation for the software RIP you’re using . Cut-off Operations B e sure to detach the media c …
-
Roland VS-640 — page 68
2 Basic Operation 66 Switch Off Switch Off W ARNING When output is not being performed, remove any loaded media or switch off the sub power . The continued application of heat at a single location may cause the release of toxic gases from the media or pose a re hazard. Procedure Switch off the sub power whenever output is nished. Hold dow …
-
Roland VS-640 — page 69
3 Maintenance Chapter 3 Maintenance: For always using the printer in the best condition Checking for Remaining Ink and Replacing Cartridges …………… 68 Checking for Remaining Ink ………………………………………………68 How to Replace Ink Cartridges …………………………………………..69 Maintenance that Should …
-
Roland VS-640 — page 70
68 3 Maintenance Checking for Remaining Ink and Replacing Cartridges Checking for Remaining Ink Procedure Press . Press several times until the screen shown on the left appears. Press . indicates the amount of ink remaining . When there ar e more , the amount of ink remaining is larger . * The disp lay shows an appro xima te gu ide to the a …
-
Roland VS-640 — page 71
Checking for Remaining Ink and Replacing Cartridges 3 Maintenance 69 How to Replace Ink Cartridges When ink runs out, a warning beep sounds and printing pauses (unless the default settings have been changed). Pull out the empty cartridge and inser t a new one. Printing resumes . W ARNING Never store ink, cleaning uid, or discharged uid in any …
-
Roland VS-640 — page 72
70 3 Maintenance Maintenance that Should Be Performed Daily Maintenance of Ink Cartridges When the message shown in the gure is displayed, remove the ink car tridge of the ashing slot number and shake it gently . T o get the stable printing quality , shake the ink cartridge periodically to maintain the good ink condi- tion. When the ink car t …
-
Roland VS-640 — page 73
Maintenance that Should Be Performed Daily 3 Maintenance 71 When the screen shown on the left appears, detach the bottle, discard the discharged uid to empty it. CAUTION Befo re you det ach the dr ain bottle , be sure to wait f or th e sc reen to displa y «EMPTY DRAIN BOTTLE.» Failing to follow this procedure may cause discharged ? …
-
Roland VS-640 — page 74
Maintenance that Should Be Performed Daily 3 Maintenance 72 Cleaning W ARNING Never use gasoline, alcohol, thinner , or any other ammable material. Doing so may cause re. CAUTION Before attempting cleaning, switch off the sub power and wait until the platen and dryer cool (approximately 30 minutes). Sudden movement of the machine may cause in …
-
Roland VS-640 — page 75
Maintenance that Should Be Performed Daily 3 Maintenance 73 About Care and Maintenance of Print Head Care of the print head is essential to ensuring optimal printing at all times. T here are daily care and periodic care. Daily Care and Maintenance Normal cleaning It is recommended to perform the normal cleaning before daily operation. P . 5 …
-
Roland VS-640 — page 76
74 3 Maintenance When Normal Cleaning Is Not Effective Medium/ Powerful Cleaning When the problems such as dot drop- out are not cleared up by the «normal cleaning» (p. 58, “Printing T ests and Cleaning”), try the more forceful «medium cleaning. » If the condition is not improved , tr y the even more forc eful «powerful …
-
Roland VS-640 — page 77
75 3 Maintenance Maintenance that Should Be Performed More Than Once a Month When Manual-Cleaning Becomes Necessary Perform the manual cleaning more than once a month. T o keep the stable output condition at all times, per form the manual cleaning more than once a month. The manual cleaning takes approxima tely 10 minutes. The manual cleaning is re …
-
Roland VS-640 — page 78
Maintenance that Should Be Performed More Than Once a Month 3 Maintenance 76 Manual Cleaning of Print Head CAUTION Be sure to perform operations as specied by the instructions above, and never touch any area not specied in the instructions. Sudden movement of the machine may cause injury . 1. Change to the print-head manual-cleaning menu. …
-
Roland VS-640 — page 79
Maintenance that Should Be Performed More Than Once a Month 3 Maintenance 77 When the screen shown on the left appears, open the cover L. Remove the cut rail. Press . Close the cover L. OPEN COVER L REMOVE CUTTING RAIL CLOSE COVER L Screw Cover L Hook Screw Cover L Hook Screw Cut rail …
-
Roland VS-640 — page 80
Maintenance that Should Be Performed More Than Once a Month 3 Maintenance 78 Close the front cover . The print-head carriage moves to the left side of the machine, and then the screen shown in the gure appears . Open the cover L. Prepar ations are complete when this scr een appears. 2. Remove cover R. Remove the cover R. T ouch t …
-
Roland VS-640 — page 81
Maintenance that Should Be Performed More Than Once a Month 3 Maintenance 79 Check that the cut rail has been detached. If the cut rail is not detached, close all the covers and restart the operation from the beginning. If you continue the operation as the cut rail r emains attached, the print head might get br oken. Perform cleaning in the …
-
Roland VS-640 — page 82
Maintenance that Should Be Performed More Than Once a Month 3 Maintenance 80 Close the front cover . Press . The print-head carr iage moves to the right side of the machine, and then the screen shown in the gure appears . Open the cover L. Replace the cut rail. Press . Attach the cover L. Press . Press to go back to the o …
-
Roland VS-640 — page 83
81 3 Maintenance When Problems Such As Dot Drop-out are Not Cleared Up When Problems Such As Dot Drop-out are Not Cleared Up When aws in the dot pattern such as dot drop-out are not cleared up even after performing cleaning using the cleaning func tion (normal, medium, or powerful) or manual cleaning, per form the operation described below . Pro …
-
Roland VS-640 — page 84
When Problems Such As Dot Drop-out are Not Cleared Up 3 Maintenance 82 When the left gure is displayed, remove all the ink cartridges and shake them. Shake it gently so that ink does not spatter . Reinstall all the ink cartridges in the original slots. Press . The screen shown in the gur e appears. When the screen shown on the left ap …
-
Roland VS-640 — page 85
When Problems Such As Dot Drop-out are Not Cleared Up 3 Maintenance 83 About [CIRCULA TE INK] menu [CIRCULA TE INK] [Ink Circulation] is the menu displayed only when the ink mode is in WMT . Use this menu only at the time of transfer . For more informa — tion on the operation at the time of transf er , refer to the “Setup Guide. ” [Setup Gu …
-
Roland VS-640 — page 86
84 3 Maintenance Replacing Consumable Parts Replacing the Wiper The wiper is a component that you use when cleaning the pr int head. When the screen displays a message like the one shown, it means the item needs to be r eplaced. Replace with new items . Regarding the purchase of the wiper , contact your authorized Roland DG Corp . dealer . CAUTION …
-
Roland VS-640 — page 87
Replacing Consumable Parts 3 Maintenance 85 T ouch the location shown in the gure to discharge any static electricity . Preparations are complete when this screen appears. 2. Replace the wiper . Detach the old wiper . Insert the new wiper . Place the inclined end on the back side. If the wiper is placed inversely , the proper cle …
-
Roland VS-640 — page 88
Replacing Consumable Parts 3 Maintenance 86 Attach the hook. Make sure to atta ch the hook . O ther w ise it cases dot-drop out or else. 3. Reattach the cover R, and quit the wiper replacement menu. Attach the cover R. Press . After the process to quit the wiper replacement menu, the screen shown in the gure appears. Press to go …
-
Roland VS-640 — page 89
Replacing Consumable Parts 3 Maintenance 87 Replacing the Felt Wiper The felt wiper is a component that you use when cleaning the print head. When the screen displays a message like the one shown, it means the item needs to be r eplaced. Replace with new items . Regarding the purchase of the f elt wiper , contact your authorized Roland DG Corp. dea …
-
Roland VS-640 — page 90
Replacing Consumable Parts 3 Maintenance 88 T ouch the location shown in the gure to discharge any static electricity . Preparations are complete when this screen appears. 2. Replace the felt wiper . Detach the old felt wiper . Insert the new felt wiper . FINISHED? Detach the hook. Hitching the tweezers to the hole on the felt wi …
-
Roland VS-640 — page 91
Replacing Consumable Parts 3 Maintenance 89 Attach the Hook. Make sure to atta ch the hook . O ther w ise it cases dot-drop out or else. 3. Reattach the cover R, and quit the felt wiper replacement menu. Attach the cover R. Press . Afte r the pr oce ss to qui t the f elt wip er rep lac emen t menu , the scr ee n show n in the gure ap …
-
Roland VS-640 — page 92
Replacing Consumable Parts 3 Maintenance 90 Replacing the Blade If the blade becomes dull, or if the edge of the blade is chipped, or if the blade quality is lowered , replace it with a new blade. CAUTION Be sure to perform operations as specied by these instructions, and never touch any area not specied in the instructions. Sudden movement o …
-
Roland VS-640 — page 93
Replacing Consumable Parts 3 Maintenance 91 Replace the blade. Support the screw from below and insert the blade holder . If installed without suppor ting the screw in this way , cutting quality may become poor . Tighten the screw . T ug the blade holder upward to make sure it does not come loose. 3. Quit the blade replacement menu. …
-
Roland VS-640 — page 94
Replacing Consumable Parts 3 Maintenance 92 Replacing the Separating Knife If the separating knife becomes dull, replace it with the included r eplacement knife. CAUTION Be sure to perform operations as specied by these instructions, and never touch any area not specied in the instructions. Sudden movement of the machine may cause injury . CA …
-
Roland VS-640 — page 95
Replacing Consumable Parts 3 Maintenance 93 Install a new knife. The knife is secured in place by the mag net. Slowly insert it into the groove. Tighten the screw . T ake care to ensure that the k nife does not slip out of position at this time. 3. Quit the blade replacement menu. Close the front cover . Press . Press to go back …
-
Roland VS-640 — page 96
94 3 Maintenance When Not in Use for a Prolonged Period Keep Performing Maintenance Switch On the Power Once a Month Switch on the sub power once a month. When you turn on the power , the machine automatically per forms some operations such as those to keep the pr int head from drying out. Allowing the machine to stand com- pletely unused for a pro …
-
Roland VS-640 — page 97
4 Part of Practice Chapter 4 Part of Practice Fully Utilizing Preset Function ……………………………………………… 96 Saving V arious Settings as a Name Assigned Preset ……………96 Loading a Saved Preset ……………………………………………………98 Fully Utilize the Media Heating System ……………….. …
-
Roland VS-640 — page 98
96 4 Part of Practice Fully Utilizing Preset Function Saving V arious Settings as a Name Assigned Preset Procedure Press . Press twice to display the left gure. Press , and then . Press . Press to select one of NAME1 through 8. Press to enable the setting. The present menu settings ar e saved. Press to enter a character . Whe …
-
Roland VS-640 — page 99
Fully Utilizing Preset Function 4 Part of Practice 97 [PRINT ] (Print hea ter), [DRYER] P . 100, «Mak ing the T emperatur e Setting for the Media Heating System» [PREHEA TING] P . 102, «C ontr ol of Media Heating Syste m during Prehea ting» [DRYING TIME] P . 103, «Setting the Drying T ime after Printing» [A …
-
Roland VS-640 — page 100
Fully Utilizing Preset Function 4 Part of Practice 98 Loading a Saved Preset Procedure Press . Press several times to display the left gure. Press twice. Press to select a name to be called. Press to enable the setting. The settings are changed and the screen sho wn in the gure appears. Description This loads a saved preset. Y ou …
-
Roland VS-640 — page 101
99 4 Part of Practice Fully Utilize the Media Heating System What Is the Media Heating System? This machine is equipped with a media heating system that warms the media. Y ou use this mainly t o impr ove ink adhesion and also dr y the ink . Y ou can adjust the temperature settings to match the type of media and the printing speed. W ARNING CAUTION: …
-
Roland VS-640 — page 102
Fully Utilize the Media Heating System 4 Part of Practice 100 Making the T emperature Setting for the Media Heating System Procedure Press Press several times to display the left gure. Press . Press t o s e l e c t [ P R I N T ] ( p r i n t h e a t e r ) o r [DR YER] Press . Press to select a temperature. Y ou can set to “OFF . …
-
Roland VS-640 — page 103
Fully Utilize the Media Heating System 4 Part of Practice 101 Description By default setting, simply switching on the power does not make the media heating system warm up to the preset temperature . T he temperature rises until preset temperature when the media is loaded correctly and lights up. Y ou can also make this setting on the RIP soft ware. …
-
Roland VS-640 — page 104
Fully Utilize the Media Heating System 4 Part of Practice 102 Control of Media Heating System during Preheating Note: Preheating: State that the main power and the sub power are switched on and is not lighted (state that media setup is not completed) Procedure Press . Press several times to display the left gure. Press , and then . P …
-
Roland VS-640 — page 105
Fully Utilize the Media Heating System 4 Part of Practice 103 Description «ENABLE» : media feed is per formed until the trailing edge of the printing area is positioned on the dr yer . The margin between the pr int-end position and the next print-star t position is set to a value of 100 mil- limeters. When a margin setting of less tha …
-
Roland VS-640 — page 106
104 4 Part of Practice Fully Utilizing the Correction Function Correcting for Misalignment in Bidirectional Printing Procedure Press . Press several times to display the left gure. Press . Press . A test pattern is printed . When printing is completed, press in t hi s order . Press to select a correction value. Press to enable th …
-
Roland VS-640 — page 107
Fully Utilizing the Correction Function 4 Part of Practice 105 Correcting for Misalignment in Bidirectional Printing More Precisely When fur ther correction is requir ed, such as when adjustment made using [SIMPLE SET TING] does not enhance printing, use [DET AIL SET TING] to make corrections. F or information on operations, r efer to p. 44 “Perf …
-
Roland VS-640 — page 108
Fully Utilizing the Correction Function 4 Part of Practice 106 Description The movement distance of media experiences subtle changes due to the thick ness of the media and the tem- perature of the media heating system. When the movement distance becomes discr epant, horizontal stripes are more likely to occur during printing. W e recommend per form …
-
Roland VS-640 — page 109
107 4 Part of Practice Accommodating to the T ypes and Condition of Media Adjusting Head Height to Match Media Thickness Procedure Press . Press several times to display the left gure. Press . When the left gure is displayed, open the front cover . Move the heigh t-adjustment lever to adjust the head height. Moving the lever t …
-
Roland VS-640 — page 110
Accommodating to the T ypes and Condition of Media 4 Part of Practice 108 Using T ransparent Media Procedure Press . Press several times to display the left gure. Press twice. Press to select “DISABLE.” Press to enable the setting. The settings are changed and the screen sho wn in the gure appears. Description This setting ena …
-
Roland VS-640 — page 111
Accommodating to the T ypes and Condition of Media 4 Part of Practice 109 Description Y ou use this when ink dries poorly even when the media heating system is used. Y ou can also make this setting on the RIP software computer . When you have made the setting on the computer , the computer’s setting is used and the printer’s setting is ig …
-
Roland VS-640 — page 112
Accommodating to the T ypes and Condition of Media 4 Part of Practice 11 0 Speeding Up Output for Narrow Media Procedure Press . Press several times to display the left gure. Press . Press several times to display the left gure. Press . Press to select an item. SHEET «SHEET » matches the range of head movement to the …
-
Roland VS-640 — page 113
Accommodating to the T ypes and Condition of Media 4 Part of Practice 111 Preventing Soiling of the Media and Dot Drop-out Procedure Press . Press several times to display the left gure. Press . Press several times to display the left gure. Press . Press to select an item. P AGE Automatic cleaning is performed every time befor …
-
Roland VS-640 — page 114
Accommodating to the T ypes and Condition of Media 4 Part of Practice 11 2 Using Sticky Media Procedure Press . Press several times to display the left gure. Press . Press several times to display the left gure. Press . Press to select «ENABLE.» Press to enable the setting. Press to go back to the original screen …
-
Roland VS-640 — page 115
Accommodating to the T ypes and Condition of Media 4 Part of Practice 11 3 Clamping the Nozzle Array to be Used (CMYKLcLm mode only) *CMYKLcLm Mode: Stat e that six colors (cyan, magenta, yellow , black, light c yan and light magenta) are used in this machine. Procedure Press . Press several times to display the left gure. Press . Pr …
-
Roland VS-640 — page 116
11 4 4 Part of Practice Fully Utilizing Cutting Function Hints and T ips for Cutting Setting Setting the [PREFEED] menu item to “ENABLE” makes the machine automatically feed out media and take it up again before cutting. This makes it unnecessary to run out media to the rear of the machine before the operation. P . 1 14, «Preventin …
-
Roland VS-640 — page 117
Fully Utilizing Cutting Function 4 Part of Practice 11 5 Fine-tuning the Cutting Conditions Procedure Performing the Cutting T est P . 60, «Setting The Cutting T est And The Blade Force»Procedure 1. When cutting of the test patterns is completed, press . Press to select the set cutting condition. Press . [Force] This sets the …
-
Roland VS-640 — page 118
Fully Utilizing Cutting Function 4 Part of Practice 11 6 Press to go back to the original screen. Evaluating the Results of a Cutting T est Check the shape of the test pattern. The cut shape is distorted. Decrease the value of [Speed]. Peel off the circle. The rectangle also peels o . Increase the value of [F orce]. Some uncut areas …
-
Roland VS-640 — page 119
Fully Utilizing Cutting Function 4 Part of Practice 11 7 Accurately Adjusting the Cutting-in Amount When you want to per form accura te and ne adj ustmen t of the cuttin g-in amou nt, suc h as when cuttin g media with thin backing paper , you can obtain good results by adjusting the tip of the blade. Turn the cap por tion of the blade holder t o …
-
Roland VS-640 — page 120
Fully Utilizing Cutting Function 4 Part of Practice 11 8 Performing Distance Correction During Cutting *When you’ re performing printing followed by cutting, be sure to set the correction value to “0.00%. ” Other wise the printing and cutting positions may become misaligned Procedure Press . Press to display the left gure. Press . …
-
Roland VS-640 — page 121
Fully Utilizing Cutting Function 4 Part of Practice 11 9 Correcting Misalignment of the Printing and Cutting Positions Note: When performing this setting, make sure to set the correction value of [ CUT TING MENU CALIBRA TION] to “0.00%. ” P . 1 18, «Performing Distance Correction During Cutting» Procedure Make sure the [AUTO E …
-
Roland VS-640 — page 122
Fully Utilizing Cutting Function 4 Part of Practice 120 Press to display the left gure. Press . Press to select a correction value of [F] (feed direction of media). Press to select a correction value of [S] (move — ment direction of head). Press to enable the setting. Press in this order to display the left gure. Press . The test …
-
Roland VS-640 — page 123
Fully Utilizing Cutting Function 4 Part of Practice 121 Description Y ou per form this when printing followed immediately by cutting yields positioning for printing and cutting that is sligh tly misaligned. Y ou print alignment marks, per form detection of the printed marks, and correct the discrepancy . Subtle misalignment between the printing and …
-
Roland VS-640 — page 124
Fully Utilizing Cutting Function 4 Part of Practice 122 V iewing the Automatic Environment Correction Function Settings The automatic envir onment correction func tion is the function that adjusts automatically to the o ptimal condition of this machine according to the operating environment (humidity and temperature). Performing automatic adjustmen …
-
Roland VS-640 — page 125
123 4 Part of Practice Performing Printing and Cutting Separately T o Perform Printing and Cutting Separately Y ou can remov e the printed media and then reload it and perform cutting. (Example: Perform lamination or other processing af ter printing, then reload the media and perform cut- ting.) Then, carry out alignment to pr event misalignment of …
-
Roland VS-640 — page 126
Performing Printing and Cutting Separately 4 Part of Practice 124 Media Sizes Allowing Aut omatic Crop Mark Detection When y ou are printing with crop marks , set a margin of at least 90 mm (3.5 in.) bef ore the next print- start position. Y ou can set the margin value with the soft ware RIP you’re using. F or information on how to make the se …
-
Roland VS-640 — page 127
Performing Printing and Cutting Separately 4 Part of Practice 125 Aligning Automatically and Cutting When you make the setting for reading crop mar ks when sending cutting data from the computer , alignment is performed with the pr esence or absenc e of crop marks determined automa tically . F or inf ormation on how to make the setting, r efer to t …
-
Roland VS-640 — page 128
Performing Printing and Cutting Separately 4 Part of Practice 126 If Automatic Alignment Cannot Be Performed If the machine fails to detect the crop marks, the screen shown in the gure appears and operation stops. Press then the screen goes back to the previous screen. Reload the media, and then send the data again. Reload the media, and then se …
-
Roland VS-640 — page 129
Performing Printing and Cutting Separately 4 Part of Practice 127 This indicates that the base point and align point 1 have been set. Aligning Manually and Cutting Depending on the type of media, it may not be possible to detect crop marks automa tically . When crop marks cannot be detected automatically , you per form alignment manually . 1. Set t …
-
Roland VS-640 — page 130
Performing Printing and Cutting Separately 4 Part of Practice 128 Repeat Procedure to to specify other align points as required. Send the cutting data and perform cutting. Correcting Misalignment for Printing and Cutting When Using Crop Marks Note: When performing this setting, make sure to set the correction value of [ CUT …
-
Roland VS-640 — page 131
Performing Printing and Cutting Separately 4 Part of Practice 129 Cutting position Printing position and Cut- ting position are aligned. Printing position Press to display the left gure. Press . The test pattern ( C&C2) is printed and cut. Press to display the left gure. Press . Press to select a correction value of [F] (feed …
-
Roland VS-640 — page 132
Performing Printing and Cutting Separately 4 Part of Practice 130 Description Depending on the composition of the media, the positioning of printing and cutting may be misaligned even when you’re using cr op marks. Make corrections for misaligned printing and cutting for the media you’re using. Default Setting [F] (feed direction): 0.00 m …
-
Roland VS-640 — page 133
131 4 Part of Practice Using Media T ake-up System Use The Media T ake-up System When The Output Accompanied With The Pull-back Operation is Performed Note: The media take -up system (hereinafter called take -up system) is optional part. Note: For information on how to assemble and install the take -up system, refer to the user ’ s manual of the …
-
Roland VS-640 — page 134
Using Media T ake-up System 4 Part of Practice 132 How to Output by Limiting Length (Roland V ersaWorks) This section describes “how to output by limiting the length” using Roland VersaW or ks (her einafter RVW ). For information on the detail usage of RVW , refer t o the user ’ s manual of RV W . Procedure Open «Que Properties» …
-
Roland VS-640 — page 135
5 To Administrators Chapter 5 T o Administrators Output Operation Management …………………………………………. 134 Printing a System Report …………………………………………………134 Determining What Happens When Ink Runs Out ………………..134 Displaying the Amount of Media Remaining ……………………. …
-
Roland VS-640 — page 136
134 5 To Administrators Output Operation Management Printing a System Report This prints system inf ormation, including a list of setting values. Procedure Press . Press several times to display the left gure. Press . Press several times to display the left gure. Press . Start printing. Press to go back to the original screen. …
-
Roland VS-640 — page 137
Output Operation Management 5 To Administrators 135 Description When «ST OP» is selected, printing pauses and so colors may be uneven. Ensure a sucient amount of remain- ing ink before y ou begin printing. When «C ONT» is selected, printing does not stop even if ink runs out completely . T o replace the cartr idge, wait until …
-
Roland VS-640 — page 138
Output Operation Management 5 To Administrators 136 Making Sure to V erify the Setting for the Amount Remaining Every Time the Media Is Changed Set to display SE T LENGTH 0.0 m 25.0 m every time when a media is changed. Procedure Press . Press twice to display the left gure. Press . Press twice. Press . Press to select «ENAB …
-
Roland VS-640 — page 139
Output Operation Management 5 To Administrators 137 Printing the Amount of Remaining Media This prints the amount of media remaining that is displa yed at the top menu . Procedure Press . Press twice to display the left gure. Press . Press . Start printing. Press to go back to the original screen. Description Y ou use this when y …
-
Roland VS-640 — page 140
138 5 To Administrators System Management of Printer Setting for the Menu Language and the Units of Measurement This sets the language and units of measurement displa yed on the display screen of the oper ation panel. Procedure Hold down and switch on the sub power . Use to select the display (menu) language. Press to enable the setting. ? …
-
Roland VS-640 — page 141
System Management of Printer 5 To Administrators 139 Deactivating the Sleep Mode (Power Saving Function) Procedure Press . Press several times to display the left gure. Press . Press several times to display the left gure. Press , , and then . to select «DISABLE.» Press to enable the setting. Press to go back to …
-
Roland VS-640 — page 142
System Management of Printer 5 To Administrators 140 V iewing Information about the System of This Machine Note: F or information on how t o set up a network, refer to «Setup Guide. » Procedure Press . Press several times to display the left gure. Y ou can view the following inf ormation. [MODEL]: Model name [SERIAL NO .]: Seri …
-
Roland VS-640 — page 143
System Management of Printer 5 To Administrators 141 Returning All Settings to Their Initial V alues This menu returns all settings to the same as their fac tor y defaults. How ever , the settings for [MENU LANGUAGE], [LENGTH UNIT ], and [ TEMP . UNIT ] are not returned to the factor y defaults. Procedure Press . Press several times to disp …
-
Roland VS-640 — page 144
5 To Administrators 142 …
-
Roland VS-640 — page 145
6 F AQ Chapter 6 Read this chapter whenever you face a problem. (F AQ) Printer Does Not Start Up! ………………………………………………… 144 The Printer Unit Doesn’t Run ……………………………………………144 The Media Heating System Doesn’t W arm Up ……………………145 Cannot cut off the media. …
-
Roland VS-640 — page 146
144 6 F AQ Printer Does Not Start Up! The Printer Unit Doesn’t Run Is the power switched on? Switch on the printer’s main power , then press the sub pow er switch and make sure the sub power switch lights up . P . 34, “Switch On!” Is illuminated? Output is not per formed when is not illuminated. Lo wer the loading lever . P . …
-
Roland VS-640 — page 147
Printer Does Not Start Up! 6 F AQ 145 Is the network routing appropriate? T r y connecting the computer and the machine to the same hub , or connecting them directly using a crossov er cable. If this makes it possible to perform output, it means the problem is in the network itself . Are the network settings correct? If the cable connections are se …
-
Roland VS-640 — page 148
146 6 F AQ Attractive Printing or Cutting is Impossible… Printed Results Are Coarse or Contain Horizontal Stripes Does the print head show dot drop-out? Carry out a printing test and make sure no dot drop- out occurs . I f dot drop-out is present, per form head cleaning. P . 58 «Printing T ests and Cleaning,» p. 74, «When Norma …
-
Roland VS-640 — page 149
Attractive printing or cutting is impossible… 6 F AQ 147 Is the media loaded and set up correctly? If the media is not loaded and set up correctly , media feed may not be smooth, or printing may be adv ersely aected. Make sure the media is loaded and set up corr ectly. P . 151, «Media Feed is Not Smooth» Are the settings for the …
-
Roland VS-640 — page 150
Attractive Printing or Cutting is Impossible… 6 F AQ 148 The Media Becomes Soiled When Printed Does the print head contact the media? The height of the print head may be too low . A lso, if the media is not loaded and set up correctly, it may wrinkle or come loose and strike the heads. P . 107, «Adjusting Head Height to Match Media Thick …
-
Roland VS-640 — page 151
Attractive printing or cutting is impossible… 6 F AQ 149 Are you using media that exhibits large expansion and contraction? Wh en you’re performing printing follo wed immedia tely by cutting , misalignment occurs if the media expands or contracts. If this happens , try per forming printing with crop marks, then setting the base point and one …
-
Roland VS-640 — page 152
150 6 F AQ Media Jam Occurs! The Media Jams If an error message is displayed because the media has jammed, immediately correct the problem. Failure to do so may damage the print head. P . 159, [MOTOR ERROR TURN POWER OFF] Is the media warped or wrinkled? Many factors can cause warping or wrinkling. Refer to the follo wing and correct the proble …
-
Roland VS-640 — page 153
151 6 F AQ Media Feed is Not Smooth A variety of problems can occur if the media feed is not smooth. This can cause such problems as poor printing quality , contact with the media by the print head, misaligned positioning, or media jams. T ake action as follows. Media W rinkles or Shrinks Is the media loaded and set up straight and securely? F eed …
-
Roland VS-640 — page 154
Media Feed is Not Smooth 6 F AQ 152 Media Feed Is Not Straight Is the media loaded and set up straight and securely? F eed is not smooth when the media is not straight or is tensioned unevenly on the left and r ight. Reload the media. P . 46, “Setup of Media” Media Feed Is Not Smooth Do the media or the shafts strike some other object? Make …
-
Roland VS-640 — page 155
153 6 F AQ Print Head Stops Moving. Why? If the print-head carriage stops over the platen, take action immediately to prevent the heads from drying out. What to Do First Sw it ch t he s u b po we r of f, t he n ba ck o n again. If the media is jammed, then also remove the media. If the print-head carriage move to the stand — by pos ition (inside th …
-
Roland VS-640 — page 156
Print Heads Stops Moving. Why? 6 F AQ 154 Gently move the print head to the standby position. St oppi ng at the pl ace wher e the audi ble click is hea rd locks the print head in place. Gently apply pressure from the right side to make sure the heads don’t move to the left. If the print head moves to the left, again move them slowly by …
-
Roland VS-640 — page 157
155 6 F AQ A Message Appears These are the main messages that appear on the machine’s display to prompt correct operation. They do not indicate any error . Follow the prompts and take action accordingly . [1 ■ 2 ■ 3 ■ 4 ■ 5 ■ 6 ■ 7 ■ 8 ■] Only a small amount of ink remains. R eplace the car tridge indicated b y the ashing nu …
-
Roland VS-640 — page 158
A Message Appears 6 F AQ 156 [OPEN THE V AL VE] Open the valve . The valve described here is the part y ou handle when you clean Heads to perform the rst ink lling af ter purchasing this machine. Do not adjust this part except when you ll ink for the rst time. If you try to close the valve in an undesirable manner , it may cause trouble …
-
Roland VS-640 — page 159
157 6 F AQ An Error Message Appears This describes the error messages that may appear on the machine’s display , and how to take action to remedy the problem. If the action described here does not correct the problem, or if an error message not described here appears, contact your authorized Roland DG Corp. dealer . [ALIGN POINT POSITION INV A …
-
Roland VS-640 — page 160
An Error Message Appears 6 F AQ 158 [TEMPERA TURE IS T OO HIGH **°C] The temperature of the location where the machine is installed has risen above the ambient temperature at which the machine can operate. Operation cannot be continued. Switch o the sub pow er . The display ed temperatur e is the curr ent ambient temperature of the installation …
-
Roland VS-640 — page 161
An Error Message Appears 6 F AQ 159 [PINCHROLL ERROR INV ALID LEFT POS] The left pinch roller is positioned at a location where it does not pinch the media. Raise the loading lever and move the left pinch roller to the corr ect location. P . 35, “Loading Media” [PINCHROLL ERROR INV ALID RIGHT POS] The right pinch roller is positioned at a l …
-
Roland VS-640 — page 162
An Error Message Appears 6 F AQ 160 The media was pulled with excessive force. Excessiv e t ension was applied to the media, and additional action is necessar y to recov er fr om this state. First , move the loading lever to the rear and adjust the media to create a small amount of slack , then switch on the sub power . …
-
Roland VS-640 — page 163
7 Main Specications Chapter 7 Main Specications Printing/Cutting Area …………………………………………………………162 Maximum Area ……………………………………………………………….162 Maximum Area When Using Crop Marks …………………………..162 The Media-cutoff Location During Continuous …
-
Roland VS-640 — page 164
162 7 Main Specications Printing/Cutting Area Maximum Area The printing or cutting area along the hor izontal plane (the direction in which the carriages move) is deter- mined by the position of the pinch rollers . Maximum Area When Using Crop Marks When crop mar ks are used, the printing or cutting area is reduced from the maximum area by an am …
-
Roland VS-640 — page 165
Printing/Cutting Area 7 Main Specications 163 The Media-cutoff Location During Continuous Printing When a media- cuto command is sent from the computer , the cuto location on the media is as shown in the gure below . 75 mm Location where separated Margin (setting on the computer) Second page First page …
-
Roland VS-640 — page 166
164 7 Main Specications About the Blade The cutting conditions and the ser vice life of the blade change according to the media and the operating environment , even when you’re using identical blades. The ser vice life also diers according to the type of blade. A rough guide is sho wn below . Blade Media Blade forc e Amount of blade o …
-
Roland VS-640 — page 167
165 7 Main Specications Locations of the Power Rating and Serial Number Labels Side view of the machine Serial Number This is required when you seek maintenance, servicing, or support. Never peel off the label or let it get dirty . Power Rating Use an electrical outlet that meets the require- ments for voltage, frequency , and amperage given her …
-
Roland VS-640 — page 168
166 7 Main Specications Specications VS-640 VS-540 VS-420 VS-300 Printing technology Piezoelectric inkjet Media Width 210 to 1,625 mm (8.3 to 64 in.) 210 to 1,371 mm (8.3 to 54 in.) 182 to 1,071 mm (7.2 to 42.2 in.) 1 8 2 to 76 2 m m ( 7 . 2 to 30 in.) Thickness Maximum 1.0 mm (39 mil) with liner , for printing Maximum 0.4 mm (16 mil) with li …
-
Roland VS-640 — page 169
Specications 7 Main Specications 167 *1 Note: The media holder of this machine is exclusive use for the media of paper tube (core) inner diameter 3 inches. T o use 2 inches media, the optional media anges are required . *2 The length of printing or cutting is subject to the limitations of the program. *3 Media type: Media specied by …
-
Roland VS-640 — page 170
168 …
-
Roland VS-640 — page 171
169 …
-
Roland VS-640 — page 172
170 …
-
Roland VS-640 — page 173
171 …
-
Roland VS-640 — page 174
172 …
-
Roland VS-640 — page 175
…
-
Roland VS-640 — page 176
R4-100903 This product is using GNU General Public License (GPL) / GNU Lesser General Public License (LGPL) sof tware. Y ou have the right to acquire, modify, and distribute the sour ce code f or this GPL/LGPL sof tware. Y ou can obtain the GPL/L GPL source code used in this product by downloading it from the f ollowing website . URL: http://www.ro …
плоттеры-каттеры VS-640i, VS-540i и VS-300i серии VersaCAMM VSi
- Обзор
- Характеристики
- Видео
- Аксессуары
Новые плоттеры-каттеры VS-640i (1625 мм), VS-540i (1371 мм) и VS-300i (762 мм) новой серии VersaCAMM VSi стали логичным продолжением успешной деятельности компании, направленной на разработку и внедрение новых технологий полноцветной печати. История фирмы Roland насчитывает множество технологических и технических инноваций, и создание новой, еще более успешной линейки популярнейших плоттеров стало очередным вкладом компании в развитие сегмента долговечной печатной продукции.
Объединение ведущих разработок компании в области полноцветной печати и резки, а также традиционная надежность и простота в эксплуатации, которой отличается любой плоттер-каттер Roland, позволили получить функциональные и производительные устройства, аналогов которым на данный момент не существует. Входящие в серию VSi модели VS-640i, VS-540i и VS-300i являются одним из самых универсальных и доступных решений, представленных на современном рынке. Очевидно, что этой разработке суждено надолго занять ведущую позицию в сегменте оборудования для производства высококачественной профессиональной графики.
Плоттеры-каттеры серии VSi имеют целый ряд технологических усовершенствований, выгодно отличающих эти модели от их предшественников. В частности, для печати в этих устройствах используются принципиально новые экосольвентные чернила ECO-SOL MAX2, не содержащие никель. Широкая гамма оттенков полноцветной печати достигается благодаря возможности выбора цветовой схемы из комбинации девяти красок: белого (Wh), CMYKLcLm, металлизированного серебра (Mt) и серого (Lk).
Появление серых чернил позволяет намного точнее передавать серые и телесные оттенки, а в целом это дает возможность получать изображения в высочайшем фотографическом качестве с идеально плавными переходами цветов. У новых белых чернил повысилась плотность и укрывистость, а у металлизированных чернил улучшена глянцевость, при этом скорость печати белым и металликом возросла почти в 2 раза сравнительно с этим же показателем предыдущих моделей плоттеров.
Помимо технологических инноваций новые плоттеры VSi получили и ряд технических усовершенствований.
Особенности плоттеров серии VersaCAMM VSi:
- Широкоформатные плоттеры-каттеры с функцией печать+резка;
- Три модели:
- VS-300i формата 762 мм;
- VS-540i формата 1371 мм;
- VS-640i формата 1625 мм.
- Новые экосольвениные чернила ECO-SOL MAX2:
- Широкий цветовой охват, повышенная плотность, и яркие, насыщенные цвета;
- Новые серые чернила (Lk) для плавных цветовых переходов и точного воспроизведения оттенков серого, телесных и пастельных цветов;
- Новые чернила металлизированное серебро (Mt) с улучшенной глянцевостью, в комбинации с CMYK дают сотни металлизированных и перламутровых цветов;
- Улучшенная плотность и укрывистость белых чернил;
- Более высокая скорость высыхания для максимальной производительности;
- Высокая устойчивость к царапинам, и стойкость более 3-х лет для уличного использования;
- Универсальны для печати на любых материалах: пленках, баннерах, бумагах, холстах, фотообоях и других носителях;
- Пять вариантов цветовых схем из комбинации в девять красок:
- CMYK+CMYK — двойной CMYK;
- CMYKLcLmLk — CMYKLcLm + серый;
- CMYKLcLmLk+Wh — CMYKLcLm + серый + белый;
- CMYKLcLmLk+Mt — CMYKLcLm + серый + серебро;
- CMYKLcLm+Wh+Mt — CMYKLcLm + белый + серебро;
- Высокая скорость печати до 26,9 м²/ч в режиме CMYK+CMYK на VS-640i;
- Улучшена точность совмещения печать+резка.
Технические
характеристики
серии VersaCAMM VSi
| Модель | VS-300i | VS-540i | VS-640i | |
| Метод печати/резки | Пьезоструйный / продвижение материала | |||
| Материал | Ширина | 210 — 762 мм | 210 — 1 371 мм | 210 — 1 625 мм |
| Толщина | Печать: максимум 1 мм с подложкой; резка: максимум 0,4 с подложкой и 0,22 мм без подложки |
|||
| Внешний диаметр рулона | Максимум 210 мм | |||
| Диаметр тубы | 50,8 мм или 76,2 мм | |||
| Ширина печати/резки [1] | Максимум 736 мм | Максимум 1 346 мм | Максимум 1 600 мм | |
| Чернила | Тип | Roland ECO-SOL MAX2 | ||
| Объём | 440 или 220 мл (± 5 мл)(зависит от цвета) | |||
| Цвета | CMYKCMYK, CMYKLcLmLk, CMYKLcLmLk+Wh, CMYKLcLmLk+Mt, CMYKLcLm+Wh+Mt | |||
| Разрешение печати | 1440 dpi | |||
| Нож для резки | Серии Roland CAMM-1 | |||
| Скорость резки | 10 — 300 мм/с | |||
| Давление ножа | 30 — 300 г | |||
| Компенсация смещения лезвия | 0 — 1,5 мм | |||
| Программное разрешение (при резке) | 0,025 мм/шаг | |||
| Точность перемещения (при печати) | Погрешность менее ±0,3% от расстояния перемещения, при больших показателях перемещения погрешность не больше ± 0,3 мм |
|||
| Точность перемещения (при резке) | Погрешность менее ± 0,4% от расстояния перемещения, при больших значениях перемещения погрешность не больше ± 0,3 мм; если произведены настройки для [CUTTING MENU] — [CALIBRATION]: погрешность менее ± 0,2% от расстояния перемещения, при больших значениях перемещения не более ± 0,1 мм |
|||
| Точность повторения (при резке) | ± 0,1 мм и меньше | |||
| Точность совмещения печати и резки [4] |
± 0,5 мм и меньше | |||
| Точность совмещения печати и резки при повторной загрузке материала |
Погрешность менее ± 0,5% от расстояния перемещения, при больших значениях перемещения погрешность не больше ± 0,3 мм |
|||
| Нагрев зоны печати | Диапазон температур 30 — 45°C | |||
| Нагрев зоны сушки | Диапазон температур 30 — 50°C | |||
| Интерфейс | Ethernet (10 BASE-T / 100 BASE-TX, автоматическое переключение) |
|||
| Энергосберегающая функция | Автоматический переход в режим сна | |||
| Электропитание | Напряжение и частота | ~ 100 — 240 В ± 10%, 50/60 Гц | ||
| Потребляемая мощность | Максимум 4,2 A (220-240 В) | |||
| Энергопотребление | Во время работы | Максимум 1044 Вт | ||
| В спящем режиме | 14,5 Вт | |||
| Уровень шума | Во время работы | 64 дБ и меньше | ||
| В спящем режиме | 41 дБ и меньше | |||
| Габариты (на подставке) | 1 705 x 795 x 1 270 мм | 2 315 x 795 x 1 270 мм | 2 575 x 795 x 1 270 мм | |
| Вес (на подставке) | 100 кг | 130 кг | 140 кг | |
| Условия окружающей среды | Включен | Температура: 15° — 32°C, влажность: 35 — 80% (без конденсата) |
||
| Выключен | Температура: 5° — 40°C, влажность: 20 — 80% (без конденсата) |
|||
| Комплектация | Подставка, шнур питания, нож, держатель ножа, прижимные пластины, сменные отрезные ножи, комплект для чистки, ПО RIP (Roland VersaWorks), руководство пользователя |
Видео
плоттеры-каттеры VS-640i, VS-540i и VS-300i
Аксессуары
|
ESL5-5CY ESL5-5CY, 500мл, картридж Голубой ECO-SOL MAX3 17 217 руб
|
ESL5-5MG ESL5-5MG, 500мл, картридж Пурпурный ECO-SOL MAX3 17 217 руб
|
ESL5-5YE ESL5-5YE, 500мл, картридж Желтый ECO-SOL MAX3 17 217 руб
|
ESL5-5BK ESL5-5BK, 500мл, картридж Черный ECO-SOL MAX3 17 217 руб
|
|
ESL5-5LC ESL5-5LC, 500мл, картридж Светло-голубой ECO-SOL MAX3 17 217 руб
|
ESL5-5LM ESL5-5LM, 500мл, картридж Светло-пурпурный ECO-SOL MAX3 17 217 руб
|
ESL5-5LK ESL5-5LK, 500мл, картридж Серый ECO-SOL MAX3 17 217 руб
|
ESL4-WH ESL4-WH, 220мл, картридж Белый ECO-Sol MAX2 15 361 руб
|
|
ESL4-4CY ESL4-4CY, 440мл, картридж Голубой ECO-Sol MAX2 12 887 руб
|
ESL4-4LC ESL4-4LC, 440мл, картридж Светло-голубой ECO-Sol MAX2 12 887 руб
|
ESL4-4LM ESL4-4LM, 440мл, картридж Светло-пурпурный ECO-Sol MAX2 12 887 руб
|
ZEC-U1005, нож ZEC-U1005, нож 4 351 руб
|
|
ZEC-U5025, нож ZEC-U5025, нож 4 227 руб
|
ZEC-U3017, нож ZEC-U3017, нож 8 075 руб
|
ZEC-U3050, нож ZEC-U3050, нож 4 227 руб
|
защитная полоска, VS-640 1000006713, защитная полоска, VS-640 4 124 руб
|

Применения
Этикетки

Инновационная технология Roland совмещенной печати и контурной резки Print&Cut кардинально изменила процесс изготовления упаковки и наклеек, благодаря легкой и качественной печати этикеток.
Визуальная реклама

Roland уже 30 лет является признанным лидером в производстве оборудования для визуальной, интерьерной и, конечно же, наружной рекламы.
Баннеры
В рекламной индустрии печати красочных и ярких баннеров плоттеры Roland доказали, что по качеству печати и надежности являются наилучшим решением для изготовителей рекламы.
Оклейка авто

Сделайте свою авто-тюнинговую мастерскую совершенной с профессиональным оборудованием Roland.
Репродукции

Для печати репродукций и для оформления квартир, домов, офисных помещений и отелей — плоттеры Roland на экосольвентных и УФ-чернилах все чаще замещают широкоформатные принтеры на водных чернилах.