
Руководство
пользователя
RT-AC68U
3×3 Wireless-AC 1900 гигабитный роутер
8U

-
Contents
-
Table of Contents
-
Troubleshooting
-
Bookmarks
Quick Links
User Guide
RT-AC68U
Wireless-AC1900 Dual Band Gigabit Router
Related Manuals for Asus RT-AC68U
Summary of Contents for Asus RT-AC68U
-
Page 1: User Guide
User Guide RT-AC68U Wireless-AC1900 Dual Band Gigabit Router…
-
Page 2
Product warranty or service will not be extended if: (1) the product is repaired, modified or altered, unless such repair, modification of alteration is authorized in writing by ASUS; or (2) the serial number of the product is defaced or missing. -
Page 3: Table Of Contents
Table of contents Getting to know your wireless router Welcome! ………………6 Package contents ……………..6 Your wireless router …………..7 Positioning your router …………..9 Setup Requirements …………..10 Router Setup …………….11 1.6.1 Wired connection …………..11 1.6.2 Wireless connection ………….12 Getting started Logging into the Web GUI ………….
-
Page 4
Table of contents Using AiCloud …………….43 3.6.1 Cloud Disk …………….44 3.6.2 Smart Access …………….46 3.6.3 Smart Sync …………….47 Configuring the Advanced Settings Wireless ………………48 4.1.1 General ………………48 4.1.2 WPS ………………..51 4.1.3 Bridge ………………53 4.1.4 Wireless MAC Filter ……………55 4.1.5 RADIUS Setting …………..56 4.1.6 Professional …………….57 LAN ……………….. -
Page 5
Utilities Device Discovery …………… 85 Firmware Restoration ………….. 86 Setting up your printer server ……….87 5.3.1 ASUS EZ Printer Sharing ………….87 5.3.2 Using LPR to Share Printer ……….91 Download Master …………..96 5.4.1 Configuring Bit Torrent download settings ….97 5.4.2 NZB settings …………….98… -
Page 6: Getting To Know Your Wireless Router
Support CD ( Manual NOTES: • If any of the items are damaged or missing, contact ASUS for technical inquiries and support, Refer to the ASUS Support Hotline list at the back of this user manual. • Keep the original packaging material in case you would need future…
-
Page 7: Your Wireless Router
1.3 Your wireless router LAN 1~4 LED Off: No power or no physical connection. On: Has physical connection to a local area network (LAN). WAN (Internet) LED Off: No power or no physical connection. On: Has physical connection to a wide area network (WAN). USB 3.0 / 2.0 LED Off: No power or no physical connection.
-
Page 8: Specifications
WI-FI On/Off button Press this button to turn on /off the Wi-Fi connection. Power button On Off Press this button to power on or off the stystem. Power (DC-IN) port Insert the bundled AC adapter into this port and connect your router to a power source. USB 3.0 / 2.0 ports Insert USB .0 / .0 devices such as USB hard disks or USB flash drives into these ports.
-
Page 9: Positioning Your Router
• Always update to the latest firmware. Visit the ASUS website at http://www.asus.com to get the latest firmware updates. • To ensure the best wireless signal, orient the three detachable antennas as shown in the drawing below.
-
Page 10: Setup Requirements
1.5 Setup Requirements To set up your wireless network, you need a computer that meets the following system requirements: • Ethernet RJ-45 (LAN) port (10Base-T/100Base-TX/ 1000BaseTX) • IEEE 802.11a/b/g/n/ac wireless capability • An installed TCP/IP service • Web browser such as Internet Explorer, Firefox, Safari, or Google Chrome NOTES: •…
-
Page 11: Router Setup
Use a wired connection when setting up your wireless router to avoid possible setup problems. • Before setting up your ASUS wireless router, do the following: • If you are replacing an existing router, disconnect it from your network. • Disconnect the cables/wires from your existing modem setup. If your modem has a backup battery, remove it as well.
-
Page 12: Wireless Connection
WAN port. 4. Insert your modem’s AC adapter to the DC-IN port and plug it to a power outlet. 1.6.2 Wireless connection RT-AC68U Wall Power Outlet Power To set up your wireless router via wireless connection: 1. Insert your wireless router’s AC adapter to the DC-IN port and plug it to a power outlet.
-
Page 13
3. Insert your modem’s AC adapter to the DC-IN port and plug it to a power outlet. 4. Install an IEEE 802.11a/b/g/n/ac WLAN adapter on your computer. NOTES: • For details on connecting to a wireless network, refer to the WLAN adapter’s user manual. -
Page 14: Getting Started
Getting started 2.1 Logging into the Web GUI Your ASUS Wireless Router comes with an intuitive web graphical user interface (GUI) that allows you to easily configure its various features through a web browser such as Internet Explorer, Firefox, Safari, or Google Chrome.
-
Page 15: Quick Internet Setup (Qis) With Auto-Detection
2.2 Quick Internet Setup (QIS) with Auto- detection The Quick Internet Setup (QIS) function guides you in quickly setting up your Internet connection. NOTE: When setting the Internet connection for the first time, press the Reset button on your wireless router to reset it to its factory default settings.
-
Page 16
2. The wireless router automatically detects if your ISP connection type is Dynamic IP, PPPoE, PPTP, L2TP, and Static IP. Key in the necessary information for your ISP connection type. IMPORTANT! Obtain the necessary information from your ISP about the Internet connection type. for Automatic IP (DHCP) for PPPoE, PPTP, and L2TP… -
Page 17
for Static IP NOTES: • The auto-detection of your ISP connection type takes place when you configure the wireless router for the first time or when your wireless router is reset to its default settings. If QIS failed to detect your Internet connection type, click Skip to •… -
Page 18
4. Your Internet and wireless settings are displayed. Click Next to continue. 5. Read the wireless network connection tutorial. When done, click Finish. -
Page 19: Connecting To Your Wireless Network
2.3 Connecting to your wireless network After setting up your wireless router via QIS, you can connect your computer or other smart devices to your wireless network. To connect to your network: 1. On your computer, click the network icon in the notification area to display the available wireless networks.
-
Page 20: Configuring The General Settings
Configuring the General settings 3.1 Using the Network Map Network Map allows you to configure your network’s security settings, manage your network clients, and monitor your USB device.
-
Page 21: Setting Up The Wireless Security Settings
3.1.1 Setting up the wireless security settings To protect your wireless network from unauthorized access, you need to configure its security settings. To set up the wireless security settings: 1. From the navigation panel, go to General > Network Map. .
-
Page 22: Managing Your Network Clients
. From the Security Level dropdown list, select the encryption method for your wireless network. IMPORTANT! The IEEE 802.11n/ac standard prohibits using High Throughput with WEP or WPA-TKIP as the unicast cipher. If you use these encryption methods, your data rate will drop to IEEE 802.11g 54Mbps connection.
-
Page 23: Monitoring Your Usb Device
3.1.3 Monitoring your USB device The ASUS Wireless Router provides two USB ports for connecting USB devices or USB printer to allow you to share files and printer with clients in your network. NOTES: • To use this feature, you need to plug a USB storage device, such as a USB hard disk or USB flash drive, to the USB 3.0/2.0 ports on the rear…
-
Page 24
IMPORTANT! You first need to create a share account and its permission /access rights to allow other network clients to access the USB device via an FTP site/third-party FTP client utility, Servers Center, Samba, or AiCloud. For more details, refer to the section 3.5.Using the USB Application and 3.6 Using AiCloud in this user manual. -
Page 25
Safely removing the USB disk IMPORTANT: Incorrect removal of the USB disk may cause data corruption. To safely remove the USB disk: 1. From the navigation panel, go to General > Network Map. > Eject USB disk. When 2. In the upper right corner, click the USB disk is ejected successfully, the USB status shows Unmounted. -
Page 26: Creating A Guest Network
The Guest Network provides temporary visitors with Internet connectivity via access to separate SSIDs or networks without providing access to your private network. NOTE: RT-AC68U supports up to six SSIDs (three 2.4GHz and three 5GHz SSIDs). To create a guest network: 1.
-
Page 27
4. To configure additional options, click Modify. 5. Click Yes on the Enable Guest Network screen. 6. Assign a wireless name for your temporary network on the Network Name (SSID) field. 7. Select an Authentication Method. 8. Select an Encryption method. 9. -
Page 28: Using The Traffic Manager
3.3 Using the Traffic Manager 3.3.1 Managing QoS (Quality of Service) Bandwidth Quality of Service (QoS) allows you to set the bandwidth priority and manage network traffic. To set up bandwidth priority: 1. From the navigation panel, go to General > Traffic Manager > QoS tab.
-
Page 29
4. On the user-defined QoS rules page, there are four default online service types – web surf, HTTPS and file transfers. Select your preferred service, fill in the Source IP or MAC, Destination Port, Protocol, Transferred and Priority, then click Apply. The information will be configured in the QoS rules screen. -
Page 30
5. On the User-defined Priority page, you can prioritize the network applications or devices into five levels from the user- defined QoS rules’ dropdown list. Based on priority level, you can use the following methods to send data packets: • Change the order of upstream network packets that are sent to the Internet. -
Page 31: Monitoring Traffic
3.3.2 Monitoring Traffic The traffic monitor function allows you to access the bandwidth usage and speed of your Internet, wired, and wireless networks. It allows you to monitor network traffic even on a daily basis. Note: Packets from the Internet are evenly transmitted to the wired and wireless devices.
-
Page 32: Setting Up Parental Control
3.4 Setting up Parental Control Parental Control allows you to control the Internet access time. Users can set the time limit for a client’s network usage. To use the parental control function: 1. From the navigation panel, go to General > Parental control. 2.
-
Page 33: Using The Usb Application
USB hard disk or USB flash drive, in the USB 2.0 port on the rear panel of your wireless router. Ensure that the USB storage device is formatted and partitioned properly. Refer to the ASUS website at http://event.asus.com/2009/networks/disksupport/ for the file system support table.
-
Page 34
3. Select the access rights that you want to assign to the clients accessing your shared data. 4. Create your domain name via the ASUS DDNS services, read the Terms of Service and then select I will use the service and accept the Terms of service and key in your domain name. -
Page 35: Using Servers Center
Servers Center. Using Media Server Your wireless router allows DLNA-supported devices to access multimedia files from the USB disk connected to your wireless router. NOTE: Before using the DLNA Media Server function, connect your device to the RT-AC68U’s network.
-
Page 36
To launch the Media Server setting page, go to General > USB application > Servers Center > Media Servers tab. Refer to the following for the descriptions of the fields: • Enable DLNA Media Server: Select ON/OFF to enable/ disable the DLNA Media Server. Enable iTunes Server?: Select ON/OFF to enable/disable the iTunes Server. -
Page 37
2. Follow the steps below to add, delete, or modify an account. To create a new account: a) Click to add new account. b) In the Account and Password fields, key in the name and password of your network client. Retype the password to confirm. -
Page 38
3. From the list of folders, select the type of access permission that you want to assign for specific folders: • R/W: Select this option to assign read/write access. • R: Select this option to assign read-only access. • No: Select this option if you do not want to share a specific file folder. -
Page 39
To use FTP Share service: Ensure that you have set up your FTP server through NOTES: AiDisk. For more details, refer to the section 3.5.1 Using AiDisk. 1. From the navigation panel, click General > USB application > Servers Center > FTP Share tab. 2. -
Page 40
Miscellaneous setting Miscellaneous setting allows you to configure other settings for the USB disk, including the maximum number of user logins, the device name, work group, and character set used on the FTP server. To configure Miscellaneous settings: 1. From the navigation panel, click General > USB application > Servers Center >… -
Page 41: G/4G
• Work Group Assigns the name of the local RT-AC68U network as seen in Network Neighborhood. NOTE: For Device Name and Work Group, the standard input characters include letters (a-z, A-Z), digits (0-9), space, underscores(_), and hyphens(-). The first and last character should not contain any spaces.
-
Page 42
To set up 3G/4G internet access: 1. From the navigation panel, click General > USB application > 3G/4G. 2. In the Enable USB Modem field, select Yes. 3. Set up the following: • Location: Select your 3G/4G service provider’s location from the dropdown list. -
Page 43: Using Aicloud
To use AiCloud: 1. From Google Play Store or Apple Store, download and install the ASUS AiCloud app to your smart device. 2. Connect your smart device to your network. Follow the instructions to complete the AiCloud setup process.
-
Page 44: Cloud Disk
1. Insert a USB storage device into the wireless router. 2. Turn on Cloud Disk. 3. Go to https://router.asus.com and enter the router login account and password. For better user experience, we recommend that you use Google Chrome or Firefox.
-
Page 45
4. You can now start accessing Cloud Disk files on devices connected to the network. NOTE: When accessing the devices that are connected to the network, you need to enter the device’s user name and password manually, which will not be saved by AiCloud for security reason. -
Page 46: Smart Access
The Smart Access function allows you to easily access your home network via your router’s domain name. NOTES: • You can create a domain name for your router with ASUS DDNS. For more details, refer to section 4.3.5 DDNS. • By default, AiCloud provides a secure HTTPS connection. Key in https://[yourASUSDDNSname].asuscomm.com for a very secure…
-
Page 47: Smart Sync
1. Launch AiCloud, click Smart Sync > Go. 2. Select ON to enable Smart Sync. 3. Click Add new account. 4. Enter your ASUS WebStorage account password and select the directory that you want to sync with WebStorage. 5. Click Apply.
-
Page 48: Configuring The Advanced Settings
Configuring the Advanced Settings 4.1 Wireless 4.1.1 General The General tab allows you to configure the basic wireless settings. To configure the basic wireless settings: 1. From the navigation panel, go to Advanced Settings > Wireless > General tab. 2. Select 2.4GHz or 5GHz as the frequency band for your wireless network.
-
Page 49
4. In the Hide SSID field, select Yes to prevent wireless devices from detecting your SSID. When this function is enabled, you would need to enter the SSID manually on the wireless device to access the wireless network. 5. Select any of these wireless mode options to determine the types of wireless devices that can connect to your wireless router: •… -
Page 50
• WPA/WPA2 Personal/WPA Auto-Personal: This option provides strong security. You can use either WPA (with TKIP) or WPA2 (with AES). If you select this option, you must use TKIP + AES encryption and enter the WPA passphrase (network key). • WPA/WPA2 Enterprise/WPA Auto-Enterprise: This option provides very strong security. -
Page 51: Wps
4.1.2 WPS WPS (Wi-Fi Protected Setup) is a wireless security standard that allows you to easily connect devices to a wireless network. You can configure the WPS function via the PIN code or WPS button. NOTE: Ensure that the devices support WPS. To enable WPS on your wireless network: 1.
-
Page 52
NOTE: WPS supports authentication using Open System, WPA-Personal, and WPA2-Personal. WPS does not support a wireless network that uses a Shared Key, WPA-Enterprise, WPA2-Enterprise, and RADIUS encryption method. 3. In the WPS Method field, select Push Button or Client PIN code. -
Page 53: Bridge
ASUS wireless router. It can also be considered as a wireless repeater where your ASUS wireless router communicates with another access point and other wireless devices.
-
Page 54
• HYBRID: Enables the Wireless Bridge feature and allows other wireless devices/stations to connect to the router. NOTE: In Hybrid mode, wireless devices connected to the ASUS wireless router will only receive half the connection speed of the Access Point. -
Page 55: Wireless Mac Filter
4.1.4 Wireless MAC Filter Wireless MAC filter provides control over packets transmitted to a specified MAC (Media Access Control) address on your wireless network. To set up the Wireless MAC filter: 1. From the navigation panel, go to Advanced Settings > Wireless >…
-
Page 56: Radius Setting
4.1.5 RADIUS Setting RADIUS (Remote Authentication Dial In User Service) Setting provides an extra layer of security when you choose WPA- Enterprise, WPA2-Enterprise, or Radius with 802.1x as your Authentication Mode. To set up wireless RADIUS settings: 1. Ensure that the wireless router’s authentication mode is set to WPA-Enterprise, WPA2-Enterprise, or Radius with 802.1x.
-
Page 57: Professional
4.1.6 Professional The Professional screen provides advanced configuration options. NOTE: We recommend that you use the default values on this page. In the Professional Settings screen, you can configure the following: • Frequency: Select the frequency band that the professional settings will be applied to.
-
Page 58
• Date to Enable Radio (weekend): You can specify which days of the weekend wireless networking is enabled. • Time of Day to Enable Radio: You can specify a time range when wireless networking is enabled during the weekend. • Set AP isolated: The Set AP isolated item prevents wireless devices on your network from communicating with each other. -
Page 59: Lan
• Wireless multicast forwarding: Select Enable to allow the wireless router to forward multicast traffic to other wireless devices that support multicast. Select Disable to prevent the router from forwarding multicast transmissions. • Enable WMM APSD: Enable WMM APSD (Wi-Fi Multimedia Automatic Power Save Delivery) to improve power management between wireless devices.
-
Page 60: Dhcp Server
To modify the LAN IP settings: 1. From the navigation panel, go to Advanced Settings > LAN > LAN IP tab. 2. Modify the IP address and Subnet Mask. 3. When done, click Apply. 4.2.2 DHCP Server Your wireless router uses DHCP to assign IP addresses automatically on your network.
-
Page 61
3. In the Domain Name text box, enter a domain name for the wireless router. 4. In the IP Pool Starting Address field, key in the starting IP address. 5. In the IP Pool Ending Address field, key in the ending IP address. -
Page 62: Route
4.2.3 Route If your network makes use of more than one wireless router, you can configure a routing table to share the same Internet service. NOTE: We recommend that you do not change the default route settings unless you have advanced knowledge of routing tables. To configure the LAN Routing table: 1.
-
Page 63: Iptv
4.2.4 IPTV The wireless router supports connection to IPTV services through an ISP or a LAN. The IPTV tab provides the configuration settings needed to set up IPTV, VoIP, multicasting, and UDP for your service. Contact your ISP for specific information regarding your service.
-
Page 64: Wan
4.3 WAN 4.3.1 Internet Connection The Internet Connection screen allows you to configure the settings of various WAN connection types. To configure the WAN connection settings: 1. From the navigation panel, go to Advanced Settings > WAN > Internet Connection tab. 2.
-
Page 65
Enable NAT: NAT (Network Address Translation) is a system • where one public IP (WAN IP) is used to provide Internet access to network clients with a private IP address in a LAN. The private IP address of each network client is saved in a NAT table and is used to route incoming data packets. -
Page 66
• Contact your ISP and update the MAC address associated with your ISP service. • Clone or change the MAC address of the ASUS wireless router to match the MAC address of the previous networking device recognized by the ISP. -
Page 67: Port Trigger
4.3.2 Port Trigger Port range triggering opens a predetermined incoming port for a limited period of time whenever a client on the local area network makes an outgoing connection to a specified port. Port triggering is used in the following scenarios: •…
-
Page 68
• Trigger Port: Specify a trigger port to open the incoming port. Protocol: Select the protocol, TCP, or UDP. • Incoming Port: Specify an incoming port to receive inbound • data from the Internet. Protocol: Select the protocol, TCP, or UDP. •… -
Page 69: Virtual Server/Port Forwarding
Forwarding on your router allows PCs outside the network to access specific services provided by a PC in your network. NOTE: When port forwarding is enabled, the ASUS router blocks unsolicited inbound traffic from the Internet and only allows replies from outbound requests from the LAN.
-
Page 70
2. Configure the following settings below. When done, click Apply. Enable Port Forwarding: Choose Yes to enable Port • Forwarding. Famous Server List: Determine which type of service you • want to access. Famous Game List: This item lists ports required for popular •… -
Page 71
You will need a client outside your LAN but has Internet access (referred to as “Internet client”). This client should not be connected to the ASUS router. • On the Internet client, use the router’s WAN IP to access the server. -
Page 72: Dmz
4.3.4 DMZ Virtual DMZ exposes one client to the Internet, allowing this client to receive all inbound packets directed to your Local Area Network. Inbound traffic from the Internet is usually discarded and routed to a specific client only if port forwarding or a port trigger has been configured on the network.
-
Page 73: Ddns
DNS name rather than WAN IP address. Server and Host Name: Choose ASUS DDNS or other DDNS. • If you want to use ASUS DDNS, fill in the Host Name in the format of xxx.asuscomm.com (xxx is your host name). •…
-
Page 74: Nat Passthrough
Enable wildcard: Enable wildcard if your DDNS service • requires one. NOTES: DDNS service will not work under these conditions: • When the wireless router is using a private WAN IP address (192.168. x.x, 10.x.x.x, or 172.16.x.x), as indicated by a yellow text. •…
-
Page 75: Ipv6
4.4 IPv6 This wireless router supports IPv6 addressing, a system that supports more IP addresses. This standard is not yet widely available. Contact your ISP if your Internet service supports IPv6. To set up IPv6: 1. From the navigation panel, go to Advanced Settings > IPv6. 2.
-
Page 76: Vpn Server
4.5 VPN Server VPN (Virtual Private Network) provides a secure communication to a remote computer or remote network using a public network such as the Internet. NOTE: Before setting up a VPN connection, you would need the IP address or domain name of the VPN server you are trying to access. To set up access to a VPN server: 1.
-
Page 77: Firewall
4.6 Firewall The wireless router can serve as a hardware firewall for your network. NOTE: The Firewall feature is enabled by default. 4.6.1 General To set up basic Firewall settings: 1. From the navigation panel, go to Advanced Settings > Firewall >…
-
Page 78: Keyword Filter
To set up a URL filter: 1. From the navigation panel, go to Advanced Settings > Firewall > URL Filter tab. 2. On the Enable URL Filter field, select Enabled. 3. Enter a URL and click the button. 4. Click Apply. 4.6.3 Keyword filter Keyword filter blocks access to webpages containing specified keywords.
-
Page 79: Network Services Filter
3. Enter a word or phrase and click the Add button. 4. Click Apply. NOTES: • The Keyword Filter is based on a DNS query. If a network client has already accessed a website such as http://www.abcxxx.com, then the website will not be blocked (a DNS cache in the system stores previously visited websites).
-
Page 80
To set up a Network Service filter: 1. From the navigation panel, go to Advanced Settings > Firewall > Network Service Filter tab. 2. On the Enable Network Services Filter field, select Yes. 3. Select the Filter table type. Black List blocks the specified network services. -
Page 81: Administration
4.7 Administration 4.7.1 Operation Mode The Operation Mode page allows you to select the appropriate mode for your network. To set up the operating mode: 1. From the navigation panel, go to Advanced Settings > Administration > Operation Mode tab. 2.
-
Page 82: System
4.7.2 System The System page allows you to configure your wireless router settings. To set up the System settings: 1. From the navigation panel, go to Advanced Settings > Administration > System tab. 2. You can configure the following settings: •…
-
Page 83: Firmware Upgrade
4.7.3 Firmware Upgrade NOTE: Download the latest firmware from the ASUS website at http://www.asus.com To upgrade the firmware: 1. From the navigation panel, go to Advanced Settings > Administration > Firmware Upgrade tab. 2. In the New Firmware File field, click Browse to locate the downloaded file.
-
Page 84: System Log
4.8 System Log System Log contains your recorded network activities. NOTE: System log resets when the router is rebooted or powered off. To view your system log: 1. From the navigation panel, go to Advanced Settings > System Log. 2. You can view your network activities in any of these tabs: •…
-
Page 85: Utilities
• The utilities are not supported on MAC OS. 5.1 Device Discovery Device Discovery is an ASUS WLAN utility that detects an ASUS wireless router device, and allows you to configure the wireless networking settings. To launch the Device Discovery utility: •…
-
Page 86: Firmware Restoration
5.2 Firmware Restoration Firmware Restoration is used on an ASUS Wireless Router that failed during its firmware upgrading process. It uploads the firmware that you specify. The process takes about three to four minutes. IMPORTANT: Launch the rescue mode on the router before using the Firmware Restoration utility.
-
Page 87: Setting Up Your Printer Server
5.3 Setting up your printer server 5.3.1 ASUS EZ Printer Sharing ASUS EZ Printing Sharing utility allows you to connect a USB printer to your wireless router’s USB port and set up the print server. This allows your network clients to print and scan files…
-
Page 88
NOTE: The print server function is supported on Windows® XP, Windows® Vista, and Windows® 7. To set up the EZ Printer sharing mode: 1. From the navigation panel, go to General > USB Application > Network Printer Server. 2. Click Download Now! to download the network printer utility. NOTE: Network printer utility is supported on Windows®… -
Page 89
4. Follow the onscreen instructions to set up your hardware, then click Next. 5. Wait a few minutes for the initial setup to finish. Click Next. 6. Click Finish to complete the installation. -
Page 90
7. Follow the Windows OS instructions to install the printer driver. ® 8. After the printer’s driver installation is complete, network clients can now use the printer. -
Page 91: Using Lpr To Share Printer
5.3.2 Using LPR to Share Printer You can share your printer with computers running on Windows® and MAC operating system using LPR/LPD (Line Printer Remote/ Line Printer Daemon). Sharing your LPR printer To share your LPR printer: 1. From the Windows® desktop, click Start > Devices and Printers >…
-
Page 92
3. Select Create a new port then set Type of Port to Standard TCP/IP Port. Click New Port. 4. In the Hostname or IP address field, key in the IP address of the wireless router then click Next. -
Page 93
5. Select Custom then click Settings. 6. Set Protocol to LPR. In the Queue Name field, key in LPRServer then click OK to continue. -
Page 94
7. Click Next to finish setting up the standard TCP/IP port. 8. Install the printer driver from the vendor-model list. If your printer is not in the list, click Have Disk to manually install the printer drivers from a CD-ROM or file. -
Page 95
9. Click Next to accept the default name for the printer. Click Finish to complete the installation. -
Page 96: Download Master
5.4 Download Master Download Master is a utility that helps you download files even while your laptops or other devices are switched off. NOTE: You need a USB device connected to the wireless router to use Download Master. To use Download Master: 1.
-
Page 97: Configuring Bit Torrent Download Settings
5. Use the navigation panel to configure the advanced settings. 5.4.1 Configuring Bit Torrent download settings To configure BitTorrent download settings: 1. From Download Master’s navigation panel, click Bit Torrent to launch the Bit Torrent Setting page. 2. Select a specific port for your download task. 3.
-
Page 98: Nzb Settings
5.4.2 NZB settings You can set up a USENET server to download NZB files. After entering USENET settings, Apply.
-
Page 99: Troubleshooting
1. Launch the Web GUI. Go to Advanced Settings > Administration > Firmware Upgrade tab. Click Check to verify if the latest firmware is available. 2. If the latest firmware is available, visit the ASUS global website at http://www.asus.com/Networks/Wireless_Routers/RTAC68U/ #download to download the latest firmware.
-
Page 100
Check if your network settings are correct. • Each client on the network should have a valid IP address. ASUS recommends that you use the wireless router’s DHCP server to assign IP addresses to computers on your network. -
Page 101
• Some cable modem service providers require you to use the MAC address of the computer initially registered on the account. You can view the MAC address in the web GUI, Network Map > Clients page, and hover the mouse pointer over your device in Client Status. -
Page 102: Frequently Asked Questions (Faqs)
6.2 Frequently Asked Questions (FAQs) I cannot access the router GUI using a web browser • If your computer is wired, check the Ethernet cable connection and LED status as described in the previous section. • Ensure that you are using the correct login information. The default factory login name and password is “admin/admin”.
-
Page 103
The client cannot establish a wireless connection with the router. NOTE: If you are having issues connecting to 5Ghz network, make sure that your wireless device supports 5Ghz or features dual band capabilities. • Out of Range: • Move the router closer to the wireless client. •… -
Page 104
• SSID has been hidden. If your device can find SSIDs from other routers but cannot find your router’s SSID, go to Advanced Settings > Wireless > General, select No on Hide SSID, and select Auto on Control Channel. • If you are using a wireless LAN adapter, check if the wireless channel in use conforms to the channels available in your country/area. -
Page 105
Internet is not accessible. • Check if your router can connect to your ISP’s WAN IP address. To do this, launch the web GUI and go to General> Network Map, and check the Internet Status. • If your router cannot connect to your ISP’s WAN IP address, try restarting your network as described in the section Restart your network in following sequence under Basic Troubleshooting. -
Page 106
The following are the factory default settings: User Name: admin Password: admin Enable DHCP: Yes (if WAN cable is plugged in) IP address: 192.168.1.1 Domain Name: (Blank) Subnet Mask: 255.255.255.0 DNS Server 1: 192.168.1.1 DNS Server 2: (Blank) SSID (2.4GHz): ASUS SSID (5GHz): ASUS_5G… -
Page 107
Firmware upgrade failed. Launch the rescue mode and run the Firmware Restoration utility. Refer to section 5.2 Firmware Restoration on how to use the Firmware Restoration utility. -
Page 108
Cannot access Web GUI Before configuring your wireless router, do the steps described in this section for your host computer and network clients. Disable the proxy server, if enabled. Windows ® 1. Click Start > Internet Explorer to launch the browser. 2. -
Page 109
MAC OS 1. From your Safari browser, click Safari > Preferences > Advanced > Change Settings… 2. From the Network screen, deselect FTP Proxy and Web Proxy (HTTP). 3. Cllick Apply Now when done. NOTE: Refer to your browser’s help feature for details on disabling the proxy server. -
Page 110
3. To obtain the IPv4 IP settings automatically, tick Obtain an IP address automatically. To obtain the IPv6 IP settings automatically, tick Obtain an IPv6 address automatically. 4. Click OK when done. MAC OS 1. Click the Apple icon located on the top left of your screen. -
Page 111
Disable the dial-up connection, if enabled. Windows ® 1. Click Start > Internet Explorer to launch the browser. 2. Click Tools > Internet options > Connections tab. 3. Tick Never dial a connection. 4. Click OK when done. NOTE: Refer to your browser’s help feature for details on disabling the dial-up connection. -
Page 112: Appendices
We believe in providing solutions for you to be able to responsibly recycle our products, batteries, other components, as well as the packaging materials. Please go to http://csr.asus. com/english/Takeback.htm for the detailed recycling information in different regions.
-
Page 113
against harmful interference in a residential installation. This equipment generates, uses and can radiate radio frequency energy and, if not installed and used in accordance with the instructions, may cause harmful interference to radio communications. However, there is no guarantee that interference will not occur in a particular installation. -
Page 114: Safety Information
Safety Information To maintain compliance with FCC’s RF exposure guidelines, this equipment should be installed and operated with minimum distance 20cm between the radiator and your body. Use on the supplied antenna. Declaration of Conformity for R&TTE directive 1999/5/EC Essential requirements – Article 3 Protection requirements for health and safety –…
-
Page 115
Radio Frequency (RF) Exposure Information The radiated output power of the ASUS Wireless Device is below the Industry Canada (IC) radio frequency exposure limits. The ASUS Wireless Device should be used in such a manner such that the potential for human contact during normal operation is minimized. -
Page 116
canadiennes ICES-003 et RSS-210. Son fonctionnement est soumis aux deux conditions suivantes: (1) cet appareil ne doit pas causer d’interférence et (2) cet appareil doit accepter toute interférence, notamment les interférences qui peuvent a ecter son fonctionnement. 警語 經型式認證合格之低功率射頻電機,非經許可,公司、商號或 使用者均不得擅自變更頻率、加大功率或變更原設計之特性及 功能。低功率射頻電機之使用不得影響飛航安全及干擾合法通… -
Page 117
Everyone is permitted to copy and distribute verbatim copies of this license document, but changing it is not allowed. Preamble The licenses for most software are designed to take away your freedom to share and change it. By contrast, the GNU General Public License is intended to guarantee your freedom to share and change free software—to make sure the software is free for all its users. -
Page 118
We protect your rights with two steps: (1) copyright the software, and (2) offer you this license which gives you legal permission to copy, distribute and/or modify the software. Also, for each author’s protection and ours, we want to make certain that everyone understands that there is no warranty for this free software. -
Page 119
of running the Program is not restricted, and the output from the Program is covered only if its contents constitute a work based on the Program (independent of having been made by running the Program). Whether that is true depends on what the Program does. -
Page 120
the program under these conditions, and telling the user how to view a copy of this License. (Exception: if the Program itself is interactive but does not normally print such an announcement, your work based on the Program is not required to print an announcement.) These requirements apply to the modified work as a whole. -
Page 121
cost of physically performing source distribution, a complete machine-readable copy of the corresponding source code, to be distributed under the terms of Sections 1 and 2 above on a medium customarily used for software interchange; or, c) Accompany it with the information you received as to the offer to distribute corresponding source code. -
Page 122
Therefore, by modifying or distributing the Program (or any work based on the Program), you indicate your acceptance of this License to do so, and all its terms and conditions for copying, distributing or modifying the Program or works based on it. -
Page 123
on consistent application of that system; it is up to the author/ donor to decide if he or she is willing to distribute software through any other system and a licensee cannot impose that choice. This section is intended to make thoroughly clear what is believed to be a consequence of the rest of this License. -
Page 124
NO WARRANTY 11 BECAUSE THE PROGRAM IS LICENSED FREE OF CHARGE, THERE IS NO WARRANTY FOR THE PROGRAM, TO THE EXTENT PERMITTED BY APPLICABLE LAW. EXCEPT WHEN OTHERWISE STATED IN WRITING THE COPYRIGHT HOLDERS AND/OR OTHER PARTIES PROVIDE THE PROGRAM “AS IS” WITHOUT WARRANTY OF ANY KIND, EITHER EXPRESSED OR IMPLIED, INCLUDING, BUT NOT LIMITED TO, THE IMPLIED WARRANTIES OF MERCHANTABILITY AND FITNESS FOR A PARTICULAR PURPOSE. -
Page 125
For Turkey only Authorised distributors in Turkey: BOGAZICI BIL GISAYAR SAN. VE TIC. A.S. Tel. No.: +90 212 3311000 Address: AYAZAGA MAH. KEMERBURGAZ CAD. NO.10 AYAZAGA/ISTANBUL CIZGI Elektronik San. Tic. Ltd. Sti. Tel. No.: +90 212 3567070 Address: CEMAL SURURI CD. HALIM MERIC IS MERKEZI No: 15/C D:5-6 34394 MECIDIYEKOY/ ISTANBUL KOYUNCU ELEKTRONiK BiLGi iSLEM SiST. -
Page 126: Asus Contact Information
ASUS COMPUTER INTERNATIONAL (America) Address 00 Corporate Way, Fremont, CA , USA Telephone +110 +1100 Website usa.asus.com Online support support.asus.com ASUS COMPUTER GmbH (Germany and Austria) Address Harkort Str. 1-, D-00 Ratingen, Germany Telephone +10010* +1011 Website www.asus.de Online contact www.asus.de/sales…
-
Page 127: Networks Global Hotline Information
Slovak Republic 00421-232162621 08:00-17:00 Mon-Fri Czech Republic 00420-596766888 08:00-17:00 Mon-Fri Switzerland-German 0041-848111010 09:00-18:00 Mon-Fri Switzerland-French 0041-848111014 09:00-18:00 Mon-Fri Switzerland-Italian 0041-848111012 09:00-18:00 Mon-Fri United Kingdom 0044-8448008340 09:00-17:00 Mon-Fri Ireland 0035-31890719918 09:00-17:00 Mon-Fri Russia and CIS 008-800-100-ASUS 09:00-18:00 Mon-Fri Ukraine 0038-0445457727 09:00-18:00 Mon-Fri…
-
Page 128
Networks Global Hotline Information Region Country Hotline Numbers Service Hours Australia 1300-278788 09:00-18:00 Mon-Fri New Zealand 0800-278788 09:00-18:00 Mon-Fri Japan 09:00-18:00 Mon-Fri 0800-1232787 09:00-17:00 Sat-Sun 09:00-18:00 Mon-Fri 0081-473905630 ( Non-Toll Free ) 09:00-17:00 Sat-Sun Korea 0082-215666868 09:30-17:00 Mon-Fri Thailand 0066-24011717 09:00-18:00 Mon-Fri 1800-8525201 Singapore… -
Page 129
00371-67408838 09:00-18:00 Mon-Fri Lithuania-Kaunas 00370-37329000 09:00-18:00 Mon-Fri Lithuania-Vilnius 00370-522101160 09:00-18:00 Mon-Fri NOTE: For more information, visit the ASUS support site at: http://support.asus.com ASUSTeK Computer Inc. Manufacturer: Tel: +886-2-2894-3447 Address: 4F, No. 150, LI-TE RD., PEITOU, TAIPEI 112, TAIWAN ASUS Computer GmbH…

Максим aka WisH
Высшее образование по специальности «Информационные системы». Опыт работы системным администратором — 5 лет.
Задать вопрос
Сегодня обсудим роутер Asus RT-AC68U. Этот беспроводной роутер по характеристикам и возможностям прилично отличается от списка из бюджетных моделей своих собратьев. Использовать его стоит в тех местах, где вам требуется хорошее качество связи и скорость. В небольших офисах или дома, если у вас стоит оборудование, которому требуется хорошая связь на большой скорости.
Содержание
- Обзор характеристик ASUS RT-AC68U
- Изменение прошивки роутера
- Настройка RT-AC68U
- Соединение с интернетом и авторизация
- Смена пароля
- Включение Wi-Fi
- Особенности PPPoE, DHCP и L2TP подключения
- Интернет через VPN
- Инструкция по очистке NVRAM
- Отзывы пользователей маршрутизатора
Обзор характеристик ASUS RT-AC68U
Выпускается в двух вариантах. В первом случае имеет белый корпус и приставку White к названию, а во втором случае выходит в черном варианте. В комплектацию входит роутер, инструкция, кабель и диск с драйверами.
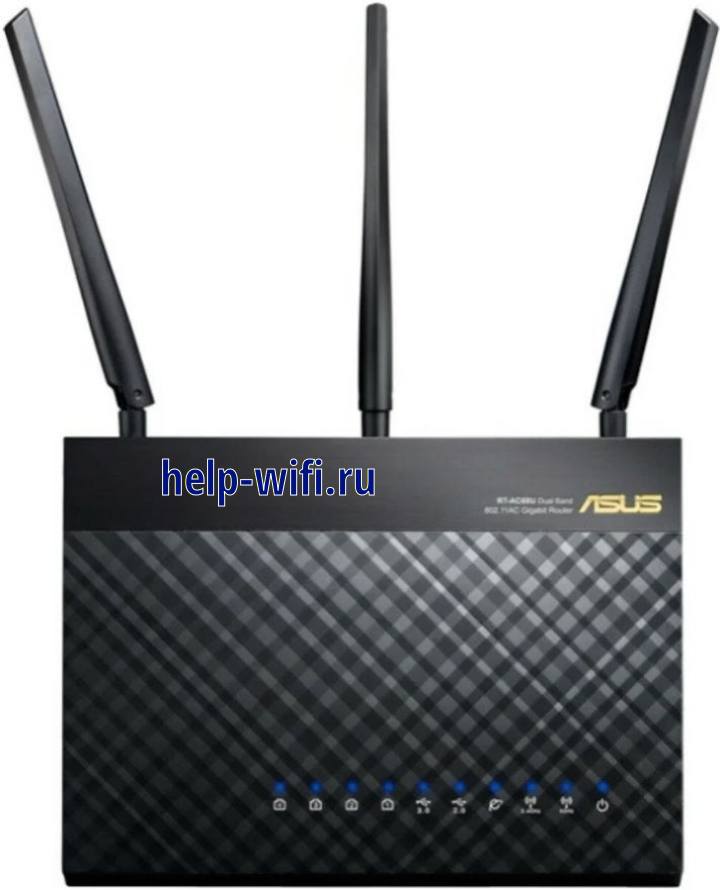
Маршрутизатор обладает следующими характеристиками:
- Тип связи: Wi-Fi;
- Подключение к интернету (WAN): Ethernet RJ-45, внешний модем;
- Стандарт Wi-Fi: 802.11a (Wi-Fi 2), ac (Wi-Fi 5), b (Wi-Fi 1), g (Wi-Fi 3), n (Wi-Fi 4);
- Частотный диапазон устройств Wi-Fi: 2.4 / 5 ГГц (одновременная работа);
- Макс. скорость беспроводного соединения: 1900 Мбит/с;
- Антенны: 3 внешн.;
- Функции и особенности: UPnP AV-сервер, WDS, поддержка IPv6, поддержка Mesh Wi-Fi, режим моста, режим репитера (повторителя);
- Маршрутизация: DHCP-сервер, NAT, SPI, демилитаризованная зона (DMZ), межсетевой экран (Firewall), поддержка Dynamic DNS, статическая маршрутизация, DNS сервер;
- VPN: IPSec, L2TP, PPTP, VPN Endpoint;
- ОЗУ: 256 MB RAM;
- Память: 128 MB Flash;
- USB: USB 2.0 x 1, USB 3.0 x 1;
- Порты: RJ45 for 10/100/1000/Gigabits BaseT for LAN x 4, RJ45 for 10/100/1000/Gigabits BaseT for WAN x 1.
Как вы можете сами посмотреть по характеристикам, он соответствует последним стандартам. Не будет проблем с включением в сеть любых устройств, которые поддерживают перечисленные параметры. По проводному подключению есть даже запас, потому что гигабитный интернет в нашей стране еще редко заходит в дома по такому проводу. По оптическому кабелю такая скорость еще встречается, а вот по витой паре пока что нет.

Роутер может использовать и резервные каналы связи, чтобы защититься от внезапного обрыва. Можно подключить 4G модем и использовать его для создания резервного канала связи. Наличие второго разъема позволит подключить флешку или другой накопитель, так что из маршрутизатора можно сделать файловый сервер и использовать его для хранения важных данных или медиа-контента.
Главным бонусом заявлена поддержка AirMesh. Этот роутер сможет быть передающим и ретранслирующим узлом в сети. Его можно подключить к интернету и поставить на раздачу или использовать как ретранслятор. Данная особенность пригодится в больших домах, где нужно обеспечить покрытие большой площади и бесшовную связь в пределах одной сети.
Изменение прошивки роутера
Сейчас последняя доступная версия прошивки v3 с большим количеством цифр после, которые обозначают конкретный патч. На асусы часто устанавливают кастомные прошивки, потому что оригинальные не всегда работают хорошо. В любом случае вам потребуется зайти на официальный сайт и скачать оттуда последнюю версию микропрограммы или загрузить прошивку из другого места.
Рассказывать про само подключение здесь не будем, это есть в следующем разделе. Если вы интересуетесь прошивкой, то нужные настройки располагаются в разделе Администрирование -> Система. Нажмите на раздел «Обновление микропрограммы», он располагается в правой части экрана сверху.
Здесь располагаются все инструменты для прошивки. Вы можете нажать на «Проверить», чтобы узнать версию прошивки доступную на сайте и скачать её автоматически или приложить файл, используя кнопку «Обзор».
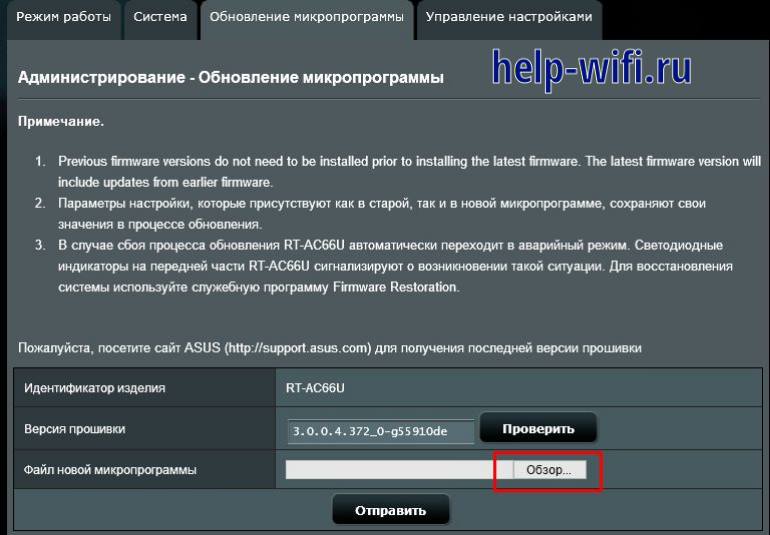
Первый метод подойдет для установки официальных обновлений. Второй способ позволит установить чью-то самодельную прошивку или даже обновление с меньшей версией. Используйте этот режим с неофициальными прошивками на свой страх и риск, если она не подойдут, то придется восстанавливать роутер.
Настройка RT-AC68U
Сначала установите роутер в том месте, где он не будет вам мешать, а провода к нему будут подходить свободно. Там не должно быть влажно или сыро. После этого подключите все провода: от провайдера, от компьютера и от остальной техники.
Если вы планируете делать бесшовную сеть, то расположите репитеры так, чтобы они находились в зоне уверенного приему сигнала от роутера.
Соединение с интернетом и авторизация
На самом компьютере откройте «Центр управления сетями и общим доступом», щелкнув правой кнопкой мыши по значку компьютера в трее. Потом перейдите в «Параметры адаптера», здесь выберите активное подключение, щелкните по нему правой кнопкой мыши и выберите «Свойства». Откроется новое окно, найдите там строку IPv4 и дважды щелкните по ней. Здесь поставьте автоматическое получение данных или проставьте такие же данные, как на экране.
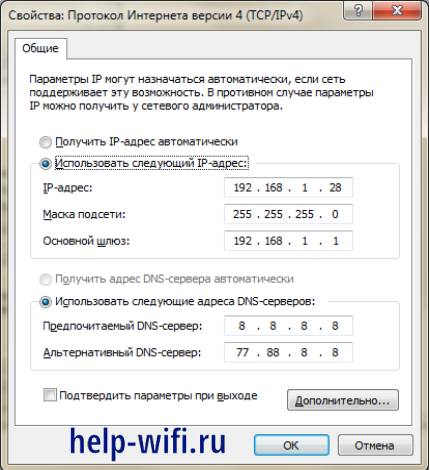
Чтобы перейти в веб-интерфейс, наберите в адресной строке браузера router.asus.com или 192.168.1.1. Для авторизации используйте следующие данные:
- Имя пользователя — admin
- Пароль — admin
Воспользоваться кнопкой WPS на маршрутизаторе для подключения к беспроводной сети не получится, потому что у Асусов такой функции пока что нет. Будем надеяться, что в следующих моделях станет доступна быстрая авторизация через беспроводную сеть и настройка через неё же.

После входа в верхнем правом углу найдите название языка, щелкните по нему и выберите из выпадающего списка «Русский».
Смена пароля
Пароль, да и имя пользователя стоит поменять. Стандартные значения известны все, а значит, что попасть на ваше устройство будет не так уж сложно. Смена и того и другого значения позволит повысить уровень безопасности.
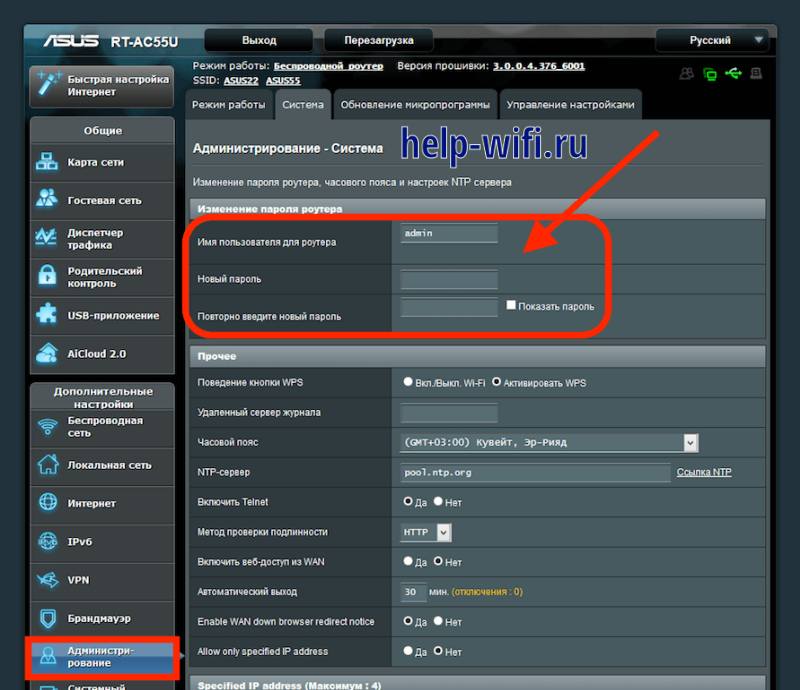
Зайдите в раздел веб-интерфейса «Администрирование». Его можно найти в дополнительных или системных настройках, обычно к нему переходят из левой колонки меню. Заполнить поля «Пароль», «Имя пользователя» и сохранить информацию. Страница перезагрузится. Так что придется ввести данные для нового входа.
В этом же разделе проведите настройку даты и времени. Данные для вайфая задаются отдельно, так что о них поговорим в следующем разделе.
Включение Wi-Fi
Теперь поговорим о том, как настроить беспроводную сеть. Не всегда удобно пользоваться проводным подключением, поэтому настройка вайфая идет одним из первых пунктов. После создания нужных сетей, подключайтесь с телефона или ноутбука и заканчивайте настройку.
Роутер двухдиапазонный, поэтому и настройку придется проводить два раза.
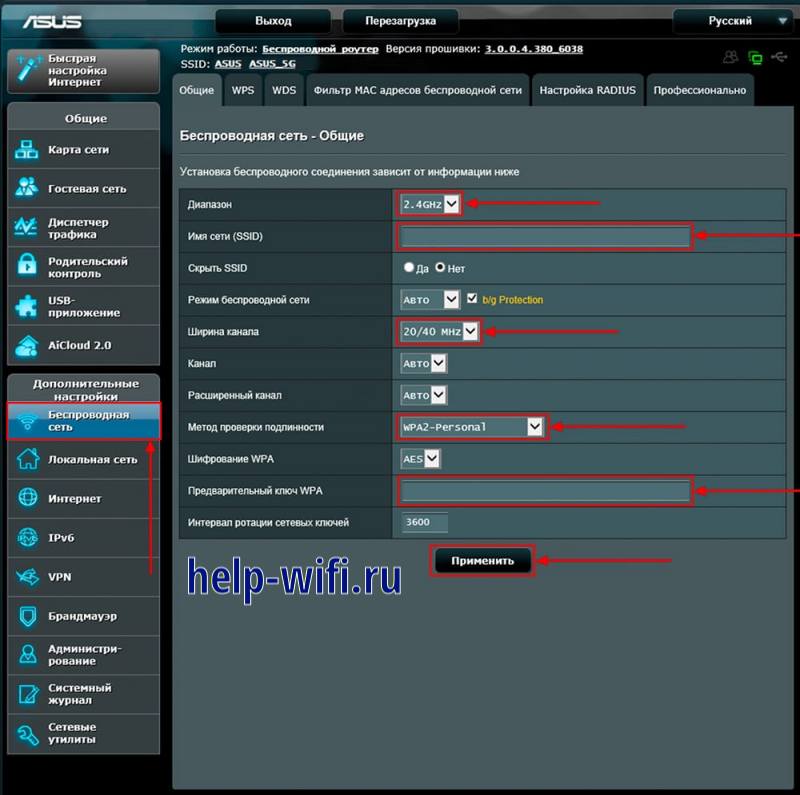
- В левом столбце ищем «Беспроводная сеть» и нажимает на этот пункт меню.
- С правой стороны найдите раздел «Диапазон», он расположен в самом верху и выберите «2,4GHz».
- В графе «SSID» укажите название для вашей сетки. Так как будет два диапазона, то лучше использовать отличающиеся имена или дописывать в конце частоту, например: «imya seti 2.4». Если старые приборы, которые просто не смогут подключиться к 5 ГГц, поэтому такую беспроводную сеть стоит создать.4. «Ширина канала» — 20 MHz.
- » — WPA2-Personal» поставьте для задания пароля.
- В поле «Предварительный ключ WPA» напишите свой будущий пароль от этой сети. Никто не мешает сделать вам его одинаковым для всех сетей, хотя это и не рекомендуется. После жмем «Применить».
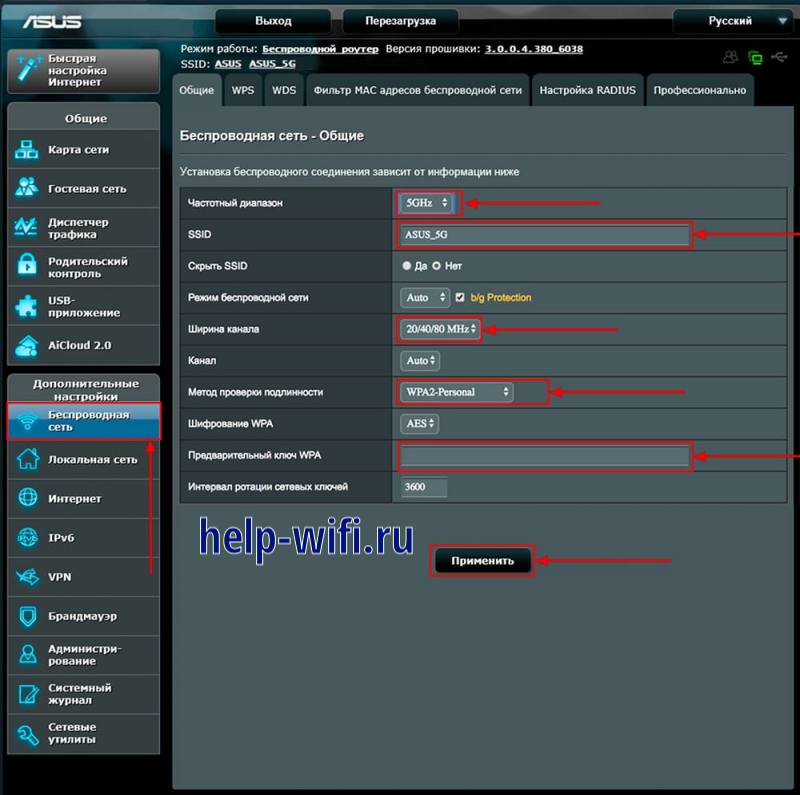
- Переходим к строчке «диапазон» выбираем «5GHz».
- В графе «SSID» снова укажите имя, если пошли по посоветованной схеме, то оно будет выглядеть так: «imya seti 5».
- «Ширина канала» — 20/40/80 MHz.
- «Метод проверки подлинности» — WPA2-Personal», здесь нет отличий от предыдущей части.
- В поле «Предварительный ключ WPA» стоит ввести пароль от новой беспроводной сети. Осталось нажать на «Применить» и завершить настройку.
Особенности PPPoE, DHCP и L2TP подключения
Теперь перейдем уже к настройке подключения к интернету. Здесь все зависит не только от провайдера, но и от региона. Бывает так, что в разных регионах способы подключения различаются, поэтому, если возникают вопросы, лучше идти на сайт провайдера по вашей области и искать инструкцию там. Здесь приведем распространенные способы подключения и их настройки.
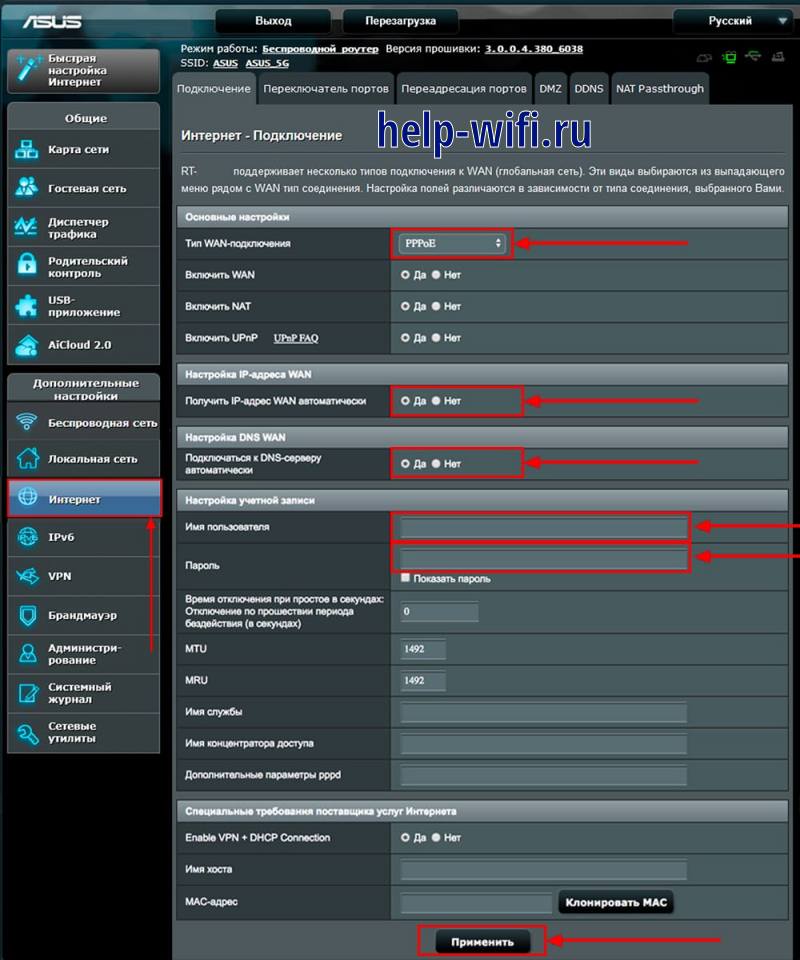
Поговорим про PPPoE, здесь алгоритм настройки следующий:
- В левом меню ищем «Интернет» и нажимаем на него.
- В «Тип WAN-подключения» выбираем «PPPOE».
- «Получить IP-адрес WAN автоматически» и «Подключаться к DNS-серверу автоматически» выбираем «Да». Если у вас по настройкам требуется статическое подключение, то поставьте «Нет», появится еще строчке, в которые и введете нужные параметры.
- Дальше остается раздел со строками «Имя пользователя», «Пароль». Это вам должен выдать провайдер, так что посмотрите в договоре, если таких данных нет, то их придется восстанавливать.
- Теперь нажимайте на «Применить».
Теперь поговорим про подключение через L2TP, он же подойдет и для PPPTP, только нужно выбрать другой тип подключения.
- В левой колонке выбирайте «Интернет».
- Теперь переходите к строке «Тип WAN-подключения» и выбирайте из списка «L2TP».
- В следующих разделах ставим «Получить IP-адрес WAN автоматически» и «Подключаться к DNS-серверу автоматически» -«Да». Если требуется что-то из этого ввести вручную, то в этом месте поставьте «нет», а в открывшихся строках введите нужные данные.
- Следующие строки относятся к самому подключению, введите здесь «Имя пользователя», «Пароль». Также необходимо будет указать ip-адрес сервера в строке «VPN сервер». Все это ищите в вашем договоре или на отдельном вкладыше.
- «Имя хоста» – здесь можно ввести что угодно на английском языке. Если нет других требований от провайдера «Host».
- Теперь нажимайте на кнопку «Применить».
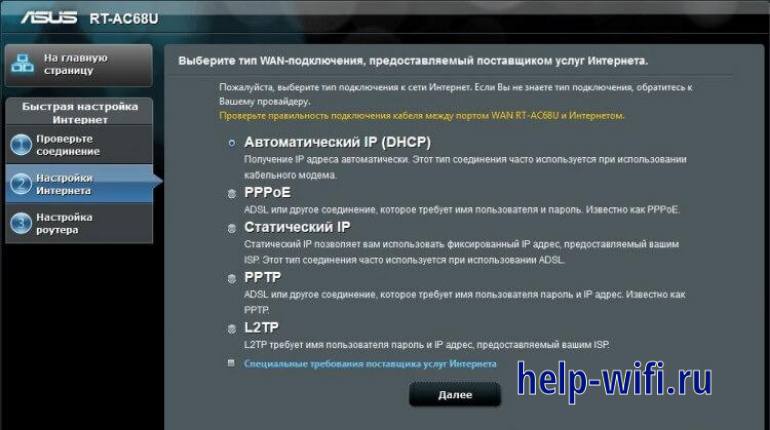
Подключение через DHCP или через динамический IP-адрес. Самый простой тип подключения, перейдите на вкладку «Интернет», а в типе подключения выберите «Динамический адрес». Больше никаких данных вводить не нужно. Если у вас такой тип подключения. То можно воспользоваться быстрой настройкой при первом подключении, потому что не придется вводить много информации.
Интернет через VPN
Сейчас актуальная настройка подключения виртуальной сети. Кто-то использует впн для подключения к рабочим ресурсам и удаленной работы, а кто-то для обхода блокировок. Можно совмещать эти виды деятельности, потому что в роутере есть возможность добавления нескольких профилей.
Алгоритм добавления профиля следующий:
Инструкция по очистке NVRAM
NVRAM – энергонезависимая память с произвольным доступом. Это небольшая часть флэш-памяти маршрутизатора, размер которой обычно составляет от 32 КБ до 128 КБ (в зависимости от модели маршрутизатора) содержащая все текущие настройки маршрутизатора. Есть еще и другая память, к которой доступ ограничен, там хранятся заводские настройки, чтобы вы всегда смогли восстановить роутер после неудачной прошивки.
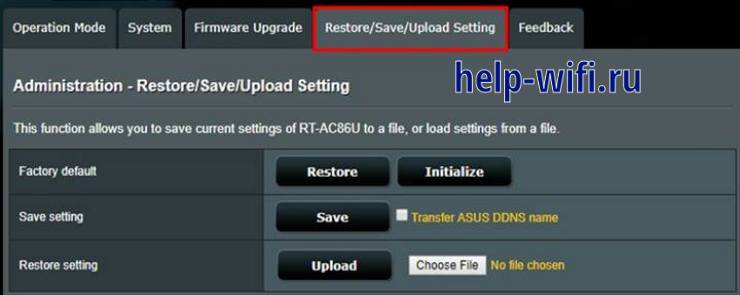
Перейдите в левой колонке в раздел «Администрирование», а в правой части выберите вкладку «Восстановить/ Сохранить/ Загрузить». Верхние две кнопки и означают сброс памяти:
- Восстановить: Удаление Лога/ NVRAM;
- Инициализировать: Удаление Лога/ NVRAM / Данных.
Расшифровка того, что удаляется:
- Log (Лог) — системные логи/ список оффлайн клиентов/ AiCloud лог;
- NVRAM — основная информация о системе;
- Database (данные) — AiProtection Monitor лог/ Traffic Analyzer лог/ История.
Следующие две кнопки позволяют сохранить файл настроек, чтобы в следующий раз не настраивать все по-новому. Последняя кнопка предлагает загрузить файл настроек, который вы сохранили ранее.
Также сброс можно провести, удерживая кнопку WPS/RESET в течение 10 секунд. Этот способ применяется, когда нет доступа к настройкам.
Отзывы пользователей маршрутизатора
Теперь поговорим о том, как сами пользователи отзываются об этом устройстве.
Мощный сигнал, далеко добивает беспроводная сеть;
Быстрый интернет;
Простая настройка;
Красивый внешний вид.
При использовании стандартной прошивки иногда глючит;
VPN сильно режет скорость;
При включении большого числа встроенных сервисов греется и тормозит.
Хорошая машина, которая обеспечит стабильную связь на достаточно больших расстояниях. Прошивку все рекомендуют устанавливать кастомную от мерлина или аналогичных товарищей, потому что со стандартной, работает не так шустро. Что касается претензий к впн, то тут все зависит от того сервиса, который вы добавили.
Небольшое количество внутренней и оперативной памяти является проблемой, поэтому не стоит ставить его в офисы, а также в места, где требуется высокая нагрузка на роутер. Он может выполнять функции сервера для обмена данными, подключения к облаку, VPN и другое, но все сразу замедлит его работу.
