На чтение 10 мин Просмотров 31.1к.

Виталий Леонидович Черкасов
Системный администратор, инженер компьютерных систем.
Задать вопрос
Двухдиапазонный Wi-Fi роутер TP Link Archer C50 V4 поддерживает новый скоростной беспроводной стандарт 802.11ас. Его настройку легко выполнить не только привычным способом, но и при помощи мобильного приложения TP-LINK Tether. Об этом мы подробно расскажем в статье. А сначала сделаем небольшой обзор опций этого роутера.
Содержание
- Особенности и технические характеристики
- Индикаторы и разъемы
- Подключение
- Вход в настройки роутера
- Автоматическая настройка
- Ручная настройка
- Настройка через мобильное приложение
- Подключение и параметры Wi-Fi
- Настройка IP TV
- Смена пароля
- Режим повторителя
- Обновление прошивки
- Сброс настроек
- Отзывы
Особенности и технические характеристики
Основные технические характеристики роутера Archer C50 V4:
- стандарты сети Wi-Fi:
диапазон 5 ГГц: 802.11ac/n/a;
диапазон 2,4 ГГц: 802.11 n/b/g; - количество портов LAN: 4;
- количество портов WAN: 1;
- скорость портов LAN: до 100 Мбит/сек;
- скорость портов WAN: до 100 Мбит/сек;
- скорость Wi-Fi:
диапазон 5 ГГц: 867 Мбит/сек;
диапазон 2,4 ГГц: 300 Мбит/сек; - количество антенн: 4 фиксированные;
- цена: 1850 до 2220 руб.
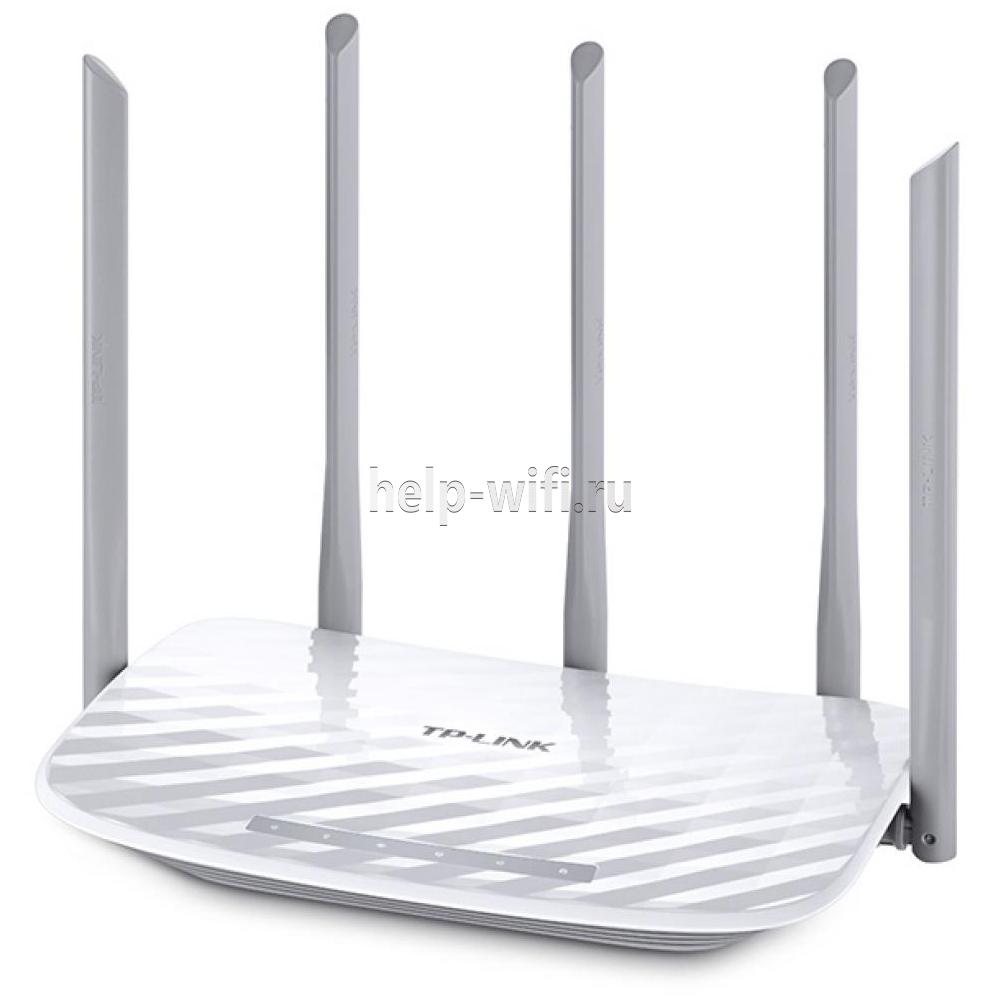
Существуют четыре аппаратные версии маршрутизатора Archer C50 АС1200. В этой статье представлен обзор новейшей, четвертой версии (V4). Эти устройства по техническим характеристикам практически полностью совпадают с wi-fi роутерами предыдущей модификации (V3).
Роутеры версии V2, в отличие от рассматриваемого гаджета Archer C50 V4, имеют только две наружные антенны. Кроме того, у них разный веб-интерфейс для настроек. Первая модификация этого роутера уже снята с производства.
Удобство и простота настройки
9
Другая модель той же марки, которая поддерживает стандарт 802.11ас, — TP-Link Archer C5.
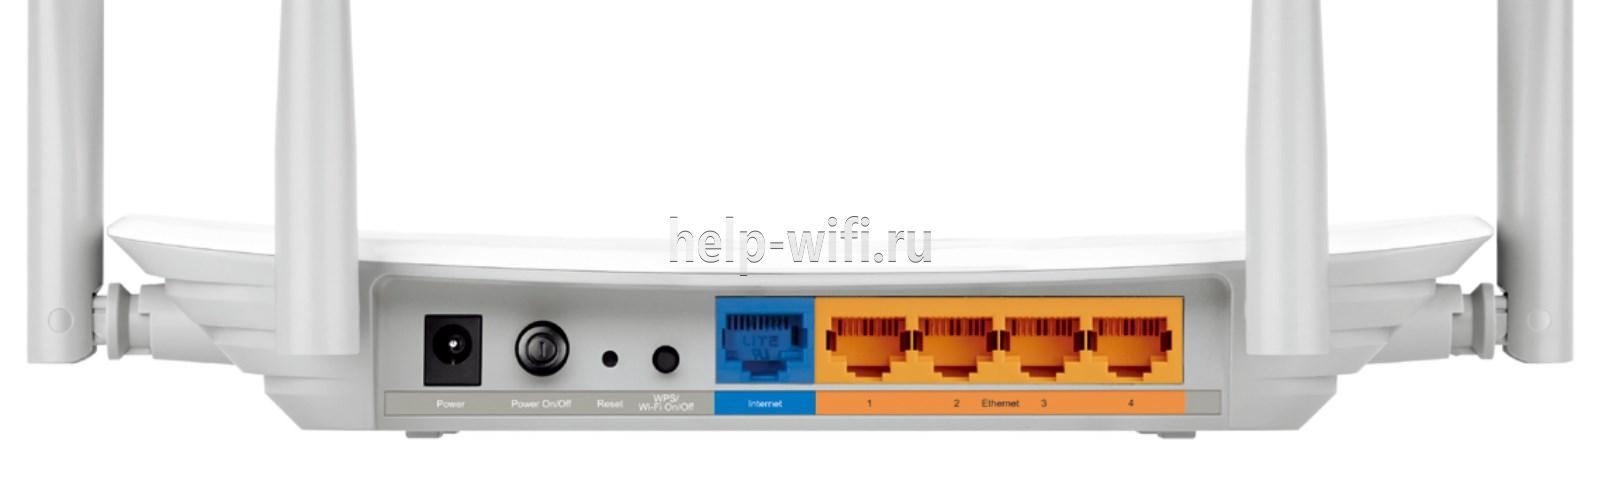
Индикаторы и разъемы
На передней панели роутера Арчер присутствуют светодиоды, которые сигнализируют о состоянии гаджета. Перечислим их в том порядке, как они расположены, слева направо.
- Индикатор «Power» светится, когда питание включено и роутер работает. Если он мигает, значит, роутер запускается или прошивка обновляется.
- Светодиод «2,4 Wireless» горит, когда работает беспроводная сеть в диапазоне 2,4 ГГц.
- Индикатор «5 Wireless» включен, когда Wi-Fi сеть в диапазоне 5 ГГц активна.
- Светодиод «Ethernet» сигнализирует о подключении устройства к одному из портов LAN.
- Индикатор «Internet» может светиться двумя цветами. Если он зеленый, то Интернет активен, если желтый, то кабель подключен к соответствующему порту, но Интернет недоступен.
- Светодиод «WPS» мигает, когда соединение устанавливается. После того, как произошло подключение, индикатор будет гореть, не мигая, еще 5 минут и после этого погаснет.

На задней панели TP Link Archer C50 расположены следующие разъемы, кнопки и порты:
- Разъем «Power» предназначен для подключения маршрутизатора к источнику питания через прилагаемый адаптер.
- Кнопка «Power On/Off» используется для того, чтобы включить или выключить маршрутизатор.
- С помощью кнопки «Reset» можно выполнить сброс настроек роутера до заводских.
- Следующая кнопка «WPS/Wi-Fi» предназначена для подключения и отключения устройств, работающих по протоколу WPS.
- Далее идет порт «Internet», в который нужно вставить сетевой кабель Интернет-провайдера.
- Следующие 4 порта «Ethernet» могут быть использованы для подключения компьютеров или других проводных сетевых устройств к маршрутизатору.
Подключение
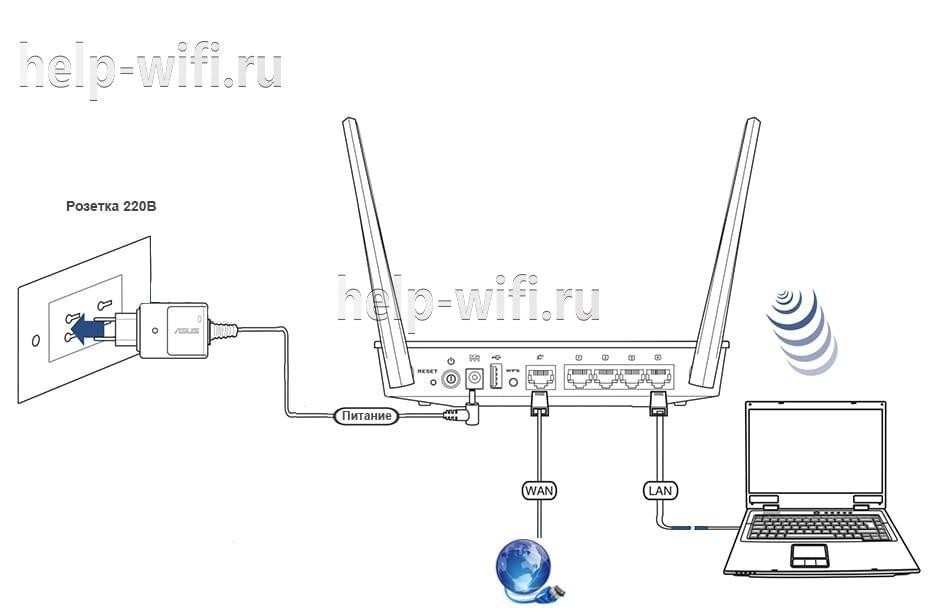
Роутер TP Link Archer C50 подключается в следующем порядке:
- сначала к порту WAN («Internet») подключаем сетевой кабель от компании, предоставляющей услуги доступа к Интернету;
- подключаем маршрутизатор к ПК кабелем через разъемы RJ45;
- включаем адаптер питания сначала в разъем роутера, а потом в электрическую сеть;
- нажимаем кнопку «Power On/Off».
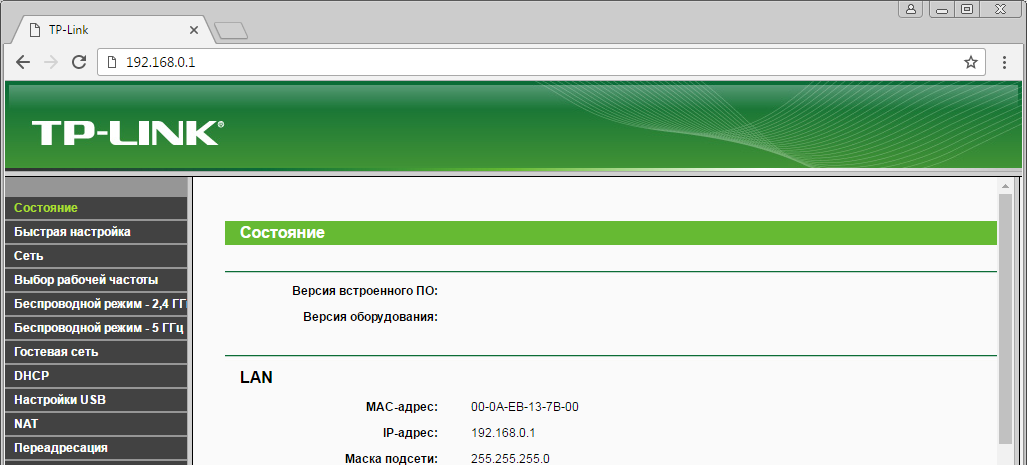
Вход в настройки роутера
Для того, чтобы попасть в настройки маршрутизатора, можно использовать любой веб-браузер. Для этого нужно набрать в адресной строке http://tplinkwifi.net и войти в систему, используя имя пользователя и пароль, которые вы установили ранее.
Если вы еще не успели поменять данные для входа, то используется логин и пароль admin, установленные по умолчанию.

Автоматическая настройка
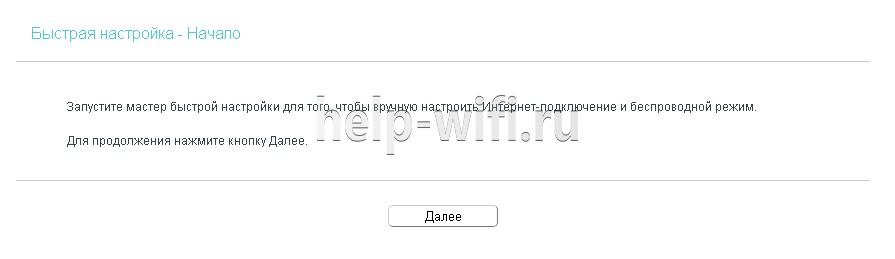
Чтобы воспользоваться функцией быстрой настройки, нужно зайти в настройки роутера. После этого:
- В левом меню выбираем строку «Быстрая настройка» и жмем «Далее» в появившемся окне.
- В новом окне можно попытаться выбрать своего Интернет-провайдера. Если он отсутствует, то поставьте галочку в поле «Я не нашел подходящих настроек».

- Если вы не нашли своего поставщика Интернет-услуг, то в следующем окне нужно будет выбрать тип подключения. Данная информация предоставляется провайдером.
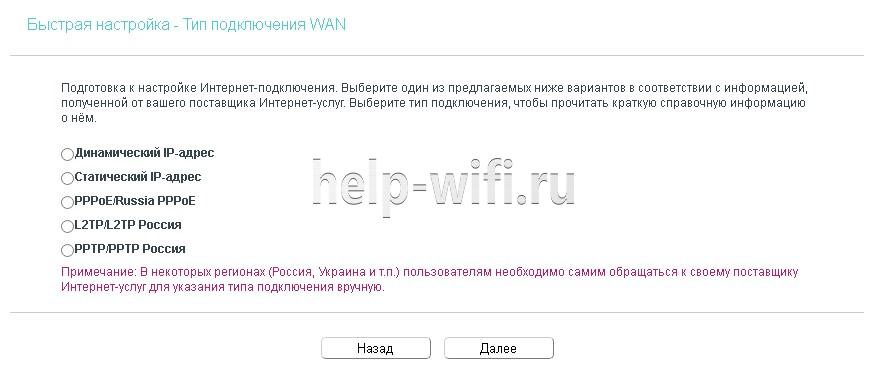
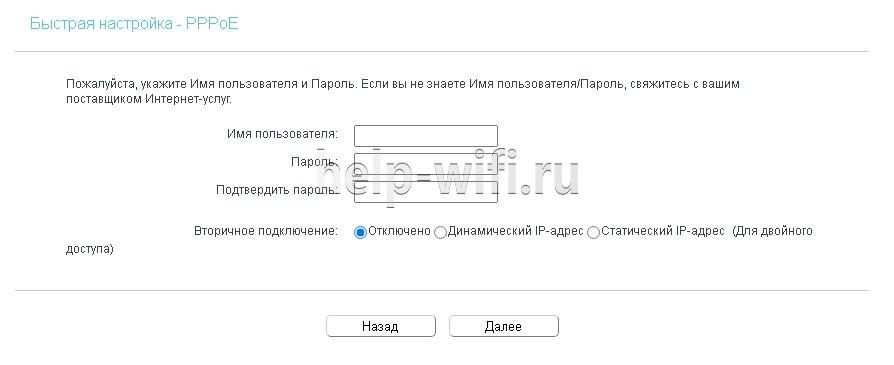
- Если вы выбрали один из наиболее распространенных типов соединения РРРоЕ, то в появившемся окне вам нужно будет ввести имя пользователя и пароль (два раза).
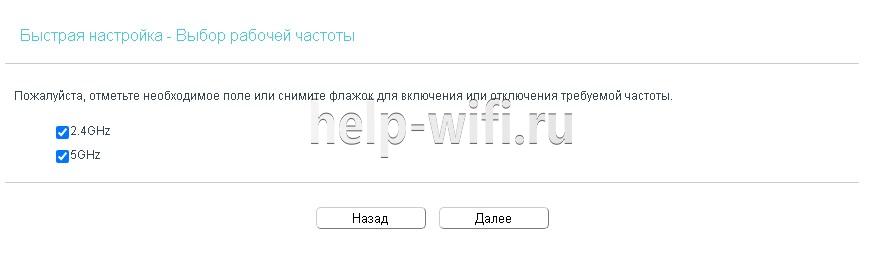
- В новом окне необходимо выбрать диапазоны, на которых будет работать Wi-Fi сеть. Можно выбрать одну из частот или обе.
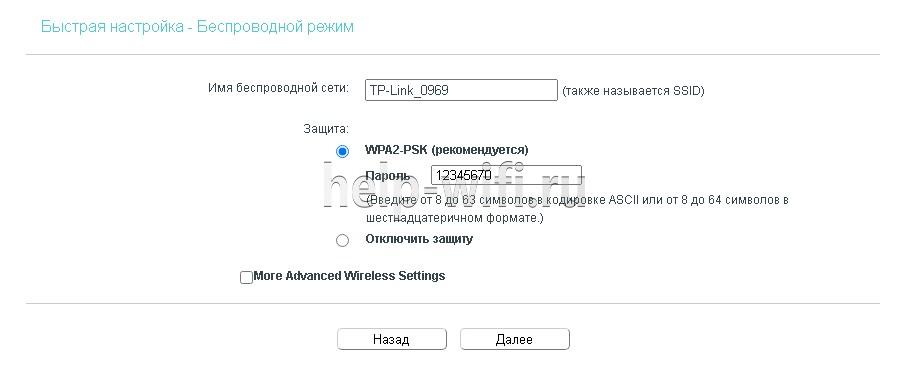
- В следующем окне требуется ввести SSID (имя сети) и пароль.
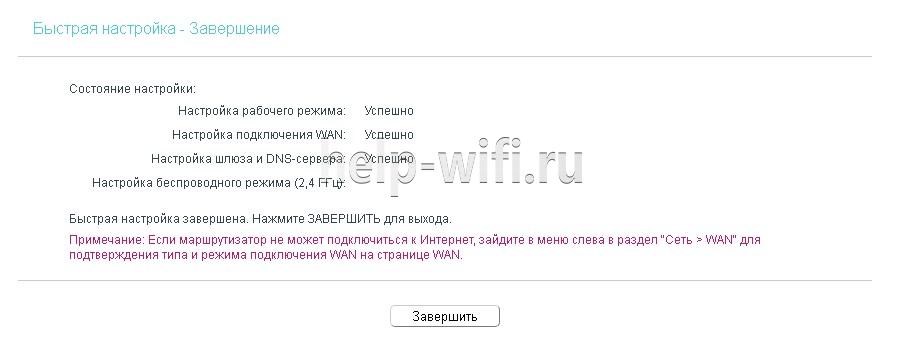
- В следующем окне показаны все настройки, которые были сделаны, их нужно проверить и нажать «Сохранить».

- После этого появится окно завершения настроек, здесь нажмите «Сохранить», Настройка для роутера TP Link Archer c50 завершена.
Ручная настройка
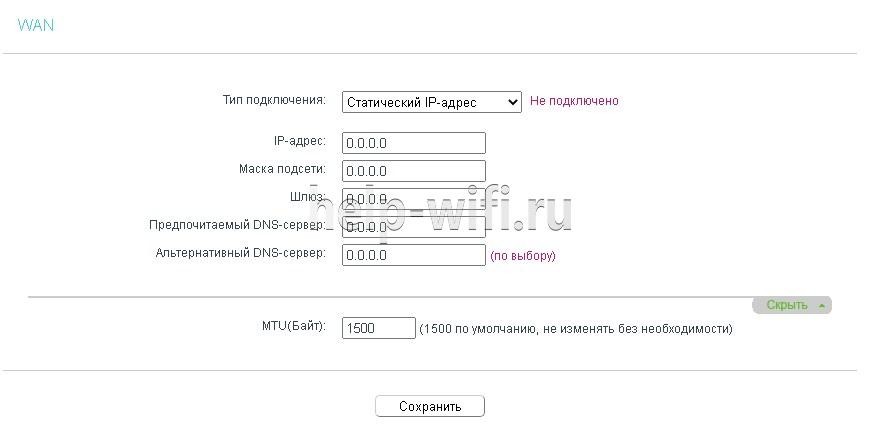
Чтобы произвести ручную настройку роутера TP Link Archer C50 AC1200, нужно в левом меню выбрать «Сеть» и кликнуть по строке «WAN». В новом окне нужно выбрать тип подключения и ввести данные.
Строку «Динамический IP» нужно выбрать, если поставщик Интернет предоставляет услугу DHCP, то есть автоматически выдает IP адрес. Выберите этот тип подключения, и маршрутизатор автоматически получит параметры IP от вашего провайдера.

Если ваш провайдер предоставляет статический или фиксированный IP-адрес, маску подсети, шлюз по умолчанию и настройку DNS, выберите пункт «Статический IP-адрес». После этого введите все предоставленные данные в соответствующие поля.
Если ваш Интернет-провайдер использует для соединения один из протоколов РРРоЕ, L2TP или PPTP, то в большинстве случаев нужно просто ввести имя пользователя и пароль.

Настройка через мобильное приложение
Компания TP-Link создала приложение Tether, которое упрощает настройку роутера со смартфона. Существуют версии этого ПО как для устройств, работающих под управлением Android, так и iOS.
Чтобы установить эту программу, нужно зайти в Apple App Store (для iOS гаджетов) или Google Play (для Android устройств), и установить приложение TP-Link Tether. После завершения инсталляции надо подключить мобильный телефон к Wi-Fi сети и запустить приложение Tether. В окне программы выберите модель используемого роутера, введите логин и пароль и войдите в настройки.
Подключение и параметры Wi-Fi
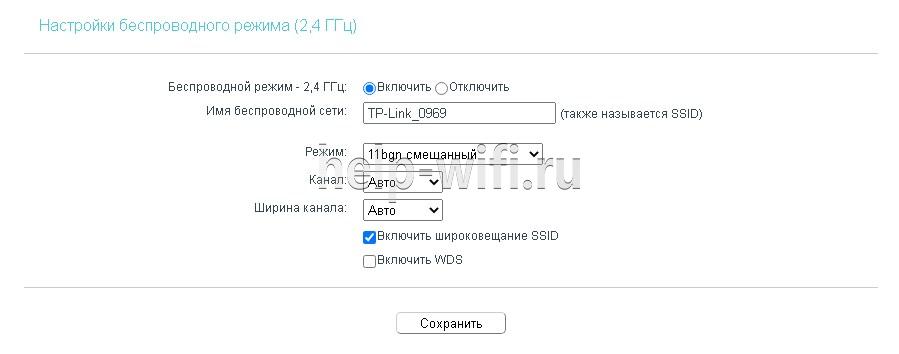
В роутере TP Link Archer C50 настройка вайфай в разных диапазонах производится отдельно. Чтобы изменить настройки Wi-Fi, нужно зайти в один из пунктов меню «Беспроводной режим – 2,4 ГГц» или «Беспроводной режим – 5 ГГц». В появившемся окне нужно ввести SSID (имя) беспроводной сети. А также можно изменить режим работы, канал и ширину канала.
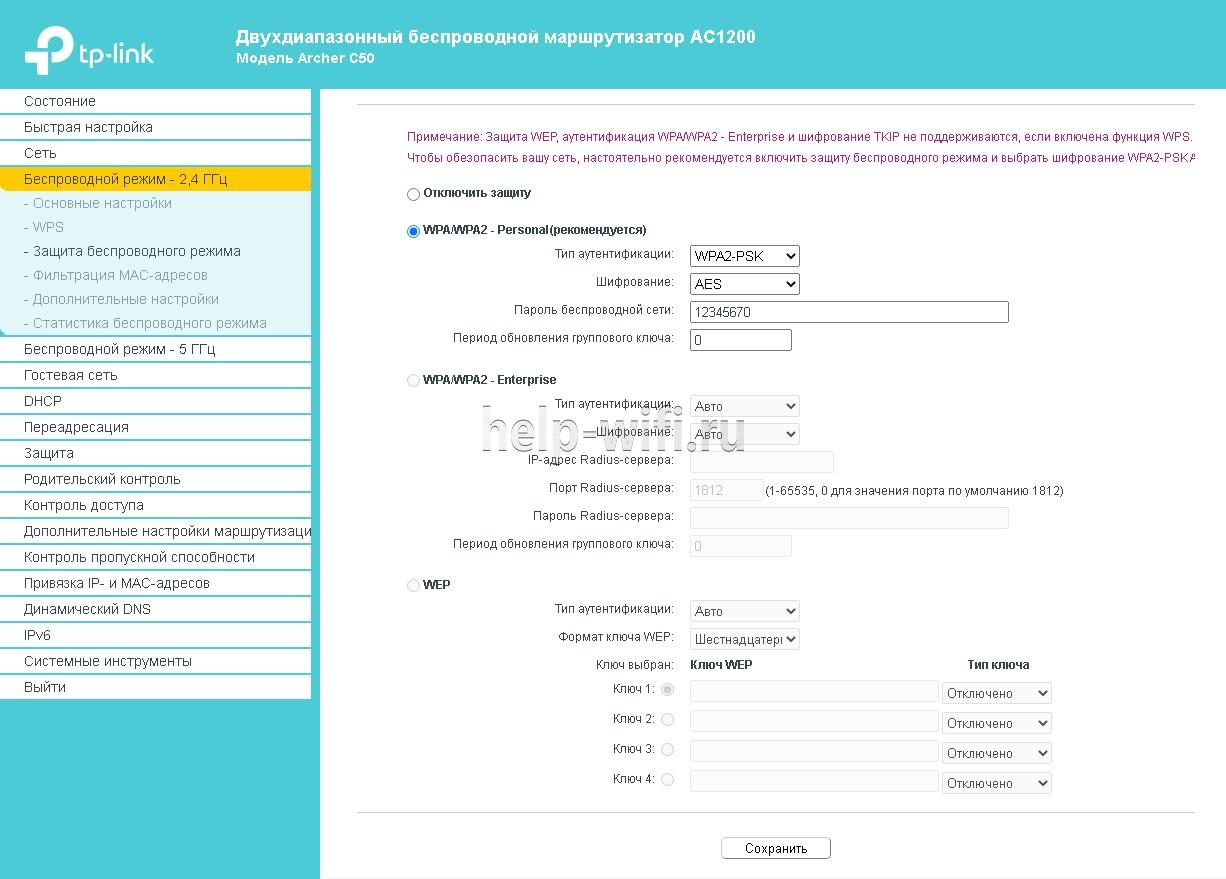
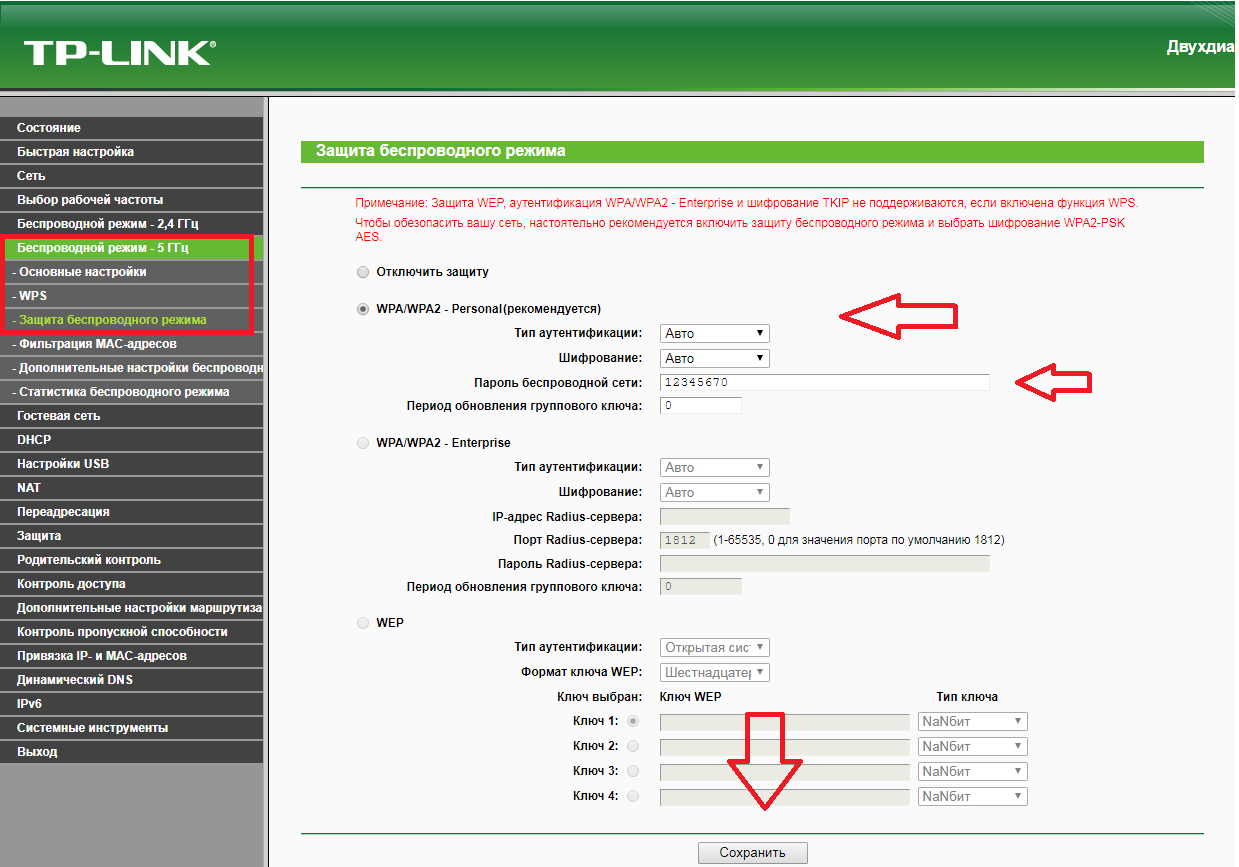
Чтобы выполнить настройку безопасности, требуется войти в подменю «Защита беспроводного режима». Здесь нужно выбрать тип аутентификации, шифрование и задать пароль беспроводной сети.
Настройка IP TV
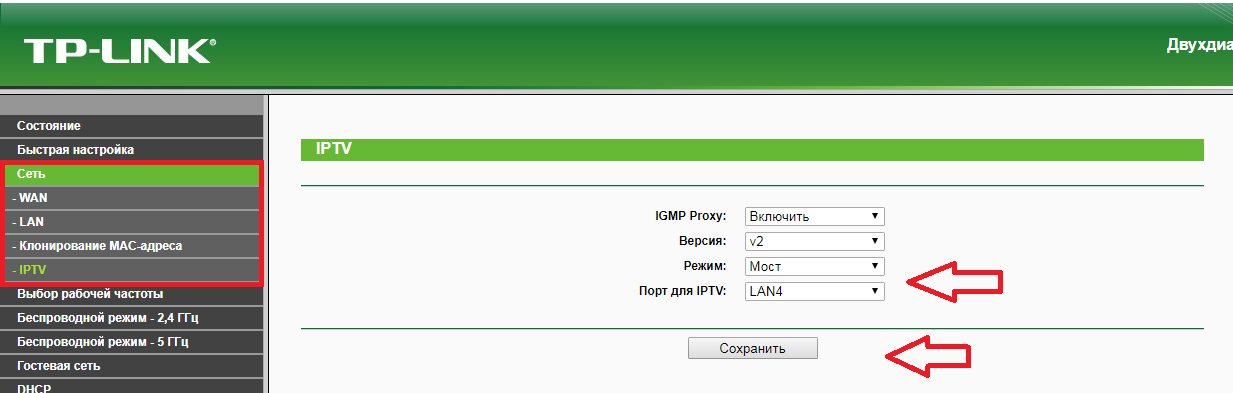
Чтобы настроить функцию IP TV, нужно кликнуть по строке слева «Сеть», и выбрать подменю «IPTV». В появившемся окне нужно выбрать версию протокола IGMP (Internet Group Management Protocol) v2 или v3. После этого выбрать режим, который рекомендует поставщик услуг.

Смена пароля
Изменить пароль администратора можно, зайдя в подменю «Пароль», которое находится слева в меню «Системные инструменты». Здесь сначала требуется ввести старое имя пользователя и пароль, а потом новый логин и пароль. После этого нажмите кнопку «Сохранить».

Режим повторителя
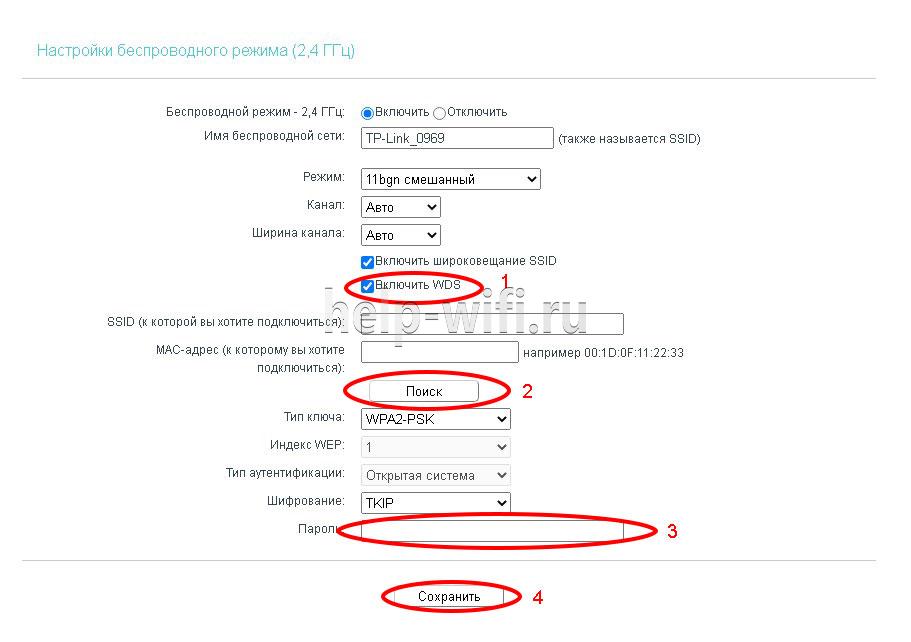
Чтобы включить режим повторителя, нужно в окне настроек беспроводного режима поставить галочку в строке «Включить WDS». Дальше нужно:
- запустить поиск при помощи соответствующей кнопки;
- в появившемся окне с сетями выбрать интересующую вас;
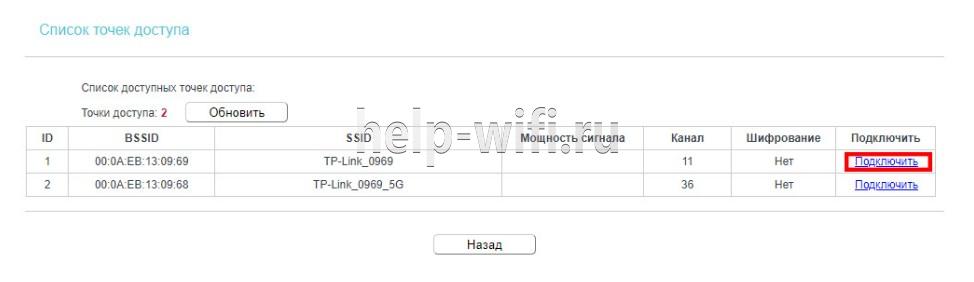
- ввести пароль, установленный на маршрутизаторе, к которому вы хотите подключиться;
- сохранить сделанные изменения.
Обновление прошивки
Перед тем, как приступить к обновлению прошивки, требуется скачать файл с последним программным обеспечением с сайта компании-производителя.
После этого в левом меню нужно кликнуть по строке «Системные инструменты» и зайти в подменю «Обновление встроенного ПО». В появившемся окне кликните по кнопке «Выберите файл» и укажите нужный файл с прошивкой и нажмите кнопку «Обновить».

Сброс настроек
Существует два варианта сброса настроек роутера до заводских.
- На задней панели маршрутизатора есть кнопка «Reset». Ее нужно нажать и удерживать в течении 5-10 секунд.
- В панели настроек в меню «Системные инструменты» есть подменю «Заводские настройки». При его выборе появится окно, в котором нужно нажать кнопку «Восстановить», чтобы настройки маршрутизатора вернулись к заводским.

Отзывы
Мы проанализировали плюсы и минусы модели, опираясь на отзывы покупателей.
4 антенны обеспечивают хорошую дальнобойность;
Хорошая скорость за сравнительно небольшие деньги;
Удобная настройка маршрутизатора с мобильного телефона благодаря фирменной программе TP-Link Tether.
Часто пропадает сеть;
В версиях V3 и V4 отсутствует USB порт;
Маркое глянцевое покрытие корпуса.
Шаг 1 из 3
Открываем браузер, в адресной строке набираем адрес роутера 192.168.0.1, нажимаем Enter.
Шаг 2 из 3
Если открывается страница авторизации роутера, вводим логин и пароль для доступа к роутеру, нажимаем Enter.

Шаг 3 из 3
Откроются настройки роутера.
Шаг 1 из 2
В левом меню нажимаем на пункт «Сеть» (Network). Выбираем подпункт WAN. Откроется соответствующее окно. В пункте «Тип подключения WAN» (WAN Connection Type) из выпадающего списка выбираем L2TP / Russia L2TP.

Шаг 2 из 2
Появятся остальные поля для настройки L2TP:
— В поле «Имя пользователя» (Username) вводим лицевой счёт.
— В поле «Пароль» (Password) вводим пароль от домашнего интернета.
— Убеждаемся, что отмечен пункт «Динамический IP» (Dynamic IP).
— В поле «IP-адрес / Имя сервера» (Server IP Address / Name) вводим tp.internet.beeline.ru.
— В режиме подключения — «Всегда активно».
После чего внизу нажимаем «Сохранить».
Шаг 1 из 4
В левом меню выбираем пункт «Беспроводной режим» (Wireless) или «Беспроводной режим — 2,4 ГГц» (Wireless — 2,4GHz). Откроется окно «Настройки беспроводного режима» (Wireless settings). В поле «Имя беспроводной сети» (Wireless Network Name) придумываем и пишем новое имя сети. В поле «Регион» (Region) выбираем «Россия» (Russia). Убеждаемся, что пункт «Включить широковещание SSID» (Enable SSID Broadcast) отмечен. Нажимаем кнопку «Сохранить» (Save), ждём применения настроек.
Шаг 2 из 4
В левом меню выбираем пункт «Защита беспроводного режима» (Wireless Security). Откроется соответствующее окно, отмечаем пункт WPA/WPA2 — Personal. В поле «Тип аутентификации» (Authentication Type) выбираем «Авто» (Auto). В поле «Шифрование» (Encryption) выбираем «Авто» (Auto). В поле «Пароль PSK» (Wireless Password) придумываем и пишем новый пароль для Wi-Fi-сети (не менее 8 символов, используя только английские буквы или цифры) и нажимаем «Сохранить».
Шаг 3 из 4
Если в слева есть пункт «Беспроводной режим – 5 ГГц», то переходим в него, после чего откроется окно «Настройки беспроводного режима» (Wireless settings). В поле «Имя беспроводной сети» (Wireless Network Name) придумываем и пишем новое имя сети. В поле «Регион» (Region) выбираем «Россия» (Russia). Убеждаемся, что пункт «Включить широковещание SSID» (Enable SSID Broadcast) отмечен. Нажимаем «Сохранить» (Save), ждём применения настроек.
Шаг 4 из 4
В левом меню выберите пункт «Защита беспроводного режима» (Wireless Security). Откроется соответствующее окно, отмечаем пункт WPA/WPA2 — Personal. В поле «Тип аутентификации» (Authentication Type) выбираем «Авто» (Auto). В поле «Шифрование» (Encryption) выбираем «Авто» (Auto). В поле «Пароль PSK» (Wireless Password) придумываем и пишем новый пароль для Wi-Fi-сети (не менее 8 символов, используя только английские буквы или цифры). Листаем страницу вниз. Нажимаем «Сохранить» (Save), ждём применения настроек.
Шаг 1 из 1
В левом меню выбираем пункт «Сеть» (Network), далее IPTV (если пункта IPTV нет, дополнительных настроек для телевидения не требуется). В поле «Режим» (Mode) выбираем «Мост» (Bridge). В поле «Порт для IPTV» (Port for IPTV) — порт для подключения ТВ-приставки. Нажимаем «Сохранить» (Save), ждём применения настроек.
-
Contents
-
Table of Contents
-
Bookmarks
Quick Links
Archer C50
AC1200 Wireless Dual Band Router
REV1.0.0
1910011182
Related Manuals for TP-Link Archer C50
Summary of Contents for TP-Link Archer C50
-
Page 1
Archer C50 AC1200 Wireless Dual Band Router REV1.0.0 1910011182… -
Page 2
Specifications are subject to change without notice. is a registered trademark of TP-LINK TECHNOLOGIES CO., LTD. Other brands and product names are trademarks or registered trademarks of their respective holders. No part of the specifications may be reproduced in any form or by any means or used to make any derivative such as translation, transformation, or adaptation without permission from TP-LINK TECHNOLOGIES CO., LTD. -
Page 3: Fcc Statement
FCC STATEMENT This equipment has been tested and found to comply with the limits for a Class B digital device, pursuant to part 15 of the FCC Rules. These limits are designed to provide reasonable protection against harmful interference in a residential installation. This equipment generates, uses and can radiate radio frequency energy and, if not installed and used in accordance with the instructions, may cause harmful interference to radio communications.
-
Page 4: Ce Mark Warning
CE Mark Warning This is a class B product. In a domestic environment, this product may cause radio interference, in which case the user may be required to take adequate measures. National Restrictions This device is intended for home and office use in all EU countries (and other countries following the EU directive 1999/5/EC) without any limitation except for the countries mentioned below: Country Restriction…
-
Page 5: Canadian Compliance Statement
Country Restriction Reason/remark General authorization required for network and service Luxembourg None supply (not for spectrum) Russian Federation No info Note: Please don’t use the product outdoors in France. Canadian Compliance Statement This device complies with Industry Canada license-exempt RSS standard(s). Operation is subject to the following two conditions: (1)This device may not cause interference, and (2)This device must accept any interference, including interference that may cause undesired…
-
Page 6: Safety Information
加大功率或變更原設計之特性或功能。 第十四條 低功率射頻電機之使用不得影響飛航安全及干擾合法通行;經發現有干擾現象時,應立即 停用,並改善至無干擾時方得繼續使用。前項合法通信,指依電信規定作業之無線電信。低功率射 頻電機需忍受合法通信或工業、科學以及醫療用電波輻射性電機設備之干擾。 減少電磁波影響,請妥適使用。 安全諮詢及注意事項 ●請使用原裝電源供應器或只能按照本產品注明的電源類型使用本產品。 ●清潔本產品之前請先拔掉電源線。請勿使用液體、噴霧清潔劑或濕布進行清潔。 ●注意防潮,請勿將水或其他液體潑灑到本產品上。 ●插槽與開口供通風使用,以確保本產品的操作可靠並防止過熱,請勿堵塞或覆蓋開口。 ●請勿將本產品置放於靠近熱源的地方。除非有正常的通風,否則不可放在密閉位置中。 ●請不要私自打開機殼,不要嘗試自行維修本產品,請由授權的專業人士進行此項工作。 Продукт сертифіковано згідно с правилами системи УкрСЕПРО на відповідність вимогам нормативних документів та вимогам, що передбачені чинними законодавчими актами України. Safety Information When product has power button, the power button is one of the way to shut off the product; when there is no power button, the only way to completely shut off power is to disconnect the product or the power adapter from the power source.
-
Page 7
This product can be used in the following countries:… -
Page 8: Declaration Of Conformity
TP-LINK TECHNOLOGIES CO., LTD DECLARATION OF CONFORMITY For the following equipment: Product Description: AC1200 Wireless Dual Band Router Model No.: C50 Trademark: TP-LINK We declare under our own responsibility that the above products satisfy all the technical regulations applicable to the product within the scope of Council Directives:…
-
Page 9: Table Of Contents
CONTENTS Package Contents…………………1 Chapter 1. Introduction………………2 1.1 Overview of the Router………………..2 1.2 Conventions ………………….. 3 1.3 Main Features ………………….3 1.4 Panel Layout ………………….4 1.4.1 The Front Panel………………..4 1.4.2 The Rear Panel ………………..5 Chapter 2.
-
Page 10
4.7.1 Basic Settings………………..50 4.7.2 WPS ………………….53 4.7.3 Wireless Security………………55 4.7.4 Wireless MAC Filtering …………….. 59 4.7.5 Wireless Advanced ………………61 4.7.6 Wireless Statistics………………62 4.8 Guest Network ………………….63 4.9 DHCP ……………………64 4.9.1 DHCP Settings ………………… 64 4.9.2 … -
Page 11
4.16.1 Static Route List……………….. 99 4.16.2 System Routing Table…………….. 100 4.17 Bandwidth Control ………………..101 4.18 IP & MAC Binding………………..102 4.18.1 Binding Settings………………102 4.18.2 ARP List…………………. 103 4.19 Dynamic DNS………………….104 4.19.1 No-ip.com DDNS ………………104 4.19.2 Comexe.cn DDNS ………………105 4.19.3 … -
Page 12: Package Contents
Package Contents The following items should be found in your package: Archer C50 AC1200 Wireless Dual Band Router DC Power Adapter for Archer C50 AC1200 Wireless Dual Band Router Quick Installation Guide Resource CD for Archer C50 AC1200 Wireless Dual Band Router, including: …
-
Page 13: Chapter 1. Introduction
Incredible Speed The Archer C50 AC1200 Wireless Dual Band Router provides up to 1200Mbps wireless connection with other wireless clients. The incredible speed makes it ideal for handling multiple data streams at the same time, which ensures your network stable and smooth. The performance of this 802.11ac wireless router will give you the unexpected networking experience at speed much faster than 802.11n.
-
Page 14: Conventions
Archer C50 AC1200 Wireless Dual Band Router Conventions The router or Archer C50 mentioned in this guide stands for Archer C50 AC1200 Wireless Dual Band Router without any explanation. Main Features Complies with IEEE 802.11ac. One 10/100M Auto-Negotiation RJ45 Internet port, four 10/100M Auto-Negotiation RJ45 …
-
Page 15: Panel Layout
Archer C50 AC1200 Wireless Dual Band Router Panel Layout 1.4.1 The Front Panel Figure 1-1 LEDs on the front panel The router’s LEDs are located on the front panel (View from left to right). Name Status Indication Power is off.
-
Page 16: The Rear Panel
Archer C50 AC1200 Wireless Dual Band Router The router is set to work concurrently in 2.4GHz and 5GHz by default. If you desire to choose the working frequency, please go to 4.5 Dual Band Selection. 1.4.2 The Rear Panel Figure 1-2 Rear Panel sketch The following parts are located on the rear panel (View from left to right).
-
Page 17
Power: The Power socket is where you will connect the power adapter. Please use the power adapter provided with this Archer C50 AC1200 Wireless Dual Band Router. Wireless antenna: To receive and transmit the wireless data. — 6 -… -
Page 18: Chapter 2. Connecting The Router
Archer C50 AC1200 Wireless Dual Band Router Chapter 2. Connecting the router System Requirements Broadband Internet Access Service (DSL/Cable/Ethernet) One DSL/Cable Modem that has an RJ45 connector (which is not necessary if the router is connected directly to the Ethernet) PCs with a working Ethernet Adapter and an Ethernet cable with RJ45 connectors …
-
Page 19
Archer C50 AC1200 Wireless Dual Band Router power on the router, please make sure your computer is NOT connected to any other wireless network.) Wall Socket Wall Socket Internet Modem Computer Figure 2-1 Hardware Installation D X>=20mm Figure 2-2 Wall-mount Installation … -
Page 20
Archer C50 AC1200 Wireless Dual Band Router Figure 2-3 USB Installation Note: If you want to use the router to share files or printer, plug the USB storage device to the USB port or connect the printer to the router with a matching cable. -
Page 21: Chapter 3. Quick Installation Guide
Archer C50 AC1200 Wireless Dual Band Router Chapter 3. Quick Installation Guide This chapter will show you how to configure the basic functions of your AC1200 Wireless Dual Band Router using Quick Setup Wizard within minutes. TCP/IP Configuration The default IP address of the router is 192.168.0.1 and the default Subnet Mask is 255.255.255.0.
-
Page 22
Archer C50 AC1200 Wireless Dual Band Router If the result displayed is similar to Figure 3-2, it means the connection between your PC and the router failed. Figure 3-2 Failure result of Ping command Please check the connection following these steps: Is the connection between your PC and the router correct? … -
Page 23: Quick Installation Guide
Archer C50 AC1200 Wireless Dual Band Router Quick Installation Guide With a Web-based utility, it is easy to configure and manage the AC1200 Wireless Dual Band Router. The Web-based utility can be used on any Windows, Macintosh or UNIX OS with a Web browser, such as Microsoft Internet Explorer, Mozilla Firefox or Apple Safari.
-
Page 24
Archer C50 AC1200 Wireless Dual Band Router Figure 3-5 Quick Setup Click Next, and then WAN Connection Type page will appear, shown in Figure 3-6. Figure 3-6 WAN Connection Type The router provides Auto-Detect function and supports five types of WAN connection: Dynamic IP, Static IP, PPPoE/Russian PPPoE, L2TP/Russian L2TP, and PPTP/Russian PPTP. -
Page 25
Archer C50 AC1200 Wireless Dual Band Router 1) If the connection type detected is Dynamic IP, there will appear the MAC Clone page (as shown in Figure 3-7). In most cases, there is no need to clone the MAC address. You can select “No, I do NOT need to clone MAC address”… -
Page 26
Archer C50 AC1200 Wireless Dual Band Router Secondary DNS Server-(Optional) If your ISP provides another DNS server, enter it into this field. 3) If the connection type detected is PPPoE/Russia PPPoE, the next screen will appear as shown in Figure 3-9. Configure the following parameters and then click Next to continue. -
Page 27
Archer C50 AC1200 Wireless Dual Band Router Figure 3-10 Quick Setup – L2TP/Russia L2TP Username/Password — Enter the Username and Password provided by your ISP. These fields are case-sensitive. If you have difficulty with this process, please contact your ISP. -
Page 28
Archer C50 AC1200 Wireless Dual Band Router Figure 3-11 Quick Setup – PPTP/Russia PPTP Username/Password — Enter the Username and Password provided by your ISP. These fields are case-sensitive. If you have difficulty with this process, please contact your ISP. -
Page 29
Archer C50 AC1200 Wireless Dual Band Router Figure 3-12 Quick Setup – Dual Band Selection 2.4GHz — You can use the 2.4GHz band to connect to many classic wireless devices like gaming consoles, laptops, DVRs, etc. 5GHz — This band is less crowded and is used for time-sensitive music, video streaming … -
Page 30
Archer C50 AC1200 Wireless Dual Band Router your country or region is not listed, please contact your local government agency for assistance. Note: Per FCC regulations, all Wi-Fi products marketed in the U.S. must be fixed to the U.S. -
Page 31
Archer C50 AC1200 Wireless Dual Band Router Figure 3-14 Quick Setup – Wireless 5GHz Wireless Network Name — Also called the SSID (Service Set Identification). Enter a value of up to 32 characters. The same name must be assigned to all wireless devices in your network. -
Page 32
Archer C50 AC1200 Wireless Dual Band Router Band — This field displayed the operating frequency being configured. Mode — This field determines the wireless mode which the router works on. 11an mixed — Select if you are using both 802.11a and 802.11n wireless clients. -
Page 33
Archer C50 AC1200 Wireless Dual Band Router Figure 3-15 Quick Setup — Confirm Click the Finish button to complete the Quick Setup. Figure 3-16 Quick Setup — Finish — 22 -… -
Page 34: Chapter 4. Configuring The Router
Archer C50 AC1200 Wireless Dual Band Router Chapter 4. Configuring the router This chapter will show each key function of the Web page and its configuration method. Login After your successful login, you will see the main menus on the left of the Web-based utility. On the right, there are the corresponding explanations and instructions.
-
Page 35
Archer C50 AC1200 Wireless Dual Band Router Figure 4-1 Status — 24 -… -
Page 36: Quick Setup
Archer C50 AC1200 Wireless Dual Band Router Quick Setup Please refer to 3.2 Quick Installation Guide. Network Figure 4-2 the Network menu There are three submenus under the Network menu (shown in Figure 4-2): WAN, LAN and MAC Clone. Click any of them, and you will be able to configure the corresponding function.
-
Page 37
Archer C50 AC1200 Wireless Dual Band Router This page displays the WAN IP parameters assigned dynamically by your ISP, including IP address, Subnet Mask, Default Gateway, etc. Click the Renew button to renew the IP parameters from your ISP. Click the Release button to release the IP parameters. -
Page 38
Archer C50 AC1200 Wireless Dual Band Router Figure 4-4 WAN — Static IP IP Address — Enter the IP address in dotted-decimal notation provided by your ISP. Subnet Mask — Enter the subnet Mask in dotted-decimal notation provided by your ISP, … -
Page 39
Archer C50 AC1200 Wireless Dual Band Router Figure 4-5 WAN — PPPoE Username/Password — Enter the User Name and Password provided by your ISP. These fields are case-sensitive. Secondary Connection — It’s available only for PPPoE Connection. If your ISP provides an … -
Page 40
Archer C50 AC1200 Wireless Dual Band Router Connect Manually — You can click the Connect/Disconnect button to connect/disconnect immediately. This mode also supports the Max Idle Time function as Connect on Demand mode. The Internet connection can be disconnected automatically after a specified inactivity period and re-established when you attempt to access the Internet again. -
Page 41
Archer C50 AC1200 Wireless Dual Band Router Set DNS server manually — If your ISP does not automatically assign DNS addresses to the router during login, please click “Set DNS server manually” check box and enter the IP address of your ISP’s primary DNS server. If a secondary DNS server address is available, enter it as well. -
Page 42
Archer C50 AC1200 Wireless Dual Band Router MTU(Bytes)- The normal MTU (Maximum Transmission Unit) value for most Ethernet networks is 1500 Bytes. It is not recommended that you change the default MTU value unless required by your ISP. Enable IGMP Proxy — IGMP (Internet Group Management Protocol) is used to manage … -
Page 43
Archer C50 AC1200 Wireless Dual Band Router Figure 4-8 WAN — L2TP/Russia L2TP Username/Password — Enter the User Name and Password provided by your ISP. These fields are case-sensitive. Addressing Type — Choose the addressing type given by your ISP, either Dynamic IP or … -
Page 44
Archer C50 AC1200 Wireless Dual Band Router again. If you wish to activate Connect on Demand, check the radio button. If you want your Internet connection to remain active at all times, enter 0 in the Max Idle Time field. Otherwise, enter the number of minutes you want to have elapsed before your Internet connection terminates. -
Page 45
Archer C50 AC1200 Wireless Dual Band Router Username/Password — Enter the User Name and Password provided by your ISP. These fields are case-sensitive. Dynamic IP/ Static IP — Choose the addressing type given by your ISP, either Dynamic IP or … -
Page 46: Lan
Archer C50 AC1200 Wireless Dual Band Router Note: If you don’t know how to choose the appropriate connection type, click the Detect button to allow the router to automatically search your Internet connection for servers and protocols. The connection type will be reported when an active Internet service is successfully detected by the router.
-
Page 47: Mac Clone
Archer C50 AC1200 Wireless Dual Band Router Note: If you change the IP Address of LAN, you must use the new IP Address to log in the router. If the new LAN IP Address you set is not in the same subnet, the IP Address pool of the DHCP server will change accordingly at the same time,while the Virtual Server and DMZ Host will…
-
Page 48: Wireless 2.4Ghz
Archer C50 AC1200 Wireless Dual Band Router Figure 4-12 Dual Band Selection 2.4GHz (802.11b/g/n) — Click the box, and then the router will only work in 2.4GHz frequency. You can use the 2.4GHz band to connect to many classic wireless devices like gaming consoles, laptops, DVRs, etc.
-
Page 49
Archer C50 AC1200 Wireless Dual Band Router Figure 4-14 Wireless Settings – 2.4GHz Wireless Network Name — Also called the SSID (Service Set Identification). Enter a value of up to 32 characters. The same name must be assigned to all wireless devices in your network. -
Page 50
Archer C50 AC1200 Wireless Dual Band Router Mode — Select the desired mode. 11bg mixed — Select if you are using both 802.11b and 802.11g wireless clients. 11bgn mixed — Select if you are using a mix of 802.11b, 11g, and 11n wireless clients. It is strongly recommended that you set the Mode to 802.11bgn mixed, and all of… -
Page 51: Wps
Archer C50 AC1200 Wireless Dual Band Router Scan — Click this button, you can search the AP which runs in the current channel. Key type — This option should be chosen according to the AP’s security configuration. It …
-
Page 52
Archer C50 AC1200 Wireless Dual Band Router Add device — You can add a new device to the existing network manually by clicking this button. If the wireless adapter supports Wi-Fi Protected Setup (WPS), you can establish a wireless connection between wireless adapter and router using either Push Button Configuration (PBC) method or PIN method. -
Page 53: Wireless Security
Archer C50 AC1200 Wireless Dual Band Router Use this method if your client device does not have the WPS button, but has a Wi-Fi Protected Setup PIN number. Step 1: Keep the default WPS status as Enabled and click the Add device button in Figure 4-16, then Figure 4-19 will appear.
-
Page 54
Archer C50 AC1200 Wireless Dual Band Router Figure 4-20 Wireless Security Disable Wireless Security — If you do not want to use wireless security, check this radio button. But it’s strongly recommended to choose one of the following modes to enable security. -
Page 55
Archer C50 AC1200 Wireless Dual Band Router Encryption — When WPA-PSK or WPA is set as the Authentication Type, you can select either Automatic, or TKIP or AES as Encryption. Note: If you check the WPA/WPA2-Personal radio button and choose TKIP encryption, you will… -
Page 56
Archer C50 AC1200 Wireless Dual Band Router Radius Server Port — Enter the port number of the Radius server. Radius Server Password — Enter the password for the Radius server. Group Key Update Period — Specify the group key update interval in seconds. The value should be 30 or above. -
Page 57: Wireless Mac Filtering
Archer C50 AC1200 Wireless Dual Band Router 4.6.4 Wireless MAC Filtering Choose menu “Wireless 2.4GHz → Wireless MAC Filtering”, you can control the wireless access by configuring the Wireless MAC Filtering function, shown in Figure 4-24. Figure 4-24 Wireless MAC Filtering To filter wireless users by MAC Address, click Enable.
-
Page 58
Archer C50 AC1200 Wireless Dual Band Router To add or modify a MAC Address Filtering entry, follow these instructions: Enter the appropriate MAC Address into the MAC Address field. The format of the MAC Address XX:XX:XX:XX:XX:XX hexadecimal digit). example: 00:0A:EB:B0:00:0B. -
Page 59: Wireless Advanced
Archer C50 AC1200 Wireless Dual Band Router 4.6.5 Wireless Advanced Choose menu “Wireless 2.4GHz → Wireless Advanced”, you can configure the advanced settings of your wireless network. Figure 4-26 Wireless Advanced Transmit Power — Here you can specify the transmit power of router. You can select High, …
-
Page 60: Wireless Statistics
Archer C50 AC1200 Wireless Dual Band Router RTS Threshold — Here you can specify the RTS (Request to Send) Threshold. If the packet is larger than the specified RTS Threshold size, the router will send RTS frames to a particular receiving station and negotiate the sending of a data frame.
-
Page 61: Wireless 5Ghz
Archer C50 AC1200 Wireless Dual Band Router Current Status — The running status of the connected wireless stations. Received Packets — Packets received by the station Sent Packets — Packets sent by the station You cannot change any of the values on this page. To update this page and to show the current connected wireless stations, click on the Refresh button.
-
Page 62
Archer C50 AC1200 Wireless Dual Band Router Figure 4-29 Wireless Settings – 5GHz Wireless Network Name — Also called the SSID (Service Set Identification). Enter a value of up to 32 characters. The same name must be assigned to all wireless devices in your network. -
Page 63
Archer C50 AC1200 Wireless Dual Band Router Mode — Select the desired mode. 11an mixed — Select if you are using both 802.11a and 802.11n wireless clients. If you set the Mode 11an mixed, all of 802.11a and 802.11n wireless stations can connect to the router. -
Page 64: Wps
Archer C50 AC1200 Wireless Dual Band Router Key type — This option should be chosen according to the AP’s security configuration. It is recommended that the security type is the same as your AP’s security type WEP Index — This option should be chosen if the key type is WEP(ASCII) or …
-
Page 65
Archer C50 AC1200 Wireless Dual Band Router If the wireless adapter supports Wi-Fi Protected Setup (WPS), you can establish a wireless connection between wireless adapter and router using either Push Button Configuration (PBC) method or PIN method. Note: To build a successful connection by WPS, you should also do the corresponding configuration of the new device for WPS function meanwhile. -
Page 66: Wireless Security
Archer C50 AC1200 Wireless Dual Band Router Step 1: Keep the default WPS status as Enabled and click the Add device button in Figure 4-31, then Figure 4-34 will appear. Figure 4-34 Add A New Device Step 2: Enter the PIN number from the client device in the field on the above WPS screen. Then click Connect button.
-
Page 67
Archer C50 AC1200 Wireless Dual Band Router Figure 4-35 Wireless Security Disable Security — If you do not want to use wireless security, check this radio button. But it’s strongly recommended to choose one of the following modes to enable security. -
Page 68
Archer C50 AC1200 Wireless Dual Band Router Note: If you check the WPA/WPA2-Personal radio button and choose TKIP encryption, you will find a notice in red as shown in Figure 4-36. Figure 4-36 WPA/WPA2 – Personal Wireless Password — You can enter ASCII characters between 8 and 63 characters or 8 to 64 Hexadecimal characters. -
Page 69
Archer C50 AC1200 Wireless Dual Band Router Radius Server Port — Enter the port number of the Radius server. Radius Server Password — Enter the password for the Radius server. Group Key Update Period — Specify the group key update interval in seconds. The value should be 30 or above. -
Page 70: Wireless Mac Filtering
Archer C50 AC1200 Wireless Dual Band Router Be sure to click the Save button to save your settings on this page. 4.7.4 Wireless MAC Filtering Choose menu “Wireless → MAC Filtering”, you can control the wireless access by configuring the Wireless MAC Filtering function, shown in Figure 4-24.
-
Page 71
Archer C50 AC1200 Wireless Dual Band Router To add or modify a MAC Address Filtering entry, follow these instructions: Enter the appropriate MAC Address into the MAC Address field. The format of the MAC Address XX:XX:XX:XX:XX:XX hexadecimal digit). example: 00:0A:EB:B0:00:0B. -
Page 72: Wireless Advanced
Archer C50 AC1200 Wireless Dual Band Router The filtering rules that configured should be similar to the following list: 4.7.5 Wireless Advanced Choose menu “Wireless → Wireless Advanced”, you can configure the advanced settings of your wireless network. Figure 4-41 Wireless Advanced Transmit Power — Here you can specify the transmit power of router.
-
Page 73: Wireless Statistics
Archer C50 AC1200 Wireless Dual Band Router performance because of excessive packets. 2346 is the default setting and is recommended. DTIM Interval — This value determines the interval of the Delivery Traffic Indication Message (DTIM). A DTIM field is a countdown field informing clients of the next window for listening to broadcast and multicast messages.
-
Page 74: Guest Network
Archer C50 AC1200 Wireless Dual Band Router If the numbers of connected wireless stations go beyond one page, click the Next button to go to the next page and click the Previous button to return the previous page. Note: This page will be refreshed automatically every 5 seconds.
-
Page 75: Dhcp
Archer C50 AC1200 Wireless Dual Band Router storage sharing servers. Guest Network Isolation -. If enabled, guests are isolated from each other. Guest Network Bandwidth Control — If enabled, the Guest Network Bandwidth Control rules will take effect.
-
Page 76: Dhcp Clients List
Archer C50 AC1200 Wireless Dual Band Router Figure 4-45 DHCP Settings DHCP Server — Enable or Disable the DHCP server. If you disable the Server, you must have another DHCP server within your network, otherwise you must configure the computer manually.
-
Page 77: Address Reservation
Archer C50 AC1200 Wireless Dual Band Router Figure 4-46 DHCP Clients List Client Name — The name of the DHCP client MAC Address — The MAC address of the DHCP client Assigned IP — The IP address that the router has allocated to the DHCP client …
-
Page 78: Usb Settings
Archer C50 AC1200 Wireless Dual Band Router Status — The status of this entry, either Enabled or Disabled. To Reserve an IP address: Click the Add New button. Then Figure 4-48 will pop up. Enter the MAC address (in XX:XX:XX:XX:XX:XX format.) and IP address (in dotted-decimal notation) of the computer for which you want to reserve an IP address.
-
Page 79: Usb Mass Storage
Archer C50 AC1200 Wireless Dual Band Router 4.10.1 USB Mass Storage The USB Mass Storage page provides the basic information about the USB mass storage device. Click the Refresh button to update this page. Figure 4-50 User Account Management 4.10.2…
-
Page 80: Storage Sharing
Archer C50 AC1200 Wireless Dual Band Router To add a new user account, please follow the steps below: Choose the Index from the drop-down list. Self-define a User Name. Enter the password in the Password field. Re-enter the password in the Confirm Password field.
-
Page 81
Archer C50 AC1200 Wireless Dual Band Router Figure 4-52 Storage Sharing Server Status — Indicates the Storage Sharing server’s current status. You can click the Enable button to start the Storage Sharing service and click the Disable button to stop it. -
Page 82: Ftp Server
Archer C50 AC1200 Wireless Dual Band Router Figure 4-53 Add or Modify Share Folder Enter display name of the share folder in Shared Name filed. Click the Browse button to select the folder which you want to share. Click the Apply button to save the settings.
-
Page 83
Archer C50 AC1200 Wireless Dual Band Router Figure 4-54 FTP Server Configuration Server Status — Indicates the FTP Server’s current status. Internet Access — Select enable to allow access of the FTP server from the Internet. Otherwise, select disable to only allow local network access. -
Page 84: Media Server
Archer C50 AC1200 Wireless Dual Band Router Figure 4-55 Add or Modify Share Folder Enter display name of the share folder in Shared Name filed. Click the Browse button to select the folder which you want to share. Click the Apply button to save the settings.
-
Page 85
Archer C50 AC1200 Wireless Dual Band Router Server Name — The name of this Media Server. Share Name — The display name of this folder. Folder Name — The real full path of the specified folder. Delete — You can delete the share folder by click Delete. -
Page 86: Print Server
Archer C50 AC1200 Wireless Dual Band Router Note: The max share folders number is 6. If you want share a new folder when the number has been reached to be 6, you can delete a share folder and then add a new one.
-
Page 87: Forwarding
Archer C50 AC1200 Wireless Dual Band Router Disable Hardware NAT Control — If disabled, neither Hardware NAT feature will take effect. 4.12 Forwarding Figure 4-61 The Forwarding menu There are four submenus under the Forwarding menu (shown in Figure 4-61): Virtual Servers, Port Triggering, DMZ and UPnP.
-
Page 88
Archer C50 AC1200 Wireless Dual Band Router Protocol — The protocol used for this application, either TCP, UDP, or All (all protocols supported by the router). Status — The status of this entry, «Enabled» means the virtual server entry is enabled. -
Page 89: Port Triggering
Archer C50 AC1200 Wireless Dual Band Router Note: If you set the service port of the virtual server as 80, you must set the Web management port on Security → Remote Management page to be any other value except 80 such as 8080.
-
Page 90
Archer C50 AC1200 Wireless Dual Band Router Select a common application from the Common Applications drop-down list, then the Trigger Port field and the Open Port field will be automatically filled. If the Common Applications do not have the application you need, enter the Trigger Port and the Open Port manually. -
Page 91: Dmz
Archer C50 AC1200 Wireless Dual Band Router Note: When the trigger connection is released, the corresponding opened ports will be closed. Each rule can only be used by one host on the LAN at a time. The trigger connection of other hosts on the LAN will be refused.
-
Page 92: Security
Archer C50 AC1200 Wireless Dual Band Router Figure 4-67 UPnP Setting Current UPnP Status — UPnP can be enabled or disabled by clicking the Enable or Disable button. This feature is enabled by default. Current UPnP Settings List — This table displays the current UPnP information.
-
Page 93: Basic Security
Archer C50 AC1200 Wireless Dual Band Router There are four submenus under the Security menu: Basic Security, Advanced Security, Local Management and Remote Management. (as shown in Figure 4-68). Click any of them, and you will be able to configure the corresponding functions.
-
Page 94: Advanced Security
Archer C50 AC1200 Wireless Dual Band Router PPTP Passthrough — Point-to-Point Tunneling Protocol (PPTP) allows the Point-to-Point Protocol (PPP) to be tunneled through an IP network. To allow PPTP tunnels to pass through the router, click Enable. L2TP Passthrough — Layer Two Tunneling Protocol (L2TP) is the method used to …
-
Page 95
Archer C50 AC1200 Wireless Dual Band Router Figure 4-70 Advanced Security DoS Protection — Denial of Service protection. Check the Enable or Disable button to enable or disable the DoS protection function. Only when it is enabled, will the flood filters be enabled. -
Page 96: Local Management
Archer C50 AC1200 Wireless Dual Band Router Forbid Ping Packet From LAN Port — Enable or Disable Forbid Ping Packet From LAN Port. The default setting is disabled. If enabled, the ping packet from LAN cannot access the router.
-
Page 97: Parent Control
Archer C50 AC1200 Wireless Dual Band Router Figure 4-72 Remote Management Web Management Port — Web browser access normally uses the standard HTTP service port 80. This router’s default remote management web port number is 80. For greater security, you can change the remote management web port to a custom port by entering that number in the box provided.
-
Page 98
Archer C50 AC1200 Wireless Dual Band Router Figure 4-73 Parent Control Settings Parent Control — Check Enable if you want this function to take effect; otherwise, check Disable. MAC Address of Parental PC — In this field, enter the MAC address of the controlling PC, or … -
Page 99
AC1200 Wireless Dual Band Router Enter the allowed domain name of the website, either the full name or the keywords (e.g. tp-link) in the Add URL field. Any domain name with keywords in it (www.tp-link.com) will be allowed. Click the Add button. -
Page 100
Archer C50 AC1200 Wireless Dual Band Router Figure 4-74 Parent Control Settings — 89 -… -
Page 101: Access Control
Archer C50 AC1200 Wireless Dual Band Router 4.15 Access Control Figure 4-75 Access Control There are four submenus under the Access Control menu: Rule, Host, Target and Schedule (as shown in Figure 4-75). Click any of them, and you will be able to configure the corresponding function.
-
Page 102
Archer C50 AC1200 Wireless Dual Band Router Schedule — Here displays the schedule selected in the corresponding rule. Enable — Here displays the status of the rule, enabled or not. Check this option to enable a specific entry. -
Page 103: Host
For example: If you desire to allow the host with MAC address 00 : 11 : 22 : 33 : 44 : AA to access www.tp-link.com only from 18:00 to 20:00 on Saturday and Sunday, and forbid other hosts in the LAN to access the Internet, you should follow the settings below: Click the submenu Rule of Access Control in the left to return to the Rule List page.
-
Page 104
Archer C50 AC1200 Wireless Dual Band Router Figure 4-78 Host Settings Description — Here displays the description of the host and this description is unique. Address Info — Here displays the information about the host. It can be IP or MAC. -
Page 105: Target
Archer C50 AC1200 Wireless Dual Band Router Figure 4-80 Add or Modify a Host Entry For example: If you desire to restrict the internet activities of host with MAC address 00:11:22:33:44:AA, you should first follow the settings below: Click Add New button in Figure 4-78 to enter the Add or Modify a Host Entry page.
-
Page 106
Archer C50 AC1200 Wireless Dual Band Router To add a new entry, please follow the steps below. Click the Add New button. In Mode field, select IP Address, MAC Address or URL Address. 1) If you select IP Address, the screen shown is Figure 4-82. -
Page 107: Schedule
In Mode field, select URL Address from the drop-down list. In Description field, create a unique description for the target (e.g. Target_1). In Add URL Address field, enter www.tp-link.com. And then click Add to save the entry. Click Save to complete the settings.
-
Page 108
Archer C50 AC1200 Wireless Dual Band Router Figure 4-85 Schedule Settings Description — Here displays the description of the schedule and this description is unique. Edit — Here you can edit or delete an existing schedule. To add a new schedule, follow the steps below: 1. -
Page 109: Advanced Routing
Archer C50 AC1200 Wireless Dual Band Router Figure 4-86 Advanced Schedule Settings For example: If you desire to restrict the internet activities of host with MAC address 00:11:22:33:44:AA to access www.tp-link.com only from 18:00 to 20:00 on Saturday and Sunday, you should first follow the settings below: Click Add New button shown in Figure 4-85 to enter the Advanced Schedule Settings page.
-
Page 110: Static Route List
Archer C50 AC1200 Wireless Dual Band Router There are two submenus under the Advanced Routing menu as shown in Figure 4-87: Static Route List and System Routing Table. Click any of them, and you will be able to configure the corresponding function.
-
Page 111: System Routing Table
Archer C50 AC1200 Wireless Dual Band Router Click the Save button to make the entry take effect. Other configurations for the entries: Click the Delete button to delete the entry. Click the Enable Selected button to enable the selected entries.
-
Page 112: Bandwidth Control
Archer C50 AC1200 Wireless Dual Band Router 4.17 Bandwidth Control Figure 4-91 Bandwidth Control Choose menu “Bandwidth Control”, and then you can configure the bandwidth control in the screen as shown in Figure 4-91 Bandwidth Control. You can configure the Egress Bandwidth and Ingress Bandwidth in this page. Their values you configure should be less than 10000Kbps.
-
Page 113: Ip & Mac Binding
Archer C50 AC1200 Wireless Dual Band Router Click Add New shown in Figure 4-91, you will see a new screen shown in Figure 4-92. Enter the information like the screen shown below. Figure 4-92 Bandwidth Control Rule Settings Click the Save button.
-
Page 114: Arp List
Archer C50 AC1200 Wireless Dual Band Router MAC Address — The MAC address of the controlled computer in the LAN. IP Address — The assigned IP address of the controlled computer in the LAN. Bind — Check this option to enable ARP binding for a specific device.
-
Page 115: Dynamic Dns
Archer C50 AC1200 Wireless Dual Band Router Figure 4-96 ARP List MAC Address — The MAC address of the controlled computer in the LAN. IP Address — The assigned IP address of the controlled computer in the LAN. Status — Indicates whether or not the MAC and IP addresses are bound.
-
Page 116: Comexe.cn Ddns
Archer C50 AC1200 Wireless Dual Band Router Figure 4-97 No-ip.com DDNS Settings To set up for DDNS, follow these instructions: Enter the Domain Name you received from dynamic DNS service provider. Enter the Username for your DDNS account. Enter the Password for your DDNS account.
-
Page 117: Dyn.com/Dns Ddns
Archer C50 AC1200 Wireless Dual Band Router Figure 4-98 Comexe.cn DDNS Settings To set up for DDNS, follow these instructions: Enter the Domain Name your dynamic DNS service provider gave. Enter the Username for your DDNS account. Enter the Password for your DDNS account.
-
Page 118: Ipv6
Archer C50 AC1200 Wireless Dual Band Router Figure 4-99 Dyn.com/dns DDNS Settings To set up for DDNS, follow these instructions: Enter the Domain Name you received from dynamic DNS service provider. Enter the Username for your DDNS account. Enter the Password for your DDNS account.
-
Page 119: Ipv6 Status
Archer C50 AC1200 Wireless Dual Band Router There are three submenus under the IPv6 Support menu (shown in Figure 4-100): IPv6 Status, IPv6 WAN and IPv6 LAN. Click either of them, and you will be able to scan or configure the corresponding function.
-
Page 120: Ipv6 Wan
Archer C50 AC1200 Wireless Dual Band Router 4.20.2 IPv6 WAN Figure 4-102 Enable/Disable IPv6 Connection Type — Choose the correct WAN connection type based on your ISP network topology. Dynamic IPv6 — Connections which use dynamic IPv6 address assignment.
-
Page 121
Archer C50 AC1200 Wireless Dual Band Router Dynamic IPv6 Figure 4-103 Dynamic IPv6 IPv6 Address — The IPv6 address assigned by your ISP dynamically. Prefix Length — The length of IPv6 address prefix. IPv6 Gateway — Enter the default gateway provided by your ISP. -
Page 122
Archer C50 AC1200 Wireless Dual Band Router Static IPv6 Figure 4-104 Static IPv6 IPv6 Address — Enter the IPv6 address provided by your ISP. Prefix Length — The length of IPv6 address prefix. IPv6 Gateway — Enter the default gateway provided by your ISP. -
Page 123
Archer C50 AC1200 Wireless Dual Band Router PPPoEv6 Figure 4-105 PPPoEv6 PPP Username/Password — Enter the User Name and Password provided by your ISP. These fields are case-sensitive. Authentication Type – Choose one authentication type from AUTO-AUTH, PAP, CHAP and MS-CHAP. -
Page 124: Ipv6 Lan
Archer C50 AC1200 Wireless Dual Band Router Tunnel 6to4 Figure 4-106 Tunnel 6to4 This type is used in the situation that your WAN connection is IPv4 while LAN connection is IPv6. WAN Connection — Display the available wan connection. …
-
Page 125: System Tools
Archer C50 AC1200 Wireless Dual Band Router 4.21 System Tools Figure 4-108 The System Tools menu Choose menu “System Tools”, and you can see the submenus under the main menu: Time Settings, Diagnostic, Firmware Upgrade, Factory Defaults, Backup & Restore, Reboot, Password, System Log and Statistics.
-
Page 126
Archer C50 AC1200 Wireless Dual Band Router Date — Enter your local date in MM/DD/YY into the right blanks. Time — Enter your local time in HH/MM/SS into the right blanks. Get From PC — Enter your PC’s current time into the right blanks. -
Page 127: Diagnostic
Archer C50 AC1200 Wireless Dual Band Router Figure 4-110 Time settings Note: This setting will be used for some time-based functions such as firewall. You must specify your time zone once you login to the router successfully, otherwise, these functions will not take effect.
-
Page 128
Archer C50 AC1200 Wireless Dual Band Router Figure 4-111 Diagnostic Tools Diagnostic Tool — Check the radio button to select one diagnostic too. Ping — This diagnostic tool troubleshoots connectivity, reachability, and name resolution to a given host or gateway. -
Page 129: Firmware Upgrade
To upgrade the router’s firmware, follow these instructions below: Download a most recent firmware upgrade file from our website (www.tp-link.com). Enter or select the path name where you save the downloaded file on the computer into the Firmware File Path blank.
-
Page 130: Factory Defaults
Archer C50 AC1200 Wireless Dual Band Router The upgrade process takes a few moments and the router restarts automatically when the upgrade is complete. 4.21.4 Factory Defaults Choose menu “System Tools → Factory Defaults”, and then and you can restore the…
-
Page 131: Reboot
Archer C50 AC1200 Wireless Dual Band Router To upgrade the router’s configuration, follow these instructions. Click the Browse button to find the configuration file which you want to restore. Click the Restore button to update the configuration with the file whose path is the one you have input or selected in the blank.
-
Page 132: System Log
Archer C50 AC1200 Wireless Dual Band Router Figure 4-117 Password It is strongly recommended that you should change the factory default user name and password of the router, because all users who try to access the router’s Web-based utility or Quick Setup will be prompted for the router’s default user name and password.
-
Page 133: Statistics
Archer C50 AC1200 Wireless Dual Band Router Log Settings — Click to change the log settings. 4.21.9 Statistics Choose menu “System Tools → Statistics”, and then you can view the statistics of the router, including total traffic and current traffic of the last Packets Statistic Interval.
-
Page 134
Archer C50 AC1200 Wireless Dual Band Router Statistics Table: The IP and MAC address are displayed with related statistics. IP/MAC Address The total number of packets received and transmitted by the Packets router. Total The total number of bytes received and transmitted by the router. -
Page 135: Logout
Archer C50 AC1200 Wireless Dual Band Router 4.22 Logout Choose ”Logout”, and you will be back to the login screen as shown in Figure 4-119. Figure 4-119 Logout — 124 -…
-
Page 136: Appendix A: Faq
Archer C50 AC1200 Wireless Dual Band Router Appendix A: FAQ How do I configure the router to access Internet by ADSL users? First, configure the ADSL Modem configured in RFC1483 bridge model. Connect the Ethernet cable from your ADSL Modem to the Internet port on the router.
-
Page 137
Archer C50 AC1200 Wireless Dual Band Router How do I configure the router to access Internet by Ethernet users? Login to the router, click the “Network” menu on the left of your browser, and click «WAN» submenu. On the WAN page, select “Dynamic IP” for «WAN Connection Type», finish by clicking “Save”. -
Page 138
Archer C50 AC1200 Wireless Dual Band Router Figure A-4 Virtual Servers Figure A-5 Add or Modify a Virtual server Entry Note: Your opposite side should call your WAN IP, which is displayed on the “Status” page. How to enable DMZ Host: Log in to the router, click the “Forwarding” menu on the left of your browser, and click «DMZ»… -
Page 139
Archer C50 AC1200 Wireless Dual Band Router Figure A-7 Basic Security I want to build a WEB Server on the LAN, what should I do? Because the WEB Server port 80 will interfere with the WEB management port 80 on the router, you must change the WEB management port number to avoid interference. -
Page 140
Archer C50 AC1200 Wireless Dual Band Router field of the Web browser. If the LAN IP of the modem connected with your router is 192.168.0.x, the default LAN IP of the router will automatically switch from 192.168.0.1 to 192.168.1.1 to avoid IP conflict; in this case, please try http://192.168.1.1:88. -
Page 141: Appendix B: Configuring The Pc
Archer C50 AC1200 Wireless Dual Band Router Appendix B: Configuring the PC In this section, we’ll introduce how to install and configure the TCP/IP correctly in Windows XP. First make sure your Ethernet Adapter is working, refer to the adapter’s manual if needed.
-
Page 142
Archer C50 AC1200 Wireless Dual Band Router The following TCP/IP Properties window will display and the IP Address tab is open on this window by default. Select Obtain an IP address automatically and Obtain DNS server automatically, as shown in the Figure below:… -
Page 143: Appendix C: Specifications
Archer C50 AC1200 Wireless Dual Band Router Appendix C: Specifications General IEEE 802.11ac, IEEE 802.11n, IEEE 802.11g, IEEE 802.11b, IEEE Standards 802.11a, IEEE 802.11e, IEEE 802.11i, IEEE 802.1X, IEEE 802.3X, IEEE 802.3, IEEE 802.3u, IEEE 802.3ab TCP/IP, PPPoE, DHCP, ICMP, NAT, SNTP, IGMPv3, L2TP, PPTP,…
-
Page 144: Appendix D: Glossary
Archer C50 AC1200 Wireless Dual Band Router Appendix D: Glossary 802.11ac — IEEE 802.11ac is a wireless computer networking standard of 802.11.This specification will enable multi-station WLAN throughput of at least 1 gigabit per second .This is accomplished by extending the air interface concepts embraced by 802.11n: wider RF bandwidth, more MIMO spatial streams, multi-user MIMO, and high-density modulation (up to 256 QAM).
-
Page 145
Archer C50 AC1200 Wireless Dual Band Router MTU (Maximum Transmission Unit) — The size in bytes of the largest packet that can be transmitted. NAT (Network Address Translation) — NAT technology translates IP addresses of a local area …
Содержание
- 1 Технические характеристики TP-Link Archer С50 AC1200
- 2 Как настроить роутер
- 3 Настройка роутера с помощью веб-браузера и компьютера
- 4 Настройка беспроводных режимов: 2,4 Ггц и 5 Ггц
- 5 Настройка подключения по протоколу L2TP на примере Билайн
- 6 Настройка подключения по протоколу IPoE
- 7 Заключение
- 8 Видео по теме
Сегодня проводной Интернет уверенными шагами отходит в прошлое, конечно, если речь идет о рядовых пользователях. Ведь на данный момент высокоскоростной безлимитный Интернет является максимально доступным, а количество гаджетов, которыми в среднем владеет каждая семья, не ограничивается одним персональным компьютером. Современные Wi-Fi-роутеры способны обеспечивать любое жилое помещение качественным и бесперебойным сигналом. Ярким примером может стать роутер TP-Link Archer С50 AC1200.
Данная модель — представитель среднего ценового сегмента беспроводных маршрутизаторов. Однако параметры, которыми обладает устройство, очевидно выходят за рамки средних. И даже несмотря на это, настройка роутера модели TP-Link Archer С50 является стандартной и интуитивно понятной.
Технические характеристики TP-Link Archer С50 AC1200
TP-Link Archer С50 AC1200 — двухдиапазонный роутер, который отличается стабильным сигналом и высокой дальностью покрытия. Для этого разработчики оснастили девайс четырьмя антеннами. Устройство полностью поддерживает современный стандарт Wi-Fi 802.11ac, скорость которого ровно в три раза превышает возможности N. Как было отмечено выше, роутер поддерживает два диапазона Wi-Fi:
- 2,4 Ггц, который на данный момент, является распространенным, но устаревшим;
- 5 Ггц — современный и новый стандарт, обеспечивающий максимальный комфорт при просмотре потокового видео, а также при игре в онлайн-игры.
Пропускная способность первого составляет 300 Мбит/с, тогда как режим 5 Ггц поднимает это значение до впечатляющих 867 Мбит/с!
Как настроить роутер
«Как настроить роутер TP-Link?», — один из наиболее распространенных вопросов, который подразумевает, в том числе, и данную модель. Настроить правильно роутер TP-Link Archer С50 AC1200 можно двумя способами:
- используя ПК/ноутбук и любой актуальный веб-браузер;
- посредством фирменного Android/iOS-приложения под названием «Tether», которое предварительно необходимо скачать с Google Play, AppStore или с официального сайта компании-производителя.
В общем и целом, стандартная настройка беспроводного интернет-соединения в данной модели не должна вызвать особых трудностей у опытных пользователей, которые ранее настраивали роутеры. Однако, в этой процедуре есть немало моментов и нюансов, способных вызвать трудности.
Настройка роутера с помощью веб-браузера и компьютера
Перед тем как произвести подключение и настройку TP Link, необходимо узнать логин и пароль, а также адрес для входа в роутер. Для этого нужно обратить внимание на специальную наклейку, нанесенную внизу устройства. Там будут указаны все три значения, в данном случае это:
- логин: admin;
- пароль: admin;
- адрес-устройства: 192.168.0.1
После этого пользователю следует:
- Подключить роутер в сеть питания и включить его, а затем подсоединяем к маршрутизатору в синий Ethernet-разъем кабель от интернет-провайдера, а в любой из желтых — кабель для подключения напрямую к компьютеру или ноутбуку (для проведения настройки).

- Включаем компьютер и запускаем любой из браузеров, например, Google Chrome. В адресную строку вводим адрес роутера (без кавычек!), который предварительно узнали: «192.168.0.1» и нажимаем клавишу «Enter».
- Если все было сделано корректно, то загрузится интерфейс роутера, предназначенный для его настройки. В самом начале будет предложено выбрать язык, выбираем «Русский» и нажимаем на клавишу «Начало».

- В графе «Имя пользователя» вводим «admin», в графе «Пароль» так же прописываем «admin» (с маленькой буквы и без кавычек!) и жмем на виртуальную кнопку «Войдите».

- Так называемая «Быстрая настройка» в нашем случае не подходит. Поэтому, оказавшись в главном меню, нажимаем на вкладку «Сеть» и переходим в подпункт «WAN». Здесь меняем тип подключения c «Динамический» на «PPPoE» (выбираем из выпадающего списка, все зависит от предоставляемого типа подключения провайдером). В графе «PPP имя пользователя» вводим логин, который предоставил вам ваш провайдер, например, «Билайн». То же самое касается графы «PPP пароль» — здесь прописываем пароль, который предоставил провайдер и повторно вводим его. Обращаем внимание на пункт «Режим подключения», важно чтобы напротив него был выбран параметр «Всегда активно».

- Прокручиваем страницу вниз и, убедившись в правильности ввода и выбора параметров, нажимаем на «Сохранить».

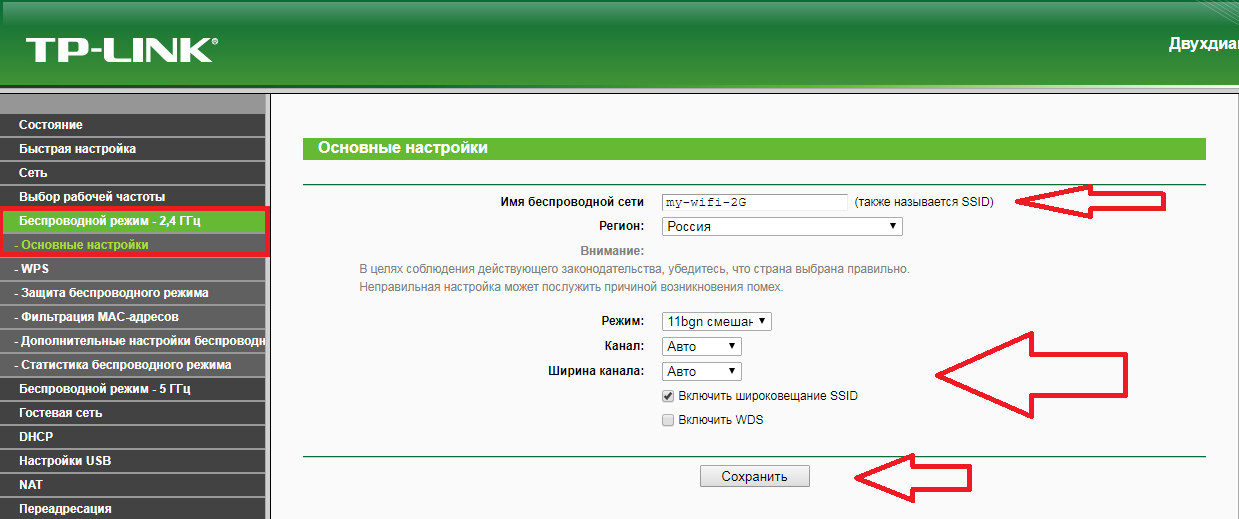
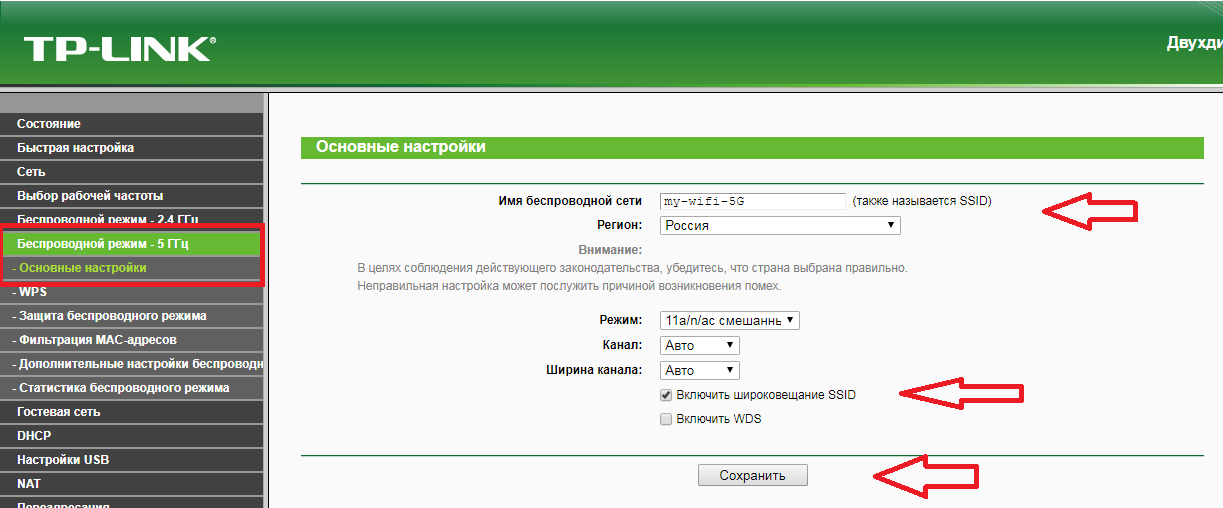
Настройка беспроводных режимов: 2,4 Ггц и 5 Ггц
Наличие режима беспроводного соединения 5 Ггц сделало данную модель роутера крайне востребованной. Приступить к его настройке следует уже после установки основных параметров, этапы которой изложены выше. Зайдя в главное меню роутера TP-Link Archer С50 AC1200, слева увидим две вкладки с настройками режимов: 2,4 Ггц и 5 Ггц.![]()
Стоит отметить, что их настройка полностью идентична. Рассмотрим подробности на примере востребованного 5 Ггц-режима:
- Переходим во вкладку «Беспроводной режим — 5 Ггц».
- Выбираем пункт «Основные настройки», где оставляем все по умолчанию, как показано на картинке ниже, и лишь задаем «Имя беспроводной сети», которое может быть абсолютно любым. И нажимаем на «Сохранить».

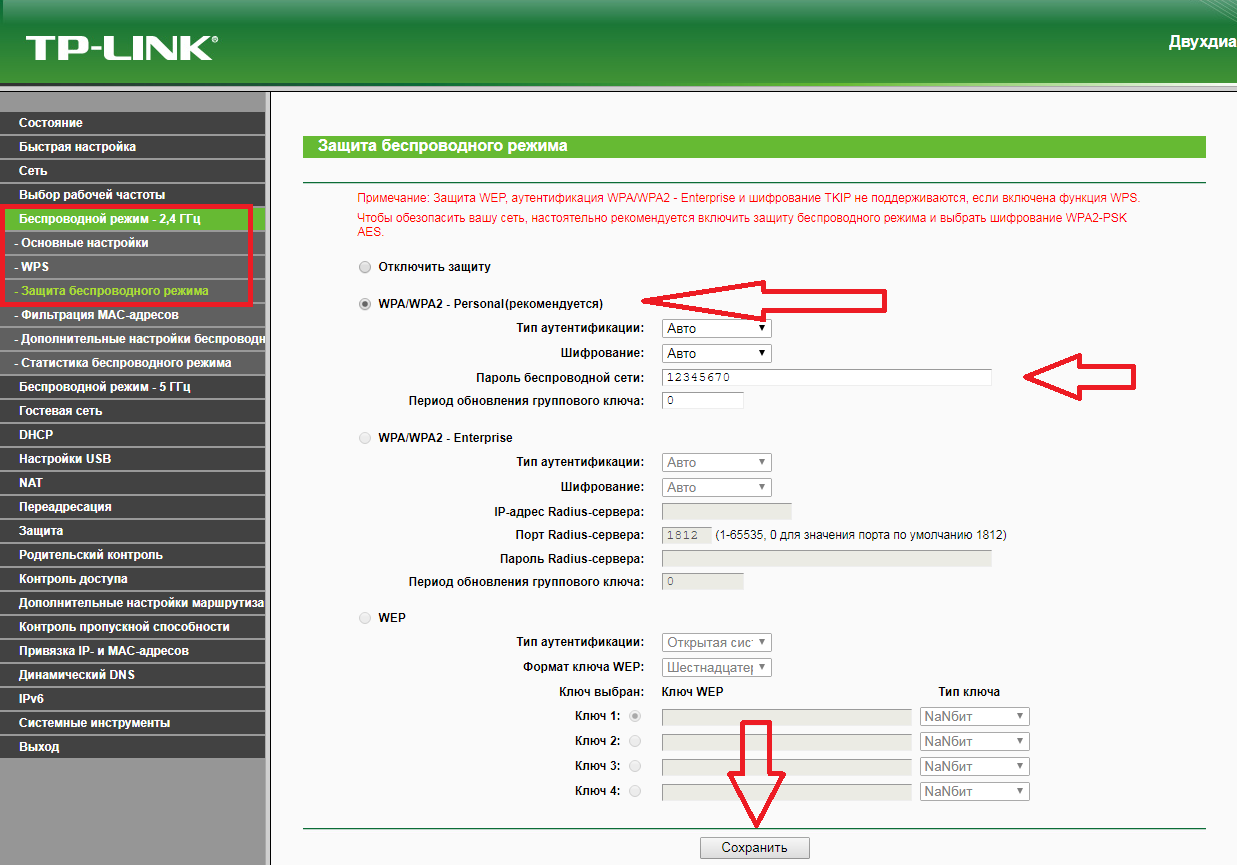
- Переходим в пункт «Защита беспроводного режима», а затем активируем режим «WPA/WPA2 — Personal», где оставляем все без изменения и только лишь придумываем и прописываем пароль в графу «Пароль беспроводной сети». Нажимаем «Сохранить».

- Перезагружаем роутер (по желанию).
Настройка подключения по протоколу L2TP на примере Билайн
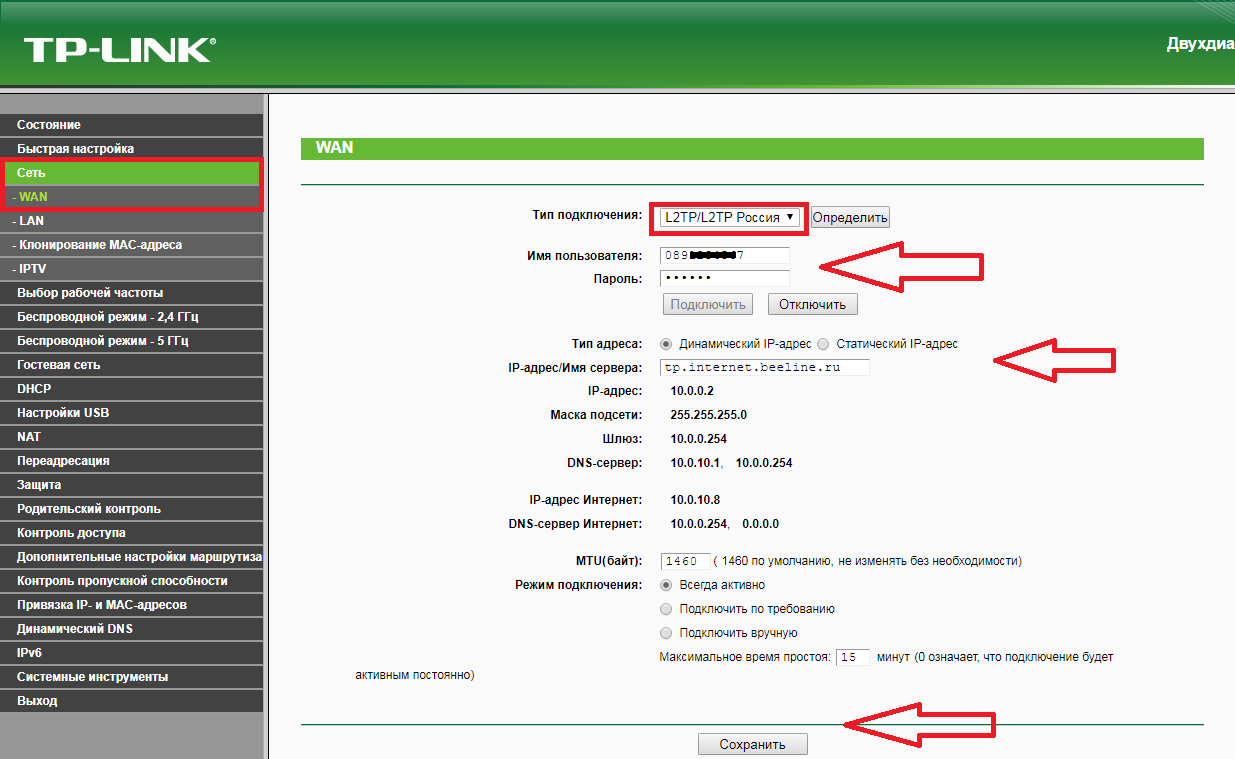
Интернет-провайдер «Билайн» использует протокол L2TP для доступа к глобальной сети. Однако настройка роутера TP-Link Archer C50 при выборе L2TP существенно отличается от оной в отношении PPPoE. Оcуществляем настройку данного режима следующим образом:
- Входим в роутер, введя адрес, логин и пароль, указанные на самом устройстве.
- Нажимаем на категорию «Дополнительные настройки».
- После переходим во вкладку «Интернет» и в пункте «IPv4» выбираем «Тип подключения» в выпадающем списке «L2TP/L2TP Россия».

- После этого следует прописать предоставленные Билайном логин и пароль в соответствующие категории: «Имя пользователи» и «Пароль». Не забываем поставить галочку напротив «Динамический IP-адрес». В параметр «IP-адрес/доменное имя VPN-сервера» нужно ввести адрес сервера, который предоставлен провайдером. В нашем случае это: tp.internet.beeline.ru.

- Листаем страничку с настройками вниз и в поле «Размер MTU» вписываем: 1460. Ставим в «Режим подключения» параметр «Авто». И жмем на «Сохранить».

- Перезагружаем роутер для того, чтобы изменения вступили в силу.
Настройка подключения по протоколу IPoE
IPoE в отличие от PPPoE является более современным и совершенным стандартом, на который активно переходят отечественные интернет-провайдеры. Процесс его настройки состоит из следующих шагов:
- Вводим логин/пароль.
- Переходим в раздел «Сеть».
- Заходим в подраздел «Интернет» и в параметре «IPv4» выбираем «Динамический IP-адрес» и жмем на «Сохранить».

- Перезагружаем устройство.
Заключение
Таким образом, настройка роутера TP-Link Archer С50 AC1200 и его основных режимов была произведена. Режимы и протоколы необходимо выбирать в соответствии с данными своего провайдера.