Выкладываю полезные инструкции по эксплуатации Ровер 75 от А до Я, с иллюстрациями</a>. Любезно передали, отредактировали и перевели английский текст с белорусского форума.Особенно полезно будет новичкам и не только ссылка в моей группе в разделе обсуждения, там полная инструкция по ремонту ровер, электрические схемы vk.com/club110860569
Инструкция по эксплуатации Ровер 75 на яндекс диске yadi.sk/i/UMeTj1sMA0T0wg
Инструкция по ремонту ровер 75 и mgzt. Haynes.
yadi.sk/i/00ixfLCNg_dMmg
Машины в продаже
Комментарии
24
Войдите или зарегистрируйтесь, чтобы писать комментарии, задавать вопросы и участвовать в обсуждении.
Все комментарии
-
nekesha
- Администратор
- Сообщения: 1668
- Зарегистрирован: 17 дек 2014, 03:43
- Благодарил (а): 2 раза
- Поблагодарили: 6 раз
Rover 75 1999-2006
Сообщение nekesha » 09 мар 2015, 15:08
Руководство по эксплуатации, техобслуживанию и ремонту Rover 75
- Выпуск: с 1999 по 2006 год
- Язык: Русский
Формат: PDF
Размер: 122 Мб
Скачать документацию Rover 75
для распаковки архива используйте пароль — avtoproblem-net.ru
краш тест
[youtube]https://youtu.be/PFzP0lCh2EA[/youtube]
Посмотреть инструкция для Rover 75 (1999) бесплатно. Руководство относится к категории автомобили, 37 человек(а) дали ему среднюю оценку 8.9. Руководство доступно на следующих языках: английский. У вас есть вопрос о Rover 75 (1999) или вам нужна помощь? Задайте свой вопрос здесь
Не можете найти ответ на свой вопрос в руководстве? Вы можете найти ответ на свой вопрос ниже, в разделе часто задаваемых вопросов о Rover 75 (1999).
Как перевести мили в километры?
1 миля равна 1,609344 километрам, а 1 километр — 0,62137119 милям.
Где я могу узнать идентификационный номер транспортного средства Rover?
Место размещения идентификационного номера транспортного средства зависит от марки и типа транспортного средства. Номер может быть выбит на раме транспортного средства или указан на номерном знаке. Чтобы узнать место расположения идентификационного номера транспортного средства лучше всего ознакомиться с руководством по эксплуатации Rover 75 (1999).
Что такое идентификационный номер транспортного средства (VIN)?
Идентификационный номер транспортного средства — уникальный для каждого транспортного средства идентификационный номер. Аббревиатура VIN расшифровывается как «Vehicle Identification Number» (Идентификационный номер транспортного средства).
Когда транспортному средству Rover требуется техническое обслуживание?
Регулярное техническое обслуживание необходимо всем транспортным средствам. С информацией о том, как часто необходимо проходить техническое обслуживание и чему именно стоит уделять особое внимание можно ознакомиться в инструкции по техническому обслуживанию. Как правило, транспортное средство требует технического обслуживания каждые 2 года или 30 000 километров пробега.
Когда следует заменять тормозную жидкость на Rover?
Тормозную жидкость рекомендуется менять каждые два года.
В чем разница между топливом E10 и E5?
В топливе E10 содержится до десяти процентов этанола, в то время как в E5 содержится менее пяти процентов. Соответственно, топливо E10 менее вредит окружающей среде.
Одна или несколько дверей не открываются изнутри. Что мне делать?
Скорее всего, замок оснащен защитой от детей и поэтому не может быть открыт изнутри. Процедура открытия замка с защитой от детей зависит от марки и типа замка.
Автомобильный радиоприемник не включается, что делать?
Если автомобильный радиоприемник не включен, на него не будет подаваться питание. Убедитесь, что красный провод подключен к контактному источнику питания, а желтый провод — к источнику питания постоянной мощности.
Инструкция Rover 75 (1999) доступно в русский?
К сожалению, у нас нет руководства для Rover 75 (1999), доступного в русский. Это руководство доступно в английский.
Не нашли свой вопрос? Задайте свой вопрос здесь
- Главная
-
Rover
-
Автомобили
-
75
-
Руководство по эксплуатации
Вы можете бесплатно скачать Руководство по эксплуатации для Rover 75.
Также вы сможете прочесть онлайн этот документ без скачивания.
Скачать Руководство по эксплуатации для Rover 75
Тип файла
PDF
Размер
4.2 Mb
Кол-во страниц
209
Просмотров
43369
Вы не робот?
60
Скачать файл:
rover-75-18-owner-s-manual.pdf
Читать онлайн Руководство по эксплуатации для Rover 75 (Страница 1)

Next →
- 1
- 2
- 3
- 4
- 5
- 6
- 7
- 8
- 9
- 10
- 11
- 12
- 13
- 14
- 15
- 16
- 17
- 18
- 19
- 20
- 21
- 22
- 23
- 24
- 25
- 26
- 27
- 28
- 29
- 30
- 31
- 32
- 33
- 34
- 35
- 36
- 37
- 38
- 39
- 40
- 41
- 42
- 43
- 44
- 45
- 46
- 47
- 48
- 49
- 50
- 51
- 52
- 53
- 54
- 55
- 56
- 57
- 58
- 59
- 60
- 61
- 62
- 63
- 64
- 65
- 66
- 67
- 68
- 69
- 70
- 71
- 72
- 73
- 74
- 75
- 76
- 77
- 78
- 79
- 80
- 81
- 82
- 83
- 84
- 85
- 86
- 87
- 88
- 89
- 90
- 91
- 92
- 93
- 94
- 95
- 96
- 97
- 98
- 99
- 100
- 101
- 102
- 103
- 104
- 105
- 106
- 107
- 108
- 109
- 110
- 111
- 112
- 113
- 114
- 115
- 116
- 117
- 118
- 119
- 120
- 121
- 122
- 123
- 124
- 125
- 126
- 127
- 128
- 129
- 130
- 131
- 132
- 133
- 134
- 135
- 136
- 137
- 138
- 139
- 140
- 141
- 142
- 143
- 144
- 145
- 146
- 147
- 148
- 149
- 150
- 151
- 152
- 153
- 154
- 155
- 156
- 157
- 158
- 159
- 160
- 161
- 162
- 163
- 164
- 165
- 166
- 167
- 168
- 169
- 170
- 171
- 172
- 173
- 174
- 175
- 176
- 177
- 178
- 179
- 180
- 181
- 182
- 183
- 184
- 185
- 186
- 187
- 188
- 189
- 190
- 191
- 192
- 193
- 194
- 195
- 196
- 197
- 198
- 199
- 200
- 201
- 202
- 203
- 204
- 205
- 206
- 207
- 208
- 209
Другие Автомобили Rover 75
-
Rover 75 Инструкция по эксплуатации
Просмотров
10289
Топ Rover Автомобили
-
75 Руководство пользователя
PDF файлов
2Просмотров
56437
Вопросы
-
слабая батарея
Ноутбуки
Acer
1310
Alex 12.02.2016 17:26
Ранее вы смотрели
Производители
All-Clad
Breckwell
Char-Griller
Columbian Home Products
Daxten
Olympia
Ozaki Worldwide
Status Acoustics
Ultralink
UNICOM Electric
Типы устройств
Морские GPS-система
Спринклеры (оросители)
Кухонная утварь
Оптические устройства хранения данных
CPAP машины (сипап)
Уличные камины
Уровни
Комплекты угловых и накидных ключей
Ротационные компрессоры
Контроллеры переменного объема хладагента
Устройства
Eizo FlexScan L461
Epson ELPCB01
FreeMotion FMTK7256P-JP1
Haier Air Conditioner HSU-09LEK03/R2(DB)
HUGFEN C31-2
JVC JLIP Video Capture Box GV-CB3E
Lexmark MX810DTE
McCulloch MCT203A20
Moen CRT Television Tl 172
Philips 227E4LSB/27
freeuserguide.ru
About Us
Contacts
Disclamers
Privacy Policy
Эта страница полезна для вас? Поделитесь ссылкой:
![]()
Owner’s Handbook Instruktieboekje Manuel du Conducteur Betriebsanleitung Manuale di Istruzioni Manual del Conductor Manual do Proprietário

Owner’s Handbook
Publication Part No. RCL 0306ENG — 3rd Edition
Published by Rover Group After Sales — Technical Communication
© Rover Group Limited 1999
All rights reserved. No part of this publication may be reproduced, stored in a retrieval system or transmitted in any form, electronic, mechanical, recording or other means without prior written permission from Rover Group Limited.
As part of Rover Cars environmental policy, this publication is printed on paper made from chlorine free pulp.

Congratulations on your choice of a Rover 75
We very much hope that this handbook, together with the other publications included in the literature pack, will provide the information you need in order to derive maximum pleasure from owning and driving your new car.
For your convenience, the handbook is divided into sections, each dealing with a different aspect of driving or caring for the car. Take a little time to read each one and get to know your new Rover as soon as you possibly can.
∙‘Before you drive’ — includes seat adjustment, seat belts and heating controls and deals with everything you need to know in order to settle comfortably into the car before you drive.
∙‘Driving controls’ — here the functions and operation of the switches, instruments and driving controls are explained.
∙‘Maintenance’ — includes information about the checks that you should carry out on a regular basis.
∙‘Emergency information’ — will help to solve some of those unavoidable little emergencies that occur from time to time, like replacing bulbs and fuses, or changing a wheel.
∙‘Technical Data’ — includes the technical specification for your car.
This warning symbol identifies procedures that must be followed precisely, or information that must be considered with great care, in order to reduce the risk
of personal injury or serious damage to the car.
 This symbol identifies those features that can be adjusted or disabled/enabled by a Rover dealer.
An asterisk appearing in the text, identifies features or items of equipment that are either optional, or are only fitted to some cars in the model range.
IMPORTANT
The specification of each Rover vehicle will vary according to territorial requirements and also from model to model within the vehicle range. Some of the information published in this handbook, therefore, may not apply to your vehicle. Contact your dealer if you are in any doubt.
Rover operate a policy of constant product improvement and therefore reserve the right to change specifications without notice at any time. Whilst every effort is made to ensure complete accuracy of the information in this handbook, no liabilities for inaccuracies or the consequences thereof, including loss or damage to property, or injury to persons, can be accepted by the manufacturer or the dealer who supplied the handbook, except in respect of personal injury caused by the negligence of the manufacturer or dealer.
2

Contents
|
1 BEFORE YOU DRIVE |
|
|
Controls …………………………………. |
4 |
|
Locks & Alarm ………………………… |
5 |
|
Seats …………………………………….. |
17 |
|
Seat Belts ………………………………. |
24 |
|
Airbag SRS ……………………………. |
30 |
|
Steering Column ……………………. |
38 |
|
Mirrors …………………………………. |
39 |
|
Windows ………………………………. |
43 |
|
Sunroof ………………………………… |
45 |
|
Heating & Ventilation …………….. |
47 |
|
Interior Equipment …………………. |
57 |
|
Audio System ………………………… |
65 |
|
In-Car Telephones …………………. |
66 |
|
Load Carrying ……………………….. |
67 |
|
Towing ………………………………… |
71 |
|
2 DRIVING CONTROLS |
|
|
Instruments ……………………………. |
72 |
|
Trip Computer ………………………. |
76 |
|
Warning Lights ………………………. |
79 |
|
Message Centre ……………………… |
86 |
|
Starting & Driving ………………….. |
95 |
|
Environmental Driving ……………. |
99 |
|
Catalytic Converter ………………. |
101 |
|
Automatic Transmission …………. |
103 |
|
Manual Gearbox …………………… |
109 |
|
Fuel System …………………………. |
110 |
|
Lights & Indicators ………………… |
114 |
|
Horn ………………………………….. |
120 |
|
Wipers & Washers ………………… |
121 |
|
Cruise Control …………………….. |
123 |
|
Brakes …………………………………. |
125 |
|
Traction Control ………………….. |
130 |
|
Parking Aid …………………………. |
132 |
|
3 |
MAINTENANCE |
|
|
Maintenance …………………………. |
134 |
|
|
Engine Compartment …………….. |
139 |
|
|
Engine …………………………………. |
143 |
|
|
Cooling System …………………….. |
145 |
|
|
Brakes …………………………………. |
147 |
|
|
Power Steering ……………………… |
148 |
|
|
Battery ………………………………… |
150 |
|
|
Washers ……………………………….. |
154 |
|
|
Wipers …………………………………. |
155 |
|
|
Tyres …………………………………… |
156 |
|
|
Cleaning & Vehicle Care ………… |
159 |
|
4 EMERGENCY INFORMATION |
|
|
Wheel Changing …………………… |
163 |
|
Emergency Starting ……………….. |
168 |
|
Vehicle Recovery ………………….. |
171 |
|
Fuses …………………………………… |
174 |
|
Bulb Replacement …………………. |
179 |
|
Parts & Accessories ………………… |
191 |
|
Identification Numbers …………… |
192 |
|
5 TECHNICAL DATA |
|
|
Technical Data ……………………… |
194 |
|
Index……………………………………. |
205 |

|
Controls |
|||||||||
|
1 |
2 |
3 |
4 |
5 |
6 |
7 |
8 |
9 10 11 12 |
13 |
|
26 25 24 |
23 |
22 |
21 |
20 |
19 |
18 |
17 16 |
15 |
14 |
|
|
H2744 |
||||||||||
|
1. |
Passenger airbag SRS |
14. |
Window controls |
|||||||
|
2. |
Audio system |
15. |
Boot release |
|||||||
|
3. |
Clock |
16. |
Headlight adjuster |
|||||||
|
4. |
Horn |
17. |
Instrument dimmer control |
|||||||
|
5. |
Direction indicators |
18. |
Cruise control switches* |
|||||||
|
6. |
Instrument panel |
19. |
Steering column adjustment lever |
|||||||
|
7. |
Driver airbag SRS |
20. |
Audio controls |
|||||||
|
8. |
Starter switch |
21. |
Heating/air conditioning controls |
|||||||
|
9. |
Wiper/washer controls |
22. |
Switch panel |
|||||||
|
10. |
Front* and rear fog light switches |
23. |
Hazard warning light switch |
|||||||
|
11. |
Main lighting switch |
24. |
Interior door lock switch |
|||||||
|
12. |
Bonnet release |
25. |
Gear lever |
|||||||
|
13. |
Mirror controls |
26. |
Handbrake |
4
Locks & Alarm
ALARM SYSTEM
Your car is fitted with a sophisticated electronic anti-theft alarm and engine immobilisation system. There are also a number of additional security features, some of which are selectable options. In order to ensure maximum security and operating convenience, you are strongly advised to gain a full understanding of the features and alternatives available, by thoroughly reading this section of the handbook.
Locking
H2698
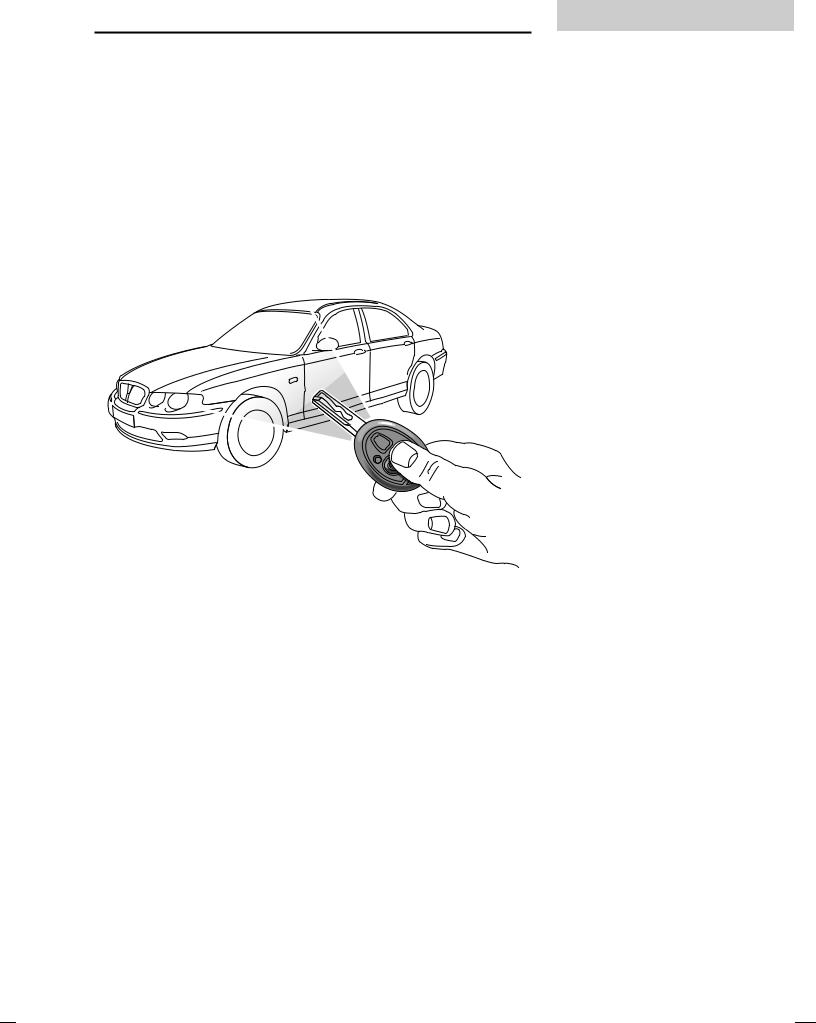
With the remote handset:
1.Shut the doors, bonnet and luggage compartment.
2.Press the lock (padlock symbol) button once:
∙all doors are superlocked (see ‘Superlocking’)
∙perimetric alarm activated (protects the doors, bonnet and boot)
∙interior space protection activated*
3.The direction indicator lights flash three times to confirm that the car is securely locked and the anti-theft alarm indicator light (in the instrument panel) starts to flash.
1
NOTE: FOR MAXIMUM SECURITY ALWAYS SUPERLOCK THE VEHICLE USING THE REMOTE HANDSET (except when passengers are to be left inside the car).
5

Locks & Alarm
With the key:
1.Insert the key and turn the door lock towards the rear of the car:
∙all doors locked (not superlocked)
∙perimetric alarm activated (protects the doors, bonnet and boot)
∙NO INTERIOR SPACE PROTECTION
2.The direction indicator lights flash three times to confirm that the car is securely locked and the anti-theft alarm indicator light (in the instrument panel) starts to flash.
Unlocking
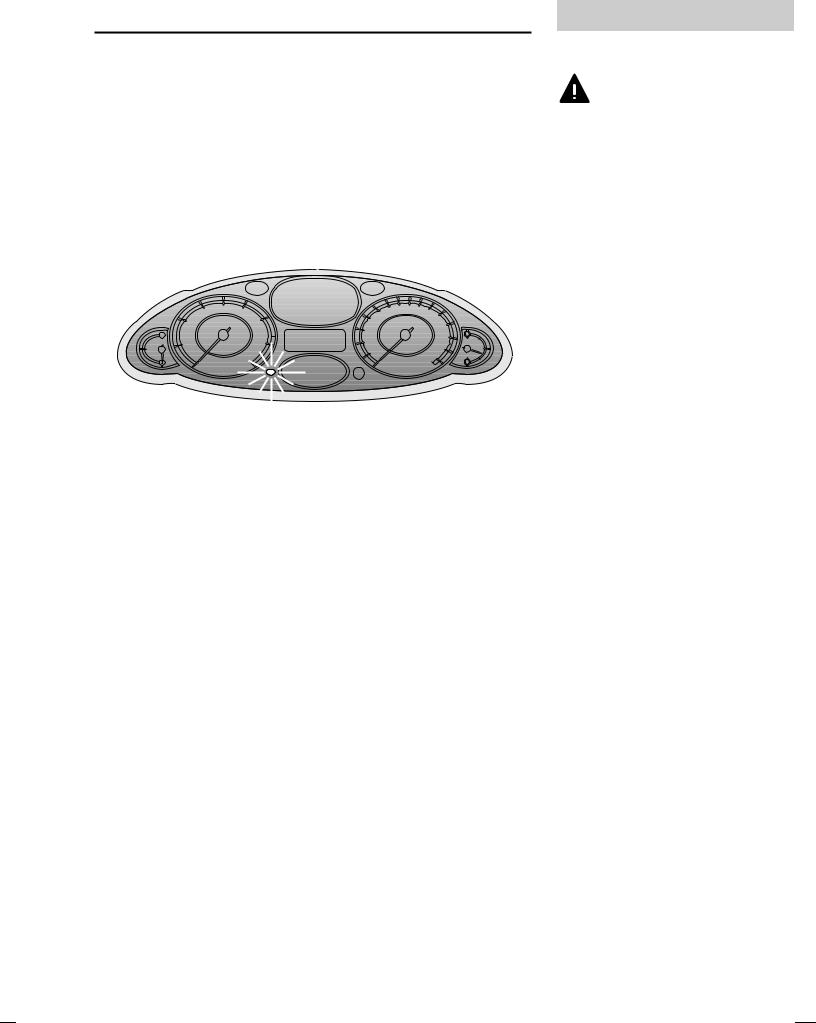
With the remote handset:
∙Press the unlock (Rover) button once. This will disarm the alarm and unlock the driver’s door only (see ‘Single point entry’).
∙Press the unlock button twice to disarm the alarm and unlock ALL the doors.
In either case, the direction indicator lights flash once and the interior lights illuminate.
With the key:
∙Turn the key in the driver’s door lock towards the front of the car to disarm the alarm and unlock the driver’s door only (see ‘Single point entry’).
∙Turn the key twice (or press the interior locking button), to unlock ALL the doors.
Using the remote handset
While it is not necessary to point the handset at the car, the handset must be within range when the buttons are pressed. Note that the operating range may vary depending upon handset battery condition and may sometimes be limited by physical and geographical factors beyond your control. From a security point of view, it may not be wise to unlock unless you are within a few feet of the car.
Operating tip: Locking with the key will not activate superlocking.
6
Locks & Alarm
Superlocking
Provided all the doors are fully closed, the superlocking feature is activated automatically whenever the car is locked using the remote handset. Superlocking immobilises the interior door handles, thereby preventing an intruder from gaining entry by smashing a window and reaching inside the car to operate the door handles.
Anti-theft alarm indicator light
H2775
This light provides information about the status of the alarm system, as follows:
∙When the alarm is armed:
The light flashes RAPIDLY while the alarm is arming itself. After ten seconds, the light adjusts to a slower frequency and continues to flash as an anti-theft deterrent until the alarm is disarmed.
∙When the alarm is partially armed: (mislock)
The light flashes SLOWLY for 10 seconds, then flashes as an anti-theft deterrent (as above) until the alarm is disarmed.
∙When the alarm has been triggered:
If the light flashes after the car is unlocked, this indicates that the alarm has been triggered during the driver’s absence. The light will flash for up to one minute or until the starter switch is turned on.
1
For safety, NEVER use Superlocking if
passengers are to remain inside the car — in an emergency they would not be able to escape. Also, on cars fitted with interior space protection, any movement from inside the car would activate the alarm.
7

Locks & Alarm
Mislock
If the driver’s door is not fully closed when the handset lock button is pressed, the alarm sounder or vehicle horn will sound once, indicating a mislock. In this case, none of the doors will lock and the alarm system will not be armed.
If a passenger door, bonnet or boot lid is not fully closed when the handset lock button is pressed, the alarm sounder or vehicle horn will sound once, indicating a mislock. However, the ‘partial arming’ attributes of the security system will enable as much of the system to be armed as possible (all fully closed door, bonnet or boot apertures will be protected, but an open door will not!). As soon as the open aperture is closed, the system will automatically revert to an armed state.
If the alarm sounds
If the alarm is triggered, the alarm sounder or vehicle horn will sound for 30 seconds before switching off and resetting itself to the same protection status that existed prior to the alarm being triggered.To silence the alarm, press either button on the remote handset, or lock/unlock the door using the key.
Single point entry
This is a personal security feature, which enables the driver’s door alone to be unlocked, leaving the other doors in a locked state. It can be operated by the remote handset as follows:
Press the unlock button once (or turn the key in the driver’s door lock towards the front of the car) to unlock the driver’s door. Press the unlock button (or turn the key) a second time to unlock the remaining doors.
8
NOTE: If a mislock occurs as a result of an open door, the superlocking and interior space protection features will not be activated, until the door is closed and the locking process is repeated.
This feature can be disabled by a Rover dealer.
Locks & Alarm
Interior locking switch
H2781
This is a personal security feature which allows the driver to lock (or unlock) all the doors from inside the car (while driving or with the car stationary). Press the closed padlock symbol on the switch to lock (the alarm will not be armed), and the open padlock symbol to unlock.
Interior door handles and door sill locking buttons
From inside the car, each door can be individually locked by depressing the appropriate door sill button. However, doors cannot be unlocked by raising the sill button.
Use the door handles to unlock, as follows:
1.First operation of the door handle unlocks the door.
2.Second operation of the door handle opens the door.
Speed-related locking*
This security feature locks all the doors automatically when the road speed exceeds 4 mph (7 km/h).
Note that this feature is not selectable by the driver, and that operation of the door locks by any other means (interior locking switch on the centre console, for example) will disable the speed-related locking function for the remainder of the journey, or until the starter switch is turned off and on again.
1
NOTE: The locking switch will not operate the locks if the alarm has been armed.
Speed related locking can be selected or deselected by a Rover dealer.
9
![]()
Locks & Alarm
Interior space protection*
Never activate interior space protection if
passengers are to be left inside the car — any movement will activate the alarm.
H2700
Interior space protection (ultrasonics) is designed to protect the interior of the car from intrusion (entry by a thief through a smashed window, for example). A pair of ultrasonic sensors monitor the interior space and activate the alarm if air movement is detected in the passenger compartment.
Using the handset: Interior space protection is activated automatically whenever the remote handset is used to set the alarm.
Key operation: Using the key will NOT activate interior space protection.
ENGINE IMMOBILISATION
Engine immobilisation is an important aspect of the security system, it is designed to safeguard the vehicle from theft, should the driver forget to lock the doors and prevents the engine from being started unless the GENUINE handset key is inserted into the starter switch. Engine immobilisation is automatic whenever any of the following conditions occur.
∙Three seconds after the starter switch has been turned off.
∙If the key is removed from the starter switch.
The engine will be re-mobilised automatically whenever the genuine handset key is inserted into the starter switch and turned to the first position.
10
NOTE: Interior space protection cannot be activated if a door, window or sunroof is open, or if the starter switch is turned on.
NOTE: If the handset is lost or fails to operate, the emergency key can be used to re-mobilise and start the engine.
Locks & Alarm
REMOTE HANDSET BATTERY
The battery should last for approximately three years dependent upon use. Always fit a Rover YWK10003 or a Panasonic CR2032 replacement battery (available from a Rover dealer).
When the battery needs replacing it will be apparent from a gradual deterioration in range and performance.
On cars fitted with a message centre, a warning icon and message will be displayed when the battery needs replacing (see ‘Message centre’).
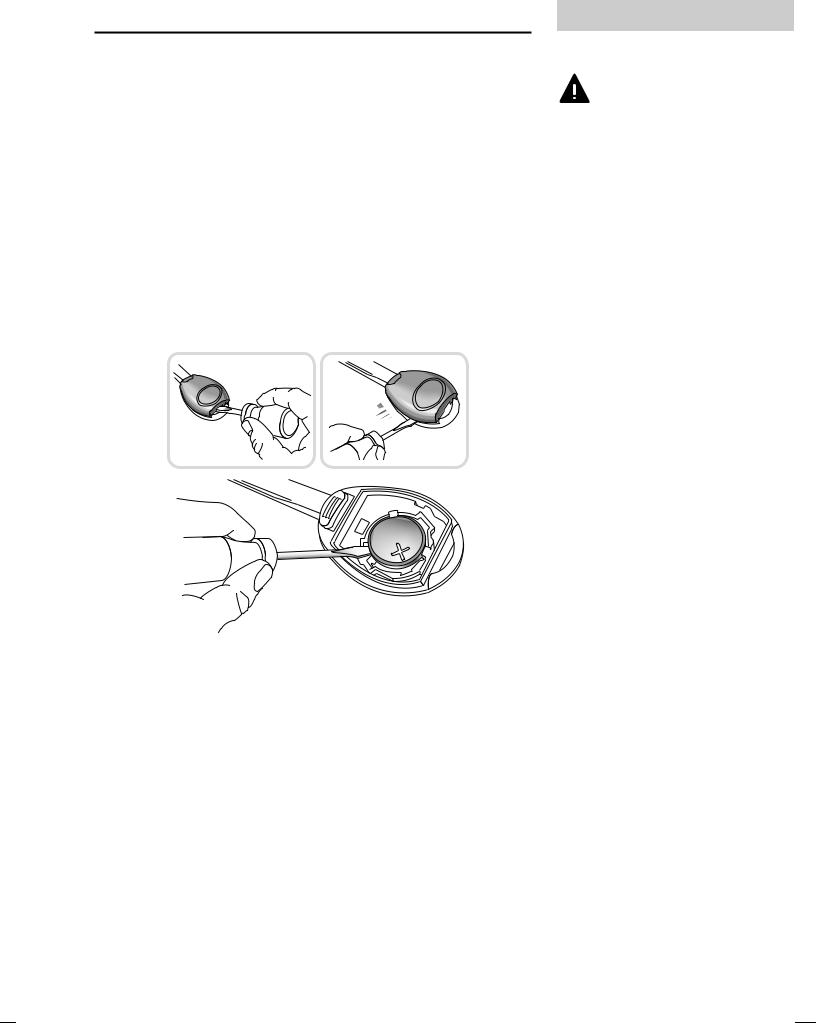
Battery renewal
H2692
1.Insert the blade of a small flat-bladed screwdriver into the slot at the rear of the handset (see illustration) and prise the rear of the back upwards.
2.Insert the screwdriver blade horizontally into the side of the handset and then slide it towards the key. Lift off the back of the handset.
3.Use a small flat-bladed screwdriver to prise the battery from its mounting (see illustration), taking care to avoid touching the circuit board or the metal battery contacts.
1
The handset contains delicate electronic
circuits and must be protected from impact and water damage, high temperatures and humidity, direct sunlight and the effects of solvents, waxes and abrasive cleaners.
11

Locks & Alarm
4.Fit the new battery, ensuring that correct polarity is maintained (‘+’ side facing up).
5.Press the two halves of the handset firmly together and ensure that both halves are fully joined to prevent dirt or moisture from entering the handset.
6.To resynchronise the handset, operate either button four times in quick succession. On the fourth press the door should lock or unlock, confirming resynchronisation.
The handset is now ready for use.
12
Care point: Finger marks will adversely affect battery life; if possible, avoid touching the flat surfaces of the battery and wipe them clean before fitting.

Locks & Alarm
KEYS AND HANDSETS
You have been supplied with two remote handsets with integral keys which operate all locks.
The keys supplied with your car are programmed to your security system — they CANNOT be re-programmed and the engine cannot be started without a key programmed to your car. If a key is lost or broken, a replacement can only be ordered from a Rover dealer.
If you lose a key, contact your Rover dealer; a key reported lost will be deactivated. If the key is recovered, your Rover dealer can have it reactivated.
1
Keep the spare handset key in a safe place — NOT
IN THE VEHICLE!
NOTE: Rover dealers do not stock spare keys, time has to be allowed for replacements to be programmed to your security system and then delivered to the dealer.
13
Locks & Alarm
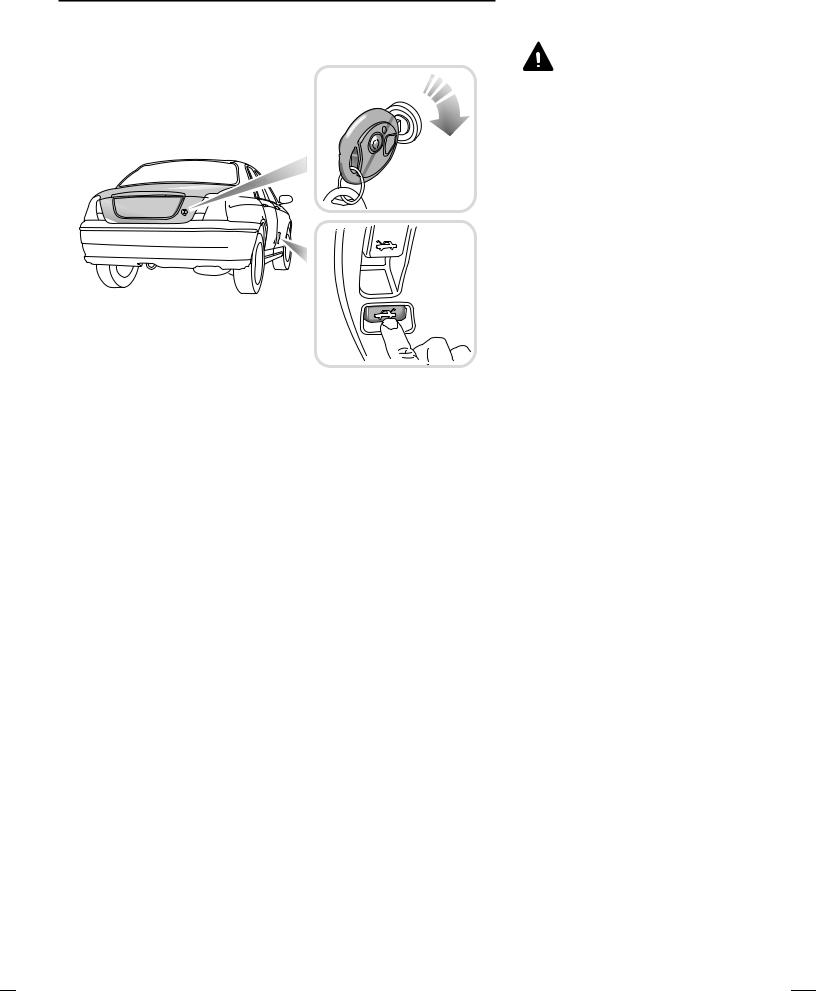
LUGGAGE COMPARTMENT
Do not drive with the luggage compartment
open, as poisonous exhaust gases will enter the car.
H2706
To open, turn the key clockwise in the lock or, from inside the car, press the release button in the driver’s footwell. The luggage compartment and interior lights switch on automatically when the boot lid is opened.
The luggage compartment is automatically locked when the boot lid is closed.
For convenience, with the alarm system armed, the luggage compartment can be unlocked and opened USING THE KEY, without activating the alarm (the rest of the car will remain protected and the engine immobilised during this process). The alarm will automatically rearm as soon as the boot lid is closed.
14
Operating tip: The interior release button is not operational when the alarm system is armed.
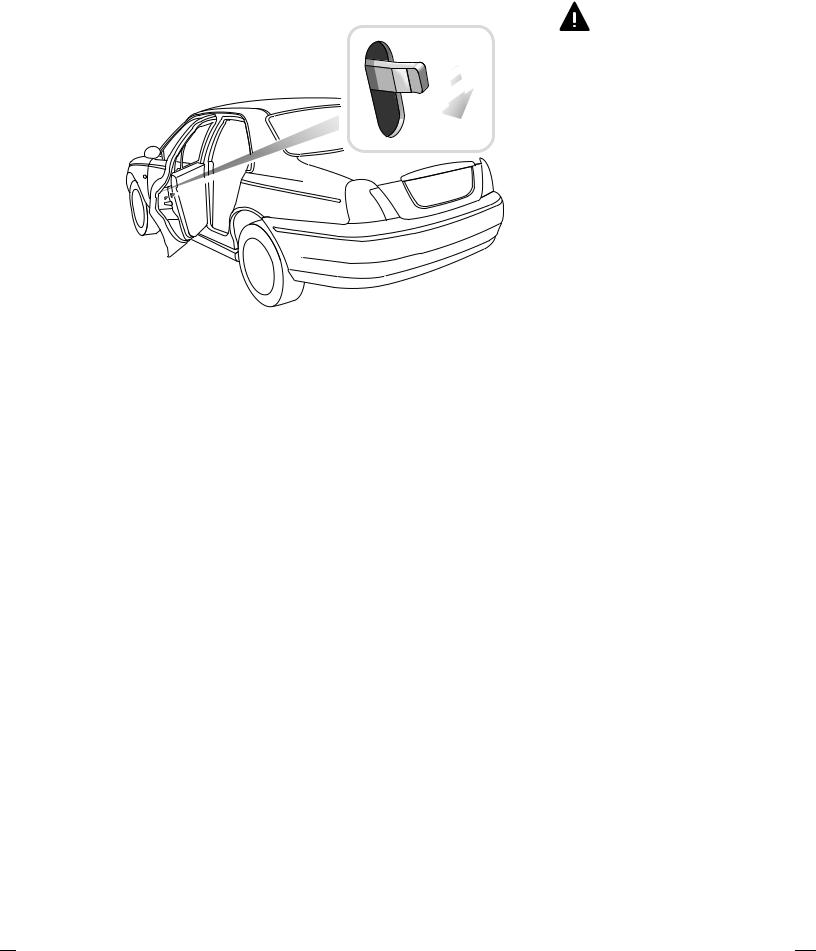
CHILD-PROOF LOCKS
NEVER leave children unsupervised in the
vehicle.
H2691
Move the locking levers on the rear doors down to engage the child locks.
With the child-proof locks engaged, the rear doors cannot be opened from inside the car, thereby avoiding the risk of a door being opened accidentally while the car is moving.
15
Locks & Alarm
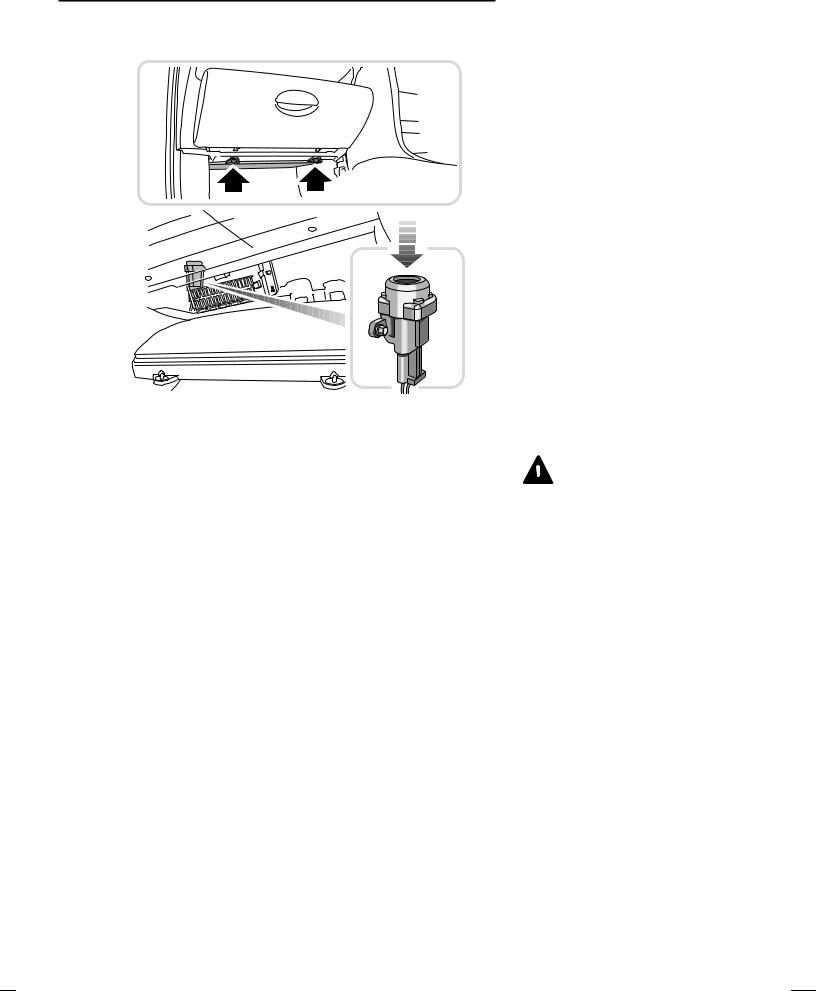
DOOR LOCKING CUT-OFF SWITCH
H2682
An inertia switch, operational only with the alarm disarmed, will unlock the doors in the event of an accident or sudden impact.
When the switch operates, the interior lights illuminate until the system is reset by pressing the rubber top (arrowed in illustration). In addition, the hazard warning lights flash until switched off.
The inertia switch is located behind the glovebox and can be reached from underneath by releasing the four fixings securing the access cover.
The inertia switch also cuts off the fuel supply (see ‘Fuel cut-off switch’ ).
Always check for fuel
 leaks before resetting the switch!
16
Seats
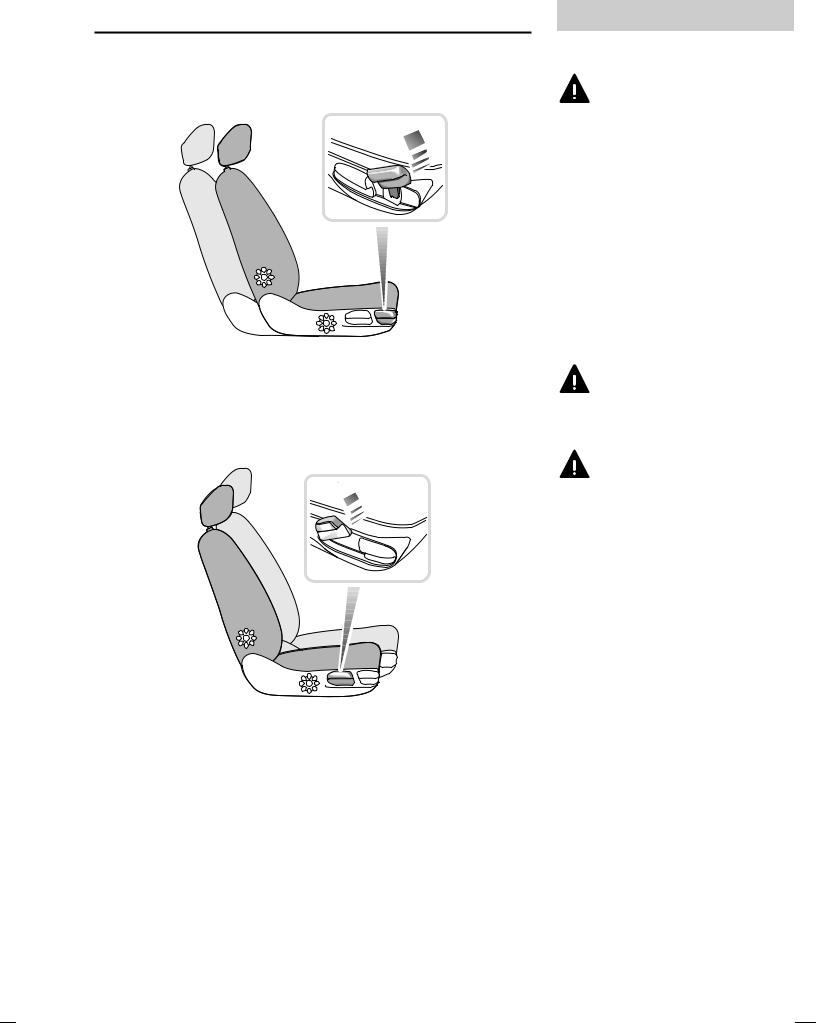
MANUALLY OPERATED FRONT SEATS* Forward/rearward adjustment
H2746
Lift the lever and slide the seat into position. Make sure the seat is locked in position before driving.
Height adjustment (Driver’s seat only)
H2745
Ensure the seat is occupied before adjusting the height. Lift the lever and apply weight to lower the seat rearwards, or allow the seat to rise forwards, as required.
1
Your car is fitted with side impact airbags. Refer to
the Airbag SRS section of this handbook before fitting seat covers, or carrying out any repair or retrimming operations to the seat or seat covers.
DO NOT adjust the seats while the car is moving.
Take care when adjusting the height of the driver’s
seat — a rear seat passenger’s feet might become trapped when lowering the seat rearwards.
Operating tip: While adjusting the height, grip the steering wheel to more accurately control the rate of rise and fall.
17
Seats
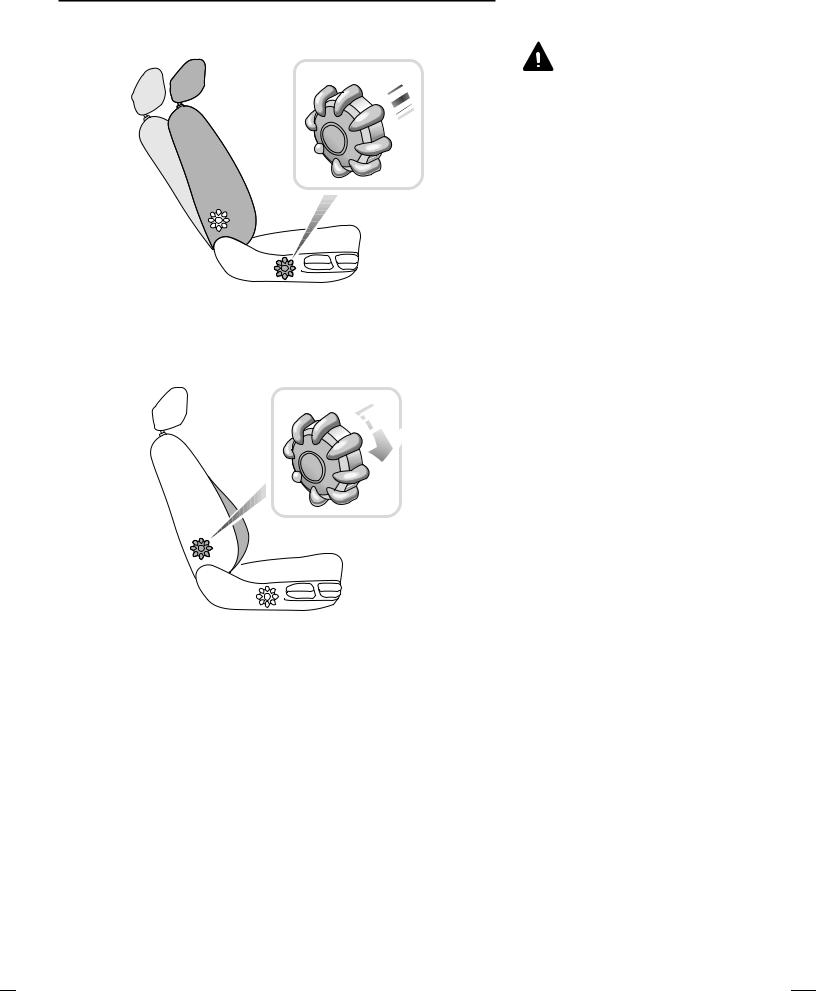
Backrest adjustment
DO NOT allow front seat occupants to travel with
the seat backs reclined steeply rearwards. Optimum benefit is obtained from the seat belt with the backrest angle set to approximately 25° from the upright (vertical).
H2747
Rotate the handwheel to adjust.
Lumbar support adjustment*
H2748
Rotate the handwheel to increase or decrease support to the lumbar region of the back.
18
Seats
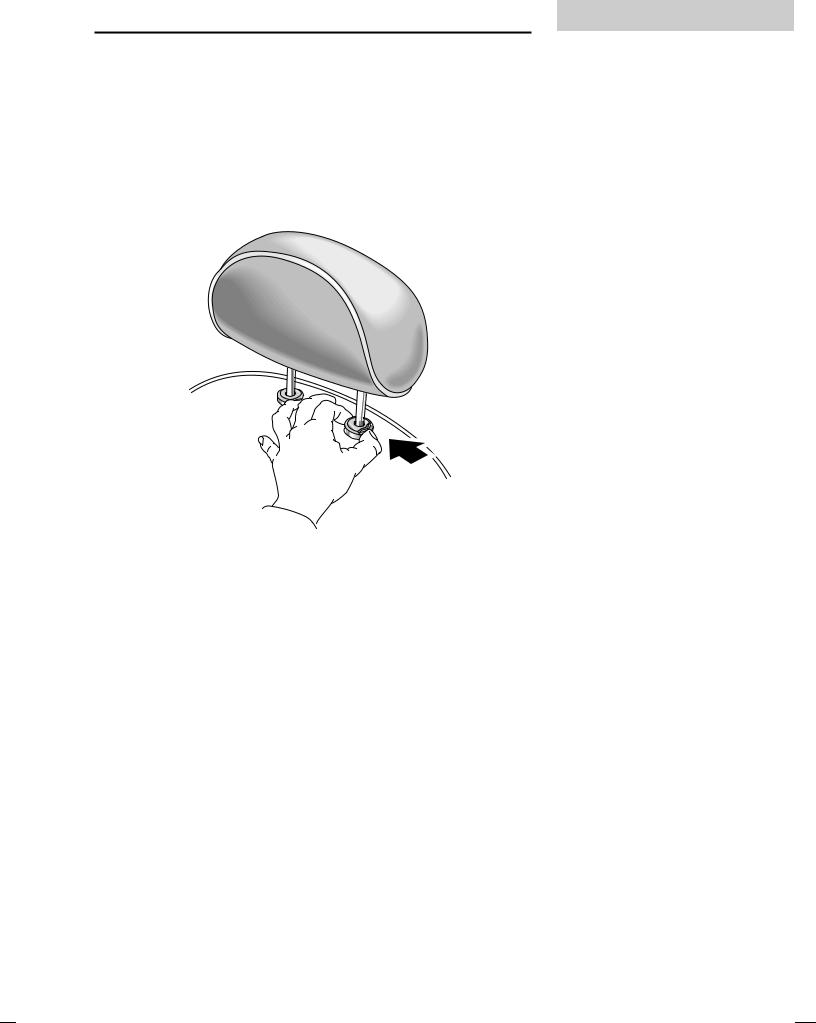
HEAD RESTRAINTS
Head restraints are designed to restrain rearward movement of the head in the event of an accident or sudden stop — a properly adjusted head restraint can considerably reduce the risk of neck and head injuries.
Head restraint adjustment
H3248
1
NOTE: Where possible, adjust the head restraint so that the cushion is level with the back of the head — NOT THE NECK!
Raise or lower the restraint until the cushion is level with the back of the head.
To lower the restraint, depress the button (arrowed) and push the restraint downwards. To raise the restraint, pull the restraint upwards without depressing the button.
On some models the angle of the restraint can be adjusted. Tilt the restraint to ensure it is as close to the back of the head as possible.
To remove the head restraint, depress the button on the left hand mounting and pull the restraint upwards.
19
![]()
Seats
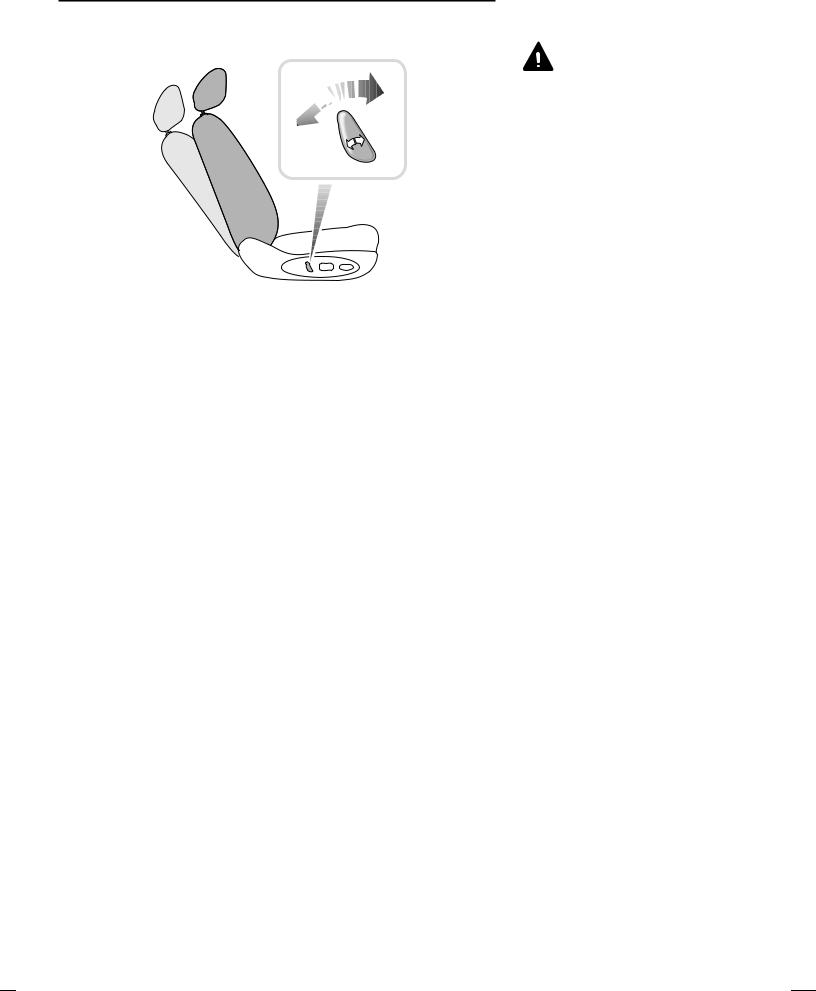
POWER-OPERATED FRONT SEATS*
Seat adjustment is available when the starter switch is in the second position.
If the driver’s seat is equipped with the memory facility, it can also be adjusted when the starter switch is in the first position, or with a front door open when the starter switch is off.
Information on operating the heated front seats* can be found in the ‘Heating & ventilation’ section of the handbook.
Forward/rearward adjustment
H2750
Push and hold the switch forwards or rearwards to move the seat to the desired position.
Lumbar support and head restraints
For information on adjusting lumbar support and head restraints, please refer to ‘Manually operated front seats’, earlier in this section.
20
Your car is fitted with side impact airbags. Refer to
the Airbag SRS section of this handbook before fitting seat covers, or carrying out any repair or retrimming operations to the seat or seat covers.
DO NOT adjust the seats while the car is moving.
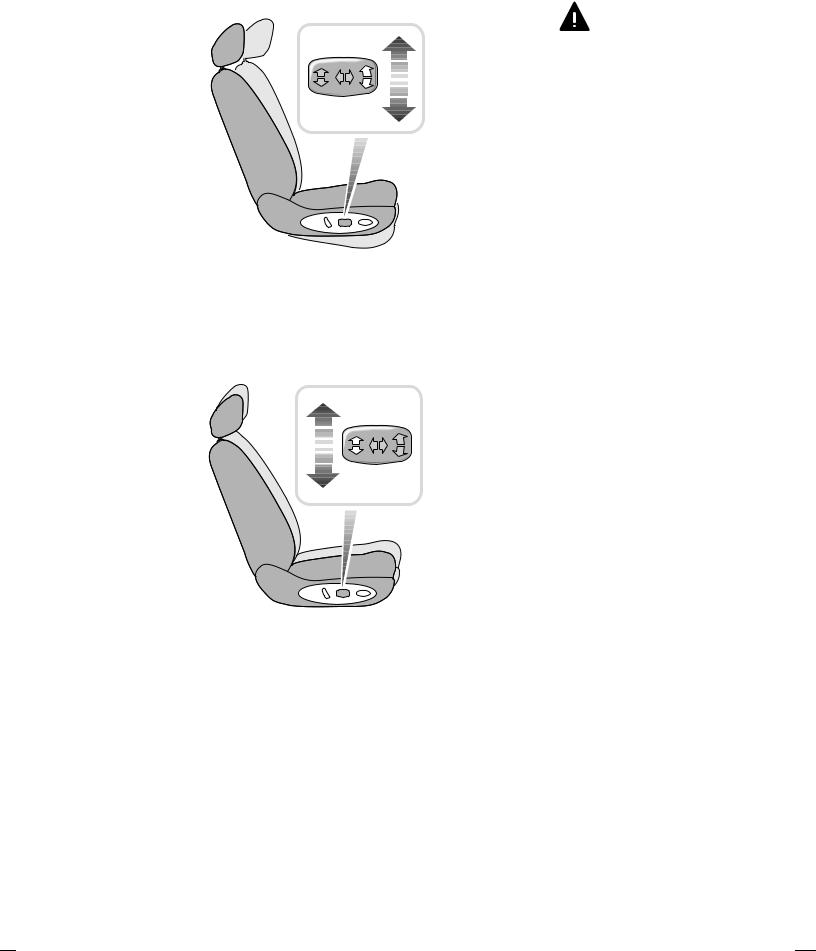
Seat cushion angle (Driver’s seat only)
DO NOT adjust the seats while the car is moving.
H2752a
Push the front of the switch up or down to tilt the seat cushion to the desired position.
Seat cushion height (Driver’s seat only)
H2753
Push the switch up or down to raise or lower the cushion.
21
Seats
Backrest adjustment
DO NOT allow front seat occupants to travel with
seat backs reclined steeply rearwards. Optimum benefit is obtained from the seat belt, with the backrest angle set to approximately 25° from the upright (vertical).
H2754
Twist the switch forward or backwards until the desired angle is achieved.
22
Seats
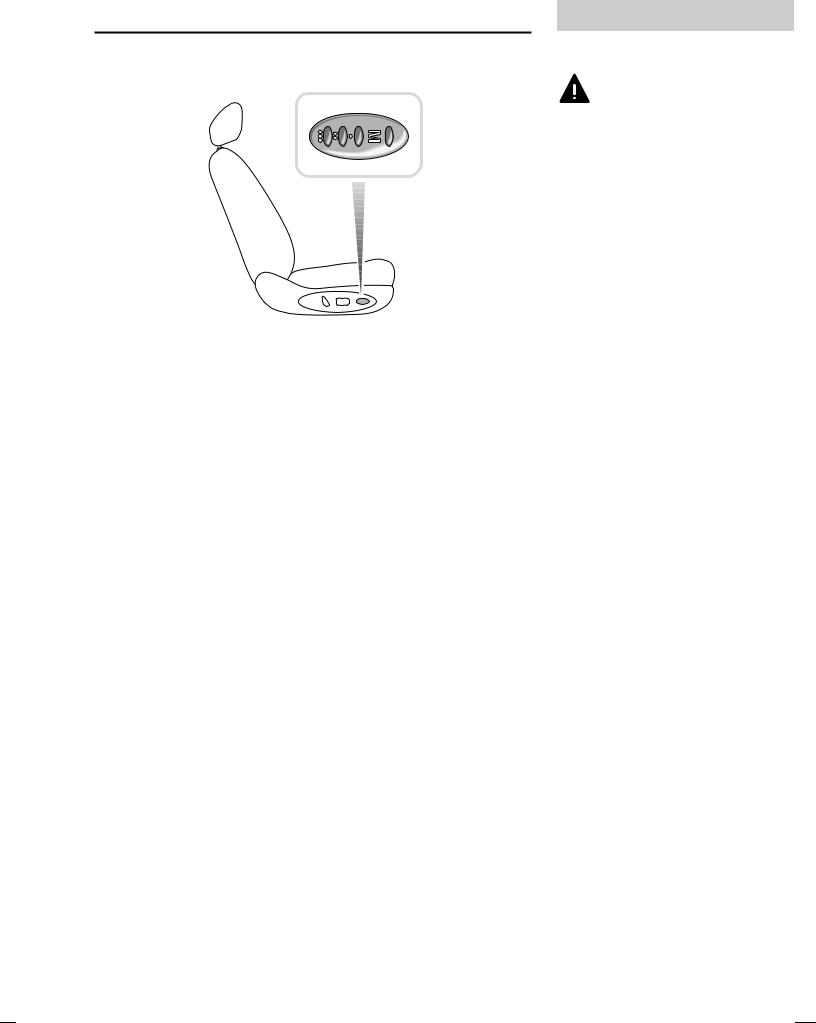
DRIVER’S SEAT MEMORY FACILITY*
H2755
Your car can memorise three different driver seating positions. To store the positions in the system memory, the starter switch must be turned to the first or second position.
Adjust the seat to the required position and store the settings by pressing and holding the memory store switch (‘M’) and, with the memory store switch still depressed, press and release one of the pre-set buttons (‘I’, ‘II’ or ‘III’). Finally, release the memory store switch; a single chime will sound to confirm that the operation was successful.
To recall a stored position after the seat has been moved by another driver, open the driver’s door and press the appropriate memory pre-set button. The seat will return to the position stored by that memory pre-set, a double chime will sound to confirm that the operation is complete.
Lazy seats
The lazy seat facility enables the handsets or keys to be used to recall seat positions, when you unlock the doors.
Press and hold the handset unlock button or turn and hold the key in the unlock position, the driver’s seat moves to the position stored in pre-set 1. An alternative driver’s setting can be programmed using pre-set 2. As before, position the seat and programme pre-set 2 then, when the spare key is used to activate ‘Lazy seats’, pre-set 2 will be selected.
1
DO NOT adjust the seats while the car is moving.
Before activating the seat memory and lazy seat functions, ensure that the area immediately surrounding the seat is clear of obstructions and that all occupants are clear of moving parts.
Operating tip: If a pre-set is selected accidentally, stop seat movement by pressing any of the seat control buttons.
NOTE: If the car is in motion, the pre-set will need to be pressed and held for the seat to move. This is to prevent inadvertent operation of the memory pre-sets, which could cause the seat to move into a position in which the driver is unable to drive safely.
23

Seat Belts
SEAT BELT SAFETY
The seat belts fitted to your car are intended for use by adult sized occupants and must be used by one occupant only.
Ensure that all passengers are correctly strapped in at all times and be sure to observe the following precautions:
∙DO NOT allow occupants to travel with the seat backs reclined steeply rearwards. Optimum benefit is obtained from the seat belt with the backrest angle set to approximately 25° from the upright (vertical).
∙Adjust seat belts to eliminate any slack. Do not pull the belt away from the body while travelling — to be fully effective, the seat belt must remain in full contact with the body at all times.
∙Fit the lap strap across the PELVIS (never across the abdomen), ensuring that the diagonal strap passes across the CHEST and SHOULDER without bearing on the neck.
∙DO NOT wear seat belts over hard, sharp or fragile items in clothing, such as pens, keys, spectacles etc.
∙Ensure that seat belts are not twisted or obstructed in any way.
∙Always replace a seat belt assembly that has withstood the strain of a severe vehicle impact, or if the webbing shows signs of fraying.
∙Where possible, use the seat belts to secure luggage carried on the seats — in an accident, loose items can be thrown around inside the car, causing serious injury.
∙In most countries, all occupants are required by law to wear a seat belt, unless they have been issued with a medical exemption certificate.
∙During pregnancy, women should wear the lap belt across the hips below the baby, with the diagonal belt passing across the shoulder, between the breasts and to one side of the baby — if in doubt, consult a doctor.
The airbag supplementary restraint system (SRS) is
designed to add to the overall effectiveness of the seat belts. It does not replace them. SEAT BELTS MUST ALWAYS BE WORN!
24

Seat Belts
SEAT BELTS
To minimise injury in the event of an accident, it is important that seat belts are worn correctly. Read the instructions below and the advice contained under the heading ‘Seat belt safety’ on a previous page.
Fastening the belt
H2731
Pull the seat belt steadily over the shoulder and across the chest and, ensuring the webbing is not twisted, insert the metal tongue plate into the appropriate buckle — a ‘click’ indicates that the belt is securely locked.
Seat belts are designed to bear upon the bony structure of the body (pelvis, chest and shoulders) and can only be worn safely with the seats in a near-upright position; DO NOT allow the front passenger to travel with the seat steeply reclined (see also ‘Seating positions’ in the ‘Airbag SRS’ section of this handbook).
Releasing the belt
Press the red button on the seat belt buckle.
1
Ensure that all seat belts are worn correctly — an
improperly worn seat belt increases the risk of death or serious injury in the event of a collision.
NOTE: Do not allow foreign matter (particularly sugary food and drink particles) to enter the seat belt buckles — such substances can render the buckles inoperative.
NOTE: Where possible, rear seat passengers should adjust their position to enable the seat belt webbing to cross the shoulder without pressing on the neck.
25
Seat Belts
Upper anchorage height adjustment
To reduce the likelihood of injury in an accident, the height of the front seat belt upper anchorage adjusts automatically as the seat is moved either forwards or backwards. The height CANNOT BE ADJUSTED MANUALLY!
CHILD SEATS
Children are more likely to receive injuries from inflating airbags than taller occupants (see ‘Airbag). For thisSRS’ reason, it is recommended that children should always be seated in the rear of the vehicle, in a child safety seat or restraint system appropriate to their age and size. The range of safety seats approved for use in your car is outlined in the Rover accessories brochure, which is available from your Rover dealer.
For optimum protection, it is recommended that children weighing up to 13 kg (29 lb — or approximately 18 months of age) are restrained in a Rover approved rear facing child seat in an outer rear seating position.
All infant and child restraint systems are designed to be secured in the car by means of an adult seat belt.
When installing and using any infant or child restraint system, always follow the manufacturer’s instructions. Failure to properly secure the child restraint system can endanger the child in a collision or sudden stop and cause injury to other passengers.
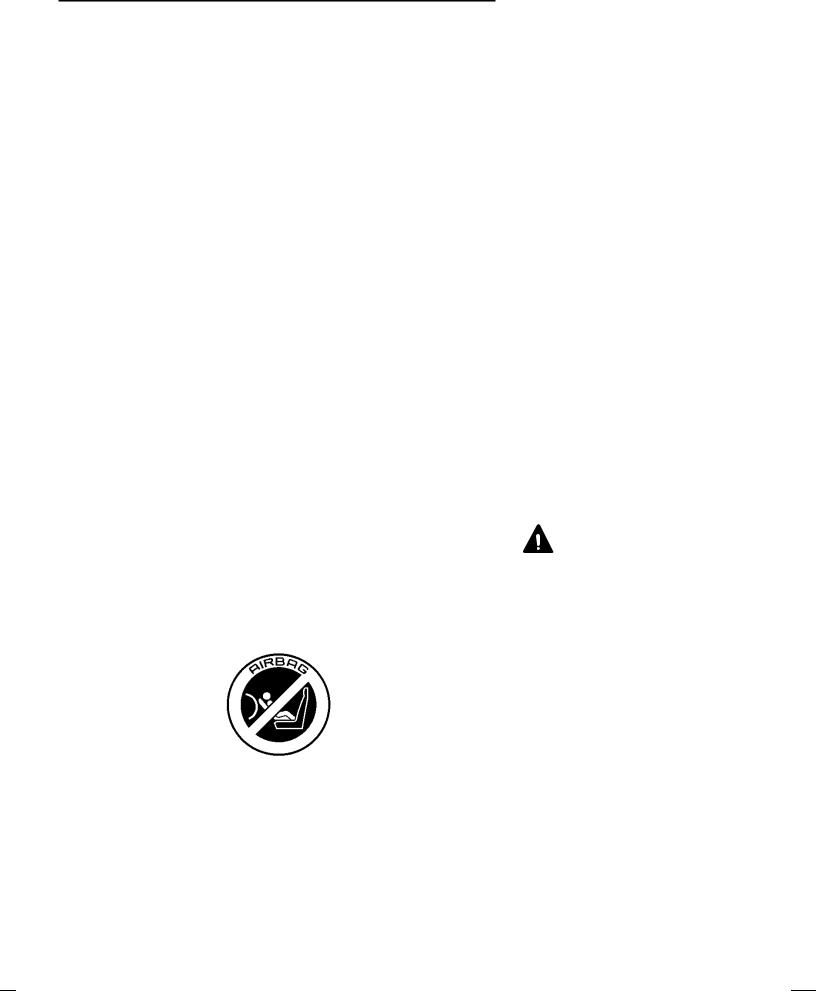
The above symbol affixed to the fascia panel of your car, warns against the use of a REAR FACING child seat in the front passenger seat. This type of child seat could cause serious injury to your child in the event of an airbag deployment.
NOTE: Accident statistics show that children are safer when properly restrained in the rear seating positions than in the front.
DO NOT install a rearward facing child seat in the
front passenger seat — an inflating airbag could impact with the seat. Failure to follow this advice could result in serious injury, or even death for the child.
26

Seat Belts
Seat belt locking mechanism
All passenger seat belts have a special locking mechanism which aids the retention of child seats. The procedure to install a child seat is as follows:
1.Install the child seat in the car, attach the seat belt and secure the buckle in accordance with the manufacturer’s fitting instructions.
2.Pull on the shoulder section of the belt to unreel all of the remaining webbing to the limit of its travel. This will engage the automatic locking feature, which then acts as a ratchet, only allowing the webbing to retract.
3.Allow the seat belt to retract onto the child seat (a
‘clicking’ sound will confirm that the ratchet has engaged), firmly pushing the child seat into the seat.
4.Ensure that there is no slack in the seat belt by pulling upwards on the shoulder belt, immediately above the child restraint. The seat belt should now be locked and the child seat held firmly in position.
Once the child seat is removed and all the seat belt webbing is allowed to retract, the seat belt locking mechanism reverts to normal operation.
1
NOTE: The automatic locking mechanism should also be used when securing large items of luggage to a seat.
27

Seat Belts
CARING FOR SEAT BELTS
Regularly inspect the webbing for signs of fraying, cuts and wear, also pay particular attention to the condition of the fixing points and adjusters.
Avoid contaminating the webbing with polish, oil and chemicals (see ‘Cleaning & vehicle care’).
Three tests for checking seat belts
1.With the seat belt fastened, give the webbing nearest the buckle a quick pull — the buckle should remain securely locked.
2.With the seat belt unfastened, unreel the webbing to the limit of its travel. Check that unreeling is free from snags and snatches and further check the webbing for visual signs of wear or fraying.
Driver’s seat belt: Allow the webbing to retract, checking that retraction is smooth, continuous and complete.
Passenger seat belts: Allow the webbing to retract approximately 200 mm (8 in), then give the tongue plate a quick forward pull — the mechanism must lock automatically and prevent further unreeling. Allow the webbing to retract a further 200 mm and repeat the process. Finally, allow the belt to retract fully and pull the webbing out slightly to check that the locking mechanism is disabled.
3.With the webbing half unreeled, hold the tongue plate and give it a quick forward pull — the mechanism must lock automatically and prevent any further unreeling.
If a seat belt should fail any of these tests, contact your dealer immediately.
Always replace a seat belt assembly where the
webbing shows signs of fraying.
28

Seat Belts
SEAT BELT PRE-TENSIONERS
The seat belt pre-tensioners activate in conjunction with the airbag SRS to provide additional protection in the event of a severe frontal, rear or side impact on the vehicle (see ‘Airbag SRS’). The pre-tensioners automatically retract the seat belts. This reduces any slack in both the lap and diagonal portions of the belts, thereby reducing forward movement of the belt wearer in the event of a severe collision, helping to protect the occupants in most crash conditions.
The airbag SRS warning light on the instrument panel, will alert you to any malfunction of the seat belt pre-tensioners (see ‘Airbag SRS warning light’).
If the pre-tensioners have been activated, the seat belts will still function as restraints, and must be worn in the event that the vehicle remains in a driveable condition.
Disposing of vehicles
If you sell your car, be sure to inform the new owner that the vehicle is fitted with pre-tensioners, and make the new owner aware that the pre-tensioners must be examined and replaced by qualified personnel after a period of 15 years.
If your car is to be scrapped, unactivated pre-tensioners are potentially very dangerous and must be safely deployed in a controlled environment by qualified personnel, before it is scrapped.
1
The seat belt pre-tensioners will only
be activated once and then MUST BE REPLACED by a Rover dealer. Failure to replace the pre-tensioners will reduce the efficiency of the car’s front restraint systems.
NOTE: The seat belt pre-tensioners will NOT be activated by minor impacts.
NOTE: After any impact, always have the seat belts and pre-tensioners checked and, if necessary, replaced by a Rover dealer.
29
![]()
Airbag SRS
AIRBAG SRS
H2773
The airbag SRS (supplementary restraint system) incorporates front and side airbags for both the driver and front seat passenger.
Provided the front seat occupants are correctly seated, with seat belts properly worn, the airbags will provide additional protection to the chest and facial areas in the event of the car receiving a severe frontal impact, and to the side of the body facing the impact, if a severe side collision occurs.
Side head impact protection (where fitted) will afford additional protection to the side of the head facing the impact, in the event of a severe side collision.
The front airbags are located in the centre pad of the steering wheel and in the fascia panel above the glovebox. Side airbags are positioned in the backrest padding on the outward side of both front seats. The side head impact protection airbags (if fitted) are situated behind the roof lining and front pillar finishers (where shown).
30
The airbag SRS provides  ADDITIONAL protection in a severe impact only. It does not replace the need to wear a seat
belt.
NOTE: Inflation and deflation of the front and side airbags takes place very quickly and will not protect against the effects of secondary impacts that may occur.
Do not allow a front seat passenger to obstruct the
operation of the airbag by placing feet, knees or any other part of the person, or any other objects in contact with, or in close proximity to, an airbag module.

To ensure correct deployment of the airbags, it is essential that obstructions are not allowed to intervene between an airbag and the occupant. The following are examples of the type of obstructions that could either, impede correct operation of the airbags, or jeopardise personal safety in the event of an airbag deployment:
∙Accessories attached to or obscuring an airbag cover, including the roof lining, front pillar and ‘B’ post finishers and the part of the front seat containing the side airbag or the pillar between front and rear doors.
∙Items of hand luggage, or other objects placed on an airbag cover.
∙Feet, knees or any other part of the anatomy in contact with, or in close proximity to, a front airbag cover.
∙Items on the shelf below the front passenger airbag that are likely to impede airbag operation in the event of an impact.
∙Head, arms or any part of the anatomy in contact with, or in close proximity to, a side airbag.
∙Items of clothing or cushions draped over the part of the front seat containing the airbag or hanging from the grab handle attached to the roof.
∙Non-approved seat covers fitted over a front seat (in particular, be aware that seat covers approved for other cars will NOT be suitable for Rover 75). If in doubt, seek advice from a Rover dealer.
Seating positions
In order to provide optimum protection in the event of a severe impact, it is necessary for the airbags to deploy with considerable speed.
An inflating airbag can cause facial abrasions and other injuries if the occupant is too close to the airbag at the time of its deployment.
DO NOT attach or position items on, or close to the
roof lining or front pillar and ‘B’ post finishers, or to an airbag cover (steering wheel centre pad or fascia panel), which could interfere with the inflation of the airbag or, if the airbag inflates, be propelled inside the car causing injury to the occupants.
To minimise the risk of accidental injury from
inflating airbags, seat belts should be correctly worn at all times. In addition, both driver and front seat passenger should adjust their seat to provide the maximum practical distance from the front airbags, and also ensure that a gap is maintained between the upper torso and the side of the vehicle, to enable unobstructed inflation of the side airbags.
31

Airbag SRS
HOW THE AIRBAG SRS WORKS
In the event of a collision, the airbag control unit monitors the rate of deceleration or acceleration induced by the collision, to determine whether the airbags should be deployed.
Operation of the airbag SRS is dependent entirely on the rate at which the car’s passenger compartment changes speed as a result of a collision. The circumstances affecting different collisions (vehicle speed, angle of impact, type and size of object hit, for example), vary considerably and will affect the rate of acceleration or deceleration accordingly.
It follows, therefore, that significant superficial damage can occur without the airbags deploying or, conversely, that a relatively small amount of structural damage may cause the airbags to be deployed.
Airbags will only deploy when they are required to supplement the restraining force of the seat belts.
In the case of a severe frontal collision, both front airbags will be deployed. In the case of a severe side collision, only the side airbag and side head impact protection airbag on the impact side of the vehicle will inflate. However, there may also be impact conditions whereby one set of side and both front airbags deploy at the same time, or where front and side airbags respond separately as a result of a secondary impact occurring after the initial collision has taken place.
32
NOTE: The airbag SRS is not designed to operate as a result of rear collisions, minor frontal or side impacts, or if the car overturns; nor will it operate as a result of heavy braking or driving over bumps and potholes.
NOTE: The seat belt pre-tensioners will be activated in all situations which result in front or side airbag deployment.

An inflating airbag can cause facial abrasions
and other injuries. Minimise the risk of injury by ensuring that front seat occupants are wearing their seat belts and are seated correctly, with the seat as far back as is practical.
H2774
Airbag inflation is virtually instantaneous and occurs with considerable force, accompanied by a loud noise. The inflated bag, together with the seat belt restraint system, limit the movement of a front seat occupant, thereby reducing the risk of injury to the head and upper torso.
When an airbag inflates, a fine powder is released. This is not an indication of a malfunction, however, the powder may cause irritation to the skin and should be thoroughly flushed from the eyes and any cuts or abrasions of the skin. After inflation, front and side airbags deflate immediately (side head protection airbags deflate slowly). This provides a gradual cushioning effect for the occupant and also ensures that the driver’s forward vision is not impaired.
NOTE: After inflation, some airbag components are hot — DO NOT touch until they have cooled.
33

Airbag SRS
Side airbags
NOTE: The manufacture and materials of the seat are critical to the performance of the airbag. For this reason, non-approved seat covers must NEVER be fitted, and it is recommended that any repair or replacement to the front seats be carried out by a Rover dealer (see ’Service information’).
H2761
Side airbags are designed to protect the thorax region of the torso and will only deploy in the event of a severe side impact. They will NOT inflate as a result of frontal or rear impacts only.
In the event of a severe side collision, the airbag on the impact side of the car breaks through the seat covering, rapidly inflating to form a cushion between the occupant and the side of the car. The airbag on the non-impact side of the car will not be deployed
Note that a part of the outer side of the seat trim (identified by the woven ‘airbag’ label) is specially constructed to enable the airbag to deploy.
34
Ensure that a gap is maintained between the
upper torso and the side of the vehicle, to enable unobstructed inflation of the side airbags.

Airbag SRS
Side head impact protection*
Side head impact airbags are designed to protect the head in the event of a severe side impact only. They will NOT inflate as a result of frontal or rear impacts.
The side head impact protection modules are located behind the roof lining and front pillar finisher, above the doors. In the event of a severe side collision, the airbag pushes out from behind the roof lining and front pillar finisher as it inflates. The side head impact airbag remains inflated for longer than the other airbags, to provide additional head protection in the event of a secondary impact.
Airbag SRS warning light
A warning light, mounted on the instrument panel, will alert you to any malfunction which might prevent the airbag SRS and seat belt pre-tensioners from operating correctly in the event of an impact. The system should always be checked by a dealer if any of the following symptoms occur:
∙The warning light fails to illuminate when the starter switch is turned to the second position.
∙The warning light fails to extinguish within approximately four seconds after the starter switch is turned to the second position.
∙The warning light illuminates while the car is being driven.
1
NOTE: For the side head impact airbags to deploy correctly, the roof lining and front pillar trim must be undamaged and fitted correctly. Any damage or suspect fitting should be referred to a Rover dealer for examination.
NOTE: After the starter switch is turned to the second position, the system’s diagnostic control unit checks its own memory and the warning light bulb for faults. If a fault is found, the warning light will not extinguish after the 4 second period.
35

Airbag SRS
CHILD SEATS
It is recommended that children should always be seated in the rear of the vehicle, in a child safety seat or restraint system appropriate to their age and size (see ‘Seat belts’).
If it is necessary for a child is to travel in the front, it is essential that the vehicle seat is set fully rearwards and that the child is seated in a FRONT FACING child safety seat, which prevents any part of the child’s head coming into close proximity with the side airbag (note the warning label shown above).
36
NOTE: Accident statistics show that children are safer when properly restrained in the rear seating positions than in the front.
DO NOT install a rearward facing child seat in the
front passenger seat — an inflating airbag could impact with the seat. Failure to follow this advice could result in serious injury or even death for the child.

Airbag SRS
SERVICE INFORMATION
After 15 years from the initial date of registration (or installation date of a replacement airbag SRS), some components will need to be replaced by a Rover dealer, who should stamp and sign the appropriate page of the Service Portfolio book once the work has been completed.
In addition, ALWAYS contact your Rover dealer if;
∙the airbag inflates.
∙the front or side of the vehicle is damaged (even if the corresponding airbag has not inflated).
∙any part of the airbag module covers show signs of deterioration or damage.
The components of the airbag SRS are sensitive to electrical and physical interference; it is recommended that you ALWAYS seek the assistance of a Rover dealer to carry out any of the following:
∙Removal or repair of any wiring or component in the vicinity of the airbag SRS components (yellow wiring harness), including the steering wheel, steering column, front seats, fascia and instrument panel.
∙Installation of electronic equipment such as a mobile phone, two-way radio or in-car entertainment system.
∙Attachment of accessories to, or modification of, the front or side of the vehicle.
∙Removal, replacement, or retrimming of a front seat or seat cover.
Disposing of the vehicle
If you sell your vehicle, be sure to inform the new owner that the vehicle has an airbag SRS and make the new owner aware of the airbag module replacement date, shown in the Service Portfolio book.
If the vehicle is to be scrapped; uninflated airbags are potentially very dangerous and must be safely deployed in a controlled environment by qualified personnel, before a vehicle is scrapped.
1
DO NOT service, repair, replace, modify or tamper
with any part of the airbag SRS, or wiring in the vicinity of an airbag SRS component; this could cause the system to activate, resulting in personal injury.
37

Steering Column
STEERING COLUMN ADJUSTMENT
DO NOT attempt to adjust  the height or angle of the steering wheel while the car is
in motion. This is extremely dangerous.
H2674
Adjust the angle and height of the steering column to suit your driving position:
1.Fully release the locking lever.
2.Hold the steering wheel in both hands and tilt the steering column up or down to move the wheel into the most comfortable position.
3.Pull or push the steering wheel closer to, or further away from, your body.
4.Once a comfortable driving position has been selected, pull the locking lever fully up to lock the steering column into its new position.
38
Operating tip: If it is difficult to move the steering column into a new position, disengage the steering lock by turning the starter switch to the first position and align the front wheels straight ahead.

POWER-OPERATED DOOR MIRRORS
NOTE: Objects viewed in exterior mirrors may appear further away than they actually are.
2
3
H3249
1.Mirror selection switches
2.Mirror glass adjustment switch
3.Mirror fold switch*
Mirror glass adjustment
∙With the starter switch turned to the second position, press the appropriate switch to select the left or right mirror.
∙Press the appropriate side of the switch to tilt the mirror glass up/down/left or right.
Heating elements
The door mirrors have integral heating elements which disperse ice or mist from the glass. The heating elements operate continuously while the starter switch is in the second position.
39
![]()
Mirrors
Mirror folding*
The body of each door mirror is designed to fold flat against the side of the car on impact. The mirrors can also be folded back manually towards the side windows into a ‘park’ position to enable the car to negotiate narrow openings.
H3250
On some cars the ‘park’ position can be achieved electrically, as follows:
With the starter switch turned on, press the mirror fold switch (see illustration on previous page); both mirrors will fold back towards the side window. Press the switch a second time to return the mirrors to their normal position. If one mirror is accidentally knocked out of position, a single press of the switch will resynchronise both.
40
Operating tip: Note that the switch can be operated for up to 40 seconds after the starter switch has been turned off.

Mirrors
INTERIOR REAR-VIEW MIRROR Automatic mirror*
H2770
1
NOTE: The dipping function of both mirrors helps to reduce glare from the headlights of following vehicles at night.
The interior mirror is equipped with a light sensor (arrowed) which activates the automatic dipping function.
Manual mirror*
NOTE: In some circumstances, the view reflected in a ‘dipped’ manual mirror can confuse the driver as to the precise location of following vehicles. Remember to take additional care!
H2676
Move the lever at the base of the mirror forward to ‘dip’ the mirror. Normal visibility is restored by pulling the lever back again.
41

Mirrors
SUN VISOR VANITY MIRROR
The driver’s vanity
 mirror* should only be used when the car is stationary
H2666
Pivot the sun visor downward to use the vanity mirror. On some models, the vanity mirror has a cover and is illuminated when the cover is raised. Close the cover to extinguish the lights.
42

Windows
POWER-OPERATED WINDOW CONTROLS
2


 1
1
4


 3
3
5
H2688
Driver’s door console
The switches on the driver’s door operate the following:
1.Right hand front window.
2.Left hand front window.
3.Right hand rear window*.
4.Left hand rear window*.
5.Rear window isolation switch*.
Operating the windows
The electric windows can be operated when the starter switch is in the first or second position and for up to 40 seconds after the starter switch is turned off (provided neither front door is opened in the meantime).
Push the switch down to lower, and lift the switch up to raise the window. The window will stop moving as soon as the switch is released (unless the ‘one-touch’ feature is active).
Rear window isolation switch*
Press the switch to isolate the rear window controls (an indicator light in the switch illuminates), press again to restore independent control.
1
Accidental closing of a power-operated window
on fingers, hands or on any other vulnerable parts of the body can result in serious injury.
NOTE: The front and rear passenger windows can also be operated by individual window switches, mounted on each door. The rear windows will only operate if the isolation switch is not activated.
NOTE: ENSURE children are kept clear when raising or lowering a window.
NOTE: ISOLATE the rear window switches when carrying children.
43

Windows
‘One-touch’ down
By briefly pressing and then releasing a switch (within half a second), a window can be opened at a single touch. Window movement can be stopped at any time by pressing the switch again.
‘One-touch’ up*
On some models, the driver’s door has a ‘one-touch’ up facility which acts in the same way as ‘one-touch’ down. Window movement can be stopped at any time by pressing the switch again.
‘Anti-trap’ function*
The ‘anti-trap’ function is a safety feature which prevents the driver’s window from fully closing if an obstruction is sensed — if this happens the window will open slightly to allow the obstruction to be removed.
44
NOTE: The ‘anti-trap’ function is fitted to cars whenever the ‘one-touch’ up option is fitted to the driver’s window.

SUNROOF OPERATION*
Accidental closing of a sunroof on fingers, hands
or any vulnerable part of the body, can result in serious injury.
H2707
The sunroof can be operated when the starter switch is in the first or second position and for up to 40 seconds after the starter switch is turned off (provided the driver’s door is not opened in the meantime).
The sunroof opens and closes in two separate phases, as follows:
∙To TILT the roof:
With the sunroof either open or closed, press and release the central portion of the sunroof button. The sunroof will automatically close (if open) and then tilt open. Sunroof movement can be stopped at any time by pressing the tilt button for a second time. Push the sunroof switch forwards to close the roof.
∙To OPEN the roof:
Push the sunroof switch rearwards, releasing when the sunroof is in the desired position. Push the switch forwards to close the sunroof.
NOTE: DO NOT allow passengers to extend any part of their bodies through the sunroof aperture while the car is moving — injury from flying debris, branches of trees or other obstructions could occur.
NOTE: ENSURE the sunroof is not obstructed when opening or closing. ALWAYS close the sunroof when the car is to be left unattended.
45

Sunroof
‘One-touch’ operation
Firmly push the switch rearwards and release (the switch will be felt to click into position), the sunroof will fully open. Push the switch firmly forwards and release to fully close the sunroof at a single touch. Sunroof movement can be stopped at any time by briefly pressing the centre of the switch.
‘Anti-trap’ function
The anti-trap function is a safety feature which prevents the sunroof from closing fully if there is an obstruction. If an obstruction is detected, the sunroof will open slightly to allow the object to be removed.
Sunroof blind
With the sunroof closed, the sunroof blind can be opened and closed manually, but will retract automatically when the sunroof is opened.
46
NOTE: The anti-trap feature does not function when the roof is closing from a tilt open position.

HEATING & VENTILATION
Care point: Keep the air grille in the rear window shelf uncovered to enable air flow through the whole of the interior.
H2782
The heating and ventilation system provides fresh or heated air to the interior of the car from the air intake grille in front of the windscreen.
Air outlets are provided to the windscreen, face and feet — the location of those vents is shown in the illustration above — and to rear seat passengers from ducts beneath the front seats.
Information concerning the operation of the heating and ventilation system, as well as the air conditioning, appears on the pages that follow.
Cars fitted with Automatic Temperature Control (ATC) are equipped with an additional outlet which supplies unheated or cooled air to the rear of the passenger compartment.
Care point: Always keep the air intake grille clear of obstructions such as leaves, snow or ice.
Care point: Do not obstruct the vents beneath the front seats.
47

Heating & Ventilation
Control panel
|
1 |
2 |
3 |
||||||||||
|
H2771 |
4 |
5 |
6 |
1.Air temperature control
∙BLUE: Unheated air
∙RED: Heated air
2.Air distribution control
Face level vents only.
Foot and face level vents.
Foot level vents.
Foot level, windscreen and side window vents.
Windscreen and side window vents.
3.Blower switch
Turn the switch clockwise to increase the blower speed.
4.Recirculated air supply button
Press to operate (the indicator light in the switch illuminates). With this button pressed, the heater recirculates the air already inside the car, preventing the entry of traffic fumes.
Press again to switch off.
If the air conditioning is switched on, air recirculation will remain active until fresh air is selected, or until the air conditioning is switched off.
48
NOTE: When distributing air to the face level vents, they must be FULLY open to ensure best performance.
NOTE: With the blower switched off, the volume of air entering the vehicle is dependent on driving speed alone.
NOTE: Leaving the system in recirculation mode can cause the windscreen to mist. If this happens, switch off recirculation and turn the controls to maximum demisting.

With air conditioning switched off (and on cars not equipped with air conditioning), air recirculation will automatically switch off after 4 minutes operation. This reduces the risk of misting windows. To override this timed feature, press and hold the recirculation button for 2 seconds (until the light in the switch flashes) — but note that the function must then be switched off manually.
5.Air conditioning switch*
With the engine running, press to operate. The indicator light in the switch illuminates when the air conditioning is switched on.
In addition, note that air recirculation is activated automatically whenever the air conditioning is switched on as an aid to more efficient cooling of the car’s interior. In conditions of high humidity, slight screen misting may be experienced when the air conditioning is first switched on. This is not a fault, misting will clear after a few seconds once the system is in operation.
6.Rear screen demister
The demister will only function with the engine running. Press to operate; the indicator light in the switch illuminates whenever the demister is on and extinguishes when the demister is turned off.
If the exterior temperature is below 10° C (50° F), the demister will switch on automatically and operate for a period of 20 minutes before switching off. However, if the exterior temperature is greater than 10° C (50° F), the demister will not switch on automatically, but will respond to any manual operation by switching off automatically after 12 minutes.
NOTE: The air conditioning will not operate without the engine running nor when the blower switch is turned to position ’O’.
NOTE: Because the system dehumidifies the air supplied to it, surplus water is produced and expelled via drain tubes beneath the car. This may result in a small pool of water forming under the car when stationary and is not a cause for concern.
Care point: The heating elements on the inside of the rear screen are easily damaged. DO NOT scrape or scratch the glass. DO NOT stick labels over the heating elements.
49
 Loading…