-
Contents
-
Table of Contents
-
Troubleshooting
-
Bookmarks
Quick Links
02
Type SUP041EU
USER MANUAL
Read these operating instructions carefully before using the machine
Related Manuals for Saeco Lirika
Summary of Contents for Saeco Lirika
-
Page 1: User Manual
Type SUP041EU USER MANUAL Read these operating instructions carefully before using the machine…
-
Page 2
16 17 • 2 •… -
Page 3
• 3 •… -
Page 4
SAFETY INSTRUCTIONS from oil. Do not use the power cord to carry or pull the machine. Do not pull out the plug by the power cord or touch it with wet hands Never allow water to come into contact or feet. Do not let the power cord hang freely with any of the electrical parts of the ma- from tables or shelves. -
Page 5
damage or melt the machine housing. Do chine in a dry place, out of the reach of chil- not use in places where the temperature may dren. Keep it protected from dust and dirt. drop to a level equal to and/or lower than 0°C Repairs / Maintenance or higher than 40°C. -
Page 6: Table Of Contents
Machine Use — User Manual CONTENTS 1 GENERAL INFORMATION ……..7 1.1 Intended Use of the Machine ……….7 1.2 How to Read the Manual……….7 1.3 How to Use this User Manual ……..7 8 HANDLING AND STORAGE ……..33 1.4 Machine Identifi cation ……….7 8.1 Handling …………..33 1.5 Technical Specifi cations ……….8 8.2 Storage …………..33…
-
Page 7: General Information
Machine Use — User Manual Service Provider/Supply Operator: GENERAL INFORMATION Company or person responsible for normal ma- chine installation, start-up and suspension of Intended Use of the Machine service. On detecting machine failures, the Ser- This machine automatically brews: vice Provider should request the assistance of the — Coff ee and espresso coff ee using coff ee beans;…
-
Page 8: Technical Specifi Cations
Machine Use — User Manual Technical Specifi cations MACHINE COMPONENTS Note: The “key to components” includes all ma- Technical Specifi cations chine models; check which one matches your ma- Power Supply and Nominal Voltage-Power Rating chine. Certain functions may not be available. See data plate on the inside of the appliance door Water tank lid Machine Housing Material…
-
Page 9: Control Panel Description
Machine Use — User Manual Control Panel Description USING THE MACHINE Note: All possible controls are described here. Before using the machine, check that the water tank and the cof- Refer to the following sections for the operating fee bean hopper are fi lled and that the machine is properly clean. modes.
-
Page 10: Turning On The Machine
Machine Use — User Manual If the water tank is not inserted, check that no cof- Note: The progress bar indicates that the machine fee beans fall into the tank compartment. If this is performing the rinse cycle of the system. happens, remove them to avoid any malfunctions.
-
Page 11: Eco-Friendly: Stand-By
Machine Use — User Manual Eco-friendly: Stand-by Adjusting the Aroma (Coff ee Strength) The machine is designed for energy saving. The machine auto- Choose your favourite coff ee blend and adjust the amount of coff ee matically turns off after 30 minutes of inactivity. to be ground according to your personal taste.
-
Page 12: Adjusting The Coff Ee Length
Machine Use — User Manual by the machine; the display shows the 2 cups icon. When the “STOP” icon is displayed, press the “ ” button (18) as soon as the desired amount of coff ee is reached. Once the prebrewing cycle has been completed, coff ee begins to come out of the dispensing spout.
-
Page 13: Cappuccinatore
Machine Use — User Manual Inserting the Cappuccinatore Remove the drip tray. (Fig.13, page 3) Remove the coff ee grounds drawer and If the water dispensing spout is installed, remove it as shown empty out the coff ee grounds in a suitable container. in the fi gure: — Press the two side buttons to unlock it and lift it slightly;…
-
Page 14: Brewing A Cappuccino
Machine Use — User Manual Note: When the Cappuccinatore is not being used, 3.13 Brewing a Cappuccino hang the suction tube on the support on the left- The machine can dispense cappuccino quickly and easily with the touch of a button. hand side of the machine.
-
Page 15: Adjusting Cappuccino
Machine Use — User Manual Insert the suction tube into the milk container. Press the “ ” button (18) to stop frothed milk dispensing. Once frothed milk has been dispensed, the machine brews coff ee. Brewing can be stopped by pressing the “ ”…
-
Page 16: Dispensing Latte Macchiato
Machine Use — User Manual 3.15 Dispensing Latte Macchiato Place a cup under the Cappuccinatore. The machine can dispense Latte Macchiato quickly and easily with Press the “ ” button (18) to start dispensing. the touch of a button. The machine requires some preheating time. Danger of burning! Dispensing may be preceded by small jets of hot water.
-
Page 17: Adjusting Latte Macchiato
Machine Use — User Manual Insert the suction tube into the milk container. Press the “ ” button (18) to stop frothed milk dispensing. Once frothed milk has been dispensed, the machine brews coff ee. Brewing can be stopped by pressing the “ ”…
-
Page 18: Dispensing Hot Milk
Machine Use — User Manual 3.17 Dispensing Hot Milk Place a cup under the Cappuccinatore. The machine can dispense hot milk quickly. Press the “ ” button (18) to start dispensing. Danger of burning! Dispensing may be preceded by small jets of hot water. Wait until the end of The machine requires some preheating time.
-
Page 19: Adjusting Hot Milk
Machine Use — User Manual Make sure that the Cappuccinatore is correctly installed. The machine requires some preheating time. Once preheating has been completed, the machine starts dispensing frothed milk directly into the cup. Insert the suction tube into the milk container. Press the “…
-
Page 20: Dispensing Hot Water
Machine Use — User Manual 3.19 Dispensing Hot Water Press and hold the “ ” button (19) until the following screen is displayed: Danger of burning! Dispensing may be preceded by small jets of hot water and steam. Wait until the end of the cycle before removing the water dispens- ing spout.
-
Page 21: Quick Carafe Rinse Cycle
Machine Use — User Manual 3.20 Quick Carafe Rinse Cycle Press the “ ” button (23). The following screen is displayed: After one or more milk-based products have been prepared, the machine allows for a quick cleaning of the carafe ducts. This screen is displayed for 10 seconds to prompt you to execute the quick rinse cycle.
-
Page 22: Using The Machine With Credits
Machine Use — User Manual Press the “ ” button (19). The main screen is displayed. USING THE MACHINE WITH CREDITS Note: This option can be enabled or disabled by the service provider. The machine is designed to manage coff ee brewing by means of a credit system.
-
Page 23: Programming Machine Functions
Machine Use — User Manual Contrast Press the “ ” (18) and “ ” (20) buttons to increase or This function allows you to adjust the contrast of the display to decrease the value of the function. better view the messages. Once the value has been changed, the “OK”…
-
Page 24: Cleaning The Cappuccinatore
Machine Use — User Manual in a dishwasher. • Do not use sharp objects or harsh chemical products (sol- vents) for cleaning. • Do not dry the machine and/or its parts using a microwave and/or standard oven. • All parts requiring cleaning are easily accessible, so no tools are needed.
-
Page 25
Machine Use — User Manual Dispense water from the Cappuccinatore until clear water Remove the fi tting. fl ows out. Press the “ ” button (18) to stop dispensing. Clean the suction tube with a damp cloth. Weekly Cleaning of the Cappuccinatore The weekly cleaning is more thorough since all milk residues are removed from the dispensing spout. -
Page 26
Machine Use — User Manual Clean all the parts thoroughly with lukewarm water. Insert the fi tting into the tube of the Cappuccinatore. Insert the milk frothing device into the support. Insert the lower part into the fi tting. Insert the fi tting into the tube. Insert the lower part into the Cappuccinatore. -
Page 27
Insert the suction tube into the container. You need to perform a more thorough cleaning of the Cappuc- cinatore every month using the “Saeco Milk Circuit Cleaner”. The “Saeco Milk Circuit Cleaner” can be purchased separately. For further details, please refer to the maintenance products page in this user manual. -
Page 28
Machine Use — User Manual Press the “ ” button (18) to start dispensing. Press the “ ” button (24). The following screen is displayed: The machine requires some preheating time. Press the “ ” button (23). The following screen is displayed: Press the “… -
Page 29: Cleaning The Coff Ee Grounds Drawer
Machine Use — User Manual Cleaning the Coff ee Grounds Drawer Open the service door. The coff ee grounds drawer is to be emptied and cleaned when- ever indicated by the machine. To carry out this operation, refer to section 3.11. Cleaning the Drip Tray Empty and clean the drip tray every day.
-
Page 30
Machine Use — User Manual If they do not match, proceed as described in step (10). Remove the coff ee residues drawer and wash it thoroughly. Ensure that the lever is in contact with the brew group base. Clean the inside of the machine with a damp cloth. Make sure that the hook which locks the brew group is in Insert the coff ee residues drawer in its seat and ensure that the correct position;… -
Page 31: Machine Warnings
Machine Use — User Manual MACHINE WARNINGS This chapter describes all the warning messages that the machine may display to the user and the actions that can and/ or must be performed by the user. Warning Signals How to Reset the Message The machine is warming up to brew beverages or dispense hot water.
-
Page 32
Machine Use — User Manual Warning Signals (Red Colour) How to Reset the Message Insert the drip tray and the coff ee grounds drawer into the machine and close the service door. Fill the coff ee bean hopper. This icon appears for 5 seconds, from when the machine detects that there is no more coff ee to be ground. -
Page 33: Handling And Storage
Machine Installation — Service Provider Manual HANDLING AND INSTALLATION STORAGE All the operations described in chapter 9 must be performed exclusively by the service provider All the operations described in chapter 8 must or a specialised technician, who shall organise be performed exclusively by the service provider all the operating steps and use only suitable means to en- or a specialised technician, who shall organise…
-
Page 34
Machine Installation — Service Provider Manual — be used if damaged; — Use the machine in explosive or harsh — be handled with damp or wet hands; environments, or with high concentra- — be wound in a coil when the machine tions of dust or oily substances sus- is in use;… -
Page 35: Stop Functions
Machine Installation — Service Provider Manual Stop Functions Descaling solution: to remove limescale build-up in the water circuit caused by normal The machine can be stopped by means of the power button. use. List of Accessories 9.3.1 List of Accessories Supplied Manual: instructions on how to use the ma- «Intenza +»…
-
Page 36: Disposal Of Packaging
Machine Installation — Service Provider Manual The following illustration shows the required access distances: Rotate the support 90° until it is properly positioned. • to the keypad on the front of the appliance; • to the service units in the event of malfunction. Disposal of Packaging After opening the outer box, it is recommended that the packag- ing materials are separated according to type and disposed of in…
-
Page 37: Filling The Coff Ee Bean Hopper
Machine Installation — Service Provider Manual Filling the Coff ee Bean Hopper Turning on/off the Machine Before turning on the machine, check that the hopper contains The machine can be turned on/off by pressing the button located enough coff ee beans. to the rear of the machine (Fig.02, page 3).
-
Page 38: Measuring And Adjusting Water Hardness
Machine Installation — Service Provider Manual The machine will brew coff ee through the dispensing spout Fill the water tank again up to the MAX level. (Fig.11, page 3); wait until the procedure has been completed and empty the container. The machine is now ready for use.
-
Page 39: Intenza+» Water Filter
Water is a key element for a good espresso coff ee. Therefore, it should always be fi ltered in a professional manner. That is why all Saeco machines can be equipped with the INTENZA+ fi lter. This fi lter is easy to use and its sophisticated technology is eff ective in preventing limescale build-up.
-
Page 40
Machine Installation — Service Provider Manual 9.12.1 Replacing the “Intenza+” Water Filter Put the fi lter into the empty tank. Press it to its limit stop. If the fi lter is already installed and the machine indicates that it must be replaced, proceed as previously described. When accessing the programming page, the “RESET”… -
Page 41: Adjusting The Coff Ee Grinder
Machine Installation — Service Provider Manual 9.13 Adjusting the Coff ee Grinder 10 MACHINE PROGRAMMING Warning! Do not pour ground and/or instant cof- All the operations described in chapter 10 must fee into the coff ee bean hopper. Do not put any be performed exclusively by the service provider material other than coff ee beans into the hopper.
-
Page 42: Programming Controls
Note: If the PASSWORD is forgotten, you can reset it by entering a PUK code. You have to request the Refer to section 10.4 on how to set the PASSWORD. PUK code to the Saeco service centre, who will guide you through the procedure. 10.2 Programming Controls When the machine menus are accessed, the buttons on the keypad take on new functions.
-
Page 43: Programming Menu
Machine Installation — Service Provider Manual 10.3 Programming Menu This menu allows you to manage certain machine operation parameters. Coff ee Temperature This function allows you to adjust the coff ee brewing temperature. Timer (stand-by) This function allows you to adjust the time taken for the machine to go into stand-by mode after the last brewing.
-
Page 44
Machine Installation — Service Provider Manual Credit Management This function activates credit management. Credit Charging This function activates credit charging. 0 0 0 Note: This function is displayed only if the «Credit Management» function is set to «YES». You can access by pressing the “ ”… -
Page 45: Setting The Password
Machine Installation — Service Provider Manual 10.4 Setting the PASSWORD To enter the password: Press the “ ” (18) or “ ” (20) button to set the desired The PASSWORD must be set by the service provider in order to number.
-
Page 46: Setting Credits
Machine Installation — Service Provider Manual 10.5 Setting Credits Press the “ ” (18) or “ ” (20) button to set the desired number. Credits can be set to allow coff ee to be brewed under the strict control of the service provider. Press the “…
-
Page 47: Cleaning And Maintenance
For improved effi ciency, it is advisable to carry out the cleaning as described in the «Weekly Cleaning of the Brew Group» chapter. and maintenance operations indicated in the following table. Lubricate the brew group guides using Saeco grease only. Every When an…
-
Page 48: Descaling
Also lubricate the shaft. to clear maintenance neglect. Use the Saeco descaling product only. Its formula has been spe- cifi cally designed to ensure better machine performance and op- eration for its whole operating life. If correctly used, it also avoids alterations in the dispensed product.
-
Page 49
” button (22) to exit. You can quit the cycle in any case; see the «Interruption of the Descaling Cycle» chapter. Pour the entire content of the Saeco concentrated descaling If you do not have a container of this capacity, solution into the water tank. -
Page 50
Machine Installation — Service Provider Manual Note: The rinse cycle is performed in order to have The machine will now start dispensing the descaling solution the circuit cleaned with a preset amount of water at intervals (the bar shows the cycle progress). to ensure proper machine performance. -
Page 51: Interruption Of The Descaling Cycle
Machine Installation — Service Provider Manual 11.4 Interruption of the Descaling Cycle Once the descaling cycle has started, it must be completed; do not turn off the machine mid-cycle. If the machine stops, you can quit the cycle by pressing the ON/ OFF button.
-
Page 52: Troubleshooting
13 TROUBLESHOOTING Machine actions Causes Solutions The machine does not turn on. The machine is not connected to the electric Connect the machine to the electric net- network. work. The ON/OFF button is on «0». Switch the ON/OFF button to “I”. The drip tray gets fi lled although no Water is sometimes drained automatically This is a normal behaviour of the machine.
-
Page 53
Machine actions Causes Solutions Coff ee is brewed slowly (see note). The coff ee grind is too fi ne. Change coff ee blend or adjust the grind as explained in the “Adjusting the Coff ee Grinder” chapter. The circuit is not primed. Prime the circuit (see the «First Use — Use Af- ter a Long Period of Inactivity»… -
Page 54
• 54 •… -
Page 55
• 55 •… -
Page 56
The manufacturer reserves the right to make changes without prior notice.
Код: 113602
Извините, товара сейчас нет в наличии
Бесплатная доставка
по Красноярску
Извините, товара сейчас нет в наличии
Новости интернет-магазина «Лаукар»:
Дополнительная информация в категории Кофемашина:
В интернет-магазине бытовой техники «Лаукар» Вы можете скачать инструкцию к товару Кофемашина Saeco LIRIKA Aura совершенно бесплатно.
Все инструкции, представленные на сайте интернет-магазина бытовой техники «Лаукар», предоставляются производителем товара.
Перед началом использования товара рекомендуем Вам ознакомиться с инструкцией по применению.
Для того чтобы скачать инструкцию, Вам необходимо нажать на ссылку «скачать инструкцию», расположенную ниже, а в случае, если ссылки нет,
Вы можете попробовать обратиться к данной странице позднее,
возможно специалисты интернет-магазина бытовой техники «Лаукар» еще не успели загрузить для скачивания инструкцию к товару:
Кофемашина Saeco LIRIKA Aura.

Фирма-производитель оставляет за собой право на внесение изменений в конструкцию, дизайн и комплектацию товара: Кофемашина Saeco LIRIKA Aura. Пожалуйста, сверяйте информацию о товаре с информацией на
официальном сайте компании производителя.
Узнавай о новинках и акциях первым
Вы успешно зарегистрированы на сайте.
Вам доступен личный кабинет пользователя.
Перейти к покупкам
Ваш пароль воcстановлен!
Теперь вы можете полноценно пользоваться
всеми возможностями нашего интернет-магазина.
Здравствуйте, Ваша претензия принята и зарегистрирована.
В течение 3-х рабочих дней Вам, на электронную почту, будет дан письменный ответ. В случае возникновения дополнительных вопросов, менеджер претензионного отдела свяжется с Вами.
Перейти к покупкам

Ваше сообщение об ошибке на сайте успешно отправлено.
Большое спасибо!
Добавить отзыв о магазине
Торг для данного товара сейчас не возможен!
Сколько вы готовы заплатить за этот товар?
Введите ваше ценовое предложение
Мы согласны с вашим предложением
Мы принимаем вашу цену, и вы можете купить товар по цене:
0 руб.
-
Page 1
Automatic Machine for Espresso Coffee and Hot Beverages WARNING: Read these instructions carefully before using the machine. -
Page 2: Table Of Contents
English MAIN PARTS Water tank lid Coffee residues drawer Water tank Service door Control panel Hot water dispensing spout Full drip tray float Coffee dispensing spout Support for hot water dispensing spout and suction tube Cup holder grill for Cappuccinatore Drip tray Chassis plug Coffee bean hopper lid…
-
Page 3
English SAFETY INSTRUCTIONS Never allow water to Children must not play with come into contact the appliance. with Children cannot carry out electrical parts of the cleaning machine: danger maintenance operations short circuit! unless they are supervised. water and steam may cause scalding! Intended Use Power Supply… -
Page 4
English Do not pass the power cord Do not touch the hot around corners, over sharp water wand with bare edges or over hot objects and hands. Always use the keep it away from oil. handles or knobs provided. Do not use the power Danger of Burning cord to carry or pull the Do not touch the hot… -
Page 5
English The machine may only be The machine must only be moved service installed in places where it provider. checked qualified staff. Do not use the machine outdoors. Cleaning Do not install the machine in Before cleaning a location where water jets machine, the power button may be used. -
Page 6
English Using Milk Storing the Machine Milk must be used and stored in accordance with If the machine is to remain the instructions given on inactive for a long time, the manufacturer’s original turn it off and unplug it. packaging. Store the machine in a dry place, out of the reach of We accept no liability for… -
Page 7
English Only skilled and experienced people with particular reference safety hygiene — are allowed to access the service area. -
Page 8
English CONTENTS 9.8 CAPPUCCINATORE MAIN PARTS 9.9 BREWING CAPPUCCINO 1 INTRODUCTION TO THE MANUAL 1.1 PREAMBLE 9.10 ADJUSTING CAPPUCCINO IN THE CUP 1.2 ICONS USED 9.11 BREWING LATTE MACCHIATO 9.12 ADJUSTING LATTE MACCHIATO IN THE CUP 2 INFORMATION ABOUT THE MACHINE 2.1 INFORMATION FOR THE MAINTENANCE 9.13 DISPENSING HOT MILK TECHNICIAN… -
Page 9: Introduction To The Manual
Always refer to this manual before carrying out any The manufacturer reserves operation. the right to make changes without prior notice. Manufacturer: SAECO Vending S.p.A. Località Casona, 1066 — 40041 Gaggio Montano Bologna, Italy…
-
Page 10: Icons Used
English Icons Used Various kinds of warnings are contained in this manual to highlight the different hazard or competence levels. Each icon is followed by a message suggesting operating and behaviour procedures and providing useful information for the correct operation of the machine. Warning It is used to highlight danger situations for the persons in charge of using, refilling and servicing the machine.
-
Page 11: Information About The Machine
English INFORMATION ABOUT THE MACHINE Information for the Description and Intended Use Maintenance Technician This machine automatically brews: The appliance must be • coffee and espresso coffee using instantly ground coffee installed well-lit, beans; sheltered and dry place • hot water to prepare beverages; •…
-
Page 12: Appliance Identification
English Appliance Identification The appliance is identified by the model name and serial number shown on the special plate. The plate contains the following data: • name of the Manufacturer; • marks of conformity; • model; • serial number; • year and month of manufacture; •…
-
Page 13: Water Tank
English Technical Specifications Size (w x h x d) 215 x 370 x 429 mm Weight approx. 8 kg Machine housing material Metal — Thermoplastic material Power Rating See the data plate Supply Voltage See the data plate Power cord length approx.
-
Page 14: Safety
• use original spare parts; regulations, SAECO VENDING has prepared a technical • carefully read the instructions contained in this manual and file relating to the LIRIKA machine at its premises, in the attached documents; acknowledging the following standards in the design stage: •…
-
Page 15: Operator Requirements
English Maintenance technician case failure The maintenance technician is the only person authorised to malfunctioning, please refer service the machine, start the programming procedures and perform the adjustment, set up and maintenance operations. only qualified Access to the internal area is personnel of the technical restricted to persons having service.
-
Page 16: Handling And Storage
English HANDLING AND STORAGE Storage operations described in this chapter The machine is packed in cardboard and expanded polystyrene packaging. must performed If the appliance is not immediately installed, it shall be kept exclusively by the service in a sheltered place according to the following instructions: provider or a specialised •…
-
Page 17: Installation
English INSTALLATION Cautions operations described in this chapter The appliance cannot be must performed installed in external areas. exclusively by the service Avoid placing it in areas provider or a specialised where the temperature is technician, shall lower than 2°C or higher organise all the operating than 32°C…
-
Page 18: Unpacking And Positioning
English Access to the machine and The presence of magnetic the plug should be kept fields proximity clear at all times in order electrical machines which to allow users to easily generate interference reach them and to leave could cause the electronic the area immediately if controls of the machine to required.
-
Page 19: Tube Support Assembly
English Power cord: to connect the machine to the mains. «Intenza +» water filter: to remove any unpleasant flavours in the water and reduce water hardness. This will improve machine use. Grinder adjustment key: for coffee grinder adjustment. Tube Support Assembly Insert the tube support into the first slot as shown in the List of Optional Accessories figure.
-
Page 20: Connection To The Electric Network
English Connection to the Electric Make sure that the power Network cord plug is easily reachable This operation must only be after installation. performed by specialised technical personnel or by the service provider. Maintenance Technician, who is in charge of the appliance’s installation, shall make sure that: •…
-
Page 21: Description Of Controls
English DESCRIPTION OF CONTROLS Power button It is located in the lower left part in the rear of the machine. If set to the «I» position the machine turns on (electrical functions enabled). If set to the «O» position the machine turns off (electrical functions disabled).
-
Page 22: Supply And Start Up
English SUPPLY AND START UP Coffee Blends The coffee bean hopper may be provided with different • We recommend using fresh, non-oily and medium-ground coffee. safety features according to • Use an espresso coffee blend. the regulations of the country •…
-
Page 23: Filling The Water Tank
English Remove the lid from the water tank. If the water tank is not inserted, check that no coffee beans fall into the tank compartment. If this happens, remove them to avoid any malfunctions. Refit the coffee bean hopper lid. Remove the tank;…
-
Page 24: Measuring And Adjusting Water
Therefore, it should always be filtered in a professional The numbers correspond to the settings indicated in the manner. That is why all Saeco machines can be equipped following machine adjustments. with the INTENZA+ filter. This filter is easy to use and its…
-
Page 25
English Immerse the «INTENZA+» water filter vertically in cold The anti-scale filter should water (with the opening positioned upwards) and gently press its sides to let the air bubbles out. replaced whenever indicated by the machine. Before descaling, remove the anti-scale filter from the water tank. -
Page 26: Coffee Bean Hopper
English Fill the tank with fresh drinking water and reinsert it into 7.5.2 Removing the «Intenza+» the machine. Water Filter Switch to programming mode as described in section If the filter is installed in the machine and you want to «Access to the Programming Menu».
-
Page 27: Adjusting The Coffee Dispensing Spout
English The reference marks indicate the grind setting. Turn off the machine by There are different grind settings to choose from with the pressing ON/OFF following references: button and remove the 1 — Fine grind 2 — Coarse grind plug from socket before carrying out any…
-
Page 28: Turning On/Off The Machine
English Manually move the dispensing spout up or down to adjust Turning on/off the Machine its height. The recommended positions are: The machine can be turned on/off by pressing the button • When using small cups. located to the rear of the machine. •…
-
Page 29
English The machine automatically starts circuit priming. Press the «Menu» button. The following screen is displayed: Press the «Latte Macchiato» button. The following screen It will then carry out the warm-up and rinse cycle as is displayed: described in section «Warm-up and Rinsing». 7.9.2 After a Period of Inactivity Empty the water tank, wash and rinse it and fill it with… -
Page 30: Washing The Parts Coming Into Contact With Food
English Fill the water tank again up to the MAX level. The machine is now ready for use. 7.10 Washing the Parts coming into Contact with Food Rinse all the parts coming into contact with food. • Thoroughly wash your hands. •…
-
Page 31: Programming Menu
English PROGRAMMING MENU Button Description in This chapter contains Programming Mode instructions on how to set Use the buttons described below to scroll the appliance change menus. programming parameters of the appliance. Therefore it is necessary to carefully read it and to understand exact sequence…
-
Page 32: User Programming
English Timer (stand-by) User Programming This function allows you to adjust the time taken for the machine to go into stand-by mode after the last brewing. Certain machine parameters can be programmed to improve the brewing of a desired product, and to better manage machine operation.
-
Page 33
English Press the «Cappuccino» button to exit programming. Press the «COFFEE» button. The main screen will be displayed. machine will automatically exit programming mode if you do not press any button for 3 minutes. The values that have been changed Press the «MENU»… -
Page 34: Service Provider Programming
English Service Provider above mentioned Programming procedure can only be The structure of the programming menu is indicated in section «Structure of the Programming Menu». used access The section «Description of Messages in the Programming programming menu when Menu» describes all the items in the programming menu. the machine has reached 8.3.1 Access to the Programming…
-
Page 35: Coffee Grounds Drawer
PUK code. should be changed upon You have to request the first prevent PUK code to the Saeco unauthorised access. After service centre, who will this change, the password guide you through the must be entered each time procedure.
-
Page 36
English 8.3.3 Description of Messages in the Programming Menu DISPLAY MENU ITEM Description Coffee temperature This function allows you to adjust the coffee brewing temperature. This function allows you to adjust the time taken for the machine to Timer (stand-by) go into stand-by mode after the last brewing. -
Page 37
English DISPLAY MENU ITEM Description This function activates the password used to access machine Password programming mode. Password setting This function changes the password used to access machine programming mode. NOTE: This function is displayed only if the «Password» function is set to «YES». -
Page 38
English Press the «MENU» button to confirm. 8.3.4 Password setting The PASSWORD must be set by the service provider in order to prevent access by unauthorised personnel who could change the machine settings and cause malfunctions. To set the PASSWORD, proceed as follows: Switch to programming mode as described in section «Access to the Programming Menu». -
Page 39
English Press the «ESPRESSO» button or the «Aroma» button to If «NO» is selected from the select «YES». «PASSWORD» menu, the saved password will be cancelled. Press the «MENU» button to confirm. 8.3.5 Setting Credits The option «SET CREDITS» will be displayed, which will allow the number of credits to be manually entered. -
Page 40
English Press the «Stand-By» button to confirm the number of credits and to exit the menu. If «NO» is selected from the «CREDIT MANAGEMENT» menu, the charged credits will remain in the memory even though they will not be counted each time a coffee is brewed. -
Page 41: Operation And Use
English OPERATION AND USE Turning on the Machine The use by children older Connection to the power than 8 years or by persons supply should be carried out with reduced physical, exclusively by the service mental or sensory abilities provider! or with lack of experience skills allowed,…
-
Page 42: Warm-Up And Rinsing
English Warm-up and Rinsing Upon start-up, the machine activates the warm-up phase. Wait until it is completed. If the machine is used for the first time or after a long period of inactivity, The progress bar indicates contact Service that the machine is heating Provider to start it up.
-
Page 43: Eco-Friendly: Stand-By
English You can choose from three options by pressing the «Aroma» button. Eco-friendly: Stand-by Each time the button is pressed, the aroma changes by one degree, according to the selected amount: The machine is designed for energy saving. The machine automatically turns off after 30 minutes of inactivity.
-
Page 44: Adjusting The Coffee Length
English To brew 2 coffees, the Brewing cannot machine automatically stopped during grinds doses prebrewing cycle. correct amount of coffee. The machine is adjusted to Brewing two cups of coffee brew true Italian requires grinding espresso coffee. This cycles and two brewing feature slightly cycles automatically carried…
-
Page 45: Cappuccinatore
English Press and hold the «Espresso» button until the «MEMO» Cappuccinatore icon is displayed, then release the button. The machine is now in «dose programming» mode. This chapter explains how to use the milk Cappuccinatore to prepare a cappuccino, a Latte Macchiato or to froth milk.
-
Page 46
English Inserting the Cappuccinatore When the Cappuccinatore If the water dispensing spout is installed, remove it as is not being used, hang the shown in the figure: • Press the two side buttons to unlock the dispensing spout suction tube and lift it slightly. -
Page 47: Brewing Cappuccino
English Removing the Cappuccinatore Fill 1/3 of a container with cold milk. To properly remove the Cappuccinatore, proceed as follows: • Press the two side buttons to unlock the Cappuccinatore and lift it slightly; • pull the Cappuccinatore to remove it. Press the «Cappuccino»…
-
Page 48: Adjusting Cappuccino In The Cup
English Insert the suction tube into the milk container. Once preheating has been completed, the machine starts dispensing frothed milk directly into the cup. Press the «Espresso» button to stop frothed milk dispensing. For hygienic reasons, make Once the frothed milk has been dispensed, the machine brews the coffee.
-
Page 49: Brewing Latte Macchiato
English When the desired quantity of frothed milk is reached, press the This screen stays active for «Espresso» button. seconds, then Once frothed milk has been dispensed, the machine starts brewing coffee. machine goes back to the main screen. The machine is now in programming mode. Insert the suction tube into the milk container.
-
Page 50
English Press the «Latte Macchiato» button. The following screen For hygienic reasons, make is displayed: sure that the outer surface of the suction tube is clean. Place a cup under the Cappuccinatore. This screen stays active for seconds, then machine goes back to the main screen. -
Page 51: Adjusting Latte Macchiato In The Cup
English Once the frothed milk has been dispensed, the machine Insert the suction tube into the milk container. brews the coffee. Dispensing can be stopped by pressing the «Espresso» button. Place a cup under the Cappuccinatore. Press the «Espresso» button to start brewing. 9.12 Adjusting Latte Macchiato in The machine needs time to preheat.
-
Page 52: Dispensing Hot Milk
English When the desired quantity is reached, press the Press the «Menu» button. The following screen is displayed: «Espresso» button. «Latte Macchiato» is now programmed. Every time it is pressed, the machine will dispense the same amount of Latte Macchiato that was programmed. 9.13 Dispensing Hot Milk The machine can dispense hot milk quickly.
-
Page 53: Adjusting Hot Milk In The Cup
English Make sure that the Cappuccinatore is correctly installed. Press the «Espresso» button to start brewing. The machine needs time to preheat. Insert the suction tube into the milk container. Once preheating has been completed, the machine starts dispensing frothed milk directly into the cup. Press the «Espresso»…
-
Page 54: Hot Water Dispensing
English Press the «Latte Macchiato» button. The following screen The machine starts dispensing frothed milk into the cup. is displayed: Press and hold the «Coffee» button until the following When the desired quantity of frothed milk is reached, screen is displayed: press the «Espresso»…
-
Page 55: Quick Carafe Rinse Cycle
English Push the water dispensing spout towards the bottom while rotating it at Press the «Latte Macchiato» button again to start the same time until it is locked into the machine as shown in the figure. dispensing. The following screen is displayed: The machine reminds you to install the water dispensing spout.
-
Page 56: Using The Machine With Credits
English This screen is displayed for 10 seconds to prompt you to 9.17 Using the Machine with execute the quick rinse cycle. Credits This option can be enabled or disabled by the service provider. The machine is designed to manage coffee brewing by means of a credit system.
-
Page 57: Emptying The Coffee Grounds Drawer
English Each service provider decides independently how to Remove the coffee grounds drawer and empty out the coffee grounds in manage the granting and recharging of credits to allow the a suitable container. machine to be used. 9.18 Emptying the Coffee Grounds Drawer This operation must be performed…
-
Page 58
English After inserting the drawer, the display shows the icon: The machine is now ready to brew coffee. -
Page 59: Cleaning And Maintenance
English CLEANING AND MAINTENANCE 10.1 General Notes for Correct Before performing Operation maintenance and/or Non-removable cleaning operation, unplug components the power cord. machine itself must be cleaned, when differently specified, only The Manufacturer is not by using cold or lukewarm liable damage water, with a non-abrasive…
-
Page 60: Cleaning And Scheduled Maintenance
English 10.2 Cleaning and Scheduled 10.2.1 Maintenance Schedule Maintenance Operation to be carried out All parts requiring cleaning Emptying and cleaning the coffee grounds drawer are easily accessible, so no Water tank cleaning Brew group cleaning tools are needed. Brew group lubrication Coffee bean hopper cleaning DESCALING When an alert is shown…
-
Page 61
English Press the «Menu» button. The following screen is displayed: 10.2.2 Cleaning of the Cappuccinatore Danger burning! Dispensing preceded by small jets of hot water. Daily Cleaning of the Cappuccinatore For hygienic reasons and to ensure a perfect milk froth Press the «Latte Macchiato»… -
Page 62
English The following icon is displayed during the dispensing phase. Remove the lower part. Dispense water from the Cappuccinatore until clear water flows out. Press the «Espresso» button to stop brewing. Clean the suction tube with a damp cloth. Remove the fitting. Weekly Cleaning of the Cappuccinatore The weekly cleaning is more thorough since all milk residues are removed from the dispensing spout. -
Page 63
English Remove the fitting from the tube. Insert the tube with the fitting. Detach the milk frothing device from the support. Insert the fitting into the tube of the Cappuccinatore. Clean all the parts thoroughly with lukewarm water. Insert the milk frothing device into the support. Insert the lower part into the fitting. -
Page 64
Monthly Cleaning of the Cappuccinatore You need to perform a more thorough cleaning of the Insert the suction tube into the container. Cappuccinatore every month using the «Saeco Milk Circuit Cleaner». The «Saeco Milk Circuit Cleaner» can be purchased separately. -
Page 65
English Press the «Menu» button. The following screen is displayed: The following icon is displayed during the dispensing phase. Press the «Latte Macchiato» button. The following screen Once the machine stops dispensing, repeat the steps until the is displayed: container is empty. Never drink the solution dispensed during this step. -
Page 66: Brew Group
English Empty the container and place it back under the Cappuccinatore. The following icon is displayed during the dispensing phase. Press the «Menu» button. The following screen is displayed: Once the machine stops dispensing, repeat the steps until the carafe is empty. Press the «Latte Macchiato»…
-
Page 67
English Remove the drip tray and the coffee grounds drawer. Wash the brew group with lukewarm water; carefully wash the upper filter. Before placing the brew group in its seat, ensure that there is no water left in the brewing chamber. -
Page 68
English Make sure that the hook which locks the brew group is in If the coffee residues drawer the correct position. Firmly press the «PUSH» button to check its position. is not positioned correctly, the brew group may not fit into the machine. -
Page 69
English Lubricate the brew group guides using Saeco grease only. Insert the brew group into its seat again until it locks into place WITHOUT pressing the «PUSH» button. Apply the grease evenly on both side guides. Insert the coffee grounds drawer and the drip tray. Close the service door. -
Page 70
English Use the Saeco descaling product only. Its formula has been Fill a container with 1/2 litres of water. Insert the suction specifically designed ensure better machine tube into the container. performance and operation for its whole operating life. If correctly used, it also avoids alterations in the dispensed product. -
Page 71
«Interruption of the Descaling Cycle» chapter. If you do not have a Pour the entire content of the Saeco concentrated descaling solution into the water tank. container of this capacity, pause the cycle by pressing «Espresso»… -
Page 72
English The machine will now start dispensing the descaling When the amount of water needed for the rinse cycle has been solution at intervals (the bar shows the cycle progress). completely dispensed, this icon is displayed. When the solution in the tank is finished, the machine requests to empty and rinse the tank with fresh drinking water. -
Page 73
English Empty the containers used to collect the liquid dispensed by the machine. Empty the drip tray and place it back. The machine is now ready for use. The descaling solution is to be disposed of according to manufacturer’s instructions and/or regulations in force in the country of use. -
Page 74: Troubleshooting
English TROUBLESHOOTING 11.1 Warning signals This chapter describes all the warning messages that the machine may display to the user and the actions that can and/or must be performed by the user. Warning Signals How to reset the message The machine is warming up to brew beverages or dispense hot water. The machine is performing the rinse cycle.
-
Page 75
English Warning Signals How to reset the message Insert the drip tray and the coffee grounds drawer into the machine and close the service door. Fill the coffee bean hopper. This icon appears for 5 seconds, from when the machine detects that there is no more coffee to be ground. -
Page 76: Problems — Causes — Solutions
English 11.2 Problems — Causes — Solutions The following table indicates the possible error or alarm cause which may lead to a partial or total shutdown of the appliance. Problems Causes Solutions The machine does not turn on. The machine is not connected to the electric Connect the machine to the electric network.
-
Page 77
English Problems Causes Solutions This might occur when the machine is The coffee is too weak (see note). Brew some cups of coffee. automatically adjusting the dose. Coffee is brewed slowly (see note). The coffee grind is too fine. Change coffee blend or adjust the grind as explained in the «Coffee Grind Adjustment»… -
Page 78: Storage — Disposal
English STORAGE — DISPOSAL 12.1 Location Change Should the machine be placed in a different location, it is necessary to: • disconnect the appliance from the supply network; • carry out the general cleaning of the appliance as indicated in chapter «Cleaning and Maintenance»; •…
-
Page 79: Instructions For End Of Operational Life Disposal
English INSTRUCTIONS FOR END OF OPERATIONAL LIFE DISPOSAL INFORMATION FOR THE USER in compliance with art. 13 of the Italian Legislative Decree dated 25 July 2005, no. 151 «Implementation of the directives 2002/95/EC, 2002/96/EC and 2003/108/EC on the restriction of the use of certain hazardous substances in electrical and electronic equipment, as well as waste disposal».
РУССКИЙ
ИНСТРУКЦИЯ ПО ЭКСПЛУАТАЦИИ
Внимательно прочитайте данную инструкцию перед использованием машины!
Type SUP041E
RU
14
14

• 2 •
1
1
2
3
4
5
6
9
10 11
16 17
12
2218
23
24
25
19
20
21
7
8
14
15
13

• 3 •
2
5
8
11
3
6
9
12
4
7
10
13
• 4 •
ПРАВИЛА БЕЗОПАСНОСТИ
Не допускайте попадания воды на
электрические компоненты машины,
находящиеся под напряжением: опас-
ность короткого замыкания! Горячая
вода и пар могут вызвать ожоги!
Назначение
Машина предназначена исключительно
для использования в небольших офисах и
коллективах.
Данный прибор не предназначен для ис-
пользования лицами (включая детей) с
ограниченными физическими, умственны-
ми или сенсорными способностями, а также
лицами, не имеющими достаточного опыта
и/или квалификации, если они не обучены
пользоваться машиной лицом, ответствен-
ным за их безопасность, либо не находятся
под его присмотром.
Электропитание
Машина должна быть подсоединена к элек-
тросети наладчиком в соответствии с ее ха-
рактеристиками.
Шнур питания
Запрещается эксплуатировать машину с по-
врежденным питающим проводом.
В случае обнаружения повреждений шнура
и/или вилки питания следует немедленно
связаться с наладчиком. Запрещается про-
кладка шнура питания через углы и острые
кромки, а также поверх очень горячих
предметов. Провод должен быть защищен
от попадания масла. Запрещается переме-
щение машины, удерживая ее за провод.
Запрещается извлекать вилку, держась за
провод или касаться провода мокрыми ру-
ками или наступать на него мокрыми нога-
ми. Следует избегать свободного свисания
шнура питания со стола или шкафа.
Защита других лиц
Не допускаются игры детей с машиной и/
или предметами упаковки. Запрещается
направлять на себя и/или других людей
струю горячей воды и/или пара. Следует
избегать прямого контакта трубки горя-
чей воды с руками, используйте для этого
специальные ручки или рукоятки.
Опасность ожогов
Следует избегать контакта с трубкой горя-
чей воды и/или устройством подачи кофе/
продукта.
Противопожарные меры
В случае возникновения пожара пользуй-
тесь углекислотными (CO
2
) огнетушителя-
ми. Не используйте для тушения воду или
порошковые огнетушители.
Условия использования и техни-
ческого обслуживания
Установка машины должна осуществляться
наладчиком в соответствии с правилами
безопасности, указанными в акте установ-

• 5 •
ки машины.
Перемещение машины должно осущест-
вляться только наладчиком.
Запрещается использовать машину на от—
крытом воздухе.
Не следует располагать вблизи машины
источники открытого огня и/или раскален-
ные предметы во избежание оплавления
или повреждения корпуса. Запрещается
использовать машину в помещениях, тем-
пература в которых может быть равна и/
или ниже 0 °C; в случае, если машина будет
подвергнута такому температурному воз-
действию, вызовите наладчика для прове-
дения ее профилактического контроля.
Очистка
Перед очисткой машины необходимо уста-
новить главный выключатель в положение
OFF (0), а затем извлечь вилку из розетки.
Кроме того, необходимо дождаться пока
машина остынет. Запрещается погружать
машину в воду! Категорически запрещается
вскрывать корпус машины. Не допускается
мыть машину, используя струю воды.
После определенного периода неисполь-
зования необходимо произвести очистку и
промывку машины и ее компонентов.
Использование молока (если
предусмотрено)
Использование и хранение молока должны
происходить в соответствии с указаниями
на оригинальной упаковке. Изготовитель
снимает с себя всякую ответственность в
случаях использования молока, не соответ-
ствующих пищевому потреблению.
Молоко в силу своих свойств должно хра-
ниться в охлажденном виде, посколь-
ку высокая температура приводит к его
окислению; это требует очистки насадки
Cappuccinatore после каждого использова-
ния, как описано в руководстве.
Для основательной чистки насадку
Cappuccinatore можно отсоединить, разо-
брать на компоненты и поместить их в посу-
домоечную машину (не профессиональную).
Мытье в посудомоечной машине может
привести к матированию поверхностей
компонентов Cappuccinatore или к выцве-
танию изображений, в особенности при ис-
пользовании агрессивных моющих средств.
Этот феномен следует считать нормальным,
и он никак не влияет на правильность рабо-
ты самой системы подачи молока.
Хранение машины
Если машина не используется в течение
длительного периода, отключите ее и вынь-
те вилку из розетки. Храните ее в сухом и
недоступном для детей месте. Предохра-
няйте ее от попадания пыли и грязи.
Ремонт / техническое обслуживание
В случае неисправности, поломки или подо-
зрения на поломку после падения машины
следует немедленно извлечь штепсельную
вилку из розетки и вызвать наладчика или
технического специалиста.
Эксплуатация поврежденной машины за-
прещена. Только наладчик сервисного цен-
тра и/или технический специалист могут
вскрывать ее корпус и проводить ремонт.
• 6 •
Использование машины – Инструкция пользователя
КРАТКИЙ ОБЗОР
1 ОБЩИЕ СВЕДЕНИЯ ……………………………………… 7
1.1 Назначение машины ………………………………………….7
1.2 Условные обозначения ……………………………………….7
1.3 Использование инструкции по эксплуатации ……….7
1.4 Паспортные данные машины ……………………………..8
1.5 Технические характеристики ……………………………….8
1.6 Остаточные риски ………………………………………………8
2 КОМПОНЕНТЫ МАШИНЫ ……………………………. 8
2.1 Описание панели управления …………………………….9
3 ИСПОЛЬЗОВАНИЕ МАШИНЫ ………………………… 9
3.1 Наполнение бака для воды …………………………………9
3.2 Наполнение емкости для зерен …………………………..9
3.3 Включение машины …………………………………………10
3.4 Подогрев и ополаскивание ……………………………….10
3.5 Цикл ополаскивания/самоочистки …………………….10
3.6 Бережное отношение к окружающей
среде: Stand-by …………………………………………………11
3.7 Регулирование ус тройства подачи …………………….11
3.8 Регулировка аромата (насыщенность вкуса кофе) 11
3.9 Подача кофе …………………………………………………….11
3.10 Регулировка длительности подачи кофе ……………12
3.11 Освобождение контейнера для сбора отходов …..12
3.12 Подача пара /Капучино …………………………………….13
3.13 Подача горячей воды ……………………………………….14
4 ИСПОЛЬЗОВАНИЕ МАШИНЫ С КРЕДИТАМИ ….. 14
5 ПРОГРАММИРОВАНИЕ ПОЛЬЗОВАТЕЛЯ ………… 14
5.1 Функции машины …………………………………………….15
5.2 Программирование функций машины ………………15
6 ЧИСТКА И ТЕХНИЧЕСКОЕ ОБСЛУЖИВАНИЕ ……. 16
6.1 Чистка насадки Pannarello …………………………………16
6.2 Очистка контейнера для сбора отходов ……………..17
6.3 Очистка поддона для сбора капель ……………………17
6.4 Еженедельная чистка блока приготовления кофе .17
7 СООБЩЕНИЯ МАШИНЫ ……………………………… 20
8 ПЕРЕМЕЩЕНИЕ И ХРАНЕНИЕ ………………………. 22
8.1 Перемещение …………………………………………………..22
8.2 Хранение …………………………………………………………22
9 УСТАНОВКА …………………………………………….. 22
9.1 Правила безопасности ……………………………………..22
9.2 Выключение машины……………………………………….23
9.3 Список принадлежностей ………………………………….23
9.4 Монтаж-установка ……………………………………………24
9.5 Утилизация упаковки………………………………………..24
9.6 Наполнение бака для воды ……………………………….24
9.7 Наполнение емкости для кофе в зернах …………….24
9.8 Подсоединение к электрической сети ………………..25
9.9 Включение/выключение машины …………………….25
9.10 Первое использование после
длительного периода простоя …………………………..25
9.11 Измерение и регулировка жесткости воды ………..26
9.12 Фильтр для воды «INTENZA+» …………………………..26
9.13 Регулировка кофемолки ……………………………………28
10 ПРОГРАММИРОВАНИЕ МАШИНЫ ………………… 29
10.1 Доступ к меню программирования ……………………29
10.2 Кнопки программирования ………………………………30
10.3 Меню программирования …………………………………30
10.4 Установка ПАРОЛЯ…………………………………………….32
10.5 Настройка кредитов …………………………………………33
11 ЧИСТКА И ТЕХНИЧЕСКОЕ ОБСЛУЖИВАНИЕ ……. 34
11.1 Периодичность очистки ……………………………………34
11.2 Смазывание блока приготовления кофе …………….34
11.3 Удаление накипи ………………………………………………35
12 УТИЛИЗАЦИЯ МАШИНЫ ……………………………. 38
13 РЕШЕНИЕ ПРОБЛЕМ ………………………………….. 38

• 7 •
Использование машины – Инструкция пользователя
1 ОБЩИЕ СВЕДЕНИЯ
1.1 Назначение машины
С помощью данной машины можно получить в автоматиче-
ском режиме:
— кофе и кофе эспрессо, приготовленные из кофе в зернах;
— горячие напитки с использованием горячей воды и (или)
пара, подаваемых через специальное устройство подачи;
— напитки на основе молока (если предусмотрено) с помо-
щью насадки Pannarello и (или) Cappuccinatore, которая
входит в комплект поставки.
Корпус машины, имеющий элегантный внешний вид, раз-
работан для использования в небольших офисах, фирмах и
коллективах.
Важно!
В случае нецелевого использования теряется
право на любую гарантию, а производитель снимает
с себя всякую ответственность при нанесении ущерба
лицам и/или имуществу.
Нецелевым использованием считается:
— использование в любых не предусмотренных це-
лях и выполнение действий, не предусмотренных
в данном руководстве;
— выполнение любых операций по ремонту и обслу-
живанию машины, не предусмотренных в данном
руководстве;
— любое использование после нарушения целостно-
сти компонентов машины и/или после изменений
в предохранительных устройствах последней;
— установка машины снаружи помещения.
В указанных случаях ремонт машины будет выпол-
нен за счет пользователя.
1.2 Условные обозначения
С целью обозначения различных уровней опасности или ква-
лификации пользователей, в данной инструкции использу-
ются различные типы значков.
Предупреждающий символ
в виде треугольника сопро-
вождает все указания, со-
держащие важную информацию для обеспечения
безопасности пользователей машины. Следует неу-
коснительно выполнять данные указания во избежа-
ние серьезных ранений!
В данном руководстве используются различные значки для
обозначения квалификации каждого пользователя.
Пользователь: лицо, которое использует машину для
приготовления конечных продуктов и может
производить внутреннюю и наружную очистку
машины, как предусмотрено в руководстве.
Ему НЕ разрешается выполнять операции,
которые находятся в компетенции наладчика/
специалиста службы снабжения или техника.
В случае выявления неисправностей и/или
поломок машины следует обращаться исклю-
чительно к наладчику.
Наладчик/специалист службы снабжения:
фирма или человек, который занимается
стандартными операциями по установке,
вводу в эксплуатацию и остановке машины.
В случае выявления неисправностей следует
обращаться к специалисту по техническому
обслуживанию.
Техник: квалифицированный персонал, в обязанности
которого входит внеплановое техническое об-
служивание и ремонт машины. Техник может
выполнять все операции, описанные в настоя-
щем руководстве, которые не требуют получе-
ния полномочий в явной форме.
Этот символ обозначает особо важную инфор-
мацию, которую следует учитывать для наибо-
лее правильного использования машины.
1.3 Использование инструкции по
эксплуатации
Настоящая инструкция является составной
частью машины и требует внимательного оз-
накомления. Она содержит указания по установке,
техническому обслуживанию и правильному исполь-
зованию машины.
Всегда смотрите инструкции в данном руководстве
перед началом выполнения каких-либо операций.
Данные инструкции по применению следует хранить в на-
дежном месте и в непосредственной близости к кофемашине
на случай, если возникнет необходимость ее использования
другим лицом. В случае утери или порчи данного руковод-
ства незамедлительно обратитесь к наладчику для полу-
чения ее копии. Для получения детальной информации, а
также в случае возникновения проблем, описание которых
недостаточно полно представлено или отсутствует в данном
руководстве, следует обращаться к наладчику.
• 8 •
Использование машины – Инструкция пользователя
1.4 Паспортные данные машины
На машине указываются название модели и заводской но-
мер, которые находятся на специальной табличке.
На табличке указаны следующие данные:
• производитель
• маркировка СЕ
• модель машины
• заводской номер
• год производства
• некоторые технические данные:
— напряжение питания (В);
— частота питающей сети (Гц);
— потребляемая мощность (Вт).
Примечание: при обращении к наладчику всег-
да следует указывать данные, приведенные в
табличке.
1.5 Технические характеристики
Технические характеристики
Напряжение и номинальная мощность: электропитание
Указаны на табличке, расположенной в задней части машины
Материал корпуса машины
Материал — термопластик
Размеры (д х ш х г)
215 x 370 x 429 (мм)
Масса
8 кг (приблизительно)
Длина шнура
1,2 м
Вместимость бака для воды
2,5 литра
Вместимость контейнера для отходов
15
Панель управления
Лицевая
А-взвешенный уровень звукового давления:
Ниже 70 дБ
Давление насоса
не менее 1,5 МПа (15,0 бар)
Условия работы
Минимальная температура: выше 10 °C
Максимальная температура: ниже 40°C
Максимальная влажность: ниже 95 %
Технические характеристики
Предохранительные устройства
Предохранительный клапан давления в бойлере
Предохранительный термостат
Изготовитель сохраняет за собой право вносить кон-
структивные и функциональные изменения, связан-
ные с техническим прогрессом.
1.6 Остаточные риски
Зона подачи продукта не имеет защитных приспособлений,
предохраняющих руки от случайного контакта с кофе, горя-
чими напитками и/или паром.
2 КОМПОНЕНТЫ МАШИНЫ
Примечание: перечень компонентов охваты-
вает все модели машины; проверьте, какие из
них соответствуют вашей машине. Некоторые функ-
ции могут отсутствовать.
1 Крышка бака для воды
2 Бак для воды
3 Панель управления
4 Поплавок полного поддона для сбора капель
5 Решетка-подставка для чашек
6 Поддон для сбора капель
7 Крышка емкости для кофе в зернах
8 Емкость для кофе в зернах
9 Контейнер для сбора отходов кофе
10 Блок приготовления кофе
11 Контейнер для сбора жидких отходов
12 Дверца доступа к сервисному отсеку
13 Трубка пара + резиновая накладка для насадки
Pannarello
14 Устройство подачи кофе
15 Насадка Pannarello
16 Соединение шнура питания
17 Выключатель ON/OFF
18 Кнопка «Эспрессо»
19 Кнопка «Кофе»
20 Кнопка «Аромат»
21 Кнопка «Stand-by»
22 Кнопка «Пар»
23 Кнопка «Горячая вода»
24 Кнопка «MENU»
25 Дисплей
• 9 •
Использование машины – Инструкция пользователя
2.1 Описание панели управления
Примечание: описаны все команды, которые
могут иметься в распоряжении. Описание по-
рядка работы приводится в следующих параграфах.
Позиция — Описание
18 Кнопка «ЭСПРЕССО»
При нажатии этой кнопки включается подача эспрессо.
19 Кнопка «КОФЕ»
При нажатии этой кнопки включается подача кофе.
20 Кнопка «Аромат»
При нажатии этой кнопки выполняется выбор аромата
кофе, которое вы желаете приготовить.
21 Кнопка «Stand-by»
При нажатии этой кнопки машина переходит в режим ожи-
дания.
22 Кнопка «Пар»
При нажатии этой кнопки включается подача пара.
23 Кнопка «Горячая вода»
При нажатии этой кнопки включается подача горячей воды.
24 Кнопка «MENU»
При нажатии этой кнопки, выполняется переход в меню
пользователя, в котором можно задавать некоторые пара-
метры работы машины.
25 ЖК-дисплей
Выводит на экран информацию о состоянии машины,
аварийные сигналы и подсказки пользователю на этапах
использования машины.
3 ИСПОЛЬЗОВАНИЕ МАШИНЫ
Перед началом использования машины необходимо прове-
рить, чтобы бак для воды и емкость для кофе были заполнены;
проверьте, чтобы машина была должным образом очищена.
3.1 Наполнение бака для воды
Перед выполнением ввода машины в эксплуатацию необхо-
димо наполнить бак для воды свежей питьевой водой.
Внимание! Перед первым использованием
аккуратно вымойте бак для воды. В бак сле-
дует наливать только свежую питьевую воду. Горячая
вода, газированная вода или другие жидкости могут
повредить машину.
1
(Рис. 04, с
тр. 3) Снимите крышку с бака для воды.
2
(Рис. 05, с
тр. 3) Достаньте бак; поднимите его при помо-
щи специальной ручки, установленной внутри бака.
3
(Рис. 06, с
тр. 3) Ополосните его и наполните свежей
водой; не превышайте максимальный уровень (MAX), ука-
занный на баке.
4
Снова вставьте бак в специальное гнездо и установите
крышку
.
3.2 Наполнение емкости для зерен
Перед выполнением ввода машины в эксплуатацию необ-
ходимо проверить, чтобы в контейнере было достаточное
количество кофе.
Внимание! Наполняйте емкость всегда и толь-
ко кофе в зернах. Молотый кофе, растворимый
кофе и другие предметы вызывают повреждения ма-
шины.
1
(Рис. 03, с
тр. 3) Снимите крышку с емкости для кофе.
Примечание: емкость может быть оснащена
защитной системой в соответствии с нормами,
принятыми в стране эксплуатации машины.
2
Медленно насыпьте кофе в зернах в емкость.
В случае, если бак для воды не вставлен, убе-
дитесь, что в отделение для бака не упали
• 10 •
Использование машины – Инструкция пользователя
кофейные зерна; если это произошло, удалите их во
избежание сбоев в работе.
3
Закройте емкость для кофе крышкой.
3.3 Включение машины
Внимание! Подключение к электросети должен
выполнять только наладчик!
Перед включением машины следует убедиться, что вилка
правильно вставлена в розетку.
1
Для включения машины главный выключатель, распо-
ложенный на задней с
тенке, должен быть установлен в поло-
жение «I». (рис. 02, стр. 3).
2
После выполнения контрольного цикла машина перехо-
дит в режим ожидания; в э
той фазе кнопка (21) «
» начи-
нает мигать.
3
Для включения машины достаточно нажать на кнопку
(21) «
».
Примечание: по окончании подогрева машина,
выполняет цикл ополаскивания внутренних кон-
туров, в ходе которого подается небольшое количество
воды. Необходимо дождаться окончания этого цикла.
3.4 Подогрев и ополаскивание
1
При включении машина начинает фазу подогрева; необ-
х
одимо подождать ее окончания.
ЖЕЛТЫЙ
Примечание: полоска шкального индикатора
ползет вперед, указывая на то, что машина
выполняет подогрев системы.
2
По окончании подогрева машина выполнит цикл опо-
ласкивания вн
утренних контуров.
ЖЕЛТЫЙ
Примечание: полоска шкального индикатора
ползет вперед, указывая на то, что машина
выполняет цикл ополаскивания системы.
3
Устройством подачи кофе подается небольшое количе-
с
тво воды. Необходимо дождаться окончания цикла.
Примечание: цикл можно прервать, нажав
кнопку (18) « ».
4
По окончании машина готова к работе.
ЗЕЛЕНЫЙ
Примечание: если машина используется в пер-
вый раз, или если она простаивала в течение
длительного периода времени, обратитесь к наладчи-
ку для ввода ее в эксплуатацию.
3.5 Цикл ополаскивания/самоочистки
Этот цикл позволяет ополаскивать внутренние контуры для
кофе свежей водой. Этот цикл выполняется:
• при включении машины (с холодным бойлером);
• после загрузки контура (с холодным бойлером);
• во время фазы подготовки режима ожидания (если был
подан хотя бы один кофейный напиток);
• во время фазы выключения после нажатия кнопки (21)
«
» (если был подан хотя бы один кофейный напиток).
Подается небольшое количество воды для ополаскивания и
нагревания всех компонентов; на этой фазе появляется сим-
вол.
ЖЕЛТЫЙ
Необходимо дождаться автоматического завершения цикла;
можно прервать подачу нажатием кнопки (18) « ».

• 11 •
Использование машины – Инструкция пользователя
3.6 Бережное отношение к окружающей
среде: Stand-by
Машина предусмотрена для экономии электроэнергии. По
истечении 30 минут после последнего пользования машина
автоматически выключается.
Примечания:
— во время фазы выключения, если был подан хотя
бы один кофейный напиток, машина выполняет
цикл ополаскивания;
— время может быть запрограммировано в соответ-
ствии с требованиями (см. инструкции в главе 5).
Для включения машины достаточно нажать на кнопку на
панели управления (если главный выключатель установ-
лен в положение «I»); в этом случае машина выполнит
ополаскивание, только если бойлер остыл.
3.7 Регулирование устройства подачи
С кофемашиной можно использовать большинство чашек/ча-
шечек, имеющихся в продаже.
Устройство подачи может быть отрегулировано по высоте для
наилучшего приспособления к размерам чашечек, которые
желаете использовать.
Для выполнения регулировки приподнимите или опустите
вручную устройство подачи.
Рекомендуемые положения:
— для маленьких чашек
(рис. 07, стр. 3)
;
— для больших кружек и/или стаканов для кофе с молоком
(рис.09, стр.3)
.
Под устройством подачи могут быть размещены две кружки/
чашки для одновременной подачи двух кофе
(рис. 05, стр. 3)
.
3.8 Регулировка аромата
(насыщенность вкуса кофе)
Выберите вашу любимую кофейную смесь и определите ко-
личество кофе для помола в соответствии с личными пред-
почтениями. Также можно выбрать функцию предварительно
намолотого кофе.
Примечание:
Выбор необходимо сделать перед
подачей кофе.
С помощью кнопки
(20) « »
можно выбрать один из пяти ва-
риантов. При каждом нажатии кнопки, аромат изменяется на
одну степень, в зависимости от выбранного количества:
= легкий аромат
= средний аромат
= сильный аромат
3.9 Подача кофе
Для подачи кофе необходимо нажать и отпус тить:
1
кнопку (18) «
» для подачи эспрессо; на дисплее поя-
вится следующий символ;
ЗЕЛЕНЫЙ
или
кнопку (19) « » для подачи кофе; на дисплее поя-
вится следующий символ;
ЗЕЛЕНЫЙ
Далее начинается цикл подачи:
Для подачи 1 кофе нажмите требуемую кнопку один раз.
Для подачи 2 кофе нажмите требуемую кнопку 2 раза
подряд.
Примечание: для подачи 2 кофе машина ав-
томатически производит помол и дозировку
нужного количества кофе. Приготовление двух кофе
требует двух циклов помола и двух циклов подачи, ко-
торыми машина управляет автоматически, при этом
• 12 •
Использование машины – Инструкция пользователя
на дисплее отображается символ с двумя чашками.
ЗЕЛЕНЫЙ
2
По окончании цикла предварительного настаивания кофе
начнет выходить из устройства подачи.
3
Подача кофе останавливается автоматически по дости-
жении установленного уровня; в любом случае можно прер-
вать подачу кофе нажатием на кнопку (18) « ».
Примечание: машина отрегулирована для
приготовления настоящего эспрессо по-ита-
льянски. Эта характеристика может слегка удлинить
время подачи кофе со всеми преимуществами интен-
сивного вкуса кофе.
3.10 Регулировка длительности подачи кофе
Машина позволяет регулировать количество подаваемого кофе
в соответствии с вашим вкусом и размером чашек/чашечек.
При каждом нажатии кнопки
(18)
« » или
(19)
« »
машина подает запрограммированное количество кофе.
Каждой кнопке соответствует определенная подача; подача
производится независимым образом.
Следующая процедура
показывает, как программировать кнопку (18) « ».
1
Установите чашку под устройством подачи (рис. 07, стр. 3).
2
Нажмите и удерживайте нажатой кнопку
(18)
« », пок а
не появится символ «MEMO». затем отпустите кнопку. Те-
перь машина находится в режиме программирования.
ЗЕЛЕНЫЙ
Машина начинает подачу кофе.
ЗЕЛЕНЫЙ
3
Когда появится символ «STOP», нажмите кнопку (18)
« », как только будет достигнуто желаемое количество кофе.
Теперь кнопка
(18)
« » запрограммирована; при каждом
ее нажатии машина будет подавать одинаковое запрограм-
мированное количество эспрессо.
Примечание: Выполните такую же процедуру
для программирования кнопки (19) « ».
Для прерывания подачи кофе при достижении желаемого
количества всегда используйте кнопку
(18)
« », в том чис-
ле во время программирования кнопки кофе
(19)
« ».
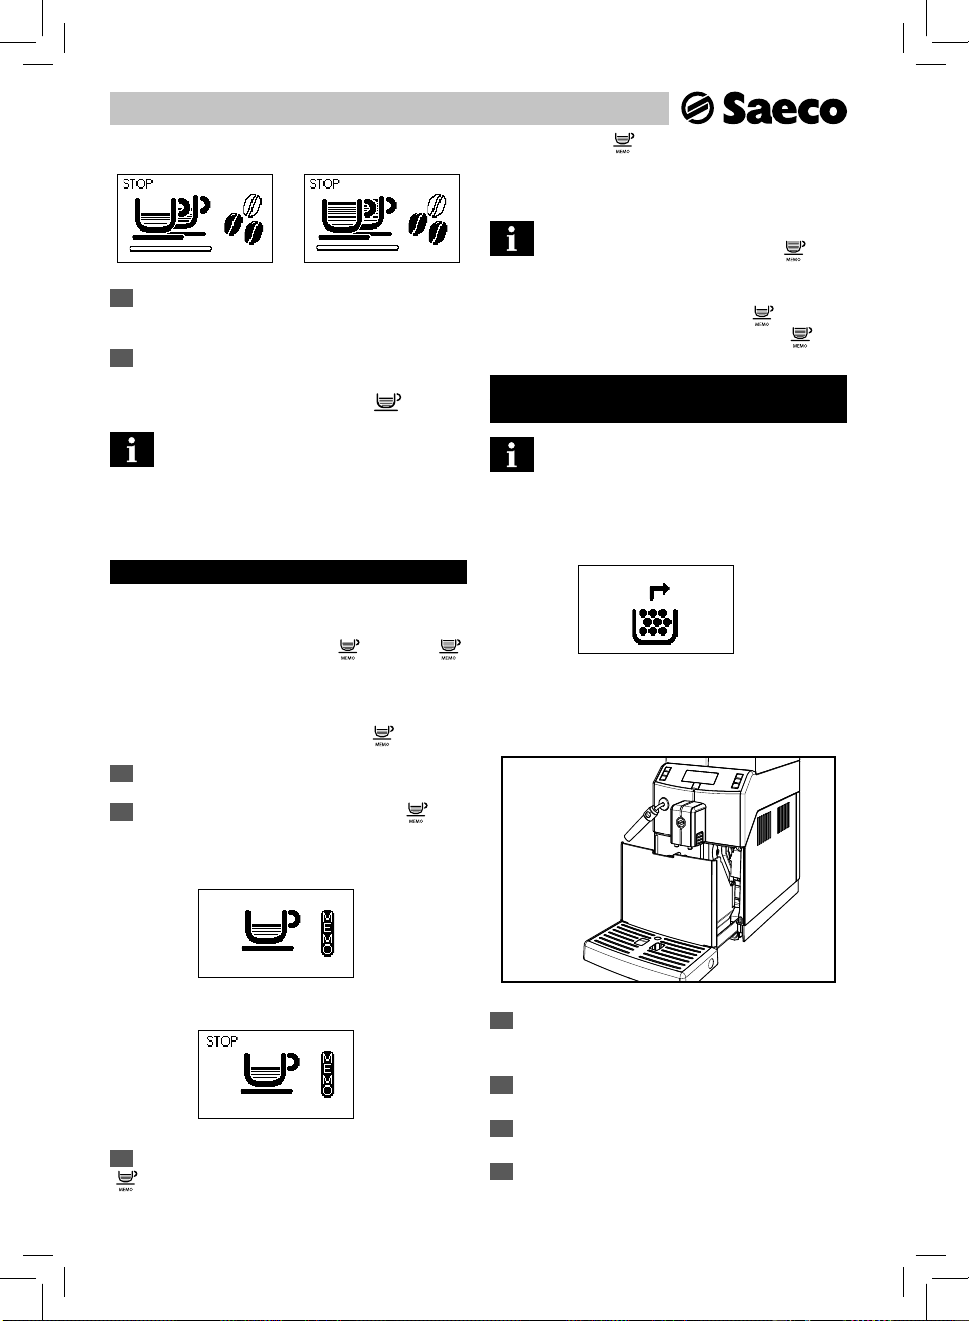
3.11 Освобождение контейнера для сбора
отходов
Примечание: для выполнения этой операции
машина должна быть включена.
Машина сообщает о максимальном уровне заполнения кон-
тейнера для сбора отходов.
КРАСНЫЙ
В этом случае машина не разрешает подачу кофе.Для восста-
новления работоспособности машины необходимо освобо-
дить контейнер для сбора отходов от использованного кофе.
1
Убедитесь, что устройство подачи сдвинуто вверх (рис.
09, с
тр. 3).
2
Поверните насадку Pannarello влево.
3
Достаньте контейнер для сбора отходов.
4
(Рис. 13, с
тр. 3) Достаньте контейнер и удалите отходы
кофе в подходящую емкость.
 Loading…