- Администраторы
- 254 сообщений
- Посетители
- 102 сообщений
- Сообщение
- Личные данные
Инструкции по открытию Root прав на Samsung Galaxy Tab 2 P5100
Похоже на данном планшете очень легко можно получить Root права, для этого не нужен даже компьютер, достаточно иметь подключение к интернету и с помощью программы Baidu Root, права суперпользователя можно получить всего за один клик. Для этого даже не нужно устанавливать кстомное рековери.
Последний раз редактировал Samik 05:08, 26.01.2018
- Главные редакторы
- 372 сообщений
- Сообщение
- Личные данные
Установка CWM Recovery для Samsung Galaxy Tab 2 P5100
Кастомное рековери нужен не всем, но если вы продвинутый пользователь, не хотите использовать официальную прошивку от Samsung то для установки кастомных прошивок вам обязательно понадобиться установить кастомное рековери. CWM Recovery один из самых популярных кастомных рековери, которую можно установить даже без компьютера.
Инструкции
1. Для установки CWM Recovery нам понадобится с начало открыть Root Права (инструкции в шапке)
2. Скачиваем и устанавливаем программу ROMManagerPro5007.apk
3. Запускаем программу, по первому пункту ClockworkMod Recovery, выбираем свою модель и предоставляем Root доступ.
Вот и все, автоматически будет установлена последняя версия CWM Recovery для вашего планшета.
- Администраторы
- 2211 сообщений
- Сообщение
- Личные данные
Инструкции по установке прошивки Linage OS 13 на Samsung Galaxy Tab 2 P5100
Нам понадобится:
1. Установленное кастомное рековери TWRP Recovery 3.0.2-1
2. Сама прошивка Lineage OS (можно скачать из шапки)
3. Файл GApps для установки сервисов Google, именно для нашей версии Android 6 open_gapps-arm-6.0-pico-20170401.zip
4. Если нам еще понадобится Root доступ на новой прошивке то еще вот этот файл SR3-SuperSU-v2.79-SR3-20170114223742.zip
Инструкции
1. Думаю не нужно написать о том как нужно установить или зайти в TWRP recovery, так что заходим туда и делаем резервную копию (в том числе и папку EFS, обязательно!)
2. Копируем файлы прошивки, GApps и SuperSU в планшет, можно на карту памяти
3. Делаем Wipe data, cache и delvik
4. Далее заходим в Instal/Установка и последовательно выбираем файл прошивки, потом Добавить ZIP и файл GApps, потом SuperSU (если нужен Root)
5. Делаем свайп и ожидаем установки всех файлов
6. Я на всякий случай всегда после установки еще раз делаю Wipe cache и delvik и только потом Reboot
Первый запуск может длится немного дольше чем обычно, планшет даже может несколько раз перезагружатся, это нормально, спокойно ожидаем запуска.
Последний раз редактировал Samik 14:09, 28.09.2018
а если после установки по инструкции без рута правда. PlayMarket и всё с ним связанное не запускается, а останавливается как служба и не хочет работать.. что может быть не так?
- Администраторы
- 2211 сообщений
- Сообщение
- Личные данные
atomen (17.12.2018, 22:48) писал:PlayMarket и всё с ним связанное не запускается, а останавливается как служба и не хочет работать.. что может быть не так?
Возможно вы установили не правильную версию GApps!
Какую именно прошивку вы вставили и GApps?
всё именно из этой темы и инструкции в них, там одна прошивка и gapps к ней…
- Администраторы
- 2211 сообщений
- Сообщение
- Личные данные
atomen (19.12.2018, 20:21) писал:
всё именно из этой темы и инструкции в них, там одна прошивка и gapps к ней…
Все вайпы сделали, до и после прошивки?
С начали прошили прошивку и только потом GApps?
Лично я прошил эту же прошивку, эти же GApps и проблем вообще не было!
Пошаговая инструкция
Идея прошить планшет мне пришла после его обновления , проще говоря мой любимый Samsung Galaxy Tab 2 стал просто тупым , при большой нагрузке просто тупо зависал и часов 10 пока не разрядится висел на одной картинке и так , как Hard Reset кнопка отсутствует перезапустить возможности никакой нет . Короче огорчал основательно. Вообще конечно причин для прошивки может быть много и раз вы здесь значит вам не стоит объяснять их все.
И так начнем с самого начала , что нам для этого понадобиться …
- SAMSUNG USB Driver for Mobile Phones v1.5.33.0 ( скачать )
- Сама прошивка Samsung Galaxy Tab 2 ( скачать )
- Программа для прошивки Odin ( скачать )
- Первое что мы делаем это ставим драйвер
SAMSUNG USB (под номером 1) на наш компьютер. - Далее устанавливаем Odin
( под номером 3) - Теперь самое главное переводим планшет в режим загрузки с помощью верхних двух кнопок 1+3 , удерживая их одновременно несколько секунд (смотрим картинку ниже)

- Далее после того как появиться менюшка , жмем кнопку 2 с картинки выше (последовательность в картинках ниже).

- Вот такое окошко откроется , это как раз то что нужно
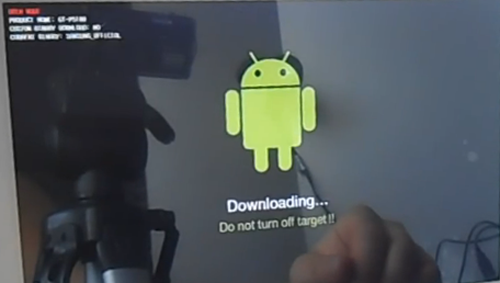
- Ну вот у нас все готово к прошивке Samsung Galaxy Tab 2 GT-P5100
- Берем USB кабель подключаем наш планшет к компьютеру
- Открываем программу Odin , которую мы ранее установили
- Программа должна определить порт к которому подключено наше устройство ( на картинке ниже обведено красным)

- Теперь осталось указать путь к самой прошивке. Так как у меня прошивка сервисная многофайловая в архиве несколько файлов и нужно указать путь ко всем . Обратите внимание на название файла оно как правило совпадает с названием кнопок . Самый большой файл укажите в PDA , туда же указывать путь если у вас в архиве всего один файл.
- Зеленая шкала на картинке показывает процесс загрузки и самая верхняя кнопка в левом углу тоже.
- Когда все готово просто нажимаем кнопку Start и ждем окончания прошивки.
-
Далее планшет перезагрузится ….дайте ему время загрузиться.
Теперь правила которыми не стоит пренебрегать….
ПЛАНШЕТ ДОЛЖЕН БЫТЬ ЗАРЯЖЕН!
ЕСЛИ ВЫ НЕ УВЕРЕННЫ ЧТО У ВАС ПОЛУЧИТСЯ НЕ СТОИТ НАЧИНАТЬ
ЗНАТЬ МОДЕЛЬ ВАШЕГО ПЛАНШЕТА
Скачать прошивку на планшет Samsung Galaxy Tab 2 10.1 (Samsung Galaxy Tab 2 10.1 Wi-Fi )GT-5110 и GT-P5100
Если ранее вы не удачно прошили планшет и он больше не выходит в загрузочное меню и не реагирует на клавишу включения , возможно это прошивка не подошла вашему планшету . Нажмите все три кнопки одновременно и на втором логотипе кнопки как обычно , возможно это поможет войти в нужное меню.
Удачи .
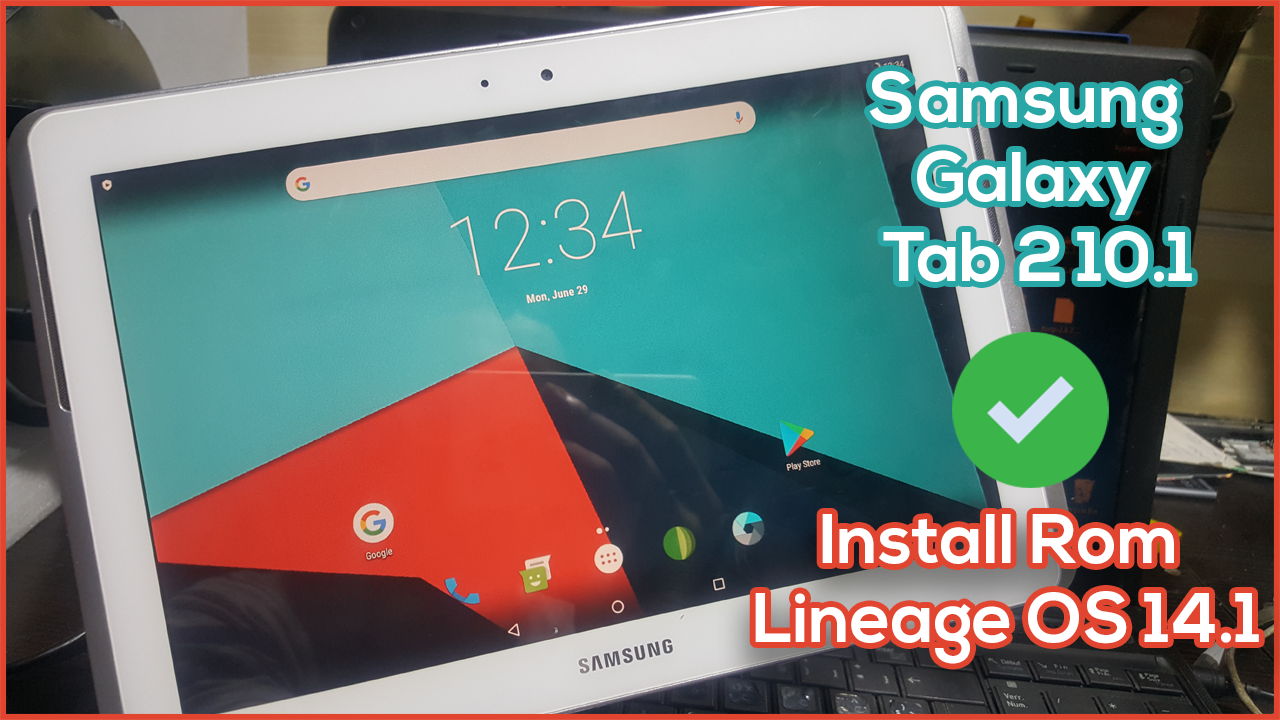
Upgrade Samsung Galaxy Tab 2 GT-P5100 to Android 7.1 Nougat — LineageOS 14.1 Android 7.1.2 Nougat on Samsung Galaxy Tab 2 10.1
What is the available custom ROM for your Samsung Galaxy Tab 2 10.1 GT-P5100 espresso10rf, how do you install this GT-P5100 custom ROM on your Galaxy Tab 2 10.1 GT-P5100 espresso10rf?
LineageOS is a free, community built, aftermarket firmware distribution of Android 7.1 (Nougat), which is designed to increase performance and reliability over stock Android for your device.
The Official Lineage OS 14.1 ROM for Galaxy Tab 2 10.1 custom rom is available to download now. Lineage OS is an aftermarket custom ROM based on AOSP source code with contributions from Android community.
CyanogenMod team will now operate under the Lineage OS name, so you’ll get all your favorite CM features on the Lineage OS ROM. The official builds will ensure regular updates and stable patches. Currently, the nightlies and experimental builds are already available to download. So, you can install the official samsung galaxy tab 2 10.1 gt-p5100 android 7 Lineage OS 14.1 ROM and Gapps package on your device.
Actually there are not gt-p5100 android 10 or android 9 or android 8 but be updated to our posts in the future if we put some new Custom ROMs for this tablet.
If you aren’t happy with your old firmware, then you can Update Samsung Galaxy Tab 2 GT-P5100 to Android 7.1 Nougat Lineage OS 14.1. The thrilling news is that LineageOS 14.1 ROM will let you taste the thrillingness of Nougat 7.1.2 on Tab 2 10.1 GT-P5100 . we recommends that Tab 2 10.1 GT-P5100 owners must save their confidential data appropriately before installing Nougat 7.1.2 Lineage OS as there is a risk of data loss from GT-P5100.
This guide walks you through update samsung galaxy tab 2 GT-P5100 Android tablet and provides remove the limitations of older Official Android to Custom ROM in your device GT-P5100 with latest updates.
Below are the appropriate steps to Software Update Android Device and install Lineage OS 14.1 on Tab 2 10.1 GT-P5100 . we won’t take responsibility if Tab 2 10.1 GT-P5100 become defective during the installation of Nougat 7.1.2 LineageOS 14.1. It is compulsory to charge GT-P5100 battery above 82 percentage before using this tutorial.
Note:
This tutorial containing the installation instructions and Lineage OS Android 7.1.2 Nougat download links can be used only for the Samsung Galaxy Tab 2 10.1 GT-P5100. Check the model number of your device first by navigating to Settings > About Phone.
What is Lineage OS ?
LineageOS is an operating system for smartphones, tablet computers, and set-top boxes, based on Android with mostly free and open-source software.
The biggest and most popular custom Android experience is LineageOS. Formerly known as CyanogenMod (and later just Cyanogen), LineageOS is a close-to-stock version of Android with additional features that make your device more powerful and customizable.
One of the best things about LineageOS is that it lets you update many devices to the latest version of Android — even if stock updates for that device ended long ago. This breathes new life into otherwise-forgotten smartphones and tablets.
Installing a new operating system on your Android device might seem daunting, but if you break it down into steps, it’s fairly easy. There’s also a wide margin for error so beginners don’t have to worry about breaking their devices.
Advantages of Installing GT-P5100 Custom ROM
There are many reasons to upgrade samsung galaxy tab 2 GT-P5100 to android 7.1 Nougat espresso10rf is user wants to update the Android version of the ROM, give a new look to their android, fix their mobile, and have the most current Android version when the manufacturer does not support it.
Custom ROMs are often a way to stay up-to-date when the manufacturer, for whatever reason, doesn’t support us. Luckily Custom ROMs are stable enough to be used daily without problems and give us a little extra customization that never hurt the user experience.
We can get many benefits, as long as we have carried out the process correctly. One of the aspects we win is customization, modifying some elements with the factory ROM we could not. It is the easiest way to make your phone updated.
Samsung Galaxy Tab 2 10.1 GT-P5100 Specifications
Samsung Galaxy Tab 2 10.1 GT-P5100 Android Tablet was launched in February 2012. It is running on the TI OMAP 4430 processor with PowerVR SGX540 GPU. The phone has 1GB RAM and 16/32 GB storage of internal storage which is expandable using microSD, up to 32GB.
The Galaxy Tab 2 10.1 P5100 has a 10.1 inches WXGA, 800 x 1280 pixels PLS display with a pixel density of 149 ppi. Coming to cameras, it has a 3.15 MP rear camera and a VGA front camera for selfies. It has a microUSB port for data syncing and charging. There is a accelerometer sensor present on the Galaxy Tab 2 10.1 P5100. It is a single SIM smartphone with support for 3G, Wi-Fi, Bluetooth and GPS too.
The Galaxy Tab 2 10.1 P5100 runs on Android OS, v4.0 (Ice Cream Sandwich) and all this is powered by a 7000 mAh battery. It measures 256.6 x 175.3 x 9.7 mm (height x width x thickness) with a total weight of 588 grams including battery.
Pre-Requirements
- Take a proper backup of all your existing data and settings before proceeding to the ROM installation guide using a recommended custom recovery like CWM or TWRP.
- Download and install the correct USB Samsung Drivers for the Galaxy Tab 2 10.1 GT-P5100 on the PC.
- Enable USB Debugging Mode on your device by navigating to Settings > Developer Options.
- Your device should be rooted with TWRP recovery installed on it.
- Make sure that the battery level of your device should be charged at least about 80%.
Note:
Official Lineage OS builds are quite stable but they’re still in the early stage. So, there could be some bugs/issues with this custom ROM which you can report to the community for quick fixes. Install/flash this custom ROM on your device at your own risk but always remember that the Lineage OS team will back you up.
Lineage OS Custom Rom Details
Build status: Official
Android Version: Android 7.1.2 Nougat
Supported Device: Galaxy Tab 2 10.1 GT-P5100
How to Install Lineage OS on Galaxy Tab 2 10.1 GT-P5100
Step 1: Download and transfer the Lineage OS ROM and Gapps files to internal storage of your samsung Galaxy Tab 2 GT-P5100.
Step 2: Boot your device into TWRP recovery. You can simply Google how to enter recovery mode on your device.
Step 3: In TWRP recovery, click on Wipe -> Advanced Wipe -> Dalvik Cache + System + Cache + Data
Step 4: Go back to TWRP main menu, tap on Install and select the Lineage OS Zip file that you transferred to your device.
Step 5: After selecting the .zip file, do Swipe to Confirm Flash on the bottom of the screen to begin the custom ROM installation process. This may take some time.
Step 6: Once your custom ROM is successfully flashed, you’ll see Wipe cache/Dalvik option, select it and then do Swipe to wipe on the bottom of the screen.
Step 7: Now flash the Lineage OS Gapps file similarly like you flashed the custom ROM file.
Step 8: After flashing both custom ROM and Gapps files, reboot your device and First start takes a long time.
Done! You’ve successfully updated samsung galaxy tab 2 10.1 gt-p5100 android 7 Custom ROM Lineage OS 14.1 Android 7.1.1 Nougat.
Download Lineage OS Rom and OpenGapps For Tab 2 10.1
Download the Official Galaxy Tab 2 10.1 Lineage OS 14.1 ROM and Gapps package from the below download links. Transfer them to your device before proceeding with the installation process.

Odin Download

espresso-common_TWRP_3.1.1-0

lineage-14.1_espresso3g-7.1.2-20200623-1945

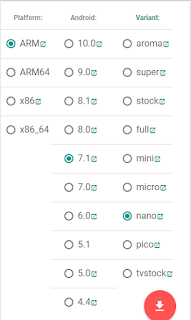
The_Open_GApps_Project
(Select : ARM + 7.1 + nano)
DISCLAIMER
All videos on my YouTube channel are for Educational purpose only and/or to help people unlock their phones who forget their Password or Google Lock. I do not endorse or encourage unlocking of stolen/barred mobile phones. Anyone using these videos for any illegal or unlawful purpose will be solely responsible for his/her activity.
Related searches
Galaxy Tab 2 10.1 has joined the lucky league of Android 6.0.1 Marshmallow. This hasn’t been done officially, but the developers who are always keen to bring a new life to such old devices have once again made this possible.
You can now easily update your Galaxy Tab 2 10.1 P5100, P5110 and P5113 to Android 6.0.1 Marshmallow using CyanogenMod 13 custom ROM.
The ROM comes from XDA recognized contributor Android-Andi. At the time of writing this post, this ROM is in early development stages, but most of the mainstream features are found to be working quite well. You can flash this ROM on your tablet using the instructions attached below.
Before heading towards the installation instructions, we will have a flashback at the Galaxy Tab 2 10.1 and also CyanogenMod.
DISCLAIMER
All videos on my YouTube channel are for Educational purpose only and/or to help people unlock their phones who forget their Password or Google Lock. I do not endorse or encourage unlocking of stolen/barred mobile phones. Anyone using these videos for any illegal or unlawful purpose will be solely responsible for his/her activity.