-
Contents
-
Table of Contents
-
Troubleshooting
-
Bookmarks
Quick Links
SAMSUNG SMARTCAM
User Manual
SNH-1011N
0678
!
Related Manuals for Samsung SMARTCAM SNH-1011N
Summary of Contents for Samsung SMARTCAM SNH-1011N
-
Page 1: User Manual
SAMSUNG SMARTCAM User Manual SNH-1011N 0678…
-
Page 2: Operational Description
Samsung Techwin Co., Ltd. and information being sent. Describe all modulation types and all data rates. The name of this product is the registered trademark of Samsung Techwin Co., Ltd. Other trademarks mentioned in this manual are the registered trademark of their Instructions &…
-
Page 3: Table Of Contents
• To avoid entangled cable lines, avoid using cable extension for adaptor’s power cord. MONITORING • The product’s servicing is allowed only to authorized Samsung Techwin’s service personnel. Registration …………………………………………………… 16 • When using the product for children’s care, be careful to keep the product out of children’s reach.
-
Page 4: Getting Started
Features • Easy to install — With the help of WPS (Wi-Fi Protected Setup), wireless sharing and easy connection are enabled. — Simply visit the home page (www.samsungsmartcam.com) and download and install the program without a separate installer program. • Remote monitoring — Whenever and wherever if you are in the Internet enabled environment, remote monitoring is ready for you.
-
Page 5: What’s Included
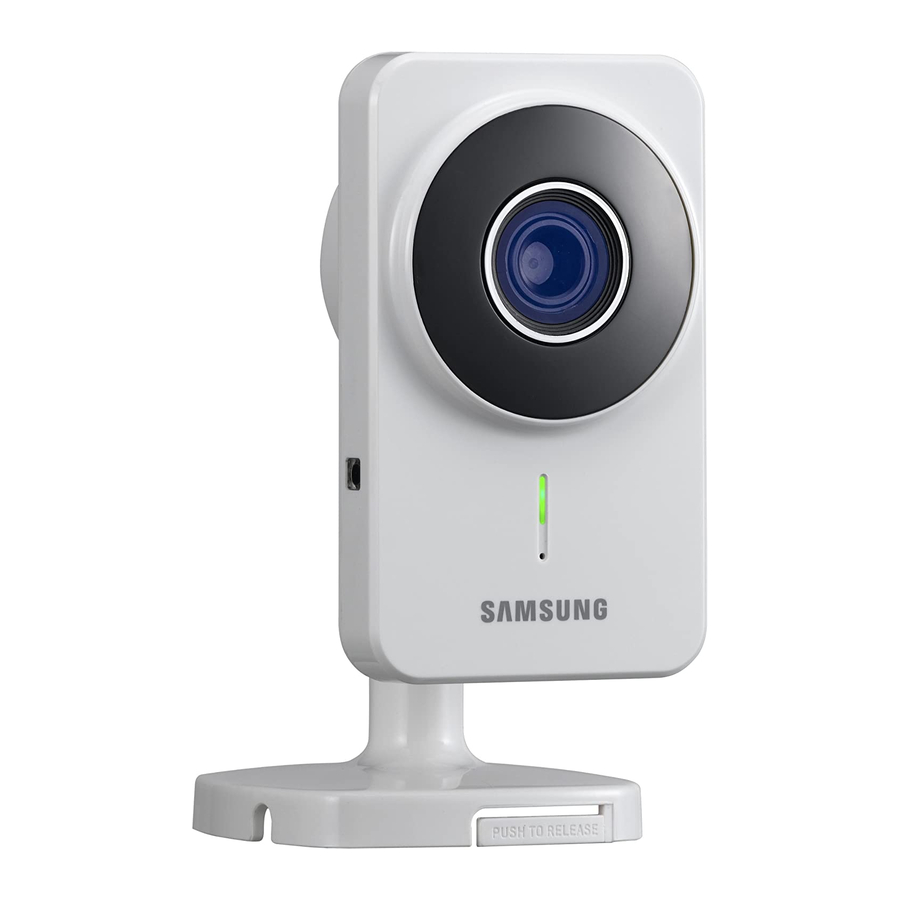
What’s Included Check for components when opening the product package. Camera & Bracket body Power Adaptor Network Cable Quick Start Guide Warranty Card GPL Lisence Double Sided Tape Tapping screw Plastic anchor Please save the packaging. You will need the serial number later to register the camera.
-
Page 6: Getting To Know Your Monitoring System
Detects light levels where the camera is placed. Produces sound transferred from a smart phone. Night vision mode changes according to detection result. SAMSUNG SMARTCAM RESET Reset button Power / Wi-Fi status LED Resets the camera settings to the default.
-
Page 7: Power Supply
Power Supply Network connection Plug-in the camera power adapter to the wall outlet and connect the camera as Connect the provided network cable to the camera’s network terminal. shown. For further details on network configuration, refer to “Network Connection and Settings”.
-
Page 8: Installation & Network Connection
Installation Precautions Install the camera in a place where the Wi-Fi signal can be reached and without interference. & NSTALLATION Keep it away from humidity such as around the humidifier. Keep it away from direct sunlight, strong light or dust; install it in a place with ETWORK ONNECTION clear view.
-
Page 9: Wall Mounting Using Double-Sided Adhesive Tape
Hold the adhesive tape’s holder and remove the protective film, and attach it Wall Mounting Using Double-sided adhesive tape to the desired spot of the wall-mount bracket while making the [▲ TOP] marker point upwards (direction of 12 o’clock). Separating the wall-mount bracket The tape will lose adhesiveness if used once, do not re-use.
-
Page 10
Run the provided adaptor wire through the Fix the body bracket by turning it clockwise until it clicks. groove prepared on the wall-mount bracket. Match adaptor’s plug part to the direction of 12 o’clock. Grooves on the body bracket Connect the adaptor’s plug to the power terminal on the camera’s rear side. -
Page 11: Wall Mounting With Screws
Adjusting the Angle Wall Mounting with Screws Adjust the camera’s shooting angle as appropriate. For more information about step of Separating the wall-mount bracket, refer to “Wall Mounting Using Double-sided adhesive tape”. Do not put excessive force. Otherwise, it may cause damage to the camera.
-
Page 12: Desktop Mounting
Use drill bit of 5mm diameter and drill on the Desktop mounting marked positions, drill to have 3 cm depth holes. Clean the holes after drilling. For more information about step of Separating the wall-mount bracket, refer to “Wall Be careful not to get injured while drilling. Mounting Using Double-sided adhesive tape”.
-
Page 13: Network Connection And Settings
DC IN 5V <Hub> the service. If this is the case, contact the service provider. NETWORK SAMSUNG SMARTCAM RESET <Modem> • Do not access the unauthorized network. • The farther the distance from the Wireless Access Point, the longer time the network connection may take.
-
Page 14: Connecting Via Wi-Fi Without Wps Feature
Press the WPS button on the camera for 1sec. Press the WPS button on the Wireless Access Point within 2min. WPS Button WPS Button DC IN 5V NETWORK SAMSUNG SMARTCAM <Wireless Access Point> RESET DC IN 5V RESET NETWORK SAMSUNG SMARTCAM…
-
Page 15
If the Wireless Access Point do not support WPS or you do not have wirelss router, please go to Wired Connection. If no WPS button is displayed or visible on the display, see the Wireless Access Point’s manual or contact the manufacturer of your Wireless Access Point for technical assistance. -
Page 16: Monitoring
Registration Once you register the product with the site, you can monitor the camera video on the PC or laptop computer. Web browser requirements Windows ONITORING Windows XP, 7 supported MAC OS X Snow Leopard or higher is supported — Internet Explorer 8, 9 (The 64-bit is not supported.) — Safari — Firefox…
-
Page 17: Plug In Installation
❖ Plug in installation Click <Install> to begin the installation. You need to install your plug in to automatically search for cameras connected to the network and view the video in your camera. If you login or click <Starting SmartCam> in a PC where the plug in is not installed, the installation message window will pop up.
-
Page 18
For Mac Enter password, and click <Install Software>. Click <Continue>. Installation has completed. Click <Install>. 18 · English… -
Page 19
Enter the requested information, and click <Sign Up>. According to the network connection and setting, click <Next> when the camera LED turns into green. • ID : Create user ID between 8 to 14 alphanumeric character. • Password : Create password between 8 to 14 alphanumeric character. Select the serial number of the camera to be added from the camera search •… -
Page 20
Create <Camera Name> and <Camera password>. Select your Wireless Network from the list. Click <Next>. Enter the password of your Wireless Network and click <Next>. The camera password is used to block the unauthorized access to your camera. Create camera password using alphanumeric characters between 1 to 8 without any space. -
Page 21: Live Video
Unplug the network cable from the camera and the router. Live Video Click <Finish> if the <Finish> button is activated. Select a camera from the camera list at the upper left hand of the screen. Once the camera is successfully registered, you can check the camera in the camera list.
-
Page 22: Monitoring Options
Item Description Monitoring options Enlarges current video to the maximum size of the monitor. Full screen Supported by Internet Explorer only. Set the IR lighting. Night Vision If you set the Night Vision to <OFF>, the camera will be operated only in color mode.
-
Page 23: Setup
Relay mode is added feature where the video from the camera is transmitted to Samsung server then retransmitted to the user’s computer. If you have trouble connection to the camera, visit «http://www.samsungsmartcam. com», go to support page, and refer to “Troubleshooting” on it.
-
Page 24: Network
If you change the camera password, you will be logged out and return to the camera Network password input page. The camera password can be changed only in admin mode. Keep the camera password in a safe place as it is used for viewing the live screen of <Wired Network>…
-
Page 25
If any of the manual settings is wrong, the network settings will not be applied. Item Description If you have both cable and wireless network connections simultaneously, the cable Wireless On/ You can select to activate or deactivate the wireless network network connection is prioritized. -
Page 26: Time
Time Alarm & Notification Camera has ability to send event notifications when motion or audio is detected. Item Description Specify whether to trigger the alarm or not, and specify the sensitivity. The higher the sensitivity is, the subtler motion/audio events will be Item Description detected.
-
Page 27
<YouTube> Notification <Picasa> Notification Automatically uploads 30 second clip to your private YouTube account. Automatically uploads a image to your private Picasa account. Select the Google. Select the Google. Check <Use> of YouTube. Check <Use> of Picasa. Enter your Gmail address and password. Enter your Gmail address and password. -
Page 28
<Gmail> Notification <Twitter> Notification The event alarm is sent through Gmail. When an event is detected, the notification message is sent to the user’s Twitter account. Select the Google. Select the Twitter. Check <Use> of Gmail. Click <Request URL>. Enter your Gmail address and password. Click <Access Twitter>. -
Page 29: Alarm Schedule
Push alarm Notification Alarm Schedule The push alarm is provided through the web viewer and mobile app in which the camera is registered. Set the desired time to activate alarms for the selected time period. • If this is set to enable, the video and image link recorded in YouTube and Picasa will be transferred to the listed friends in real time in the event of an alarm.
-
Page 30: Event Alarm
Event Alarm Information You can check the event alarm that occurred. Item Description Delete by dates Delete all the event alarms on the date. Select an event and double click on it. The video will be played. Play Video Video can be played only if you are logged into the Google account where you uploaded the video.
-
Page 31
My Account Support You can download the Samsung SmartCam mobile app and user guide. If you want to change your information, click < > icon and move to “Account” page and select an item (password and/or email address) and make changes as necessary. -
Page 32: Appendix
Specifi cations Specifications Item Description Video Imaging Device 1/5″ 3M CMOS PPENDIX Effective Pixels 2,048(H) x 1,536(V) Scanning System Progressive Synchronization Internal Specifications Lens Focal Length (Zoom Ratio) 2.87mm Specifications Product Appearance Angular Field of View (D/V/H) 65.1°/ 42.9°/ 54.1° Min.
-
Page 33
Item Description Item Description Operational Audio Communication 2-Way (Built-in Microphone, Speaker) On Screen Display (Web Browser, TCP/IP, DHCP, SMTP, DNS, RTSP, RTCP, RTP, HTTP, TCP, UDP, English, French, Germany, Spanish, Taiwan, Korean Protocol Local page) STUN, XMPP, SIP, uPNP, ICE, SNTP, IPv4, ICMP Day &… -
Page 34
Product Appearance 34 · English… -
Page 35: Troubleshooting
Troubleshooting Problem Action Video will not be — Event video will be uploaded in confidential mode. Login to the Google played in event account where you uploaded the video. alarms. If you encounter a problem with your system, see the table below to solve the problem as quickly and easily as possible.
-
Page 36: Correct Disposal Of This Product
(password and/or email address) and make changes as necessary. email address. Samsung Techwin cares for the environment at all product manufacturing stages, and Camera will be is taking measures to provide customers with more environmentally friendly products.
-
Page 37
TEL : +82-70-7147-8740~60 FAX : +82-31-8018-3745 SAMSUNG TECHWIN AMERICA Inc. SAMSUNG TECHWIN EUROPE LTD. 100 Challenger Rd. Suite 700 Ridgefield Park, NJ 07660 Samsung House, 1000 Hillswood Drive, Hillswood Business Park Chertsey, Toll Free : 1-877-349-3149 Surrey, UNITED KINGDOM KT16 OPS www.samsungsv.com…
1.
Tap <Add Camera>.
2.
Select the camera found and tap
<next>.
M
`
When your smartphone is
connected to the same WiFi
network as the camera, it will
automatically search for the
camera.
3.
If the camera is not detected,
please enter the camera serial
number manually.
M
`
For camera’s power and network
connection, refer to [ ].
`
For camera’s serial number
location, refer to [ ].
4. Camera Registration
4.
Create the <Camera
password> and <Camera
Name>, and then tap <Add>.
M
`
Create camera password using
alphanumeric characters between
1 to 8 without any space.
Camera Move
1.
Move to the <Camera> item.
From the listed active cameras,
tap the desired camera’s [ ]
on the right.
M
`
You cannot monitor an inactive
camera.
2.
You may find the Live, Event or
Setup icons.
Delete Camera
1.
To delete an added camera, tap
and slide from right to left on a
desired camera from the list.
2.
Tap <Delete>.
5. Camera
Хорошее руководство по эксплуатации
Законодательство обязывает продавца передать покупателю, вместе с товаром, руководство по эксплуатации Samsung SNH-1011N. Отсутствие инструкции либо неправильная информация, переданная потребителю, составляют основание для рекламации в связи с несоответствием устройства с договором. В законодательстве допускается предоставлении руководства в другой, чем бумажная форме, что, в последнее время, часто используется, предоставляя графическую или электронную форму инструкции Samsung SNH-1011N или обучающее видео для пользователей. Условием остается четкая и понятная форма.
Что такое руководство?
Слово происходит от латинского «instructio», тоесть привести в порядок. Следовательно в инструкции Samsung SNH-1011N можно найти описание этапов поведения. Цель инструкции заключается в облегчении запуска, использования оборудования либо выполнения определенной деятельности. Инструкция является набором информации о предмете/услуге, подсказкой.
К сожалению немного пользователей находит время для чтения инструкций Samsung SNH-1011N, и хорошая инструкция позволяет не только узнать ряд дополнительных функций приобретенного устройства, но и позволяет избежать возникновения большинства поломок.
Из чего должно состоять идеальное руководство по эксплуатации?
Прежде всего в инструкции Samsung SNH-1011N должна находится:
— информация относительно технических данных устройства Samsung SNH-1011N
— название производителя и год производства оборудования Samsung SNH-1011N
— правила обслуживания, настройки и ухода за оборудованием Samsung SNH-1011N
— знаки безопасности и сертификаты, подтверждающие соответствие стандартам
Почему мы не читаем инструкций?
Как правило из-за нехватки времени и уверенности в отдельных функциональностях приобретенных устройств. К сожалению само подсоединение и запуск Samsung SNH-1011N это слишком мало. Инструкция заключает ряд отдельных указаний, касающихся функциональности, принципов безопасности, способов ухода (даже то, какие средства стоит использовать), возможных поломок Samsung SNH-1011N и способов решения проблем, возникающих во время использования. И наконец то, в инструкции можно найти адресные данные сайта Samsung, в случае отсутствия эффективности предлагаемых решений. Сейчас очень большой популярностью пользуются инструкции в форме интересных анимаций или видео материалов, которое лучше, чем брошюра воспринимаются пользователем. Такой вид инструкции позволяет пользователю просмотреть весь фильм, не пропуская спецификацию и сложные технические описания Samsung SNH-1011N, как это часто бывает в случае бумажной версии.
Почему стоит читать инструкции?
Прежде всего здесь мы найдем ответы касательно конструкции, возможностей устройства Samsung SNH-1011N, использования отдельных аксессуаров и ряд информации, позволяющей вполне использовать все функции и упрощения.
После удачной покупки оборудования/устройства стоит посвятить несколько минут для ознакомления с каждой частью инструкции Samsung SNH-1011N. Сейчас их старательно готовят или переводят, чтобы они были не только понятными для пользователя, но и чтобы выполняли свою основную информационно-поддерживающую функцию.
-
Samsung SNH-1011N — page 1
SAMSUNG SMAR TCAM User Manual SNH-1011N 0678 ! …
-
Samsung SNH-1011N — page 2
SPECIFY SERVICE INSTRUCTIONS AND WARRANTY TERMS This device complies with Part 15 of the FCC Rules. Operation is subject to the following two conditions: (1) this device may not cause harmful interference, and (2) this device must accept any interfer ence received, including interference that may cause undesir ed operation. FCC NOTE: THE MANUF ACTU …
-
Samsung SNH-1011N — page 3
• Especially , the power cord should be installed carefully while keeping it out of children’ s reach. • Never use the product near bath tub, sink, washing machine and in wet basement to avoid moisture. • The product is designed for indoor use. • The product is not designed for medical monitoring, and r equires a grown-up’ s protective …
-
Samsung SNH-1011N — page 4
4 · English Features 4 What’ s Included 5 Getting to know your Monitoring system 6 Power Supply 7 Network connection 7 01 G ETTING S T AR TED • Easy to install — With the help of WPS (Wi-Fi Pr otected Setup), wireless sharing and easy connection are enabled. — Simply visit the home page (www .samsungsmartcam.com) and download and install the p …
-
Samsung SNH-1011N — page 5
5 01 Getting Started What’s Included Check for components when opening the product package. Camera & Bracket body Power Adaptor Network Cable Quick Start Guide Warranty Card GPL Lisence Double Sided T ape T apping screw Plastic anchor n ` Please save the packaging. Y ou will need the serial number later to register the camera. …
-
Samsung SNH-1011N — page 6
6 · English Getting to know your Monitoring system High quality camera lens Built-in IR LEDs for night vision Power / Wi-Fi status LED Luminance Sensor Detects light levels where the camera is placed. Night vision mode changes according to detection result. Built-in Mic DC IN 5V SAMSUNG SMARTCAM NETWORK RESET DC 5V Power Input Network port Used if …
-
Samsung SNH-1011N — page 7
7 01 Getting Started Power Supply Plug-in the camera power adapter to the wall outlet and connect the camera as shown. n ` Make sure to use the provided power adaptor . Otherwise, the product may not operate properly . ` It will take about 1min for the camera to boot-up completely . ` When the boot-up is complete, the power LED color will change fr …
-
Samsung SNH-1011N — page 8
8 · English Installation 8 Precautions 8 W all Mounting Using Double-sided adhesive tape 9 W all Mounting with Screws 11 Desktop mounting 12 Network Connection and Settings 13 Precautions 13 Connecting via network cable 13 Connecting via Wi-Fi without WPS feature 14 Conneting using Wi-Fi WPS feature 14 02 I NST ALLA TION & N ETWORK C ONNECTION …
-
Samsung SNH-1011N — page 9
9 02 Installation & Network Connection W all Mounting Using Double-sided adhesive tape Separating the wall-mount bracket 1. Press and hold [ PUSH TO RELEASE ] on the left side of bracket and turn the bracket counterclockwise to separate it. n ` Y ou may turn the bracket body counterclockwise without pressing the [ PUSH TO RELEASE ]. Assembling …
-
Samsung SNH-1011N — page 10
10 · English 4. Run the provided adaptor wir e through the groove pr epared on the wall-mount bracket. n ` Match adaptor’ s plug part to the direction of 12 o’clock. 5. Arrange the wire by using two gr ooves on the body bracket. n ` Make both body bracket’ s [ UNLOCK LOCK ] and wall-mount bracket’ s [▲ TO P ] marks face the same directio …
-
Samsung SNH-1011N — page 11
11 02 Installation & Network Connection Adjusting the Angle 1. Adjust the camera’ s shooting angle as appropriate. n ` Do not put excessive force. Otherwise, it may cause damage to the camera. 2. T ur n the part shown in the figure clockwise to lock the bracket’ s ball hinge and fix the shooting angle. 3. T ur n it counterclockwise to unloc …
-
Samsung SNH-1011N — page 12
12 · English Desktop mounting n ` For more information about step of Separating the wall-mount bracket, refer to “ Wall Mounting Using Double-sided adhesive tape ”. Assembling 1. Assemble body bracket and wall-mount bracket while matching the [▼] and [▲] marks. 2. T ur n the body bracket clockwise until it clicks, use the groove on the bod …
-
Samsung SNH-1011N — page 13
13 02 Installation & Network Connection Precautions • The wireless network access may fail, depending on the communications environment. • For details about the network settings and password, contact your network administrator or service provider . • For a specific Internet service requiring user authentication, you may not access the ser …
-
Samsung SNH-1011N — page 14
14 · English Connecting via Wi-Fi without WPS feature If you want to connect the camera using a non-WPS Wireless Access Point, change the network setting to Wire and try the wir eless network. 1. When you apply the power , the power status LED is lit red, and it will change to red blinking when the booting is completed. 2. Use the network cable (L …
-
Samsung SNH-1011N — page 15
15 02 Installation & Network Connection n ` If the Wireless Access Point do not support WPS or you do not have wirelss router , please go to Wired Connection. ` If no WPS button is displayed or visible on the display, see the Wireless Access Point’ s manual or contact the manufacturer of your Wireless Access Point for technical assistance. ` …
-
Samsung SNH-1011N — page 16
16 · English Registration 16 Web br owser requirements 16 Starting SmartCam 16 Live Video 21 Monitoring options 22 Setup 23 Basic Info 23 Network 24 Time 26 Alarm & Notification 26 Alarm Schedule 29 Event Alarm 30 Information 30 My Account 31 Support 31 03 M ONITORING Once you register the pr oduct with the site, you can monitor the camera vid …
-
Samsung SNH-1011N — page 17
17 03 Monitoring ❖ Plug in installation Y ou need to install your plug in to automatically search for cameras connected to the network and view the video in your camera. n ` If you login or click < Starting SmartCam > in a PC where the plug in is not installed, the installation message window will pop up. ` When you install the plug in, the …
-
Samsung SNH-1011N — page 18
18 · English For Mac 2) Click < Continue >. 3) Click < Install >. 4) Enter password, and click < Install Softwar e >. 5) Installation has completed. …
-
Samsung SNH-1011N — page 19
19 03 Monitoring 6. According to the network connection and setting, click < Next > when the camera LED turns into green. 7. Select the serial number of the camera to be added from the camera sear ch list. If the camera is not found, enter the serial number manually . 8. Click < Next >. n ` Serial number can be found the label on the si …
-
Samsung SNH-1011N — page 20
20 · English 9. Create < Camera Name > and < Camera passwor d >. 10. Click < Next >. n ` The camera password is used to block the unauthorized access to your camera. ` Create camera password using alphanumeric characters between 1 to 8 without any space. 11. After adding the camera, click < Ye s > in the wireless network se …
-
Samsung SNH-1011N — page 21
21 03 Monitoring 1. Select a camera from the camera list at the upper left hand of the scr een. n ` The gray icon indicates the camera is inactive so you cannot monitor it right now . 2. Enter the camera password and click < Apply >. n ` Check < Remember > to connect the camera without entering the camera password. ` If you want to chan …
-
Samsung SNH-1011N — page 22
22 · English Monitoring options Item Description Default Camera Set the default camera to monitor in the camera list. b Delete Camera Delete the registered camera. c Cancel remembering camera password Cancel remembering the camera password. Item Description Full screen Enlarges current video to the maximum size of the monitor . ` Supported …
-
Samsung SNH-1011N — page 23
23 03 Monitoring ❖ Network Speed Profile Name Resolution Frame rate Recommended bandwidth Low Speed Network VGA 5 fps 768Kbps Mid Speed Network VGA 10 fps 1Mbps High Speed Network VGA 30 fps 2Mbps n ` What is relay mode? If the network condition is unstable, the camera cannot make a normal connection (P2P), so it will set up a connection in relay …
-
Samsung SNH-1011N — page 24
24 · English n ` If you change the camera password, you will be logged out and return to the camera password input page. ` The camera password can be changed only in admin mode. ` Keep the camera password in a safe place as it is used for viewing the live screen of the camera or for changing the display settings. ❖ Firmware update If the current …
-
Samsung SNH-1011N — page 25
25 03 Monitoring n ` If any of the manual settings is wrong, the network settings will not be applied. ` If you have both cable and wireless network connections simultaneously , the cable network connection is prioritized. ` Press WPS to set the network connection to Wireless regardless of the current network settings. When the system reboots, it w …
-
Samsung SNH-1011N — page 26
26 · English Time Item Description Time Confirm the camera’s time. b Time Zone Select your region. c Display Time Select time format on display . Automatic Time It sets camera’s time automatically . Daylight Saving Time Check this option if you live in a country or region where DST(Daylight Saving Time) is applied. n ` The ti …
-
Samsung SNH-1011N — page 27
27 03 Monitoring < Y ouT ube> Notification Automatically uploads 30 second clip to your private Y ouT ube account. 1. Select the Google. 2. Check < Use > of Y ouT ube. 3. Enter your Gmail address and passwor d. 4. Click < Save >. n ` Y ou can check the recorded video at the Y ouT ube homepage “ Video Manager ” “ Uploaded …
-
Samsung SNH-1011N — page 28
28 · English < Gmail> Notification The event alarm is sent through Gmail. 1. Select the Google. 2. Check < Use > of Gmail. 3. Enter your Gmail address and passwor d. 4. Click < Save >. 5. Enter your email address to r eceive the notification e-mail and click < Add >. Now , the receiver full email address will be shown in th …
-
Samsung SNH-1011N — page 29
29 03 Monitoring Push alarm Notification The push alarm is provided thr ough the web viewer and mobile app in which the camera is register ed. • If this is set to enable, the video and image link recor ded in Y ouT ube and Picasa will be transferred to the listed friends in r eal time in the event of an alarm. • The video/image alarm will be tr …
-
Samsung SNH-1011N — page 30
30 · English Event Alarm Y ou can check the event alarm that occurred. Item Description Delete by dates Delete all the event alarms on the date. b Play Video Select an event and double click on it. The video will be played. ` Video can be played only if you are logged into the Google account where you uploaded the video. c Delete All Delete al …
-
Samsung SNH-1011N — page 31
31 03 Monitoring My Account n ` If you want to change your information, click < > icon and move to “ Account ” page and select an item (password and/or email address) and make changes as necessary . Support Y ou can download the Samsung SmartCam mobile app and user guide. n ` If you want to know more information of camera, move to » …
-
Samsung SNH-1011N — page 32
32 · English Specifications 32 Specifications 32 Product Appearance 34 T r oubleshooting 35 04 A PPENDIX Item Description Video Imaging Device 1/5″ 3M CMOS Effective Pixels 2,048(H) x 1,536(V) Scanning System Progressive Synchronization Internal Lens Focal Length (Zoom Ratio) 2.87mm Angular Field of View (D/V/H) 65.1°/ 42.9°/ 54.1° Min. Ob …
-
Samsung SNH-1011N — page 33
33 04 Appendix Item Description Operational On Screen Display (Web Browser , Local page) English, French, Germany , Spanish, T aiwan, Korean Day & Night Auto(Infra-red Cut Removable), Color , B./W (850nm), 5m OS Linux Audio Detection Support Motion Detection Video Motion Detection White Balance Auto Digital Zoom Not Support Flip / Mirror Y es N …
-
Samsung SNH-1011N — page 34
34 · English Product Appearance 54 90 114 …
-
Samsung SNH-1011N — page 35
35 04 Appendix If you encounter a problem with your system, see the table below to solve the pr oblem as quickly and easily as possible. Please follow the instruction below: Troubleshooting Problem Action I forgot my user ID/ password. — Move to “Log-in page Forgot your ID/Password?”, and enter the registered e-mail address to which we will …
-
Samsung SNH-1011N — page 36
36 · English Problem Action No sound is output from the video. — Click the Voice icon in the video playback page, or check if the voice is turned On in your smart phone app. — Depending on the policy of the Internet service provider , the sound output may not be supported. (in either 3G UDP or Relay mode) I forgot my Camera password. — Y ou must c …
-
Samsung SNH-1011N — page 37
SALES NETWORK SAMSUNG TECHWIN CO ., L TD. Samsungtechwin R&D Center , 701, Sampyeong-dong, Bundang-gu, Seongnam-si, Gyeonggi-do, Korea, 463-400 TEL : +82-70-7147-8740~60 FAX : +82-31-8018-3745 SAMSUNG TECHWIN AMERICA Inc . 100 Challenger Rd. Suite 700 Ridgefield Park, NJ 07660 T oll Free : 1-877-349-3149 www .samsungsv .com SAMSUNG TECHWIN EURO …
Краткое содержание страницы № 1
SAMSUNG SMARTCAM
User Manual
SNH-1011N
!
0678
Краткое содержание страницы № 2
SPECIFY SERVICE INSTRUCTIONS AND WARRANTY TERMS This device complies with Part 15 of the FCC Rules. Operation is subject to the following two conditions: (1) this device may not cause harmful interference, and (2) this device must accept any interference received, including interference that may cause undesired operation. FCC NOTE: THE MANUFACTURER IS NOT RESPONSIBLE FOR ANY RADIO OR TV INTERFERENCE CAUSED BY UNAUTHORIZED MODIFICATIONS TO THIS EQUIPMENT. SUCH MODIFICATIONS COULD VOID THE USER
Краткое содержание страницы № 3
• Especially, the power cord should be installed carefully while keeping it out of Contents children’s reach. • Never use the product near bath tub, sink, washing machine and in wet basement to avoid moisture. • The product is designed for indoor use. GETTING STARTED • The product is not designed for medical monitoring, and requires a grown-up’s protective supervision on its use. Features ……………………………………………………… 4 • To avoid overheating of the product, do not expose the product to direct sunlig
Краткое содержание страницы № 4
Features • Easy to install — With the help of WPS (Wi-Fi Protected Setup), wireless sharing and easy connection are enabled. — Simply visit the home page (www.samsungsmartcam.com) and download and install the program without a separate installer program. • Remote monitoring — Whenever and wherever if you are in the Internet enabled environment, remote monitoring is ready for you. — PC, laptop or smart phone can be used for monitoring. GETTING STARTED 01 • Real-time alarm — When a motion and s
Краткое содержание страницы № 5
Getting Started What’s Included Check for components when opening the product package. 01 Camera & Bracket body Power Adaptor Network Cable Quick Start Guide Warranty Card GPL Lisence Double Sided Tape Tapping screw Plastic anchor ` Please save the packaging. You will need the serial number later to register the camera. n 5
Краткое содержание страницы № 6
Getting to know your Monitoring system DC 5V Power Input Built-in IR LEDs for night vision Network port DC IN 5V Used if WPS is not supported on the Wireless High quality camera lens Access Point or if you do not have a Wireless Access Point NETWORK Luminance Sensor Built-in speaker Detects light levels where the camera is placed. Produces sound transferred from a smart phone. Night vision mode changes according to detection SAMSUNG SMARTCAM result. RESET Reset button Resets the camera sett
Краткое содержание страницы № 7
UNLOCK LOCK Getting Started Power Supply Network connection Plug-in the camera power adapter to the wall outlet and connect the camera as Connect the provided network cable to the camera’s network terminal. shown. For further details on network configuration, refer to “Network Connection and Settings”. (Page 13) 01 ` Make sure to use the provided power adaptor. Otherwise, the product may not operate n properly. LED status ` It will take about 1min for the camera to boot-up completely. LED
Краткое содержание страницы № 8
Installation Precautions 1. Install the camera in a place where the Wi-Fi signal can be reached and without interference. 2. Keep it away from humidity such as around the humidifier. INSTALLATION & 3. Keep it away from direct sunlight, strong light or dust; install it in a place with clear view. NETWORK CONNECTION 02 4. Do not install it in a place where there are a lot of obstacles. 5. Keep the lens clean at all times. Wipe off the dust with a soft cloth. 6. Switching between day and night
Краткое содержание страницы № 9
Installation & Network Connection UNLOCK LOCK 3. Hold the adhesive tape’s holder and remove the protective film, and attach it Wall Mounting Using Double-sided adhesive tape to the desired spot of the wall-mount bracket while making the [▲ TOP] marker point upwards (direction of 12 o’clock). ` The tape will lose adhesiveness if used once, do not re-use. Separating the wall-mount bracket n ` Before attaching tape, clean dust / water / oil off the wall-mount bracket’s adhesive 1. Press and ho
Краткое содержание страницы № 10
UNLOCK LOCK 4. Run the provided adaptor wire through the 6. Fix the body bracket by turning it clockwise until it clicks. groove prepared on the wall-mount bracket. ` Match adaptor’s plug part to the direction of 12 n o’clock. Grooves on the body bracket TOP 7. Connect the adaptor’s plug to the power terminal on the camera’s rear side. 5. Arrange the wire by using two grooves on the body bracket. ` When done, remove the protective film from n ` Make both body bracket’s [UNLOCK LOCK] and
Краткое содержание страницы № 11
Installation & Network Connection Adjusting the Angle Wall Mounting with Screws 1. Adjust the camera’s shooting angle as appropriate. ` For more information about step of Separating the wall-mount bracket, refer to “Wall n Mounting Using Double-sided adhesive tape”. ` Do not put excessive force. Otherwise, it may n cause damage to the camera. Assembling 1. Take out screws (M3xL20) and Anchor (Φ5×25) from the zipper bag. 02 2. On a wooden wall, use screws to fix the 2. Turn the part shown
Краткое содержание страницы № 12
UNLOCK LOCK 4. Use drill bit of 5mm diameter and drill on the Desktop mounting marked positions, drill to have 3 cm depth holes. Clean the holes after drilling. ` For more information about step of Separating the wall-mount bracket, refer to “Wall ` Be careful not to get injured while drilling. n J Mounting Using Double-sided adhesive tape”. Assembling 1. Assemble body bracket and wall-mount bracket while matching the [▼] and [▲] marks. 5. Insert an anchor for each hole. Fully insert anch
Краткое содержание страницы № 13
Installation & Network Connection Connecting via network cable Network Connection and Settings If you do not have a Wireless Access Point, you must connect the camera using LAN cable directly to your home router. Precautions 1. When you apply the power, the power status LED is lit red, and it will change to red blinking when the booting is completed. • The wireless network access may fail, depending on the communications environment. 2. Connect the network cable to the camera and to the home
Краткое содержание страницы № 14
Connecting via Wi-Fi without WPS feature Conneting using Wi-Fi WPS feature If you want to connect the camera using a non-WPS Wireless Access Point, What is WPS? change the network setting to Wire and try the wireless network. WPS enables to make connection between the camera and the Wireless Access Point with a simple click of the button. 1. When you apply the power, the power status LED is lit red, and it will change to red blinking when the booting is completed. 1. When you apply the power,
Краткое содержание страницы № 15
Installation & Network Connection ` If the Wireless Access Point do not support WPS or you do not have wirelss router, n please go to Wired Connection. ` If no WPS button is displayed or visible on the display, see the Wireless Access Point’s manual or contact the manufacturer of your Wireless Access Point for technical assistance. ` On some routers, you may need to log in to the web interface and click on an on-screen button to activate the WPS feature. ` If you fail to connect to the Inte
Краткое содержание страницы № 16
Registration Once you register the product with the site, you can monitor the camera video on the PC or laptop computer. Web browser requirements Windows Mac Windows XP, 7 supported MAC OS X Snow Leopard or higher is MONITORING 03 supported — Internet Explorer 8, 9 (The 64-bit is not supported.) — Safari — Firefox — Firefox — Chrome — Chrome Registration 16 Event Alarm 30 Web browser requirements 16 Starting SmartCam Starting SmartCam 16 Information 30 1. From your PC, launch your web browse
Краткое содержание страницы № 17
Monitoring ❖ Plug in installation 3) Click to begin the installation. You need to install your plug in to automatically search for cameras connected to the network and view the video in your camera. ` If you login or click in a PC where the plug in is not installed, n the installation message window will pop up. ` When you install the plug in, the web browser will be terminated and you need to launch it again. 1) Click , run the setup file. 4)
Краткое содержание страницы № 18
For Mac 4) Enter password, and click . 2) Click . 5) Installation has completed. 3) Click . 18 · English
Краткое содержание страницы № 19
Monitoring 5. Enter the requested information, and click . 6. According to the network connection and setting, click when the camera LED turns into green. • ID : Create user ID between 8 to 14 alphanumeric character. 03 • Password : Create password between 8 to 14 alphanumeric character. 7. Select the serial number of the camera to be added from the camera search • Confirm Password : Please enter the password again for confirmation. list. If the camera is not found, enter the
Краткое содержание страницы № 20
9. Create and . 12. Select your Wireless Network from the list. 10. Click . 13. Enter the password of your Wireless Network and click . ` The camera password is used to block the unauthorized access to your camera. n ` Create camera password using alphanumeric characters between 1 to 8 without any space. ` If your Wireless Network is hidden, select . n 11. After adding the camera, click in the wireless network