JBL CINEMA SB160 — Soundbar Manual
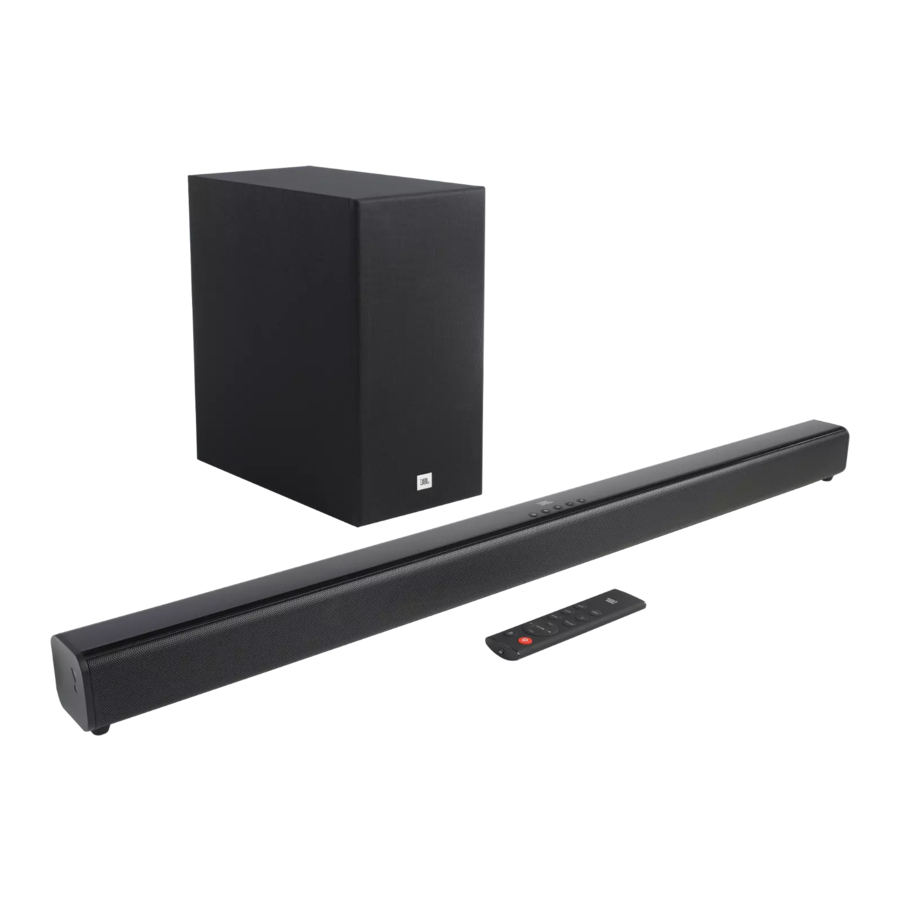
CONTACT US: If you have any questions about JBL CINEMA SB160, its installation or its operation, please contact your retailer or custom installer, or visit our website at www.JBL.com.
WHAT’S IN THE BOX
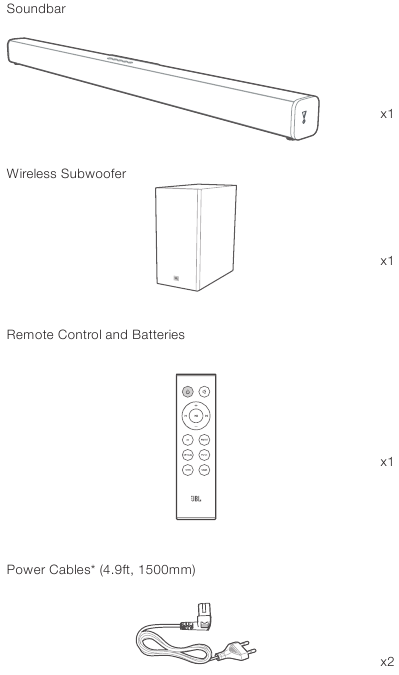
*Power cable types and numbers varied by regions.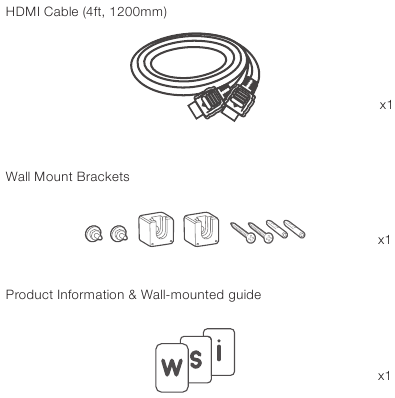
CONNECT YOUR SOUNDBAR
This section helps you connect your soundbar to a TV and other devices, and set up the whole system.
Connect to HDMI (ARC) Socket
An HDMI connection supports digital audio and is the best option to connect to your soundbar. If your TV supports HDMI ARC, you can hear the TV audio through your soundbar by using a single HDMI cable. Socket")
- Using a High Speed HDMI cable, connect the HDMI OUT (ARC)to TV connector on your soundbar to the HDMI ARC connector on the TV.
- The HDMI ARC connector on the TV might be labeled differently. For details, see the TV user manual.
- On your TV, turn on HDMI-CEC operations. For details, see the TV user manual.
Note:
- Do confirm if HDMI CEC function on your TV is turned on.
- Your TV must support the HDMI-CEC and ARC function. HDMICEC and ARC must be set to On.
- The setting method of HDMI-CEC and ARC may differ depending on the TV. For details about ARC function, please refer to your TV owner’s manual.
- Only HDMI 1.4 cables can support the ARC function.
Connect to Optical Socket

- Remove the protective cap of the OPTICAL socket. Using an optical cable, connect the OPTICAL connector on your soundbar to the OPTICAL OUT connector on the TV or other device.
- The digital optical connector might be labeled SPDIF or SPDIF OUT.
Note: While in OPTICAL/HDMI ARC mode, if there’s no sound output from the unit and the status Indicator flashes, you may need to activate PCM or Dolby Digital Signal output on your source device (e.g. TV, DVD or Blu-ray player).
Connect to Power
- Before connecting the AC power cord, ensure you have completed all other connections.
- Risk of product damage! Ensure that the power supply voltage corresponds to the voltage printed on the back or the underside of the unit.
- Connect the mains cable to the AC~ Socket of the unit and then into a mains socket
- Connect the mains cable to the AC~ Socket of the subwoofer and then into a mains socket.

PAIR WITH THE SUBWOOFER
Automatic Pairing
Plug the soundbar and the subwoofer into the mains sockets and then press on the unit or remote control to switch the unit to ON mode. The subwoofer and soundbar will automatically pair.
- When the subwoofer is pairing with the soundbar, the Pair indicator on the subwoofer will flash fast.
- When the subwoofer is paired with the soundbar, the Pair indicator on the subwoofer will light up steadily.
- Do not press Pair on the rear of the subwoofer, except for manual pairing.
Manual Pairing
If no audio from the wireless subwoofer can be heard, manually pair up the subwoofer.
- Unplug both units from the mains sockets again, then plug them in again after 3 minutes.
- Press and hold the
 (Pair) button on the subwoofer for a few seconds.
The Pair indicator on the subwoofer will rapidly blink. - Then press the
 button on the unit or remote control to switch the unit ON.
The Pair indicator on the subwoofer will become solid when successful. - If the Pair indicator still keeps blinking, repeat step 1-3.
Note:
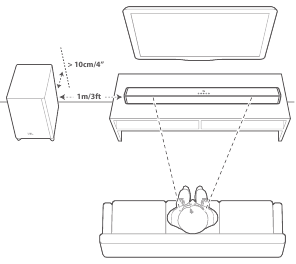
- The subwoofer should be within 6 m of the soundbar in an open area (the closer the better).
- Remove any objects between the subwoofer and the soundbar.
- If the wireless connection fails again, check if there is a conflict or strong interference (e.g. interference from an electronic device) around the location. Remove these conflicts or strong interferences and repeat the above procedures.
- If the main unit is not connected with the subwoofer and it is in ON mode, the unit’s POWER indicator will flash.
PLACE YOUR SOUNDBAR
Place the Soundbar on the table
Wall mount the Soundbar
Use tape to stick the wall-mounted paper guide on the wall, push a pen tip through the center of each mounting hole to mark the wall-mounted bracket location and remove the paper.
Screw the wall mount brackets on the pen mark; screw the threaded mounting post into the back of the soundbar; then hook the soundbar on the wall.
PREPARATIONS
Prepare the Remote Control
The provided Remote Control allows the unit to be operated from a distance.
- Even if the Remote Control is operated within the effective range 19.7 feet (6m), remote control operation may be impossible if there are any obstacles between the unit and the remote control.
- If the Remote Control is operated near other products which generate infrared rays, or if other remote control devices using infra-red rays are used near the unit, it may operate incorrectly. Conversely, the other products may operate incorrectly.
First-time use:
The unit has a pre-installed lithium CR2025 battery. Remove the protective tab to activate the remote control battery.
Replace the Remote Control Battery
- The remote control requires a CR2025, 3V Lithium battery.

- Push the tab on the side of the battery tray towards the tray.
- Now slide the battery tray out of the remote control.
- Remove the old battery. Place a new CR2025 battery into the battery tray with the correct polarity (+/-) as indicated.
- Slide the battery tray back into the slot in the remote control.
Precautions Concerning Batteries
- When the Remote Control is not to be used for a long time (more than a month), remove the battery from the Remote Control to prevent it from leaking.
- If the batteries leak, wipe away the leakage inside the battery compartment and replace the batteries with new ones.
- Do not use any batteries other than those specified.
- Do not heat or disassemble batteries.
- Never throw them in fire or water.
- Do not carry or store batteries with other metallic objects. Doing so could cause batteries to short circuit, leak or explode.
- Never recharge a battery unless it is confirmed to be a rechargeable type.
USE YOUR SOUNDBAR SYSTEM
To Control
Top panel

* Switch between BT/OPTICAL/HDMI ARC mode.
** Switch between MUSIC/MOVIE/NEWS sound mode.
*** Source LED: • Red-Standby / • Blue-Bluetooth / • Orange-OPTICAL / • White-HDMI ARC
Remote Control

- Power
- Volume +/
- Bluetooth mode
- Optical mode
- HDMI ARC mode
- Mute
- Previous Track / Next Track
- Play / Pause
- Movie EQ
- Music EQ
- News EQ
Wireless Subwoofer

- AC~ Socket
- PAIR button
- Subwoofer indicator
To use Bluetooth
- Press the
 button repeatedly on the unit or press the BT button on the remote control to start Bluetooth pairing
 - Select «JBL CINEMA SB160» to connect

Remark: Press and hold Bluetooth (BT) button on your remote control for 3 seconds if you want to pair another mobile device.
NOTES
- If asked for a PIN code when connecting a Bluetooth device, enter <0000>.
- In Bluetooth connection mode, the Bluetooth connection will be lost if the distance between the Soundbar and the Bluetooth device exceeds 27 ft/ 8m.
- The Soundbar automatically turns off after 10 minutes in the Ready state.
- Electronic devices may cause radio interference. Devices that generate electromagnetic waves must be kept away from the Soundbar main unit — e.g., microwaves, wireless LAN devices, etc.
- Listen to Music from Bluetooth Device
- If the connected Bluetooth device supports Advanced Audio Distribution Profile (A2DP), you can listen to the music stored on the device through the player.
- If the device also supports Audio Video Remote Control Profile (AVRCP), you can use the player’s remote control to play music stored on the device.
- Pair your device with the player.
- Play music via your device (if it supports A2DP).
- Use supplied remote control to control play (if it supports AVRCP).
To use OPTICAL / HDMI ARC mode
Ensure that the unit is connected to the TV or audio device.
- Press the
 button repeatedly on the unit or press the OPTICAL, HDMI buttons on the remote control to select the desired mode.
 - Operate your audio device directly for playback features.
- Press the VOL +/– buttons to adjust the volume to your desired level.
Tip: While in OPTICAL/HDMI ARC mode, if there’s no sound output from the unit and the status Indicator flashes, you may need to activate PCM or Dolby Digital Signal output on your source device (e.g. TV, DVD or Blu-ray player).
Respond to Your TV Remote Control
Use your own TV remote control to control your soundbar
For other TVs do IR remote learning
To program the soundbar to respond to your TV remote control, follow these steps in Standby mode.
- Press and hold VOL+ and SOURCE button for 5 seconds on soundbar to enter learning mode.
- The Orange indicator will Fast flash.
Learning POWER button
- Press and hold the POWER button for 5 seconds on the soundbar.
- Press the POWER button twice on the TV remote control.

Follow the same procedure (2-3) for VOL- and VOL+. For mute, press both VOL+ and VOL- button on soundbar and press MUTE button on TV remote control.
- Press and hold VOL+ and SOURCE button for 5 seconds on soundbar again and now your soundbar respond to your TV remote control.
- The Orange indicator will flash slowly.
SOUND SETTING
This section helps you choose the ideal sound for your video or music.
Before you start
- Make the necessary connections described in the user manual.
- On the soundbar, switch to corresponding source for other devices.
Adjust the volume
- Press VOL+/- button to increase or decrease a volume level.
- To mute sound, press MUTE button.
- To restore the sound, press MUTE button again or press VOL+/- button.
Note: While adjusting the volume, the status LED indicator will flash quickly. When the volume has hit maximum/minimum value level, the status LED indicator will flashes once.
Select Equalizer (EQ) Effect
Select predefined sound modes to suit your video or music.
Press the ![]() (EQ) button on the unit or press the MOVIE / MUSIC / NEWS button on remote control to select your desired preset equalizer effects:
(EQ) button on the unit or press the MOVIE / MUSIC / NEWS button on remote control to select your desired preset equalizer effects:
- MOVIE: recommended for viewing movies
- MUSIC: recommended for listening to music
- NEWS: recommended for listening to news
SYSTEM
Auto standby
This soundbar automatically switches to standby after 10 minutes of button inactivity and no audio/video play from a connected device.
Auto wake up
The soundbar is powered on whenever a sound signal is received. This is most useful when connecting to the TV using the optical cable, as most HDMI™ ARC connections enable this feature by default.
Select Modes
Press the ![]() button repeatedly on the unit or press the BT, OPTICAL, HDMI buttons on the remote control to select the desired mode. The indicator light on the front of the main unit will show which mode is currently in use.
button repeatedly on the unit or press the BT, OPTICAL, HDMI buttons on the remote control to select the desired mode. The indicator light on the front of the main unit will show which mode is currently in use.
- Blue: Bluetooth mode.
- Orange: OPTICAL mode.
- White: HDMI ARC mode.
Software Update
JBL may offer updates for soundbar’s system firmware in the future. If an update is offered, you can update the firmware by connecting a USB device with the firmware update stored on it to the USB port on your soundbar.
Please visit www.JBL.com or contact JBL call center to receive more information about downloading update files.
PRODUCT SPECIFICATIONS
General
- Power supply : 100 — 240V~, 50/60Hz
- Total maximum power : 220 W
- Soundbar maximum output power: 2 x 52 W
- Subwoofer maximum power : 116 W
- Standby consumption : 0.5 W
- Soundbar transducer : 2 x (48×90)mm racetrack driver + 2 x 1.25″ tweeter
- Subwoofer transducer : 5.25″, wireless sub
- Max SPL : 82dB
- Frequency response : 40Hz — 20KHz
- Operating temperature : 0°C — 45°C
- Bluetooth version : 4.2
- Bluetooth frequency range : 2402 – 2480MHz
- Bluetooth maximum power : 0dBm
- Bluetooth modulation : GFSK, π/4 DQPSK
- 2.4G wireless frequency range : 2400 – 2483MHz
- 2.4G wireless maximum power : 3dBm
- 2.4G wireless modulation : FSK
- Soundbar dimensions (W x H x D) : 900 x 67 x 63 (mm) 35.4″ x 2.6″ x 2.5″
- Soundbar weight : 1.65 kg
- Subwoofer dimensions (W x H x D): 170 x 345 x 313 (mm) 6.7″ x 13.6″ x 12.3″
- Subwoofer weight : 5 kg
TROUBLESHOOTING
If you have problems using this product, check the following points before you request service.
System
The unit will not turn on.
- Check if power cord is plugged into the outlet and the soundbar
Sound
No sound from Soundbar.
- Make sure that the soundbar is not muted.
- On the remote control, select the correct audio input source
- Connect the audio cable from your soundbar to your TV or other devices.
- However, you do not need a separate audio connection when:
- the soundbar and TV are connected through HDMI ARC connection.
No sound from the wireless subwoofer.
- Check if the Subwoofer LED is in solid orange colour. If white LED is blinking, connection is lost. Manually pair the Subwoofer to soundbar (see ‘Pair with the subwoofer’).
Distorted sound or echo.
- If you play audio from the TV through the soundbar, make sure that the TV is muted.
Bluetooth
A device cannot connect with the Soundbar.
- You have not enabled the Bluetooth function of the device. See the user manual of the device on how to enable the function.
- The soundbar is already connected with another Bluetooth device. Press and hold BT button on your remote control to disconnect the connected device, then try again.
- Turn off and turn off your Bluetooth device and try to connect again.
- The device is not correctly connected. Connect the device correctly.
Quality of audio play from a connected Bluetooth device is poor.
- The Bluetooth reception is poor. Move the device closer to the soundbar, or remove any obstacle between the device and the soundbar.
The connected Bluetooth device connects and disconnects constantly.
- The Bluetooth reception is poor. Move your Bluetooth device closer to the soundbar, or remove any obstacle between the device and the soundbar.
- For some Bluetooth device, the Bluetooth connection can be deactivated automatically to save power. This does not indicate any malfunction of the soundbar.
Remote Control
The remote control does not work.
- Check if the batteries are drained and replace with new batteries.
- If the distance between the remote control and the main unit is too far, move it closer to the unit.

Documents / Resources
References
 Official JBL Store — Speakers, Headphones, and More!
Download manual
Here you can download full pdf version of manual, it may contain additional safety instructions, warranty information, FCC rules, etc.
Download JBL CINEMA SB160 — Soundbar Manual
JBL Cinema SB160 Руководство
 (Pair) button on the subwoofer for a few seconds.
The Pair indicator on the subwoofer will rapidly blink.
The Pair indicator on the subwoofer will become solid when successful.
Note:
- The subwoofer should be within 6 m of the soundbar in an open area (the closer the better).
- Remove any objects between the subwoofer and the soundbar.
- If the wireless connection fails again, check if there is a conflict or strong interference (e.g. interference from an electronic device) around the location. Remove these conflicts or strong interferences and repeat the above procedures.
- If the main unit is not connected with the subwoofer and it is in ON mode, the unit’s POWER indicator will flash.
PLACE YOUR SOUNDBAR
Place the Soundbar on the table
Wall mount the Soundbar
Use tape to stick the wall-mounted paper guide on the wall, push a pen tip through the center of each mounting hole to mark the wall-mounted bracket location and remove the paper.
Screw the wall mount brackets on the pen mark; screw the threaded mounting post into the back of the soundbar; then hook the soundbar on the wall.
PREPARATIONS
Prepare the Remote Control
The provided Remote Control allows the unit to be operated from a distance.
- Even if the Remote Control is operated within the effective range 19.7 feet (6m), remote control operation may be impossible if there are any obstacles between the unit and the remote control.
- If the Remote Control is operated near other products which generate infrared rays, or if other remote control devices using infra-red rays are used near the unit, it may operate incorrectly. Conversely, the other products may operate incorrectly.
First-time use:
The unit has a pre-installed lithium CR2025 battery. Remove the protective tab to activate the remote control battery.
Replace the Remote Control Battery
- The remote control requires a CR2025, 3V Lithium battery.
- Push the tab on the side of the battery tray towards the tray.
- Now slide the battery tray out of the remote control.
- Remove the old battery. Place a new CR2025 battery into the battery tray with the correct polarity (+/-) as indicated.
- Slide the battery tray back into the slot in the remote control.
Precautions Concerning Batteries
- When the Remote Control is not to be used for a long time (more than a month), remove the battery from the Remote Control to prevent it from leaking.
- If the batteries leak, wipe away the leakage inside the battery compartment and replace the batteries with new ones.
- Do not use any batteries other than those specified.
- Do not heat or disassemble batteries.
- Never throw them in fire or water.
- Do not carry or store batteries with other metallic objects. Doing so could cause batteries to short circuit, leak or explode.
- Never recharge a battery unless it is confirmed to be a rechargeable type.
USE YOUR SOUNDBAR SYSTEM
To Control
Top panel
* Switch between BT/OPTICAL/HDMI ARC mode.
** Switch between MUSIC/MOVIE/NEWS sound mode.
*** Source LED: • Red-Standby / • Blue-Bluetooth / • Orange-OPTICAL / • White-HDMI ARC
Remote Control
- Power
- Volume +/
- Bluetooth mode
- Optical mode
- HDMI ARC mode
- Mute
- Previous Track / Next Track
- Play / Pause
- Movie EQ
- Music EQ
- News EQ
Wireless Subwoofer
- AC~ Socket
- PAIR button
- Subwoofer indicator
To use Bluetooth
- Press the button repeatedly on the unit or press the BT button on the remote control to start Bluetooth pairing
- Select «JBL CINEMA SB160» to connect
Remark: Press and hold Bluetooth (BT) button on your remote control for 3 seconds if you want to pair another mobile device.
NOTES
- If asked for a PIN code when connecting a Bluetooth device, enter <0000>.
- In Bluetooth connection mode, the Bluetooth connection will be lost if the distance between the Soundbar and the Bluetooth device exceeds 27 ft/ 8m.
- The Soundbar automatically turns off after 10 minutes in the Ready state.
- Electronic devices may cause radio interference. Devices that generate electromagnetic waves must be kept away from the Soundbar main unit — e.g., microwaves, wireless LAN devices, etc.
- Listen to Music from Bluetooth Device
- If the connected Bluetooth device supports Advanced Audio Distribution Profile (A2DP), you can listen to the music stored on the device through the player.
- If the device also supports Audio Video Remote Control Profile (AVRCP), you can use the player’s remote control to play music stored on the device.
- Pair your device with the player.
- Play music via your device (if it supports A2DP).
- Use supplied remote control to control play (if it supports AVRCP).
To use OPTICAL / HDMI ARC mode
Ensure that the unit is connected to the TV or audio device.
- Press the button repeatedly on the unit or press the OPTICAL, HDMI buttons on the remote control to select the desired mode.
- Operate your audio device directly for playback features.
- Press the VOL +/– buttons to adjust the volume to your desired level.
Tip: While in OPTICAL/HDMI ARC mode, if there’s no sound output from the unit and the status Indicator flashes, you may need to activate PCM or Dolby Digital Signal output on your source device (e.g. TV, DVD or Blu-ray player).
Respond to Your TV Remote Control
Use your own TV remote control to control your soundbar
For other TVs do IR remote learning
To program the soundbar to respond to your TV remote control, follow these steps in Standby mode.
- Press and hold VOL+ and SOURCE button for 5 seconds on soundbar to enter learning mode.
- The Orange indicator will Fast flash.
Learning POWER button
- Press and hold the POWER button for 5 seconds on the soundbar.
- Press the POWER button twice on the TV remote control.
Follow the same procedure (2-3) for VOL- and VOL+. For mute, press both VOL+ and VOL- button on soundbar and press MUTE button on TV remote control.
- Press and hold VOL+ and SOURCE button for 5 seconds on soundbar again and now your soundbar respond to your TV remote control.
- The Orange indicator will flash slowly.
SOUND SETTING
This section helps you choose the ideal sound for your video or music.
Before you start
- Make the necessary connections described in the user manual.
- On the soundbar, switch to corresponding source for other devices.
Adjust the volume
- Press VOL+/- button to increase or decrease a volume level.
- To mute sound, press MUTE button.
- To restore the sound, press MUTE button again or press VOL+/- button.
Note: While adjusting the volume, the status LED indicator will flash quickly. When the volume has hit maximum/minimum value level, the status LED indicator will flashes once.
Select Equalizer (EQ) Effect
Select predefined sound modes to suit your video or music.
Press the ![]() (EQ) button on the unit or press the MOVIE / MUSIC / NEWS button on remote control to select your desired preset equalizer effects:
(EQ) button on the unit or press the MOVIE / MUSIC / NEWS button on remote control to select your desired preset equalizer effects:
- MOVIE: recommended for viewing movies
- MUSIC: recommended for listening to music
- NEWS: recommended for listening to news
SYSTEM
Auto standby
This soundbar automatically switches to standby after 10 minutes of button inactivity and no audio/video play from a connected device.
Auto wake up
The soundbar is powered on whenever a sound signal is received. This is most useful when connecting to the TV using the optical cable, as most HDMI™ ARC connections enable this feature by default.
Select Modes
Press the ![]() button repeatedly on the unit or press the BT, OPTICAL, HDMI buttons on the remote control to select the desired mode. The indicator light on the front of the main unit will show which mode is currently in use.
button repeatedly on the unit or press the BT, OPTICAL, HDMI buttons on the remote control to select the desired mode. The indicator light on the front of the main unit will show which mode is currently in use.
- Blue: Bluetooth mode.
- Orange: OPTICAL mode.
- White: HDMI ARC mode.
Software Update
JBL may offer updates for soundbar’s system firmware in the future. If an update is offered, you can update the firmware by connecting a USB device with the firmware update stored on it to the USB port on your soundbar.
Please visit www.JBL.com or contact JBL call center to receive more information about downloading update files.
PRODUCT SPECIFICATIONS
General
- Power supply : 100 — 240V~, 50/60Hz
- Total maximum power : 220 W
- Soundbar maximum output power: 2 x 52 W
- Subwoofer maximum power : 116 W
- Standby consumption : 0.5 W
- Soundbar transducer : 2 x (48×90)mm racetrack driver + 2 x 1.25″ tweeter
- Subwoofer transducer : 5.25″, wireless sub
- Max SPL : 82dB
- Frequency response : 40Hz — 20KHz
- Operating temperature : 0°C — 45°C
- Bluetooth version : 4.2
- Bluetooth frequency range : 2402 – 2480MHz
- Bluetooth maximum power : 0dBm
- Bluetooth modulation : GFSK, π/4 DQPSK
- 2.4G wireless frequency range : 2400 – 2483MHz
- 2.4G wireless maximum power : 3dBm
- 2.4G wireless modulation : FSK
- Soundbar dimensions (W x H x D) : 900 x 67 x 63 (mm) 35.4″ x 2.6″ x 2.5″
- Soundbar weight : 1.65 kg
- Subwoofer dimensions (W x H x D): 170 x 345 x 313 (mm) 6.7″ x 13.6″ x 12.3″
- Subwoofer weight : 5 kg
TROUBLESHOOTING
If you have problems using this product, check the following points before you request service.
System
The unit will not turn on.
- Check if power cord is plugged into the outlet and the soundbar
Sound
No sound from Soundbar.
- Make sure that the soundbar is not muted.
- On the remote control, select the correct audio input source
- Connect the audio cable from your soundbar to your TV or other devices.
- However, you do not need a separate audio connection when:
- the soundbar and TV are connected through HDMI ARC connection.
No sound from the wireless subwoofer.
- Check if the Subwoofer LED is in solid orange colour. If white LED is blinking, connection is lost. Manually pair the Subwoofer to soundbar (see ‘Pair with the subwoofer’).
Distorted sound or echo.
- If you play audio from the TV through the soundbar, make sure that the TV is muted.
Bluetooth
A device cannot connect with the Soundbar.
- You have not enabled the Bluetooth function of the device. See the user manual of the device on how to enable the function.
- The soundbar is already connected with another Bluetooth device. Press and hold BT button on your remote control to disconnect the connected device, then try again.
- Turn off and turn off your Bluetooth device and try to connect again.
- The device is not correctly connected. Connect the device correctly.
Quality of audio play from a connected Bluetooth device is poor.
- The Bluetooth reception is poor. Move the device closer to the soundbar, or remove any obstacle between the device and the soundbar.
The connected Bluetooth device connects and disconnects constantly.
- The Bluetooth reception is poor. Move your Bluetooth device closer to the soundbar, or remove any obstacle between the device and the soundbar.
- For some Bluetooth device, the Bluetooth connection can be deactivated automatically to save power. This does not indicate any malfunction of the soundbar.
Remote Control
The remote control does not work.
- Check if the batteries are drained and replace with new batteries.
- If the distance between the remote control and the main unit is too far, move it closer to the unit.
Documents / Resources
References
- Official JBL Store — Speakers, Headphones, and More!
Download manual
Here you can download full pdf version of manual, it may contain additional safety instructions, warranty information, FCC rules, etc.
Download JBL CINEMA SB160 — Soundbar Manual
JBL Cinema SB160 Руководство
ВВЕДЕНИЕ
Благодарим вас за покупку JBL CINEMA SB160. JBL CINEMA SB160 создан для того, чтобы привнести в вашу домашнюю развлекательную систему непревзойденное качество звука. Мы настоятельно рекомендуем вам потратить несколько минут на то, чтобы прочитать это руководство, которое описывает продукт и включает пошаговые инструкции, которые помогут вам настроить и начать работу.
КОНТАКТЫ : Если у вас есть какие-либо вопросы о JBL CINEMA SB160, его установке или эксплуатации, обратитесь к продавцу или установщику, либо посетите наш webсайт www.JBL.com.
ЧТО В КОРОБКЕ


ПОДКЛЮЧИТЕ СВОЙ ЗВУК
Этот раздел поможет вам подключить звуковую панель к телевизору и другим устройствам и настроить всю систему.
Подключение к разъему HDMI (ARC)
Соединение HDMI поддерживает цифровой звук и является лучшим вариантом для подключения к звуковой панели. Если ваш телевизор поддерживает HDMI ARC, вы можете слышать звук с телевизора через звуковую панель с помощью одного кабеля HDMI.

- С помощью высокоскоростного кабеля HDMI подключите выход HDMI OUT (ARC) — к телевизору на звуковой панели и к разъему HDMI ARC на телевизоре.
- Разъем HDMI ARC на телевизоре может иметь другую маркировку. Подробнее см. В руководстве пользователя телевизора.
- Включите на телевизоре операции HDMI-CEC. Подробности см. В руководстве пользователя телевизора.
Примечание:
- Убедитесь, что функция HDMI CEC на вашем телевизоре включена.
- Ваш телевизор должен поддерживать функции HDMI-CEC и ARC. HDMI-CEC и ARC должны быть включены.
- Метод настройки HDMI-CEC и ARC может отличаться в зависимости от телевизора. Подробную информацию о функции ARC см. В руководстве пользователя телевизора.
- Только кабели HDMI 1.4 могут поддерживать функцию ARC.
Подключение к оптическому разъему

Снимите защитный колпачок ОПТИЧЕСКОЙ розетки. С помощью оптического кабеля соедините разъем OPTICAL на звуковой панели с разъемом OPTICAL OUT на телевизоре или другом устройстве.
- Цифровой оптический разъем может иметь маркировку SPDIF или SPDIF OUT.
Внимание: В режиме OPTICAL / HDMI ARC, если звук из устройства не выводится и индикатор состояния мигает, вам может потребоваться активировать вывод сигнала PCM или Dolby Digital на исходном устройстве (например, телевизоре, DVD или проигрывателе Blu-ray).
Подключиться к источнику питания
- Перед подключением кабеля питания переменного тока убедитесь, что вы выполнили все остальные подключения.
- Опасность повреждения изделия! Убедитесь, что источник питания vol.tagе соответствует объемуtage напечатан на задней или нижней стороне устройства.
- Подключите сетевой кабель к розетке переменного тока устройства, а затем — к сетевой розетке.
- Подключите сетевой кабель к AC ~ розетке сабвуфера, а затем к сетевой розетке.

СОПРЯЖЕНИЕ С САБВУФЕРОМ
Автоматическое сопряжение
Подключите звуковую панель и сабвуфер к электросети, а затем нажмите на устройстве или на пульте дистанционного управления, чтобы переключить устройство в режим ON. Сабвуфер и звуковая панель автоматически соединятся.

- Когда сабвуфер сопряжен со звуковой панелью, индикатор сопряжения на сабвуфере будет быстро мигать.
- Когда сабвуфер сопряжен со звуковой панелью, индикатор сопряжения на сабвуфере будет гореть постоянно.
- Не нажимайте кнопку Pair на задней панели сабвуфера, за исключением ручного сопряжения.
Ручное сопряжение
Если звук от беспроводного сабвуфера не слышен, вручную выполните сопряжение сабвуфера.
- Снова отключите оба устройства от электросети, а затем снова подключите их через 3 минуты.
- Нажмите и удерживайте
 (Сопряжение) на сабвуфере на несколько секунд. Индикатор сопряжения на сабвуфере будет быстро мигать.
 - Затем нажмите
 кнопку на устройстве или пульте дистанционного управления, чтобы включить устройство. При успешном выполнении индикатор пары на сабвуфере загорится.
 - Если индикатор сопряжения все еще мигает, повторите шаги 1-3.
Примечание:
- Сабвуфер должен находиться в пределах 6 м от звуковой панели на открытом пространстве (чем ближе, тем лучше).
- Уберите все предметы между сабвуфером и звуковой панелью.
- Если беспроводное соединение снова не работает, проверьте, нет ли поблизости конфликта или сильных помех (например, помех от электронного устройства). Устраните эти конфликты или сильные помехи и повторите описанные выше процедуры.
- Если основной блок не подключен к сабвуферу и находится в режиме ON, индикатор POWER на устройстве будет мигать.
РАЗМЕСТИТЕ СВОЙ саундбар
Поместите саундбар на стол

Настенное крепление звуковой панели
Используйте клейкую ленту, чтобы приклеить настенную направляющую для бумаги к стене, протолкните кончик ручки через центр каждого монтажного отверстия, чтобы отметить место настенного кронштейна, и удалите бумагу.
Прикрутите кронштейны для настенного крепления к отметке пера; вверните резьбовую монтажную стойку в заднюю часть звуковой панели; затем прикрепите звуковую панель к стене.

ПРЕПАРАТЫ
Подготовьте пульт дистанционного управления
Поставляемый пульт дистанционного управления позволяет управлять устройством на расстоянии.
- Даже если пульт дистанционного управления работает в пределах эффективного диапазона 19.7 футов (6 м), работа пульта дистанционного управления может быть невозможна, если между устройством и пультом дистанционного управления есть какие-либо препятствия.
- Если пульт дистанционного управления используется рядом с другими продуктами, излучающими инфракрасные лучи, или если рядом с устройством используются другие устройства дистанционного управления, использующие инфракрасные лучи, он может работать некорректно. И наоборот, другие продукты могут работать некорректно.
Первое использование:
В устройстве предустановлена литиевая батарея CR2025. Снимите защитный язычок, чтобы активировать батарею пульта дистанционного управления.

Замените батарею пульта дистанционного управления
Для пульта дистанционного управления требуется литиевая батарея CR2025, 3 В.

- Сдвиньте язычок сбоку батарейного отсека по направлению к нему.
- Теперь выдвиньте батарейный отсек из пульта дистанционного управления.
- Удалите старую батарею. Поместите новую батарею CR2025 в батарейный отсек, соблюдая полярность (+/-), как показано.
- Вставьте батарейный отсек обратно в гнездо на пульте дистанционного управления.
Меры предосторожности при обращении с батареями
- Если пульт дистанционного управления не будет использоваться в течение длительного времени (более месяца), извлеките батарею из пульта дистанционного управления, чтобы предотвратить утечку.
- Если батарейки протекли, вытрите протечку внутри батарейного отсека и замените батарейки новыми.
- Не используйте батареи, отличные от указанных.
- Не нагревайте и не разбирайте батареи.
- Никогда не бросайте их в огонь или воду.
- Не переносите и не храните батареи вместе с другими металлическими предметами. Это может привести к короткому замыканию, утечке или взрыву батарей.
- Никогда не заряжайте аккумулятор, если не подтверждено, что он перезаряжаемый.
ИСПОЛЬЗУЙТЕ СВОЮ ЗВУКУЮ СИСТЕМУ
Контролировать
Верхняя панель

дистанционное управление

Беспроводной сабвуфер

Чтобы использовать Bluetooth
- Нажмите
 несколько раз кнопку на устройстве или нажмите кнопку BT на пульте дистанционного управления, чтобы начать сопряжение по Bluetooth
 - Выберите «JBL CINEMA SB160» для подключения

замечание: Нажмите и удерживайте кнопку Bluetooth (BT) на пульте дистанционного управления в течение 3 секунд, если вы хотите подключить другое мобильное устройство.
ПРИМЕЧАНИЯ
- Если при подключении устройства Bluetooth запрашивается PIN-код, введите <0000>.
- В режиме подключения Bluetooth соединение Bluetooth будет потеряно, если расстояние между Soundbar и устройством Bluetooth превышает 27 футов / 8 м.
- Саундбар автоматически выключается через 10 минут в состоянии готовности.
- Электронные устройства могут вызывать радиопомехи. Устройства, генерирующие электромагнитные волны, должны находиться вдали от основного блока Soundbar, например, микроволновые печи, устройства беспроводной локальной сети и т. Д.
- Слушайте музыку с устройства Bluetooth
- Если подключенное устройство Bluetooth поддерживает Advanced Audio Distribution Profile (A2DP) вы можете слушать музыку, хранящуюся на устройстве, через плеер.
- Если устройство также поддерживает Audio Video Remote Control Profile (AVRCP), вы можете использовать пульт дистанционного управления проигрывателя для воспроизведения музыки, хранящейся на устройстве.
- Подключите свое устройство к плееру.
- Воспроизведение музыки через ваше устройство (если оно поддерживает A2DP).
- Используйте прилагаемый пульт дистанционного управления для управления воспроизведением (если он поддерживает AVRCP).
Для использования режима OPTICAL / HDMI ARC
Убедитесь, что устройство подключено к телевизору или аудиоустройству.
- Нажмите кнопку на устройстве или нажмите кнопки OPTICAL, HDMI на пульте дистанционного управления, чтобы выбрать нужный режим.
- Управляйте своим аудиоустройством напрямую для функций воспроизведения.
- Нажмите кнопку VOL +/- кнопки, чтобы отрегулировать громкость до желаемого уровня.
Функции: В режиме OPTICAL / HDMI ARC, если звук из устройства не выводится и индикатор состояния мигает, вам может потребоваться активировать вывод сигнала PCM или Dolby Digital на исходном устройстве (например, телевизоре, DVD или проигрывателе Blu-ray).
Отвечайте на пульт дистанционного управления телевизором
Используйте собственный пульт от телевизора для управления звуковой панелью
Для других телевизоров выполните дистанционное обучение через ИК-порт.
Чтобы запрограммировать звуковую панель на реакцию пульта ДУ телевизора, выполните следующие действия в режиме ожидания.
- Нажмите и удерживайте кнопки VOL + и SOURCE в течение 5 секунд на звуковой панели, чтобы войти в режим обучения.
- Оранжевый индикатор будет быстро мигать.

Кнопка обучения POWER
- Нажмите и удерживайте кнопку ПИТАНИЕ на звуковой панели в течение 5 секунд.
- Дважды нажмите кнопку POWER на пульте дистанционного управления телевизора.

Выполните ту же процедуру (2-3) для VOL- и VOL +. Для отключения звука нажмите кнопки VOL + и VOL- на звуковой панели, а затем нажмите кнопку MUTE на пульте дистанционного управления телевизора.

- Снова нажмите и удерживайте кнопки VOL + и SOURCE в течение 5 секунд на звуковой панели, и теперь ваша звуковая панель реагирует на команды пульта ДУ телевизора.
- Оранжевый индикатор будет медленно мигать.
НАСТРОЙКА ЗВУКА
Этот раздел поможет вам выбрать идеальный звук для вашего видео или музыки.
Прежде чем ты начнешь
- Выполните необходимые подключения, описанные в руководстве пользователя.
- На звуковой панели переключитесь на соответствующий источник для других устройств.
Отрегулируйте громкость
- Нажмите кнопку VOL +/-, чтобы увеличить или уменьшить уровень громкости.
- Чтобы отключить звук, нажмите кнопку MUTE.
- Чтобы восстановить звук, нажмите кнопку MUTE еще раз или нажмите кнопку VOL +/-.
Внимание: Во время регулировки громкости светодиодный индикатор состояния будет быстро мигать. Когда уровень громкости достигнет максимального / минимального значения, светодиодный индикатор состояния мигнет один раз.
Выберите эффект эквалайзера (EQ)
Выберите предустановленные режимы звука, подходящие для вашего видео или музыки. нажмите ![]() (EQ) на устройстве или нажмите кнопку MOVIE / MUSIC / NEWS на пульте дистанционного управления, чтобы выбрать желаемые предустановленные эффекты эквалайзера:
(EQ) на устройстве или нажмите кнопку MOVIE / MUSIC / NEWS на пульте дистанционного управления, чтобы выбрать желаемые предустановленные эффекты эквалайзера:
- КИНО: рекомендуется для viewфильмы
- МУЗЫКА: рекомендуется для прослушивания музыки
- НОВОСТИ: рекомендуется для прослушивания новостей
СИСТЕМА
- Автоматический режим ожидания
Эта звуковая панель автоматически переключается в режим ожидания после 10 минут бездействия кнопок и отсутствия воспроизведения аудио / видео с подключенного устройства. - Автоматическое пробуждение
Саундбар включается при получении звукового сигнала. Это наиболее полезно при подключении к телевизору с помощью оптического кабеля, поскольку большинство подключений HDMI ™ ARC включают эту функцию по умолчанию. - Выберите режимы
Нажмите несколько раз на устройстве или нажмите кнопки BT, OPTICAL, HDMI на пульте дистанционного управления, чтобы выбрать нужный режим. Световой индикатор на передней панели основного блока покажет, какой режим используется в данный момент.
- Синий: режим Bluetooth.
- Оранжевый: ОПТИЧЕСКИЙ режим.
- Белый: режим HDMI ARC.
- Обновление ПО
В будущем JBL может предлагать обновления для системной прошивки звуковой панели. Если предлагается обновление, вы можете обновить микропрограмму, подключив USB-устройство с сохраненным на нем обновлением микропрограммы к USB-порту на звуковой панели.
Пожалуйста, посетите www.JBL.com или обратитесь в колл-центр JBL, чтобы получить дополнительную информацию о загрузке обновления. files.
ТЕХНИЧЕСКИЕ ХАРАКТЕРИСТИКИ
Общие
- Источник питания : 100 — 240 В ~, 50/60 Гц
- Общая максимальная мощность : 220 Вт
- Максимальная выходная мощность звуковой панели : 2 х 52 Вт
- Максимальная мощность сабвуфера : 116 Вт
- Потребление в режиме ожидания : 0.5 Вт
- Преобразователь звуковой панели : 2 динамика (48 × 90) мм + твитер 2 x 1.25 ″
- Преобразователь сабвуфера : 5.25 ″, беспроводной сабвуфер
- Макс SPL : 82dB
- Частотная характеристика : 40 Гц — 20 кГц
- Рабочая Температура : 0 ° С — 45 ° С
- версия Bluetooth : 4.2
- Частотный диапазон Bluetooth : 2402 — 2480 МГц
- Максимальная мощность Bluetooth : 0дБм
- Модуляция Bluetooth : GFSK, π / 4 DQPSK
- Беспроводной диапазон частот 2.4 ГГц : 2400 — 2483 МГц
- Максимальная мощность беспроводной сети 2.4 ГГц : 3дБм
- Беспроводная модуляция 2.4 ГГц : ФСК
- Размеры звуковой панели (Ш x В x Г) : 900 x 67 x 63 (мм) 35.4 дюйма x 2.6 дюйма x 2.5 дюйма
- Вес звуковой панели : 1.65 кг
- Размеры сабвуфера (Ш x В x Г) : 170 x 345 x 313 (мм) 6.7 дюйма x 13.6 дюйма x 12.3 дюйма
- Вес сабвуфера : 5 кг
УСТРАНЕНИЕ
Если у вас возникли проблемы с использованием этого продукта, проверьте следующие пункты, прежде чем запрашивать обслуживание.
Система
Устройство не включается.
- Убедитесь, что шнур питания вставлен в розетку и звуковую панель.
Звук
Нет звука из звуковой панели.
- Убедитесь, что звуковая панель не отключена.
- На пульте дистанционного управления выберите правильный источник аудиовхода
- Подключите аудиокабель от звуковой панели к телевизору или другим устройствам.
- Однако отдельное аудиоподключение не требуется, если:
- звуковая панель и телевизор подключены через соединение HDMI ARC.
Нет звука из беспроводного сабвуфера.
- Убедитесь, что индикатор сабвуфера горит оранжевым цветом. Если белый светодиод мигает, соединение потеряно. Вручную выполните сопряжение сабвуфера и звуковой панели (см. «Сопряжение с сабвуфером» на стр. 5).
Искаженный звук или эхо.
- Если вы воспроизводите звук с телевизора через звуковую панель, убедитесь, что звук на телевизоре отключен.
Блютуз
Устройство не может подключиться к звуковой панели.
- Вы не включили функцию Bluetooth на устройстве. См. Руководство пользователя устройства, чтобы узнать, как включить функцию.
- Звуковая панель уже подключена к другому устройству Bluetooth. Нажмите и удерживайте кнопку BT на пульте дистанционного управления, чтобы отключить подключенное устройство, затем повторите попытку.
- Выключите и выключите устройство Bluetooth и попробуйте подключиться снова.
- Устройство подключено неправильно. Подключите устройство правильно.
Низкое качество воспроизведения звука с подключенного устройства Bluetooth.
- Плохой прием Bluetooth. Переместите устройство ближе к звуковой панели или удалите все препятствия между устройством и звуковой панелью.
Подключенное устройство Bluetooth постоянно подключается и отключается.
- Плохой прием Bluetooth. Переместите устройство Bluetooth ближе к звуковой панели или устраните любые препятствия между устройством и звуковой панелью.
- Для некоторых устройств Bluetooth соединение Bluetooth может быть отключено автоматически для экономии энергии. Это не указывает на неисправность звуковой панели.
дистанционное управление
Пульт дистанционного управления не работает.
- Проверьте, не разряжены ли батареи, и замените их новыми.
- Если расстояние между пультом дистанционного управления и основным устройством слишком большое, переместите его ближе к устройству.
![]()
ХАРМАН Интернэшнл Индастриз,
Зарегистрировано 8500 Balboa
Boulevard, Northridge, CA 91329, США
www.jbl.com
© 2019 HARMAN International Industries, Incorporated. Все права защищены. JBL является товарным знаком HARMAN International Industries, Incorporated, зарегистрированным в США и / или других странах. Характеристики, технические характеристики и внешний вид могут быть изменены без предварительного уведомления. Словесный знак и логотипы Bluetooth® являются зарегистрированными товарными знаками, принадлежащими Bluetooth SIG, Inc., и любое использование этих знаков HARMAN International Industries, Incorporated осуществляется по лицензии. Другие товарные знаки и торговые наименования принадлежат их соответствующим владельцам. Термины HDMI, HDMI High-Definition Multimedia Interface и логотип HDMI являются товарными знаками или зарегистрированными товарными знаками HDMI Licensing Administrator, Inc. Изготовлены по лицензии Dolby Laboratories. Dolby, Dolby Audio и символ двойной буквы D являются товарными знаками Dolby Laboratories.
![]()
Руководство JBL Cinema SB160 — Оптимизированный PDF
Руководство JBL Cinema SB160 — Исходный PDF
Документы / Ресурсы
Рекомендации

Официальный магазин JBL — динамики, наушники и многое другое!
Перейти к контенту
![]()
Русские электронные инструкции по эксплуатации
Постоянно обновляемый большой каталог документации по эксплуатации и использованию современных устройств и оборудования на русском языке. Бесплатное скачивание файлов.
Поиск:
Главная
♥ В закладки
Просмотр инструкции в pdf


/Cinema%20SB160%20Black.jpeg)
Инструкция по эксплуатации саундбара JBL Cinema SB160 Black.
Скачать инструкцию к саундбару JBL Cinema SB160 Black (3,43 МБ)

Инструкции по эксплуатации саундбаров (звуковых панелей) JBL
« Инструкция к встраиваемой электрической варочной панели Fornelli PV 4517 DELIZIA WH
» Инструкция к встраиваемой электрической варочной панели Gorenje ECT643BCSC
Вам также может быть интересно

Инструкция к беспроводным наушникам JBL REFLECT MINI BT 2 Black

Инструкция к беспроводным наушникам JBL Tune 220 TWS Blue

Инструкция к беспроводным наушникам JBL Tune 510BT Blue

Инструкция к беспроводным наушникам JBL Endurance Dive Blue

Инструкция к беспроводным наушникам JBL Live 650BTNC Blue
.jpg)
Инструкция к наушникам JBL Tune510BT Black (JBLT510BTBLK)

Инструкция к наушникам JBL C150 SIU

Инструкция к беспроводным наушникам JBL Tune 215BT Black
Добавить комментарий
Имя *
Email *
Сайт
Комментарий


![]()


Сохранить моё имя, email и адрес сайта в этом браузере для последующих моих комментариев.
- Добавить инструкцию
- Заказать инструкцию
- Политика конфиденциальности
|
Код: 123927 Извините, товара сейчас нет в наличии
Бесплатная доставка
Извините, товара сейчас нет в наличии Сравнить Новости интернет-магазина «Лаукар»:28.03.2023 22.02.2023 13.02.2023 Дополнительная информация в категории Саундбар:Таблица Авторизованных сервисных центров по брендам. Описание Инструкция Отзывы (0) В интернет-магазине бытовой техники «Лаукар» Вы можете скачать инструкцию к товару Саундбар JBL Cinema SB160 совершенно бесплатно. Все инструкции, представленные на сайте интернет-магазина бытовой техники «Лаукар», предоставляются производителем товара. Для того чтобы скачать инструкцию, Вам необходимо нажать на ссылку «скачать инструкцию», расположенную ниже, а в случае, если ссылки нет, Скачать инструкцию Смотреть инструкцию
Фирма-производитель оставляет за собой право на внесение изменений в конструкцию, дизайн и комплектацию товара: Саундбар JBL Cinema SB160. Пожалуйста, сверяйте информацию о товаре с информацией на |


More Speakers Device Models:
-
YORKVILLE
ELITE E10P
MODEL TYPE: YS1066U.S.A.Yorkville Sound Inc.4625 Witmer Industrial EstateNiagara Falls, New York14305 USAVoice: (716) 297-2920Fax: (716) 297-3689WORLD HEADQUARTERSWEB ACCESS: http://www.yorkville.comCANADAYorkville Sound550 Granite CourtPickering, OntarioL1W-3Y8 CANADAVoice: (905) 837-8481Fax: (905) 837-8746Quality and …
ELITE E10P Speakers, 15
-
Fender
01
30Fender Accessories01GUITAR & BASS ACCESSORIES31www.fender.comTUNERS0101020202020101RACKKeyChAinpedAl/stAgepitCh PERFECTFender® Accessories is your pitch-perfect place for all manner of digital guitar tuners, from colorful handheld units that go wherever you do to rugged stomp-box tuners to full-on rack-mounted p …
01 Guitar, 15
-
Sonance
C201SQ
When using the C201SQ speakers as a rear channel speaker, the speakers should be located from 2 to 6 feet behind the main listening position. The speakers should be separated approximately 6 to 10 feet apart. FlexBracket — part number 91942Plastic template to reserve hole in new construction. Designed to be used with …
C201SQ Speakers, 4
-
Toa
TZ-105
INSTRUCTION MANUALCOLUMN SPEAKERSTZ-105, TZ-205The TZ-105 and TZ-205 are column speakers with built-inidentical cone speakers (2 for TZ-105, 4 for TZ-205) verticallyarranged on the baffle boards. They present sound pressurecharacteristics in an extremely narrow angle in a vertical planeand in a wide angle in a horiz …
TZ-105 Speakers, 2
Recommended Documentation: