Hide thumbs
Also See for Sound Blaster Audigy 2 ZS:
- User manual (77 pages)
-
Contents
-
Table of Contents
-
Bookmarks
Quick Links
Related Manuals for Creative Sound Blaster Audigy 2 ZS
Summary of Contents for Creative Sound Blaster Audigy 2 ZS
-
Page 2: Table Of Contents
Contents Movie Creation Guide Software Applications ………………………… 1-1 Computer Configuration ……………………….1-2 Optimizing Your Computer ……………………1-2 Processor speed and RAM memory ………………….1-3 Hard drive space ……………………….1-4 DVD writer …………………………. 1-4 USB 2.0 …………………………..1-5 Windows XP …………………………1-5 Graphics Cards …………………………
-
Page 3
Creating a WMV file for Zen Portable Media Center Starting VideoStudio 8 ……………………….. 4-1 Creating a WMV file from an existing video file ………………… 4-2 Capturing a WMV file ………………………… 4-6 Taking Control of Your DVD Project Planning Space and Organizing Your DVD ………………….. 5-1 Organization ………………………… -
Page 4
PerfectView® Pro MPEG encoding ……………………A-2 TrueView™ Pro: Motion Compensated Temporal Filtering …………..A-3 Video Formats …………………………..A-3 Analog Television Video Formats – NTSC, PAL and SECAM …………..A-4 Video Transmission — Composite Video and S-Video (SVHS) …………… A-5 Digital Video Formats – DV and MPEG ………………….A-6 Digital Audio Formats ………………………. -
Page 5: Movie Creation Guide
DVDs and movies on your computer. Read ahead to learn how to: • capture video using Audigy 2 ZS Video Editor into a digital video file on your computer and make professional-looking DVDs or SVCDs (See «Capturing Video from a Video Source»…
-
Page 6: Computer Configuration
Audigy 2 ZS Video Editor features hardware MPEG encoding, which greatly reduces Computer the burden on your computer during video capture. Configuration However, working on your DVD project will be easier if you have a computer configured for video capturing and editing. Performing basic computer maintenance can also make a difference when working on your video project.
-
Page 7: Processor Speed And Ram Memory
The more RAM and the faster the processor you have, the more responsive your Processor speed computer will be during the editing and rendering phases. and RAM memory While editing, for example, you would preview the results of your latest edit in real-time.
-
Page 8: Hard Drive Space
As mentioned in the note above for external drives, 1394 connectivity is preferred so there is no bus contention with the Audigy 2 ZS Video Editor, but USB works well too. See «Selecting the DVD Format and Media Type» on page 6-1.
-
Page 9: Usb 2.0
Audigy 2 ZS Video Editor will work well with either USB 1.1 or USB 2.0 connections USB 2.0 to your computer; Audigy 2 ZS Video Editor also serves as a USB hub. For flexibility, USB 2.0 is preferred. USB 1.1 does not support the data transfer speed required for capturing DV.
-
Page 10: Capturing Video From A Video Source
Capturing Video from a Video Source Follow the next few steps to successfully capture video. Your Quick Start guide has full instructions on how to connect your Audigy 2 ZS Video Editor. Be sure that you have properly connected and turned on your video source Step 1: Install and Audigy 2 ZS Video Editor.
-
Page 11: Step 2: Start Ulead Dvd Moviefactory 3
Run DVD MovieFactory and click Create Step 2: Start Ulead Video Disc. DVD MovieFactory Disable any scheduled tasks on your computer, such as virus scans, so that Select the New Project option and select they do not interfere with the video capture the Output disc format option you require process.
-
Page 12: Step 3: Set Video Capture Parameters
Audigy 2 ZS Video Editor. Select VCR Input when capturing from a VCR; You should defragment this allows the Audigy 2 ZS Video Editor to your hard drive before stabilize video from older VCRs. capturing video. Also,…
-
Page 13: Step 4: Set Audio Parameters
Go to Start -> Programs/All Programs -> Step 4: Set Audio Creative -> Sound Blaster Audigy 2 ZS Video Parameters and select Editor -> Creative Speaker Settings the Speaker or Headphone settings. Go to Start -> Programs/All Programs -> Creative -> Sound Blaster Audigy 2 ZS Video and enable or Editor ->…
-
Page 14: Step 5: Perform The Capture
— consider performing the capture in VideoStudio do not disconnect or which allows real-time color adjustments in hardware during the capture. This is turn off Audigy 2 ZS preferable to using software video filters after capture to make color adjustments. Video Editor, stop the video device or start Videos captured in VideoStudio are easily imported into DVD MovieFactory.
-
Page 15: Capturing Video Using Direct To Disc
DVD or other available format. Be sure you have properly connected and turned on your video source and Starting DVD Audigy 2 ZS Video Editor. See your Quick Start guide. MovieFactory 3 Insert a blank DVD into your DVD recorder.
-
Page 16
In the window that appears, select an Output disc format (DVD). Select the drive that you want to use to burn the DVD. If the drive you want does not appear, check your drive connections. If you have a blank DVD in the drive, disc information appears in the window. -
Page 17
In the dialog box that appears, select a DVD recording format. Select: • DVD-Video when you have no need to later edit or append to the DVD. This format is not as fast as the next format. • DVD-Video (fast re-editable) when you will be adding more video to the disc or for the quickest, on-the-fly, recording to DVD •… -
Page 18
On your video source, find the capture start point. Click the record button. Click the pause button to pause the recording. Click the stop button to end the recording, and burn your project to the DVD. When the DVD burning is complete, a dialog box appears. -
Page 19
10. Click option to save your video project and start a new Return to Start page one. Click to burn another copy of your project, or to burn a new Continue DVD with different settings. Click to save your project and close Close MovieFactory. -
Page 20: Creating A Wmv File For Zen Portable Media Center
Creating a WMV file for Zen Portable Media Center Use Ulead VideoStudio 8 Editor to create specially configured Windows Media Video (WMV) files for your Creative Zen Portable Media Center. These files have faster transfer times to your player than other types of digital video files. With VideoStudio, you can apply a wide range of video edits and effects, as well as optimize the video files for quick transfers to your Zen Portable Media Center.
-
Page 21: Creating A Wmv File From An Existing Video File
In the window that appears, Creating a click the Load Video WMV file from icon. an existing In the Open Video File video file window, locate the video file you want to use to create your WMV file. Click the Open button. For information on A thumbnail of the video using VideoStudio 8,…
-
Page 22
Using a drag-and-drop operation, move the video over to the StoryBoard view. If you want to make edits to your video, click one of the Step buttons located at the top of the window. Creating a WMV file for Zen Portable Media Center 4-3… -
Page 23
Otherwise, click the Share button (the last Step button). The left panel changes. Click Create Video File. A list of options appears. Click Custom. The Create Video File dialog box appears. Creating a WMV file for Zen Portable Media Center 4-4… -
Page 24
10. In the Save as type box, select Windows Media Video. 11. Click the Options… button. The Video Save Options window appears. Creating a WMV file for Zen Portable Media Center 4-5… -
Page 25: Capturing A Wmv File
Creative Zen PMC (NTSC 800Kbps) option if you want the video to be in NTSC format. Otherwise, select the WMV9 for Creative Zen PMC (PAL 800Kbps) option. 14. In the Create Video File dialog box, enter the name of your video file.
-
Page 26
In the window that appears, click the Capture button. In the Capture Settings tabbed page, in the Format list, select the WMV option. Click the Options icon. Select the Video and Audio Capture Property Settings option. options icon Creating a WMV file for Zen Portable Media Center 4-7… -
Page 27
If the Current profile is not WMV9 for Creative Zen PMC, click the Select button. In the list that appears, select the WMV9 for Creative Zen PMC option that best matches your TV display type (PAL or NTSC). Click the OK button. -
Page 28
Planning Your DVD Project The process of planning the layout and content of your DVD, then capturing, editing, and formatting the audio and video media, is called authoring. This chapter briefly highlights video format and compression considerations, which can affect the length of your video; for example, a lower compression level results in a larger video file. -
Page 29: Organization
There are several considerations when planning how to use the space on your DVD: DVD play time — how many minutes of video material you want to include in your DVD. For example, if you plan to create DVDs from the many home movies you’ve recorded over the years, you need to plan how to lay them out across multiple DVDs thematically (e.g.
-
Page 30
DVD MovieFactory shows you the Checking the remaining space on your DVD at the Available Space on bottom of the Add/Edit Media window. Your DVD To check the size of a video, right-click the video and select the Media Clip Properties option. -
Page 31: Capturing In Mpeg Or Dv/Avi
DV (Digital Video) format instead. Note that your project may contain videos of both types. See «Video Formats» on page A-3. The Audigy 2 ZS Video Editor can capture DV (sometimes referred to as AVI) from Capturing in DV both the analog video inputs and DV input.
-
Page 32
When significant editing is done, a project whose underlying video files are DV may better preserve video quality than one whose underlying videos were captured in MPEG. To appreciate this, imagine a compressed frame of video you have captured, upon which you would like to overlay a title. In order to render such a frame for output to a DVD, the original frame needs to be decompressed from its stored form (MPEG or DV) into raw video, the graphics of the title need to be composited or blended with the graphics of the frame, then it needs to be… -
Page 33: Capturing In Mpeg
VideoStudio. Using the Audigy 2 ZS Video Editor, video stored as DV (AVI files) can be transferred out to the Audigy 2 ZS Video Editor and printed to both DV and analog recorders (while MPEG video sent back out to the Audigy 2 ZS Video Editor can be printed only to analog recorders), and •…
-
Page 34: Controlling The Mpeg Capture Parameters
If the project will be printed back out to DV tape instead of output as a DVD, capture to DV is recommended since, within VideoStudio, DV (AVI files) can be output through the Audigy 2 ZS Video Editor to both the DV and analog outputs while MPEG files can be output to the analog outputs.
-
Page 35
Preset Video Audio Comments 384 Kbps DVD-High Quality 7 Mbps VBR Excellent Dolby Digital stereo (Approx. 60 min.) MPEG2 quality audio 384 Kbps DVD-Standard Play 4 Mbps VBR Very good Dolby Digital stereo (Approx. 120 min.) MPEG2 quality audio 384 Kbps DVD-Long Play 2.5 Mbps VBR Dolby Digital stereo… -
Page 36: Setting Capture Properties
From the Capture Video window, select Advanced Settings, then Capture Properties. Format: Selecting DVD means Audigy 2 ZS Video Editor will capture in DVD- compliant MPEG2. TV System: Set for the type of TV system you use. Resolution: Use 720×480 for NTSC or 720×576 for PAL.
-
Page 37: Controlling The Project Settings For Output
Audio Type: Use Dolby Digital most of the time as it has the best compatibility with DVD players. Use PCM for less audio compression. Use MPEG audio for compatibility with European DVD players or when you want the lowest audio bitrate (MPEG audio may not be compatible with some DVD players).
-
Page 38: Change Mpeg Settings
You can set the Project Settings to control the operation of the renderer; you have control over many of the same parameters as during capture. If the videos within the project do not have the same frame size, bitrate, audio format, etc. as these project settings, they will be converted before the final DVD is created.
-
Page 39: Selecting The Dvd Format And Media Type
Selecting the DVD Format and Media Type You’ll need to consider both the physical media type and logical format of the final DVD, then specify these through DVD MovieFactory’s choices. Confusingly, both of these concepts are sometimes referred to as DVD “formats”, and “formatting” is also a verb.
-
Page 40
You should select a media type that is supported for the format you’ve selected. This media type should be: • Supported by the desired DVD format (see table below) • Compatible with your DVD player • Compatible with your DVD writer – it is recommended to use a type and brand of recordable media that is documented to work well with your DVD writer. -
Page 41
Format DVD-Video fast Operation DVD-Video re-editable DVD-VR DVD+VR (Ulead only) DVD-R/RW, DVD-RW, DVD+RW DVD-RW, DVD+RW, DVD-RW* Media type DVD+R/RW DVD-R/+R DVD-RAM (*Ulead only) Must move all titles Appends the title Appends the title Appends the title Add video to HDD and re-burn directly (RW only) directly directly… -
Page 42
Format DVD-Video fast Operation DVD-Video re-editable DVD-VR DVD+VR (Ulead only) Menu space is Menu space is as pre-allocated at Menu space No menus — only 30 MB menu space large as menus formatting — handling playlists limitation need currently hardcoded to 240MB Compatible with –VR Compatible with +VR… -
Page 43: Video And Audio Monitoring
You can connect a video monitor (i.e. a TV) About to the video and audio outputs of your Monitoring Audigy 2 ZS Video Editor to monitor your video activities: • During video capture, or when no operation is being performed, the analog…
-
Page 44: Television Display
Listed below are some characteristics of TVs in relation to computer displays: Television • Colors can be more vivid on a TV. Display • Pixels are more blended, removing some detail and making text less crisp on a • Unseen overscan areas can dictate how you size and place pictures and text. For example, if you add a title that goes to the edges of the screen when displayed on your computer monitor, the far ends of the title may be off the screen on a TV.
-
Page 45: Audio Monitoring
Audio If you have a TV connected to the video and audio outputs of your Audigy 2 ZS Video Editor as described above, there are several different modes for monitoring Monitoring the audio of your video project: • Sync to PC, in which the audio is synchronized to the video shown on your computer (generally the Preview display) •…
-
Page 46
If you enable these two audio output signals in Creative Surround Mixer, they are directed through the Line Out connections (where you are most likely to connect your speakers as well). This can result in an echo because they are not synchronized, due to different signal paths. -
Page 47
To control the audio output from DVD MovieFactory, select or deselect the Sync Audio with TV button, just below the Preview screen within the capture window. This will automatically reverse the MUTE between the Wave (audio synchronized to PC) and the Line/Mic/ Video In (audio synchronized to TV). -
Page 48
→ Click Start Programs → Creative Sound Blaster → Audigy 2 ZS Video Editor Creative Surround Mixer. To sync Line Out audio to your computer display(Default setting): Click the Mute button to mute Line/ Mic/Video In and unmute Wave. Video and Audio Monitoring 7-6… -
Page 49
To sync Line Out audio to your Click the Mute button to mute Wave and unmute Line/Mic/Video In. Video and Audio Monitoring 7-7… -
Page 50: Technology Glossary
DoMiNoFX™ for crisp, smooth, glitch-free video encoding to MPEG. Encoding is accomplished with a dedicated video chip in the Audigy 2 ZS Video Editor, ensuring minimum overhead to the computer. The dedicated video chip contributes to: • no more dropped video frames •…
-
Page 51: Perfectview Pro Mpeg Encoding
Part of DoMiNoFX, PerfectView Pro is the result of decades of MPEG experience — ® PerfectView this 5th-generation, Emmy-winning compression technology is the most widely Pro MPEG used MPEG compression technology in the world, providing proven algorithms to avoid digital artifacts such as blockiness and loss of detail, even at low bitrates. encoding Poor compression PerfectView Pro Compression…
-
Page 52: Trueview™ Pro: Motion Compensated Temporal Filtering
Part of DoMiNoFX, Motion Compensated Temporal Filtering (MCTF) is a technique TrueView™ for reducing noise that is inherent in tape-based, broadcast and cable video Pro: Motion sources. Noise degrades digital video and requires more storage. During MPEG Compensated encoding from analog sources, MCTF provides 3D digital video pre-filtering to remove random noise, increasing the video quality and extending recording time.
-
Page 53: Analog Television Video Formats — Ntsc, Pal And Secam
The television standards define a video signal that is broadcast serially as a set of Analog Television horizontal scan lines with a varying brightness (luma) and color (chroma; Video Formats – originally not present in the black-and-white days). There are one luma signal and NTSC, PAL and two chroma signals.
-
Page 54: Video Transmission — Composite Video And S-Video (Svhs
Analog television programming is broadcast on a RF (radio frequency) carrier Video signal, a high frequency that can be selected by a tuner and demodulated to Transmission — extract the original video program. Consumer electronic devices that deal with Composite Video broadcast signals (e.g.
-
Page 55: Digital Video Formats — Dv And Mpeg
For capture into your computer, analog video signals from televisions, VCRs or Digital Video videocameras, are converted to digital samples and assembled into frames (or Formats – DV and fields) of digital video. The resolution, namely the number of horizontal and MPEG vertical samples packed into a digital frame, sometimes tracks the resolution of the analog signal –…
-
Page 56
the video stream is quite voluminous — one second of raw video from NTSC comprises approximately 166 Mbits of data (720 samples per line x 480 lines x 16 bits per sample x 30 frames per second). Raw video is sometimes referred to by the underlying color space of its samples, for example, YUV, YCrCb or RGB. -
Page 57: Digital Audio Formats
DV type 2 This is a form of DV often found when stored as an AVI file on a PC in which the video and audio streams are separated from each other. The value of this form is that it is compatible with a wide variety of video software applications. Use this form if you are capturing DV to make a DVD.
-
Page 58: Digital Video And Audio Resolutions And Bitrates
MPEG1 file (these are both MPEG1 streams), and SVCD, DVD and MPEG2 file Resolutions (these are all MPEG2 streams). These formats are supported by the Audigy 2 ZS Video Editor hardware MPEG encoder. Additionally, PCM audio is supported by the and Bitrates Ulead applications.
-
Page 59
MPEG1 MPEG2 MPEG1 SVCD MPEG2 DVD-Video 1.15 — 1.5 – 1.15 2.0 — 9.5 * 2.0 — 9.5 * Video Bitrate (Mbps) 2.375 CBR, CBR, VBR CBR, VBR Video Bitrate Control 352 x 352 x 480 x (352, 480, 544, 640, (352, 704, 720) NTSC 704, 720) x 480… -
Page 60
MPEG encoding (reducing overall clarity). In practice, half-D1 resolution can help maintain visual quality in bitrates below 4 Mbps. The following table summarizes the video resolutions available in the Audigy 2 ZS Video Editor targeted at DVD. Technology Glossary A-11… -
Page 61: Dvd Format
– the number of samples per second — controls the resolution of the digital audio. After sampling, the resultant digital audio stream will be stored as PCM or compressed into MPEG Audio or Dolby Digital. The Audigy 2 ZS Video Editor hardware produces MPEG Audio or Dolby Digital when compressing to MPEG (PCM audio is created in the Ulead application when specified by the user) and PCM when compressing or capturing DV.
-
Page 62
The physical disc medium can be: • DVD-ROM: read only, used for commercial content, manufactured by a commercial press • DVD+R/RW: R=Recordable once, RW = ReWritable • DVD-R/RW: R=Recordable once, RW = ReWritable • DVD-RAM: random access rewritable The disc may have one or two sides, and one or two layers of data per side. The number of sides and layers determines the disc capacity: •… -
Page 63
The audio data on a DVD movie can be of the format PCM, MPEG audio, Dolby Digital (AC-3) or DTS. In countries using the NTSC standard, DVD discs contain a sound track in PCM or Dolby Digital (AC-3) format, and any NTSC DVD player must support these two, while MPEG Audio and DTS are optional. -
Page 64: Frequently Asked Questions
Frequently Asked Questions This section covers common questions you might have while using your Audigy 2 ZS Video Editor. I hear echoes while capturing video. Questions You are likely hearing audio from two sources: About Video • audio directly from the video source, that is reflected to the Line Out (and synchronized with an external TV monitor if you have one connected to the analog video outputs), and •…
-
Page 65: General Usage
However, this may result in echoing. • Use a pair of headphones to hear what you are recording. USB devices connected to the Audigy 2 ZS Video Editor don’t seem to be recognized. This may be caused by connecting USB devices with an external power supply to your Audigy 2 ZS Video Editor without first turning it on.
-
Page 66
(thus resetting the device’s firmware). Ensure that the Audigy 2 ZS Video Editor is turned on. Ensure the Audigy 2 ZS Video Editor is connected to your computer via USB. Turn on your computer. Start the Ulead application and attempt the operation again. -
Page 67: General Precautions
Editor and use of low-speed USB devices, such as a USB mouse, connected to the Audigy 2 ZS Video Editor. Use of high-speed devices, such as external USB hard drives, should be avoided on the same USB 1.1 bus as the Audigy 2 ZS Video Editor during video capture.
Audigy 2 ZS
Срок обслуживания истек
Выбранное изделие относится к категории изделий с истекшим сроком обслуживания.
Для таких изделий техническая поддержка ограничивается предоставлением в интерактивном режиме материалов, размещенных на веб-узле технической поддержки пользователей Creative: решений из базы знаний, драйверов, обновленных версий приложений и документации по изделию.
База знаний: Самые популярные решения
Руководство пользователя по началу работы / инструкции по технике безопасности и нормативная информация
|
Ниже приведен список руководств пользователя по началу работы с Audigy 2 ZS. |
Последние материалы для загрузки
В следующем списке представлены последние совместимые с Audigy 2 ZS материалы для загрузки.
Просмотр: Драйвер | Приложение | Все
Все материалы для загрузки
Для получения полного списка загрузочных файлов, Вы можете вручную найти их в нашей базе данных.
Драйвер
Дата выпуска:
9 Apr 10
Размер файла:
40.42 MB
Загрузка
Дата выпуска:
13 Jul 09
Размер файла:
37.62 MB
Загрузка
Дата выпуска:
16 Mar 07
Размер файла:
38.3 MB
Загрузка
Приложение
Creative ALchemy 1.43.27
This download is an application for use with Creative audio products. It restores 3D audio and EAX® effects for certain DirectSound®3D games in Microsoft® Windows® 7 and Windows Vista®. For more details, read the rest of this web release note.
Показать сведения »
Дата выпуска:
16 Nov 12
Размер файла:
18.92 MB
Загрузка
Дата выпуска:
2 Oct 12
Размер файла:
14.19 MB
Загрузка
Дата выпуска:
20 Mar 09
Размер файла:
8.12 MB
Загрузка
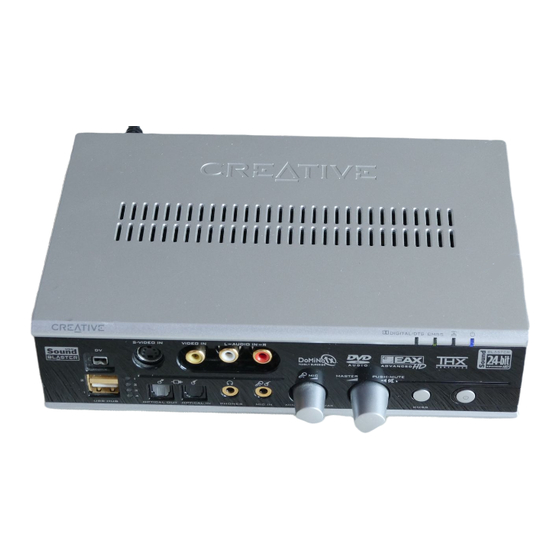
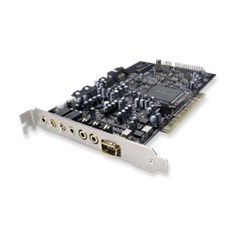
Your audio card has these jacks and connectors to enable the attachment of a wide variety of devices:
Jack or Connector
FireWire (IEEE 1394)
1.
connector
2.
Line Out 3 jack (LIN_OUT3)
3.
Line Out 2 jack (LIN_OUT2)
4.
Line Out 1 jack (LIN_OUT1)
M icrophone In jack
5.
(M IC_IN)
6.
Line In jack (LIN_IN)
7.
Digital Out jack
Telephone Answering Device
8.
connector (TAD)
CD Audio connector
9.
(CD_IN)
10.
Aux In connector (AUX_IN)
Internal FireWire (IEEE 1394)
11.
connector (SB1394)
CD SPDIF connector
12.
(CD_SPDIF)
Connects to a FireWire (IEEE 1394) compatible external device (for example, a digital video camcorder,
digital still camera, printer or scanner).
Connects to Front Center, Subwoofer, Side Left (only on 7.1 systems) and Rear Center (only on 6.1
systems) inputs on powered analog speakers or an external amplifier.
Connects to Rear Left, Rear Right, and Side Right (only on 7.1 systems) inputs on powered analog
speakers or an external amplifier.
Connects to Front Left and Front Right inputs on powered analog speakers or an external amplifier.
Also supports headphones.
Connects to an external microphone for voice input.
Connects to analog devices like music synthesizers and other line-level sources.
Connects to external digital devices or digital speaker systems (6-channel or compressed AC-3 SPDIF
output).
Provides a monaural connection from a standard voice modem, and transmits microphone signals to
the modem.
Connects to the Analog Audio output on a CD/DVD-ROM drive using an Analog CD audio cable
(available separately).
Connects to the analog output from a CD/DVD-ROM drive.
Connects to the internal FireWire (IEEE 1394) connector on the Platinum Drive (included with Audigy
2 ZS Platinum).
Connects to the digital output from a CD/DVD-ROM drive.
Description

What You Need
Installing Hardware
Preparing Your
Computer
TAD
CD_IN
AUX_IN
CD_SPDIF
A
U
D_EXT
SB1394
JOYSTICK
1
2
3
a
b
OR
CD/DVD-ROM drive
Remove metal brackets
PCI slot
SOUND BLASTER AUDIGY 2 ZS and AUDIGY 2 ZS PLATINUM SETUP
SOUND BLASTER AUDIGY 2 ZS and AUDIGY 2 ZS PLATINUM SETUP
RESET
Remove 5¼» drive
bay front panel
AD_EXT cable
Power splitter cable
Screws for Platinum Drive
Internal FireWire®
(IEEE® 1394) cable
f
SB1394
TAD
CD_IN
AUX_IN
CD_SPDIF
A
U
D_EXT
SB1394
JOYSTICK
SB1394
TAD
CD_IN
AUX_IN
CD_SPDIF
A
U
D_EXT
SB1394
JOYSTICK
Remove any audio card in your
computer and uninstall its software.
Disable any on-board audio device
in your computer.
Turn off your computer and all
peripheral devices before removing
the computer cover.
1
2
3
e
Connect to system
power unit
J1
Red stripe
J5
JP1
POR
T
1
CD_
IN
TAD
AU
X_IN
SB1
39
4
CD_SP
DI
F
AU
D
_EXT
JO
YSTIC
K
For Audigy 2 ZS Platinum only
For Audigy 2 ZS Platinum only
For Audigy 2 ZS Platinum only
c
d
Platinum Drive
With Compact Disc Digital Audio (CDDA)
extraction enabled on your computer’s operating
system, you do not have to use an audio cable to
connect your drive to your audio card. For more
information, refer to the User’s Guide (on CD). Go to
d:\manual\<language>\manual.chm (replace d:\
with your CD-ROM drive letter and <language> with
the language that the document is in).
Installing Software
Installing Sound Blaster Audigy 2 ZS drivers and applications
1. After you have installed your hardware, turn on your computer.
Windows automatically detects the audio card.
2. When prompted for the audio drivers, click the Cancel button.
3. Insert the Sound Blaster Audigy 2 ZS Installation and Applications CD into your
CD-ROM drive. Your CD should start automatically. If it does not, follow the steps
below:
i.
Double-click
the
My Computer icon.
Alternatively,
click
Start
→ My Computer.
ii. Right-click the CD-ROM/DVD-ROM drive icon, and then click AutoPlay.
4. Follow the instructions on the screen to complete the installation.
5. When prompted, restart your system.
Uninstalling drivers and applications
Refer to the Installing Software chapter in the User’s Guide (on CD).
These instructions are applicable to all Windows operating systems.
PN 03SB000000030 Rev.A
Up to two drives can be
connected simultaneously to
the Audigy 2 ZS, using both the
AUX_IN (analog) and CD_SPDIF
(digital) connectors.
Analog CD audio
cable (available
separately) for
analog CD audio
output
Digital CD audio
cable for digital CD
audio output
Connect Joystick/
MIDI bracket ribbon
cable (optional)
Attach Joystick/
MIDI bracket
Insert Sound
Blaster Audigy 2 ZS
audio card
PCI Slot
To prevent permanent damage, use only:
— the AD_EXT cable with the AD_EXT connector
— the Audigy 2 ZS audio card with the Platinum Drive.
Do not force any cable into a connector. This can cause
permanent damage to your hardware.
Your Platinum Drive is capable of supporting both dynamic
and condenser microphones. By default, your Platinum
Drive is set for use with a condenser microphone. To use a
dynamic microphone, fit the provided shunt onto Jumper
JP1 of your Platinum Drive.
Connect
Internal
FireWire
(IEEE1394)
cable
Connect power
splitter cable
Insert
Platinum
Drive into
drive bay
Secure
Platinum
Drive with
screws
provided.
Useful Information
User’s Guide (on CD)
For more information, refer to the User’s Guide (on CD).
Go to Start
→ Programs → Creative → Sound Blaster Audigy 2 ZS→ Documentation →
Online Manual.
Digital output sampling rate
Make sure you select the sampling rate of the PCM SPDIF output of your Digital Out connector
to match the requirements of your receiving device. The choices available are 48 kHz or 96 kHz.
If you do not hear any sound from your digital speakers or experience intermittent hissing,
you may need to select a lower digital output sampling rate.
To select the digital output sampling rate:
1. In
Windows Control Panel, double-click the AudioHQ icon.
2. In
the
AudioHQ window, double-click the Device Controls icon.
3. Click
the
Sampling Rate tab.
4. In
the
Digital Output Sampling Rate list, click the required sampling rate.
For more technical updates, go to http://www.soundblaster.com
You can use Creative Diagnostics to test the software and hardware installation.
Go to Start
→ Programs → Creative → Sound Blaster Audigy 2 ZS → Creative Diagnostics.
Joystick/MIDI bracket
(with ribbon cable)
Phillips-head screwdriver
(not included)
Digital CD audio cable
Sound Blaster Audigy 2 ZS audio card
Sound Blaster Audigy 2 ZS
Platinum Drive
Shunt
Connect
AD_EXT cable
Connect Internal FireWire
(IEEE 1394) cable
Connect AD_EXT
cable
Audigy 2 ZS
audio card
Shunt
Jumper
Red stripe

 Loading…
You can only view or download manuals with
Sign Up and get 5 for free
Upload your files to the site. You get 1 for each file you add
Get 1 for every time someone downloads your manual
Buy as many as you need