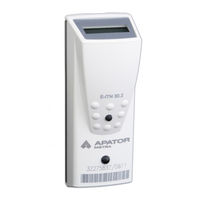
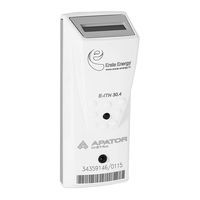
E
E-ITN 30.
EX
LECTRONIC HEAT COST ALLOCATOR
XX
WITH A
REMOTE SENSOR
Description and usage
E-ITN 30.xx EX is a modern electronic device intended for
ratio based allocation of heat cost in buildings with central
heating system. Heat cost allocator E-ITN 30.xx uses the
two-sensor measuring principle – integrates temperature
difference between the sensor of the radiator surface
temperature and the sensor of the surrounding temperature.
Using this principle the allocator ensures measurement of
consumption value only when the radiator really emits heat
(i.e. it does not
measure in the summer).
The allocator with the remote sensor is equipped with a
mechanic and an electronic seal and is delivered in sealed
state with the electronic seal activated. In case of
unauthorized removal of the base plate the allocator saves
the date of breach of the electronic seal to its memory and
stops to show measured data on the display. Only the notice
oPEn is displayed and indicates the breach of the electronic
seal but allocator continues measuring and transmitting the
measured data. Information about the breach of the
electronic seal is available in the data transmitted by the
radio module and via IR interface.
Application
In one-tube horizontal/vertical and two-tube heating systems
with the lowest mean design heating medium temperature ≥
35 °C
and highest mean design heating medium
temperature ≤ 105 °C.
E-ITN 30.xx EX is not intended for heat cost allocation for
floor heating systems, ceiling radiant heating, flap controlled
radiators, radiators with fan, systems with steam heating
medium, air heaters and single tube radiators if exceeds the
scope of one user. It must not be also used for heating
elements that shape and design does not allow reliable
transfer of heat to heat cost allocators.
Each radiator in billing (account) unit with common invoicing
heat meter must be equipped with a heat cost allocator of
the same type. Technical conditions of heating system must
be fulfilled when using heat cost allocators E-ITN 30.xx EX.
Technical specification
Application
t
≥ 35 °C
min
(heating medium)
t
≤ 105 °C
max
Measuring principle
two-sensor meas. principle
Billing period
year (E-ITN 30.2 EX,
E-ITN 30.6 EX)
month (E-ITN 30.4 EX,
E-ITN 30.6 EX)
Dimensions
allocator 100 x 37 x 33 mm
Operating frequency
868 MHz
(E-ITN 30.2 EX, E-ITN
30.4 EX)
868,95 Mhz
(E-ITN 30.6 EX)
Transmitting power
< 5 mW or < 1 mW
Conditions
— temperature of the sensor of
of registration
the radiator temp. ≥ 23 °C
— difference of mean temp. of
heating medium and
surroundings temp. ≥ 4 °C
Material
ABS + PC / Al – F22
(E-ITN 30.2
EX, E-ITN 30.4 EX)
ABS + PC / Al – F (E-ITN 30.6 EX)
IP code
IP 42
Conformity
EN 834
Dimensional drawings
Installation of E-ITN 30
1. Install the base plate to the radiator according to the
instructions in Installation and service manual.
2. Slide the locks in the upper part of the sensor housing
on the base plate and push the bottom part of the
housing to the base plate. The allocator must be fixed
with the latch on both sides of back plate.
3. The base of the allocator is placed on the wall.
Do not install the allocator if the notice Error or Open is
displayed on LCD.
Activation of E-ITN 30
I the sign uPr is displayed on LCD, the allocator must be
activated:
1. When LCD is on and notice uPr is displayed, hold the
button till notice
—A — —
appears that indicates sub-
menu activation.
2. Switch to item Act with short button presses if
necessary.
3. When notice Act appears, press and hold the button till
notice —A — — is displayed. When you release the button,
first menu item is displayed.
Reading of measured data
Basic allocator status and measured values can be
displayed on LCD. The meaning of some values may be
different if the additional symbol „SM» at the right bottom
corner is displayed. These values are mentioned with „SM»
symbol in text , e.g. 385 SM.
The last value shows the termination of the battery lifetime.
1 / 2
To save the battery, after longer period of inactivity (approx.
1 min.), energy-saving mode is activated and display is
switched off. Display can be activated by pushing the
button.
When pushing the button briefly, notice —— on the display
will appear. If the button is not pushed in 1 minute, the
display will switch off.
Displayed data
E-ITN 30.2 EX, E-ITN 30.4 EX
Value for current billing period
245
Value for last billing period
458 SM
Alphanumerical code for last billing period
A.0.i.h.t.
Serial number – first part
-3400
Serial number – second part
0060-
E-ITN 30.6 EX Wireless M-Bus
Consumption for the current billing year
245
Consumption for the past billing year
458 SM
Consumption for the current billing month
2.4.5
Consumption for the past billing month
4.5.8.SM
Serial number – first part
-3400
Serial number – second part
0060-
E-ITN 30.5, E-ITN 30.51 Wireless M-Bus
LCD test
Current date
10.12.
Start of the billing period
u 1.2.
Value for last billing period
458 SM
Average surroundings temperature for last
23.7°C SM
billing period
Value for current billing period
245
E-ITN 30.6 Wireless M-Bus
Value for current year billing period
245
Value for last year billing period
458 SM
Value for current month billing period
2.4.5
Value for last month billing period
.4.5.8.SM
Serial number – first part
-3600
Serial number – second part
0060-
* also other items can be displayed based on setting
Transport and storage
Transport
• devices can be transported by all usual covered means
of transport
• devices must be in original package
• originally packed devices must be stored and secured
to avoid mechanical damages during transportation
• devices
can
not
be
transported
together
aggressive substances
• temperature during transportation from -10 °C to +50
°C
• relative humidity from 45 % to 75 %
Storage
• devices must be originally packed by manufacturer and
individually stored in antistatic bags
• storage temperature from +10 °C to +30 °C
• relative humidity from 45 % to 75 %
• devices must be stored in clean covered areas without
aggressive substances and stored properly to avoid
mechanical damage
Disposal
This device is subject to a waste management in
accordance with local legislation.
Possible minor faults and their elimination
Any E-ITN 30.xx EX defect should be repaired by
manufacturer only.
Warranty terms and conditions
If device is installed and handled according to manufacturer
instructions mentioned in Installation and service manual,
manufacturer provide warranty under the valid legislation
unless agreed differently.
The warranty is void if device was used contrary to
Installation and service manual or damaged:
• during transport or storage by customer or reseller
• when mounted or dismantled to the customer device
• because of improper handling or installation into other
device than agreed in manual
• if the product was exposed to different environment
than agreed in manual
• if mechanically or in other way damaged by user
Declaration of conformity, declaration of directive RoHS
You can find declaration of conformity and declaration of
directive RoHS on producer´s web page:
www.metra-su.cz
Warranty and post warranty repairs
Warranty and post warranty repairs have to be done by
manufacturer. Pack the defective product and send
back to the manufacturer’s address.
with
2 / 2
- Manuals
- Brands
- Apator Metra Manuals
- Control Unit
- E-ITN 30
Manuals and User Guides for Apator Metra E-ITN 30. We have 3 Apator Metra E-ITN 30 manuals available for free PDF download: Installation And Service Manual, User Manual
Apator Metra E-ITN 30 Installation And Service Manual (46 pages)
ELECTRONIC HEAT COST ALLOCATOR WITH INTEGRATED RADIO TRANSMITTER
Brand: Apator Metra
|
Category: Cash Counter
|
Size: 1.78 MB
Table of Contents
-
Table of Contents
2
-
1 Introduction
4
-
LC Display
4
-
-
2 Device Description
5
-
Type E-ITN 30.2
5
-
Type E-ITN 30.3
5
-
Type E-ITN 30.4
5
-
-
3 Technical Specifications
6
-
Construction
8
-
-
4 Operation Modes
9
-
Submenu Navigation
9
-
Sleeping Mode
9
-
Submenu Structure in Sleeping Mode
9
-
Activation of Working Mode
10
-
Allocator Self Test
10
-
Setting of Radiator Type (E-ITN 30.3 Only)
10
-
-
-
Mode of Waiting for Start Date
10
-
Submenu Structure in Mode of Waiting for Start Date
11
-
-
Working Mode
11
-
Menu Structure in Working Mode
11
-
Value for Current Billing Period
12
-
Value for the Last Billing Period
12
-
Alphanumeric Code
12
-
Serial Number (E-ITN 30.2, 30.4 Only)
12
-
Temperature of the Radiator Sensor (E-ITN 30.2, 30.4 Only )
12
-
Temperature of the Surroundings Sensor (E-ITN 30.2, 30.4 Only)
12
-
Date of the Billing Period Beginning
12
-
Current Date
12
-
Current Time (E-ITN 30.2, 30.4 Only)
12
-
Display Test (E-ITN 30.3 Only)
12
-
-
Structure of Submenu with Month Values ( E-ITN 30.2, 30.4 Only)
13
-
Structure of Submenu with Month Values (E-ITN 30.3 Only)
13
-
Menu Structure in Service Mode (E-ITN 30.3 Only)
14
-
Number of Measuring Cycles in Single Sensor Mode
14
-
Max. Temperature of Radiator Sensor in Last Billing Period
14
-
Date When the Max. Temperature of Radiator Sensor in Last Billing Period was Reached
14
-
Min. Temperature of Radiator Sensor in Last Billing Period
14
-
Date When the Min. Temperature of Radiator Sensor was Reached in Last Billing Period
14
-
Value in Penultimate Billing Period
14
-
-
Last Year of Battery Life
14
-
-
Error Mode
15
-
-
5 Other Informations
16
-
Electronic Seal Reactivation
16
-
Allocator Parameters Setting
16
-
Transportation
16
-
Storage
17
-
Application and Disposal
17
-
Defects and Their Elimination
17
-
Warranty
17
-
-
6 Accompanying Documentation
18
-
Ordering
18
-
Packing
18
-
-
7 Installation Methods
21
-
Allocator Installation
21
-
Allocator Back Plate
21
-
List of Installation Material
22
-
E-ITN 30 Mounting Place on Segmented and Panel Radiators
23
-
Vertical Position
23
-
Horizontal Position
23
-
-
Installation on Segmented Radiators
24
-
Description of Installation
24
-
Installation Differences
25
-
-
Installation on Panel Radiators
26
-
Description of Installation
26
-
-
Installation on Horizontal and Vertical Registers
28
-
Installation Description
28
-
Proper E-ITN 30 Installation on Different Register Types
29
-
-
Model No. 1 — Cast Iron Radiators
31
-
Model No. 2 — Cast Iron Radiators with Flat Vertical Front Panel
32
-
Model No. 3 — Cast Iron Radiators with Distance Pad
33
-
Model No. 4 — Steel Radiators
34
-
Model No. 5 — Steel Radiators with Distance Pad
35
-
Model No. 6 — Panel Radiators with Shaped Front Side
36
-
Model No. 7 — Panel Radiators with a Flat Front Panel
37
-
Model No. 8 — Tubular Radiators — Ladder
38
-
Model No. 9 — Tubular Radiators — Ladder with Oval Base
39
-
Model No. 10 — Radiators Made from Smooth or Ribbed Tubes — Register
40
-
Patter No. 11 — Aluminium Radiator with Vertical Ribs
41
-
Model No. 12 — Aluminium Radiator with Vertical Ribs
42
-
Model No. 13 — Radiator JAGA TEMPO
43
-
Model No. 14 — Radiators Koratherm Horizontal K22HM
44
-
Model No. 15 — Radiators OT Koral
45
-
Model No. 16 — Koratherm Vertikal K20 V
46
-
Advertisement

Apator Metra E-ITN 30 User Manual (2 pages)
Brand: Apator Metra
|
Category: Accessories
|
Size: 0.2 MB
Apator Metra E-ITN 30 User Manual (2 pages)
ELECTRONIC HEAT COST ALLOCATOR
Brand: Apator Metra
|
Category: Control Unit
|
Size: 0.14 MB
Advertisement
Advertisement
Related Products
-
Apator Metra E-RM 30
-
Apator Metra E-ITN 30 EX Series
-
Apator Metra E-ITN 30 EXNR Series
-
Apator Metra E-ITN 10 Series
-
Apator Metra E-ITN 10.41
-
Apator Metra E-ITN 10.42
-
Apator Metra E-ITN 10.51
-
Apator Metra E-ITN 10.52
-
Apator Metra E-ITN 10.6
-
Apator Metra E-ITN 10.71
Apator Metra Categories
Thermostat
Measuring Instruments
Cash Counter
Control Unit
Heating System
More Apator Metra Manuals
Specifications:1833/1833828-eitn_30.pdf file (03 Feb 2023) |
Accompanying Data:
Apator Metra E-ITN 30 Cash Counter, Control Unit PDF Installation And Service Manual (Updated: Friday 3rd of February 2023 11:52:21 AM)
Rating: 4.4 (rated by 51 users)
Compatible devices: MSK210, airtelligence provis 3, zws-15/CD/QS, 754V-SS, E-RM 30, UHBV124, RTC-9701JE, VMB1BLS.
Recommended Documentation:
Installation And Service Manual (Text Version):
(Ocr-Read Summary of Contents of some pages of the Apator Metra E-ITN 30 Document (Main Content), UPD: 03 February 2023)
-
37, E-ITN 30 Installation and service manual M2019/01a [EN] 7.14. MODEL NO. 7 – PANEL RADIATORS WITH A FLAT FRONT PANEL Verified on: RADIK PLAN, VENTIL KOMPAKT mod, type 11, manufacturer : KORADO, a.s. Česká Třebová Basic dimensions of the RADIK, VENTIL KOMPAKT modification, type 11 PLAN VK and da…
-
16, E-ITN 30 Installation and service manual M2019/01a [EN] 5. OTHER INFORMATIONS 5.1. ELECTRONIC SEAL REACTIVATION The electronic seal is used for detection if allocator was removed from back plate – more in chapter 2. Device description. If you need to re-fit allocator (e.g. replace old radiator with…
-
30, E-ITN 30 Installation and service manual M2019/01a [EN] • 1x E-ITN 30 in the beginning of the tubular element curve • in case of register welded into the frame, place E-ITN 30 on a horizontal tube II. Bare tube with two curves • 2x E-ITN 30 in the beginning of the upper curve and in the end …
-
29, E-ITN 30 Installation and service manual M2019/01a [EN] 7.7.2. Proper E-ITN 30 installation on different register types Horizontal tubes — bare and ribbed: I. Ribbed tube straight with l ≤ 6 m and bare with l ≤ 12 m • 1x E-ITN 30 in the centre of the tubular element II. Ribbed tube straight with l &…
-
14, Apator Metra E-ITN 30 E-ITN 30 Installation and service manual M2019/01a [EN] the long button press can be used to exit. Press and hold the button till —A— appears. After release, menu item „value for last billing period“ will appear. 4.5.4. Menu structure in service mode (E-ITN 30.3 only) Allocator can be switche…
-
32, Apator Metra E-ITN 30 E-ITN 30 Installation and service manual M2019/01a [EN] 7.9. MODEL NO. 2 – CAST IRON RADIATORS WITH FLAT VERTICAL FRONT PANEL Verified on: KALOR 3, manufacturer: ŽDB GROUP a.s. , plant Viadrus Basic dimensions of the KALOR 3 for 10 segments, data for correct allocator installation (mm): Length — H…
-
23, E-ITN 30 Installation and service manual M2019/01a [EN] 7.4. E-ITN 30 MOUNTING PLACE ON SEGMENTED AND PANEL RADIATORS Place with suitable relation between the displayed value and the heat emission of the radiator over a sufficiently operating range must be determined for allocator inst…
-
Apator Metra E-ITN 30 User Manual
-
Apator Metra E-ITN 30 User Guide
-
Apator Metra E-ITN 30 PDF Manual
-
Apator Metra E-ITN 30 Owner’s Manuals
Recommended: Quick-Hitch PS15 Series, PG715850, C5221, 113.170200, VRC-3E
Operating Impressions, Questions and Answers:
Почему вы выбрали именно этот товар?
Для каких целей планируете использовать?
Устраивает ли вас соотношение цены и качества?
Не терпим нечестные отзывы, а также:
Мат, ругательства, оскорбления и угрозы
Контактную информацию, рекламу и прочее, не относящиеся к теме
Обсуждение цены товара и ее изменение
Отзывы по обслуживанию и сервису следует оставлять через раздел Гарантийное обслуживание, там они будут рассмотрены в обязательном порядке