
2959-5064466 ME VITAMIN-M2 23/12/02 17:46 Page C2
December 2002 — Ref. : 5064466 — Document subject to change — Conception et réalisation : ADHOC’S — 2959
2959-5064466 ME VITAMIN-M2 23/12/02 17:46 Page C3
User Instructions
Gebrauchsanleitung
Mode d’emploi
Istruzioni per l’uso
Οδηγίες χρήσεως
Руководство для
пользователя
Instrukcja obsługi
Kullanım kılavuzu
2959-5064466 ME VITAMIN-M2 23/12/02 17:46 Page C4
1
2
3
4*
5
7
4
5
4
6
8
9
10
11
12
13
14
17
16 15
VC 4002 — VC 4003
min.
10
60
min.
20
min.
50
min.
min.
30
40
min.
10
min.
60
2
min.
m
50
30
min.
min.
40
min.
Vinegar Water
2959-5064466 ME VITAMIN-M2 23/12/02 17:46 Page 3
5
21

2959-5064466 ME VITAMIN-M2 23/12/02 17:47 Page 34
PYCCKИЙ
Защита окружающей среды.
• Приобретенное Вами устройство прослужит долгие годы. Однако,
когда Вы решите заменить его, не забудьте, пожалуйста, о
необходимости бережного отношения к окружающей среде – отнесите
его в пункт утилизации (для устройств с электронным
программированием).
Внимательно соблюдайте приведенные ниже правила пользования.
Меры безопасности при обращении с устройством.
В процессе эксплуатации устройство вырабатывает пар температуры кипения.
Данное устройство соответствует действующим правилам и
условиям безопасности, а также следующим нормативным
документам:
• Инструкция по бытовым приборам 89/336/СЕЕ, дополненная
Инструкцией 93/68/СЕЕ.
— Инструкция по низковольтному оборудованию 72/23/СЕЕ,
дополненная Инструкцией 93/68/СЕЕ.
— Перед началом эксплуатации необходимо убедиться, что напряжение
(переменного тока) в электросети соответствует напряжению,
указанному на маркировке данного устройства.
• Если устройство предполагается использовать не в той стране, где оно
было куплено, то, принимая во внимание действующие различные
стандарты в разных странах, необходимо произвести его проверку в
специализированном сервисном центре.
• Нельзя помещать прибор рядом с источником тепла, либо в горячую
духовую печь – это может привести к выводу его из строя.
• Устройство следует установить на плоской и устойчивой поверхности,
в месте, исключающем попадание водяных брызг.
• Никогда не оставляйте прибор в работающем состоянии. Берегите от
детей.
• Не оставляйте электрошнур прибора свисающим.
• Источник электропитания устройства должен быть обязательно
заземлен.
• Вынимая вилку из розетки, не тяните за электрошнур.
• Устройство нельзя использовать:
— если оно находится в неисправном состоянии, или если поврежден
электрошнур;
— после падения, при наличии видимых повреждений, либо сбоев в
работе.
В вышеуказанных случаях устройство должно быть отправлено в
специализированный сервисный центр.
• Замена поврежденного шнура электропитания в целях обеспечения
гарантии безопасности должна быть произведена компанией-
производителем, службой гарантийного обслуживания, либо
специалистом, имеющим аналогичный уровень квалификации.
• Остерегайтесь возможных ожогов в результате соприкосновения с
горячей поверхностью прибора, горячей водой, паром, либо горячей
пищей.
• Устройство следует отключать от сети:
— сразу же по завершении использования,
— при перемещении,
— перед мойкой или обслуживанием.
• Ни в коем случае нельзя погружать устройство в воду.
• Не следует размещать прибор в непосредственной близости от стен
или мебели, так как производимый в ходе работы пар может нанести
повреждения.
• Нельзя перемещать устройство, если оно заполнено жидкостью, либо
горячей пищей.
• Прибор предназначен исключительно для домашнего применения.
Производитель не несет ответственности в случае его использования
в промышленных целях, а также при неправильной эксплуатации, либо
при несоблюдении инструкции по эксплуатации. Гарантия на такие
случаи также не распространяется.
• Не прикасайтесь к прибору в процессе парообразования, не снимайте
голой рукой крышку, рисовую чашу, либо паровую корзину.
34
2959-5064466 ME VITAMIN-M2 23/12/02 17:47 Page 35
PYCCKИЙ
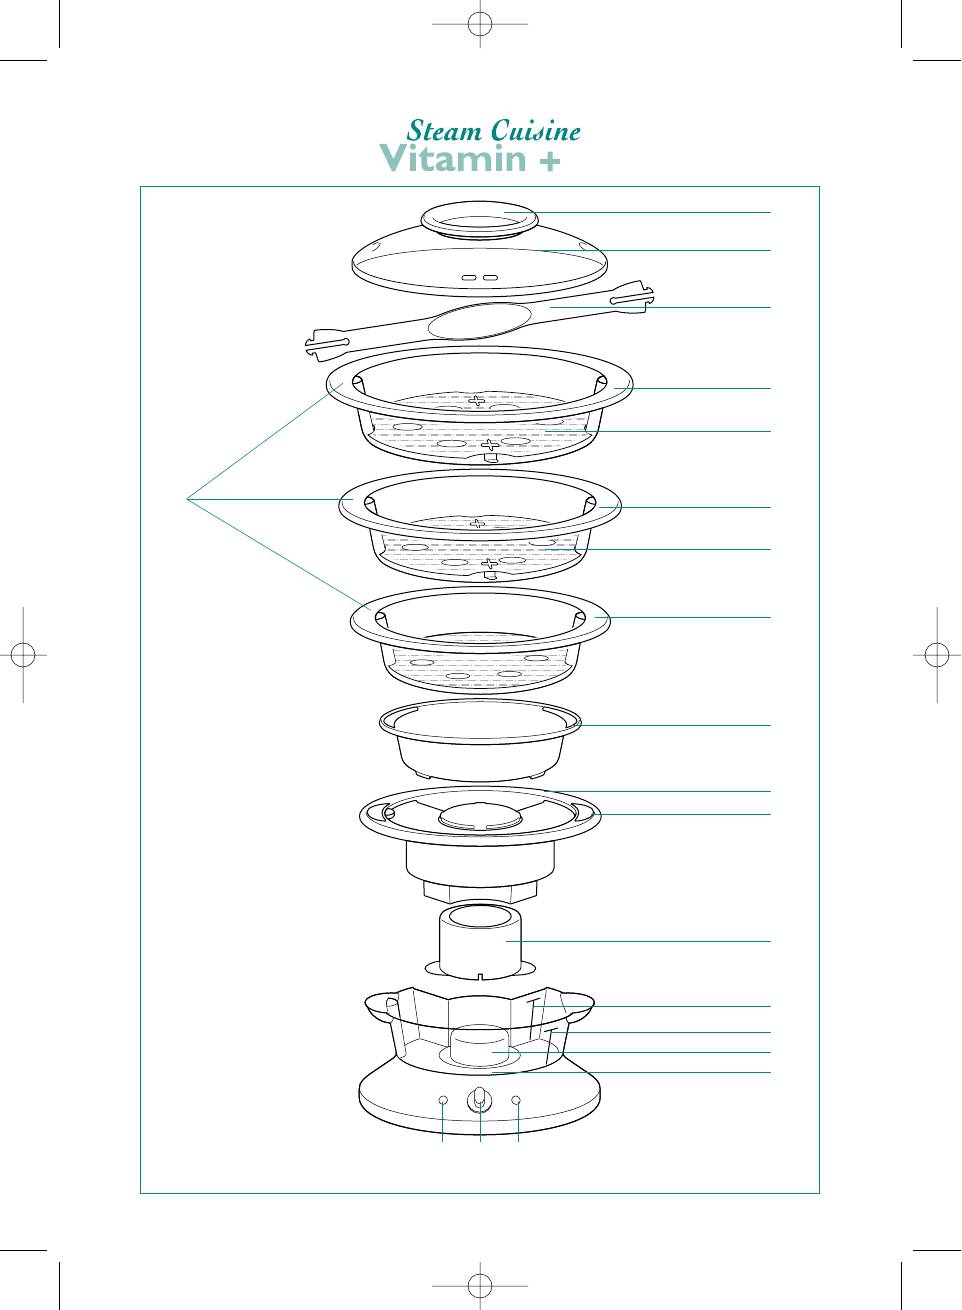
Описание
1 Ручка крышки
10 Съемное турбо-кольцо
2 Крышка
11 Внутренний максимальный уровень
3 Пристегивающаяся ручка
воды
4 Паровая корзина (2 или 3 – в
12
Наружный максимальный уровень воды
зависимости от модели)
13 Нагревательный элемент
5 Съемная решетка с углублениями
14 Резервуар для воды (вместимостью
для варки яиц (только в верхней
1,1 л).
корзине (корзинах))
15 Световой индикатор включения
6 Чаша для риса
прибора в сеть
7 Паровой канал
16 60-минутный таймер.
8 Поддон для сока
17
Сенсорная панель “Витамин+”: для
9 Отверстие для залива воды
ускоренного приготовления пищи с
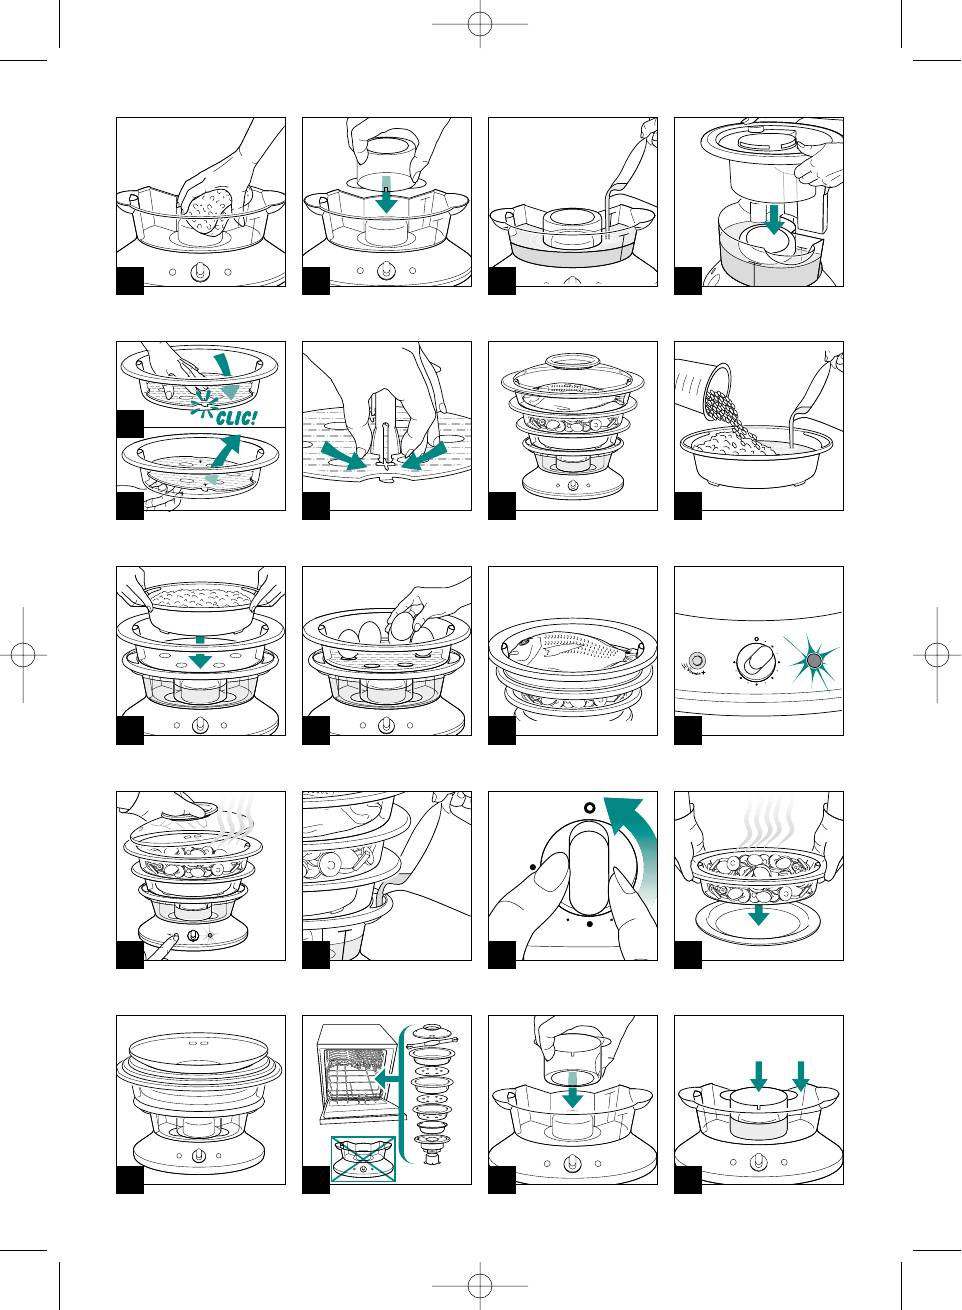
Подготовка к работе
Не заливайте воду в паровой
Перед началом эксплуатации
канал.
Вымойте все съемные части и
В резервуар для воды нельзя
резервуар для воды изнутри теплой
класть какие-либо приправы или
мыльной водой.
Протрите и просушите — Рис.
1
заливать какую-либо жидкость,
кроме воды.
Во время мойки нельзя
погружать резервуар в воду.
Перед началом работы
убедитесь, что резервуар для воды
Подготовка пароварки к работе
Пароварка должна стоять на устойчивой
заполнен.
поверхности.
Перед использованием
Наденьте турбо-кольцо на
убедитесь в том, что в резервуаре
нагревательный элемент, в направлении,
есть вода.
указанном на рисунке — Рис.
2
Установка съемных решеток
Все предметы, которые могут
паровых корзин
быть повреждены в результате
Верхние паровые корзины (корзина)
воздействия пара, должны
имеют решетки, которые можно снять,
находиться на достаточном удалении.
чтобы приготовить продукты большого
Перед заполнением резервуара
объема.
для воды необходимо установить
Чтобы установить решетку:
Положите паровую корзину на стол.
турбокольцо.
Возьмите решетку скобками вниз.
Заполнение резервуара для воды
Положите решетку в корзину по центру.
Залейте воду непосредственно в
Защелкните скобы решетки, чтобы она
резервуар для воды до максимальной
встала на место — Рис.
5
отметки а также в турбокольцо — Рис.
3
Чтобы снять решетку, надавите на нее
Установите сокосборник на резервуар
снизу — Рис.
6
для воды (проверьте, чтобы он прочно
Ваша пароварка оснащена
встал на свое место).
пристегивающейся ручкой для извлечения
Если не удается надлежащим образом
“хрупкой” пищи без повреждения
установить сокосборник на свое место,
(например, рыбы, ростков спаржи и т. п.).
проверьте положение турбокольца.
Для установки пристегивающейся ручки
Возможно, турбокольцо установлено не
зафиксируйте ее зажимы в решетке
той стороной вверх.
— Рис.
7
Каждый раз заливайте в резервуар
Чтобы отсоединить ручку от решетки,
свежую воду.
сожмите ее зажимы.
35

2959-5064466 ME VITAMIN-M2 23/12/02 17:47 Page 36
отверстия для выпуска пара находились
Решетка нижней корзины
с противоположной стороны.
несъемная.
Приготовление блюд с
Используйте пристегивающуюся
ручку только для верхней паровой
использованием таймера
корзины.
Выбор продолжительности
приготовления
В том случае, когда используется
Включите прибор в сеть.
пристегивающаяся ручка, решетку в
Установите таймер на рекомендуемую
паровой корзине фиксировать не
продолжительность приготовления (см.
следует. Решетку в корзину нужно
таблицу продолжительности
просто положить, чтобы затем извлечь
приготовления блюд).
без дополнительных усилий.
Включившийся красный индикатор
Убедитесь, что зажимы
означает начало процесса приготовления.
пристегивающейся ручки находятся
Для установки таймера устройство
на месте.
должно быть включено в сеть.
Установка корзин
Ускоренное приготовление при
Положите продукты в паровую корзину
помощи сенсорной панели
Самая маленькая паровая корзина
“VITAMIN+”
всегда должна помещаться на поддоне
Отличительная особенность: Ваша
для сока.
пароварка оснащена сенсорной
Затем устанавливайте остальные
панелью “VITAMIN+”, позволяющей
корзины от наименьшей до наибольшей,
сократить время приготовления блюд
правильно фиксируя их одну в другую.
для максимального сохранения
Накройте паровые корзины крышкой
витаминов.
(крышка подходит к каждой из корзин)
В начале работы нажмите кнопку
— Рис.
8
“VITAMIN+”, загорится световой
13
Приготовление риса
индикатор — Рис. . Теперь
Положите рис и налейте воду в чашу
приготовление начнется быстрее
для риса (см. таблицу времени
благодаря более крупным выпускным
приготовления) — Рис.
9
паровым отверстиям.
Поместите чашу для риса в паровую
По достижении необходимой для
корзину — Рис.
10
приготовления блюда температуры
индикатор сенсорной панели
Приготовление яиц
“VITAMIN+” автоматически гаснет.
Положите яйца в предназначенные для
Если необходимо снять крышку
них ячейки — Рис.
11
пароварки (например, чтобы добавить
Приготовление рыбы целиком
ингредиентов для приготовления
Поместите рыбу в верхнюю паровую
блюда), то затем можно снова нажать
корзину а овощи — в нижнюю корзину
кнопку “VITAMIN+” для быстрого
(корзины) — Рис.
12
возврата к нужной температуре
Если в процессе работы из
приготовления блюда — Рис.
14
устройства выходит пар, проверьте,
В некоторых случаях после нажатия
все ли паровые корзины правильно
кнопки “VITAMIN+” световой индикатор
закреплены в необходимом порядке.
выключается через довольно короткий
промежуток времени. Это не является
Для достижения наилучших
сбоем в работе и означает, что
результатов не кладите слишком много
температура в паровых корзинах
продуктов в паровые корзины.
достигла необходимого уровня.
Чтобы избежать возможности
Нормальным явлением является
ожогов от пара, выходящего из крышки,
выход небольшого количества пара и
располагайте крышку так, чтобы
иногда некоторого количества воды из
36

2959-5064466 ME VITAMIN-M2 23/12/02 17:47 Page 37
находящихся сзади и специально для
Уход и обслуживание
этого предназначенных выпускных
Мойка устройства
отверстий.
Опорожните резервуар для воды и
Загоревшийся индикатор
вымойте его теплой мыльной водой и
мягкой тканью.
“VITAMIN+” нельзя выключить вручную.
Вытрите и просушите — Рис.
1
Он сам выключится автоматически.
Все остальные съемные части
Помимо вышеописанных
пароварки можно мыть в посудомоечной
ситуаций не рекомендуется включать
машине — Рис.
19
кнопку “VITAMIN+” более одного раза
Не используйте абразивные
в процессе приготовления блюда.
чистящие средства.
В процессе приготовления
Не погружайте резервуар для
В ходе приготовления блюда
воды в воду.
проверяйте уровень воды по внешнему
Периодически очищайте
индикатору.
При необходимости добавьте воды через
турбокольцо.
отверстия для залива воды — Рис.
15
Всегда используйте режим
Во избежание ожогов не
предварительной мойки либо мойки
дотрагивайтесь до устройства или до
при самой низкой температуре.
приготавливаемой пищи.
Очистка от накипи
По окончании приготовления
Положите турбокольцо в перевернутом
Подается звуковой сигнал.
положении на нагревательный элемент
Гаснет красный индикатор.
— Рис.
20
Для отключения пароварки до окончания
Залейте внутрь турбокольца светлый
приготовления блюда поверните ручку
уксус до максимальной отметки.
таймера в положение О — Рис.
16
Наполните водяной бачок холодной
водой до того же уровня — Рис.
21
Разогрев пищи
Не включайте нагрев (во избежание
С помощью пароварки Вы можете
появления запахов). Оставьте на ночь
разогреть пищу (см. таблицу
для удаления накипи.
продолжительности приготовления).
Промойте резервуар для воды изнутри
Если вода закончилась, устройство
несколько раз теплой водой.
отключится автоматически.
Проводите процедуру удаления
Извлечение приготовленного
накипи примерно после 8-кратного
блюда из паровых корзин
использования устройства.
Снимите крышку за ручку.
Не пользуйтесь иными
Выньте из пароварки паровую корзину.
средствами для снятия накипи.
Положите паровую корзину на тарелку
— Рис.
17
Хранение паровых корзин
Паровые корзины и крышку
В целях экономии места паровые
корзины можно хранить вложенными
берите с помощью кухонных рукавиц.
одна в другую — Рис.
18
По окончании приготовления
Со временем, в результате сильного
Отключите устройство от сети.
окрашивающего воздействия соков таких
Перед тем, как убрать для хранения,
дайте устройству полностью остыть.
овощей как, например, свекла и морковь,
на стенках поддона для сока могут
Перед тем, как достать из
появиться пятна. Этот процесс является
пароварки поддон для сока,
нормальным. Пятна можно удалять путем
убедитесь в том, что он уже остыл.
замачивания в слабом (не абразивном)
отбеливающем растворе сразу же по
окончании приготовления блюда.
37

2959-5064466 ME VITAMIN-M2 23/12/02 17:47 Page 38
Таблица продолжительности приготовления блюд
Bремя приготовления указано ориентировочно, оно зависит от размеров
приготавливаемого продукта, от расстояний между его отдельными частями, от общей массы
продукта, от индивидуальных предпочтений, а также от напряжения в сети.
Приготовление продуктов с разной продолжительностью паровой обработки: в нижнюю
паровую корзину положите самый крупный кусок, либо продукт требующий наибольшего
времени приготовления. Затем, в процессе приготовления, положите во вторую и третью
корзины продукты, которые требуют меньшего времени приготовления.
В начале приготовления нажмите кнопку “VITAMIN+”для ускорения времени приготовления
блюда и для сохранения максимального количества витаминов.
Паровые корзины и крышку в ходе приготовления блюд берите с
помощью кухонных рукавиц.
Рыба и морепродукты
Наименование продукта Вид Масса Время Рекомендации
приготовления
Тонкое филе рыбы Свежее 450 г 5-10 мин. Не укладывайте кусочки филе рыбы один на
другой.
Тонкое филе рыбы Заморож. 450 г 10-15 мин.
Толстое филе или вырезка Свежее 400 г 10-15 мин.
Рыба целиком Свежая 600 г 20-25 мин.
Мидии Свежие 1 кг 10-15 мин.
Не используйте в пищу неоткрывшиеся моллюски
.
Креветки Свежие 200 г 2-5 мин. Приготовление по вкусу.
Морские гребешки Свежие 100 г 2-5 мин Приготовление по вкусу.
Мясо и птица
Наименование продукта Вид Масса Время Рекомендации
приготовления
Куриные грудки (без костей) Ломтики 500 г 10-15 мин.
Целиком 450 г 15-20 мин.
Куриные ножки Свежие 4 шт. 30-35 мин.
Эскалоп из индейки Свежий 600 г 15-20 мин.
Свиное филе Свежее 700 г 10-15 мин. Порезать 1 см кубиками.
Вырезка баранины Свежая 500 г 10-15 мин.
Колбаски Копченые 10 5 мин.
Сосиски 10 10-15 мин Перед приготовлением проколоть.
38

2959-5064466 ME VITAMIN-M2 23/12/02 17:47 Page 39
Таблица продолжительности приготовления блюд
Овощи
Наименование продукта Вид Количе-ство Время Рекомендации
приготовления
Спаржа Свежая 600 г 10-15 мин. Срезать корневую часть.
Брокколи Свежая 400 г 19 мин. Разделить на небольшие
Заморож. 400 г 13 мин. соцветия.
Сельдерей Свежий 350 г 15-18 мин. Нарезать кубиками или соломкой.
Грибы Свежие 500г 11 мин. Срезать ножки и хорошо промыть.
Цветная капуста Свежая 1 средний кочан 20-25 мин. Разделить на небольшие соцветия.
Капуста (краснокочанная, Свежая 600 г 15-18 мин. Порезать ломтиками или покрошить.
белокочанная)
Кабачки Свежие 600 г. 7-10 мин. Порезать ломтиками.
Шпинат Свежий 300 г 8-10 мин.
Заморож. 300 г 15-20 мин.
Небольшая стручковая фасоль Свежая 500 г 20-25 мин.
Заморож 500 г 25-30 мин.
Зеленый горошек Свежий 400 г 20 мин.
Заморож 400 г 25 мин.
Морковь Свежая 500 г 10 мин. Порезать тонкими ломтиками.
Кукурузные початки Свежие 500 г 30 мин.
Лук-порей Свежий 500 г 8 мин Порезать тонко.
Перец Свежий 300 г 10-15 мин. Порезать широкими полосками.
Зрелый картофель Свежий 600 г 20-25 мин. Нарезать ломтиками или кубиками.
Молодой картофель Свежий, 600 г 35-40 мин. Время приготовления зависит от
мелкий целиком размера и сорта.
Мелкие целые луковицы Свежий 400 г 8 мин.
Рис • крупы • макаронные изделия
Наименование Количество Количество Время Рекомендации
продукта продукта воды
приготовления
Белый длиннозерновой рис 150 г 300 мл 25-30 мин.
Промойте рис перед приготовлением.
В чашу для риса залейте кипяток.
Белый круглый рис 150 г 300 мл 25 мин.
Белый рис быстрого 150 г 300 мл 18-20 мин.
приготовления
Коричневый рис 150 г 300 мл 35 мин.
Кускус 200 г 350 мл 10 мин. Предварительно залейте кипятком
на 5 мин.
Пшеница 150 г 300 мл 15 мин. Залейте кипятком.
Спагетти (паста) 200 г 400 мл 20-25 мин. Залейте кипятком.
Другие продукты.
Наименование Вид Количе-ство Время Рекомендации
продукта приготовления
Яйца Вкрутую 6 15 мин. Хорошо смазать формочки.
Всмятку 6 8-10 мин.
Фрукты Свежие 10-15 мин.
Разогрев продуктов.
Наименование Вид Масса Время Рекомендации
продукта приготовления
Мясо Кусочки 10-15 мин.
Спагетти 10-15 мин.
Овощи 5-10 мин.
39
Tefal Vitacuisine Compact VS4003 Manual
Important safeguards
Safety instructions
- Read and follow the instructions for use. Keep them safe. This appliance is not intended to be operated using an external timer or separate remote control system. For your safety, this appliance complies with the safety regulations and directives in effect at the time of manufacture (Low-voltage Directive, Electromagnetic Compatibility, Food Contact Materials Regulations, Environment…).
- Check that the power supply voltage corresponds to that shown on the appliance (alternating current).
- Given the diverse standards in effect, if the appliance is used in a country other than that in which it is purchased, have it checked by an approved service centre.
- Do not place the appliance near a heat source or in a hot oven, as serious damage could result.
- Use a flat, stable, heat-resistant work surface away from any water splashes.
- Never leave the appliance in operation unattended. Keep away from children.
- This appliance is not intended for use by persons (including children) with reduced physical, sensory or mental capabilities, or lack of experience and knowledge, unless they have been given supervision or instruction concerning use of the appliance by a person responsible for their safety.
- Children should be supervised to ensure that they do not play with the appliance.
- Do not leave the cord hanging.
- Always plug the appliance into an earthed socket.
- Do not use an extension lead. If you accept liability for doing so, only use an extension lead which is in good condition, has an earthed plug and is suited to the power of the appliance.
- Do not unplug the appliance by pulling on the cord.
- Do not use the appliance if:
- the appliance or the cord is damaged.
- the appliance has fallen or shows visible damage or does not work properly. In the event of the above, the appliance must be sent to an approved Service Centre. Do not take the appliance apart yourself.
- If the power supply cord is damaged, it must be replaced by the manufacturer, an authorised service centre or a similarly qualified person in order to avoid any danger.
- Burns can occur by touching the hot surface of the appliance, the hot water, steam or the food.
- Always unplug the appliance:
- immediately after use,
- when moving it,
- prior to any cleaning or maintenance.
- Never immerse the appliance in water!
- Do not place the appliance near a wall or a cupboard: the steam produced by the appliance can cause damage.
- Do not move the appliance when it is full of liquids or hot foods.
- This appliance is designed for domestic use only. In case of professional use, inappropriate use or failure to comply with the instructions, the manufacturer accepts no responsibility and the guarantee does not apply.
- It is not intended to be used in the following applications, and the guarantee will not apply for:
- staff kitchen areas in shops, offices and other working environments;
- farm houses;
- by clients in hotels, motels and other residential type environments;
- bed and breakfast type environments.
- Cooking times are given as a guide only.
- Do not touch the appliance when it is steaming and use oven gloves to remove the lid and steam baskets.
- If one of the steaming cups is damaged do not use it anymore.
- For any problems or queries please contact our Customer Relations Team or consult our web site:
Helpline:
UK 0845 602 1454 www.tefal.co.uk
Ireland (01) 677 4003
Australia 02 9748 7944 www.tefal.com.au
NZ 0800 700711 www.tefal.co.nz
- If your appliance is fitted with a removable power cord: if the power cord is damaged, it must be replaced by a special cord or unit available from a Tefal authorised service centre.
- If your appliance is fitted with a fixed power cord: if the power supply cord is damaged, it must be replaced by a Tefal authorised service centre or a similarly qualified person in order to avoid any danger.
Protect the environment
- Your appliance has been designed to run for many years. However, when you decide to replaceit, remember to think about how you can contribute to protecting the environment.
- Before discarding your appliance you should remove the battery from the timer and dispose ofit at a local civic waste collection centre (according to model).

Environment protection first!
Your appliance contains valuable materials which can be recovered or recycled.
→ Leave it at a local civic waste collection point.
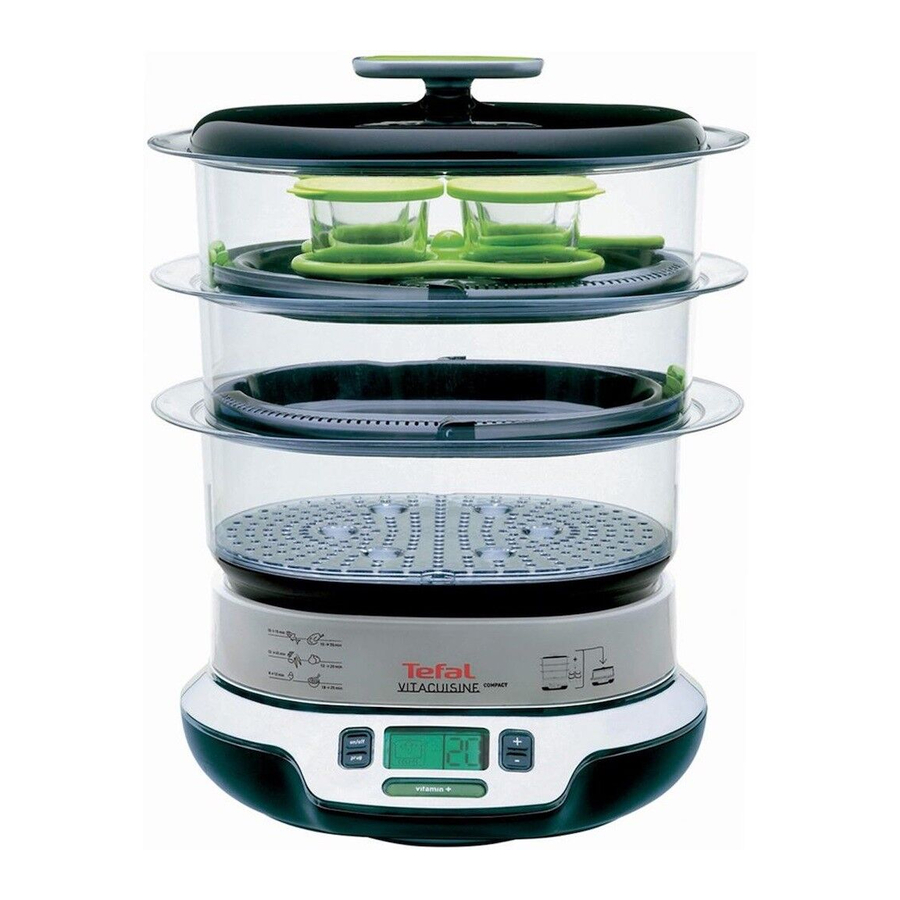
Description

- Lid
- Cooking trays
- Steam baskets – numbered 1, 2 & 3
- Removable base
- Juice collector
- Interior water level indicator
- Heating element
- Water tank
- Power supply base
- Steaming cups and lids
- Steaming cups holder
- On/off touchpad
- Programme touchpad
- + Touchpad
- – Touchpad
- LCD screen
- Cooking level indicator
- Clock
- Low water level indicator
- Timer
- « vitamin + » touchpad
Instructions for Use
Before first use
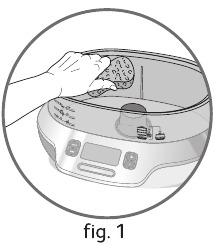
- Clean the water tank using a damp, non-abrasive sponge — fig. 1.
- Wash all removable parts using warm water and washing up liquid, rinse and dry.
Do not immerse the power supply base in water.
Fill the water tank
Do not use seasoning, herbs or any liquid other than water in the water tank. Ensure that the water tank (8) is filled with water to the maximum level before using the steamer.
Cooking
Choose the cooking time
A long press on the + or – touchpad allows you to increase or decrease the cooking time more quickly.
Using the « vitamin + » touchpad
After a few minutes cooking, you can manually stop the « vitamin + » programme by pressing the illuminated touchpad — fig. 9.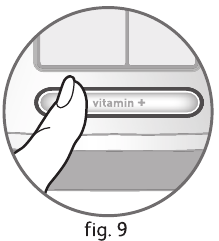
- Your steamer is fitted with a « vitamin + » touchpad which reduces cooking time and preserves the full vitamin content.
- The touchpad lights up when cooking starts. This allows a faster start to the cooking process owing to a higher steam output.
- The « vitamin + » touchpad light goes out automatically when the quantity of steam is sufficient for the cooking process.
- If the « vitamin + » touchpad is not illuminated and you intervene during the cooking process (such as inserting a basket, removing the lid to check the cooking progress, etc.), press the « vitamin + » touchpad to replace the lost steam — fig. 9.
During cooking
If ![]() is displayed (+ sound alarm) — fig. 10 carefully remove the baskets and juice collector using oven gloves, add water up to the maximum level. The steamer will automatically continue the cooking process.
is displayed (+ sound alarm) — fig. 10 carefully remove the baskets and juice collector using oven gloves, add water up to the maximum level. The steamer will automatically continue the cooking process.
Do not touch hot surfaces or hot food during cooking. Use oven gloves.
If the water tank is empty, the steamer stops heating.
Delayed start
The delayed start time can be changed at any point.
Keep warm function
While the keep warm function is in operation, no other action is possible, except stop when required.
Removing the food
Use oven gloves when handling the baskets, handles and lid.
To stop the steamer
If you want to switch off the steamer when the « low water level » indicator is on, you must press twice on the on/off touchpad.
Table of cooking times
Cooking times are approximate and may vary depending on the size of the food, the space between the food, the amount of food, individual preferences, and the mains voltage.
Use oven gloves when handling the baskets during the cooking time.
Meat — Poultry
| Preparation | Type | Quantity | Cooking time | Recommendations |
| Chicken breast (boneless) | Fresh Whole |
350 g | 20 min | 2 chicken breast in a steam basket |
| Small pieces | 450 g | 17 min | ||
| Chicken drumsticks | Fresh Whole |
2 | 36 min | |
| Turkey escalope | Thin | 600 g | 24 min | |
| Pork fillet | Fresh | 700 g | 38 min | Cut in 1 cm thickness slice |
| Lamb steak | Fresh | 500 g | 14 min | |
| Frankfurters | Fresh | 10 | 10 min |
Fish — Shellfish
| Preparation | Type | Quantity | Cooking time | Recommendations |
| Thin fish fillets (cod, haddock, plaice, sole, salmon…) | Fresh | 450 g | 15 min | |
| Frozen | 370 g | 18 min | ||
| Fish steaks (cod, haddock, plaice, sole, salmon…) | Fresh | 400 g | 15 min | |
| Whole fish (trout, salmon trout, sea bass) | Fresh | 600 g | 25 min | |
| Mussels | Fresh | 1 kg | 20 min | |
| Prawns | Fresh | 200 g | 5 min | |
| Scallops | Fresh | 100 g | 5 min |
Vegetables
| Food | Type | Quantity | Cooking time | Recommendations |
| Artichoke | Fresh | 2 | 55 min | Whole in steam basket 1 and 2 (without cooking trays) |
| Potatoes | Fresh | 600 g | 20 min | Sliced or cubed. Small new potatoes can be cooked whole |
| Asparagus | Fresh | 600 g | 17 min | |
| Broccoli | Fresh | 500 g | 18 min | Small florets |
| Frozen | 500 g | 18 min | ||
| Celeriac | Fresh | 350 g | 22 min | In cubes |
| Mushrooms | Fresh | 500 g | 22 min | Whole |
| Cauliflower | Fresh | 1 medium | 19 min | Small florets |
| Cabbage (red-green) | Fresh | 600 g | 22 min | Sliced |
| Courgette | Fresh | 600 g | 12 min | Sliced |
| Spinach | Fresh | 300 g | 13 min | Toss halfway through cooking |
| Frozen | 300 g | 15 min | ||
| Fine green beans | Fresh | 500 g | 35 min | |
| Frozen | 500 g | 35 min | ||
| Carotts | Fresh | 500 g | 15 min | Thinly sliced |
| Corn on the cob | Fresh | 500 g | 45 min | |
| Green beans | Fresh | 500 g | 35 min | Whole |
| Leeks | Fresh | 500 g | 30 min | Sliced |
| Sweet peppers | Fresh | 300 g | 20 min | Cut in wide strips |
| Peas | Fresh | 400 g | 20 min | Shelled |
| Frozen | 400 g | 20 min |
Rice
| Food | Weight | Quantity | Cooking time | Recommendations |
| For one cup of white long grain or basmati | g | ml | min |
Wash rice well before cooking. Place rice and cold water in the steaming cup without the lid on. Use steam basket n° 3. |
Fruits
| Food | Type | Quantity | Cooking time | Recommendations |
| Pears | Fresh | 4 | 25 min | With steam basket 1 and 2 (without cooking trays). Steam whole or halved. |
| Bananas | Fresh | 4 | 15 min | Whole |
| Apples | Fresh | 5 | 20 min | Quartered |
Steaming Tips and Techniques
- Do not pack food too tightly in the steam baskets. Leave some space for steam to circulate as much as possible.
- For best results, use pieces of food of approximately the same size (such as potatoes, vegetables and chicken breasts) so that they cook at the same time. The size and thickness of the food will alter the cooking time.
- Avoid lifting the lid to check on the cooking progress too often, as this allows loss of steam and can lengthen the cooking time.
- If recipes require the use of cling film, always use the all purpose type suitable for use in microwave ovens. Cling film is often used to prevent condensation forming and spoiling delicates foods such as egg custards. Avoid using foil as this tends to increase the steaming time.
- When choosing food for steaming, select suitable size food to fit the steaming basket, especially if it is cooked whole such as fish.
- Subtle flavour can be given to steamed food with the addition of fresh herbs, slices of lemon or orange, garlic and onion. These may be placed either directly underneath or on top of the food in the steaming basket.
- To give meat, poultry and fish a delicious flavour plus make then moist and tender, marinade for a few hours before steaming. The marinade can be as simple as a blend of wine and fresh herbs, or it can be a spicy barbecue or tandoori mix.
- Frozen vegetables can be steamed from frozen. All shellfish, poultry and meat must be completely thawed before steaming.
- For some recipes with a long cooking time, such as steamed sponge pudding, you will need to top up with more cold water during steaming.
- Always use oven gloves when handling the baskets or steaming cups during or after cooking.
Steaming Cup Recipes
Preparing steaming cup recipes
You can cook recipes in the steaming cups, either from the steamer recipe book or from your own recipes. Put the prepared mixture into the cups, taking care not to overfill them to prevent spillages as some recipes may rise during cooking. Cover the cups if necessary, using the lids. Place the four cups in the holder fig. 16.
Take the holder by the handle and place it in the basket — fig. 17.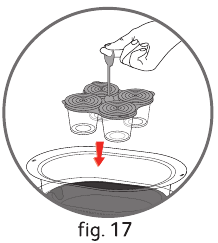
The cups must always be placed in the top basket (basket no. 3) immediately under the lid.
Removing the steaming cups
Use oven gloves. Remove the lid by the handle. Remove the cups using the holder handle. Take the cups out of the holder and remove the lids (if your recipe uses lids). If necessary you can cool the cups by standing them in cold water. Do this using the holder. Wait until the cups are at room temperature before placing them in the refrigerator. Serve the recipe in the cups.
Maintenance and cleaning
Cleaning the steamer
- Unplug the steamer after use.
- Allow it to cool completely before cleaning.
- Check that the steamer has cooled completely before emptying the juice collector and water tank.
- Wash all removable parts using warm water and washing up liquid, rinse and dry.
- All parts except the power supply base are dishwasher safe.
Do no immerse the power supply base in water. Do not use abrasive cleaning products.
Descaling your steamer
For best results, descale the steamer after every 8 uses. To do this:
- Remove the juice collector.
- Pour 1 litre of cold water into the water tank.
- Add 1 glass (about 150 ml) of white vinegar (available from hardware stores).
- Leave it to descale overnight.
- Rinse out the inside of the water tank several times using warm water.
- Do not use other scale removing products.
Storage
All parts can be stored inside the steamer.

Documents / Resources
References
Download manual
Here you can download full pdf version of manual, it may contain additional safety instructions, warranty information, FCC rules, etc.
Download Tefal Vitacuisine Compact VS4003 Manual

Environment protection first!
Your appliance contains valuable materials which can be recovered or recycled.
→ Leave it at a local civic waste collection point.
Description
- Lid
- Cooking trays
- Steam baskets – numbered 1, 2 & 3
- Removable base
- Juice collector
- Interior water level indicator
- Heating element
- Water tank
- Power supply base
- Steaming cups and lids
- Steaming cups holder
- On/off touchpad
- Programme touchpad
- + Touchpad
- – Touchpad
- LCD screen
- Cooking level indicator
- Clock
- Low water level indicator
- Timer
- « vitamin + » touchpad
Instructions for Use
Before first use
- Clean the water tank using a damp, non-abrasive sponge — fig. 1.
- Wash all removable parts using warm water and washing up liquid, rinse and dry.
Do not immerse the power supply base in water.
Fill the water tank
Do not use seasoning, herbs or any liquid other than water in the water tank. Ensure that the water tank (8) is filled with water to the maximum level before using the steamer.
Cooking
Choose the cooking time
A long press on the + or – touchpad allows you to increase or decrease the cooking time more quickly.
Using the « vitamin + » touchpad
After a few minutes cooking, you can manually stop the « vitamin + » programme by pressing the illuminated touchpad — fig. 9.
- Your steamer is fitted with a « vitamin + » touchpad which reduces cooking time and preserves the full vitamin content.
- The touchpad lights up when cooking starts. This allows a faster start to the cooking process owing to a higher steam output.
- The « vitamin + » touchpad light goes out automatically when the quantity of steam is sufficient for the cooking process.
- If the « vitamin + » touchpad is not illuminated and you intervene during the cooking process (such as inserting a basket, removing the lid to check the cooking progress, etc.), press the « vitamin + » touchpad to replace the lost steam — fig. 9.
During cooking
If ![]() is displayed (+ sound alarm) — fig. 10 carefully remove the baskets and juice collector using oven gloves, add water up to the maximum level. The steamer will automatically continue the cooking process.
is displayed (+ sound alarm) — fig. 10 carefully remove the baskets and juice collector using oven gloves, add water up to the maximum level. The steamer will automatically continue the cooking process.
Do not touch hot surfaces or hot food during cooking. Use oven gloves.
If the water tank is empty, the steamer stops heating.
Delayed start
The delayed start time can be changed at any point.
Keep warm function
While the keep warm function is in operation, no other action is possible, except stop when required.
Removing the food
Use oven gloves when handling the baskets, handles and lid.
To stop the steamer
If you want to switch off the steamer when the « low water level » indicator is on, you must press twice on the on/off touchpad.
Table of cooking times
Cooking times are approximate and may vary depending on the size of the food, the space between the food, the amount of food, individual preferences, and the mains voltage.
Use oven gloves when handling the baskets during the cooking time.
Meat — Poultry
| Preparation | Type | Quantity | Cooking time | Recommendations |
| Chicken breast (boneless) | Fresh Whole |
350 g | 20 min | 2 chicken breast in a steam basket |
| Small pieces | 450 g | 17 min | ||
| Chicken drumsticks | Fresh Whole |
2 | 36 min | |
| Turkey escalope | Thin | 600 g | 24 min | |
| Pork fillet | Fresh | 700 g | 38 min | Cut in 1 cm thickness slice |
| Lamb steak | Fresh | 500 g | 14 min | |
| Frankfurters | Fresh | 10 | 10 min |
Fish — Shellfish
| Preparation | Type | Quantity | Cooking time | Recommendations |
| Thin fish fillets (cod, haddock, plaice, sole, salmon…) | Fresh | 450 g | 15 min | |
| Frozen | 370 g | 18 min | ||
| Fish steaks (cod, haddock, plaice, sole, salmon…) | Fresh | 400 g | 15 min | |
| Whole fish (trout, salmon trout, sea bass) | Fresh | 600 g | 25 min | |
| Mussels | Fresh | 1 kg | 20 min | |
| Prawns | Fresh | 200 g | 5 min | |
| Scallops | Fresh | 100 g | 5 min |
Vegetables
| Food | Type | Quantity | Cooking time | Recommendations |
| Artichoke | Fresh | 2 | 55 min | Whole in steam basket 1 and 2 (without cooking trays) |
| Potatoes | Fresh | 600 g | 20 min | Sliced or cubed. Small new potatoes can be cooked whole |
| Asparagus | Fresh | 600 g | 17 min | |
| Broccoli | Fresh | 500 g | 18 min | Small florets |
| Frozen | 500 g | 18 min | ||
| Celeriac | Fresh | 350 g | 22 min | In cubes |
| Mushrooms | Fresh | 500 g | 22 min | Whole |
| Cauliflower | Fresh | 1 medium | 19 min | Small florets |
| Cabbage (red-green) | Fresh | 600 g | 22 min | Sliced |
| Courgette | Fresh | 600 g | 12 min | Sliced |
| Spinach | Fresh | 300 g | 13 min | Toss halfway through cooking |
| Frozen | 300 g | 15 min | ||
| Fine green beans | Fresh | 500 g | 35 min | |
| Frozen | 500 g | 35 min | ||
| Carotts | Fresh | 500 g | 15 min | Thinly sliced |
| Corn on the cob | Fresh | 500 g | 45 min | |
| Green beans | Fresh | 500 g | 35 min | Whole |
| Leeks | Fresh | 500 g | 30 min | Sliced |
| Sweet peppers | Fresh | 300 g | 20 min | Cut in wide strips |
| Peas | Fresh | 400 g | 20 min | Shelled |
| Frozen | 400 g | 20 min |
Rice
| Food | Weight | Quantity | Cooking time | Recommendations |
| For one cup of white long grain or basmati | g | ml | min |
Wash rice well before cooking. Place rice and cold water in the steaming cup without the lid on. Use steam basket n° 3. |
Fruits
| Food | Type | Quantity | Cooking time | Recommendations |
| Pears | Fresh | 4 | 25 min | With steam basket 1 and 2 (without cooking trays). Steam whole or halved. |
| Bananas | Fresh | 4 | 15 min | Whole |
| Apples | Fresh | 5 | 20 min | Quartered |
Steaming Tips and Techniques
- Do not pack food too tightly in the steam baskets. Leave some space for steam to circulate as much as possible.
- For best results, use pieces of food of approximately the same size (such as potatoes, vegetables and chicken breasts) so that they cook at the same time. The size and thickness of the food will alter the cooking time.
- Avoid lifting the lid to check on the cooking progress too often, as this allows loss of steam and can lengthen the cooking time.
- If recipes require the use of cling film, always use the all purpose type suitable for use in microwave ovens. Cling film is often used to prevent condensation forming and spoiling delicates foods such as egg custards. Avoid using foil as this tends to increase the steaming time.
- When choosing food for steaming, select suitable size food to fit the steaming basket, especially if it is cooked whole such as fish.
- Subtle flavour can be given to steamed food with the addition of fresh herbs, slices of lemon or orange, garlic and onion. These may be placed either directly underneath or on top of the food in the steaming basket.
- To give meat, poultry and fish a delicious flavour plus make then moist and tender, marinade for a few hours before steaming. The marinade can be as simple as a blend of wine and fresh herbs, or it can be a spicy barbecue or tandoori mix.
- Frozen vegetables can be steamed from frozen. All shellfish, poultry and meat must be completely thawed before steaming.
- For some recipes with a long cooking time, such as steamed sponge pudding, you will need to top up with more cold water during steaming.
- Always use oven gloves when handling the baskets or steaming cups during or after cooking.
Steaming Cup Recipes
Preparing steaming cup recipes
You can cook recipes in the steaming cups, either from the steamer recipe book or from your own recipes. Put the prepared mixture into the cups, taking care not to overfill them to prevent spillages as some recipes may rise during cooking. Cover the cups if necessary, using the lids. Place the four cups in the holder fig. 16.
Take the holder by the handle and place it in the basket — fig. 17.
The cups must always be placed in the top basket (basket no. 3) immediately under the lid.
Removing the steaming cups
Use oven gloves. Remove the lid by the handle. Remove the cups using the holder handle. Take the cups out of the holder and remove the lids (if your recipe uses lids). If necessary you can cool the cups by standing them in cold water. Do this using the holder. Wait until the cups are at room temperature before placing them in the refrigerator. Serve the recipe in the cups.
Maintenance and cleaning
Cleaning the steamer
- Unplug the steamer after use.
- Allow it to cool completely before cleaning.
- Check that the steamer has cooled completely before emptying the juice collector and water tank.
- Wash all removable parts using warm water and washing up liquid, rinse and dry.
- All parts except the power supply base are dishwasher safe.
Do no immerse the power supply base in water. Do not use abrasive cleaning products.
Descaling your steamer
For best results, descale the steamer after every 8 uses. To do this:
- Remove the juice collector.
- Pour 1 litre of cold water into the water tank.
- Add 1 glass (about 150 ml) of white vinegar (available from hardware stores).
- Leave it to descale overnight.
- Rinse out the inside of the water tank several times using warm water.
- Do not use other scale removing products.
Storage
All parts can be stored inside the steamer.
Documents / Resources
References
Download manual
Here you can download full pdf version of manual, it may contain additional safety instructions, warranty information, FCC rules, etc.
Download Tefal Vitacuisine Compact VS4003 Manual
RU
p. 2 — 9
UK
p. 10 — 17
PL
p. 18 — 25
ET
p. 26 — 33
LV
p. 34 — 41
LT
p. 42 — 49
J
P
M
&
A
s
s
o
c
ié
s
•
m
a
rk
e
ti
n
g
-d
e
s
ig
n
-c
o
m
m
u
n
ic
a
ti
o
n
•
0
2
/2
0
1
0
•
R
e
f.
N
C
0
0
0
1
3
7
2
9
TEFAL370_NoticeVitaCuisine_6L_NC00013729_TEAL370_NoticeVitacuisine 01/02/10 14:05 PageI