‘
Пользователь
-
#2
А где находится этот блок ECU
спасибо за мануал)
-
#3
А где находится этот блок ECU
чёрная коробочка, рядом с аккумулятором
‘
Пользователь
-
#4
чёрная коробочка, рядом с аккумулятором
Ок пойду ковырять
кстати так и не нашел я кнопку чтоб часы выставить
есть провод с заглушкой с 3мя контактами + с ним одинарный провод
ща сфоткаю
-
#5
чёрная коробочка, рядом с аккумулятором
Это блок лебёдки. ECU НАХОДИТСЯ ПОД КАПОТОМ. Для года выпуска после 2010.
— — — Добавлено — — —
есть провод с заглушкой с 3мя контактами + с ним одинарный провод
ща сфоткаю
Это разъём PDA- для диагностики.
Последнее редактирование: 12 Апр 2013
-
#6
спасибо за полезный мануал
-
#7
Руководство по ремонту, эксплуатации и техническому обслуживанию CF MOTO X6
Есть у кого данный мануал ?????
?????

-
#9
Там мануал только на английском!!! Может на русском у кого есть???
-
#10
Там мануал только на английском!!! Может на русском у кого есть???
За четыре года ещё не перевели.


-
#13
Есть ли у кого-нибудь более актуальная ссылка?
-
#14
Полный сервис мануал на X6 !!!!! На английском. Скачал за деньги с забугорного сайта, делюсь с народом
Файл из Облака Mail.Ru
-
#15
Почему ни одна вкладка,ни один файл тут не открываются?Постоянно или ошибка или недоступен.
-
#16
Если в течение какого-то времени не происходит обращения к файлу на обменнике (2-3 месяца), то файл автоматически удаляется.
Господа пользователи Х6, выложите, пожалуйста, еще раз руководства по ремонту. Думаю, что у многих нет.

-
#17
Это блок лебёдки. ECU НАХОДИТСЯ ПОД КАПОТОМ. Для года выпуска после 2010.
А вот и нет. Квадрик 11 года и блок управления лебёдкой и ECU находятся в бардачке за аккумулятором

-
#18
Хороший вопрос про кнопку часов! Где она?
-
#20
Есть только на неё часы не реагируют(

Сборник руководств на английском языке по эксплуатации и техническому обслуживанию квадроциклов CFMoto моделей CF500/CF500-A/CF500-5B/CF500-5C/CF625-B/CF625-C.
- Издательство: —
- Год издания: —
- Страниц: —
- Формат: PDF
- Размер: 74,3 Mb

Руководство на английском языке по техническому обслуживанию и ремонту квадроциклов CFMoto моделей CF500 и CF500-A.
- Издательство: Chunfeng Holding Group
- Год издания: 2006
- Страниц: 254
- Формат: PDF
- Размер: 12,8 Mb

Руководство на русском языке по эксплуатации и техническому обслуживанию квадроциклов CFMoto модели CF500-A.
- Издательство: —
- Год издания: —
- Страниц: 206
- Формат: PDF
- Размер: 2,8 Mb
Руководство на русском языке по ремонту квадроциклов CFMoto модели CF500-A.
- Издательство: —
- Год издания: —
- Страниц: 266
- Формат: PDF
- Размер: 15,8 Mb

Руководство на русском языке по эксплуатации и техническому обслуживанию квадроциклов CFMoto моделей CF500-2 и CF500-2A 2008 года выпуска.
- Издательство: —
- Год издания: —
- Страниц: 144
- Формат: PDF
- Размер: 6,9 Mb

Руководство на русском языке по эксплуатации и техническому обслуживанию мотовездехода CFMoto модели CF500-3 с полным приводом.
- Издательство: —
- Год издания: —
- Страниц: 163
- Формат: PDF
- Размер: 2,1 Mb
Руководство на английском языке по техническому обслуживанию и ремонту квадроциклов CFMoto моделей CF500-5B и CF500-5C.
- Издательство: Zhejiang CFMOTO Power Co., Ltd.
- Год издания: 2009
- Страниц: 272
- Формат: PDF
- Размер: 23,2 Mb

Руководство на английском языке по эксплуатации и техническому обслуживанию мотовездеходов CFMoto Terracross моделей CF500-6/CF625-3/CF625-6 с полным приводом.
- Издательство: —
- Год издания: —
- Страниц: 135
- Формат: PDF
- Размер: 16,9 Mb

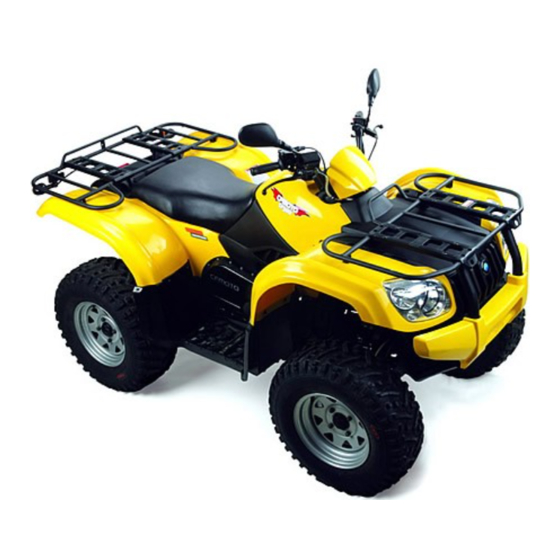
Руководство на русском языке по эксплуатации и техническому обслуживанию квадроциклов CFMoto модели CF625-X6 EFI.
- Издательство: —
- Год издания: —
- Страниц: 157
- Формат: PDF
- Размер: 43,8 Mb

Руководство на русском языке по эксплуатации и техническому обслуживанию квадроциклов CFMoto модели CF800-2X8 EFI.
- Издательство: —
- Год издания: —
- Страниц: 162
- Формат: PDF
- Размер: 3,4 Mb

Руководство на английском языке по техническому обслуживанию и ремонту квадроциклов CFMoto модели CF800-2 Terralander 800 с полным приводом.
- Издательство: Zhejiang CFMOTO Power Co., Ltd.
- Год издания: 2011
- Страниц: 316
- Формат: PDF
- Размер: 16,5 Mb

Руководство на французском языке по эксплуатации и техническому обслуживанию квадроциклов CFMoto моделей Goes 520 и Goes 520 Max с полным приводом.
- Издательство: —
- Год издания: —
- Страниц: 30
- Формат: PDF
- Размер: 2,7 Mb

Руководство на русском языке по эксплуатации и техническому обслуживанию квадроциклов CFMoto моделей HX500-S и HX500-L 2009 года выпуска.
- Издательство: —
- Год издания: —
- Страниц: 146
- Формат: PDF
- Размер: 3,8 Mb
Руководство на чешском языке по эксплуатации и техническому обслуживанию квадроциклов CFMoto модели JourneyMan Gladiator RX.
- Издательство: —
- Год издания: —
- Страниц: 31
- Формат: PDF
- Размер: 1,1 Mb

Руководство на чешском языке по эксплуатации и техническому обслуживанию квадроциклов CFMoto модели JourneyMan Gladiator X-8.
- Издательство: —
- Год издания: —
- Страниц: 24
- Формат: PDF
- Размер: 802 Kb
Руководство на чешском языке по эксплуатации и техническому обслуживанию мотовездеходов CFMoto модели JourneyMan Gladiator Z6.
- Издательство: —
- Год издания: —
- Страниц: 24
- Формат: PDF
- Размер: 823 Kb

Руководство на русском языке по эксплуатации и техническому обслуживанию мотовездеходов CFMoto модели SSV 625-Z6 EFI с полным приводом.
- Издательство: —
- Год издания: —
- Страниц: 131
- Формат: PDF
- Размер: 5,7 Mb
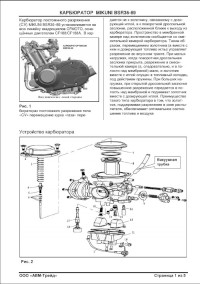
Руководство на русском языке по ремонту карбюратора Mikuni модели BSR36-89.
- Издательство: —
- Год издания: —
- Страниц: 5
- Формат: PDF
- Размер: 393 Kb
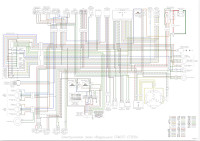
Электросхемы на русском и английсом языках квадроциклов CFMoto моделей CF500/CF500-A/CF500-X5/CF625-X6/CF800-2-X8.
- Издательство: —
- Год издания: —
- Страниц: —
- Формат: PDF
- Размер: 5,1 Mb

Сборник руководств на английском языке по эксплуатации и техническому обслуживанию квадроциклов CFMoto моделей CF500/CF500-A/CF500-5B/CF500-5C/CF625-B/CF625-C.
- Издательство: —
- Год издания: —
- Страниц: —
- Формат: PDF
- Размер: 74,3 Mb
Руководство на английском языке по техническому обслуживанию и ремонту квадроциклов CFMoto моделей CF500 и CF500-A.
- Издательство: Chunfeng Holding Group
- Год издания: 2006
- Страниц: 254
- Формат: PDF
- Размер: 12,8 Mb
Руководство на русском языке по эксплуатации и техническому обслуживанию квадроциклов CFMoto модели CF500-A.
- Издательство: —
- Год издания: —
- Страниц: 206
- Формат: PDF
- Размер: 2,8 Mb
Руководство на русском языке по ремонту квадроциклов CFMoto модели CF500-A.
- Издательство: —
- Год издания: —
- Страниц: 266
- Формат: PDF
- Размер: 15,8 Mb
Руководство на русском языке по эксплуатации и техническому обслуживанию квадроциклов CFMoto моделей CF500-2 и CF500-2A 2008 года выпуска.
- Издательство: —
- Год издания: —
- Страниц: 144
- Формат: PDF
- Размер: 6,9 Mb
Руководство на русском языке по эксплуатации и техническому обслуживанию мотовездехода CFMoto модели CF500-3 с полным приводом.
- Издательство: —
- Год издания: —
- Страниц: 163
- Формат: PDF
- Размер: 2,1 Mb
Руководство на английском языке по техническому обслуживанию и ремонту квадроциклов CFMoto моделей CF500-5B и CF500-5C.
- Издательство: Zhejiang CFMOTO Power Co., Ltd.
- Год издания: 2009
- Страниц: 272
- Формат: PDF
- Размер: 23,2 Mb
Руководство на английском языке по эксплуатации и техническому обслуживанию мотовездеходов CFMoto Terracross моделей CF500-6/CF625-3/CF625-6 с полным приводом.
- Издательство: —
- Год издания: —
- Страниц: 135
- Формат: PDF
- Размер: 16,9 Mb
Руководство на русском языке по эксплуатации и техническому обслуживанию квадроциклов CFMoto модели CF625-X6 EFI.
- Издательство: —
- Год издания: —
- Страниц: 157
- Формат: PDF
- Размер: 43,8 Mb
Руководство на русском языке по эксплуатации и техническому обслуживанию квадроциклов CFMoto модели CF800-2X8 EFI.
- Издательство: —
- Год издания: —
- Страниц: 162
- Формат: PDF
- Размер: 3,4 Mb
Руководство на английском языке по техническому обслуживанию и ремонту квадроциклов CFMoto модели CF800-2 Terralander 800 с полным приводом.
- Издательство: Zhejiang CFMOTO Power Co., Ltd.
- Год издания: 2011
- Страниц: 316
- Формат: PDF
- Размер: 16,5 Mb
Руководство на французском языке по эксплуатации и техническому обслуживанию квадроциклов CFMoto моделей Goes 520 и Goes 520 Max с полным приводом.
- Издательство: —
- Год издания: —
- Страниц: 30
- Формат: PDF
- Размер: 2,7 Mb
Руководство на русском языке по эксплуатации и техническому обслуживанию квадроциклов CFMoto моделей HX500-S и HX500-L 2009 года выпуска.
- Издательство: —
- Год издания: —
- Страниц: 146
- Формат: PDF
- Размер: 3,8 Mb
Руководство на чешском языке по эксплуатации и техническому обслуживанию квадроциклов CFMoto модели JourneyMan Gladiator RX.
- Издательство: —
- Год издания: —
- Страниц: 31
- Формат: PDF
- Размер: 1,1 Mb
Руководство на чешском языке по эксплуатации и техническому обслуживанию квадроциклов CFMoto модели JourneyMan Gladiator X-8.
- Издательство: —
- Год издания: —
- Страниц: 24
- Формат: PDF
- Размер: 802 Kb
Руководство на чешском языке по эксплуатации и техническому обслуживанию мотовездеходов CFMoto модели JourneyMan Gladiator Z6.
- Издательство: —
- Год издания: —
- Страниц: 24
- Формат: PDF
- Размер: 823 Kb
Руководство на русском языке по эксплуатации и техническому обслуживанию мотовездеходов CFMoto модели SSV 625-Z6 EFI с полным приводом.
- Издательство: —
- Год издания: —
- Страниц: 131
- Формат: PDF
- Размер: 5,7 Mb
Руководство на русском языке по ремонту карбюратора Mikuni модели BSR36-89.
- Издательство: —
- Год издания: —
- Страниц: 5
- Формат: PDF
- Размер: 393 Kb
Электросхемы на русском и английсом языках квадроциклов CFMoto моделей CF500/CF500-A/CF500-X5/CF625-X6/CF800-2-X8.
- Издательство: —
- Год издания: —
- Страниц: —
- Формат: PDF
- Размер: 5,1 Mb
К вопросу о мигании лампы форсунки.
Начиная с 2014 года на Х6 ставится приборная панель от U8 (Z8). Потому-то на нашей панели есть значки непристёгнутого ремня и EPS.
Логика работы этой лампы не описана в инструкции Х6 (там для ранних версий) даже моего Х6 2015 года.
Но зато описана в инструкции к U8:
ПОИСК И УСТРАНЕНИЕ НЕИСПРАВНОСТЕЙ
Бортовая самодиагностика
1. Поверните ключ зажигания в положение «Включено», но не запускайте двигатель. Если в системе
управления двигателем ошибок не зафиксировано, индикатор неисправности «Check engine» будет
гореть постоянно.
2. Поверните ключ зажигания в положение «Включено», но не заводите двигатель. Если в системе управ-
ления впрыском зафиксирована ошибка:
– Индикатор неисправности «Check engine» начнёт «промаргивать» коды ошибок в очерёдности их регистрации
до тех пор, пока ключ зажигания не будет повёрнут в положение «Выключено» или двигатель не будет запущен.
–Интервал между пакетом цифр (вспышек) первого и следующего кода 3,2 секунды.
–Интервал между «промаргиванием» двух цифр в одном коде 1,2 секунды.
–Длительность одной вспышки 0,4 секунды и интервал между вспышками тоже 0,4 секунды.
–Если индикатор неисправности «Check engine» «моргнул» 10 раз подряд —это означает цифру 0 в коде.
Соответственно, один сигнал означает —1, два сигнала —2 и так далее, до 9.
3. Поверните ключ зажигания в положение «Включено» и заведите двигатель. Если в системе управле-
ния впрыском зафиксирована ошибка:
– Индикатор неисправности «Check engine» будет гореть постоянно.
Например, в системе зарегистрированы две ошибки P0117 и P0232:
P0117: контрольная лампа загорится на 5 секунд, затем погаснет на 3,2 секунды контрольная лампа мигнёт
10 раз, а затем отключится на 1,2 секунды контрольная лампа затем мигнёт 1 раз и отключится на 1,2 секун-
ды, затем мигнёт 1 раз и отключиться на 1,2 секунды контрольная лампа мигнёт 7 раз.
P0232: контрольная лампа погаснет на 3,2 секунды, затем мигнёт 10 раз и отключится на 1,2 секунды контроль-
ная лампа мигнёт 2 раза и отключится на 1,2 секунды контрольная лампа мигнёт 3 раза и отключится на 1,2 се-
кунды, затем мигнёт 2 раза.
Коды неисправностей P0117 и P0232 будут последовательно отображаться, пока ключ в замке зажигания не
будет повернут в положение OFF или двигатель не будет запущен.
Сборник руководств на английском языке по эксплуатации и техническому обслуживанию квадроциклов CFMoto моделей CF500/CF500-A/CF500-5B/CF500-5C/CF625-B/CF625-C.
- Издательство: —
- Год издания: —
- Страниц: —
- Формат: PDF
- Размер: 74,3 Mb
Руководство на английском языке по техническому обслуживанию и ремонту квадроциклов CFMoto моделей CF500 и CF500-A.
- Издательство: Chunfeng Holding Group
- Год издания: 2006
- Страниц: 254
- Формат: PDF
- Размер: 12,8 Mb
Руководство на русском языке по эксплуатации и техническому обслуживанию квадроциклов CFMoto модели CF500-A.
- Издательство: —
- Год издания: —
- Страниц: 206
- Формат: PDF
- Размер: 2,8 Mb
Руководство на русском языке по ремонту квадроциклов CFMoto модели CF500-A.
- Издательство: —
- Год издания: —
- Страниц: 266
- Формат: PDF
- Размер: 15,8 Mb
Руководство на русском языке по эксплуатации и техническому обслуживанию квадроциклов CFMoto моделей CF500-2 и CF500-2A 2008 года выпуска.
- Издательство: —
- Год издания: —
- Страниц: 144
- Формат: PDF
- Размер: 6,9 Mb
Руководство на русском языке по эксплуатации и техническому обслуживанию мотовездехода CFMoto модели CF500-3 с полным приводом.
- Издательство: —
- Год издания: —
- Страниц: 163
- Формат: PDF
- Размер: 2,1 Mb
Руководство на английском языке по техническому обслуживанию и ремонту квадроциклов CFMoto моделей CF500-5B и CF500-5C.
- Издательство: Zhejiang CFMOTO Power Co., Ltd.
- Год издания: 2009
- Страниц: 272
- Формат: PDF
- Размер: 23,2 Mb
Руководство на английском языке по эксплуатации и техническому обслуживанию мотовездеходов CFMoto Terracross моделей CF500-6/CF625-3/CF625-6 с полным приводом.
- Издательство: —
- Год издания: —
- Страниц: 135
- Формат: PDF
- Размер: 16,9 Mb
Руководство на русском языке по эксплуатации и техническому обслуживанию квадроциклов CFMoto модели CF625-X6 EFI.
- Издательство: —
- Год издания: —
- Страниц: 157
- Формат: PDF
- Размер: 43,8 Mb
Руководство на русском языке по эксплуатации и техническому обслуживанию квадроциклов CFMoto модели CF800-2X8 EFI.
- Издательство: —
- Год издания: —
- Страниц: 162
- Формат: PDF
- Размер: 3,4 Mb
Руководство на английском языке по техническому обслуживанию и ремонту квадроциклов CFMoto модели CF800-2 Terralander 800 с полным приводом.
- Издательство: Zhejiang CFMOTO Power Co., Ltd.
- Год издания: 2011
- Страниц: 316
- Формат: PDF
- Размер: 16,5 Mb
Руководство на французском языке по эксплуатации и техническому обслуживанию квадроциклов CFMoto моделей Goes 520 и Goes 520 Max с полным приводом.
- Издательство: —
- Год издания: —
- Страниц: 30
- Формат: PDF
- Размер: 2,7 Mb
Руководство на русском языке по эксплуатации и техническому обслуживанию квадроциклов CFMoto моделей HX500-S и HX500-L 2009 года выпуска.
- Издательство: —
- Год издания: —
- Страниц: 146
- Формат: PDF
- Размер: 3,8 Mb
Руководство на чешском языке по эксплуатации и техническому обслуживанию квадроциклов CFMoto модели JourneyMan Gladiator RX.
- Издательство: —
- Год издания: —
- Страниц: 31
- Формат: PDF
- Размер: 1,1 Mb
Руководство на чешском языке по эксплуатации и техническому обслуживанию квадроциклов CFMoto модели JourneyMan Gladiator X-8.
- Издательство: —
- Год издания: —
- Страниц: 24
- Формат: PDF
- Размер: 802 Kb
Руководство на чешском языке по эксплуатации и техническому обслуживанию мотовездеходов CFMoto модели JourneyMan Gladiator Z6.
- Издательство: —
- Год издания: —
- Страниц: 24
- Формат: PDF
- Размер: 823 Kb
Руководство на русском языке по эксплуатации и техническому обслуживанию мотовездеходов CFMoto модели SSV 625-Z6 EFI с полным приводом.
- Издательство: —
- Год издания: —
- Страниц: 131
- Формат: PDF
- Размер: 5,7 Mb
Руководство на русском языке по ремонту карбюратора Mikuni модели BSR36-89.
- Издательство: —
- Год издания: —
- Страниц: 5
- Формат: PDF
- Размер: 393 Kb
Электросхемы на русском и английсом языках квадроциклов CFMoto моделей CF500/CF500-A/CF500-X5/CF625-X6/CF800-2-X8.
- Издательство: —
- Год издания: —
- Страниц: —
- Формат: PDF
- Размер: 5,1 Mb
‘
Пользователь
-
#2
А где находится этот блок ECU
спасибо за мануал)
-
#3
А где находится этот блок ECU
чёрная коробочка, рядом с аккумулятором
‘
Пользователь
-
#4
чёрная коробочка, рядом с аккумулятором
Ок пойду ковырять
кстати так и не нашел я кнопку чтоб часы выставить
есть провод с заглушкой с 3мя контактами + с ним одинарный провод
ща сфоткаю
-
#5
чёрная коробочка, рядом с аккумулятором
Это блок лебёдки. ECU НАХОДИТСЯ ПОД КАПОТОМ. Для года выпуска после 2010.
— — — Добавлено — — —
есть провод с заглушкой с 3мя контактами + с ним одинарный провод
ща сфоткаю
Это разъём PDA- для диагностики.
Последнее редактирование: 12 Апр 2013
-
#6
спасибо за полезный мануал
-
#7
Руководство по ремонту, эксплуатации и техническому обслуживанию CF MOTO X6
Есть у кого данный мануал?????
-
#9
Там мануал только на английском!!! Может на русском у кого есть???
-
#10
Там мануал только на английском!!! Может на русском у кого есть???
За четыре года ещё не перевели.
-
#13
Есть ли у кого-нибудь более актуальная ссылка?
-
#14
Полный сервис мануал на X6 !!!!! На английском. Скачал за деньги с забугорного сайта, делюсь с народом
-
#15
Почему ни одна вкладка,ни один файл тут не открываются?Постоянно или ошибка или недоступен.
-
#16
Если в течение какого-то времени не происходит обращения к файлу на обменнике (2-3 месяца), то файл автоматически удаляется.
Господа пользователи Х6, выложите, пожалуйста, еще раз руководства по ремонту. Думаю, что у многих нет.
-
#17
Это блок лебёдки. ECU НАХОДИТСЯ ПОД КАПОТОМ. Для года выпуска после 2010.
А вот и нет. Квадрик 11 года и блок управления лебёдкой и ECU находятся в бардачке за аккумулятором
-
#18
Хороший вопрос про кнопку часов! Где она?
-
#20
Есть только на неё часы не реагируют(
Создан 22 Июня 2012 года.
-
Charskiy
- Администратор
- Сообщения: 11668
- Зарегистрирован: 22.06.12
- Имя: Андрей
- Благодарил (а): 1335 раз
- Поблагодарили: 498 раз
Руководство по ремонту квадроцикла CF 625 — X6 EFI
#1
Сообщение
Charskiy » 21 авг 2012, 12:21
Для тех, кто хочет проводить ТО своими силами.
У вас нет необходимых прав для просмотра вложений в этом сообщении.
-
Sashok-2112
- Новичок
- Сообщения: 2
- Зарегистрирован: 18.05.16
- Имя: Саша
- Благодарил (а): 1 раз
Руководство по ремонту квадроцикла CF 625 — X6 EFI
#4
Сообщение
Sashok-2112 » 19 май 2016, 21:55
Charskiy писал(а): Для тех, кто хочет проводить ТО своими силами.
Как скачать
-
СергейН
- Новичок
- Сообщения: 1
- Зарегистрирован: 15.08.16
- Имя: Сергей
- Благодарил (а): 1 раз
Руководство по ремонту квадроцикла CF 625 — X6 EFI
#5
Сообщение
СергейН » 15 авг 2016, 12:18
Хелп! Не могу скпчать руководство по ремонту — пишет » У вас нет необходимых прав для просмотра вложений в этом сообщении.» наисайте зарегистрирован. Где ещё можно скпчать! Или в почту мне оьпоавтье плиз
-
sirius_x
- Бродяга
- Сообщения: 9526
- Зарегистрирован: 22.06.12
- Имя: Александр
- Благодарил (а): 591 раз
- Поблагодарили: 546 раз
Руководство по ремонту квадроцикла CF 625 — X6 EFI
#6
Сообщение
sirius_x » 15 авг 2016, 14:11
СергейН писал(а): Или в почту мне оьпоавтье плиз
Почта то какая ?
в профиле не указано !
-
Reallross
- Новичок
- Сообщения: 1
- Зарегистрирован: 18.06.17
- Имя: Роман
Руководство по ремонту квадроцикла CF 625 — X6 EFI
#7
Сообщение
Reallross » 18 июн 2017, 19:43
Добрый вечер!
Ребята, помогите пожалуйста с мануалом по ремонту CF X6.
За ранее благодарен!
-
Лучший
- Сообщения: 1
- Зарегистрирован: 19.07.20
- Имя: Леонид
- Благодарил (а): 1 раз
Руководство по ремонту квадроцикла CF 625 — X6 EFI
#8
Сообщение
Лучший » 19 июл 2020, 09:06
sirius_x писал(а): ↑
15 авг 2016, 14:11
СергейН писал(а): Или в почту мне оьпоавтье плиз
Почта то какая ?
в профиле не указано !
Можете и мне тоже скинуть на почту, заранее спасибо. tyumencev48@inbox.ru
-
Sergant
- Сообщения: 1
- Зарегистрирован: 23.11.20
- Имя: Сергей
Руководство по ремонту квадроцикла CF 625 — X6 EFI
#10
Сообщение
Sergant » 23 ноя 2020, 18:27
Добрый вечер.
Не могу скачать мануал (нет прав)….. можно мне скинуть на почту?
-
Charskiy
- Администратор
- Сообщения: 11668
- Зарегистрирован: 22.06.12
- Имя: Андрей
- Благодарил (а): 1335 раз
- Поблагодарили: 498 раз
Руководство по ремонту квадроцикла CF 625 — X6 EFI
#11
Сообщение
Charskiy » 24 ноя 2020, 20:57
Sergant писал(а): ↑
23 ноя 2020, 18:27
Добрый вечер.
Не могу скачать мануал (нет прав)…..можно мне скинуть на почту?
Отправил на почту.
-
Charskiy
- Администратор
- Сообщения: 11668
- Зарегистрирован: 22.06.12
- Имя: Андрей
- Благодарил (а): 1335 раз
- Поблагодарили: 498 раз
Руководство по ремонту квадроцикла CF 625 — X6 EFI
#13
Сообщение
Charskiy » 09 июн 2021, 18:24
dron696 писал(а): ↑
05 июн 2021, 14:20
День.Добрый скиньте пожалуйста руководство на почту dron.rd@gmail.com
Проблема в чем? Мы можем, а Вы почему нет? Наверное что то мешает. Скорее всего чтение Правил. Кинуться Вам скидывать что то, нет никакого желания. Без обид. Ищите и обрящите, товарисчь.
Сборник руководств на английском языке по эксплуатации и техническому обслуживанию квадроциклов CFMoto моделей CF500/CF500-A/CF500-5B/CF500-5C/CF625-B/CF625-C.
- Издательство: —
- Год издания: —
- Страниц: —
- Формат: PDF
- Размер: 74,3 Mb
Руководство на английском языке по техническому обслуживанию и ремонту квадроциклов CFMoto моделей CF500 и CF500-A.
- Издательство: Chunfeng Holding Group
- Год издания: 2006
- Страниц: 254
- Формат: PDF
- Размер: 12,8 Mb
Руководство на русском языке по эксплуатации и техническому обслуживанию квадроциклов CFMoto модели CF500-A.
- Издательство: —
- Год издания: —
- Страниц: 206
- Формат: PDF
- Размер: 2,8 Mb
Руководство на русском языке по ремонту квадроциклов CFMoto модели CF500-A.
- Издательство: —
- Год издания: —
- Страниц: 266
- Формат: PDF
- Размер: 15,8 Mb
Руководство на русском языке по эксплуатации и техническому обслуживанию квадроциклов CFMoto моделей CF500-2 и CF500-2A 2008 года выпуска.
- Издательство: —
- Год издания: —
- Страниц: 144
- Формат: PDF
- Размер: 6,9 Mb
Руководство на русском языке по эксплуатации и техническому обслуживанию мотовездехода CFMoto модели CF500-3 с полным приводом.
- Издательство: —
- Год издания: —
- Страниц: 163
- Формат: PDF
- Размер: 2,1 Mb
Руководство на английском языке по техническому обслуживанию и ремонту квадроциклов CFMoto моделей CF500-5B и CF500-5C.
- Издательство: Zhejiang CFMOTO Power Co., Ltd.
- Год издания: 2009
- Страниц: 272
- Формат: PDF
- Размер: 23,2 Mb
Руководство на английском языке по эксплуатации и техническому обслуживанию мотовездеходов CFMoto Terracross моделей CF500-6/CF625-3/CF625-6 с полным приводом.
- Издательство: —
- Год издания: —
- Страниц: 135
- Формат: PDF
- Размер: 16,9 Mb
Руководство на русском языке по эксплуатации и техническому обслуживанию квадроциклов CFMoto модели CF625-X6 EFI.
- Издательство: —
- Год издания: —
- Страниц: 157
- Формат: PDF
- Размер: 43,8 Mb
Руководство на русском языке по эксплуатации и техническому обслуживанию квадроциклов CFMoto модели CF800-2X8 EFI.
- Издательство: —
- Год издания: —
- Страниц: 162
- Формат: PDF
- Размер: 3,4 Mb
Руководство на английском языке по техническому обслуживанию и ремонту квадроциклов CFMoto модели CF800-2 Terralander 800 с полным приводом.
- Издательство: Zhejiang CFMOTO Power Co., Ltd.
- Год издания: 2011
- Страниц: 316
- Формат: PDF
- Размер: 16,5 Mb
Руководство на французском языке по эксплуатации и техническому обслуживанию квадроциклов CFMoto моделей Goes 520 и Goes 520 Max с полным приводом.
- Издательство: —
- Год издания: —
- Страниц: 30
- Формат: PDF
- Размер: 2,7 Mb
Руководство на русском языке по эксплуатации и техническому обслуживанию квадроциклов CFMoto моделей HX500-S и HX500-L 2009 года выпуска.
- Издательство: —
- Год издания: —
- Страниц: 146
- Формат: PDF
- Размер: 3,8 Mb
Руководство на чешском языке по эксплуатации и техническому обслуживанию квадроциклов CFMoto модели JourneyMan Gladiator RX.
- Издательство: —
- Год издания: —
- Страниц: 31
- Формат: PDF
- Размер: 1,1 Mb
Руководство на чешском языке по эксплуатации и техническому обслуживанию квадроциклов CFMoto модели JourneyMan Gladiator X-8.
- Издательство: —
- Год издания: —
- Страниц: 24
- Формат: PDF
- Размер: 802 Kb
Руководство на чешском языке по эксплуатации и техническому обслуживанию мотовездеходов CFMoto модели JourneyMan Gladiator Z6.
- Издательство: —
- Год издания: —
- Страниц: 24
- Формат: PDF
- Размер: 823 Kb
Руководство на русском языке по эксплуатации и техническому обслуживанию мотовездеходов CFMoto модели SSV 625-Z6 EFI с полным приводом.
- Издательство: —
- Год издания: —
- Страниц: 131
- Формат: PDF
- Размер: 5,7 Mb
Руководство на русском языке по ремонту карбюратора Mikuni модели BSR36-89.
- Издательство: —
- Год издания: —
- Страниц: 5
- Формат: PDF
- Размер: 393 Kb
Электросхемы на русском и английсом языках квадроциклов CFMoto моделей CF500/CF500-A/CF500-X5/CF625-X6/CF800-2-X8.
- Издательство: —
- Год издания: —
- Страниц: —
- Формат: PDF
- Размер: 5,1 Mb
-
Bookmarks
Quick Links
READ THIS MANUAL CAREFULLY!
Related Manuals for CF MOTO CF500-A
Summary of Contents for CF MOTO CF500-A
- Page 1
READ THIS MANUAL CAREFULLY! - Page 9
Failure to follow the warnings contained in this manual can result in serious injury or death. An ATV is not a toy and can be hazardous to operate. This vehicle handles differently from other vehicles, such as motorcycles and cars. A collision or rollover can occur quickly, even during routine maneuvers like turning, or driving on hills or over obstacles, if you fail to take proper precautions. - Page 10
You should review this information on a regular basis. If you purchased a used ATV from a party other than a dealer, you can request this free safety training from any authorized dealer. Familiarize yourself with all laws and regulations concerning the operation of this vehicle in your area. We strongly advise you to strictly follow the recommended maintenance program outlined in your owner s manual. - Page 11
The safety alert caution indicates a potential hazard that may result in minor personal injury or damage to the vehicle. A caution indicates a situation that may result in damage to the vehicle. A note will alert you to important information or instructions. - Page 12
Read this manual and all labels carefully, and follow the operating procedures described. Never operate an ATV without proper instruction. Take a training course. Beginners should receive training from a certified instructor. Contact an authorized ATV dealer to find out about the training courses nearest you. - Page 13
Always keep both hands on the handlebars and both feet on the foot-rests of the ATV during operation. Always travel slowly and use extra caution when operating on unfamiliar terrain. Be alert to changing terrain conditions. Never operate on excessively rough, slippery, or loose terrain. Always follow proper turning procedures as described in this manual. - Page 14
any hill until you ve mastered (on level ground) the turning technique outlined in this manual. Avoid crossing the side of a steep hill when possible. Always use proper procedures if you stall or roll backwards while climbing a hill . To avoid stalling , maintain a steady speed when climbing a hill. - Page 15
in reverse, move slowly and avoid turning at sharp angles. Always use the size and type of tires specified for your ATV, and always maintain proper tire pressure. Never modify an ATV through improper installation or use of accessories. Never exceed the stated load capacity for your ATV. Cargo must be properly distributed and securely attached. - Page 16
We are concerned with the safety of our customers and for the general public. Therefore , we strongly recommend that consumers do not install on an ATV any equipment that may increase the speed or power of the vehicle, or make any other modifications to the vehicle for these purposes. Any modifications to the original equipment of the vehicle create a substantial safety hazard and increase the risk of body injury. - Page 39
Warning decals have been placed on the ATV for your protection. Read and follow the instructions on each decal carefully. If a decal becomes illegible or comes off, contact your dealer to purchase a replacement. - Page 43
Always wear clothing suited to the type of riding. ATV riding requires special protective clothing for comfort and to reduce the chance of injury. Your helmet is the most important piece of protective gear for safe riding. An approved helmet can prevent a severe head injury. Do not depend on sunglasses for proper eye protection. - Page 44
Off-road style gloves with knuckle pads are the best for comfort and protection. The best footwear is a pair of strong over-the-calf boots with heels, like moto-cross boots. Always wear long sleeves and long pants to protect arms and legs. Riding pants with kneepads and a jersey with shoulder pads provide the best protection. - Page 45
Top speed is normally limited when operating in 4WD-LOCK. If conditions require more engine power when riding forward, push and hold this switch to override the 4WD-LOCK speed limiting function. (See page 49-52 for a detailed explanation about the front gear lock switch and its function.) Releasing the switch restores the speed limiting function. - Page 46
When the switch is at this position, the front pilot light, the rear pilot light and instrument light are on. When the switch is at this position, headlight, the front pilot light, the rear pilot light and instrument light are off. Press the switch to , the left turning indicator and left turning light are on. - Page 47
The front brake lever is located on the right handlebar. Pull it toward the handlebar to apply the front brake. The brake pedal is located on the right side of the machine and the brake lever is located on the left handlebar. Push down on the pedal or pull the lever toward the handlebar to apply the rear brake. - Page 48
Operating the ATV with a spongy brake lever can result in loss of braking, which could cause an accident. Never operate the ATV with a spongy-feeling brake lever. Always test brake lever travel and master cylinder fluid level before riding. When squeezed, the lever should feel firm. - Page 49
An over-full master cylinder may cause brake drag or brake lock-up, which could result in serious injury or death. Maintain brake fluid at the recommended level. Do not overfill. When checking the fluid level, the ATV must be on level ground with the handlebars straight. If the fluid level is low, add DOT3 brake fluid only. - Page 50
When parking, stop the engine and shift the gear selector Lever into the park position. Operating the ATV while the parking brake is engaged could result in an accident and serious injury or death. Always check to be sure the parking brake is disengaged before operating. - Page 51
The choke assists in starting a cold engine. Refer to the engine starting procedure on page 60 for correct choke and throttle settings during starting. The fuel tank filler cap is located directly below the handlebar. Remove the fuel tank filler cap by turning it counterclockwise. Install the fuel tank filler cap by turning it clockwise. - Page 52
Gasoline is highly flammable and explosive under certain conditions. Always exercise extreme caution whenever handling gasoline. Always refuel with the engine stopped, and outdoors or in a well ventilated area. Never fill a gas plastic container while it’s in the racks. Static electricity between the rack and container could cause a spark. - Page 53
The transmission gear selector is located on the left side of the vehicle. L: Low Gear H: High Gear N: Neutral R: Reverse P: Park To shift into Reverse or Park, you must first apply the rear brake lever or pedal to activate the lock-out mechanism. When shifting out of Reverse or Park, it’s necessary to apply the rear brake lever or pedal. - Page 54
To extend belt life, use low forward gear in heavy pulling situations and when operating at less than seven miles per hour for extended periods of time. If towing the vehicle is necessary, shift the transmission into neutral for better mobility and to prevent damage to the belt. - Page 55
Extending the starter rope too far will cause damage to the recoil assembly. Do not extend the starter rope so far that it stops. If the starter rope handle is not seated properly, water may enter the recoil housing and damage components. Make sure the handle is fully seated on the recoil housing, especially when driving in wet areas. - Page 56
To change from 2WD to 4WD, stop the ATV, and then set the switch to . When the ATV is in 4WD, the 4WD indicator will come on in the dashboard display. To change from 4WD to 2WD, stop the ATV, be sure the lever is set to position , and then set the switch to 2WD . - Page 57
When the switch is set to LOCK , the front gear lock indicator light will flash until the front gear is locked. When the indicator light is flashing, turning the handlebar left and right will help the front gear lock to engage. - Page 58
Check the operation of the throttle lever before you start the engine. If it does not work smoothly, check for the cause. Correct the problem before riding the ATV. Consult your dealer if you can t find or solve the problem yourself. - Page 59
Functions of the respective switch positions are as follows: The engine can be started only at this position and the headlights and taillight come on when the light switch is on. The key can not be removed in this position. OFF: All electrical circuits are switched off. - Page 60
: This indicator comes on when the 2WD / 4WD switch is set to the 4WD position. : The front lock indicator DIFF.LOCK in the four-wheel-drive indicator comes on when the LOCK 4WD switch is set to the LOCK-4WD position. Due to the synchronizing mechanism in the front gear case, the four- wheel drive indicator may not come on until the ATV starts moving. - Page 61
This indicator light comes on when the gear selector is in the R reverse position. This indicator light comes on when the gear selector is in the P (park) position. This indicator light comes on when press the turning switch to This indicator light comes on when press the override switch. - Page 62
when the temperature indicator is in the white area of side C, it means that the temperature is normal. The red area of side H indicates that the temperature is high. In that case please stop the engine until the coolant temperature goes down. In case the temperature frequently goes high, check coolant capacity or consult the local dealer. - Page 63
The break-in period for your new ATV is defined as twenty first ten hours of operation, or the time it takes to use the first four full tanks of gasoline. No single action on your part is as important as following the procedures for a proper break-in. - Page 64
6. Pull only light loads. 7. During the break-in period, change both the oil and the filter at 25 hours or one month. If a proper inspection is not done before each use, severe injury or death could result. Always inspect the vehicle before each use to ensure it s in proper operating condition. - Page 66
Engine exhaust contains poisonous carbon monoxide and can cause loss of consciousness resulting in severe injury or death. Never run an engine in an enclosed area. Operating the vehicle immediately after starting could cause engine damage. Allow the engine to warm up for several minutes before operating the vehicle. - Page 67
Position : Cold engine start ambient temperature Above (80 F) and warm engine start position. 5. Completely close the throttle lever and start the engine by pushing the start switch. If the engine fails to start, release the start switch, then push the start switch again. - Page 68
See the Break-In Period section prior to operating the engine for the first time. To start a warm engine, refer to the Starting a cold engine section. The starter (choke) should not be used. The throttle should be opened slightly. Before shifting, you must stop the machine and return the throttle lever to the closed position. - Page 69
3. Open the throttle lever gradually. Shifting: Neutral to Reverse and Reverse to Park The gear selector cannot be shifted into reverse (R) or park(P) without applying the rear brake. 1. Bring the machine to a complete stop and return the throttle lever to the closed position. - Page 70
Overloading the vehicle or carrying or towing cargo improperly can alter vehicle handling and may cause loss of control or brake instability. Always follow these precautions when hauling cargo: Never exceed the stated load capacity for this vehicle. Reduce speed and allow a greater distance for braking. When operating over rough or hilly terrain, reduce speed and cargo to maintain stable driving conditions. - Page 71
Carrying a load on only the front rack or the rear rack may cause an imbalanced condition and increases the possibility of vehicle overturn. Balance loads proportionally between the front rack and the rear rack, but do not exceed the stated load capacity. Use extreme caution when applying brakes with a loaded vehicle. - Page 72
Your ATV has been designed to carry or tow a certain amount of load. Always read and understand the load distribution warnings listed on the warning labels, and never exceed the specified weights. Cargo weight should be mounted as low as possible. When operating over rough or hilly terrain, reduce speed and cargo to maintain stable driving conditions. - Page 73
1. Sit upright with both feet on the footrests and both hands on the handlebars. 2. Start the engine and allow it to warm up, apply the brakes, then shift the transmission into gear. 3. Check your surroundings and determine your path of travel. 4. - Page 74
To make a turn, steer in the direction of the turn, leaning your upper body to the inside of the turn while supporting your weight on the outer footrest. This technique alters the balance of traction between the wheels, allowing the turn to be made smoothly. The same leaning technique should be used for turning in reverse. - Page 75
Whenever riding on slippery surfaces such as wet trails or loose gravel, or during freezing weather, follow these precautions: 1. Slow down when entering slippery areas. 2. Maintain a high level of alertness, reading the trail and avoiding quick, sharp turns which can cause skids. 3. - Page 76
Whenever traveling uphill, follow these precautions: 1. Always travel straight uphill. 2. Avoid steep hills (25 maximum). 3. Keep both feet on the footrests. 4. Shift your weight forward. 5. Proceed at a steady rate of speed and throttle opening. 6. - Page 77
Braking and handling are greatly affected when operating in hilly terrain. Improper procedure could cause loss of control or overturn and result in serious injury or death. Avoid climbing steep hills (25 maximum). Use extreme caution when operating on hills, and follow proper operating procedures outlined in the owner s manual. - Page 78
2. Lean into the hill, transferring your upper body weight toward the hill while keeping your feet on the footrests. 3. Steer slightly into the hill to maintain vehicle directions. If the vehicle begins to tip, quickly turn the front wheel downhill, if possible, or dismount on the uphill side immediately! Whenever descending a hill, follow these precautions: 1. - Page 79
Improper hill climbing procedures could cause loss of control or overturn and result in serious injury or death. Avoid climbing steep hills (25 maximum). Use extreme caution when operating on hills, and follow proper operating procedures outlined in the owner s manual. If the vehicle stalls while climbing a hill, never back it down the hill! One maneuver that can be used when it s necessary to turn around while climbing a hill is the K-turn:… - Page 80
7. Restart the engine, while holding the brake lever, shift the gear selector lever to low gear position. 8. Release the brake and proceed slowly, controlling speed with the brake, until the vehicle is on more level ground. Your ATV can operate through water with a maximum recommended depth equal to the bottom of the footrests . Follow these procedures when operating through water: 1. - Page 81
Avoid operating the vehicle through deep or fast-flowing water. If you cannot avoid water that exceeds the recommended maximum depth , go slowly , balance your weight carefully , avoid sudden movements, and maintain a slow and steady forward motion. Do not make sudden turns or stops, and do not make sudden throttle changes. - Page 82
Be alert! Look ahead and learn to read the terrain. Be constantly alert for hazards such as logs, rocks and low hanging branches. Severe injury or death can result if your vehicle comes in contact with a hidden obstacle. Not all obstacles are immediately visible. - Page 83
Follow these precautions when operating in reverse: 1. Always avoid backing downhill. 2. Back slowly. 3. When in reverse, apply the brakes lightly for stopping. 4. Avoid turning at sharp angles in reverse. 5. Never open the throttle suddenly while backing. Failure to use caution when operating in reverse can result in serious injury or death. - Page 84
Avoid parking on an incline if possible. If it s unavoidable, follow these precautions: 1. Turn the engine off. 2. Place the gear selector to parking position. 3. Always block the rear wheels on the downhill side as illustrated. - Page 85
To achieve maximum traction while riding in 2WD or 4WD, the two rear wheels are mounted solidly on one axle and turn together at the same speed. Furthermore, when riding in 4WD-LOCK DIFF. LOCK ), the front wheels also turn together at the same speed. Therefore, unless the wheel on the inside of the turn is allowed to slip or lose some traction, the ATV will resist turning. - Page 86
This procedure should be practiced at slow speed many times in a large area with no obstacles. If an incorrect technique is used, your ATV may continue to go straight. If the ATV doesn t turn, come to a stop and then practice the procedure again. - Page 87
Auxiliary power outlets provide 12V power for operating accessories such as hand held spot lights. See your dealer. Careful periodic maintenance will help keep your vehicle in the safest, most reliable condition. Inspection, adjustment and lubrication of important components are explained in the periodic maintenance chart. - Page 88
Frequent immersion in mud, water or sand Racing or race-style high RPM use Prolonged low speed, heavy load operation Extended idle Short trip cold weather operation Pay special attention to the oil level. A rise in oil level during cold weather can indicate contaminants collecting in the oil sump or crankcase. - Page 89
Perform all services at whichever maintenance interval is reached first. Steering Pre-Ride Make adjustments as needed. See Pre-Ride Checklist on page 58. Front suspension Pre-Ride Rear suspension Pre-Ride Tires Pre-Ride Brake fluid level Pre-Ride Brake lever/pedal travel Pre-Ride Brake systems Pre-Ride Wheels/fasteners Pre-Ride… - Page 90
Check level daily, change coolant Coolant Daily every 2 years Check operation; apply dielectric Headlamp/tail lamp Daily grease if replacing Air filter, main element Weekly Inspect; replace as needed Drain water as needed, check often Recoil housing Weekly if operating in wet conditions Brake pad wear Monthly 60 (100) - Page 91
Shift Linkage 310 (500) Inspect, lubricate, adjust Steering 310 (500) Lubricate Front suspension 310 (500) Lubricate Rear suspension Lubricate 310 (500) Drain bowl periodically and prior Carburetor float bowl 310 (500) to storage Throttle Cable/ ETC Inspect; adjust; lubricate;replace if 310 (500) necessary Switch… - Page 92
Oil filter change 100H 620 (1000) Replace with oil change Oil tank vent hose 100H 12 M 620 (1000) Inspect routing, condition Valve clearance 100H 12 M 620 (1000) Inspect; adjust Check for leaks at tank cap, lines, fuel valve, filter, carburetor; replace Fuel system 100H 12 M… - Page 93
Clutches 100H 12 M 620 (1000) Inspect; clean; replace worn parts (drive and driven) Wheel bearings 100 H 12 M 1000 (1600) Inspect; replace as needed Brake fluid 200 H 24 M Change every two years 1240 (2000) Spark arrestor 300 H 36 M 1860 (3000) - Page 94
Check and lubricate all components at the intervals outlined in the Periodic Maintenance Chart beginning on page 83. Items not listed in the chart should be lubricated at the General Lubrication interval. More often under severe use, such as wet or dusty conditions All Season Grease Use U-Joint Lube every 500 miles, before long periods of storage, or after pressure washing or submerging Engine… - Page 95
Always check and change the engine oil at the intervals outlined in the Periodic Maintenance Chart beginning on page 83. Always change the oil filter whenever changing oil. 1. Pull outward on the areas shown . 2. Position the ATV on a level surface. 3. - Page 96
7. If the engine oil is at or below the lower limit mark, add sufficient oil of the recommended type to raise it to the correct level. 8. Insert the dipstick into the oil filler hole, and then tighten the oil filler cap. 9. - Page 97
7. Apply a light coat of engine oil to the O-ring of the new oil filter cartridge. Make sure the O-ring is seated properly. 8. Install the new oil filter cartridge with an oil filter wrench, and then tighten it to the specified torque with a torque wrench. Oil filter cartridge tightening torque: 17 N m (1.7 m kgf, 12 ft lbf) - Page 98
The rear gear case must be checked for oil leakage before each ride. If any leakage is found, have your dealer check and repair the ATV. 1. Place the machine on a level place. 2. Place a container under the rear gear case to collect the used oil. - Page 99
6. Install the filler bolt and tighten to the specified torque. Filler bolt (rear gear case) tightening torque: 23 N m (2.3 m kgf, 16 ft lbf) 7. Check for oil leakage. If oil leakage is found, check for the cause. Be sure no foreign material enters the rear gear case. - Page 100
4. Install the drain bolt and tighten it to the specified torque. Drain bolt tightening torque: 10 N m (1.0 m kgf, 7.2 ft lbf) 5. Fill the front gear case with oil. Periodic oil change oil quantity: 0.28 L (0.25 Imp qt, 0.3 US qt) Total amount oil quantity: 0.33 L (0.29 Imp qt, 0.35 US qt) 6. - Page 101
3. If the coolant is at or below the lower limit mark, remove the reservoir cap, add coolant to the upper limit mark, install the reservoir cap, and then install the panel. Coolant reservoir capacity(up to the upper limit mark):0.3 L (0.26 Imp qt, 0.32 US qt) Hard water or salt water is harmful to the engine. - Page 102
5. Disconnect the hose on the coolant reservoir side, and then drain the coolant from the coolant reservoir. 6. After draining the coolant, thoroughly flush the cooling system with clean tap water. 7. Replace the coolant drain bolt washer if it is damaged, and then tighten the coolant drain bolt to the specified torque. - Page 103
Coolant reservoir capacity (up to the upper limit mark): 0.3 L (0.26 Imp qt, 0.32 US qt) Hard water or salt water is harmful to the engine. You may use soft water if you can not get distilled water. 12. Install the radiator cap. 13. - Page 104
Check the protective boots for holes or tears. If any damage is found, have them replaced by your dealer. Removal 1. Remove panel. 2. Remove the spark plug cap. 3. Use the spark plug wrench in the tool kit to remove the spark plug as shown. - Page 105
The spark plug is an important engine component and is easy to inspect. The condition of the spark plug can indicate the condition of the engine. The ideal color on the white insulator around the center electrode is a medium-to-light tan color for a ATV that is being ridden normally. - Page 106
3. Install the spark plug and tighten it to the specified torque. Spark plug tightening torque: 17.5 N m (1.75 m kgf, 12.5 ft lbf) If a torque wrench is not available when you are installing a spark plug, a good estimate of the correct torque is 1/4 to 1/2 turn past finger tight. - Page 107
1. Remove the seat. 2. Remove the air filter case cover by unhooking the holders. 3. Remove the air filter element. 4. Remove the air filter element from its frame. 5. Wash the air filter element gently but thoroughly in solvent. 6. - Page 108
12. Install the seat. The air filter element should be cleaned every 20 40 hours. It should be cleaned and lubricated more often if the machine is operated in extremely dusty areas. Each time air filter element maintenance is performed, check the air inlet to the air filter case for obstructions. Check the air filter element rubber joint to the carburetor and manifold fittings for an airtight seal. - Page 109
4. Insert the tailpipe into the muffler and align the bolt holes. 5. Install and tighten the bolts. When cleaning the spark arrester: Always let the exhaust system cool prior to touching exhaust components. Do not start the engine when cleaning the exhaust system. If dust or water collects in the V-belt cooling duct check hose, remove the hose and clean it. - Page 110
After riding in water deep enough to allow it to enter the V-belt case, remove this bolt to drain the water from the case. If water drains from the V-belt case after removing the bolt, have your dealer inspect the ATV as the water may affect other engine parts. - Page 111
A diagnostic tachometer must be used for this procedure. 1. Start the engine and warm it up for a few minutes at approximately 1,000 to 2,000r/min. Occasionally rev the engine to 4,000 to 5,000 r/min. The engine is warm when it quickly responds to the throttle. - Page 112
Adjust the engine idling speed before adjusting the throttle lever free play. 1. Loosen the locknut. 2. Turn the adjusting bolt until the throttle lever free play is 3 5 mm (0.12 0.20 in). 3. Tighten the locknut. Check the brake pads for damage and wear. If a brake pad thickness is less than 2 mm (0.08 in), have your dealer replace the pads as a set. - Page 113
Inspect the brake pads for damage and wear. If the thickness is less than 4 mm(0.16 in), have your dealer replace the pads. Insufficient brake fluid may let air enter the brake system, possibly causing the brakes to become ineffective. Before riding, check that the brake fluid is above the lower level and replenish when necessary. - Page 114
Observe these precautions: 1. When checking the fluid level, make sure the top of the master cylinder reservoir is level by turning the handlebars. 2. Use only the designated quality brake fluid. Otherwise, the rubber seals may deteriorate, causing leakage and poor brake performance. - Page 115
Complete fluid replacement should be done only by trained service personnel. Have your dealer replace the following components during periodic maintenance or when they are damaged or leaking. Replace the oil seals every two years. Replace the brake hoses every four years. The front brake lever should have a free play of zero mm (zero in) at the lever end. - Page 116
The rear brake lever free play should be 0.5 2 mm (0.02 0.08 in). 1. Loosen the locknut . 2. Turn the adjusting bolt in direction to increase free play, and in direction to decrease free play. 3. Tighten the locknut . If correct free play cannot be obtained, ask your dealer to make that adjustment. - Page 117
The top of the brake pedal should be positioned 72mm (2.8 in) above the top of the footrest. If not, ask your dealer to adjust it. After servicing: Make sure the brakes operate smoothly and that the free play is correct. Make sure the brakes do not drag. - Page 118
Turn the adjusting nut while holding the rear brake light switch in place. To make the brake light come on earlier, turn the adjusting nut in direction . To make the brake light come on later, turn the adjusting nut in direction Inspect cables frequently. - Page 119
1. Loosen the wheel nuts. 2. Elevate the ATV and place a suitable stand under the frame. 3. Remove the nuts from the wheel. 4. Remove the wheel. 1. Install the wheel and the nuts. Tapered nuts are used for both the front and rear wheels. - Page 120
2. Lower the ATV so that the wheel is on the ground. 3. Tighten the wheel nuts to the specified torque. Wheel nut torque: Front: 55 N m ( 5.5 m kgf, 40 ft lbf). Re ar: 55 N m (5.5 m kgf, 40 ft lb f) This machine is equipped with a sealed-type battery. - Page 121
1. When the machine is not used for a month or longer, remove the battery and store it in a cool, dark place. Completely recharge the battery before reinstallation. A special battery charger (constant voltage/ampere or constant voltage) is required for recharging a sealed- type battery. - Page 122
To prevent accidental short-circuiting, turn off the main switch when checking or replacing a fuse. If a headlight bulb burns out, replace it as follows: 1. Remove the bolts and pulling headlight cover off. 2. Remove the rubber cover at the rear of the headlight by pulling it off. - Page 123
5. Insert a new headlight bulb into the headlight bulb holder, and then lock it by spring. 6. Install the bulb holder by turning it clock-wise. 7. Install the rubber cover at the rear of the headlight. 8. Install the headlight cover with the bolts. It is advisable to have your dealer make this adjustment. - Page 124
If the tail/brake light bulb burns out, replace it as follows: 1. Remove the screws , and then pull tail/brake light cover out. 2. Remove the tail/brake light bulb by pushing it in and turning it counter-clockwise. 3. Insert a new tail/brake light bulb, push it in, and the turning it clockwise. 4. - Page 125
The spring preload can be adjusted to suit the rider s weight and riding conditions. When adjusting the rear shock absorbers, the rear wheels need to be removed. Adjust the spring preload as follows. To increase the spring preload, turn the adjusting ring in direction To decrease the spring preload, turn the ad-justing ring in direction… - Page 126
If your vehicle becomes immersed, major engine damage can result if the machine is not thoroughly inspected. Take the vehicle to your dealer before starting the engine. If it s impossible to take your ATV to a dealer before starting it, follow the steps outlined below. 1. - Page 127
Keeping your ATV clean will not only improve its appearance but it can also extend the life of various components. With a few precautions, your ATV can be cleaned much like an automobile. The best and safest way to clean your ATV is with a garden hose and a pail of mild soap and water. Use a professional type washing mitten, cleaning the upper body first and the lower parts last. - Page 128
Starting the engine during the storage period will disturb the protective film created by fogging and damage could occur. Never start the engine during the storage period. Make necessary repairs and then clean the ATV thoroughly with mild soap and warm water to remove all dirt and grime. - Page 129
Inspect and clean or replace the pre-cleaner and air filter. Clean the air box and drain the sediment tube. Inspect and clean or replace the breather filter. Inspect the following fluid levels and change if necessary: front gear case; transmission; brake fluid (change every two years or as required if fluid looks dark or contaminated). - Page 130
If you choose not to use Fogging Oil, perform the following procedure. 1. Support the front end of the machine so the engine is level or tilted slightly rearward. 2. Remove the spark plug. Rotate the piston to BDC and pour approximately two ounces of oil into the cylinder. 3. - Page 131
Remove the battery from the vehicle and ensure that it’s fully charged before placing it in storage. Engine Anti-Freeze Test engine coolant strength and change if necessary. Coolant should be replaced every two years. Set the tire pressure and safely support the ATV with the tires 1 2 off the ground. Be sure the storage area is well ventilated, and cover the machine with a ATV cover. - Page 132
Proper maintenance will protect chrome wheels from corrosion, preserve wheel life and ensure a like new appearance for many years. 1. Wash chrome rims frequently. Use a mild detergent to remove any salt, dirt, mud or grime. Never use abrasive cleaners on plated or painted surfaces. - Page 133
Driving the ATV onto a pickup or tall Shift transmission to low range during loading of the ATV to prevent belt trailer in high range. burning. When starting out on an incline, use low range or dismount the ATV (after Starting out going up a steep incline. - Page 134
Shift the transmission to low range, and carefully use fast, aggressive Stuck in mud or snow. throttle application to engage clutch. Excessive throttle may cause loss of control and vehicle overturn. Shift the transmission to low range, and carefully use fast, brief, aggressive Climbing over large objects from a throttle application to engage clutch. - Page 135
Contact your dealer for service if you’re unable to identify solutions using the following charts. Tripped circuit breaker Reset the breaker Low battery voltage Recharge battery to 12.5 VDC Loose battery connections Check all connections and tighten Loose solenoid connections Check all connections and tighten Out of fuel Refuel… - Page 136
Crankcase filled with water or fuel Immediately see your dealer Overuse of choke Inspect, clean and/or replace spark plugs Clogged fuel filter Replace the filter Low battery voltage Recharge battery to 12.5 VDC Mechanical failure See your dealer Poor quality or low octane fuel Replace with recommended fuel Incorrect ignition timing See your dealer… - Page 137
Weak spark from spark plugs Inspect, clean and/or replace spark plugs Incorrect spark plug gap or heat range Set gap to specs or replace plugs Old or non-recommended fuel Replace with new fuel Incorrectly installed spark plug wires See your dealer Incorrect ignition timing See your dealer Mechanical failure… - Page 138
Kinked or plugged fuel vent line Inspect and replace Incorrect fuel Replace with recommended fuel Clogged air filter Inspect and clean or replace Reverse speed limiter malfunction See your dealer Electronic throttle control malfunction See your dealer Other mechanical failure See your dealer Low or contaminated fuel Add or change fuel, clean the fuel system… - Page 139
Out of fuel refuel Kinked or plugged fuel vent line Inspect and replace Water present in fuel Replace with new fuel Overuse of choke Inspect, clean and/or replace spark plugs Fouled or defective spark plugs Inspect, clean and/or replace spark plugs Worn or defective spark plug wires See your dealer Incorrect spark plug gap or heat range… - Page 140
Clean radiator screen and core if equipped Overheated engine Clean engine exterior See your dealer…
-
Литература о мотоциклах
- Руководство по ремонту квадроцикла CF500
На этой странице
в любой момент можно бесплатно скачать много других пособий по мототранспорту
Руководство по ремонту квадроцикла CF500 и CF500A
Предлагаем скачать бесплатно по нижней ссылке руководство по ремонту CF500 и CF500A.
Руководство по ремонту модели квадроцикла (квадрицикла) CF500A и CF500.
Настоящее справочное издание содержит необходимые описание процедур контроля, обслуживания,
капремонта, операции разборки/сборки, демонтажа и монтажа самых разных компонентов и деталей. Кроме того в этой инструкции предоставлена развернутая
информация по устранению неисправностей и сервисные данные вместе с
иллюстрациями квадрицикла CF500А.
скачать
книгу
бесплатно
Предлагаем еще одно руководство по ремонту модели квадроцикла (квадрицикла) CF500A.
Настоящее пособие содержит необходимое описание процедур контроля, обслуживания, капремонта, а также разборки/сборки, демонтажа и монтажа компонентов и деталей, приведена информация по устранению неисправностей и сервисные данные, снабженные иллюстрациями квадрицикла CF500А.
Глава 1: общая информация по ремонту CF500А, необходимые инструменты, конструкция квадрицикла и его технические данные.
Глава 2: ключевые точки для контроля и регулировок, руководство по обслуживанию CF500А.
скачать
пособие бесплатно

- Manuals
- Brands
- CF MOTO Manuals
- Offroad Vehicle
- CF500
- Service manual
-
Bookmarks
Quick Links
Related Manuals for CF MOTO CF500
Summary of Contents for CF MOTO CF500
- Page 81
1 . Bolt M8X55 21. Steering arm 11 . Bolt M8X22 2 . Alum cover 12 . Steering bearing seat 22 . Bolt M8X35 13. Bearing 3.O-ing; 23 . Washer 8 14 . Steering shaft support 4. Steering shaft coat 24 . - Page 82
Steering column 1.Removal 2.Remove upper cover of handlebar 3.Remove plastics 4.Remove front wheel 5.Remove handlebar 6.Remove handlebar brake lever 7.Remove connector of handlebar switches 8.Remove nut of steering tie-rod and steering column 9.Remove 4 bolt 15 10.Use slotted screw driver and hammer to fix 11.Lock clip 1 flap 12.Remove bolt 13.Remove bolt… - Page 83
EPS steering system The EPS indicator light works when the vehicle is equipped with EPS system . Under normal conditions EPS indicator light is on after turning power switch on. EPS doesn’t work; EPS indicator light is off after engine is started EPS begins to work. NOTE: Spare parts in the EPS system cannot be taken apart by user. - Page 84
1 BOLT M8×55 20 BOLT,M8×25 2 RUBBER COLLAR,FRONT LICENSE PLATE BRACKET 21 BOLT,M10×20 3 BRACKET (RH), DASHBOARD 22 COTTER PIN,2.0×16 4 BRACKET (LH), DASHBOARD 23 HEXAGON SLOTTED NUTS, STYLE1 M10×1.25 5 ALUM. COVER, HANDLEBAR 24 WASHER 10 6 BOLT, M6×125 25 STEERING ARM 7 FRONT BRACKET, DASHBOARD 27 STEERING TIE-ROD… -
Page 85: Installation
Installation Reverse the removal procedure for installation note:after installation be sure to check steering agility; cable instal- lation according to chapter 1, be sure steering arm in the middle be patient when install steering shaft then lock other parts. EPS motor remove 1.Remove plastics 2.Remove front wheel 3.Remove handlebar…
- Page 86
EPS system fault code table EPS indicator light on the instrument flashes when fault occurs. At that time, do not cut the power off but observe the frequency of flashing and record the orderliness in a period. Then please check with this table to find troubleshooting. - Page 87
fault analysis & emergency countermeasure for EPS System Failure Probable Reason Troubleshooting Phenomenon 1.connectors of wire is bad contact 1.Check whether wire connectors are Steering 2.The fuse blew out fully inserted without 3.Relay damage 2.Replace the fuse( 30A) assistance 4.Thecontroller motor or sensor is 3.Replace the relay damaged 4.Contact with suppliers and replace it…
This manual is also suitable for:
Cf500-a

-
#1
Есть у кого, киньте в меня пожалуйста!

-
#2
Последнее редактирование: 31 Янв 2017

-
#5
Там описание настройки иглы карбюратора.Я думаю не столь важная.
-
#6
Может быть и не в тему я при ремонте пользуюсь не только форумом(за что ему (ОГРОМНОЕ СПАСИБО) и сайтом ( промалчу ) но и книжным пособием вообще не плохо.
-

51 KB
Просмотры: 1,282
-
#13
вот моя подборка инструкций по ремонту на х6 в папке разное на х5 и х8 х 6.rar

-
#14
На Х8 есть русский сервис-мануал.
У меня в подписи.
Давнооооооо лежит….
-
#16
На х6 есть у кого сервис мануал?
-
#18
Тоже нужен сервис мануал на х6
-
#19
Поиском пробывали в гугле искать ??? Учим английский
CFMoto CF625-C Specifications | Manualzz
View online(267 pages) or download PDF(14.87 MB) CFMoto CF625-C Specifications • CF625-C Offroad Vehicle pdf manual download and more CFMoto online manuals
![]()
manualzz.com
-
#20
Сервисмануал на Z8-EFI не попадался ? Спасибо
-
Bookmarks
Quick Links
READ THIS MANUAL CAREFULLY!
Related Manuals for CF MOTO CF500-A
Summary of Contents for CF MOTO CF500-A
- Page 1
READ THIS MANUAL CAREFULLY! - Page 9
Failure to follow the warnings contained in this manual can result in serious injury or death. An ATV is not a toy and can be hazardous to operate. This vehicle handles differently from other vehicles, such as motorcycles and cars. A collision or rollover can occur quickly, even during routine maneuvers like turning, or driving on hills or over obstacles, if you fail to take proper precautions. - Page 10
You should review this information on a regular basis. If you purchased a used ATV from a party other than a dealer, you can request this free safety training from any authorized dealer. Familiarize yourself with all laws and regulations concerning the operation of this vehicle in your area. We strongly advise you to strictly follow the recommended maintenance program outlined in your owner s manual. - Page 11
The safety alert caution indicates a potential hazard that may result in minor personal injury or damage to the vehicle. A caution indicates a situation that may result in damage to the vehicle. A note will alert you to important information or instructions. - Page 12
Read this manual and all labels carefully, and follow the operating procedures described. Never operate an ATV without proper instruction. Take a training course. Beginners should receive training from a certified instructor. Contact an authorized ATV dealer to find out about the training courses nearest you. - Page 13
Always keep both hands on the handlebars and both feet on the foot-rests of the ATV during operation. Always travel slowly and use extra caution when operating on unfamiliar terrain. Be alert to changing terrain conditions. Never operate on excessively rough, slippery, or loose terrain. Always follow proper turning procedures as described in this manual. - Page 14
any hill until you ve mastered (on level ground) the turning technique outlined in this manual. Avoid crossing the side of a steep hill when possible. Always use proper procedures if you stall or roll backwards while climbing a hill . To avoid stalling , maintain a steady speed when climbing a hill. - Page 15
in reverse, move slowly and avoid turning at sharp angles. Always use the size and type of tires specified for your ATV, and always maintain proper tire pressure. Never modify an ATV through improper installation or use of accessories. Never exceed the stated load capacity for your ATV. Cargo must be properly distributed and securely attached. - Page 16
We are concerned with the safety of our customers and for the general public. Therefore , we strongly recommend that consumers do not install on an ATV any equipment that may increase the speed or power of the vehicle, or make any other modifications to the vehicle for these purposes. Any modifications to the original equipment of the vehicle create a substantial safety hazard and increase the risk of body injury. - Page 39
Warning decals have been placed on the ATV for your protection. Read and follow the instructions on each decal carefully. If a decal becomes illegible or comes off, contact your dealer to purchase a replacement. - Page 43
Always wear clothing suited to the type of riding. ATV riding requires special protective clothing for comfort and to reduce the chance of injury. Your helmet is the most important piece of protective gear for safe riding. An approved helmet can prevent a severe head injury. Do not depend on sunglasses for proper eye protection. - Page 44
Off-road style gloves with knuckle pads are the best for comfort and protection. The best footwear is a pair of strong over-the-calf boots with heels, like moto-cross boots. Always wear long sleeves and long pants to protect arms and legs. Riding pants with kneepads and a jersey with shoulder pads provide the best protection. - Page 45
Top speed is normally limited when operating in 4WD-LOCK. If conditions require more engine power when riding forward, push and hold this switch to override the 4WD-LOCK speed limiting function. (See page 49-52 for a detailed explanation about the front gear lock switch and its function.) Releasing the switch restores the speed limiting function. - Page 46
When the switch is at this position, the front pilot light, the rear pilot light and instrument light are on. When the switch is at this position, headlight, the front pilot light, the rear pilot light and instrument light are off. Press the switch to , the left turning indicator and left turning light are on. - Page 47
The front brake lever is located on the right handlebar. Pull it toward the handlebar to apply the front brake. The brake pedal is located on the right side of the machine and the brake lever is located on the left handlebar. Push down on the pedal or pull the lever toward the handlebar to apply the rear brake. - Page 48
Operating the ATV with a spongy brake lever can result in loss of braking, which could cause an accident. Never operate the ATV with a spongy-feeling brake lever. Always test brake lever travel and master cylinder fluid level before riding. When squeezed, the lever should feel firm. - Page 49
An over-full master cylinder may cause brake drag or brake lock-up, which could result in serious injury or death. Maintain brake fluid at the recommended level. Do not overfill. When checking the fluid level, the ATV must be on level ground with the handlebars straight. If the fluid level is low, add DOT3 brake fluid only. - Page 50
When parking, stop the engine and shift the gear selector Lever into the park position. Operating the ATV while the parking brake is engaged could result in an accident and serious injury or death. Always check to be sure the parking brake is disengaged before operating. - Page 51
The choke assists in starting a cold engine. Refer to the engine starting procedure on page 60 for correct choke and throttle settings during starting. The fuel tank filler cap is located directly below the handlebar. Remove the fuel tank filler cap by turning it counterclockwise. Install the fuel tank filler cap by turning it clockwise. - Page 52
Gasoline is highly flammable and explosive under certain conditions. Always exercise extreme caution whenever handling gasoline. Always refuel with the engine stopped, and outdoors or in a well ventilated area. Never fill a gas plastic container while it’s in the racks. Static electricity between the rack and container could cause a spark. - Page 53
The transmission gear selector is located on the left side of the vehicle. L: Low Gear H: High Gear N: Neutral R: Reverse P: Park To shift into Reverse or Park, you must first apply the rear brake lever or pedal to activate the lock-out mechanism. When shifting out of Reverse or Park, it’s necessary to apply the rear brake lever or pedal. - Page 54
To extend belt life, use low forward gear in heavy pulling situations and when operating at less than seven miles per hour for extended periods of time. If towing the vehicle is necessary, shift the transmission into neutral for better mobility and to prevent damage to the belt. - Page 55
Extending the starter rope too far will cause damage to the recoil assembly. Do not extend the starter rope so far that it stops. If the starter rope handle is not seated properly, water may enter the recoil housing and damage components. Make sure the handle is fully seated on the recoil housing, especially when driving in wet areas. - Page 56
To change from 2WD to 4WD, stop the ATV, and then set the switch to . When the ATV is in 4WD, the 4WD indicator will come on in the dashboard display. To change from 4WD to 2WD, stop the ATV, be sure the lever is set to position , and then set the switch to 2WD . - Page 57
When the switch is set to LOCK , the front gear lock indicator light will flash until the front gear is locked. When the indicator light is flashing, turning the handlebar left and right will help the front gear lock to engage. - Page 58
Check the operation of the throttle lever before you start the engine. If it does not work smoothly, check for the cause. Correct the problem before riding the ATV. Consult your dealer if you can t find or solve the problem yourself. - Page 59
Functions of the respective switch positions are as follows: The engine can be started only at this position and the headlights and taillight come on when the light switch is on. The key can not be removed in this position. OFF: All electrical circuits are switched off. - Page 60
: This indicator comes on when the 2WD / 4WD switch is set to the 4WD position. : The front lock indicator DIFF.LOCK in the four-wheel-drive indicator comes on when the LOCK 4WD switch is set to the LOCK-4WD position. Due to the synchronizing mechanism in the front gear case, the four- wheel drive indicator may not come on until the ATV starts moving. - Page 61
This indicator light comes on when the gear selector is in the R reverse position. This indicator light comes on when the gear selector is in the P (park) position. This indicator light comes on when press the turning switch to This indicator light comes on when press the override switch. - Page 62
when the temperature indicator is in the white area of side C, it means that the temperature is normal. The red area of side H indicates that the temperature is high. In that case please stop the engine until the coolant temperature goes down. In case the temperature frequently goes high, check coolant capacity or consult the local dealer. - Page 63
The break-in period for your new ATV is defined as twenty first ten hours of operation, or the time it takes to use the first four full tanks of gasoline. No single action on your part is as important as following the procedures for a proper break-in. - Page 64
6. Pull only light loads. 7. During the break-in period, change both the oil and the filter at 25 hours or one month. If a proper inspection is not done before each use, severe injury or death could result. Always inspect the vehicle before each use to ensure it s in proper operating condition. - Page 66
Engine exhaust contains poisonous carbon monoxide and can cause loss of consciousness resulting in severe injury or death. Never run an engine in an enclosed area. Operating the vehicle immediately after starting could cause engine damage. Allow the engine to warm up for several minutes before operating the vehicle. - Page 67
Position : Cold engine start ambient temperature Above (80 F) and warm engine start position. 5. Completely close the throttle lever and start the engine by pushing the start switch. If the engine fails to start, release the start switch, then push the start switch again. - Page 68
See the Break-In Period section prior to operating the engine for the first time. To start a warm engine, refer to the Starting a cold engine section. The starter (choke) should not be used. The throttle should be opened slightly. Before shifting, you must stop the machine and return the throttle lever to the closed position. - Page 69
3. Open the throttle lever gradually. Shifting: Neutral to Reverse and Reverse to Park The gear selector cannot be shifted into reverse (R) or park(P) without applying the rear brake. 1. Bring the machine to a complete stop and return the throttle lever to the closed position. - Page 70
Overloading the vehicle or carrying or towing cargo improperly can alter vehicle handling and may cause loss of control or brake instability. Always follow these precautions when hauling cargo: Never exceed the stated load capacity for this vehicle. Reduce speed and allow a greater distance for braking. When operating over rough or hilly terrain, reduce speed and cargo to maintain stable driving conditions. - Page 71
Carrying a load on only the front rack or the rear rack may cause an imbalanced condition and increases the possibility of vehicle overturn. Balance loads proportionally between the front rack and the rear rack, but do not exceed the stated load capacity. Use extreme caution when applying brakes with a loaded vehicle. - Page 72
Your ATV has been designed to carry or tow a certain amount of load. Always read and understand the load distribution warnings listed on the warning labels, and never exceed the specified weights. Cargo weight should be mounted as low as possible. When operating over rough or hilly terrain, reduce speed and cargo to maintain stable driving conditions. - Page 73
1. Sit upright with both feet on the footrests and both hands on the handlebars. 2. Start the engine and allow it to warm up, apply the brakes, then shift the transmission into gear. 3. Check your surroundings and determine your path of travel. 4. - Page 74
To make a turn, steer in the direction of the turn, leaning your upper body to the inside of the turn while supporting your weight on the outer footrest. This technique alters the balance of traction between the wheels, allowing the turn to be made smoothly. The same leaning technique should be used for turning in reverse. - Page 75
Whenever riding on slippery surfaces such as wet trails or loose gravel, or during freezing weather, follow these precautions: 1. Slow down when entering slippery areas. 2. Maintain a high level of alertness, reading the trail and avoiding quick, sharp turns which can cause skids. 3. - Page 76
Whenever traveling uphill, follow these precautions: 1. Always travel straight uphill. 2. Avoid steep hills (25 maximum). 3. Keep both feet on the footrests. 4. Shift your weight forward. 5. Proceed at a steady rate of speed and throttle opening. 6. - Page 77
Braking and handling are greatly affected when operating in hilly terrain. Improper procedure could cause loss of control or overturn and result in serious injury or death. Avoid climbing steep hills (25 maximum). Use extreme caution when operating on hills, and follow proper operating procedures outlined in the owner s manual. - Page 78
2. Lean into the hill, transferring your upper body weight toward the hill while keeping your feet on the footrests. 3. Steer slightly into the hill to maintain vehicle directions. If the vehicle begins to tip, quickly turn the front wheel downhill, if possible, or dismount on the uphill side immediately! Whenever descending a hill, follow these precautions: 1. - Page 79
Improper hill climbing procedures could cause loss of control or overturn and result in serious injury or death. Avoid climbing steep hills (25 maximum). Use extreme caution when operating on hills, and follow proper operating procedures outlined in the owner s manual. If the vehicle stalls while climbing a hill, never back it down the hill! One maneuver that can be used when it s necessary to turn around while climbing a hill is the K-turn:… - Page 80
7. Restart the engine, while holding the brake lever, shift the gear selector lever to low gear position. 8. Release the brake and proceed slowly, controlling speed with the brake, until the vehicle is on more level ground. Your ATV can operate through water with a maximum recommended depth equal to the bottom of the footrests . Follow these procedures when operating through water: 1. - Page 81
Avoid operating the vehicle through deep or fast-flowing water. If you cannot avoid water that exceeds the recommended maximum depth , go slowly , balance your weight carefully , avoid sudden movements, and maintain a slow and steady forward motion. Do not make sudden turns or stops, and do not make sudden throttle changes. - Page 82
Be alert! Look ahead and learn to read the terrain. Be constantly alert for hazards such as logs, rocks and low hanging branches. Severe injury or death can result if your vehicle comes in contact with a hidden obstacle. Not all obstacles are immediately visible. - Page 83
Follow these precautions when operating in reverse: 1. Always avoid backing downhill. 2. Back slowly. 3. When in reverse, apply the brakes lightly for stopping. 4. Avoid turning at sharp angles in reverse. 5. Never open the throttle suddenly while backing. Failure to use caution when operating in reverse can result in serious injury or death. - Page 84
Avoid parking on an incline if possible. If it s unavoidable, follow these precautions: 1. Turn the engine off. 2. Place the gear selector to parking position. 3. Always block the rear wheels on the downhill side as illustrated. - Page 85
To achieve maximum traction while riding in 2WD or 4WD, the two rear wheels are mounted solidly on one axle and turn together at the same speed. Furthermore, when riding in 4WD-LOCK DIFF. LOCK ), the front wheels also turn together at the same speed. Therefore, unless the wheel on the inside of the turn is allowed to slip or lose some traction, the ATV will resist turning. - Page 86
This procedure should be practiced at slow speed many times in a large area with no obstacles. If an incorrect technique is used, your ATV may continue to go straight. If the ATV doesn t turn, come to a stop and then practice the procedure again. - Page 87
Auxiliary power outlets provide 12V power for operating accessories such as hand held spot lights. See your dealer. Careful periodic maintenance will help keep your vehicle in the safest, most reliable condition. Inspection, adjustment and lubrication of important components are explained in the periodic maintenance chart. - Page 88
Frequent immersion in mud, water or sand Racing or race-style high RPM use Prolonged low speed, heavy load operation Extended idle Short trip cold weather operation Pay special attention to the oil level. A rise in oil level during cold weather can indicate contaminants collecting in the oil sump or crankcase. - Page 89
Perform all services at whichever maintenance interval is reached first. Steering Pre-Ride Make adjustments as needed. See Pre-Ride Checklist on page 58. Front suspension Pre-Ride Rear suspension Pre-Ride Tires Pre-Ride Brake fluid level Pre-Ride Brake lever/pedal travel Pre-Ride Brake systems Pre-Ride Wheels/fasteners Pre-Ride… - Page 90
Check level daily, change coolant Coolant Daily every 2 years Check operation; apply dielectric Headlamp/tail lamp Daily grease if replacing Air filter, main element Weekly Inspect; replace as needed Drain water as needed, check often Recoil housing Weekly if operating in wet conditions Brake pad wear Monthly 60 (100) - Page 91
Shift Linkage 310 (500) Inspect, lubricate, adjust Steering 310 (500) Lubricate Front suspension 310 (500) Lubricate Rear suspension Lubricate 310 (500) Drain bowl periodically and prior Carburetor float bowl 310 (500) to storage Throttle Cable/ ETC Inspect; adjust; lubricate;replace if 310 (500) necessary Switch… - Page 92
Oil filter change 100H 620 (1000) Replace with oil change Oil tank vent hose 100H 12 M 620 (1000) Inspect routing, condition Valve clearance 100H 12 M 620 (1000) Inspect; adjust Check for leaks at tank cap, lines, fuel valve, filter, carburetor; replace Fuel system 100H 12 M… - Page 93
Clutches 100H 12 M 620 (1000) Inspect; clean; replace worn parts (drive and driven) Wheel bearings 100 H 12 M 1000 (1600) Inspect; replace as needed Brake fluid 200 H 24 M Change every two years 1240 (2000) Spark arrestor 300 H 36 M 1860 (3000) - Page 94
Check and lubricate all components at the intervals outlined in the Periodic Maintenance Chart beginning on page 83. Items not listed in the chart should be lubricated at the General Lubrication interval. More often under severe use, such as wet or dusty conditions All Season Grease Use U-Joint Lube every 500 miles, before long periods of storage, or after pressure washing or submerging Engine… - Page 95
Always check and change the engine oil at the intervals outlined in the Periodic Maintenance Chart beginning on page 83. Always change the oil filter whenever changing oil. 1. Pull outward on the areas shown . 2. Position the ATV on a level surface. 3. - Page 96
7. If the engine oil is at or below the lower limit mark, add sufficient oil of the recommended type to raise it to the correct level. 8. Insert the dipstick into the oil filler hole, and then tighten the oil filler cap. 9. - Page 97
7. Apply a light coat of engine oil to the O-ring of the new oil filter cartridge. Make sure the O-ring is seated properly. 8. Install the new oil filter cartridge with an oil filter wrench, and then tighten it to the specified torque with a torque wrench. Oil filter cartridge tightening torque: 17 N m (1.7 m kgf, 12 ft lbf) - Page 98
The rear gear case must be checked for oil leakage before each ride. If any leakage is found, have your dealer check and repair the ATV. 1. Place the machine on a level place. 2. Place a container under the rear gear case to collect the used oil. - Page 99
6. Install the filler bolt and tighten to the specified torque. Filler bolt (rear gear case) tightening torque: 23 N m (2.3 m kgf, 16 ft lbf) 7. Check for oil leakage. If oil leakage is found, check for the cause. Be sure no foreign material enters the rear gear case. - Page 100
4. Install the drain bolt and tighten it to the specified torque. Drain bolt tightening torque: 10 N m (1.0 m kgf, 7.2 ft lbf) 5. Fill the front gear case with oil. Periodic oil change oil quantity: 0.28 L (0.25 Imp qt, 0.3 US qt) Total amount oil quantity: 0.33 L (0.29 Imp qt, 0.35 US qt) 6. - Page 101
3. If the coolant is at or below the lower limit mark, remove the reservoir cap, add coolant to the upper limit mark, install the reservoir cap, and then install the panel. Coolant reservoir capacity(up to the upper limit mark):0.3 L (0.26 Imp qt, 0.32 US qt) Hard water or salt water is harmful to the engine. - Page 102
5. Disconnect the hose on the coolant reservoir side, and then drain the coolant from the coolant reservoir. 6. After draining the coolant, thoroughly flush the cooling system with clean tap water. 7. Replace the coolant drain bolt washer if it is damaged, and then tighten the coolant drain bolt to the specified torque. - Page 103
Coolant reservoir capacity (up to the upper limit mark): 0.3 L (0.26 Imp qt, 0.32 US qt) Hard water or salt water is harmful to the engine. You may use soft water if you can not get distilled water. 12. Install the radiator cap. 13. - Page 104
Check the protective boots for holes or tears. If any damage is found, have them replaced by your dealer. Removal 1. Remove panel. 2. Remove the spark plug cap. 3. Use the spark plug wrench in the tool kit to remove the spark plug as shown. - Page 105
The spark plug is an important engine component and is easy to inspect. The condition of the spark plug can indicate the condition of the engine. The ideal color on the white insulator around the center electrode is a medium-to-light tan color for a ATV that is being ridden normally. - Page 106
3. Install the spark plug and tighten it to the specified torque. Spark plug tightening torque: 17.5 N m (1.75 m kgf, 12.5 ft lbf) If a torque wrench is not available when you are installing a spark plug, a good estimate of the correct torque is 1/4 to 1/2 turn past finger tight. - Page 107
1. Remove the seat. 2. Remove the air filter case cover by unhooking the holders. 3. Remove the air filter element. 4. Remove the air filter element from its frame. 5. Wash the air filter element gently but thoroughly in solvent. 6. - Page 108
12. Install the seat. The air filter element should be cleaned every 20 40 hours. It should be cleaned and lubricated more often if the machine is operated in extremely dusty areas. Each time air filter element maintenance is performed, check the air inlet to the air filter case for obstructions. Check the air filter element rubber joint to the carburetor and manifold fittings for an airtight seal. - Page 109
4. Insert the tailpipe into the muffler and align the bolt holes. 5. Install and tighten the bolts. When cleaning the spark arrester: Always let the exhaust system cool prior to touching exhaust components. Do not start the engine when cleaning the exhaust system. If dust or water collects in the V-belt cooling duct check hose, remove the hose and clean it. - Page 110
After riding in water deep enough to allow it to enter the V-belt case, remove this bolt to drain the water from the case. If water drains from the V-belt case after removing the bolt, have your dealer inspect the ATV as the water may affect other engine parts. - Page 111
A diagnostic tachometer must be used for this procedure. 1. Start the engine and warm it up for a few minutes at approximately 1,000 to 2,000r/min. Occasionally rev the engine to 4,000 to 5,000 r/min. The engine is warm when it quickly responds to the throttle. - Page 112
Adjust the engine idling speed before adjusting the throttle lever free play. 1. Loosen the locknut. 2. Turn the adjusting bolt until the throttle lever free play is 3 5 mm (0.12 0.20 in). 3. Tighten the locknut. Check the brake pads for damage and wear. If a brake pad thickness is less than 2 mm (0.08 in), have your dealer replace the pads as a set. - Page 113
Inspect the brake pads for damage and wear. If the thickness is less than 4 mm(0.16 in), have your dealer replace the pads. Insufficient brake fluid may let air enter the brake system, possibly causing the brakes to become ineffective. Before riding, check that the brake fluid is above the lower level and replenish when necessary. - Page 114
Observe these precautions: 1. When checking the fluid level, make sure the top of the master cylinder reservoir is level by turning the handlebars. 2. Use only the designated quality brake fluid. Otherwise, the rubber seals may deteriorate, causing leakage and poor brake performance. - Page 115
Complete fluid replacement should be done only by trained service personnel. Have your dealer replace the following components during periodic maintenance or when they are damaged or leaking. Replace the oil seals every two years. Replace the brake hoses every four years. The front brake lever should have a free play of zero mm (zero in) at the lever end. - Page 116
The rear brake lever free play should be 0.5 2 mm (0.02 0.08 in). 1. Loosen the locknut . 2. Turn the adjusting bolt in direction to increase free play, and in direction to decrease free play. 3. Tighten the locknut . If correct free play cannot be obtained, ask your dealer to make that adjustment. - Page 117
The top of the brake pedal should be positioned 72mm (2.8 in) above the top of the footrest. If not, ask your dealer to adjust it. After servicing: Make sure the brakes operate smoothly and that the free play is correct. Make sure the brakes do not drag. - Page 118
Turn the adjusting nut while holding the rear brake light switch in place. To make the brake light come on earlier, turn the adjusting nut in direction . To make the brake light come on later, turn the adjusting nut in direction Inspect cables frequently. - Page 119
1. Loosen the wheel nuts. 2. Elevate the ATV and place a suitable stand under the frame. 3. Remove the nuts from the wheel. 4. Remove the wheel. 1. Install the wheel and the nuts. Tapered nuts are used for both the front and rear wheels. - Page 120
2. Lower the ATV so that the wheel is on the ground. 3. Tighten the wheel nuts to the specified torque. Wheel nut torque: Front: 55 N m ( 5.5 m kgf, 40 ft lbf). Re ar: 55 N m (5.5 m kgf, 40 ft lb f) This machine is equipped with a sealed-type battery. - Page 121
1. When the machine is not used for a month or longer, remove the battery and store it in a cool, dark place. Completely recharge the battery before reinstallation. A special battery charger (constant voltage/ampere or constant voltage) is required for recharging a sealed- type battery. - Page 122
To prevent accidental short-circuiting, turn off the main switch when checking or replacing a fuse. If a headlight bulb burns out, replace it as follows: 1. Remove the bolts and pulling headlight cover off. 2. Remove the rubber cover at the rear of the headlight by pulling it off. - Page 123
5. Insert a new headlight bulb into the headlight bulb holder, and then lock it by spring. 6. Install the bulb holder by turning it clock-wise. 7. Install the rubber cover at the rear of the headlight. 8. Install the headlight cover with the bolts. It is advisable to have your dealer make this adjustment. - Page 124
If the tail/brake light bulb burns out, replace it as follows: 1. Remove the screws , and then pull tail/brake light cover out. 2. Remove the tail/brake light bulb by pushing it in and turning it counter-clockwise. 3. Insert a new tail/brake light bulb, push it in, and the turning it clockwise. 4. - Page 125
The spring preload can be adjusted to suit the rider s weight and riding conditions. When adjusting the rear shock absorbers, the rear wheels need to be removed. Adjust the spring preload as follows. To increase the spring preload, turn the adjusting ring in direction To decrease the spring preload, turn the ad-justing ring in direction… - Page 126
If your vehicle becomes immersed, major engine damage can result if the machine is not thoroughly inspected. Take the vehicle to your dealer before starting the engine. If it s impossible to take your ATV to a dealer before starting it, follow the steps outlined below. 1. - Page 127
Keeping your ATV clean will not only improve its appearance but it can also extend the life of various components. With a few precautions, your ATV can be cleaned much like an automobile. The best and safest way to clean your ATV is with a garden hose and a pail of mild soap and water. Use a professional type washing mitten, cleaning the upper body first and the lower parts last. - Page 128
Starting the engine during the storage period will disturb the protective film created by fogging and damage could occur. Never start the engine during the storage period. Make necessary repairs and then clean the ATV thoroughly with mild soap and warm water to remove all dirt and grime. - Page 129
Inspect and clean or replace the pre-cleaner and air filter. Clean the air box and drain the sediment tube. Inspect and clean or replace the breather filter. Inspect the following fluid levels and change if necessary: front gear case; transmission; brake fluid (change every two years or as required if fluid looks dark or contaminated). - Page 130
If you choose not to use Fogging Oil, perform the following procedure. 1. Support the front end of the machine so the engine is level or tilted slightly rearward. 2. Remove the spark plug. Rotate the piston to BDC and pour approximately two ounces of oil into the cylinder. 3. - Page 131
Remove the battery from the vehicle and ensure that it’s fully charged before placing it in storage. Engine Anti-Freeze Test engine coolant strength and change if necessary. Coolant should be replaced every two years. Set the tire pressure and safely support the ATV with the tires 1 2 off the ground. Be sure the storage area is well ventilated, and cover the machine with a ATV cover. - Page 132
Proper maintenance will protect chrome wheels from corrosion, preserve wheel life and ensure a like new appearance for many years. 1. Wash chrome rims frequently. Use a mild detergent to remove any salt, dirt, mud or grime. Never use abrasive cleaners on plated or painted surfaces. - Page 133
Driving the ATV onto a pickup or tall Shift transmission to low range during loading of the ATV to prevent belt trailer in high range. burning. When starting out on an incline, use low range or dismount the ATV (after Starting out going up a steep incline. - Page 134
Shift the transmission to low range, and carefully use fast, aggressive Stuck in mud or snow. throttle application to engage clutch. Excessive throttle may cause loss of control and vehicle overturn. Shift the transmission to low range, and carefully use fast, brief, aggressive Climbing over large objects from a throttle application to engage clutch. - Page 135
Contact your dealer for service if you’re unable to identify solutions using the following charts. Tripped circuit breaker Reset the breaker Low battery voltage Recharge battery to 12.5 VDC Loose battery connections Check all connections and tighten Loose solenoid connections Check all connections and tighten Out of fuel Refuel… - Page 136
Crankcase filled with water or fuel Immediately see your dealer Overuse of choke Inspect, clean and/or replace spark plugs Clogged fuel filter Replace the filter Low battery voltage Recharge battery to 12.5 VDC Mechanical failure See your dealer Poor quality or low octane fuel Replace with recommended fuel Incorrect ignition timing See your dealer… - Page 137
Weak spark from spark plugs Inspect, clean and/or replace spark plugs Incorrect spark plug gap or heat range Set gap to specs or replace plugs Old or non-recommended fuel Replace with new fuel Incorrectly installed spark plug wires See your dealer Incorrect ignition timing See your dealer Mechanical failure… - Page 138
Kinked or plugged fuel vent line Inspect and replace Incorrect fuel Replace with recommended fuel Clogged air filter Inspect and clean or replace Reverse speed limiter malfunction See your dealer Electronic throttle control malfunction See your dealer Other mechanical failure See your dealer Low or contaminated fuel Add or change fuel, clean the fuel system… - Page 139
Out of fuel refuel Kinked or plugged fuel vent line Inspect and replace Water present in fuel Replace with new fuel Overuse of choke Inspect, clean and/or replace spark plugs Fouled or defective spark plugs Inspect, clean and/or replace spark plugs Worn or defective spark plug wires See your dealer Incorrect spark plug gap or heat range… - Page 140
Clean radiator screen and core if equipped Overheated engine Clean engine exterior See your dealer…
-
Литература о мотоциклах
- Руководство по ремонту квадроцикла CF500
На этой странице
в любой момент можно бесплатно скачать много других пособий по мототранспорту
Руководство по ремонту квадроцикла CF500 и CF500A
Предлагаем скачать бесплатно по нижней ссылке руководство по ремонту CF500 и CF500A.
Руководство по ремонту модели квадроцикла (квадрицикла) CF500A и CF500.
Настоящее справочное издание содержит необходимые описание процедур контроля, обслуживания,
капремонта, операции разборки/сборки, демонтажа и монтажа самых разных компонентов и деталей. Кроме того в этой инструкции предоставлена развернутая
информация по устранению неисправностей и сервисные данные вместе с
иллюстрациями квадрицикла CF500А.
скачать
книгу
бесплатно
Предлагаем еще одно руководство по ремонту модели квадроцикла (квадрицикла) CF500A.
Настоящее пособие содержит необходимое описание процедур контроля, обслуживания, капремонта, а также разборки/сборки, демонтажа и монтажа компонентов и деталей, приведена информация по устранению неисправностей и сервисные данные, снабженные иллюстрациями квадрицикла CF500А.
Глава 1: общая информация по ремонту CF500А, необходимые инструменты, конструкция квадрицикла и его технические данные.
Глава 2: ключевые точки для контроля и регулировок, руководство по обслуживанию CF500А.
скачать
пособие бесплатно
Download Service manual of CFMoto CF625-B Offroad Vehicle for Free or View it Online on All-Guides.com.

1

2

3

4

5

6

7

8

9

10

11

12

13

14

15

16

17

18

19

20

21

22

23

24

25

26

27

28

29

30

31

32

33

34

35

36

37

38

39

40

41

42

43

44

45

46

47

48

49

50

51

52

53

54

55

56

57

58

59

WWW.CFMOTO.COM
CF625-B
CF625-C
Service
Manual