-
Contents
-
Table of Contents
-
Troubleshooting
-
Bookmarks
Quick Links
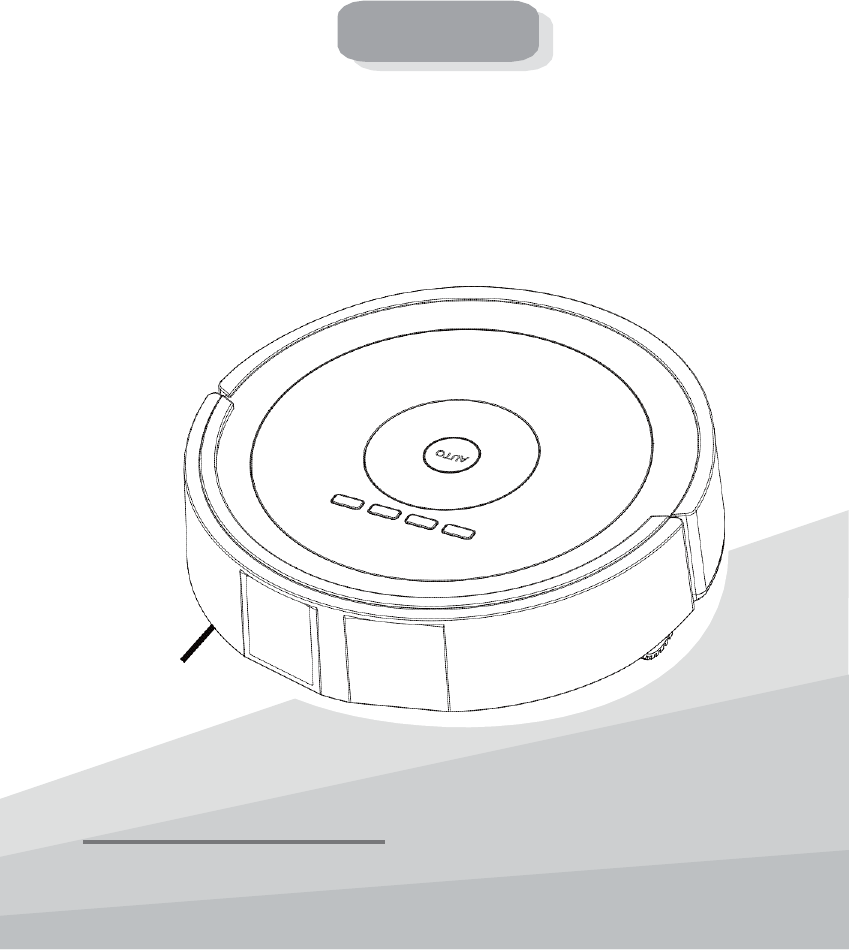
ROBOT VACUUM CLEANER
Model X6
With Remote Control
USER MANUAL
Thank you for purchasing the product.
Please read the Manual carefully before using.
A0
Related Manuals for Silver Star X6

Summary of Contents for Silver Star X6
-
Page 1
ROBOT VACUUM CLEANER Model X6 With Remote Control USER MANUAL Thank you for purchasing the product. Please read the Manual carefully before using. -
Page 2: Table Of Contents
Thank you for purchasing X6 intelligent vacuum cleaner. I hope you will enjoy your utilization! If you have any questions about the product during use, please dial our helpline.
-
Page 3: Safety Instructions
1. Safety Instructions 1.1 Use Instructions Please observe the following safety precautions prior to the use of this product: * Please operate this product in accordance with the steps indicated in the User Manual after perusing such a manual. * Keep the User Manual properly in order to be able to refer to it at any time in the future. * If you need to have any third party use this product, please hand it over together with the User Manual.
-
Page 4: About Children’s Safety
Caution Use it only indoors. Stop water, oil or others Arrange the scattered Please take away wires on the floor something frangible from enter the cleaner before use to avoid before use. for fear of damage. hindering the work of the cleaner.
-
Page 5: Scope Of Use For The Product
1.5 Scope of Use for the Product This product applies to the ground environments as follows: Applicable Scope Wood floor Ceramic Tiles Undercoat Carpet Inapplicable Scope * It is inapplicable to the extremely hot or cold places. * It can only be used indoors. * Please don’t use it in the midair without the protective fence to avoid personal injury arising out of accidental fall.
-
Page 6: Product Composition
2. Product Composition 2.1 Main Body and Parts Charging Stand Battery Adapter Main Body Intelligent Vacuum Cleaner Side Brush Dust Brush User Manual Filter 感 谢 您 购 买 本 产 品 使 用 前 请 仔 细 阅 读 用…
-
Page 7: Names Of Components And Parts
2.2 Names of Components and Parts Front View of the Cleaner Top cover Dust Box START Control Buttons Front Shell Sensor Window Bottom View of the Cleaner Charging Pole Shoe Side Brush Front wheel Battery Compartment Right wheel Left wheel Floor brush Power switch Charging hole…
-
Page 8: Product Installation
3. Product Installation Please tear the protective film on the front laser glass before the first use of this cleaner. The work of each time starts from charging status! Please tear the protective film before use! Before the use of a new cleaner, please start it for use after the protective film on the front laser glass is torn. Installation of Charging Stand Top Cover of Charging Stand Charging-stand…
-
Page 9
Danger! High Voltage! Please operate it after drying hands. 1. No obstacles appear within 3 meters in front and 0.5 meter left and right! 2. Connect the adapter to the charging stand and power supply. Please arrange the cable of adapter to prevent the cleaner from being winded when it works. -
Page 10: Product Use
4. Product Use 4.1 Use of Main Body 4.1.1 Explanatory Chart of Indicators and Controls Buttons Button Introduction AUTO Auto Cleaning Su Mo Tu We Th Fr DOCK Auto Recharge HOUR DOCK CLOCK SPOT The indicator for this part Cur. Time Setting will light only in the time or CLOCK presetting mode.
-
Page 11
4.1.3 Operational Guideline of Main Body Function In the standby mode, press this button and the cleaner will start auto cleaning; re-press this button and it will stop working; in the clock/preset mode, press this button and this setting will be AUTO deleted. -
Page 12: Charging Methods
4.2 Charging Methods 4.2.1 Manual Charging: Danger! High Voltage! Please operate it after drying hands. 1. Charge the battery with the adapter: Connect the adapter plug with the charging hole of cleaner first and then power it on. Danger! High Voltage! Please The position of central line operate it after drying hands.
-
Page 13: Product Maintenance
Tips: 5. Product Maintenance Please clean and maintain the cleaner regularly as actually used. 5.1 Daily Storage If the cleaner lies idle Please close the power for a long time, please switch without fail when take the battery out and the cleaner lies idle for store it in a cool and dry fear of battery damage.
-
Page 14: Filter Cleaning
5.4 Filter Cleaning 2. Press the button on the dust box and the fan 1. Dismantle the dust box by following the steps of assembling and disassembling the dust box first, assembly will automatically pop up. and then open the baffle through moving the (Note: The fan assembly can’t be washed directly with buckles on both sides.
-
Page 15: Side-Brush Cleaning
Rubber Sleeve Rubber Sleeve Bearing 4. Take out the rubber sleeves separately from the 3. Take out the main brush and mid-brush. main brush and mid plastic brush. (Note: there is a bearing in the rubber sleeve. Don’t let it fall off during dismounting and cleaning.
-
Page 16: Sensor Cleaning
5.7 Wheel Cleaning Please clean the front wheel and left-right wheels with the dust brush regularly. (Note: The wheel spindle may be entangled by hair and cloth strips. If so, please remove them without delay.) 5.8 Sensor Cleaning After the cleaner completes cleaning each time, please scrape clean its transparent board with a piece of dry all-cotton cloth…
-
Page 17: Common Faults
6. Common Faults 6.1 Alarm and Prompt Note: 1. The cleaner will stop working or can’t be started in the following cases. 2. Please pay attention to the fault codes on the display screen. Please remove abnormalities by reference to the following table. Fault Code Interpretive Code Fault Forms…
-
Page 18: Technical Parameters
Faults Solutions 1. Check the APP for correct installation. The cleaner can’t sense APP. 2. Check the cleaner and iPad or mobile for normal connection. 1. Check if the cleaner starts “Local Cleaning” mode. “Local Cleaning” mode works The cleaner will halt 3-5 minutes.
-
Page 19: App Installation
8. Use of APP 8.1 How to download APP? Scan the two-dimensional code on the color box or on the right for APP downloading. 8.2 How to install APP? Install APP, register a new account and connect the machine as prompted. 8.3 How to use APP? 1.
-
Page 20
2. Click “Refresh” and the Main Body AP address will appear. Click “CONNECT” after selecting the Main Body AP address first and then enter the password of the Main Body at the area shown in Figure 2 (each Main Body has a label). Click “NEXTA” TO ENTER THE NEXT STEP. -
Page 21
4. Click “RETURN” on the mobile as shown in Figure 1 first and then enter the next APP operating phase by clicking “OPEN MAP” as shown in Figure 2. The operation interface of APP is shown as the following figure. Full Show of Map Local Show of Map Local… -
Page 22
Shenzhen Silver Star Intelligent Electronic Co., Ltd Address: Block D, Huiqing Technical Park, Dafu Industrial Zone, Aobei Community, Guanlan Street, Baoan District, Shenzhen City Post-sale service hotline:400 6671 909 Http://www. yxrobot.com Caution: This device complies with Part 15 of the FCC rules and Industry Canada license-exempt RSS standard(s).
ROBOT VACUUM CLEANER
Model X6
With Remote Control
USER MANUAL
Thank you for purchasing the product.
Please read the Manual carefully before using.
A0

Welcome to X6 intelligent vacuum cleaner!
This product is presently a robot of laser autonomous navigation with advanced
technology in the world. Equipped with a laser scanning rangefinder , it can create a
map and plan out the optimum cleaning path. Besides, it can automatically return to
the initial position after completing the cleaning work because it has the memory
function of map coordinates. In the meanwhile, such a robot can perform the
interactive control function between area space identification and APP visualization,
as well as the function of initiative obstacle avoidance, automatic recharge and timing
cleaning.
Thank you for purchasing X6 intelligent vacuum cleaner. I hope you will enjoy your
utilization! If you have any questions about the product during use, please dial our
helpline.
Helpline: 400 6671 909
Contents
1.
Safety Instructions………………2-4
1.1 Use Instructions
1.2 About Safety Matters of Product
1.3 About Children’s Safety
1.4 About Battery
1.5 Scope of Use for the Product
1.6 Exception Clause
2.
Product Composition……………5-6
2.1 Main Body and Parts
2.2 Names of Components and Parts
3.
Product Installation………………………7-8
4. Product Use…………………………………9—11
4.1 Use of Main Body
4.2 Use of Charging Stand
4.3 Charging Methods
5.
Product Maintenance……………12—15
5.1 Daily Storage
5.2 Body Cleaning
5.3 Dust-box Cleaning
5.4 Filter Cleaning
5.5 Middle Brush Cleaning
5.6 Side-brush Cleaning
5.7 Front-wheel Cleaning
5.8 Cleaning of Left-right Wheels
5.9 Sensor Cleaning
6.
Common Faults………………… 16—17
6.1 Alarm and Prompt
6.2 Troubleshooting
7.
Technical Parameters…………………17
8. APP Installation…………….….….…18—20
— 01 —
1. Safety Instructions
1.1 Use Instructions
Please observe the following safety precautions prior to the use of this product:
* Please operate this product in accordance with the steps indicated in the User Manual after perusing such a
manual.
* Keep the User Manual properly in order to be able to refer to it at any time in the future.
* If you need to have any third party use this product, please hand it over together with the User Manual.
* Any operational behavior against the guiding content in the User Manual is likely to result in serious personal
injury or damage to the product itself.
1.2 About Safety Matters of Product
Warning
This product is only for use with the Adapter, battery and charging stand
provided with this device, or the damage to the product, or electric shock or
fie caused by high pressure may arise.
If you find the main body and parts of this product damage, please stop
using it. Please contact our after-sales service department. Anyone but our
designated or authorized servicemen is not allowed to dismantle, repair or
change this product.
Don’t touch the power plug or the device with your wet hands, as this may
cause electric shock.
To avoid personal injury due to the accidental fall of this cleaner, please
don’t use it in the midair without protective fence.
Please don’t pull or move this product with the power cable and distort or
bend such a cable excessively or place something heavy on it.
Please keep this product far from fire or inflammable, explosive and
corrosive.
Never let your apparel or body parts (such as hair, nail, etc) drawn into the
brush or wheel of this cleaner, otherwise it may cause personal injury.
— 2 —
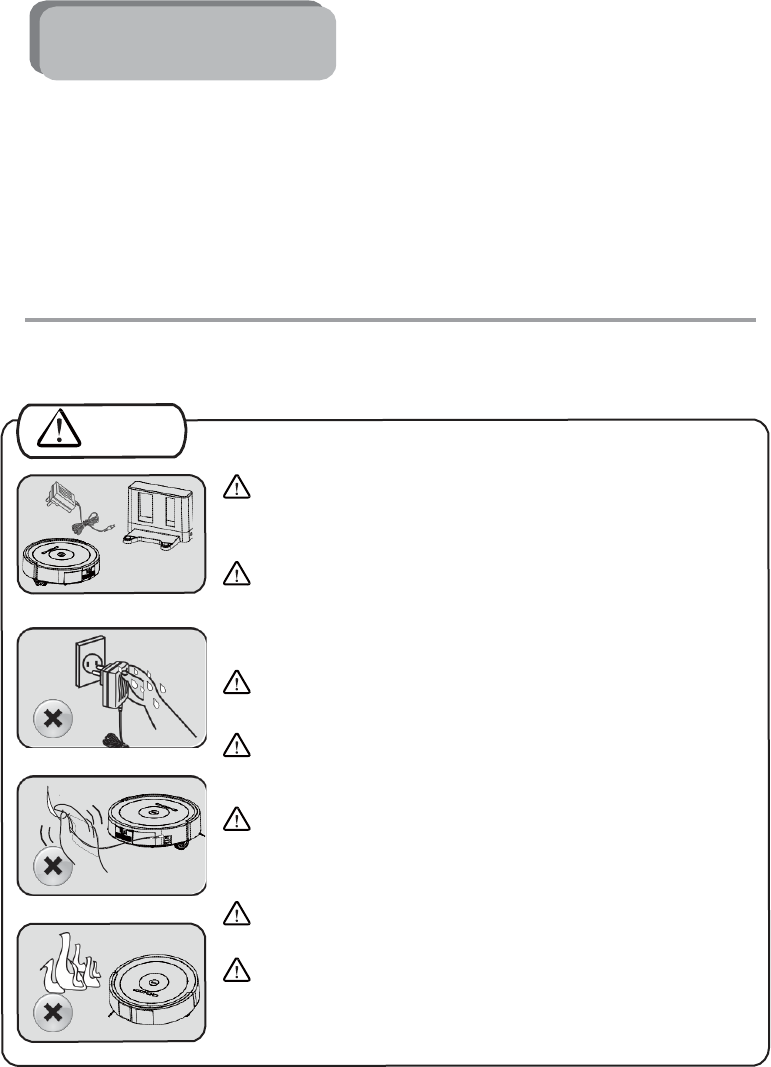
Caution
Use it only indoors. Stop water, oil or others
from enter the cleaner
for fear of damage.
Arrange the scattered
wires on the floor
before use to avoid
hindering the work of
the cleaner.
Please take away
something frangible
before use.
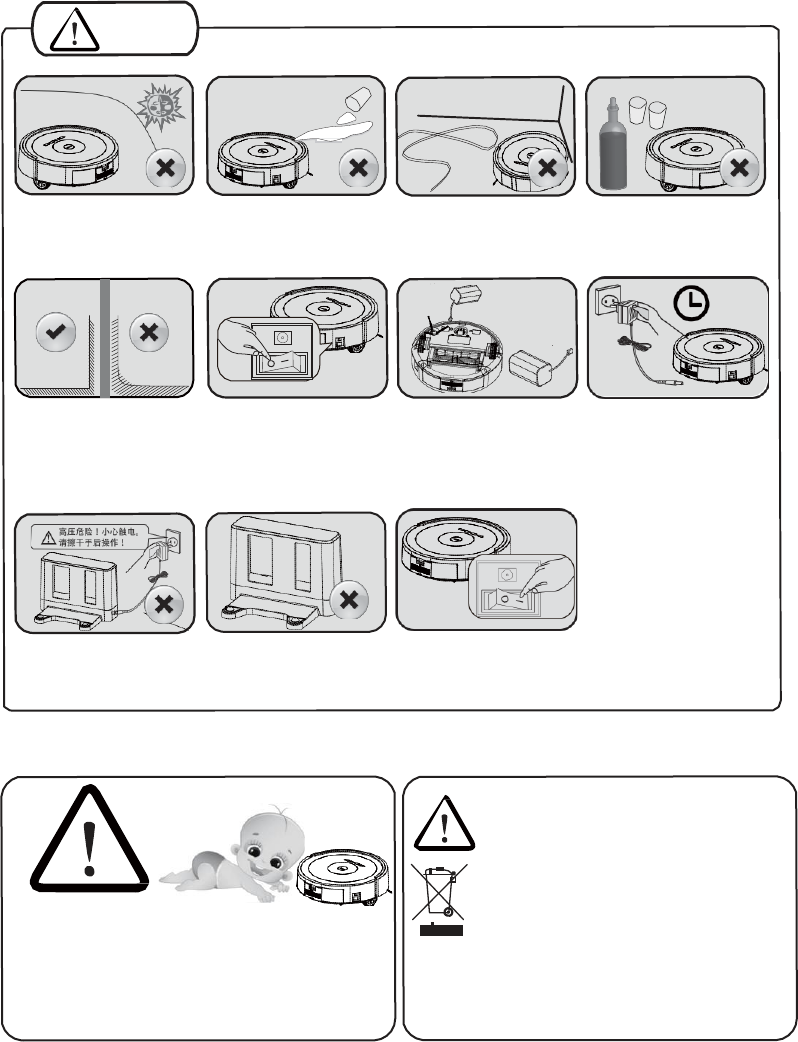
The charging stand
should be flat and
against the wall to
prevent the device from
being impacted.
OFF/ON
During the nonuse of
the device, please
power off the machine
to avoid battery damage.
If it is not used for a long
time, please charge the
battery fully first, and then
store it in the cool and dry
place to keep its bottom
dry and clean.
If it is used for the first
time or reused after lying
idle for a long time,
please use it after
charging it about 6 hours.
After charged fully for the
first 3 or4 times, it can be
charged when its power
is used up each time.
Please pull out the plug
from the outlet when the
charging stand lies idle
chronically.
Please don’t move the
charging stand or device
when the product works,
or it can’t be recharged.
OFF/ON
Wait for 15 seconds
after starting the
cleaner, because it is
checking.
1.3 About Children’s Safety
*
No use of this product by a child alone.
*
Children aren’t allowed to play with the
packing bag, or it will cause asphyxia.
1.4 About Battery
1.
This cleaner can only work with the battery from
the manufacturer.
2.
Turn off the power switch before removing the
battery.
3.
Please take out the battery when the cleaner is
discarded.
4.
If the battery of main body needs replacing, please
contact our after-sales service department. Use of
the wrong model of battery may cause accidents.
5.
In case of battery leakage, don’t attach its fluid to
your skin or clothing. If so, please send it to the
recycle bin or the designated repair center after
cleaning with the dry cloth. Don’t discard it at
random.
6.
Please duly handle the used battery of the cleaner (including
the remote control) because it contains environmentally
hazardous substances. Please follow the local environment
rules and throw such a battery into the designated recycle bin.
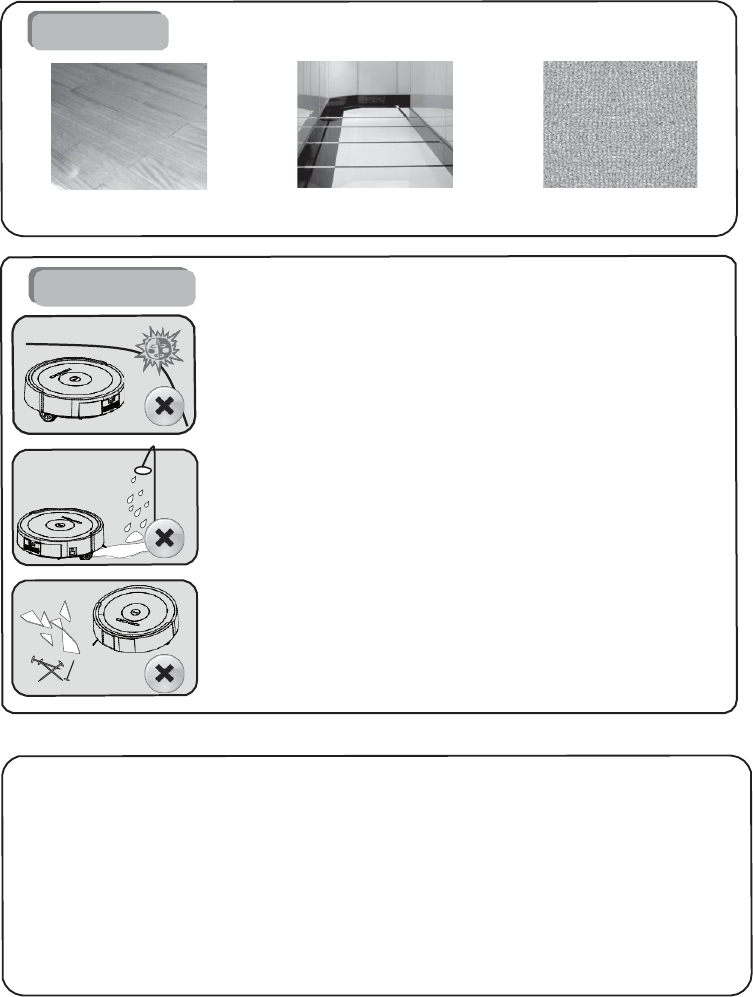
1.5 Scope of Use for the Product
Applicable Scope This product applies to the ground environments as follows:
Wood floor Ceramic Tiles Undercoat Carpet
Inapplicable Scope
* It is inapplicable to the extremely hot or cold places.
* It can only be used indoors.
* Please don’t use it in the midair without the protective fence to avoid
personal injury arising out of accidental fall.
* Don’t use it in the wet places or those with flammable, explosive and
corrosive.
* Don’t let the product collect the burning cigarette ends or matches and so
on.
* It can’t be used to collect the toners used in the laser printer and duplicator
because these substances may cause a fire.
* Please don’t collect something sharp such as glass sheet and iron nail with
it for fear of product damage.
1.6 Exception Clause
The cleaner can’t be repaired free of charge in one of the following cases:
A. The damage arises out of the user’s failure in use and storage of the cleaner according to our User Manual;
B. The complete device and components go beyond the warranty period;
C. The damage arises out of the disassembly not by our or our authorized servicemen;
D. The valid evidence of purchase can’t be provided.
E. The model in the warranty card disagrees with the product number or is altered.
F. The damage arises out of force majeure including natural disaster;
G. The product failure or damage arises out of unexpected factors or man-made reasons (including
misoperation, fluid inlet, improper insertion or pulling, hauling, bump, improper voltage input and others).
Tip: We undertake to warrant this product according to the State’s New Regulations on “Repair, Replacement
or Compensation of Faulty Products”. For details, see the warranty card attached with the product.
2.
Product Composition
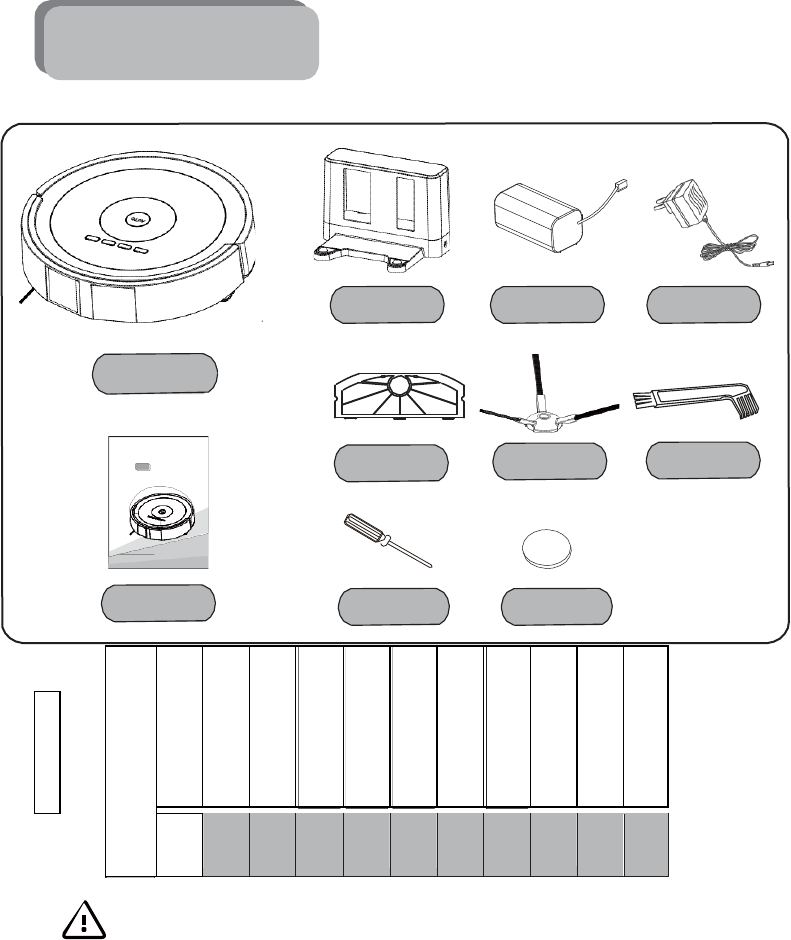
2.1 Main Body and Parts
Charging Stand Battery Adapter
Main Body
Intelligent Vacuum Cleaner
X6 User Manual Filter Side Brush Dust Brush
感 谢 您 购 买
本 产 品 使 用
前 请 仔 细 阅 读
用 户 指 南
A0
User Manual Screwdriver Mat
Tips:
* The battery, side brush and filter have been installed well in the main body.
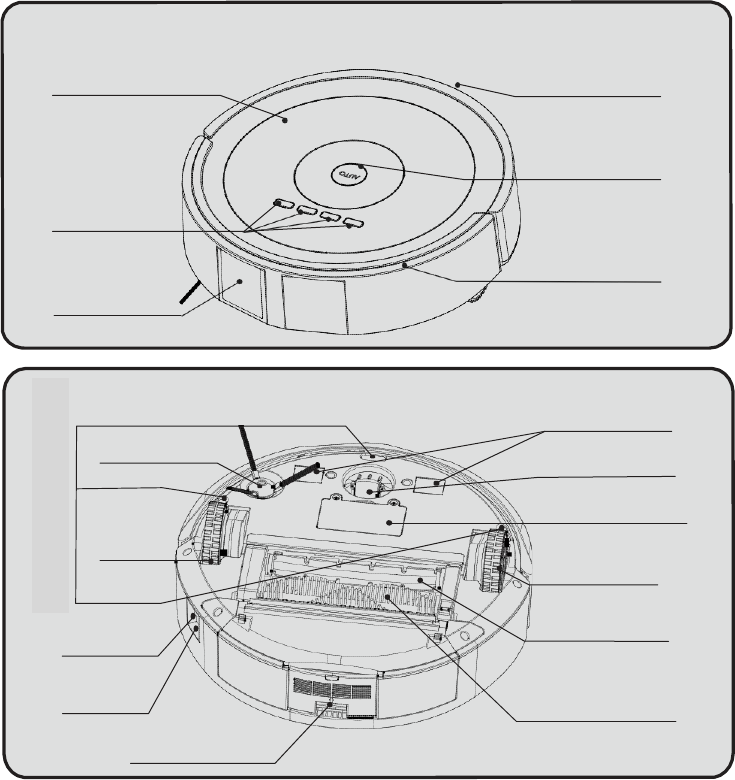
2.2 Names of Components and Parts
Front View of the Cleaner
Top cover Dust Box
Control Buttons
START
Sensor Window
Front Shell
Side Brush
Bottom View of the Cleaner
Charging Pole Shoe
Front wheel
Right wheel
Battery Compartment
Left wheel
Power switch
Charging hole
Floor brush
Main brush
Dust Box Button
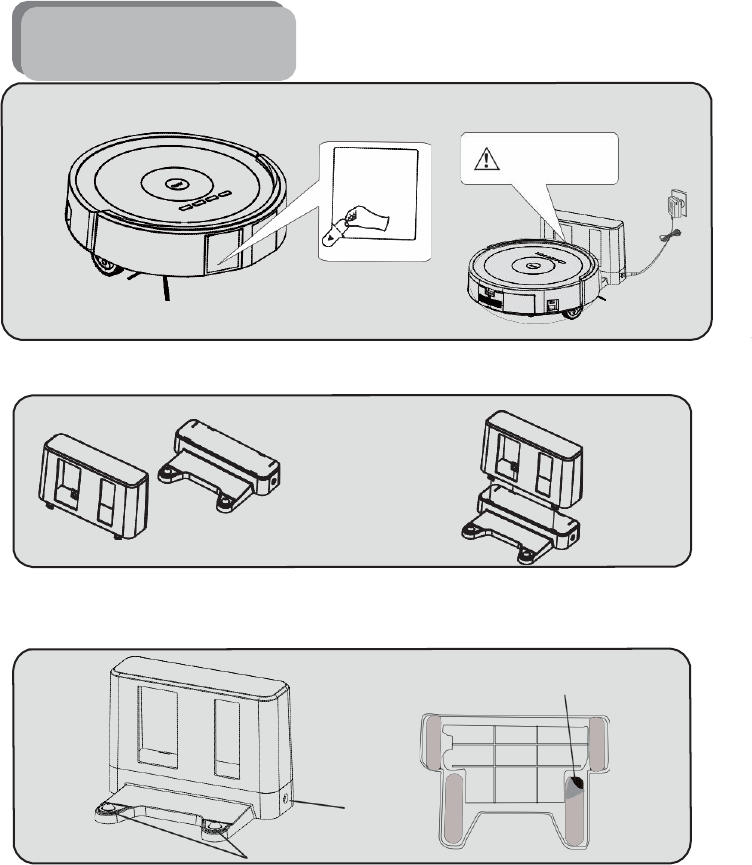
3.
Product Installation
Please tear the protective film on the front laser glass before the first use of this cleaner.
Please tear the
protective film
before use!
The work of each time
starts from charging
status!
Before the use of a new cleaner, please start it for use after the protective film on the front laser glass is torn.
Installation of Charging Stand
Top Cover of Charging Stand
Top Cover of
Charging Stand
Charging-stand
Base
Charging-stand Base
1. Take out the top cover and base of the charging stand from the packing box first.
2. Vertically press the top cover of such a stand after aiming such a cover at the button placement of the
charging-stand base to make such a cover completely fit for the base.
Tear the protective film
Adapter
Jack
Charging Terminal
Place the charging stand against the wall and press it with force after the protective film on the mat of
charging stand is torn. After that, connect the adapter with power and insert the DC plug into the DC
hole of charging stand.
Tip:
Don’t place the charging stand on the carpet, but at the permanent position. Please don’t move the
charging stand at random in the cleaning process, or the cleaner will not find the charging stand for
charging.
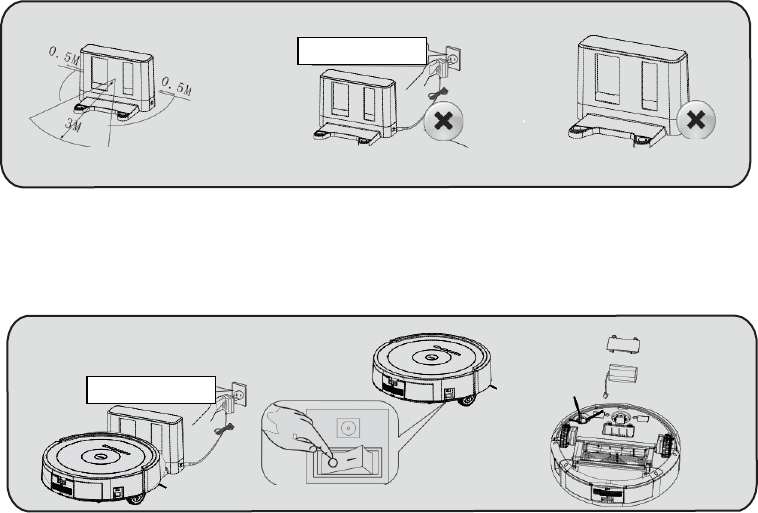
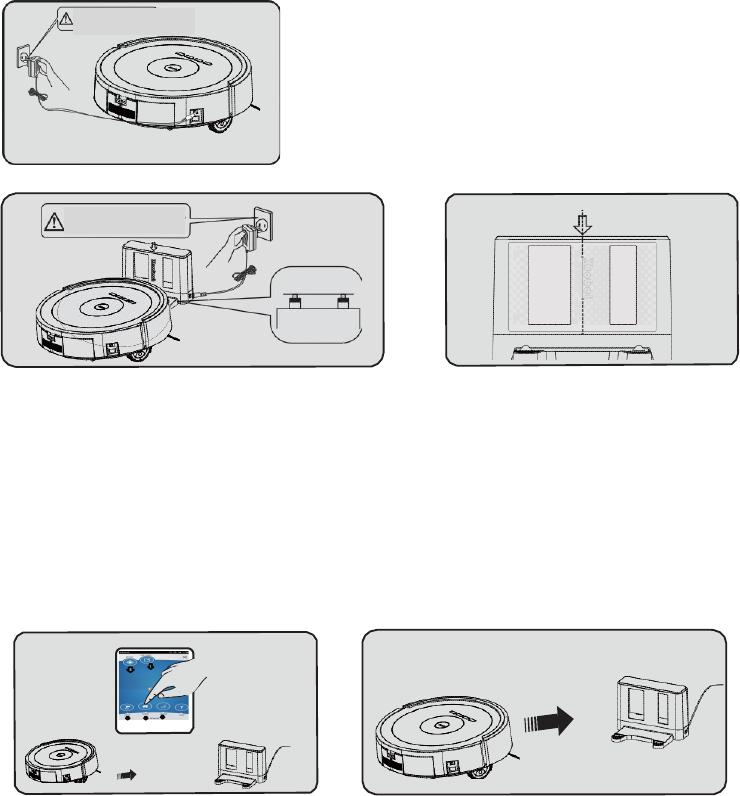
Danger! High Voltage! Please
operate it after drying hands.
1. No obstacles appear within 3 meters in front and 0.5 meter left and right!
2. Connect the adapter to the charging stand and power supply. Please arrange the cable of adapter to
prevent the cleaner from being winded when it works.
3. Please move the charging stand or the device when the product works, otherwise it can’t be recharged.
Precautions:
Danger! High Voltage! Please
operate it after drying hands.
OFF/ON
1. Please turn off the power switch when the vacuum cleaner lies idle for fear of battery damage.
2. If the vacuum cleaner lies idle for a long time, please charge the battery fully first, and then take out and
place it in a cool and dry place to keep the bottom of the cleaner dry and clean.
3. In case of the first use or reuse after long nonuse of the device, the cleaner can be used after the battery
is charged about 6 hours. Charging can start only after the power is completely consumed each time, if
the battery is charged fully in the first 3-4 time, which can keep the battery of optimum effect.
4. Please use the original battery from the manufacturer without fail, otherwise it may cause damage or
accidents.
4. Product Use
4.1
Use of Main Body
4.1.1
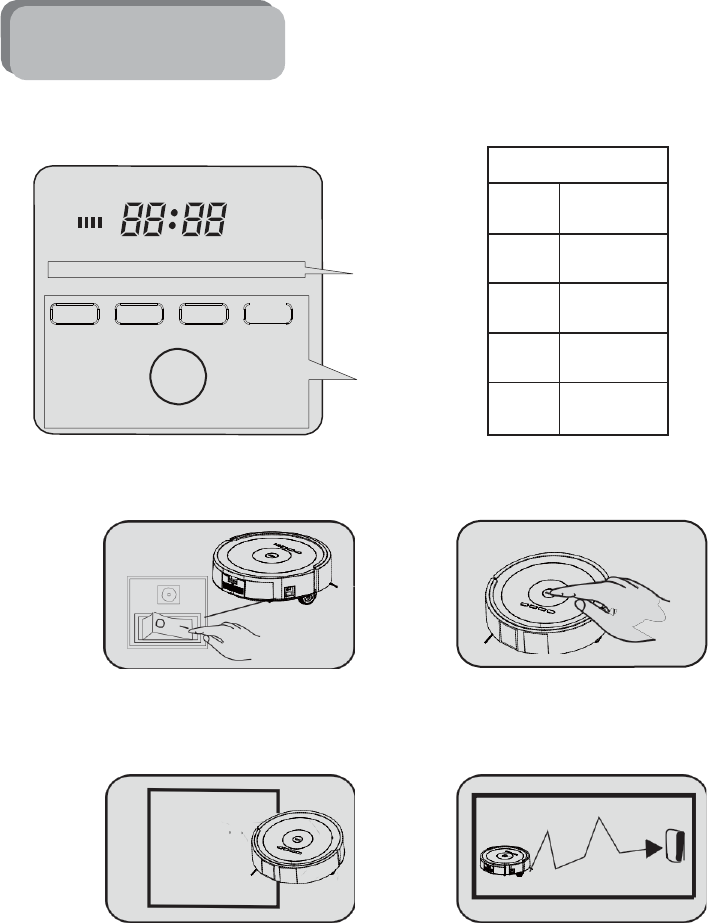
Explanatory Chart of Indicators and Controls Buttons
Su Mo Tu We Th Fr Sa
DAY
HOUR
MIN OK
DOCK
CLOCK
AUTO
SCH SPOT
The indicator for this part
will light only in the time or
presetting mode.
Control button
4.1.2
Working Mode:
OFF/ON
1. Ensure the cleaner battery is
charged fully. Turn on the power
switch and wait for 15 seconds and
the indicator will light. At this time
the cleaner is in the standby mode.
2. When the cleaner is standby, press the
“AUTO” button and it will start auto
cleaning. Press such a button again and
the machine will stop cleaning.
3. When the cleaner is standby, press
the STOP button and it will start local
cleaning within 1 meter. Press such a
button again and it will stop cleaning.
4. When the cleaner is standby,
press the “DOCK” button and it will
start auto recharge. Press such a
button again and it will stop
recharge.
Tip: If the cleaner is short of power, it will stop cleaning and automatically search the
charging stand for charging.

4.1.3
Operational Guideline of Main Body Function
AUTO
In the standby mode, press this button and the cleaner will start auto cleaning; re-press this
button and it will stop working; in the clock/preset mode, press this button and this setting will be
deleted.
SPOT In the standby mode, press this button and the cleaner will start spot cleaning;
In the clock / preset mode, press this button and this setting will be saved.
DOCK
CLOCK
In the working or standby mode, press this button and the cleaner will search the status of the
recharging stand; re-press this button and it will stop searching; in the clock/preset mode, press
this button and you can start the date setting. Press it once and days will increase one by one with
week as a unit, and time will be circulated continuously.
Press this button and the cleaner will enter the current time setting;
Press the “DOCK” button and you can start the week setting. Press it once and days will increase
one by one with week as a unit, and time will circulate continuously;
Press the “CLOCK” button and you can set hours. Press it once and hours will increase one by one
with one day of 24 hours as a unit and time will circulate continuously;
Press the “SCHEDULE” button and you can set minutes. Press it once and minutes will increase one
by one and time will circulate continuously.
Remarks: Press the “AUTO” button and the current setting will be deleted; press the “SPOT” button
and the current setting will be saved.
SCH
First, press the «CLOCK» button and the cleaner will enter the current time setting mode:
Press the «DOCK» button to adjust week settings. Press it once and days will increase one by one
with a week as a unit and time will circulate continuously;
Press the «CLOCK» button to adjust the hour setting. Press it once and hours will increase one by
one with one day of 24 hours as a unit and time will circulate continuously;
Press the «SCH» button to adjust the minute setting. Press it once and minutes will increase one by
one and time will circulate continuously;
Press the «SPOT» button to save the current settings.
Then press the «SCH» button to enter the time presetting mode;
Short press the «DOCK» button to adjust week setting. Press it once and days will increase one by
one with a week as a unit and time will circulate continuously;
Long press the «DOCK» button and you can select or delete the presetting of last day;
Press the «CLOCK» button to adjust the hour setting. Press it once and hours will increase one by
one with one day of 24 hours as a unit and time will circulate continuously;
Press the «SCH» button to adjust the minute setting. Press it once and minutes will increase one by
one and time will circulate continuously;
Press the «SPOT» button to save the current settings and the cleaning presetting will be completed.
Remarks: Press the “AUTO” button to delete the current setting; press the “SPOT” button to save
the current setting.
4.2
Charging Methods
4.2.1
Manual Charging:
Danger! High Voltage! Please
operate it after drying hands.
Danger! High Voltage! Please
operate it after drying hands.
1. Charge the battery with the adapter: Connect the adapter plug
with the charging hole of cleaner first and then power it on.
The position of central line
2. Charge the battery with the charging stand: Instructions for Central Position of Charging Stand:
Connect the adapter with the charging stand first and then
conduct power connection; switch on the cleaner and wait
for 15 seconds until it enters the standby; place the cleaner
in front of the charging stand and aim it at the central
position of the charging stand; manually push the cleaner to
the charging stand slowly until the charging pole shoe is well
connected with the terminal of charging stand. Charging will
start after the cleaner clicks.
The underline shown in the chart LOGO is the
central position of charging stand as the central
reference line.
4.2.2
Auto Charging:
地图局
部显示
地图全部
显示
局部清
扫键
自动回 自动清
充键 扫键
1. APP charging:
Connect the cleaner with the iPad or
mobile first and then press the “CHARGE”
button. The cleaner will automatically
search the charging stand in the effective
range.
2. Auto Charging:
In the cleaning mode, the cleaner will stop cleaning
when the battery is short of power, and search the
charging stand for charging automatically.
5.
Product Maintenance
5.1
Daily Storage
Tips:
Please clean and maintain the cleaner regularly as actually used.
OFF/ON
Please close the power
switch without fail when
the cleaner lies idle for
fear of battery damage.
If the cleaner lies idle
for a long time, please
take the battery out and
store it in a cool and dry
place after charged fully.
Please keep the bottom
of the cleaner dry and
clean.
5.2
Body Cleaning
5.3
Dust-box Cleaning
5.3.1 Assembling and
Disassembling Dust Box
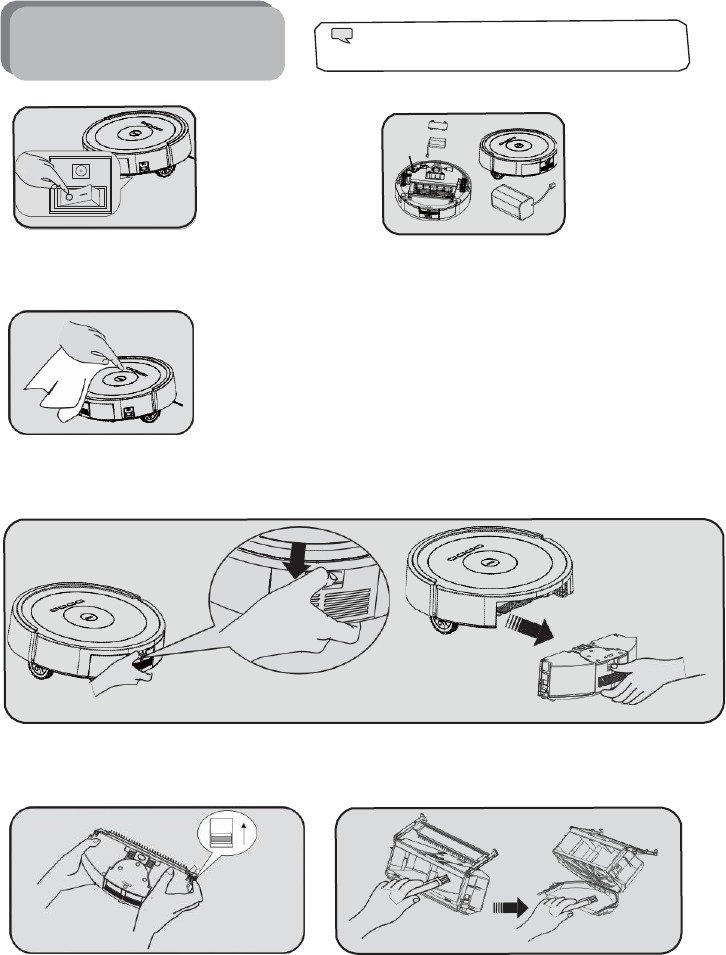
1. Please close the power switch or pull out the power plug before cleaning the
body and charging stand.
2. Please scrub the cleaner with water or neutral detergent and wring the
duster cloth out without fail. Never have water permeate through the product.
3. Never scrub the device with oil.
As shown in the above chart, press the button on the dust box first and then draw out the box.
5.3.2 Dust-box Cleaning
1. Move up the buckles on both sides of
the dust box first, and then open the
baffle for dumping of dust.
2. As shown in the above chart, clean it with the dust
brush.

5.4
Filter Cleaning
1. Dismantle the dust box by following the steps of
assembling and disassembling the dust box first,
and then open the baffle through moving the
buckles on both sides.
2. Press the button on the dust box and the fan
assembly will automatically pop up.
(Note: The fan assembly can’t be washed directly with
water.)
3. Put away the fan assembly and take out the
filter first, and then remove the dust on the filter
with the dust brush.
4. If you find too much dust in the dust box and on
the filter, please flush the filter and the inside of dust
box under running water (note: the dust box and
filter can be placed into the cleaner only after fully
dried.)
5. Upon cleaning, install the filter and fan assembly into the dust box first, and then fix the dust box into the cleaner.
5.5
Middle Brush Cleaning
5.5.1 Assembling and Disassembling of Middle Brush
1. As shown in the figure, push forward the locking-
bar buckle and lift it up.
2. Hold and lift up the main brush or mid-brush.
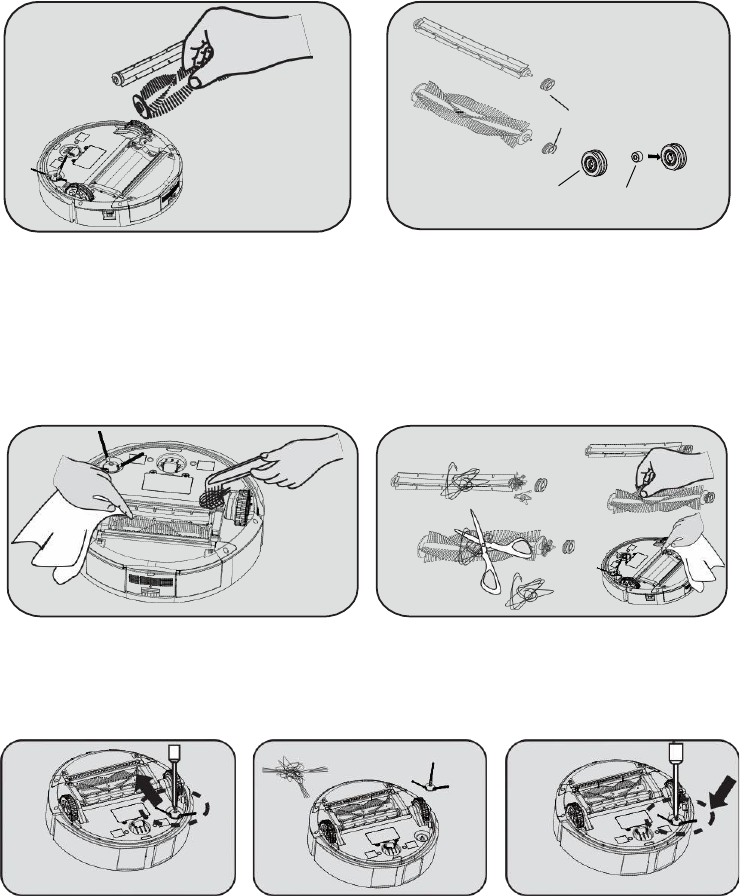
Rubber Sleeve
Rubber Sleeve Bearing
3. Take out the main brush and mid-brush. 4. Take out the rubber sleeves separately from the
main brush and mid plastic brush. (Note: there is a
bearing in the rubber sleeve. Don’t let it fall off during
dismounting and cleaning. If so, please insert it back
into the rubber sleeve.)
5.5.2 Cleaning of Main Brush and Mid Plastic brush
1. As shown in the figure, clean the main brush
and mid plastic brush with the dust brush at
regular intervals.
2. As shown in the above figure, clean up the hair
and other entanglements on the main brush and
mid plastic brush at regular intervals.
5.6
Side-brush Cleaning
1. Unscrew the screws from
the side brush.
2. Take out the side brush and clean
up the hair on the brush first, and
then remove the entanglements in
the neck of side brush.
3. Put the side brush on it and lock
the screws on the side brush with
the screwdriver.
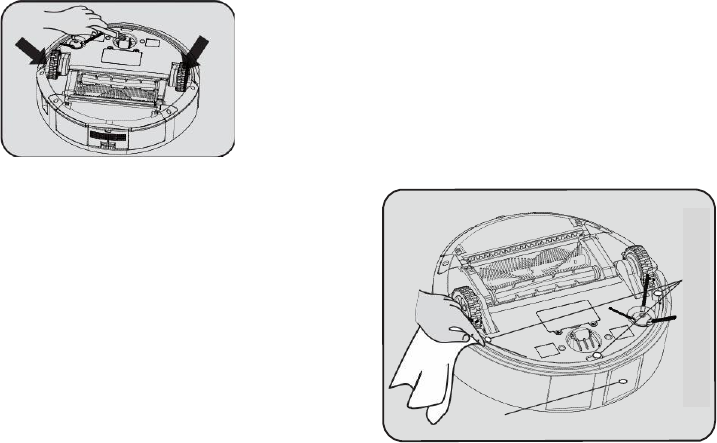
5.7
Wheel Cleaning
Please clean the front wheel and left-right wheels with the dust
brush regularly.
(Note: The wheel spindle may be entangled by hair and cloth
strips. If so, please remove them without delay.)
5.8
Sensor Cleaning
After the cleaner completes cleaning each
time, please scrape clean its transparent
board with a piece of dry all-cotton cloth
carefully to prevent dust from piling up on
such a board so as to affect the usability of
this product.
Laser Sensor
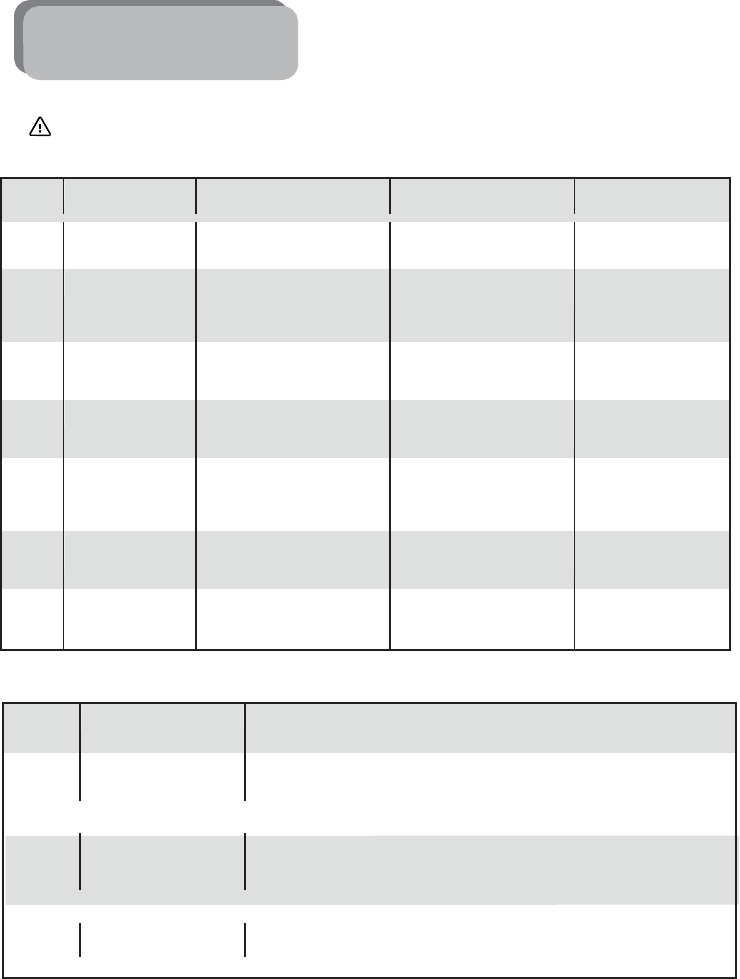
6. Common Faults
6.1 Alarm and Prompt
Note: 1. The cleaner will stop working or can’t be started in the following cases. 2. Please pay attention to the fault
codes on the display screen. Please remove abnormalities by reference to the following table.
1.
The inductive head is blocked.
2.
The device is clamped at the
step.
1.
Clean the ground detection
sensor.
2.
Take out the cleaner with
hands.
Clean and maintain the
ground detection sensor
regularly.
1.
The mid plastic brush is
clamped.
2.
The mid plastic brush is twined
by hair and cloth strips.
Check the mid plastic brush and
clean foreign matters on it.
Clean and maintain the mid
plastic brush regularly.
Electric energy is short.
1.
The cleaner can’t work normally.
2.
It can’t automate charging.
Please conduct the manual
charging.
It can’t automatically
return to recharge because
the electric energy
disappears.
1.
The wheel is clamped.
2.
The wheel is twined by hair and
cloth strips.
Check the right wheel and
remove the entanglements
on the right wheel.
Clean and maintain the
wheels regularly.
Dust box faults:
Motor faults arise
from poor contact of
1.
The dust box is not mounted.
2.
The dust box is mounted badly.
1.
Fix the dust box.
2.
Check it for installation.
The cleaner is off
ground.
1.
The cleaner is lifted.
2.
The front wheel is elevated
excessively.
Guarantee the machine lands
smoothly.
Please clean the dust box
first before lifting the
device.
The side brush is twined by hair
and cloth strips.
Check the side brush and
remove foreign matters on it.
Replace the excessively
worn side brush with a new
one.
6.2 Common Faults
The vacuum cleaner
always goes back at
1.
Prevent the cleaner from working in the glare environment.
2.
Prevent the cleaner from being used on the dark-black carpet.
3. Check if the ground detection sensor is covered with rubbish including dust. If so,
work. please scrub it with a piece of dry cloth.
The cleaner can’t be
started.
1.
Check the power switch of cleaner for being on and the indicator for lighting.
2.
Check if the cleaner is powered on and start it after it is charged.
1. Check if the charging stand is powered on.
The cleaner can’t automate
charging.
2. Check if there are obstacles between the cleaner and the charging stand.
3. Please charge the battery manually when the electric energy is short.
The cleaner can’t sense APP.
1. Check the APP for correct installation.
2. Check the cleaner and iPad or mobile for normal connection.
The cleaner will halt
automatically after working
1. Check if the cleaner starts “Local Cleaning” mode. “Local Cleaning” mode works
3-5 minutes.
1. Check if the adapter is an original product and if it is connected with the power
supply.
2. If the cleaner deforms and damages, please stop using it and contact our
Tips: If the corresponding faults can’t be fixed by reference to the above methods, please contact our
customer service personnel without delay.
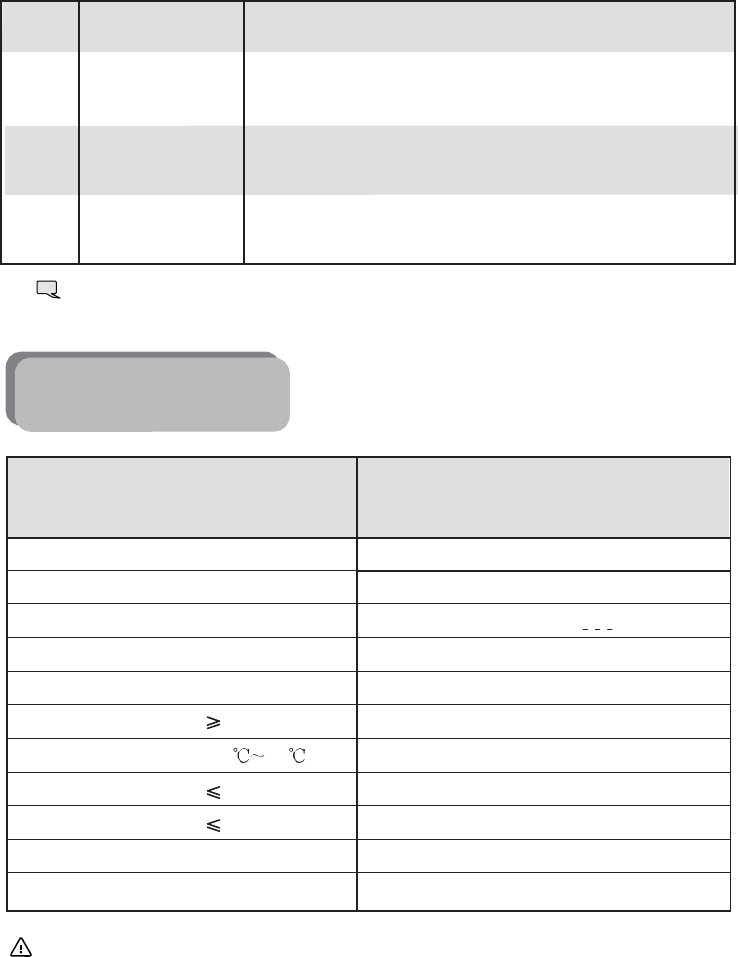
7. Technical Parameters
Functional Parameters of Main Body
Functional Parameters of Parts
Tips: We reserve the right to alter any technologies and designs of product due to the need for
continuous improvement of product. The right of interpretation belongs to us.
8.
Use of APP
8.1
How to download APP?
Scan the two-dimensional code on the color box or on the right for APP downloading.
8.2
How to install APP?
Install APP, register a new account and connect the machine as prompted.
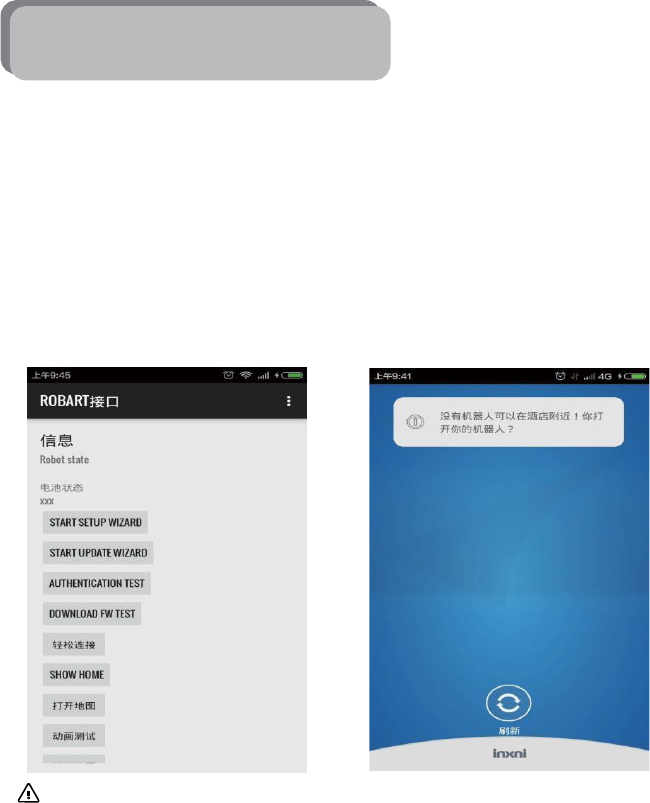
8.3
How to use APP?
1.
Turn on APP by opening the power switch of the main body as shown in the following
figure.
Step 1: click “START SETUP WIZARD” and enter Figure 2. Start the next step by
clicking “Refresh”.
Tips: APP may lose connection when the device is far from the mobile or iPad due to the
network quality of home. Please reconnect it.
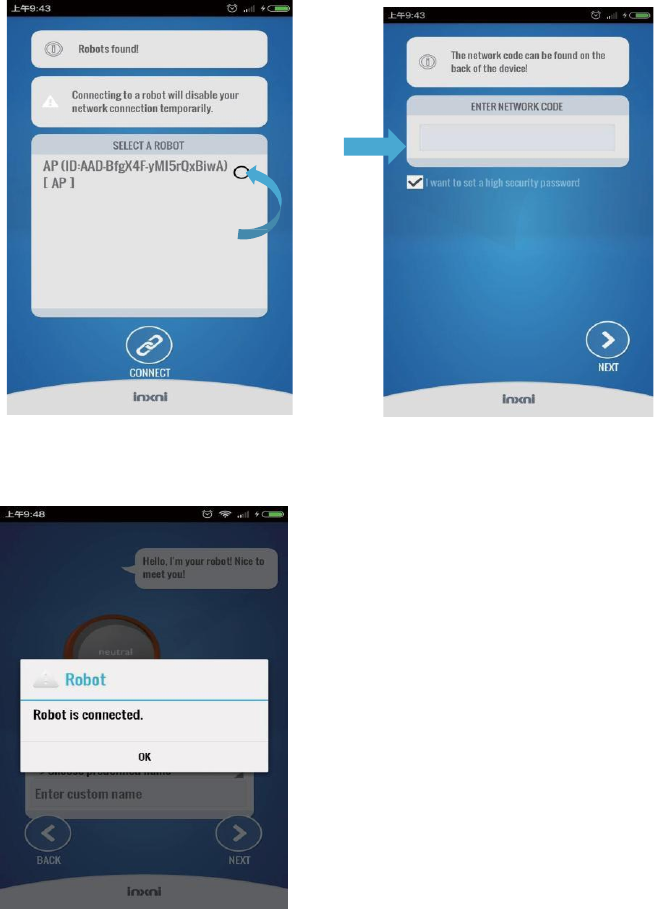
2.
Click “Refresh” and the Main Body AP address will appear. Click “CONNECT” after
selecting the Main Body AP address first and then enter the password of the Main Body at
the area shown in Figure 2 (each Main Body has a label). Click “NEXTA” TO ENTER THE NEXT
STEP.
3.
Select “OK” as shown in the figure and start the next step after entering the password for
connection.
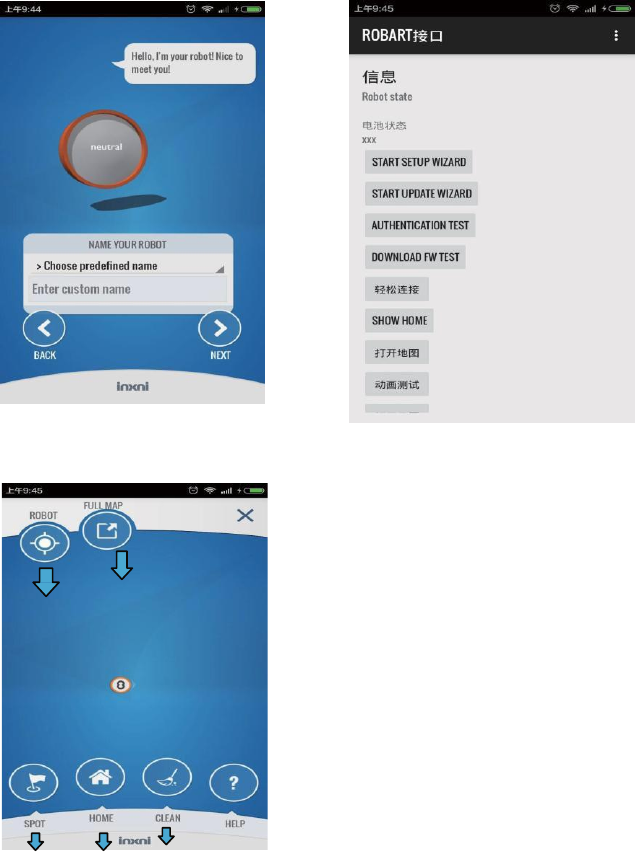
4.
Click “RETURN” on the mobile as shown in Figure 1 first and then enter the next APP
operating phase by clicking “OPEN MAP” as shown in Figure 2.
The operation interface of APP is shown as the following figure.
Full Show of Map
Local Show of Map
Local
Cleaning
key
Auto
Recharge
key
Auto
Cleaning
key

Shenzhen Silver Star Intelligent Electronic Co., Ltd
Address: Block D, Huiqing Technical Park, Dafu Industrial Zone, Aobei Community,
Guanlan Street,
Baoan District, Shenzhen City
Post-sale service hotline:400 6671 909
Http://www. yxrobot.com
Caution:
This device complies with Part 15 of the FCC rules and Industry Canada license-exempt RSS
standard(s). Operation is subject to the following two conditions: (1) this device may not cause
harmful interference, and (2) this device must accept any interference received, including
interference that may cause undesired operation.
The manufacturer is not responsible for any radio or TV interference caused by unauthorized
modifications or change to this equipment. Such modifications or change could void the user’s
authority to operate the equipment.
This radio transmitter (identify the device by certification number or model number if Category II)
has been approved by Industry Canada to operate with the antenna types listed below with the
maximum permissible gain indicated. Antenna types not included in this list, having a gain greater
than the maximum gain indicated for that type, are strictly prohibited for use with this device.
This equipment has been tested and found to comply with the limits for a Class B digital device,
pursuant to part 15 of the FCC Rules. These limits are designed to provide reasonable protection
against harmful interference in a residential installation. This equipment generates, uses and can
radiate radio frequency energy and, if not installed and used in accordance with the instructions,
may cause harmful interference to radio communications. However, there is no guarantee that
interference will not occur in a particular installation. If this equipment does cause harmful
interference to radio or television reception, which can be determined by turning the equipment
off and on, the user is encouraged to try to correct the interference by one or more of the
following measures:
— Reorient or relocate the receiving antenna.
— Increase the separation between the equipment and receiver.
— Connect the equipment into an outlet on a circuit different from that to which the receiver is
connected.
— Consult the dealer or an experienced radio/TV technician for help.
The device has been evaluated to meet general RF exposure requirement.
To maintain compliance with FCC’s RF exposure guidelines, this equipment should be installed and
operated with a minimum distance of 20cm between the radiator and your body.
Перед вами файл pdf, где представлена инструкция (руководство) на русском для XROBOT XR-510F. Вы можете скачать ее либо изучить в онлайн режиме.
Подробные сведения об инструкции:
Устройство из раздела: робот-пылесос
Бренд-производитель: XROBOT
Наименование модели: XROBOT XR-510F
Язык: Руководство на русском языке
Файл: pdf
Размер файла: 11,63 MB

Скачать инструкцию к HARPER HDT2-1110
ЗАГРУЗИТЬ
Просмотр инструкции онлайн
Робот-пылесос Xrobot ROBOTмодель VACUUM CLEANER XR510F c пультом дистационного управления и Model No. XR510F ___________автоматическим зарядным устройством___________ With Remote Control,Auto Charging Station Инструкция USER MANUAL Благодарим Вас за покупку нашего робота Thank you for purchasing
Содержание Contents Contents Содержание Applicability Применение 01 02 Function Introduction Знакомства с функциями 02 Компоненты of the Cleaner Components 02 Знакомство с устройством Introduction 03 Структура Structure Introduction 03 Подключение аккумулятора Battery Replacement & Installment 04
Область применения: Applicability: Устройство предназначено для применения дома, в гостиничные номерах или The product, mainly applicable home, hotel rooms and small office, isполов, good for cleaning офисах для очистки различныхtoкороткошерстных ковров, деревянных various short-haired керамической
Введение Introduction Structure Introduction Верхняя Top coverкрышка AUTO /AUTO/automatic автоматическая очистка cleaning Decorative lamp лампы Декоративные CHARGE / charge CHARGE / зарядка SPOT/spot SPOT / очисткаcleaning пятна Приемник сигнала Signal receiver Decorative lamp Декоративные лампы
Подключение аккумулятора: 1.Battery Отпустите винт с&помощью отвертки, открыть основание. (См. рисунок 1) Replacement Installment 2. Соедините два терминала во время установки батареи. (См. Рисунок 2) 1. Release the screw with a screwdriver, open its base plate. (Refer to Figure 1 ) 3. Поместите
Battery of the Space lsolator: Заменаreplacement батарей виртуальной стены: 1.Откройте крышку как на рис. 1. 1. Open the cover as per figure 1. 2.Вставте батареи (соблюдая Please the batteries (not inclued 2. полярность (+polarity / -) with correct (+/-) (См. Рисунок 2/3) 2/3) (Refer to Figure
Function information on panel: Функции кнопок: Power Indicator: When switch on, all lights and decorative lamps keep on. When cleaning,питания: the key you pressed will be on, and decorative lamps flash one by one. Выключатель When recharging, middle one decorative lamp flash.когда робот-пылесос
Установка зарядной станции Charging Method of Main Body: и зарядка робота-пылесоса Manual Charging: 1. You can use the adapter or docking Ручная зарядка: station to charge for the main body directly. 1. Вы можете использовать переходник или док-станцию для 2. Turn on the cleaner and connect the
Пульт управления: Remote Control: Панель управления пульта дистанционного управления: Control Panel of Remote Control: Дни недели Weekdays Прием сигнала Emission signal Текущее время Current time Общий выбор/Сброс or turn Pre-set to select индикации всех all дней недели off charging indicators
Functions Introduction of Remote Control: SPEED selection: press “SPEED” button on the remote control, you can choose fast or slow speed. fast speed slow speed TIME (Current Time Setting) buttons, you can see a shining spot on the Press “TIME” button first and then press screen of the remote
Виртуальная Space Isolator:стена передатчик сигнала Signal transmitting Power switch выключатель питания кнопка кода проверки Code check button индикатор питания Power indicator Совет: Вы должны проверить код перед использованием «виртуальной стены», иначе она не будет работать. Tip: You should
ЗаряднаяStation: станция Docking индикатор LED indicator Infrared signal transmitting Окно для передачи инфракрасного сигнала window Кнопка проверки Code check button кода (на (backside) задней стороне) Charging electrode Контакты для заряда DC разъем socket DC Советы: Перед код требует проверки, в
Монтаж & Разборка и очистка частей: Maintenance of the Cleaner: Сборка и демонтаж пылесборника: Assembly & Disassembly of Dust Box: А. держите машину нижней рукой, нажмите на кнопку пылесборника (см.Рисунок 1) A. Hold the machine bottom with your hand, press the button on the dust box(Refer to
Filter Replacement & Cleaning: A. Press the two side clips over the dust box to open the fencing plate, If the rubber part which attached the fencing plate was worn out, you need to take out it for replacement. (Refer to figue 1) take out Figure 1 B. Press the button on the dust box, the fan
Tip: The rubber cleaningпылесборника head sometimesможет might be droppedпри off when you clean the Внимание: резинка выпасть чистки, dustbin, please follow the below to reinstall следуйте инструкции, чтобыinstruction установить ее. it.. Rubber cleaning head Figure 1 Figure 2 Figure 3 1.
Cleaning Main Brush and FloorиBrush: Чисткаofосновной щетки щетки пола 1.Регулярно вытащите 1. Clear the прочищайте hair or big щетки, dust particles on щетки, the brushes очистите ихtoотimprove всех волосков, ниток, пыли и др.отходов. regularly the cleaning performance. Clean the Очищайте от
Технические характеристики Technical Specifications: Параметры машины Machine parameters 1 2 3 4 5 Номинальное Rated Voltageнапряжение 6 7 Влажность при эксплуатации Operating Humidity Range Пульт ДУ Remote Wireless -10℃~45℃ ≤90%RH ISM Frequency Band 2.4GHz 8 9 10 11 Размер Specification Вес Weight
Safety Меры Precautions: предосторожности Внимание Caution No one else can disassemble, or Только специалисты нашейmaintain компании или сервис-центра могут except the transform the product обслуживать, разбиратьdesignated и изменять maintenance technicians by конфигурации Опасно the company, or
Роботы-пылесосы XRobot от официального дилера Xrobotmarket
«CE» marking states that the product is compliant to European Directives: 2006/95/EC Low Voltage Directive 2004/108/EC EMC Directive It is possible to request a full copy of Declaration of compliance to the Distributor: This product comply with the rules of RoHs Directive(2002/95/CE) This product