LK-300TV Manual
-
LK300TV
( 3.66MB)
Terms and Conditions
-

-
A PDF reader is required to view PDF files. If you don’t have one, click on the banner to download one.
РУКОВОДСТВО ПОЛЬЗОВАТЕЛЯ

Заявление о соответствии
Номер модели: LK-300TV
Торговая фирма: CASIO COMPUTER CO., LTD.
Ответственная сторона: CASIO, INC.
Адрес: 570 MT. PLEASANT AVENUE, DOVER, NEW JERSEY 07801
Телефон: 973-361-5400
Данное устройство отвечает требованиям части 15 Правил ФКС. Работа устройства должна соответствовать следующим двум
условиям.
(1) Это устройство не должно вызывать недопустимых помех и (2) это устройство должно подавлять любые принимаемые
помехи, включая те, которые могут вызывать неправильное функционирование
.
Внимание!
Прежде чем приступать к использованию данного изделия, ознакомьтесь со следующей ин-
формацией:
•
Прежде чем приступить к использованию адаптера AD-5 (в комплект поставки не вхо-
дит) для подачи питания на устройство, убедитесь в отсутствии в адаптере каких бы
то ни было повреждений. Тщательно проверьте шнур питания на наличие обрывов,
надрезов, оголенных проводов и других серьезных повреждений. Не позволяйте детям
пользоваться серьезно поврежденным адаптером.
•
Не пытайтесь перезаряжать батареи.
•
Не используйте аккумуляторные батареи.
•
Не используйте вместе старые и новые батареи.
•
Используйте батареи рекомендованного типа или эквивалентные.
•
При установке батарей соблюдайте полярность. Подключайте полюса (+) и (-) в соот-
ветствии с обозначениями около батарейного отсека.
•
При первых же признаках разрядки как можно скорее заменяйте батареи.
•
Не допускайте короткого замыкания полюсов батареи.
•
Не допускайте к изделию детей младше 3 лет.
•
Используйте только адаптер CASIO AD-5.
•
Адаптер переменного тока – не игрушка!
•
Перед тем как приступить к очистке изделия, отсоединяйте от него адаптер перемен-
ного тока.
Меры безопасности
Поздравляем вас с приобретением электронного му-
Примеры символов
зыкального инструмента CASIO!
•
Прежде чем приступать к использованию этого
Данный треугольный символ ( ) означает,
инструмента, внимательно прочитайте все содер-
что пользователь должен быть осторожен.
жащиеся в этом руководстве инструкции.
(Приведенный слева символ предупрежда-
•
Сохраните это руководство после прочтения, чтобы
ет об опасности поражения электрическим
обращаться к нему в будущем.
током.)
Данный перечеркнутый круг (
) означает,
Символы
что нельзя выполнять указанное действие.
В руководстве пользователя и на самом музыкальном
Действия, изображенные в данном символе
инструменте имеются различные символы, предна-
или рядом с ним, строго запрещены. (Приве-
значенные для обеспечения безопасной и правильной
денный слева символ указывает на запреще-
эксплуатации инструмента, предотвращения травм
ние разборки.)
пользователя и иных лиц, а также ущерба собствен-
ности. Эти символы и их значения приведены ниже.
Черный круг (
) означает, что указанное
действие должно быть обязательно выпол-
нено. Необходимо обязательно выполнить
ОПАСНОСТЬ
операцию, изображенную в этом символе.
Этот символ обращает ваше особое внимание на те
(Приведенный слева символ указывает на не-
сведения, игнорирование или неправильное исполь-
обходимость извлечения вилки из розетки.)
зование которых влечет за собой опасность для жизни
или риск получения серьезной травмы.
ПРЕДУПРЕЖДЕНИЕ
Этот символ обращает ваше особое внимание на те
вопросы и предметы, которые таят в себе угрозу для
жизни или риск получения серьезной травмы, если
вопреки такому предупреждающему символу музы-
кальный инструмент эксплуатируется неправильно.
ОСТОРОЖНО
Этот знак обращает ваше особое внимание на те воп-
росы и предметы, которые таят в себе опасность по-
лучения травмы, а также на те вопросы и предметы,
в связи с которыми вероятность получения телесных
повреждений возникает только в том случае, если воп-
реки такому предостерегающему знаку музыкальный
инструмент эксплуатируется неправильно.
1
-
Contents
-
Table of Contents
-
Troubleshooting
-
Bookmarks
Quick Links
ES
USER’S GUIDE
GUÍA DEL USUARIO
LK300ES1A
Related Manuals for Casio LK-300TV
Summary of Contents for Casio LK-300TV
-
Page 1
USER’S GUIDE GUÍA DEL USUARIO LK300ES1A… -
Page 2
Changes or modifications not expressly approved by the party responsible for compliance could void the user’s authority to operate the equipment. Model Number: LK-300TV Trade Name: CASIO COMPUTER CO., LTD. Responsible party: CASIO, INC. Address: 570 MT. PLEASANT AVENUE, DOVER, NEW JERSEY 07801… -
Page 3: Safety Precautions
Safety Precautions Congratulations on your selection of the CASIO electronic musical instrument. • Before using the instrument, be sure to carefully read through the instructions contained in this manual. • Be sure to keep all user documentation handy for future reference.
-
Page 4
• Never twist or stretch the cord. • Should the electric cord or plug become damaged, contact your original retailer or authorized CASIO Service Provider. G Never touch the AC adaptor while your hands are wet. -
Page 5
2. If you are using the AC adaptor for power, unplug it from the wall outlet. 3. Contact your original retailer or an authorized CASIO Service Provider. Plastic Bags Never place the plastic bag the product comes in over your head or in your mouth. -
Page 6
Safety Precautions Connectors Connect only the specified devices and equipment to the product’s connectors. Connection of a non-specified device or equipment creates the risk of fire and electric shock. Location Avoid the following locations for this product. Such locations create the risk of fire and electric shock. -
Page 7: Main Features
❐ Storing and Playing Back Tune Data You Transferred from Your Computer You can connect your keyboard to a computer, use special CASIO conversion software to convert SMF data you purchase or create to CASIO format, and then transfer it to the keyboard.
-
Page 8: Table Of Contents
Contents Safety Precautions … E-1 Main Features … E-5 General Guide … E-8 Attaching the Score Stand … E-10 Quick Reference …E-11 To play the keyboard … E-11 Power Supply … E-13 Using batteries … E-13 Using the AC Adaptor … E-13 Auto Power Off …
-
Page 9
Using Auto Accompaniment … E-32 Using an Intro Pattern … E-35 Using a Fill-in Pattern … E-35 Using a Rhythm Variation … E-35 Using a Fill-in Pattern with a Variation Rhythm … E-36 Synchro Starting Accompaniment with Rhythm Play … E-36 Finishing with an Ending Pattern … -
Page 10: General Guide
General Guide 664A-E-010A…
-
Page 11
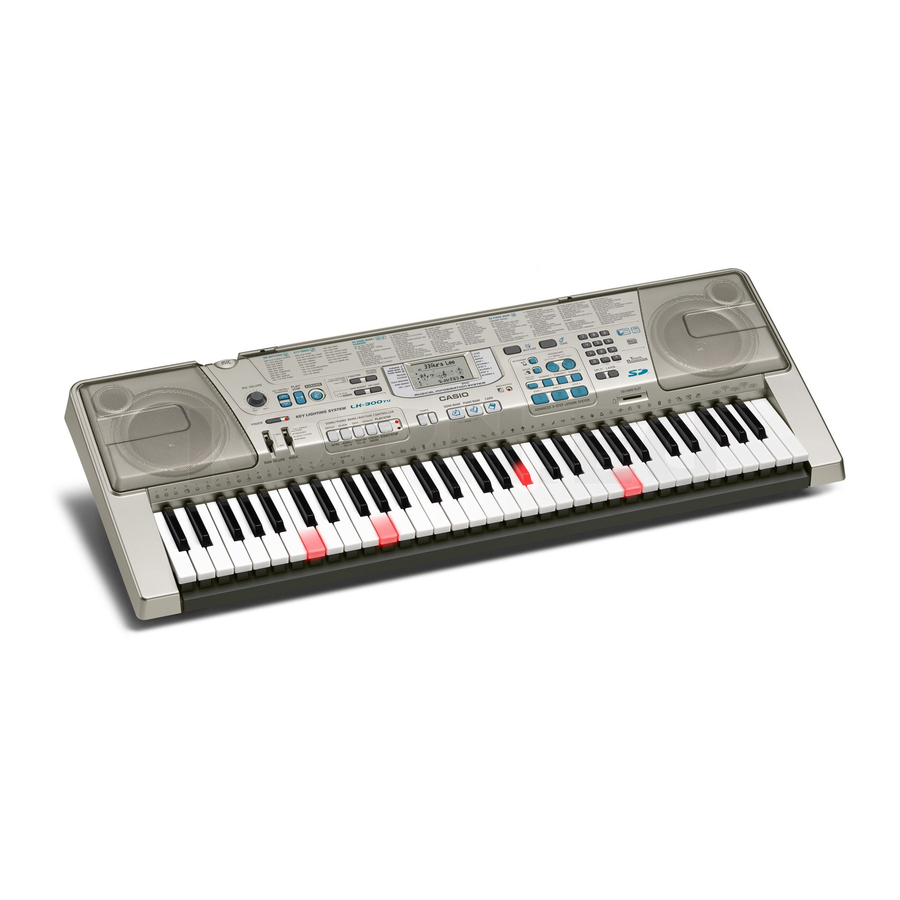
NOTE • This keyboard has two PLAY/STOP buttons. In this manual, the PLAY/STOP button that is located near the KARAOKE button is indicated as <PLAY/STOP>. MIC VOLUME knob KEY CONTROL/TRANSPOSE buttons <PLAY/STOP> button KARAOKE button FUNCTION button REVERB/CHORUS button SONG MEMORY button KEY LIGHT button RHYTHM button TONE button… -
Page 12: Attaching The Score Stand
General Guide *1 Attaching the Score Stand Insert both ends of the music stand provided with the keyboard into the two holes on the top surface. Rear Panel USB port VIDEO OUT jack Using the Keyboard Position Stickers Affix the keyboard position stickers that come with the keyboard as shown in the illustration below.
-
Page 13: Quick Reference
Quick Reference POWER This section provides a quick overview of keyboard operation using steps one and two of the 3-step lesson feature. To play the keyboard Press the POWER button to turn on power. • This causes the power indicator to light. Set the MODE switch to NORMAL.
-
Page 14
Quick Reference If you selected lesson Step 1 • Play the notes on the keyboard. • Accompaniment (left-hand part) plays in time with the notes. • With Step 1, the correct melody note is played no matter which keyboard key you press. If you selected lesson Step 2 •… -
Page 15: Power Supply
Power Supply This keyboard can be powered by current from a standard household wall outlet (using the specified AC adaptor) or by batteries. Always make sure you turn the keyboard off whenever you are not using it. Using batteries Always make sure you turn off the keyboard before loading or replacing batteries.
-
Page 16: Auto Power Off
Power Supply Note the following important precautions to avoid damage to the power cord. GDuring Use • Never pull on the cord with excessive force. • Never repeatedly pull on the cord. • Never twist the cord at the base of the plug or connector. •…
-
Page 17: Connections
The wrong type of connector at either end can cause one of the stereo channels to be lost. When connected to a musical instrument amplifier, set the volume of the keyboard to a relatively low level and make output volume adjustments using the amplifier’s controls.
-
Page 18: Microphone Jack
Connections Microphone Jack You can connect a commercially available microphone to the microphone jack and sing along with notes played on the keyboard. For details, see “Using a Microphone for Karaoke” on page E-29. VIDEO OUT Jack You can connect the keyboard to a TV equipped with a video input jack, and view lessons* and song lyrics* screen.
-
Page 19: Basic Operations
Basic Operations POWER MAIN VOLUME This section provides information on performing basic keyboard operations. To play the keyboard Press the POWER button to turn the keyboard on. Set the MODE switch to NORMAL. Use the MAIN VOLUME slider to set the volume to a relatively low level.
-
Page 20: Using Tone Effects
Basic Operations Polyphony The term polyphony refers to the maximum number of notes you can play at the same time. The keyboard has 32-note polyphony, which includes the notes you play as well as the rhythms and auto-accompaniment patterns that are played by the keyboard.
-
Page 21: Playing A Built-In Tune
Playing a Built-in Tune Your keyboard comes with a total of built-in 100 tunes. You can play back built-in tunes for your own listening pleasure, or you can use them for practice and even karaoke. Built-in tunes are divided between the two groups described below. •…
-
Page 22: To Play Back A Piano Bank Tune
Playing a Built-in Tune To play back a Piano Bank tune Find the tune you want to play in the PIANO BANK List, and note its number. • See page A-9 for the PIANO BANK List. Press the PIANO BANK button to specify the Piano Bank group.
-
Page 23: To Pause Playback
To pause playback Press the PAUSE button while a tune is playing to pause it. Pressing the PAUSE button again resumes play from the point where it was paused. To fast reverse While a tune is playing or paused, hold down the REW button to skip in a reverse direction at high speed.
-
Page 24: To Change The Melody Tone
Playing a Built-in Tune To change the melody tone Press the TONE button. Indicator appears Find the tone you want in the TONE List, and then use the number buttons to input its three-digit number. Example: To select “130 VIOLIN”, input 1, then 3, then •…
-
Page 25: Advanced 3-Step Lesson
Advanced 3-Step Lesson With the 3-Step Lesson System, you can practice built-in tunes and SMF data from a memory card, and even plot your progress according to the evaluation points the keyboard awards you. * See “Using a Memory Card” on page E-52 for information about using the SMF data from a memory card for playback.
-
Page 26: Evaluation Mode
Advanced 3-Step Lesson Example: When play requires pressing keys with fingers 3, 2, and then 1 1st Note 2nd Note Next note Current note Flash Flash Lit Key light NOTE • Note length is not indicated when you are using two- hand tunes with 3-step lesson Steps 1 and 2.
-
Page 27: Using The Lesson Functions And Evaluation Mode
Evaluation Results After you finish playing, the keyboard calculates an evaluation of your total performance, from beginning to end, and displays your total score on the monitor screen. The greater the score, the higher your evaluation is. Evaluation Rank Display Messages and Sound Effects Display Message Sound Effect “Bravo!”…
-
Page 28: Step 2 — Master The Notes
Advanced 3-Step Lesson Evaluation 1: Find out how the keyboard evaluates your Step 1 play. Use the SCORING 1 button to check the evaluation of your play in Step 1. Press the SCORING 1 button. • This causes the SCORING 1 indicator to appear on the display.
-
Page 29: Step 3 — Play At Normal Speed
Step 3 – Play at normal speed. Select the tune you want to play. Press the RIGHT/TRACK 2 button or the LEFT/ TRACK 1 button to specify the part you want to practice. • If you want to practice both hands, press both buttons at the same time.
-
Page 30: Voice Fingering Guide
Advanced 3-Step Lesson To practice the practice phrase While the Phrase Practice Mode screen is on the display, press the STEP 1, STEP 2, or STEP 3 button. • This starts 3-Step Lesson playback of the practice phrase in accordance with the STEP button you pressed.
-
Page 31: Using A Microphone For Karaoke
Using a Microphone for Karaoke MIC VOLUME <PLAY/STOP> You can select any of the 50 Song Bank/Karaoke Group tunes or SMF data from a memory card, and sing along with its accompaniment. Using the microphone jack Connecting a commercially available microphone to the MIC jack makes it possible to sing along with the keyboard’s built- in tunes or with SMF playback.
-
Page 32
Using a Microphone for Karaoke Select the karaoke source. I Song Bank Press the SONG BANK button. This enters the Karaoke Song Bank Mode, and displays the Song Bank indicator. Indicator appears I Card Bank See “Reading a Memory Card” on page E-54 for information about using song data on a memory card. -
Page 33: Auto Accompaniment
[+] and decrement it by pressing [–]. • Some rhythms consist of chord accompaniments only, without any drums or other percussion instruments. Such rhythms do not sound unless CASIO CHORD, FINGERED, or FULL RANGE CHORD is selected as the accompaniment mode.
-
Page 34: Playing A Rhythm
This method of chord play makes it possible for anyone to easily play chords, regardless of previous musical knowledge and experience. The following describes the CASIO CHORD “Accompaniment keyboard” and “Melody keyboard”, and tells you how to play CASIO CHORDs.
-
Page 35
Chord Types CASIO CHORD accompaniment lets you play four types of chords with minimal fingering. Chord Types Major chords Major chord names are marked above the keys of the accompaniment keyboard. Note that the chord produced when you press an… -
Page 36
Auto Accompaniment NOTE • Except for the chords specified in note* fingerings (i.e. playing E-G-C or G-C-E instead of C-E- G) will produce the same chords as the standard fingering. • Except for the exception specified in note* of the keys that make up a chord must be pressed. Failure to press even a single key will not play the desired FINGERED chord. -
Page 37: Using An Intro Pattern
Using an Intro Pattern This keyboard lets you insert a short intro into a rhythm pattern to make startup smoother and more natural. The following procedure describes how to use the Intro feature. Before starting, you should first select the rhythm you want to use, and set the tempo.
-
Page 38: Using A Fill-In Pattern With A Variation Rhythm
Before starting, you should first select the rhythm you want to use, set the tempo, and use the MODE switch to select the chord play method you want to use (NORMAL, CASIO CHORD, FINGERED, FULL RANGE CHORD). To use synchro start Press the SYNCHRO/ENDING button to put the keyboard into synchro start standby.
-
Page 39: Song Memory Function
Song Memory Function SONG MEMORY MODE INTRO NORMAL/FILL-IN You can use Song Memory to record your lesson play (lesson recording) and to record your keyboard play along with the Auto Accompaniment you are using (performance recording). Parts and Tracks How data is recorded to Song Memory and the type of data that is recorded depends on whether you are performing a performance recording operation or a lesson recording operation.
-
Page 40: Recording Play Along With A Built-In Tune
Song Memory Function Recorded Data Storage • Anything previously stored in song memory is replaced whenever you make a new recording. • Song Memory contents are retained even when power is turned off, as long as the keyboard is being supplied battery or AC adaptor power.
-
Page 41: Playing Back A Lesson Recording
To record as you play along with a built-in tune Press the SONG BANK button or PIANO BANK button to select the mode that includes the tune you want to play along with. Use the SONG MEMORY button to select record standby.
-
Page 42
Song Memory Function Part/Track Indicators in Playback Standby Each press of a part/track button toggles playback of that track on (part/track indicator displayed) and off (indicator not displayed). Track 1 Playback (displayed) Example: The above indicates that Track 1 will be played back, while Track 2 will not. -
Page 43: Playing Back A Performance Recording
Track 1 Data In addition to notes played on the keyboard and chord accompaniments, the following data is also stored in Track 1 during performance recording. • Tone number • Rhythm number • INTRO button, SYNCHRO/ENDING button, NORMAL/ FILL-IN button, VARIATION/FILL-IN button operations •…
-
Page 44: Overdubbing A Performance Recording
Song Memory Function Overdubbing a Performance Recording You can use the following procedure to record a melody in Track 2 so it combines with a recording you previously made in Track 1. Press the RHYTHM button to enter the rhythm mode.
-
Page 45: Keyboard Settings
Keyboard Settings This section describes how to use layer (to play two tones with a single key) and split (to assign different tones to either end of the keyboard), and how to make touch response, transpose, and tuning settings. Using Layer Layer lets you assign two different tones (a main tone and a layered tone) to the keyboard, both of which play whenever you press a key.
-
Page 46: Using Split
Keyboard Settings Using Split With split you can assign two different tones (a main tone and a split tone) to either end of the keyboard, which lets you play one tone with your left hand and another tone with your right hand. For example, you could select STRINGS as the main (high range) tone and PIZZICATO STRINGS as the split (low range) tone, putting an entire string ensemble at your fingertips.
-
Page 47: Transposing The Keyboard
Press the SPLIT button and then input the number of the split tone. P i z z . t S r • After specifying the split tone, press the SPLIT button to unsplit the keyboard. Press the LAYER button and then input the number of the layered tone.
-
Page 48: Using Touch Response
Keyboard Settings Using Touch Response When touch response is turned on, the relative volume of sound output by the keyboard is varied in accordance with the amount of pressure applied, just like an acoustic piano. Touch response provides a choice of three settings, described below.
-
Page 49: Tuning The Keyboard
• In this case, a song volume screen will appear in place of the accompaniment volume screen. Tuning the Keyboard Use the following procedure to fine tune the keyboard to match the tuning of another musical instrument. To tune the keyboard Press the FUNCTION button three times to display the tuning screen.
-
Page 50: Connection To A Computer
MIDI driver user’s guide.* * You need to have Adobe Reader or Acrobat Reader installed on your computer in order to view the contents of the “CASIO USB MIDI Driver User’s Guide” (manual_e.pdf). If your computer does not have either Adobe Reader or Acrobat Reader installed, use the procedure below to install it.
-
Page 51: Expanding The Selections In The Song Bank Tunes
CASIO MUSIC SITE http://music.casio.com/ Keyboard USB port • In addition to the software itself, the CASIO MUSIC SITE will also provide you with information about its installation and use. You can also find out about the latest news about your keyboard and other CASIO musical instruments, and much more.
-
Page 52: General Midi Tone
Connection to a Computer Song Data Storage Song data saved as Song Bank tunes are retained even when power is turned off, as long as the keyboard is being supplied battery or AC adaptor power. If you remove the batteries or should the batteries go dead while the keyboard is not being supplied power by the AC adaptor, song data will be deleted.
-
Page 53
LOCAL CONTROL (Default: On) oFF: Anything played on the keyboard is output as a message from the USB port, without being sounded by the internal sound source. • Note that no sound is produced by the keyboard if LOCAL CONTROL is turned off and no external device is connected. -
Page 54: Using A Memory Card
G Supported Data: SMF Format 0, CASIO Original Format CM2 IMPORTANT! • Use only an SD memory card or an optional CASIO song data card* with this keyboard. Proper operation is not guaranteed when any other type of card is used.
-
Page 55: Getting Ready
Inserting and Removing a Memory Card IMPORTANT! • Make sure you turn off the keyboard before inserting or removing a memory card. • Be sure to orient the card correctly when inserting it. Never try to force a memory card into the card slot when you feel resistance.
-
Page 56: Reading A Memory Card
Using a Memory Card Reading a Memory Card Press the CARD button. Indicator appears Use the number buttons to input the three-digit number that corresponds to the SMF data you want to select. Perform one of the following operations. I To play back SMF data Press the START/STOP button.
-
Page 57: Memory Card Error Messages
Memory Card Error Messages Display Message Err No Card There is no memory card loaded in the keyboard or the memory card you are using is not loaded correctly. Err No File (1) The memory card song data that is supported by the keyboard is not in the MUSICDAT folder.
-
Page 58
Using a Memory Card The keyboard ran out of memory for SMF data Err Mem Full reading during a playback, karaoke, lesson or use of the evaluation feature. After a few seconds, the “Err Mem Full” message will be replaced by one of the messages described below. -
Page 59: Troubleshooting
(1) Power supply problem. (2) Power is not turned on. (3) Volume setting is too low. (4) The MODE switch is in the CASIO CHORD or FINGERED position. (5) LOCAL CONTROL is off. Low battery power Accompaniment volume is set to 000.
-
Page 60
* Multiple digital samples are taken for the low range, middle range, and high range of the original musical instrument. Because of this, there may be a very slight difference in tonal quality and volume between sample ranges. Action (1) Correctly insert the memory card into the card slot. -
Page 61: Specifications
514 (372 panel tones + 128 General MIDI tones + 14 drum sets); with layer and split Reverb (4 types), Chorus (4 types) 32 notes maximum (16 for certain tones) 3 fingering methods (CASIO CHORD, FINGERED, FULL RANGE CHORD) START/STOP, INTRO, NORMAL/FILL-IN, VARIATION/FILL-IN, SYNCHRO/ENDING…
-
Page 62: Care Of Your Keyboard
Specifications Terminals SUSTAIN/ASSIGNABLE JACK: PHONES/OUTPUT Jack: Microphone In: USB port: VIDEO OUT Jack: SD CARD SLOT Power Jack: Power Supply: Batteries: Battery Life: AC Adaptor: Auto Power Off: Speaker Output: Power Consumption: Dimensions: Weight: • Design and specifications are subject to change without notice. Care of your keyboard Avoid heat, humidity or direct sunlight.
-
Page 63
Appendix/Apéndice 664A-E-125A… -
Page 64
Appendix/Apéndice 664A-E-126A… -
Page 65
Appendix/Apéndice 664A-E-127A… -
Page 66
Appendix/Apéndice 664A-E-128A… -
Page 67
Appendix/Apéndice 664A-E-129A… -
Page 68
Appendix/Apéndice 664A-E-130A… -
Page 69
Appendix/Apéndice 664A-E-131A… -
Page 70: Appendix
• Rhythms 110 through 119 consist of chord accompaniments only, without any drums or other percussion instruments. These rhythms do not sound unless CASIO CHORD, FINGERED, or FULL RANGE CHORD is selected as the accompaniment mode. With such rhythms, make sure that CASIO CHORD, FINGERED, or FULL RANGE CHORD is selected before you try playing chords.
-
Page 71: Song List
Song List/Lista de canciones SONG BANK/KARAOKE List Lista SONG BANK/KARAOKE WE GOT THE BEAT BEYOND THE SEA (“FINDING NEMO” THEME) BORDERLINE WE WISH YOU A MERRY CHRISTMAS JINGLE BELLS SILENT NIGHT JOY TO THE WORLD O CHRISTMAS TREE WHEN THE SAINTS GO MARCHING IN GREENSLEEVES SWING LOW, SWEET CHARIOT AMAZING GRACE…
-
Page 72
664A-E-138A… -
Page 73
664A-E-139A… -
Page 74
This recycle mark indicates that the packaging conforms to the environmental protection legislation in Germany. Esta marca de reciclaje indica que el empaquetado se ajusta a la legislación de protección ambiental en Alemania. CASIO COMPUTER CO.,LTD. 6-2, Hon-machi 1-chome MA0603-A Printed in China Shibuya-ku, Tokyo 151-8543, Japan…

- Manuals
- Brands
- Casio Manuals
- Electronic Keyboard
- LK-300TV
- Service manual
-
Contents
Table of Contents -
Bookmarks
Quick Links
LK-300TV
MAY. 2006
LK-300TV
ELECTRONIC KEYBOARD
INDEX
Related Manuals for Casio LK-300TV
Summary of Contents for Casio LK-300TV
-
Page 1
LK-300TV MAY. 2006 LK-300TV ELECTRONIC KEYBOARD INDEX… -
Page 2: Table Of Contents
CONTENTS Specifications ———————————————————————————————- 1 Circuit Description ————————————————————————————— 2 Printed Circuit Board ———————————————————————————— 3 Diagnostic Program ————————————————————————————— 6 Exploded View ——————————————————————————————— 9 Parts List ————————————————————————————————— 10 Schematic Diagrams ———————————————————————————— 13…
-
Page 3: Specifications
101 steps (A4 = approximatery 440Hz ±50Cents) Tuning: Card Supported Memory Cards: SD memory cards, optional CASIO song data cards ∗ ∗ May not be available in some geographic areas. Supported SD Cards: 1 GB or less (Cards with capacity greater than 1 GB are not supported.)
-
Page 4: Circuit Description
CIRCUIT DESCRIPTION KEY MATRIX KC7- C2 (1) C#2(1) D2 (1) D#2 (1) E2 (1) F2 (1) F#2 (1) G2 (1) C2 (2) C#2 (2) D2 (2) D#2 (2) E2 (2) F2 (2) F#2 (2) G2 (2) G#2 (1) A2 (1) A#2 (1) B2 (1) C3 (1)
-
Page 5: Printed Circuit Board
PRINTED CIRCUIT BOARDS Main PCB M664-MDA1 — 3 —…
-
Page 6
CONSOLE PCB M664-CNA1 CONSOLE PCB M664-CNA2 CONSOLE PCB M664-CNA3 CONSOLE PCB M664-CNA4 — 4 —… -
Page 7
SUB PCBs M664-SDA1 LED PCBs CSM446-LD3M/LD4M/LD5M — 5 —… -
Page 8: Diagnostic Program
DIAGNOSTIC PROGRAM I Initial Setup 1. Connect the AC adaptor. 2. Connect a Sustain pedal. 3. Setting SD card into slot. 3. “MODE” switch: NORMAL 4. “MAIN VOLUME”: MAX 5. “MIC VOLUME”: MIN NOTE: If there is no Sustain pedal, Sustain pedal check can be skipped. I How to start diagnostic program 1.
-
Page 9
Message on LCD 6. ROM Ver. check 1 Press “3” button. (internal ROM) 2 Press “3” button. (extenal ROM) 7. RAM check 1 Press “+” button. * Confirmation sound sounds. 8. D/A check 1 Press the “4” button. * When standing in the center, the tester hears the minimum test sound in an equal volume from both right and left speakers. -
Page 10
Message on LCD 12. APO check 1 Press the “PRACTICE PHRASE” button. To discharge * Go out from TEST mode (Power off). * The LCD turns off. * Disconnect an AC adaptor. * Disconnect the SD card from slot. * Press the “POWER” button 3 times DIAGNOSTIC PROGRAM IS FINISHED. -
Page 11: Exploded View
EXPLODED VIEW — 9 —…
-
Page 12: Parts List
PARTS LIST LK-300TV Notes: This parts list does not include the cosmetic parts, which parts are marked with item No. «R-X» in the exploded view. Contact our spare parts department if you need these parts for refurbish. 1. Prices and specifications are subject to change without prior notice.
-
Page 13
Price Item Parts Code Parts Name Specification Remarks Code Main PCB 10243438 PCB ASSY/MAIN TK-RJM506904*001 A NTSC 10243444 PCB ASSY/MAIN TK-RJM506904*002 A PAL 23901820 DIODE 1SS355TE-17 D1,2,3 10116986 I.C SN74AHCT1G08DCKR IC7,8 10240648 IC TC74LCX08FT(EL.K) IC22 10197553 IC TC7S04FU(TE85L.F) IC14 10197554 IC TC7SZ126FU(TE85L.F IC17 10197555 IC… -
Page 14
Price Item Parts Code Parts Name Specification Remarks Code Key board assy 10200656 PCB ASSY/LDA1 TK-RJM505754*001 23701408 LED SLI-332URCTJ2 D501-515 10200657 PCB ASSY/LDB2 TK-RJM505756*001 23701408 LED SLI-332URCTJ2 D516-536 10037820 PCB ASSY/LD3M TK-M240428*6(M476) 10037819 PCB ASSY/LD4M TK-M240429*6(M476) 10037818 PCB ASSY/LD5M TK-M240430*6(M476) 10135908 PCB ASSY/LDA TK-RJM503255*001 10243426 PCB ASSY/KY1M… -
Page 15: Schematic Diagrams
SCHEMATIC DIAGRAMS MAIN PCB M664-MDA1(1/2) — 13 —…
-
Page 16
MAIN PCB M664-MDA1(2/2) — 14 —… -
Page 17
CONSOLE PCB M664-CNA1 — 15 —… -
Page 18
CONSOLE PCBs M664-CNA2/CNA3/CNA4 — 16 —… -
Page 19
KEY LED PCB M655-LDA1 — 17 —… -
Page 20
KEY LED PCB M655-LDB2 — 18 —… -
Page 21
KEY LED PCBs M446-LD3M/LD4M/LD5M — 19 —… -
Page 22
KEY PCBs CSM618T-KY1M/KY2M — 20 —… -
Page 23
CASIO COMPUTER CO.,LTD. Overseas Service Division 6-2, Hon-machi 1-Chome Shibuya-ku, Tokyo 151-8543, Japan…
![]()
Ch
CASIO COMPUTER CO.,LTD.
|
6-2, Hon-machi 1-chome |
C MA0603-A Printed in China |
LK300CH1A |
|
|
Shibuya-ku, Tokyo 151-8543, Japan |
LK300CH1A |
||

Version: 1.0
USB MIDI
93TV-LK Model
Remarks
|
Recognized |
1-16 1-16 |
Mode3 |
|
Function… |
Default |
Changed |
Default |
|
Basic |
Channel |
|
X |
|
|
X |
|
|
Messages |
Altered |
|
Mode |
|
A-1 |
|||
|
*1: |
XX: |
||
|
0-127 |
12-1081* |
9nHV=1-127 |
V=0,8nHV=XX |
|
O |
9nH |
||
|
X |
|||
|
36-96 |
O9nHV=1-127 |
X8nHV=64 |
|
|
Truevoice |
NoteON |
NoteOFF |
|
|
Note |
Number |
Velocity |
Modulation
Bank select
|
Key’s |
Ch’s |
|
|
After |
Touch |
PitchBender |
Sostenuto
Hold1
Expression
Pan
Volume
O O O O O
X X X O*4 O*4
7 10 11 64 66
664A-CH-002A
|
O4OSoftpedal* XOReberbsend |
OOChorussend |
XO3RPNLSB,MSB* OOAllsoundoff |
OOResetallcontroller |
O0-127O0-127 |
*5O O*5*6 |
X X X X X X |
O X O X |
X X O O X O X X |
2* |
FINETUNECOARSETUNEPITCHBENDSENSEPRNNull3* |
4* |
1 01 2 |
[F0][7F][7F][04][05][01][01][01][01][02][00][vv][F7]vv• 00 1 01 2 02 |
4033 |
GMGMON[F0][7E][7F][09][01][F7]GMOFF[F0][7E][7F][09][02][F7]6* |
Mode2:OMNION,MONOO:Yes |
Mode4:OMNIOFF,MONOX:No |
|
|
* 203104 |
||||||||||||||||||
|
00 vv |
||||||||||||||||||
|
[01][vv][F7][00][01][01][01][01] |
||||||||||||||||||
|
[7F][04][05] |
||||||||||||||||||
|
[F0][7F] |
||||||||||||||||||
|
• |
||||||||||||||||||
|
5 |
||||||||||||||||||
|
67 91 |
93 |
100,101 120 |
121 |
Program |
Change :True# |
SystemExclusive |
System :SongPos Common :SongSel :Tune |
System :Clock RealTime :Commands |
Aux :LocalON/OFF :AllnotesOFF Messages :ActiveSense :Reset |
Remarks |
Mode1:OMNION,POLY |
Mode3:OMNIOFF,POLY |
664A-CH-079A


• 查閱
下

有導致人員死亡及嚴重受傷的危險


在危險


1. 眼睛
有導致眼睛失明的危險
作
3. 聯繫
項
• 電變壓器
交流電源
• 載
• 熱
• 曲
• 經銷商或卡西歐特約服務中心聯 繫
● 有造成觸電的危險
及觸電的危險
須嚴格遵守下列注意事項
• 燒
•(+) (–)
險
出現上述情況時應立即執行下述操作
3. 聯繫
節及維護作業委托給您的經銷商或卡西 歐特約服務中心


項
• 附近
項
• 插到底
• 座拔下交流電變壓器
• 從牆上的電源插座拔下并把插頭周 圍積蓄的灰塵清潔乾淨
電的危險
須嚴格遵守下列注意事項
• 出電池


|
• |
||||||
|
• |
||||||
|
• |
•*
•LCD
LCD
*• LCD
LCD
•L C D
|
• LCD |
|||
|
• |
|||
|
15 |
|||
|
• |
|||
|
• |
|||
|
• |
|||
|
• |
|||
|
• |
|||
|
• |
|||
|
• |
|||
|
• |
|||
|
• |
|||
|
• |
|||
|
• |
|||
|
• |
|||
|
• |
|||
|
• |
• |
||
|
• |
|||
|
• |
|||
|
• |
|||


514
此外還配備能控制音色的聲學特性的數位音效功能
PIANO BANK
•SMF
進行到第3
•1 2 3
OK
SMF
100
50 50
120
趣無窮
CASIO SMF CASIO
MIDI (SMF)
VIDEO OUT
OK
Russian Cyrillic Latin


|
……………… |
Ch-1 |
|
……………………. |
Ch-5 |
|
……………………. |
Ch-8 |
|
………………………… |
Ch-10 |
|
………………….. |
Ch-11 |
|
…………………….. |
Ch-11 |
|
………………………… |
Ch-13 |
|
……………………………. |
Ch-13 |
|
……………… |
Ch-13 |
|
………………………… |
Ch-14 |
|
……………………………….. |
Ch-14 |
|
………………………… |
Ch-14 |
|
………………………… |
Ch-15 |
|
…………………….. |
Ch-15 |
|
USB ………………………………… |
Ch-15 |
|
…………………….. |
Ch-15 |
|
……………………………. |
Ch-16 |
|
VIDEO OUT …………………… |
Ch-16 |
|
………………………… |
Ch-16 |
|
………………….. |
Ch-17 |
|
…………………….. |
Ch-17 |
|
……………………………. |
Ch-17 |
|
……………………………. |
Ch-18 |
|
………. |
Ch-18 |
|
………… |
Ch-19 |
|
……………… |
Ch-19 |
|
……………… |
Ch-20 |
|
………………………… |
Ch-20 |
|
……………………………. |
Ch-20 |
|
………………………… |
Ch-21 |
|
………………………… |
Ch-21 |
|
………………………… |
Ch-21 |
|
…………………….. |
Ch-21 |
|
…………………. |
Ch-22 |
|
………. |
Ch-22 |
|
PIANO BANK ………… |
Ch-22 |
|
CD-ROM SMF |
|
|
………………………………………. |
Ch-22 |
|
……………. |
Ch-23 |
|
……………………………….. |
Ch-24 |
|
…… |
Ch-25 |
|
1 ……………….. |
Ch-25 |
|
2 ……………….. |
Ch-26 |
|
3 …….. |
Ch-27 |
|
……………… |
Ch-27 |
|
………………………… |
Ch-28 |
|
………………………… |
Ch-28 |
|
OK ………………… |
Ch-29 |
|
Ch-31 |
||||||||
|
Ch-31 |
…………………………………… |
Ch-47 |
||||||
|
……………………………. |
Ch-32 |
……………. |
Ch-48 |
|||||
|
…………………….. |
Ch-32 |
Ch-48 |
||||||
|
Ch-35 |
||||||||
|
…………………….. |
Ch-49 |
|||||||
|
Ch-35 |
||||||||
|
……………… |
MIDI |
Ch-50 |
||||||
|
Ch-35 |
||||||||
|
…………………….. |
Ch-50 |
|||||||
|
…………………………………… |
Ch-36 |
……………. |
Ch-52 |
|||||
|
………. |
Ch-36 |
……………………………….. |
Ch-53 |
|||||
|
……………… |
Ch-36 |
………………………… |
Ch-54 |
|||||
|
Ch-37 |
…………………….. |
Ch-55 |
||||||
|
……………………………. |
Ch-37 |
………………….. |
Ch-57 |
|||||
|
………. |
Ch-38 |
Ch-59 |
||||||
|
…………………. |
Ch-39 |
|||||||
|
……………………………….. |
Ch-39 |
……………. |
Ch-60 |
|||||
|
…………………….. |
Ch-41 |
|||||||
|
…………………….. |
Ch-42 |
……………………………. |
A-1 |
|||||
|
………….. |
Ch-42 |
………………….. |
A-1 |
|||||
|
Ch-43 |
………………………………… |
A-5 |
||||||
|
A-7 |
||||||||
|
Ch-43 |
||||||||
|
A-8 |
||||||||
|
Ch-44 |
||||||||
|
A-9 |
||||||||
|
Ch-44 |
||||||||
|
………………………… |
Ch-45 |
USB |
||||||
|
…………………….. |
Ch-46 |
MIDI |
||||||
|
………. |
Ch-46 |
|||||||
|
Ch-47 |
||||||||


![]()

•PLAY/STOP KARAOKE PLAY/STOP
<PLAY/STOP>
1 MIC VOLUME
2 KEY CONTROL/TRANSPOSE
3 <PLAY/STOP>
4 KARAOKE OK
5 FUNCTION
6 REVERB/CHORUS
7 SONG MEMORY
8 KEY LIGHT
9 RHYTHM
0 TONE
● ADVANCED 3-STEP LESSON SYSTEM
ALEFT/TRACK 1 1 BRIGHT/TRACK 2 2 CMETRONOME
DSPEAK
EPRACTICE PHRASE FSTEP 1 to 3 1 3
GSCORING 1 to 3 1 3
H SPLIT
I LAYER
J
K RHYTHM L TONE
M SONG BANK/KARAOKE
OK
N
O PIANO BANK P CHORD
Q
R 1 5
S POWER
T
U MAIN VOLUME
V MODE
● SONG/PIANO BANK/RHYTHM CONTROLLER
WREPEAT INTRO
XREW NORMAL/FILL-IN
YFF VARIATION/FILL-IN
ZPAUSE SYNCHRO/ENDING
[PLAY/STOP START/ STOP
]
_ TEMPO
a SONG BANK b PIANO BANK c CARD
d DATA ACCESS
SONG BANK PIANO BANK KARAOKEW [
RHYTHM RHYTHM SONG MEMORYW [
• 說明書採用的範例中表示的不同


e SD CARD SLOT SD
*2
|
f |
• |
||||
|
• |
|||||
|
[+] |
|||||
|
g [+]/[–] |
[–] |
||||
|
h USB |
j SUSTAIN/ASSIGNABLE |
l PHONES/OUTPUT |
|
i VIDEO OUT |
JACK |
|
|
k DC 9V 9V |
m MIC |
|
▼ ● |
|||
盤間的位置關係


SONG BANK
|
PIANO BANK |
|||
|
STEP2 |
|||
|
POWER |
MODE |
PLAY/STOP |
STEP1 |
|
1 |
4 SONG BANK/KARAOKE |
||
|
2 |
|||
|
• SONG BANK/KARAOKE |
|||
|
A-9 |
|||
|
1 POWER |
“46 ALOHA OE” |
||
|
• |
4 6 |
||
|
2 MODE NORMAL |
5 STEP 1 STEP 2 |
||||
|
• |
|||||
|
6 |
||
|
• |
||
|
3 |
||
|
SONG BANK |
||
|
A l o h a O e |
||


1
• 奏
•1
2
• 按下琴鍵的同時琴鍵便會熄滅
7PLAY/ STOP
13 PIANO BANK SONG BANK
2PIANO BANK
• PIANO BANK A-9
3 5


用時請務必關閉電子琴電源
1
26 D
• (+) (–)
3
琴便可恢復正常
……………………………………. 2.5
音量演奏均會縮短電池壽命

•
•(+) (–)

•
• 池
AD-5
[ ]
DC 9V
AD-5


|
● |
|||||
|
• |
|||||
|
6 |
|||||
|
• |
|||||
|
• |
|||||
|
• |
|||||
|
● |
|||||
• 流電變壓器
|
● |
|||||
|
• |
|||||
|
• |
1 |
FUNCTION |
||
|
“DEMO 2” |
||||
|
• |
||||
|
2 |
[+] [–] “oFF” |
|||
|
3 |
FUNCTION |
|||
6
POWER
|
• |
||||
|
TONE |
||||
|
• |
||||
|
• |
||||
|
• |
• 會重新有效
電子琴的電源已被關閉


畢後再重新調節音量
[ ]
PHONES/OUTPUT
1
|
2 |
LEFT RIGHT |
||
|
AUX IN |
|||
|
3 |
|||
1
2
AUX IN
3
大器上
造成單聲道輸出
664A-CH-017A
|
INPUT 1 |
|||
|
PHONES/OUTPUT |
|||
|
INPUT 2 |
|||
|
( ) |
|||
USB
說明請參閱第Ch-48 “ ”
SP-3 SP-20
SUSTAIN/ASSIGNABLE JACK
Ch-51 “SUSTAIN/ASSIGNABLE JACK
SUS”
SUSTAIN/ASSIGNABLE JACK
SP-20
• 象鋼琴的製音器踏板一樣
• 開踏板為止
• 板可使響音延留
• 開琴鍵之前踩踏板
START/STOP
Ch-15


閱第Ch-29 “ OK”
VIDEO OUT
*1*2
*1: SMF *2: SMF
• 電源
要放置得離電視機過近
下所示
• 輸入終端
[ ]
VIDEO OUT
|
TV/ |
|
|
VIDEO |
|
• 機附帶的用戶文件
•NTSC PAL
LK-300TV-N NTSC
LK-300TV-P PAL
在購買之前向銷售商確認好
險


|
REVERB/CHORUS |
TONE |
|
POWER |
[+] / [–] |
|
MAIN VOLUME |
MODE |
KEY LIGHT |
|
2 TONE |
|
1 |
POWER |
||||||
|
2 |
MODE NORMAL |
||||||
|
3 |
|||||||
|
3 |
MAIN VOLUME |
||||||
|
“049 BRIGHT CELESTA” |
|||||||
|
4 |
0 4 9 |
||||||
|
B r t C e l s t |
||||||||||||
|
514 |
||||||||||||
|
• |
||||||||||||
|
0 0 |
||||||||||||
|
1 |
||||||||||||
|
• |
||||||||||||
|
[+] [–] |
||||||||||||
|
• |
• |
|||||||||||
|
500 513 |
||||||||||||
|
A-1 |
||||||||||||
|
“ ” |
||||||||||||
|
A-5 |
||||||||||||
|
• |
||||||||||||
|
Ch-16 “VIDEO OUT ” |
||||||||||||


|
2 [+]/ |
||||||||||||||||||
|
[–] |
||||||||||||||||||
|
• [+]/[–] |
||||||||||||||||||
|
32 |
||||||||||||||||||
|
0 1 |
||||||||||||||||||
|
1 2 |
||||||||||||||||||
|
16 |
||||||||||||||||||
|
2 1 |
||||||||||||||||||
|
• |
3 2 |
|||||||||||||||||
|
0 1 |
||||||||||||||||||
|
1 2 |
||||||||||||||||||
|
2 3 |
||||||||||||||||||
|
3 4 |
||||||||||||||||||
|
1 REVERB CHORUS |
||||||||||||||||||
|
• REVERB CHORUS |
||||||||||||||||||
|
1 KEY LIGHT |
||||||||||||||||||
|
• KEY LIGHT |
||||||||||||||||||
|
• |
||||||||||||||||||
![]()

|
REPEAT |
SONG BANK |
|
|
REW |
PIANO BANK |
TONE |
[+] / [–]
100 OK
•OK 50
麥克風並進入卡拉OK *
*OK
•50 20 30
Ch-49
• Ch-17
1SONG BANK/KARAOKEOK
• SONG BANK/KARAOKE
A-9
2 SONG BANK
|
3 |
|
|
“46 ALOHA OE” |
|
|
4 6 |
|
|
A l o h a O e |
|
|
• |
00
•[+] [–]
4 PLAY/STOP
5PLAY/STOP
•


|
• PIANO BANK A-9 |
||
|
2 PIANO BANK |
||
|
A l o h a O e |
||
|
• |
||
|
• PIANO BANK STEREO |
||
|
GRAND PIANO 000 |
||
|
3 1 |
30 255 |
|
|
44 (ODE TO JOY) |
OK |
|
|
4 4 |
||
|
O d e T o J o y |
||
|
1 TEMPO |
||
|
• 00 |
||
|
• [+] [–] |
||
|
4 PLAY/STOP |
5 PLAY/STOP
•
• [+] [–]90 090
• 
 TEMPO
TEMPO
•


1PAUSE
2PAUSE
1REW
•
•
2REW
•REW
1FF
•
•
2FF
•
“”
REPEAT
•
REPEAT
•
• REPEAT


|
PIANO BANK |
||||||
|
1 TONE |
PIANO BANK |
|||||
|
000 STEREO GRAND PIANO |
||||||
|
2 TONE |
||||||
|
1 PIANO BANK |
||||||
|
“130 VIOLIN” |
||||||
|
1 3 0 |
||||||
|
• |
|
V i o l i n |
|||||||||||||||||||||
|
2 |
|||||||||||||||||||||
|
• [+] [–] |
• |
||||||||||||||||||||
|
• |
3 PLAY/STOP |
||||||||||||||||||||
|
• |
|||||||||||||||||||||
|
• |
|||||||||||||||||||||
|
• PLAY/STOP |
|||||||||||||||||||||
|
CD-ROM SMF |
|||||||||||||||||||||
|
1 SONG BANK PIANO BANK |
CD-ROM 25 |
||||||||||||||||||||
|
(SMF) |
|||||||||||||||||||||
|
|
|||||||||||||||||||||
|
• 00 |
CD-ROM |
||||||||||||||||||||
|
“MusicDataFolder” “List.txt” |
|||||||||||||||||||||
|
“List.txt” |
|||||||||||||||||||||
|
2 PLAY/STOP |
|||||||||||||||||||||
|
SMF |
|||||||||||||||||||||
|
|
|||||||||||||||||||||
|
* (*) |
|||||||||||||||||||||
|
• [+] [–] |
•
• SD Ch-54 SMF
Ch-49 CD-ROM SMF
• PDFAdobe Reader Acrobat Reader
Ch-48 “Adobe ReaderAcrobat Reader** ”
 Loading…
You can only view or download manuals with
Sign Up and get 5 for free
Upload your files to the site. You get 1 for each file you add
Get 1 for every time someone downloads your manual
Buy as many as you need