Перейти к основному контенту
Support
Support
Войти
Войдите с помощью учетной записи Майкрософт
Войдите или создайте учетную запись.
Здравствуйте,
Выберите другую учетную запись.
У вас несколько учетных записей
Выберите учетную запись, с помощью которой нужно войти.
Краткое руководство
Установите Skype для бизнеса, выполните вход и начинайте добавлять контакты, делать звонки, общаться в чате и проводить онлайн-собрания.
Начало работы на Windows
Начало работы на Mac
Популярные разделы
Осуществление и прием звонков
Добавление контакта
Добавление и обновление своего аватара
Изменение состояния присутствия
Настройка параметров звуковых устройств
Настройка собрания в Outlook
Поиск предыдущей беседы
Запись и воспроизведение собрания
Поддержка специальных возможностей в Skype для бизнеса
Установка Skype для бизнеса
Задачи администратора
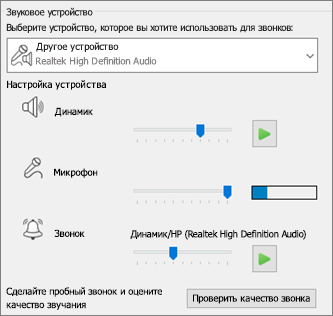
Настройка звукового устройства
-
Нажмите Показать меню
 и выберите:
Сервис > Параметры звукового устройства.
-
В разделе Звуковое устройство выберите нужное устройство и настройте параметры.
-
Динамик — нажмите кнопку Воспроизвести
 и перетащите ползунок, чтобы настроить громкость.
 -
Микрофон — проговорите что-нибудь в микрофон, чтобы проверить громкость речи: перетаскивайте ползунок, пока индикатор не будет заполняться наполовину.
-
Звонок — нажмите кнопку Воспроизвести
и перетащите ползунок, чтобы настроить громкость.
-
-
Настройте параметры звука и нажмите кнопку ОК.
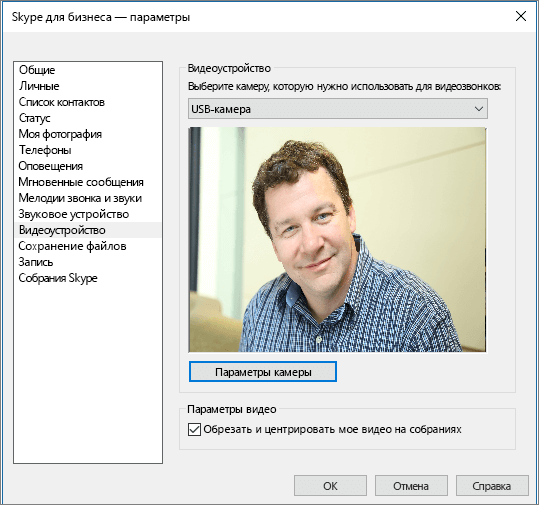
Настройка видеоустройства
-
Нажмите Показать меню
и выберите:Сервис > Параметры видеоустройства.
-
В разделе Видеоустройство выберите нужную камеру.
-
Измените положение камеры так, чтобы вы находились в центре области предварительного просмотра.
-
Если вы хотите настроить параметры видеопроцессора или камеры, нажмите кнопку Параметры камеры.
-
Чтобы вас было лучше видно во время видеоконференций, установите флажок Обрезать и центрировать мое видео на собраниях.
-
Нажмите кнопку ОК.
Нужна дополнительная помощь?
Нужны дополнительные параметры?
Изучите преимущества подписки, просмотрите учебные курсы, узнайте, как защитить свое устройство и т. д.
В сообществах можно задавать вопросы и отвечать на них, отправлять отзывы и консультироваться с экспертами разных профилей.
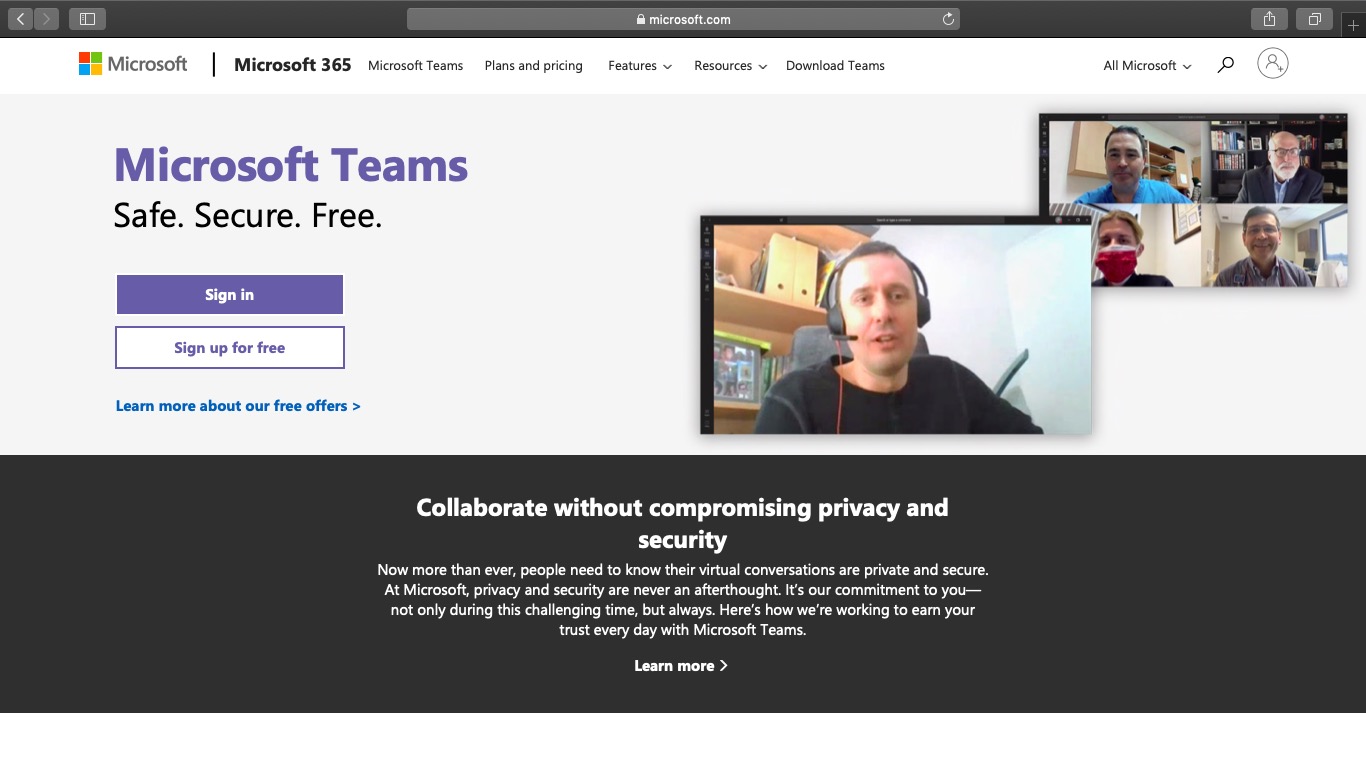
Want to learn how to use Skype for Business?
The current global pandemic has forced many businesses to go remote — but that comes with tons of communication challenges!
Luckily, Microsoft’s Skype for Business is a popular video conferencing tool that can help you overcome that. But if you don’t know how to use it properly, your communication issues are only going to get worse.
Don’t worry!
This article is a step-by-step guide on how to use Skype for Business the right way.
However, as Microsoft will be replacing Skype for Business with Microsoft Teams, support for Skype for Business will end by 2025. Additionally, new Office 365 users can’t download Skype for Business anymore — they should download Teams instead.
To help you with this transition, we’ll briefly cover how to get started with Teams as well.
This article contains:
(Click on the links below to jump to a specific section)
What is Skype for Business?
How is Skype for Business different from Skype?
How to use Skype for Business (Step-by-Step Guide)
- How to get started with Skype for Business
- How to use it for video conferencing
- How to schedule meetings
- How to make audio or video calls
- How to share your screen during video calls
- How to use Skype for Business for instant messaging
How to transition to Microsoft Teams
- What is Microsoft Teams?
- How to get started with Teams (Step-by-Step Guide)
- Microsoft Teams pricing
Let’s get started.
What is Skype for Business?
Skype for Business (previously known as Microsoft Lync) is a popular communication platform developed by Microsoft. It supports remote communication through various channels like text, audio and video chat.
Key features of Skype for Business include:
- Instant messaging
- HD video conferencing
- Voice calls
- Call recording
- File sharing
- Whiteboard collaboration
- Broadcasting online meetings
How is Skype for Business different from Skype?
Skype for Business and Skype are both used for virtual communication.
So how are they different from each other?
Here’s how:
- Skype: Meant for small businesses (~20 people). It’s free to use, but if you want services like mobile or landline calls, then you would have to go for the paid plans.
- Skype for Business: Meant for larger businesses (~250 people). It offers enterprise-level security, account management and integrates with other Office 365 applications like Microsoft Outlook, PowerPoint, SharePoint, etc.
How to use Skype for Business [step-by-step guide]
As Microsoft Teams is replacing Skype for Business, new Office 365 users can no longer download Skype for Business.
This section is only meant for those who have already downloaded Skype for Business as a virtual communication tool.
Skype for Business has two versions:
Skype for Business Server
An on-premise application used by highly regulated large organizations. It requires specialized hardware and dedicated IT support and maintenance.
Skype for Business Online
A cloud-based application that can be accessed by users anytime, anywhere! There are no additional hardware or maintenance costs here.
As COVID-19 quarantines have forced most teams to work remotely, we’ll focus on how to use Skype for Business Online.
This step-by-step guide covers how to:
- Get started with Skype for Business
- Use it for video conferencing
- Use it for scheduling meetings
- Use it for audio or video calling
- Use it for screen sharing
- Use it for instant messaging
A. How to get started with Skype for Business
Here’s a step-by-step guide to help you get started with some basic features of Skype for Business:
1. How to set a presence status in Skype for Business
Setting an availability status makes it easier for team members and business clients to communicate efficiently.
Skype for Business lets you display your availability (or presence) with various statuses like Available, Busy, Away, etc.
Here’s how you can add or edit these:
Step 1: Sign in to your Skype for Business account.
Step 2: In the new window that appears, click on the drop-down arrow in the status menu under your name.
Here, you can choose from a list of status options, like:
- Available: online and active.
- Busy: shouldn’t be interrupted.
- Away: logged on, but away from the computer for a long time.
- And more!
You can also use “Reset Status” for Skype to automatically set your presence status based on your app activity. (On Mac, use the “Automatic” option instead.)
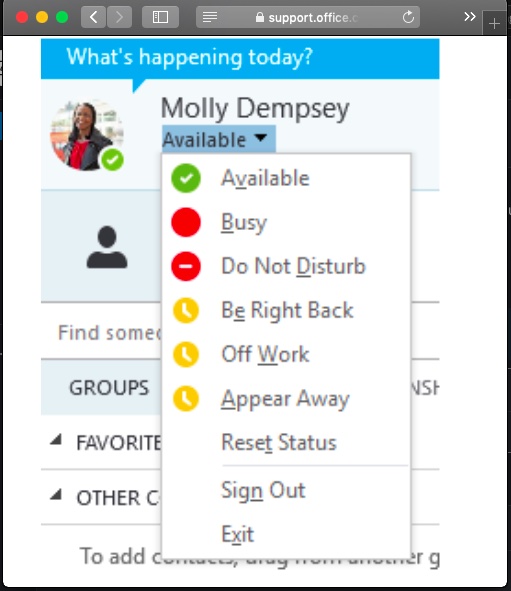
As Skype for Business Online integrates with your Microsoft Outlook account, you can even check your colleagues’ presence statuses or edit your own status via email.
Note: If there’s no keyboard or mouse activity for over 5 minutes, then your status automatically changes to “Inactive”.
2. How to set up contacts in Skype for Business
Skype for Business lets you add people to your contact list from within and outside your organization.
Here’s how to add contacts on Skype for Business:
Step 1: Click on the “Add a contact” icon to access various options to add contacts. The “Create New Group” option lets you create groups that you can add your contacts to.
Step 2: To add people, type their name into the search box in the main Skype for Business window.
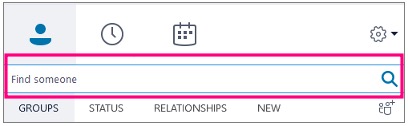
Step 3: Right-click on their picture, select “Add to Contacts List” and choose the right contact group.
Now you’re all set to communicate with your contact list!
B. How to use Skype for Business for video conferencing
Skype for Business’ video conferencing features combat the lack of face-to-face interaction when working remotely.
But video calls aren’t all you can do.
Skype for Business users can share their screen with attendees during a call or even conduct a webinar easily.
Here are the steps to start a video conference in Skype for Business:
Step 1: Launch your Skype for Business application and set your presence status to Available.
Step 2: Go to the “Meetings” tab and click on the “Meet Now” option.
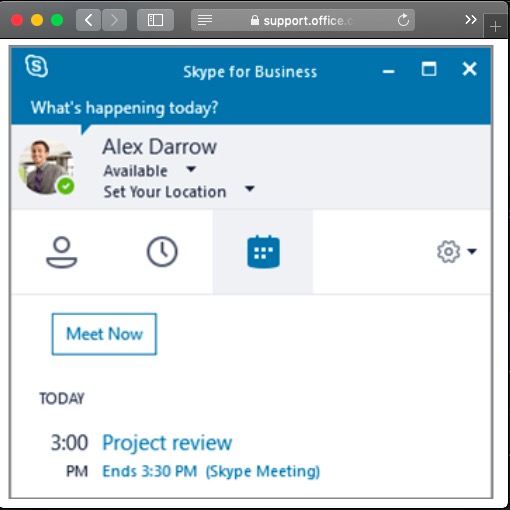
Step 3: The meeting screen will immediately appear as a pop-up. Here, you can add participants by clicking on the “Invite” button at the top right corner.
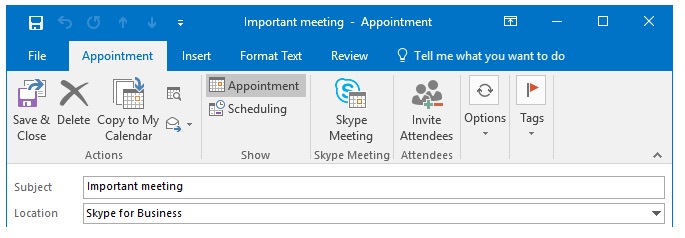
C. How to schedule a Skype for Business meeting
As Skype for Business Online works with Microsoft Outlook, you can follow these steps to schedule a meeting quickly:
Step 1: Open Microsoft Outlook.
Step 2: Go to the “Appointments” tab.
Step 3: Click “Skype Meeting”.
This will add the call info to the meeting invite.
Fill in the required meeting details and hit “Send.”
The recipients will receive Outlook calendar reminders and a “Join Meeting” pop up when the meeting is about to start. Simply click on it to join the conference call!
D. How to make audio or video calls
Here’s how to make audio or video calls to someone via Skype for Business:
Step 1: To make a call, find the person in your contact list and click the “Audio” or the “Video” icon.
Step 2: When you receive a call on Skype for Business, a pop up offering various call settings appears.
These include:
- Mute (Microphone icon): Your microphone is muted.
- Video on/off (Camera icon): Click on this to turn your webcam on or off.
- Options (three dots): A list of additional options appear:
- Conduct an audio call only.
- Respond with an instant message only.
- Set your status to “Do not disturb” and reject the incoming call.
E. How to share your screen during Skype for Business calls
Let’s say you need to discuss that PowerPoint presentation you made last night with another individual. Or maybe show someone how to perform a specific task.
How do you do that virtually?
As a presenter, you can easily share your screen via Skype for Business for this.
Here’s a closer look at how:
Step 1: Click on the “Present” icon (shaped like a monitor) in the meeting window.
This will open a pop-up, giving you several options to share your screen:
- Present Desktop: Share your entire screen.
- Present Programs: Share an open Word or Excel file.

Step 2: When you share your screen, the “Now Presenting” tab will appear on your device.
Additionally, your presence status will auto-change to “Presentation” to restrict other Skype users’ alerts.
Step 3: Each participant will receive a request to accept your shared screen/content.
If you want another attendee to demonstrate something, you can give them control over the sharing session by clicking “Give Control”. You can click on “Take back control” to revoke these access rights anytime you want.
Step 4: Use “Stop Presenting” to stop sharing your screen.
F. How to use Skype for Business for instant messaging
Skype for Business lets you communicate with your contacts list in real-time via instant messaging (IM). This is faster than a phone call and less formal than an email.
Here’s how to do this:
Step 1: Hover over the contact you want to start IM with and click the “Message” icon (shown below). Their chat box will appear, where you can start a real-time conversation instantly.
![]()
Step 2: When someone starts an IM conversation with you, a pop up appears on your screen.
To respond, click on their photo and type in your message.
To reject the message, click “Ignore.”
Step 4: You can add more people to your IM conversation window by dragging their contact picture into your IM conversation. Alternatively, click the “Invite More People” button at the top of the window to do this.
Step 5: To send an IM to all the contacts in a group, right-click on the group in your contact list and click on “Send an Instant Message” to deliver the message to all group members.
How to transition to Microsoft Teams
Whether you’re using Skype for Business or not, it’s best to switch to Microsoft Teams as early as possible.
This way, you won’t face any difficulties when Skype for Business is rolled back!
To help you out, we’ll briefly cover how to get started with Microsoft Teams.
Note: You can check out our extensive guide on Microsoft Teams for more information.
A. What is Microsoft Teams?
Microsoft Teams is an online communication platform that’s part of the Microsoft Office 365 suite.
Meant for larger businesses (>250 people), it lets you host large audio or video conferences with individuals within or outside your company.
Key features of Microsoft Teams:
- Centralised hub for all Office 365 applications
- Enhanced security and compliance
- File creation, sharing and editing within the application
- Can be accessed easily via desktop, a mobile device or web browser
- Audio and video calls (with VoIP support)
- Instant messaging (IM)
B. How to get started with Microsoft Teams? [step-by-step guide]
Follow this step-by-step guide to get started with Microsoft Teams:
1. Create an account
A) For desktop
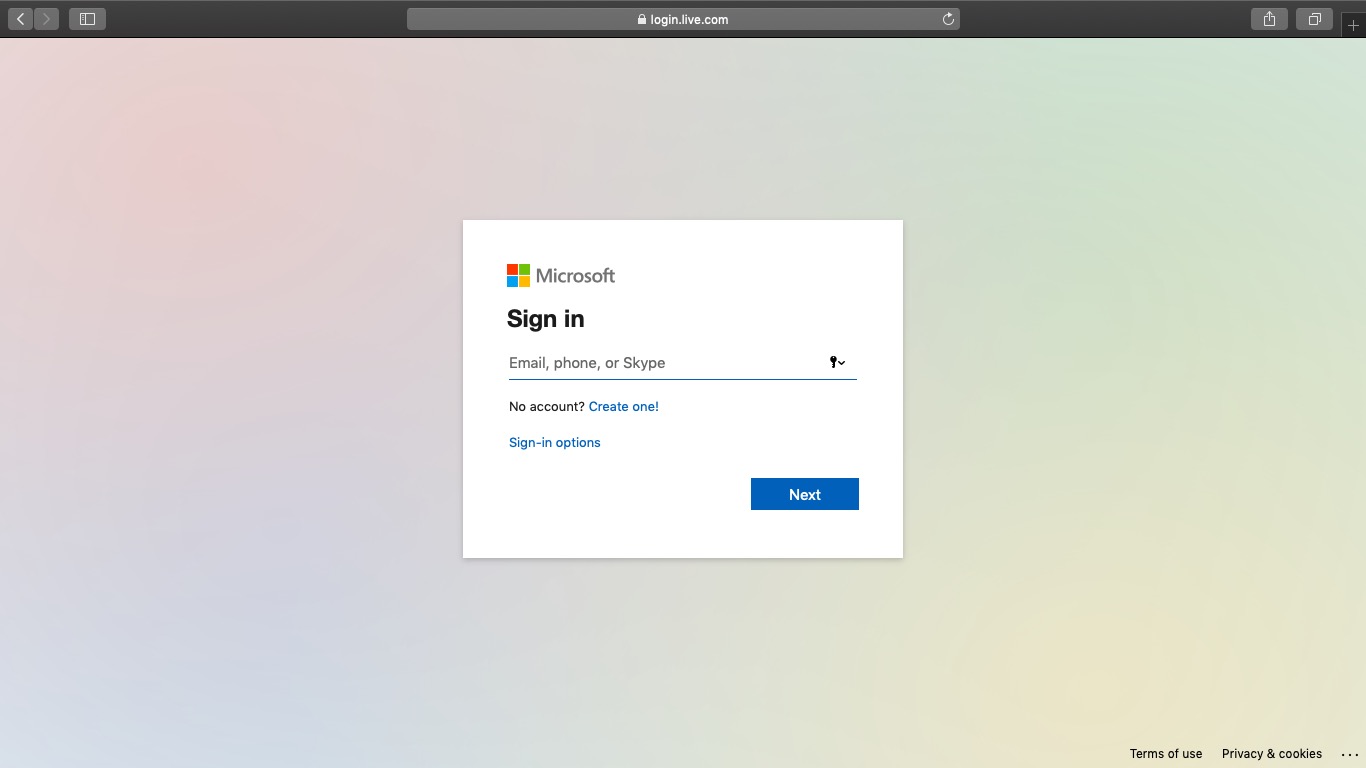
Step 1: Visit the Microsoft Teams web page and click on “Sign in.”
Step 2: Click the “Create one!” tab on the new “Sign in” page.
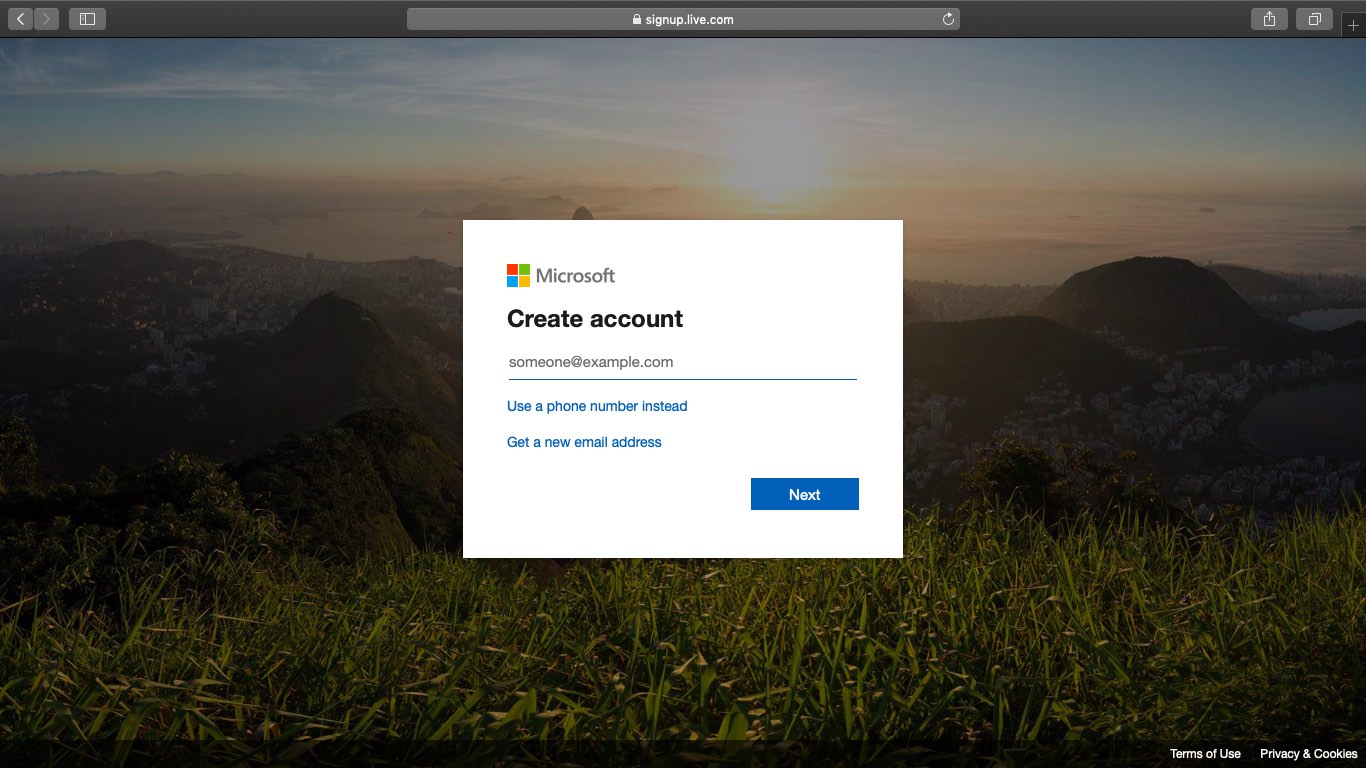
Step 3: Type your work email address into the “Create account” window and click on “Next.”
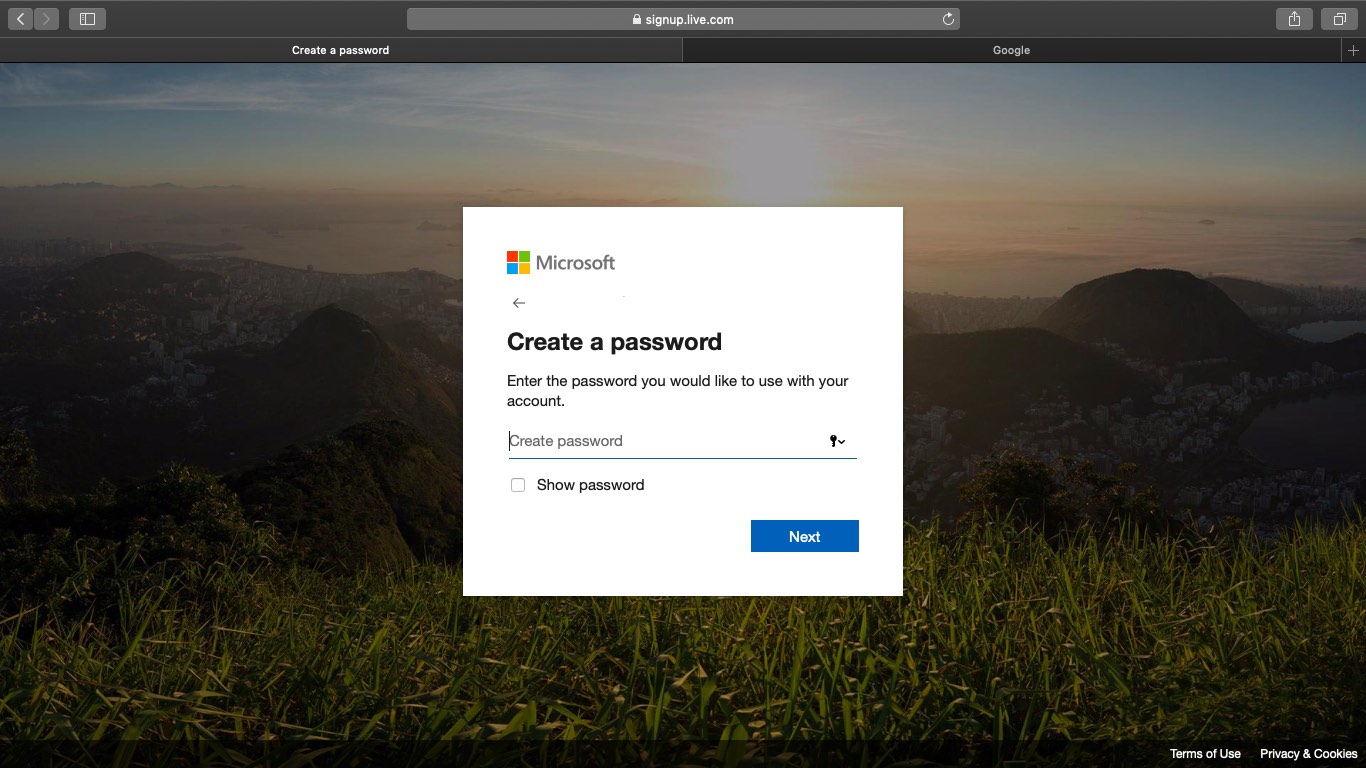
Step 4: Create your password and then enter the required details on the pages that follow.
After creating your account and verifying your email, you can start using Microsoft Teams via its homepage.
B) For mobile
Follow the steps above to create your Microsoft account via mobile phone.
2. Download the Microsoft Teams app
A) For desktop
Step 1: Visit the Microsoft Teams homepage and click on “Download Teams.”
Step 2: Click on “Download for Desktop.”
Based on your operating system, you will get a download link for either Mac or Windows.
Step 3: Once downloaded, follow the on-screen instructions to install Microsoft Teams.
B) Mobile version
Step 1: Based on your phone, you can download the Microsoft Teams app from the Google Play Store for Android or the iOS App Store for Apple.
Step 2: After installing the app, log in to Teams via your Microsoft account.
C. Microsoft Teams pricing
Microsoft Teams offers four different plans that you can choose from as per your business needs:
1. Microsoft Teams (Free)
Offers features like instant messaging, audio and video call, file sharing and file storage.
2. Microsoft 365 Business Basic: $5/user per month
Offers all “Free” features along with video conferencing (up to 250 people).
3. Microsoft 365 Business Standard: $12.50/user per month
Offers “Microsoft Teams Business Basic” features + desktop versions of Office apps like Excel, Word, etc.
4. Office 365 E3: $20/user per month
Includes “Business Standard” features + unlimited file storage per user on OneDrive + enterprise-level video service to hold video conferences across the organization for $20.00 user/month.
Conclusion
With COVID-19 disrupting businesses everywhere, having a remote communication tool is now more essential than ever.
And while Microsoft Skype for Business is a good option to collaborate with your co-workers, it doesn’t look like it’s going to be there for the long run. Recently, Microsoft announced an end-of-life date to Skype for Business. That’s why it makes sense to switch to other platforms like Microsoft Teams or Zoom instead!

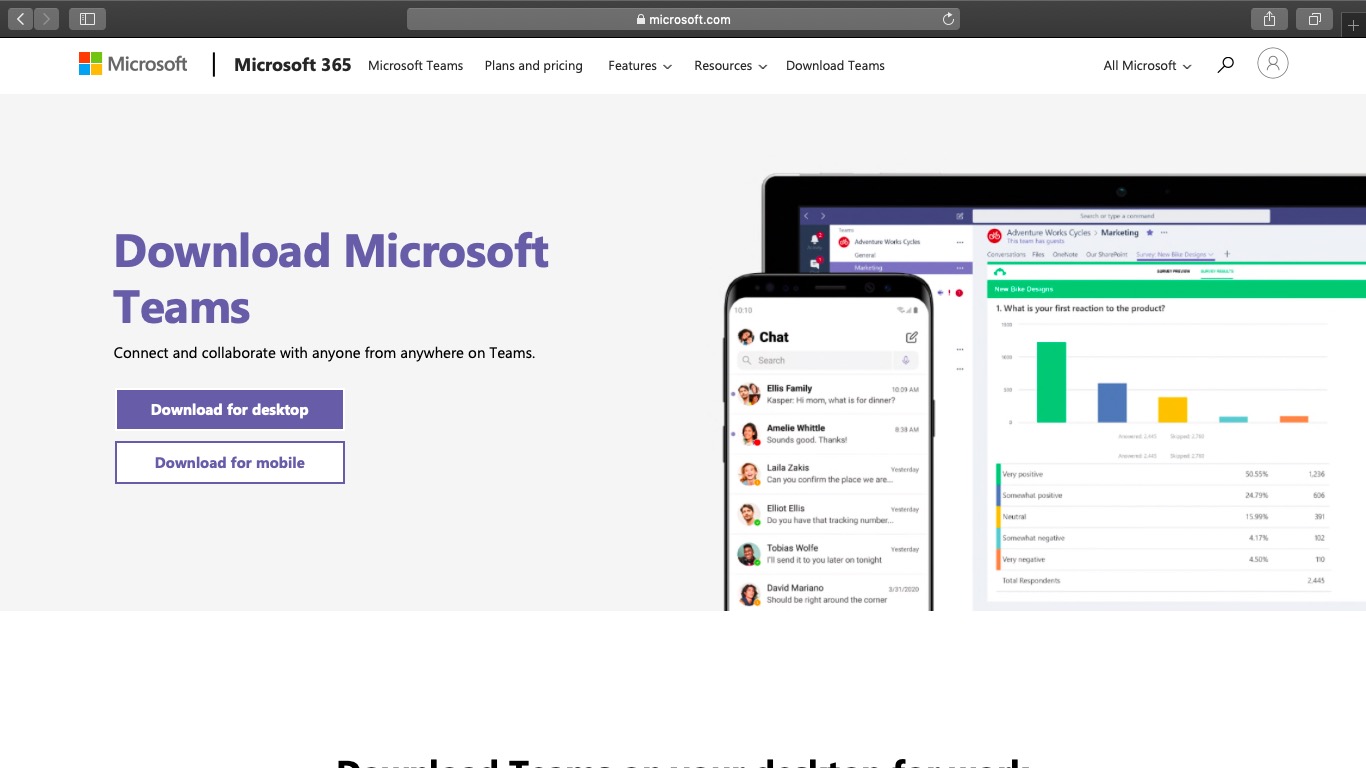
Добавление нового пользователя
Чтобы найти необходимый контакт, в поле поиска («Найдите человека») введите ФИО или электронную почту работника:
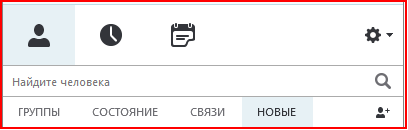
Далее навести курсор мыши на найденный контакт, нажав правой кнопкой мыши на него и выбрав пункт «Добавить в список контактов» сохраняете его в группу, созданную вами:
Как позвонить работнику?
Чтобы позвонить работнику, нужно навести курсор мыши на его фотографию в кружке и нажать левой кнопкой мыши, далее появится меню быстрой связи. Чтобы сделать звонок, нажмите значок телефонной трубки:

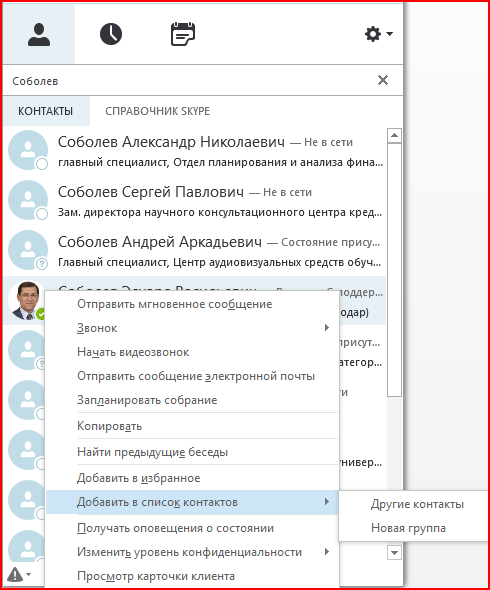
Карточка контакта
Для того, чтобы посмотреть карточку контакта, необходимо навести на контакт (изображение в кружочке) курсор мыши и выбрать:

или навести курсор на контакт и нажать правую кнопку мыши выбрать пункт «Просмотр карточки клиента»:
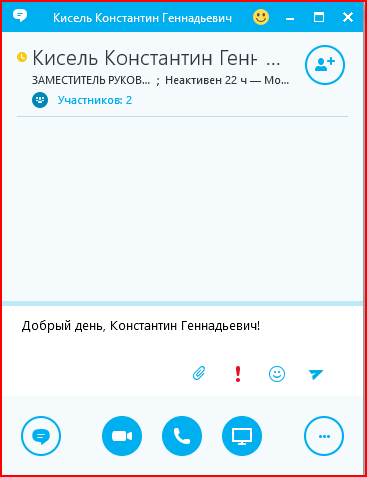
Начало текстовой беседы / Обмен мгновенными сообщениями
Для того, чтобы начать обмениваться быстрыми сообщениями, необходимо навести курсор на контакт и в появившемся меню выбрать:

также можно навести курсор на контакт и нажать правую кнопку мыши и выбрать пункт «Отправить мгновенное сообщение» или просто щелкните два раза мышкой по контакту. После этого откроется окно мгновенных сообщений:
Аудио и видео звонки
Для того, чтобы позвонить необходимому работнику, нужно навести курсор мыши на фото контакта (изображение в кружке) и нажать для аудио звонка:

Для видео звонка:

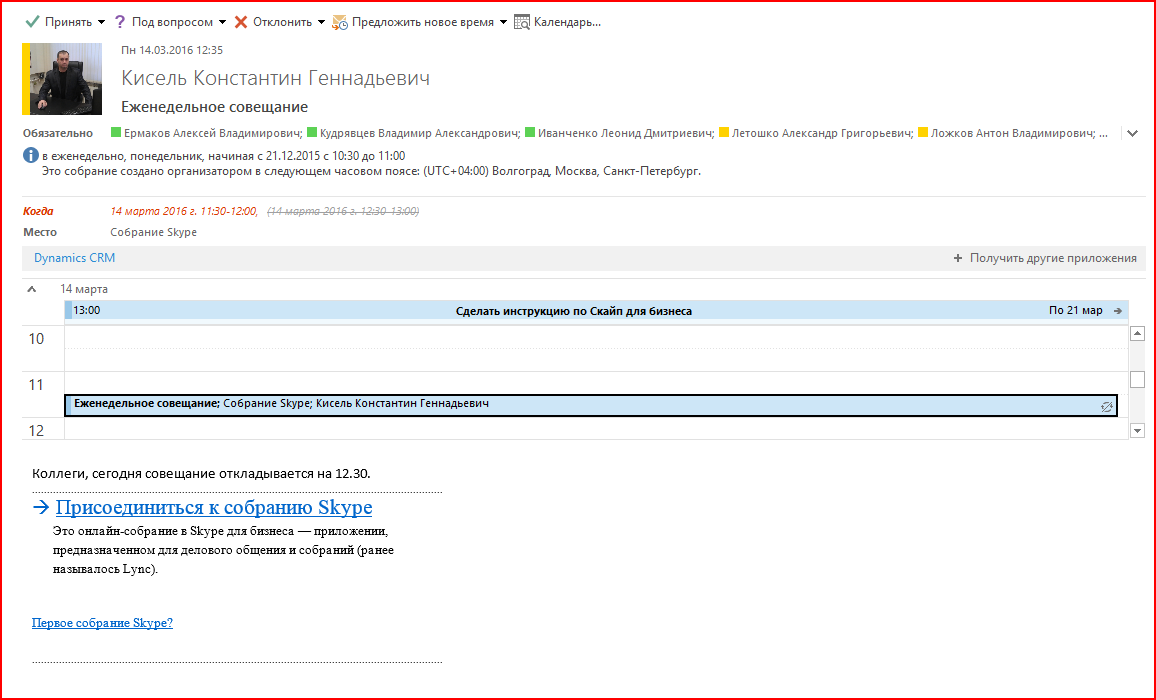
Присоединение к собранию
Пользователи Skype for Business могут создавать собрания и приглашать в них своих коллег:
-
приглашение в реальном времени то же самое что и обычный аудио или видеозвонок;
-
приглашение на запланированное собрание, отправленное по электронной почте.
Получив письмо с датой и временем начала собрания, у вас автоматически будет создано событие в Outlook и установлено автоматическое напоминание. Чтобы присоединится к собранию, необходимо нажать на ссылку «Присоединиться к собранию Skype» или во всплывшем окне-напоминании нажать «Присоединиться к собранию», после этого в приложении Skype для бизнеса у вас откроется окно собрания
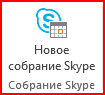
Планирование и создание конференции / собрания
Откройте календарь Outlook, нажмите вкладку Главная и выберите пункт Новое собрание Skype:
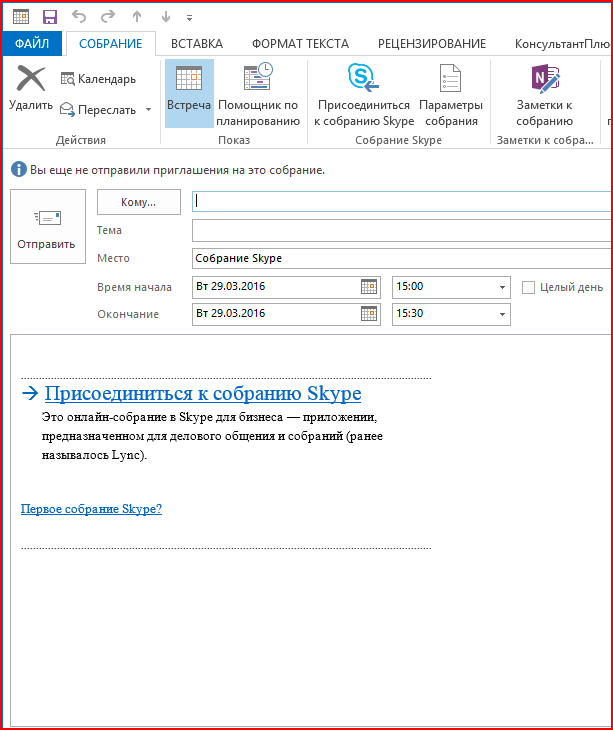
После этого откроется окно настройки собрания.
В поле «КОМУ» указываются работники, коллеги, которых вы хотите пригласить на конференцию (собрание), также необходимо указать название и время проведения:
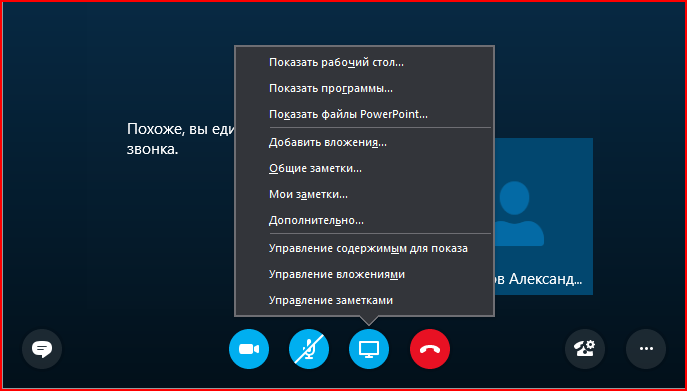
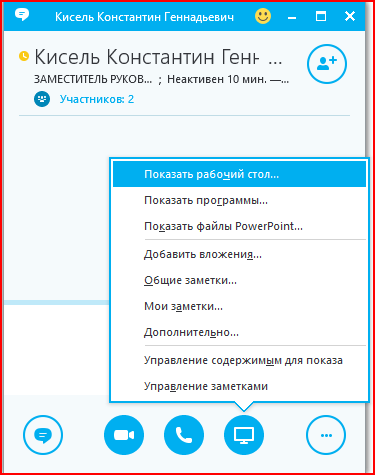
Совместный доступ к рабочему столу
Подключившись к конференции(собранию) можно открыть совместный доступ к рабочему столу или программе, показать презентацию PowerPoint, добавить вложения, вставить слайд доски или опроса:
Время на прочтение
2 мин
Количество просмотров 13K
Microsoft предоставляет расширенный список сочетания клавиш, которые вы можете использовать, когда обмениваетесь мгновенными сообщениями, совершаете голосовые звонки или видео-конференции в Skype для бизнеса. Ниже шпаргалка от COMPAREX с восемью главными рекомендациями.
1. Снизить посторонние шумы:
Если вы участвуете в большом вебинаре, где более 4-х слушателей, основным правилом этикета является не допускать постороннего шума на заднем фоне. Отключите ваш аудио звук и дайте слово презентору. Если вы хотите быстро присоединиться к обсуждению, то используйте следующее сочетание клавиш.

Включить/отключить аудио
2. Вернуть контроль над вашим экраном:
Если у вас часто возникают бизнес-кейсы, требующие передачи управления вашим рабочим столом другим сотрудникам, тогда данное сочетание клавиш идеально подходит для вас, чтобы вернуть обратно контроль над экраном.

Вернуть контроль над вашим экраном после передачи управления
3. Остановить показ вашего экрана:
Если вы часто пользуетесь фразой «Давайте я продемонстрирую это на моем экране», тогда следующие «быстрые кнопки» для вас. Сочетание CTRL+Shift+S немедленно остановит демонстрацию вашего экрана.

Остановить демонстрацию вашего экрана
4. Просмотреть загрузки:
Если вы часто обмениваетесь с коллегами файлами в Skype, то открывать их можно с помощью сочетания ALT+P.

5. Сохранить загрузки:
Если среди пересылаемых файлов есть важные документы, которые необходимо сохранить, то клавиши ALT+S помогут в этом.

Открыть диалоговое окно «Сохранить как»
6. Добавить аудио к чату:
Это легко. Сочетание CTRL + Enter. Когда оно применяется? Есть моменты, когда ваши мысли быстрее, чем ваши пальцы. Тогда пришло время добавить вызов в окне вашей деловой беседы:

Добавить/закончить вызов в окне деловой беседы
7. Закрыть диалоговые окна:
Переписка с несколькими коллегами. Вы страдаете из-за большого количества открытых диалоговых окон в Scype для бизнеса. Следующие «быстрые кнопки» помогут.

Закрыть текущее диалоговое окно
8. Включить/выключить камеру:
Больше всего мы любим нашу последнюю рекомендацию. Когда вы, работая из дома, в середине видео-вызова и ваш любимый кот решает прыгнуть и присоединиться к вашей презентации, быстрые клавиши помогут выйти из этой ситуации.

Включить/выключить камеру во время звонка