INSTRUCTION MANUAL
Manufactured by
SKYRC TECHNOLOGY CO., LTD.
www.skyrc.com
All specifications and figures are subject to change without notice.
Printed in China 2013 Version 2.0 7504-0388-02
16
180Watt
TABLE OF CONTENTS
INTRODUCTION…………………………………………………………………………………………
01
SPECIAL FEATURES…………………………………………………………………………………
03
WARNING AND SAFETY NOTES……………………………………………………………….
06
CONNECTION ……………..
.
……………………………………………………………………………
10
LITHIUM BATTERY CONNECTION DIAGRAM ……………..
.
…………………………….
OPERATION………………………………………………………………………………………………
12
13
PROGRAM FLOW CHART………………………………………………………………………….. 14
LITHIUM BATTERY (LiPo/LiFe/LiIon) PROGRAM…………………………….
…
.
…………..
16
Charging Lithium Battery at Balance Mode………………………………………..
…………….
.
16
Charging of Lithium Battery…………………………………………………………….
…………….
.
17
‘FAST’ Charging of Lithium Battery……………………………………………………
…………….
18
‘STORAGE’ Control of Lithium Battery………………………………………………..
……………
19
Discharging Lithium Battery…………………………………………………………….
…………….
.
20
NIMH/NICAD BATTERY PROGRAM…………………………………………………………….
21
Charging of NiMH/NiCad Battery……………………………………………………….
…………….
21
Charging NiMH/NiCad Battery in The AUTO Charge Mode……………………..
………….
21
Discharging of NiMH/NiCad Battery…………………………………………………..
…………….
.
22
Charging NiMH/NiCad Battery In Re-Peak Charge Mode…………………….
…………….
.
22
Charge/Discharge & Discharge/Charge Cycle of NiMH/NiCad Battery………
………….
23
Pb( lead-sulphuric acid) battery program……………………………………………………….
24
Charging of Pb Battery…………………………………………………………………
…………….
..
24
Discharging of Pb Battery……………………………………………………………..
…………….
…
USING THE CHARGE CONTROL SOFTWARE “CHARGE MASTER”………………
24
25
BATTERY MEMORY SET…………………………………………………………………………..
26
LITHIUM BATTERY METER……………………………………………………………………….
SYSTEM SET UP……………………………………………………………………………………….
28
29
VARIOUS INFORMATION DURING THE PROCESS………………………………………
31
WARNING AND ERROR MESSAGE…………………………………………………………..
32
SPECIFICATION………………………………………………………………………………………..
33
RECOMMENDED PRODUCTS…………………………………………………………………….
34
LIABILITY EXCLUSION…………………………………………………………………………….
CONFORMITY DECLARATION…………………………………………………………………..
36
36
WARRANTY AND SERVICE………………………………………………………………………
37
INTRODUCTION
Congratulations on your choice of the SKYRC RacingStar RS16
Professional Balance Charger/Discharger from SKYRC Technology Co.,
Ltd. This unit is simple to use, but the operation of a sophisticated automatic charger such as RacingStar RS16 does require some knowledge on the part of the user. These operating instructions are designed to ensure that you quickly become familiar with its functions. It is therefore important that you read right through the Operating Instructions, Warning and Safety
Notes before you attempt to use your new charger for the first time. We hope you have many years of pleasure and success with your new battery charger.
RacingStar RS16 represents the newest technology of chargers with its handheld super-compact portable charging system. The joystick gives the user best operational experience and also makes the charger smart and unique. There are two DC inputs, one is located in the right side of the charger and the other is located in the bottom for docking into the eFule
230W/13.8V Switch DC Power Supply.
RacingStar RS16 is a high-performance, micro processor control charge/discharge station with battery management suitable for all current battery types. With integral equalizer for six-cell Lithium- Polymer (LiPo),
Lithium-Ferrum (LiFe) and Lithium-Ion (LiIon) batteries; maximum 16A charge current; maximum 180W charge power.
The fan cooling system is so smart and efficient. The fan is ON/OFF automatically according due to the internal temperature.
Please BE SURE to read these INSTRUCTIONS, WARNING and SAFETY
NOTES before you use the charger for the first time.
It can be dangerous to mis-handle batteries and battery chargers, as there is always a risk of batteries catching fire and exploding.
Please read this entire operating manual completely and attentively before using this product, as it covers a wide range of information on operating and safety. Or please do use this product in company with a specialist!
INTRODUCTION
LCD Screen
Joystick
Smart
Cooling Fan
Micro USB Port for PC Control &
Firmware Upgrade
DC Input Socket
(XT60 Type)
11-18V DC
Balance Socket
Port Pitch=2.54mm
Temp. Sensor
Battery Socket
DC Input Socket
11-18V DC
SPECIAL FEATURES
Compact and Unique Design
The size of RacingStar RS16 is 92*111.4*50mm which is super-compact portable charging system. The joystick gives the user best operational experience and also makes the charger smart and unique.
Two DC inputs
There are two DC inputs, one is located in the right side of the charger and the other is located in the bottom for docking into the eFule 230W 13.8V
Switch DC Power Supply(Part No. SK-200017).
Optimized Operating Software
RacingStar RS16 Charger features the so-called AUTO function that set the feeding current during the process of charging or discharging. Especially for lithium batteries, it can prevent the overcharging which may lead to an explosion due to the user’s fault. It can disconnect the circuit automatically and alarm once detecting any malfunction. All the programs of this product were controlled through two way linkage and communication, to achieve the maximum safety and minimize the trouble. All the settings can be configured by users!
Internal Independent Lithium Battery Balancer
RacingStar RS16 Charger employs an individual-cell-voltage balancer. It isn’t necessary to connect an external balancer for balance charging.
Balancing Individual Cells Battery Discharging
During the process of discharging, RacingStar RS16 Charger can monitor and balance each cell of the battery individually. Error message will be indicated and the process will be ended automatically if the voltage of any single one cell is abnormal.
Adaptable to Various Type of Lithium Battery
RacingStar RS16 charger is adaptable to various types of lithium batteries, such as LiPo, LiIon and the new LiFe series of batteries.
SPECIAL FEATURES
Fast and Storage Mode of Lithium Battery
Purposes to charge lithium battery varies, ‘fast’ charge reduce the duration of charging, whereas ‘store’ state can control the final voltage of your battery, so as to store for a long time and protect useful time of the battery.
Cyclic Charging/Discharging
1 to 5 cyclic and continuous process of charge>discharge or discharge > charge is operable for battery refreshing and balancing to stimulate the battery’s activity.
Memory Preset
The charger can store up to 5 different charge/discharge profiles for your convenience. You can keep the data pertaining to program setting of the battery of continuous charging or discharging. Users can call out these data at any time without any special program setting.
Terminal Voltage Control (TVC)
The charger allows user to set the charge/discharge end voltage.
LiPo Battery Meter
The user can check battery’s total voltage, the highest voltage, the lowest voltage and each cell’s voltage.
Re-Peak Mode of NiMH/NiCad Battery
In re-peak charge mode, the charger can peak charge the battery once, twice or three times in a row automatically. This is good for making certain the battery is fully charged, and for checking how well the battery receives fast charges.
Delta-peak Sensitivity for NiMH/NiCad
Delta-peak sensitivity for NiMH/NiCad battery: The automatic charge termination program based on the principle of the delta-peak voltage detection. When the battery’s voltage exceeds the threshold, the process will be terminated automatically.
SPECIAL FEATURES
Automatic Charging Current Limit
You can set up the upper limit of the charging current when charging your
NiMH or NiCad battery, it is useful for the NiMH battery of low impedance and capacity in the ‘AUTO’ charging mode.
Capacity Limit
The charging capacity is always calculated as the charging current multiplied by time. If the charging capacity exceeds the limit, the process will be terminated automatically when you set the maximum value.
Temperature Threshold*
The battery’s internal chemical reaction will cause the temperature of the battery to rise. If the temperature limit is reached, the process will be terminated.
Processing Time Limit
You can also limit the maximum process time to avoid any possible defect
PC Control Software “Charge Master”
There is a micro USB port in the charger which can be used to connect it to the PC. You need optional USB cable (USB A Male to Micro B Male) which is not included in the package. The free “Charge Master” software gives you unparalleled ability to operate the charger through your computer. You can monitor pack voltage, cell voltage and other data during the charging, view charge date in realtime graphs. And you can initiate, control charging and update firmware from “Charge Master”.
When your charger is connected to computer, the “Charger Master” takes over the control of charger. You can control and operate the charger via the
“Charger Master” only.
WARNING AND SAFETY NOTES
These warnings and safety notes are particularly important. Please follow the instructions for maximum safety; otherwise the charger and the battery can be damaged or at worst it can cause a fire.
Never leave the charger unattended when it is connected to its power supply. If any malfunction is found, TERMINATE THE
PROCESS AT ONCE and refer to the operation manual.
Keep the charger well away from dust, damp, rain, heat, direct sunshine and vibration. Never drop it.
The allowable DC input voltage is 11-18V DC.
This charger and the battery should be put on a heat-resistant, non-flammable and non-conductive surface. Never place them on a car seat, carpet or similar surface. Keep all flammable volatile materials away from the operating area.
Make sure you know the specifications of the battery to be charged or discharged to ensure it meets the requirements of this charger. If the program is set up incorrectly, the battery and charger may be damaged. Fire or explosion can occur due to overcharging. This warranty is not valid for any damage or subsequent damage arising as a result of a misuse or failure to observe the procedures outlined in this manual.
To avoid short circuiting between the charge lead, always connect the charge cable to the charger first, then connect the battery.
Reverse the sequence when disconnecting.
Never attempt to charge or discharge the following types of batteries:
A battery pack which consists of different types of cells
(including different manufacturers)
A battery that is already fully charged or just slightly discharged
Non-rechargeable batteries (pose an explosion hazard)
A faulty or damaged battery
A battery fitted with an integral charge circuit or a protection circuit
WARNING AND SAFETY NOTES
Batteries installed in a device or which are electrically linked to other components
Batteries that are not expressly stated by the manufacturer to be suitable for the currents the charger delivers during the charge process
Please bear in mind the following points before commencing
charging:
Did you select the appropriate program suitable for the type of battery you are charging?
Did you set up adequate current for charging or discharging?
Have you checked the battery voltage? Lithium battery packs can be wired in parallel and in series, i.e. a 2-cell pack can be
3.7V (in parallel) or 7.4V (in series).
Have you checked that all connections are firm and secure?
Make sure there are no intermittent contacts at any point in the circuit.
Standard Battery Parameters
LiPo
LiIon
Nominal
Voltage
3.7V/cell 3.6V/cell
LiFe
3.3V/cell
NiCad
1.2V/cell
MiMH
1.2V/cell
Pb
2.0V/cell
Max Charge
Voltage
Storage
Voltage
Allowable
Fast Charge
4.2V/cell
3.8V/cell
≦1C
4.1V/cell
3.7V/cell
≦1C
3.6V/cell
3.3V/cell
≦4C
1.5V/cell n/a
1C-2C
1.5V/cell n/a
1C-2C
2.46V/cell n/a
≦0.4C
Min. Discharge
Voltage
3.0-3.3V/cell 2.9-3.2V/cell 2.6-2.9V/cell 0.1-1.1V/cell 0.1-1.1V/cell 1.8V/cell
Be very careful to choose the correct voltage for different types of battery otherwise you may cause damage to the batteries. Incorrect settings could cause the cells to fire or explode.
WARNING AND SAFETY NOTES
Charging
During charge process, a specific quantity of electrical energy is fed into the battery. The charge quantity is calculated by multiplying charge current by charge time. The maximum permissible charge current varies depending on the battery type or its performance, and can be found in the information by the battery manufacturer.
Only batteries that are expressly stated to be capable of quickcharge are allowed to be charged at rates higher than the standard charge current.
Connect the battery to the terminal of the charger: red is positive and black is negative. Due to the difference between resistance of cable and connector, the charger can not detect resistance of the battery pack, the essential requirement for the charger to work properly is that the charge lead should be of adequate conductor cross-section, and high quality connectors which are normally goldplated should be fitted to both ends.
Always refer to the manual by the battery manufacturer pertaining to charging methods. Operate according to their recommended charging current and charging time. lithium batteries, in particular, should be charged strictly according to the manufacturer’s instruction.
Close attention should be paid to the connection of lithium batteries.
Do not attempt to disassemble the battery pack arbitrarily.
Please get highlighted that lithium battery packs can be wired in parallel and in series. In the parallel connection, the battery’s capacity is calculated by multiplying single the battery’s capacity by the number of cells, bearing in mind that total voltage stays the same. If the voltage is imbalanced, it may cause a fire or explosion.
Lithium batteries are recommended to charge in series.
WARNING AND SAFETY NOTES
Discharging
The main purpose of discharging is to clean the residual capacity of the battery, or to reduce the battery’ voltage to a defined level.
The same attention should be paid to the discharging process as the charging process. The final discharge voltage should be set up correctly to avoid deep discharging. Lithium batteries cannot be discharged to lower than the minimum voltage, or it will cause a rapid loss of capacity or a total failure. Generally, lithium batteries don’t need to be discharged. Please pay attention to the minimum voltage of lithium batteries to protect them.
Some rechargeable batteries have a memory effect. If they are partly used and recharged before the whole charge is accomplished, they remember this and will only use that part of their capacity next time. This is a ‘memory effect’ It is said that
NiMH and NiCad batteries are suffering from memory effect. NiCad has more ‘memory effect’ than NiMH.
Lithium batteries are recommended to be discharged partially rather than fully. Frequent full discharging should be avoided if possible. Instead, charge the battery more often or use a battery of larger capacity. Full capacity cannot be reached until it has been subjected to 10 or more charge cycles. The cyclic process of charge and discharge will optimize the capacity of battery pack.
CONNECTION
This charger is powered by a 11-18V DC power source. There are two DC input sockets, one is used for the connection of DC power cord (XT60), locating on the right of the charger and the other is used for docking into the
Efule 230W/13.8V Power Supply.
Please connect the charger by supplied DC input cable (XT60 connectors attaching to charger and banana plugs attaching to power supply.)
CONNECTION
Always connect the red (+) positive lead from your charger to the red (+) positive terminal on the power supply, and the black (+) positive lead from your charger to the black (+) positive terminal on the power supply. To utilize the charger’s absolute maximum power capabilities, the DC power source must be capable of delivering at least 17 amps while maintaining 12V DC.
WARNING
To avoid damage to both the power supply and the charger:
Follow the correct polarity when connecting the power supply and the device.
Do not let the ends of the positive and negative wires touch each other.
XT60 Connectors plugging to charger directly
4mm Bullet Connectors plugging to eFUEL power supply directly
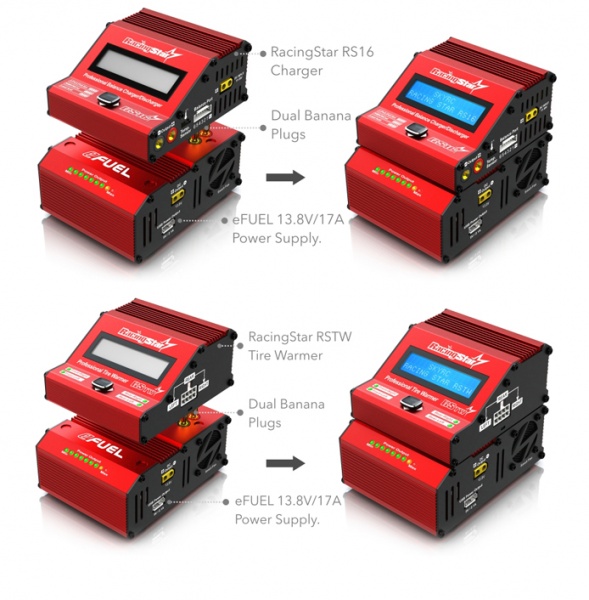
You could also connect the charger with eFule 230W/13.8V Power Supply by a pair of dual banana plugs,
RacingStar RS16
Charger
Dual Banana
Plugs eFUEL 13.8V/17A
Power Supply.
LITHIUM BATTERY CONNECTION DIAGRAM
CONNECTING THE BATTERY
Important!!! Before connecting a battery it is absolutely essential to check one last time that you have set the parameters correctly. If the settings are incorrect, the battery may be damaged, and could even burst into flames or explode. To avoid short circuits between the banana plugs, always connect the charge leads to the charger first, and only then to the battery. Reverse the sequence when disconnecting the pack.
Balance socket:
The balance wire attached to the battery must be connected to the charger with the blackwire aligned with the negative marking. Take care to maintain correct polarity! (See the wiring diagram below.)
This diagram shows the correct way to connect your battery to the
SKYRCRacingStar RS16 while charging in the balance charge program mode only.
The only tool to operate the charger is the joystick in front panel of the charger. You could move the joystick up/down/left/right to make the charger work.
Joystick Position Keywords Function
UP
DOWN
INC
DEC
OPERATION
Moving the joystick up and down enables you to go through the menus and adjust parameters.
WARNING:
Failure to connect as shown in this diagram will damage this charger.
LEFT
RIGHT
STOP/
MODE
START/
ENTER
It is used to enter parameter alert or store parameters on screen.
It is used to stop the progress or go back to previous step/screen.
When you are willing to alter the parameter value in the program, move the joystick right to make it blink then change the value by moving the joystick up and down. The value will be stored by re- moving the joystick right.
When you are willing to start the progress, move the joystick right and hold it for 3 seconds. When you are willing to stop the progress or go back to previous step/screen, move the joystick left.
When you power on the charger, it will enter LiPo Battery balance program directly. You could change the mode (balance mode, normal charge mode, fast charge mode, store mode or discharge mode), enter the desired charging/discharging mode, set the referred parameter and start the progress.
If you have no request for LiPo Battery program, please move the joystick left to enter Program Select screen.
PROGRAM FLOW CHART PROGRAM FLOW CHART
LITHIUM BATTERY(LiPo/LiFe/LiIon)PROGRAM
These programs are only suitable for charging and discharging lithium batteries with a nominal voltage of 3.7V, 3.6V and 3.3V per cell. These batteries need to adopt different charge technique which is termed as constant voltage(CV) and constant current(CC) method. The charge current varies according to the battery capacity and performance. The final voltage of charge process is also very important; it should be precisely matched with the charge voltage of the battery. They are 4.2V for LiPo, 3.6 V for LiFe, and 4.1V for Lilon. The charge current and nominal voltage as for cell count set on the charge program must always be correct for the battery to be charged.
CHARGING LITHIUM BATTERY AT BALANCE MODE
This function is for balancing the voltage of lithium-polymer battery cells while charging.
In the balance mode, the battery needs to connect to the battery’s power lead with balance wire.
In this mode, the charging process will be different from ordinary charging mode. The internal processor of the charger will monitor the voltages of each cell of the battery pack and control charging current which is feeding to each cell to equalize the voltage.
Note: We recommend charging lithium batteries with a balance wire in the balance mode only.
+
—
UP DOWN
+
—
UP DOWN
LEFT RIGHT > 3 seconds
The left side of the first line shows the type of battery you choose. The value on the left of the second line of the charger is current the user sets. After setting the current and voltage, move the joystick right and hold it for 3 seconds to start the process.
LITHIUM BATTERY(LiPo/LiFe/LiIon)PROGRAM
RIGHT
This screen displays the number of cells you set up and the processor detects. R shows the number of cells detected by the charger and S is the number of cells set by you at the previous screen. If both numbers are identical you can start charging process. If not, move the joystick left to go back to previous screen to recheck the number of cells of the battery pack before going ahead.
This screen shows the real-time status during charge process. Move the joystick left to stop the charge process.
Number of cells
Charging time
Charging current
Battery voltage
Charged capacity
CHARGING OF LITHIUM BATTERY
This charging mode is for charging LiPo/LiFe/LiIon battery in normal mode.
Note: We recommend charging lithium batteries with a balance lead in the balance mode only.
+
—
UP DOWN
+
—
UP DOWN
LEFT RIGHT > 3 seconds
The left side of the first line shows the type of battery you choose. The value on the left of the second line of the charger is current the user sets. After setting the current and voltage, move the joystick right and hold it for 3 seconds to start the process.
This displays the number of cells you set up and the processor detects. R shows the number of cells detected by the charger and
LITHIUM BATTERY(LiPo/LiFe/LiIon)PROGRAM
RIGHT
S is the number of cells set by you at the previous screen. If both numbers are identical you can start charging process. If not, move the joystick left to go back to previous screen to recheck the number of cells of the battery pack before going ahead.
Number of cells
Charging time
Charging current
Battery voltage
Charged capacity
This screen shows the real-time status during charge process. Move the joystick left to stop the charge process.
‘FAST’ CHARGING OF LITHIUM BATTERY
The charging current is getting smaller as the process goes to the near end term of Lithium battery charging. To finish charging process earlier, this program eliminate certain period of CV process. Actually, the charging current will goes to 1/5 from the initial value to end the process while the normal charging goes to 1/10 during CV period. The charging capacity may be a bit smaller than normal charging but the process time will be reduced.
+
—
UP DOWN
+
—
UP DOWN
LEFT RIGHT > 3 seconds
The value on the left side of the second lines shows the charge current. The value on the right side of the second lines shows the battery pack’s voltage. After setting current and voltage, move the joystick right and hold it for 3 seconds to start the process.
This displays the number of cells you set up and the processor detects. R shows the number of cells detected by the charger and
S is the number of cells set by you at the previous screen. If both numbers are
LITHIUM BATTERY(LiPo/LiFe/LiIon)PROGRAM
RIGHT
Number of cells
Charging time
Charge current
Supplied capacity
Current voltage battery identical you can start charging process. If not, move the joystick left to go back to previous screen to recheck the number of cells of the battery pack before going ahead.
This screen shows the real-time status during charge process. Move the joystick left to stop the charge process.
‘STORAGE’ CONTROL OF LITHIUM BATTERY
This program is for charging or discharging Lithium battery which will not be used for long time. The program will determine to charge or discharge the battery to certain voltage depending on the voltage of the battery at its initial stage. They are different from the type of the battery,
3.75V for LiIo, 3.85V for LiPo and 3.3V for LiFe per cell. If the voltage of battery at its initial stage is over the voltage level to storage, the program will start to discharge.
+
—
UP DOWN
+
—
UP DOWN
At this screen, you can set up the current and voltage of the battery pack. Charging and discharging will make the batteries come to the voltage level of storage state.
LEFT RIGHT > 3 seconds
This screen displays the number of cells you set up and the processor detects. R shows the number of cells detected by the charger and S is the number of cells set by you at the previous screen. If both numbers are identical you can move the joystick right to start charging process. If not, move the
LITHIUM BATTERY(LiPo/LiFe/LiIon)PROGRAM
RIGHT joystick left to go back to previous screen to recheck the number of cells of the battery pack before going ahead.
This screen shows the real-time status charging. Move the joystick left to stop the charge process.
Number of cells
Elapsed time
Supplied capacity
Charge or discharge current
Current voltage battery
DISCHARGING LITHIUM BATTERY
+
—
UP DOWN
+ —
UP DOWN
LEFT RIGHT > 3 seconds
The value of discharge current on the left can not exceed 1C, and the value on the right can not be under the voltage recommended by the manufacturer to avoid over discharging. move the joystick right and hold it for 3 seconds to start discharging.
RIGHT
This screen displays the number of cells you set up and the processor detects. R shows the number of cells detected by the charger and S is the number of cells set by you at the previous screen. If both numbers are identical you can move the joystick right to start charging process. If not, move the joystick left to go back to previous screen to recheck the number of cells of the battery pack before going ahead.
Number of cells elapsed time discharge
current
Battery voltage
Discharged capacity
This screen shows the real-time status of discharging, you can move the joystick left to stop discharging.
NIMH/NICAD BATTERY PROGRAM
These programs are for charging or discharging NiMH (Nickel-Metal-
Hydride) or NiCad (Nickel-Cadmium) battery.
CHARGING OF / BATTERY
The charger will charge NiMH and NiCad batteries using the charge current set by the user.
This program is for charging of NiMH/NiCad
NiMH CHARGE
CURRENT 2.0A
Battery type
+ —
UP DOWN batteries. You can move the joystick right to make the parameter blink, then move the joystick up/down to change the value and remove the joystick right to store the value.
LEFT RIGHT > 3 seconds
Battery type
Elapsed time
Charge current
Battery voltage
Charged capacity
The screen displays the current state of charging.
To stop the process, move the joystick left.
The audible sound indicates the end of process.
CHARGING
CHARGE MODE
BATTERY IN THE AUTO
In this program the charger detects the condition of the battery which is connected to the output and automatically charges the battery. In this mode, you should set up the upper limit of the charge current to avoid damage by excessive feeding current. Some batteries of low resistance and capacity can lead to higher current in the auto charging mode.
NiMH Auto CHARGE
CURRENT 2.0A
Battery type
LEFT RIGHT > 3 seconds
This program is for charging of NiMH/NiCad batteries in auto mode. You can move the joystick right to make the parameter blink, then move the joystick up/down to change the value and re-move the joystick right to store the value.
NIMH/NICAD BATTERY PROGRAM
NiMH 2.0A 9.52V
AUT 000:13 00000
Battery type
Elapsed time
Charge current
Battery voltage
Charged capacity
The screen displays the current state of charging.
To stop the process, move the joystick left.
The audible sound indicates the end of process.
CHARGING /
CHARGE MODE
BATTERY IN RE-PEAK
Re-peak Charge Mode (NiMH and NiCad batteries only): In re-peak charge mode, the charger can peak charge the battery once, twice or three times in a row automatically. This is good for confirming the battery is fully charged, and for checking how well the battery receives fast charges. A five minute cool-off delay occurs after each re-peak charge. To start charge, move the joystick right and hold it for 3 seconds.
NiMH RE-PEAK
1
RIGHT
+
—
UP DOWN
NiMH 2.0A 9.59V
RPC 000:33 00017
Re-peak cycle number 1 shows on the display.
Move the joystick right to make the re-peak cycle number blink and then move the joystick up/down to find the desired number of times to re-peak charge the battery.
Move the joystick right to confirm selection.
Battery type
Elapsed time
Charge current
Charged capacity
Battery voltage
DISCHARGING OF / BATTERY
NiMH DISCHARGE
0.1A CUT:1.0V
Battery type
+
—
UP DOWN
LEFT RIGHT > 3 seconds
Set discharge current on the left and final voltage on the right. The discharge current ranges from 0.1 to 8.0A and the final voltage ranges from 0.1 to 25.2V. To start the process, move the joystick right and hold it for 3 seconds.
NIMH/NICAD BATTERY PROGRAM
NiMH 0.1A 7.42V
DSC 022:45 00890
Battery type
Elapsed time
Battery voltage
Discharge current
The screen indicates the discharging state.
You can move the joystick up/down to alter discharge current and move the joystick
Discharged capacity right to store the value. Move the joystick left to stop discharging.
The audible sound indicates the end of process.
CHARGE/DISCHARGE & DISCHARGE/CHARGE CYCLE
OF NIMH/NICAD BATTERY
NiMH CYCLE
CHG>DCHG 1
+
—
UP DOWN
+ —
UP DOWN
You can set up sequence on the left and the number of cycles on the right. Range of the cycle number is 1-5.
LEFT RIGHT > 3 seconds
NiMH 1.0A 7.42V
C>D 022:45 00890
Battery type
Elapsed time
Battery voltage
Discharge or charge current
Discharged or charged capacity
Move the joystick left to stop program, you can move the joystick up/down to alter the current.
PB( LEAD-SULPHURIC ACID) BATTERY PROGRAM
This is programmed for charging Pb (lead-sulphuric acid) battery with nominal voltage from 2 to 20V. Pb batteries are totally different from
NiMH or NiCad batteries. They can only deliver relatively lower current comparing to their capacity, and similar restrictions definitely apply to charge. So the optimal charge current will be 1/10 of the capacity. Pb batteries must not be charged rapidly. Always follow the instruction supplied by the battery manufacturer.
CHARGING OF PB BATTERY
+
—
UP DOWN
+
—
UP DOWN
LEFT RIGHT > 3 seconds
Set up the charge current on the left and the nominal voltage of the battery on the right.
The charge current ranges from 0.1 to 16.0A and the voltage should be matched with the battery being charged. Start the charge process by moving the joystick right and holding it for 3 seconds.
The screen displays the state of charging process. To stop charging forcibly, move the joystick left.
The audible sound indicates end of process.
Battery type
Elapsed time current
Battery
Charged capacity
DISCHARGING OF PB BATTERY
+ —
UP DOWN
+
—
UP DOWN
Set discharge current on the left and final voltage on the right. The discharge current ranges from 0.1 to 8.0A.
To start the process, move the joystick right and hold it for 3 seconds.
LEFT RIGHT > 3 seconds
USING THE CHARGE CONTROL SOFTWARE
“CHARGE MASTER”
Battery type
Elapsed time
Battery voltage
Discharge current
Discharged capacity
The screen displays the current state of discharge. You can alter the discharge current by moving the joystick right during the process. Once you find the desired current value by moving the joystick up/down, store it by re-moving the joystick right.
To stop discharging, move the joystick left.
The audible sound indicates the end of process.
USING THE CHARGE CONTROL SOFTWARE
“CHARGE MASTER”
The free “Charge Master” software gives you unparalleled ability to operate the charger through the computer. You can monitor pack voltage, cell voltage and other data during the charging process, view charging data in real-time graphs. And you can initiate, control charging and update firmware from “Charge Master”.
In order to connect the charger to the computer and use the “Charge
Master”, you are required to use a USB cable which is not included in this package. The cable must be terminated on one end with “A” plug and the opposite end is terminated with “micro-B” plug which can connect to the charger directly.
The “Charge Master” can be download from www.skyrc.com. For more details, please refer to HELP file which can be found in “Charge
Master” software.
BATTERY MEMORY SET
The charger can store up to 10 different charge/discharge profiles for your convenience, and the stored profiles can be recalled quickly without having to go through the setup process.
BATT MEMORY【1】
ENTER SET
Enter the battery memory program, you can change the battery type(LiPo, LiFe, LiIon, NiMH,
NiCad, Pb battery), voltage, charge current by
RIGHT > 3 seconds moving the joystick right to make the value blink, then move the joystick up/down to alter the value,
BATT TYPE
LiPo
UP DOWN and re-move the joystick right to store the value and move to the next value or screen.
Note:The battery used for this example is a
2S(7.4V) Lipo battery.
BATT VOLTS
7.4V(2S)
+ —
UP DOWN
UP DOWN
Set the voltage and number of cells, along with the normal voltage (1S-6S).
CHARGE CURRENT
4.9A
+ —
UP DOWN
UP DOWN
Set the charge current, which can be adjusted(0.1-
16.0A).
DSCH CURRENT
2.2A
+
—
UP DOWN
UP DOWN
Set the discharge current, which can be adjusted
(0.1A-8.0A).
DSCH VOLTAGE
3.0V/CELL
+
—
UP DOWN
UP DOWN
Set the discharge voltage, which can be adjusted
(3.0-3.3V/Cell).
BATTERY MEMORY SET
TVC=YOUR RISK
4.20V
+ —
UP DOWN
UP DOWN
Set the terminal voltage, which can be adjusted(4.18-4.30V).
TEMPERATURE
CUT-OFF 50C
+
—
UP DOWN
UP DOWN
Set the cut-off temperature, which can be adjusted(20 C /68 F-80 C/176 F).
SAVE PROGRAM
ENTER
UP DOWN
SAVE PROGRAM
SAVE
RIGHT > 3 seconds
Save the program set by moving the joystick right and holding it for 3 seconds.
This screen indicate the saved profile.
BATT MEMORY【1】
LiPo 7.4V(2S) next flash
BATT MEMORY【1】
C:4.9A D:2.2A
UP DOWN
Once you’ve saved a charge profile, you can load those settings to use later. To load a memory, you have to move the joystick right and hold it for 3 seconds. Otherwise you only enter the setting mode.
ENTER CHARGER
LOAD……
This screen indicates that the charge profile is being loaded.
LITHIUM BATTERY METER
The user can check battery’s total voltage, the highest voltage, the lowest voltage and each cell’s voltage.
Please connect the battery to the charger main battery lead to battery socket and balance wires to balance socket.
Bottom or
Right Side
Power Supply
Lithium
Battery
This diagram shows the correct way to connect your battery to check the voltage.
PROGRAM SELECT
Li BATT METER
RIGHT
4.19 4.15 4.18V
0.00 0.00 0.00V
UP DOWN
MAIN 12.52V
H4.190V L4.160V
Move the joystick right to enter the Lithium
Battery Meter program.
The screen indicate each cell’s voltage.
The screen indicate the total voltage, the highest voltage, the lowest voltage.
SYSTEM SET UP
It will be operated with the default value of the essential user settings when it is connected to a DC 11~18V battery for the first time. The screen displays the following information in sequence and the user can change the value of parameter on each screen.
When you are willing to alter the parameter value, move the joystick right to make it blink then change the value by moving the joystick up/down. The value will be stored by re-moving the joystick right.
PROGRAM SELECT
SYSTEM SET
User set up starting screen.
UP DOWN
Rest Time
CHG>DCHG 10Min
+
—
UP DOWN
UP DOWN
The battery is on the cyclic process of charge and discharge can often become warm after charge or discharge period. The program can insert a time delay to occur after each charge and discharge process to allow the battery adequate time to cool down before being subjected to the next process. The value ranges from 1 to 60 minutes.
SAFETY TIME
ON 120Min
+
—
UP DOWN
+
—
UP DOWN
UP DOWN
When you start a charge process, the integral safety timer automatically starts running at the same time. This is programmed to prevent overcharge the battery if it proves to be faulty, or if the termination circuit cannot detect the battery full. The value for the safety timer should be generous enough to allow a full charge of the battery.
Safe timer Calculation
When charging NiMH or NiCad batteries, divide the capacity by current, then divide the
SYSTEM SET UP
Capacity Cut-Off
ON 5000mAH
+ —
UP DOWN
+ —
UP DOWN
UP DOWN result by 11.9, set this number as the value for safety timer setting. If the charger stopped at this threshold, about 140% of the capacity will have been fed into the battery.
For example:
Capacity
2000mAh
3300mAh
1000mAh
Current
2.0A
3.0A
1.2A
Safety Time
(2000/2.0=1000)/11.9=84 minutes
(3300/3.0=1100)/11.9=92 minutes
(1000/1.2=833)/11.9=70 minutes
This program sets the maximum charge capacity that will be supplied to the battery during charge. If the deltapack voltage is not detected nor the safety timer expired by any reason, this feature will automatically stop the process at the selected capacity value.
Key Beep ON
Buzzer ON
+ —
UP DOWN
UP DOWN
The beep sounds at every time pressing the buttons to confirm your action. The beep or melody sounded at various times during operation to alert different mode changes.
These audible sounds can be on or off.
Input Power Low
Cut-Off 11.0V
+
—
UP DOWN
UP DOWN
This program monitors the voltage of input battery. If the voltage drops below the value you set the operation forcibly terminated to protect the input battery.
Ext. Temp 0C
Int. Temp 37C
This screen shows the external and internal temperature.
UP DOWN
VARIOUS INFORMATION DURING THE PROCESS
LOAD FACTORY SET
ENTER
UP DOWN
Press and hold the Start/Enter dial for 3 seconds to load the factory set.
VERSION
1.00
This screen shows the version.
VARIOUS INFORMATION DURING THE PROCESS
You can inquire various information on LCD screen during charging or discharging process. When you rotate the dial counterclockwise, the screen will display the user’s settings.
And also you can monitor the voltage of individual cell by rotating the dial clockwise when the individual connection cable is linked to the
Lithium battery being processed.
It comes to the final voltage when the program ended.
Present input voltage.
Ext. Temp 0C
Int. Temp 26C
4.19 4.15 4.18V
0.00 0.00 0.00V
This screen shows the internal temperature.
Displayed safety timer is turn on and duration of time in minutes.
Displayed capacity cut-off function is turn on and the setting value of capacity.
The battery is connected with balance lead, you can check voltage of each cell in the battery pack.
WARNING AND ERROR MESSAGE
It incorporates a variety of functions for the systems to verify processes and the state of the electronics. In case of an error the screen will display the cause of error and emit an audible sound.
Incorrect polarity connected.
CONNECT ERROR
CHECK MAIN PORT
BALANCE CONNECT
ERROR
DC IN TOO LOW
DC IN TOO HIGH
CELL ERROR
LOW VOLTAGE
CELL ERROR
HIGH VOLTAGE
CELL ERROR
VOLTAGE-INVALID
CELL NUMBER
INCORRECT
INT.TEMP.TOO HI
EXT.TEMP.TOO HI
OVER CHARGE
CAPACITY LIMIT
OVER TIME LIMIT
BATTERY WAS FULL
The battery is interrupted.
The Battery connection is wrong.
The balance connect is wrong.
Input voltage less than 11V.
Input voltage higher than 18V.
Voltage of one cell in the battery pack is too low.
Voltage of one cell in the battery pack is too high.
Voltage of one cell in the battery pack is invalid.
The cell number is wrong.
The internal temperature of the unit goes too high.
The external temperature of the unit goes too high.
The battery capacity is more than the maximum capacity which the user sets.
The charging time is longer than the maximum charging time which the user sets.
The battery voltage is higher than the maximum voltage which the user sets when charging in balance mode.
SPECIFICATION
SPECIFICATION
Display Type: 2×16 LCD Display Backlight: Blue
Case Material: Metal Cooling System: Built-in fan x1pc
Case Size: 92×111.4x50mm Weight: 405g
PC Communications: USB Port for PC Control & Firmware Upgrade
External Port: Balance Socket-XH, Temperature Probe Socket,
Battery Socket, DC Input, Micro USB Port for PC.
Delta Peak Detection: NiMH/NiCad: 3-15mV/cell
Charge Cutoff Temperature: 20-80ºC(adjustable)
Charge Voltage: NiMH/NiCad: Delta peak detection
LiPo: 4.18-4.3V/cell
LiIon: 4.08-4.2V/cell
LiFe: 3.58-3.7V/cell
Balance Current: 200mA/cell
Reading Voltage Range: 0.1-25.8V/cell
Battery Types/Cells: LiPo/LiIon/LiFe: 1-6cells
NiMH/NiCad: 1-15cells
Pb: 2-20V
Battery Capacity Range: NiMH/NiCad: 100-50000mAh
LiPo/LiIon/LiFe: 100-50000mAh
Pb: 100-50000mAh
Safety Timer: 1-720minutes off
Charge Wattage: 180W
Discharge Current: 0.1A-8A (±10%)
Discharge Cut-off Voltage: NiMH/NiCad: 0.1-1.1V/cell
LiPo: 3.0-3.3V/cell LiIon: 2.9—3.2V/cell
LiFe: 2.6-2.9V/cell Pb: 1.8V
Discharge Wattage: 30W
Balance Cells: 6 cells
Memory: 10 different charge/discharge profiles
Charge Method: CC/CV for lithium types and lead (Pb) batteries
Delta-peak Sensitivity for NiMH/NiCad.
RECOMMENDED ACCESSORIES
THE SET CONTAINS
1. SKYRC RacingStar RS16 Charger
2. 18AWG Wire Charging Cable
3. DC Input Power Cable
4. 2S LiPo Hardcase Charging Lead Including Balancing Adapter
5. Multiple Balancing Board
1
3
2
4
5
RECOMMENDED PRODUCTS
SK-200017 eFUEL 13.8V/17A Power Supply
SPECIFICATION
Voltage: 100-240V AC
Input AC Frequency: 50-60Hz
Output Voltage: 13.8V DC±0.2V
Output Current: 17A±0.5A
Input Fuse: 5A Fuse
Over Temperature Protection: <65℃
Cooling Method: Cooling Fan
Dimensions: 125.7×92.7×50.2mm
Net weight: 602g
RECOMMENDED ACCESSORIES
Temp. Sensor Cable
SK-600005-01
TP/FP Adaptor
SK-600018-02
HP/PQ Adaptor
SK-600016-03
EH Adaptor
SK-600014-01
XH Adaptor
SK-600020-04
Tamiya charging cable
5201-0030-01
JST/BEC charging cable
5201-0043-01
Dean charging cable
5201-0012-01
Futaba RX charging cable
5201-0044-01
TRAXXAS charging cable
5201-0033-01
Glow charging cable
5201-0045-01
Crocodile clip charging cable
5201-0031-01
EC3 charging cable
5201-0034-01
This charger is designed and approved exclusively for use with the types of battery stated in these Instruction Manual. SKYRC accepts no liablility of any kind if the charger is used for any purpose other than that stated. We are unable to ensure that you follow the instructions supplied with the charger, and we have no control over the methods you employ for using, operating and maintaining the device. For this reason we are obliged to deny all liability for loss, damage or costs which are incurred due to the incompetent or incorrect use and operation of our products, or which are connected with such operation in any way. Unless otherwise prescribed by law, our obligation to pay compensation, regardless of the legal argument employed, is limited to the invoice value of those SKYRC products which were immediately and directly involved in the event in which the damage occurred.
CONFORMITY DECLARATION
SKYRC RacingStar RS16 Charger satisfies all relevant and mandatory CE directives and FCC
Part 15 Subpart B: 2008.
The product has been tested to meet the following technical standards:
WARRANTY AND SERVICE
We guarantee this product to be free of manufacturing and assembly defects for a period of one year from the time of purchase. The warranty only applies to material or operational defects, which are present at the time of purchase. During that period, we will repair or replace free of service charge for products deemed defective due to those causes.
For any repair or replace service, please contact your dealer in the first instance, who is responsible for processing guarantee claims. This warranty is not valid for any damage or subsequent damage arising as a result of misuse, modification or as a result of failure to observe the procedures outlined in this manual.
This symbol means that you must dispose of electrical devices from the General household waste when it reaches the end of its useful life. Take your charger to your local waste collection point or recycling centre. This applies to all countries of the European Union, and to other European countries with a separate waste collection system.

180Watt
16
Printed in China 2013
All specifications and figures are subject to change without notice.
Manufactured by
SKYRC TECHNOLOGY CO., LTD.
www.skyrc.com
Version 2.0 7504-0388-02
Professional Balance
Charger/Discharger
INSTRUCTION MANUAL
Компания SkyRC выпустила два новых устройства в виде зарядного устройства RacingStar RS16 и блока питания eFuel мощностью 230W/17A. Зарядник RacingStar RS16 позволяет заряжать все типы современных аккумуляторов, включая LiXX, NiXX и Pb аккумуляторы. Поддерживаются от 1 до 6 банок литиевых аккумуляторов, от 1 до 15 банок никелевых аккумуляторов и от 1 до 10 банок свинцовых аккумуляторов.
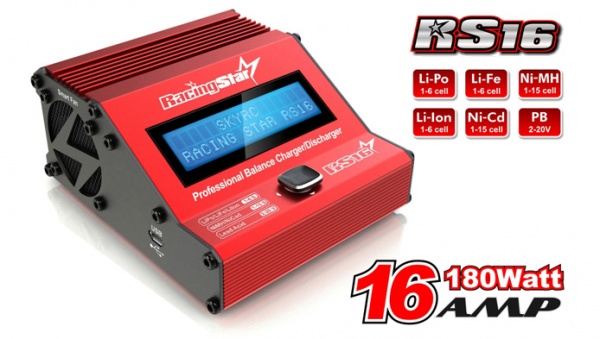
При своих невероятно компактных размерах 92х111х50мм он выдает 180W с максимальным током до 16A. Алюминиевый корпус устройства имеет встроенный радиатор охлаждения, а также охлаждающий кулер, включающийся автоматически при достижении порогового значения температуры. Данное з/у можно подключать к персональному компьютеру для того чтобы отслеживать различные показатели аккумулятора, а также обновлять прошивку устройства. На корпусе RacingStar RS16 предусмотрено сразу два разъема (сбоку разъем XT60, снизу два разъема 4мм банан) для подключения внешнего источника питания постоянного тока 11-18V. К последним относится и новый блок питания eFuel.
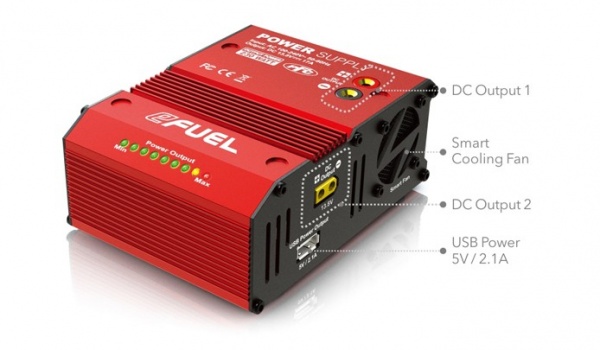
Блок питания eFuel разработан не только для питания зарядного устройства RacingStar RS16, но также и для большинства других з/у, грелок для модельных резиновых покрышек и любых других устройств, которым требуется питание 13.8V. Однако, только с зарядником RacingStar RS16, будучи объединенными вместе, блок eFuel может образовывать единое устройство.
Также как и на заряднике RS16, на блоке eFuel имеется два выходных разъема питания, XT60 и 4мм бананы. Последние расположены сверху, что позволяет, при помощи небольшого переходника, объединять два устройства в одно, одновременно позволяя избавиться вам от лишних проводов. Также на eFuel имеется и USB порт выдающий ток 5V/2.1А. От него можно заряжать современные смартфоны, планшеты и камеры. Наглядный индикатор нагрузки, в виде 9 последовательно расположенных светодиодов на лицевой панели блока eFuel, отображает текущий уровень нагрузки на устройство.
Инструкция для SkyRC RacingStar RS16 (на англиском)
Программное обеспечение для SkyRC RacingStar RS16
Похожие статьи:
Электроника → Дорабатываем зарядник Turnigy Accucel 6
Электроника → iMax B6. Оригинал vs. подделка. Обзор.
Рейтинг: +2
Голосов: 2
4247 просмотров
Комментарии ()
Нет комментариев. Ваш будет первым!
Наличие балансира Есть
Наличие интерфейса Есть
Для типов аккумуляторов Ni-CD/Ni-MH, Li-PO, Li-Ion, Li-Fe/Li-FePo4, Pb
Входное напряжение 12
Максимальный ток заряда 16
Максимальный ток разряда 8
Количество каналов 1
Напряжение заряжаемых аккумуляторов 3,7-22,2
Универсальное сверхкомпактное зарядное устройство для всех современных типов аккумуляторов. Работает как от сети ~220 В, так и от источника постоянного напряжения 11-18 В. Выходная мощность 180 Вт, ток — до 16А. Идеально совместимо с блоком питания SKYRC eFuel 230W.
Это высококачественное зарядно-разрядное устройство создано для заряда/разряда и обслуживания всех современных типов аккумуляторов. Специальные разъёмы для балансировки Li-XX аккумуляторов позволяют сбалансировать вольтаж на каждой банке, в итоге обеспечивается долгий срок службы и максимальное время работы модели от аккумулятора. Зарядно-разрядное устройство работает от источника питания 11-18 вольт с током минимум 5 ампер.
Основные особенности:
Поддерживает любые типы аккумуляторов
Невероятно компактный размер
Два входа для источника питания
Навигация по меню при помощи джойстика
Управляется микропроцессором
Отдельная балансировка каждой банки LI-PO АКБ
Широкий диапазон тока зарядки
Функция ограничения по времени заряда
Заряд/разряд до напряжения хранения литиевых аккумуляторов
Мониторинг входного напряжения (Защита переразряда аккумулятора вашего автомобиля на поле)
Память параметров заряда/разряда для 5ти АКБ
Возможность подключить опциональный температурный сенсор (приобретается отдельно)
Поддерживаемые аккумуляторы:
Тип: Напряжение (количество элементов)
Ni-XX 1.2 — 18 В (1-15S)
Li-PO 3.7 — 22.2 В (1-6S)
Li-Ion 3.6 — 21.6 В (1-6S)
Li-Fe 3.3 — 19.8 В (1-6S)
Разъёмы:
Силовые: Deans T-Plug, крокодилы
Для бортовых аккумуляторов: JST (BEC), JR/Futaba/Hitec
Балансировочный разъём JST-XH (для 2-6S аккумуляторов)
Разъём для заряда накала
В комплекте:
Зарядное устройство iMax B6
Провода/разъемы
Инструкция
Комплект требует:
Блок питания SkyRC eFuel 230A
Спецификация:
Ток заряда 0.1 – 16 А (50 Вт max)
Ток разряда 0.1 – 1А А (10 Вт max)
Режимы заряд, разряд, циклирование, хранение, балансировка
Входное напряжение 11-18В
Вес 405 г.

Производитель: SkyRC
Артикул: SK-100078-01
Звоните!
Поможем найти замену:
8 (495) 662-97-94
Товара в данный момент нет на складе.
Вероятно, он закончился или снят с производства.
Способы оплаты:
![]()
![]()
![]()
![]()
![]()
![]()
![]()
Самовывоз —  руб
руб
Другими способами — руб
- ОПИСАНИЕ
- ОТЗЫВЫ
SKYRC RACINGSTAR RS16 180W/16A LiPo LiFe LiIon BALANCE CHARGER/DISCHARGE
Универсальное зарядно-разрядное устройство RacingStar RS16 со встроенным балансиром, разработанное специально для спортивных нужд.
Это устройство может обслуживать LiPo и Li-Ion батареи состоящее из шести элементов; максимальный ток заряда 16A, мощность до 180Вт.
Супер-компактное портативное устройство RacingStar RS16 использует новейшие технологии для зарядки. Оно имеет джойстик, который позволяет пользователю легко и просто выбрать и настроить режим работы. RacingStar RS16 имеет два входа постоянного тока: один под разъемы «банан», а другой под XT60.
В зависимости от типа батареи, чтобы удовлетворить запросы пользователя, существуют различные режимы зарядки:
Для LiPo, LiFe и LiIon батарей: нормальная зарядка, балансировка, быстрая зарядка, разрядка, режим хранения
Для NiCd / NiMH батарей: нормальная зарядка, авто зарядка, разрядка, циклирование, режим Re-Peak
Для PB батарей: нормальная зарядка и разряд
Технические характеристики:
Входное напряжение: 11 -18В
Управление: джойстик
Тип дисплея: LCD 2×16
Подсветка: синяя
Материал корпуса: металл
Система охлаждения: Встроенный вентилятор
Размер: 92×111.4×50мм
Вес: 405грамм
Коммуникации PC: USB-порт для управления с ПК и обновления прошивки
Дельта пик для NiMH / NiCD: 3-15мВ/на элемент
Температура отсечки: 20-80°C (регулируемая)
Напряжение зарядки:
NiMH / NiCD: по дельта пику
LiPo: 4.18-4.3В/ на элемент
LiIon: 4.08-4.2В/ на элемент
LiFe: 3.58-3.7В/ на элемент
Ток балансировки: 200мA/ на элемент
Тип заряжаемых аккумуляторов:
LiPo / LiIon / LiFe: 1- 6 элементов
NiMH / NiCD: 1- 15 элементов
Pb: 2- 20В
Емкость заряжаемых аккумуляторов:
NiMH / NiCD: 100- 50000мAч
LiPo / LiIon / LiFe: 100- 50000мAч
Pb: 100- 50000мAч
Номинальный ток:
0.1A -1A (± 0,3)
1A -16A (± 10%)
Таймер безопасности: 1- 720мин
Мощность заряда: 180 Вт
Ток разряда: 0,1 А — 8А (± 10%)
Напряжение отсечки:
NiMH / NiCd: 0.1-1.1В/на элемент
LiPo: 3.0-3.3В/ на элемент
LiIon: 2.9-3.2В/ на элемент
LiFe: 2.6-2.9В/ на элемент
Pb: 1,8 В
Мощность разряда: 30 Вт
Память: 10 различных профилей заряда / разряда
Метод заряда:
CC / CV для литиевых и свинцовых батареи
дельта — пик для NiMH / NiCD.
Внимание! Внешний вид товара, комплектация и характеристики могут изменяться производителем без предварительных уведомлений. Данный интернет-сайт носит исключительно информационный характер и ни при каких условиях не является публичной офертой, определяемой положениями Статьи 437 (2) Гражданского кодекса Российской Федерации.
Заявка успешно отправлена.
Наш менеджер скоро свяжется с Вами.