Предложите, как улучшить StudyLib
(Для жалоб на нарушения авторских прав, используйте
другую форму
)
Ваш е-мэйл
Заполните, если хотите получить ответ
Оцените наш проект
1
2
3
4
5
Предложите, как улучшить StudyLib
(Для жалоб на нарушения авторских прав, используйте
другую форму
)
Ваш е-мэйл
Заполните, если хотите получить ответ
Оцените наш проект
1
2
3
4
5
- Manuals
- Brands
- dallmeier Manuals
- Server
- SMAVIA appliance VideoNetBox II
- Commissioning
-
Contents
-
Table of Contents
-
Bookmarks
Quick Links
Commissioning
English
Appliance
VideoNetBox II
P R E L O A D E D
004707 / Rev. 1.0.2 / 2014-03-13
Related Manuals for dallmeier SMAVIA appliance VideoNetBox II
Summary of Contents for dallmeier SMAVIA appliance VideoNetBox II
-
Page 1
Commissioning English Appliance VideoNetBox II P R E L O A D E D 004707 / Rev. 1.0.2 / 2014-03-13… -
Page 2: Warranty
General Validity This documents applies to the SMAVIA appliance VideoNetBox II. It has been created in connection with version 8.11.3 of the software SMAVIA Recording Server. Documentation • Data Sheet — information on technical specifications and features (for trained system integrators) • Commissioning — instructions for mounting and commissioning (for trained system integrators) • Configuration — instructions for the configuration of the software (for trained system integrators) • Main Functions — instructions for the operation of basic software functions (for operators without special knowledge) • Operation — instructions for the operation of all software functions (for operators without special knowledge) • Service — instructions for maintaining and cleaning (for trained system integrators) Conventions • Instructions are indicated with this arrow ►.
-
Page 3: Safety Instructions
Safety Instructions Only use the unit if it is technically in proper working condition and for the intended purpose while keeping safety and potential dangers in mind. • Qualified Personnel The installation, mounting, connection, commissioning and configuration of the unit may only be carried out by qualified personnel. This also applies to the maintenance, testing and repair, whereat the regulations of the DIN VDE 0701 series of standards (repair, modification and inspection of electrical appliances) have to be followed. • Regulations The use of video and audio surveillance systems is, in general, strictly regulated. Inform yourself about the currently valid laws and regulations regarding data, worker and environmental protection before using the unit and ensure compliance with them. • System Components Only use internal components that have been tested and approved by Dallmeier. Inappropriate internal components can cause malfunctions, damages and data loss and can result in the loss of warranty. • Modifications Do not make any modifications to the hardware or software that has not been tested and approved by Dallmeier. Inappropriate modifications can cause malfunctions, damages and data loss and can result in the loss of warranty. • Documentation Read the documents included in the delivery carefully and thoroughly. Always observe the contained instructions, notes and warnings. The product documentation contains several documents which are included in the delivery in printed form and/or on a digital medium. Store all documents in legible condition in a suitable location in order to provide for later consultation. • Condensation Water If the device is brought from a cold to a warm environment, resulting condensation water may cause malfunctions and damages. In this case, wait (up to 8 hours) until the device has reached room temperature before commissioning. • Earthing & Equipotential Bonding For the safety of persons (protection against dangerous contact voltages) and devices (protection against over-voltages) and…
-
Page 4: Ambient Conditions
• steam or oil vapours (e.g. kitchen) • unsuitable ambient temperatures • insufficient ventilation (e.g. closed cabinet) • direct sunlight • sources of strong heat dissipation (e.g. radiator) • sources of strong radiation (e.g. radio transmitter, magnetic field) • corrosive surrounding (e.g. gas, salt water) Stand-alone operation The appliance is designed for stand-alone operation. It can usually be set up and operated at any place that meets the requirements above. In addition, observe the following requirements and notes: Computer room This appliance is not designed for the use in a computer room as defined in the US fire protection regulation “Standard for Protection of Electronic Computer/Data Processing Equipment, ANSI/NFPA 75”. Secured room Risk of manipulation and sabotage. A stand-alone installation should be operated in secured rooms with restricted access only. Socket outlet The used socket outlet has to be installed near the appliance. It has to be easily accessible. Hard disk drives Appliances that have been ordered with hard disk drives can be mounted, connected and commissioned directly. Appliances that have been ordered without hard disk drives must be equipped with one 2.5» hard disk drive at least. Note that • all mounted hard disk drives have to be tested and released for mounting by Dallmeier (HDD whitelist in the Partner Forum)! • all mounted hard disk drives do not have to be formatted or partitioned! • the HDD holder 1 on the left side has to be used if only one hard disk drive is mounted! www.dallmeier.com…
-
Page 5: Hdd Mounting
► Insert the HDD-1 completely into the guidances of the HDD slot 1. ► Proceed as described in order to mount the HDD-2, if necessary. ► Finally put the cover on the housing. ► Close the cover using the 6 housing screws. NOTE During the fi rst start various messages can be displayed. ► Observe the given instructi ons and confi rm the messages. ► Note the appropriate Confi gurati on documentati on. ► Load the Default System Parameters as fi rst step of the confi gurati on. www.dallmeier.com…
-
Page 6
Mounting The VideoNetBox II is designed for vertical mounting on a wall. As an option it can be mounted on an horizontal surface or on a ceiling. ► Ensure a stable mounting surface. ► Ensure a horizontal or vertical mounting surface. ► Ensure 10 cm (4.0») of free space at the left and right side. ► Use the drilling template or the housing feet as guidance. ► Mark 4 drill holes. ► Drill 4 holes, appropriate for the designated anchors / screws. ► Use proper anchors, appropriate for the condition of the mounting surface. ► Mount the appliance with 4 screws. ► Connect the appliance as described on the following pages. ► Commission the appliance as described on the following pages. www.dallmeier.com… -
Page 7
Dimensions 230 mm (9.0») 95 mm (3.6») 150 mm (5.9») 280 mm (11.0») 100 mm (3.9») 256 mm Ø 4 mm (10.1») (0.2») Dimensions W × H × D 230 × 95 × 150 mm / 9.0» × 3.6» × 5.9» (without feet) 280 × 100 × 150 mm / 11.0» × 3.9» × 5.9» (with feet) www.dallmeier.com… -
Page 8
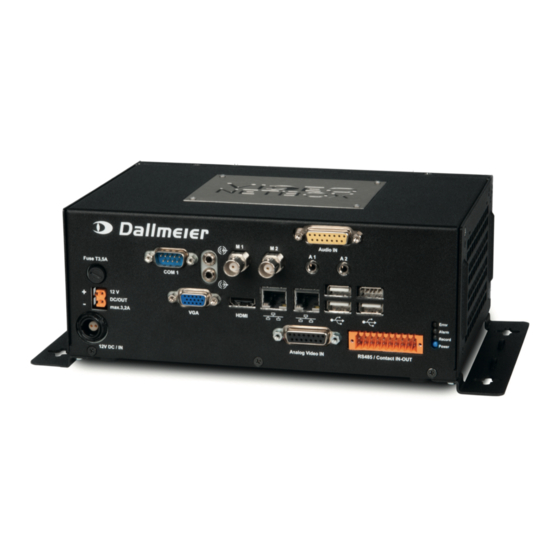
(optional, only with Analog Upgrade Kit) Fuse for 12 V DC OUT USB Interface 5 × 20 mm, type F, 3.15 A 4× USB 2.0, type A Serial Interface COM 1 Serial Interface COM 2 D-SUB, 9 pins, 1× RS232 2 pins on Weidmüller 20 pins, 1× RS485 Half Duplex (for Dallmeier PTZ dome) Video OUT Mini-D-SUB Relay OUT (1 and 2) Mini-D-SUB, 15-pole, 1920 × 1080 Weidmüller socket, 4 pins, max. 12 V DC / 24 V AC / 0.5 A, (for configuration, LocalViewing optional) 150 mOhm Audio OUT Contact IN global (1 - 4) 3.5 mm phone jack, 1 kOhm, 2.828 V Weidmüller socket, 4 pins, only for switch / push button… -
Page 9
Assignment Assignment Assignment Camera 1 Camera 6 GND 3 Camera 2 Camera 7 GND 4 Camera 3 Camera 8 GND 5 Camera 4 GND 1 GND 6 Camera 5 GND 2 GND 7 + 8 Audio IN (U) Assignment Assignment Assignment Audio 1 Audio 6 GND 3 Audio 2 Audio 7 GND 4 Audio 3 Audio 8 GND 5 Audio 4 GND 1 GND 6 Audio 5 GND 2 GND 7 + 8 www.dallmeier.com… -
Page 10
The user interface is displayed in the initial state after the start is complete. Login In the initial state it is possible to login without a password. The rights of the Administrator group are valid. Note that the definition of the passwords and of the network parameters are necessary for remote access (SMAVIA Viewing Client). ► Drag the mouse pointer to the lower screen edge. The task bar with the LOGIN button is displayed. ► Click the LOGIN button. The Recorder login dialogue is displayed. ► Click Later to login without changing a password. The configuration interface is displayed. ► Observe the appropriate Operation and Configuration documentations. www.dallmeier.com… -
Page 11
(SMAVIA Viewing Client). ► Observe the documentation Operation for the software PService. ► Start the software PService. ► Scan the network and select the appliance in the displayed list. ► Open the context menu with a right-click and select NetConfig3. The dialog NetConfig3 is displayed with the basic data of the appliance. ► Enter the serial number (e.g. DAV7-12345678) as Password. ► Confirm with Login. The configuration interface is compressed for slow network connections before transmission if the Slow Network check-box is activated. The configuration interface is displayed. ► Observe the appropriate Configuration documentation. www.dallmeier.com… -
Page 12
Dallmeier electronic GmbH & Co.KG Cranachweg 1 93051 Regensburg Germany www.dallmeier.com info@dallmeier.com All trademarks identified by ® are registered trademarks of Dallmeier electronic. www.dallmeier.com…
Configuration
Viewer
English
Rev. 1.0.0 / 2012-05-24
SMAVIA Viewer
Information about Copyright, Trademarks, Design Patents
© 2012 Dallmeier electronic
The reproduction, distribution and utilization of this document as well as the communication of its contents to others without express authorization is prohibited. Offenders will be held liable for the payment of damages. All rights reserved in the event of the grant of a patent, utility model or design.
We reserve the right to make technical modifications.
The manufacturer accepts no liability for damage to property or pecuniary damages arising due to minor defects of the product or documentation, e.g. print or spelling errors, and for those not caused by intention or gross negligence of the manufacturer.
Dallmeier electronic GmbH & Co.KG
Cranachweg 1
93051 Regensburg, Germany www.dallmeier.com
[email protected]
All trademarks identified by ® are registered trademarks of Dallmeier electronic.
All trademarks identified by *) are trademarks or registered trademarks of the following owners:
AMD and Athlon of AMD Corporation headquartered in Sunnyvale, California, USA
Intel and Pentium of Intel Corporation headquartered in Santa Clara, California, USA
Microsoft, Windows, Windows Vista and DirectX of Microsoft Corporation headquartered in Redmond, Washington, USA
Third-party trademarks are named for information purposes only.
Dallmeier electronic respects the intellectual property of third parties and always attempts to ensure the complete identification of third-party trademarks and indication of the respective holder of rights. In case that protected rights are not indicated separately, this circumstance is no reason to assume that the respective trademark is unprotected.
www.dallmeier.com
2
SMAVIA Viewer
Table of Contents
1 Introduction ………………………………………………………………………………………4
1.1 Validity ……………………………………………………………………………………………….4
1.2 Documents …………………………………………………………………………………………4
1.3 Conventions ……………………………………………………………………………………….4
2
2.1
General Notes……………………………………………………………………………………6
Appropriate Use ………………………………………………………………………………….6
2.2 Performance Features …………………………………………………………………………6
2.3 Warranty ……………………………………………………………………………………………6
3 Start ………………………………………………………………………………………………….7
4 Configuration ……………………………………………………………………………………8
4.1 View ………………………………………………………………………………………………….9
4.2 Split …………………………………………………………………………………………………..9
4.3 Display …………………………………………………………………………………………….10
4.4 Operation …………………………………………………………………………………………11
4.5 Transparent Channel …………………………………………………………………………11
www.dallmeier.com
3
SMAVIA Viewer
1 Introduction
1.1 Validity
This document applies to the SMAVIA Viewer software. The descriptions in this document are based on the software version 1.0.0.7:
1.2 Documents
Installation
The document Installation contains detailed descriptions of the installation and commissioning of the software.
The target audience of this document is trained and authorized professionals (installers).
Operation
The document entitled Operation contains detailed descriptions of how to operate the software.
The target audience of this document is the operator of the device. No special technical knowledge is required.
Configuration (this document)
The document Configuration contains detailed descriptions on the configuration of the software. Safety notes, general information and technical data are additionally provided.
The target audience of this dicumment is trained and authorized professionals (installers).
1.3 Conventions
Various warning words and warning symbols can indicate potential sources of danger.
DANGER
DANGER indicates a hazardous situation which, if not avoided, will result in death or serious injury.
WARNING
WARNING indicates a hazardous situation which, if not avoided, could result in death or serious injury.
CAUTION
CAUTION indicates a hazardous situation which, if not avoided, could result in minor or moderate injury.
www.dallmeier.com
4
SMAVIA Viewer
NOTICE
NOTICE indicates practices for preventing property damage, incorrect configurations or faulty operations.
The following symbols and various character formats are used to increase the clearness of the document.
Instructions are indicated by arrows ().
Expressions in bold and italics indicate a control element on the device (switches or labels) or on its user interface (buttons, menu entries).
Paragraphs in italics contain information on basic principles, special features and efficient procedure as well as general recommendations.
www.dallmeier.com
5
SMAVIA Viewer
2 General Notes
2.1 Appropriate Use
The SMAVIA Viewer software provides you with a functional control tool for DVR3 and DVR4.
User-friendly functions ensure convenient operation.
The SMAVIA Viewer software can be installed on standard commercial PCs (Dual Core systems) or on the Dallmeier evaluation stations.
2.2 Performance Features
SMAVIA Viewer is characterized by the following functions and features:
• 16:9 image format
• EasyZoom: Digital zooming in the image possible
• Variable display formats up to 9 x split
• Fast search possibilities
2.3 Warranty
The terms and conditions valid at the signing of the contract shall apply.
www.dallmeier.com
6
SMAVIA Viewer
3 Start
When exporting images and sequences on CD/DVD the software SMAVIA Viewer is exported automatically as well. The software does not require installation and can be launched by double-click.
Start SMAVIA Viewer.
The user interface is displayed in the initial state.
A
Fig. 3-1
B
A Main panel
B Info window
C Split
D Control panel
C D
www.dallmeier.com
7
SMAIVA Viewer
4 Configuration
The configuration dialogues allow to edit general view settings for the startup.
Open the Configuration dialogue via Program > Configuration….
The Configuration dialogue is displayed.
Fig. 4-1 www.dallmeier.com
8
4.1 View
In the View section settings of the SMAVIA Viewer presentation are made.
SMAIVA Viewer
Fig. 4-2
Language
The Language option sets the display language.
Background
This option allows to change the colour scheme of SMAVIA Viewer.
Double split display
The Double split display option allows adding a further split view on the right side of the window.
4.2 Split
This section allows to set options for displaying splits.
Fig. 4-3
Increase size of video pictures in views
If this option is enabled the split is displayed in full screen mode when double-clicking on a split.
16:9
Activate this option to display splits in 16:9.
Display Mode
The Display Mode option allows to either maintain the original aspect ratio of the split (As-
pect Ratio) or adapt it to the complete split display (Fit to Split).
Use DirectX
With this option compute-intensive processes for the display will be outsourced to the graphics card.
Not all graphics cards are compatible. Disable this option when it comes to display problems. If required, contact the Dallmeier support.
www.dallmeier.com
9
SMAIVA Viewer
DirectX features
In addition, DirectX performance can be customized from the drop-down menu. The default setting basic is suffi cient for most applications.
4.3 Display
The Display section allows to defi ne options for data overlays (camera name, time, size, etc.) in the split screen.
Fig. 4-4
Display duration
Sets the duration (in seconds) for overlays.
Always show sensor grid
This option allows to overlay of defi ned detection areas on the display.
Show milliseconds
The time display is extended to milliseconds.
Position
With this option the position of data overlays is set in the display.
If no data is displayed in the display, the setting None will be selected in the drop-down menu.
Font size
Set the font size of data overlays.
www.dallmeier.com
10
SMAIVA Viewer
4.4 Operation
This section allows the definition of operating options.
Fig. 4-5
Show pictures during slider movement
This option allows for a quick search on a track (with slider) to indicate the frames during movement.
PTZ control without panel
If this option is enabled the mouse wheel zooms in and out in a split with active PTZ camera.
GPU accelaration
This software version does not support this function.
4.5 Transparent Channel
In this section a data channel can be set to control devices (e. g. dome camera).
Example:
Command is sent from an external controller through SMAVIA Viewing Client to a device and passed to a dome camera from there.
Fig. 4-6
Activate the checkbox Active.
Select the
COM Port on PC which is connected to the external control unit.
Select the Baud rate.
In order that the commands can be assigned to a device, the device must be activated and configured accordingly (see section Settings).
www.dallmeier.com
11
09.06.2016

Устройство IPS Smavia 10000 построено на базе высокопроизводительного сервера с многоядерным процессором. Тщательно подобранные компоненты системы обеспечивают высокую скорость записи. Интегрированное в разработку хранилище данных RAID 6 (Redundant Array of Independent Disks) имеет большую емкость, но при этом еще может быть расширено за счет внешних накопительных устройств RAID-6 JBOD (Just Band of Disks). Таким образом, IPS 10000 представляет собой оптимальную систему записи и хранения данных для приложений, требующих обработки больших объемов видеоинформации в режиме реального времени. Подобный функционал особенно востребован на стадионах, в торговых и развлекательных центрах, казино, конференц-залах.
Емкость хранилища данных
Устройство IPS 10000 имеет восемь легкодоступных HDD корзин на передней стороне, в каждую из которых установлен серверный жесткий диск емкостью 6 TB. Такая архитектура хранилища RAID 6 обеспечивает запись 36 TB данных. При использовании дополнительного внешнего накопителя «Smavia Enterprise JBOD» стандарта RAID 6 емкость хранилища увеличивается до 60 TB.
Запись и оценка видеоданных
Установленное в систему записывающее программное обеспечение «Smavia Recording Server» разработано в виде открытой платформы. Поэтому, помимо видеоданных от камер Dallmeier, через протокол ONVIF устройство IPS 10000 может принимать информацию от камер других производителей, оснащенных функцией обнаружения движения и имеющих лицензии соответствия.
Просмотровая программа Smavia Viewing Client имеет широкий набор поисковых и навигационных функций и предлагает удобный интерфейс для анализа видеопотока. Кроме того, на стадии производства в IPS 10000 устанавливается оригинальная лицензия компании Dallmeier «SeMSy® Flat», что позволяет легко интегрировать его в хранилище данных системы управления видео под названием SeMSy® III. Устройство поддерживает полный функционал программы SeMSy® III, включая удобную оценку записанной в него информации на рабочей станции SeMSy® III.
Доступ к просмотру изображений IPS 10000 с мобильных устройств также возможен посредством установки на смартфонах приложения «Dallmeier Mobile Video Center (DMVC)». Это приложение совместимо с мобильными операционными системами iOS и Android.
К списку новостей

Configuration
English
Rev. 2.0.3/ 27.06.2017
Viewing Client

SMAVIA Viewing Client
www.dallmeier.com 2
Information about Copyright, Trademarks, Design Patents
© 2017 Dallmeier electronic
The reproduction, distribution and utilization of this document as well as the communication of its contents to others without express authorization is prohibited. Offenders will be held liable for the payment of damages. All rights reserved in the event of the grant of a patent, utility model or design.
We reserve the right to make technical modifications.
The manufacturer accepts no liability for damage to property or pecuniary damages arising due to minor defects of the product or documentation, e.g. print or spelling errors, and for those not caused by intention or gross negligence of the manufacturer.
Dallmeier electronic GmbH & Co.KGBahnhofstrasse 1693047 Regensburg
[email protected]
All trademarks identified by ® are registered trademarks of Dallmeier electronic.
All trademarks identified by *) are trademarks or registered trademarks of the following owners:Microsoft, Windows and DirectX from Microsoft Corporation headquartered in Redmond, Washington, USANvidia and CUDA from Nvidia Corporation headquartered in Santa Clara, California, USA
Third-party trademarks are named for information purposes only.Dallmeier electronic respects the intellectual property of third parties and always attempts to ensure the complete identification of third-party trademarks and indication of the respective holder of rights. In case that protected rights are not indicated separately, this circumstance is no reason to assume that the respective trademark is unprotected.

SMAVIA Viewing Client
www.dallmeier.com 3
Table of Contents
1 Introduction ………………………………………………………………………………………51.1 Validity ……………………………………………………………………………………………….51.2 Documents …………………………………………………………………………………………51.3 Typographical Conventions…………………………………………………………………..5
2 General Notes……………………………………………………………………………………72.1 Appropriate Use ………………………………………………………………………………….72.2 Performance Features …………………………………………………………………………72.3 Warranty ……………………………………………………………………………………………7
3 Login ………………………………………………………………………………………………..83.1 Login …………………………………………………………………………………………………83.2 License Check ……………………………………………………………………………………9
4 Configuration ………………………………………………………………………………….114.1 General ……………………………………………………………………………………………124.1.1 View ………………………………………………………………………………………………..124.1.2 Split …………………………………………………………………………………………………134.1.3 Display …………………………………………………………………………………………….144.1.4 Operation …………………………………………………………………………………………164.1.5 UDP Live ………………………………………………………………………………………….164.1.6 Configuration Import or Export …………………………………………………………….174.2 Login ……………………………………………………………………………………………….184.2.1 Default User ……………………………………………………………………………………..184.2.2 Program Start……………………………………………………………………………………194.3 Local Tracks ……………………………………………………………………………………..204.3.1 Shoot……………………………………………………………………………………………….204.3.2 Mirror……………………………………………………………………………………………….214.3.3 Default File Name ……………………………………………………………………………..224.4 Recorder ………………………………………………………………………………………….234.4.1 General Settings ……………………………………………………………………………….244.4.2 Add a Device…………………………………………………………………………………….254.4.3 Edit Device ……………………………………………………………………………………….324.4.3.1 IP Address ………………………………………………………………………………………..334.4.3.2 Connection ……………………………………………………………………………………….334.4.3.3 Password …………………………………………………………………………………………344.4.3.4 Settings ……………………………………………………………………………………………344.4.3.5 Relay ……………………………………………………………………………………………….354.4.3.6 Tracks ……………………………………………………………………………………………..354.5 Camera Control…………………………………………………………………………………364.6 Panomera/Fisheye …………………………………………………………………………….384.7 HotKeys …………………………………………………………………………………………..394.8 Monitors …………………………………………………………………………………………..394.9 External Applications………………………………………………………………………….424.10 VMS Server………………………………………………………………………………………444.11 Interfaces …………………………………………………………………………………………454.12 Compression …………………………………………………………………………………….464.13 Audio Devices …………………………………………………………………………………..47

SMAVIA Viewing Client
www.dallmeier.com 4
5 User Management ……………………………………………………………………………485.1 Create A New User ……………………………………………………………………………485.2 Create A New Group ………………………………………………………………………….495.3 Add User To A Group …………………………………………………………………………515.4 Change User Password ……………………………………………………………………..51
6 RemoteConfigurationDevice…………………………………………………………..526.1 Time ………………………………………………………………………………………………..526.2 Restart …………………………………………………………………………………………….526.3 File Transfer ……………………………………………………………………………………..536.3.1 Files ………………………………………………………………………………………………..536.3.2 Configuration…………………………………………………………………………………….546.3.3 Protocol ……………………………………………………………………………………………546.3.4 Latest reference picture set ……………………………………………………………….556.4 Tracks ……………………………………………………………………………………………..556.4.1 Delete………………………………………………………………………………………………556.4.2 Start / Stop ………………………………………………………………………………………..56

SMAVIA Viewing Client
www.dallmeier.com 5
1 Introduction
1.1 ValidityThis document applies to the installation of the SMAVIA Viewing Client software. The de-scriptions in this document are based on the following software versions:
• Microsoft*) Windows*) 7/8/10 32 Bit / Microsoft Windows 7/8/10 64 Bit• SMAVIA Viewing Client, Version 2.4.22
1.2 DocumentsData SheetDetailed technical specifications and features of the software(for trained system integrators)
InstallationInstructions to install the software(for trained system integrators)
Main FunctionsInstructions for the use of basic functions of the software(for operators without technical knowledge)
OperationFor instructions on using all features of the software(for operators without technical knowledge)
Configuration(this document)Instructions for configuring the software (for trained system integrators)
1.3 TypographicalConventionsThis document may contain various warning words and symbols that indicate potential sources of danger:
NOTICE
NOTICE indicates practices for preventing property damage, incorrect configurations or faulty operations.
For reasons of clarity and readability, various text formatting elements and types of empha-sis are used in this documentation:
Instructions are indicated by arrows (). Carry out instructions one after the other in the sequence described.

SMAVIA Viewing Client
www.dallmeier.com 6
Expressions in bold/italics generally indicate a control element on the device (switches or labels) or on its user interface (buttons, menu items).
Paragraphs in italics provide information on basic principles, special features and efficient procedure as well as general recommendations.

SMAVIA Viewing Client
www.dallmeier.com 7
2 General Notes
2.1 Appropriate UseThe new HD-ready SMAVIA Viewing Client software provides you with a functional control tool for one ore more Dallmeier devices.SMAVIA Viewing Client provides many useful features and functions for video image dis-play in the user area as well as for the administration. All the digital devices important user options can be accessed via LAN / WAN.Live picture transmission, backup, virtual tours or synchronisation are just some of the functions which make it easy to monitor with SMAVIA Viewing Client software. It is possible to trigger message display in the SMAVIA Viewing Client window through PGuard advance (central evaluation and management software for messages), The search and filter crite-ria set up on the device can be called up and used through SMAVIA Viewing Client. Us-er-friendly functions ensure convenient operation.A variety of different picture compression processes and transmission codings (H.264, MPEG-4, H.261, Wavelet, MPEG-2 and JPEG) for live and archived pictures can be de-coded. It also guarantees compatibility to all the rest of the Dallmeier product range.Within the Dallmeier video management system (SMAVIA Viewing Client, PGuard advance) SMAVIA Viewing Client takes the important role of a central managing element.SMAVIA Viewing Client can be installed on standard PCs (minimum: dual-core CPU; for system requirements see “Data Sheet” for SMAVIA Viewing Client at www.dallmeier.com) or on Dallmeier workstations.
2.2 Performance FeaturesSMAVIA Viewing Client is characterized by the following functions and features:
• Access to SMAVIA Recording Server via Ethernet (LAN/WAN)• Full support for Multifocal Sensor System Panomera®
• Comfortable split management• PRemote-HD function supported• Live display and playback• Full-HDTV with 16:9 display format• Sophisticated navigation functions• Extensive search functions• Evaluation of VCA data possible• PTZ camera control via GUI• Auto update function via Ethernet (WAN)
2.3 WarrantyThe terms and conditions valid at the signing of the contract shall apply.

SMAVIA Viewing Client
www.dallmeier.com 8
3 Login
3.1 LoginSMAVIA Viewing Client is usually installed on a workstation / PC and starts automatically after booting the system. In addition, the user login normally is automatically via Autologin.
If SMAVIA Vewing Client starts with enabled “Autologin”, it is still possible to enter the login dialog. Keep the left “Ctrl” key at the start of SMAVIA Viewing Client.
When a manual start with login is required, proceed as follows:
The factory-set “User” is “Administrator”.The factory-set “Password” is “admin”.
NOTICE
Risk of abuse by unauthorized users!
Change the factory-set “Default user” and the “Default password” as soon as possible (see “Default User” on page 18 and chapter “User Management” on page 48).
Start the workstation / PC. Start SMAVIA Viewing Client.
The Login dialog is displayed.
Abb. 3-1
Enter the User and the Password. Confirm with OK.

SMAVIA Viewing Client
www.dallmeier.com 9
The user interface is displayed depending on the chosen preferences.
Abb. 3-2
Make the required settings as described in the following.
3.2 License CheckThe basic license is included in the SMAVIA Recording Server. The basic license allows access from a SMAVIA Viewing Client with full functionality. A SMAVIA Viewing Client can only access one SMAVIA Recording Server with one basic license. If acquiring a floating license, the basic license to a floating license is converted. The floating license allows mul-tiple SMAVIA Viewing Clients (according to the license number) to access to one SMAVIA Recording Server.If in the device list Dallmeier devices of the 3rd and 4 Generation are included and no com-patibility dongle is connected the Dongle Options dialog is displayed.
Abb. 3-3
There are 3 options:Option 1: Always continue without dongleWith this option, you only have access to SMAVIA devices. The Dongle Options dialog no longer appears at launch the next time.
Enable this option if required. Confirm with OK.

SMAVIA Viewing Client
www.dallmeier.com 10
Option 2: Continue without dongle onceThis option provides unique access to the SMAVIA devices. The Dongle Options dialog reappears at launch the next time.
Enable this option if required. Confirm with OK.
Option 3: Unlock dongle by input of its serial numberThis option is needed for Dallmeier devices of the 3rd and 4 Generation.
Connect the compatibility dongle. Enter the license code. Confirm with OK.
The dongle can be again enabled on the help button ? (check dongle).

SMAVIA Viewing Client
www.dallmeier.com 11
4 Configuration
The configuration dialogs allow to edit general view settings and preferences for the start-up. It can be configured recorders / cameras for the access with SMAVIA Viewing Client, default settings for image backups be set and camera controls defined. In addition, the behavior for events that are triggered by external programs, and the definition of hotkeys for the operation can be managed.
The “Configuration” dialog can only be opened, if no recorder / camera is active in SMAVIA Viewing Client.
First, disconnect all active connections if required. Open the Configuration dialog via Program > Configuration….
The Configuration dialog is displayed.
Abb. 4-1
Select the required tab. Make the required settings as described below. Finally, confirm with OK in order to save the setttings.

SMAVIA Viewing Client
www.dallmeier.com 12
4.1 GeneralThe General tab allows general settings of the user interface, of the application language, for displaying splits, for text overlays and for the opeartion to be made. In addition, configu-ration files can be imported or exported.
Open the General tab via Program > Configuration… > General.
Abb. 4-2
Make the required settings as described below. Finally, confirm with OK in order to save the setttings.
4.1.1 ViewIn the View section settings of the SMAVIA Viewing Client presentation are made.
Abb. 4-3
LanguageHere the user interface language can be changed.
Select from the Language drop down box the required option.

SMAVIA Viewing Client
www.dallmeier.com 13
The user interface will be after saving the configuration dialog immediately converted with-out rebooting.
Connection MonitorThis option makes it possible to visualize the status of connections in an additional window next to the control panel.
Enable the Connection monitor check box if required.
Double Split DisplayThe Double split display option allows adding a further split view on the right side of the window (for example, for the presentation of additional data with POS systems). In addition, this option is required for the presentation of the SMAVIA Viewing Client on two monitors.
Enable the Double split display check box. Select from the Splits on right side drop down box the required option.
4.1.2 SplitThis section allows to set options for displaying splits.
Abb. 4-4
BorderSplits can be presented with different borders or without borders.
Select from the Border drop down box the required option.
GPUAcceleration(NvidiaCUDA)If the workstation has graphics cards with NVIDIA*) CUDA*) technology compute-intensive processes for the presentation can be taken from the GPUs.
Enable the GPUAcceleration(NvidiaCUDA) check box if required.
Not all graphics cards are compatible. Contact the Dallmeier support if required.
Use DirectXWith this option compute-intensive processes for displaying will be outsourced to DirectX*)-enabled graphics cards.
Disable this option if required.
Not all graphics cards are compatible. Disable this option when it comes to display prob-lems. Contact the Dallmeier support if required.

SMAVIA Viewing Client
www.dallmeier.com 14
Intel GPUGPUAcceleration(NvidiaCUDA)If the workstation has graphics cards with Intel*) technology compute-intensive processes for the presentation can be taken from the GPUs.
Enable the Intel GPU check box if required.
Not all graphics cards are compatible. Contact the Dallmeier support if required.
Display ModeThe Display Mode option allows to either maintain the original aspect ratio of the split (As-pect Ratio) or adapt it to the complete split display (Fit to Split).
Select the rquired option from the Display Mode drop down box.
Aspect RatioHere, the aspect ratio of the split display can be set.
Select the required option from the Aspect Ratio drop down box.
DirectX FeaturesIf the Use DirectX option is enabled the DirectX performance can be customized here.
Select the required option from the DirectX features drop down box.
4.1.3 DisplayThe Display section allows to define options for data overlays (camera name, time, size, etc.) in the split screen.
Abb. 4-5
Always Show Sensor GridThis option allows the display of defined detection areas on the screen.
Enable the check box if required.
Show MillisecondsIf this option is enabled, the time display is extended to milliseconds.
Enable the check box if required.

SMAVIA Viewing Client
www.dallmeier.com 15
Show recording stateWith this option enabled, an icon in the upper right corner of the display indicates whether the camera is recording or not.
Enable the check box if required.
Display SEDOR “arm / disarm” iconSMAVIA Recording Server software allows for the deactivation (disarmed) and activation (armed) of the SEDOR analysis applications by contact events. The status of the analysis application can be indicated by an icon in the upper right corner of the display, if the the camera is in live mode.
Enable the check box if required.
Display DurationDefine here the display time (in milliseconds) of text overlays.
Enter the required time period.
Show descriptionsHere different settings are offered for the kinds of information on display.
Select the necessary kinds of information for display, using the checkboxes.
PositionWith this option the position of data overlays is set in the display. IIf no information data should be displayed on the screen, the setting None must be selected in the drop down menu.
Select the required option from the Position drop down box.
Font SizeThe font size of text overlays can be customized.
Select the required option from the Font size drop down box.

SMAVIA Viewing Client
www.dallmeier.com 16
4.1.4 OperationIn this area, options for zoom operation and track playback can be set.
Abb. 4-6
ShowPicturesDuringSliderMovementThis option allows for a quick search in a track (with slider) to display the individual images while moving.
Enable the check box if required.
Digital PTZ Control Without PanelIf this option is enabled it can be comfortably zoomed in and out with the mouse wheel in a split view.
Enable the check box if required.
Digital PTZ Control ThumbnailIf this option is enabled a thumbnail image in the split will be displayed when zooming, in which the image can be moved quickly.
Enable the check box if required.
FluidReversPlaybackThis option enables smooth playback at a reverse search.
Enable the check box if required.
PView Drag&Drop ModeIf this option is enabled the connenction is copied at a split exchange by drag and drop, so that is active in two splits. If this option is disabled, the connection is changed from one to another split (split exchange).
Enable the PView Drag&Drop Mode check box if required.
4.1.5 UDPLiveEnabling these options, it is possible to decode incomplete frames as also frames without beginning and to display them.
Abb. 4-7
Enable the required options if required.

SMAVIA Viewing Client
www.dallmeier.com 17
4.1.6 ConfigurationImportorExportConfiguration settings can be as a file imported or exported in the Configurations area.
All SMAVIA Viewing Client user must have write access in the following windows storage paths for configuration and dongle license:Windows XP: C:Documents and SettingsAll UsersApplication dataDallmeierSMAVIA Viewing ClientWindows 7/10: C:ProgramDataDallmeierSMAVIA Viewing Client
Abb. 4-8
Export Click Export. Select the target directory in order to save the file in the Windows Explorer. Enter the file name. Click the Save button.
Import Click the Import button. Select the relevant directory of the file to be imported in the Windows Explorer. Select the file. Click Import.
Confirm the subsequent info dialog:
Abb. 4-9
Click OK in order to close the Configuration dialog. Select Program > Finish in order to close the SMAVIA Viewing Client. Start the SMAVIA Viewing Client again in order to complete the import of the configura-tion data.
After the boot process is the SMAVIA Viewing Client with the imported parameters avail-able.

SMAVIA Viewing Client
www.dallmeier.com 18
4.2 LoginThe Login tab allows to define settings for the program start. So can be set for example, presets for the startup or the search enabled for updates of the SMAVIA Viewing Client. In addition, the Default user for the automatic logon process can be changed here.
Open the Configuration dialog via Program > Configuration…. Select the Login tab.
Abb. 4-10
Make the required settings (see below). Finally, confirm with OK in order to save the setttings.
4.2.1 Default UserIn the Login section the automatic login (Autologin) with a Default user at startup can be defined. By default, the automatic login with the factory-set login data is enabled.New users can be created and edited in the user management (see chapter “User Manage-ment” on page 48).
NOTICE
Risk of abuse by unauthorized users!
Change the factory-set “Default user” and the “Default password” as soon as possible.

SMAVIA Viewing Client
www.dallmeier.com 19
Abb. 4-11
Activate or deactivate the Autologin checkbox. Enter the new Default user if required. Enter the associated Default password if required.
4.2.2 Program StartThis section allows to configure of certain default values for the program start.
Abb. 4-12
PresetIf the Preset checkbox is enabled, SMAVIA Viewing Client starts with a configured preset (see documentation “Operation” SMAVIA Viewing Client).
Enable the Preset check box. Select the required preset from the drop down box.
Complete split views with the activated cameras / recorders can be saved as presets.
MaximiseSMAVIAViewingClientautomaticallyThis option allows to launch SMAVIA Viewing Client in full screen mode.
Enable the check box if required
Check For UpdatesIf this option is enabled it will be searched for software updates at program start automati-cally.
Check DongleIf this option is enabled, the licenese dongle is checked every time at program start.
Numbers of instances to be launchedHere, the number of instances to be lauchned of SMAVIA Viewing Client at program start can be determined, if necessary.

SMAVIA Viewing Client
www.dallmeier.com 20
4.3 Local TracksThe backup of the local tracks can be configured on the Local tracks tab.
Open the Configuration dialog via Program > Configuration…. Select the Local tracks tab.
Abb. 4-13
Make the required settings (see below). Finally, confirm with OK in order to save the setttings.
4.3.1 ShootThe Shoot section allows configuration of options for image backup (shoot track).
This option is relevant for wavelet devices (3rd generation).
Abb. 4-14
Size Of One PictureDefinition of the file size (maximum 64 KB) for an image to save.

SMAVIA Viewing Client
www.dallmeier.com 21
NumberOfPicturesToBeSavedThis option allows to specify the number of images that can be saved on a track.
PathThe Path option allows to define a directory in which the images are stored.
Total Track SizeThe space required for the above configurations will be displayed.
RingBufferThis option enables operation of the local track as a ring buffer.
If a track is defined as a ring buffer, it will be described continuously and periodically over-written again and again.
4.3.2 MirrorThe Mirror section allows configuration of options for the mirror track backup.
This option is relevant for wavelet devices (3rd generation).Note that from a split with activated PRemote connection no mirror track recording can be saved.
Abb. 4-15
Size Of One PictureDefinition of the file size (maximum 64 KB) for an image to save.
NumberOfPicturesToBeSavedThis option allows to specify the number of images that can be saved on a track.
PathThe Path option allows to define a directory in which the images are stored.
Total Track SizeThe space required for the above configurations will be displayed.
RingBufferThis option enables operation of the local track as a ring buffer.If a track is defined as a ring buffer, it will be described continuously and periodically over-written again and again.

SMAVIA Viewing Client
www.dallmeier.com 22
4.3.3 Default File NameThe Default file name section allows to set default directories for the various export op-tions of image backups for the modes PRemote recording, Backup, Export and Mirror.
This option is only relevant for H.264 devices (4th generation).
Abb. 4-16
Settings ForThe required backup mode – PRemote recording, Backup, Export, Mirror – musst be selected in the drop down menu.
Settings:Use Default File NameIf the image backups are exported without demand in a particular directory, the check box Default file name must be enabled to use.
PathSet here the default directory for the image backup of the respective mode.
File NameThe drop-down menu allows to choose for the file name between the templates Current Time or Recorder name Current Time.
Always Use Original VersionThis option allows storing uncompressed frames in bitmap format in backup mode Export without prompting (see chapter “Image Export” in the documentation “Operation” SMAVIA Viewing Client).

SMAVIA Viewing Client
www.dallmeier.com 23
4.4 RecorderThe Recorder tab allows to define recorders and cameras for access in a SMAVIA Viewing Client. In addition, settings can be checked and changed from devices already installed.
Open the Configuration dialog via Program > Configuration…. Select the Recorder tab.
Abb. 4-17
Make the required settings (see below). Finally, confirm with OK in order to save the settings.

SMAVIA Viewing Client
www.dallmeier.com 24
4.4.1 General SettingsAll Recorders
If the Establish a new connection if lost option is activated, attempts an abort of the con-nection automatically reestablish the connection.The RDT connection is standard gateway option allows the connection build by default via ISDN/modem in contrast to a LAN connection.If the Live display when connected option is activated, always the live image of the de-vice / camera appears when a connection is established.The option APR-Mode allows to record to UVV Kassen guidelines.The transfer of audio data can be enabled with the option Default audio transmission.With the Auto Clipping/Rotation option, active areas (image snippets) can be transferred from IP cameras. If this option is disabled, the information is not observed and the complete image is displayed.With the Force encrypted credentials option all login processes are transmitted in en-crypted form.WaveletRecordersThe Image fast playback option allows to set the number of images for fast forward play-back. In order that it is possible to regulate the speed of fast reproduction.The Max. live images /sec. option allows you to specify the number of images for live playback. This makes it possible to regulate the data rate of a connection.
PRemote RecordersIf the Establish a new connenction if lost option is enabled, the connection is automati-cally restored when an interrupt.If the Low Delay option is enabled the time delay in the live image display is reduced. If it comes in fast moving sequences to an unclean representation, this option should be disabled.The Activate mixer control option allows that the unused devices in the operating system are automatically enabled or disabled during an audio transmission.If the Transfer mouse buttons via PRemote option is enabled mouse clicks are sent to the device (option is only available for wavelet device).The Audio active by default option allows for a PRemote connection automatically estab-lish an audio connection.
DIS RecordersThe Accurate time positioning option allows a precise slider search at DIS devices.
Make the required settings. Finally, confirm with OK in order to save the settings.

SMAVIA Viewing Client
www.dallmeier.com 25
4.4.2 AddaDeviceA new device will be added through a setup wizard. It will be automatically retrieved all the settings of the Edit recorder dialog gradually.
With this option, it is possible to add Dallmeier or 3rd party ONFIV cameras as well.
It is possible to search the network for devices using the IP Scanner.
Open the Configuration dialog via Program > Configuration…. Select the Recorder tab. Click New.
The Name dialog is displayed.
Name Enter an appropriate name for the recorder / camera.
Abb. 4-18
Devicetype Select the appropriate Device type.
IP ScannerWith the IP Scanner it is possible to search the network for devices, according to deter-mined parameters. Dallmeier Broadcast lists all available devices according to the se-lected interface, whereas Dallmeier DaVid TCP makes it enables searching in a certain IP interval.
Select the necessary IP Scanner
The according dialog opens.

SMAVIA Viewing Client
www.dallmeier.com 26
• Broadcast Scan
Abb. 4-19
Select the necessary Interface. Click Scan. If necessary select an appropriate Filter. Click OK.
• IP-Scan
Abb. 4-20
Enter the IP range you want to search. Click Scan. If necessary select an appropriate Filter. Click OK.
The Name and IP-Adress dialogs are filled automatically.

SMAVIA Viewing Client
www.dallmeier.com 27
The IP-Address dialog is displayed.
Abb. 4-21
Enter the IP address. Make the required settings (see below).
Slow NetworkThe option allows the use of a device over a slow network connection (with low network bandwidth).
This option is only available for Wavelet device (3rd generation).
NetworkWithRouters(NAT)If the device is integrated into the network through a router this option must be enabled. If the option is enabled the TCP network protocol is used to transfer data. If disabeld the UDP protocol is used.
LiveMulticastThe option integrates DIS-2 devices or IP cameras over a multicast network (multi-point connection).
LiveStreamSourceIf the Use IP device directly option is activated the stream is transferred directly from the IP camera when connecting an IP camera (HD and SD) about a device.If the Use recorder as proxy option is enabled the stream is transferred form the device when connecting an IP camera (HD and SD) about a device.
Finally, click Next.
The Connection dialog is displayed.

SMAVIA Viewing Client
www.dallmeier.com 28
Abb. 4-22
Make the required settings (see below).
LAN Activate this option if the device is in the same LAN network.
No further settings are required.
RAS Activate this option if the device is integrated throug a dial-up connection. Enter the Telephone number. Enter the User. Enter the Password. Select the required RAS device. Finally, click Next.
The Password dialog is displayed.
Abb. 4-23
Make the required settings (see below).

SMAVIA Viewing Client
www.dallmeier.com 29
ExtendedLoginIf this option is enabled, the login process is done by querying the user name and password for each connection.The Extended login can be combined with the Automatic login option and the user name and password for the automatic login can be saved.
Double AuthenticationTwo user logins are queried at each connection. If this option is enabled no automatic logon process is possible.
Automatic LoginThis option allows you to save the password for an automatic group registration. There is no query during the connection establishment process.
Note the documentation and the settings of the respective recorder / the respective camera to the options of the “Password” tab.
Finally, click Next.
The Settings dialog is displayed.
Abb. 4-24
Make the required settings (see below).
Enable CVBS Monitor SwitchingThis option allows to display a live image or playback on a connected CVBS monitor.
LiveExclusiveWithoutRegardForRecordingIf this option is enabled the image limitation is removed and used always the maximum number of images.
This option is only for wavelet devices (3rd generation) which support the “PRemote” func-tion.

SMAVIA Viewing Client
www.dallmeier.com 30
Allow PRemote ConnectionThe option allows to activate PRemote connections for a recorder (Coding is done in the format H. 261 / MPEG4) and support therefore low bandwidth for data transfer.
Prefer PRemote On Remote Connection RequestIf this option is activated the live image on a PRemote connection is transmitted when the image display is triggered by an external application (e. g. PGuard advance).
Transparent ChannelIf the Transparent channel option is enabled the channel on the required device is en-abled with this option. In the drop-down menu the COM port must be selected in addition to which the external device is connected.
Transparent channels can be activated for several devices. The device that is enabled in the split receives the command.
TransparentBackChannel(Dominant)This option allows to forward data to SMAVIA Viewing Client received by a device via the serial interface.
Close Relay On ConnectionThis option allows the user to define a relay that closes when the device is activated to a transparent back channel connection.
ActivateMirrorTrackRecordingWithStandardConnectionThis option automatically stores multiple image sequences on a hard drive.
ActivateMirrorTrackRecordingWithPRemoteConnectionThis option automatically stores multiple image sequences on a hard drive at a PRemote connection.
Allow disarmIf this option os activated, a temporal deactivation of the SEDOR analysis application is possible.
Finally, click Next.
The Relay dialog is displayed.

SMAVIA Viewing Client
www.dallmeier.com 31
Abb. 4-25
Enable the Request relay status check box if required. Enter an name for the respective relay. Finally, click Next.
The End dialog is displayed.
Abb. 4-26
Enable the Check recorder access checkbox if required. Click Finish.
The new device is displayed in the Recorder list.

SMAVIA Viewing Client
www.dallmeier.com 32
4.4.3 EditDeviceThe configuration of devices can be changed via the Edit recorder dialog.
Open the Configuration dialog via Program > Configuration…. Select the Recorder tab. Select the required device. Click Edit.
The Edit recorder dialog is displayed with the Name tab.
Abb. 4-27
Customize the name if required. Click OK in order to save the settings.

SMAVIA Viewing Client
www.dallmeier.com 33
4.4.3.1 IP Address
The IP-Address tab allows to change the IP address of the device and configure network settings.
Select the IP-Address tab.
Abb. 4-28
Change the IP address if required. Select the required options (see above). Click OK in order to save the settings.
4.4.3.2 Connection
The Connection tab allows to define a network connection.
Select the Connection tab.
Abb. 4-29 Make the required settings (see above). Click OK in order to save the settings.

SMAVIA Viewing Client
www.dallmeier.com 34
4.4.3.3 Password
The Password tab allows to configure login options for the device.
Select the Password tab.
Abb. 4-30
Make the required settings (see above). Click OK in order to save the settings.
4.4.3.4 Settings
The Settings tab allows the configuration of general settings of the device to monitor switching, PRemote connection and transparent channel.
Select the Settings tab.
Abb. 4-31
Make the required settings (see above). Click OK in order to save the settings.

SMAVIA Viewing Client
www.dallmeier.com 35
4.4.3.5 Relay
The Relay tab enables the use of the device relays. In addition, individual names for the relays can be entered.
Select the Relay tab.
The Relay tab is displayed.
Abb. 4-32
Aktivate the Request relay status checkbox. Enter names for the relays if required. Click OK in order to save the settings.
4.4.3.6 Tracks
This feature simplifies the search on slow networks. For this purpose, two tracks are joined together to record at different qualities. An event is searched for in the track with lower qual-ity. The track with the higher quality is then used to display.
This function is only available for wavelet devices (3rd generation).
Select the Recorder tracks tab.

SMAVIA Viewing Client
www.dallmeier.com 36
Abb. 4-33 Select the track for high quality in the All tracks field. Select the track for low quality from the drop-down box. Click OK in order to save the settings.
4.5 Camera ControlThe Camera control tab allows the configuration of the control functions of PTZ cameras. These can then be operated via SMAVIA Viewing Client.
This function is available for Dallmeier devices from 3rd generation.
PTZ Cameras Open the Configuration dialog via Program > Configuration…. Select the Camera control tab.

SMAVIA Viewing Client
www.dallmeier.com 37
Abb. 4-34
Select the required camera from the Recorder / Camera list. Select the required Camera type. Select the required Protocol. Enter the Camera ID. Select the Interface. Selet an Alarmposition if required.
A camera preset can be set as an “Alarmposition”. This preset is activated when an alarm event is triggerd by an external application (e. g. PGuard).The “Camera ID” is required to uniquely identify the camera.
UTC CamerasPre-requirements for the use of the UTC function:Wavelet devices (3rd generation) must be equipped with the frame grabber card “FG11” , H.264 devices (4th generation) with a UTC module.
Open the Configuration dialog via Program > Configuration…. Select the Camera control tab.
The Camera control tab is displayed.
Select the required camera from the Recorder / Camera list. Select the required Camera type. Select CamInPix_V20 for the Protcol. Set 1 for the Camera ID.

SMAVIA Viewing Client
www.dallmeier.com 38
Select UTC for the Interface.
The “Alarmposition” field is without function at UTC cameras.
4.6 Panomera/FisheyeUnder the Panomera/Fisheye tab one can adjust certain settings for those camera types.
Open the Configuration dialog using Programm > Configuration…. Select Panomera/Fisheye.
Abb. 4-35 SplitselectionforPanomeradetailviewHere the behavior when opening Panomera® detail view is set up with the radio buttons.
Digital PTZSMAVIA Viewing Client simulates digital controls analogue to those of PTZ cameras, in order to simplify controlling fisheye cameras.The Pan/Tilt speed can be regulated with the slider. It is automatically reduced the more you zoom into the picture (proportionally to the zoom factor).This setting can be deactivated by unchecking the Zoom adaptive pan/tile speed check-box.
Make the necessary adjustments. Click the OK button.

SMAVIA Viewing Client
www.dallmeier.com 39
4.7 HotKeysThe HotKeys tab allows to specify custom keyboard shortcuts to control SMAVIA Viewing Client.
Open the Configuration dialog via Program > Configuration…. Select the HotKeys tab.
Abb. 4-36
Select the required Category from the drop-down menu. Select the required command from the Commands list. Enter the New hotkey. Click the Accept button.
The “Default” button resets all shortcuts back to the default state.
4.8 MonitorsThe Monitors tab allows the direct connection of an IP camera to a CVBS monitor. For this purpose the CVBS monitor must be connected to a decoder (e. g. DIS-2 Multi-D). The connection to this decoder can be configured here.
The “Enable CVBS monitor switching” function must be activated for the device (see “En-able CVBS Monitor Switching” on page 29).
Open the Configuration dialog via Program > Configuration…. Select the Monitors tab.

SMAVIA Viewing Client
www.dallmeier.com 40
Abb. 4-37
Click New.
The Name tab is displayed.
Abb. 4-38
Enter an appropriate name. Select the correct Device type. Click Next.

SMAVIA Viewing Client
www.dallmeier.com 41
The IP-Address tab is displayed.
Abb. 4-39
Enter the IP address. Click Next.
The Password tab is displayed.
Abb. 4-40
Make the required settings (see above). Click Finish.

SMAVIA Viewing Client
www.dallmeier.com 42
4.9 ExternalApplicationsThe External applications tab allows to set the behavior when using external programs (e. g. PGuard advance).
Open the Configuration dialog via Program > Configuration…. Select the External applications tab.
Abb. 4-41
Make the required settings (see below). Finally, click OK.
Split SelectionThe Split selection section allows to define which split is used in activation of external applications.
Abb. 4-42

SMAVIA Viewing Client
www.dallmeier.com 43
Alaways Use This SplitIf this option is enabled the split is used which has been entered in the Split No. field.Use Free Split Otherwise This SplitThis option uses the first free split. Is not a free split available it will be switched to the split which has been entered in the Split No. field.
AlwaysUseActiveSplitIt uses always the active split.
UseFreeSplitOtherwiseNextOneIf this option is enabled the first free split is used. Is not a free split available, is brought up to the next according to the active split.
Use Only Free SplitThe option use always a free split. When no free split is available there is no connection.
QualityThis section sets the image quality at remote setup of wavelet devices (3rd generation).
Abb. 4-43
Set the image quality from 0 to 4.
The value “0” provides the highest quality and value “4” the lowest quality.LocalRecordingWhenSwitchingToALiveStreamThis section allows to configure the local recording at the connection after an alarm event.
Abb. 4-44
No Local RecordingIf this option is enabled the activated images are not saved.
SaveFirstPicToShootTrackThe first image of the activation is saved in the shoottrack when an alarm event is triggerd.
ActivateMirrorThe complete image activation is saved in the mirror track when an alarm event is triggerd.
SMAVIAViewingClientActivationSMAVIA Viewing Client can be automatically displayed in the foreground when activations from external applications are triggered.

SMAVIA Viewing Client
www.dallmeier.com 44
Abb. 4-45
Activate the Display SMAVIA Viewing Client in the foreground with external com-mand checkbox.
4.10 VMSServerThe VMS server tab allows the configuration of the connection between SMAVIA Viewing Client and a VMS server for the autobackup feature.
The autobackup function is not available in the current version of SMAVIA Recording Serv-er Appliances.
Open the Configuration dialog via Program > Configuration…. Select the VMS server tab.
Abb. 4-46
Activate the Connect checkbox. Enter the IP address of the VMS server. Enter the Port number. Click OK.
The VMS server is part of the autobackup feature of SMAVIA Viewing Client. This exten-sion must be installed separately. Note the “SMAVIA Viewing Client Autobackup” documen-tation.

SMAVIA Viewing Client
www.dallmeier.com 45
4.11 InterfacesOn the Interfaces tab a data channel to control devices (such as a dome camera) can be established.
Example:Command is sent from an external controller via SMAVIA Viewing Client to a device and passed from there to a dome camera.
Open the Configuration dialog via Program > Configuration…. Select the Interfaces tab.
Abb. 4-47
Enable the Active check box. Select the COM Port on PC to which the external control unit is connected. Select the Baud rate. Click OK.
Thus, the commands can be assigned to a device, the device must be switched on and configured accordingly (see”Transparenter Kanal” on page 30).

SMAVIA Viewing Client
www.dallmeier.com 46
4.12 CompressionThis function is only available for Wavelet devices (3rd generation).
The Compression tab allows a time-dependent adjustment of image compression for live activations.
Open the Configuration dialog via Program > Configuration…. Select the Compression tab.
Abb. 4-48
The value “0” is the lowest level of compression (best image quality).
Select the Compression level. Drag a rectangle over the desired time range with the mouse. Repeat the first two steps for other time periods if required. Finally, click OK in order to save the settings.

SMAVIA Viewing Client
www.dallmeier.com 47
4.13 AudioDevicesThe Audio Devices tab allows devices to test audio settings and configure.
Open the Configuration dialog via Program > Configuration…. Select the Audio Devices tab.
Abb. 4-49
Test Audio INIn the Test Audio IN area an audio stream can be checked.
Make sure that the audio stream can be received. Click Start Audio IN. Check the display. Click Stop Audio IN in order to stop the test.
Test Audio OUTThe output of audio streams can be checked in the Test Audio OUT area.
Select the required Audio OUT option. Click Start Audio OUT. Set the Volume. Click Stop Audio OUT in order to stop the test.

SMAVIA Viewing Client
www.dallmeier.com 48
5 User Management
The User Management dialog allows creating new users and assign users to groups that have been equipped with different permissions. In addition, passwords of users can be changed here.
5.1 Create A New User Open the User Management dialog via Program > User Management….
The User Management dialog is displayed.
Select the User tab.
Abb. 5-1
Click New.
The New user dialog is displayed.
Abb. 5-2
Enter user name. Enter password. Confirm the password. Click OK in order to save the settings

SMAVIA Viewing Client
www.dallmeier.com 49
The new user is displayed in the User list.
Abb. 5-3
Delete A User Select the required user. Click Delete. Confirm the subsequent info dialog
5.2 Create A New Group Open the User Management dialog via Program > User Management….
The User Management dialog is displayed.
Select the Groups tab.
Abb. 5-4
Click New.
The Groups dialog is displayed.

SMAVIA Viewing Client
www.dallmeier.com 50
Abb. 5-5
Enter a name for the new group. Click OK in order to save the settings.
The new group is displayed in the Group list.
Abb. 5-6
The permissions can now be assigned through the Rights field for the new group:
Select the required Group. Activate the required Rights. Click OK in order to save the settings.
Delete A Group Select the required group. Click Delete. Confirm the subsequent info dialog.

SMAVIA Viewing Client
www.dallmeier.com 51
5.3 Add User To A Group Open the User Management dialog via Program > User Management….
The User Management dialog is displayed.
Select the User tab.
Abb. 5-7
Select the required User. Activate the required Group. Click OK.
5.4 Change User PasswordPasswords from users can be changed.
Select the required User. Click Edit.
The New password dialog is displayed.
Abb. 5-8
Enter the new password and confirm ist in the secodn field. Click OK in order to save the settings.

SMAVIA Viewing Client
www.dallmeier.com 52
6 RemoteConfigurationDevice
The Recorder menu allows remote access to device functions. Track recordings can be started, stopped and deleted. In addition, the device time can be defined, the device re-started and re-configured through a file.
The required device must be enabled to view the menu “Recorder”.
6.1 TimeThe Recorder time dialog allows to change date and time.
Open the Recorder time dialog via Recorder > Set recorder time.
Abb. 6-1
Click Set system time if required.or
Set New recorder time if required. Click Set recorder time. Click Close in order to close the dialog.
With the “Set system time” option the device is automatically synchronized with the current SMAVIA Viewing Client system time.
6.2 RestartThe Restart recorder dialog provides options for the restart of the device.
Open the Restart recorder dialog via Recorder > Restart.
Abb. 6-2
The “Restart recorder program” option restarts only the device program.
The “Restart recorder program and delete all tracks” option initialize the device completely.

SMAVIA Viewing Client
www.dallmeier.com 53
NOTICE
Data loss!The “Restart recorder programm and delete all tracks” option deletes all tracks – even the standard tracks.
The “Restart recorder system” option allows a restart of the device.
Select the required setting. Click OK.
6.3 File TransferFiles – any files, the configuration file of the device and the device protocol – can received by the device and transmitted to the device.
6.3.1 FilesIn order to receive a file from the device proceed as follows.
Open the Receive file from recorder dialog via Recorder > Files transfer > Get file.
Abb. 6-3
Enter the File path on recorder. Enter the File path on this computer. Click OK.
The file is stored in the directory specified in the File path on this computer field.
In order to send a file to the device proceed as follows.
Open the Send file to recorder dialog via Recorder > Files transfer > Send file.
The Send file to recorder dialog is displayed.
Enter the File path on this computer. Enter the File path on recorder. Click OK.

SMAVIA Viewing Client
www.dallmeier.com 54
The file is stored in the directory specified in the File path on recorder field.
6.3.2 ConfigurationIn order to receive the configuration file (tank.par) of the device proceed as follows.
Open the Receive configuration from recorder dialog via Recorder > Files transfer > Get configuration.
Abb. 6-4
Enter the File path on this computer. Click OK.
The configuration file is stored in the directory specified in the File path on this computer field.Now the file can be unpacked and edited.
NOTICE
Hardware damage!
Changes to the configuration file should be used by trained and autho-rized personnel are carried out.
In order to send a configuration file to the device proceed as follows.
Open the Send configuration to recorder dialog via Recorder > Files transfer > Send configuration.
The Send configuration to recorder dialog is displayed.
Enter the File path on this computer. Click OK.
The configuration file is sent to the device.
Restart the device in order to run the configuration file.
6.3.3 ProtocolThe protocol (protocol.txt) can be received from the device and evaluated.

SMAVIA Viewing Client
www.dallmeier.com 55
Open the Receive protocol from recorder dialog via Recorder > Files transfer > Get protocol.
Abb. 6-5
Enter the File path on this computer. Click OK.
The protocol file is stored in the directory specified in the File path on this computer field.The file can now be evaluated.
6.3.4 Latest reference picture set You can export the latest reference picture set into a PDF file and save it to your harddisk.
Open the Get latest reference picture set (pdf) dialog via Recorder > Files transfer > Get latest reference picture set (pdf).
The dialog Receive reference picture set (pdf) set from recorder is shown.
Enter the desired File path on this computer. Click OK.
The PDF file will be saved in the folder specifed under File path on this computer.
6.4 TracksTracks/recordings can be started, stopped and deleted.
6.4.1 DeleteTo delete a track proceed as follows.
Open the Select track to be deleted dialog via Recorder > Delete track.

SMAVIA Viewing Client
www.dallmeier.com 56
Abb. 6-6
Select the required track. Click Delete. Click Finish in order to close the dialog.
Multiple tracks can be deleted at once. Select multiple tracks with the “Shift” or “CTRL” key.
6.4.2 Start / StopRecordings on the device can completely (all tracks) or for each track started and stopped.
Start / Stop Recording Of All TracksIn order to stop all recordings on the device proceed as follows.
Click Recorder > Stop recording (all tracks).
In order to restart all recordings on the device proceed as follows.
Click Recorder > Start recording (all tracks).
If all recordings are stopped by the SMAVIA Viewing Client function “Stop recording (all tracks)” the complete track recording can only be resumed by the SMAVIA Viewing Client function “Start recording (all tracks)”.
Stop Recording Of A Single TrackIn order to stop a recording of a single track proceed as follows.
Open the Stop recording temporarily (single track) dialog via Recorder > Stop re-cording (single track).
Abb. 6-7
Select the required track.

SMAVIA Viewing Client
www.dallmeier.com 57
Click OK.
The recording of the track is stopped.
Start Recording Of A Single TrackIn order to stop a recording of a single track proceed as follows.
Open the Start recording temporarily (single track) dialog via Recorder > Start re-cording (single track).
The Start recording temporarily (single track) dialog is displayed.
Select the required track. Click OK.
The recording of the track is started.
- Manuals
- Brands
- dallmeier Manuals
- Server
- SMAVIA appliance VideoNetBox II
- Commissioning
-
Contents
-
Table of Contents
-
Bookmarks
Quick Links
Commissioning
English
Appliance
VideoNetBox II
P R E L O A D E D
004707 / Rev. 1.0.2 / 2014-03-13
Related Manuals for dallmeier SMAVIA appliance VideoNetBox II
Summary of Contents for dallmeier SMAVIA appliance VideoNetBox II
-
Page 1
Commissioning English Appliance VideoNetBox II P R E L O A D E D 004707 / Rev. 1.0.2 / 2014-03-13… -
Page 2: Warranty
General Validity This documents applies to the SMAVIA appliance VideoNetBox II. It has been created in connection with version 8.11.3 of the software SMAVIA Recording Server. Documentation • Data Sheet — information on technical specifications and features (for trained system integrators) • Commissioning — instructions for mounting and commissioning (for trained system integrators) • Configuration — instructions for the configuration of the software (for trained system integrators) • Main Functions — instructions for the operation of basic software functions (for operators without special knowledge) • Operation — instructions for the operation of all software functions (for operators without special knowledge) • Service — instructions for maintaining and cleaning (for trained system integrators) Conventions • Instructions are indicated with this arrow ►.
-
Page 3: Safety Instructions
Safety Instructions Only use the unit if it is technically in proper working condition and for the intended purpose while keeping safety and potential dangers in mind. • Qualified Personnel The installation, mounting, connection, commissioning and configuration of the unit may only be carried out by qualified personnel. This also applies to the maintenance, testing and repair, whereat the regulations of the DIN VDE 0701 series of standards (repair, modification and inspection of electrical appliances) have to be followed. • Regulations The use of video and audio surveillance systems is, in general, strictly regulated. Inform yourself about the currently valid laws and regulations regarding data, worker and environmental protection before using the unit and ensure compliance with them. • System Components Only use internal components that have been tested and approved by Dallmeier. Inappropriate internal components can cause malfunctions, damages and data loss and can result in the loss of warranty. • Modifications Do not make any modifications to the hardware or software that has not been tested and approved by Dallmeier. Inappropriate modifications can cause malfunctions, damages and data loss and can result in the loss of warranty. • Documentation Read the documents included in the delivery carefully and thoroughly. Always observe the contained instructions, notes and warnings. The product documentation contains several documents which are included in the delivery in printed form and/or on a digital medium. Store all documents in legible condition in a suitable location in order to provide for later consultation. • Condensation Water If the device is brought from a cold to a warm environment, resulting condensation water may cause malfunctions and damages. In this case, wait (up to 8 hours) until the device has reached room temperature before commissioning. • Earthing & Equipotential Bonding For the safety of persons (protection against dangerous contact voltages) and devices (protection against over-voltages) and…
-
Page 4: Ambient Conditions
• steam or oil vapours (e.g. kitchen) • unsuitable ambient temperatures • insufficient ventilation (e.g. closed cabinet) • direct sunlight • sources of strong heat dissipation (e.g. radiator) • sources of strong radiation (e.g. radio transmitter, magnetic field) • corrosive surrounding (e.g. gas, salt water) Stand-alone operation The appliance is designed for stand-alone operation. It can usually be set up and operated at any place that meets the requirements above. In addition, observe the following requirements and notes: Computer room This appliance is not designed for the use in a computer room as defined in the US fire protection regulation “Standard for Protection of Electronic Computer/Data Processing Equipment, ANSI/NFPA 75”. Secured room Risk of manipulation and sabotage. A stand-alone installation should be operated in secured rooms with restricted access only. Socket outlet The used socket outlet has to be installed near the appliance. It has to be easily accessible. Hard disk drives Appliances that have been ordered with hard disk drives can be mounted, connected and commissioned directly. Appliances that have been ordered without hard disk drives must be equipped with one 2.5» hard disk drive at least. Note that • all mounted hard disk drives have to be tested and released for mounting by Dallmeier (HDD whitelist in the Partner Forum)! • all mounted hard disk drives do not have to be formatted or partitioned! • the HDD holder 1 on the left side has to be used if only one hard disk drive is mounted! www.dallmeier.com…
-
Page 5: Hdd Mounting
► Insert the HDD-1 completely into the guidances of the HDD slot 1. ► Proceed as described in order to mount the HDD-2, if necessary. ► Finally put the cover on the housing. ► Close the cover using the 6 housing screws. NOTE During the fi rst start various messages can be displayed. ► Observe the given instructi ons and confi rm the messages. ► Note the appropriate Confi gurati on documentati on. ► Load the Default System Parameters as fi rst step of the confi gurati on. www.dallmeier.com…
-
Page 6
Mounting The VideoNetBox II is designed for vertical mounting on a wall. As an option it can be mounted on an horizontal surface or on a ceiling. ► Ensure a stable mounting surface. ► Ensure a horizontal or vertical mounting surface. ► Ensure 10 cm (4.0») of free space at the left and right side. ► Use the drilling template or the housing feet as guidance. ► Mark 4 drill holes. ► Drill 4 holes, appropriate for the designated anchors / screws. ► Use proper anchors, appropriate for the condition of the mounting surface. ► Mount the appliance with 4 screws. ► Connect the appliance as described on the following pages. ► Commission the appliance as described on the following pages. www.dallmeier.com… -
Page 7
Dimensions 230 mm (9.0») 95 mm (3.6») 150 mm (5.9») 280 mm (11.0») 100 mm (3.9») 256 mm Ø 4 mm (10.1») (0.2») Dimensions W × H × D 230 × 95 × 150 mm / 9.0» × 3.6» × 5.9» (without feet) 280 × 100 × 150 mm / 11.0» × 3.9» × 5.9» (with feet) www.dallmeier.com… -
Page 8
(optional, only with Analog Upgrade Kit) Fuse for 12 V DC OUT USB Interface 5 × 20 mm, type F, 3.15 A 4× USB 2.0, type A Serial Interface COM 1 Serial Interface COM 2 D-SUB, 9 pins, 1× RS232 2 pins on Weidmüller 20 pins, 1× RS485 Half Duplex (for Dallmeier PTZ dome) Video OUT Mini-D-SUB Relay OUT (1 and 2) Mini-D-SUB, 15-pole, 1920 × 1080 Weidmüller socket, 4 pins, max. 12 V DC / 24 V AC / 0.5 A, (for configuration, LocalViewing optional) 150 mOhm Audio OUT Contact IN global (1 - 4) 3.5 mm phone jack, 1 kOhm, 2.828 V Weidmüller socket, 4 pins, only for switch / push button… -
Page 9
Assignment Assignment Assignment Camera 1 Camera 6 GND 3 Camera 2 Camera 7 GND 4 Camera 3 Camera 8 GND 5 Camera 4 GND 1 GND 6 Camera 5 GND 2 GND 7 + 8 Audio IN (U) Assignment Assignment Assignment Audio 1 Audio 6 GND 3 Audio 2 Audio 7 GND 4 Audio 3 Audio 8 GND 5 Audio 4 GND 1 GND 6 Audio 5 GND 2 GND 7 + 8 www.dallmeier.com… -
Page 10
The user interface is displayed in the initial state after the start is complete. Login In the initial state it is possible to login without a password. The rights of the Administrator group are valid. Note that the definition of the passwords and of the network parameters are necessary for remote access (SMAVIA Viewing Client). ► Drag the mouse pointer to the lower screen edge. The task bar with the LOGIN button is displayed. ► Click the LOGIN button. The Recorder login dialogue is displayed. ► Click Later to login without changing a password. The configuration interface is displayed. ► Observe the appropriate Operation and Configuration documentations. www.dallmeier.com… -
Page 11
(SMAVIA Viewing Client). ► Observe the documentation Operation for the software PService. ► Start the software PService. ► Scan the network and select the appliance in the displayed list. ► Open the context menu with a right-click and select NetConfig3. The dialog NetConfig3 is displayed with the basic data of the appliance. ► Enter the serial number (e.g. DAV7-12345678) as Password. ► Confirm with Login. The configuration interface is compressed for slow network connections before transmission if the Slow Network check-box is activated. The configuration interface is displayed. ► Observe the appropriate Configuration documentation. www.dallmeier.com… -
Page 12
Dallmeier electronic GmbH & Co.KG Cranachweg 1 93051 Regensburg Germany www.dallmeier.com info@dallmeier.com All trademarks identified by ® are registered trademarks of Dallmeier electronic. www.dallmeier.com…
Обзор SMAVIA-Viewer (автоматический перевод)Средство просмотра SMAVIA является бесплатным программным обеспечением просмотра для независимой оценки резервных копий. Средство просмотра SMAVIA может быть выполнено в системах с Windows XP / 7 / 8 операционных систем. Основные функции: — Воспроизведение и оценка резервных копий. — Обширные поисковые функции. |
Обнови Софт рекомендует использовать программу SMAVIA-Viewer в соответствии с правилами интеллектуальной собственности. Обнови Софт не рекомендует использовать кряк, серийник, ключ, keygen, crack, serial для SMAVIA-Viewer
Самые популярные программы категории Безопасность / Менеджеры паролей
Другие программы компании Dallmeier electronic GmbH & Co.KG