- Manuals
- Brands
- Snom Manuals
- IP Phone
- D735
- User manual
-
Contents
-
Table of Contents
-
Troubleshooting
-
Bookmarks
Quick Links
User Manual
IP Phone D735
Related Manuals for Snom D735
Summary of Contents for Snom D735
-
Page 1
User Manual IP Phone D735… -
Page 2: Table Of Contents
TABLE OF CONTENTS Copyright, Trademarks, GPL, Legal Disclaimers …………7 Important information ………………….8 Safety instructions ……………………. 8 Standards conformance ………………….8 Product specifications ………………….9 Disposal of the device ………………….9 Cleaning ………………………. 9 Setting up the phone …………………. 10 Delivery Content ……………………10 Attaching and detaching the footstand …………….10 Wall mounting ……………………11 Rotating the tab of the cradle …………………11…
-
Page 3
Settings ………………………28 Phone settings …………………….28 Settings available in administrator mode …………29 Settings available in user mode …………….30 Display settings …………………..31 Adjusting the backlight on the phone’s display ……….31 Adjusting display settings for connected D7s ……….32 The phone’s web interface …………………34 Opening the web interface ……………..35 How the web interface works …………….36 User mode/administrator mode ………………37… -
Page 4
Using different audio devices ………………48 Handset ……………………48 Headset ……………………48 Speakerphone …………………..48 Handset or headset and casing speaker …………48 Using different dialing methods ……………….49 Auto dial …………………….49 Redialing ……………………49 Calling number from call history (missed, received, dialed calls) ….49 Calling number from phone directory …………..49 Calling number from external directory …………49 Speed dialing ………………….50 Calling emergency numbers …………….50… -
Page 5
Configuring the function keys ………………67 Function key types on Snom phones …………….67 Function key page of phone’s web interface …………..69 Programming the function keys ………………71 Function key settings on the phone …………….71 Function key settings on the web interface ……………73 Selected examples for function key programming …………74… -
Page 6
Reset to factory values ………………… 101 TFTP Update ……………………101 Manual initialization ………………….101 Contacting Snom Support ………………..102 Traces ……………………… 102 Appendix 1 — Display Symbols and Icons …………..104 Symbols found in the function key line …………….. 104 SmartLabel function symbols ……………… -
Page 7: Copyright, Trademarks, Gpl, Legal Disclaimers
Snom therefore disclaims all warranties and liability for the accurateness, completeness, and currentness of the information published, except in the case of intention or gross negligence on the part of Snom or where liability arises due to binding legal provisions.
-
Page 8: Important Information
If the phone is not supplied with power via an Ethernet cable, use only a power adapter expressly recommended by Snom Technology (see «Product specifications» on page 9). Other power supplies may damage or destroy the phone, affect its behavior, or induce noise.
-
Page 9: Product Specifications
Power: Power over Ethernet (PoE), IEEE 802.3af, Class 2. If PoE is not available, one of the following power adapters (not included in delivery) can be ordered separately: ◦ EU: Snom power adapter A6, Phihong model PSM10R-050, Snom PN 00004325 ◦ US: Snom power adapter A6, Snom PN 00004326 ◦…
-
Page 10: Setting Up The Phone
D735 User Manual Setting up the Phone etting up the phone elivery Content Quick Installation General Public License Guide D735 Base phone unit Footstand Handset Handset cord Ethernet cable Quick Installation Guide, GNU General Public Licence ttaching and detaching the footstand The footstand can be attached at two different angles: 46°…
-
Page 11: Wall Mounting
D735 User Manual Setting up the Phone 3. Plug the short end of the handset cord into the connector on the handset. 4. Place the phone on an even, horizontal surface. all mounting See «Appendix 3 — Wall Mounting» on page 110.
-
Page 12: Connecting The Phone
D735 User Manual Setting up the Phone onnecting the phone (2, 3) (2, 3) (2, 3) (1, 2) (2, 3) If PoE not available Not included in delivery Optional The phone can be operated with Power over Ethernet (PoE) provided via the network cable or, if PoE is not avaible in your network, with the separately available 5V DC power adapter (see «Product…
-
Page 13: Connecting A Headset
1. Connect the plug labeled D3xx/D735 on the 2xRJ12 cable that came with the Snom EHS Adapter to the jack marked EHS on the D735, and the plug labeled EHS box to the Snom EHS Adapter’s RJ12 jack. For more information, see the illustrated EHS Advanced Quick Installation Guide at http://wiki.snom.com/Accessories/Documentation.
-
Page 14: Initializing And Registering The Phone
For more information, see «Identities/accounts» on page 86. Initialization Snom phones are plug-and-play. Once the phone is connected to your network, it will begin to initialize. Note: Normally the initialization is completely automatic, using DHCP. If the phone…
-
Page 15
D735 User Manual Setting up the Phone 2. Next, you will be prompted in the language of your choice to select a time zone. This affects the time shown on your display. Fig. 1 Fig. 2 Fig. 3 ◦ Press , respectively, on the navigation key to move up or down the list one item at a time;… -
Page 16
D735 User Manual Setting up the Phone ◦ Press to save the selected country’s tone scheme. 4. The display shows the «Welcome» screen. Press any key to log on. 5. Enter the account number and save with Note: See «Entering numerals, letters, special characters, and symbols» on page 24 on how to enter numbers and letters. -
Page 17: What To Do If Initialization And Registration Are Unsuccessful
What to do if initialization and registration are unsuccessful Your network or your VoIP provider may require more login data than requested by the Snom phone during the initialization and registration process. This data is entered on the web interface of the phone.
-
Page 18: Getting To Know Your Phone
Press the function key underneath the display to show phone’s IP address and URL to Snom’s Wiki symbol to activate the function, open the list etc. depicted by the symbol above the key.
-
Page 19
D735 User Manual Getting to Know Your Phone Audio control keys Adjusting the volume ◦ of the ringer when the phone is idle or ringing ◦ of the handset/casing loudspeaker when in a call Mute/unmute microphone Toggling between handsfree and handset mode. Press to dial number and accept calls on speakerphone. -
Page 20: Led Indicators
D735 User Manual Getting to Know Your Phone ED indicators Call indicator The bright-red LED situated on the top right corner of the phone indicates incoming, ongoing, held, and missed calls. LED status indications: • Blinking rapidly when a call is coming in.
-
Page 21: Hard Keys
D735 User Manual Getting to Know Your Phone ard keys Context-sensitive, programmable function keys These function keys can be programmed on the Function Keys page of the phone’s web interface with a number of key events; these functions will then be available when the phone is in idle mode. For more information, see «Configuring the function keys»…
-
Page 22: Audio Control Keys
D735 User Manual Getting to Know Your Phone Hold key. See «Hold» on page 55 for further information. Turn «do not disturb» (DND) mode on and off for all identities registered on the phone (Fig. 1). If you want to turn on DND for one or more, but not all of the identities (Fig. 2), use the Configuration identity settings on the phone’s web user interface.
-
Page 23: Alphanumeric Keypad
D735 User Manual Getting to Know Your Phone Conference See «Conference» on page 56 for more information. Smart transfer Silent mode Turns off the phone’s ringer; red LED lights up. Press again to turn it back on; LED turns off.
-
Page 24: Entering Numerals, Letters, Special Characters, And Symbols
D735 User Manual Getting to Know Your Phone Entering numerals, letters, special characters, and symbols When entering letters and special characters, pause briefly after each character until the cursor has moved forward so that you won’t overwrite the last character you entered. Pausing is not necessary when entering numerals.
-
Page 25: Display Layout
D735 User Manual Getting to Know Your Phone isplay layout In idle mode Info/status bar Smart Confi gured identities Smart labels labels Function key line Context-sensitive function key symbols Fig. 1 When active Showing SmartLabels Not showing SmartLabels Info/status bar…
-
Page 26
D735 User Manual Getting to Know Your Phone Deleting or temporarily suppressing status messages: ◦ Messages will be deleted automatically when the underlying cause is removed, i.e., call forwarding is turned off, HTTP password is set, etc. ◦ Temporarily suppressing messages: Press , if the button is available, or >… -
Page 27: When The Phone Is Active
D735 User Manual Getting to Know Your Phone Function key line The symbols on the buttons in this line depict the functions that can be activated by pressing the function key underneath the respective symbol. See «Appendix 1 — Display Symbols and Icons» on page 104 for a complete list.
-
Page 28: Settings
D735 User Manual Getting to Know Your Phone navigation key you can increase the size of the SmartLabels from the default «short» display mode (Fig. 2) to «full» (Fig. 3); the display will revert to «short» display mode after three seconds.
-
Page 29: Settings Available In Administrator Mode
D735 User Manual Getting to Know Your Phone Settings available in administrator mode All settings of the phone menu and on the phone’s web interface are accessible. 1 Preferences 2 Call Features 3 Identity 4 Network 5 Maintenance 6 Information…
-
Page 30: Settings Available In User Mode
D735 User Manual Getting to Know Your Phone Settings available in user mode 1 Preferences 2 Call Features 3 Identity 4 Maintenance 5 Information 1 Select outgoing 1 Language 1 Security 1 Status info Call forwarding identity 1 Administrator 2 Date & Time…
-
Page 31: Display Settings
D735 User Manual Getting to Know Your Phone Display settings The backlight on the display of the phone and on the displays of the connected expansion modules can be adjusted separately for the times when the phone is active and when the phone is idle. The backlight when idle can be reduced to zero bars.
-
Page 32: Adjusting Display Settings For Connected D7S
D735 User Manual Getting to Know Your Phone Adjusting display settings for connected D7s You can adjust the intensity of the display’s backlight, the display contrast, and the font size of the function key labels for the connected D7 expansion modules. The label layout can be adjusted for each D7 separately.
-
Page 33
D735 User Manual Getting to Know Your Phone 6. Select Font size (line layout) or Font size (tile layout), respectively, and press 7. Use the alphanumeric keypad to enter the font size. Press the function key underneath to delete the character to the left of the cursor if you need to correct your input. -
Page 34: The Phone’s Web Interface
D735 User Manual Getting to Know Your Phone The phone’s web interface When the web interface is opened for the first time upon initialization, you will see the Security page. We urge you to set administrator and HTTP passwords to protect your phone. The default administrator password is 0000 (4 zeros);…
-
Page 35: Opening The Web Interface
D735 User Manual Getting to Know Your Phone symbols» on page 24). Write the password down and store it in a safe place! ◦ HTTP user name and password. Enter the data in the text fields of the HTTP Server section and click Apply.
-
Page 36: How The Web Interface Works
D735 User Manual Getting to Know Your Phone How the web interface works The vertical menu on the left side of the window is always the same, no matter which window happens to be open at the time. Available menu items depend on whether the phone is running in user or administrator mode.
-
Page 37: User Mode/Administrator Mode
Getting to Know Your Phone ser mode/administrator mode Snom phones can be operated in administrator or user mode. In administrator mode, all settings are accessible and can be modified; in user mode, a number of settings are not accessible. The factory default is administrator mode.
-
Page 38
D735 User Manual Getting to Know Your Phone Fig. 1 Fig. 2 To return the phone and its web interface to administrator mode, open the Advanced Settings page, enter the administrator password in Administrator Login and click on Apply (Fig. 2). The default password is 0000 (4 x zero). -
Page 39: Directories
D735 User Manual Directories irectories irectory The directory is the built-in directory of the phone. It can hold up to 1000 entries. Entries can be added and edited on the phone and on the web interface. Any changes you make on the web interface will not take effect until you click on «Save» or on «Apply»…
-
Page 40: Contact Types
D735 User Manual Directories Contact Types VIP: Calls from numbers with this contact type will ring on your phone even when DND mode is active. You can assign a ringtone to this contact type. If your VIP is also assigned to a group (see below) and if that group has a distinct ringtone, the ringtone assigned to the group will be played.
-
Page 41: Adding/Editing Entries On The Phone
D735 User Manual Directories Adding/Editing Entries on the Phone Adding new entry manually 1. Press to open the phone’s directory. 2. Press the function key underneath Note: See «Input modes and navigation» and «Entering numerals, letters, special characters, and symbols» on page 24 for information on how to enter data.
-
Page 42: Adding Current Caller
D735 User Manual Directories Adding current caller With the call on the line, you can add the caller’s name (if transmitted) and phone number to the directory. If the name has not been transmitted, the number will be used for both name and number.
-
Page 43: Deleting An Entry
D735 User Manual Directories Deleting an entry 1. Press to open the phone’s directory. 2. Selecting an entry: Scroll to the entry or enter the first letter of the name. (Fig. 1) and continue with step 4, below. 3. If you want to delete the entry, press Fig.
-
Page 44: Adding/Editing Entries On The Web Interface
D735 User Manual Directories Adding/editing entries on the web interface Click on Directory in the menu on the left side. Adding new entry 1. Type data in text fields of Add or Edit Entry. ◦ Number: Type the number exactly as you would dial it, with country and area codes, if necessary, and without parentheses, hyphens, blank spaces.
-
Page 45: Editing An Entry
D735 User Manual Directories Editing an entry When you open an existing entry, the current information is displayed in the text fields of «Add or Edit Entry» and two additional buttons, «Add Sub» and «Change», are available (see Fig. 2 and 3, below).
-
Page 46: Deleting Entry On Web Interface
Dialing from phone directory To dial, click on the phone symbol on the right side of the line with the phone number. Deleting whole directory Deletes the entire directory irretrievably! Importing/Exporting Directory See our Wiki at http://wiki.snom.com/Web_Interface/V8/Directory.
-
Page 47: External Directories
D735 User Manual Directories xternal directories Available if provided by your network, your VoIP provider, or another external source. LDAP Enter the necessary data received from your administrator, VoIP provider or other external source in the text fields of the phone‘s web interface > Advanced Settings page > Network tab > LDAP section and click on «Apply»…
-
Page 48: Using The Phone
D735 User Manual Using the Phone sing the phone This section describes the functions of the phone with the factory default settings. If your phone was installed and/or set up by someone else, the default settings may have been changed. Please check with that person or company if the phone does not react as described here.
-
Page 49: Using Different Dialing Methods
D735 User Manual Using the Phone Using different dialing methods Auto dial When the setting is enabled, the phone will dial the number on the display when the specified number of seconds has elapsed since the last digit was typed.
-
Page 50: Speed Dialing
Call completion Note: This function depends on whether it is available in your network or not. On Snom phones call completion means that when a called number is busy or not available, you can have your phone call you back as soon as the dialed number is not busy anymore or available again.
-
Page 51: Number Guessing (Auto Completion)
D735 User Manual Using the Phone 2. Press if you wish to dial another number while waiting for call completion (Fig. 2). You can now hang up the handset to return to the idle screen (Fig. 3); use handset, headset, or speakerphone to dial another number;…
-
Page 52: Accepting Calls
D735 User Manual Using the Phone ccepting calls Using different audio devices Handset: Pick up the handset. Headset: Press . If the phone is already in headset mode, you can also press the blinking line key. Speakerphone: Press orthe blinking line key.
-
Page 53: Call Waiting
D735 User Manual Using the Phone When these prerequisites are met, the status of the monitored extension is indicated by the LED of the function key: ◦ Blinking LED: Incoming call ringing. If the call is not answered, press the key to pick it up;…
-
Page 54
D735 User Manual Using the Phone Fig. 5 Fig. 6 Fig. 7 When a call is waiting, you have the following options: • Press the blinking line key of the call waiting to put your current call on hold and to accept the second call without knowing who is calling (Fig. -
Page 55: Active Calls
D735 User Manual Using the Phone ctive calls Hold One call on hold Press to put the ongoing call on hold. Held calls are indicated threefold: ◦ By the text on the display. ◦ By the slowly blinking line key.
-
Page 56: Conference
D735 User Manual Using the Phone • In Fig. 4–6 there are two calls on hold. Fig. 5 and 6 both show the second held call, in short label display mode (Fig. 5) and in full label display mode (Fig. 6). Press the function keys underneath to show the call not currently on screen.
-
Page 57: Transferring Calls
D735 User Manual Using the Phone Fig. 2 Fig. 3 Fig. 4 • Selecting individual participants. ◦ On the conference screen (Fig. 2), press to select the first of the participants of the conference; press again to select the next one of the participants (Fig. 3).
-
Page 58
D735 User Manual Using the Phone Fig. 1 Fig. 2 Fig. 3 2. Dial the number you want to transfer the call to and announce the call (Fig. 2). You can also select a number from the internal or one of the available external phone directories (see «Calling number from phone directory»… -
Page 59: Blind Transfer
D735 User Manual Using the Phone Blind transfer • Blind transfer of active call 1. With a call on the line (Fig. 8), press . The dial screen will appear. Fig. 8 Fig. 9 2. Dial the number (Fig. 9), or press to select a number from the internal or one of the available external phone directories (see «Calling number from phone directory»…
-
Page 60: Terminating Calls
D735 User Manual Using the Phone • Blind transfer of ringing call 1. With a call ringing (Fig. 12), press Fig. 12 2. The dial screen (Fig. 9, above) appears. 3. Enter the number of the third party you intend to transfer the call to and press erminating calls •…
-
Page 61: Call Lists
D735 User Manual Using the Phone ◦ Via the Status info screen. 1. Press , if available (Fig. 1), or open the Settings menu > Information > Status Info to view the status info messages. 2. Press the function key underneath to delete the «Missed»…
-
Page 62: Locking And Unlocking The Keyboard
D735 User Manual Using the Phone ◦ Press to delete the selected call. ◦ Press to delete the entire list. ◦ Press for three seconds to return to idle screen. ◦ Press to sort the calls. ◦ Press to show the call details of the selected call.
-
Page 63: Automatically
D735 User Manual Using the Phone ◦ Press for two seconds to reject the call and additionally place the caller on the «Deny» list of the phone’s directory so that calls from that number will never ring on your phone; the caller will always hear the busy signal.
-
Page 64: Call Forwarding
D735 User Manual Using the Phone Fig. 1 Fig. 2 6. Press for two seconds to return to the idle screen. all forwarding The phone can be set to forward incoming calls, either always or under certain conditions. The settings can be done on the phone and on the web interface. For further information on using the web interface for these settings, see «Call forwarding»…
-
Page 65: Making/Changing The Settings On The Phone And Turning On Call Forwarding
D735 User Manual Using the Phone Scrolling line Fig. 4 – Forwarding all calls Fig. 5 – Forwarding when busy Fig. 6 – Forwarding when call has not been answered after time set in seconds Making/changing the settings on the phone and turning on call forwarding…
-
Page 66: Turning Forwarding Of All Calls On/Off With A Function Key
D735 User Manual Using the Phone Press Forward All Forward when Busy Forward after Timeout Press Enable forwarding Enable forwarding Enable forwarding The setting will change from on to off, and the settings for the forwarding target and, in the case of timeout, for the time span will disappear.
-
Page 67: Configuring The Function Keys
Snom has therefore designed the function keys to be programmable, even the preprogrammed «hard keys» whose default function is printed on them.
-
Page 68
D735 User Manual Configuring the Function Keys other module of the same type is connected to the phone. They are not visible on the function keys page when no expansion module is connected. Settings descriptions: ◦ Context This setting specifies which configured identity will be used when executing the functionality of the key. -
Page 69: Function Key Page Of Phone’s Web Interface
D735 User Manual Configuring the Function Keys If the LP feature of a key has been disabled, use the Preferences menu to access the key’s configuration menu. See «Function key settings on the phone» on page Fig. 1 Fig. 2 unction key page of phone’s web interface The page has two subpages;…
-
Page 70
D735 User Manual Configuring the Function Keys Fig. 3 — Short labels P9 – P12 Fig. 4 — Short labels P13 – P15 Fig. 5 — Full Labels P9 – P12 Fig. 6 — Full Labels P13 – P16 When expansion modules are connected to the phone, they will also be shown on the function key page of the phone’s web interface, below the phone’s function keys and above the Apply button. -
Page 71: Programming The Function Keys
D735 User Manual Configuring the Function Keys 2, Extension monitoring and call pick-up on D7 expansion module» on page 77 and the D7 user manual available at http://wiki.snom.com/Snom_D7/Documentation. Fig. 7 — Function keys of connected D7 expansion module rogramming the function keys The freely programmable function keys on the phone and on all connected expansion modules can be mapped on the phone and on the phone’s web interface.
-
Page 72
D735 User Manual Configuring the Function Keys Fig. 6 Fig. 7 Fig. 8 5. The default for Context is Active, i.e., all configured identities whose status is «active» (Fig. 6). a. If you want to restrict the functionality to a configured identity, select Context and press . -
Page 73: Function Key Settings On The Web Interface
D735 User Manual Configuring the Function Keys Fig. 15 Fig. 16 11. Select Short Label Mode (Fig. 15) and press 12. Specify the content you want the label to display by scrolling to the respective line (Fig. 16) and to save and return to the Key 17 Function menu (Fig. 15). The default is icon and text;…
-
Page 74: Selected Examples For Function Key Programming
D735 User Manual Configuring the Function Keys Fig. 2 1. On the phone’s web interface, click on Function Keys in the menu on the left. When the page is opened, the Key Assignment page is on-screen, as indicated by the bold font of its tab (Fig. 1). The four types of programmable function keys can be configured on this page.
-
Page 75: Example 1, Extension Monitoring And Call Pick-Up
D735 User Manual Configuring the Function Keys Example 1, Extension monitoring and call pick-up This feature makes it possible to pick up a call ringing on another extension registered at the same registrar, for example when the other extension is busy or when the user is absent. The prerequisites for this function are: ◦…
-
Page 76
D735 User Manual Configuring the Function Keys Page key Proximity sensor Move hand or object over sensor to switch from default to alternative SmartLabel display mode. See «Display options for SmartLabel keys» on page 81 for more information. Fig. 1 Fig. -
Page 77: Example 2, Extension Monitoring And Call Pick-Up On D7 Expansion Module
D735 User Manual Configuring the Function Keys Example 2, Extension monitoring and call pick-up on D7 expansion module • All functions available on the freely programmable LED function keys of the phone are available on the connected D7. • The prerequisites are the same as those for the LED function keys on the phone. See «Example 1, Extension monitoring and call pick-up»…
-
Page 78: Example 3, Speed Dialing
D735 User Manual Configuring the Function Keys Example 3, Speed dialing Besides using the Speed Dial page on the web interface to program speed dial numbers, you can also put the functionality on the freely programmable function keys with LEDs on the phone or a connected expansion module.
-
Page 79
D735 User Manual Configuring the Function Keys Page key Proximity sensor Move hand or object over sensor to switch from default to alternative SmartLabel display mode. See «Display options for SmartLabel keys» on page 81 for more information. Fig. 1 Fig. -
Page 80: Example 4, Changing Setting Of Context-Sensitive Key
D735 User Manual Configuring the Function Keys Example 4, Changing setting of context-sensitive key You can select a different key event to be available on the four keys under the display when the phone is in idle mode. You cannot change the functions that are available when the phone is active, for example when you are in a call, when the phone is ringing, etc.
-
Page 81: Display Options For Smartlabel Keys
D735 User Manual Configuring the Function Keys isplay options for SmartLabel keys A number of settings control the appearance of the SmartLabels on the display; they can be set on the phone and on the phone’s web interface. There are separate settings for the idle screen, call screens, and other screens.
-
Page 82
D735 User Manual Configuring the Function Keys Fig. 1 Fig. 2 5. Select Idle Screen Behavior, Call Screen Behavior, or Other Screen Behavior and press . The bold italic default settings are indicated in in the table. The available options for the three… -
Page 83: Timer Setting For Returning Display Mode To Default
D735 User Manual Configuring the Function Keys Fig. 7 Fig. 8 Fig. 9 b. Use the navigation key to select Proximity sensor (Fig. 9). c. Press to save and return to the Screen Behavior menu where the line underneath Alternative display trigger now reads Proximity (Fig. 10).
-
Page 84
D735 User Manual Configuring the Function Keys 1. Press -> Preferences -> Display -> Primary display (if there is at least one connected expansion module) -> SmartLabel options. 2. Select Return to first page (Fig. 14) and press . The preset default is 60 seconds (Fig. 15). -
Page 85: Settings On The Web Interface
D735 User Manual Configuring the Function Keys Settings on the web interface 1. On the phone’s web interface, click on Function Keys in the menu on the left. 2. Click the SmartLabel tab. bold italic 3. The default settings are indicated in in the table.
-
Page 86: Customizing The Phone Settings
If you want more information on a web interface setting, click on the radio button with the question mark that you see to the right of each item. It links to a page on Snom’s Wiki with detailed information about that particular item.
-
Page 87
D735 User Manual Customizing the Phone Settings On the web interface Open the web interface and click on an identity in the menu on the left. The configuration window for that identity will open; it contains four tabs, with the left one, Login, visible in the front. To view SIP, NAT, and RTP pages, click on the respective tab;… -
Page 88: Assigning Ringtones
D735 User Manual Customizing the Phone Settings Assigning ringtones The phone has 10 built-in ringtones that can be assigned to identities, group types, and the contact type «VIP». It is also possible to download a custom melody. When an incoming call to an identity is ringing, the phone will play the ringtone assigned to that identity, unless it is a call from a VIP or from a group with a distinctive ringer of their own.
-
Page 89: Date And Time Formats
D735 User Manual Customizing the Phone Settings ate and time formats Date and time formats can be set on the phone and on the web interface. The defaults are US time format and 24-hour clock (Fig. 1 and 2). European date and time formats are shown in Fig. 3 and 4, US date and time formats in Fig.
-
Page 90: Time
D735 User Manual Customizing the Phone Settings 3. Press briefly to return to the previous menu or for two seconds to return to the idle screen. • Web interface settings. 1. Open the Preferences page > General Information section > US Date Format. The default is «on».
-
Page 91: Language Settings Of Phone And Web Interface
D735 User Manual Customizing the Phone Settings On the phone > Preferences > Date & Time > Time Zone. 1. Press Fig. 1 Fig. 2 ◦ Press to collapse the list to show only selected times zones and/or locations where the phone language is spoken).
-
Page 92: Web Interface Language
D735 User Manual Customizing the Phone Settings Setting on the web interface 1. Open Preferences > General Information > Language. 2. Select the language from the drop-down list. 3. Click on Apply and Save. Web interface language 1. Open Preferences > General Information > Web interface language.
-
Page 93: Call Forwarding
D735 User Manual Customizing the Phone Settings all forwarding This feature automatically redirects all or certain incoming calls to another phone or a mailbox. Call forwarding is configured for each identity separately. On the web interface, the settings are configured on the Configuration identity (1-12) pages. If you set call forwarding on the phone, the settings are applied to the identity selected as the outgoing identity at the time of the configuration;…
-
Page 94: Call Completion
3. Click on Apply and Save. all completion On Snom phones call completion means that when a called number is busy or not available, your phone will call you back as soon as the dialed number is not busy anymore or available again. The factory default setting is «off».
-
Page 95: Call Waiting
D735 User Manual Customizing the Phone Settings all waiting Default setting: When in a call, another call coming in is announced visually in the status line and acoustically by a double beep. See «Call waiting» on page 53 on how to use this feature. Available settings: ◦…
-
Page 96: Hiding My Caller Id
D735 User Manual Customizing the Phone Settings Setting on the web interface Call waiting is set independently for each identity. 1. In the menu on the left, click on the identity whose call waiting settings you want to change. 2. Click on the SIP tab. The setting Call Waiting Indication is the second to last on the page.
-
Page 97: Rejecting Anonymous Calls
D735 User Manual Customizing the Phone Settings ejecting anonymous calls With this setting you will not receive calls from phones whose number is not shown on your display. Anonymous callers will hear the busy signal. Please note that calls from analog phone connections will, most likely, be received as anonymous calls.
-
Page 98: Speed Dial
D735 User Manual Customizing the Phone Settings Setting on the web interface This setting requires administrator mode. 1. Open Advanced Settings page > Behavior tab > Phone Behavior section > Number Guessing. 2. Select the radio button on. 3. Type the minimum number of digits in the text field of Number Guessing Minimum Length.
-
Page 99
D735 User Manual Customizing the Phone Settings 2. Enter one phone number with any required prefixes (area code, country code, operator/auto attendant, etc.) in the text field for each respective number or special character in the table. Type each phone number without spaces or punctuation between the digits. -
Page 100: Software Update
Software Update oftware update anual update 1. Open a browser and enter the address http://wiki.snom.com/Firmware. 2. Click on the type of phone to be updated. 3. Click on the firmware version currently running on your phone. 4. Right-click on the link of the firmware version you want to update to.
-
Page 101: Troubleshooting
D735 User Manual Troubleshooting roubleshooting eboot 1. Press 2. Select Maintenance and press 3. Select Reboot and press 4. When asked whether to «Reboot?», press 5. Wait for the idle screen to reappear. ard reboot Disconnect the power, wait for 10 seconds, and reconnect. Wait for the idle screen to reappear.
-
Page 102: Contacting Snom Support
Make sure to delete private and/or security-relevant data like the MAC address, public IP address, etc. races Snom Support may ask you to submit a SIP Trace and/or a PCAP Trace to help them analyze your problem. Performing a SIP Trace 1.
-
Page 103
D735 User Manual Troubleshooting 4. Click on Reload. 5. Copy the text and submit to Support in whatever form they requested you to use. If it is the public forum, make sure to delete private and/or security-relevant data like the MAC address, public IP address, etc. -
Page 104: Appendix 1 — Display Symbols And Icons
Turning DND on and off Contacts list Forwarding all calls (turning on/turning off) Presence signaling on/off Retrieving messages from mailbox Settings menu Directory IP address of phone and Snom’s web address Redial (dialed calls) Received calls Missed calls Favorites LDAP Directory Silencing ringer…
-
Page 105
D735 User Manual Appendix 1 Context-sensitive symbols These are the symbols displayed in the function key line when the phone is active, for example when a call is ringing, when you are dialing, etc. Confirming a selection or an action… -
Page 106: Smartlabel Function Symbols
D735 User Manual Appendix 1 martLabel function symbols These are the symbols displayed in the SmartLabel area of the programmable function keys P1–P32 when the function key page with the configured key is on-screen. For information on the configuration of the keys see «Configuring the function keys» on page 67.
-
Page 107
D735 User Manual Appendix 1 Contacts / Presence state Delete message Deny all — reject current and all future calls from the number Directory (internal phonebook) Push2Talk DND (turning on/turning off) (red symbol = DND is on) Favorites Forwarding all calls (turning on/turning off) -
Page 108: Display Indications
D735 User Manual Appendix 1 isplay indications On activity Outgoing call ringing Incoming call ringing Connected (single connection or conference) Call disconnected/terminated Dialed number is busy Holding call Call being held by other party On idle screen Outgoing identity •…
-
Page 109: Appendix 2 — Status Messages
D735 User Manual Appendix 2 ppendix 2 — Status Messages Whenever there is a current message concerning the status of the phone, the function key will be available. Press the function key or, if it not available, > Information > Status Info) to open the Status info screen.
-
Page 110: Appendix 3 — Wall Mounting
D735 User Manual Appendix 3 ppendix 3 — Wall Mounting Not included in the delivery are the two screws (diameter of head between 6 and 9 mm, diameter of body max. 4.5 mm) and two screw anchors/molly bolts/wall plugs appropriate for your type of wall.
-
Page 111: Appendix 4 — Programmable Functions
(Busy Lamp Field) incoming call ringing on your own extension. These functionalities depend on your PBX; for more information, please check snom’s interoperability page and the PBX manual. With Asterisk, generally use this feature rather than extension. Button This is a function key that is connected to your PBX to perform a task specified in the buttons document.
-
Page 112
These functionalities depend on your PBX; for more information, please check snom’s interoperability page and the PBX manual. With Asterisk, generally use BLF rather than this function. -
Page 113
D735 User Manual Appendix 4 This function key can be used for regular calls to an extension that is reached via an IVR or auto attendant and a number of voice prompts where the caller has to make a selection by pressing a key after or during the prompt. If you know which keys need to be pressed in which order in order to reach the desired extension, the entire process can be automated and considerably speeded up. -
Page 114
D735 User Manual Appendix 4 Presence If supported by your PBX, the LED of this function key will reflect the presence status (ringing, busy, available, etc.) of the extension specified in the «Number» text field. The function key can also be used to dial the extension, usually when the destination signals availability. -
Page 115: Key Events
FW versions lower than 8: Phone’s IP address, MAC address, and firmware version. FW 8 and higher: Phone’s IP address and the URI to Snom Wiki. IP address, MAC address, and firmware version can be found in Settings > 6 Information >…
-
Page 116
D735 User Manual Appendix 4 LDAP Directory Allows the user to look up a remote directory while dialing. Once set, this pressed key will open up the Direcory Search window. If LDAP is setup, corresponding matching entries as returned by the sever will be shown. If LDAP is not used and and presence_ lookup_number setting is turned on, the contact matches will be shown. -
Page 117: Appendix 5 — Gnu General Public License
Appendix 5 — GNU General Public License COPYRIGHT NOTICE AND WARRANTY We protect your rights with two steps: (1) copyright the software, and (2) offer you this license which gives you legal permission to copy, DISCLAIMER distribute and/or modify the software. Also, for each author‘s protection and ours, we want to make certain that everyone understands that there is no warranty for this free software.
-
Page 118
Appendix 5 the Program itself is interactive but does not normally print such an modify or distribute the Program or its derivative works. These actions announcement, your work based on the Program is not required to are prohibited by law if you do not accept this License. Therefore, by modifying or distributing the Program (or any work based on the print an announcement.) Program), you indicate your acceptance of this License to do so, and… -
Page 119
If requested by you, the complete corresponding source code of the 11. BECAUSE THE PROGRAM IS LICENSED FREE OF CHARGE, THERE Software can be sent by Snom Technology GmbH on a standard data IS NO WARRANTY FOR THE PROGRAM, TO THE EXTENT PERMITTED BY storage medium against the reimbursement of the manufacturing APPLICABLE LAW. -
Page 120
Tel. +886 2 8751 1120 Fax +44 169 348 7509 Fax +886 2 8751 1130 offi ce.uk@snom.com offi ce.tw@snom.com Your specialist retailer — Ihr Fachhändler — Votre distributeur — Su distribuidor — Il tuo rivenditore: © Snom Technology GmbH v1.01…
Характеристики
-
Свойства IP-телефонов
-
1 Гбит/с, Gigabit Ethernet
-
2 порта Ethernet, Поддержка PoE, HD звук
-
Программируемые BLF клавиши
-
Участников конференц-вызова
(чел.)
Описание
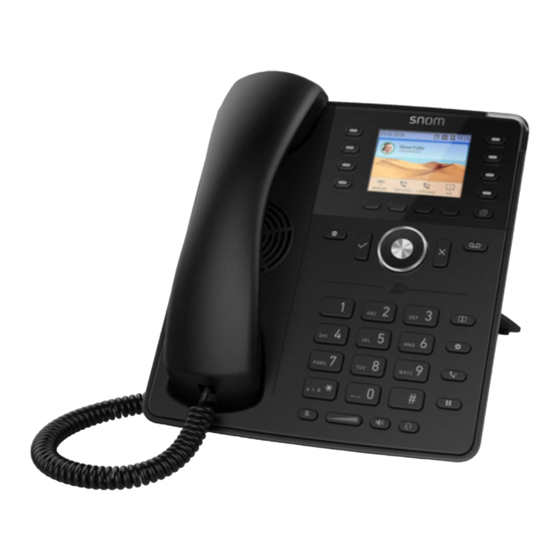
Snom D735 — премиальный SIP-телефон класса Enterprise, предназначенный для использования руководителями и секретарями (поддерживается до 12 SIP-аккаунтов, оснащен 32 клавишами быстрого набора с LED-подсветкой). Оснащен информативным дисплеем, портом USB и 2-мя гигабитными портами LAN с поддержкой PoE.
Технические характеристики Snom D735
Общая информация
- Цветной TFT дисплей 2.7”
- 32 программируемые клавиши (8 физических)
- Интерфейс пользователя на сенсорной технологии
- Улучшенное качество звука (за счет использования специального процессора)
- USB-порт
- Два угла наклона подставки: 46° и 28°
- Широкополосная громкая связь
- Совместимость с USB-гарнитурой
- Совместимость с модулем расширения D7
- Электронный переключатель Hook Switch (EHS) для беспроводных гарнитур
Особенности
- 12 идентификаторов / учетных записей SIP
- XML-браузер
- Списки вызовов для набранных, принятых и пропущенных вызовов
- Локальный каталог с 10000 записями
- Поддержка нескольких языков
- DTMF в полосе / вне полосы / SIP-INFO
- Совместимость со всеми основными платформами IP PBX
Функции вызова
- Быстрый набор
- Набор URL-адресов
- Собственный dial-plan
- Автоматический повторный набор при занятости
- Завершение вызова (занято / недоступно)
- Идентификация абонента
- Ожидание вызова
- Блокировка вызовов (список запретов)
- Автоматический ответ
- Удержание вызова
- Музыка на ужержании
- Трансферы слепой и сопровождением
- Переадресация вызова
- 3-полосная конференц-связь на телефоне
- Мониторинг внутренних линий, вызов
- Парк вызовов, вызов unpark
- Многоадресный пейджинг
- Режим DND (не беспокоить)
- Блокировка клавиатуры
- Код вопроса клиента (CMC)
Аудио
- G711 α-law, μ-law
- G.722 (широкополосный)
- G.726, G.729AB, GSM 6.10 (FR)
- Встроенные настраиваемые мелодии звонка
- Генератор комфортных шумов (CNG)
- Обнаружение голосовой активности (VAD)
Настройки
- Конфигурируемый через веб-интерфейс
- Provisioning: Автоматическая загрузка настроек через HTTP / HTTPS / TFTP
- Параметры DHCP 66/67
- Служба перенаправления Snom
- Удаленное управление через TR-069 / TR-111
Протоколы
- SIP (RFC3261)
- DHCP, NTP
- HTTP / HTTPS / TFTP
- LDAP (Directory)
- Двойной стек IPv4 / IPv6
Пользовательский интерфейс
- Локализация (язык, время, гудок)
- Красный светодиод для индикации вызова / ожидающего сообщения
- 4 контекстно-зависимых ключа
- 32 (8 физических) программируемых линейных / функциональных клавиш с многоцветными светодиодами
- Выделенные ключи для: сообщения; DND, Directory, Menu, Transfer; Удержание, переключение страницы
- Клавиши со светодиодным индикатором: Отключение звука, Громкая связь, Гарнитура
- Клавиша громкости
- 5-позиционная клавиша навигации
- ОК и клавиши Отмена
- Датчик приближения связанный с интерфейсом пользователя
Безопасность
- Аутентификация 802.1X и EAPOL
- Безопасность транспортного уровня (TLS)
- SRTP (RFC3711), SIPS, RTCP
- Сервер / клиент HTTPS
- Защищенный паролем веб-интерфейс
- VPN-поддержка
- VLAN (IEEE 802.1Q)
- LLDP-MED, RTCP-XR
Особенности телефона
- Размеры (приблизительно)
- 205 x 185 x 40 мм (ДxШxВ) без подставки
- 205 x 185 x 200/220 мм (ДxШxВ) с подставкой
- Вес (прибл.) Устройство 450 г, подставка 120 г
- Входное напряжение (5 В постоянного тока) (SELV)
- Питание: адаптер питания PoE или 5Vdc, 10 Вт
- Трубка: 4P4C
- Гарнитура: 4P4C; 4pin для Snom EHS Advanced
- Совместимый с слуховыми аппаратами (HAC)
- 1x порт USB 2.0, тип A, Hi / Full / Low-Speed
Условия окружающей среды
- Температура окружающей среды: от 0° C до 35° C
- Температура хранения: от -10° C до 45° C
- Влажность: от 5% до 95% (без конденсации)
- Цвет: черный
- Гарантия: 3 года
Инструкции и файлы
Файлы
Время на прочтение
7 мин
Количество просмотров 2.1K
Здравствуйте уважаемые читатели, всем доброго дня и приятного прочтения!
В прошлой публикации мы рассказали вам о флагманской модели Snom — аппарате Snom D785.
Сегодня мы вернулись к вам с обзором на следующую модель линейки D7xx – Snom D735. Перед прочтением вы можете просмотреть краткий видеообзор этого устройства.
Приступим.
Распаковка и комплектация
Вся важная информация о телефоне содержится на его коробке: модель, серийный номер и версия ПО по умолчанию, если вам понадобятся эти данные – мы позаботились чтобы вы всегда знали где их найти. Комплектация этого телефона не уступает таковой у старшей модели, о которой мы рассказывали вам чуть ранее. Комплект телефона состоит из:
- Самого телефонного аппарата
- Миниатюрного краткого руководства. Несмотря на свою миниатюрность, руководство исключает все вопросы по началу эксплуатации телефона
- Подставки
- Ethernet-кабеля категории 5E
- Трубки с витым шнуром
Также, в комплекте с телефонным аппаратом присутствует гарантийный талон, он подтверждает три года гарантии, предоставляемые нашей компанией.
Дизайн
Посмотрим на телефон. Черный, матовый цвет корпуса, как в нашем случае, идеально впишется в любую обстановку. Белый же, в котором телефон также выпускается, подчеркнет неординарность вашего подхода к выбору аппаратуры для коллег и сотрудников. Естественно, очень уместно телефон в белом цвете будет смотреться и в медицинских учреждениях.

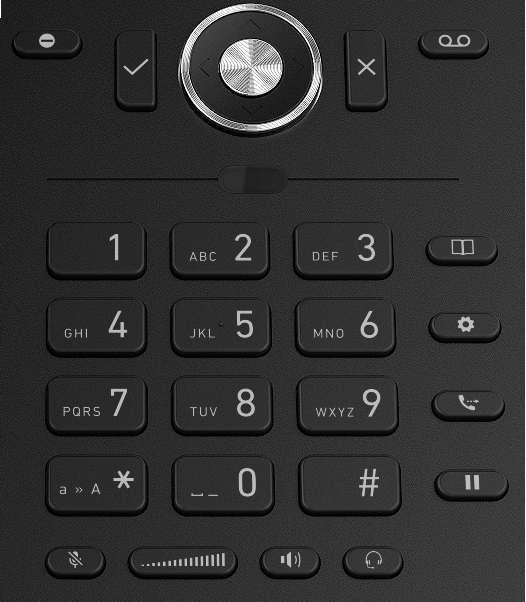
Крупные и приятные на ощупь клавиши сразу же наводят на мысль об удобстве использования аппарата, и отсутствии ошибок при наборе номера. BLF-клавиши на этой модели переместились на привычное, в наше время, место – по обе стороны от цветного дисплея, что позволило сделать телефон еще более компактным чем его старший собрат. Под навигационными клавишами виден датчик приближения – изюминка данной модели, впервые использованная в настольном телефонном аппарате. Позже мы расскажем вам, как именно он используется и для чего предназначен.
Элегантная подставка обеспечивает два угла наклона телефона – 28 и 46 градуса. Изменить угол наклона можно за счет переворота самой подставки, что обеспечивает минимум лишних отверстий и креплений на корпусе телефона.
Цветной дисплей, диагональю в 2.7 дюйма – яркий и контрастный. Его форма близка к квадрату, что обеспечивает большое пространство для отображения информации, что весьма важно при наличии боковых BLF-клавиш. Изображение на экране хорошо видно с различных углов обзора, что весьма важно в рабочих условиях. Все надписи экранного меню выполнены в строгой и аскетичной манере, ничто не будет отвлекать вас от работы.
С двух сторон от дисплея расположились BLF-клавиши, по четыре с каждой стороны. Значения клавиш имеют несколько страниц, и, чтобы не уменьшать количество значений, для перелистывания страниц используется отдельная клавиша, расположенная в правом нижнем углу экрана. Самих страниц поддерживается 4, что обеспечивает суммарно 32 значения.
С задней стороны корпуса, помимо креплений подставки, находятся отверстия для настенного крепления, а также сетевые разъемы Gigabit-Ethernet, порты подключения трубки и гарнитуры, разъем микролифта/EHS, и разъем подключения сетевого адаптера питания. Ehernet-порты, порт питания и разъем EHS расположились в специальной нише, кабели подключаемые в них удобно заводить с нижней части корпуса аппарата. Кабели в порты для подключения гарнитуры и трубки включаются перпендикулярно корпусу телефона, для вывода кабеля на боковую часть корпуса аппарата предусмотрены специальные направляющие. Кабели эти выводятся с левой стороны телефона.

С правой же стороны находится USB-порт, в него подключаются USB-гарнитура, флеш-накопитель, DECT донгл A230, Wi-Fi-модуль A210, а также панель расширения D7.
Из непривычных, пока еще, для IP-телефонов деталей в данной модели присутствует электронный механизм отбоя. Это решение позволяет визуально «облегчить» корпус телефона, но помимо этого еще и сильно повысило надежность аппарата, из-за уменьшения количества физических механизмов, склонных к поломке.
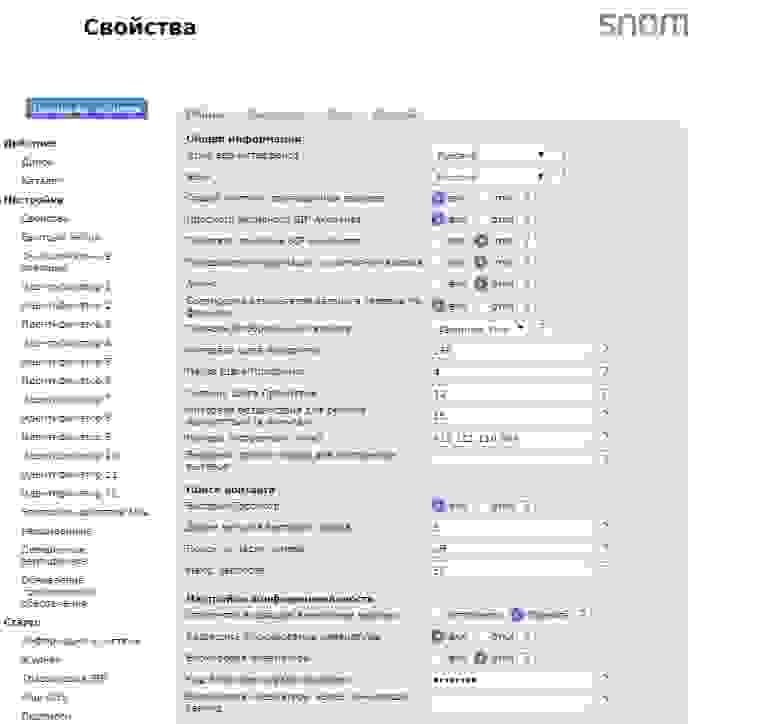
Программное обеспечение и настройка
Скажем несколько слов о настройке IP-телефона. Суть нашего подхода к настройке – минимум действий со стороны пользователя, максимум возможностей на старте использования. Веб-интерфейс прост и понятен, основные разделы вынесены в общее меню и доступны по 1 клику, дополнительные настройки понятно разнесены по подразделам. Помимо этого, благодаря тому, что ПО телефона поддерживает редактирование с помощью XML, вы сможете сделать его еще более удобным для вас лично, и ваших коллег, использовав привычные корпоративные цвета, или изменив используемые в нем иконки.
Помимо кастомизации самого интерфейса, Snom предоставляет вам возможность самостоятельно создавать приложения для своих настольных телефонов, для этого была создана среда разработки Snom.io. Это не просто набор инструментов разработки, но и возможность публикации созданных приложений и массового развертывания их на устройствах Snom.
Тот же подход к простоте настройки что используется в веб-интерфейсе, мы постарались реализовать и в экранном меню телефона – часто используемы функции уже доступны пользователю с момента регистрации телефонного аппарата на АТС и практически не требуют дополнительной настройки – Plag and Play как он есть. Если же это необходимо, любая из BLF-клавиш настраивается самим пользователем в несколько кликов экранного меню на любую из 25 доступных функций – просто и удобно.

Функционал и эксплуатация
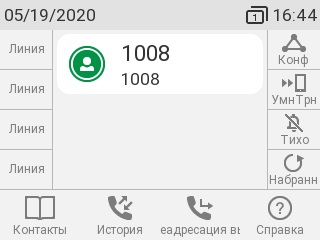
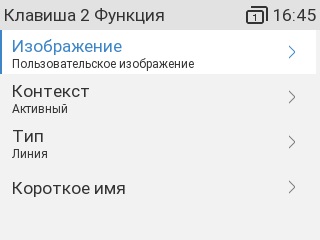
Давайте посмотрим на экран нашего аппарата и поговорим о его особенности – работе с датчиком приближения. В режиме ожидания основную часть экрана занимает информация об учетной записи и уведомления о произошедших событиях, подписям BLF-клавиш в таком режиме выделено две небольших полосы по правую и левую сторону цветного дисплея.
Но стоит поднести к клавиатуре руку, как увеличивается яркость подсветки экрана, а для каждой из клавиш разворачивается полноценная подпись. Суммарно подписи занимают весь дисплей, за исключением небольшой полосы в верхней части, куда смещается информация об учетной записи, и чуть большей полосы в нижней части, где остаются подписи подэкранных кнопок.
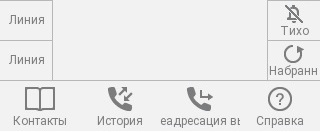
Обратите внимание на скриншот подэкранных кнопок, вам может показаться что кнопка «Переадресация вызова» обрезана. На самом деле текст не обрезан, на клавише работает бегущая строка. На наших телефонах вы можете самостоятельно переназначать все кнопки, и если функции имеют длинные названия, бегущая строка исправит положение. Таким образом вам нет необходимости ломать голову, переназвать ли вам кнопку более кратко, чтобы было понятно пользователю, или оставить как есть, отобразив полное название функции. Такой подход предоставляет гибкость настройки для администратора и удобство для пользователя.

Возвращаясь к датчику приближения нужно отметить, что смена режима происходит очень быстро, стоит вашей руке оказаться в 10-15 см от клавиатуры, а значит и датчика приближения. Обратная же смена происходит спустя 2-3 секунды после того как рука будет убрана, чтобы пользователь успел получить всю нужную информацию с экрана телефона. Подсветка при этом остается яркой еще некоторое время, во избежание контраста восприятия пользователем изображения дисплея. С помощью этого функционала пользователь видит полную информацию о клавишах все время работы с телефоном, но вне прямого контакта с клавиатурой «лишняя» информация не будет мешать отображению его номера и важных оповещений.
Сами клавиши BLF, как уже говорилось ранее, частично преднастроены. Для D735 это клавиши находящиеся справа от экрана. Разберемся подробнее для чего они предназначены:
Умный трансфер. Клавиша с большим набором функций, использование которых зависит от текущего состояния телефона. Все действия будут производиться для номера, указанного в настройках данной клавиши, при первом нажатии на нее вы перейдете в соответствующее меню для указания этого номера. После чего, в режиме ожидания клавиша будет работать как быстрый набор, вызывая абонента. Если же вы уже находитесь в разговоре, вы сможете перевести вызов на номер, занесенный в настройки кнопки. Эту функцию часто используют для перевода текущего разговора на свой мобильный номер, если понадобилось покинуть рабочее место. Ну а если вы еще не успели поднять трубку – клавиша будет работать как переадресация входящего звонка.
Набранные номера. Простая в использовании клавиша с востребованным функционалом — отображение истории всех исходящих вызовов. Если вам необходимо повторно произвести звонок на номер который вы набирали последним – просто нажмите клавишу еще раз.
Тихо. Нажатие на данную клавишу включает на нашем телефоне беззвучный режим. В этот момент аппарат не будет мешать вам своим рингтоном, а лишь отобразит входящий вызов на экране. Если вам это необходимо, вы также можете отключить рингтон для уже пришедшего вызова нажатием на эту кнопку.
Конференция. Часто бывает, что в процессе общения с коллегой необходимо уточнить какие-либо относящиеся к разговору детали у еще одного, или устроить мозговой штурм для решения проблемы, или… Словом все мы с вами прекрасно знаем, как бывает полезен функционал конференции. Данная клавиша позволит вам превратить в конференцию ваш текущий разговор, или собрать 3-х стороннюю конференцию из режима ожидания. Важным моментом при использовании в режиме ожидания является одновременный вызов всех участников диалога, что очень удобно.
Коль уж мы ведем речь об использовании функциональных клавиш в процессе разговора, скажем несколько слов и о звуке телефона. По качеству звука D735 не уступает старшей модели, качество звучания остается весьма высоким. Уже упомянутый ранее динамик громкой связи обеспечивает прекрасную слышимость и достаточную громкость, микрофон громкой связи, расположенный в нижней части корпуса телефона, также успешно справляется со своими обязанностями – у собеседника не возникает сомнений, что с ним говорят не через трубку.
Качество связи трубки также на высоте. Как микрофон, так и динамик прекрасно выполняют возложенные на них функции и полно, четко и ясно передают ваши слова собеседнику, а его – вам. Использование нашей компанией звуковой лаборатории позволяет нам обеспечивать действительно хорошее качество звука и воплощать в жизнь устройства, ничуть не уступающие, а в большинстве случаев и превосходящие конкурентов по звуку.
Аксессуары
В качестве аксессуаров к телефону можно подключить донглы беспроводной связи Snom A230 и Snom A210 и панель расширения Snom D7.
Snom D735 обладает внушительным количеством значений BLF-клавиш в 32 штуки, но не всегда удобно использовать страницы экрана для мониторинга состояния абонентов, да и этого количества может не хватить. В этом случае обратите свое внимание на панели расширения D7, они выпускаются в тех же цветах, что и корпус телефона, белом и черном, и идеально сочетаются с D735 внешне.

Snom D7 дополнит телефон 18 BLF-клавишами, что, с учетом возможности подключения 3-х панелей и клавишами телефона, даст 86 клавиш.

Донглы беспроводной связи служат для взаимодействия телефонного аппарата с беспроводными сетями. Например Wi-Fi модуль A210 служит для подключения к соответствующей сети, а DECT донгл A230 — это модуль для подключения беспроводных DECT-гарнитур и других аксессуаров, таких как внешний динамик Snom C52 SP к нашему телефону.
Подведем итог
Snom D735 – универсальный и удобный инструмент современных телекоммуникаций. Он подойдет и руководителю, и секретарю, и менеджеру, а также любому сотруднику, который активно использует в своей работе средство связи. Это продуманное и приятное в обращении устройство предоставит вам максимум функционала при простоте использования и запоминающимся внешнем виде.
инструкцияSnom D735

© Snom Technology GmbH
Snom Technology GmbH
Wittestr. 30 G
13509 Berlin, Deutschland
Tel. +49 30 39 83 3 0
Fax +49 30 39 83 31 11
offi ce.de@snom.com
Snom, Inc.
2603 Camino Ramon, Suite 420
San Ramon, CA 94583, USA
Tel. +1 339 227 6160
Fax +1 339 227 6180
o ce.us@snom.com
Snom Technology GmbH
The Courtyard, High Street
Ascot
Berkshire SL5 7HP, UK
Tel. +44 161 348 7500
Fax +44 169 348 7509
o ce.uk@snom.com
Snom Technology GmbH
6 Parc des fontenelles
78870 Bailly, France
Tel. +33 1 80 87 62 87
Fax +33 1 80 87 62 88
o ce.fr@snom.com
Snom Technology GmbH
Via Milano 1
20020 Lainate, Italia
Tel. +39 02 00611212
Fax +39 02 93661864
o ce.it@snom.com
Snom Technology Ltd.
Rm. 828, 5F, No. 285, Sec. 4
Zhongxiao E. Rd., Da‘an Dist.
Taipei City 10692, Taiwan
Tel. +886 2 8751 1120
Fax +886 2 8751 1130
o ce.tw@snom.com
Your specialist retailer — Ihr Fachhändler —
Votre distributeur — Su distribuidor — Il tuo rivenditore:
v1.01
IP Phone D735
User Manual
Посмотреть инструкция для Snom D735 бесплатно. Руководство относится к категории офисные телефоны, 1 человек(а) дали ему среднюю оценку 9.5. Руководство доступно на следующих языках: английский. У вас есть вопрос о Snom D735 или вам нужна помощь? Задайте свой вопрос здесь

Главная
| Snom | |
| D735 | 00004389 | |
| офисный телефон | |
| 4260059582490 | |
| английский | |
| Руководство пользователя (PDF), Краткое руководство пользователя (PDF), Техническая спецификация (PDF) |
Дизайн
| Цвет товара | Черный |
| Тип телефонной трубки | Проводная телефонная трубка |
| Блокировка устройства | Да |
| Клавиатура с подсветкой | Да |
| Тип продукта | IP телефон |
Условия эксплуатации
| Диапазон температур при эксплуатации | 0 — 35 °C |
| Диапазон температур при хранении | -10 — 45 °C |
| Диапазон относительной влажности при эксплуатации | 5 — 95 % |
Сертификаты
| Сертификация | CE, IEC 60950 |
Аудио
| Громкоговоритель | Да |
| Кодеки голоса | G.711, G.722, G.726, G.727, GSM 6.10 |
| Обнаружение голосовой активности | Да |
| Генерация комфортного шума | Да |
| Отключение микрофона | Да |
Содержимое упаковки
| Количество ручек в комплекте | 1 шт |
| Краткая инструкция пользователя | Да |
| Поставляемые кабели | LAN (RJ-45) |
| Телефонная трубка | 4P4C |
| Гарнитура в комплекте | Да |
| Базовая станция | Да |
| Ethernet кабель | Да |
Экран
| Дисплей | TFT |
| Сенсорный экран | Нет |
| Диагональ экрана | 2.7 « |
| Дисплей с задней подсветкой | Да |
| Цвет подсветки | Мульти |
Сеть
| Подключение Ethernet | Да |
| Стандарты сети | IEEE 802.1Q, IEEE 802.1x, IEEE 802.3af |
| Алгоритмы шифрования данных | 802.1x RADIUS, SIPS, SRTP |
| Поддерживаемые сетевые протоколы | SIP (RFC3261), DHCP, NTP, HTTP/HTTPS/TFTP, LDAP, IPv4/IPv6 |
| Bluetooth | Нет |
| Wi-Fi | Нет |
Вес и размеры
| Ширина | 185 mm |
| Глубина | 205 mm |
| Высота | 40 mm |
| Вес | 450 g |
Порты и интерфейсы
| Количество портов USB 2.0 | 1 |
| Гнездо входа постоянного тока (DC) | Да |
| Подключение хэдсета | USB 2.0 |
Энергопитание
| Выходное напряжение адаптера переменного тока | 5 V |
| Потребляемая мощность (в обычном режиме) | 10 W |
| Питание по Ethernet (PoE) | Да |
Характеристики телефона
| Переадресация | Да |
| Удержание вызова | Да |
| Идентификация абонента (Caller ID) | Да |
| Переадресация вызова | Да |
| Возможность совещаний по телефону | Да |
| Удержание вызова | Да |
| Функциия «не беспокоить» | Да |
| Автоматическое согласование | Да |
| Повторный набор | Да |
| Быстрый набор | Да |
| Автоответчик | Да |
| Функция отложенного звонка (вызова) | Да |
| Подбор вызовов | Да |
| Индикатор непросмотренных сообщений | Да |
| Вместимость телефонной книги | 1000 записей |
| Вызов | Тоновый |
| Количество линий | — линий |
Производительность
| Совместимость со слуховыми аппаратами | Да |
| Режимы двухтонального многочастотного аналогового сигнала | In-band, Out-of band, SIP info |
Характеристики управления
| Регулятор громкости | Кнопки |
| Количество функциональных кнопок | 32 |
Камера
Логистические данные
| Код гармонизированной системы описания (HS) | 85171800 |
показать больше
Не можете найти ответ на свой вопрос в руководстве? Вы можете найти ответ на свой вопрос ниже, в разделе часто задаваемых вопросов о Snom D735.
Какой вес Snom D735?
Snom D735 имеет вес 450 g.
Какие сертификаты Snom D735 имеет?
Snom D735 имеет следующие сертификаты: CE, IEC 60950.
Какой размер экрана Snom D735?
Размер экрана Snom D735 составляет 2.7 «.
Какая высота Snom D735?
Snom D735 имеет высоту 40 mm.
Какая ширина Snom D735?
Snom D735 имеет ширину 185 mm.
Какая толщина Snom D735?
Snom D735 имеет толщину 205 mm.
Инструкция Snom D735 доступно в русский?
Да, руководствоSnom D735 доступно врусский .
Не нашли свой вопрос? Задайте свой вопрос здесь
-
Page 1
User Manual IP Phone D735… -
Page 2: Table Of Contents
TABLE OF CONTENTS Copyright, Trademarks, GPL, Legal Disclaimers …………7 Important information ………………….8 Safety instructions ……………………. 8 Standards conformance ………………….8 Product specifications ………………….9 Disposal of the device ………………….9 Cleaning ………………………. 9 Setting up the phone …………………. 10 Delivery Content ……………………10 Attaching and detaching the footstand …………….10 Wall mounting ……………………11 Rotating the tab of the cradle …………………11…
-
Page 3
Settings ………………………28 Phone settings …………………….28 Settings available in administrator mode …………29 Settings available in user mode …………….30 Display settings …………………..31 Adjusting the backlight on the phone’s display ……….31 Adjusting display settings for connected D7s ……….32 The phone’s web interface …………………34 Opening the web interface ……………..35 How the web interface works …………….36 User mode/administrator mode ………………37… -
Page 4
Using different audio devices ………………48 Handset ……………………48 Headset ……………………48 Speakerphone …………………..48 Handset or headset and casing speaker …………48 Using different dialing methods ……………….49 Auto dial …………………….49 Redialing ……………………49 Calling number from call history (missed, received, dialed calls) ….49 Calling number from phone directory …………..49 Calling number from external directory …………49 Speed dialing ………………….50 Calling emergency numbers …………….50… -
Page 5
Configuring the function keys ………………67 Function key types on Snom phones …………….67 Function key page of phone’s web interface …………..69 Programming the function keys ………………71 Function key settings on the phone …………….71 Function key settings on the web interface ……………73 Selected examples for function key programming …………74… -
Page 6
Reset to factory values ………………… 101 TFTP Update ……………………101 Manual initialization ………………….101 Contacting Snom Support ………………..102 Traces ……………………… 102 Appendix 1 — Display Symbols and Icons …………..104 Symbols found in the function key line …………….. 104 SmartLabel function symbols ……………… -
Page 7: Copyright, Trademarks, Gpl, Legal Disclaimers
Snom therefore disclaims all warranties and liability for the accurateness, completeness, and currentness of the information published, except in the case of intention or gross negligence on the part of Snom or where liability arises due to binding legal provisions.
-
Page 8: Important Information
If the phone is not supplied with power via an Ethernet cable, use only a power adapter expressly recommended by Snom Technology (see «Product specifications» on page 9). Other power supplies may damage or destroy the phone, affect its behavior, or induce noise.
-
Page 9: Product Specifications
Power: Power over Ethernet (PoE), IEEE 802.3af, Class 2. If PoE is not available, one of the following power adapters (not included in delivery) can be ordered separately: ◦ EU: Snom power adapter A6, Phihong model PSM10R-050, Snom PN 00004325 ◦ US: Snom power adapter A6, Snom PN 00004326 ◦…
-
Page 10: Setting Up The Phone
D735 User Manual Setting up the Phone etting up the phone elivery Content Quick Installation General Public License Guide D735 Base phone unit Footstand Handset Handset cord Ethernet cable Quick Installation Guide, GNU General Public Licence ttaching and detaching the footstand The footstand can be attached at two different angles: 46°…
-
Page 11: Wall Mounting
D735 User Manual Setting up the Phone 3. Plug the short end of the handset cord into the connector on the handset. 4. Place the phone on an even, horizontal surface. all mounting See «Appendix 3 — Wall Mounting» on page 110.
-
Page 12: Connecting The Phone
D735 User Manual Setting up the Phone onnecting the phone (2, 3) (2, 3) (2, 3) (1, 2) (2, 3) If PoE not available Not included in delivery Optional The phone can be operated with Power over Ethernet (PoE) provided via the network cable or, if PoE is not avaible in your network, with the separately available 5V DC power adapter (see «Product…
-
Page 13: Connecting A Headset
1. Connect the plug labeled D3xx/D735 on the 2xRJ12 cable that came with the Snom EHS Adapter to the jack marked EHS on the D735, and the plug labeled EHS box to the Snom EHS Adapter’s RJ12 jack. For more information, see the illustrated EHS Advanced Quick Installation Guide at http://wiki.snom.com/Accessories/Documentation.
-
Page 14: Initializing And Registering The Phone
For more information, see «Identities/accounts» on page 86. Initialization Snom phones are plug-and-play. Once the phone is connected to your network, it will begin to initialize. Note: Normally the initialization is completely automatic, using DHCP. If the phone…
-
Page 15
D735 User Manual Setting up the Phone 2. Next, you will be prompted in the language of your choice to select a time zone. This affects the time shown on your display. Fig. 1 Fig. 2 Fig. 3 ◦ Press , respectively, on the navigation key to move up or down the list one item at a time;… -
Page 16
D735 User Manual Setting up the Phone ◦ Press to save the selected country’s tone scheme. 4. The display shows the «Welcome» screen. Press any key to log on. 5. Enter the account number and save with Note: See «Entering numerals, letters, special characters, and symbols» on page 24 on how to enter numbers and letters. -
Page 17: What To Do If Initialization And Registration Are Unsuccessful
What to do if initialization and registration are unsuccessful Your network or your VoIP provider may require more login data than requested by the Snom phone during the initialization and registration process. This data is entered on the web interface of the phone.
-
Page 18: Getting To Know Your Phone
Press the function key underneath the display to show phone’s IP address and URL to Snom’s Wiki symbol to activate the function, open the list etc. depicted by the symbol above the key.
-
Page 19
D735 User Manual Getting to Know Your Phone Audio control keys Adjusting the volume ◦ of the ringer when the phone is idle or ringing ◦ of the handset/casing loudspeaker when in a call Mute/unmute microphone Toggling between handsfree and handset mode. Press to dial number and accept calls on speakerphone. -
Page 20: Led Indicators
D735 User Manual Getting to Know Your Phone ED indicators Call indicator The bright-red LED situated on the top right corner of the phone indicates incoming, ongoing, held, and missed calls. LED status indications: • Blinking rapidly when a call is coming in.
-
Page 21: Hard Keys
D735 User Manual Getting to Know Your Phone ard keys Context-sensitive, programmable function keys These function keys can be programmed on the Function Keys page of the phone’s web interface with a number of key events; these functions will then be available when the phone is in idle mode. For more information, see «Configuring the function keys»…
-
Page 22: Audio Control Keys
D735 User Manual Getting to Know Your Phone Hold key. See «Hold» on page 55 for further information. Turn «do not disturb» (DND) mode on and off for all identities registered on the phone (Fig. 1). If you want to turn on DND for one or more, but not all of the identities (Fig. 2), use the Configuration identity settings on the phone’s web user interface.
-
Page 23: Alphanumeric Keypad
D735 User Manual Getting to Know Your Phone Conference See «Conference» on page 56 for more information. Smart transfer Silent mode Turns off the phone’s ringer; red LED lights up. Press again to turn it back on; LED turns off.
-
Page 24: Entering Numerals, Letters, Special Characters, And Symbols
D735 User Manual Getting to Know Your Phone Entering numerals, letters, special characters, and symbols When entering letters and special characters, pause briefly after each character until the cursor has moved forward so that you won’t overwrite the last character you entered. Pausing is not necessary when entering numerals.
-
Page 25: Display Layout
D735 User Manual Getting to Know Your Phone isplay layout In idle mode Info/status bar Smart Confi gured identities Smart labels labels Function key line Context-sensitive function key symbols Fig. 1 When active Showing SmartLabels Not showing SmartLabels Info/status bar…
-
Page 26
D735 User Manual Getting to Know Your Phone Deleting or temporarily suppressing status messages: ◦ Messages will be deleted automatically when the underlying cause is removed, i.e., call forwarding is turned off, HTTP password is set, etc. ◦ Temporarily suppressing messages: Press , if the button is available, or >… -
Page 27: When The Phone Is Active
D735 User Manual Getting to Know Your Phone Function key line The symbols on the buttons in this line depict the functions that can be activated by pressing the function key underneath the respective symbol. See «Appendix 1 — Display Symbols and Icons» on page 104 for a complete list.
-
Page 28: Settings
D735 User Manual Getting to Know Your Phone navigation key you can increase the size of the SmartLabels from the default «short» display mode (Fig. 2) to «full» (Fig. 3); the display will revert to «short» display mode after three seconds.
-
Page 29: Settings Available In Administrator Mode
D735 User Manual Getting to Know Your Phone Settings available in administrator mode All settings of the phone menu and on the phone’s web interface are accessible. 1 Preferences 2 Call Features 3 Identity 4 Network 5 Maintenance 6 Information…
-
Page 30: Settings Available In User Mode
D735 User Manual Getting to Know Your Phone Settings available in user mode 1 Preferences 2 Call Features 3 Identity 4 Maintenance 5 Information 1 Select outgoing 1 Language 1 Security 1 Status info Call forwarding identity 1 Administrator 2 Date & Time…
-
Page 31: Display Settings
D735 User Manual Getting to Know Your Phone Display settings The backlight on the display of the phone and on the displays of the connected expansion modules can be adjusted separately for the times when the phone is active and when the phone is idle. The backlight when idle can be reduced to zero bars.
-
Page 32: Adjusting Display Settings For Connected D7S
D735 User Manual Getting to Know Your Phone Adjusting display settings for connected D7s You can adjust the intensity of the display’s backlight, the display contrast, and the font size of the function key labels for the connected D7 expansion modules. The label layout can be adjusted for each D7 separately.
-
Page 33
D735 User Manual Getting to Know Your Phone 6. Select Font size (line layout) or Font size (tile layout), respectively, and press 7. Use the alphanumeric keypad to enter the font size. Press the function key underneath to delete the character to the left of the cursor if you need to correct your input. -
Page 34: The Phone’s Web Interface
D735 User Manual Getting to Know Your Phone The phone’s web interface When the web interface is opened for the first time upon initialization, you will see the Security page. We urge you to set administrator and HTTP passwords to protect your phone. The default administrator password is 0000 (4 zeros);…
-
Page 35: Opening The Web Interface
D735 User Manual Getting to Know Your Phone symbols» on page 24). Write the password down and store it in a safe place! ◦ HTTP user name and password. Enter the data in the text fields of the HTTP Server section and click Apply.
-
Page 36: How The Web Interface Works
D735 User Manual Getting to Know Your Phone How the web interface works The vertical menu on the left side of the window is always the same, no matter which window happens to be open at the time. Available menu items depend on whether the phone is running in user or administrator mode.
-
Page 37: User Mode/Administrator Mode
Getting to Know Your Phone ser mode/administrator mode Snom phones can be operated in administrator or user mode. In administrator mode, all settings are accessible and can be modified; in user mode, a number of settings are not accessible. The factory default is administrator mode.
-
Page 38
D735 User Manual Getting to Know Your Phone Fig. 1 Fig. 2 To return the phone and its web interface to administrator mode, open the Advanced Settings page, enter the administrator password in Administrator Login and click on Apply (Fig. 2). The default password is 0000 (4 x zero). -
Page 39: Directories
D735 User Manual Directories irectories irectory The directory is the built-in directory of the phone. It can hold up to 1000 entries. Entries can be added and edited on the phone and on the web interface. Any changes you make on the web interface will not take effect until you click on «Save» or on «Apply»…
-
Page 40: Contact Types
D735 User Manual Directories Contact Types VIP: Calls from numbers with this contact type will ring on your phone even when DND mode is active. You can assign a ringtone to this contact type. If your VIP is also assigned to a group (see below) and if that group has a distinct ringtone, the ringtone assigned to the group will be played.
-
Page 41: Adding/Editing Entries On The Phone
D735 User Manual Directories Adding/Editing Entries on the Phone Adding new entry manually 1. Press to open the phone’s directory. 2. Press the function key underneath Note: See «Input modes and navigation» and «Entering numerals, letters, special characters, and symbols» on page 24 for information on how to enter data.
-
Page 42: Adding Current Caller
D735 User Manual Directories Adding current caller With the call on the line, you can add the caller’s name (if transmitted) and phone number to the directory. If the name has not been transmitted, the number will be used for both name and number.
-
Page 43: Deleting An Entry
D735 User Manual Directories Deleting an entry 1. Press to open the phone’s directory. 2. Selecting an entry: Scroll to the entry or enter the first letter of the name. (Fig. 1) and continue with step 4, below. 3. If you want to delete the entry, press Fig.
-
Page 44: Adding/Editing Entries On The Web Interface
D735 User Manual Directories Adding/editing entries on the web interface Click on Directory in the menu on the left side. Adding new entry 1. Type data in text fields of Add or Edit Entry. ◦ Number: Type the number exactly as you would dial it, with country and area codes, if necessary, and without parentheses, hyphens, blank spaces.
-
Page 45: Editing An Entry
D735 User Manual Directories Editing an entry When you open an existing entry, the current information is displayed in the text fields of «Add or Edit Entry» and two additional buttons, «Add Sub» and «Change», are available (see Fig. 2 and 3, below).
-
Page 46: Deleting Entry On Web Interface
Dialing from phone directory To dial, click on the phone symbol on the right side of the line with the phone number. Deleting whole directory Deletes the entire directory irretrievably! Importing/Exporting Directory See our Wiki at http://wiki.snom.com/Web_Interface/V8/Directory.
-
Page 47: External Directories
D735 User Manual Directories xternal directories Available if provided by your network, your VoIP provider, or another external source. LDAP Enter the necessary data received from your administrator, VoIP provider or other external source in the text fields of the phone‘s web interface > Advanced Settings page > Network tab > LDAP section and click on «Apply»…
-
Page 48: Using The Phone
D735 User Manual Using the Phone sing the phone This section describes the functions of the phone with the factory default settings. If your phone was installed and/or set up by someone else, the default settings may have been changed. Please check with that person or company if the phone does not react as described here.
-
Page 49: Using Different Dialing Methods
D735 User Manual Using the Phone Using different dialing methods Auto dial When the setting is enabled, the phone will dial the number on the display when the specified number of seconds has elapsed since the last digit was typed.
-
Page 50: Speed Dialing
Call completion Note: This function depends on whether it is available in your network or not. On Snom phones call completion means that when a called number is busy or not available, you can have your phone call you back as soon as the dialed number is not busy anymore or available again.
-
Page 51: Number Guessing (Auto Completion)
D735 User Manual Using the Phone 2. Press if you wish to dial another number while waiting for call completion (Fig. 2). You can now hang up the handset to return to the idle screen (Fig. 3); use handset, headset, or speakerphone to dial another number;…
-
Page 52: Accepting Calls
D735 User Manual Using the Phone ccepting calls Using different audio devices Handset: Pick up the handset. Headset: Press . If the phone is already in headset mode, you can also press the blinking line key. Speakerphone: Press orthe blinking line key.
-
Page 53: Call Waiting
D735 User Manual Using the Phone When these prerequisites are met, the status of the monitored extension is indicated by the LED of the function key: ◦ Blinking LED: Incoming call ringing. If the call is not answered, press the key to pick it up;…
-
Page 54
D735 User Manual Using the Phone Fig. 5 Fig. 6 Fig. 7 When a call is waiting, you have the following options: • Press the blinking line key of the call waiting to put your current call on hold and to accept the second call without knowing who is calling (Fig. -
Page 55: Active Calls
D735 User Manual Using the Phone ctive calls Hold One call on hold Press to put the ongoing call on hold. Held calls are indicated threefold: ◦ By the text on the display. ◦ By the slowly blinking line key.
-
Page 56: Conference
D735 User Manual Using the Phone • In Fig. 4–6 there are two calls on hold. Fig. 5 and 6 both show the second held call, in short label display mode (Fig. 5) and in full label display mode (Fig. 6). Press the function keys underneath to show the call not currently on screen.
-
Page 57: Transferring Calls
D735 User Manual Using the Phone Fig. 2 Fig. 3 Fig. 4 • Selecting individual participants. ◦ On the conference screen (Fig. 2), press to select the first of the participants of the conference; press again to select the next one of the participants (Fig. 3).
-
Page 58
D735 User Manual Using the Phone Fig. 1 Fig. 2 Fig. 3 2. Dial the number you want to transfer the call to and announce the call (Fig. 2). You can also select a number from the internal or one of the available external phone directories (see «Calling number from phone directory»… -
Page 59: Blind Transfer
D735 User Manual Using the Phone Blind transfer • Blind transfer of active call 1. With a call on the line (Fig. 8), press . The dial screen will appear. Fig. 8 Fig. 9 2. Dial the number (Fig. 9), or press to select a number from the internal or one of the available external phone directories (see «Calling number from phone directory»…
-
Page 60: Terminating Calls
D735 User Manual Using the Phone • Blind transfer of ringing call 1. With a call ringing (Fig. 12), press Fig. 12 2. The dial screen (Fig. 9, above) appears. 3. Enter the number of the third party you intend to transfer the call to and press erminating calls •…
-
Page 61: Call Lists
D735 User Manual Using the Phone ◦ Via the Status info screen. 1. Press , if available (Fig. 1), or open the Settings menu > Information > Status Info to view the status info messages. 2. Press the function key underneath to delete the «Missed»…
-
Page 62: Locking And Unlocking The Keyboard
D735 User Manual Using the Phone ◦ Press to delete the selected call. ◦ Press to delete the entire list. ◦ Press for three seconds to return to idle screen. ◦ Press to sort the calls. ◦ Press to show the call details of the selected call.
-
Page 63: Automatically
D735 User Manual Using the Phone ◦ Press for two seconds to reject the call and additionally place the caller on the «Deny» list of the phone’s directory so that calls from that number will never ring on your phone; the caller will always hear the busy signal.
-
Page 64: Call Forwarding
D735 User Manual Using the Phone Fig. 1 Fig. 2 6. Press for two seconds to return to the idle screen. all forwarding The phone can be set to forward incoming calls, either always or under certain conditions. The settings can be done on the phone and on the web interface. For further information on using the web interface for these settings, see «Call forwarding»…
-
Page 65: Making/Changing The Settings On The Phone And Turning On Call Forwarding
D735 User Manual Using the Phone Scrolling line Fig. 4 – Forwarding all calls Fig. 5 – Forwarding when busy Fig. 6 – Forwarding when call has not been answered after time set in seconds Making/changing the settings on the phone and turning on call forwarding…
-
Page 66: Turning Forwarding Of All Calls On/Off With A Function Key
D735 User Manual Using the Phone Press Forward All Forward when Busy Forward after Timeout Press Enable forwarding Enable forwarding Enable forwarding The setting will change from on to off, and the settings for the forwarding target and, in the case of timeout, for the time span will disappear.
-
Page 67: Configuring The Function Keys
Snom has therefore designed the function keys to be programmable, even the preprogrammed «hard keys» whose default function is printed on them.
-
Page 68
D735 User Manual Configuring the Function Keys other module of the same type is connected to the phone. They are not visible on the function keys page when no expansion module is connected. Settings descriptions: ◦ Context This setting specifies which configured identity will be used when executing the functionality of the key. -
Page 69: Function Key Page Of Phone’s Web Interface
D735 User Manual Configuring the Function Keys If the LP feature of a key has been disabled, use the Preferences menu to access the key’s configuration menu. See «Function key settings on the phone» on page Fig. 1 Fig. 2 unction key page of phone’s web interface The page has two subpages;…
-
Page 70
D735 User Manual Configuring the Function Keys Fig. 3 — Short labels P9 – P12 Fig. 4 — Short labels P13 – P15 Fig. 5 — Full Labels P9 – P12 Fig. 6 — Full Labels P13 – P16 When expansion modules are connected to the phone, they will also be shown on the function key page of the phone’s web interface, below the phone’s function keys and above the Apply button. -
Page 71: Programming The Function Keys
D735 User Manual Configuring the Function Keys 2, Extension monitoring and call pick-up on D7 expansion module» on page 77 and the D7 user manual available at http://wiki.snom.com/Snom_D7/Documentation. Fig. 7 — Function keys of connected D7 expansion module rogramming the function keys The freely programmable function keys on the phone and on all connected expansion modules can be mapped on the phone and on the phone’s web interface.
-
Page 72
D735 User Manual Configuring the Function Keys Fig. 6 Fig. 7 Fig. 8 5. The default for Context is Active, i.e., all configured identities whose status is «active» (Fig. 6). a. If you want to restrict the functionality to a configured identity, select Context and press . -
Page 73: Function Key Settings On The Web Interface
D735 User Manual Configuring the Function Keys Fig. 15 Fig. 16 11. Select Short Label Mode (Fig. 15) and press 12. Specify the content you want the label to display by scrolling to the respective line (Fig. 16) and to save and return to the Key 17 Function menu (Fig. 15). The default is icon and text;…
-
Page 74: Selected Examples For Function Key Programming
D735 User Manual Configuring the Function Keys Fig. 2 1. On the phone’s web interface, click on Function Keys in the menu on the left. When the page is opened, the Key Assignment page is on-screen, as indicated by the bold font of its tab (Fig. 1). The four types of programmable function keys can be configured on this page.
-
Page 75: Example 1, Extension Monitoring And Call Pick-Up
D735 User Manual Configuring the Function Keys Example 1, Extension monitoring and call pick-up This feature makes it possible to pick up a call ringing on another extension registered at the same registrar, for example when the other extension is busy or when the user is absent. The prerequisites for this function are: ◦…
-
Page 76
D735 User Manual Configuring the Function Keys Page key Proximity sensor Move hand or object over sensor to switch from default to alternative SmartLabel display mode. See «Display options for SmartLabel keys» on page 81 for more information. Fig. 1 Fig. -
Page 77: Example 2, Extension Monitoring And Call Pick-Up On D7 Expansion Module
D735 User Manual Configuring the Function Keys Example 2, Extension monitoring and call pick-up on D7 expansion module • All functions available on the freely programmable LED function keys of the phone are available on the connected D7. • The prerequisites are the same as those for the LED function keys on the phone. See «Example 1, Extension monitoring and call pick-up»…
-
Page 78: Example 3, Speed Dialing
D735 User Manual Configuring the Function Keys Example 3, Speed dialing Besides using the Speed Dial page on the web interface to program speed dial numbers, you can also put the functionality on the freely programmable function keys with LEDs on the phone or a connected expansion module.
-
Page 79
D735 User Manual Configuring the Function Keys Page key Proximity sensor Move hand or object over sensor to switch from default to alternative SmartLabel display mode. See «Display options for SmartLabel keys» on page 81 for more information. Fig. 1 Fig. -
Page 80: Example 4, Changing Setting Of Context-Sensitive Key
D735 User Manual Configuring the Function Keys Example 4, Changing setting of context-sensitive key You can select a different key event to be available on the four keys under the display when the phone is in idle mode. You cannot change the functions that are available when the phone is active, for example when you are in a call, when the phone is ringing, etc.
-
Page 81: Display Options For Smartlabel Keys
D735 User Manual Configuring the Function Keys isplay options for SmartLabel keys A number of settings control the appearance of the SmartLabels on the display; they can be set on the phone and on the phone’s web interface. There are separate settings for the idle screen, call screens, and other screens.
-
Page 82
D735 User Manual Configuring the Function Keys Fig. 1 Fig. 2 5. Select Idle Screen Behavior, Call Screen Behavior, or Other Screen Behavior and press . The bold italic default settings are indicated in in the table. The available options for the three… -
Page 83: Timer Setting For Returning Display Mode To Default
D735 User Manual Configuring the Function Keys Fig. 7 Fig. 8 Fig. 9 b. Use the navigation key to select Proximity sensor (Fig. 9). c. Press to save and return to the Screen Behavior menu where the line underneath Alternative display trigger now reads Proximity (Fig. 10).
-
Page 84
D735 User Manual Configuring the Function Keys 1. Press -> Preferences -> Display -> Primary display (if there is at least one connected expansion module) -> SmartLabel options. 2. Select Return to first page (Fig. 14) and press . The preset default is 60 seconds (Fig. 15). -
Page 85: Settings On The Web Interface
D735 User Manual Configuring the Function Keys Settings on the web interface 1. On the phone’s web interface, click on Function Keys in the menu on the left. 2. Click the SmartLabel tab. bold italic 3. The default settings are indicated in in the table.
-
Page 86: Customizing The Phone Settings
If you want more information on a web interface setting, click on the radio button with the question mark that you see to the right of each item. It links to a page on Snom’s Wiki with detailed information about that particular item.
-
Page 87
D735 User Manual Customizing the Phone Settings On the web interface Open the web interface and click on an identity in the menu on the left. The configuration window for that identity will open; it contains four tabs, with the left one, Login, visible in the front. To view SIP, NAT, and RTP pages, click on the respective tab;… -
Page 88: Assigning Ringtones
D735 User Manual Customizing the Phone Settings Assigning ringtones The phone has 10 built-in ringtones that can be assigned to identities, group types, and the contact type «VIP». It is also possible to download a custom melody. When an incoming call to an identity is ringing, the phone will play the ringtone assigned to that identity, unless it is a call from a VIP or from a group with a distinctive ringer of their own.
-
Page 89: Date And Time Formats
D735 User Manual Customizing the Phone Settings ate and time formats Date and time formats can be set on the phone and on the web interface. The defaults are US time format and 24-hour clock (Fig. 1 and 2). European date and time formats are shown in Fig. 3 and 4, US date and time formats in Fig.
-
Page 90: Time
D735 User Manual Customizing the Phone Settings 3. Press briefly to return to the previous menu or for two seconds to return to the idle screen. • Web interface settings. 1. Open the Preferences page > General Information section > US Date Format. The default is «on».
-
Page 91: Language Settings Of Phone And Web Interface
D735 User Manual Customizing the Phone Settings On the phone > Preferences > Date & Time > Time Zone. 1. Press Fig. 1 Fig. 2 ◦ Press to collapse the list to show only selected times zones and/or locations where the phone language is spoken).
-
Page 92: Web Interface Language
D735 User Manual Customizing the Phone Settings Setting on the web interface 1. Open Preferences > General Information > Language. 2. Select the language from the drop-down list. 3. Click on Apply and Save. Web interface language 1. Open Preferences > General Information > Web interface language.
-
Page 93: Call Forwarding
D735 User Manual Customizing the Phone Settings all forwarding This feature automatically redirects all or certain incoming calls to another phone or a mailbox. Call forwarding is configured for each identity separately. On the web interface, the settings are configured on the Configuration identity (1-12) pages. If you set call forwarding on the phone, the settings are applied to the identity selected as the outgoing identity at the time of the configuration;…
-
Page 94: Call Completion
3. Click on Apply and Save. all completion On Snom phones call completion means that when a called number is busy or not available, your phone will call you back as soon as the dialed number is not busy anymore or available again. The factory default setting is «off».
-
Page 95: Call Waiting
D735 User Manual Customizing the Phone Settings all waiting Default setting: When in a call, another call coming in is announced visually in the status line and acoustically by a double beep. See «Call waiting» on page 53 on how to use this feature. Available settings: ◦…
-
Page 96: Hiding My Caller Id
D735 User Manual Customizing the Phone Settings Setting on the web interface Call waiting is set independently for each identity. 1. In the menu on the left, click on the identity whose call waiting settings you want to change. 2. Click on the SIP tab. The setting Call Waiting Indication is the second to last on the page.
-
Page 97: Rejecting Anonymous Calls
D735 User Manual Customizing the Phone Settings ejecting anonymous calls With this setting you will not receive calls from phones whose number is not shown on your display. Anonymous callers will hear the busy signal. Please note that calls from analog phone connections will, most likely, be received as anonymous calls.
-
Page 98: Speed Dial
D735 User Manual Customizing the Phone Settings Setting on the web interface This setting requires administrator mode. 1. Open Advanced Settings page > Behavior tab > Phone Behavior section > Number Guessing. 2. Select the radio button on. 3. Type the minimum number of digits in the text field of Number Guessing Minimum Length.
-
Page 99
D735 User Manual Customizing the Phone Settings 2. Enter one phone number with any required prefixes (area code, country code, operator/auto attendant, etc.) in the text field for each respective number or special character in the table. Type each phone number without spaces or punctuation between the digits. -
Page 100: Software Update
Software Update oftware update anual update 1. Open a browser and enter the address http://wiki.snom.com/Firmware. 2. Click on the type of phone to be updated. 3. Click on the firmware version currently running on your phone. 4. Right-click on the link of the firmware version you want to update to.
-
Page 101: Troubleshooting
D735 User Manual Troubleshooting roubleshooting eboot 1. Press 2. Select Maintenance and press 3. Select Reboot and press 4. When asked whether to «Reboot?», press 5. Wait for the idle screen to reappear. ard reboot Disconnect the power, wait for 10 seconds, and reconnect. Wait for the idle screen to reappear.
-
Page 102: Contacting Snom Support
Make sure to delete private and/or security-relevant data like the MAC address, public IP address, etc. races Snom Support may ask you to submit a SIP Trace and/or a PCAP Trace to help them analyze your problem. Performing a SIP Trace 1.
-
Page 103
D735 User Manual Troubleshooting 4. Click on Reload. 5. Copy the text and submit to Support in whatever form they requested you to use. If it is the public forum, make sure to delete private and/or security-relevant data like the MAC address, public IP address, etc. -
Page 104: Appendix 1 — Display Symbols And Icons
Turning DND on and off Contacts list Forwarding all calls (turning on/turning off) Presence signaling on/off Retrieving messages from mailbox Settings menu Directory IP address of phone and Snom’s web address Redial (dialed calls) Received calls Missed calls Favorites LDAP Directory Silencing ringer…
-
Page 105
D735 User Manual Appendix 1 Context-sensitive symbols These are the symbols displayed in the function key line when the phone is active, for example when a call is ringing, when you are dialing, etc. Confirming a selection or an action… -
Page 106: Smartlabel Function Symbols
D735 User Manual Appendix 1 martLabel function symbols These are the symbols displayed in the SmartLabel area of the programmable function keys P1–P32 when the function key page with the configured key is on-screen. For information on the configuration of the keys see «Configuring the function keys» on page 67.
-
Page 107
D735 User Manual Appendix 1 Contacts / Presence state Delete message Deny all — reject current and all future calls from the number Directory (internal phonebook) Push2Talk DND (turning on/turning off) (red symbol = DND is on) Favorites Forwarding all calls (turning on/turning off) -
Page 108: Display Indications
D735 User Manual Appendix 1 isplay indications On activity Outgoing call ringing Incoming call ringing Connected (single connection or conference) Call disconnected/terminated Dialed number is busy Holding call Call being held by other party On idle screen Outgoing identity •…
-
Page 109: Appendix 2 — Status Messages
D735 User Manual Appendix 2 ppendix 2 — Status Messages Whenever there is a current message concerning the status of the phone, the function key will be available. Press the function key or, if it not available, > Information > Status Info) to open the Status info screen.
-
Page 110: Appendix 3 — Wall Mounting
D735 User Manual Appendix 3 ppendix 3 — Wall Mounting Not included in the delivery are the two screws (diameter of head between 6 and 9 mm, diameter of body max. 4.5 mm) and two screw anchors/molly bolts/wall plugs appropriate for your type of wall.
-
Page 111: Appendix 4 — Programmable Functions
(Busy Lamp Field) incoming call ringing on your own extension. These functionalities depend on your PBX; for more information, please check snom’s interoperability page and the PBX manual. With Asterisk, generally use this feature rather than extension. Button This is a function key that is connected to your PBX to perform a task specified in the buttons document.
-
Page 112
These functionalities depend on your PBX; for more information, please check snom’s interoperability page and the PBX manual. With Asterisk, generally use BLF rather than this function. -
Page 113
D735 User Manual Appendix 4 This function key can be used for regular calls to an extension that is reached via an IVR or auto attendant and a number of voice prompts where the caller has to make a selection by pressing a key after or during the prompt. If you know which keys need to be pressed in which order in order to reach the desired extension, the entire process can be automated and considerably speeded up. -
Page 114
D735 User Manual Appendix 4 Presence If supported by your PBX, the LED of this function key will reflect the presence status (ringing, busy, available, etc.) of the extension specified in the «Number» text field. The function key can also be used to dial the extension, usually when the destination signals availability. -
Page 115: Key Events
FW versions lower than 8: Phone’s IP address, MAC address, and firmware version. FW 8 and higher: Phone’s IP address and the URI to Snom Wiki. IP address, MAC address, and firmware version can be found in Settings > 6 Information >…
-
Page 116
D735 User Manual Appendix 4 LDAP Directory Allows the user to look up a remote directory while dialing. Once set, this pressed key will open up the Direcory Search window. If LDAP is setup, corresponding matching entries as returned by the sever will be shown. If LDAP is not used and and presence_ lookup_number setting is turned on, the contact matches will be shown. -
Page 117: Appendix 5 — Gnu General Public License
Appendix 5 — GNU General Public License COPYRIGHT NOTICE AND WARRANTY We protect your rights with two steps: (1) copyright the software, and (2) offer you this license which gives you legal permission to copy, DISCLAIMER distribute and/or modify the software. Also, for each author‘s protection and ours, we want to make certain that everyone understands that there is no warranty for this free software.
-
Page 118
Appendix 5 the Program itself is interactive but does not normally print such an modify or distribute the Program or its derivative works. These actions announcement, your work based on the Program is not required to are prohibited by law if you do not accept this License. Therefore, by modifying or distributing the Program (or any work based on the print an announcement.) Program), you indicate your acceptance of this License to do so, and… -
Page 119
If requested by you, the complete corresponding source code of the 11. BECAUSE THE PROGRAM IS LICENSED FREE OF CHARGE, THERE Software can be sent by Snom Technology GmbH on a standard data IS NO WARRANTY FOR THE PROGRAM, TO THE EXTENT PERMITTED BY storage medium against the reimbursement of the manufacturing APPLICABLE LAW. -
Page 120
Tel. +886 2 8751 1120 Fax +44 169 348 7509 Fax +886 2 8751 1130 offi ce.uk@snom.com offi ce.tw@snom.com Your specialist retailer — Ihr Fachhändler — Votre distributeur — Su distribuidor — Il tuo rivenditore: © Snom Technology GmbH v1.01…