Посмотреть инструкция для Sony RDR-AT200 бесплатно. Руководство относится к категории DVD-рекордеры, 2 человек(а) дали ему среднюю оценку 8.4. Руководство доступно на следующих языках: русский. У вас есть вопрос о Sony RDR-AT200 или вам нужна помощь? Задайте свой вопрос здесь
Не можете найти ответ на свой вопрос в руководстве? Вы можете найти ответ на свой вопрос ниже, в разделе часто задаваемых вопросов о Sony RDR-AT200.
Как лучше всего выполнять чистку DVD-рекордер?
Для удаления отпечатков пальцев лучше всего использовать слегка влажную салфетку для уборки или мягкую чистую ткань. Пыль в труднодоступных местах лучше всего удаляется потоком сжатого воздуха.
Инструкция Sony RDR-AT200 доступно в русский?
Да, руководствоSony RDR-AT200 доступно врусский .
Не нашли свой вопрос? Задайте свой вопрос здесь
Раздел: Бытовая, кухонная техника, электроника и оборудование
Тип: DVD Рекордер С Жестким Диском
Характеристики, спецификации
Тип загрузки дисков:
выдвижной лоток
Блокировка открывания лотка:
Да
Диаметр дисков:
5″(12 см)/ 3″(8 см)
Воспроизведение DVD видео:
Да
Воспроизведение DVD+R/RW:
Да
Воспроизведение DVD-R/RW:
Да
Воспроизведение DVD-RAM:
Да
Воспроизведение CD/-R/-RW:
Да
Воспроизведение Picture CD (JPEG):
Да
Запись двуслойных DVD+R DL (8.5 ГБ):
Да
Запись двуслойных DVD-R DL(8.5 ГБ):
Да
Запись с линейного входа:
Да
Запись со встроен.ТВ тюнера:
Да
Запись со встроен. HDD:
Да
Копирование с DVD на HDD/USB:
Да
Видеотракт:
10 бит / 108 МГц
Прогрессивная развертка:
PAL/NTSC
Аудиотракт:
24 бит / 192 кГц
Жесткий диск (HDD):
250 ГБ
Макс. время записи на HDD:
до 710 часов
Количество каналов тюнера:
234
Автоматическая настройка:
Да
Ввод названий телеканалов:
Да
Сис-ма обмена данными c ТВ:
Да
Авт. выбор систем цвет.:
Да
Ручной выбор систем цвет.:
Да
Кол-во программ таймера:
32
Ежедневный таймер записи:
Да
Пауза при просмотре ТВ-передач:
Да
Ввод названий DVD дисков:
Да
Одновременная запись и воспр.:
Да
Светящиеся символы дисплея:
Да
Цвет светящихся символов:
голубой
Регул. яркости дисплея:
Да
Дистанционное управление:
полное
ДУ другими компонентами:
Да
Мультибрендовый пульт ДУ:
Да
Тип батарей пульта ДУ:
2 x AA (LR6)
Батареи пульта ДУ:
в комплекте
Фронт.вход RCA аудио/видео:
1
Фронт. вход I.Link (IEEE 1394) 4pin:
1
Фронт. порт USB 1.1 Тип А:
1
Фронт. порт USB 1.1 Тип В:
1
Выход RCA видео (композитный):
1
Выход RCA компонент.YPbPr:
1
Выход коаксиальный цифр.:
1
Тип кабеля в комплекте 1:
TV коаксиальный
Макс. потребляемая мощность:
43 Вт
Материал фронт. панели:
пластик
Габаритные размеры (В*Ш*Г):
6.7*43*29 см
Инструкция к DVD Рекордеру С Жестким Диском Sony RDR-AT200 Black

4-273-934-12(1)
DVD рекордер
Инструкция пo экcплyaтaции
Полезные рекомендации, советы и информацию об
изделиях Sony можно найти на сайте: www.sony-
europe.com/myproduct/
RDR-AT100/AT200
© 2009 Sony Corporation
• Установите эту систему
так, чтобы в случае
ПРЕДУПРЕЖ-
неисправности вилку
сетевого шнура (провода
ДЕНИЕ
электропитания) можно
было немедленно вынуть из
штепсельной розетки.
Во избежание пожара или
поражения электрическим
током не подвергайте
аппарат воздействию дождя
Такая этикетка находится на
или влаги.
защитном кожухе лазера
Во избежание удара
внутри корпуса устройства.
электрическим током не
Утилизация
открывайте корпус
устройства самостоятельно.
электрического и
Техническое обслуживание
электронного
должно осуществляться
оборудования
только сотрудниками
Данный знак применим
сервисных центров.
только в Европейском союзе
Сетевой шнур (провод
и прочих европейских
электропитания) следует
странах, в которых
заменять только в
организована система
специализированном
раздельного сбора.
сервисном центре.
Батарейки и аппарат не
должны подвергаться
чрезмерному воздействию
Для покупателей в
тепла, например, прямого
Украине (Для
солнечного света, огня и т.п.
користувачів в Україні)
Утилизация
Обладнання відповідає
Данный продукт
использованных
вимогам:
классифицируется как
элементов питания
— Технічного регламенту
ЛАЗЕРНОЕ УСТРОЙСТВО
безпеки низьковольтного
(применяется в странах
КЛАССА 1. Этикетка с
електричного обладнання
Евросоюза и других
надписью CLASS 1 LASER
(постанова КМУ від
PRODUCT расположена на
европейских странах,
29.10.2009 № 1149);
задней стороне аппарата.
где действуют системы
— Технічного регламенту з
Класс защиты от поражения
електромагнітної сумісності
раздельного сбора
электрическим током II
обладнання (постанова КМУ
отходов)
від 29.07.2009 № 785).
Данный знак применим
Дата изготовления
только в Европейском союзе
напечатана на задней панели
Меры
и прочих европейских
аппарата.
предосторожности
странах, в которых
Рекомендуемый срок
организована система
• Данный аппарат работает
годности указан на стороне
от сети с напряжением 220 –
раздельного сбора.
батарейки со знаком минус.
240 В переменного тока, 50/
60 Гц. Проверьте,
Для покупателей в
Внимание!
соответствует ли рабочее
России
Использование оптических
напряжение аппарата
Импортер на территории РФ
приборов с данным
напряжению Вашей
и название и адрес
устройством вредно для
местной электрической
организации, раположенной
зрения. Поскольку
сети.
на территории РФ,
используемый в DVD-
• Во избежание
уполномоченной принимать
рекордере лазерный луч
возникновения пожара или
претензии от пользователей:
опасен для зрения, не
удара электрическим током
ЗАО “Сони Электроникс”,
пытайтесь самостоятельно
не ставьте на устройство
123103, Москва,
разбирать устройство.
наполненные жидкостью
Карамышевский проезд, 6,
Техническое обслуживание
предметы, например, вазы.
Россия
должно осуществляться
только сотрудниками
сервисных центров.
2

Для покупателей в
• Не помещайте рекордер
Казахстане
сверху на горячую
Меры
поверхность, как,
Сони Оверсиз С.А.
Представительство в
например, на кассетный
предосторож-
Казахстане
видеомагнитофон или
050059 Алматы, улица
усилитель (приемник).
ности
Иванилова, д. 58
• Не помещайте рекордер в
место, подверженное
Для покупателей в
Данное оборудование было
чрезмерным изменениям
Украине (Для
протестировано с
температуры
користувачів в Україні)
использованием
(температурный градиент
Manufacturer:
соединительного кабеля
менее, чем 10 °C/час).
Sony Corporation 1-7-1,
менее 3 м и признано
• Не перемещайте
Konan, Minato-ku, Tokyo,
соответствующим
рекордер с
Japan, 108-0075.
ограничениям,
подсоединенным сетевым
Виробник:
установленным директивой
шнуром переменного
Сoні Кopпopейшн
EMC.
тока (проводом
1-7-1 Конан, Мінато-ку,
электропитания).
Токио, Японія, 108-0075
О безопасности
• Не отсоединяйте сетевой
При попадании какого-
Уповноважений представник
шнур переменного тока
в Україні: ТОВ «Соні
либо твердого предмета
(провод электропитания)
Україна», вул. Спаська 30,
или жидкости внутрь
при включенном питании.
м.Київ, 04070, Україна.
корпуса отсоедините
• При отсоединении
рекордер от сети питания и
Обладнання відповідає
сетевого шнура
проверьте его у
вимогам Технічного
переменного тока
регламенту обмеження
квалифицированного
(провода
використання деяких
обслуживающего
электропитания)
небезпечних речовин в
персонала перед
выключите питание и
електричному та
дальнейшей
убедитесь в том, что
електронному обладнанні
эксплуатацией.
привод жесткого диска не
(постанова КМУ від 03/12/
работает (на передней
2008 № 1057)
О накопителе на
индикаторной панели по
Примечание для
жестком диске
крайней мере 30 секунд
покупателей:
Жесткий диск имеет
отображается время, а
приведенная ниже
высокую плотность
процесс записи или
перезаписи остановлен).
информация относится
размещения информации,
позволяющую
• Не перемещайте
к оборудованию,
осуществлять запись
рекордер в течение одной
продаваемому в
большой длительности и
минуты после того, как
странах, где действуют
быстрый доступ к
Вы отсоедините сетевой
директивы ЕС.
записанным данным.
шнур переменного тока
Производителем данного
Однако он может быть
(провод электропитания).
изделия является Sony
легко поврежден при ударе,
• Не пытайтесь заменить
Corporation, адрес: 1-7-1
вибрации или воздействии
или модернизировать
Konan Minato-ku Tokyo, 108-
пыли, и не должен
жесткий диск
0075 Japan (Япония).
самостоятельно, так как
Уполномоченным
подвергаться воздействию
представителем по
магнитного поля. Во
это может привести к его
электромагнитной
избежание потери важных
неисправности.
совместимости и
данных, соблюдайте
безопасности изделия
При неисправности
следующие меры
является Sony Deutschland
жесткого диска Вы не
предосторожности.
GmbH, адрес: Hedelfinger
сможете восстановить
• Не подвергайте рекордер
Strasse 61, 70327 Stuttgart,
утерянные данные.
сильным ударам.
Germany (Германия). По
Накопитель на жестком
вопросам обслуживания или
• Не помещайте рекордер в
диске является лишь
гарантийных обязательств,
место, подверженное
временной областью
пожалуйста, обращайтесь по
механическим вибрациям,
памяти.
адресам, указанным в
или в неустойчивое место.
отдельных документах по
техническому обслуживанию
или гарантийным
обязательствам.
,Продолжение следует
3
О ремонте
• Не устанавливайте
повреждено в результате
рекордер на мягкую
неисправности рекордера
накопителя на
поверхность, как,
или выполненного ремонта
жестком диске
например, коврик,
рекордера. В следующих
• Содержимое накопителя
которая может
случаях Sony не
на жестком диске может
перекрыть
восстанавливает, не
быть проверено в случае
вентиляционные
покрывает расходы и не
ремонта или осмотра при
отверстия.
несет ответственность за
неисправности или
• Не устанавливайте
содержимое записи.
модификации. Тем не
данное устройство в
менее, содержимое не
местах, где пространство
Авторские права
будет копироваться или
ограничено, например, в
• Телевизионные
сохраняться фирмой
книжных шкафах и т.п.
программы, фильмы,
Sony.
• Не устанавливайте
видеоленты, диски и
• Если жесткий диск
рекордер в месте,
другие материалы могут
нуждается в
расположенном возле
быть защищены
форматировании или
источников тепла или
авторскими правами.
замене, это будет
подверженном
Несанкционированная
выполнено по
воздействию прямых
запись таких материалов
усмотрению фирмы Sony.
солнечных лучей,
может противоречить
Все содержимое
чрезмерному запылению
положениям законов об
накопителя на жестком
или механическим
авторском праве. Также
диске будет стерто,
ударам.
использование данного
включая содержимое,
• Не устанавливайте
рекордера с передачами
которое нарушает
рекордер в наклонном
кабельного телевидения
авторские права.
положении. Он
может потребовать
предназначен для
разрешения от
Об источниках
эксплуатации только в
передающей стороны
питания
горизонтальном
кабельного телевидения
• Данное устройство не
положении.
и/или владельца
будет отключено от
• Держите аппарат и диски
программы.
электросети, пока шнур
подальше от
• Это изделие включает
питания подключен к
оборудования с сильными
технологию защиты
сетевой розетке, даже
магнитными полями, как,
авторских прав, которая
если вы выключили само
например,
защищена патентами
устройство с помощью
микроволновые печи или
США и другими правами
кнопки.
большие
на интеллектуальную
• Если Вы не собираетесь
громкоговорители.
собственность.
использовать рекордер в
• Не кладите на рекордер
Использование этой
течение длительного
тяжелые предметы.
технологии защиты
периода времени, не
авторских прав должно
забудьте отсоединить его
О записи
быть одобрено
от сетевой розетки. Для
Выполните пробную
Macrovision и
отсоединения сетевого
запись перед выполнением
предназначено для
шнура переменного тока
фактической записи.
использования в быту и
(провода
другого ограниченного
электропитания)
О компенсации за
использования для
беритесь
просмотра, если только
утерянную запись
непосредственно за
иное не одобрено
Sony не несет
штепсельную вилку, ни в
Macrovision. Запрещается
ответственность и не
коем случае не тяните за
копирование технологии
обеспечивает компенсацию
шнур.
и демонтаж изделия.
за утерянную запись и
связанные с этим потери,
Об установке
включая обстоятельства,
• Установите рекордер в
когда запись не была
месте с достаточной
выполнена по причине
вентиляцией для
неисправности рекордера
предотвращения
или когда содержимое
накопления в нем тепла.
записи было утеряно или
4

• Данный аппарат
• В данном руководстве
использует шрифты
внутренний накопитель
ВАЖНЫЕ
®
FontAvenue
,
на жестком диске
ПРИМЕЧАНИЯ
лицензированные
обозначается как “HDD”,
корпорацией NEC.
Предостережение:
а “диск” используется как
FontAvenue является
Данный рекордер
общий термин для дисков
зарегистрированной
способен удерживать
HDD, DVD или CD, если
торговой маркой
неподвижное
в тексте или на рисунках
корпорации NEC.
видеоизображение или
не указано иное.
• “ ” и x-Application
изображение экранной
• Значки, такие как
являются товарными
индикации на Вашем
DVD
, приведенные
знаками Sony Corporation.
телевизионном экране
вверху каждого
• Использование данного
неограниченное
пояснения, указывают,
продукта для каких-либо
количество времени.
какой носитель
целей, кроме личных
Если Вы будете
информации можно
целей потребителя,
оставлять неподвижное
использовать с
любым способом,
видеоизображение или
соответствующей
совместимым со
экранную индикацию на
функцией. Подробные
стандартом MPEG-2, для
Вашем телевизоре в
сведения приведены в
кодирования
течение
разделе “Диски,
видеоинформации,
продолжительного
доступные для записи и
содержащейся на
периода времени,
воспроизведения” на
стандартном носителе
существует опасность
стр. 155.
информации,
неисправимого
• Инструкции в данном
категорически
повреждения Вашего
руководстве описывают
запрещается без
телевизионного экрана.
регуляторы на пульте
лицензии в соответствии с
Плазменные панели и
дистанционного
применяемыми
проекционные
управления. Вы также
патентами в пакете
телевизоры особенно
можете использовать
патентов MPEG-2,
чувствительны к этому.
регуляторы на рекордере,
лицензию на
если они имеют такие же
использование которых
Если у Вас имеются какие-
или похожие названия,
можно приобрести в
либо вопросы или
что и на пульте
компании MPEG LA,
проблемы, касающиеся
дистанционного
L.L.C., 250 Steele Street,
Вашего рекордера,
управления.
Suite 300, Denver,
пожалуйста, обратитесь к
• Иллюстрации экранной
Cоlоradо 80206.
Вашему ближайшему
индикации, используемые
дилеру фирмы Sony.
в данном руководстве,
Функция защиты от
могут не совпадать с
Об этом
графическим
копирования
изображением на экране
Поскольку рекордер имеет
руководстве
Вашего телевизора.
функцию защиты от
• Пояснения, касающиеся
копирования, программы,
Проверьте название
дисков DVD в данном
принимаемые через
Вашей модели
руководстве, относятся к
внешний тюнер (не
В данном руководстве
дискам DVD, созданным
прилагается), могут
приведены инструкции
на данном рекордером.
содержать сигналы защиты
для 2 моделей: RDR-
Пояснения не
от копирования (функции
AT100 и RDR-AT200.
распространяются на
защиты от копирования) и
Проверьте название
диски DVD, созданные на
как таковые могут быть не
Вашей модели на
других рекордерах и
перезаписываемыми, в
передней панели
воспроизводимые на
зависимости от типа
рекордера.
данном рекордере.
сигнала.
5

Оглавление
ПРЕДУПРЕЖДЕНИЕ . . . . . . . . . . . . . . . . . . . . . . . . . . . . . . . . . . . . . . . . . 2
Меры предосторожности . . . . . . . . . . . . . . . . . . . . . . . . . . . . . . . . . . . . . 3
Справочник по деталям и регуляторам . . . . . . . . . . . . . . . . . . . . . . . . . 10
Подсоединения и установки . . . . . . . . . . . . . . . . . . . . . . . 15
Подсоединение рекордера . . . . . . . . . . . . . . . . . . . . . . . . . . . . . . . . . . . 15
Шаг 1: Подсоединение антенного кабеля . . . . . . . . . . . . . . . . . . . . . . . 16
Шаг 2: Подсоединение видеошнуров/шнура HDMI . . . . . . . . . . . . . . . . 17
О возможностях SMARTLINK
(только для подсоединений SCART) . . . . . . . . . . . . . . . . . . . . . 19
О функциях “Контроль по HDMI” для ‘BRAVIA’ Sync
(только для подсоединений HDMI) . . . . . . . . . . . . . . . . . . . . . . . 20
Шаг 3: Подсоединение аудиошнуров/шнура HDMI . . . . . . . . . . . . . . . . 21
Шаг 4: Подсоединение сетевого шнура переменного тока . . . . . . . . . 23
Шаг 5: Подготовка пульта дистанционного управления . . . . . . . . . . . 23
Управление телевизорами с помощью пульта дистанционного
управления . . . . . . . . . . . . . . . . . . . . . . . . . . . . . . . . . . . . . . . . . . 24
Если у Вас есть DVD-проигрыватель Sony или несколько
DVD-рекордеров Sony . . . . . . . . . . . . . . . . . . . . . . . . . . . . . . . . . 25
Изменение положений программ рекордера при помощи пульта
дистанционного управления . . . . . . . . . . . . . . . . . . . . . . . . . . . . 25
Шаг 6: Простая настройка . . . . . . . . . . . . . . . . . . . . . . . . . . . . . . . . . . . .26
Подсоединение кассетного видеомагнитофона или подобного
устройства . . . . . . . . . . . . . . . . . . . . . . . . . . . . . . . . . . . . . . . . . . . . . 28
Подсоединение к гнезду LINE 1/DECODER . . . . . . . . . . . . . . . . . . . 28
Подсоединение к гнездам LINE 2 IN на передней панели . . . . . . . 30
Подсоединение к спутниковому или цифровому тюнеру . . . . . . . . . . 31
Подсоединение внешнего декодера . . . . . . . . . . . . . . . . . . . . . . . . . . . 32
Подсоединение декодера . . . . . . . . . . . . . . . . . . . . . . . . . . . . . . . . . 32
Установка положений программ внешнего декодера
(аналогового декодера PAY-TV/Canal Plus) . . . . . . . . . . . . . . . . 33
Семь основных операций — Ознакомление с Вашим
DVD-рекордером
1. Вставление диска . . . . . . . . . . . . . . . . . . . . . . . . . . . . . . . . . . . . . . . . 35
2. Запись программы . . . . . . . . . . . . . . . . . . . . . . . . . . . . . . . . . . . . . . . . 36
Проверка состояния диска во время записи . . . . . . . . . . . . . . . . . . 37
3. Воспроизведение записанной программы (Список титулов) . . . . . 38
Отображение времени воспроизведения и информации о
воспроизведении . . . . . . . . . . . . . . . . . . . . . . . . . . . . . . . . . . . . . 41
4. Изменение названия записанной программы . . . . . . . . . . . . . . . . . . 42
5. Маркировка и защита диска . . . . . . . . . . . . . . . . . . . . . . . . . . . . . . . . 44
Маркировка диска . . . . . . . . . . . . . . . . . . . . . . . . . . . . . . . . . . . . . . . 44
Защита диска . . . . . . . . . . . . . . . . . . . . . . . . . . . . . . . . . . . . . . . . . . . 44
6. Воспроизведение диска на другой DVD-аппаратуре
(Финализация) . . . . . . . . . . . . . . . . . . . . . . . . . . . . . . . . . . . . . . . . . . 45
Отмена финализации диска . . . . . . . . . . . . . . . . . . . . . . . . . . . . . . . 47
7. Повторное форматирование диска . . . . . . . . . . . . . . . . . . . . . . . . . . 48
6

Запись . . . . . . . . . . . . . . . . . . . . . . . . . . . . . . . . . . . . . . . . . . 50
Запись по таймеру . . . . . . . . . . . . . . . . . . . . . . . . . . . . . . . . . . . . . . . . . . 50
Использование функции быстрой записи по таймеру . . . . . . . . . . 52
Запись стереофонических и двуязычных программ . . . . . . . . . . . . 52
Создание разделов в заголовке . . . . . . . . . . . . . . . . . . . . . . . . . . . . 53
Проверка/изменение/отмена установок таймера
(Список по таймеру) . . . . . . . . . . . . . . . . . . . . . . . . . . . . . . . . . . . . . 53
Запись с подсоединенной аппаратуры . . . . . . . . . . . . . . . . . . . . . . . . . 54
Запись с подсоединенной аппаратуры с таймером
(Синхронная запись) . . . . . . . . . . . . . . . . . . . . . . . . . . . . . . . . . . . 54
Запись с подсоединенной аппаратуры без таймера . . . . . . . . . . . . 55
Воспроизведение . . . . . . . . . . . . . . . . . . . . . . . . . . . . . . . . 57
Воспроизведение . . . . . . . . . . . . . . . . . . . . . . . . . . . . . . . . . . . . . . . . . . . 57
Опции воспроизведения. . . . . . . . . . . . . . . . . . . . . . . . . . . . . . . . . . . 60
Повторное воспроизведение выбранного фрагмента
(Повтор A-B) . . . . . . . . . . . . . . . . . . . . . . . . . . . . . . . . . . . . . . . . . 62
Повторное воспроизведение (Повтор) . . . . . . . . . . . . . . . . . . . . . . . 62
Создание Вашей собственной программы (Программа) . . . . . . . . . 63
Воспроизведение видеофайлов DivX . . . . . . . . . . . . . . . . . . . . . . . . . . 65
Подсоединение устройства USB. . . . . . . . . . . . . . . . . . . . . . . . . . . . 65
Воспроизведение видеофайлов DivX . . . . . . . . . . . . . . . . . . . . . . . . 65
Расширенные функции воспроизведения . . . . . . . . . . . . . . . . . . . . . . .67
Приостановка телевизионного вещания
(ТВ пауза/пауза в прямом ТВ эфире) . . . . . . . . . . . . . . . . . . . . .67
Воспроизведение с начала программы, которую Вы записываете
(Воспр. с зап) . . . . . . . . . . . . . . . . . . . . . . . . . . . . . . . . . . . . . . . . . 68
Воспроизведение предыдущей записи во время выполнения
другой (Одновременная запись и воспроизведение) . . . . . . . . 68
Поиск по времени/заголовку/разделу/дорожке и т.п. . . . . . . . . . . . . . 69
Удаление и редактирование . . . . . . . . . . . . . . . . . . . . . . . 70
Перед редактированием . . . . . . . . . . . . . . . . . . . . . . . . . . . . . . . . . . . . . 70
Удаление и редактирование заголовка . . . . . . . . . . . . . . . . . . . . . . . .71
Редактирование нескольких заголовков (Мультирежимный) . . . . 71
Удаление части заголовка (Стирание A-B) . . . . . . . . . . . . . . . . . . . 72
Разделение заголовка (Делить) . . . . . . . . . . . . . . . . . . . . . . . . . . . . 73
Удаление и редактирование раздела . . . . . . . . . . . . . . . . . . . . . . . . . . 74
Разделение раздела (Делить) . . . . . . . . . . . . . . . . . . . . . . . . . . . . . . 74
Удаление раздела (Стереть) . . . . . . . . . . . . . . . . . . . . . . . . . . . . . . . 75
Объединение нескольких разделов (Объединить) . . . . . . . . . . . . . 75
Создание и редактирование списка воспроизведения . . . . . . . . . . . . 76
Перемещение заголовка списка воспроизведения
(Переместить) . . . . . . . . . . . . . . . . . . . . . . . . . . . . . . . . . . . . . . . . 76
Объединение нескольких заголовков списка воспроизведения
(Объединить). . . . . . . . . . . . . . . . . . . . . . . . . . . . . . . . . . . . . . . . . 77
Разделение заголовка списка воспроизведения (Делить). . . . . . . 77
Перемещение раздела (Переместить) . . . . . . . . . . . . . . . . . . . . . . . 77
,Продолжение следует
7

Перезапись (жесткий диск y DVD) . . . . . . . . . . . . . . . . 78
Перед перезаписью . . . . . . . . . . . . . . . . . . . . . . . . . . . . . . . . . . . . . . . . . 78
Перезапись HDD/DVD . . . . . . . . . . . . . . . . . . . . . . . . . . . . . . . . . . . . . . . 79
Перезапись с помощью списка перезаписи . . . . . . . . . . . . . . . . . . . . . 80
Создание диска с резервной копией (Дублир. DVD) . . . . . . . . . . . . . . 83
Перезапись с HDD-видеокамеры . . . . . . . . . . . . . . . . . . . 85
Перед перезаписью с HDD-видеокамеры . . . . . . . . . . . . . . . . . . . . . . . 85
Подготовка к перезаписи с HDD-видеокамеры. . . . . . . . . . . . . . . . 86
Перезапись одним касанием с HDD-видеокамеры
(ONE-TOUCH DUB) . . . . . . . . . . . . . . . . . . . . . . . . . . . . . . . . . . . . . . 87
Перезапись с HDD-видеокамеры c помощью экранной индикации
(Перезапись HDD-видеокамеры.) . . . . . . . . . . . . . . . . . . . . . . . . . . . 88
Перезапись с DV-видеокамеры . . . . . . . . . . . . . . . . . . . . 90
Перед перезаписью с DV-видеокамеры . . . . . . . . . . . . . . . . . . . . . . . .90
Подготовка к перезаписи с DV-видеокамеры . . . . . . . . . . . . . . . . . 90
Перезапись всей ленты в формате DV (DV-перезапись одним
касанием) . . . . . . . . . . . . . . . . . . . . . . . . . . . . . . . . . . . . . . . . . . . . . . 92
Перезапись выбранных эпизодов (Перезапись DV вручную) . . . . . . . 93
Воспроизведение с DV-видеокамеры . . . . . . . . . . . . . . . . . . . . . . . . . . 94
Функция музыкальной шкатулки . . . . . . . . . . . . . . . . . . 95
О функции музыкальной шкатулки . . . . . . . . . . . . . . . . . . . . . . . . . . . . 95
Подготовка к использованию функции музыкальной шкатулки . . . . 96
Подсоединение устройства USB. . . . . . . . . . . . . . . . . . . . . . . . . . . . 96
Копирование дорожек или альбомов (USB t жесткий диск). . . . 96
Копирование аудиодорожек (ДИСК t жесткий диск). . . . . . . . . . 97
Копирование дорожек или альбомов на жесткий диск
(жесткий диск y жесткий диск) . . . . . . . . . . . . . . . . . . . . . . . . 97
Воспроизведение аудиодорожек с помощью функции музыкальной
шкатулки/устройства USB . . . . . . . . . . . . . . . . . . . . . . . . . . . . . . . . 98
Добавление аудиодорожек к списку воспроизведения
(только жесткий диск) . . . . . . . . . . . . . . . . . . . . . . . . . . . . . . . . . 99
Опции воспроизведения. . . . . . . . . . . . . . . . . . . . . . . . . . . . . . . . . . 100
Повторное воспроизведение (Повтор) . . . . . . . . . . . . . . . . . . . . . . 100
Создание Вашей собственной программы (Программа)
(только устройство USB) . . . . . . . . . . . . . . . . . . . . . . . . . . . . . . 101
Управление аудиодорожками с помощью функции музыкальной
шкатулки (только жесткий диск) . . . . . . . . . . . . . . . . . . . . . . . . . . 102
8

Фотоальбом . . . . . . . . . . . . . . . . . . . . . . . . . . . . . . . . . . . . 103
О функции “Фотоальбом” . . . . . . . . . . . . . . . . . . . . . . . . . . . . . . . . . . . 103
Подготовка к использованию функции “Фотоальбом” . . . . . . . . . . . 103
Подсоединение устройства USB. . . . . . . . . . . . . . . . . . . . . . . . . . . 103
Копирование файлов изображений JPEG на жесткий диск
(ДИСК/USB t жесткий диск) . . . . . . . . . . . . . . . . . . . . . . . . . . 104
Копирование всех файлов изображений JPEG с подсоединенного
устройства USB (USB
t
DVD-RW/DVD-R) . . . . . . . . . . . . . . . . . 105
Копирование файлов изображений JPEG или альбомов на
жесткий диск (жесткий диск y жесткий диск) . . . . . . . . . . . 105
Копирование альбомов изображений JPEG на диск
(жесткий диск t DVD-RW/DVD-R). . . . . . . . . . . . . . . . . . . . . .106
Копирование файлов изображений JPEG на диск (жесткий
диск t DVD-RW/DVD-R) . . . . . . . . . . . . . . . . . . . . . . . . . . . . . . 107
Использование списка “Фотоальбом” . . . . . . . . . . . . . . . . . . . . . . . . . 109
Воспроизведение слайд-шоу . . . . . . . . . . . . . . . . . . . . . . . . . . . . . . 111
Создание слайд-шоу с наиболее предпочитаемой Вами музыкой
или графическими эффектами (x-Pict Story)
(только жесткий диск) . . . . . . . . . . . . . . . . . . . . . . . . . . . . . . . . . . . 112
Управление файлами изображений JPEG на жестком диске . . . . . 114
Печать файлов изображений JPEG . . . . . . . . . . . . . . . . . . . . . . . . . . . 116
Установки и регулировки . . . . . . . . . . . . . . . . . . . . . . . . 118
Регулирование качества изображения . . . . . . . . . . . . . . . . . . . . . . . . 118
Использование меню установок . . . . . . . . . . . . . . . . . . . . . . . . . . . . . 122
Установки диска (Настройка диска) . . . . . . . . . . . . . . . . . . . . . . . . . . 123
Установки рекордера (Основные) . . . . . . . . . . . . . . . . . . . . . . . . . . . . 124
Установки антенного приема (Тюнер) . . . . . . . . . . . . . . . . . . . . . . . . . 126
Установки изображения (Видео вх/вых) . . . . . . . . . . . . . . . . . . . . . . . 129
Установки входного аудиосигнала (Аудио вход) . . . . . . . . . . . . . . . . 131
Установки выходного аудиосигнала (Аудио выход) . . . . . . . . . . . . . 132
Установки языка (Язык) . . . . . . . . . . . . . . . . . . . . . . . . . . . . . . . . . . . . 134
Установки записи (Запись) . . . . . . . . . . . . . . . . . . . . . . . . . . . . . . . . . . 136
Установки воспроизведения (Воспроизв.) . . . . . . . . . . . . . . . . . . . . . 138
Установки HDMI (HDMI выход) . . . . . . . . . . . . . . . . . . . . . . . . . . . . . . . 141
Прочие установки (Опции) . . . . . . . . . . . . . . . . . . . . . . . . . . . . . . . . . . 143
Прочие установки (Опции 2) . . . . . . . . . . . . . . . . . . . . . . . . . . . . . . . . . 144
Дополнительная информация . . . . . . . . . . . . . . . . . . . . 145
Поиск и устранение неисправностей . . . . . . . . . . . . . . . . . . . . . . . . . . 145
Переустановка рекордера . . . . . . . . . . . . . . . . . . . . . . . . . . . . . . . . . . 154
Диски, доступные для записи и воспроизведения . . . . . . . . . . . . . . . 155
Диски, доступные для воспроизведения . . . . . . . . . . . . . . . . . . . . . . . 158
О режиме записи/перезаписи . . . . . . . . . . . . . . . . . . . . . . . . . . . . . . . . 160
Список кодов языка . . . . . . . . . . . . . . . . . . . . . . . . . . . . . . . . . . . . . . . 165
Код страны/области . . . . . . . . . . . . . . . . . . . . . . . . . . . . . . . . . . . . . . . . 165
Примечания относительно данного рекордера . . . . . . . . . . . . . . . . . 166
Примечания относительно аудиодорожек MP3, файлов
изображения JPEG, видеофайлов DivX и функции i.Link . . . . . . 167
Технические характеристики . . . . . . . . . . . . . . . . . . . . . . . . . . . . . . . . 169
Алфавитный указатель . . . . . . . . . . . . . . . . . . . . . . . . . . . . . . . . . . . . . 171
9
Оглавление
Аннотация для DVD Рекордера С Жестким Диском Sony RDR-AT200 Black в формате PDF
Топ 10 инструкций
Другие инструкции
-
Страница 1
4-128-703- 12 (1) © 2009 Sony Corporation RDR-A T100/A T105/A T107/A T200/A T205 D VD Recorder Operatin g Instructi ons To find out usef ul hint s, tips and infor mation abo ut Sony p roducts and services please visit: www.sony-europe.com/myproduct[…]
-
Страница 2
2 WARNING To red uce the ri sk of fire o r electric shock, do not expose this apparatus to rain or moi sture. To avoid el ectrical shock, do no t open the cabinet. Refer servicing to qualified personnel only. The mains lead m ust be changed only at a qu alified service shop. Batterie s or batteries installed apparatus shall not be exposed to excess[…]
-
Страница 3
3 Disposal of waste batteries (applicabl e in the European Union and other Eu ropean countries with separate collection systems) This symb ol on th e battery or on the packaging indicates that the battery provided wi th this product shall not be treated as househo ld waste. On certain batterie s this symbol might be used in combination with a chemi[…]
-
Страница 4
4 • Do not atte mpt to rep lace or upgrade the hard disk by yourse lf, as th is may res ult in malfunc tion. If the hard dis k drive s hould malfunc tion, you c annot recover lost data. Th e hard disk drive is only a temporar y storage spa ce. About re pairing the hard disk d rive • The cont ents of t he hard disk drive may be ch ecked in case […]
-
Страница 5
5 Copy gu ard fun ction Since th e recorder has a copy guard functi on, programmes received through an exte rnal tuner (not supplie d) may contain co py protection sign als (copy guard f unction) and as such may not be recordab le, depending on the type of signal. If you have any questions o r problems concer ning your recorder, please consult you […]
-
Страница 6
6 Table of Contents WARNING . . . . . . . . . . . . . . . . . . . . . . . . . . . . . . . . . . . . . . . . . . . . . . . . . . 2 Precautions . . . . . . . . . . . . . . . . . . . . . . . . . . . . . . . . . . . . . . . . . . . . . . . . . 3 Guide to Parts a nd Controls . . . . . . . . . . . . . . . . . . . . . . . . . . . . . . . . . . . . 10 Hook[…]
-
Страница 7
7 GUIDE Plus+ ( RDR-AT105 /AT107/AT205 only) . . . . . . . . . . . . . . . 47 Viewing the GUIDE Pl us+ Display . . . . . . . . . . . . . . . . . . . . . . . . . . . . . . . 47 Listing Up Your Favourite Progr amme Information ( My TV) . . . . . . . . . . . 49 Making Changes to the GUIDE Plus+ Syste m . . . . . . . . . . . . . . . . . . . . . . 50 Se[…]
-
Страница 8
8 Erasing an d Editi ng . . . . . . . . . . . . . . . . . . . . . . . . . . . . . . . . . 75 Before Editing . . . . . . . . . . . . . . . . . . . . . . . . . . . . . . . . . . . . . . . . . . . . . . . 75 Erasing and Editin g a Title . . . . . . . . . . . . . . . . . . . . . . . . . . . . . . . . . . . . . 76 Editing multi ple titl es (Multi-Mode) […]
-
Страница 9
9 Photo Album . . . . . . . . . . . . . . . . . . . . . . . . . . . . . . . . . . . . . 101 About the “Photo Alb um” Function . . . . . . . . . . . . . . . . . . . . . . . . . . . . . . 101 Preparing for Us ing the “Photo Alb um” Function . . . . . . . . . . . . . . . . . . . 101 Connecting t he USB device . . . . . . . . . . . . . . . . . […]
-
Страница 10
10 Guide to Part s and Contr ols For more in forma tion, see the page s in pare nthese s. A HDD (3 5) Records to o r plays title s on HDD. DVD (34) Records to o r plays title s on DVD. B [ / 1 (on/standby) (25) Turns th e rec order on or off. C Z (open/clos e) (34) Open s or clos es the disc tray. D PROG (programme) +/– (35) The + butto n has a t[…]
-
Страница 11
11 K ANGLE (67, 10 7) Chang es th e angl es o r rot ates an i mage duri ng sli desho w. Yellow (RDR-AT105/AT10 7/ AT205 on ly) (47) L Red (RDR-AT105/AT107/AT205 onl y) (4 7) M PLAY MODE (69, 74) Blue (RDR-AT105/AT10 7/AT205 onl y) (4 7) N GUIDE (for RDR-AT105/AT107/ AT205) (4 7) Displays GUI DE Plus+ ® system scre en. TIMER (for RDR-AT100/AT200) ([…]
-
Страница 12
12 A [ / 1 (on/standby) (25) Turns th e rec order on or off. B (remote sen sor) (23) C Disc tray (34) D Front panel displa y (13) E Z (open/clos e) (34) Open s or clos es the disc tray. F N (play) (65 , 107) The N butt on has a t acti le do t * . G x (stop) (65, 97 , 107) H HDD Lights up when t he HDD is sele cted. DVD Lights up when t he DVD is se[…]
-
Страница 13
13 A SYNCHRO REC indicator (RDR- AT100/AT2 00 only) (64) Lig hts up wh en the r ecorder is set to stand by for Syn chro-Reco rding. B Displays the followin g: • Playing t ime • Current t itle/chap ter/track/in dex number • Recording time /recording mode •C l o c k • Progr amme po sition • EPG ind ication (RDR -AT105 /AT107/ AT205 on ly)[…]
-
Страница 14
14 A AERIAL IN/OUT jacks (15) B LINE 2 OUT (R-AUDIO-L/VIDEO) jacks ( 18, 21) C LINE 1/DECODER jack (29) D G-LINK jack (RDR-AT105/ AT107/AT2 05 only) (16) Connect the set top box contr oller to this jack. E HDMI OUT (high-defin ition multimed ia interface o ut) jack (18, 21) F D IGITAL OU T (COAXIAL) jack (21) G A C IN terminal (22) H LINE 3 – TV […]
-
Страница 15
15 Hookup s and Settings Hookups and Se ttings Hook ing Up the Reco rder Follo w steps 1 t hrough 6 to hook up an d adjust th e setti ngs of th e recorder . Do not connect the mains lead unti l you reach “Step 4: Connecting the Mains Lead ” on page 22. b Notes • S ee “Specific ations” (pa ge 155) fo r a li st of supplied accessories. • […]
-
Страница 16
16 With this hooku p, you can record a ny progr amme pos ition on t he set top bo x receiv er. To watch cabl e programmes, you need t o match the programme posit ion on the recorder to the a erial output program me p osition on t he set top bo x rece iver. *1 If your s et top box r eceiver does not have an aerial output j ack, conn ect the aeri al […]
-
Страница 17
17 Hookup s and Settings About th e set top box receiv er contro l function You ca n use the set top box re ceiver contro l function w ith hoo kup A. When using th e set top box receiver control function: – T he recor der contr ols the set top box re ceiver via the supp lied se t top box con troller . – T he recor der cont rols prog ramme p osi[…]
-
Страница 18
18 Step 2: Connect ing the Vide o Cord s/HDMI Cor d Selec t one of the f ollowing p atterns, A throug h E , according to the input j ack on your TV moni tor, projec tor, or audio compo nent such as an AV amp lifier (r eceive r). This w ill enable you to vi ew pictur es. D B E C A Audio/vi deo cord (not supp lie d) Comp onent vid eo cord (no t suppl[…]
-
Страница 19
19 Hookup s and Settings A SCART input jac k When setting “LINE 3 Out” to “S-Video” or “RGB” in th e “Vid eo I n/Out ” set up (page 122), use a SCART c ord that conforms to the selecte d signal. B Vide o input ja ck You w ill enjoy st andard quality i mages . C S VIDE O input j ack You wi ll enjoy high quality i mages. D Compo nent […]
-
Страница 20
20 b Notes • D o not conne ct more than on e type of video cor d bet ween the recor der and y our T V at the same time . • D o not m ake connec tions A an d E at the sa me time . • W hen you c onnect t he recorder to your TV via the SCAR T jacks, the TV’s input source is set to the recorder automati cally when you start playback. If necess […]
-
Страница 21
21 Hookup s and Settings Step 3: Connect ing the Au dio Cord s/HDMI Cor d Select one of the following patt erns, A or B , according to the input jack o n your TV monitor, proje ctor, or au dio com ponent such as an AV ampli fier (rec eiver) . This wil l enable you to listen to sound. * T he yellow plug is used for vide o signals (page 18). VIDEO A […]
-
Страница 22
[…]
-
Страница 23
23 Hookup s and Settings Step 5: Prepar ing th e Remote You can contr ol the reco rder using the suppli ed remot e. Inse rt two R 6 (size AA) batt eries by mat chi ng the 3 an d # e nds on the batteri es to the markings ins ide the battery co mpartment. When usi ng the remote, poin t it at t he remote sensor on the reco rder. b Notes • I f the su[…]
-
Страница 24
24 Code n umbers of co ntrollab le TVs If mo re than o ne code num ber is lis ted, try enteri ng them one at a time until y ou find the o ne th at work s wi th yo ur TV . The remot e performs the fo llowing: To op erate th e TV/D VD but ton (for S CART conn ections on ly) The TV/ DVD but ton switc hes between TV mode and DVD m ode. Press the TV/DVD[…]
-
Страница 25
25 Hookup s and Settings Step 6: Easy Se tup Make the basic adjust ments by follo wing the on-scr een i nstr ucti ons in “Ea sy Setu p.” Be care ful not to di sconne ct the cabl es or exit the “Easy Setup” f unction durin g this proc edur e. * RDR -AT105/AT107/AT2 05 only 1 Tur n on the re corder an d your TV. Then sw itch th e input s elec[…]
-
Страница 26
26 Prog ress ive When you c onnect a p rogres sive for mat TV to this recorder using the COMPONENT VIDEO OUT jacks, select “Compatib le.” Stan dby Mod e (page 11
 Sele ct th e mode fo r when the re corder is turned o ff. • “Mode 1” ( default) : No input sig nals are outp ut whe n the reco rder is in standb y mode. • “Mod e 2”: Inp[…]
 -
Страница 27
27 Hookup s and Settings Exter nal Rece iver 1/Exte rnal Rece iver 2/Ex ternal Rec eiver 3 (on ly when c onn ecti ng t he se t t op box receiv er) 1 Pres s ENTER t o se lect “Con tinu e.” 2 Selec t the set t op box recei ver type using M / m , and press EN TER. 3 Selec t the provi der usi ng M / m , and press ENTER. 4 Sele ct the rec eive r bra[…]
-
Страница 28
28 To fix the set top box controlle r to your set top bo x receiver Once you have c onfi rme d tha t the set to p box co ntro ller cont rols yo ur s et to p box receiver, f ix it in place. 1 Remove the backing on th e double- sided tape. 2 Attach it so t hat the set top box controlle r is directly abov e the remote contr ol sensor on your set t op […]
-
Страница 29
29 Hookup s and Settings Connec ting a VCR or Sim ilar Devi ce After di sconnecting t he recorder’ s mains l ead from the mains, connec t a VCR or simil ar recording device to t he LINE IN jack s of th is recorder . To watch the c onnected VCR or a s imilar devi ce’s pictur e through the recorder whil e the record er is in s tandby mode , set ?[…]
-
Страница 30
30 Connect a VCR or similar r ecording devic e to the LINE 2 IN jacks of this re corder. If the equip ment has a n S-vide o jack, you c an use an S- video co rd instea d of an audi o/video cord. z Hint When the connected equipment outp uts only monaural sound, connect to only the L(MONO) and VIDEO input jacks on the front of the recorde r. Do not c[…]
-
Страница 31
31 Hookup s and Settings Connec ting t o a Satelli te or Di gital Tun er (RDR- AT100/ AT20 0 only) Connect a sate llite or dig ital tuner to this recor der using the LINE 1 /DECODER jack. Dis connect the reco rder’s mains le ad from the main s when co nnec ting the tu ner. To us e the Synchr o Rec funct ion, see below. Do NOT set “LINE 1 I n”[…]
-
Страница 32
32 Connec ting an Ex tern al Decod er You ca n watch or record e xternal de coder (P AY-TV/ Canal Pl us analogu e deco der) prog ramme s if you co nnect a de coder (n ot suppl ied) to the reco rder. Di sconne ct the re corder ’s mains lead f rom the mains when connectin g the deco der. To wat ch the co nnected external decoder (PAY-TV /Cana l Plu[…]
-
Страница 33
33 Hookup s and Settings To wa tch or reco rd P AY-TV/ Canal Plus analo gue progr ammes , set your r ecorder to receive the programme p ositions using the on-scr een di spla y. In orde r to set the program me po sitions correctly, be sure t o follow al l of the ste ps belo w. 1 Pr ess SYS TEM MENU . The Syst em Men u appear s. 2 Select “In itial […]
-
Страница 34
34 Seven Basi c Operation s — Getting to Kn ow Your DVD Recorder 1. Ins erting a D isc 1 Press DVD. 2 Press Z (open/ clos e), an d place a disc on the disc tray. 3 Press Z (open/c los e) to close the disc tr ay. Wait until “LOAD” dis appears from th e front pa nel displ ay. Unused DVDs are formatted automatically . • For DVD-RW discs DVD-RW[…]
-
Страница 35
35 Seven B asic O peration s — Get ting to Know Your DVD Recorder 2. Reco rdin g a Prog ramme This sectio n introd uces the basi c operati on to record a current TV programme to th e hard disk (HDD) or to a disc (DVD). Fo r an expl anat ion of how to ma ke t imer recor dings, se e page 52 (for RDR-AT1 05/ AT107 /AT205) or page 58 (for RDR — AT100[…]
-
Страница 36
36 b Notes • T o turn off the TV Direct Rec. function, set “SMARTLINK” to “Pass Through” in the “Option s” setup (page 132). • S ome butto ns, such as the T ITLE LIST button or H butto n, do no t work wh en “TV” appears in the fro nt pa nel dis pla y. • I f you press the [ / 1 button wh ile record ing, th e recorder s tops rec[…]
-
Страница 37
37 Seven B asic O peration s — Get ting to Know Your DVD Recorder 3. Pl aying the Re cord ed Progra mme (Title List ) To play a recorded title , select the title from the Title List. 1 Press HDD or D VD. If you sel ect DVD, insert a DVD (see “1. Inser ting a Di sc” on page 34 ). Playback st arts automati cally dep ending on th e di sc. 2 Pr e[…]
-
Страница 38
38 To stop playbac k Pres s x (sto p). To scro ll the list dis play by pa ge (Pag e mode) Pres s . / > while the Title List is displayed. Each time y ou press . / > , the Titl e List chan ges to the pr evious/n ext page of tit les. About th e Title List fo r DVD-RWs/DV D-Rs (VR m ode) You ca n switch the Title Lis t to show Original o r Playl[…]
-
Страница 39
39 Seven B asic O peration s — Get ting to Know Your DVD Recorder To switc h to the 8 Title L ist 1 Press < while the Tit le List is disp laye d. 2 Select “Title Vie w” using M / m , and press ENTER. 3 Select “8 T itles ” us ing M / m , an d press ENTER . Detailed info rmation, in cluding th e resumption time, fo r the sel ected tit le[…]
-
Страница 40
40 E Station na me and p rogram me positi on numb er F Audio setting for the current programme G Recording restrictions for the current programme H TV mode o r DVD mode (page 24) I Disc information J Title type (Origina l or Playli st) for DVD-RW/DVD-R in VR mode K Disc type/format (page 143 ) Displa ys th e fi nalis ed d isc i n Vide o mode as “[…]
-
Страница 41
41 Seven B asic O peration s — Get ting to Know Your DVD Recorder 4 Select “T itle Name” using M / m , and pres s ENTER . The d isplay for en tering characte rs appear s. The c urrent nam e is disp layed at the input row. 5 Move the c ursor to th e point where you wa nt to i nsert t he char acter using m / M . To er ase all of th e charac ter[…]
-
Страница 42
42 4 Sel ect “Basi c,” and press ENTE R. 5 Sel ect “In put Dis c Name,” and pr ess ENTER . 6 Select “Ne xt Scr een,” and press ENTER . Ent er the disc name (p age 40 ). You can e nter up to 64 charac ters fo r a DVD-RW/DVD-R (VR mode) disc name , and 40 ch aracters for a DVD+RW/DVD-RW (Video mode)/ DVD+R/DVD-R (Video mode) dis c name. b[…]
-
Страница 43
43 Seven B asic O peration s — Get ting to Know Your DVD Recorder 6. Play ing the Di sc on Other DV D Equ ipment (Finalis e) Final ising is nece ssary w hen you pl ay discs recorded wit h this recorder o n other DVD equi pment . When you finalise a DVD+RW, DV D-RW (Video mode), DVD+R, or DVD-R (Video mode), a DVD menu wil l be automati cally crea[…]
-
Страница 44
44 5 Sel ect “Fin alise,” and pres s ENTER. 6 Select “Ne xt Scr een,” and press ENTER . For DVD-RW/DVD-R (VR mode), the recorder sta rts finalis ing the disc. Go to step 9. 7 (DVD+RW/DVD-RW (Video mode)/ DVD+R/DVD-R (Video mo de) only) Sele ct a title me nu style, and press ENTER . The menu appears in the selecte d title menu style whe n th[…]
-
Страница 45
45 Seven B asic O peration s — Get ting to Know Your DVD Recorder 5 Sel ect “Unf inal ise,” a nd press ENTER . 6 Sel ect “Sta rt,” an d press EN TER. The record er sta rts un final ising th e disc . Unfi nalisi ng may take several minute s. 7. Ref ormatt ing a Di sc New discs are automaticall y formatte d when inser ted. If ne cessary, yo[…]
-
Страница 46
46 4 Sel ect “Fo rmat,” and pres s ENTER. 5 Select an item, an d pre ss ENT ER. “VR Mode”: Formats DVD-RWs/DVD- Rs in VR mode. “ Video Mode”: Formats DVD-RWs/ DVD-Rs in Video mode. “Form at DVD+ RW”: Format s DVD+RWs. 6 Sel ect “Sta rt,” an d press EN TER. All con tents o n the disc ar e erased . z Hint By re form attin g, you c[…]
-
Страница 47
47 GUIDE Plus+ (RDR -AT105/AT107/ AT205 only) GUIDE Plus+ (RDR-AT105/AT107/ AT20 5 only) Viewing the GU IDE Plus + Disp lay The GUIDE Plus+ ® system is a fr ee interacti ve programme guide. It displa ys up to seven d ays of prog ramme listin gs, including pro gramme titles, p romotions, a nd broa dcast inform atio n. GUID E Plus+ data for the t el[…]
-
Страница 48
48 D Menu Bar : Pre ss the b lue button (“Home”), and p ress M to move the cursor to the Menu Bar. Then select one of the fo llowin g featu res using < / , , and press EN TER. “Grid”: Shows the programmes for the curr ent time slot and n ext 7 days. “Search” : Allows you to search fo r titles by cate gory or by keyword (page 5 3). Th[…]
-
Страница 49
49 GUIDE Plus+ (RDR -AT105/AT107/ AT205 only) List ing Up Your Favour ite Pro gramm e Info rmat ion (My TV) You ca n set a pro file and l ist up only your favou rite progr amme in formatio n. 1 Pr ess GUI DE. 2 Press M to move the cursor to the Menu Bar. 3 Select “M y TV” using < / , . 4 Pr ess the ye llow but ton (“P rofil e”). 5 Selec […]
-
Страница 50
50 Making Chan ges to t he GUIDE Pl us+ Sy stem You ca n custom ize the GU IDE Plu s+ syst em. If the ho st cha nnel has be en chan ged or mo ved, and t he pr ogra mme gu ide d ata can not be recei ved, you can reso lve the problem by f ollowing t he steps below. The defau lt host chan nel setti ng is set to “Autom atic,” so you sho uld not hav[…]
-
Страница 51
51 GUIDE Plus+ (RDR -AT105/AT107/ AT205 only) 7 Select “Con firm” usin g < / , , and pres s ENTER . The display re turns to th e GUIDE Plus+ setup menu. 8 Wait one day until t he pr ogramme guide d ata c an be rece ived. To can cel the s ettings Press the red bu tton (“ Back”). To check the GUI DE Plus+ system information 1 S elect “Se[…]
-
Страница 52
52 Rec ord ing Time r Record ing (GUID E Plus +/Manu al/Easy Time r) (For RD R-AT105 / AT107/ AT20 5) You can set the timer for a total o f 32 prog ramme s (8 pr ogram mes wh en usin g the VPS/P DC func tio n), up to 30 days in advan ce. Methods to s et the timer inclu de: • One Butt on R ecord ing ( GUIDE Plus + system) • Setting the t imer ma[…]
-
Страница 53
53 Record ing 3 Pr ess the r ed butt on (“R ecord” ) or z REC. The set program me and Tim e Slot change colour an d the reco rder is ready to start record ing. When re cording f rom a set top box receiv er, be su re to t urn it on. Unlike a VCR, ther e is no n eed to turn off the r ecorder be fore th e timer record ing start s. To se arch f or […]
-
Страница 54
54 To sel ect a p rogramme position quic kly using the TV br oadcast station logo 1 Pre ss the yellow button ( “Channels ”) whi le the GUI DE Plus+ system “Ho me Screen ” is displa yed. 2 Select the TV broa dcast statio n logo usin g < / M / m / , , and pr ess EN TER. The displa y returns to “Grid” an d the progr amme cur rently be i[…]
-
Страница 55
55 Record ing 5 Set the yellow-high lighted da te using the n umber buttons a nd < / M / m / , . Then p ress th e green butt on (“Next”). 6 Set the sta rt time u sing t he numbe r buttons and < / M / m / , . Then pr ess the green bu tton (“Next”) . 7 Set the sto p time us ing the number buttons and < / M / m / , . Then pr ess the g[…]
-
Страница 56
56 You can easily se t the timer re cording f or up to one m onth in adv ance. 1 Pr ess SYS TEM MENU . The Syst em Menu appear s. 2 Select “Tim er Reco rding ,” and pre ss ENTER . 3 Sel ect “Easy T imer,” a nd press ENTER . 4 Select the program me po sition a nd the sourc e using PROG +/–. 5 Set the rec ording mode us ing REC MODE (page 1[…]
-
Страница 57
57 Record ing b Note If you turn off the recorder duri ng recording, record ing is stopped. The r ecorder au tomat ically rece ives an d record s stere o and bil ingua l progr ammes based on the ZWE ITON sy stem o r the NICAM syst em. The HDD (when “HDD Recording Format” is set t o “Video Mod e Off” in the “Rec ording” setup (page 128))[…]
-
Страница 58
58 Time r Record ing (For RDR-AT 100/AT200) You can set the timer for a total o f 32 prog ramme s (8 pr ogram mes wh en usin g the VPS/P DC functio n), up to 30 da ys in advan ce. Set the date, time, and programme posit ion of the prog ramme manually. Before you start recording … • Check t hat t he di sc has en ough a vail able space for t he r[…]
-
Страница 59
59 Record ing 4 Sel ect “O K,” and pr ess ENTE R. The “ Timer L ist” disp lay appe ars. The timer recording i ndicator li g hts up on the f ront pan el displa y and the record er is re ady to s tart recordin g. Unlike a VCR, ther e is no n eed to turn off the r e corder b efore th e timer record ing start s. • To rec ord a satell ite prog[…]
-
Страница 60
60 You can set the record er to reco rd in 30- minu te increm ents. For details , see page 56. The r ecorder au tomat ically rece ives an d record s stere o and bil ingua l progr ammes. For details , see page 57. The r ecorder ca n autom atically di vide a recordin g (a title ) into c hapters by insertin g chapte r marks. To select ch apter mark in[…]
-
Страница 61
61 Record ing 5 Pr ess the g reen but ton (“E dit”). 6 In the left column, se lect an ite m using the red button (“Bac k”) or the gree n button ( “Next”) , and ad just using th e numbe r button s or < / M / m / , . 7 Pr ess the co rrespon ding col our butt on repea tedly to chan ge set tings. • To chan ge the re cordin g destin ati[…]
-
Страница 62
62 Checki ng/Changi ng/ Cancel ling Timer Setting s (Timer Lis t) (For RDR-AT 100/AT200) You ca n check, change, or cancel t imer settings u sing t he Timer List. 1 Pr ess TIME R. The “ Timer L ist” disp lay appe ars. When all of the timer s ettings are not visibl e on the di splay, pres s M / m to view the hidden timer se ttings. 2 Select the […]
-
Страница 63
63 Record ing Record ing from Connec ted Equipm ent You ca n record from a c onnecte d VCR or similar dev ice. To connect a VCR or similar devi ce, s ee “ Conne ctin g a VCR or Simi lar Device ” on pag e 29. 1 Press HDD or D VD. If you select DVD, insert a recordab le DVD (see “1. Inser ting a Dis c” on page 34). 2 Pr ess INPU T to sele ct […]
-
Страница 64
64 You can set the record er to automatic ally recor d progra mmes from conn ected equi pment that ha s a tim er fun ctio n (such a s a satell ite tuner) . Connect the eq uipm ent to the LINE 1/DECODER jack of the recorder (page 3 1). Wh en the con nected equipm ent tu rns o n, the reco rder star ts reco rding a pr ogra mme fro m the LINE 1/DECOD E[…]
-
Страница 65
65 Playback Playback Play ing RDR-AT1 05/AT107 /AT205 RDR-AT1 00/AT200 1 Press HDD o r DVD. • If yo u select DVD, insert a d isc (see “1. Ins erting a Disc ” on p age 34). • If you i nsert a DVD VIDEO, VIDEO CD, DATA DVD or DATA CD, press H . Play back star ts. 2 Pre ss TITLE LIS T. If the Title List is al ready di splayed, skip this step. […]
-
Страница 66
66 To play VIDEO CDs/S u per VIDEO CDs with PBC func tions PBC (P layback Con trol) al lows you to pl ay VIDEO CDs/Super VIDEO CDs intera ctively us ing the menu on your TV screen . When you sta rt playin g a VID EO CD/ Super VIDEO CD with PBC functions, t h e menu app ears. Select an item using the number buttons, and pres s ENTER. Then , follo w […]
-
Страница 67
67 Playback To che ck the po sition of the button s below, see the ill ustrati on on page 65. Playback options But tons Operations ANG LE Change s the angles for a scene when pre ssed during play back. When the di sc has v arious a ngles (m ult i-a ngle s) re cord ed, “ ” appears on the screen. To switch th e angle m ark indicator to off, set ?[…]
-
Страница 68
68 b Notes • A ngles and subt itles cannot be changed with titles recorded on th is record er. • JPEG image files made with a DVD camcorder can only be playe d as a slideshow. For vide o files co ntaining JPEG im age files and mo vies, the re corder can play movi e parts onl y. Notes on playin g DVDs with a DTS sound track DTS audio signals are[…]
-
Страница 69
69 Playback 1 Pr ess PLAY MODE dur ing playba ck. For au dio tra cks on a CD, pre ss , while the Tit le List is displayed, and sele ct “Pla y Mode.” The “ Play Mo de” men u appear s. 2 Select “A-B Repeat,” and pr ess ENTER . “Set point A” i s sel ecte d. 3 Whi le monit oring th e sound, press ENTER a t the starti ng poin t (point A)[…]
-
Страница 70
70 *1 finalised dis c only *2 MP3 audi o tracks only You can play the c ontents of th e HDD or a disc in th e or der yo u wan t by arrang ing the order of t he title s/chapte rs/albums/ tracks on the HD D or disc to cr eate yo ur own prog ramme. You can ma ke a pr ogramme of up t o 24 ch apters /tracks, etc. 1 Pr ess PLAY MODE dur ing playba ck. Fo[…]
-
Страница 71
71 Playback Playing DivX Video File s You can enjoy DivX video fil es on the HDD, disc s, or conne cted USB devices. You ca n connec t a USB dev ice to the U SB jack on the r e corder to play the Div X video files or c opy to the HDD. Refer to the operating instr uctions supplied with the USB de vice befor e connecti ng. b Notes • S ome US B dev […]
-
Страница 72
72 • “Copy all t o HDD” (DISC/USB t HDD only): Al lows you to copy al l album s when you s elect an al bum or all th e titles in a n album when you select a title. • “Copy to HDD” (DISC/USB t HDD only): All ows you to copy the sele cted album . b Notes • Y ou cannot copy DivX vi deo files on the HDD to discs or USB devic es. • S ome[…]
-
Страница 73
73 Playback 2 Press H to resume wa tchi ng the prog ramme. You ca n fast f orward/ fast re verse, pau se, or stop the progra mme usi ng m / M , X and x wi tho ut af fec ting the record ing. 3 Press x REC STOP t o stop re cording . b Notes • Y ou may not be able to u se the “TV Pause” function depending on some TV s. For details, refer to th e[…]
-
Страница 74
74 Sear ching fo r a Time / Titl e/Cha pter/Tr ack, etc. * D ivX video file only You ca n search a disc by t itle, ch apter, or trac k. As t itles an d tracks are assi gned individual numbers, selec t the title or track by en tering it s number. You can als o search for a sce ne using th e time code. 1 Pr ess PLAY MODE dur ing playba ck. The “ Pl[…]
-
Страница 75
75 Erasing and Edi ting Erasing and Edit ing Before Editing This re corder offers various edi t options f or vari ous dis c types. b Notes • Y ou may lose the edited conte nts if you re move the d isc or a ti mer re cording start s whil e edit ing. • D VD discs cr eated by DVD camcorders cannot be edit ed on this reco rd er. • If a message ap[…]
-
Страница 76
76 Erasing and Editing a Title This sectio n explains the basi c edit functions. No te t hat editing is irreve rsible. To edit DVD-RWs/DVD-Rs (VR mode) without changi ng the orig inal record ings, create a Playlist title (p age 80). 1 Pr ess TITL E LIST. For DVD-RWs/DVD-Rs in VR mode, switch the Title List ( Original or Playlist) , if necessary . 2[…]
-
Страница 77
77 Erasing and Edi ting z Hint You can exit “ Multi-Mode ” by press ing , an d selecti ng “Single-Mo de” while selecting ti tles. You can select a sect ion (scene) in a title and erase it. Note th at eras ing scen es in a title cannot be undone . 1 Af ter step 2 of “Era sing and Editin g a Titl e,” sele ct “Edi t,” and pr ess ENTER […]
-
Страница 78
78 4 Pr ess ENTE R. For the HDD, t he display asks for confirmation . 5 Select “Yes ,” and pr ess ENTER (H DD only). The title is divided into two. Erasing and Editing a Chapte r You ca n edit ind ividua l chapte rs with in a title. To edit DVD-RWs/DVD-Rs (VR mode ) withou t changing the ori ginal recor dings, cr eate a Play list (pag e 80). 1 […]
-
Страница 79
79 Erasing and Edi ting 1 Af ter step 4 of “Era sing and Editin g a Chapter ,” se lect “Di v ide .” 2 Select a c hapter using < / , . 3 Sel ect th e divid ing point using m / M or H , an d pres s X . • To retur n to the be ginning of the chap ter, pr ess X and the n press . . 4 Pr ess ENTE R. The chapter is divide d into two. 1 Af ter […]
-
Страница 80
80 Creat ing an d Ed iting a Playlis t Playlist edit allows y ou to edit or r e-edit withou t chang ing t he act ual reco rdings . You can create up to 99 P laylist titles. b Note Playli st title s contain ing titles recorded with the “Copy-Once” copy protecti on signal cann ot be dubbed or moved ( page 150). 1 Pr ess TITL E LIST, an d switch t[…]
-
Страница 81
81 Erasing and Edi ting 1 Pr ess TITL E LIST, an d switch to the Playlist. For details on switchi ng to the P laylist , see page 7 5. 2 Select a P laylist title conta ining the chapte r you wa nt to edit, and pre s s , . The s ub-menu appears . 3 Sel ect “Edi t,” and pr ess ENTER . 4 Sel ect “Chap ter Edi t,” and pr ess ENTER . 5 Sel ect ?[…]
-
Страница 82
82 Dubbing (HDD y DVD) Before Dubbing In this section, “dubbin g” refer s to “copyi ng a reco rded title on the i nterna l hard di sk drive (HDD) to anothe r disc, or vic e versa.” You can dub a p laying title using the HDD/ DVD DUB button (see “HDD/DVD Dubb ing” on pa ge 83) or you ca n select to dub multiple tit les all at once (s ee […]
-
Страница 83
83 Dubbin g (HDD y DVD) HDD/ DVD Dubb ing You ca n dub a singl e title by pre ssing the HDD /DVD D UB bu tton dur ing pla yback. You can also dub fro m finalised DVD-RWs/ DVD-Rs (Video mode) t o the HDD. 1 St art play back of a ti tle. For playing a title, see “Playing” on page 65. 2 Press HDD/DVD D UB. The re corder st arts dubbi n g th e curr[…]
-
Страница 84
84 D Total size of the selected titles and availab le space on the disc to be dubbed (approxi mate) E Selected title’s thu mbnail p icture 5 Select a ti tle, and press EN TER. The s elected t itle chan ges colo ur. When you select “ HDD -> DVD” in step 3, you c an change the title or der or search for a tit le by genre (see “3 . Playing […]
-
Страница 85
85 Dubbin g (HDD y DVD) To edit titles o n the Du bbing List 1 Follow ste ps 1 to 7 of “Dubbi ng Using Dubb ing List” on pa ge 83. The “Title Edit” display appears. 2 Select a title you want to edit, and press ENTER . The s ub-menu appears . 3 Sel ect an option , and press EN TER. The op tions diffe r depend ing on th e dubbi ng di recti on[…]
-
Страница 86
86 Making a Backup Disc (DVD Ba ckup) You ca n dub all of t he conte nts on a fina lised DVD+RW/DVD+R or finalised DVD-RW/ DVD-R (Video mod e) to a nother re cordable DVD+RW/DVD-RW or unused DVD+R/ DVD-R via the HDD as a back up copy. b Note Backup di scs of unfi nalised dis cs cannot b e made. 1 Pr ess SYS TEM MENU . The Syst em Menu appear s. 2 S[…]
-
Страница 87
87 HDD Camco rder Dub bing HDD Camcorder Dubbing Before HDD Ca mcorde r Dubbin g You ca n dub the c ontents of a So ny HDD camc order t o the hard disk dri ve of the record er vi a the US B jack o n the front pa nel. Meth ods to dub from th e HDD ca mcorde r incl ude: • One-Touch Dubbing (Incre m ent al Dubb ing) • D ubbing us ing the on-screen[…]
-
Страница 88
88 Connect an HDD camc order to t he USB jack on the record er. Ref er a s well to th e inst ruct ion manu al supplied wit h the HDD c amcorder be fore conne cting. 1 Turn on your H DD camc orde r and t he recorder. 2 Connect yo ur HDD ca mcorder t o the USB jack o n the fr ont pan el. 3 Set your HDD c amcorde r to the USB conn ectio n mode (e xamp[…]
-
Страница 89
89 HDD Camco rder Dub bing One-To uch Dubbi ng from HDD Ca mcor der (O NE- TOUCH D UB) You can dub content s of your HDD camcorder onto the HDD of the rec order with a si ngle press of th e ONE-TOUCH DU B button o n the reco rder. Wh en dubbi ng from the H DD cam corde r for the first time, all of the con tents are dub bed to the re corder. The ne […]
-
Страница 90
90 6 Sel ect “Yes,” a nd pr ess EN TER. The re corder st arts d ubbin g the conten ts on the HDD camcorder to t he HDD Title List of the re corder . The record er turns off auto matically i f you do not u se the recorder fo r more than 20 mi nutes aft er the dubbin g has fini shed. To stop dubbin g Pres s x REC STOP. Or, select “Exit” in st[…]
-
Страница 91
91 DV Camcord er Dubbing DV Camcorder Dubbing Befor e DV Camcor der Dubbin g This sectio n expl ains d ubbi ng wit h a DV camco rder and pl ayin g the con tents of a DV camcorder via the DV IN j ack on the fr ont panel . If you w ant to du b by wa y of the LINE IN jac ks, see “ Recordi ng from Connec ted Equipm ent” on pag e 63. The DV IN jack […]
-
Страница 92
92 1 Pres s HDD or DVD to select the recordin g destinatio n. If you sele ct DVD, insert a disc (s ee “1. Inser ting a Di sc” on page 34 ). 2 Insert the sou rc e DV/Dig ital8 fo rmat tape into your DV ca mcorder. For the r ecorder to record or e dit, yo ur DV camcorder must be set to video play back m ode. 3 Press REC MODE on th e remote repe a[…]
-
Страница 93
93 DV Camcord er Dubbing Dubbin g an Entire DV Format Tape ( DV One — Touch D ubbing) You ca n record the entir e conten ts of a DV / Digit al8 form at tape ont o a disc wit h a single pres s of the ONE -TOUC H DUB butto n on the r ecorde r. Th e reco rder c ontrol s the D V camc order fo r the w hole pro cess, an d compl etes the re cordi ng. Foll[…]
-
Страница 94
94 z Hint You can tu rn off the dubbing menu by pressing t he DISPLAY b utton during dubbin g. Press the DISPLAY butt on again to display the dubbi ng menu. b Note You cannot set a scen e to be shorter than one second. Play ing from a DV Camc order 1 Conne ct your DV camco rder to the DV IN jack on the fron t pane l. 2 Press S YSTEM ME NU. The Sy s[…]
-
Страница 95
95 Music Ju kebox Mu sic Juk ebox About Ju kebox Ther e are two methods t o use Juke box: conne cting t he US B dev ice or copy ing audio tracks to th e HDD. When us ing Juke box, you ca n do followi ng: • S tore audi o tracks on t he HDD. • Play au dio trac ks usi ng va rious pla y mode s. • L abel tr acks, alb ums, or arti sts. • C reate […]
-
Страница 96
96 6 Sel ect “Edi t” using M / m , a nd press ENTER . 7 Select an it em usin g M / m , and p ress ENTER . To co py all albu ms, sele ct “Copy all to HDD.” To copy the selected albu ms, select “Copy to HDD.” The displa y asks fo r confirma tion. 8 Select “Ye s” us ing < / , , and pres s ENTER . The a lbums ar e copied to the HDD .[…]
-
Страница 97
97 Music Ju kebox Play ing Audio Tracks Using Ju kebox/US B Devi ce 1 Pr ess SYS TEM MENU . The Syst em Menu appear s. 2 Select “M usic J ukebo x,” and pre s s ENTER . 3 Select “Li sten to M usic / Edit” or “Listen to Music from US B Device,” and pre ss ENTER . To lis ten to the au dio track s on the HDD, select “Lis ten to Music / Ed[…]
-
Страница 98
98 You can add audio track s on the HDD to the Playl ist. You ca n add up to 25 audio tra cks to each Play list. 1 After step 2 of “Pla ying A udio Track s Using Ju kebox/US B Device,” select “List en to Mus ic / Edit ,” and pre ss ENTER . Switch the display to the Origin al list (page 9 7). 2 Select a tr ack to ad d to the Playli st, and p[…]
-
Страница 99
99 Music Ju kebox 5 Pr ess ENTE R. Repe at play st arts. To cancel Re peat play Set “Repe at” t o “Rep eat Off” in step 4. b Note You can select “R epeat Progr amme” onl y during Programm e play. You ca n play the co ntents of the conne cted USB device i n the o rder y ou want by arran ging the or der of the trac ks on the connec ted US[…]
-
Страница 100
100 Managi ng Aud io Tr acks on the Mu sic Jukebo x (HDD o nly) You can era se or label artists/al bums/tracks on the HDD. 1 Pr ess SYS TEM MENU . The Syst em Menu appear s. 2 Select “M usic J ukebo x,” and pre s s ENTER . 3 Select “Li sten to M usic / Edit,” and pres s ENTER . The “Music Jukebox (HDD)” appears. 4 Sel ect an ar tist, al[…]
-
Страница 101
101 Phot o Album Photo Album About th e “Photo Albu m” Func tion The “ Photo Al bum ” func tion enable s you to do f ollow ing . • Store JPEG image file s on the HDD. • View JPEG image files on t he HDD, DATA DVDs (DVD-RWs/DVD-Rs)/ DATA CD s, or connect ed USB de vice . • Edit JPEG image files. • Print JPEG image file s. • C opy J[…]
-
Страница 102
102 1 In sert a dis c that you are goi ng to copy to the HDD or connect the USB device to the USB jack on the recorder. 2 Pr ess SYS TEM MENU . The Syst em Menu appear s. 3 Select “Pho to Album,” and pre ss ENTER . The “Photo Al bum” menu appear s. 4 Sel ect th e item, and pr ess ENT ER. To copy from DATA CDs/DATA DVDs (DVD-RWs/DVD-Rs), sel[…]
-
Страница 103
103 Phot o Album b Notes • D uring copying, other operations can not be performed. • While cop ying JP EG image files , time r recordings are unav ailable . If th e timer is set during copying, t he recorde r starts t he timer recor ding afte r copying is fi nished. 1 Pr ess SYS TEM MENU . The Syst em Menu appear s. 2 Select “Pho to Album,”[…]
-
Страница 104
104 7 Select an al bum, an d press ENT ER. A check mark appe ars in the chec k box by the sele cted it em. • To cl ear th e check mar k, press ENT ER again. • To cle ar all chec k marks, press , to select “Single- Mode” f rom the su b- menu. 8 Repeat step 7 to select al l of the albu ms you want to co py. 9 Press , . The s ub-menu appears .[…]
-
Страница 105
105 Phot o Album 9 Sel ect “Yes,” a nd pr ess EN TER. The select ed JPEG image f iles are copi ed in the “ PICTU RE” f olde r on t he disc . The JPEG image fi le names are automatically l a belle d as “PHOT****.” If you wa nt to pla y the disc o n other DVD eq uipme nt, fi nalise t he dis c (page 4 3). • To ca ncel, s elect “ No.”[…]
-
Страница 106
106 12-Photo List ( Example: HDD) 4-Ph oto Li st 1-Ph oto Li st A Album nam e B Album si ze C Sub-menu: Pres s , to display the sub-me nu. The sub- menu displ ays opt ion s applicable only to the selected item. The disp layed op tions di ffer de pending upon the model, si tu ati on, and dis c type. For de tails abo ut the sub- menu opt ions, see ?[…]
-
Страница 107
107 Phot o Album To swi tch betw een the album list and JPEG im age file list 1 Press < while the “Photo Album” li st is displaye d. 2 S elect “Dis play Mo de” using M / m , and press ENTER. 3 Select “File” or “ Album” using M / m , and pr ess ENTER. z Hints • Y ou can switch the t humbnail pi cture on t he album li st among th[…]
-
Страница 108
108 To play a slide show with the sound (HDD only) You can enjoy a s lideshow while lis tening to the sound stored in the HDD. First prepare Musi c Playli sts by ad ding audi o trac ks using Jukeb ox (see “Add ing audi o tracks to a Playlist (HDD only)” on page 98). 1 Select “View/Edit Photos on the HDD” in step 3 of “Usin g the “Pho to[…]
-
Страница 109
109 Phot o Album 6 Sel ect a gra phic effect and a Music Play list us ing < / M / m / , . • “Theme ”: Select a theme. The recorde r adds gr aphic ef fects accordi ng to the theme y ou set from the fo llo win g: “Happy moment s (1)”: with simple graphi c effect s “Happy moment s (2)”: with simple gra phic eff ects rapi dly c hangi n[…]
-
Страница 110
110 Managi ng JPE G Im age File s on the HDD 1 Pr ess SYS TEM MENU . The Syst em Menu appear s. 2 Select “Pho to Album,” and pre ss ENTER . The “Photo Al bum” menu appear s. 3 Sel ect “V iew/Ed it Phot os on the HDD,” and p ress ENTER. The “Photo Alb um (HD D)” list a ppears . 4 Select an albu m or JPEG image file , and pre ss , . T[…]
-
Страница 111
111 Phot o Album Print ing JPEG Image Files You can pri nt JPEG image f iles o n the HDD, DATA DVDs/DATA CDs, or connecte d USB device b y co nnecting a Pict Bridge- compatible pri nter to th e USB jack on the record er. Refer to the instructi ons supplied with the printer. 1 Connect a P ictBridge-comp atible printer to the USB jack on the recorder[…]
-
Страница 112
112 To dis play th e conn ected printer Select “Conf irm Printer” of “USB” in the “Opt ions 2” setup (page 133). To re start the connected USB device Selec t “Resta rt USB Device” of “USB” i n the “Optio ns 2” setup ( page 133). z Hint Printing options, such as paper si ze or la yout, differ de pending on the printe r. For d[…]
-
Страница 113
113 Settings an d Adjustments Settings and Adj ustments Adjus tin g Picture Qual ity * D ivX video file only You c an adj ust the pict ure quali ty fr om th e conn ected equ ipmen t, such as a TV or VCR , and als o the pict ure quality o f broadc asts that the record er can receive by sele cting a pres et se tting . You can al so adjus t the pictur[…]
-
Страница 114
114 Settin g option s for recordi ng pictur e quality For details about eac h setting, s ee the expl anat ion of the disp lay. Sett ing option s for playb ack pictur e qual ity For details about each s e ttin g, see the expl anat ion of the d isplay . Prog. Motion Adjusts the progressive video signal w hen “ Component Video Out” i s set to “P[…]
-
Страница 115
115 Settings an d Adjustments b Notes • If the outline s of the images on yo ur screen become blu rred, set “BNR” and/o r “MNR” to “Off.” • Depen ding on th e disc or the s cene being played, the above BNR or MNR effects may be hard to discern. Also, these fun ctions may no t work with some screen si zes. • The fol lowing se tting[…]
-
Страница 116
116 Using th e Setup Menus You c an chang e the s ettings of the re corder, such as pi ctur e quali ty set ting s, aud io setti ngs, et c. 1 Pr ess SY STEM M ENU w hile the recorder is in stop mode. 2 Select “Dis c Setup” or “I nitial Setu p” usi ng M / m , and pres s ENTER. 3 Sel ect th e desired setup item usin g M / m , then pr ess ENTE […]
-
Страница 117
117 Settings an d Adjustments As you record, erase and e dit reco rdings repeatedly , the HDD fi le syst em gradually becomes fragment ed. To ‘clean u p’ all the fragmented files, opt imise the HDD peri odic ally. When the HDD need s optim ising, a m essage recom mending optimisatio n will app ear automati cally. To cance l optim isation, pres […]
-
Страница 118
118 Selec ts the colo ur syst em when r ecording from the connect ed equi pment. b Notes • W hen picture nois e appears after you chang e the “Inpu t Line System ” setting, chang e the “Input Colour Sys tem” setting ( page 122). If pictur e nois e still a ppears, ho ld down x (stop ) on the recorder, a n d pr ess INPUT on t he record er. […]
-
Страница 119
119 Settings an d Adjustments Aerial Re ception Setting s (Tuner) You c an make tuner an d pr ogramm e pos ition s ettings for the r ecord er. Auto Scan If you c onnect a TV to this recorde r not using SMARTL INK, yo u can pres et prog ramme po sitio ns automat ical ly usin g “Auto Sc an.” Selec t your cou ntry/re gion using < / , , and pr e[…]
-
Страница 120
120 Rece ivable cha nnels * To receive broadcas ts in France, select “L.” Tuni ng th e Fr ench C ATV c hannels This r ecorder can scan the CATV channe ls B to Q an d the HYPER f requenc y channe ls S21 to S41. On th e Channel Set menu, the channe ls are indica ted as CC1 to CC44. For exam ple, chan nel B is indicat ed by C hanne l Set number CC[…]
-
Страница 121
121 Settings an d Adjustments AFT • If the Au to Fine T uning function does not wor k effecti vely, select “O ff” an d press m to se lect “ Level. ” Press < / , to obtain a clea rer pictur e, and pres s ENTER. Sound S ystem Selec t an avai lable TV sys tem (p age 120) . Name Chan ges or enter s a new station name (up t o 5 char acters)[…]
-
Страница 122
122 Video Se ttings (Video In/ Out) You can adjus t items rela ted to th e image, such a s size and col our, acco rdin g to the t ype of TV , tun er, o r de coder connecte d to t he record er. Sele cts th e colo ur sys tem whe n pict ure noi se appear s after yo u change the “Input Line System” setting (pa ge 11 8). z Hint When “I nput Line S[…]
-
Страница 123
123 Settings an d Adjustments Selec ts a method of inputti ng video si gnals for th e LINE 1 /DECO DER ja ck. The picture will not be clear if this setti n g does not match t he type of vi deo input s ignal. Sets the recorder to convert s ignals of the NTSC colour sy stem to t he PAL co lour system t o pla y NTSC disc s on P AL-only TVs. Refer to t[…]
-
Страница 124
124 b Note When r eceiving audio input si gnals from the DV input j ack, the recorde r automatic ally sel ects “Ster eo” or “Bilin gual” regardl ess of the “ External Audio” se tting. Selec ts the so und to be rec orded. b Note When recor ding a bilin gual audio signal to th e HDD (when “HDD Recording Format” i s set to “Video Mod[…]
-
Страница 125
125 Settings an d Adjustments b Note When HDMI outp ut is performed to equipment not compa tible wi th DTS sign als, the si gnals will not be out put regardl ess of t he “DTS O utput” s etting. Selects th e sampli ng frequen cy of the audio sign al. b Notes • “ 96 kHz PCM Output ” setting has no effect when audi o signals are outp ut from[…]
-
Страница 126
126 Langua ge Setting s (Langu age) You ca n make lan guage sett ings. Switc hes the di splay la nguage on the scre en. Swit ches t he langu age of th e sound t rac k. Switches t he language of the su btitles record ed on the di sc. The “ Auto Langu age” fun ction is avai lable when “Audio Lan guage” an d “Sub title Lang uage” a re set […]
-
Страница 127
127 Settings an d Adjustments Record ing Settings (Record ing) You ca n adjust record ing set tings. You can selec t further optio ns for re cordin g mode ( manual record ing mo de). The defaul t setting is “Off” (standard recording mode). You ca n check th e approx imate re cordin g times fo r the HDD and th e differe nt DVD type s in each r e[…]
-
Страница 128
128 Selects t he HDD recor ding format. z Hint The HDD con tents recorded in V ideo mode can b e dubbed to a disc at high speed (page 82). Play back Se tting s (Pla ybac k) You ca n adjus t playback settings. Sele ct th e pl ayback picture size acc ordi ng t o the ty pe of conn ecte d TV (wi descr een/wide mode TV or conven tional 4: 3 screen TV) .[…]
-
Страница 129
129 Settings an d Adjustments Sele cts t h e p ictur e quali ty i n paus e mode. Playback of some DVD VIDEOs can be limited acc ording to a predetermi ned level, such as the age of the users. Scenes ma y be bloc ked or replace d with di fferent s cenes. 1 Select “Parental Co ntrol” in “Pla yback,” and pr ess ENTER. Wh en you have alread y r[…]
-
Страница 130
130 10 Press ENTER. The P arental Co ntrol sett ing is complete. To ca ncel the Par ental C ontrol se tting for the disc, select “Off” in step 9. Change Password 1 Select “Parental Co ntrol” in “Pla yback,” and pr ess ENTER. 2 S elect “Cha nge Pass word,” an d press ENTER . 3 Enter your four-digit password in the “Curren t Passwo […]
-
Страница 131
131 Settings an d Adjustments b Notes • W hen picture nois e appears after you chang e the “Screen Re s olu tion” s etting, hold down x (st op) on the recorder, a nd press Z (op en/close) on the recorder. • W hen “Colou r” is set to “YC bCr 4:2:2” in the “HDMI Out put” setup, you canno t select “720 x 576i” (or “720 x 480i[…]
-
Страница 132
132 Other Se ttings (Option s ) You ca n make oth er opera tion se ttings. Adju sts the ligh ting of the fron t panel disp lay. Chan ges the Co mman d Mode of the record er to avoid interfer ence with your other Sony DVD re corder or player. 1 Select a Command Mode (“ 1,” “2,” or “3 (D efault setting )”), and press ENTER . 2 Set the Com[…]
-
Страница 133
133 Settings an d Adjustments Selects t he thumbnail type shown in th e Title Lis t. Other Se ttings (Opt ions 2) You ca n make o ther opera tion se ttings. Restart USB Device Res tarts the conn ected U SB dev ice if it does not r espond to the rec order. I f the conn ected USB d evice sti ll does not work proper ly, try following: – Turn t he co[…]
-
Страница 134
134 Additional Information Trouble shooting If you e xperie nce any of the followi ng difficult ie s while using the re corder, u se this troub leshoo ting guid e to help reme dy the problem bef ore requestin g repairs . Should any pr oble m persis t, consul t you r near est Sony dealer. The pow er does no t turn on. , Check that t he mains l ead i[…]
-
Страница 135
135 Additional Info rmation , If the HDMI OUT jack is us ed for vi deo output , changi ng the “Scre en Resolu tion” sett ing in t he “ HDMI Ou tput” se tup may solve th e problem (page 130). C onnect th e TV an d the recor der us ing a video jack othe r than HD MI OU T, and s witch the TV’s inpu t to the co nnected video in put so that yo[…]
-
Страница 136
136 GUIDE Plus + system do es not ap pear. , 1 Even if you com plete “Easy Se tup,” TV progr amme listi ngs do no t appea r until t he reco rder rece ives th e GUIDE Plus+ da ta. 2 Turn off the rec order, b ut do not un plug it. 3 Wait for 24 ho urs. It may take several days for the r ecord er to rece ive the GUIDE Plus+ data for all pro gramme[…]
-
Страница 137
137 Additional Info rmation , If the audio signal does not co me through the DIGITAL OUT (CO AXIAL)/HDMI OUT jacks, check the “A udio Out” setup (pa ge 1 24) . , The record er suppor ts only MP3 audio, Dolby D igital and MPEG audio for DivX video files. Press AUDIO and select MP3 audio or MPEG audio. No soun d is outp ut fr om the HDMI OUT jack[…]
-
Страница 138
138 , Disconnect the ma ins lead from the ma ins, and connect i t again. , The programme contain s copy protecti on signals tha t restrict copyin g. , Anot her timer set ting overl apped th e timer setting (page 6 1). , There is no DVD inside the recorde r. , There is not enough disc spac e for the reco rdin g. , The set top bo x receiver wa s turn[…]
-
Страница 139
139 Additional Info rmation Some fu nctions su ch as Stop , Searc h, or Slow- motio n Play ca nnot be p erforme d. , Depending on the DVD, you may not be able to do som e of the operat ions above . Refer to the i nstruction manual supplied with the disc. The la nguage f or the sou nd track can not be chang ed. , Multil ingual t racks are not re cor[…]
-
Страница 140
140 , The Sy nchro-Reco rding and anothe r timer recor d in g overl ap (page 64) . Synch ro-Rec ording does n ot com plete. , The time r sett ing for the c onnected equip ment ov erl apped the rec order’s t imer setting (page 6 4). , There was a p ower f ailur e dur ing the reco rdin g. , The [ / 1 button was pressed be fore Synchro- Recording st[…]
-
Страница 141
141 Additional Info rmation , The USB devic e is c onnected via a USB hub. Connec t the U SB devi ce d ir ectly to the reco rder . Disp lay lang uage on t he screen switch es automatic ally. , When “C ontr ol fo r HDMI ” is set to “ On” (def ault) in th e “HD MI Output ” setup (pag e 131), the disp lay languag e on the screen auto matic[…]
-
Страница 142
142 Resett ing the Record er You can rese t the r ecorder to all its factory setting s. 1 Make sure that the recorder is turned on and r emove the dis c. 2 Ho ld down x (stop) on the r ecorde r and pre ss [ / 1 on the recorde r. All settin gs are rese t and th e record er turns off .[…]
-
Страница 143
143 Additional Info rmation Recor dable and Pl ayabl e Discs Typ e Disc Logo Ic on used in th is manua l Format ting (new dis cs) Compat ibilit y with other DVD p layers (fi nalising) Hard di sk dri ve (intern al) VR mode Sele ct “Vi deo Mode Of f” in “HDD Recording Form at” (pag e 128) Dub HDD contents to a DVD (VR mo de) to play on other […]
-
Страница 144
144 Usabl e disc versio ns (as of April 20 09) • 8 x-spee d or slowe r DVD +RWs • 6 x-spee d or slowe r DVD -RWs (Ve r.1.1, Ver.1. 2 with CPR M *2 ) • 16x-speed or slower DVD+Rs • 16x-speed or slower DVD-Rs (Ver.2.0, Ver.2. 1 with CPR M *2 ) • 8 x-spee d or slow er DVD +R DL (D ouble Lay er) discs • 8 x-spee d or slowe r DVD -R DL (Dua […]
-
Страница 145
145 Additional Info rmation Play able Disc s “DVD VIDEO” and “CD” ar e trademarks. DivX, DivX Certifi ed, and associated logo s are tradema rks of Di vX, Inc. and are used und er licens e. DivX ® is a video fi le compr ession technology, develope d by DivX, Inc. *1 If the DVD-RAM has a removable cartridge, remove the cartridge b efore play[…]
-
Страница 146
146 Regi on c ode ( DVD VI DEO only ) Your recorder h as a region c ode printe d on the rear of the unit and will only p lay DVD VIDE Os (p laybac k only) lab elled w ith identical r egion codes. This system is used to prot ect c opyrig hts. DVD VIDEOs labelled will al so play on th is reco rder . If you t ry to play an y other DV D VIDE O, the m e[…]
-
Страница 147
147 Additional Info rmation About Re cording/ Dubbin g Mode Like the standa rd ×3 rec ordi ng mo des of vide o tape s, you ca n select the de sired recording mode using the REC MODE butt on. Recording modes wi th higher quality provide a more beautif ul recording, but the large da ta volume als o results in a sho rter recordin g time. Conv ersely,[…]
-
Страница 148
148 Recordi ng time in each rec ording mode Bold lines indicate noti ceable leve l differe nces in rec ording pic ture qualit y. Recording mo de Approx. re cordi ng time (hours) HDD DVD+RW/ DVD-RW/ DVD+R/ DVD-R DVD+R DL/ DVD-R DL RDR- AT100/ AT105/ AT107 RDR- AT200/ AT205 HQ+ *1 23 36 – – PCM *2 34 53 1 hr. 1 min. 1 hr . 51 min. HQ MN32 3 4 53 […]
-
Страница 149
149 Additional Info rmation *1 Records in higher quality (15 Mbps ). When recording to the HDD in HQ+ mode, recordings are made in “Video Mo de Off” format regardless of the “HDD Record ing Format” setti ng (page 128). HQ+ mode is not available for D VDs. When re cording to DVDs, th e r ecording mode automatical ly switche s to HQ mode eve […]
-
Страница 150
150 Required times ( a pproximate ) for “High- Speed” dubbing from HDD to DVD (for 60- minute programme ) *1 *1 The values in the above table are for reference only. Actua l times for dubb ing also requ ire time for creating disc’s control info rmation and ot her data. *2 This is th e maximu m recordi ng speed of th is reco rd er. Th e reco r[…]
-
Страница 151
151 Additional Info rmation Langua ge Code Lis t For det ails, se e page 126. The lan guage spelling s confor m to the IS O 639: 1988 (E/F ) standa rd. Countr y/Area Code For det ails, se e page 129. Num ber, Lang uage (Code) Number, Area (Code) 0118, Argentina (ar) 0121, Australia (au) 0120, Austria (at) 0205, Belgium (be) 0218, Brazil (br) 0301, […]
-
Страница 152
152 Notes Ab out This Record er On oper ation • If the recorder is brought di rectly fro m a cold to a war m location, o r is plac ed in a very damp ro om, moisture may condens e on th e lens es inside the reco rder. Shou ld this occur, the recorde r may not op erate properly. In this case, if the recorder is o n, leave it on (if it is off , leav[…]
-
Страница 153
153 Additional Info rmation Notes on MP3 Audio Tracks , JPEG Image File s, DivX Vide o Files , and i.Lin k MP3 is an audio compre ssion tec hnology that satisf ies certain ISO/MPEG regula tions. JPEG is an image compression tech nology. You can play MP3 (M PEG1 A udio Laye r 3) format audio tra cks on the HD D, DATA CDs (CD-ROMs/CD-Rs/CD-RWs), DATA[…]
-
Страница 154
154 • P roceeding to the next or another album may take so me time . • T he ima ge size th at can be displ ayed is l imited. The fol lowing image size s can be displaye d: width 160–5,120 pixels by heig ht 120–3,840 pixels . • T his record er supports MP3 a udio tracks recorde d with a sampling freq uency of 32 kHz, 44.1 kHz , and 48 kHz.[…]
-
Страница 155
155 Additional Info rmation Specifi cations System Laser: Semic onducto r laser Channel c overage: PAL (B/G, D/K, I)/SE CAM (L) VHF: E2 t o E12, R1 to R12, F2 to F10, Ita lian A to H, Ire land A to J, South A frica 4 to 11, 13 UHF: E21 to E69, R21 to R69, B21 to B69, F21 to F 69 CATV: S01 to S0 5, S1 to S20, Fra nce B to Q HYPER: S21 to S41 The ab […]
-
Страница 156
156 Hard disk drive capacity: RDR-AT1 00/AT105/ AT107: 16 0 GB RDR-AT2 00/AT205: 250 GB Mass (appro x.): 4.4 kg Operating te mperature: 5ºC t o 35ºC Operating hu midity: 25% to 80% Supplied access ories: Mains lead (1) Aerial ca ble (1) Remote commander (remote) (1) Set top box co ntrol ler (1) *1 R6 (size AA) batteries (2) HDMI cord (1) *2 *1 RD[…]
-
Страница 157
157 Index Wo rds in qu otations appear in the on -scr een di splays . Numerics “96 kHz PCM Output” 125 A “A-B Erase ” 77 “A-B Repeat” 69 “Add to P lay List” 98 Adjusting playback picture 113 recording picture 113 Aerial 15 “AFT” 121 “Album Name” 71 , 10 0 ANGLE 67 , 107 “Ang le Indica tor” 67 , 13 0 “Artist Name” 100[…]
-
Страница 158
158 Dubbing Dubbin g List 83 HDD/DVD DUB 83 “Hig h-Spe ed” 150 Move 150 DV camcorder 91 DV c am cord er dub bing 91 “DV Man ual Dubbi ng” 93 “DV One-Tou ch Dubbi ng” 93 “DV Pl ayback” 94 DV IN 91 “DV Inpu t” 92 , 124 “DV Manu al Dubb ing” 93 “DV One-Tou ch Dubbin g” 93 “DV Pl ayback” 94 “DVD Backu p” 86 “DVD Me[…]
-
Страница 159
159 N “Name” 121 “New Album ” 110 NICAM 57 “NICAM Se lect” 123 “NTSC on PAL TV” 123 Numb er buttons 74 O “On Screen Display” 132 ONE-TOUCH DUB 89 , 93 One-Touch P lay 20 , 66 “Optimise HDD” 117 “Options” 132 “Options 2” 133 “Origi nal” 38 , 75 , 97 “OSD Lang uage” 126 P Page m ode 38 , 71 , 97 , 106 “Parent[…]
-
Страница 160
Sony Corporation Printed in Hungary Searching audio track 98 by ge nre 38 fast reverse/fast forward 68 , 98 JPEG image file 107 locating the beginn ing of the title/chapte r/ track 67 , 98 scan audi o 68 “Set Genr e” 76 “Set Previ ew” 133 “Set Thu mbnail” 76 , 127 Set to p box co ntroll er 15 , 28 Set to p box rec eiver 16 Setting up th[…]
Sony RDR-AT205 RDR-AT100 RDR-AT200 User Manual [PDF]
Pages: 160 | Size: 4.74 MB
Table of Contents
- WARNING
- Precautions
- Guide to Parts and Controls
- Hookups and Settings
- Hooking Up the Recorder
- Step 1: Connecting the Aerial Cable and Set Top Box Controller
- A: Connecting a set top box receiver (RDR-AT105/AT107/AT205 only)
- B: Connecting the aerial cable only (no set top box receiver)
- Step 2: Connecting the Video Cords/HDMI Cord
- About the SMARTLINK features (for SCART connections only)
- About the “Control for HDMI” functions for ‘BRAVIA’ Sync (for HDMI connections only)
- Step 3: Connecting the Audio Cords/HDMI Cord
- Step 4: Connecting the Mains Lead
- Step 5: Preparing the Remote
- Controlling TVs with the remote
- If you have a Sony DVD player or more than one Sony DVD recorder
- Changing programme positions of the recorder using the remote
- Step 6: Easy Setup
- Setting up the GUIDE Plus+® system (RDR-AT105/AT107/AT205 only)
- Connecting a VCR or Similar Device
- Connecting to the LINE 1/DECODER jack
- Connecting to the LINE 2 IN jacks on the front panel
- Connecting to a Satellite or Digital Tuner (RDR-AT100/AT200 only)
- Connecting an External Decoder
- Connecting a decoder
- Setting external decoder (PAY-TV/Canal Plus analogue decoder) programme positions
- Seven Basic Operations — Getting to Know Your DVD Recorder
- 1. Inserting a Disc
- 2. Recording a Programme
- Checking the disc status while recording
- 3. Playing the Recorded Programme (Title List)
- Displaying the playing time and play information
- 4. Changing the Name of a Recorded Programme
- 5. Labelling and Protecting a Disc
- Labelling a disc
- Protecting a disc
- 6. Playing the Disc on Other DVD Equipment (Finalise)
- Unfinalising a disc
- 7. Reformatting a Disc
- GUIDE Plus+ (RDR-AT105/AT107/AT205 only)
- Viewing the GUIDE Plus+ Display
- Listing Up Your Favourite Programme Information (My TV)
- Making Changes to the GUIDE Plus+ System
- Searching for the GUIDE Plus+ host channel (Setup)
- Changing the GUIDE Plus+ host channel manually (Setup)
- Checking programme positions (Editor)
- Disabling programme positions (Editor)
- Recording
- Timer Recording (GUIDE Plus+/Manual/Easy Timer) (For RDR-AT105/AT107/AT205)
- One Button Recording (GUIDE Plus+)
- Setting the timer manually (Schedule)
- Easy Timer Recording
- Using the Quick Timer function
- Recording stereo and bilingual programmes
- Creating chapters in a title
- Timer Recording (For RDR-AT100/AT200)
- Using the Quick Timer function
- Recording stereo and bilingual programmes
- Creating chapters in a title
- Checking/Changing/Cancelling Timer Settings (Schedule) (For RDR-AT105/AT107/AT205)
- Checking/changing timer settings
- Cancelling timer settings
- Checking/Changing/Cancelling Timer Settings (Timer List) (For RDR-AT100/AT200)
- Recording from Connected Equipment
- Recording from connected equipment without a timer
- Recording from connected equipment with a timer (Synchro Rec.) (RDR-AT100/AT200 only)
- Timer Recording (GUIDE Plus+/Manual/Easy Timer) (For RDR-AT105/AT107/AT205)
- Playback
- Playing
- Playback options
- Playing a specific portion repeatedly (A-B Repeat)
- Playing repeatedly (Repeat)
- Creating your own programme (Programme)
- Playing DivX Video Files
- Connecting the USB device
- Playing DivX video files
- Advanced Playback Functions
- Pausing a TV broadcast (TV Pause/Pause Live TV)
- Playing from the beginning of the programme you are recording (Chase Play)
- Playing a previous recording while making another (Simultaneous Rec and Play)
- Searching for a Time/Title/Chapter/Track, etc.
- Playing
- Erasing and Editing
- Before Editing
- Erasing and Editing a Title
- Editing multiple titles (Multi-Mode)
- Erasing a section of a title (A-B Erase)
- Dividing a title (Divide)
- Erasing and Editing a Chapter
- Dividing a chapter (Divide)
- Erasing a chapter (Erase)
- Combining multiple chapters (Combine)
- Creating and Editing a Playlist
- Moving a Playlist title (Move)
- Combining multiple Playlist titles (Combine)
- Dividing a Playlist title (Divide)
- Moving a chapter (Move)
- Dubbing (HDD y DVD)
- Before Dubbing
- HDD/DVD Dubbing
- Dubbing Using Dubbing List
- Making a Backup Disc (DVD Backup)
- HDD Camcorder Dubbing
- Before HDD Camcorder Dubbing
- Preparing for HDD camcorder dubbing
- One-Touch Dubbing from HDD Camcorder (ONE-TOUCH DUB)
- Dubbing from HDD Camcorder Using the On-Screen Display (HDD-Cam Dubbing)
- Before HDD Camcorder Dubbing
- DV Camcorder Dubbing
- Before DV Camcorder Dubbing
- Preparing for DV camcorder dubbing
- Dubbing an Entire DV Format Tape (DV One-Touch Dubbing)
- Dubbing Selected Scenes (DV Manual Dubbing)
- Playing from a DV Camcorder
- Before DV Camcorder Dubbing
- Music Jukebox
- About Jukebox
- Preparing for Using Jukebox
- Connecting the USB device
- Copying tracks or albums (USB t HDD)
- Copying audio tracks (DISC t HDD)
- Copying tracks or albums on the HDD (HDD y HDD)
- Playing Audio Tracks Using Jukebox/USB Device
- Adding audio tracks to a Playlist (HDD only)
- Playback options
- Playing repeatedly (Repeat)
- Creating your own programme (Programme) (USB device only)
- Managing Audio Tracks on the Music Jukebox (HDD only)
- Photo Album
- About the “Photo Album” Function
- Preparing for Using the “Photo Album” Function
- Connecting the USB device
- Copying JPEG image files to the HDD (DISC/USB t HDD)
- Copying all JPEG image files from the connected USB device (USB t DVD-RW/DVD-R)
- Copying JPEG image files or albums on the HDD (HDD y HDD)
- Copying JPEG image albums to a disc (HDD t DVD-RW/DVD-R)
- Copying JPEG image files to a disc (HDD t DVD-RW/DVD-R)
- Using the “Photo Album” List
- Playing a slideshow
- Creating a Slideshow with Your Favourite Music and Graphic Effects (x-Pict Story) (HDD only)
- Managing JPEG Image Files on the HDD
- Printing JPEG Image Files
- Settings and Adjustments
- Adjusting Picture Quality
- Using the Setup Menus
- Disc Settings (Disc Setup)
- Recorder Settings (Basic)
- Aerial Reception Settings (Tuner)
- Video Settings (Video In/Out)
- Audio Input Settings (Audio In)
- Audio Output Settings (Audio Out)
- Language Settings (Language)
- Recording Settings (Recording)
- Playback Settings (Playback)
- HDMI Settings (HDMI Output)
- Other Settings (Options)
- Other Settings (Options 2)
- Additional Information
- Troubleshooting
- Resetting the Recorder
- Recordable and Playable Discs
- Playable Discs
- About Recording/Dubbing Mode
- Language Code List
- Country/Area Code
- Notes About This Recorder
- Notes on MP3 Audio Tracks, JPEG Image Files, DivX Video Files, and i.Link
- Specifications
- Index
![]()
4-128-703-12(1)
DVD Recorder
Operating Instructions
To find out useful hints, tips and information about Sony products and services please visit: www.sony-europe.com/myproduct
RDR-AT100/AT105/AT107/AT200/AT205
© 2009 Sony Corporation
WARNING
To reduce the risk of fire or electric shock, do not expose this apparatus to rain or moisture. To avoid electrical shock, do not open the cabinet. Refer servicing to qualified personnel only.
The mains lead must be changed only at a qualified service shop. Batteries or batteries installed apparatus shall not be exposed to excessive heat such as sunshine, fire or the like.
This appliance is classified as a CLASS 1 LASER product. The CLASS 1 LASER PRODUCT MARKING is located on the rear of the unit.
CAUTION
The use of optical instruments with this product will increase eye hazard. As the laser beam used in this DVD recorder is harmful to eyes, do not attempt to disassemble the cabinet.
Refer servicing to qualified personnel only.
This label is located on the laser protective housing inside the enclosure.
Notice for customers in the United Kingdom and Republic of Ireland
A molded plug complying with BS1363 is fitted to this equipment for your safety and convenience. Should the fuse in the plug supplied need to be replaced, a fuse of the same rating as the supplied one and approved by ASTA or BSI to BS1362, (i.e., marked with  or
or  mark) must be used.
If the plug supplied with this equipment has a detachable fuse cover, be sure to attach the fuse cover after you change the fuse. Never use the plug without the fuse cover. If you should lose the fuse cover, please contact your nearest Sony service station.
Precautions
•This unit operates on 220 – 240 V AC, 50/60 Hz. Check that the unit’s operating voltage is identical with your local power supply.
•To prevent fire or shock hazard, do not place objects filled with liquids, such as vases, on the apparatus.
•Install this system so that the mains lead can be unplugged from the wall socket immediately in the event of trouble.
RDR-AT105/AT107/ AT205 only
GUIDE Plus+ and G-LINK are (1) registered trademarks or trademarks of, (2) manufactured under license from and (3) subject of various international patents and patent applications owned by, or licensed to, Gemstar-TV Guide International, Inc. and/or its related affiliates.
GEMSTAR-TV GUIDE INTERNATIONAL, INC. AND/ OR ITS RELATED AFFILIATES ARE NOT IN ANY WAY LIABLE FOR THE ACCURACY OF THE PROGRAM SCHEDULE INFORMATION PROVIDED BY THE GUIDE PLUS+ SYSTEM. IN NO EVENT SHALL GEMSTAR-TV GUIDE INTERNATIONAL, INC. AND /OR ITS RELATED AFFILIATES BE LIABLE FOR ANY AMOUNTS REPRESENTING LOSS OF PROFITS, LOSS OF BUSINESS, OR INDIRECT, SPECIAL, OR CONSEQUENTIAL DAMAGES IN CONNECTION WITH THE PROVISION OR USE OF ANY INFORMATION, EQUIPMENT, OR SERVICES RELATING TO THE GUIDE PLUS+ SYSTEM.
Disposal of Old Electrical & Electronic Equipment (Applicable in the European Union and other European countries with separate collection systems)
This symbol on the product or on its packaging indicates that this product shall not be treated as household waste. Instead it shall be handed over to the applicable collection point for the recycling of electrical and electronic equipment. By ensuring this product is disposed of correctly, you will help prevent potential negative consequences for the environment and human health, which could otherwise be caused by inappropriate waste handling of this product. The recycling of materials will help to conserve natural resources. For more detailed information about recycling of this product, please contact your local Civic Office, your household waste disposal service or the shop where you purchased the product.
2

Disposal of waste batteries (applicable in the European Union and other European countries with separate collection systems)
This symbol on the battery or on the packaging indicates that the battery provided with this product shall not be treated as household waste.
On certain batteries this symbol might be used in combination with a chemical symbol. The chemical symbols for mercury (Hg) or lead (Pb) are added if the battery contains more than 0.0005% mercury or 0.004% lead.
By ensuring these batteries are disposed of correctly, you will help prevent potentially negative consequences for the environment and human health which could otherwise be caused by inappropriate waste handling of the battery. The recycling of the materials will help to conserve natural resources.
In case of products that for safety, performance or data integrity reasons require a permanent connection with an incorporated battery, this battery should be replaced by qualified service staff only.
To ensure that the battery will be treated properly, hand over the product at end-of-life to the applicable collection point for the recycling of electrical and electronic equipment.
For all other batteries, please view the section on how to remove the battery from the product safely.
Hand the battery over to the applicable collection point for the recycling of waste batteries.
For more detailed information about recycling of this product or battery, please contact your local Civic Office, your household waste disposal service or the shop where you purchased the product.
The manufacturer of this product is Sony Corporation, 1-7-1 Konan Minato-ku Tokyo, 108-0075 Japan. The Authorized Representative for EMC and product safety is Sony Deutschland GmbH, Hedelfinger Strasse 61, 70327 Stuttgart, Germany. For any service or guarantee matters please refer to the addresses given in separate service or guarantee documents.
Precautions
This equipment has been tested and found to comply with the limits set out in the EMC Directive using a connection cable shorter than 3 metres.
On safety
Should any solid object or liquid fall into the cabinet, unplug the recorder and have it checked by qualified personnel before operating it any further.
About the hard disk drive
The hard disk has a high storage density, which enables long recording durations and quick access to the written data. However, it can easily be damaged by shock, vibration or dust, and should be kept away from magnets. To avoid losing important data, observe the following precautions.
•Do not apply a strong shock to the recorder.
•Do not place the recorder in a location subject to mechanical vibrations or in an unstable location.
•Do not place the recorder on top of a hot surface, such as a VCR or amplifier (receiver).
•Do not use the recorder in a place subject to extreme changes in temperature (temperature gradient less than 10 °C/hour).
•Do not move the recorder with its mains lead connected.
•Do not disconnect the mains lead while the power is on.
•When disconnecting the mains lead, turn off the power and make sure that the hard disk drive is not operating (the clock is displayed in the front panel display for at least 30 seconds and all recording or dubbing has stopped).
•Do not move the recorder for one minute after you have unplugged the mains lead.
,continued 3
•Do not attempt to replace or upgrade the hard disk by yourself, as this may result in malfunction.
If the hard disk drive should malfunction, you cannot recover lost data. The hard disk drive is only a temporary storage space.
About repairing the hard disk drive
•The contents of the hard disk drive may be checked in case of repair or inspection during a malfunction or modification. However, the contents will not be backed up or saved by Sony.
•If the hard disk needs to be formatted or replaced, it will be done at the discretion of Sony. All contents of the hard disk drive will be erased, including contents that violate copyright laws.
On power sources
•The recorder is not disconnected from the AC power source (mains) as long as it is connected to the wall outlet, even if the recorder itself has been turned off.
•If you are not going to use the recorder for a long time, be sure to disconnect the recorder from the wall outlet. To disconnect the AC power cord (mains lead), grasp the plug itself; never pull the cord.
On placement
•Place the recorder in a location with adequate ventilation to prevent heat build-up in the recorder.
•Do not place the recorder on a soft surface such as a rug that might block the ventilation holes.
•Do not place the recorder in a confined space such as a bookshelf or similar unit.
•Do not place the recorder in a location near heat sources, or in a place subject to direct sunlight, excessive dust, or mechanical shock.
•Do not place the recorder in an inclined position. It is designed to be operated in a horizontal position only.
•Keep the recorder and discs away from equipment with strong magnets, such as microwave ovens, or large loudspeakers.
•Do not place heavy objects on the recorder.
On recording
Make trial recordings before making the actual recording.
On compensation for lost recordings
Sony is not liable and will not compensate for any lost recordings or relevant losses, including when recordings are not made due to reasons including recorder failure, or when the contents of a recording are lost or damaged as a result of recorder failure or repair undertaken to the recorder. Sony will not restore, recover, or replicate the recorded contents under any circumstances.
Copyrights
•Television programmes, films, video tapes, discs, and other materials may be copyrighted. Unauthorized recording of such material may be contrary to the provisions of the copyright laws. Also, use of this recorder with cable television transmission may require authorization from the cable television transmitter and/or programme owner.
•This product incorporates copyright protection technology that is protected by U.S. patents and other intellectual property rights. Use of this copyright protection technology must be authorized by Macrovision, and is intended for home and other limited viewing uses only unless otherwise authorized by Macrovision. Reverse engineering or disassembly is prohibited.
•This Product includes FontAvenue® fonts licenced by NEC corporation. FontAvenue is a registered trademark of NEC corporation.
•“ ” and x-Application are trademarks of Sony Corporation.
•ANY USE OF THIS PRODUCT OTHER THAN CONSUMER PERSONAL USE IN ANY MANNER THAT COMPLIES WITH THE MPEG-2 STANDARD FOR ENCODING VIDEO INFORMATION FOR PACKAGED MEDIA IS EXPRESSLY PROHIBITED WITHOUT A LICENSE UNDER APPLICABLE PATENTS IN THE MPEG-2 PATENT PORTFOLIO, WHICH LICENSE IS AVAILABLE FROM MPEG LA, L.L.C., 250 STEELE STREET, SUITE 300, DENVER, COLORADO 80206.
4

Copy guard function
Since the recorder has a copy guard function, programmes received through an external tuner (not supplied) may contain copy protection signals (copy guard function) and as such may not be recordable, depending on the type of signal.
IMPORTANT NOTICE
Caution: This recorder is capable of holding a still video image or on-screen display image on your television screen indefinitely. If you leave the still video image or onscreen display image displayed on your TV for an extended period of time you risk permanent damage to your television screen. Plasma display panels and projection televisions are especially susceptible to this.
If you have any questions or problems concerning your recorder, please consult your nearest Sony dealer.
About this manual
Check your model name
The instructions in this manual are for 5 models: RDR-AT100, RDR-AT105, RDR-AT107, RDR-AT200, and RDR-AT205. Check your model name by looking at the front panel of the recorder.
•In this manual, the internal hard disk drive is written as “HDD,” and “disc” is used as a general reference for the HDD, DVDs, or CDs unless
otherwise specified by the text or illustrations.
• Icons, such as DVD , listed at the top of each explanation indicate what kind of media can be used with the function being explained. For details, see “Recordable and Playable Discs” on page 143.
•Instructions in this manual describe the controls on the remote. You can also use the controls on the recorder if they have the same or similar names as those on the remote.
•The on-screen display illustrations used in this manual may not match the graphics displayed on your TV screen.
•RDR-AT105/AT107/AT205 is used for illustration purposes.
•The explanations regarding DVDs in this manual refer to DVDs created on this recorder. The explanations do not apply to DVDs that are created on other recorders and played back on this recorder.
5

Table of Contents
WARNING . . . . . . . . . . . . . . . . . . . . . . . . . . . . . . . . . . . . . . . . . . . . . . . . . . 2 Precautions . . . . . . . . . . . . . . . . . . . . . . . . . . . . . . . . . . . . . . . . . . . . . . . . . 3 Guide to Parts and Controls . . . . . . . . . . . . . . . . . . . . . . . . . . . . . . . . . . . . 10
Hookups and Settings . . . . . . . . . . . . . . . . . . . . . . . . . . . . . . . .15
Hooking Up the Recorder . . . . . . . . . . . . . . . . . . . . . . . . . . . . . . . . . . . . . . 15 Step 1: Connecting the Aerial Cable and Set Top Box Controller . . . . . . . 15
A: Connecting a set top box receiver
(RDR-AT105/AT107/AT205 only) . . . . . . . . . . . . . . . . . . . . . . . . . . 16 B: Connecting the aerial cable only (no set top box receiver). . . . . . . . 17 Step 2: Connecting the Video Cords/HDMI Cord . . . . . . . . . . . . . . . . . . . . 18 About the SMARTLINK features (for SCART connections only). . . . . . 20
About the “Control for HDMI” functions for ‘BRAVIA’ Sync
(for HDMI connections only) . . . . . . . . . . . . . . . . . . . . . . . . . . . . . . 20 Step 3: Connecting the Audio Cords/HDMI Cord . . . . . . . . . . . . . . . . . . . . 21 Step 4: Connecting the Mains Lead . . . . . . . . . . . . . . . . . . . . . . . . . . . . . . 22 Step 5: Preparing the Remote . . . . . . . . . . . . . . . . . . . . . . . . . . . . . . . . . . 23 Controlling TVs with the remote . . . . . . . . . . . . . . . . . . . . . . . . . . . . . . 23
If you have a Sony DVD player or more than one Sony DVD
recorder. . . . . . . . . . . . . . . . . . . . . . . . . . . . . . . . . . . . . . . . . . . . . . 24 Changing programme positions of the recorder using the remote . . . . 24 Step 6: Easy Setup . . . . . . . . . . . . . . . . . . . . . . . . . . . . . . . . . . . . . . . . . . 25
Setting up the GUIDE Plus+® system
(RDR-AT105/AT107/AT205 only) . . . . . . . . . . . . . . . . . . . . . . . . . . 26 Connecting a VCR or Similar Device . . . . . . . . . . . . . . . . . . . . . . . . . . . . . 29 Connecting to the LINE 1/DECODER jack . . . . . . . . . . . . . . . . . . . . . . 29 Connecting to the LINE 2 IN jacks on the front panel . . . . . . . . . . . . . . 30 Connecting to a Satellite or Digital Tuner (RDR-AT100/AT200 only) . . . . 31 Connecting an External Decoder . . . . . . . . . . . . . . . . . . . . . . . . . . . . . . . . 32 Connecting a decoder . . . . . . . . . . . . . . . . . . . . . . . . . . . . . . . . . . . . . . 32
Setting external decoder (PAY-TV/Canal Plus analogue decoder) programme positions. . . . . . . . . . . . . . . . . . . . . . . . . . . . . . . . . . . . 33
|
Seven Basic Operations — Getting to Know Your DVD Recorder |
||
|
1. |
Inserting a Disc . . . . . . . . . . . . . . . . . . . . . . . . . . . . . . . . . . . . . . . . . . . |
34 |
|
2. |
Recording a Programme . . . . . . . . . . . . . . . . . . . . . . . . . . . . . . . . . . . . |
35 |
|
Checking the disc status while recording . . . . . . . . . . . . . . . . . . . . . . . |
36 |
|
|
3. |
Playing the Recorded Programme (Title List) . . . . . . . . . . . . . . . . . . . . |
37 |
|
Displaying the playing time and play information . . . . . . . . . . . . . . . . . |
39 |
|
|
4. |
Changing the Name of a Recorded Programme . . . . . . . . . . . . . . . . . . |
40 |
|
5. |
Labelling and Protecting a Disc . . . . . . . . . . . . . . . . . . . . . . . . . . . . . . . |
41 |
|
Labelling a disc . . . . . . . . . . . . . . . . . . . . . . . . . . . . . . . . . . . . . . . . . . . |
41 |
|
|
Protecting a disc . . . . . . . . . . . . . . . . . . . . . . . . . . . . . . . . . . . . . . . . . . |
42 |
|
|
6. |
Playing the Disc on Other DVD Equipment (Finalise) . . . . . . . . . . . . . . |
43 |
|
Unfinalising a disc . . . . . . . . . . . . . . . . . . . . . . . . . . . . . . . . . . . . . . . . . |
44 |
|
|
7. |
Reformatting a Disc . . . . . . . . . . . . . . . . . . . . . . . . . . . . . . . . . . . . . . . . |
45 |
6

GUIDE Plus+ (RDR-AT105/AT107/AT205 only) . . . . . . . . . . . . . . .47
Viewing the GUIDE Plus+ Display . . . . . . . . . . . . . . . . . . . . . . . . . . . . . . . 47 Listing Up Your Favourite Programme Information (My TV) . . . . . . . . . . . 49 Making Changes to the GUIDE Plus+ System . . . . . . . . . . . . . . . . . . . . . . 50 Searching for the GUIDE Plus+ host channel (Setup) . . . . . . . . . . . . . 50 Changing the GUIDE Plus+ host channel manually (Setup). . . . . . . . . 50 Checking programme positions (Editor) . . . . . . . . . . . . . . . . . . . . . . . . 51 Disabling programme positions (Editor) . . . . . . . . . . . . . . . . . . . . . . . . 51
Recording . . . . . . . . . . . . . . . . . . . . . . . . . . . . . . . . . . . . . . . .52
Timer Recording (GUIDE Plus+/Manual/Easy Timer)
(For RDR-AT105/AT107/AT205) . . . . . . . . . . . . . . . . . . . . . . . . . . . . . 52 One Button Recording (GUIDE Plus+) . . . . . . . . . . . . . . . . . . . . . . . . . 52 Setting the timer manually (Schedule) . . . . . . . . . . . . . . . . . . . . . . . . . 54 Easy Timer Recording. . . . . . . . . . . . . . . . . . . . . . . . . . . . . . . . . . . . . . 56 Using the Quick Timer function . . . . . . . . . . . . . . . . . . . . . . . . . . . . . . . 56 Recording stereo and bilingual programmes . . . . . . . . . . . . . . . . . . . . 57 Creating chapters in a title . . . . . . . . . . . . . . . . . . . . . . . . . . . . . . . . . . 57
Timer Recording (For RDR-AT100/AT200) . . . . . . . . . . . . . . . . . . . . . . . . 58 Using the Quick Timer function . . . . . . . . . . . . . . . . . . . . . . . . . . . . . . . 60 Recording stereo and bilingual programmes . . . . . . . . . . . . . . . . . . . . 60 Creating chapters in a title . . . . . . . . . . . . . . . . . . . . . . . . . . . . . . . . . . 60
Checking/Changing/Cancelling Timer Settings (Schedule)
(For RDR-AT105/AT107/AT205) . . . . . . . . . . . . . . . . . . . . . . . . . . . . . 60 Checking/changing timer settings . . . . . . . . . . . . . . . . . . . . . . . . . . . . . 60 Cancelling timer settings . . . . . . . . . . . . . . . . . . . . . . . . . . . . . . . . . . . . 61
Checking/Changing/Cancelling Timer Settings (Timer List)
(For RDR-AT100/AT200) . . . . . . . . . . . . . . . . . . . . . . . . . . . . . . . . . . . 62 Recording from Connected Equipment . . . . . . . . . . . . . . . . . . . . . . . . . . . 63 Recording from connected equipment without a timer . . . . . . . . . . . . . 63
Recording from connected equipment with a timer (Synchro Rec.) (RDR-AT100/AT200 only) . . . . . . . . . . . . . . . . . . . . . . . . . . . . . . . . 64
Playback . . . . . . . . . . . . . . . . . . . . . . . . . . . . . . . . . . . . . . . .65
Playing . . . . . . . . . . . . . . . . . . . . . . . . . . . . . . . . . . . . . . . . . . . . . . . . . . . . 65 Playback options. . . . . . . . . . . . . . . . . . . . . . . . . . . . . . . . . . . . . . . . . . 67 Playing a specific portion repeatedly (A-B Repeat). . . . . . . . . . . . . . . . 69 Playing repeatedly (Repeat) . . . . . . . . . . . . . . . . . . . . . . . . . . . . . . . . . 69 Creating your own programme (Programme) . . . . . . . . . . . . . . . . . . . . 70
Playing DivX Video Files . . . . . . . . . . . . . . . . . . . . . . . . . . . . . . . . . . . . . . 71 Connecting the USB device . . . . . . . . . . . . . . . . . . . . . . . . . . . . . . . . . 71 Playing DivX video files. . . . . . . . . . . . . . . . . . . . . . . . . . . . . . . . . . . . . 71 Advanced Playback Functions . . . . . . . . . . . . . . . . . . . . . . . . . . . . . . . . . . 72 Pausing a TV broadcast (TV Pause/Pause Live TV) . . . . . . . . . . . . . . 72
Playing from the beginning of the programme you are recording
(Chase Play) . . . . . . . . . . . . . . . . . . . . . . . . . . . . . . . . . . . . . . . . . . 73 Playing a previous recording while making another
(Simultaneous Rec and Play) . . . . . . . . . . . . . . . . . . . . . . . . . . . . . 73 Searching for a Time/Title/Chapter/Track, etc. . . . . . . . . . . . . . . . . . . . . . 74
,continued 7

Erasing and Editing . . . . . . . . . . . . . . . . . . . . . . . . . . . . . . . . .75
Before Editing . . . . . . . . . . . . . . . . . . . . . . . . . . . . . . . . . . . . . . . . . . . . . . . 75 Erasing and Editing a Title . . . . . . . . . . . . . . . . . . . . . . . . . . . . . . . . . . . . . 76 Editing multiple titles (Multi-Mode) . . . . . . . . . . . . . . . . . . . . . . . . . . . . 76 Erasing a section of a title (A-B Erase) . . . . . . . . . . . . . . . . . . . . . . . . . 77 Dividing a title (Divide) . . . . . . . . . . . . . . . . . . . . . . . . . . . . . . . . . . . . . 77 Erasing and Editing a Chapter . . . . . . . . . . . . . . . . . . . . . . . . . . . . . . . . . . 78 Dividing a chapter (Divide) . . . . . . . . . . . . . . . . . . . . . . . . . . . . . . . . . . 79 Erasing a chapter (Erase) . . . . . . . . . . . . . . . . . . . . . . . . . . . . . . . . . . . 79 Combining multiple chapters (Combine) . . . . . . . . . . . . . . . . . . . . . . . . 79 Creating and Editing a Playlist . . . . . . . . . . . . . . . . . . . . . . . . . . . . . . . . . . 80 Moving a Playlist title (Move) . . . . . . . . . . . . . . . . . . . . . . . . . . . . . . . . 80 Combining multiple Playlist titles (Combine) . . . . . . . . . . . . . . . . . . . . . 80 Dividing a Playlist title (Divide) . . . . . . . . . . . . . . . . . . . . . . . . . . . . . . . 80 Moving a chapter (Move) . . . . . . . . . . . . . . . . . . . . . . . . . . . . . . . . . . . 81
Dubbing (HDD y DVD) . . . . . . . . . . . . . . . . . . . . . . . . . . . . . .82
Before Dubbing . . . . . . . . . . . . . . . . . . . . . . . . . . . . . . . . . . . . . . . . . . . . . 82
HDD/DVD Dubbing . . . . . . . . . . . . . . . . . . . . . . . . . . . . . . . . . . . . . . . . . . 83
Dubbing Using Dubbing List . . . . . . . . . . . . . . . . . . . . . . . . . . . . . . . . . . . . 83
Making a Backup Disc (DVD Backup) . . . . . . . . . . . . . . . . . . . . . . . . . . . . 86
HDD Camcorder Dubbing . . . . . . . . . . . . . . . . . . . . . . . . . . . . .87
Before HDD Camcorder Dubbing . . . . . . . . . . . . . . . . . . . . . . . . . . . . . . . . 87 Preparing for HDD camcorder dubbing. . . . . . . . . . . . . . . . . . . . . . . . . 88 One-Touch Dubbing from HDD Camcorder (ONE-TOUCH DUB) . . . . . . . 89
Dubbing from HDD Camcorder Using the On-Screen Display
(HDD-Cam Dubbing) . . . . . . . . . . . . . . . . . . . . . . . . . . . . . . . . . . . . . . 89
DV Camcorder Dubbing . . . . . . . . . . . . . . . . . . . . . . . . . . . . . .91
Before DV Camcorder Dubbing . . . . . . . . . . . . . . . . . . . . . . . . . . . . . . . . . 91 Preparing for DV camcorder dubbing . . . . . . . . . . . . . . . . . . . . . . . . . . 91 Dubbing an Entire DV Format Tape (DV One-Touch Dubbing) . . . . . . . . . 93 Dubbing Selected Scenes (DV Manual Dubbing) . . . . . . . . . . . . . . . . . . . 93 Playing from a DV Camcorder . . . . . . . . . . . . . . . . . . . . . . . . . . . . . . . . . . 94
Music Jukebox . . . . . . . . . . . . . . . . . . . . . . . . . . . . . . . . . . . .95
About Jukebox . . . . . . . . . . . . . . . . . . . . . . . . . . . . . . . . . . . . . . . . . . . . . . 95 Preparing for Using Jukebox . . . . . . . . . . . . . . . . . . . . . . . . . . . . . . . . . . . 95 Connecting the USB device . . . . . . . . . . . . . . . . . . . . . . . . . . . . . . . . . 95 Copying tracks or albums (USB t HDD). . . . . . . . . . . . . . . . . . . . . . . 95 Copying audio tracks (DISC t HDD) . . . . . . . . . . . . . . . . . . . . . . . . . 96 Copying tracks or albums on the HDD (HDD y HDD) . . . . . . . . . . . . 96 Playing Audio Tracks Using Jukebox/USB Device . . . . . . . . . . . . . . . . . . 97 Adding audio tracks to a Playlist (HDD only) . . . . . . . . . . . . . . . . . . . . 98 Playback options. . . . . . . . . . . . . . . . . . . . . . . . . . . . . . . . . . . . . . . . . . 98 Playing repeatedly (Repeat) . . . . . . . . . . . . . . . . . . . . . . . . . . . . . . . . . 98 Creating your own programme (Programme) (USB device only) . . . . . 99 Managing Audio Tracks on the Music Jukebox (HDD only) . . . . . . . . . . . 100
8

Photo Album . . . . . . . . . . . . . . . . . . . . . . . . . . . . . . . . . . . . . 101
About the “Photo Album” Function . . . . . . . . . . . . . . . . . . . . . . . . . . . . . . 101 Preparing for Using the “Photo Album” Function . . . . . . . . . . . . . . . . . . . 101 Connecting the USB device . . . . . . . . . . . . . . . . . . . . . . . . . . . . . . . . 101 Copying JPEG image files to the HDD (DISC/USB t HDD) . . . . . . . 102
Copying all JPEG image files from the connected USB device
(USB t DVD-RW/DVD-R). . . . . . . . . . . . . . . . . . . . . . . . . . . . . . 102 Copying JPEG image files or albums on the HDD
(HDD y HDD). . . . . . . . . . . . . . . . . . . . . . . . . . . . . . . . . . . . . . . 103 Copying JPEG image albums to a disc
(HDD t DVD-RW/DVD-R) . . . . . . . . . . . . . . . . . . . . . . . . . . . . . 103 Copying JPEG image files to a disc (HDD t DVD-RW/DVD-R) . . . . 104 Using the “Photo Album” List . . . . . . . . . . . . . . . . . . . . . . . . . . . . . . . . . . 105 Playing a slideshow. . . . . . . . . . . . . . . . . . . . . . . . . . . . . . . . . . . . . . . 107
Creating a Slideshow with Your Favourite Music and Graphic Effects
(x-Pict Story) (HDD only) . . . . . . . . . . . . . . . . . . . . . . . . . . . . . . . . . . 108 Managing JPEG Image Files on the HDD . . . . . . . . . . . . . . . . . . . . . . . . 110 Printing JPEG Image Files . . . . . . . . . . . . . . . . . . . . . . . . . . . . . . . . . . . . 111
Settings and Adjustments . . . . . . . . . . . . . . . . . . . . . . . . . . . . 113
Adjusting Picture Quality . . . . . . . . . . . . . . . . . . . . . . . . . . . . . . . . . . . . . 113
Using the Setup Menus . . . . . . . . . . . . . . . . . . . . . . . . . . . . . . . . . . . . . . 116
Disc Settings (Disc Setup) . . . . . . . . . . . . . . . . . . . . . . . . . . . . . . . . . . . . 116
Recorder Settings (Basic) . . . . . . . . . . . . . . . . . . . . . . . . . . . . . . . . . . . . 117
Aerial Reception Settings (Tuner) . . . . . . . . . . . . . . . . . . . . . . . . . . . . . . 119
Video Settings (Video In/Out) . . . . . . . . . . . . . . . . . . . . . . . . . . . . . . . . . . 122
Audio Input Settings (Audio In) . . . . . . . . . . . . . . . . . . . . . . . . . . . . . . . . 123
Audio Output Settings (Audio Out) . . . . . . . . . . . . . . . . . . . . . . . . . . . . . . 124
Language Settings (Language) . . . . . . . . . . . . . . . . . . . . . . . . . . . . . . . . 126
Recording Settings (Recording) . . . . . . . . . . . . . . . . . . . . . . . . . . . . . . . . 127
Playback Settings (Playback) . . . . . . . . . . . . . . . . . . . . . . . . . . . . . . . . . . 128
HDMI Settings (HDMI Output) . . . . . . . . . . . . . . . . . . . . . . . . . . . . . . . . . 130
Other Settings (Options) . . . . . . . . . . . . . . . . . . . . . . . . . . . . . . . . . . . . . 132
Other Settings (Options 2) . . . . . . . . . . . . . . . . . . . . . . . . . . . . . . . . . . . . 133
Additional Information . . . . . . . . . . . . . . . . . . . . . . . . . . . . . . 134
Troubleshooting . . . . . . . . . . . . . . . . . . . . . . . . . . . . . . . . . . . . . . . . . . . . 134 Resetting the Recorder . . . . . . . . . . . . . . . . . . . . . . . . . . . . . . . . . . . . . . 142 Recordable and Playable Discs . . . . . . . . . . . . . . . . . . . . . . . . . . . . . . . . 143 Playable Discs . . . . . . . . . . . . . . . . . . . . . . . . . . . . . . . . . . . . . . . . . . . . . 145 About Recording/Dubbing Mode . . . . . . . . . . . . . . . . . . . . . . . . . . . . . . . 147 Language Code List . . . . . . . . . . . . . . . . . . . . . . . . . . . . . . . . . . . . . . . . . 151 Country/Area Code . . . . . . . . . . . . . . . . . . . . . . . . . . . . . . . . . . . . . . . . . 151 Notes About This Recorder . . . . . . . . . . . . . . . . . . . . . . . . . . . . . . . . . . . 152 Notes on MP3 Audio Tracks, JPEG Image Files, DivX Video Files, and
i.Link . . . . . . . . . . . . . . . . . . . . . . . . . . . . . . . . . . . . . . . . . . . . . . . . . . 153 Specifications . . . . . . . . . . . . . . . . . . . . . . . . . . . . . . . . . . . . . . . . . . . . . . 155 Index . . . . . . . . . . . . . . . . . . . . . . . . . . . . . . . . . . . . . . . . . . . . . . . . . . . . 157
9

Guide to Parts and Controls
For more information, see the pages in parentheses.
Remote
|
RDR-AT105/AT107/AT205 |
RDR-AT100/AT200 |
|
1 |
2 |
3 |
1 |
2 |
3 |
|
4 |
5 |
6 |
4 |
5 |
6 |
|
7 |
8 |
9 |
7 |
8 |
9 |
|
0 |
0 |
AHDD (35)
Records to or plays titles on HDD.
DVD (34)
Records to or plays titles on DVD.
B[/1 (on/standby) (25)
Turns the recorder on or off.
CZ (open/close) (34)
Opens or closes the disc tray.
DPROG (programme) +/– (35)
The + button has a tactile dot*.
ENumber buttons (74)
The number 5 button has a tactile dot*.
FINPUT (input select) (63)
Selects an input source.
GAUDIO (67)
The AUDIO button has a tactile dot*.
H CLEAR (40, 69, 70)
ITV/DVD (23)
Switches between TV mode and DVD mode.
JSUBTITLE (67)
Green (RDR-AT105/AT107/ AT205 only) (47)
10
KANGLE (67, 107)
Changes the angles or rotates an image during slideshow.
Yellow (RDR-AT105/AT107/ AT205 only) (47)
LRed (RDR-AT105/AT107/AT205 only) (47)
MPLAY MODE (69, 74)
Blue (RDR-AT105/AT107/AT205 only) (47)
NGUIDE (for RDR-AT105/AT107/
AT205) (47)
Displays GUIDE Plus+® system screen.
TIMER (for RDR-AT100/AT200) (58)
OSYSTEM MENU (113) TITLE LIST (37, 65, 76)
TOP MENU (65)
PINFO (information) (RDR-AT105/ AT107/AT205 only) (48)
Displays the programme information.
QMENU (65)
Displays the disc’s menu.
R </M/m/,/ENTER (25)
S O RETURN (25)
TDISPLAY (39)
Displays the playing status or disc information.
U./> (previous/next) (67,
98)
PAGE +/– (RDR-AT105/AT107/ AT205 only) (48)
Changes the programme list by page.
 /
/ (instant replay/instant advance) (67)
mc /
/ CM (search/ slow/freeze frame) (47, 67, 98)
DAY +/– (RDR-AT105/AT107/ AT205 only) (48)
Changes the programme list by day.
H (play) (65, 107)
X (pause) (35, 67, 98, 107)
x (stop) (65, 97, 107)
The H button has a tactile dot*.
V TV PAUSE (72)
Wz REC (35)
x REC STOP (35)
HDD/DVD DUB (83)
Starts dubbing the current playing title or cancels the dubbing.
REC MODE (35)
Selects the recording mode.
XTV [/1 (on/standby) (23) TV t (input select) (23) TV 2 (volume) +/– (23)
TV PROG (programme) +/– (23)
The + button has a tactile dot*.
YZOOM (RDR-AT100/AT200 only) (107)
Zooms an image during a slideshow.
*Use the tactile dot as a reference when operating the recorder.
,continued 11
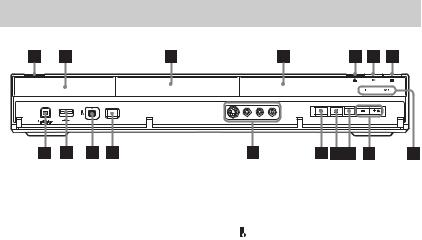
Front panel
A[/1 (on/standby) (25)
Turns the recorder on or off.
B (remote sensor) (23)
C Disc tray (34)
D Front panel display (13)
EZ (open/close) (34)
Opens or closes the disc tray.
FN (play) (65, 107)
The N button has a tactile dot*.
G x (stop) (65, 97, 107)
HHDD
Lights up when the HDD is selected.
DVD
Lights up when the DVD is selected.
IPROGRAM +/– (35)
The + button has a tactile dot*.
JINPUT (input select) (63)
Selects an input source.
K x REC STOP (35)
L z REC (35)
MLINE 2 IN (S VIDEO/VIDEO/ L(MONO) AUDIO R) jacks (30)
Connect a VCR or similar recording device to these jacks.
NONE-TOUCH DUB (89, 93)
Starts dubbing from a connected digital video camera.
O DV IN jack (91)
Connect a DV camcorder to this jack.
P  USB jack (type A) (95, 101)
Connect a USB device to this jack.
QPictBridge USB jack (type B) (111)
Connect a PictBridge-compatible printer to this jack.
*Use the tactile dot as a reference when operating the recorder.
To lock the recorder (Child Lock)
You can lock all of the buttons on the recorder so that the settings are not cancelled by mistake.
When the recorder is turned off, hold down x (stop) on the recorder until “LOCKED” appears in the front panel display. The recorder does not work except for timer recordings and Synchro-Recording (RDRAT100/AT200 only) while the Child Lock is set.
To unlock the recorder, hold down x (stop) on the recorder until “UNLOCKED” appears in the front panel display.
12
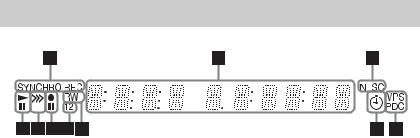
Front panel display
ASYNCHRO REC indicator (RDRAT100/AT200 only) (64)
Lights up when the recorder is set to stand by for Synchro-Recording.
BDisplays the following:
•Playing time
•Current title/chapter/track/index number
•Recording time/recording mode
•Clock
•Programme position
•EPG indication (RDR-AT105/AT107/ AT205 only) (47)
“EPG” appears when receiving the GUIDE Plus+ data.
•TV Direct Rec. indication (35) “TV” appears in the right most two digits.
CNTSC indicator (118, 123)
Lights up when NTSC colour system is selected.
DVPS/PDC indicator (55, 59)
Lights up when the VPS/PDC function is turned on.
ETimer indicator (52, 58)
Lights up when the timer for recording is set.
FDisc type
Lights up when a recordable DVD-R or DVD-RW disc is loaded.
GCommand Mode indicator (132)
Displays the Command Mode of the remote.
When the Command Mode for the recorder is set to “3 (Default setting),” either “1” or “2” does not appear.
H Recording status
I Dubbing direction indicator
J Playing status
,continued 13
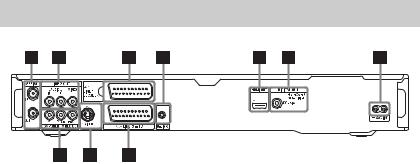
Rear panel
A AERIAL IN/OUT jacks (15)
BLINE 2 OUT (R-AUDIO-L/VIDEO) jacks (18, 21)
C LINE 1/DECODER jack (29)
DG-LINK jack (RDR-AT105/ AT107/AT205 only) (16)
Connect the set top box controller to this jack.
EHDMI OUT (high-definition multimedia interface out) jack (18, 21)
FDIGITAL OUT (COAXIAL) jack (21)
G AC IN terminal (22)
H LINE 3 – TV jack (18)
I LINE 2 OUT (S VIDEO) jack (18)
JCOMPONENT VIDEO OUT (Y, PB/CB, PR/CR) jacks (18)
14

Hookups and Settings
Hooking Up the Recorder
Follow steps 1 through 6 to hook up and adjust the settings of the recorder. Do not connect the mains lead until you reach “Step 4: Connecting the Mains Lead” on page 22.
b Notes
•See “Specifications” (page 155) for a list of supplied accessories.
•Plug in cords securely to prevent unwanted noise.
•Refer to the instructions supplied with the components to be connected.
•You cannot connect this recorder to a TV that does not have a SCART or video input jack.
•Be sure to disconnect the mains lead of each component before connecting.
Step 1: Connecting the
Aerial Cable and Set Top
Box Controller
Select one of the following aerial hookups. Do NOT set “LINE 1 In” to “Decoder” in the “Video In/Out” setup (page 123) when making connection A.
“Standby Mode” is set to “Mode 1” (default) in the “Basic” setup and the picture does not appear on the TV when the recorder is in standby mode.
To watch TV in standby mode, set “Standby Mode” to “Mode 2” in “Step 6: Easy Setup” (page 25) or use a splitter to divide aerial input signals between the TV and the recorder.
|
If you have |
Hookup |
|
Set top box receiver |
A (page 16) |
|
No set top box receiver |
B (page 17) |
z Hint
You can also set “Standby Mode” to “Mode 2” in the “Basic” setup (page 118).
b Notes
•If your aerial is a flat cable (300-ohm twin lead cable), use an external aerial connector (not supplied) to connect the aerial to the recorder.
•If you have separate cables for AERIAL antennas, use an AERIAL UHF/VHF band mixer (not supplied) to connect the aerial to the recorder.
•If you disconnect the recorder’s mains lead, you will not be able to view the signals from the connected set top box receiver.
Settings and Hookups
,continued 15
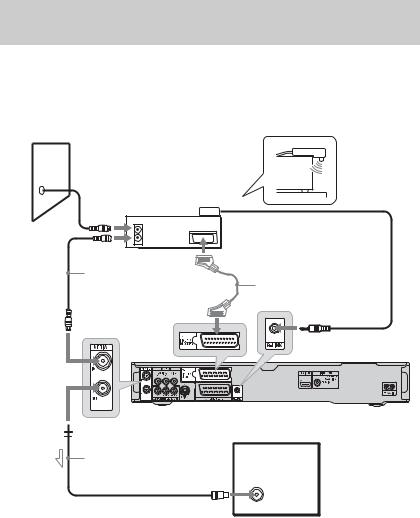
A: Connecting a set top box receiver (RDR-AT105/AT107/AT205 only)
With this hookup, you can record any programme position on the set top box receiver.
To watch cable programmes, you need to match the programme position on the recorder to the aerial output programme position on the set top box receiver.
Place the set top box controller near the remote sensor on the set top box receiver.
Wall
|
Set top box |
|
|
controller |
|
|
Set top box |
(page 17) |
|
receiver |
|
|
ANT IN |
|
|
TO TV |
|
|
Aerial cable*1 |
SCART cord*2 |
|
(not supplied) |
(not supplied) |
to AERIAL IN
to G-LINK
DVD recorder
 to AERIAL OUT
|
Aerial cable |
TV |
|
(supplied) |
to aerial input
 : Signal flow
*1 If your set top box receiver does not have an aerial output jack, connect the aerial cable to the recorder’s AERIAL IN jack.
*2 Connect only if your set top box receiver has a SCART connector.
If the set top box receiver can output RGB signals
This recorder accepts RGB signals. If the set top box receiver can output RGB signals, connect the TV SCART connector on the set top box receiver to the LINE 1/DECODER jack, and set “LINE 1 In” to “RGB” in the “Video In/Out” setup (page 123). Refer to the instructions supplied with the set top box receiver.
16
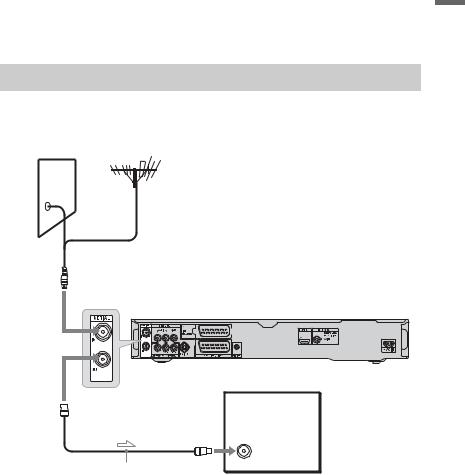
About the set top box receiver control function
You can use the set top box receiver control function with hookup A.
When using the set top box receiver control function:
–The recorder controls the set top box receiver via the supplied set top box controller.
–The recorder controls programme positions on the set top box receiver for timer recording.
–You can use the recorder’s remote control to change programme positions on the set top box receiver whenever the set top box receiver and recorder are turned on.
After making hookup A, check that the recorder correctly controls the set top box receiver (page 26).
B: Connecting the aerial cable only (no set top box receiver)
Use this hookup if you watch cable programme position without a set top box receiver. Also use this hookup if you are connecting only an aerial antenna.
With this hookup, you can record any programme position by selecting the programme position on the recorder.
Wall
to AERIAL IN
DVD recorder
to AERIAL OUT
TV
to aerial input
Aerial cable (supplied)
 : Signal flow
Settings and Hookups
17
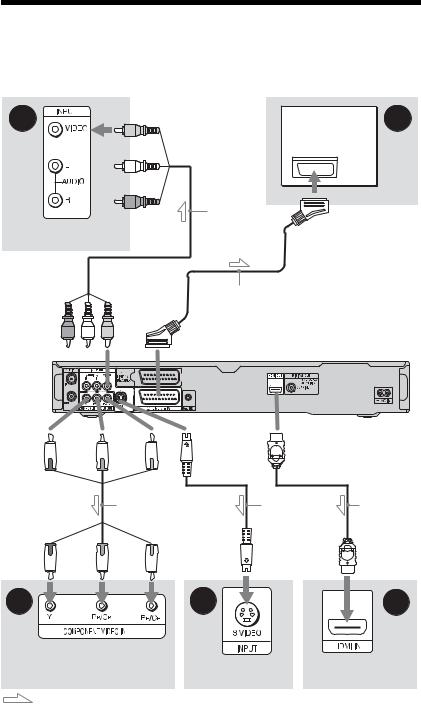
Step 2: Connecting the Video Cords/HDMI Cord
Select one of the following patterns, A through E, according to the input jack on your TV monitor, projector, or audio component such as an AV amplifier (receiver). This will enable you to view pictures.
|
B |
A |
|
TV |
|
|
Audio/video |
|
|
cord (not |
|
|
TV, projector, or audio |
supplied) |
|
component |
to LINE 2 OUT (VIDEO)
SCART cord (not supplied)
(yellow)
to T LINE 3 – TV
|
DVD recorder |
|||||
|
(green) |
(blue) |
(red) |
to LINE 2 OUT |
to HDMI OUT |
|
|
(S VIDEO) |
|||||
|
to COMPONENT |
|||||
|
VIDEO OUT |
Component video |
S-video cord |
HDMI cord |
||
|
cord (not supplied) |
(not supplied) |
||||
|
(green) |
(blue) |
(red) |
|
D |
C |
E |
|
|
TV, projector, or audio |
|||
|
component |
TV, projector, or audio |
TV, projector, or |
|
|
component |
audio component |
||
|
: Signal flow |
18
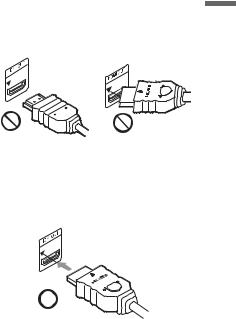
A SCART input jack
When setting “LINE 3 Out” to “S-Video” or “RGB” in the “Video In/Out” setup
(page 122), use a SCART cord that conforms to the selected signal.
B Video input jack
You will enjoy standard quality images.
C S VIDEO input jack
You will enjoy high quality images.
D Component video input jacks (Y, PB/
CB, PR/CR)
You will enjoy accurate colour reproduction and high quality images.
If your TV accepts progressive 525p/625p format signals, use this connection and set “Progressive” to “Compatible” in the “Easy Setup” setup (page 25). Then set “Component Video Out” to “Progressive” in the “Video In/Out” setup to send progressive video signals. For details, see “Component Video Out” on page 122.
E HDMI input jack
Use a certified HDMI cord to enjoy high quality digital picture and sound through the HDMI OUT jack.
When connecting a Sony TV that is compatible with the “Control for HDMI” function, see page 20.
To see the signals from the connected set top box receiver when the set top box receiver is connected to the recorder using a SCART cord only, turn the recorder on.
When connecting to the HDMI jack
Follow the steps below. Improper handling may damage the HDMI jack and the connector.
1Carefully align the HDMI jack on the rear of the recorder and the HDMI connector by checking their shapes. Make sure the connector is not upside down or tilted.
|
Connector is upside |
Not straight |
|
down |
2Insert the HDMI connector straight into the HDMI jack.
Do not bend or apply pressure to the HDMI connector.
b Notes
•Be sure to disconnect the HDMI cord when moving the recorder.
•Do not apply too much pressure to the cabinet wall, if you place the recorder on the cabinet with the HDMI cord connected. It may damage the HDMI jack or the HDMI cord.
•Do not twist the HDMI connector while connecting to or disconnecting from the HDMI jack to avoid damaging the HDMI jack and connector.
When playing “wide screen” images
Some recorded images may not fit your TV screen. To change the picture size, see page 128.
If you are connecting to a VCR
Connect your VCR to the LINE 1/ DECODER jack on the recorder (page 29).
Settings and Hookups
,continued 19

b Notes
•Do not connect more than one type of video cord between the recorder and your TV at the same time.
•Do not make connections A and E at the same time.
•When you connect the recorder to your TV via the SCART jacks, the TV’s input source is set to the recorder automatically when you start playback. If necessary, press the TV t button on the remote to return the input to the TV.
•If you connect the recorder to a TV with SMARTLINK, set “LINE 3 Out” to “Video” in the “Video In/Out” setup.
•You cannot connect the HDMI OUT jack (connection E) to DVI jacks that are not HDCP compliant (e.g., DVI jacks on PC displays).
•Component video and RGB signals are not output when using the HDMI connection.
*This DVD recorder incorporates HighDefinition Multimedia Interface (HDMI™) technology.
HDMI, the HDMI logo and High-Definition Multimedia Interface are trademarks or registered trademarks of HDMI Licensing LLC.
About the SMARTLINK features (for SCART connections only)
If the connected TV (or other connected equipment such as a set top box receiver) complies with SMARTLINK, NexTView Link*3, MEGALOGIC*1, EASYLINK*2, CINEMALINK*2, Q-Link*3, EURO VIEW LINK*4, or T-V LINK*5, you can enjoy the following SMARTLINK features.
•TV Direct Rec. (page 35)
•One-Touch Play (page 66)
•Preset Download
You can download the tuner preset data from your TV to this recorder, and tune the recorder according to that data in “Easy Setup.”
•NexTView Download
You can easily set the timer by using the NexTView Download function on your TV.
To prepare for the SMARTLINK features
Set “LINE 3 Out” to “Video” in the “Video In/Out” setup (page 122) and “SMARTLINK” to “This Recorder Only” in the “Options” setup (page 132).
b Notes
•For correct SMARTLINK connection, you will need a SCART cord that has the full 21 pins. Refer as well to your TV’s instruction manual for this connection.
•Not all TVs respond to the functions above.
*1 “MEGALOGIC” is a registered trademark of Grundig Corporation.
*2 “EASYLINK” and “CINEMALINK” are trademarks of Philips Corporation.
*3 “Q-Link” and “NexTView Link” are trademarks of Panasonic Corporation.
*4 “EURO VIEW LINK” is a trademark of Toshiba Corporation.
*5 “T-V LINK” is a trademark of JVC Corporation.
About the “Control for HDMI” functions for ‘BRAVIA’ Sync (for HDMI connections only)
By connecting Sony components that are compatible with the “Control for HDMI” function with an HDMI cord, operation is simplified as below:
•One-Touch Play (page 66)
•System Power-Off
When you turn the TV off using the power button on the TV’s remote, the recorder and components compatible with the “Control for HDMI” function turn off automatically. However, the recorder does not turn off while recording or dubbing even if you turn off the TV.
•‘BRAVIA’ Sync display
You can control the recorder by pressing the SYNC MENU button on the TV’s remote.
b Notes
•Depending on the connected component, the “Control for HDMI” function may not work. Refer to the operating instructions supplied with the component.
•You can use the ‘BRAVIA’ Sync display feature only when the connected TV has the SYNC MENU button. For details on ‘BRAVIA’ Sync, refer to the operating instructions supplied with the TV.
•To use the ‘BRAVIA’ Sync features, set “Control for HDMI” to “On” (default) in the “HDMI Output” setup (page 131).
20
![]()
Step 3: Connecting the Audio Cords/HDMI Cord
Select one of the following patterns, Aor B, according to the input jack on your TV monitor, projector, or audio component such as an AV amplifier (receiver). This will enable you to listen to sound.
|
[Speakers] |
[Speakers] |
A |
|
|
Rear (L) |
Rear (R) |
||
|
Audio component with |
|||
|
Front (L) |
a decoder |
Front (R) |
|
|
Centre |
Subwoofer |
|
or |
to coaxial/HDMI digital input |
|
HDMI cord |
Coaxial digital cord |
|
(not supplied) |
|
|
to HDMI OUT |
to DIGITAL OUT (COAXIAL) |
Settings and Hookups
to LINE 2 OUT (R-AUDIO-L)
(white)
(red)
Audio/video cord
(not supplied)
(yellow)*
 : Signal flow
* The yellow plug is used for video signals (page 18).
DVD recorder
|
INPUT |
B |
|
|
VIDEO |
||
|
(yellow) |
||
|
L |
||
|
(white) |
AUDIO |
|
|
R |
||
|
(red) |
||
|
TV, projector, or |
||
|
audio component |
,continued 21
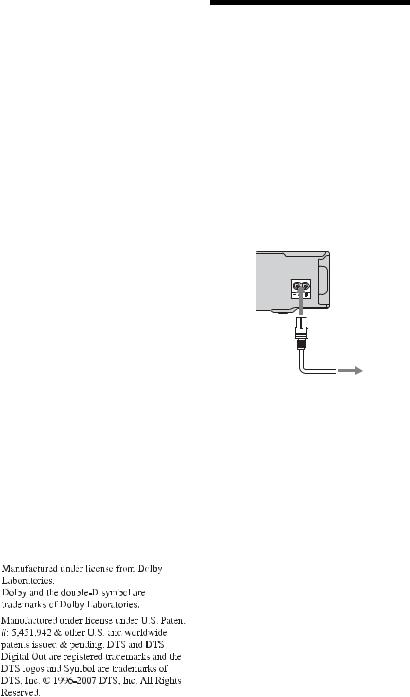
A Digital audio input jack
If your audio component has a Dolby*1 Digital, DTS*2, or MPEG audio decoder and a digital input jack, use this connection. You can enjoy Dolby Digital (5.1ch), DTS (5.1ch), and MPEG audio (5.1ch) surround effects.
If you connect a Sony audio component that is compatible with the “Control for HDMI” function, refer to the operating instructions supplied with the audio component.
B Audio L/R (left/right) input jacks
This connection will use your TV’s or audio component’s two speakers for sound.
z Hint
For correct speaker location, refer to the operating instructions supplied with the connected components.
b Notes
•Do not connect your TV’s audio output jacks to the LINE IN (R-AUDIO-L) jacks at the same time. This will cause unwanted noise to come from your TV’s speakers.
•With connection B, do not connect the LINE IN (R-AUDIO-L) and LINE 2 OUT (R-AUDIO-L) jacks to your TV’s audio output jacks at the same time. This will cause unwanted noise to come from your TV’s speakers.
•With connection A, after you have completed the connection, make the appropriate settings in the “Audio Out” setup (page 124). Otherwise, no sound or a loud noise will come from your speakers.
•When you connect the recorder to an audio component using an HDMI cord, you will need to do one of the following:
–Connect the audio component to the TV with the HDMI cord, or
–Connect the recorder to the TV with a video cord other than HDMI cord (component video cord, S-video cord, or audio/video cord).
*1
*2
Step 4: Connecting the
Mains Lead
Connect the supplied mains lead to the AC IN terminal of the recorder. Then plug the recorder and TV mains leads (AC power cords) into the mains. After you connect the mains lead, you must wait for a short while before operating the recorder.
You can operate the recorder once the front panel display lights up and the recorder enters standby mode.
If you connect additional equipment to this recorder (page 29), be sure to connect the mains lead after all connections are complete.
1
 to AC IN
 2
2
to mains
22
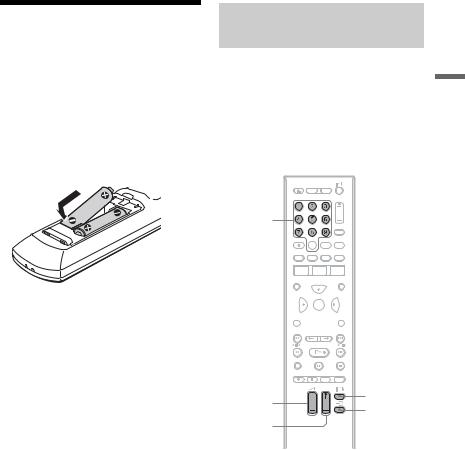
Step 5: Preparing the
Remote
You can control the recorder using the supplied remote. Insert two R6 (size AA) batteries by matching the 3 and # ends on the batteries to the markings inside the battery compartment. When using the remote, point it at the remote sensor  on the recorder.
b Notes
•If the supplied remote interferes with your other Sony DVD recorder or player, change the command mode number for this recorder (page 24).
•Use the batteries correctly to avoid possible leakage and corrosion. Should leakage occur, do not touch the liquid with bare hands. Observe the following:
–Do not use a new battery with an old battery, or batteries of different manufacturers.
–Do not attempt to recharge the batteries.
–If you do not intend to use the remote for an extended period of time, remove the batteries.
–If battery leakage occurs, wipe out any liquid inside the battery compartment, and insert new batteries.
•Do not expose the remote sensor (marked on the front panel) to strong light, such as direct sunlight or a lighting apparatus. The recorder may not respond to the remote.
•When you replace the batteries of the remote, the code number and Command Mode may be reset to the default setting. Set the appropriate code number and Command Mode again.
Controlling TVs with the remote
You can adjust the remote’s signal to control your TV.
b Notes
•Depending on the connected unit, you may not be able to control your TV with some or all of the buttons below.
•If you enter a new code number, the code number previously entered will be erased.
Number buttons


 TV/DVD


 DISPLAY
TV [/1
TV 2 +/–
TV t
TV PROG +/–
1 Hold down TV [/1 located at the bottom of the remote.
Do not press the [/1 button at the top of the remote.
2 With TV [/1 pressed down, enter the
TV’s manufacturer code using the number buttons.
For instance, to enter “09,” press “0” then “9.” After you enter the last number, release the TV [/1 button.
Settings and Hookups
,continued 23

Code numbers of controllable TVs
If more than one code number is listed, try entering them one at a time until you find the one that works with your TV.
|
Manufacturer |
Code number |
|
|
Sony |
01 (default) |
|
|
Hitachi |
24 |
|
|
JVC |
33 |
|
|
LG/Goldstar |
76 |
|
|
Panasonic |
17, 49 |
|
|
Philips |
06, 08, 72 |
|
|
Samsung |
71 |
|
|
Sharp |
29 |
|
|
Toshiba |
38 |
|
|
The remote performs the following: |
||
|
Buttons |
Operations |
|
|
TV [/1 |
Turns your TV on or |
|
|
off. |
||
|
TV 2 (volume) |
Adjusts the volume |
|
|
+/– |
of your TV. |
|
|
TV PROG +/– |
Selects the |
|
|
programme position |
||
|
on your TV. |
||
|
TV t (input |
Switches your TV’s |
|
|
select) |
input source. |
|
To operate the TV/DVD button (for SCART connections only)
The TV/DVD button switches between TV mode and DVD mode. Press the TV/DVD button when in stop mode or no menu appears on the TV screen. Point your remote at the recorder when using this button.
TV mode: switch to this when you use the TV’s tuner mainly. When you start playback, the input source for the TV is set to the recorder automatically.
DVD mode: switch to this when you use the recorder’s tuner mainly.
To check the current mode, press DISPLAY (page 39).
If you have a Sony DVD player or more than one Sony DVD recorder
If the supplied remote interferes with your other Sony DVD recorder or player, set the command mode number for this recorder and the supplied remote to one that differs from the other Sony DVD recorder or player after you have completed “Step 6: Easy Setup.”
The default command mode setting for this recorder and the supplied remote is “3 (Default setting).”
You can check the current Command Mode in the front panel display. For details, see page 132.
The default command mode setting for this recorder and the supplied remote is “3 (Default setting).”
The remote does not function if different command modes are set for the recorder and remote. Set the same command mode.
Changing programme positions of the recorder using the remote
You can change programme positions of the recorder using the number buttons.
Example: for channel 50
Press “5,” “0,” then press ENTER.
24
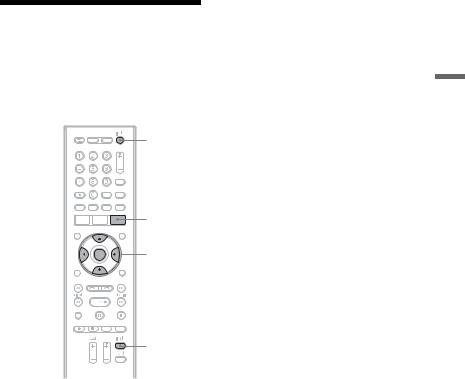
Step 6: Easy Setup
Make the basic adjustments by following the on-screen instructions in “Easy Setup.”
Be careful not to disconnect the cables or exit the “Easy Setup” function during this procedure.
[/1
GUIDE*
</M/m/,, ENTER
O RETURN 
TV [/1
* RDR-AT105/AT107/AT205 only
1 Turn on the recorder and your TV. Then switch the input selector on your TV so that the signal from the recorder appears on your TV screen.
The “Language” display appears.
•If the “Language” display does not appear, select “Easy Setup” in the “Basic” setup from “Initial Setup” in the System Menu (page 118).
2 Select a language for the on-screen displays using </M/m/,, and press ENTER.
The initial settings message appears.
3 Select “Start” using M/m, and press
ENTER.
Follow the on-screen instructions to make the following settings.
 Auto Channel Setting
•If you connect a TV to this recorder not using SMARTLINK, select “Auto Scan.” Then select your country/ region using </,, and press ENTER. The programme position order will be set according to the country/region you select.
•If you connect a TV to this recorder with SMARTLINK, select “Download from TV.” Then select your country/ region using </,, and press ENTER. The tuner preset data will be downloaded from your TV to this recorder. (For details, refer to the operating instructions supplied with your TV.)
•To skip this setting, select “Do not set.”
To set the programme positions manually, see page 119.
 Clock Setting
•Select “Auto” when a programme position in your local area broadcasts a time signal. The “Auto Clock Setting” display appears.
Select a programme position that carries a time signal and then “Start” using </,/m, and press ENTER. If a clock signal cannot be found, press O RETURN, and set the clock manually.
•Select “Manual” to set the clock manually. The “Manual Clock Setting” display appears.
1Select the time zone for your area or GMT (Greenwich Mean Time) using </,, and press m.
2Select “On” using </, if you are now on summer time, and press ENTER.
3Set the day, month, year, hour and minutes using </M/m/,, and press ENTER to start the clock.
 TV Type (page 128)
•If you have a widescreen TV, select “Wide (16:9).”
•If you have a standard TV, select “Standard (4:3).” This will determine how “widescreen” images are displayed on your TV.
Settings and Hookups
,continued 25
 Progressive
When you connect a progressive format TV to this recorder using the COMPONENT VIDEO OUT jacks, select “Compatible.”
 Standby Mode (page 118)
Select the mode for when the recorder is turned off.
•“Mode 1” (default): No input signals are output when the recorder is in standby mode.
•“Mode 2”: Input signals are output
when the recorder is in standby mode. When you select “Mode 1,” the display asks for confirmation. Select “Yes(Mode 2)” or “No(Mode 1).”
 HDD caution messages
Read the HDD caution messages, and press ENTER.
4 Select “Finish Setup” using M/m, and press ENTER.
“Easy Setup” is completed.
Go to “Setting up the GUIDE Plus+® system (RDR-AT105/AT107/AT205 only)” (page 26) to use the Gemstar GUIDE Plus+ electronic programme guide.
To return to the previous step
Press O RETURN.
z Hint
If you want to run “Easy Setup” again, select “Easy Setup” in the “Basic” setup from “Initial Setup” in the System Menu (page 118).
Setting up the GUIDE Plus+® system (RDR-AT105/AT107/ AT205 only)
Follow the instructions below to set up the GUIDE Plus+ system and use the connected set top box receiver.
1 Press GUIDE.
The GUIDE Plus+ system “Basic Setup” appears.
2 Select an item using M/m, and press
ENTER. Then set each item.
 Language
Select a language for the on-screen displays using M/m, and press ENTER.
 Country
Select a country/area using M/m, and press ENTER.
 Postal Code
Enter your postal code using </M/m/ ,, and press ENTER.
If “Country” is set to “Others,” you cannot enter a postal code and the GUIDE Plus+ system will not search for a host channel.
•If you do not need to set up the GUIDE Plus+ system, press SYSTEM MENU to exit.
•Even if you cannot use the GUIDE Plus+ system where you live, you can still set up a manual recording. See “Setting the timer manually (Schedule)” on page 54.
26

 External Receiver 1/External
Receiver 2/External Receiver 3 (only when connecting the set top box receiver)
1Press ENTER to select “Continue.”
2Select the set top box receiver type using M/m, and press ENTER.
3Select the provider using M/m, and press ENTER.
4Select the receiver brand using M/ m, and press ENTER.
If you select “Other providers,” you can select a receiver brand from a list of all available brands.
If your receiver brand is not on the list, select “???.”
The receiver brand list is automatically updated, so your receiver may be available at a later date. Select your brand when it becomes available. Until then, use “???.”
5Select the connection you used for your set top box receiver using M/ m, and press ENTER.
When the set top box receiver is connected to the recorder using hookup A with both an aerial cable and a SCART cord, select either “Line1” or “Antenna.”
The display asks for confirmation.
6Press ENTER to select “Continue.” The Video Window switches to the specified programme position.
7Select “YES” using M/m, and press ENTER.
The display asks for confirmation. If the Video Window does not switch to the specified programme position, select “NO” and press ENTER until the Video Window switches to the specified programme position.
3 Turn off the recorder to receive GUIDE Plus+ system data.
To receive GUIDE Plus+ system data your recorder must be turned off when not in use. If your recorder is connected to a set top box receiver, be sure to leave the set top box receiver turned on. After initial setup, it may take up to 24 hours to begin receiving TV programme listings.
b Note
You cannot set tuner system or “OSD Language” to a country/region or language that is not supported by the GUIDE Plus+ system.
If you cannot get the recorder to control your set top box receiver
Check the connection and position of the set top box controller (page 16).
If your set top box receiver still does not operate with this recorder, refer to the instructions supplied with your set top box receiver and contact your cable or satellite company to see if they can provide you with a compatible set top box receiver.
b Notes
•The list of external receivers controllable by the GUIDE Plus+ system is updated constantly and is distributed through GUIDE Plus+ system data signals. Since the time your recorder has been produced and the time you installed your recorder for the first time, new external receiver codes might have been added.
•If the external receiver is still not on the list or is not controlled properly by the recorder, please call Customer Support to report the brand and model of your external receiver.
Settings and Hookups
,continued 27
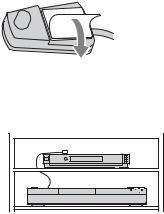
To fix the set top box controller to your set top box receiver
Once you have confirmed that the set top box controller controls your set top box receiver, fix it in place.
1Remove the backing on the doublesided tape.
2Attach it so that the set top box controller is directly above the remote control sensor on your set top box receiver.
To change the basic GUIDE Plus+ settings
1Press GUIDE.
2Select “Setup” in the Menu Bar using M/ ,, and press ENTER.
3Select “Basic Setup” using M/m, and press ENTER.
4Repeat from step 2 of “Setting up the GUIDE Plus+® system (RDR-AT105/ AT107/AT205 only)” on page 26.
28
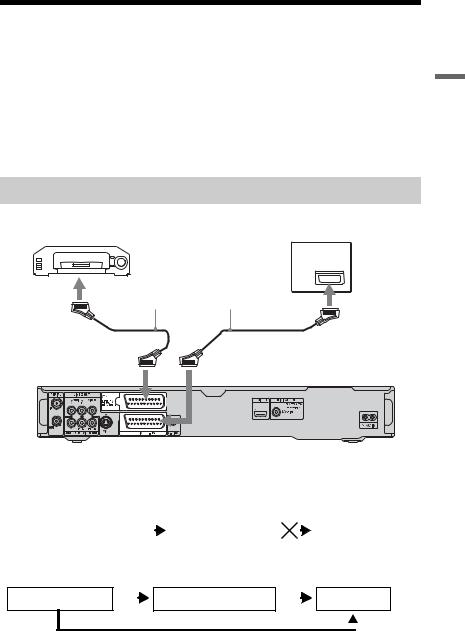
Connecting a VCR or Similar Device
After disconnecting the recorder’s mains lead from the mains, connect a VCR or similar recording device to the LINE IN jacks of this recorder.
To watch the connected VCR or a similar device’s picture through the recorder while the recorder is in standby mode, set “Standby Mode” to “Mode 2” in the “Basic” setup (page 118). If not, the picture will not appear.
Use the DV IN jack on the front panel if the equipment has a DV output jack (i.LINK jack) (page 91).
For details, refer to the instruction manual supplied with the connected equipment. To record on this recorder, see “Recording from Connected Equipment” on page 63.
Connecting to the LINE 1/DECODER jack
Connect a VCR or similar recording device to the LINE 1/DECODER jack of this recorder.
|
VCR |
TV |
||||||
|
SCART cord (not supplied) |
|
|
to SCART input |
|
|
to i LINE 1/DECODER |
to T LINE 3 – TV |
DVD recorder
b Notes
•Pictures containing copy protection signals that prohibit any copying cannot be recorded.
•If you pass the recorder signals through a VCR, you may not receive a clear image on your TV screen.
|
DVD recorder |
VCR |
TV |
||||||
Be sure to connect your VCR to the DVD recorder and to your TV in the order shown below. To watch video tapes, watch the tapes through a second line input on your TV.
Line input 1
|
VCR |
DVD recorder |
TV |
 Line input 2
•The SMARTLINK features are not available for devices connected via the DVD recorder’s LINE 1/ DECODER jack.
•When you record to a VCR from this DVD recorder, do not switch the input source to TV by pressing the TV/DVD button on the remote.
•If you disconnect the recorder’s mains lead, you will not be able to view the signals from the connected VCR.
Settings and Hookups
,continued 29
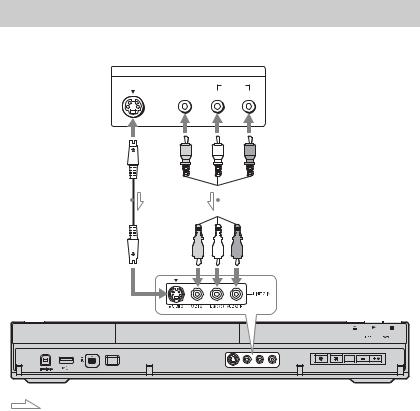
Connecting to the LINE 2 IN jacks on the front panel
Connect a VCR or similar recording device to the LINE 2 IN jacks of this recorder. If the equipment has an S-video jack, you can use an S-video cord instead of an audio/video cord.
|
OUTPUT |
VCR, etc. |
|
|
S VIDEO |
VIDEO |
AUDIO |
|
L |
R |
|
S-video cord |
Audio/video cord |
||||||||||||||||||||||
|
(not supplied) |
(not supplied) |
||||||||||||||||||||||
to LINE 2 IN
DVD recorder
: Signal flow
z Hint
When the connected equipment outputs only monaural sound, connect to only the L(MONO) and VIDEO input jacks on the front of the recorder. Do not connect the R input jack.
b Notes
•Do not connect the yellow LINE IN (VIDEO) jack when using an S-video cord.
•Do not connect the output jack of this recorder to another equipment’s input jack with the other equipment’s output jack connected to the input jack of this recorder. This may cause noise (feedback).
•Do not connect more than one type of video cord between the recorder and your TV at the same time.
30
![]()
Connecting to a Satellite or Digital Tuner (RDRAT100/AT200 only)
Connect a satellite or digital tuner to this recorder using the LINE 1/DECODER jack. Disconnect the recorder’s mains lead from the mains when connecting the tuner.
To use the Synchro Rec function, see below.
Do NOT set “LINE 1 In” to “Decoder” in the “Video In/Out” setup (page 123) when making this connection.
|
Satellite tuner, |
TV |
|
|
CanalSat, etc. |
||
|
SCART cord (not supplied) |
|
|
to SCART input |
|
|
to i LINE 1/DECODER |
to T LINE 3 – TV |
DVD recorder
If the satellite tuner can output RGB signals
This recorder accepts RGB signals. If the satellite tuner can output RGB signals, connect the TV SCART connector on the satellite tuner to the LINE 1/DECODER jack, and set “LINE 1 In” to “RGB” in the “Video In/Out” setup (page 123). Refer to the instructions supplied with the set top box receiver.
If you want to use the Synchro Rec function
This connection is necessary to use the Synchro-Recording function. See “Recording from connected equipment with a timer (Synchro Rec.) (RDR-AT100/ AT200 only)” on page 64.
Set “LINE 1 In” in the “Video In/Out” setup (page 123) according to the specifications of your satellite tuner. Refer to your satellite tuner’s instructions for more information.
b Notes
•Synchro-Recording does not work with some tuners. For details, refer to the tuner’s operating instructions.
•If you disconnect the recorder’s mains lead, you will not be able to view the signals from the connected tuner.
Settings and Hookups
31

Connecting an External Decoder
You can watch or record external decoder (PAY-TV/Canal Plus analogue decoder) programmes if you connect a decoder (not supplied) to the recorder. Disconnect the recorder’s mains lead from the mains when connecting the decoder.
To watch the connected external decoder (PAY-TV/Canal Plus analogue decoder) programmes while the recorder is in standby mode, set “Standby Mode” to “Mode 2” in the “Basic” setup (page 118). If not, the picture will not appear.
Note that when you set “LINE 1 In” to “Decoder” in step 7 of “Setting external decoder (PAYTV/Canal Plus analogue decoder) programme positions” (page 33), you will not be able to select “L1” because Line 1 will become a dedicated line for the decoder.
Connecting a decoder
|
TV |
External decoder (PAY-TV/ |
||
|
Canal Plus analogue decoder) |
|||
|
to AERIAL IN |
|||
|
Aerial cable |
|||
|
(supplied) |
to SCART input |
||
|
SCART cord |
|||
|
SCART cord |
(not supplied) |
||
|
to T LINE 3 – TV |
(not supplied) |
||
|
to AERIAL OUT |
to i LINE 1/DECODER |
DVD recorder
32

Setting external decoder (PAYTV/Canal Plus analogue decoder) programme positions
To watch or record PAY-TV/Canal Plus analogue programmes, set your recorder to receive the programme positions using the on-screen display.
In order to set the programme positions correctly, be sure to follow all of the steps below.
1 Press SYSTEM MENU.
The System Menu appears.
2 Select “Initial Setup” using </M/m/ ,, and press ENTER.
3 Select “Video In/Out” using M/m, and press ENTER.
4 Select “LINE 3 Out” using M/m, and press ENTER.
5 Press M/m to select “Video” or
“RGB,” and press ENTER.
6 Select “LINE 1 In” using M/m, and press ENTER.
7 Press M/m to select “Decoder,” and press ENTER.
8 Press O RETURN to return the cursor to the left column.
9 Select “Tuner” using M/m, and press
ENTER.
10 Select “Manual CH Setting” using M/ m, and press ENTER.
The highlight moves to “Next Screen.”
11 Press ENTER.
12 Select your country/region using </ ,, and press ENTER.
Programme position
13 Select the desired programme position using PROG +/– or number buttons.
14 Select “Channel” using M/m, and select the external decoder programme position using </,.
15 Select “Sound System” using M/m, and select an available TV system, B/ G, D/K, I, or L using </,.
To receive broadcasts in France, select “L.”
16 Select “Decoder” using M/m, and select “On” using </,.
17 Press SYSTEM MENU to exit the menu.
To return to the previous step
Press O RETURN.
b Notes
•If you disconnect the recorder’s mains lead, you will not be able to view the signals from the connected decoder.
•To watch the connected external decoder (PAYTV/Canal Plus analogue decoder) programmes during recording, press the PROGRAM + button on the recorder (“SCART THRU” appears on the front panel display). To return to the previous display, press the PROGRAM – button on the recorder (“SCART NORM” appears on the front panel display). The recorder automatically switches to the programme tuned by the recorder’s tuner after the recording has finished. To watch the connected external decoder (PAYTV/Canal Plus analogue decoder) programmes while the recorder is in standby mode, set “Standby Mode” to “Mode 2” in the “Basic” setup (page 118).
Settings and Hookups
33

Seven Basic Operations
—Getting to Know Your DVD Recorder
1.Inserting a Disc
|
+RW -RWVR -RWVideo +R |
-RVR |
—RVideo DVD VCD CD DATADVD
DATA CD
1 Press DVD.
2 Press Z (open/close), and place a disc on the disc tray.
Recording/playing side facing down
3 Press Z (open/close) to close the disc tray.
Wait until “LOAD” disappears from the front panel display.
Unused DVDs are formatted automatically.
•For DVD-RW discs DVD-RWs are formatted in the
recording format (VR mode or Video mode) set by “Format DVD-RW” of “Basic” in the “Disc Setup” setup (page 116).
•For DVD-R discs
DVD-Rs are automatically formatted in Video mode. To format an unused DVD-R in VR mode, format the disc in the “Format” setup (page 45) before you make a recording.
If the disc is recordable on this recorder, you can manually re-format the disc to make a blank disc (page 45).
34

2. Recording a
Programme
HDD +RW -RWVR -RWVideo +R
-RVR -RVideo
This section introduces the basic operation to record a current TV programme to the hard disk (HDD) or to a disc (DVD). For an explanation of how to make timer recordings, see page 52 (for RDR-AT105/ AT107/AT205) or page 58 (for RDRAT100/AT200).
|
X |
|
|
z REC |
REC MODE |
|
x REC |
|
|
STOP |
1 Press HDD or DVD.
If you want to record to a DVD, insert a recordable DVD.
2 Press PROG +/– to select the programme position or input source you want to record.
3 Press REC MODE repeatedly to select the recording mode.
Each time you press the button, the display on the TV screen changes as follows:
*Available when “Manual Rec. Mode” is set to “On (go to setup)” in the “Recording” setup (page 127).
For more details about the recording mode, see page 147.
4 Press z REC.
Recording starts.
To stop recording
Press x REC STOP.
To pause recording
Press X.
To resume recording, press X again.
To watch another TV programme while recording
If your TV is connected to the T LINE 3 – TV jack, set your TV to the TV input using the TV/DVD button and select the programme you want to watch. If your TV is connected to the LINE 2 OUT or COMPONENT VIDEO OUT jacks, set the TV to TV input using the TV t button (page 23).
TV Direct Rec. (for SMARTLINK connections only)
When the TV is turned on and the recorder is turned off, press TV PAUSE. The recorder automatically turns on and starts recording what you are watching on the TV to the HDD.
Set “TV Pause” to “TV’s Tuner” in the “Options 2” setup (page 133).
Recorder DVD Your Know to Getting — Operations Basic Seven
,continued 35

b Notes
•To turn off the TV Direct Rec. function, set “SMARTLINK” to “Pass Through” in the “Options” setup (page 132).
•Some buttons, such as the TITLE LIST button or H button, do not work when “TV” appears in the front panel display.
•If you press the [/1 button while recording, the recorder stops recording and turns off.
•After pressing the z REC button, it may take a short while to start recording.
•It may take a short while for recorder to stop or pause recording.
•You cannot change the recording mode while recording.
•Programmes are recorded in the original aspect ratio when recording to the HDD (when “HDD Recording Format” is set to “Video Mode Off” in the “Recording” setup (page 128))/DVD- RWs/DVD-Rs (VR mode).
•When recording to DVD-R DLs (Video mode), the title is divided when the layer switches.
•If there is a power failure, the programme you are recording may be erased.
•You cannot watch a PAY-TV/Canal Plus programme while recording another PAY-TV/ Canal Plus programme.
•To use the TV Direct Rec. function, you must first correctly set the recorder’s clock.
Checking the disc status while recording
You can check the recording information such as recording time or disc type.
Press DISPLAY during recording.
The recording information appears.
A Recording mode
B Recording time
C Disc type/format
D Recording status
To turn off the display
Press DISPLAY repeatedly.
36

3. Playing the Recorded
Programme (Title List)
HDD +RW -RWVR -RWVideo +R
-RVR -RVideo
To play a recorded title, select the title from the Title List.
TITLE LIST
</M/m/,, ENTER
1 Press HDD or DVD.
If you select DVD, insert a DVD (see “1. Inserting a Disc” on page 34). Playback starts automatically depending on the disc.
2 Press TITLE LIST.
Example: 4-Title List for HDD
ADisc type:
Displays the media type, HDD or DVD.
B Total number of titles
CSub-menu:
Press , to display the sub-menu. The sub-menu displays options
applicable only to the selected item. The displayed options differ depending upon the model, situation, and disc type.
Sub-menu
DScroll bar:
Appears when all of the titles do not fit on the list. To view the hidden titles, press M/m.
ETitle information:
“Recording”: Indicates that the title is
currently being recorded.
 : Indicates a protected title.
“NEW”: Indicates that the title is newly recorded (not played back) (HDD only).
 : Press DISPLAY to display “
 .” “
.” “ ” indicates titles containing “Copy-Once” copy protection signals (HDD only)
(page 150).
 : Indicates that the title is recorded using the Update function.
Genre icons: Indicates the title’s genre (HDD only).
 : Indicates a bilingual programme (HDD only).
FRemaining time of the current disc in the current recording mode (example: SP mode)
3 Select a title using M/m, and press
ENTER.
Playback starts from the selected title.
Recorder DVD Your Know to Getting — Operations Basic Seven
,continued 37

To stop playback
Press x (stop).
To scroll the list display by page (Page mode)
Press ./> while the Title List is displayed. Each time you press ./>, the Title List changes to the previous/next page of titles.
About the Title List for DVD-RWs/DVD-Rs (VR mode)
You can switch the Title List to show Original or Playlist titles.
1Press < while the Title List is displayed.
2Select “Play List” using M/m, and press ENTER.
3Select “Original” or “Play List” using M/m, and press ENTER.
To change the title order for HDD (Sort Titles)
1Press < while the Title List is displayed.
2Select “Sort Titles” using M/m, and press ENTER.
3Select the item using M/m, and press ENTER.
|
Order |
Sorted |
|
By Date |
In order of when the titles |
|
were recorded. The title |
|
|
that is recorded most |
|
|
recently is listed at the |
|
|
top. |
|
|
Unseen Title |
In order of when the titles |
|
were recorded. The title |
|
|
that is recorded most |
|
|
recently and has not been |
|
|
played is listed at the top. |
|
|
By Title |
In alphabetical order. |
|
By Number |
In order of recorded title |
|
number. |
|
To search for a title by genre (HDD only)
1Press < while the Title List is displayed.
2Select “Genre” using M/m, and press ENTER.
3Select a genre using M/m, and press ENTER.
To change a title thumbnail picture (Thumbnail)
After recording, the first scene of the recording (the title) is automatically set as the thumbnail picture.
You can select a favourite scene for the thumbnail picture shown in the Title List.
1Press TITLE LIST.
For DVD-RWs/DVD-Rs (VR mode), switch the Title List to show Original or Playlist titles, if necessary.
2Select a title using M/m, and press ,. The sub-menu appears.
3Select “Edit” using M/m, and press ENTER.
4Select “Set Thumbnail” using M/m, and press ENTER.
The display for setting the thumbnail point appears and the title starts to play.
5While watching the playback picture, press H, X, c m/M
m/M C or PLAY MODE to select the scene you want to set for a thumbnail picture, and press X.
Playback pauses.
6Select “OK” using M/m, and press ENTER.
The scene is set for the title’s thumbnail picture.
To return to the Title List, press O RETURN.
To change the thumbnail preview mode (Set Preview) (HDD only)
You can select “Quick Preview” or “Normal” for the thumbnail preview mode in the Title List. Set “Set Preview” in the “Options” setup (page 133).
38

To switch to the 8 Title List
1Press < while the Title List is displayed.
2Select “Title View” using M/m, and press ENTER.
3Select “8 Titles” using M/m, and press ENTER.
Detailed information, including the resumption time, for the selected title is shown below the list.
To turn off the Title List
Press TITLE LIST.
b Notes
•The title names may not appear for DVDs created on other DVD recorders.
•It may take a few seconds for the thumbnail pictures to be displayed.
•After editing, the title thumbnail picture may change to the first scene of the recording (title).
•The thumbnail picture setting in the dubbing source does not retain in the dubbed title.
•(RDR-AT100/AT200 only) When the Title List does not appear by pressing the TITLE LIST button, the DVD has no Title List. In this case, try pressing the TOP MENU button to display the DVD’s menu.
Displaying the playing time and play information
HDD +RW -RWVR -RWVideo +R
-RVR -RVideo DVD VCD CD
DATADVD DATA CD
You can check the playing time of the current title, chapter, track, or disc. Also, you can check the disc name recorded on the DVD/CD.
Press DISPLAY repeatedly.
The displays differ depending on the disc type or playing status.
In stop mode
Example: DVD-RW in VR mode
During playback
Example: DVD-R in Video mode
A Playing status
BShows that the Resume Play is available (page 66).
CCurrent selected recording mode (maximum DVD recording time) (page 147)
D Remaining time
Recorder DVD Your Know to Getting — Operations Basic Seven
,continued 39

EStation name and programme position number
FAudio setting for the current programme
GRecording restrictions for the current programme
H TV mode or DVD mode (page 24)
I Disc information
JTitle type (Original or Playlist) for DVD-RW/DVD-R in VR mode
KDisc type/format (page 143)
Displays the finalised disc in Video mode as “DVD-VIDEO.”
LTitle number-Chapter number (page 74)
M Playing time
N Multi-angles indicator (page 67)
O Copy-protected indicator (page 150)
P Data transfer bar and rate
4. Changing the Name of
a Recorded Programme
HDD +RW -RWVR -RWVideo +R
-RVR -RVideo
You can label a DVD, title, or programme by entering characters. You can enter up to 64 characters for a title recorded in the HDD/ DVD-RW/DVD-R (VR mode), 40 characters for a title recorded in the DVD+RW/DVD-RW (Video mode)/ DVD+R/DVD-R (Video mode), but the actual number of characters displayed in the menus such as the Title List will vary. The steps below explain how to change the name of the recorded programme.
To turn off the display
Press DISPLAY repeatedly.
z Hints
•When “On Screen Display” is set to “On” (default) in the “Options” setup (page 132), information automatically appears on the screen when the recorder is operated.
•To increase disc space, see “To open up disc space” (page 75).
b Note
Playing time of MP3 audio tracks may not be displayed correctly.
TITLE LIST
</M/m/,, ENTER
. 


 > m
> m 
 M
M
x
1 Press TITLE LIST.
2 Select a title using M/m, and press
,.
The sub-menu appears.
3 Select “Edit” using M/m, and press
ENTER.
40
![]()
4 Select “Title Name” using M/m, and press ENTER.
The display for entering characters appears.
The current name is displayed at the input row.
Input row
5 Move the cursor to the point where you want to insert the character using m/M.
To erase all of the characters, press and hold CLEAR for 2 seconds or more.
6 Select “Upper case” or “Lower case” using ./>.
The characters for the selected type are displayed.
7 Press </M/m/, to select the character you want to enter, and press ENTER.
The selected character appears at the input row.
To insert a space, press X (or select “Space,” and press ENTER).
8 Repeat steps 6 and 7 to enter the remaining characters.
To erase a character, move the cursor to the character at the input row, and press CLEAR (or select “Clear,” and press ENTER).
To insert a character, move the cursor to the right of the point where you want to insert the character. Then select the character, and press ENTER.
To erase all of the characters, press and hold CLEAR for 2 seconds or more.
9 Press x (or select “OK,” and press
ENTER).
To cancel the setting, press O RETURN.
5. Labelling and
Protecting a Disc
You can execute options effective for the entire disc in the “Disc Setup” setup.
SYSTEM
MENU
</M/m/,, ENTER
Labelling a disc
|
+RW -RWVR -RWVideo +R |
-RVR |
-RVideo
1 Insert a disc.
See “1. Inserting a Disc” on page 34.
2 Press SYSTEM MENU.
The System Menu appears.
3 Select “Disc Setup,” and press ENTER.
Recorder DVD Your Know to Getting — Operations Basic Seven
,continued 41

4 Select “Basic,” and press ENTER.
5 Select “Input Disc Name,” and press ENTER.
6 Select “Next Screen,” and press ENTER.
Enter the disc name (page 40).
You can enter up to 64 characters for a DVD-RW/DVD-R (VR mode) disc name, and 40 characters for a DVD+RW/DVD-RW (Video mode)/ DVD+R/DVD-R (Video mode) disc name.
b Note
The disc name may not appear when the disc is played on other DVD equipment.
Protecting a disc
-RWVR -RVR
1 Insert a disc.
See “1. Inserting a Disc” on page 34.
2 Press SYSTEM MENU.
The System Menu appears.
3 Select “Disc Setup,” and press ENTER.
4 Select “Basic,” and press ENTER.
5 Select “Protect Disc,” and press ENTER.
6 Select “On,” and press ENTER.
7 Press SYSTEM MENU to exit.
To cancel the protection
Select “Off” in step 6.
z Hint
You can set protection for individual titles (page 76).
42

The System Menu appears.
See “1. Inserting a Disc” on page 34.
6. Playing the Disc on Other DVD Equipment (Finalise)
|
+RW -RWVR -RWVideo +R |
-RVR |
-RVideo
Finalising is necessary when you play discs recorded with this recorder on other DVD equipment.
When you finalise a DVD+RW, DVD-RW (Video mode), DVD+R, or DVD-R (Video mode), a DVD menu will be automatically created, which can be displayed on other DVD equipment.
Before finalising, check the differences between the disc types in the table below.
Differences between disc types
+RW
Discs are automatically finalised when removed from the recorder. However, you may need to finalise the disc for certain DVD equipment, or if the recording time is short. You can edit or record on the disc even after finalising.
|
-RWVR |
Finalising is unnecessary when |
|
|
playing a disc on VR format |
||
|
compatible equipment. |
||
|
Even if your other DVD equipment |
||
|
is VR format compatible, you may |
||
|
need to finalise the disc, especially |
||
|
if the recording time is short. You |
||
|
can edit or record on the disc even |
||
|
after finalising. |
||
|
Finalising is necessary when |
||
|
-RWVideo playing on any equipment other |
||
|
than this recorder. |
||
|
After finalising, you cannot edit or |
||
|
record on the disc. If you want to |
||
|
record on it again, unfinalise |
||
|
(page 44) or reformat the disc |
||
|
(page 45). However, if you |
||
|
reformat the disc, all recorded |
||
|
contents will be erased. |
||
-RVR
Finalising is necessary. The disc can be played only on equipment that supports DVD-R in VR mode. You can edit or record on the disc even after finalising (except DVD- R DL in VR mode).
+R
Finalising is necessary when
playing on any equipment other -RVideo than this recorder.
After finalising, you cannot edit or record on the disc.
SYSTEM
MENU
</M/m/,, ENTER
1 Insert a disc.
2 Press SYSTEM MENU.
3 Select “Disc Setup,” and press ENTER.
4 Select “Finalise,” and press ENTER.
Recorder DVD Your Know to Getting — Operations Basic Seven
,continued 43

The System Menu appears.
See “1. Inserting a Disc” on page 34.
5 Select “Finalise,” and press ENTER.
6 Select “Next Screen,” and press ENTER.
For DVD-RW/DVD-R (VR mode), the recorder starts finalising the disc. Go to step 9.
7 (DVD+RW/DVD-RW (Video mode)/ DVD+R/DVD-R (Video mode) only) Select a title menu style, and press ENTER.
The menu appears in the selected title menu style when the “top menu” (or “menu” for a DVD+RW/DVD+R) is selected on the DVD equipment.
8 (DVD+RW/DVD-RW (Video mode)/ DVD+R/DVD-R (Video mode) only) Select “Yes,” and press ENTER.
The recorder starts finalising the disc.
9 Press SYSTEM MENU to exit.
z Hint
You can check whether the disc has been finalised or not. Press DISPLAY after step 1 (page 39).
b Notes
•Depending on the condition of the disc, recording, or the DVD equipment, discs may not play even if the discs are finalised.
•The recorder may not be able to finalise the disc if it was recorded on another recorder.
•Inserting an unfinalised disc into other DVD equipment may damage the recorded contents.
•When using a DVD+RW, you can edit or record on the disc even after finalising. However, the title menu will not be displayed. Finalise the disc again to display the title menu.
Unfinalising a disc
-RWVR -RWVideo
For DVD-RWs (Video mode)
DVD-RWs (Video mode) that have been finalised to prohibit additional recording or editing can be unfinalised to allow further recording or editing.
For DVD-RWs (VR mode)
If you cannot record or edit on a DVD-RW (VR mode) that has been finalised with other DVD equipment, unfinalise the disc.
b Note
The recorder is not able to unfinalise DVD-RWs (Video mode) that have been finalised on another recorder.
1 Insert a disc.
2 Press SYSTEM MENU.
3 Select “Disc Setup,” and press ENTER.
4 Select “Finalise,” and press ENTER.
44

5 Select “Unfinalise,” and press ENTER.
6 Select “Start,” and press ENTER.
The recorder starts unfinalising the disc. Unfinalising may take several minutes.
7. Reformatting a Disc
+RW -RWVR -RWVideo -RVR -RVideo
New discs are automatically formatted when inserted. If necessary, you can manually reformat a DVD+RW, DVD-RW, or DVD-R disc to make a blank disc. For DVD-RWs or DVD-Rs, you can select a recording format (VR mode or Video mode) according to your needs.
SYSTEM
MENU
</M/m/,, ENTER
1 Insert a disc.
See “1. Inserting a Disc” on page 34.
2 Press SYSTEM MENU.
The System Menu appears.
3 Select “Disc Setup,” and press ENTER.
Recorder DVD Your Know to Getting — Operations Basic Seven
,continued 45

Select “Format,” and press ENTER.
Select an item, and press ENTER.
“VR Mode”: Formats DVD-RWs/DVD- Rs in VR mode.
“Video Mode”: Formats DVD-RWs/ DVD-Rs in Video mode.
“Format DVD+RW”: Formats DVD+RWs.
6 Select “Start,” and press ENTER.
All contents on the disc are erased.
z Hint
By reformatting, you can change the recording format on DVD-RWs, or record again on DVDRWs that have been finalised.
b Note
You cannot reformat recorded DVD-Rs.
46

GUIDE Plus+ (RDR-AT105/AT107/
AT205 only)
b Note
The GUIDE Plus+ system cannot be used when “Input Line System” is set to “NTSC” in the “Basic” setup (page 118).
Viewing the GUIDE Plus+
Display
The GUIDE Plus+® system is a free interactive programme guide. It displays up to seven days of programme listings, including programme titles, promotions, and broadcast information. GUIDE Plus+ data for the television programme listings are carried by your local broadcast host channel and are received through your aerial, set top box receiver, or direct cable connection from the wall.
Visit www.europe.guideplus.com for a list of all European host channels.
These are just a few of the ways to use the GUIDE Plus+ system.
–Search for programmes by listing them according to category (such as Movies or Sport) or by using the Keyword Search function (page 53).
–Once you have found the programme you are looking for, use the GUIDE Plus+ system to set the timer for recording (page 52).
–You can set the system to display your favourite programmes according to conditions that you set, such as category and keyword (page 49).
|
Red button |
Blue button |
GUIDE |
|
Green button |
Yellow button |
|
|
GUIDE |
Plus+ |
|
|
INFO |
(RDR |
|
|
ENTER |
||
|
</M/m/,, |
||
|
— |
||
|
The GUIDE Plus+ system “Home Screen” |
AT105/AT107/AT205 |
|
|
PAGE – |
PAGE + |
|
|
DAY – |
DAY + |
Press GUIDE.
AVideo Window: This shows the programme you were watching when you pressed GUIDE.
BAction Bar: When the same colour button on the remote is pressed, the Action Bar functions. The Action Bar function differs according to the screen.
CInformation Box: Shows information about the selected programme when the “Home Screen” is displayed.
Contents will differ according to the displayed screen.
,continued 47

DMenu Bar: Press the blue button (“Home”), and press M to move the cursor to the Menu Bar. Then select one of the following features using </,, and press ENTER.
“Grid”: Shows the programmes for the current time slot and next 7 days. “Search”: Allows you to search for titles by category or by keyword (page 53). The displayed category depends upon the programme data received by this recorder. Movies, Sport, and Children are examples of possible categories.
“My TV”: Sets the profile for your favourite programmes (page 49). “Schedule”: Displays the list of timer settings (page 60).
“Info”: Shows information when available.
“Editor”: Allows you to edit the channel lineup and channel display (page 51).
“Setup”: Allows you to change the language, country/region, postal code, input source, or host channel.
E“Home” position: When you press the blue button (“Home”), the cursor returns to the last programme position on the “Grid.”
FTiles: Shows the programme titles and category; green (sports), purple (movies), blue (children’s), teal (others).
Select a programme using </M/m/ ,, and press ENTER to watch the programme.
GBroadcast station Logo: Shows the broadcast station logo.
HTime Slot: Indicates the currently selected time slot. Use </, to select a different time slot.
Available buttons in the GUIDE Plus+ system “Home Screen”
|
Buttons |
Operations |
|
Blue button |
Returns to the “Home” |
|
(“Home”) |
position on the “Grid.” |
|
GUIDE |
Closes the GUIDE Plus+ |
|
system. |
|
|
PAGE +/– |
Changes the programme list |
|
by page. |
|
|
DAY +/– |
Changes the programme list |
|
by day. |
|
|
INFO |
Shows information about the |
|
selected programme. |
|
To unlock the Video Window
The Video Window is locked so that it does not change programme positions when you move the cursor across other titles.
From “Grid,” select the logo of the programme position that is locked, and press the red button (“Unlock”). “ ” changes to “
 ” and the Video Window is unlocked. To lock the Video Window, select the logo of the programme position you want to lock and press the red button (“Lock”).
b Notes
•The Video Window is locked during recording and the lock indicator appears in the Video Window. You cannot unlock the Video Window while recording.
•If you are watching programmes through a set top box receiver, the Video Window may not change as fast as you move the cursor. In this case, lock the Video Window (page 48).
48
 Loading…